

Page 1
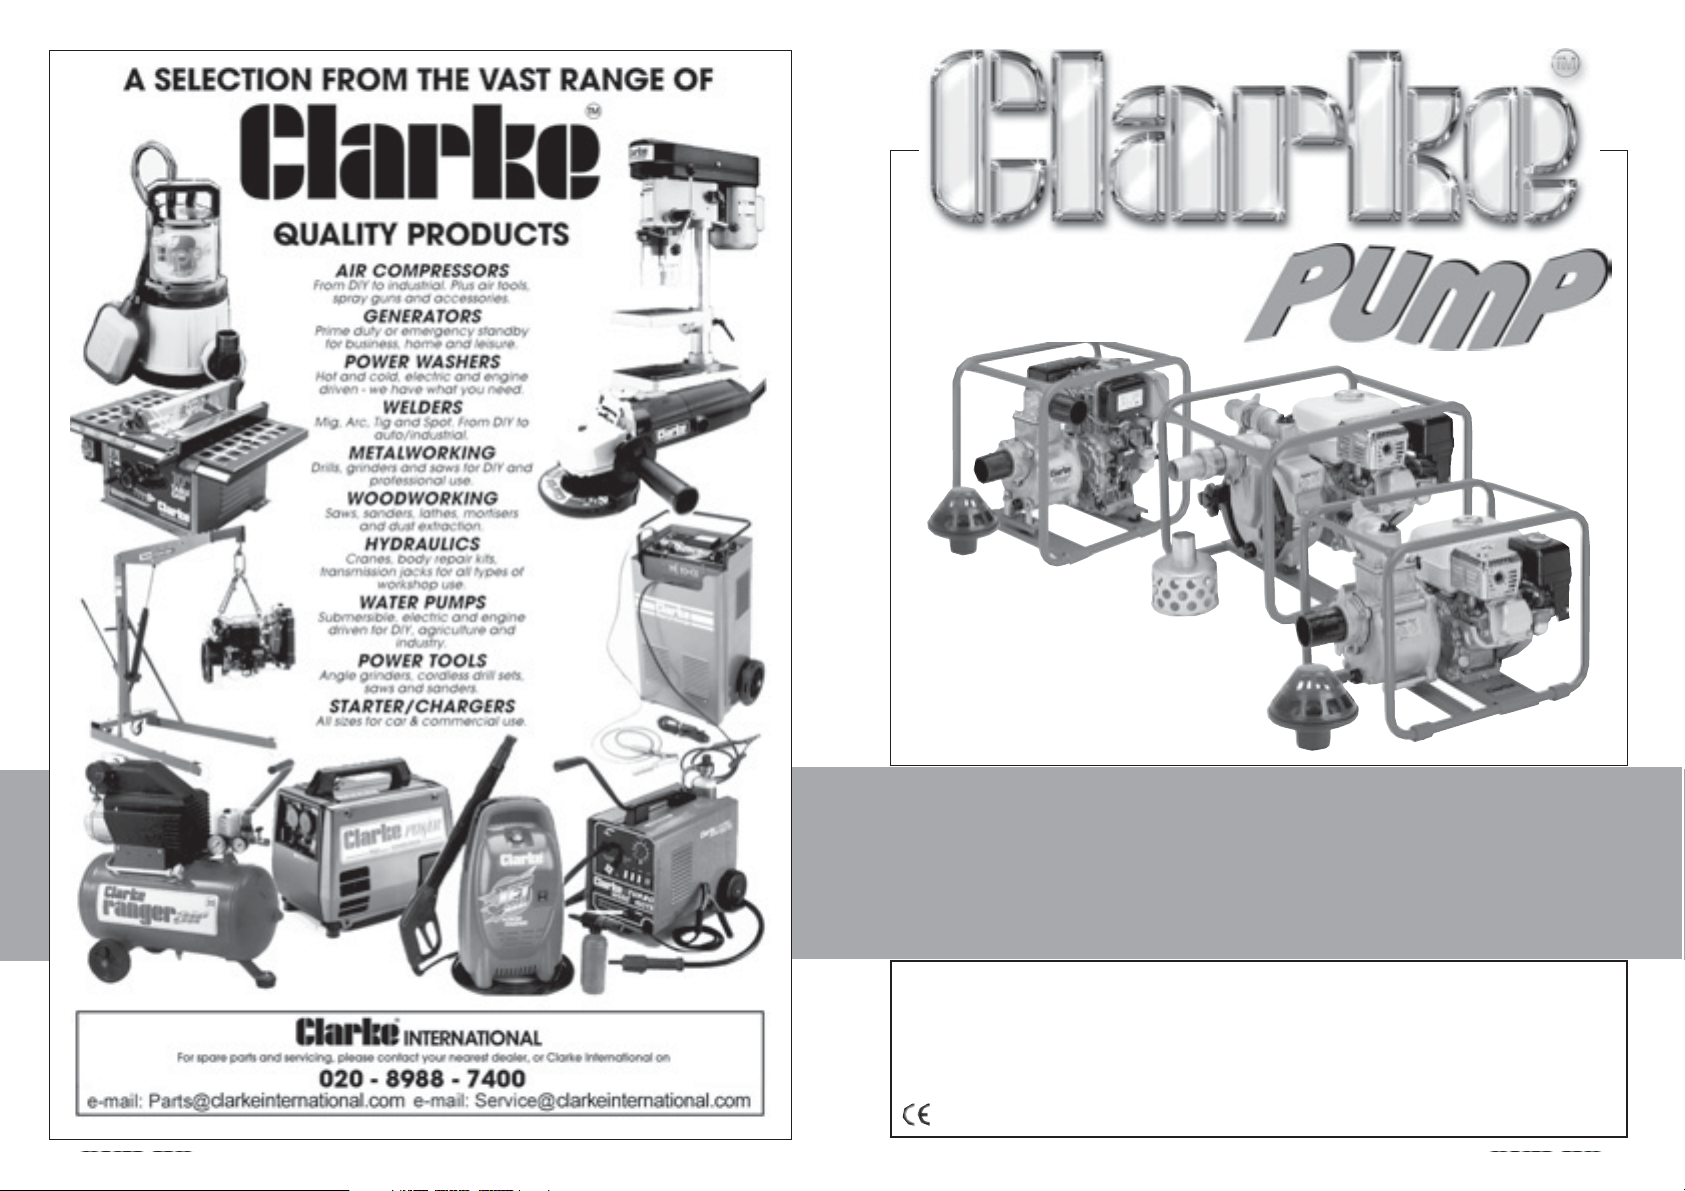
WATER PUMP
WATER PUMP
Model Nos.
CHF2 & CHF3 • CHS3 & CHS2E • CH3D • CH2D
OPERATING & MAINTENANCE
INSTRUCTIONS
0104
Page 2
For Spare Parts and Service, please contact your nearest dealer,
or CLARKE International, on one of the following numbers.
PARTS & SERVICE TEL: 020 8988 7400
PARTS & SERVICE FAX: 020 8558 3622
or e-mail as follows:
PARTS: [email protected]
SERVICE: [email protected]
152
Page 3
PARTS DIAGRAM
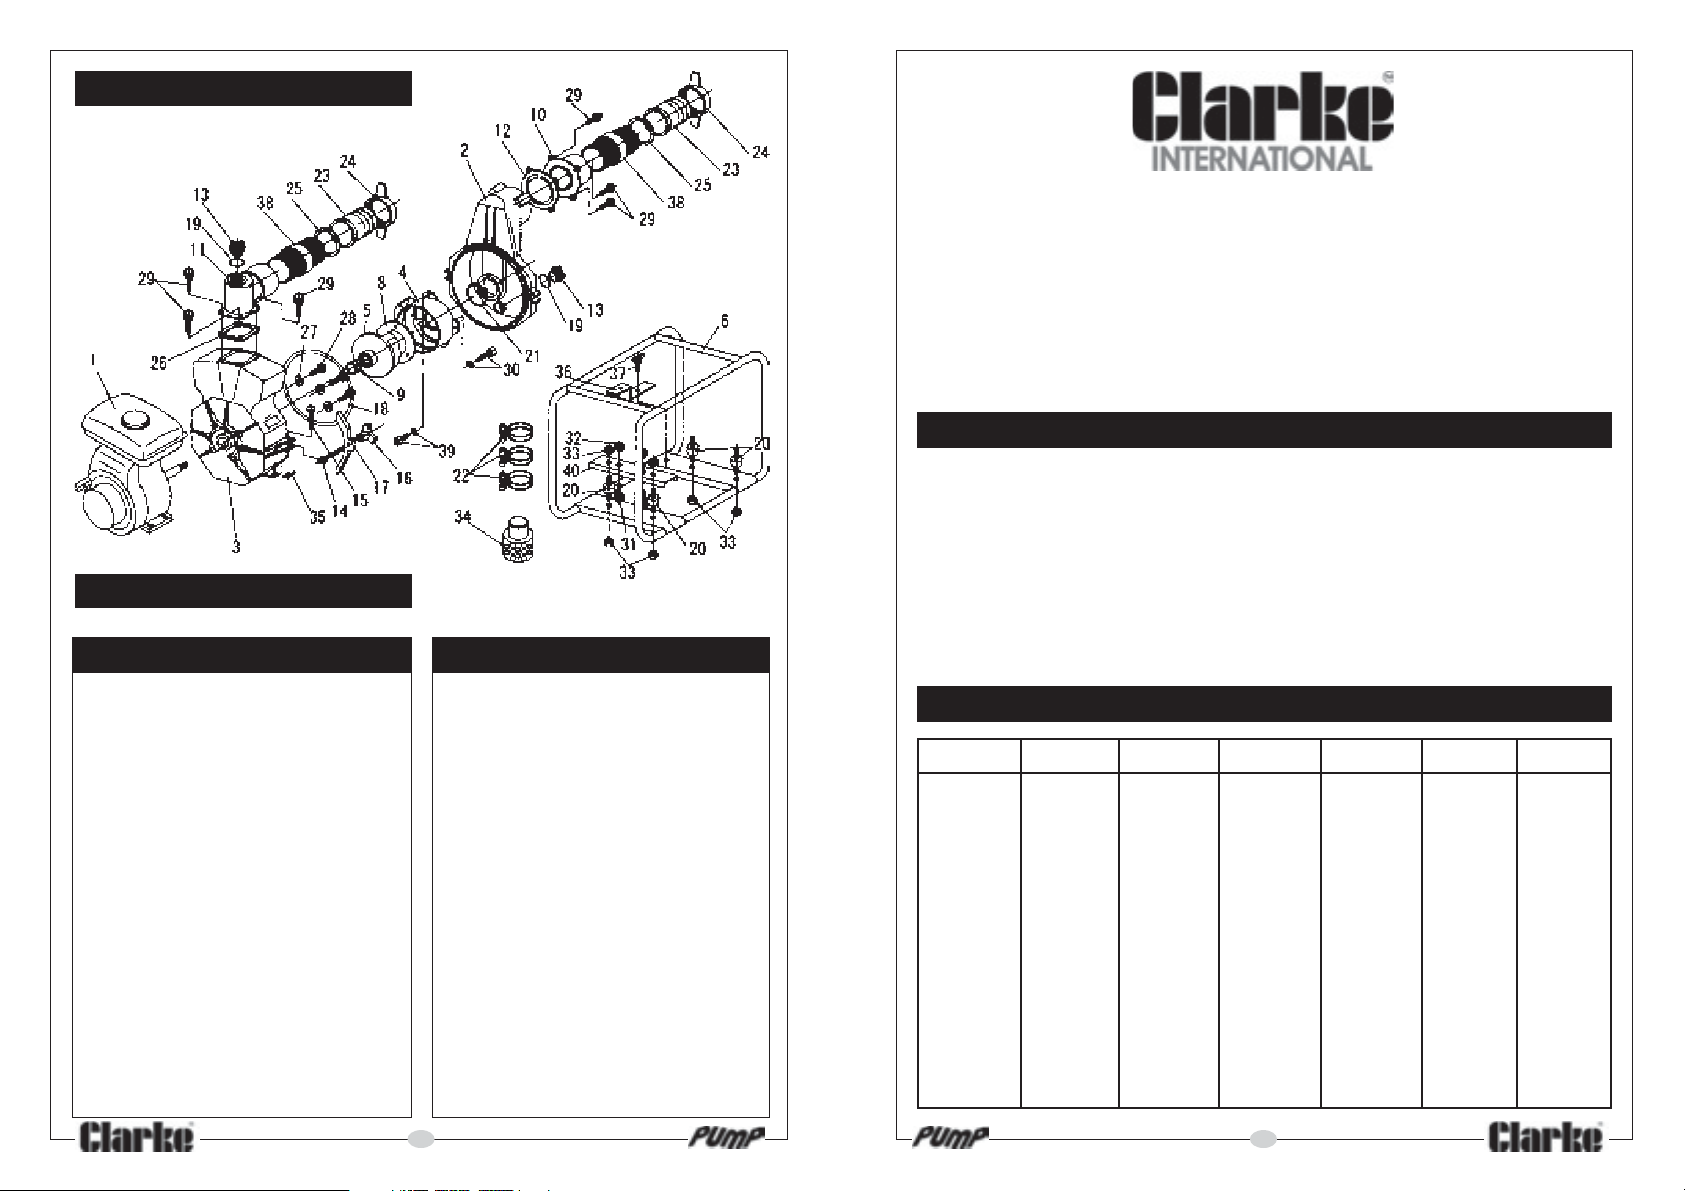
Model - CHF3
PARTS LIST
For Engine part no. - Consult your CLARKE dealer
No. Description Part No.
1 Engine See yr Dealer
2 Casing DS821-001N
3 Casing Cover DS821-002
4 Inner Casing DS821-003N
5 Impeller DS821-004
6 Frame DS821-0058 Liner DS821-007N
9 Mechanical Seal DS821-008
10 Flange DS821-009N
11 Outlet Adapter DS821-010N
12 Check Valve DS821-011N
13 Filler Plug DS801-012
14 Cover Bolt DS821-013
15 Rivet DS821-014
16 Knob DS821-015
17 Casing Cover Hldr DS821-016
18 Casing Packing DS821-017
19 “O” Ring DS801-018
20 Anti-Vibration Rubber DS821-019
21 Inner Casing Bkt DS821-020
14
No. Description Part No.
22 Hose Clip DS801-028
23 Hose Coupling DS801-018
24 Coupling DS801-016
25 Coupling Packing DS801-017
26 Delivery Packng DS801-020
27 Seal Packing DS501-006
28 Bolt M8x48 N/A
29 Bolt M10x30 N/A
30 Blt Hex. Skt. M6x20 DS821-029
31 Bolt M10x45 N/A
32 Flange Nut DS1001-025
33 Spring Nut DS1001-024
34 Strainer DS821-033
35 Spring Pin DS821-034
36 Bracket DS521-035
37 Wing Bolt DS521-036
38 Coupling DS831-033
39 Hex Skt Hd. Bolt DS821-039
40 Support Bracket N/A
Thank you for purchasing this Clarke Water Pump, designed for pumping water, or
water containing, sand, or solids in suspension, depending upon the model (please
see below).
Please read this leaflet thoroughly and follow the instructions carefully, in doing so
you will ensure the safety of yourself and that of others around you, and with
correct handling and servicing, you can look forward to the pump giving you
long and satisfactory service.
GUARANTEE
This CLARKE product is guaranteed against faulty manufacture for a period of 12
months from the date of purchase. Please keep your receipt which will be required
as proof of purchase. This guarantee is invalid if the product is found to have been
abused or tampered with in any way, or not used for the purpose for which it was
intended.
Faulty goods should be returned to their place of purchase. No product can be
returned to us without prior permission. This guarantee does not effect your statutory
rights.
SPECIFICATIONS
Model No. CH2E CH3D CHS2E CHS3 CHF2 CHF3
Hose Dia. 2" 3" 2" 3" 2" 3"
Motor HP 4.0 5.5 4.0 5.5 5.5 8.0
Max Flow 600 L/m 925 L/m 700 L/m 1000 L/m 750 L/m 1300 L/m
Max Head 26M 30M 23M 23M 27M 28M
Max Suction 7.5M 7.5M 7.5M 7.5M 7.5M 7.5M
Height
Weight kg 21.5 27 21 26 33 57
Dimensions 470x355x350 456x370x370 429x368x344 500x400x396 510x440x397 660x484x572
Max Size of
Solids in - - 20mm 20mm 31mm 31mm
Suspension
Part No. 7140520 7140610 7230150 7230110 7230120 7230125
3
Page 4
SAFETY PRECAUTIONS
PARTS DIAGRAM
WARNING
As with all machinery, there are certain hazards involved with their operation
and use. Exercising respect and caution will considerably lessen the risk of
personal injury. However, if normal safety precautions are overlooked, or
ignored, personal injury to the operator, or damage to property may result.
1. These pumps are designed to pump WATER ONLY. Never use for pumping petrol
(or other flammable liquids), or chemicals.
2. Before operating this pump and its’ power unit, you should thoroughly
familiarise yourself with all aspects of its’ operation, and follow all instructions
in this manual and any other supplementary instructions supplied with the
pump.
3. Never operate an engine driven unit in an explosive atmosphere, near
combustiblematerials, or where there is insufficient ventilation.
4. Always ensure that the pump is properly secured and anchored where
necessary to prevent it from moving during operation, and that the immediate
area surrounding the pump is kept clear.
5. Do not over tighten drain or filler plugs. Excessive force may damage the
threads or the pump body.
6. Observe all safety precautions for the handling of fuel. Never refuel the engine
whilst it is running, and allow the engine to cool sufficiently before refuelling.
7. Whenever carrying out maintenance or making adjustments, ensure that the
power unit cannot be started inadvertently.
8. Use at least 1ft (3OOmm) of flexible hose to make plumbing connections to
the pump. Rigid piping may put stress on the pump, causing damage. If rigid
piping must be used, it should be supported so as to eliminate stress on the
pump.
9. Use only replacement parts supplied by the manufacturer. The use of non
standard parts could be hazardous.
10. NEVER run the pump dry. Always fill the pump body with water before starting.
When in regular use, it is not necessary to drain the pump body each time it is
used, unless there is danger of freezing
11. ALWAYS use the strainer connected to the suction hose, to prevent stones
and other solids from being drawn up, which could cause severe damage.
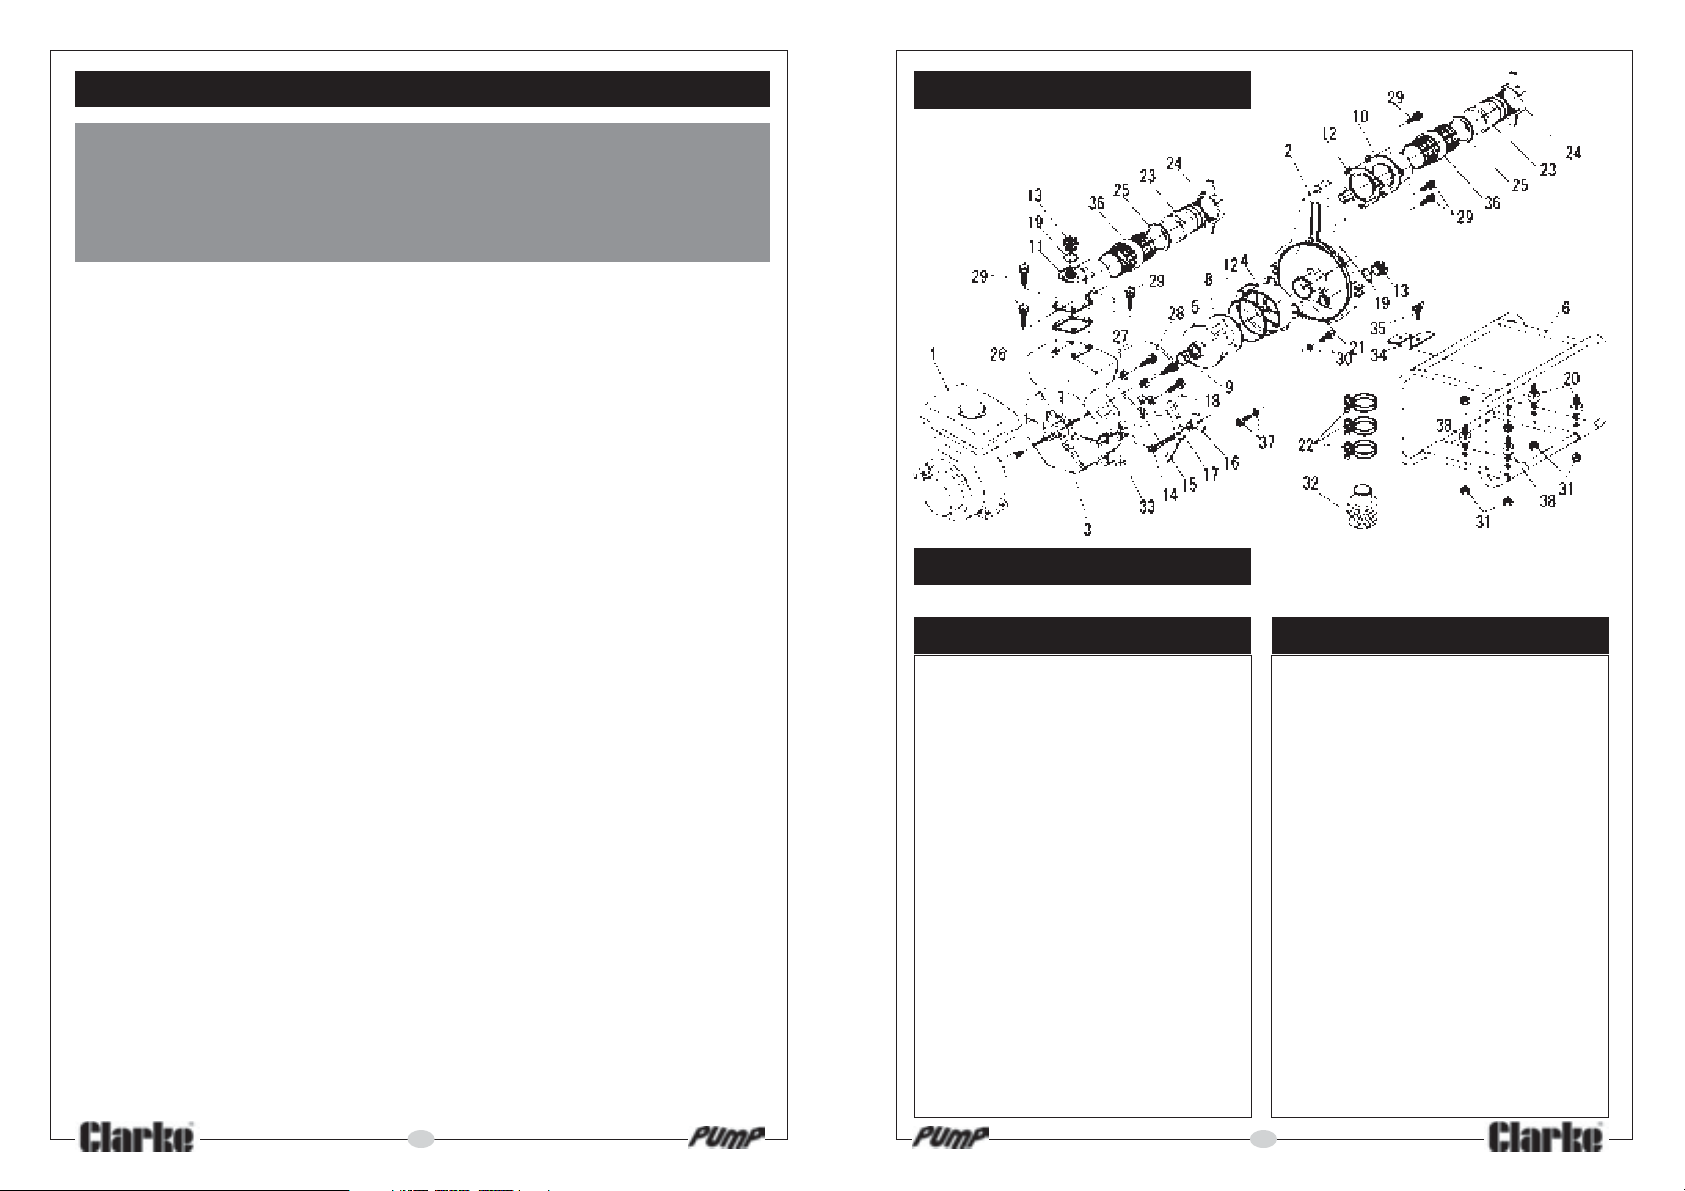
Model - CHF2
PARTS LIST
For Engine part no. - Consult your CLARKE dealer
No. Description Part No.
1 Engine See yr Dealer
2 Casing A DS521-002
3 Casing B DS
4 Inner Casing DS521-003N
5 Impeller DS521-04
6 Frame DS521-0058 Liner DS521-007N
9 Mechanical Seal DS521-008
10 Flange DS521-009N
11 Bend DS521-010N
12 Check Valve DS521-011N
13 Filler Plug DS501-021
14 Cover Bolt DS521-013
15 Rivet DS521-014
16 Knob DS521-015
17 Casing Cover Hldr DS521-016
18 Casing Packing DS521-017
19 “O” Ring DS501-022
20 Anti-Vibration Rubber DS521-019
No. Description Part No.
22 Hose Clip DS501-028
21 Inner Casing Bkt DS521-020
23 Hose Coupling DS501-08P
24 Coupling Handle DS501-016
25 Coupling Packing DS501-017
26 Delivery Packing DS501-020
27 Seal Packing DS501-006
28 Bolt M8x48 N/A
29 Bolt M8x25 N/A
30 Blt Hex. Skt. M8 DS521-029
33 Spring Nut DS1001-024
34 Strainer DS521-033
35 Spring Pin DS521-034
36 Bracket DS521-035
37 Wing Bolt DS521-036
38 Spacer N/A
39 Coupling DS531-030
40 Hex Skt Hd. Bolt DS521-039
41 Anti-Vibration Rubber DS521-037
4
13
Page 5
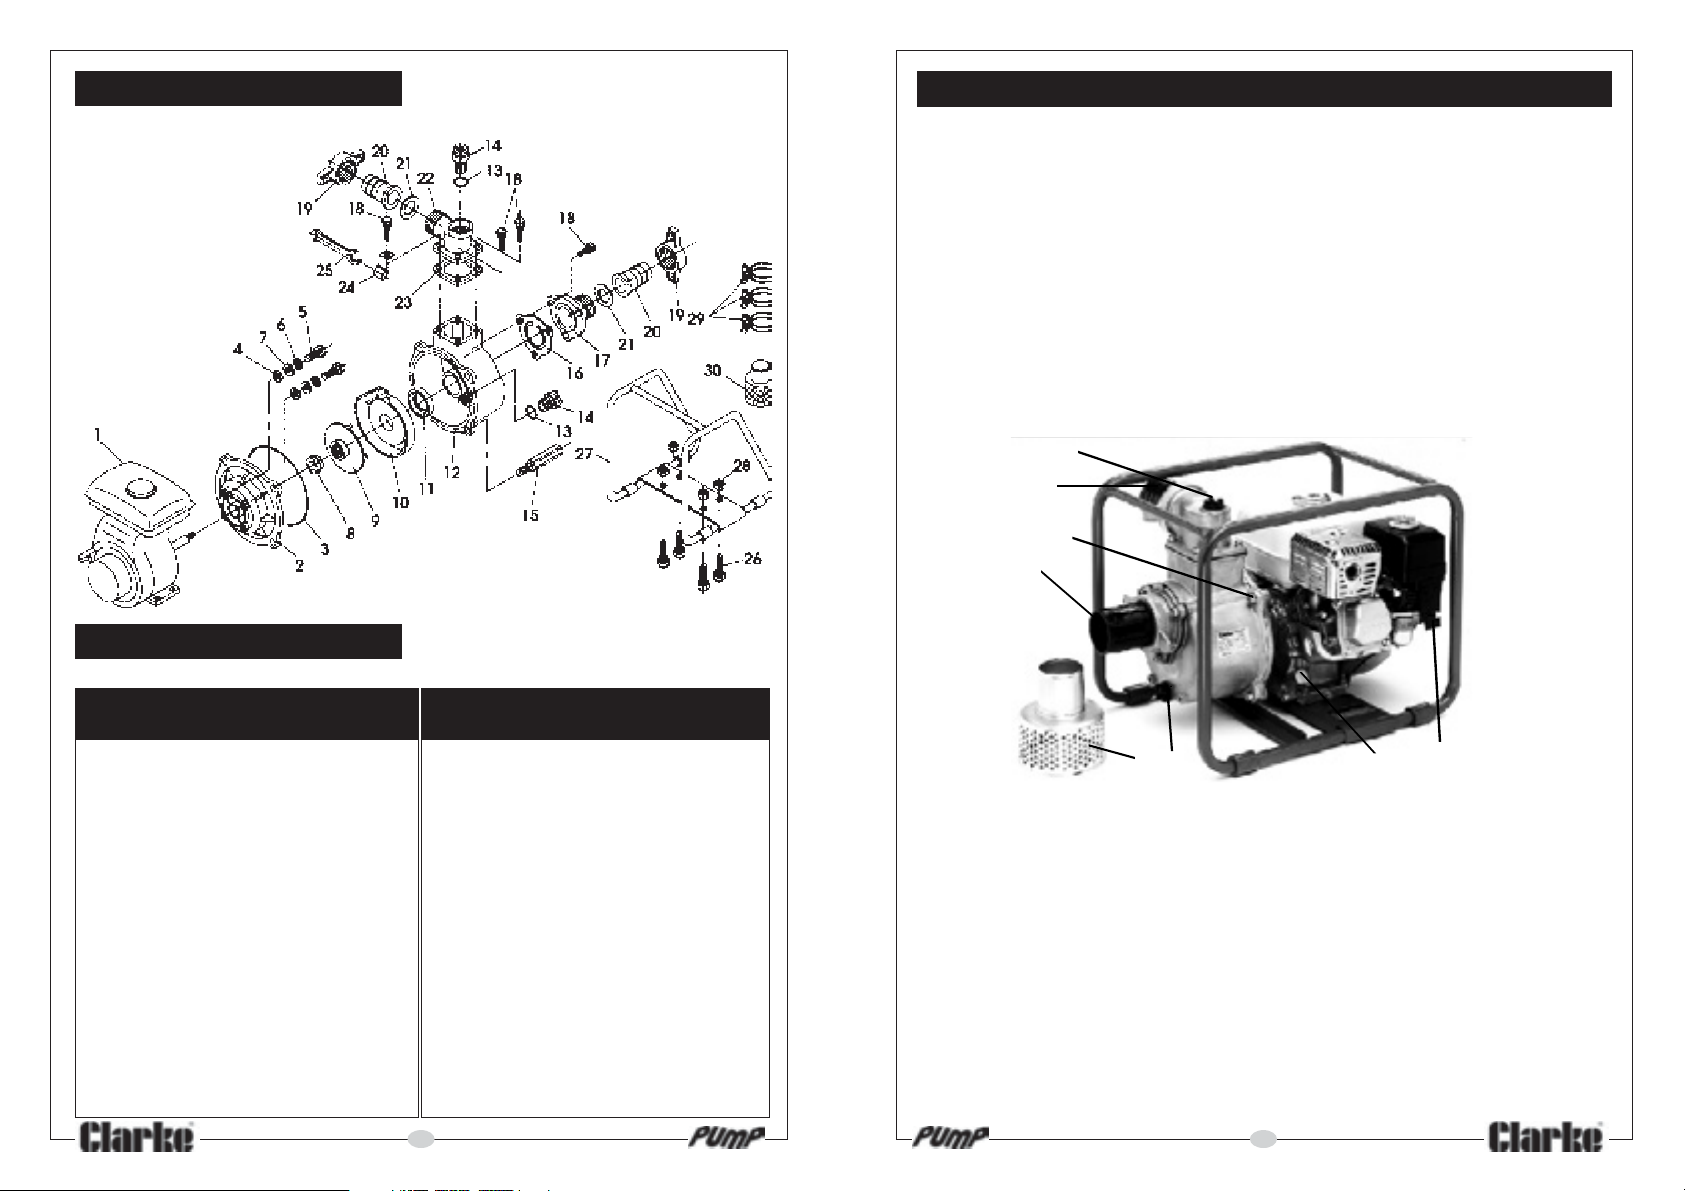
PARTS DIAGRAM
PARTS LIST
For Engine part no. - Consult your CLARKE dealer
No. Description Part No. Part No.
CHS2 CHS3 CHS2 CHS3
1 Motor Consult your dealer
2 End Cover DS501-004 DS501-004
3 Packing Casing DS501-002 DS501-002
4 Seal Packing DS501-006 DS501-006
5 Bolt M8x48 DS521-027 DS501-005
6 Spring Washer N/A N/A
7 Plain Washer N/A N/A
8 Mech Seal DS521008 DS521008
9 Impeller DS571-009 DS871-009
10 Inner Casing DS571-011 DS571-811
11 Packing DS501-012 DS801-012
12 Casing DS510-001 DS801-001
13 Sealing Ring DS510-022 DS501-022
14 Plug DS501-021 DS501-021
15 Special Bolt DS571-003 DS571-003
Models - CHS2 & CHS3
No.Description Part No. PartNo.
16 Check Valve DS501-015 DS801-015
17 Valve Case DS501-013 DS801-013
18 Bolt M*x25 N/A N/A
19 Coupling DS501-016P DS801-016
20 Hose Coupling DS501-018P DS801-018P
21 Packing DS501-017 DS801-017
22 Outlet Conn. DS501-019 DS801-019
23 Gasket DS501-020 DS801-020
24 Bracket DS571-021 DS571-021
25 Spanner DS571-022 DS571-022
26 Bolt M8x40 N/A N/A
27 Frame DS571-030 DS871-030
28 Nut N/A N/A
29 Hose Clip DS501-028 DS801-028
30 Strainer DS571-029 DS871-029
INTRODUCTION
These self-priming centrifugal pumps are designed for pumping water, or water
containing small solids in suspension. The pumps are self-priming, and an open
impeller with small solids handling capacity is fitted (see specifications). The suction
strainer supplied, must always be used, to ensure that large stones or other objects
cannot be drawn up, as this would cause severe damage to the pump.
Models CH2E and CH3D should be used for water only, Models CHS2E and CHS3
are semi-trash pumps, and may be used for contaminated water. Models CHF2
and CHF3, are trash pumps, for use with heavily contaminated water.
REMEMBER: Contaminated water is water containing small solids in suspension,
NOT slurry, sludge, sand, or mud.
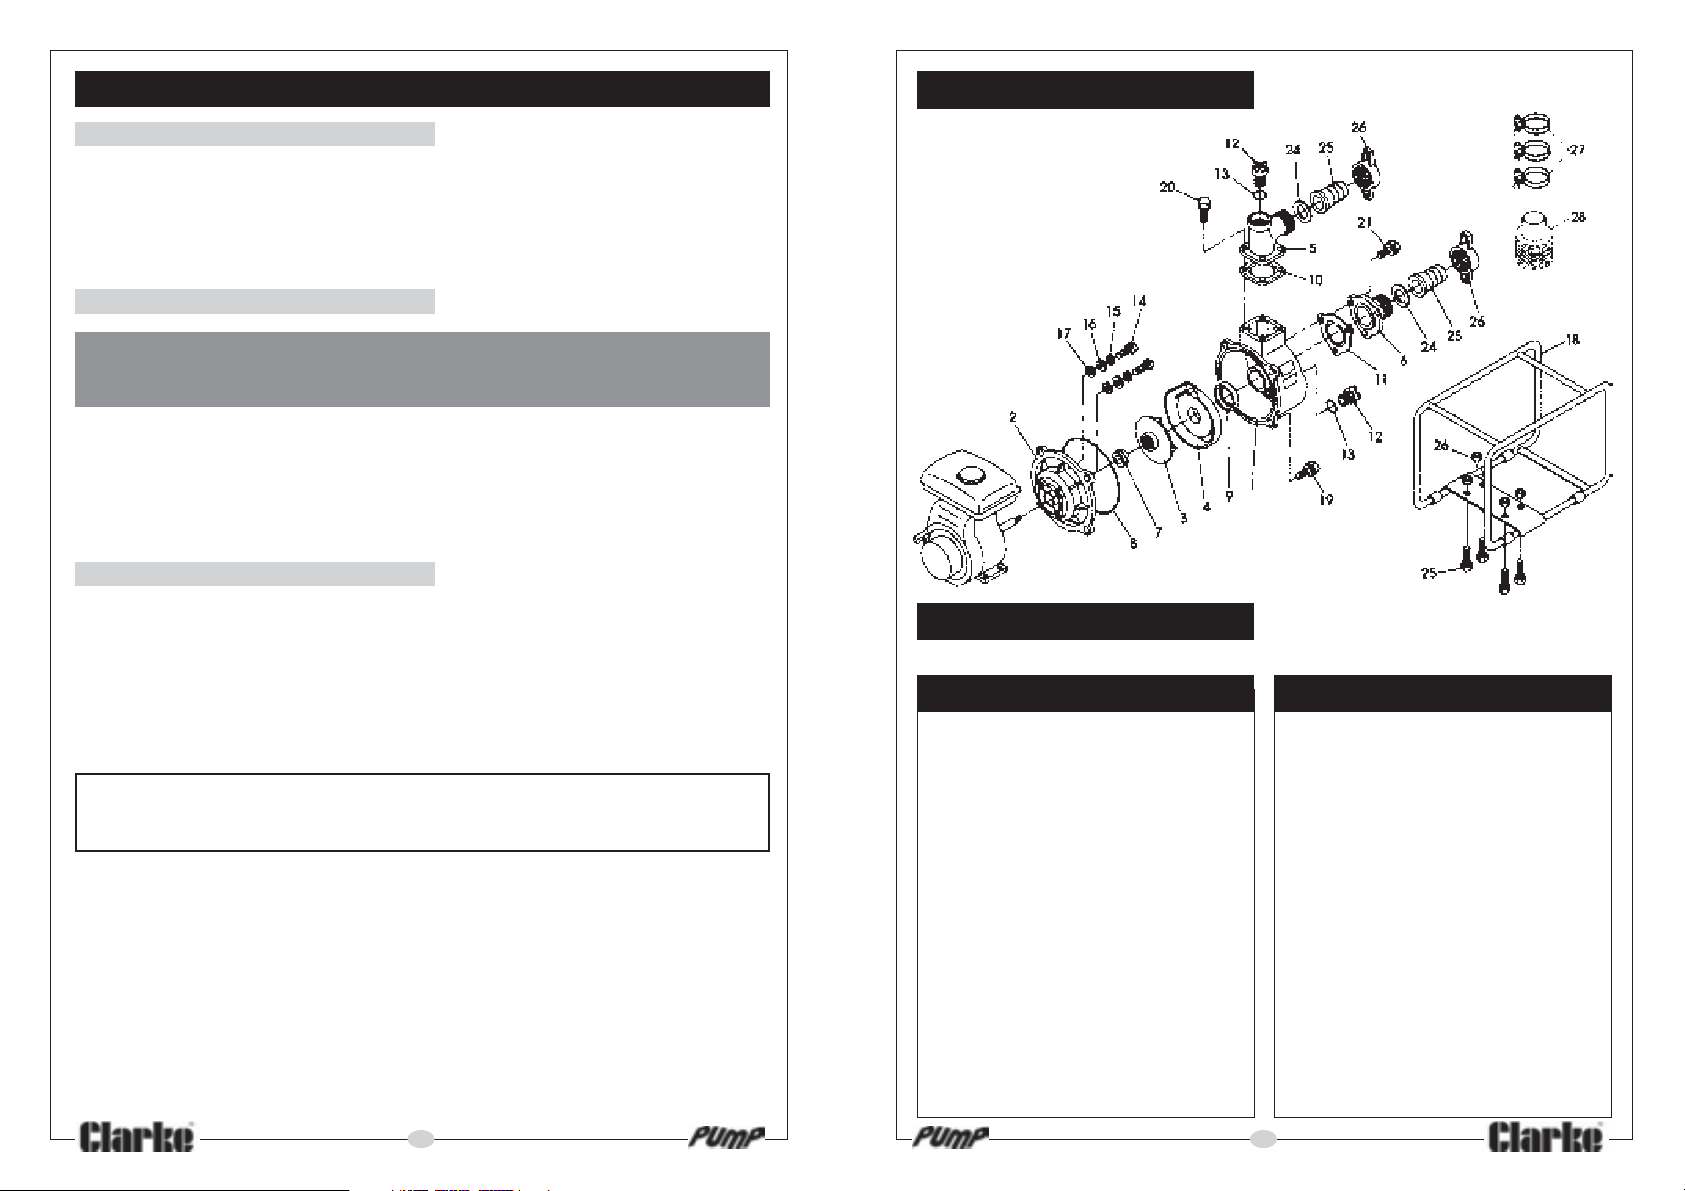
This illustration shows a CH3D pump, but all pumps are similar in construction.
3
2
6
1
5
4
1. Input to Suction Chamber
2. Output or Discharge pipe
3. Filler Plug
4. Strainer
5. Drain Plug
6. Suction Chamber Bolts
7. Starter Recoil Rope
8. Oil Filler and Dipstick
8
7
12
5
Page 6
PREPARING THE PUMP FOR OPERATION
A. GENERAL.
Always prepare the site beforehand.
Ensure there is an adequate, firm foundation on which the pump may be located,
and as near the water source as possible.
Ensure there is adequate drainage for the discharged water, and that there is no
danger of damage to property as a result of the pumping operation.
B. THE ENGINE.
WARNING:
Never run the engine in an enclosed space
- ensure there is adequate ventilation.
This pump is not supplied with engine oil or fuel. Fill the engine crankcase with oil
as specified in the engine manual.
Fill the fuel tank with petrol.
Consult the engine manual and carry out all checks, and prepare for use as
specified.
C. THE PUMP
1. Place the pump on a firm, level foundation, putting it as near as possible to
the water source, and ensure it is anchored where necessary, to prevent it
from moving during operation.
2. Connect the suction hose to the pump housing, and ensure the complete hose
is sound. There must be no damage of any kind. The connection at the pump
body, and all other connections, (should there be any), must be air tight.
Hoses or pipes should he supported independently and not carried by the pump.
IMPORTANT : An air leak in the suction line will prevent priming, and reduce
the capacity of the pump. The vast majority of problems which may occur,
are as a result of air leaks in the suction line.
Pay particular attention to the following:
a. Use sealant on all threaded connections.
b. Always ensure the quick release gasket is in place, and correctly fitted.
c. Always use a flexible hose at the pump body connection, of at least 1ft
(300mm).
d. Keep all pipes/hoses as short and straight as possible, and avoid sharp bends.
e. If a flexible hose must he laid across a roadway, protect it with planking.
(Instantaneous shut off pressure, applied when a vehicle runs across an
unprotected hose, will cause “hydraulic shock”, which can damage the
pump and/or the hose).
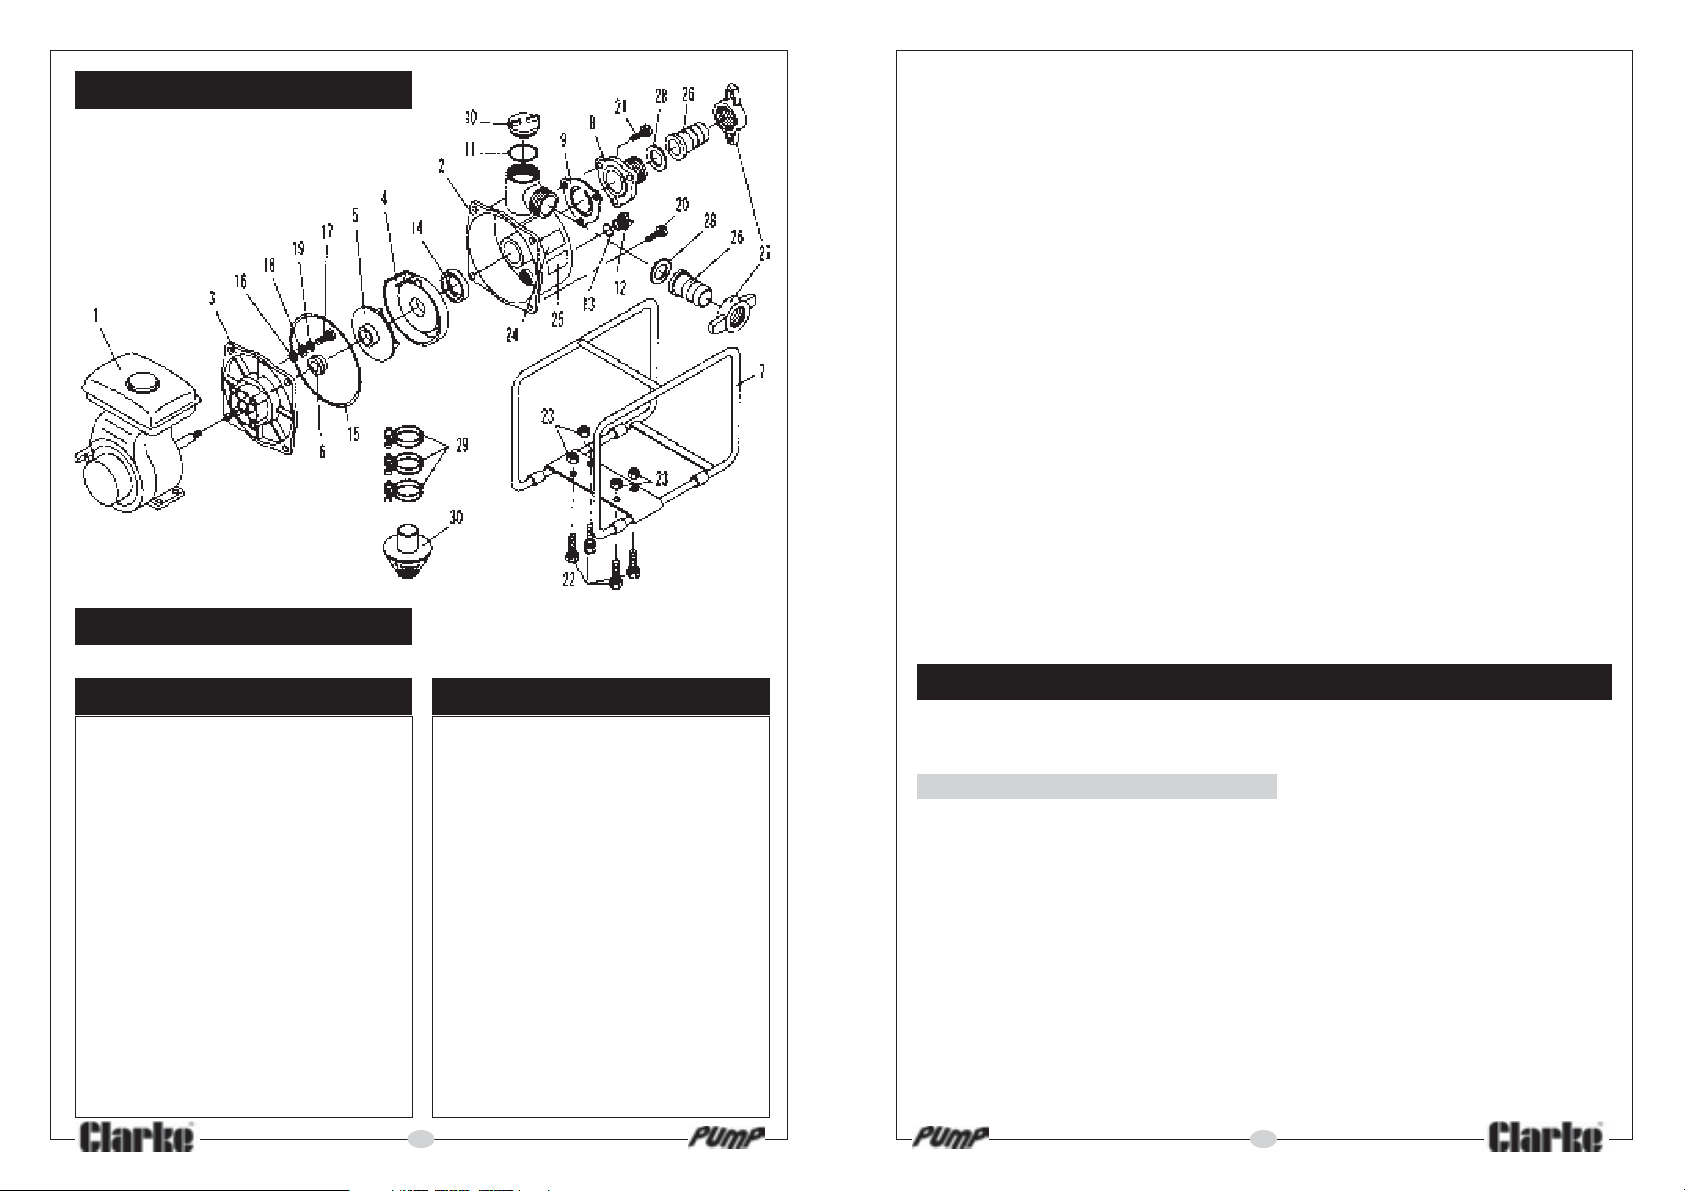
PARTS DIAGRAM
PARTS LIST
For Engine part no. - Consult your CLARKE dealer
No. Description Part No.
- Engine See Dealer
1 Casing DS801001
2 End Cover DS501004
3 Impeller DS801009
4 Inner Casing DS801001
5 Outlet Connector DS801019
6 Valve Casing DS801013
7 Mechanical Seal DS501010
8 Sealing Ring DS501002
9 Packing Inner Casing DS801012
10 Gasket Outlet Conn. DS801020
11 Check Valve DS801015
12 Plug DS501012
13 Packing Plug DS501022
14 Bolt M8x48 N/A
Model - CH3D
No. Description Part No.
15 Spring Washer N/A
16 Plain Washer N/A
17 Seal Packing DS501006
18 Frame DS801030N
19 Bolt M10x30 SW DS501003
20 Bolt M8x25 SW DS501014
21 Bolt M8x30 SW DS801014
22 Bolt M8x40 SW DS501023
23 Flange Nut M6 N/A
24 Packing Coupling DS801017
25 Hose Connector DS801018
26 Hose Coupling DS801016
27 Hose Clip DS801028
28 Strainer DS801029
6
11
Page 7
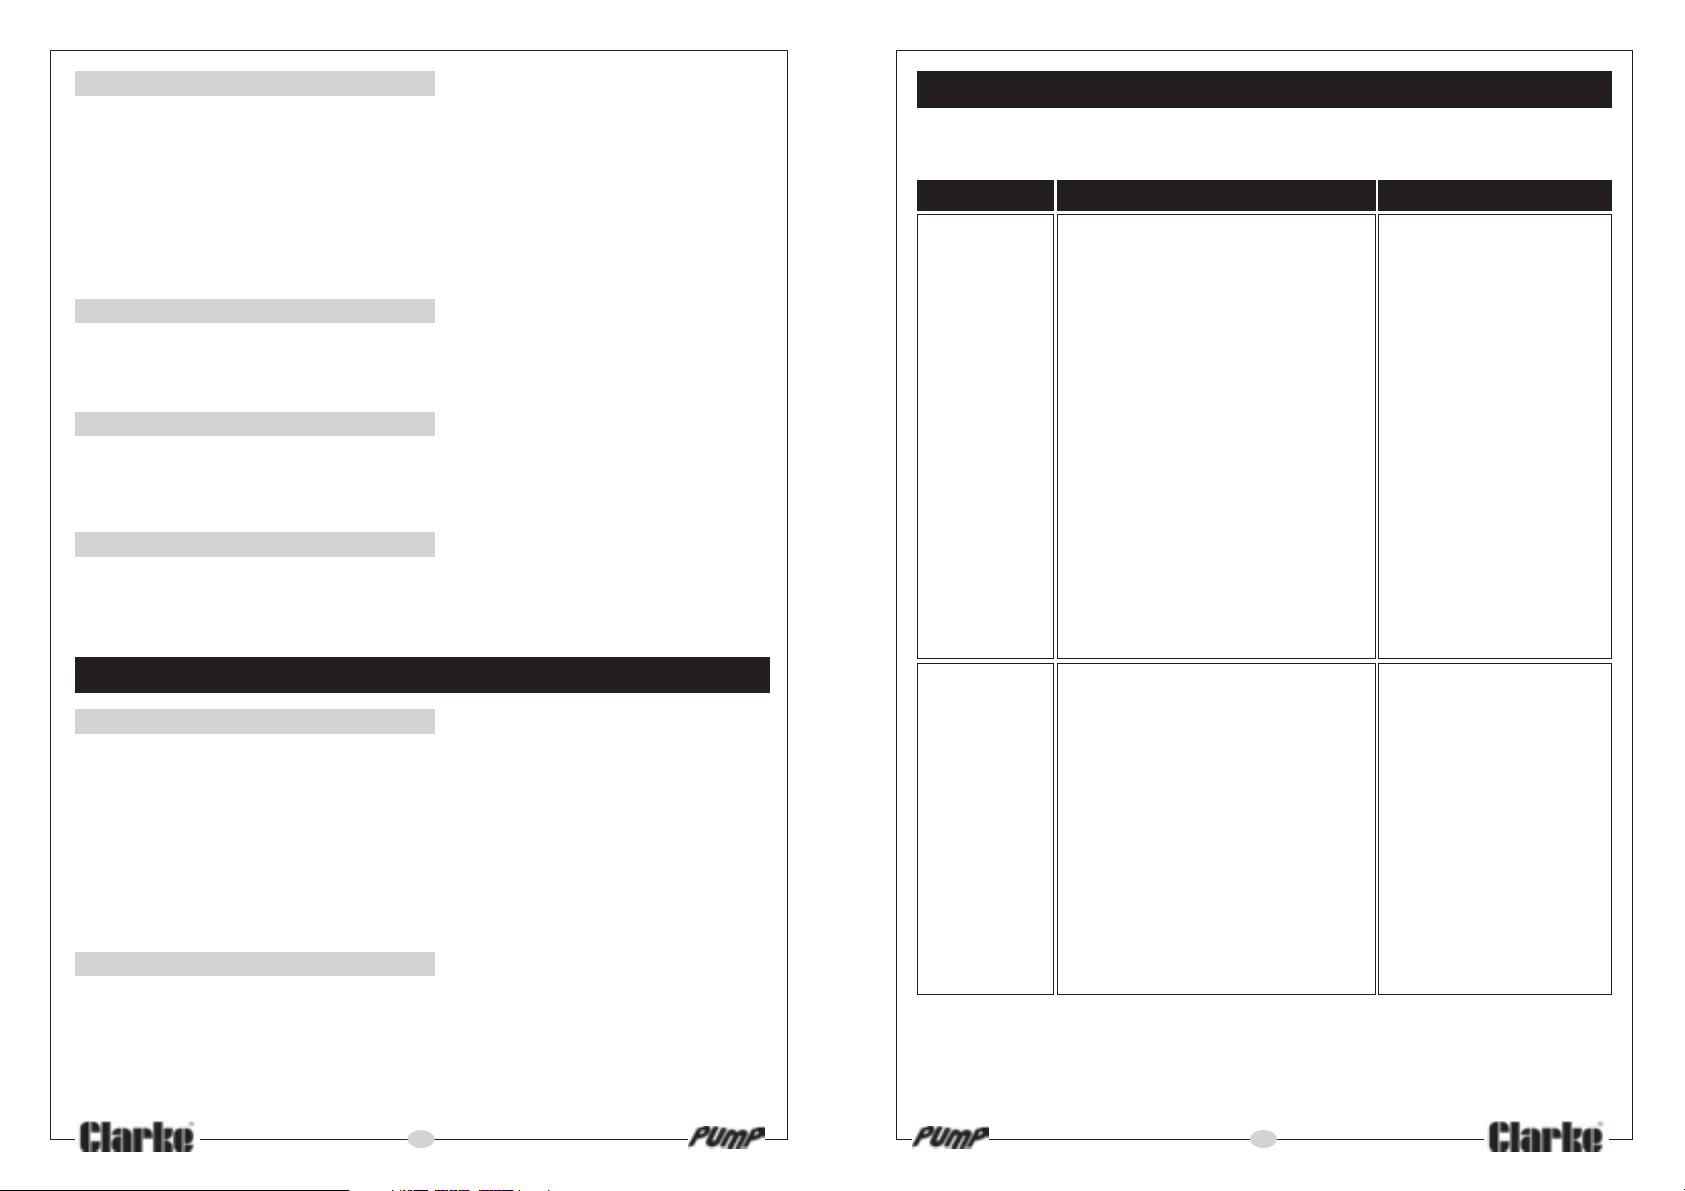
PARTS DIAGRAM
MODEL - CH2E
PARTS LIST
For Engine part no. - Consult your CLARKE dealer
No. Description Part No. No. Description Part No.
1 Engine - 16 Seal Packing DS501-006
2 Casing DS505-001 17 Bolt M8x48 N/A
3 End Cover DS505-004 18 Plain Washer N/A 4
4 Inner Casing DS505-011 19 Spring Washer N/A
5 Impeller DS505-009 20 Tapping Bolt 30M DS505-050
6 Mechanical Seal DS505-010 21 Tapping Bolt 25M DS523-051
7 Frame DS505-030NH 22 Bolt M8x40 DS501-023
8 Valve Case DS505-013 23 Nut M8 N/A
9 Check Valve DS505-015 24 Data Plate N/A
10 Filler Plug DS505-021 25 Name Plate N/A
11 Packing DS505-022 26 Hose Connector 7950320
12 Drain Plug DS501-021 27 Coupling 7950320
13 Packing DS501-022 28 Coupling Packing 7950320
14 Packing DS501-012 29 Hose Clip DS501-028
15 Packing DS505-002 30 Strainer DS505-029
3. The suction strainer MUST be attached to the end of suction hose, to prevent
large stones etc., from being drawn up which could cause severe damage.
Keep the strainer clean. If it is likely to clog with dirt or debris, proceed as
follows:
a. Prepare a bed of stones on which to rest the strainer.
or b. Tie the strainer so that it stays off the bottom of the pit, pond or excavation.
or c. Tie the strainer inside a basket or bucket.
4. Remove the Filler Plug on top of the pump case and fill the pump with water,
leaving no air gap. Remember the pump is self-priming only when the pump
is filled. It will prime and reprime itself without refilling. Refilling is necessary only
if the pump has been drained or if the water has been lost. Never run the
pump dry.
5. Ensuring there is adequate drainage for the discharged water, attach the
discharge hose if required, ensuring it is well protected and supported.
If the discharge line runs vertically more than 30ft., it is advisable to install a
check valve in the discharge line near the pump to stop destructive liquid
hammer when the pump is shut down. If a check valve is installed, it may also
be necessary to vent the top of the pump so that air can he expelled during
automatic repriming. This air bleed may he accomplished by providing a 1/4"
line from the top of the pump back to the liquid source. We will not assume
any responsibility for damage to the pump if no check valve is used in the
discharge line.
Properly fuelled and lubricated, your pump will run without attention.
OPERATION (Refer to the illustration on page 3)
Ensure the site and pump is prepared as detailed on page 4,then proceed as
follows:
1. STARTING.
Refer to the Engine Manual. Pay particular attention to “running in” the engine.
Do not exceed the recommended engine speeds or running duration.
1.1 With the fuel cock open, pull the starter recoil rope slowly two or three times,
to allow fuel to reach the carburettor.
1.2 Hold down the pump, and with the ignition switch ON, and choke and throttle,
set according to the engine manual, pull the starter recoil rope firmly until the
engine starts. Do not snatch at the starter rope, and allow it to retract slowly
after each pull.
1.3 Once the engine starts, set the choke according to the manual, and use the
engine throttle to gradually increase engine speed.
10
7
Page 8
2. PRIMING TIME.
With a suction lift from 5 to 10ft., the pump should discharge liquid in less than a
minute. A suction lift of 25ft (at sea level) should require not more than 2 minutes
for initial prime. To further reduce priming time the engine speed may be increased,
after the engine is properly run in. If pumping does not start within this time, shut off
engine and check carefully to find the problem, (See TROUBLESHOOTING GUIDE).
NOTE: Filling the suction pipe with water will speed up the priming process, and it
is recommended that a foot valve (non-return valve) be fitted to the end of the
suction pipe.
3. CONTROL.
On high suction lifts, a higher engine speed is necessary than on low lifts. On shallow
lifts therefore, or when there is little water to pump, preserve fuel and engine wear,
by reducing engine speed. (See engine manual).
4. STOPPING.
4.1 GRADUALLY reduce engine speed to minimum, and stop the engine by
switching OFF the ignition switch.
4.2 Close the fuel cock.
5. BLOCKAGES
In the event of blockages, where debris has entered the suction chamber, the
suction chamber bolts, (or quick release clamps on the larger pumps), allow the
chamber to be opened and cleaned
TROUBLESHOOTING
NOTE: For engine problems, consult the manual supplied.
FAULT PROBLEM REMEDY
A) Pump fails to
prime
1. Priming chamber not filled correctly.
2. Air leaks through the suction line
joints (broken/damaged screws or,
rubber hoses, loose or broken hose
clamps
3. Quick coupling gaskets broken or
not correctly fitted.
4. Suction or delivery line obstructed
5. Pump speed too low.
6. Worn or broken impeller.
7. Air leaks through damaged
mechanical seal.
8. Suction strainer clogged
1. Fill priming chamber
leaving no air gap.
2. Carry out repairs as
necessary
3. Check connections,
and renew gaskets where
necessary.
4. Remove obstruction and
ensure there are no kinks
in delivery line.
5. Increase engine speed.
6. Renew Impeller.
7. Renew Seal.
8. Clean strainer, and
ensure it is not submerged
in mud or sediment etc.
MAINTENANCE
A. ENGINE
Ensure the engine is maintained in accordance with the instructions given in the
engine manual, additionally, if the pump is not to be used for some time, it should
be prepared as follows:
1. Drain the fuel tank and carburetor completely.
2. Remove the spark plug, and pour 2 - 3 teaspoons of light oil into the cylinder
through the spark plug hole.
3. Pull the starter recoil rope slowly, 2 or 3 times so that the oil is deposited on the
cylinder walls, and replace the spark plug.
B. PUMP
Always maintain the pump in a clean condition, checking regularly for loose bolts
etc. Additionally, drain the pump body whenever there is danger of freezing, and
if the pump has been used with contaminated or salty water, it should be thoroughly
flushed with clean water immediately after use, both inside and out.
If the pump is not to be used for some time, it should be flushed thoroughly with
clean water, and drained completely before storing in a clean dry environment
8
B) Low output
1. Suction strainer clogged.
2. Suction or delivery line obstructed
3. High friction losses in the suction line.
4. Suction lift too high.
5. Pump speed too low.
6. Impeller clogged.
9
1. Clean strainer, and ensure
it is not sub merged in
mud or sediment etc.
2. Remove obstruction and
ensure there are no kinks
in delivery line.
3. Avoid unnecessary curves,
restrictions or valves.
4. Set pump as near as
possible to the level of
the liquid to be pumped.
5. Increase engine speed.
6. Disassemble pump, and
clean.
 Loading...