

Page 1
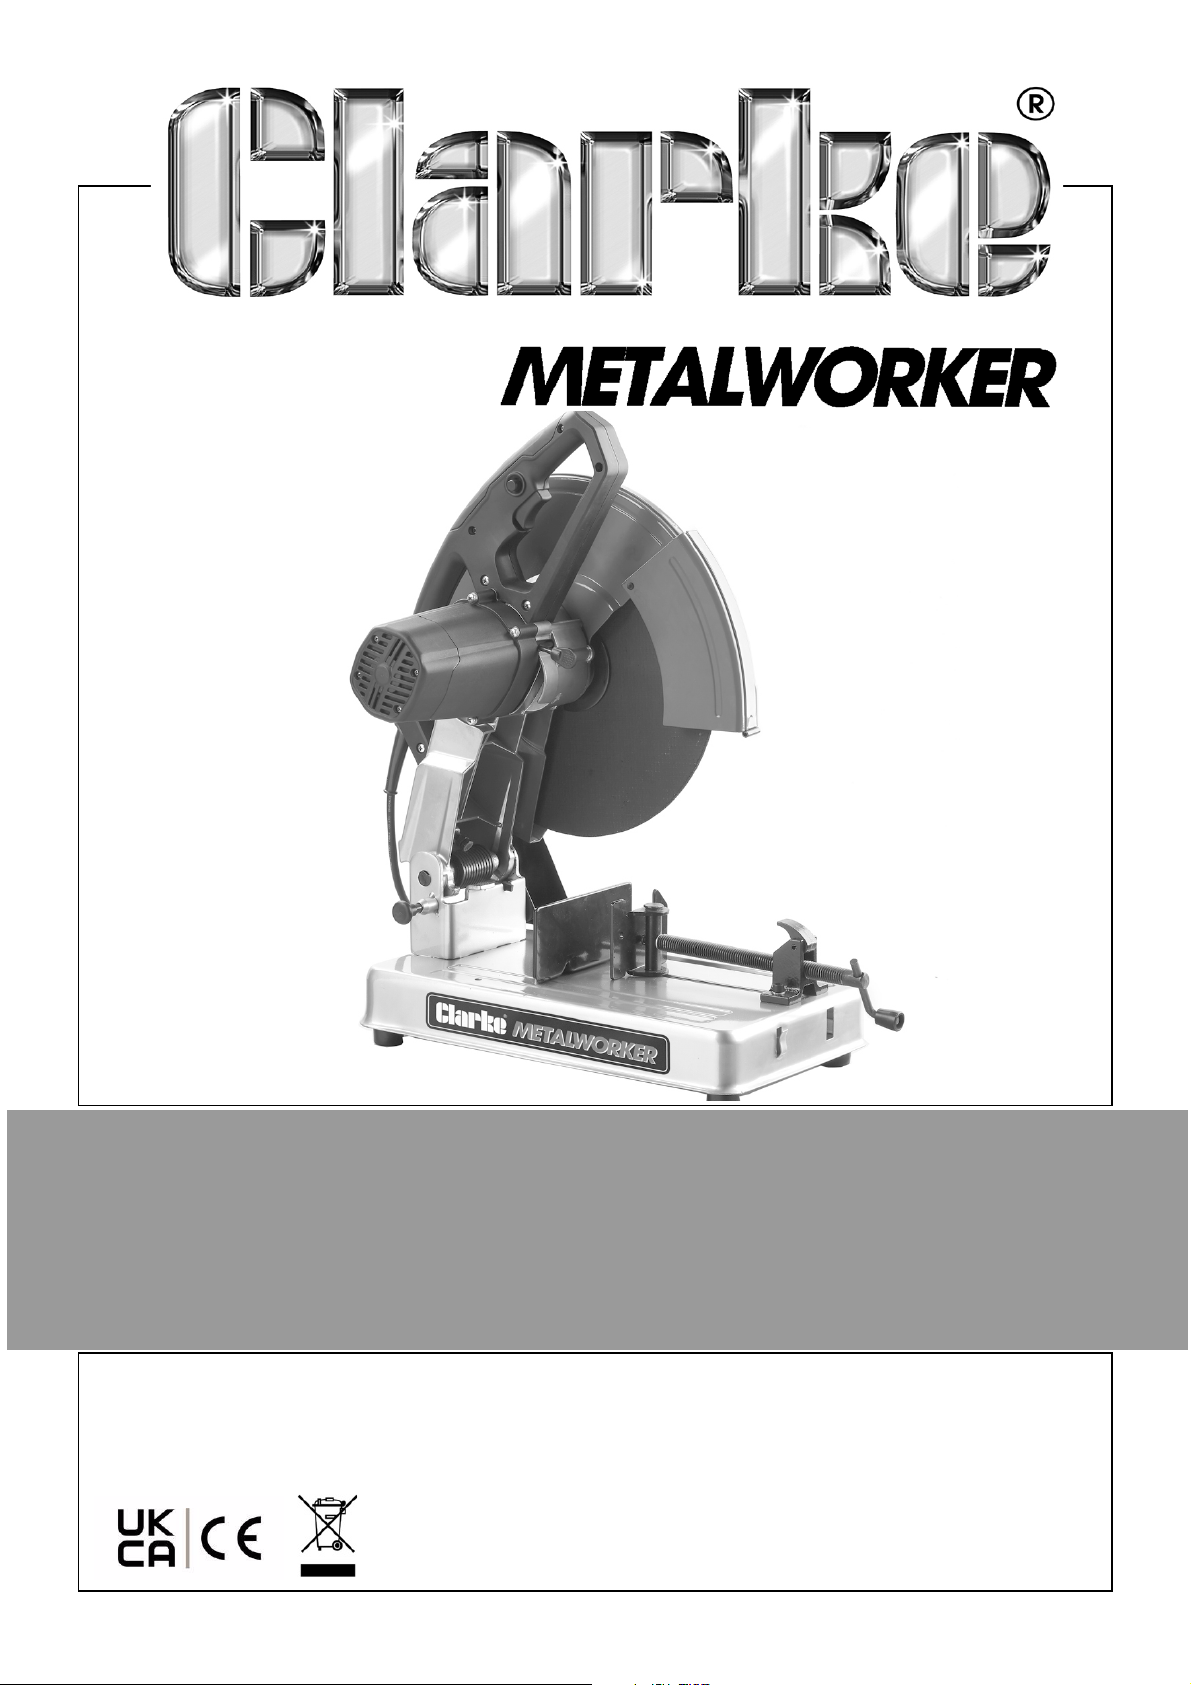
355MM ABRASIVE CUT-OFF SAW
MODEL NO: CCO14D
PART NO: 6470162
OPERATION & MAINTENANCE
INSTRUCTIONS
ORIGINAL INSTRUCTIONS DL0922 REV 1
Page 2
INTRODUCTION
Thank you for purchasing this CLARKE Abrasive Cut-Off Saw which is suitable
for cutting any ferrous metals which are compatible with the type of abrasive
wheel fitted.
Before attempting to use this product, please read this manual thoroughly and
follow the instructions carefully. In doing so you will ensure the safety of yourself
and that of others around you, and you can look forward to your purchase
giving you long and satisfactory service.
GUARANTEE
This product is guaranteed against faulty manufacture for a period of 12
months from the date of purchase. Please keep your receipt which will be
required as proof of purchase.
This guarantee is invalid if the product is found to have been abused or
tampered with in any way, or not used for the purpose for which it was
intended.
Faulty goods should be returned to their place of purchase, no product can
be returned to us without prior permission.
This guarantee does not effect your statutory rights.
ENVIRONMENTAL RECYCLING POLICY
By purchasing this product, the customer is taking on the obligation
to deal with its safe disposal in accordance with the Waste Electrical
and Electronic Equipment (WEEE).
In effect, this means that this product must not be disposed of with
general household waste. It must be disposed of according to the laws
governing Waste Electrical and Electronic Equipment (WEEE) at a recognised
disposal facility. If disposing of this product or any damaged components, do
not dispose of with general waste. This product contains valuable raw
materials. Metal products should be taken to your local civic amenity site for
recycling of metal products.
2
Parts & Service: 020 8988 7400 / E-mail: [email protected] or [email protected]
Page 3
GENERAL POWER TOOL SAFETY WARNINGS
WARNING: READ ALL INSTRUCTIONS. FAILURE TO FOLLOW ALL
INSTRUCTIONS LISTED BELOW MAY RESULT IN ELECTRIC SHOCK, FIRE AND/
OR SERIOUS INJURY. THE TERM “POWER TOOL” IN THE WARNINGS REFERS
TO YOUR SAW.
Save these warnings and instructions for future reference.
WORK AREA SAFETY
a. Keep work area clean and well lit. Cluttered or dark areas invite
accidents.
b. DO NOT operate power tools in explosive atmospheres, such as in the
presence of flammable liquids, gases or dust. Power tools create sparks
which may ignite the dust or fumes.
c. Keep children and bystanders away while operating a power tool.
Distractions can cause you to lose control.
ELECTRICAL SAFETY
a. Power tool plugs must match the outlet. Never modify the plug in any
way. Do not use any adapter plugs with earthed (grounded) power
tools. Unmodified plugs and matching outlets will reduce risk of electric
shock.
b. Avoid body contact with earthed or grounded surfaces, such as pipes,
radiators, ranges and refrigerators. There is an increased risk of electric
shock if your body is earthed or grounded.
c. DO NOT expose power tools to rain or wet conditions. Water entering a
power tool will increase the risk of electric shock.
d. DO NOT abuse the cable. Never use the cable for carrying, pulling or
unplugging the power tool. Keep cable away from heat, oil, sharp
edges or moving parts. Damaged or entangled cables increase the risk
of electric shock.
e. When operating a power tool outdoors, use an extension cable suitable
for outdoor use. Use of a cable suitable for outdoor use reduces the risk
of electric shock.
f. If operating a power tool in a damp location is unavoidable, use a
residual current device (RCD) protected supply. Use of an RCD reduces
the risk of electric shock.
3
Parts & Service: 020 8988 7400 / E-mail: [email protected] or [email protected]
Page 4

PERSONAL SAFETY
a. Stay alert, watch what you are doing and use common sense when
operating a power tool. Do not use a power tool while you are tired or
under the influence of drugs, alcohol or medication. A moment of
inattention while operating power tools may result in serious personal
injury.
b. Use personal protective equipment. Always wear eye protection.
Protective equipment such as dust mask, non-skid safety shoes, hard
hat, or hearing protection used for appropriate conditions will reduce
personal injuries.
c. Prevent unintentional starting. Ensure the switch is in the off-position
before connecting to power source and/or battery pack, picking up or
carrying the tool. Carrying power tools with your finger on the switch or
energising power tools that have the switch on invites accidents.
d. Remove any adjusting key or wrench before turning the power tool on.
A wrench or a key left attached to a rotating part of the power tool
may result in personal injury.
e. DO NOT overreach. Keep proper footing and balance at all times. This
enables better control of the power tool in unexpected situations.
f. Dress properly. Do not wear loose clothing or jewellery. Keep your hair,
clothing and gloves away from moving parts. Loose clothes, jewellery or
long hair can be caught in moving parts.
g. If devices are provided for the connection of dust extraction and
collection facilities, ensure these are connected and properly used. Use
of dust collection can reduce dust-related hazards.
POWER TOOL USE AND CARE
a. DO NOT force the power tool. Use the correct power tool for your
application. The correct power tool will do the job better and safer at
the rate for which it was designed.
b. DO NOT use the power tool if the switch does not turn it on and off. Any
power tool that cannot be controlled with the switch is dangerous and
must be repaired.
c. Disconnect the plug from the power source and/or the battery pack
from the power tool before making any adjustments, changing
accessories, or storing power tools. Such preventive safety measures
reduce the risk of starting the power tool accidentally.
d. Maintain power tools. Check for misalignment or binding of moving
parts, breakage of parts and any other condition that may affect the
power tool's operation. If damaged, have the power tool repaired
before use. Many accidents are caused by poorly maintained power
tools.
4
Parts & Service: 020 8988 7400 / E-mail: [email protected] or [email protected]
Page 5

e. Store idle power tools out of the reach of children and do not allow
persons unfamiliar with the power tool or these instructions to operate
the tool. Power tools are dangerous in the hands of untrained users.
f. Keep cutting tools sharp and clean. Properly maintained cutting tools
with sharp cutting edges are less likely to bind and are easier to control.
g. Use the power tool, accessories and tool bits etc. in accordance with
these instructions, taking into account the working conditions and the
work to be performed. Use of the power tool for operations different
from those intended could result in a hazardous situation.
SERVICING
a. Have your power tool serviced by a qualified repair person using only
identical replacement parts. This will ensure that the safety of the power
tool is maintained.
ADDITIONAL WARNINGS FOR CUT-OFF SAWS
1. IMPORTANT: You should not operate this machine unless you are thoroughly
familiar with metal cutting saws. If there is any doubt whatsoever, you
should consult a qualified person.
2. DO NOT operate the machine until it is completely assembled and this
entire manual has been read and understood.
3. Ensure the proper electrical regulations are followed.
4. Ensure the abrasive disc is securely mounted in accordance with these
instructions before connecting to a power supply.
5. DO NOT over tighten the abrasive disc. This can cause stress, and could
lead to the wheel shattering when under load.
6. ALWAYS check the abrasive disc for cracks before use.
7. Before switching the machine on, ALWAYS ensure the work is properly
secured. ALWAYS use the vice, NEVER hand hold a workpiece.
8. Make all adjustments with the power OFF.
9. When starting a cut, always ease the tool into the workpiece. A harsh or
sudden impact could shatter the abrasive disc.
10. Ensure the abrasive disc reaches maximum speed before beginning a cut.
11. NEVER use the machine with the guards removed.
12. Ensure you use the correct type of abrasive disc for the type of material
being cut. Metal cutting & masonry abrasive discs are available from your
CLARKE dealer. NEVER cut magnesium, wood, or non-ferrous metals.
5
Parts & Service: 020 8988 7400 / E-mail: [email protected] or [email protected]
Page 6
ELECTRICAL CONNECTIONS
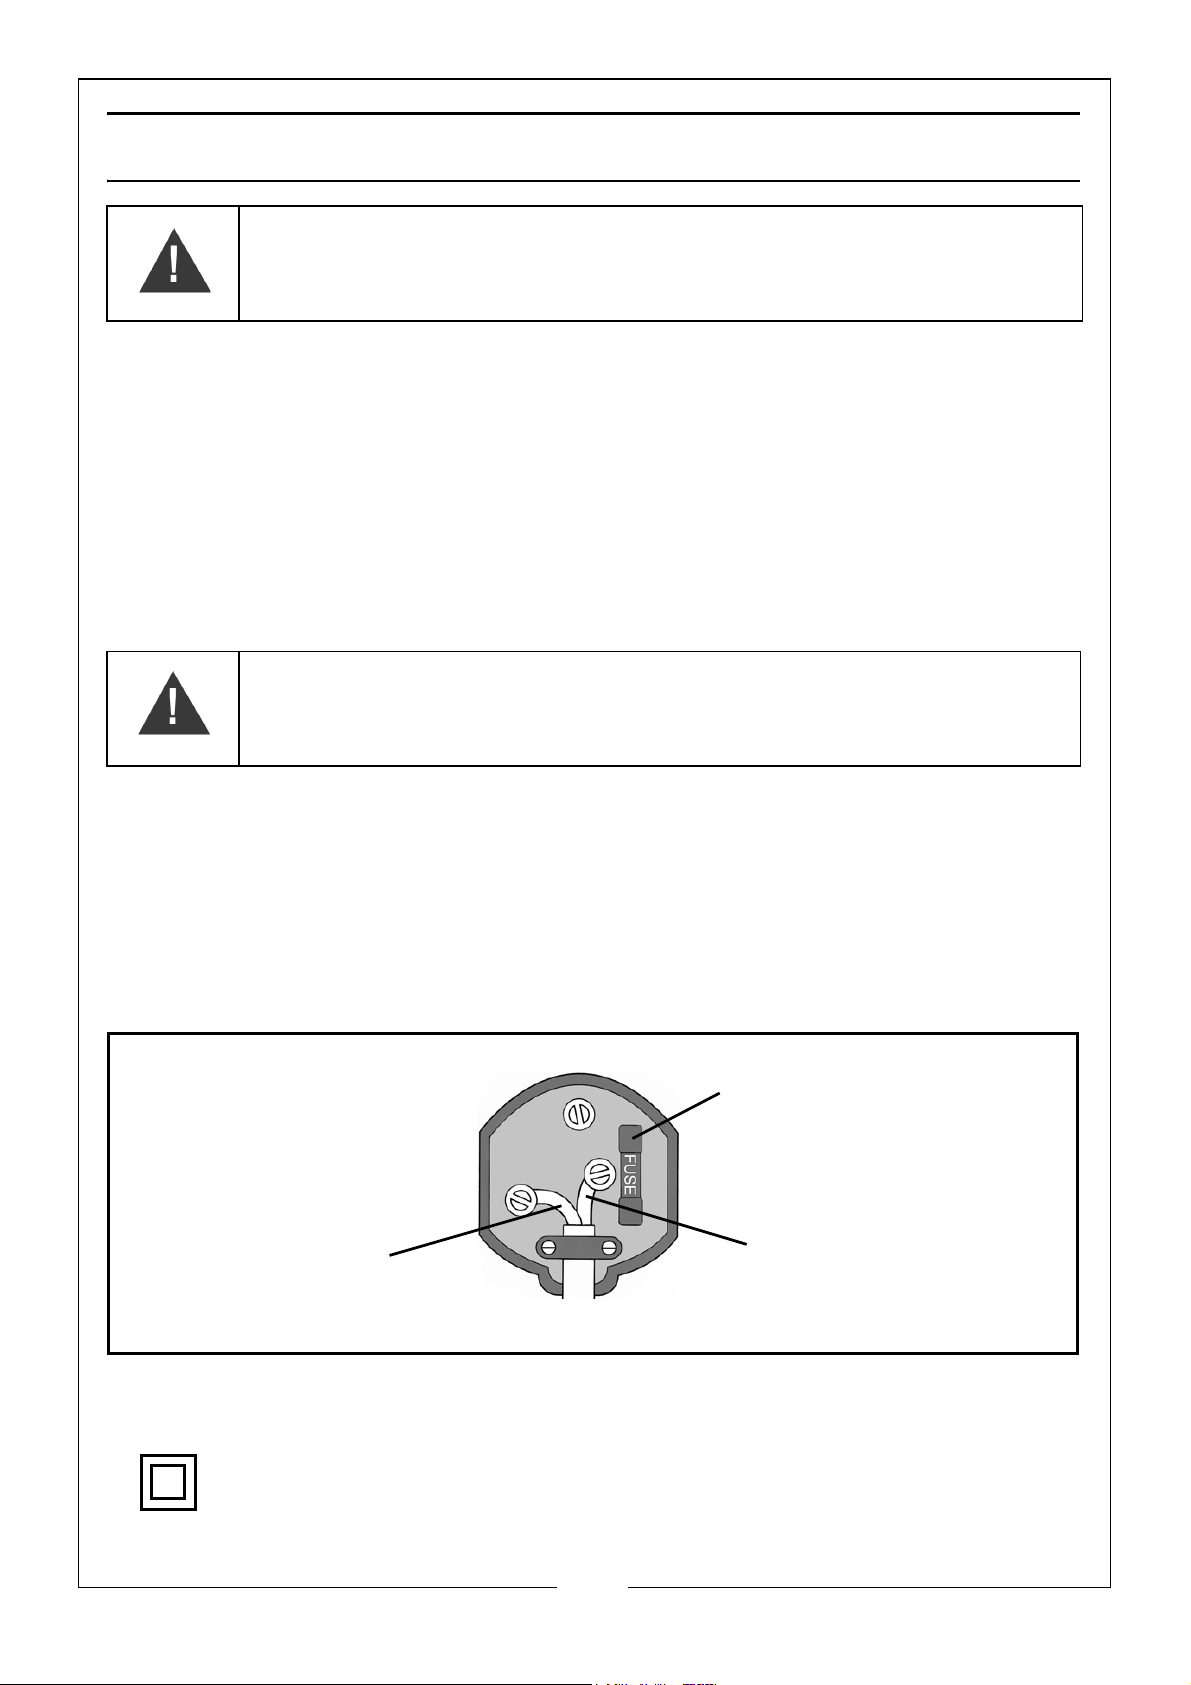
Plug must be BS1363/A approved.
Always fit a 13 Amp fuse.
Ensure that the outer sheath of the cable is firmly held by the clamp
Neutral
(Blue)
Live
(Brown)
WARNING: READ THESE ELECTRICAL SAFETY INSTRUCTIONS
THOROUGHLY BEFORE CONNECTING THE PRODUCT TO THE MAINS
SUPPLY.
Before switching the product on, make sure that the voltage of your electricity supply is
the same as that indicated on the rating plate. This product is designed to operate on
230VAC 50Hz. Connecting it to any other power source may cause damage.
This product may be fitted with a non-rewireable plug. If it is necessary to change the
fuse in the plug, the fuse cover must be refitted. If the fuse cover becomes lost or
damaged, the plug must not be used until a suitable replacement is obtained.
If the plug has to be changed because it is not suitable for your socket, or due to
damage, it should be cut off and a replacement fitted, following the wiring instructions
shown below. The old plug must be disposed of safely, as insertion into a mains socket
could cause an electrical hazard.
WARNING: THE WIRES IN THE POWER CABLE OF THIS PRODUCT ARE
COLOURED IN ACCORDANCE WITH THE FOLLOWING CODE:
BLUE = NEUTRAL BROWN = LIVE
If the colours of the wires in the power cable of this product do not correspond
with the markings on the terminals of your plug, proceed as follows.
•The Blue wire must be connected to the terminal marked N or
coloured Black.
•The Brown wire must be connected to the terminal marked L or
coloured Red.
We strongly recommend that this machine is connected to the mains supply
via a Residual Current Device (RCD)
This symbol indicates that this is a Class II product, and does not require
an earth connection.
Parts & Service: 020 8988 7400 / E-mail: [email protected] or [email protected]
6
Page 7
UNPACKING AND ASSEMBLY
Unpack the saw carefully and ensure that the following items are in the box. In
the event of any deficiencies you should contact your CLARKE dealer
immediately.
• Abrasive Cut-off Saw
• 355mm cutting disc (supplied fitted)
• Double ended ring and hex spanner
BEFORE USE
UNLOCKING / LOCKING
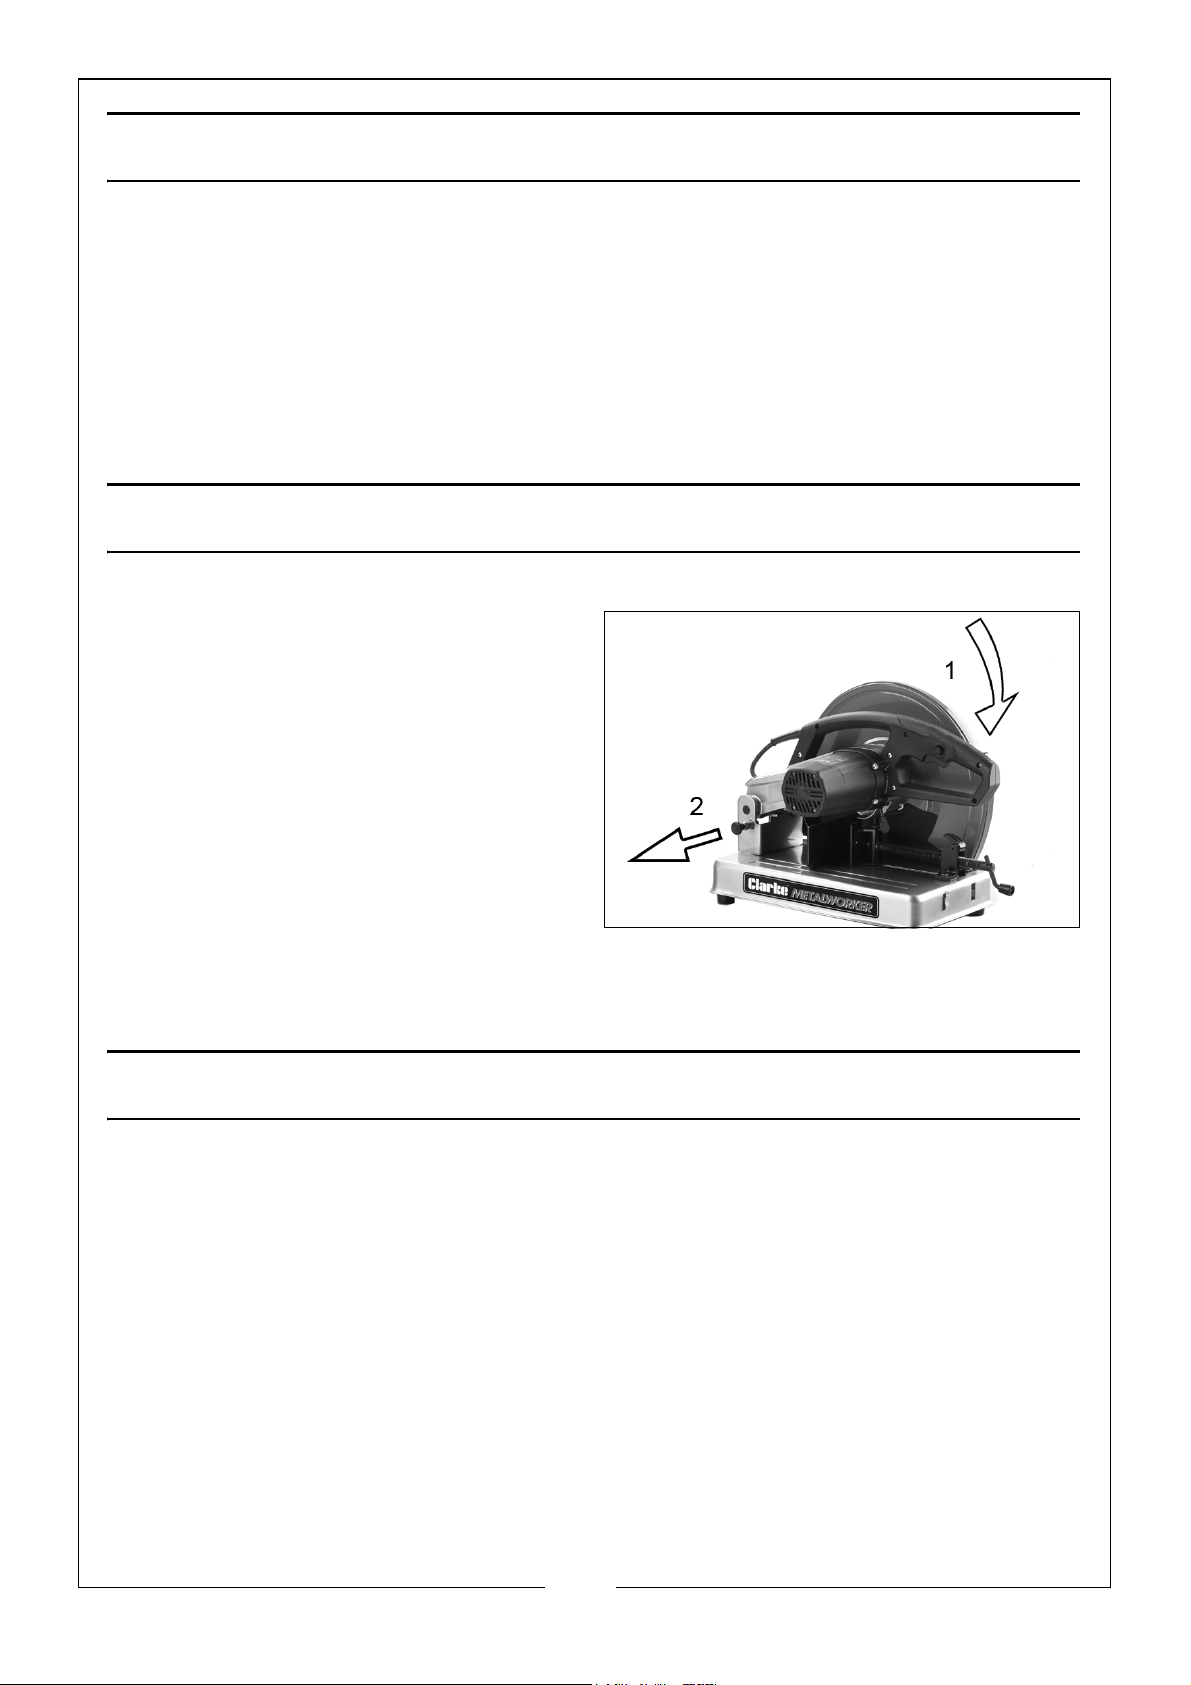
To unlock the saw and raise the motor
arm.
1. Push down on the handle (1).
2. Pull the locking pin out slightly (2) to
unlock the motor arm.
3. Release the pressure on the handle.
• The motor arm will then raise into
position.
• Reverse step 2 when locking the motor arm down for storage.
MATERIAL CLAMPING AND SUPPORT
• Angle iron should be clamped and cut with both legs resting against
the base of the saw.
• A spacer block slightly narrower than the workpiece can be used to
raise the workpiece if required.
• A long workpiece must be supported by a block so that it will be
level with the top of the base. The cut-off end should be free to fall
downward to avoid binding against the wheel.
7
Parts & Service: 020 8988 7400 / E-mail: [email protected] or [email protected]
Page 8
OPERATION
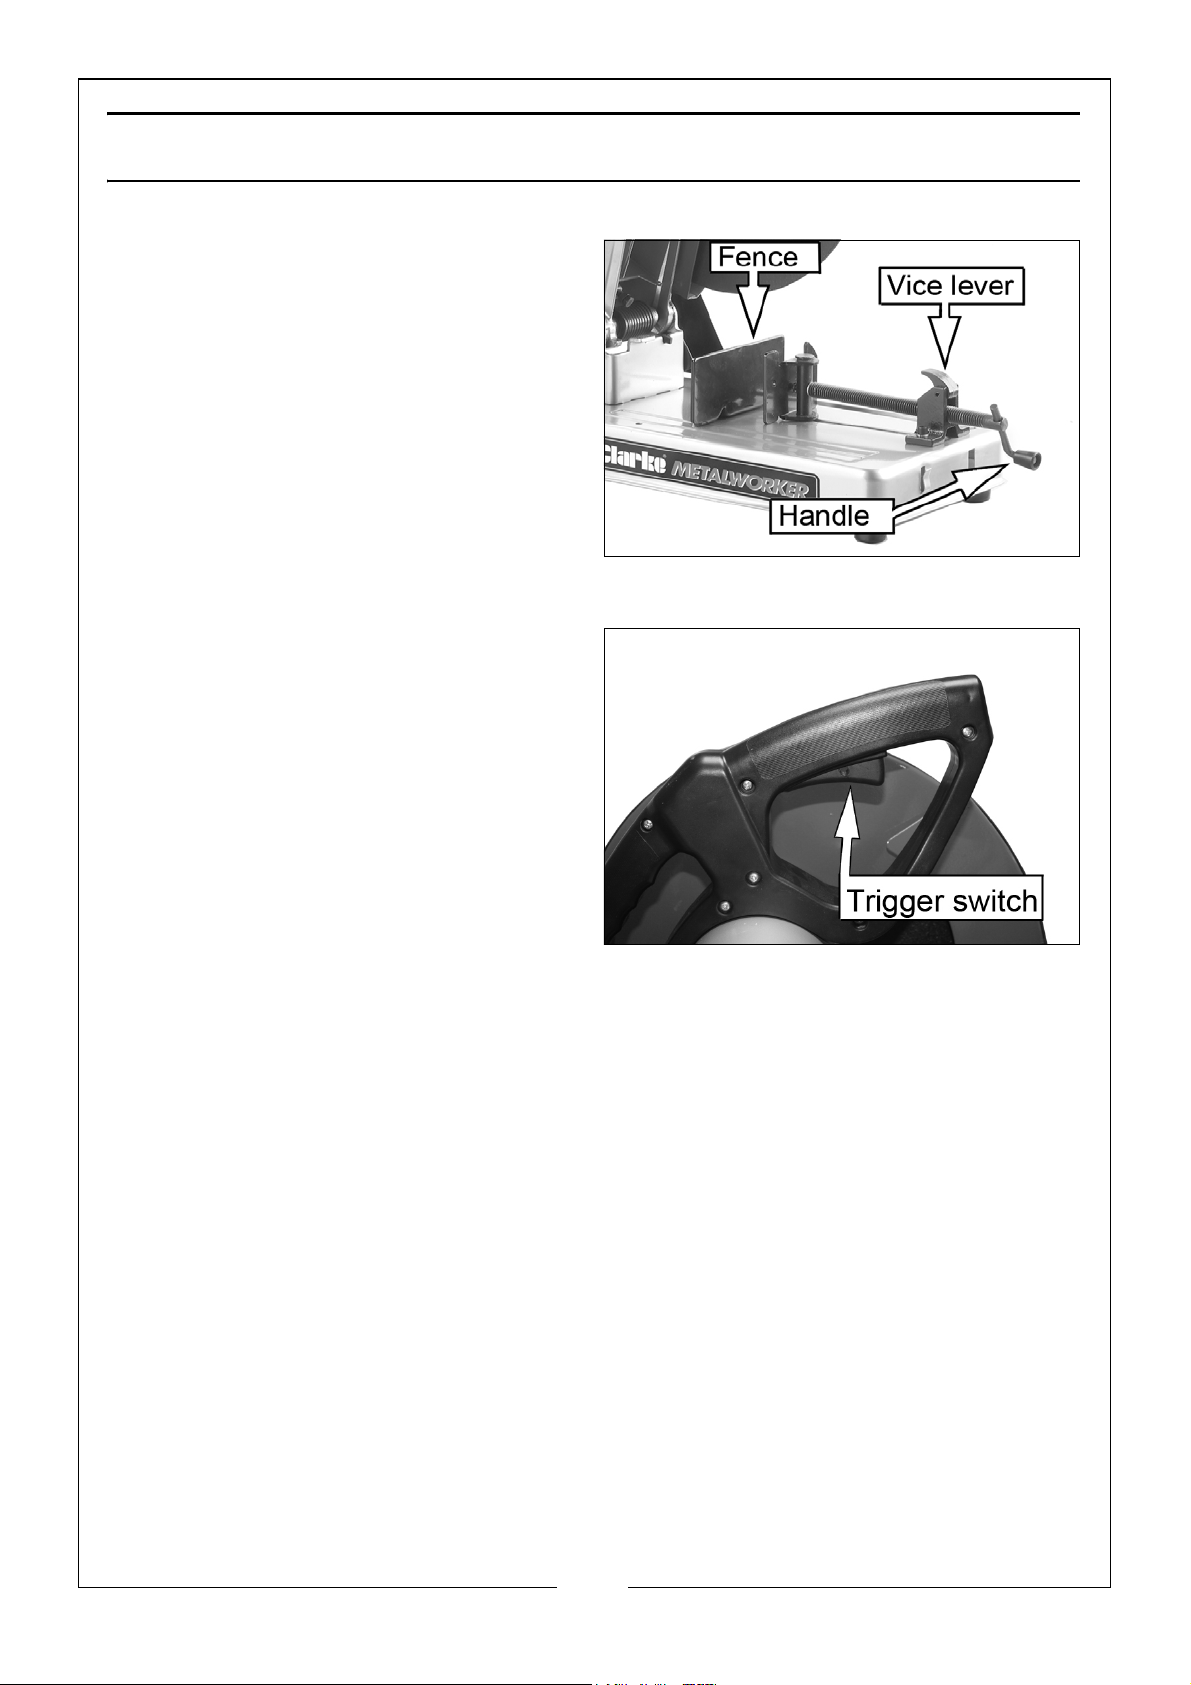
VICE OPERATION
1. Turn the handle counterclockwise
to remove clamping pressure.
2. Lift the vice lever up.
3. Pull handle out as far as desired.
• The vice may be pushed forward
into the work without turning the
handle.
4. Lower the vice lever then tighten the vice on to the work using the handle.
TRIGGER SWITCH
1. To start the saw, pull the trigger
switch.
• Wait a couple of seconds until
the cutting disc reaches full
speed.
2. To turn the saw off, release the
trigger switch.
• Keep hands and materials away
from the cutting disc until it has come to a complete stop.
TIPS FOR MORE ACCURATE CUTS
• Allow the cutting disc to do the cutting. Excessive force will cause
the cutting disc to glaze reducing cutting efficiency and/or to
deflect causing inaccurate cuts.
• Adjust the fence angle.
• Make sure the workpiece is laying flat across the base.
• Clamp the workpiece securely to avoid movement and vibration.
8
Parts & Service: 020 8988 7400 / E-mail: [email protected] or [email protected]
Page 9
ADJUSTMENTS
WARNING: TURN OFF AND UNPLUG THE SAW BEFORE MAKING ANY
ADJUSTMENTS. MAKE SURE THE TRIGGER SWITCH IS IN THE OFF POSITION.
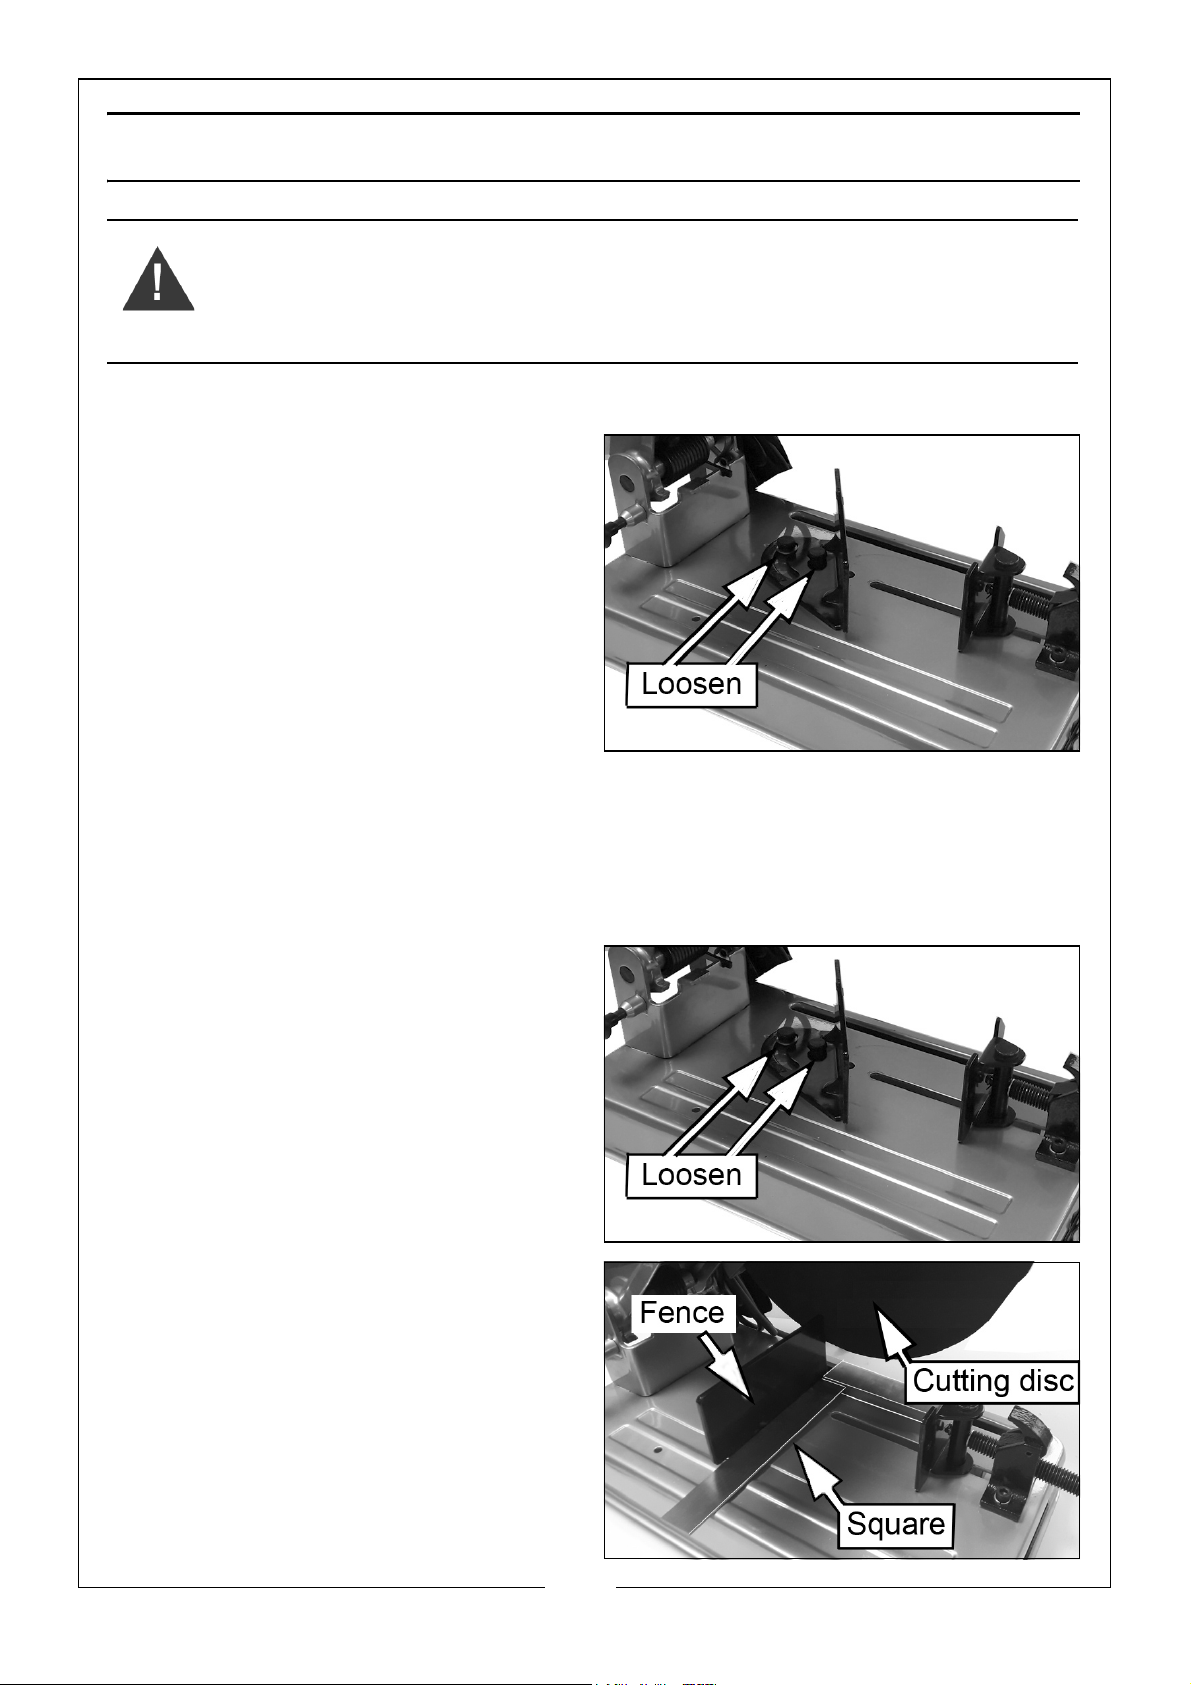
CHANGING THE CUTTING ANGLE
1. Use the hex wrench provided to
loosen (do not remove) the two
fence bolts.
2. Adjust the fence to the desired
angle.
3. Re-tighten both fence bolts before
use.
• When making a mitre cut, the
vice may not clamp securely,
depending on the thickness of the workpiece and the mitre angle.
• Other aids (such as spring, bar or C-clamps) will be necessary to
secure the workpiece to the fence when making these cuts.
SQUARING THE FENCE TO THE BLADE
1. Disconnect the power supply.
2. Loosen the two fence bolts, push
the arm down until the cutting disc
lowers into the base.
3. Place a set square against the
cutting disc and adjust the fence to
rest against the square.
4. Securely tighten both fence bolts
before use.
9
Parts & Service: 020 8988 7400 / E-mail: [email protected] or [email protected]
Page 10
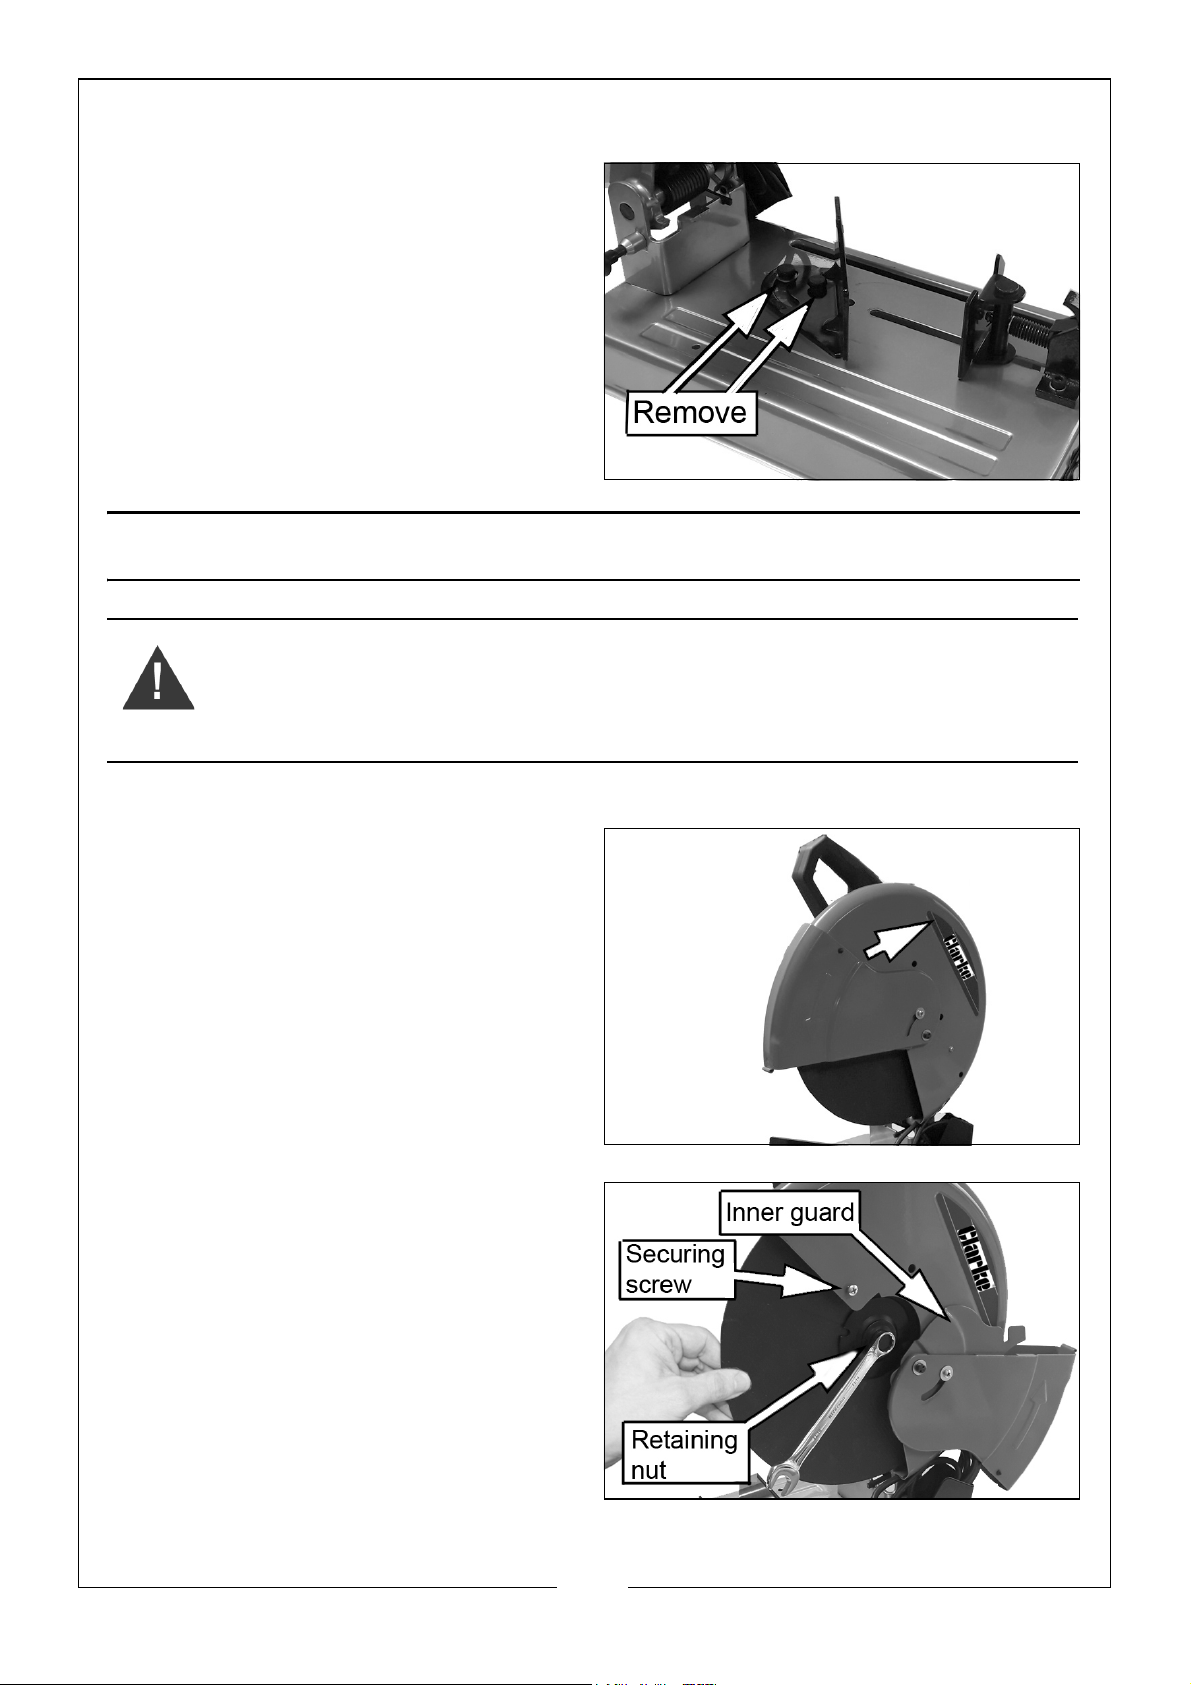
CHANGING THE SPACING BETWEEN THE FENCE AND VICE
1. Use the wrench provided to loosen
and remove the two fence bolts.
2. Adjust the fence to the desired
position.
3. Tighten the fence bolts securely
before use.
REMOVAL AND INSTALLATION OF CUTTING DISCS
WARNING: TURN OFF AND UNPLUG THE TOOL BEFORE MAKING ANY
ADJUSTMENTS OR REMOVING OR INSTALLING CUTTING WHEELS. BE SURE
THE TRIGGER SWITCH IS IN THE OFF POSITION.
Cutting discs are available from your CLARKE dealer - Part Number: 6470800
1. With the motor arm in the ‘UP’
position, rotate the blade guard
out of the way as shown.
• This will expose the inner guard
and its securing screw.
2. Loosen the inner guard securing
screw and swing both the inner
and main guards as far as possible
to expose the cutting disc retaining
nut.
3. Hold the cutting disc and use a
wrench to loosen and remove the
bolt in the center of the disc.
4. Remove the bolt, washer, outside
flange and old cutting disc.
• Make sure that the retaining disc
surfaces are clean and flat.
5. Install the new cutting disc by
reversing the above steps.
• Do not overtighten the bolt.
10
Parts & Service: 020 8988 7400 / E-mail: [email protected] or [email protected]
Page 11
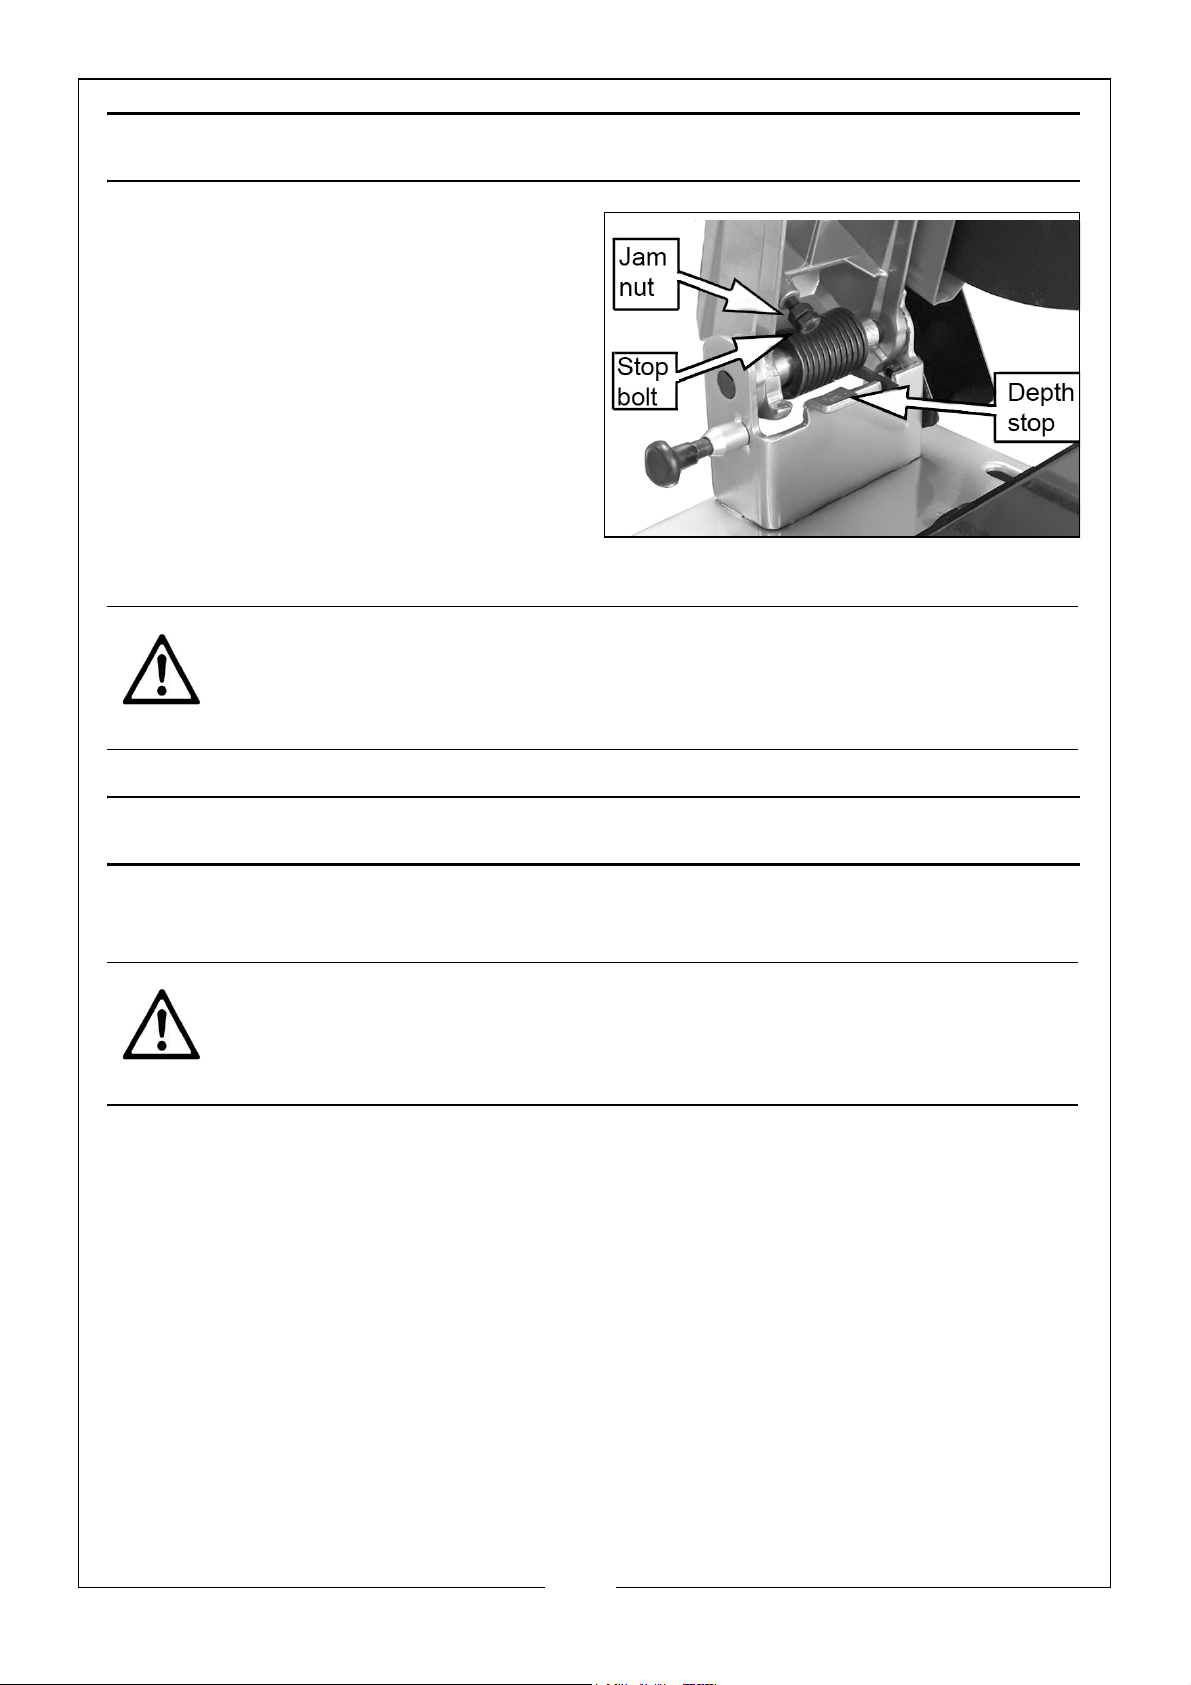
DEPTH STOP
The depth stop is set at the factory for
a new 14" (355mm) cutting disc. This
can be adjusted as the disc wears.
1. Loosen the jam nut.
2. Loosen the depth stop bolt.
3. Adjust the bolt to desired height.
4. Then turn the jam nut until seated
firmly against the saw arm casting.
• Securely tighten the depth stop
bolt before use.
CAUTION: WHEN CHANGING TO A NEW CUTTING DISC, READJUST THE
DEPTH STOP TO THE ORIGINAL POSITION TO PREVENT CUTTING INTO THE
SUPPORTING SURFACE.
MAINTENANCE
CLEANING
CAUTION: NEVER USE SOLVENTS OR OTHER HARSH CHEMICALS FOR
CLEANING THE NON-METALLIC PARTS OF THE TOOL. THESE CHEMICALS
MAY WEAKEN THE PLASTIC MATERIALS USED IN THESE PARTS.
Use a cloth dampened only with water and mild soap. Never let any liquid get
inside the tool; never immerse any part of the tool into a liquid.
Occasionally blow dirt and dust out of motor air vents with clean, dry air. To
minimize the risk of eye injury, always wear ANSI Z87.1 approved eye
protection when performing this task.
11
Parts & Service: 020 8988 7400 / E-mail: [email protected] or [email protected]
Page 12
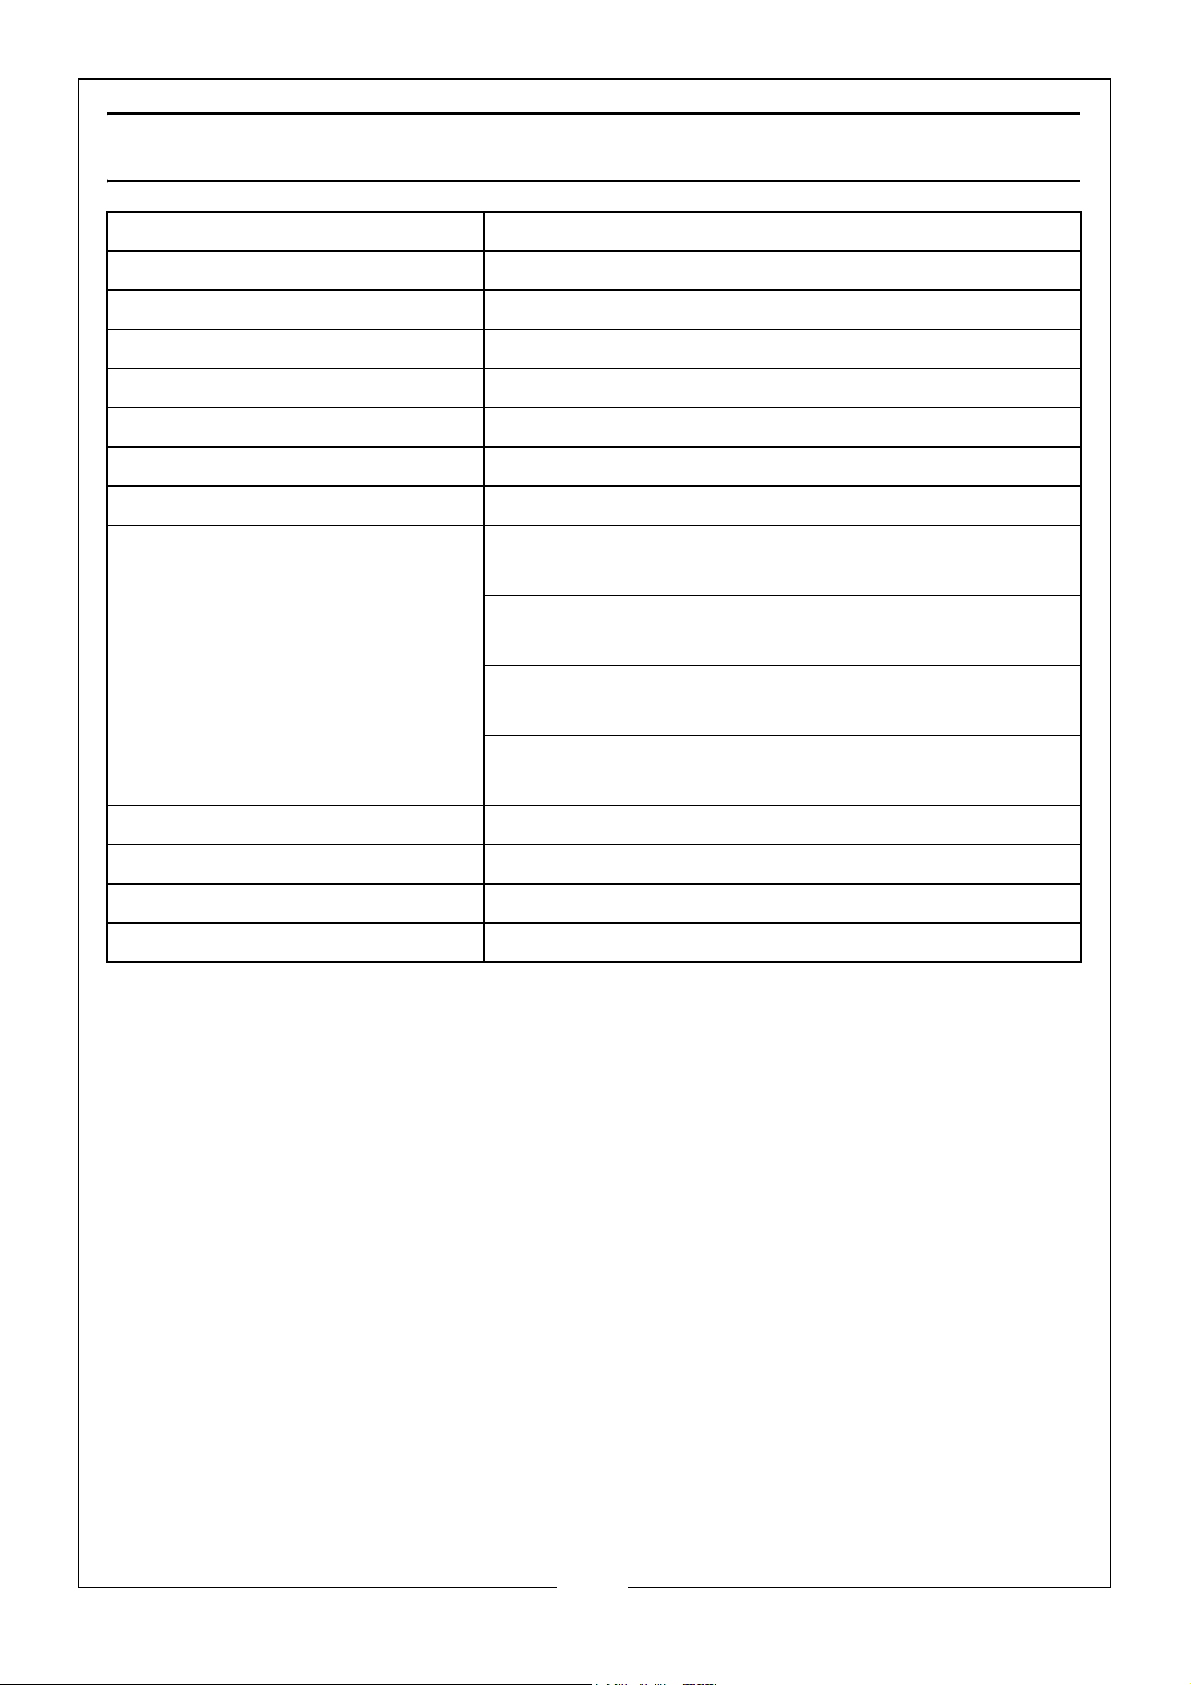
SPECIFICATIONS
Voltage 230V AC @ 50Hz
Input power 2000W
Current Rating 10.43A
Ingress protection IP20
No-load speed 3800 rpm
Weight 16.5 kg
Dimensions (L x W x H) mm 550 x 320 x 650 (head raised/395 lowered)
Cutting disc size 355 dia x 3.2 thick. 25.4mm bore dia
Max cutting dimensions (mm) Round
(130 dia @ 90°) - (130 dia @ 45°)
Square
(115 sq @ 90°) - (110 sq @ 45°)
Angle iron
(135 x 135@ 90°)* - (88 x 88 @ 45°)
Rectangle
(80 x 230@ 90°)* - (80 x 160 @ 45°)
Sound Pressure Level (LPA) 95 dB(A)
Sound Power Level (LWA) 109 dB(A)
Sound Uncertainty Value (K) 3 dB(A)
Vibration < 3.1 m/s²
12
Parts & Service: 020 8988 7400 / E-mail: [email protected] or [email protected]
Page 13
Page 14
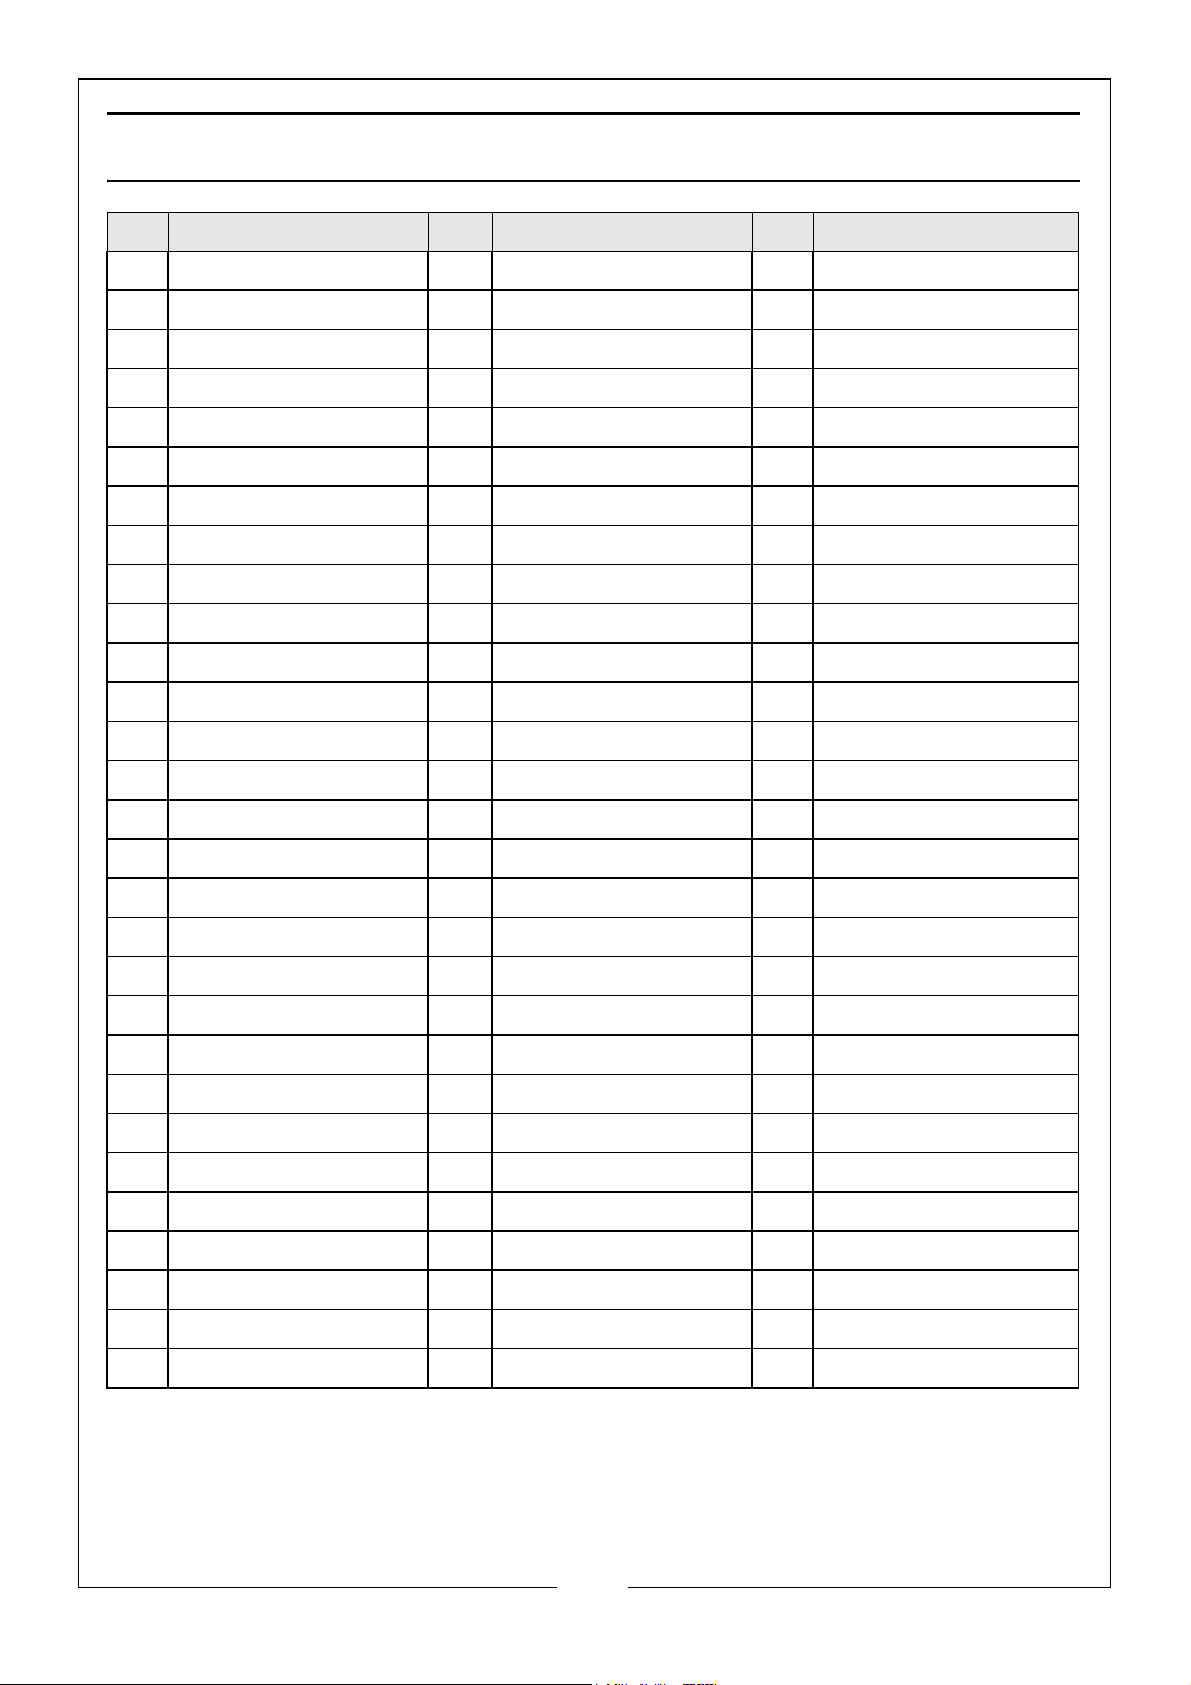
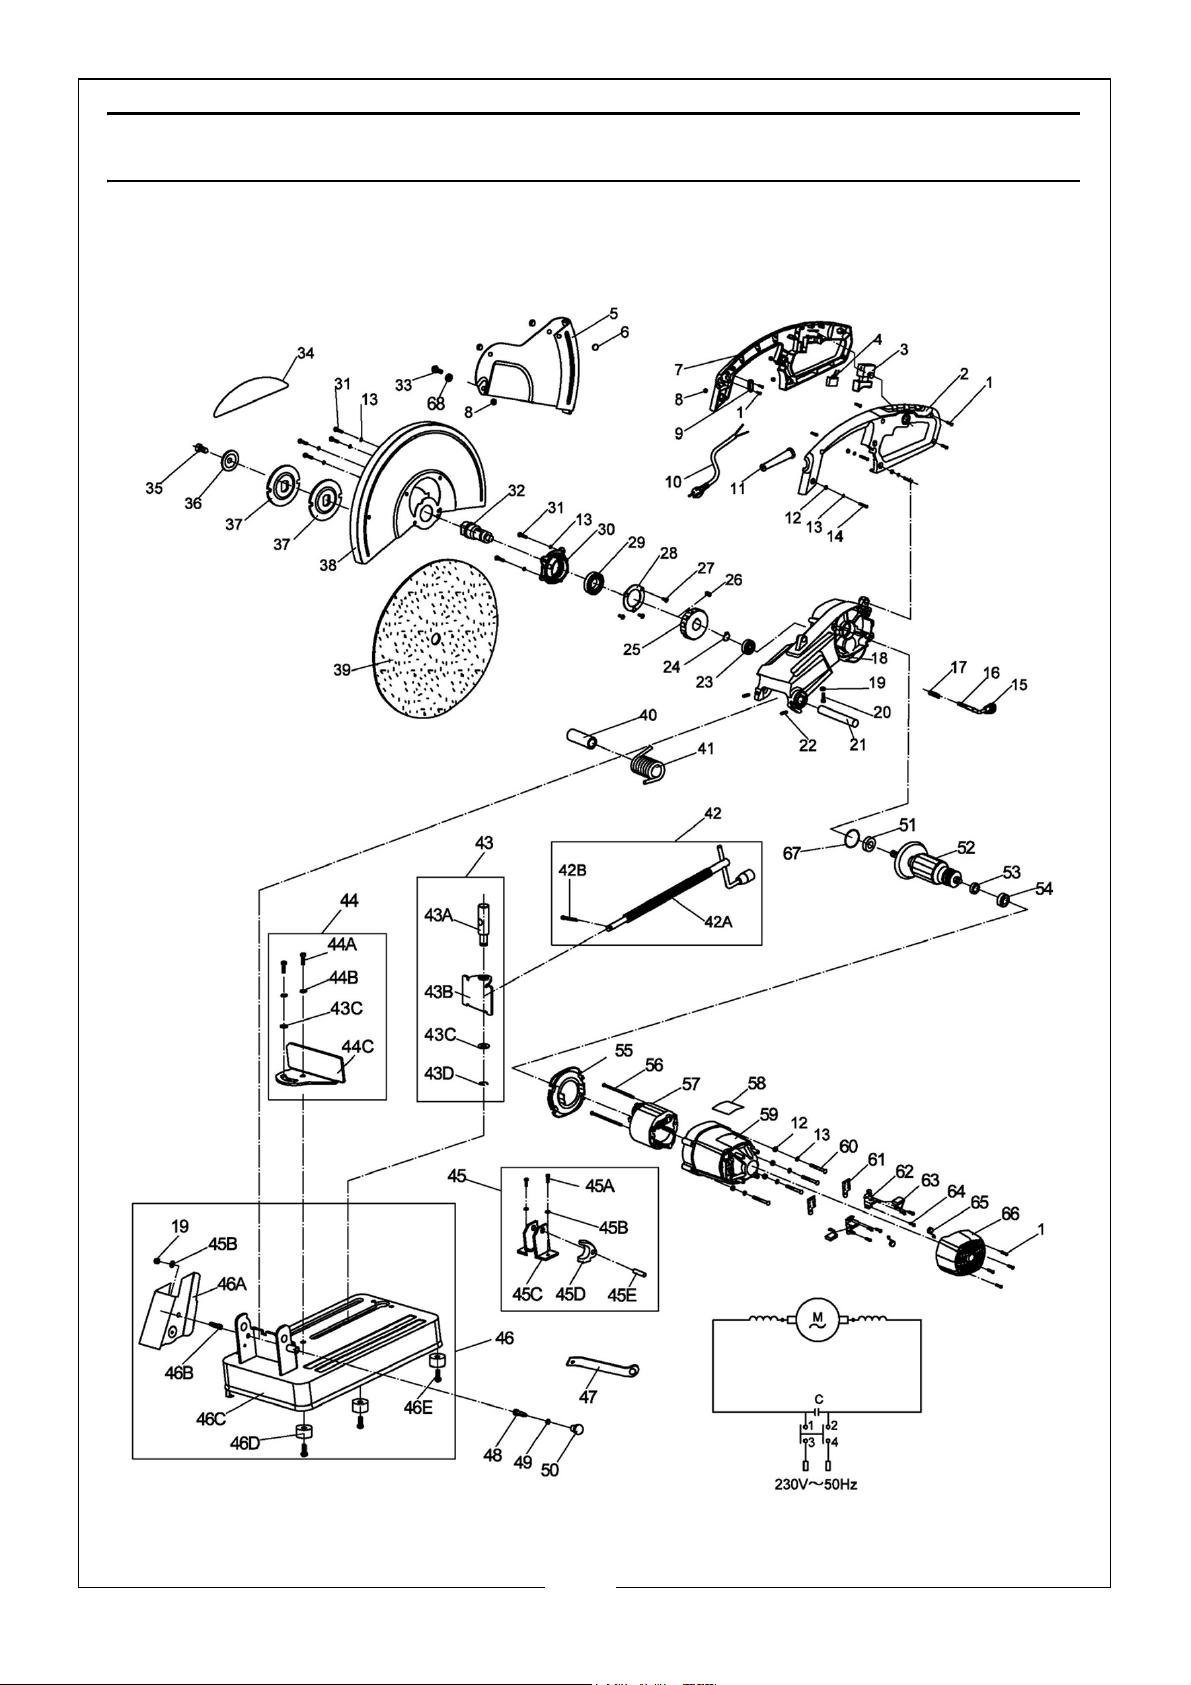
PARTS LIST
No Description No Description No Description
01 S/t screw st4.2 x 16 30 Bearing holder 45E Pin 6 x 30
02 Left handle 31 Screw M5 x 16 46 Base assembly
03 On/off switch 32 Output spindle 46A Rear guard
04 Capacitor 33 Screw M5 46B Screw M8 x 20
05 Cover 34 Name plate 46C Base
06 Rubber sheath 35 Bolt M5 x 16 46D Rubber feet
07 Right handle 36 Retaining disc 46E Screw M6 x 16
08 Lock nut M5 37 Retaining disc 47 Wrench
09 Cable clamp 38 Cutting blade guard 48 Locked pin
10 Cable with plug 39 Blade 355x3.2x25.4 49 O-ring 6x1.8
11 Cable protector 40 Sheath 50 Locked nut
12 Washer 5 41 Coil spring 51 Bearing 6202-2RS/Z2
13 WAsher 5 42 Steel pole assembly 52 Armature
14 Screw M5 x 30 42A Steel pole 53 Bearing 609-2Z/Z2
15 Locking pin button 42B Pin 2 x 20 54 Bearing sleeve
16 Locking pin 43 Moving flange assy 55 Fan guide
17 Compression spring 43A Vertical Pin 56 S/t screw 4.8 x70
18 Gear housing 43B Moving flange 57 Stator
19 Nut M8 43C Washer 10 58 Rating plate
20 Bolt M8 x 40 43D Circlip 10 59 Housing
21 Rotating spindle 44 Fixed flange assy 60 Screw M5x45
22 Screw M8 x 10 44A Bolt M10 x 20 61 Brush holder plate
23 Bearing 6200-2Z/Z2 43B Washer 10 62 Brush holder assembly
24 Circlip 22mm 44C Fixed flange 63 Carbon brush
25 Driven gear 45 Nut 64 S/t screw 3.5x13
26 Pin 6 x 14 45A Bolt M8 x 20 65 Roll spring
27 Screw M4 x 12 45B Washer 8 66 Back cover
28 Bearing plate 45C Holder 67 O-ring 34.5x.2.65
29 Bearing 6005-2RS/Z2 45D NUt 68 Washer 8mm
14
Parts & Service: 020 8988 7400 / E-mail: [email protected] or [email protected]
Page 15
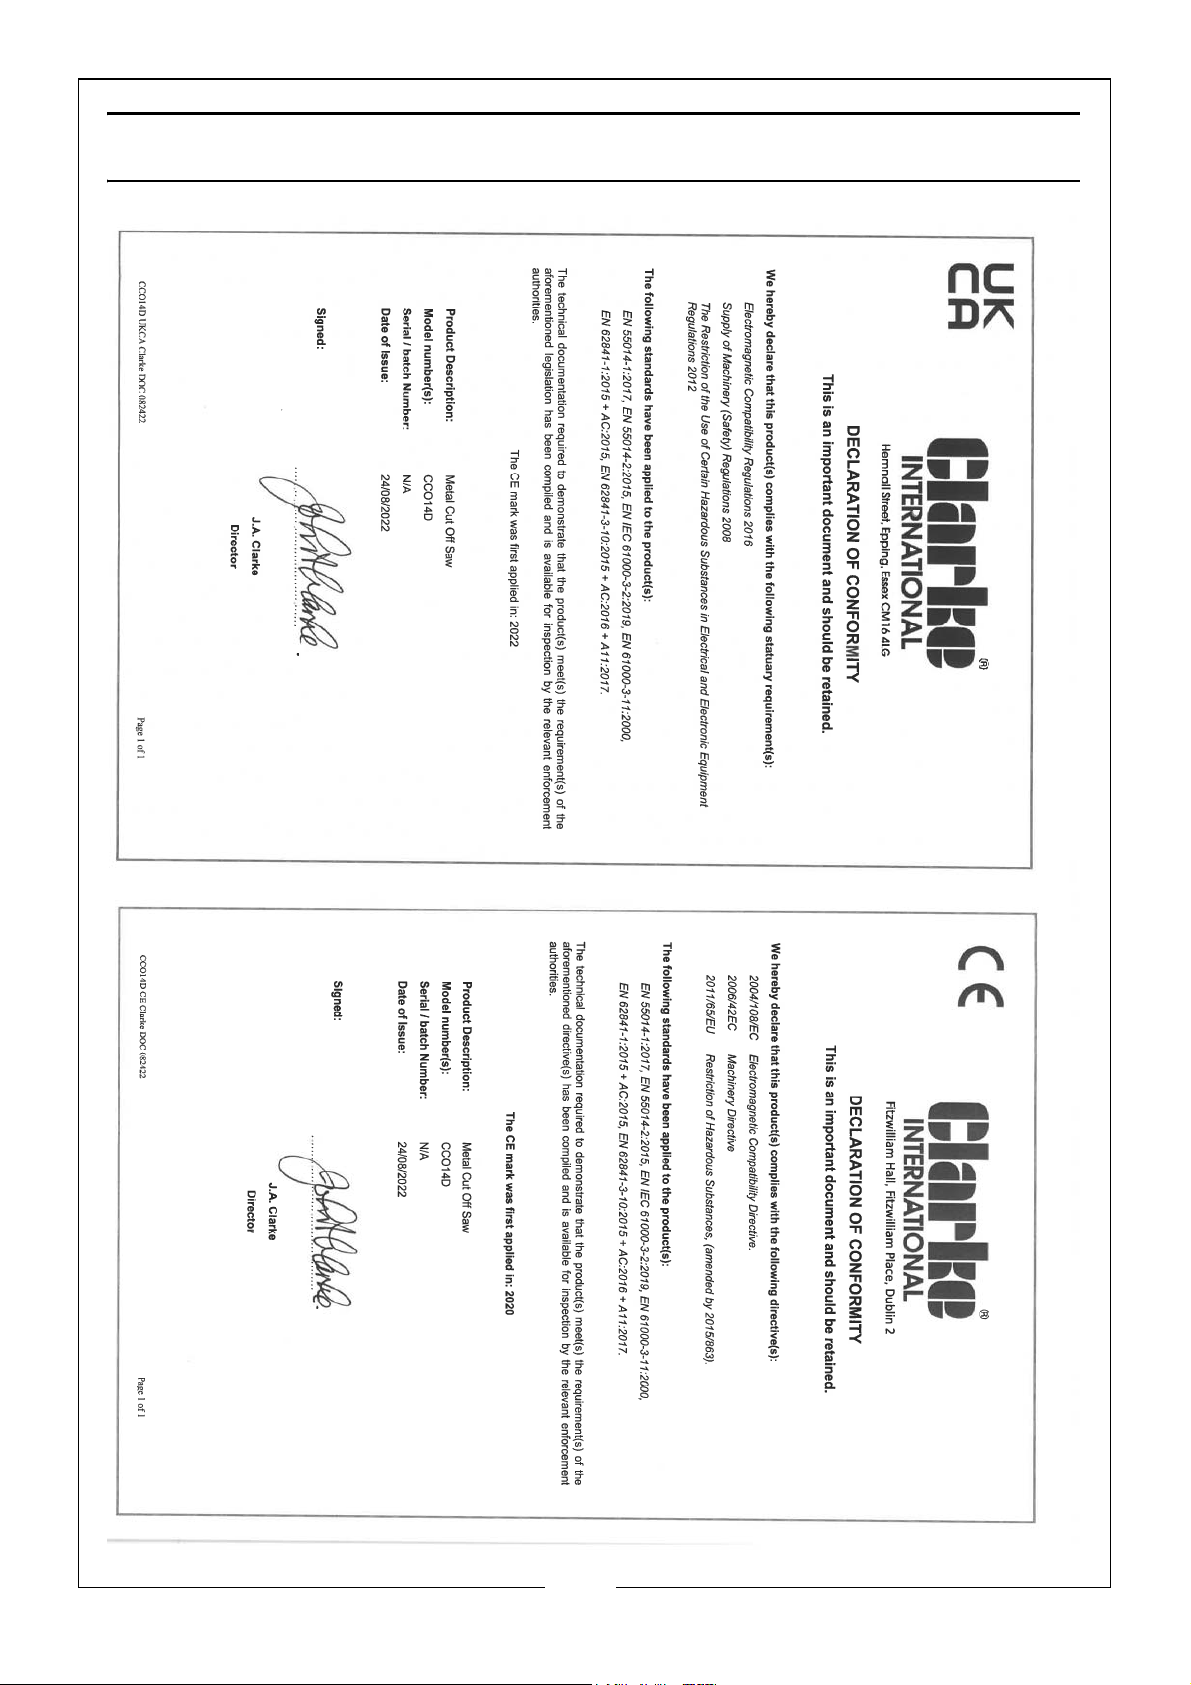
DECLARATION OF CONFORMITY
15
Parts & Service: 020 8988 7400 / E-mail: [email protected] or [email protected]
Page 16

 Loading...