

Page 1
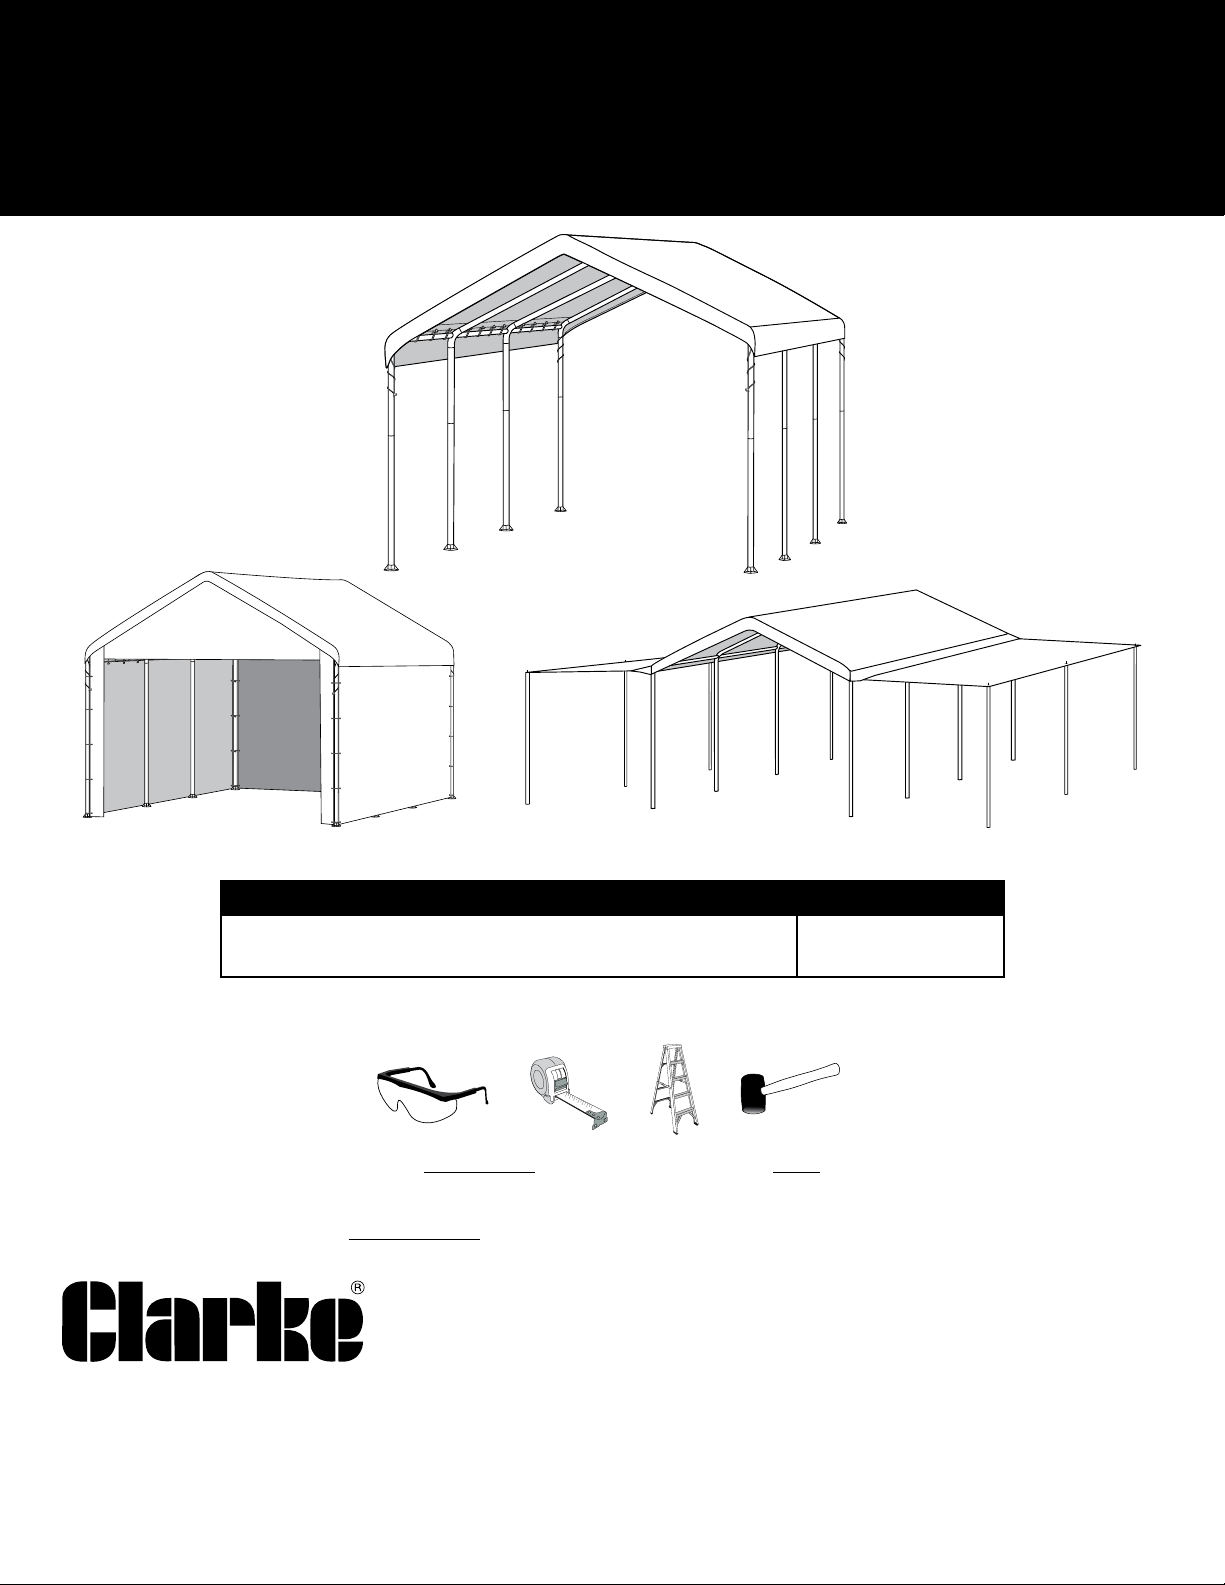
3-in-1 Garden Canopy
3m x 6.1m x 2.7m / 10’ x 20’ x 9’
Assembly Instructions
Canopy - Pgs 1-5
Please read instructions COMPLETELY before assembly. This shelter MUST be securely anchored.
THIS IS A TEMPORARY STRUCTURE AND NOT RECOMMENDED AS A PERMANENT STRUCTURE.
Clarke International
Hemnall Street
Epping
Essex CM16 4LG
ENGLAND
www.clarkeinternational.com
Extension Kit - Pgs 9-11Enclosure Kit - Pgs 6-8
DESCRIPTION MODEL #
3-in-1 Garden Canopy
3m x 6.1m x 2.7m / 10’ x 20’ x 9’
RECOMMENDED TOOLS
Before you start: 2 or more individuals recommended for assembly.
PARTS & SERVICE: 0208 988 7400
E-mail: [email protected] or
SALES: UK 01992 565333 or
EXPORT: 00 44 (0)1992 565335
CC1020
3503534
05_23632_A0Page 1
Page 2
ATTENTION:
This shelter product is manufactured with quality materials. The frame is designed to t the custom frabic cover included. Shelters
offer storage and protection from damage caused by sun, light rain, tree sap and animal – bird excrement. Please anchor the
canopy carefully following the instructions in the manual. Proper anchoring, keeping the cover tight and free of snow and debris is
the responsibility of the customer. This product is not recommended for severe weather conditions. Please read and understand the
installation detail, warnings and cautions prior to beginning installation.
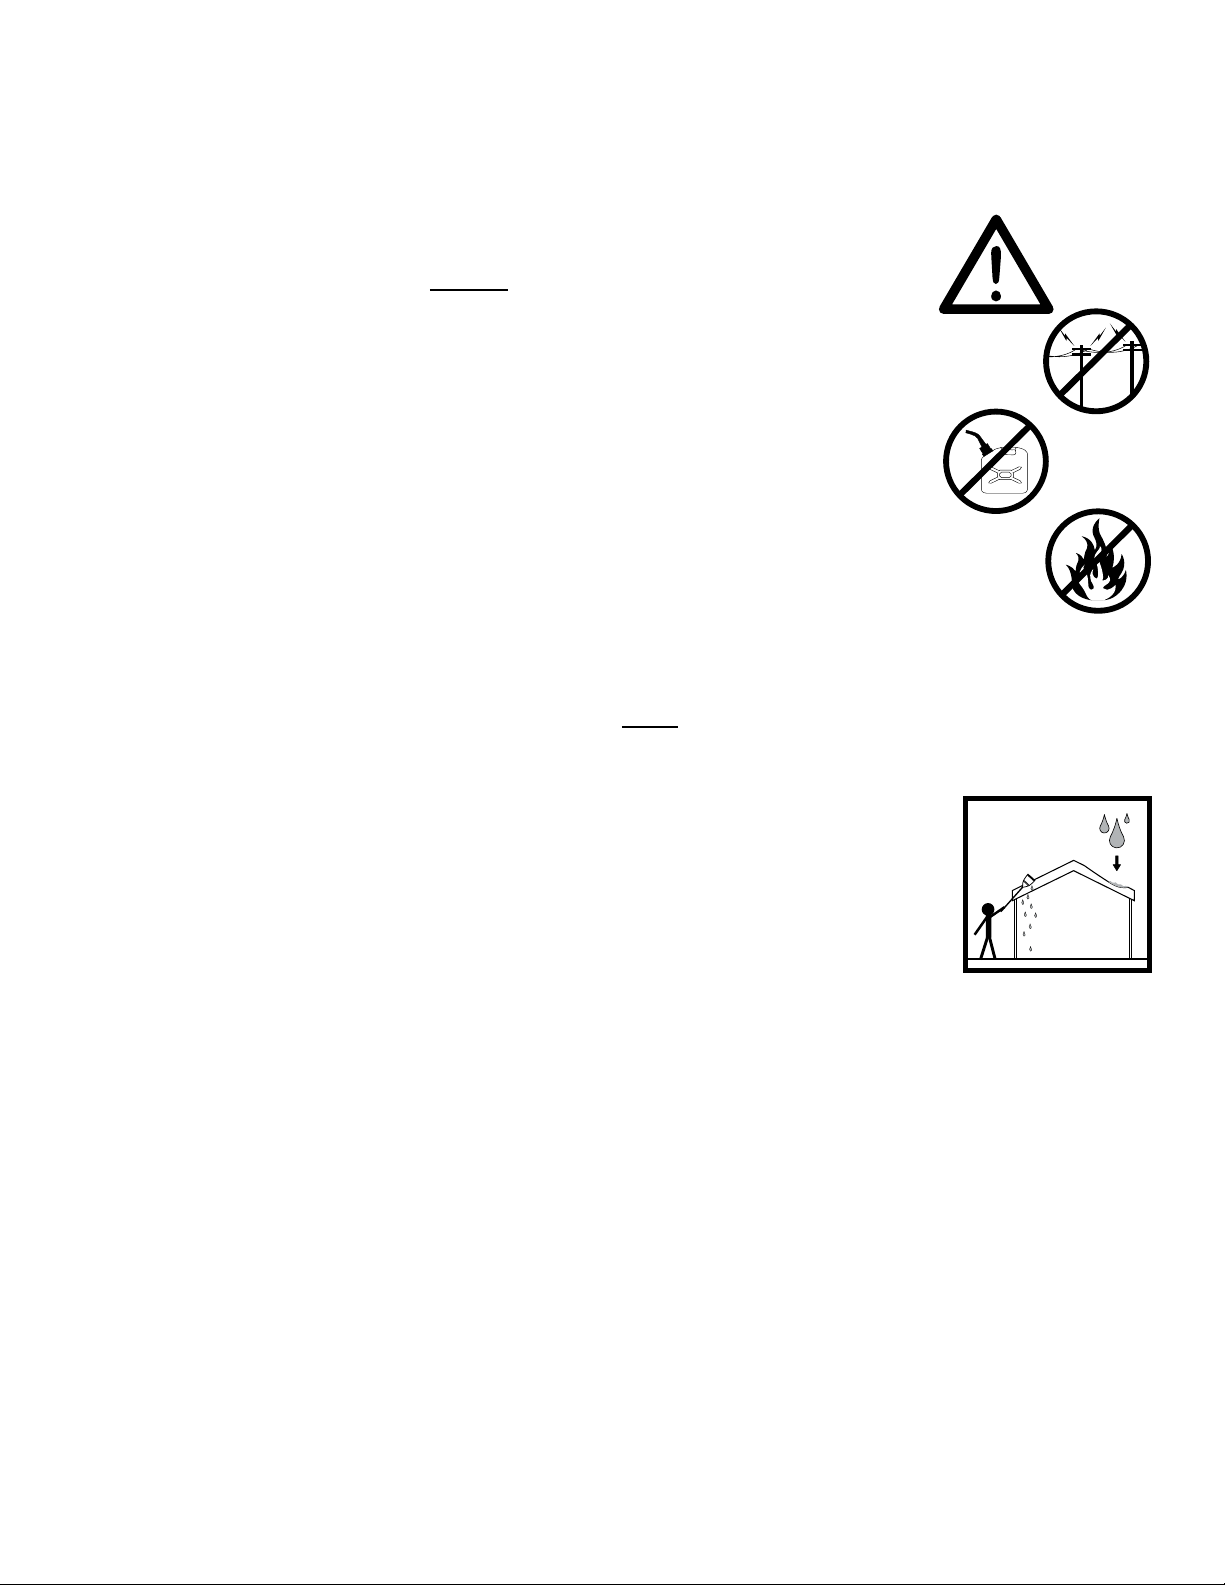
DANGER:
Choose the location of your shelter carefully. DANGER: Keep away from electrical wires. Check for
overhead utility lines, tree branches or other structures. Check for underground pipes or wires before
you dig. DO NOT install near roof lines or other structures that could shed debris onto your shelter.
DO NOT hang objects from the roof or support cables.
WARNING:
Risk of re. DO NOT smoke or use open ame devices (including grills, re pits, deep fryers, smokers or
lanterns) in or around the shelter. DO NOT store ammable liquids (gasoline, kerosene, propane, etc.) in
or around your shelter. Do not expose top or sides of the shelter to open re or other ame source.
CAUTION:
Use CAUTION when erecting the frame.
PROPER ANCHORING AND INSTALLATION OF FRAME:
PROPER ANCHORING OF THE FRAME IS THE RESPONSIBILITY OF THE CONSUMER.
Clarke® International is not responsible for damage to the unit or the contents from acts of nature. Any garage that is not anchored
securely has the potential to y away causing damage. Periodically check the anchors to ensure stability of the garage. Clarke
International cannot be responsible for any shelter that blows away. NOTE: Your shelter’s cover can be quickly removed and stored
prior to severe weather conditions. If strong winds or severe weather is forecast in your area, we recommend removal of cover.
®
CARE AND CLEANING:
A tight cover ensures longer life and performance. Always maintain a tight cover. Loose fabric can accelerate
deterioration of cover fabric. Immediately remove any accumulated debris from the roof structure with a
broom, mop or other soft-sided instrument. Use extreme caution when removing debris from cover- always
remove from outside the structure. DO NOT use hard-edged tools or instruments like rakes or shovels to
remove debris. This could result in punctures to the cover. DO NOT use bleach or harsh abrasive products to
clean the fabric cover. Cover is easily cleaned with mild soap and water.
05_23632_A0Page 2
Page 3
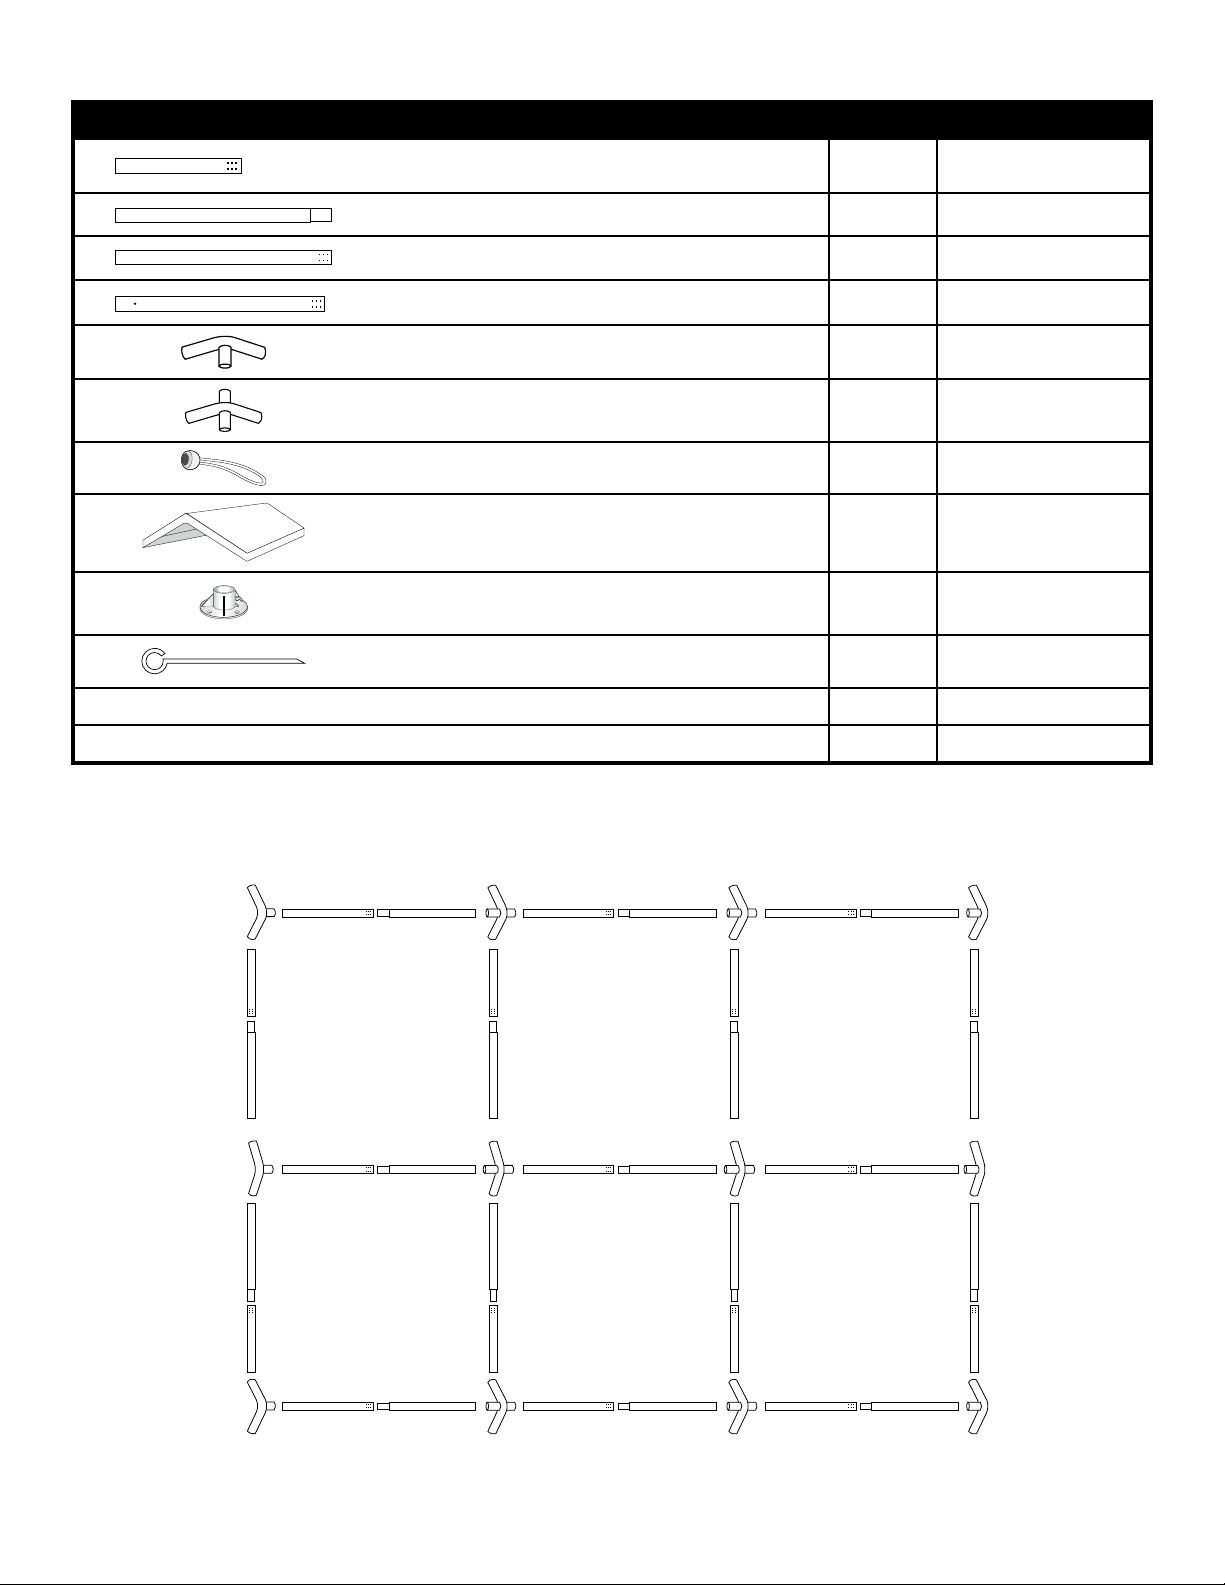
PARTS LIST
Description of Parts:
3
Rafter Poles 24
Cross Rails 40
Cross Rails 39
in. / 61,9 cm
/
8
11
in. / 103,3 cm
/
16
1
in. / 100,3 cm
/
2
Leg Poles 39 in. / 99 cm
3 - Way Frame Connectors
4 - Way Frame Connectors
Bungee Cords
Cover
Base Feet
Temporary Spike Anchors
Quantity Part #
8
25
9
8
6
6
24
1
8
8
CC1020 13104
CC1020 13103
CC1020 13107
CC1020 13105
CC1020 13101
CC1020 13102
CC1020 10066
CC1020 803671
CC1020 802916
CC1020 10431
See Pages 6 - 8
See Pages 9 -11
Enclosure Kit
Extension Kit
1. LAY OUT ROOF FRAME
13101
13107 13107 13107
13104 13104 13104
13103 13103 13103
13101
13107 13107 13107
13103 13103 13103
13103 13103 13103
FRONT
13103 13103 13103
1
1
13102 13101
13102 13101
13102
13104
13103
13102
13103
REAR
13104 13104 13104
13107 13107 13107
13101
13103 13103 13103
13102 13101
13104
13102
05_23632_A0Page 3
Page 4
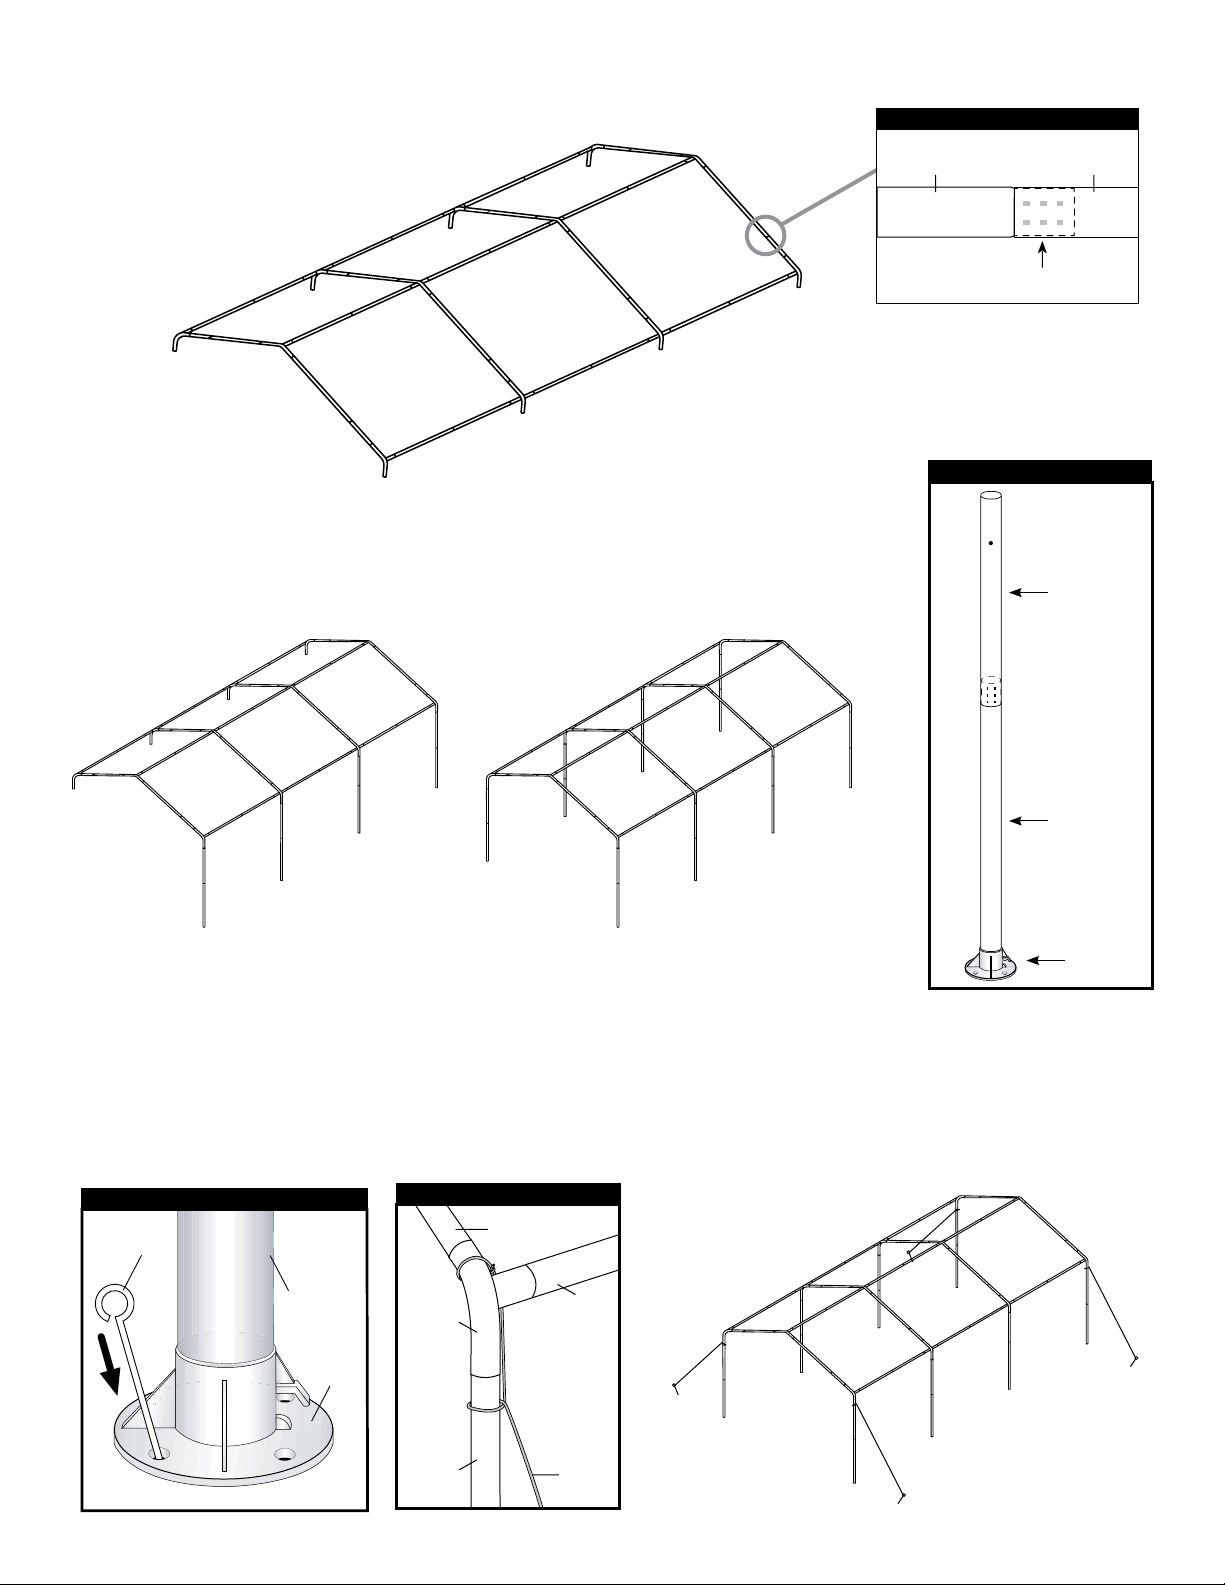
2. ASSEMBLE ROOF FRAME
NOTE: Swedged tubes insert into plain ends at the crimp marks.
Swedged Tubes Connections
3. ASSEMBLE LEGS & ATTACH TO ROOF FRAME
Attach all legs to one side rst. Let the other side of roof frame rest on the ground.
Repeat for opposite side.
13103
Leg Pole Assembly
13104
Crimp Marks
13105
13103
802916
4. ANCHOR THE FRAME
There are four holes on each base foot that the anchor can go into.
A. Select a hole in each base foot. Insert each anchor (10431) into the ground until the round head is touching the
base foot. These anchors prevent the canopy from shifting. Insert one anchor into all four base feet.
This is a temporary spike anchor. Not intended for permanent use.
B. To securely anchor canopy, Accessory Anchoring Kit #10073 is recommended. The 4-anchor pins are inserted
into the ground. Then the ropes are tied from the anchors to the corner tees as shown in B.
Anchoring Base Feet
10431
A
Tie Rope Around Frame Corners
13104
B
13103
13101
802916
13103
13105
rope
05_23632_A0Page 4
Page 5
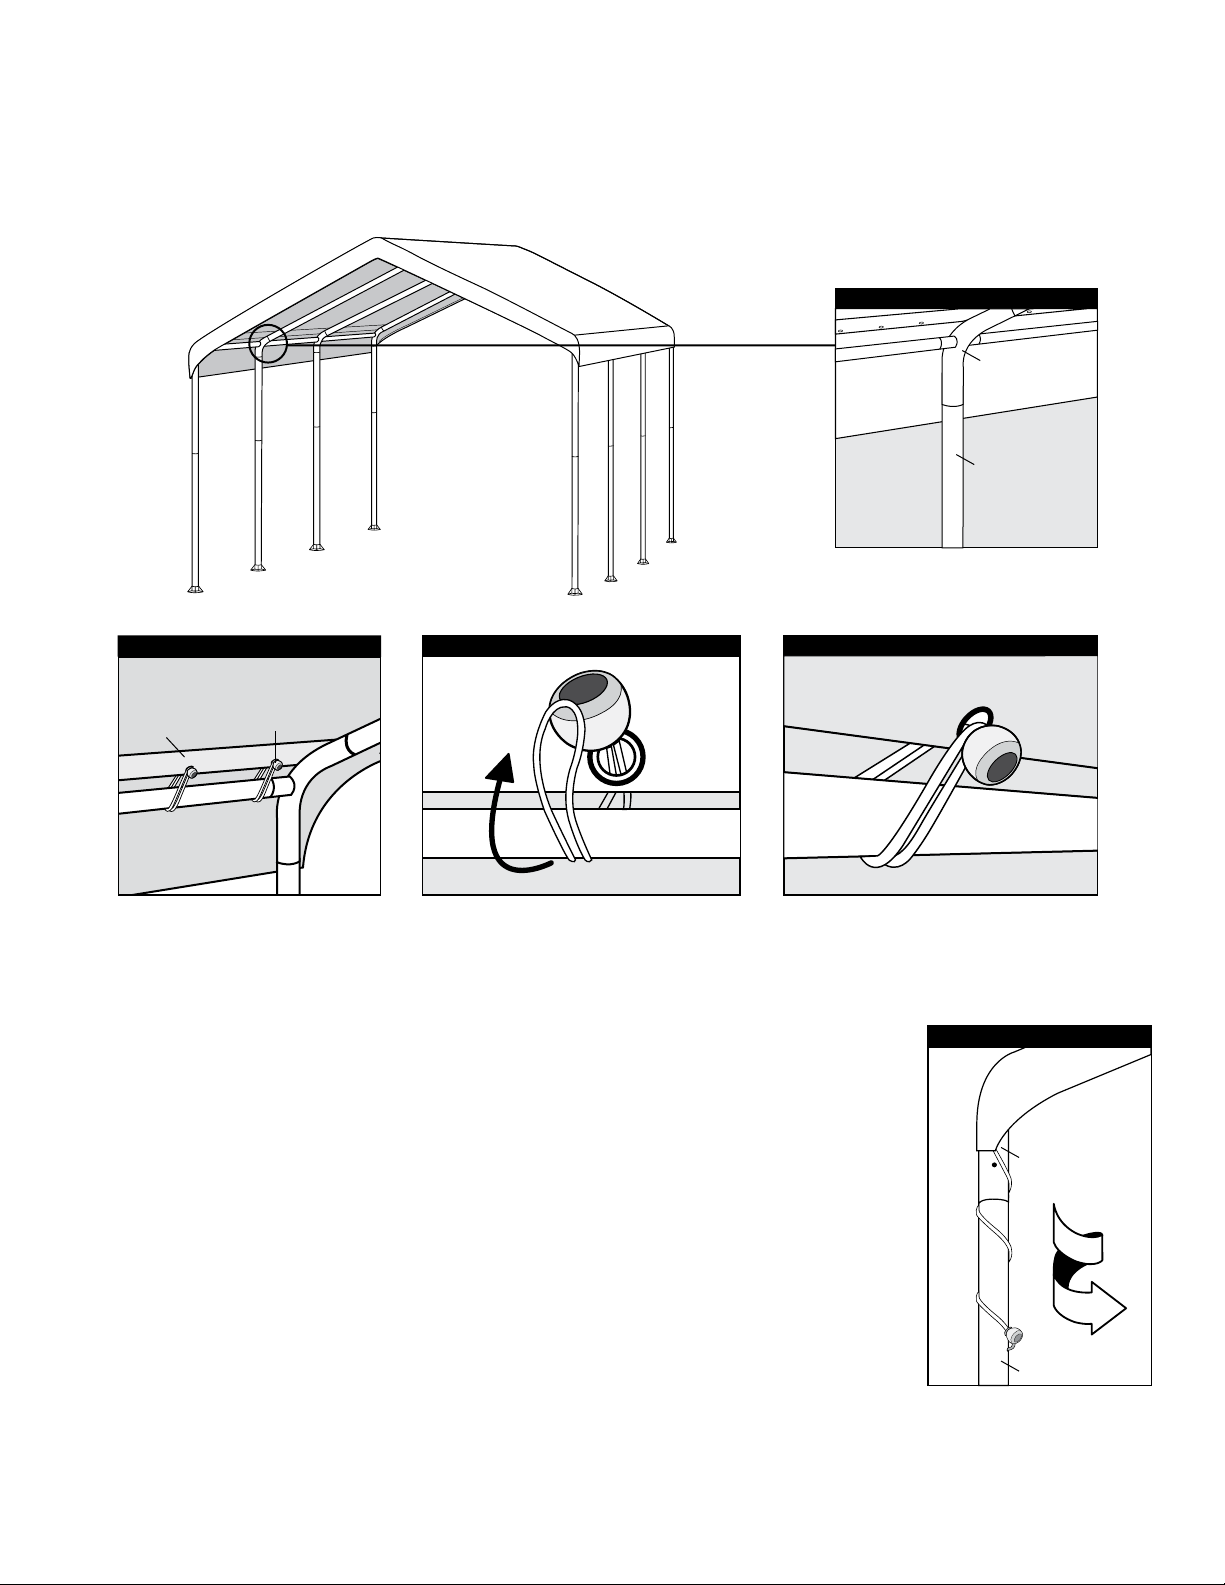
5. PLACE COVER AND SECURE TO CANOPY FRAME
A. Place cover over assembled roof frame with grommet panels facing down, aligned with cross rails.
B. Make sure the cover is properly aligned on the frame, secure the four corners of the cover with bungees
(10066) to the frame rst. Attach remaining bungees.
Re-adjust bungees position along cross pole as needed to ensure a tight and even t of the cover to the frame.
Leg Pole to Side Frame Connections
13102
13105
Grommet Panels for Bungees
Grommet
Panel
10066
6. TIGHTEN THE COVER WITH TWIST TITE
Insert Bungee Cord Through Grommet Secure Bungee Around Plastic Ball
™
A. Wrap the cord with plastic ball and "S" hook at the corners of the cover around the
corner leg poles. Insert "S" hook into the hole of the corner leg poles.
B. Twist each leg pole toward the inside of the shelter until the cover becomes tight
Twist the leg poles equally to ensure the cover stays aligned during tightening.
Twist-Tite™ Tighten Cover
13101
13105
05_23632_A0Page 5
Page 6
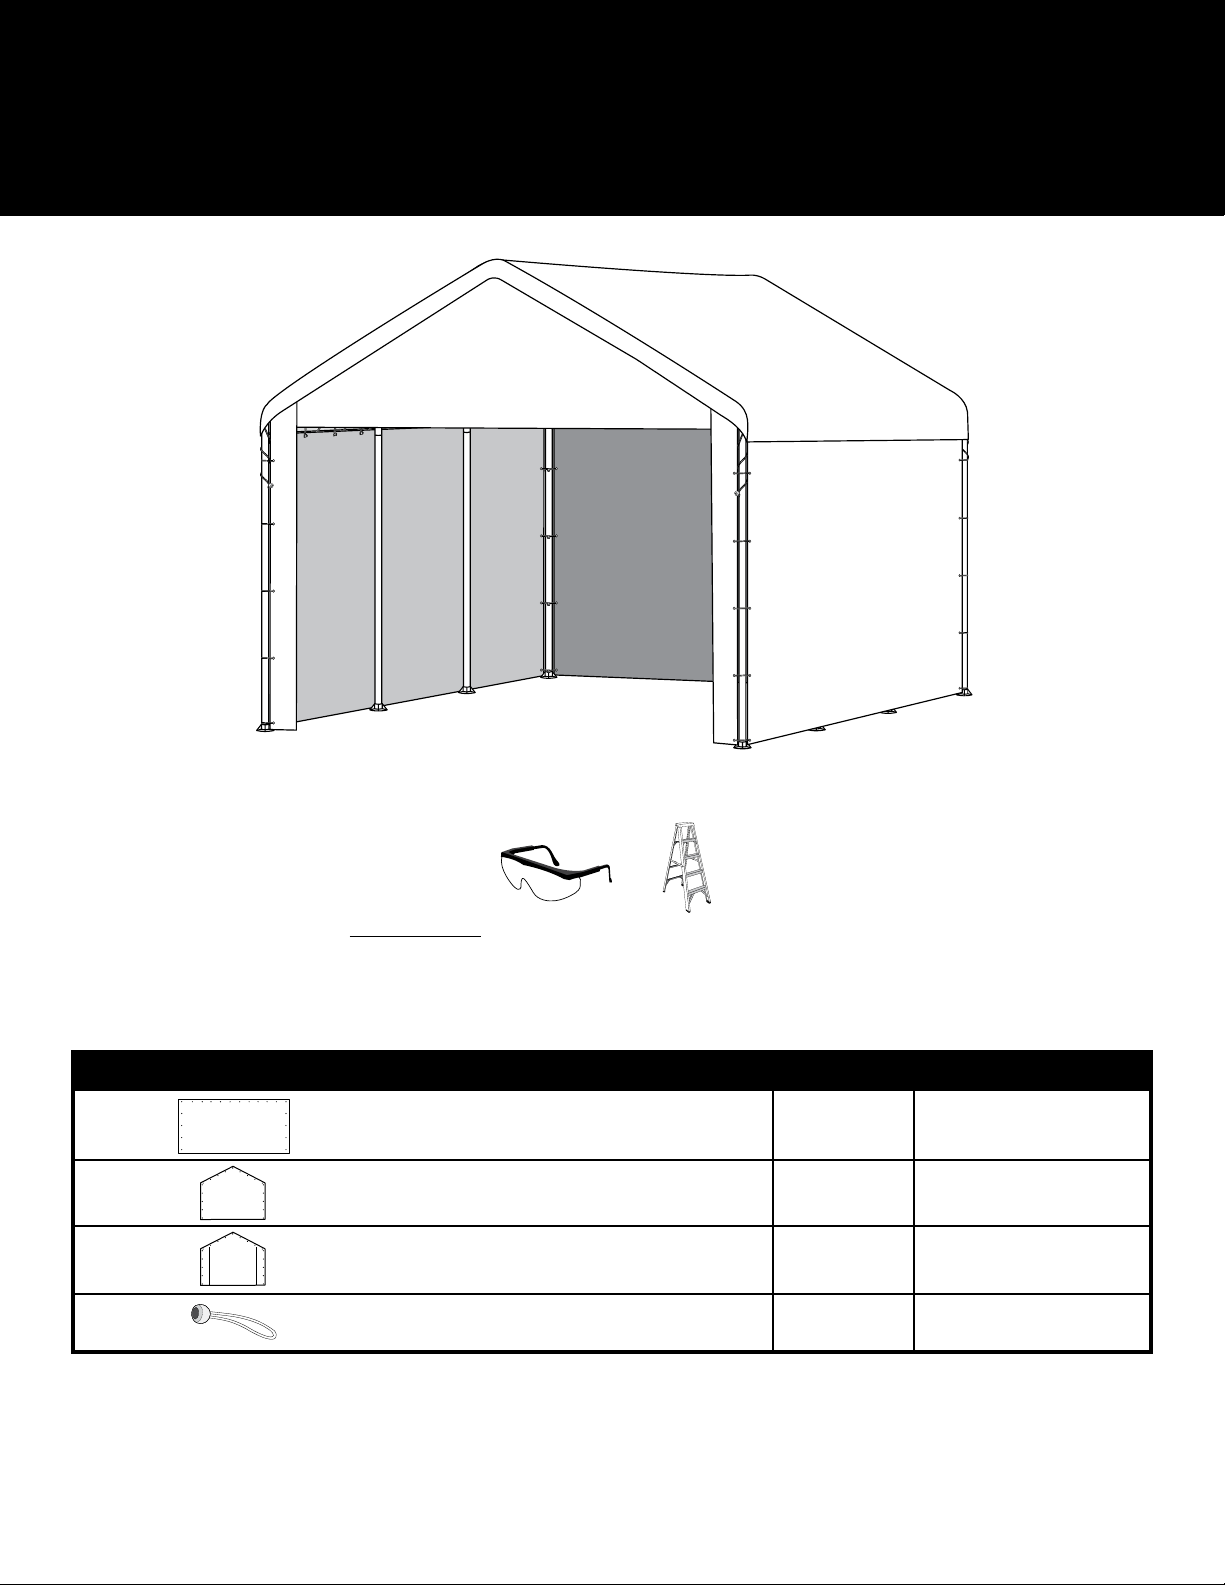
3-in-1 Garden Canopy - Enclosure Kit
3m x 6.1m x 2.7m / 10’ x 20’ x 9’
Assembly Instructions
Description of Parts:
RECOMMENDED TOOLS
Before you start: 2 or more individuals recommended for assembly.
Canopy Enclosure Kit - Parts List
Quantity Part #
Side Walls
Back Panel
Double Zipper Door Panel
Bungee Cords
2
1
1
80 CC1020 10066
CC1020 803672
CC1020 803673
CC1020 803674
05_23632_A0Page 6
Page 7
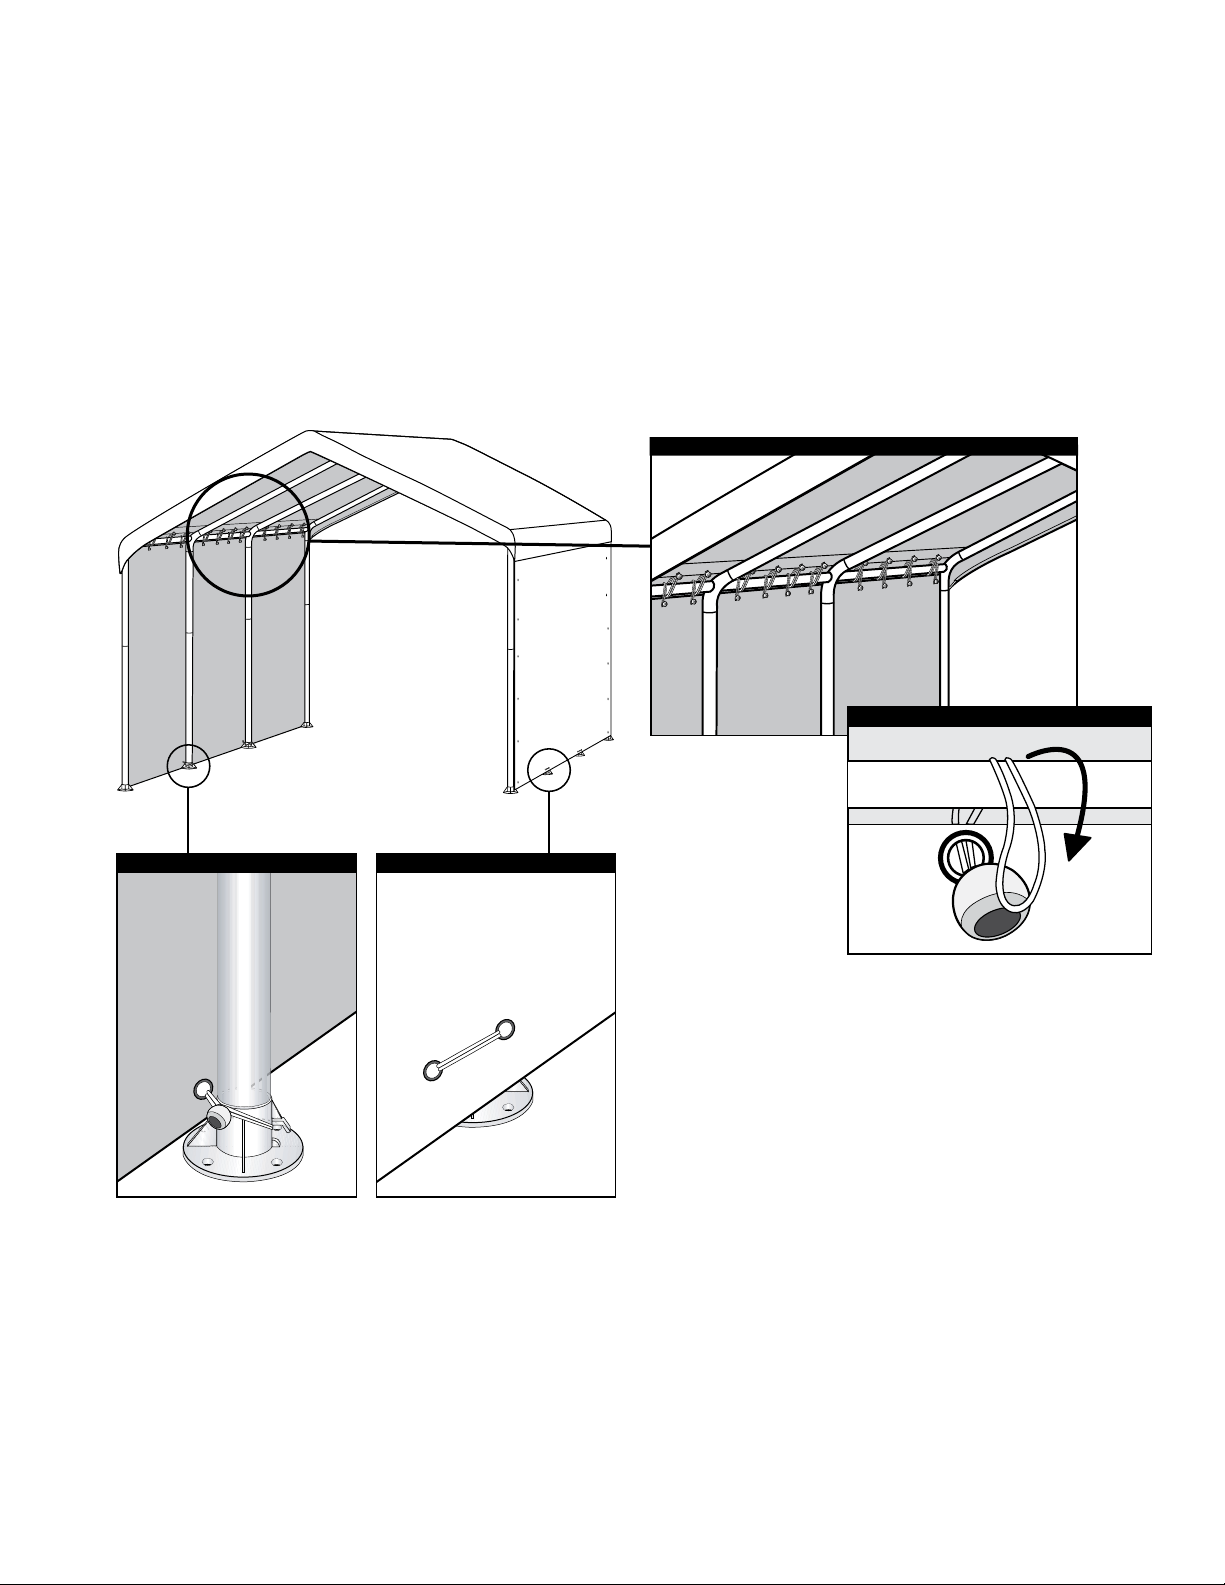
NOTES:
• Canopy Enclosure panels attach to frame with bungee cords.
• Leave Canopy Cover bungees in place when attaching Enclosure panels.
CAUTION: Bungee Cords are under extreme tension. Use Caution when installing. Safety glasses are
recommended to prevent injury.
1. ATTACH SIDE WALLS TO FRAME
A. If tightened at corner leg poles, disengage the TwistTite™ cord and “S” hook from canopy cover and corner
legs. Re-tighten after all Enclosure panels have been secured, as shown in Step 3.
B. Attach the extension panels with bungees to the cross rails at the top rst. Adjust the panels as needed to
ensure a tight and even t before securing to the leg poles.
Interior View Side Wall Panel Setup
Side Wall
Panel
803672
Interior View of Canopy Base Feet
Side Wall
Panel
(Interior)
803672
Insert Bungee Cord Through Grommet
Exterior View of Canopy Base Feet
Side Wall
Panel
(Exterior)
803672
05_23632_A0Page 7
Page 8
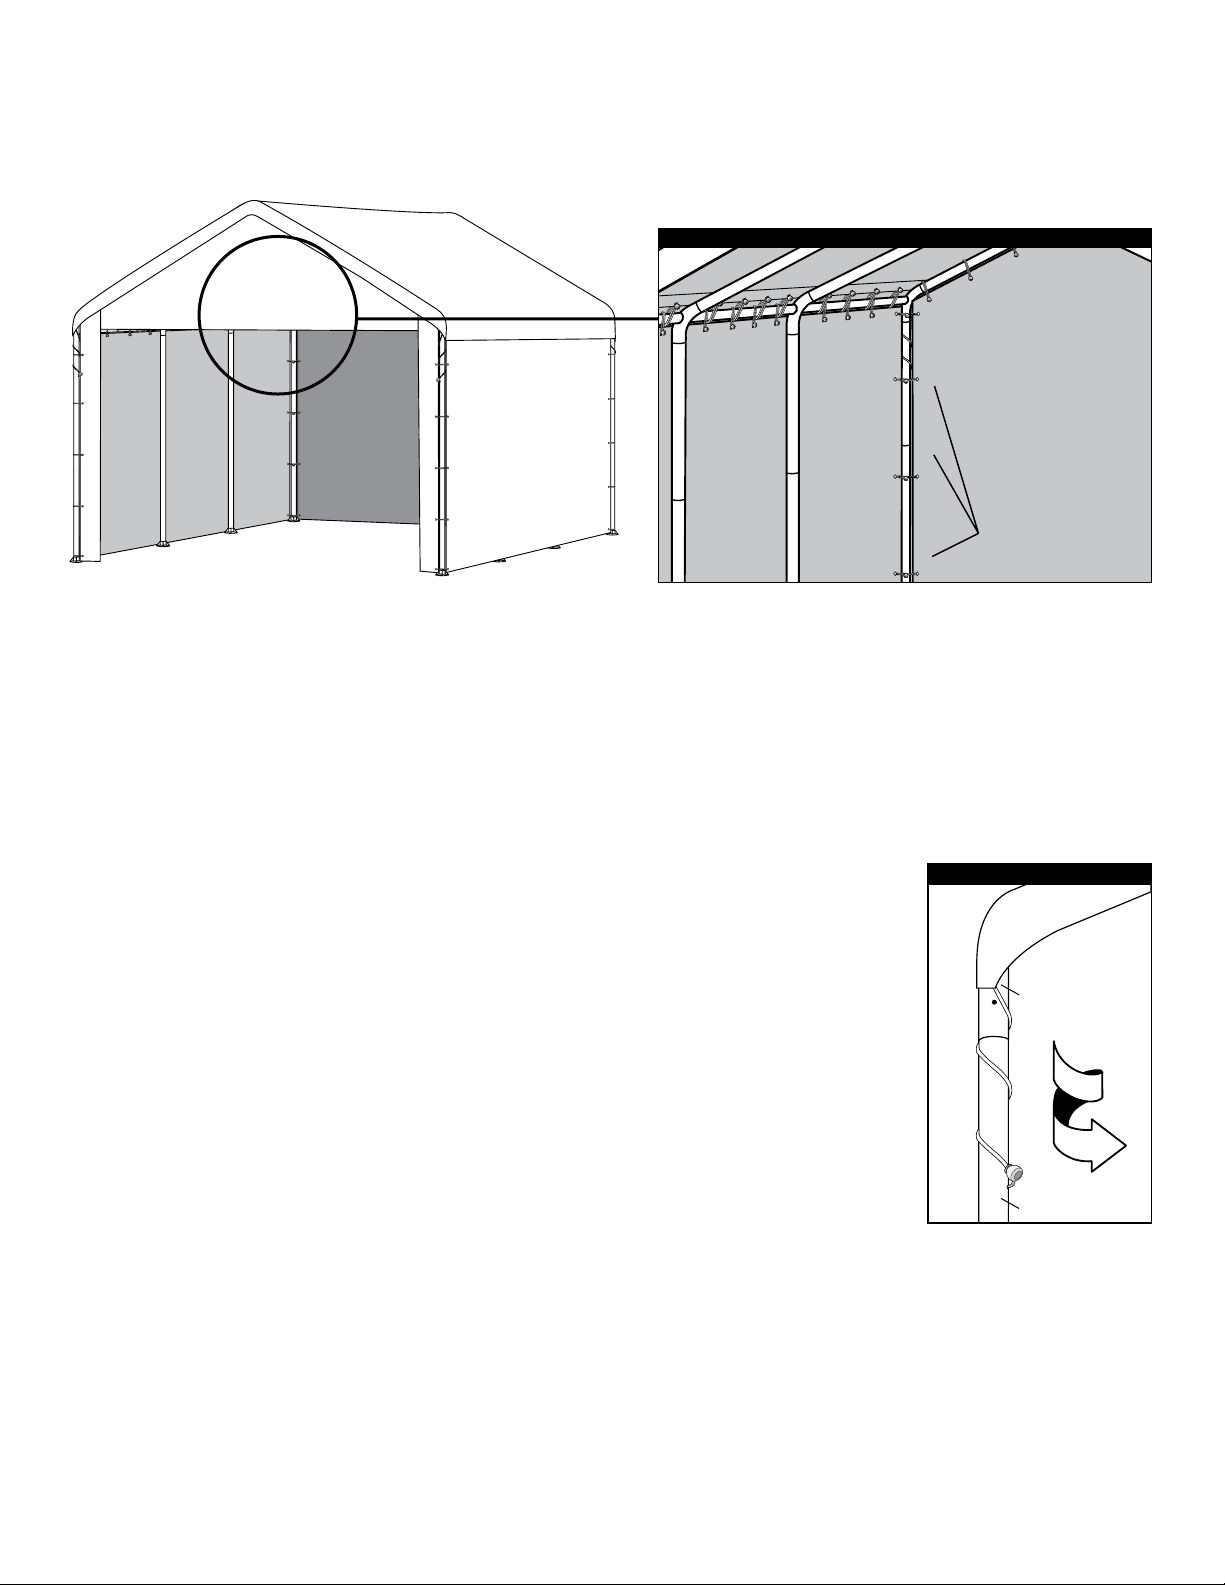
2. ATTACH ENCLOSURE END AND ZIPPER DOOR PANELS
When securing enclosure panels to corner legs, note that each bungee is shared with the neighboring panel.
NOTE: Door panels zippers must be closed when securing door panel.
Interior / Rear View of Canopy Enclosure Panels
Back Panel
803673
Side Wall
Panel
803672
One bungee for
both panels.
3. TIGHTEN THE COVER WITH TWIST TITE
™
A. Wrap the cord with plastic ball and "S" hook at the corners of the cover around the
corner leg poles. Insert "S" hook into the hole of the corner leg poles.
B. Twist each leg pole toward the inside of the shelter until the cover becomes tight
Twist the leg poles equally to ensure the cover stays aligned during tightening.
Twist-Tite™ Tighten Cover
13101
13105
05_23632_A0Page 8
Page 9
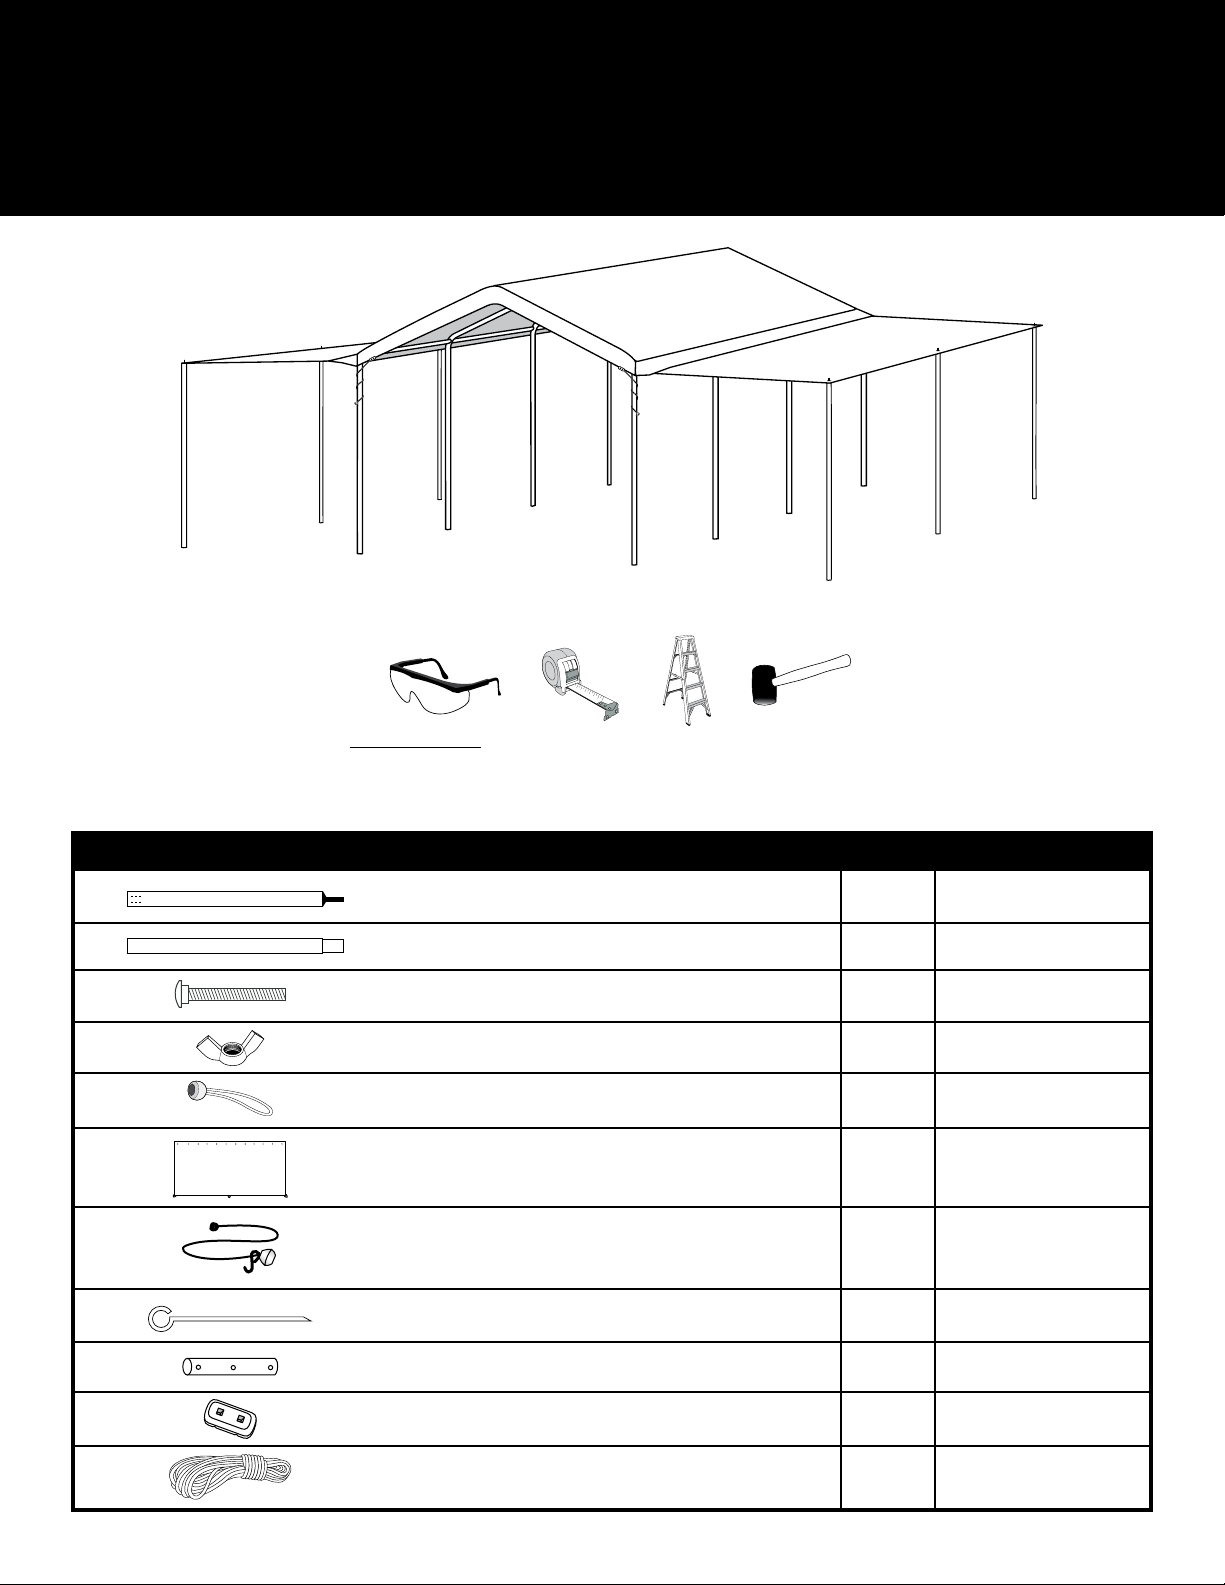
3-in-1 Garden Canopy - Extension Kit
7.3m x 6.1m x 2.8m / 24’ x 20’ x 9’
Assembly Instructions
RECOMMENDED TOOLS
Description of Parts:
Before you start: 2 or more individuals recommended for assembly.
Canopy Extension Kit - Parts List
Quantity Part #
2
in.
1
in. / 97,8 cm
/
2
3
in. / 102,1 cm
16
/
Tent Poles, top 38
Tent Poles, bottom 40
1
Bolts
Wing Nut
Bungee Cords
Extension Panel
Tetherball
“S” Hook
Ropes 3'
Temporary Spike Anchors
/
4
x 1
1
/
6
6
8
8
50
2
4
4
4
6
CC1020 10458
CC1020 10459
CC1020 03025
CC1020 07000
CC1020 10066
CC1020 803672
CC1020 10465
CC1020 10464
CC1020 10463
CC1020 10447
Rope Toggle
Clamp
6
8
6Guy Ropes 11'
CC1020 10436
CC1020 10462
CC1020 10437
05_23632_A0Page 9
Page 10
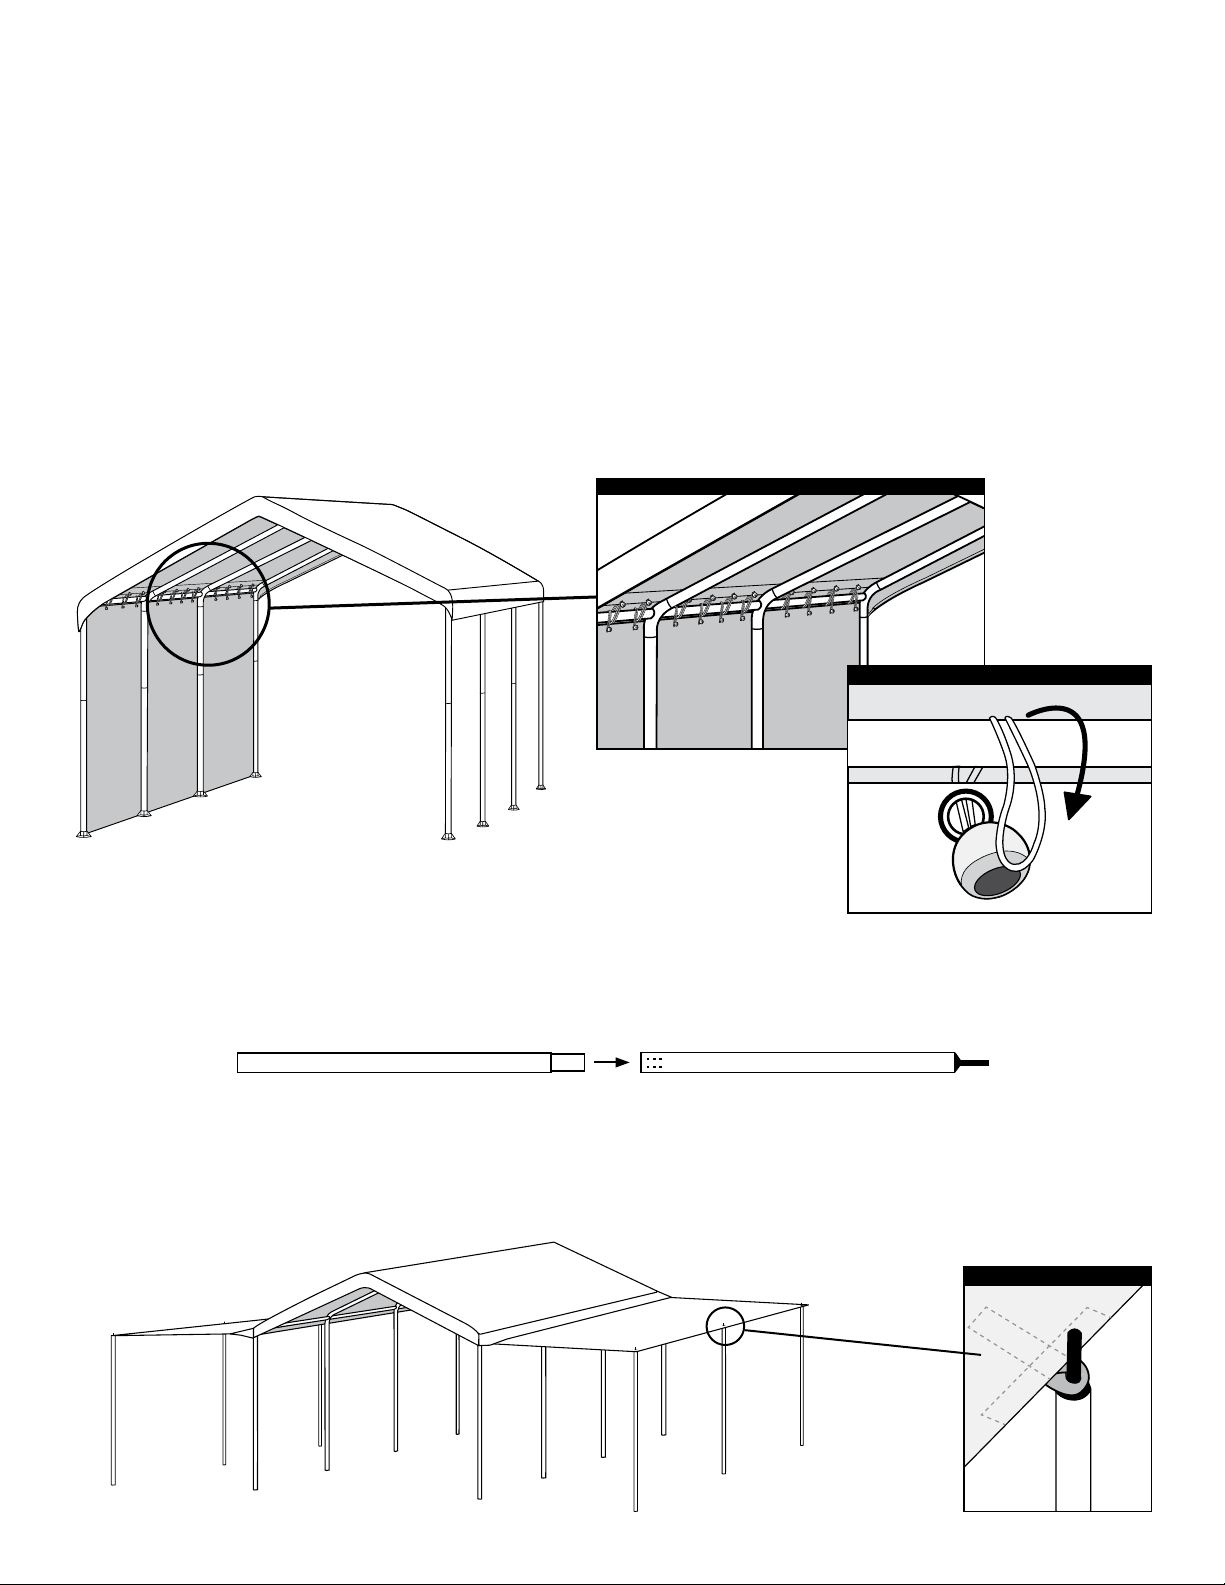
NOTES:
• Canopy extension panels attach to frame cross rails with bungee cords.
• Leave Canopy Cover bungees in place when attaching extension panels.
• Extension panels will not allow the canopy cover TwistTite™ mechanism to properly tighten the cover
when extended. An alternate TwistTite™ Clamp system is included with this kit and shown in Step 5.
1. ATTACH SIDE WALLS TO FRAME
A. If tightened at corner leg poles, disengage the TwistTite™ cord and “S” hook from canopy cover and corner
™
legs. Wrap up TwistTite
cord and secure inside the shelter with one of the cover panel bungee cords.
B. Attach the extension panels with bungees to the cross rails at the top rst. Adjust the panels as needed to
ensure a tight and even t before extending panel and securing to the tent poles.
CAUTION: Bungee Cords are under extreme tension. Use Caution when installing. Safety glasses are
recommended to prevent injury.
Interior View Extension Panel Setup
Extension
Panel
803672
Insert Bungee Cord Through Grommet
2. ASSEMBLE EXTENSION PANEL TENT POLES
1045810459
3. RAISE EXTENSION PANELS AND ATTACH TENT POLES
Top of Extension Pole
05_23632_A0Page 10
Page 11
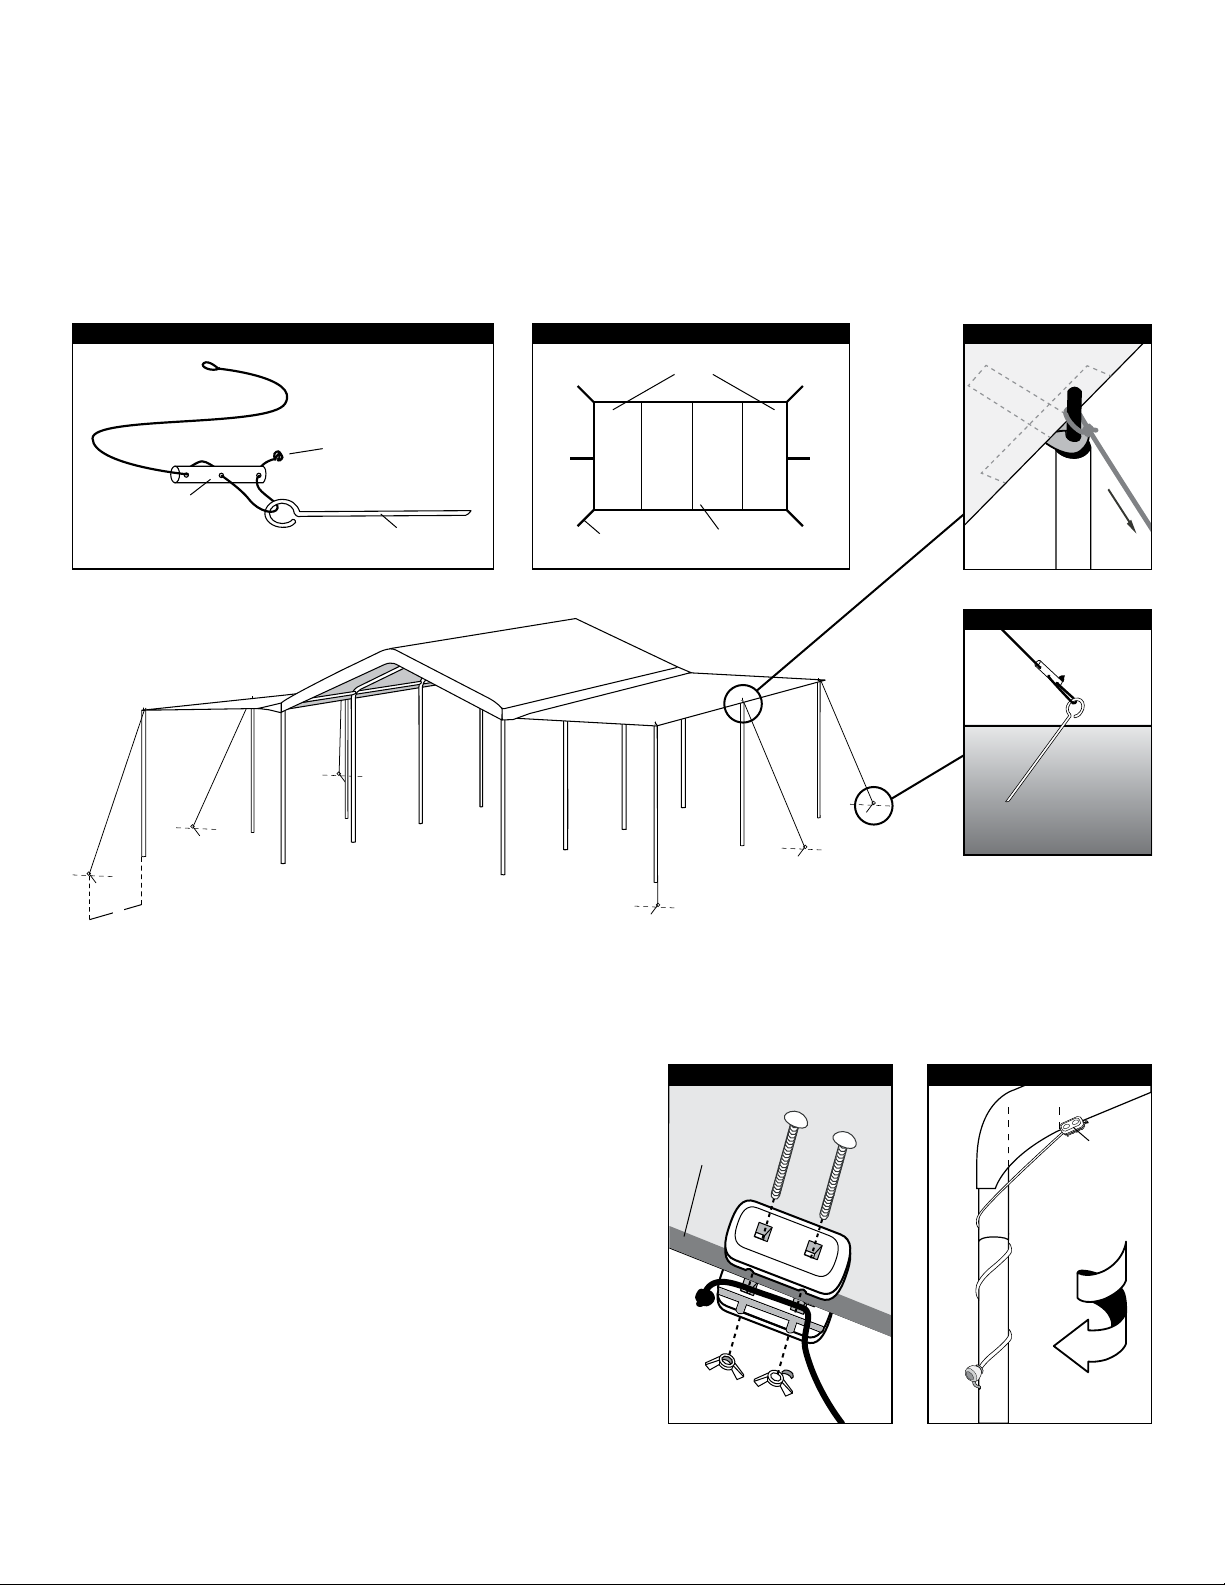
4. ANCHORING AND ROPE TOGGLES
A. Thread the Guy Ropes 10437 through the Rope Toggle 10436 as shown below. Tie a knot at the end of
the rope to keep it from sliding out of the rope toggle.
B. Make a loop knot at the other end of the rope and place it over the tab the the top of the tent pole.
C. Place the anchor securely in the ground about 3' from each tent pole.
D. Tighten anchor rope with rope toggle.
This is a temporary spike anchor. Not intended for permanent use.
Thread Guy Rope Through Rope Toggle
10436
3'
Knot
10447
Top View Anchor Ropes Setup
803672
Ropes &
Anchors
Canopy
Top of Tent Pole
Spike Anchor
5. TIGHTEN THE COVER WITH CLAMP TWIST TITE
A. Mount the clamp and new TwistTite™ cable so it
holds onto the rope that is still threaded through
the canopy cover edges.
B. The clamp should be mounted approximately
6" to 10" up from the corners.
C. Wrap the cord with plastic ball and "S" hook at
the corners of the cover around the corner leg
poles. Insert "S" hook into the hole of the corner
leg poles.
D. Twist each leg pole toward the outside of the
shelter until the cover becomes tight.
Twist the leg poles equally to ensure the cover stays
aligned during tightening.
Rope threaded
through edge
of canopy cover
™
Attach Clamp
Clamp Twist-Tite
6" - 10"
05_23632_A0Page 11
™
10462
Page 12
OTHER QUALITY LEISURE & GARDENING
PRODUCTS AVAILABLE FROM
LOGBUSTERS
BANQUETING TABLES
POP-UP CANOPIES
INSTANT SHEDS & GARAGES
PORTABLE GENERATORS
GARDEN TROLLEYS
LED HEADLIGHTS / FLASHLIGHTS
HOT & COLD POWER WASHERS
TARPAULINS • INSECT KILLERS
CAR COVERS • INVERTERS
JUMP STARTS
FOOT PUMPS
FANS • LADDERS
AND MUCH MORE!
PARTS & SERVICE: 0208 988 7400
E-mail: [email protected] or [email protected]
SALES: UK 01992 565333 or EXPORT: 00 44 (0)1992 565335
Hemnall Street, Epping, Essex CM16 4LG
www.clarkeinternational.com
 Loading...