

Page 1
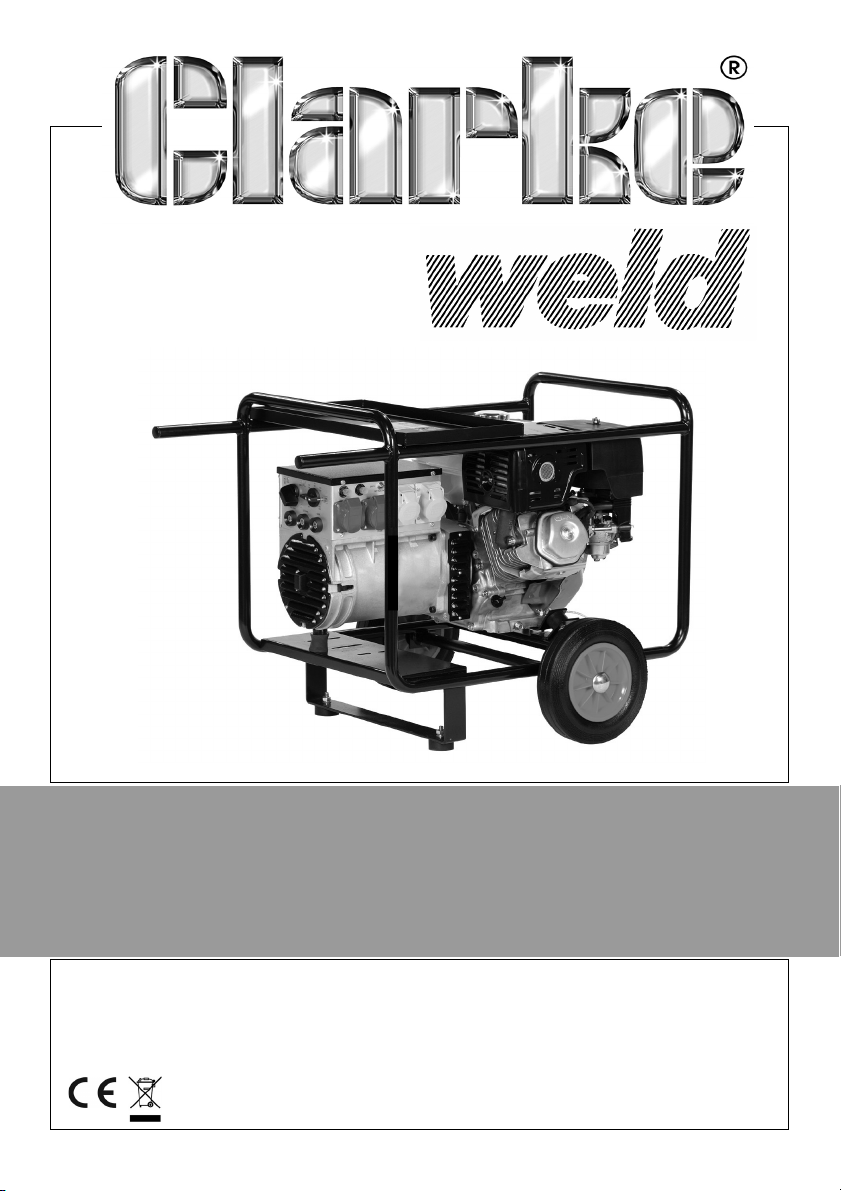
WELDER GENERATOR
MODEL NO: WH215
PART NO: 8130535
OPERATION & MAINTENANCE
INSTRUCTIONS
ORIGINAL INSTRUCTIONS GC0320
Page 2

INTRODUCTION
Thank you for purchasing this CLARKE Welder Generator designed to provide
single phase electrical power for power or arc welding. No other appliance
other than those indicated should be used with this machine.
Please read through this document and the instruction manuals for the engine
and alternator thoroughly before operating the machine. In doing so you will
ensure the safety of yourself and that of others around you. This will also ensure
that the welder generator will give you long and satisfactory service.
It is important that all accompanying instructions are observed. Clarke
International does not accept responsibility for any injury or damage caused
through improper use.
Please keep these instructions in a safe place for future reference.
GUARANTEE
This CLARKE product is guaranteed against faulty manufacture for a period of
12 months from the date of purchase. Please keep your receipt as proof of
purchase.
This guarantee is invalid if the product is found to have been abused or
tampered with in any way, or not used for the purpose for which it was
intended.
Faulty goods should be returned to their place of purchase, no product can
be returned to us without prior permission. This guarantee does not effect your
statutory rights.
ENVIRONMENTAL RECYCLING POLICY
By purchasing this product, the customer is taking on the
obligation to deal with its safe disposal in accordance with the
Waste Electrical and Electronic Equipment (WEEE).
In effect, this means that this product must not be disposed of with
general household waste. It must be disposed of according to the
laws governing at a recognised disposal facility.
Please note that the details and specifications contained herein, are correct
at the time of going to print. However, CLARKE International reserve the right
to change specifications at any time without prior notice. ALWAYS CONSULT
THE MACHINE’S DATA PLATE.
2
Parts & Service: 020 8988 7400 / E-mail: [email protected] or [email protected]
Page 3

GENERAL SAFETY PRECAUTIONS FOR ALL TYPES OF WELDING
WARNING: AS WITH ALL MACHINERY, THERE ARE CERTAIN HAZARDS
INVOLVED WITH THEIR OPERATION AND USE. EXERCISING RESPECT AND
CAUTION WILL CONSIDERABLY LESSEN THE RISK OF PERSONAL INJURY.
HOWEVER, IF NORMAL SAFETY PRECAUTIONS ARE OVERLOOKED, OR
IGNORED, PERSONAL INJURY TO THE OPERATOR MAY RESULT.
FAILURE TO FOLLOW THESE RULES MAY RESULT IN SERIOUS PERSONAL INJURY
GENERAL PRECAUTIONS
A) BURN PREVENTION
Wear protective clothing - gauntlet gloves designed for use in welding, apron,
and protective shoes. Button any shirt collar and pocket flaps, and wear
cuffless trousers to avoid entry of sparks and slag. Wear a helmet with safety
goggles or glasses with side shields underneath, appropriate filter lenses or
plates (protected by clear glass). This is a MUST for welding (and chipping) to
protect the eyes from radiant energy and spatter. Replace cover glass when
broken, pitted, or spattered. Avoid oily greasy clothing. A spark may ignite
them. Hot metal should never be handled without gloves. First aid facilities and
a qualified first-aid person should be available unless medical facilities are
close by, for immediate treatment of flash burns of the eyes and skin burns. Ear
plugs should be worn when working overhead or in a confined space. A hard
hat should be worn when others are working overhead. Flammable hair
preparations should not be used by persons intending to weld or cut.
NOTE: ALL protective wear including masks & head shields MUST comply
with PPE Directive 89/686/EEC
B) TOXIC FUME PREVENTION
Severe discomfort, illness or death can result from fumes, vapours, heat, or
oxygen enrichment or depletion that welding (or cutting) may produce.
Prevent them with adequate ventilation. NEVER ventilate with oxygen. Lead-,
cadmium-, zinc-, mercury- and beryllium-bearing materials, when welded (or
cut) may produce harmful concentrations of toxic fumes. Adequate local
exhaust ventilation must be used, or each person in the area as well as the
operator must wear an air-supplied respirator. For beryllium, both must be
used. Metals coated with or containing materials that emit toxic fumes should
not be heated unless any coating is removed from the work surface, the area
is well ventilated, or the operator wears an air-supplied respirator. Only work in
a confined space when it is being force ventilated and, if necessary, while
wearing an air-supplied respirator. Vapours from chlorinated solvents can be
decomposed by the heat of the arc (or flame) to form PHOSGENE, a highly
toxic gas, and other lung and eye irritating products. The ultraviolet (radiant)
3
Parts & Service: 020 8988 7400 / E-mail: [email protected] or [email protected]
Page 4

energy of the arc can also decompose trichloroethylene and
perchloroethylene vapours to form phosgene. DO NOT WELD or cut where
solvent vapours can be drawn into the welding or cutting atmosphere or
where the radiant energy can penetrate to atmospheres containing even
minute amounts of trichloroethylene or perchloroethylene.
C) FIRE AND EXPLOSION PREVENTION
Causes of fire and explosion are:
1. Combustibles reached by the arc, flame, flying sparks, hot slag or heated
material;
2. misuse of compressed gases and cylinders
3. short circuits.
BE AWARE that flying sparks or falling slag can pass through cracks, along
pipes, through windows or doors, and through wall or floor openings, out of
sight of the goggle wearing operator.
To prevent fires and explosion: keep equipment clean and operable, free of
oil, grease, and (in electrical parts) of metallic particles that can cause short
circuits. If combustibles are in the area, do NOT weld. Move the work if
practicable, to an area, free of combustibles.
Avoid working in paint spray rooms, dip tanks, storage areas, ventilators. If the
work cannot be moved, move any combustibles away from sparks and heat
or protect against ignition with suitable fire- resistant covers or shields.
Walls, ceilings and floors near the work should be protected by heat resistant
covers or shields. A ‘fire watcher’ must be standing by, with suitable fire
extinguishing equipment during, and for some time after welding or cutting if:
1. appreciable combustibles are within 10m.
2. appreciable combustibles are further than 10m but can be ignited by
sparks.
3. openings (concealed or visible) in floors or walls can expose combustibles
to sparks.
4. combustibles adjacent to walls, ceilings, roofs or metal partitions can be
ignited by radiant or conducted heat.
After work, check that area is free of sparks, glowing embers and flames. An
empty container that held combustibles or that can produce flammable or
toxic vapours when heated, must never be welded on or cut, unless the
container has first been cleaned. This includes a thorough steam or caustic
cleaning (or a solvent or water washing, depending on the combustible’s
solubility) followed by purging and inerting with nitrogen or carbon dioxide,
and using protective equipment.
Water filling just below the working level may substitute for inerting.
4
Parts & Service: 020 8988 7400 / E-mail: [email protected] or [email protected]
Page 5

A container with unknown contents should be cleaned (see paragraph
above). Do NOT depend on sense of smell or sight to determine if it is safe to
weld or cut. Hollow castings or containers must be vented before welding or
cutting - they can explode.
In explosive atmospheres, never weld or cut where the air may contain
flammable dust, gas, or liquid vapours.
ELECTRIC ARC WELDING
Comply with the precautions above and this section. Arc welding, properly
done, is a safe process, but a careless operator invites trouble. The equipment
carries high currents at significant voltages. The arc is very bright and hot.
Sparks fly, fumes rise, ultraviolet and infrared energy radiates and work pieces
are hot. The wise operator avoids unnecessary risks and protects himself and
others from accidents.
A) BURN PROTECTION
The welding arc is intense and visibly bright. It’s radiation can damage eyes,
penetrate lightweight clothing, reflect from light coloured surfaces and burn
the skin and eyes. Skin burns resemble acute sunburn, those from gas shielded arcs are more severe and painful.
DON’T GET BURNED! FOLLOW ALL SAFETY PRECAUTIONS!
PROTECTIVE CLOTHING
Wear long sleeved clothing (particularly for gas shielded arc) in addition to
gloves, apron and strong shoes. As necessary, use additional protective
clothing such as leather jacket or sleeves, flameproof apron and fire-resistant
leggings. Avoid outer garments of untreated cotton. For bare skin protection
wear dark substantial clothing Keep collars closed to protect the chest and
neck and button any pockets to prevent entry of sparks.
EYE AND HEAD PROTECTION
Protect your eyes from exposure to arc. NEVER look at an electric arc without
a welding helmet or shield containing an appropriate filter plate (Please refer
to the section ‘Welding Shield). Always place over the face before striking an
arc. Protect the filter plate with a clear cover plate. Any cracked or broken
helmet or shield should NOT be worn; radiation can pass through to cause
burns.
Cracked, broken, or loose filter plates must be replaced IMMEDIATELY.
Replace the clear cover plate when broken, pitted, or spattered. WE SUGGEST
you wear flash goggles with side shields under the helmet, to give some
protection to the eyes should the helmet not be lowered over the face before
an arc is struck. Looking at an arc momentarily with unprotected eyes
(particularly high intensity gas-shielded arc) can cause a retinal burn that may
5
Parts & Service: 020 8988 7400 / E-mail: [email protected] or [email protected]
Page 6

leave a permanent dark area in the field of vision. Before welding whilst
wearing contact lenses, seek advice from your optician.
PROTECTION OF NEARBY PERSONNEL
For production welding, a separate, well vented room or enclosed bay is best.
In open areas, surround the operation with low reflection, non- combustible
screens or panels. Allow for free air circulation, particularly at floor level.
Provide face shields for all persons who will be looking directly at the weld.
Others working in the area should wear flash goggles. Before starting to weld,
make sure that screen or bay doors are closed.
B) TOXIC FUME PREVENTION
Comply with all precautions in 1B.
C) FIRE AND EXPLOSION PREVENTION
Do not overload arc welding equipment. It may overheat cables and cause a
fire. Loose cable connections may overheat or flash and cause a fire. Never
strike an arc on a cylinder or other pressure vessel. It creates a brittle area that
can cause a violent rupture or lead to such a rupture later under rough
handling.
D) SHOCK PREVENTION
Exposed live conductors or other bare metal in the welding circuit, or in
unearthed, electrically-LIVE equipment can fatally shock a person whose
body becomes a conductor. DO NOT STAND, SIT, LIE, LEAN ON, OR TOUCH a
wet surface when welding, without suitable protection.
E) PROTECTION FOR WEARERS OF ELECTRONIC LIFE SUPPORT
DEVICES (PACEMAKERS)
Magnetic fields from high currents can affect pacemaker operation. Persons
wearing pacemakers should consult with their doctor before going near arc
welding or spot welding operations.
F) PROTECTION AGAINST SHOCK
Keep your body and clothing dry. Never work in a damp area without
adequate insulation against electric shock. Stay on a dry duckboard or rubber
mat when dampness or sweat can not be avoided. Sweat, sea water, or
moisture between your body and an electrically LIVE part - or earthed metal reduces the body surface electrical resistance, enabling dangerous and
possibly lethal currents to flow through the body.
1) EARTHING THE EQUIPMENT
When arc welding equipment is earthed according to the National Electrical
Code and the workpiece is earthed, a voltage may exist between the
electrode and any conducting object.
6
Parts & Service: 020 8988 7400 / E-mail: [email protected] or [email protected]
Page 7

Examples of conducting objects include, but are not limited to, buildings,
electrical tools, work benches, welding power source cases, workpieces, etc.
Never touch the electrode and any metal object unless the welding power
source is off. When installing, connect the frames of each unit such as the
welding power source, control, work table and water circulator to the building
earth. Conductors must be adequate to carry earth currents safely.
Equipment made electrically LIVE by stray current may shock, possibly fatally.
Do not EARTH to electrical conduit, or to a pipe carrying ANY gas or a
flammable liquid such as oil or fuel.
2) TORCH
A fully insulated torch should be used without protruding screws or other
damage.
3) CONNECTORS
Fully insulated lock-type connectors should be used to join welding cable.
4) CABLES
Frequently inspect cables for wear, cracks and damage. IMMEDIATELY
REPLACE those with excessively worn or damaged insulation to avoid possibly
lethal shock from bare cable. Cables with damaged areas may be taped to
give resistance equivalent to original cable. Keep the cable dry, free of oil
and grease and protected from hot metal and sparks.
5) TERMINALS AND OTHER EXPOSED PARTS
Terminals and other exposed parts of electrical units should have insulating
covers secured before operation.
6) ELECTRODE
a) Equipment with output on/off control (contactor)
Welding power sources for use with the gas metal arc welding, gas tungsten
arc welding and similar processes normally are equipped with devices hat
permit on/off control of the welding power output. When so equipped the
electrode wire becomes electrically LIVE when the power source switch is ON
and welding gun switch is closed. Never touch the electrode wire or any
conducting object in contact with the electrode circuit unless the welding
power source is off.
b) Equipment without output on/off control (no contactor)
Welding power sources used with shielded metal arc welding and similar
processes may not be equipped with welding power output on/off control
devices. With such equipment the electrode is electrically LIVE when the
power switch is turned ON. Never touch the electrode unless the welding
power source is off.
7
Parts & Service: 020 8988 7400 / E-mail: [email protected] or [email protected]
Page 8

7) SAFETY DEVICES
Safety devices such as interlocks and circuit breakers should not be
disconnected or shunted out. Before installation, inspection, or service of
equipment, shut OFF all power and remove line fuses (or lock or red-tag
switches) to prevent accidental turning ON of power. Do not open power
circuit or change polarity while welding. If, in an emergency, it must be
disconnected, guard against shock burns or flash from switch arcing. Always
shut OFF and disconnect all power to equipment. A power disconnect switch
must be available near the welding power source.
ELECTROMAGNETIC INTERFERENCE (EMC)
Whilst this unit complies with EMC regulations, the user is responsible for
installing and using the welding equipment according to the manufacturers
instructions. If electromagnetic disturbances are detected then it shall be the
responsibility of the user of the welding equipment to resolve the situation. In
some cases this remedial action may be as simple as earthing the welding
circuit, see ‘Note’. In other cases it could involve constructing an
electromagnetic screen enclosing the power source and the work complete
with associated input filters. In all cases electromagnetic disturbances must be
reduced to the point where they are no longer troublesome.
NOTE: The welding circuit may or may not be earthed for safety reasons.
Changing the earthing arrangements should only be authorised
by a person who is competent to assess whether the changes will
increase the risk of injury, e.g. by allowing parallel welding current
return paths which may damage the earth circuits of other
equipment.
ASSESSMENT OF THE AREA
Before installing welding equipment the user shall make an assessment of
potential electromagnetic problems in the surrounding area. Avoid using your
inverter in the vicinity of:
• other supply cables, control cables, signalling and telephone cables;
above, below and adjacent to the welding equipment;
• radio and television transmitters and receivers;
• computer and other control equipment;
• safety critical equipment, e.g. guarding of industrial equipment;
• pacemakers and hearing aids etc;
• equipment used for calibration or measurement;
8
Parts & Service: 020 8988 7400 / E-mail: [email protected] or [email protected]
Page 9

• other equipment in the environment. The user shall ensure that other
equipment being used in the environment is compatible. This may require
additional protection measures;
It may be possible to avoid the above by changing the time of day that
welding or other activities are to be carried out.
The size of the surrounding area to be considered will depend on the structure
of the building and other activities that are taking place. The surrounding area
may extend beyond the boundaries of the premises.
METHODS OF REDUCING EMISSIONS
MAINS SUPPLY
Welding equipment should be connected to the mains supply according to
the manufacturers recommendations. If interference occurs, it may be
necessary to take additional precautions such as filtering of the mains supply.
Consideration should be given to shielding the supply cable of permanently
installed welding equipment, in metallic conduit or equivalent. Shielding
should be electrically continuous throughout its length. The shielding should be
connected to the welding power source so that good electrical contact is
maintained between the conduit and the welding power source enclosure.
MAINTENANCE OF THE WELDING EQUIPMENT
The welding equipment should be routinely maintained according to the
manufacturers recommendations. All access and service doors and covers
should be closed and properly fastened when the welding equipment is in
operation. The welding equipment should not be modified in any way except
for those changes and adjustments covered in the manufacturers instructions.
In particular, the spark gaps of arc striking and stabilizing devices should be
adjusted and maintained according to the manufacturers recommendations.
WELDING CABLES
The welding cables should be kept as short as possible and should be
positioned close together, running at or close to the floor level.
EQUIPOTENTIAL BONDING
Bonding of all metallic components in the welding installation and adjacent to
it should be considered. However, metallic components bonded to the work
piece will increase the risk that the operator could receive a shock by
touching these metallic components and the electrodes at the same time.
The operator should be insulated from all such bonded metallic components.
EARTHING OF THE WORKPIECE
Where the workpiece is not bonded to earth for electrical safety, nor
connected to earth because of its size and position, e.g. a ships hull or building
steelwork, a connection bonding the workpiece to earth may reduce
emissions in some, but not all instances.
9
Parts & Service: 020 8988 7400 / E-mail: [email protected] or [email protected]
Page 10

Care should be taken to prevent the earthing of the workpiece increasing the
risk of injury to users, or damage to other electrical equipment.
Where necessary, the connection of the workpiece to earth should be made
by a direct connection to the workpiece, but in some countries where direct
connection is not permitted, the bonding should be achieved by suitable
capacitance, selected according to national regulations.
SCREENING AND SHIELDING
Selective screening and shielding of other cables and equipment in the
surrounding area may alleviate problems of interference. Screening of the
entire welding installation may be considered for special applications.
10
Parts & Service: 020 8988 7400 / E-mail: [email protected] or [email protected]
Page 11
PREPARATION OF THE WORKING AREA
The working area must be sufficiently spacious, with low humidity and wellventilated so as to avoid any fumes which develop from the welding process
and from incidental material adhering to the pieces to be welded (oils, paints,
tars...) which may cause danger to the operator.
Avoid welding by contact with humid parts nearby combustible liquids. Least
of all, do not weld upon tanks which may contain inflammable residuals.
WARNING: ELECTRIC SHOCK CAN BE FATAL. A PERSON QUALIFIED IN FIRST
AID SHOULD ALWAYS BE PRESENT IN THE WORKING AREA. IF PERSON IS
UNCONSCIOUS AND ELECTRIC SHOCK IS SUSPECTED, DO NOT TOUCH
THE PERSON IF HE OR SHE IS IN CONTACT WITH THE WELDER OR CABLES.
DISCONNECT THE WELDER FROM THE POWER SOURCE AND THEN USE FIRST
AID. DRY WOOD, OR OTHER INSULATING MATERIAL CAN BE USED TO
MOVE CABLES, IF NECESSARY, AWAY FROM THE PERSON.
FIRE PREVENTION
• ALWAYS switch the engine OFF when refuelling.
• ALWAYS refuel away from any source of heat.
• ALWAYS refuel in a well ventilated area.
• NEVER overfill fill the tank, fill to the level specified.
• NEVER smoke whilst refuelling and avoid smoking or using a naked flame
near the machine.
• NEVER start the engine if there is a fuel spill. Any spillage must be wiped
clean and the machine allowed to dry before attempting to start the
engine.
PREVENTION OF ELECTRIC SHOCK
• ALWAYS store the machine undercover when not in use and away from
damp or wet conditions.
• NEVER use the machine when it is raining or snowing or in wet or damp
conditions.
• NEVER operate the machine with wet hands.
• NEVER use water or any other liquids to clean the unit.
POSITIONING THE MACHINE FOR USE
• ALWAYS leave at least a 1 metre gap between the machine and any
surrounding building or structure.
• ALWAYS ensure the machine is on a solid, flat surface.
11
Parts & Service: 020 8988 7400 / E-mail: [email protected] or [email protected]
Page 12

• ALWAYS ensure the surrounding area is free from any material that could
burn or be damaged by heat.
• NEVER move or tilt the machine whilst it is switched on.
• NEVER cover or enclose the machine whilst it is in use.
• Be aware of the weight of the machine, do not attempt to lift or move the
machine without the assistance or suitable lifting equipment.
EXHAUST GAS PRECAUTIONS
WARNING!: EXHAUST FUMES CAN BE FATAL
• ALWAYS ensure that there is adequate ventilation when using the machine.
• ALWAYS position the machine so that the exhaust is pointing away from
people or animals.
• If the machine is to be used indoors the exhaust MUST be piped to
atmosphere.
ADDITIONAL SAFETY PRECAUTIONS FOR ARC WELDERS
• NEVER attempt to remove any of the panels unless the machine is
disconnected from the supply.
• NEVER use the machine with any of the panels removed.
• NEVER attempt any electrical or mechanical repair unless your are a
qualified technician. If you have a problem with the machine contact your
local CLARKE dealer.
• NEVER use or store in a wet/damp environment. DO NOT EXPOSE TO RAIN.
• NEVER allow children or animals in the vicinity of a welding operation.
• ALWAYS remove all flammable materials from the welding area.
• ALWAYS ensure that there is full free air circulating around the outer casing
of the machine, and that the louvres are unobstructed.
• Welding arc can seriously damage your eyes. Both the operator and any
spectators should ALWAYS use a proper welding face shield or helmet, with
suitable filter lenses. Proper gloves and working clothes should be worn at
all times.
• ALWAYS wear a pair of safety spectacles/goggles when chipping away
slag after welding,. Remember, ordinary eye glasses are not safety gasses.
• ALWAYS ensure there is adequate ventilation or extraction in the work area
as the welding process gives off toxic fumes.
• ALWAYS ensure there is a fire extinguisher on hand.
• ALWAYS ensure that a medical supply is on hand, and that treatment for
burns is provided.
12
Parts & Service: 020 8988 7400 / E-mail: [email protected] or [email protected]
Page 13
PREPARATION FOR USE
FUELLING
Fill with fuel, according to the instructions within the engine manual.
NOTE: Always use a fuel funnel to fill the tank so as to avoid accidental spillage
of fuel. If fuel is spilled it must be removed from the unit and the surrounding
area, BEFORE attempting to start the engine.
WARNING: OBSERVE ALL SAFETY PRECAUTIONS WHEN HANDLING FUEL.
ALWAYS REFUEL IN A WELL VENTILATED AREA AWAY FROM ANY HEAT
SOURCES.
WARNING: ENSURE THERE IS ADEQUATE FUEL IN THE TANK WHEN USING
THE MACHINE. RUNNING OUT OF FUEL OR STOPPING THE ENGINE
SUDDENLY WITH A LOAD CONNECTED COULD CAUSE SERIOUS DAMAGE.
WARNING: ALLOW THE UNIT TO COOL DOWN BEFORE REFUELLING.
WARNING: BE AWARE THAT FUEL AND LUBRICANTS ARE POTENTIALLY
CARCINOGENIC, DIRECT SKIN CONTACT SHOULD BE AVOIDED, WEAR
SUITABLE RUBBER GLOVES.
EXTENSION CABLES
All extension cables, from the generator set to the appliance, must be
carefully selected, fitted and maintained. Cables in accordance with IEC 2454 should be used.
Cables should be inspected regularly, and should be replaced, not repaired in
the event of a defect.
The length and cross section of conductors should be selected according to
the job to be done. The table below is an indication of the sizes that should be
used.
Conductor (mm2) Max Length (M) Current (Amps) Single Phase (kW)
1.5 25 10 2.3
2.5 40 16 3.7
4.0 60 28 6.5
IMPORTANT! Ensure the cable is fully unwound when in use to avoid
overheating, and the placing of extra load on the generator.
13
Parts & Service: 020 8988 7400 / E-mail: [email protected] or [email protected]
Page 14
OPERATION - GENERATOR
IMPORTANT: Ensure all precautions are taken, referring to this and the
engine manual, before proceeding.
1. Start the engine. (refer to engine manual) and allow to run for a few
minutes at full speed in order for it to warm up.
IMPORTANT: Ensure no appliances are connected to the generator when
starting the engine.
2. Check the condition of the appliance, including the supply cable and the
extension cable if used, and ensure it is switched OFF. Ensure also that the
operating voltage is the same as the output from the generator.
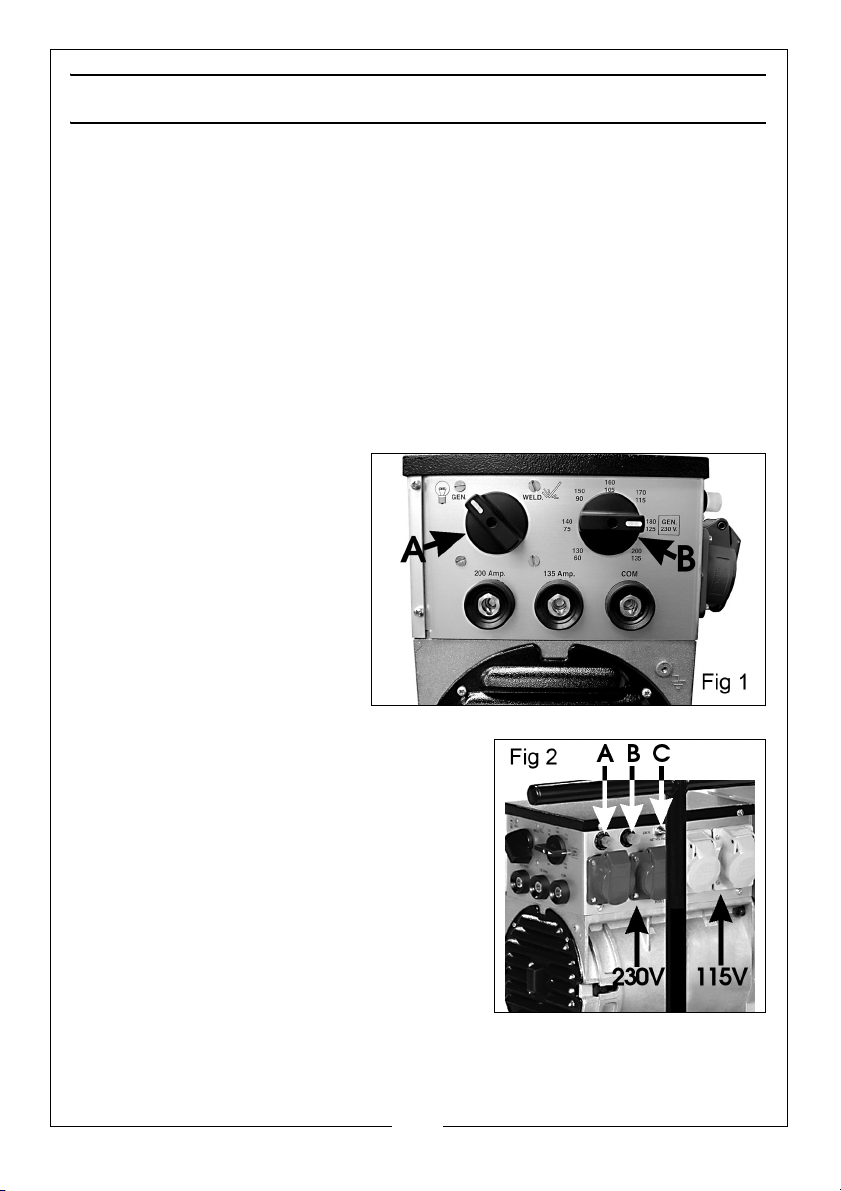
3. Ensure the voltage selector switch, shown at ‘C’ Fig.2 is set to the deliver
the appropriate output - 115V or 230V.
4. Turn the Gen/Weld knob -
A’ Fig1, to GEN.
5. Turn the Welding Current
knob - ‘B’ Fig.1, to GEN
230V.
6. With the engine ru nning
smoothly, connect the
appliance to the
appropriate receptacle:
BLUE - 230V, YELLOW - 115V.
7. Switch ON the appliance.
NOTE: If the AC circuit is overloaded the
circuit protection switch will trip. To reset the
circuit, first disconnect the appliance, and
rectify the cause of the overload. Wait a short
period and then press the appropriate reset
button, shown at ‘A’ and ‘B’, Fig.2.
BE AWARE!
Some appliances draw more current on startup than their normal running current, i.e.
electric motors and compressors. If in any
doubt as to whether an appliance is
compatible or not, please consult your
CLARKE dealer.
Additionally, please refer to the specifications to ensure the machine is used
under the correct operating conditions.
14
Parts & Service: 020 8988 7400 / E-mail: [email protected] or [email protected]
Page 15

OPERATION - WELDING
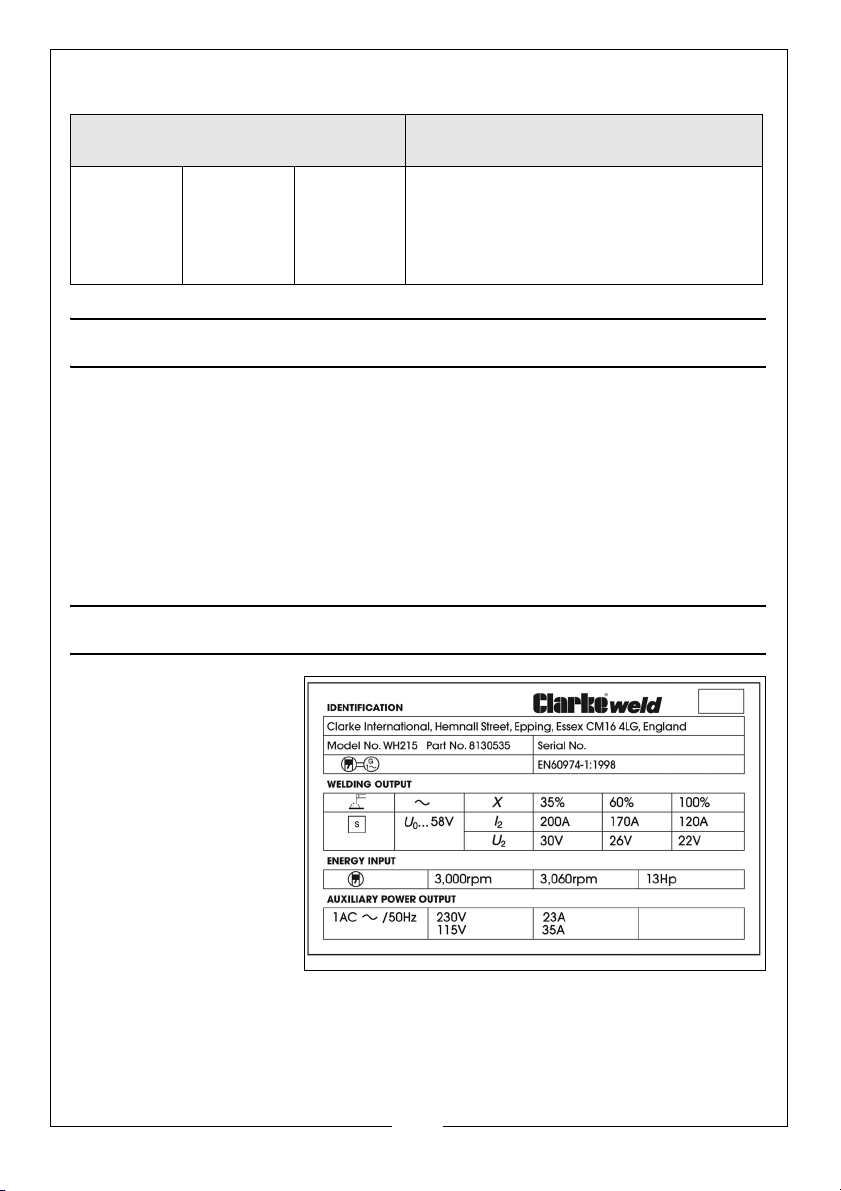
The welding capabilities of your welder are given on the data label printed on
the rear panel of the machine, and reproduced on page 16. An explanation
of markings and symbols appearing on the data label is shown on page 21.
THERMAL OVERLOAD PROTECTION
If the duty cycle of the welder is exceeded (see Specifications), the Overload
Protection Device will automatically cut the power to prevent damage to the
machine. Should the cut-out operate, you will have to wait until the
transformer cools down (approx. 30 minutes), when the overload device will
automatically reset itself.
Although no harm will be done to the machine if/when the overload device is
actuated, its frequent use could eventually result in damage.
PREPARATION FOR WELDING
1. Set the GEN/WELD knob - ‘A’, Fig.1 to WELD.
2. Set the Welding Current knob - ‘B’, Fig.1, to the appropriate welding
current noting that TWO ranges are provided - HIGH and LOW.
• High range is indicated in RED, Low range in BLACK
3. Connect the welding lead to the appropriate DIN socket:
• 135 Amp - LOW range
• 200 Amp - HIGH range.
4. Connect the earth lead to the COM DIN socket.
Ensure the earth lead is connected to the work piece.
IMPORTANT: Ensure also that the earth clamp is attached to clean, solid
metal. If necessary thoroughly clean with a wire brush or similar to
guarantee a good connection.
5. Select the appropriate electrode, which should be approximately the
same thickness as the piece to be welded, for single pass welding.
NOTE: With practice you will get a feel for the best current settings for
different welding rod thicknesses.
The chart below gives an indication of the thickness of material/welding rod
thickness and the corresponding welding current. This is intended as a guide
only.
15
Parts & Service: 020 8988 7400 / E-mail: [email protected] or [email protected]
Page 16
.
SIIZE OF WELDING ROD
THICKNESS OF METAL
1/16”
1/8”
16 swg
14 swg
12 swg
10 swg
1.5 mm
2.0 mm
2.5 mm
3.25 mm
4.0 mm
CURRENT SETTING
40-55
60-75
75-105
105-135
135-200
SHUTTING DOWN THE MACHINE
IMPORTANT: Never switch OFF the engine whilst an electrical appliance is
connected.
1. Switch OFF the electrical appliance.
2. Unplug the appliance from the generator.
3. Switch the engine OFF (refer to engine manual).
4. Turn the fuel OFF (refer to engine manual).
DUTY CYCLES
This model is covered
by regulations EN
60974-1 and EN 50199,
where the Duty Cycle
(X) is expressed as a
percentage of time the
machine may be used
in a given period for a
specified welding
current.
i.e. using the example above:
When welding at 170 Amps the machine may be used for 6 minutes (60%) in
any 10 minute period, or, the machine may be used continuously, (100%)
when welding at 120 Amps.
16
Parts & Service: 020 8988 7400 / E-mail: [email protected] or [email protected]
Page 17

WELDING TECHNIQUE
1. With the welder correctly connected to the mains supply and the leads
attached to the machine, ensure the earth clamp is firmly attached to the
workpiece on CLEAN, SOLID metal and as close to the proposed weld as is
practical, and the appropriate current setting for the job has been set.
2. Start the engine.
NOTE: If the machine stops at any time and the amber light on the front
panel illuminates, the thermal cutout has intervened. Wait until the
transformer has cooled sufficiently for work to recommence. This
could take considerable time and is denoted by the amber light
going OUT.
3. Bring the electrode to the work surface at an angle of approx 70o then,
BEFORE you strike an arc, bring the face shield up to protect your eyes.
Strike an arc by briefly touching the work surface with the tip of the electrode.
Once the arc is struck or primed, raise the electrode slightly and maintain it at
a distance of approx 1.5mm (1/16”) from the work surface, then proceed to
move the electrode along its intended path, keeping the tip in the molten
pool at all times. An even crackling noise should be heard, which is an
indication of a good weld.
NOTE: This is the most difficult aspect for most beginners. It is
recommended that you practice on some scrap material in order
to get a feel of the operation.
If the electrode is not withdrawn quickly enough once the arc is primed, there
is a possibility that the electrode will weld itself to the workpiece. Should this
happen, give it a sharp tug to free it and try again. If this fails to free it, turn OFF
the machine immediately as it will quickly overheat.
If you withdraw the electrode too far once the arc is primed, you will lose the
arc and have to try again.
4. Inspect the job carefully. With a correct combination of electrode size and
current setting the area of weld should be complete fusion of the
electrode and parent metal/s. Any slag which forms on the surface should
be chipped away with a pick/brush.
If the resultant weld looks messy and irregular, this is an indication of porosity or
slag contamination and you have almost certainly failed to achieve the
correct combination. This is a common problem, so do not worry as practice
will quickly cure this.
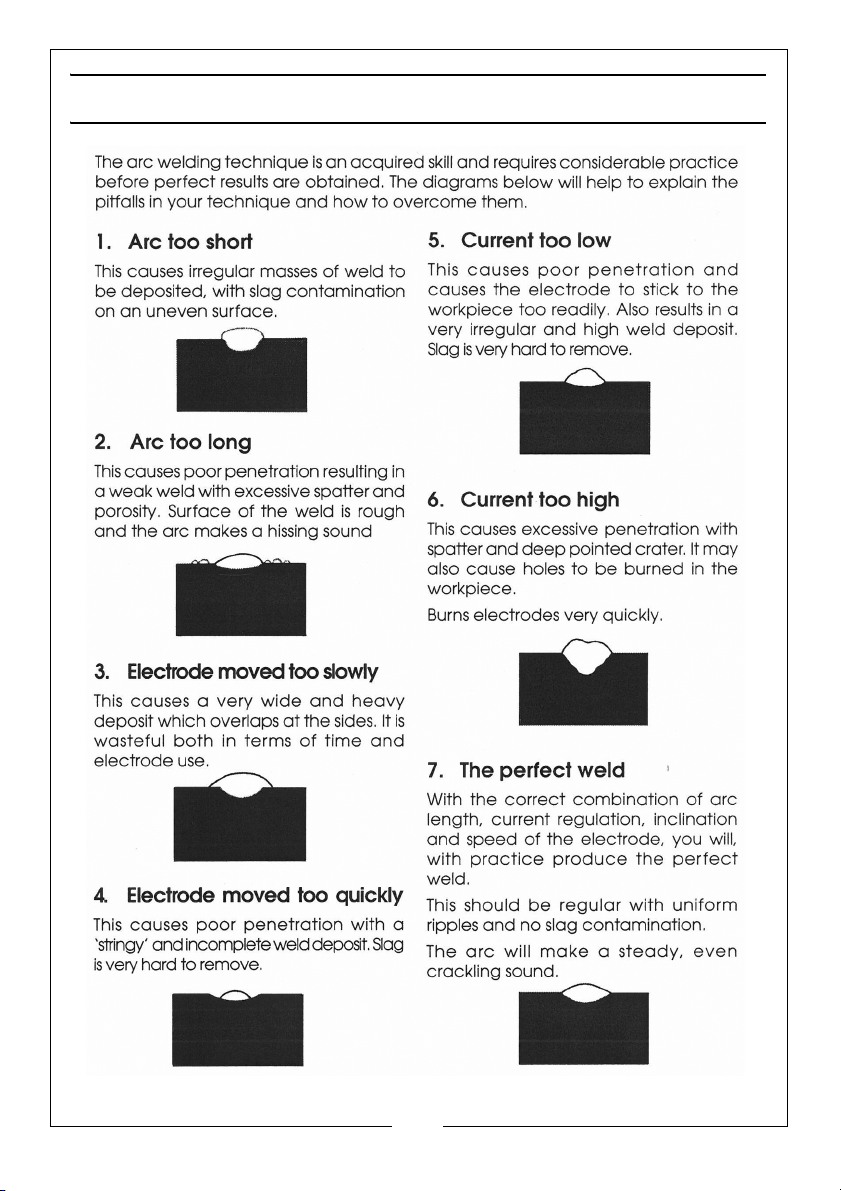
The following tips should help you improve your welding technique fairly
quickly.
17
Parts & Service: 020 8988 7400 / E-mail: [email protected] or [email protected]
Page 18
Page 19
Page 20
MAINTENANCE
GENERAL CARE
1. Check all cables periodically; they must be in good condition and not
cracked.
2. Always ensure the generator’s air vents are completely clear. Brush away
any dust which may have accumulated.
The engine requires periodic servicing. Please refer to the engine manual for
details.
If the machine is not going to be used for some time the engine must be
adequately prepared. Please refer to the engine manual for details.
IMPORTANT: ALWAYS switch the engine OFF before servicing or cleaning
ELECTRICAL TROUBLE SHOOTING
Problem: No AC Output
CAUSE REMEDY
Selector switch in the wrong position. Set selector switch
Tripped circuit breaker Re-set AC safety trip
Poor connection or damaged lead Check connection and or
replace lead
Broken AC connector Contact CLARKe service dept
Faulty circuit breaker Contact CLARKe service dept
Problem: Erratic supply
CAUSE REMEDY
Incorrect engine rpm Set engine rpm. Consult your
CLARKE dealer
Alternator defect Contact CLARKe service dept
ENGINE TROUBLESHOOTING
Consult the suppliers engine manual.
20
Parts & Service: 020 8988 7400 / E-mail: [email protected] or [email protected]
Page 21
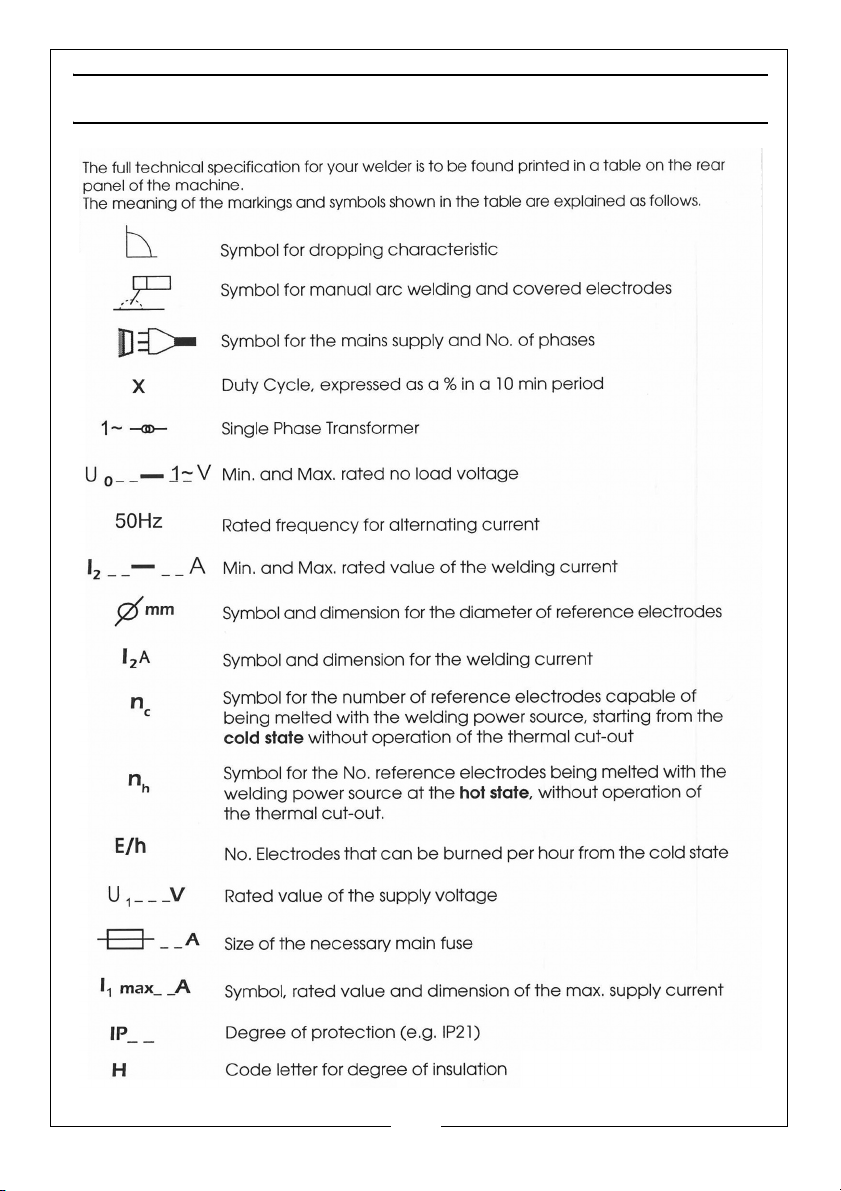
ELECTRICAL SYMBOLS EXPLAINED
21
Parts & Service: 020 8988 7400 / E-mail: [email protected] or [email protected]
Page 22
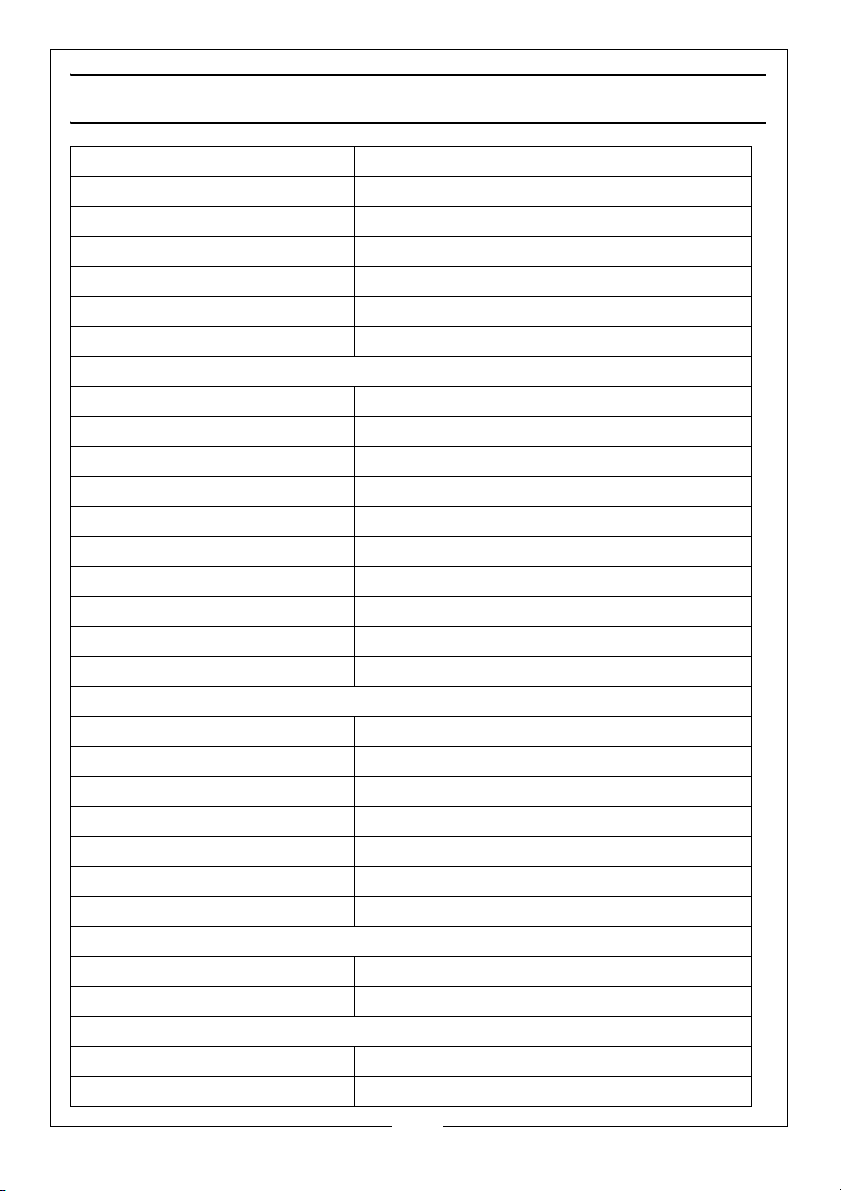
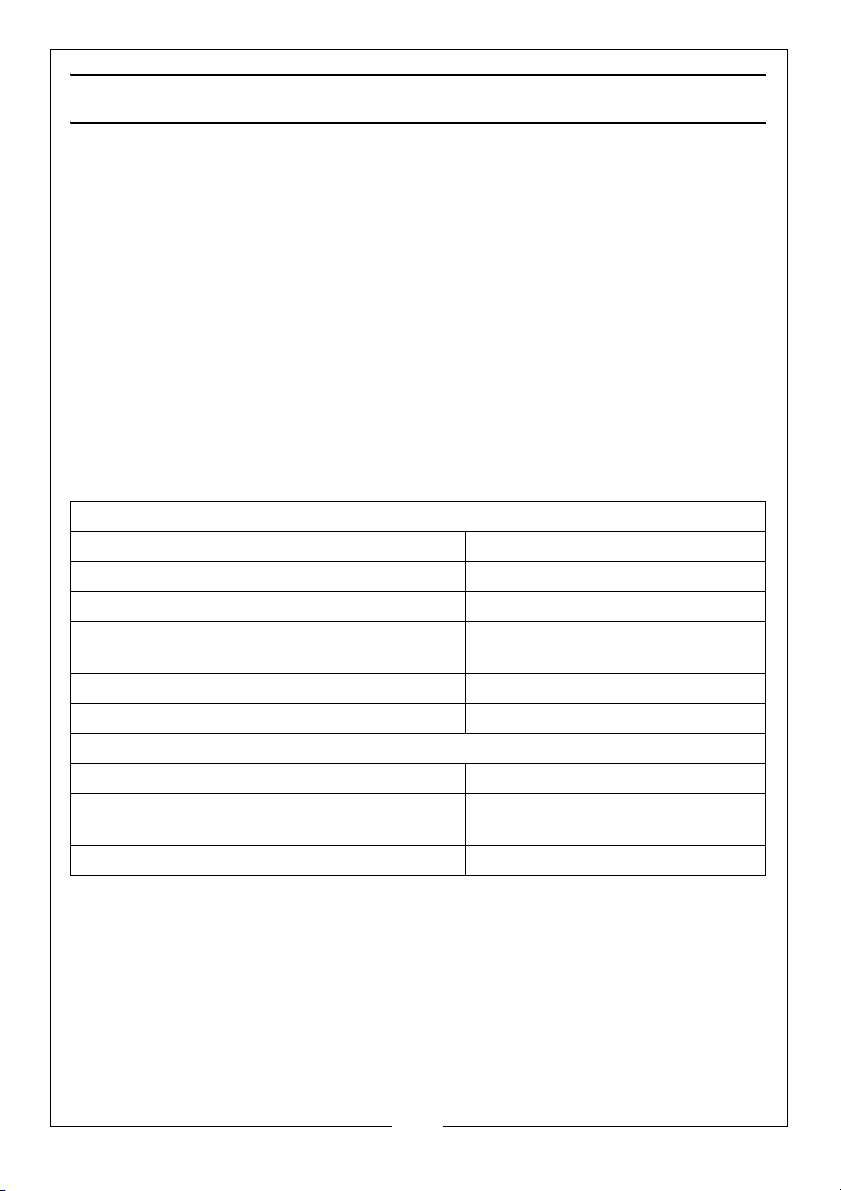
PRODUCT SPECIFICATIONS
Output (min/max) 60-200 amps
Open circuit voltage 45-48V
IP rating 23
Electrode diameter/material 4mm (max) (ARC)
Output cable length 6m
Plug type DIN small
Welding gun type 400A (screw type)
Engine specifications
Make/type Honda GX390
Capacity 389cc
Oil capacity/ grade 1.1 Litres/ 10W 30
Engine power 13HP
Fuel tank capacity/fuel type 6.5Litres/Unleaded
Spark plug type BPR 6ES
Fuel consumption 313g/KwH
Fuel consumption @75% power 2.15Litres/Hour
Cooling system Air
Choke type Manual
Auxiliary Generator
Rated output power 6.5kVA@230V (5.2kW)/ 4kVA@115V (3.2kW)
Rated output 23amps@230V/35amps@115V
Operating voltages 230/115V-1ph
Run time@rated load (max) 2 hours
Earthing type Floating
Operating temperature -20 deg C - 40 deg C
Number of sockets 2 x16amps@230V/2 x 16amps@115V
Noise Emissions
Noise @7m 72dB(A)
Sound power measured 97dBL
Dimension/weights
Product (LxWxH) 945 x 690 x 685mm
Weight 88kg
WA (measured & guaranteed)
22
Parts & Service: 020 8988 7400 / E-mail: [email protected] or [email protected]
Page 23
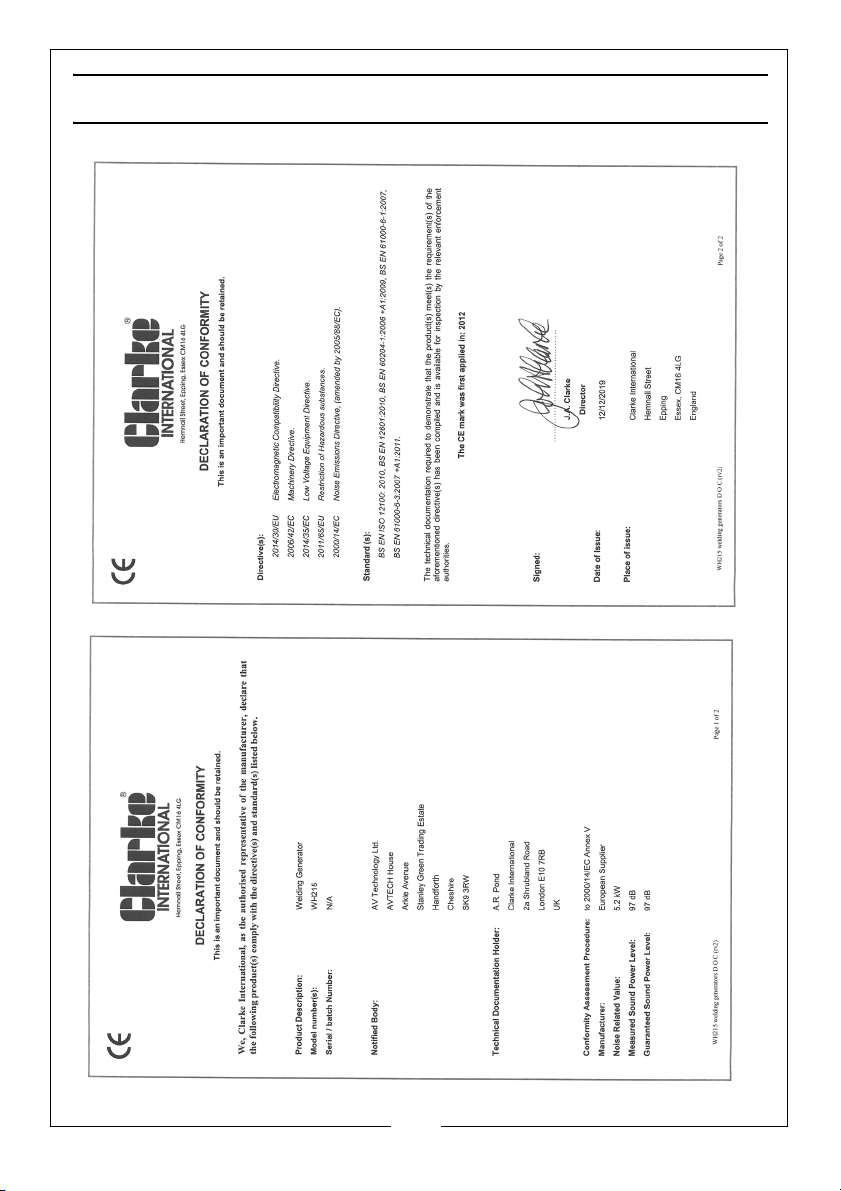
DECLARATION OF CONFORMITY
23
Parts & Service: 020 8988 7400 / E-mail: [email protected] or [email protected]
Page 24

 Loading...