

Page 1
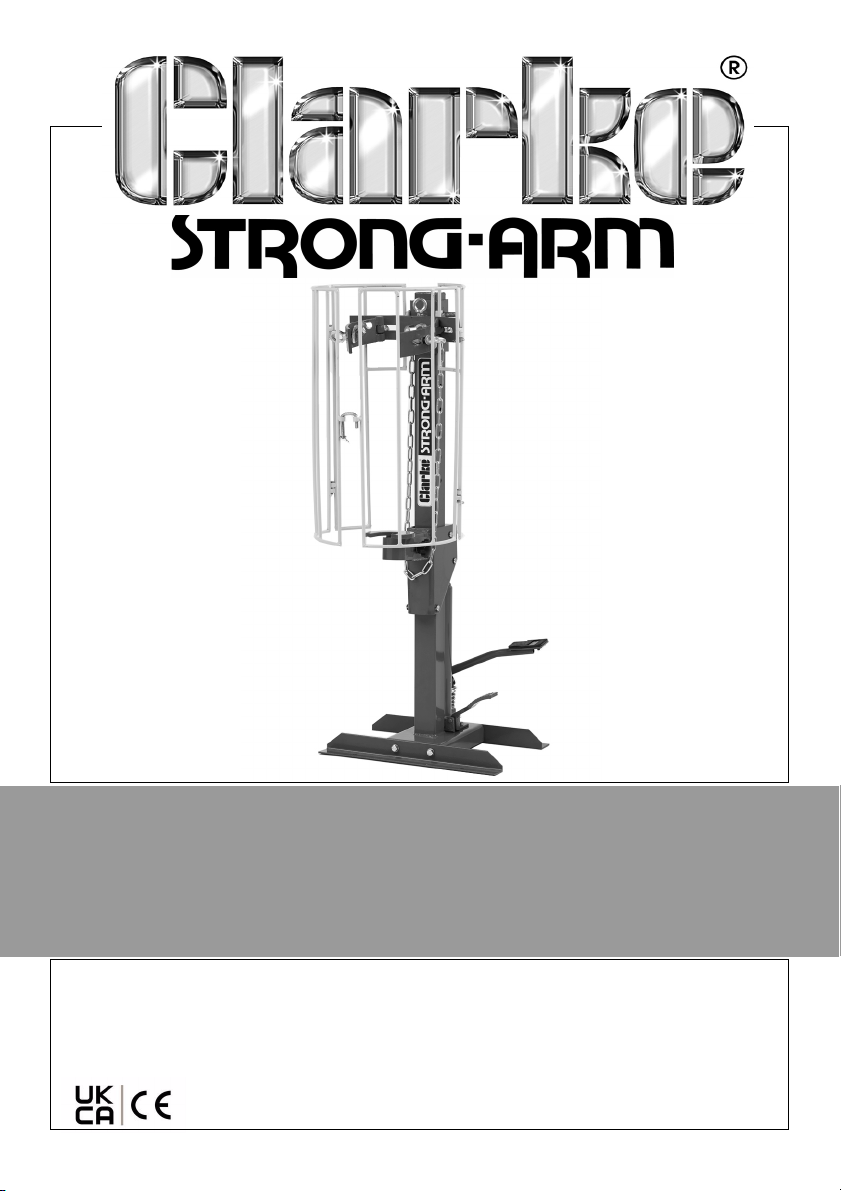
STRUT SPRING COMPRESSOR
MODEL NO: SSC1000G
PART NO: 7630030
OPERATION & MAINTENANCE
INSTRUCTIONS
ORI GINAL INSTRUCTIONS GC0721 rev 1
Page 2
INTRODUCTION
Thank you for purchasing this CLARKE strut spring compressor.
Before attempting to operate the machine, it is essential that you read this
manual thoroughly and carefully follow all instructions given. In doing so you
will ensure the safety of yourself and that of others around you, and you can
also look forward to the spring compressor, giving you long and satisfactory
service.
GUARANTEE
This CLARKE product is guaranteed against faulty manufacture for a period of
12 months from the date of purchase. Please keep your receipt as proof of
purchase.
This guarantee is invalid if the product is found to have been abused or
tampered with in any way, or not used for the purpose for which it was
intended.
Faulty goods should be returned to their place of purchase, no product can
be returned to us without prior permission. This guarantee does not effect your
statutory rights
2
Parts & Service: 020 8988 7400 / E-mail: [email protected] or [email protected]
Page 3
TECHNICAL SPECIFICATIONS
Rated Load Capacity 1000 kg
Net Weight 34.9 kg
Dimensions D x W x H 610 (o/a guards) x 515 x
1180 mm (o/a pedal)
No of strokes to full extension 128
Ram travel per stroke 2.44 mm
Total Range 320 mm
Lower strut support to upper clamping bracket 150-510 mm
Maximum spring diameter (3 sizes) 210 mm
Maximum spring length 520 mm
Pump oil capacity 270 ml
Oil grade VG15 hydraulic oil
3
Parts & Service: 020 8988 7400 / E-mail: [email protected] or [email protected]
Page 4
SAFETY PRECAUTIONS
• Due to the weight of the product the help of an assistant may be required
during installation. Secure the spring compressor to a firm level floor using
suitable anchor bolts (not supplied).
• Before starting work, check for signs of cracked welds, loose or missing bolts,
damaged guards, or any structural damage. Do not operate if any of these
conditions exist. Have repairs made only by an authorised service centre.
• Never tamper with the components or modify them. The safety valve is
calibrated and sealed at the factory; do not attempt to change the setting.
• Use only the recommended hydraulic oil.
• The components of this product are designed to withstand the rated load.
Do not substitute any other components or exceed the rated load.
• Before applying pressure, ensure the workpiece is secure and stable.
• Always clean up spills of hydraulic oil immediately as this can be dangerous
in a workshop environment.
• Do not allow any person who is unfamiliar with spring compressors to use this
item unless they are under direct supervision.
• Keep children and unauthorised personnel away from the work area.
• Always apply the spring centrally under the centre of the ram. Offset loads
can damage the ram and may cause the spring to be ejected.
• Always ensure the spring is properly supported.
• Springs may be ejected from the spring compressor. Always use the guards
supplied.
• Keep hands and fingers away from parts that may pinch or shift.
• Never use extension tubes to increase the length of the pump handle.
Excessive effort can cause damage and/or accidents.
• Wear approved impact safety goggles and heavy duty work gloves.
• Failure to heed these warnings may result in damage to the equipment, or
serious personal injury.
• The following safety symbols appear on the product.
Read instruction
manual before use
4
Parts & Service: 020 8988 7400 / E-mail: [email protected] or [email protected]
Wear safety glasses
Page 5
UNPACKING & ASSEMBLY
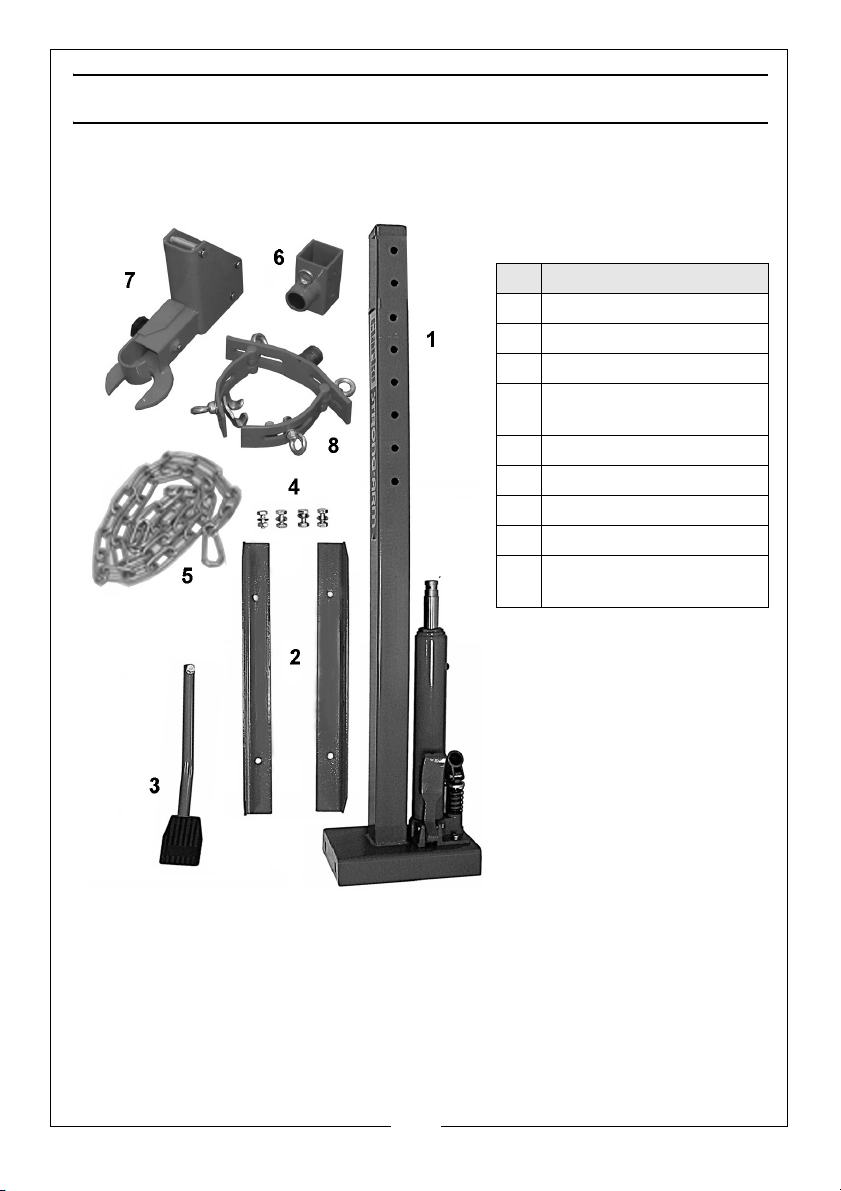
Ensure the product suffered no damage during transit and all components are
present. Should any loss or damage become apparent, please contact your
CLARKE dealer immediately. The following items are supplied.
No Description
1 Frame & ram assembly
2 Base supports
3 Pump actuating pedal
4 Fixing Kit
(bolts, nuts, washers)
5 Safety chain
6 Upper clamping bracket
7 Lower clamping bracket
8 Suspension leg clasp
9 Safety guards (LH/RH)
(4 pieces)
TOOLS REQUIRED
• Wrench/socket set
•Hex key
IMPORTANT: The spring compressor must be firmly secured to a firm and
level floor using expansion bolts (not supplied). Holes are provided in the
base supports for this purpose.
IMPORTANT: The spring compressor should not be stored where it will be
open to the elements, as severe weather conditions will damage the
hydraulic parts.
5
Parts & Service: 020 8988 7400 / E-mail: [email protected] or [email protected]
Page 6
ASSEMBLY PROCEDURE
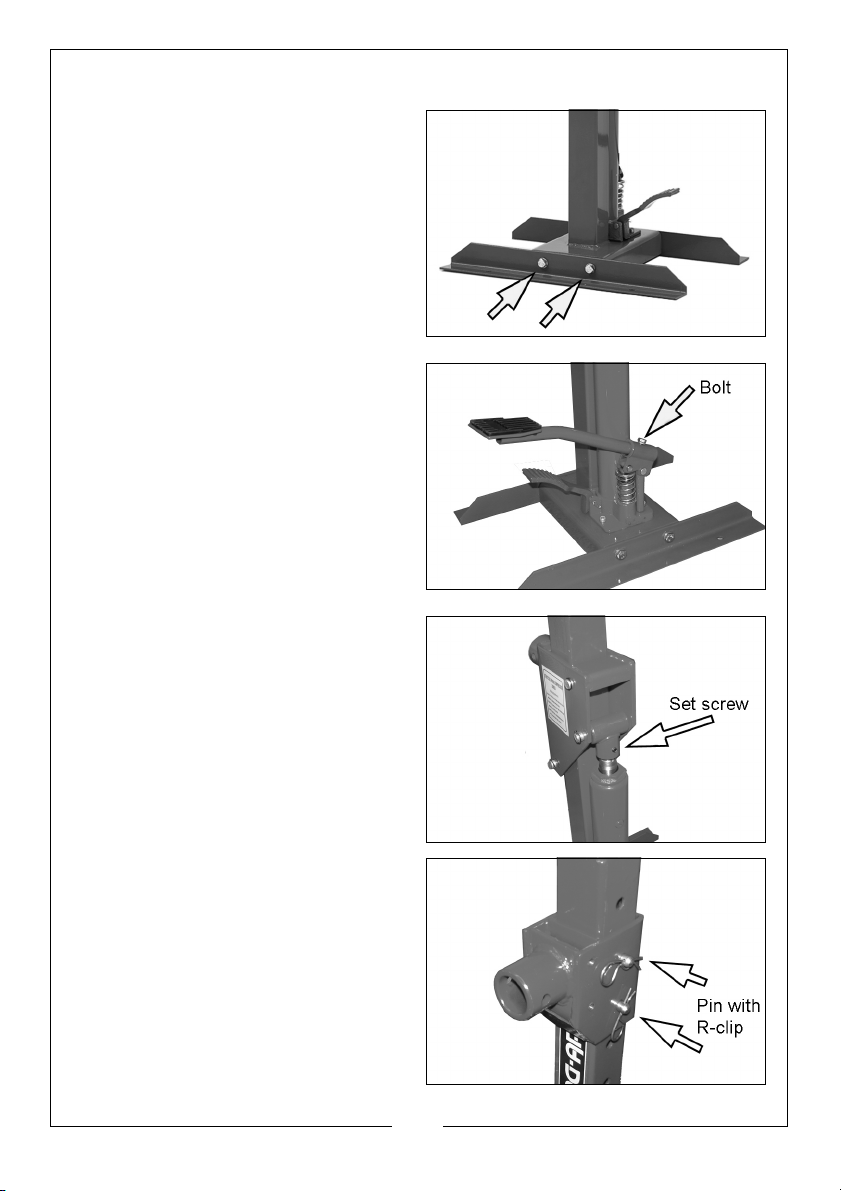
1. With the help of an assistant,
attach the base supports to the
frame using the nuts, bolts and
washers.
2. Lift the frame assembly upright
and manoeuvre it to its intended
location in the workshop, noting
that the operator will be standing
at the side of the machine.
3. Attach the foot pedal to the
frame using the bolt and washer.
4. Fit the lower support bracket of
either the suspension leg or open
yoke, to the column, engaging
the bracket with the end of the
hydraulic ram and securing with
the set-screw.
5. Fit the corresponding upper
bracket to the column, securing
at the required height with the
pins and R-clips.
• The removable pins provide
several height settings for
different length springs.
6
Parts & Service: 020 8988 7400 / E-mail: [email protected] or [email protected]
Page 7
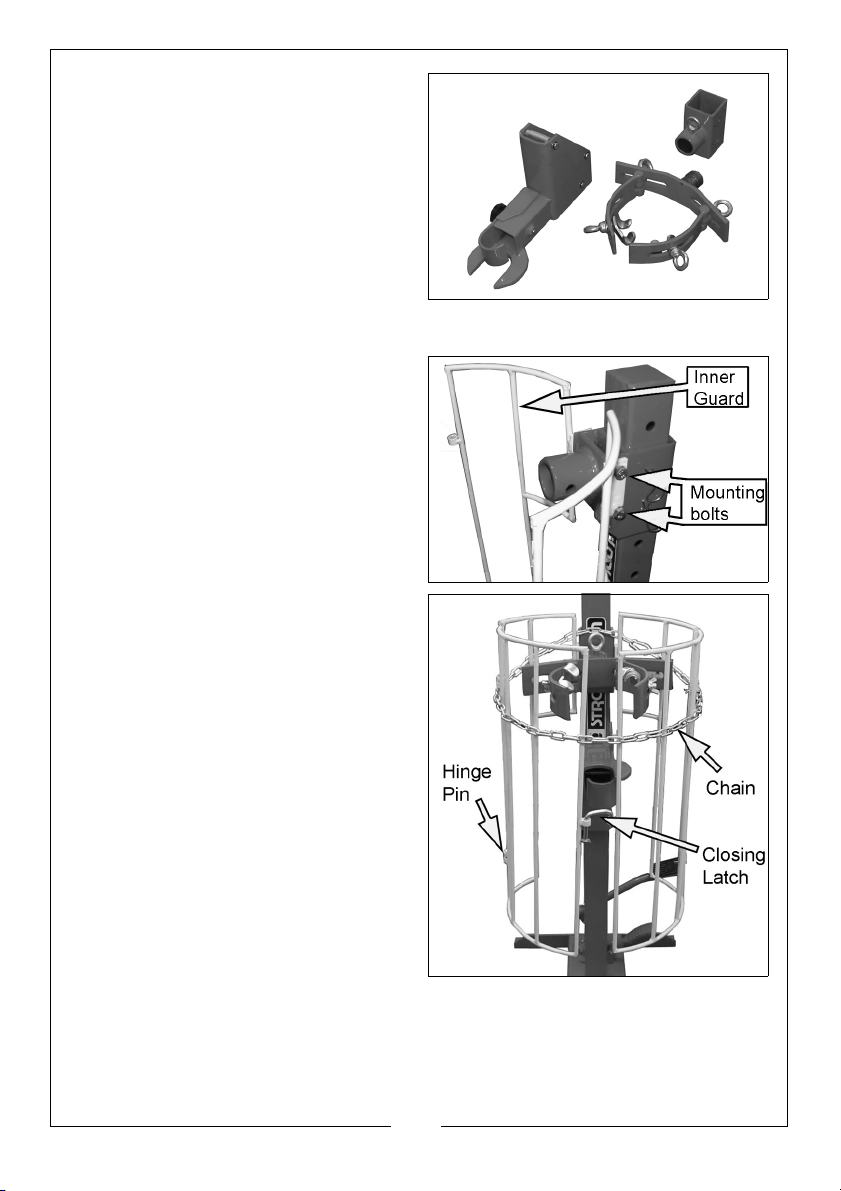
The suspension leg support kit is used
to hold a front suspension leg
assembly.
SAFETY GUARD KIT
Fit the safety guards as follows.
1. Bolt both the inner guards to the
upper bracket with four bolts.
2. Add the outer guards to the inner
guards, locating them using the
hinge pins supplied and lock with
split pins.
3. Fit the closing latch to the guards.
4. Before operating the compressor,
the safety chain should be
wrapped around the inner and
outer guards as shown,
connecting the two chain ends
with the snap hook.
7
Parts & Service: 020 8988 7400 / E-mail: [email protected] or [email protected]
Page 8
OPERATION
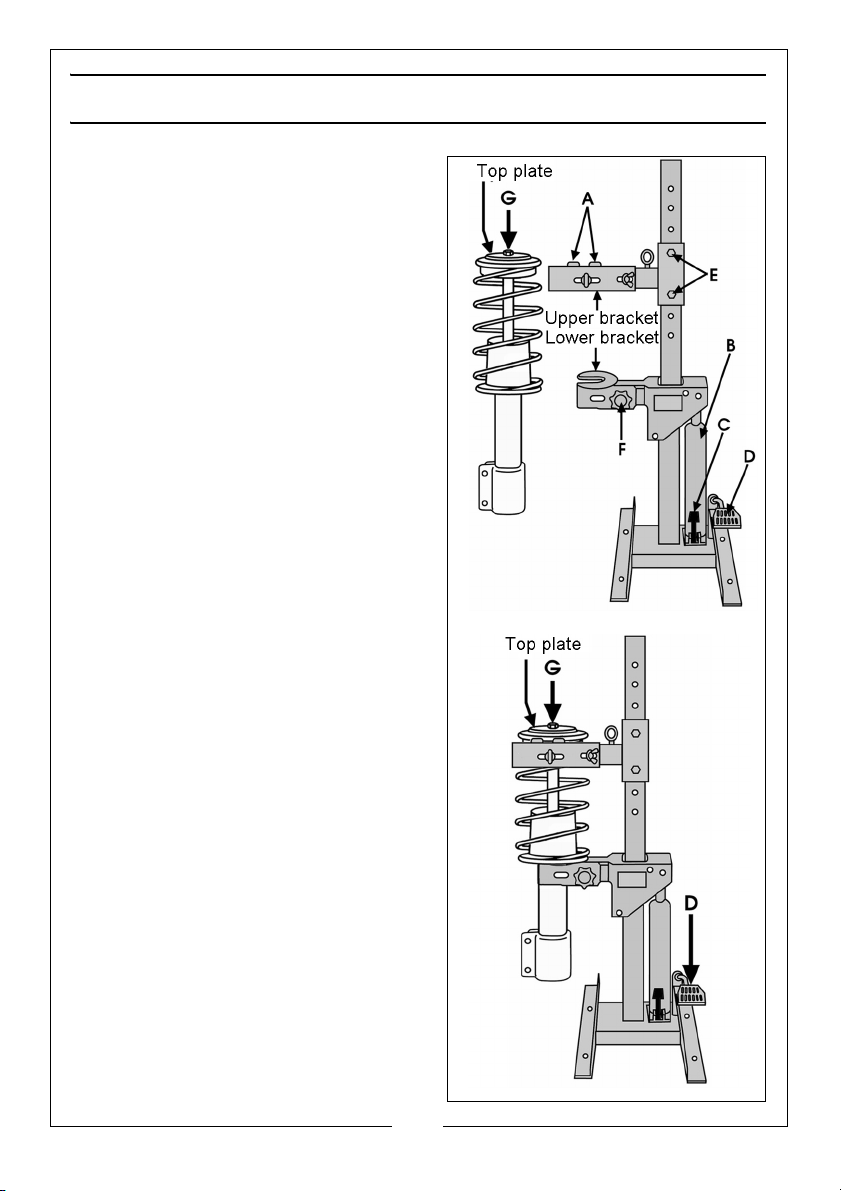
1. Press and hold down the release
valve pedal ‘C’ to lower the ram to
its lowest position.
2. Hinge the upper brackets back,
3. Slide the suspension leg into the
lower bracket and clamp in place
using the clasp and knob ‘F’. Do not
overtighten - it should only be firm.
4. Position the upper bracket so that
the two clamps ‘A’ fit snugly and
squarely around the spring coils, as
near to the top of the assembly as
possible.
• It may be necessary to remove the
two pins securing the upper bracket
assembly ‘E’ and slide the bracket up
or down by the appropriate amount
in order to locate the clamps ‘A’
correctly. Ensure the pins ‘E’ are
locked by the R-clips before
proceeding.
5. Sufficient adjustment to the upper
bracket components is provided in
all directions in order to ensure the
clamps sit squarely and snugly onto
the spring coils. Ensure all wing nuts
and adjusters are finger tight
only...DO NOT fully tighten.
6. Once secured, pump the pedal ‘D’
until all strain on the securing nut ‘G’
is completely relieved, (i.e. when the
nut turns easily). WARNING! DO NOT
undo the nut until this is achieved.
7. With the nut removed, remove the
top plate, then carefully and gently
press release lever ‘C’ to allow the
spring to fully relax
8
Parts & Service: 020 8988 7400 / E-mail: [email protected] or [email protected]
Page 9
8. When all pressure on the spring is relieved undo all restraints and remove it.
9. Support the suspension leg whilst loosening the lower bracket using the
locking knob F. The suspension leg may then be removed.
10. Reassembly of the suspension leg is in reverse order.
MAINTENANCE
ROUTINELY
A visual inspection should be made before each use of the spring compressor,
checking for leaking hydraulic fluid and damaged, loose or missing parts.
Owners and/or users should be aware that repair of this equipment requires
specialised knowledge and facilities. It is recommended that a thorough
annual inspection of the spring compressor, be made and that any defective
parts be replaced with genuine Clarke parts.
If the spring compressor appears to be damaged in any way, is found to be
badly worn, or operates abnormally, it SHOULD BE REMOVED FROM SERVICE
until the necessary repairs are made.
If the spring compressor is not to be used for any length of time, store it with the
ram piston withdrawn to protect the surface of the moving parts.
OCCASIONALLY
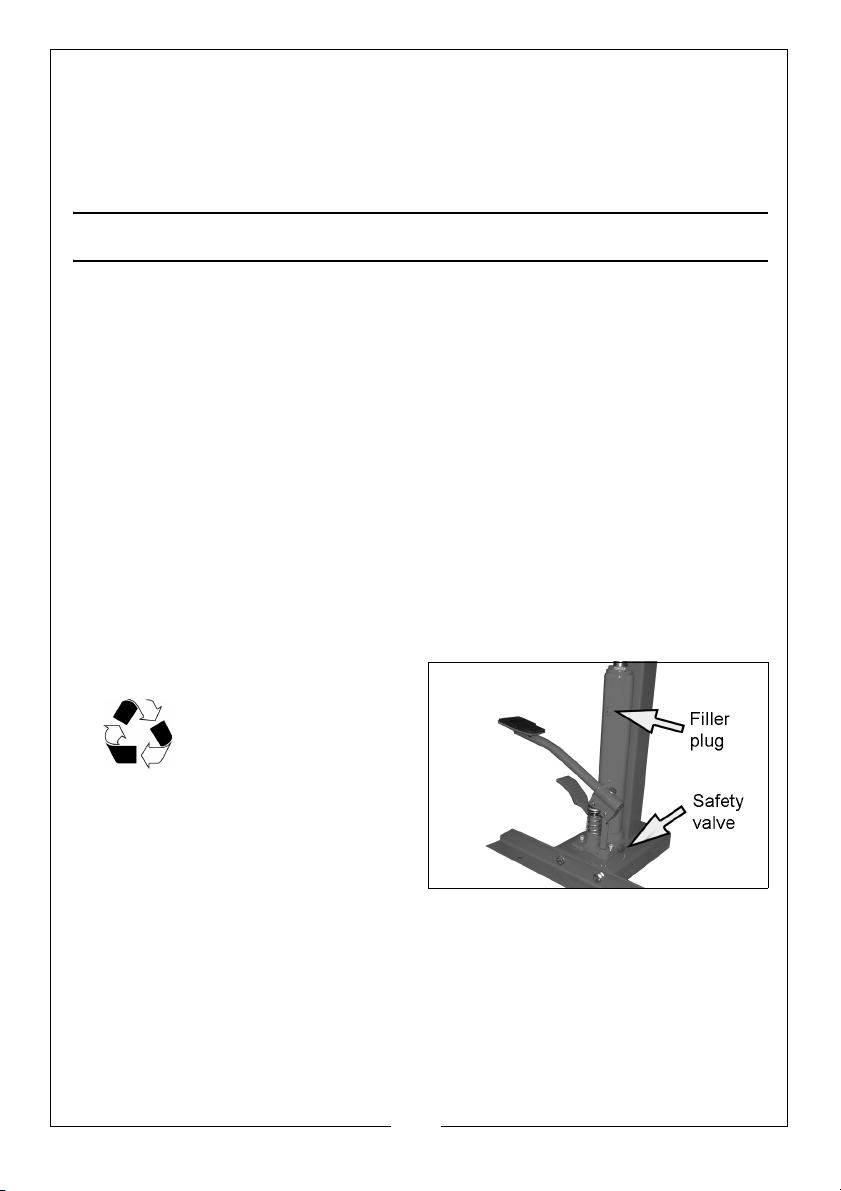
In the event of leaking seals, oil can
be topped up via the
filler plug on the side of
the pump. Oil should be
level with the bottom of
the hole. If necessary
top up with CLARKE hydraulic oil, Part
No. 3050830. This task is carried out
with the ram fully retracted. Further
repairs should be carried out by your
Clarke dealer.
If any rust is apparent it must be removed and the paint restored.
In the event of an airlock, air bubbles can be purged from the ram as follows;
1. Depress the release valve pedal.
2. Pump the actuating pedal several full strokes to eliminate any air bubbles.
Top up the hydraulic oil to the lower level of the filler plug with CLARKE
hydraulic oil, Part No. 3050830.
9
Parts & Service: 020 8988 7400 / E-mail: [email protected] or [email protected]
Page 10
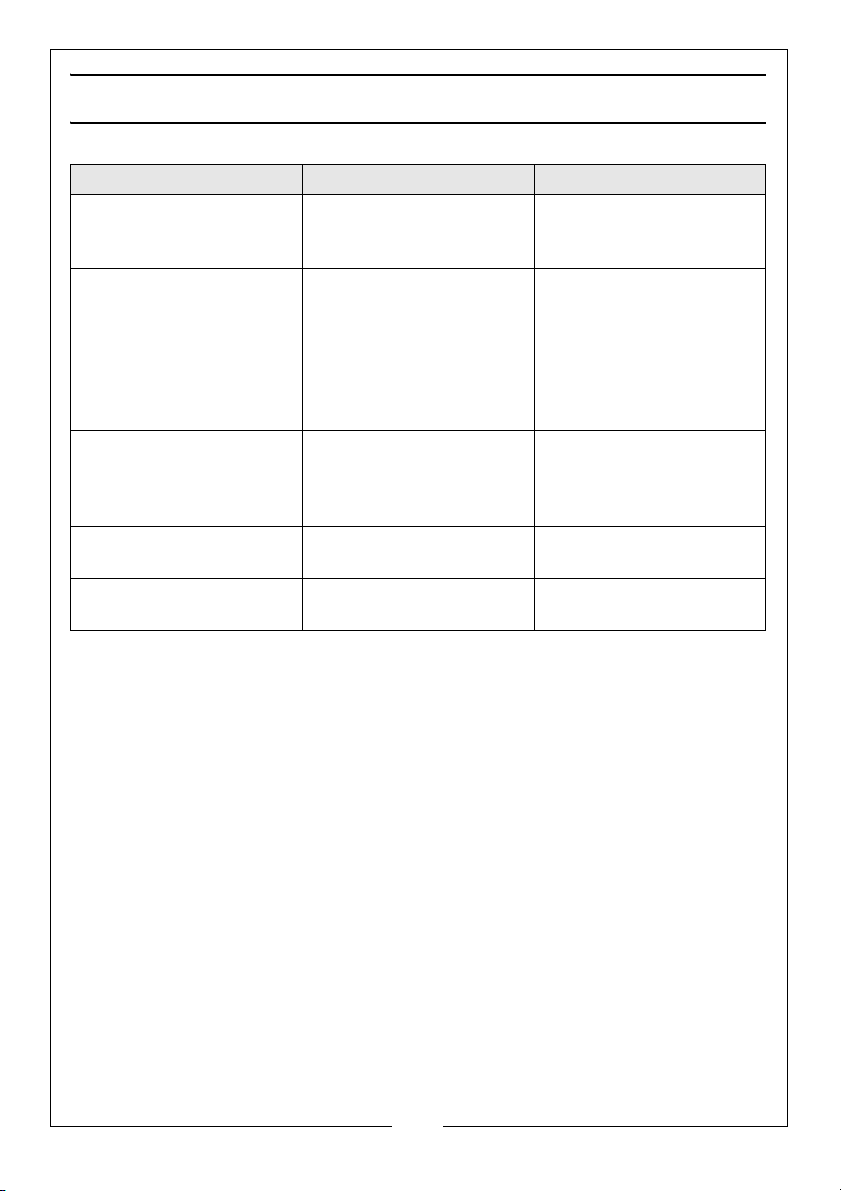
TROUBLESHOOTING
Problem Probable Cause Remedy
Pump will not work. Dirt on seals/worn valve
components.
Pump will not produce
pressure.
Pump feels hesitant
under load.
Pump will not lower
completely.
Pump will not deliver
pressure.
Pump feels hesitant
under load.
Piston will not withdraw
completely.
Air-lock. Open the release valve
Pump has wrong low oil
level.
Pump seal could be
worn out.
Air-lock. Release air by removing
DISPOSAL OF UNWANTED MATERIALS
One of the most damaging sources of environmental pollution is oil products.
Never throw away used oil with domestic refuse or flush it down a sink or drain.
Collect any oil in a leak proof container and take it to your local waste
disposal site.
Should hydraulic components become completely unserviceable and require
disposal, draw off the oil into an approved container and dispose of the
product and the oil according to local regulations.
Bleed pump or have unit
overhauled with new
seals by your dealer.
and remove the oil filler
plug. Pump the actuating pedal a couple of full
strokes and close the
release valve. Replace
the filler plug.
Check oil level by
removing the filler plug
and topping up to the
correct level.
Have the seal replaced
by your Clarke dealer.
the filler plug.
10
Parts & Service: 020 8988 7400 / E-mail: [email protected] or [email protected]
Page 11
Page 12
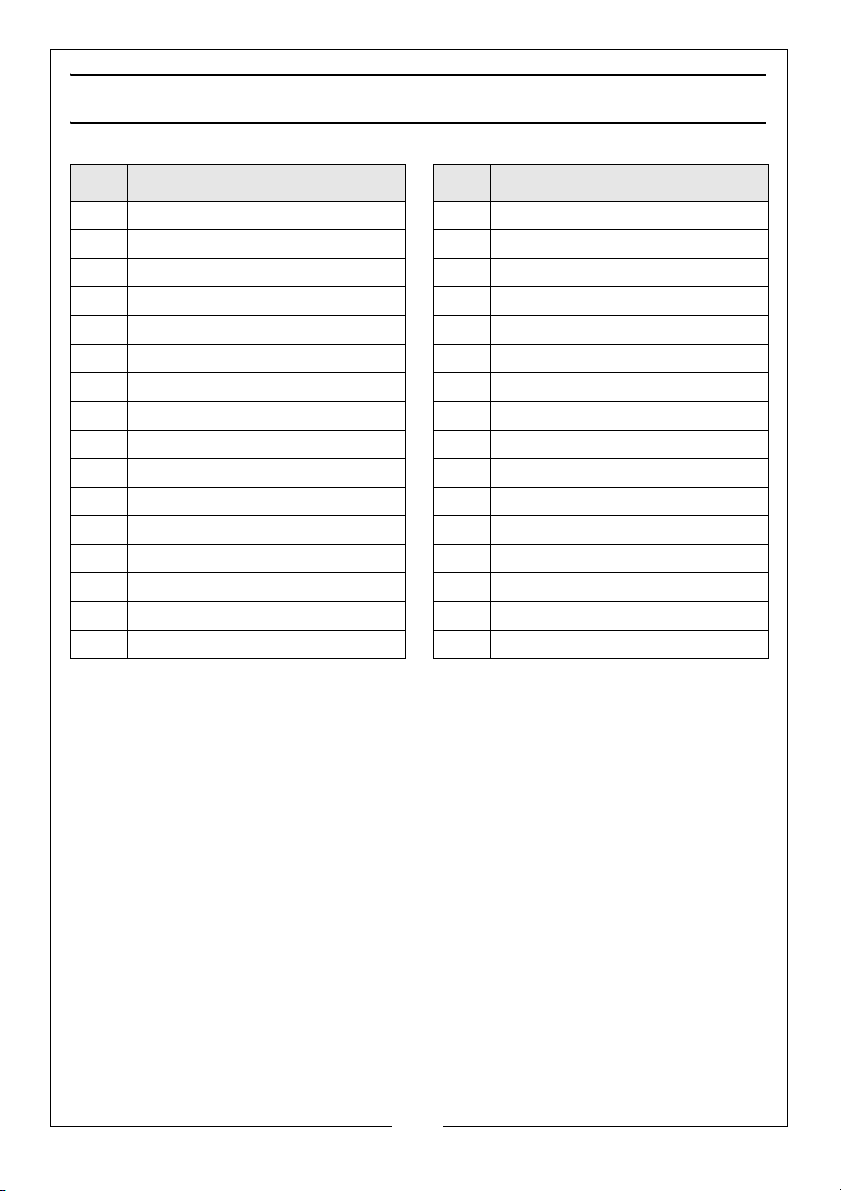
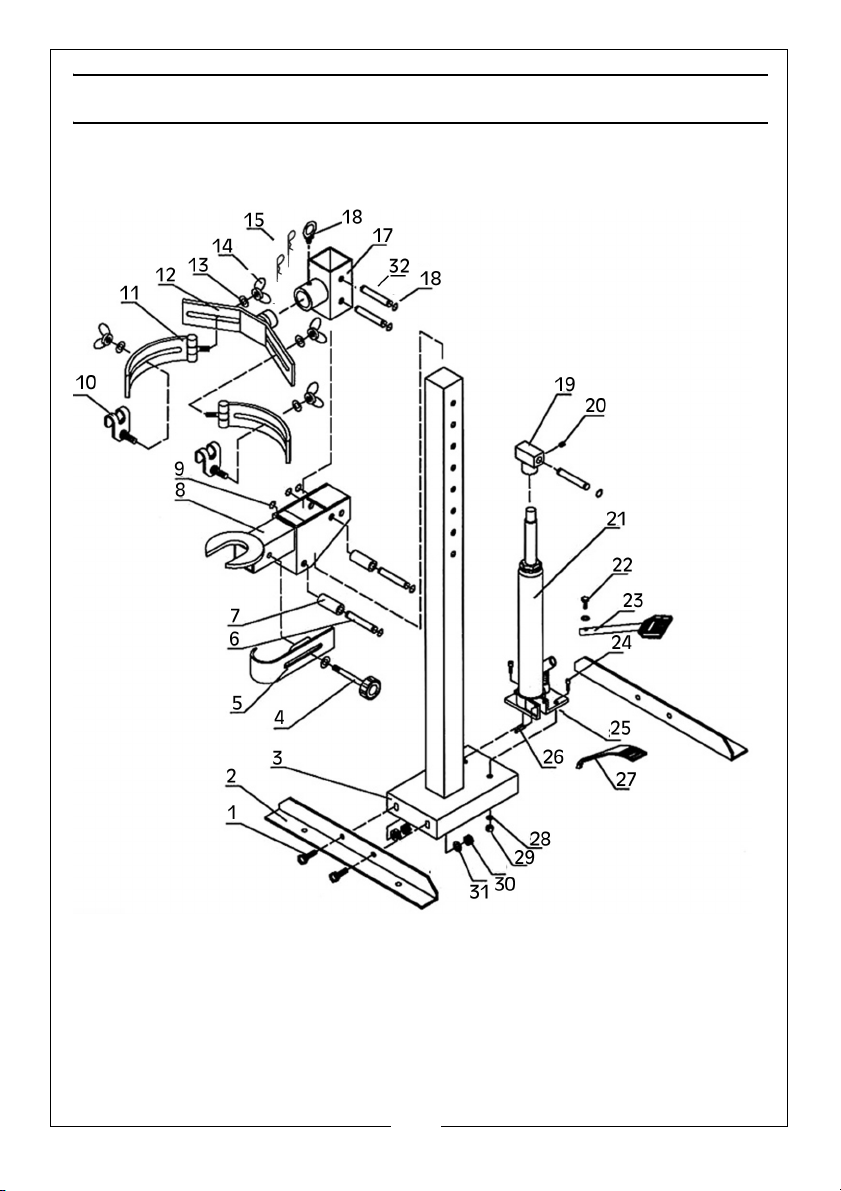
COMPONENT PARTS
NO DESCRIPTION NO DESCRIPTION
1 Bolt 17 Upper Strut Support
2 Base Support 18 Circlip
3 Main Frame 19 Saddle
4 Fixing Knob 20 Screw
5 Strut Clasp 21 Hydraulic Ram Assembly
6 Locating Pin 22 Bolt
7 Sleeve 23 Actuating Pedal
8 Lower Strut Holder 24 Bolt
9 Circlip 25 Ram Base
10 Spring Clasp 26 Pin
11 Spring Clasp Bracket 27 Release Foot Pedal
12 Spring Clasp Holder 28 Washer
13 Washer 29 Nut
14 Wing Nut 30 Nut
15 R-Clip 31 Washer
16 Screwed Ring 32 Pin
12
Parts & Service: 020 8988 7400 / E-mail: [email protected] or [email protected]
Page 13
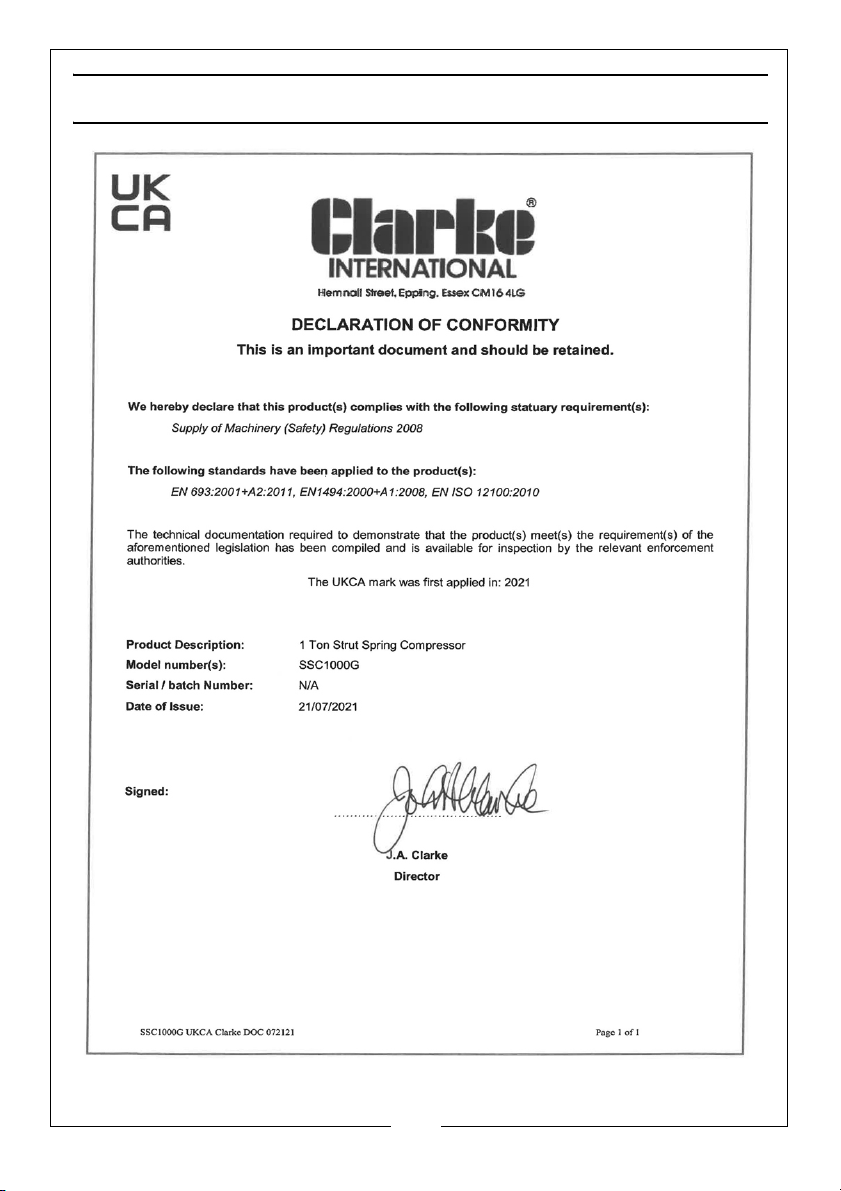
DECLARATIONS OF CONFORMITY
13
Parts & Service: 020 8988 7400 / E-mail: [email protected] or [email protected]
Page 14
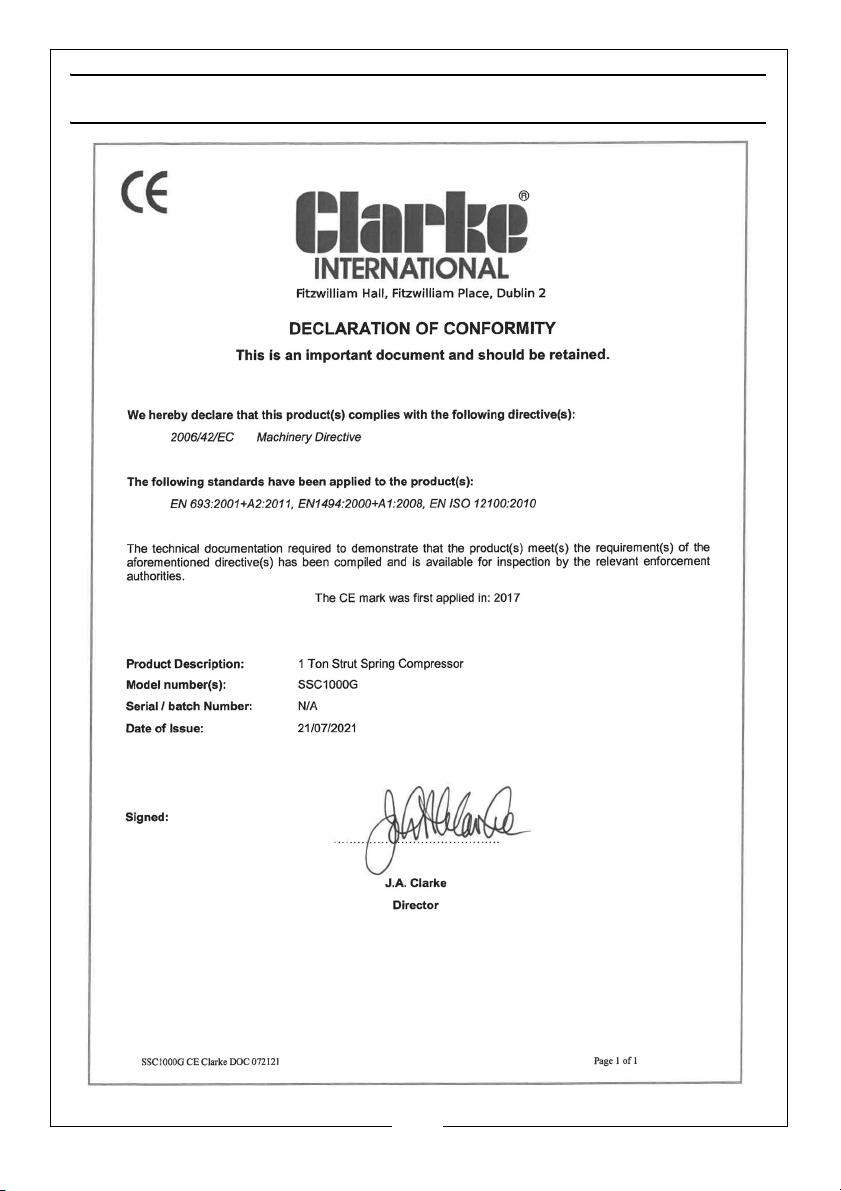
DECLARATIONS OF CONFORMITY
14
Parts & Service: 020 8988 7400 / E-mail: [email protected] or [email protected]
Page 15

NOTES
_____________________________________________________________________________
_____________________________________________________________________________
_____________________________________________________________________________
_____________________________________________________________________________
_____________________________________________________________________________
_____________________________________________________________________________
_____________________________________________________________________________
_____________________________________________________________________________
_____________________________________________________________________________
_____________________________________________________________________________
_____________________________________________________________________________
_____________________________________________________________________________
_____________________________________________________________________________
_____________________________________________________________________________
15
Parts & Service: 020 8988 7400 / E-mail: [email protected] or [email protected]
Page 16
 Loading...