

Page 1

ENGINE STAND
MODEL NO: CES560
PART NO: 7610123
USER INSTRUCTIONS
ORIGINAL INSTRUCTIONS GC0918 Issue 2
Page 2

INTRODUCTION
Thank you for purchasing this CLARKE Engine Stand.
Before attempting to operate the product, it is essential that you read this
manual thoroughly and carefully follow all instructions given. In doing so you
will ensure the safety of yourself and that of others around you, and you can
also look forward to your purchase giving you long and satisfactory service.
GUARANTEE
This CLARKE product is guaranteed against faulty manufacture for a period of
12 months from the date of purchase. Please keep your receipt as proof of
purchase.
This guarantee is invalid if the product is found to have been abused or
tampered with in any way, or not used for the purpose for which it was
intended.
Faulty goods should be returned to their place of purchase, no product can
be returned to us without prior permission.
This guarantee does not effect your statutory rights.
TECHNICAL SPECIFICATIONS
Max Capacity (SWL) 560 kg (0.56 Tonne)
Net Weight 28 kg
Dimensions L x W x H 1000 x 845 x 810
2
Parts & Service: 020 8988 7400 / E-mail: [email protected] or [email protected]
Page 3

SAFETY PRECAUTIONS
1. Do not allow personnel to use the stand unless they have read these safety
precautions.
2. Never tamper with the product or modify it in any way, as this could prove
to be dangerous and will invalidate the guarantee. Only use the product
for the purpose for which it is intended.
3. Ensure that the stand is in good working order. Have any damaged parts
repaired or replaced immediately. Use genuine Clarke parts only. The use
of unauthorised parts may be dangerous and invalidate the guarantee.
4. Do not use the stand if it is damaged.
5. Use the stand in a suitable, well lit work area.
6. Keep the work area clean and tidy and free from unrelated items.
7. Do not use the stand when you are tired or under the influence of alcohol,
drugs or intoxicating medication.
8. Use the stand on level and solid ground, preferably concrete. Avoid soft/
unmade ground as the castors may sink in.
9. Ensure all bystanders keep at a safe distance whilst the stand is in use.
10. Do not work underneath an engine mounted on the stand.
11. Never climb on, or attempt to ride on the stand.
12. Take care not to trap your fingers in the adjustable parts of the stand.
13. Due to the weight of the loaded stand, the help of an assistant will be
beneficial when moving the stand around.
14. Never attempt to move a loaded engine stand across a floor having
cracks, pebbles, or other obstacles which might impede its movement.
15. The components of this engine stand are designed to withstand the rated
capacity. Do not substitute any other components or exceed the rated
capacity of the stand.
16. To move a loaded stand, push it from the load side. DO NOT move the
stand from the handle end and never pull the stand towards yourself.
17. Always ensure the engine is properly bolted to the stand.
18. Do not over-reach. Keep your proper footing and balance at all times.
19. Safety equipment such as gloves and non-skid shoes will reduce personal
injuries.
20. Failure to heed these warnings may result in damage to the equipment, or
serious personal injury.
3
Parts & Service: 020 8988 7400 / E-mail: [email protected] or [email protected]
Page 4
UNPACKING & ASSEMBLY
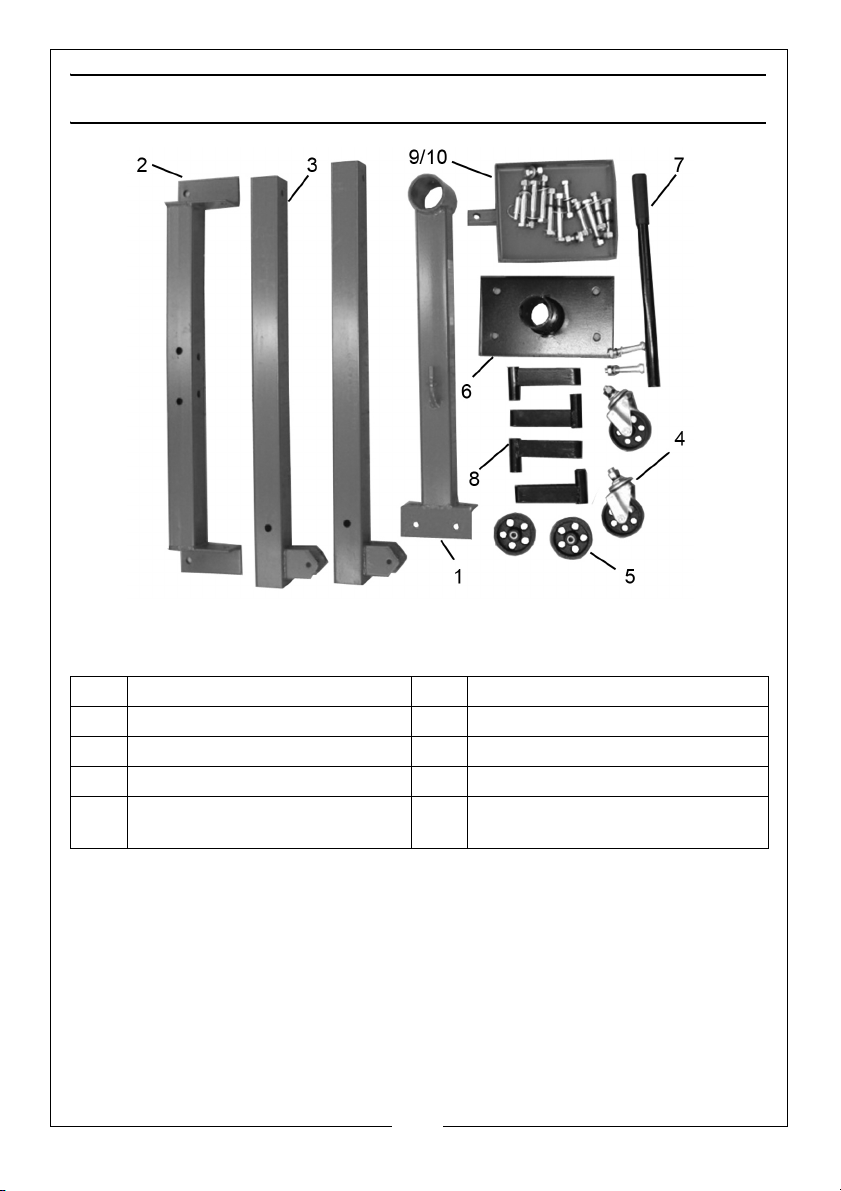
Unpack the components on a clean flat area of hard standing, and ensure
that all parts are present according to the packing list, as follows:
1 1 x Column assembly 6 1 x Mounting plate
2 1 x Rear cross-member 7 1 x Mounting plate handle
3 2 x Side arms 8 4 x Mounting Arms
4 2 x Castors with brake 9 1 x Parts tray
5 2 x Wheels 10 1 x Fixings kit including nuts, bolts,
washers and locating pin.
Visually inspect all components to ensure that no damage was suffered in
transit. Any deficiencies should be reported to your CLARKE dealer
immediately.
TOOLS REQUIRED
• Open or ratchet ring spanner (19 mm) or an adjustable wrench.
4
Parts & Service: 020 8988 7400 / E-mail: [email protected] or [email protected]
Page 5
ASSEMBLY
IMPORTANT: Due to the weight of the components, we recommend that you
get assistance during assembly.
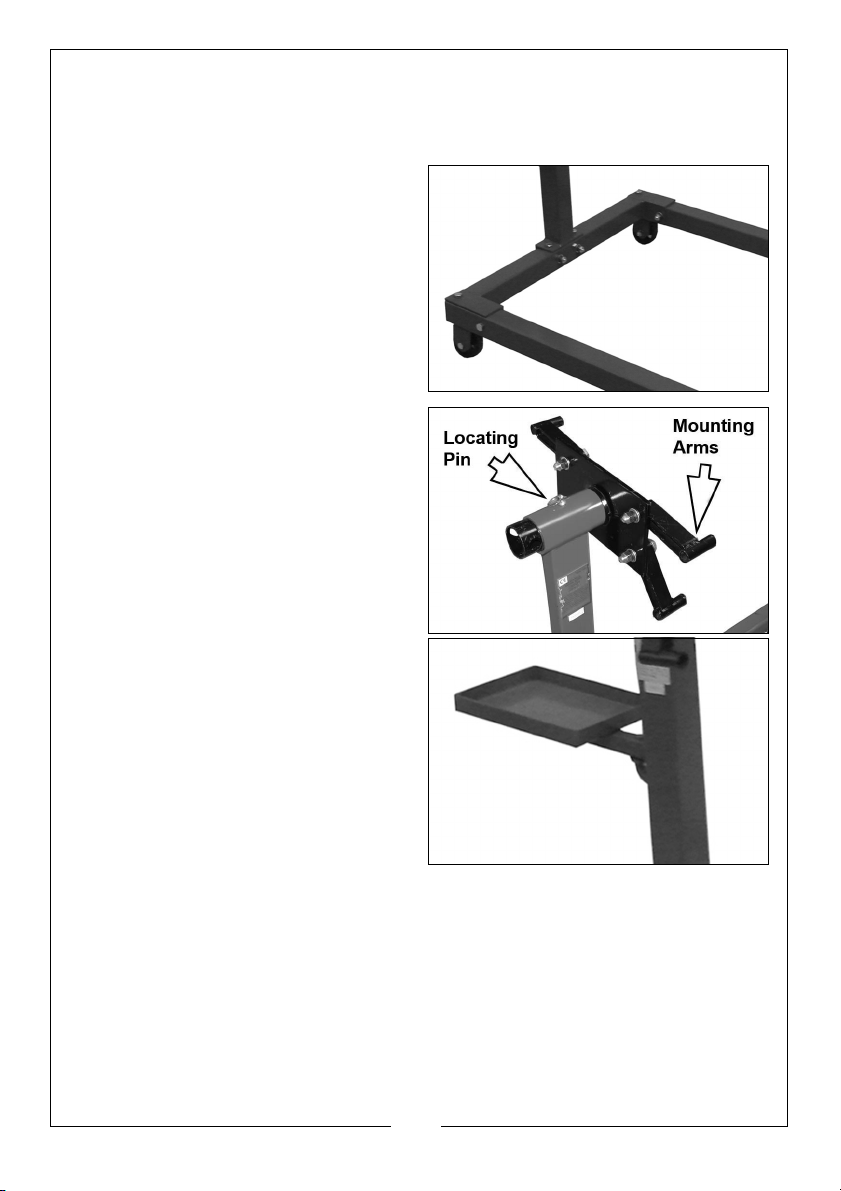
1. Loosely bolt the column to the
rear cross member.
2. Loosely bolt the side arms to the
rear cross member.
3. Bolt the straight castors to the
brackets on side arms.
4. Attach the castors to the side
arms, using the nuts, bolts &
washers.
5. Fit the mounting plate to the
upright column and secure with
the locating pin.
6. Attach the four mounting arms to
the mounting plate with nuts, bolts
and washers.
7. Pass the handle through the hole
in the spindle of the mounting
plate.
8. Ensure that all weight is spread
evenly across the crossmember
and side arms, making sure that
all four wheels are on level
ground and that the assembly is
sitting square and true. Tighten all
nuts and bolts.
9. Fit the parts tray to the column.
INSPECTION BEFORE USE
1. Always visually inspect the stand before use, to ensure that all parts are
correctly located and secure. Check for cracks, deformation or other signs
of damage or worn parts and check the castors for damage. Do not use
the stand unless it is totally sound.
2. Check castors to ensure they move freely without undue wear to their
pivots, and that the wheels are not cracked or damaged in any way.
3. Remove any rust or corrosion and repaint for protection.
5
Parts & Service: 020 8988 7400 / E-mail: [email protected] or [email protected]
Page 6
MOUNTING THE ENGINE TO THE STAND
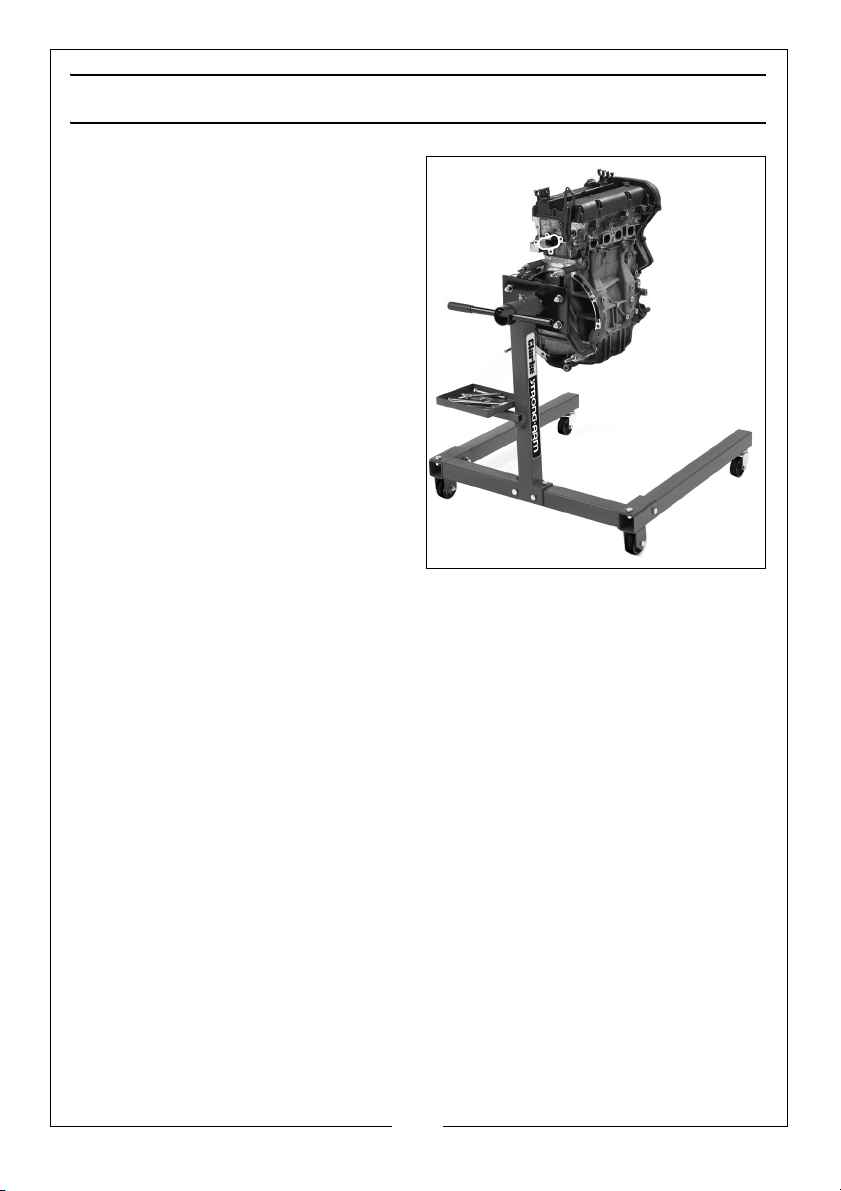
1. The mounting plate has four
adjustable arms with long bolt
holes. This is where the engine will
mount to the engine stand, using
suitable bolts which are
compatible with the threaded
holes in the engine block.
2. If the bellhousing bolts are too
short, obtain bolts that have the
same diameter and thread pitch.
Ideally, the bolts must be long
enough to go through the engine
stand arms and go at least one
inch into the engine block.
3. Lift the engine with your engine
hoist and move it towards the
engine stand.
4. Remove the locating pin, then
remove the mounting plate assembly from the engine stand.
5. Using compatible bolts, pass them through the mounting arms and bolt
them to the engine where the transmission was mounted to the block.
Mount two arms low down on the engine and bolt the other two as high as
possible.
6. Adjust the arms on the engine stand mounts so that the centre of the
mounting plate is aligned with the centre of the engine crankshaft. By
doing this you can ensure that the engine is balanced on the stand.
Tighten the bolts securely.
7. Lower the engine until the spindle is at the same level as the engine stand.
Slide the spindle of the mount into the engine stand. Replace the locating
pin to secure the mounting.
8. Slowly lower the engine hoist so that the engine stand starts to support the
weight of the engine. Double-check all fasteners and be sure that the
engine is secure.
9. Once you are confident that the stand is supporting the weight of the
engine, disconnect the hoist. Now that the engine is mounted to the stand
it can be rotated around to access all sides of the engine. Use the locking
pin to lock the engine at one of four different working angles.
6
Parts & Service: 020 8988 7400 / E-mail: [email protected] or [email protected]
Page 7
PARTS DIAGRAM
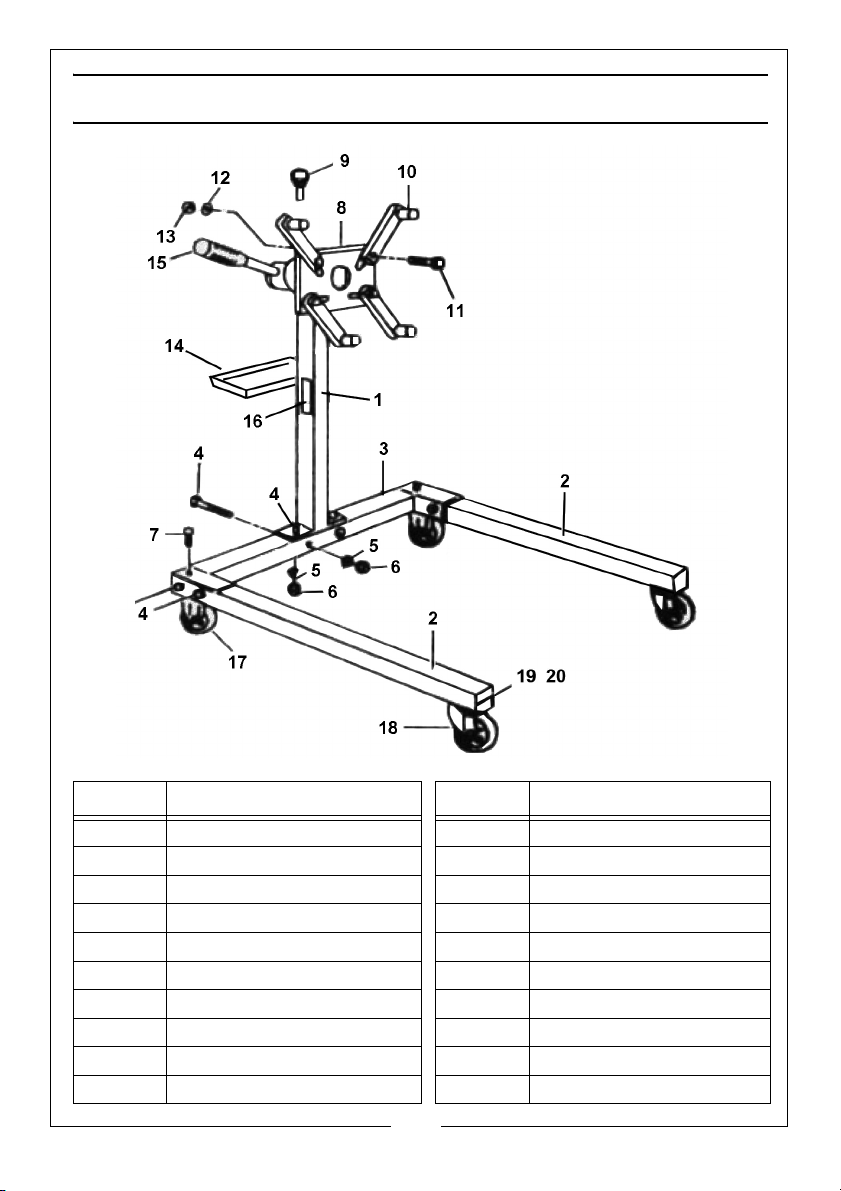
PART NO DESCRIPTION PART NO DESCRIPTION
1 Main Column assembly 11 Bolt (1/2” x 2.1/2”)
2 Side Arm 12 Flat Washer
3 Rear Crossmember 13 Hex Nut
4 Bolt (1/2” x 3.1/2”) 14 Parts Tray
5 Locking Washer 15 Rotation Handle
6 Hex Nut (1/2”) 16 Warning Label
7 Bolt 1/2” x 1” 17 Rear Wheel
8 Mounting Plate 18 Front Castor Wheel
9 Locating Pin 19 Bolt (5/16” x 5/16”)
10 Mounting Arm 20 Hex Nut
7
Parts & Service: 020 8988 7400 / E-mail: [email protected] or [email protected]
Page 8
 Loading...