

Page 1
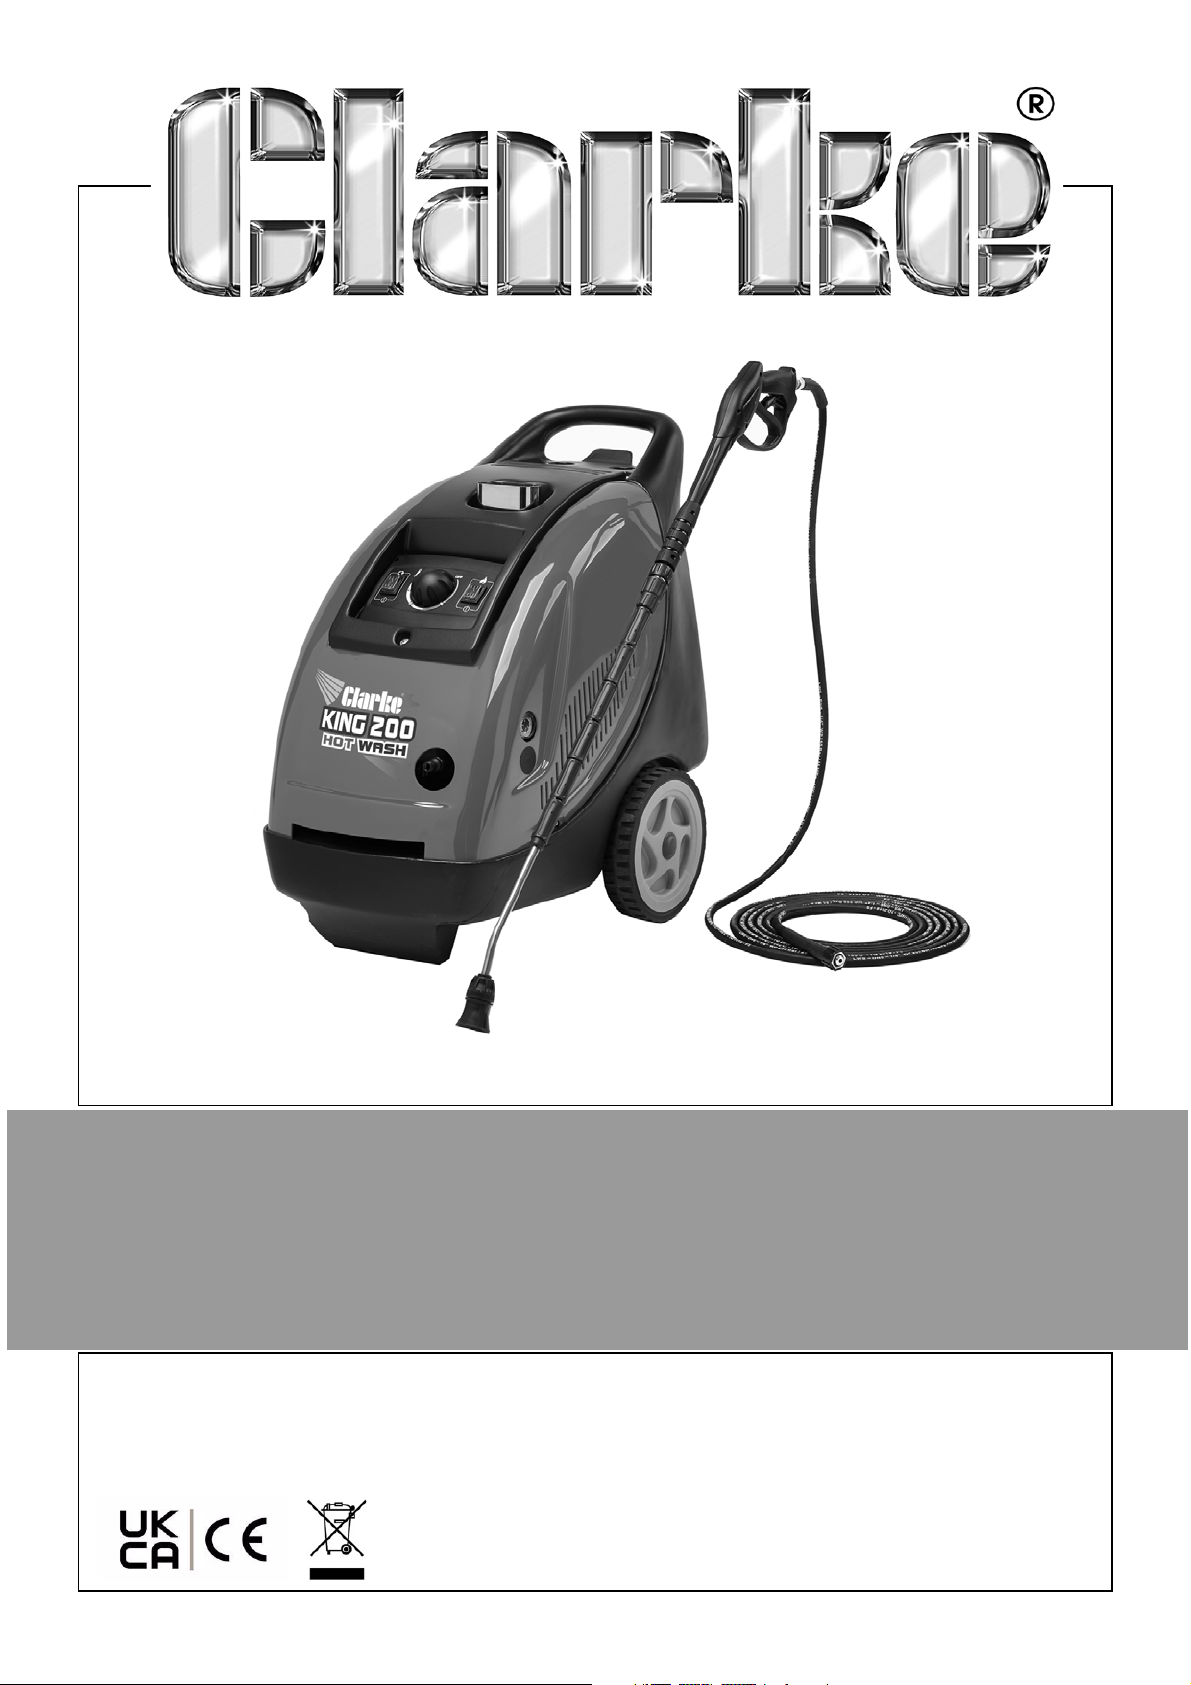
WARNING: Read these instructions before using the machine
PROFESSIONAL HIGH PRESSURE HOT WASHER
MODEL NO: KING 200
PART NO: 7320176
OPERATION & MAINTENANCE
INSTRUCTIONS
ORIGINAL INSTRUCTIONS
DL0322 - rev 2
Page 2
INTRODUCTION
Thank you for purchasing this CLARKE Hot Washer.
The machine has been designed to use hot or cold water to clean any
surfaces which can stand the force of the high pressure water jet and the
action of the detergents used.
The machine must only be used for the purpose for which it was designed.
Before attempting to use this product, please read this manual thoroughly and
follow the instructions carefully. In doing so you will ensure the safety of yourself
and that of others around you, and you can look forward to your purchase
giving you long and satisfactory service.
GUARANTEE
This product is guaranteed against faulty manufacture for a period of 12
months from the date of purchase. Please keep your receipt which will be
required as proof of purchase.
This guarantee is invalid if the product is found to have been abused or
tampered with in any way, or not used for the purpose for which it was
intended.
Faulty goods should be returned to their place of purchase, no product can
be returned to us without prior permission.
This guarantee does not effect your statutory rights.
UNPACKING
Remove the cardboard box, put two wheels of the machine on the ground
and remove the pallet.
The following items should be supplied. If any parts are missing or damaged,
please see your CLARKE dealer.
1 x Pressure Washer 1 x Water Inlet Hose Adaptor
1 x Gun Assembly 1 x Hose Assembly
1 x Lance Assembly 1 x High Pressure Nozzle
2
Parts & Service: 020 8988 7400 / E-mail: [email protected] or [email protected]
Page 3

GENERAL SAFETY RULES
WARNING: WATER AT HIGH PRESSURE CAN BE DANGEROUS AND CAN
CAUSE DAMAGE IF THE OPERATOR IS CARELESS. NEVER ALLOW ANYONE
TO OPERATE THIS PRESSURE WASHER UNLESS THEY ARE FAMILIAR WITH THE
SAFETY PRECAUTIONS.
1. NEVER direct the spray towards any person or animal.
2. NEVER direct the spray towards electrical wiring or equipment.
3. NEVER hold your finger over the high pressure nozzle.
4. NEVER allow children or untrained personnel to use this machine.
5. NEVER operate the machine with any of the covers removed.
6. NEVER attempt any repairs to this machine. Always refer to your CLARKE dealer.
7. NEVER supply any liquid other than water to the water inlet.
8. NEVER use the detergent bottle to introduce flammable liquids/solvents, e.g. paint
thinners, petrol, oil as there is a risk of explosion.
9. NEVER direct the jet at electrical equipment or the machine itself.
10. NEVER use the pressure washer if the power cable or important parts of the machine
are damaged.
11. ALWAYS release any residual pressure in the system by turning off the water supply
and operating the trigger before disconnecting any hose or accessory.
12. ALWAYS keep the machine itself dry and well clear of water spray.
13. ALWAYS wear protective clothing and safety glasses. Loose particles and other
debris may be propelled at high speed by the water jet.
14. ALWAYS grip the gun firmly and expect the spray gun to ‘kick’ when starting.
15. ALWAYS respect the requirements of the local water company. Pressure washers may
only be connected to the mains drinking water supply, if a system separator (known
as a backflow preventer) is installed in the supply hose.
16. ALWAYS disconnect from the water supply and ensure the system is completely
drained when not in use. Store in a cool dry location.
17. ONLY use chemical cleaning agents (detergents), that are approved for pressure
washers. CLARKE Traffic Film Remover or CLARKE Wash and Wax (available from your
dealer), is recommended.
18. WAR NI NG : High pressure water jets can be dangerous if subject to misuse. The jet
must not be directed at a person or anything that they are wearing.
19. WAR NI NG : High pressure hoses, fittings and couplings are important for the safety of
the machine. Only use hoses, fittings and couplings recommended by the
manufacturer.
20. WAR NI NG : Water that has flowed through a system separator (known as a backflow
preventer) is considered non-drinkable.
3
Parts & Service: 020 8988 7400 / E-mail: [email protected] or [email protected]
Page 4
ELECTRICAL CONNECTIONS
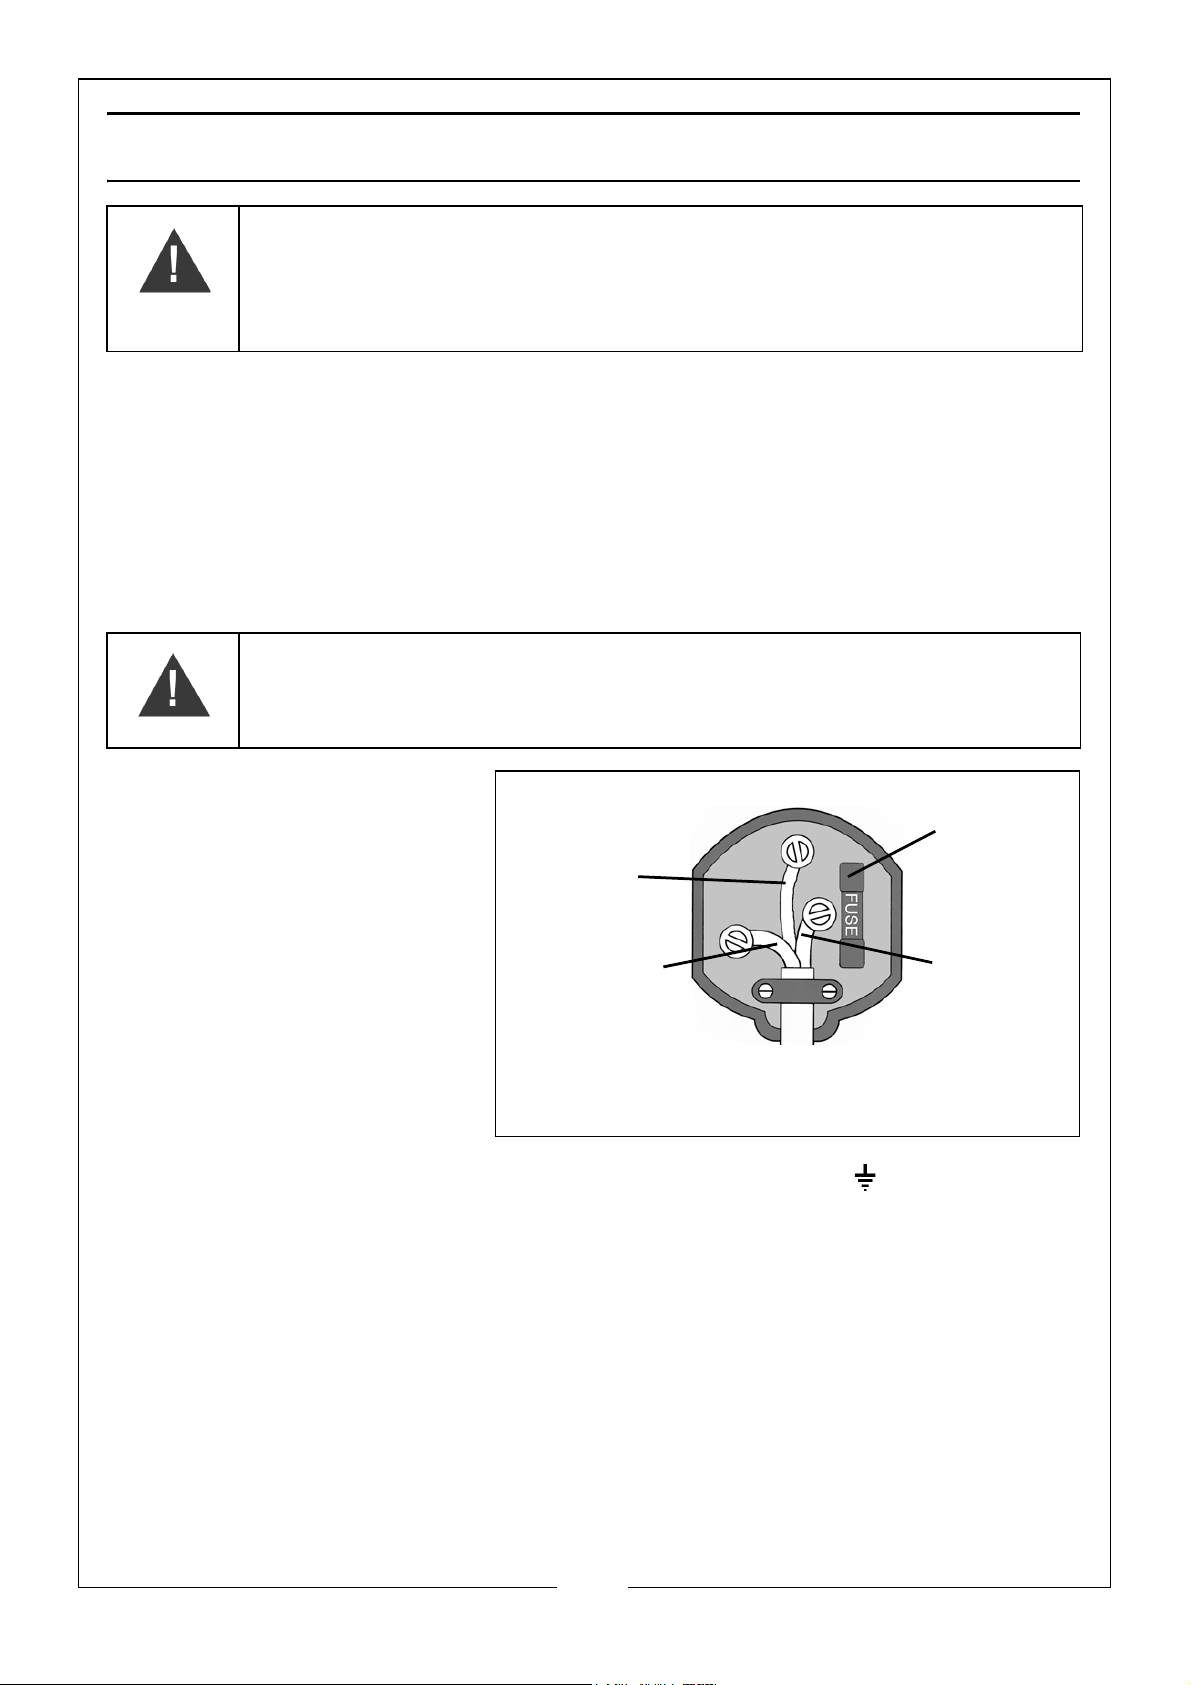
Plug must be BS1363/A approved.
Always fit
Ensure that the outer sheath of
Neutral
(Blue)
Live
(Brown)
Earth
(Green and
a 13 Amp
the cable is firmly held by the clamp
fuse.
Yellow)
WARNING: READ THESE ELECTRICAL SAFETY INSTRUCTIONS
THOROUGHLY BEFORE CONNECTING THE PRODUCT TO THE MAINS
SUPPLY.
Before switching the product on, make sure that the voltage of your electricity supply is
the same as that indicated on the rating plate. This product is designed to operate on
230VAC 50Hz. Connecting it to any other power source may cause damage.
If the fuse cover becomes lost or damaged, the plug must not be used until a suitable
replacement is obtained.
If the plug has to be changed, it should be cut off and a replacement fitted, following
the wiring instructions shown below. The old plug must be disposed of safely, as insertion
into a mains socket could cause an electrical hazard.
WARNING: THE WIRES IN THE POWER CABLE OF THIS PRODUCT ARE
COLOURED IN ACCORDANCE WITH THE FOLLOWING CODE:
BLUE = NEUTRAL BROWN = LIVE YELLOW AND GREEN = EARTH
If the colours of the wires in the
power cable of this product do
not correspond with the
markings on the terminals of
your plug, proceed as follows.
We strongly recommend that this machine is connected to the mains supply via
a Residual Current Device (RCD).
EXTENSION CABLES
If an extension cable is used, always ensure it is fully unwound. When used
outdoors, ensure that the extension cable is specifically designed for outdoor
use. Ensure that the cable is rated for the voltage and amperage of the
machine.
If in any doubt, consult a qualified electrician. DO NOT attempt any repairs
yourself.
• The blue wire must be
connected to the
terminal marked N.
• The brown wire must
be connected to the
terminal marked L.
• The yellow and green
wire must be connected to the terminal marked E or .
4
Parts & Service: 020 8988 7400 / E-mail: [email protected] or [email protected]
Page 5
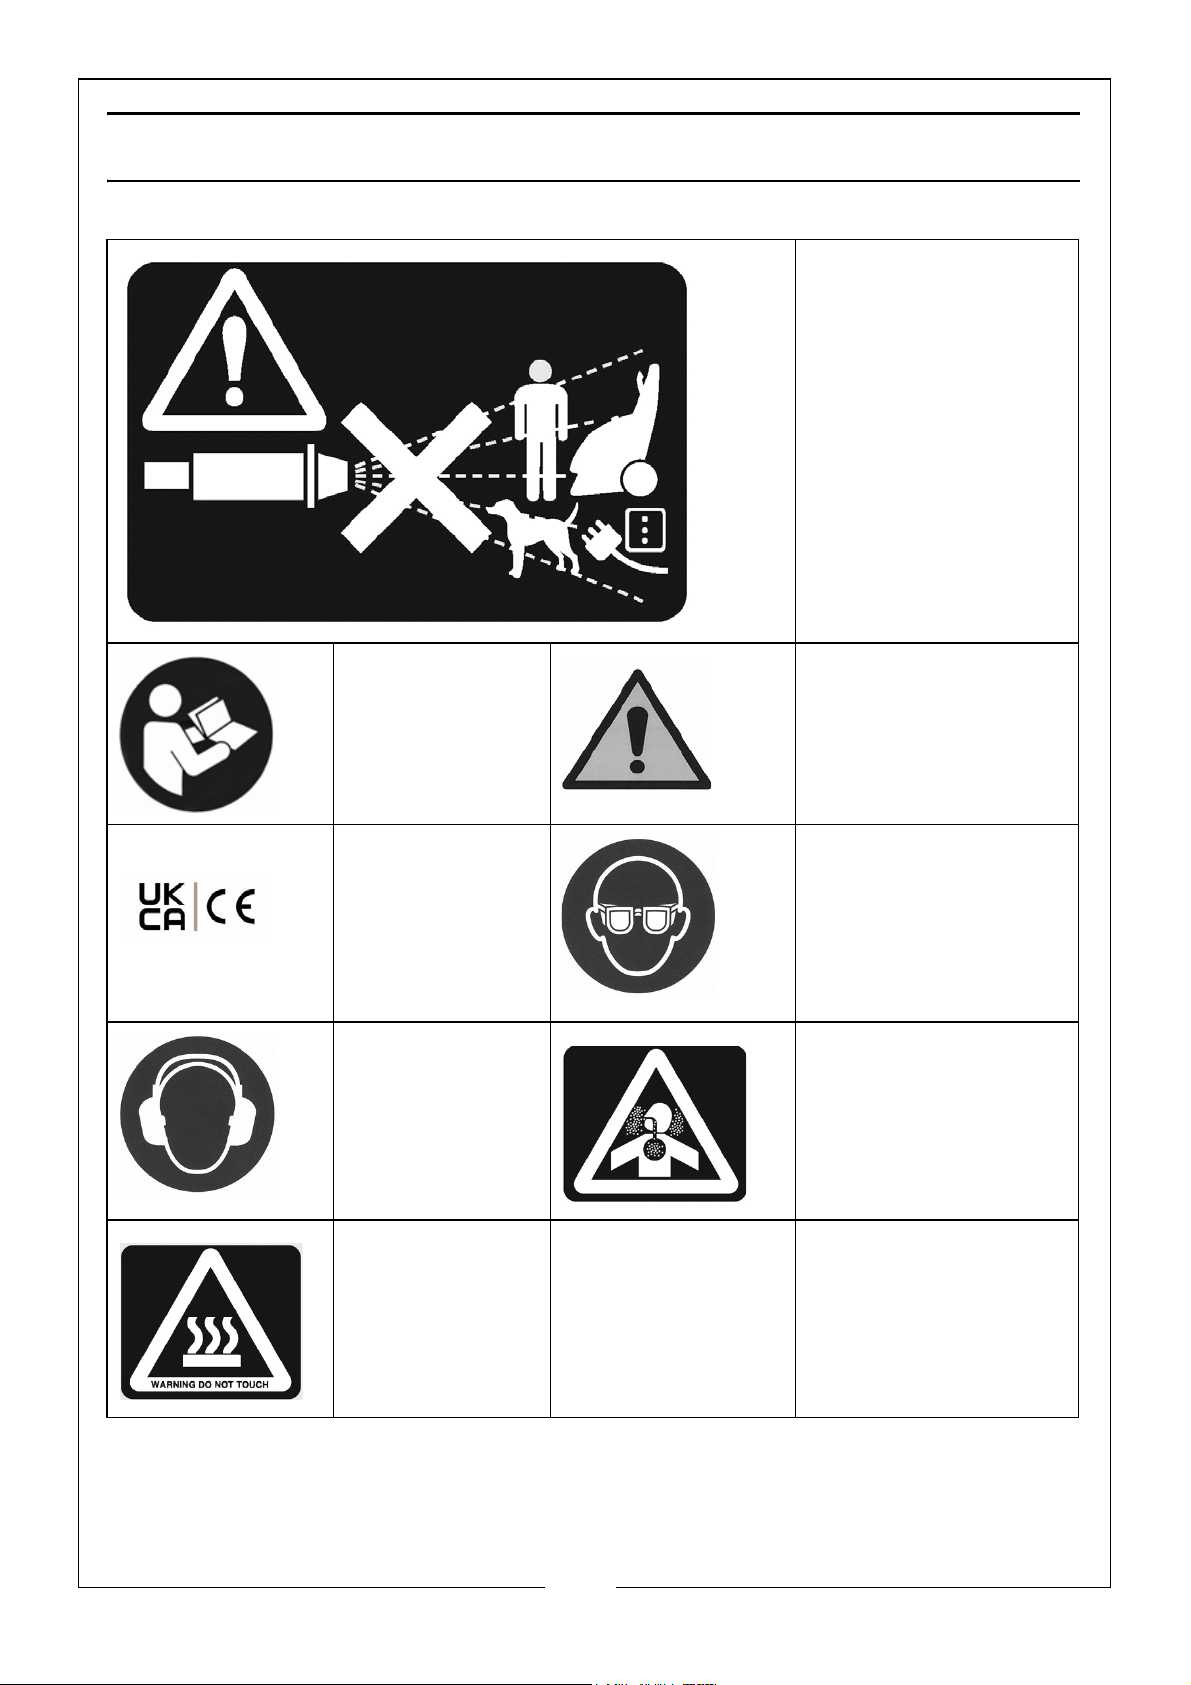
SYMBOLS ON THE MACHINE
The high pressure jet
must not be directed
at persons, animals,
live electrical
equipment or at the
appliance itself.
Read the
manual before
use.
Conforms to
UKCA &
CE Regulations.
Wear ear
protection
Hot Surface
Do Not Touch
Failing to follow these
instructions could
result in injury or
damage to the
machine.
Wear safety glasses
when using this
machine.
Respiratory Hazard.
Always Wear
Protection.
5
Parts & Service: 020 8988 7400 / E-mail: [email protected] or [email protected]
Page 6
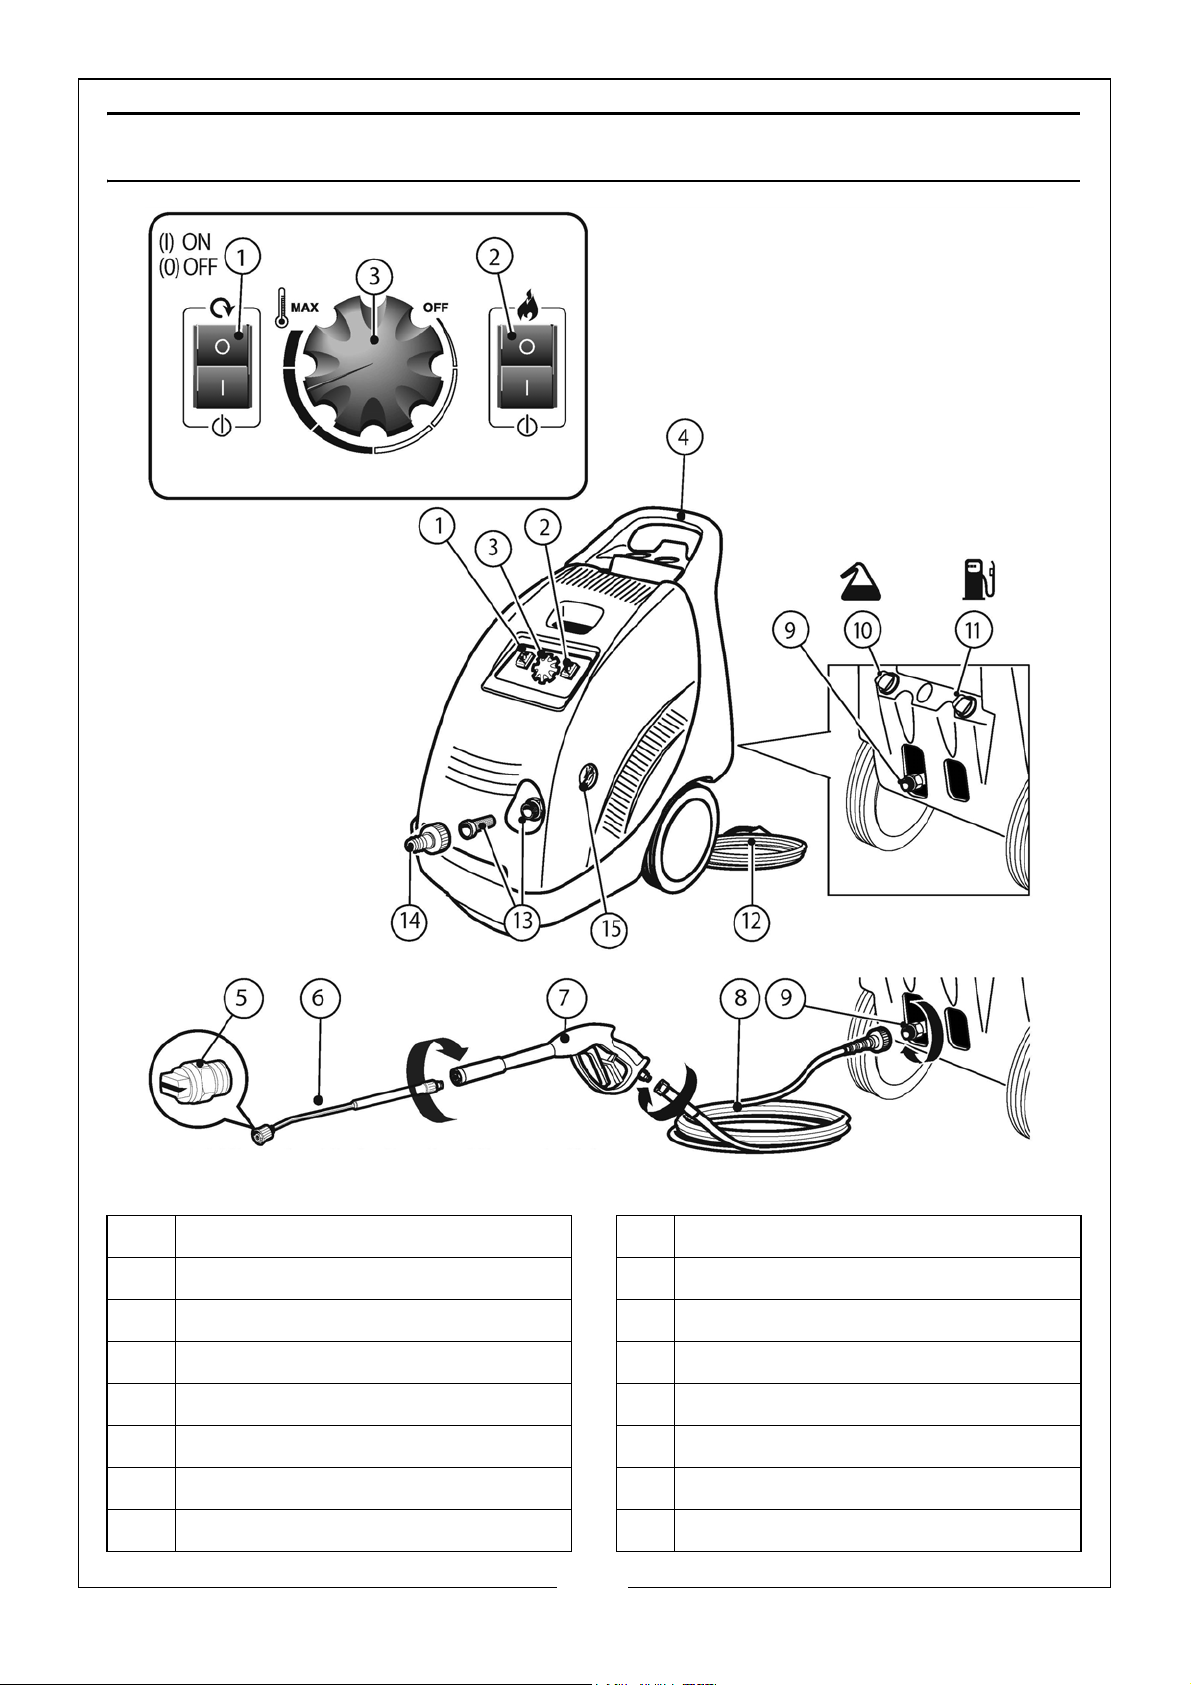
OVERVIEW
1 On/off Switch 9 High Pressure Water Outlet
2 Burner On/Off Switch 10 Detergent Tank
3 Burner Thermostat 11 Diesel Tank
4 Handle 12 Power Cable
5 Nozzle 13 Water Inlet & Filter
6 Extension Lance 14 Water Inlet Adaptor
7Gun 15Pressure Gauge
8 High Pressure Hose
6
Parts & Service: 020 8988 7400 / E-mail: [email protected] or [email protected]
Page 7
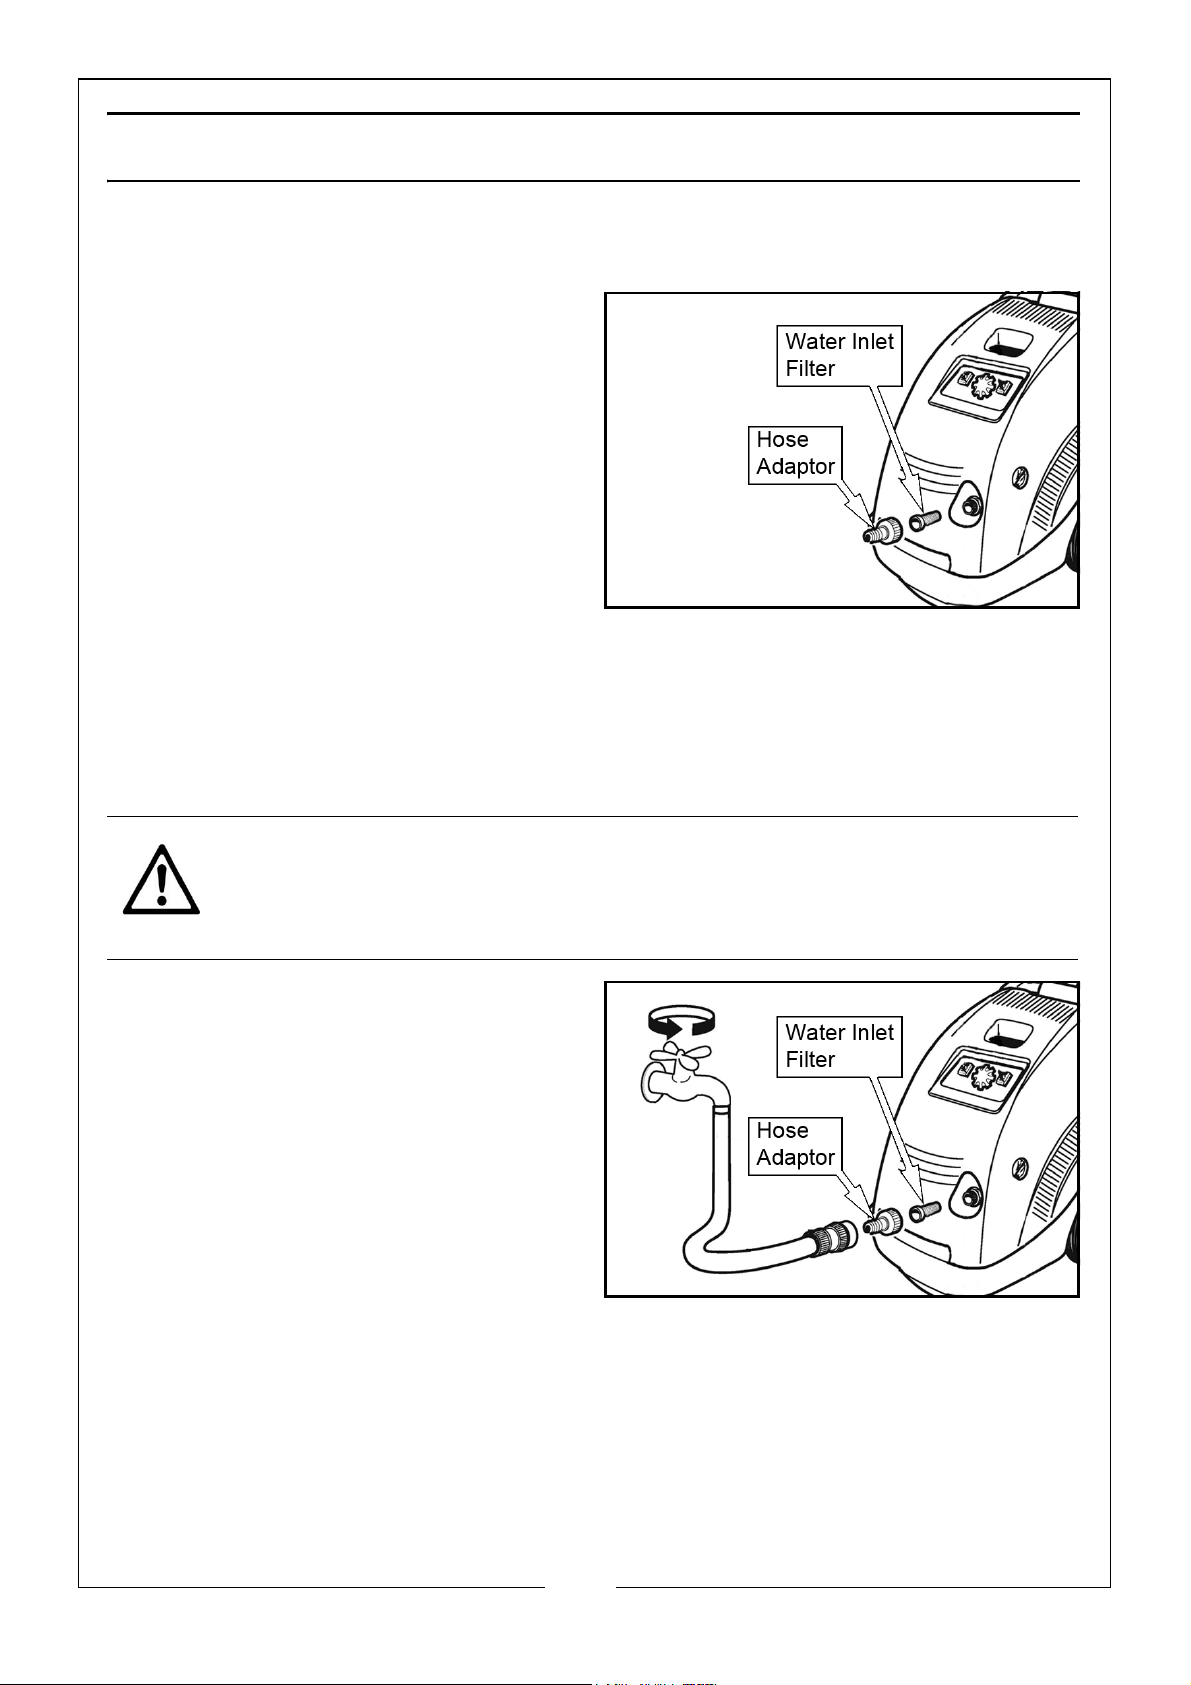
CONNECTION
CONNECT THE HOSE ADAPTOR
1. Insert the Water inlet filter into the
water inlet.
2. Screw the supplied hose adaptor
onto the water inlet by hand as
shown.
• Do not use any tools to tighten
the adaptor.
CONNECT TO A WATER SUPPLY
The pressure washer must never be connected to the drinking water supply
without using a system separator (also known as a backflow preventer).
Always follow the regulations of your local water supplier.
CAUTION: WATER THAT HAS FLOWED THROUGH A SYSTEM SEPARATOR IS
CONSIDERED NON-DRINKABLE.
1. Connect a supply hose to the inlet
adaptor.
• We recommend that you use a
push fit quick connector (not
supplied).
• The water supply must be able
to deliver at least 10 l/min with
an inlet temperature between
5°C and 40°C.
7
Parts & Service: 020 8988 7400 / E-mail: [email protected] or [email protected]
Page 8
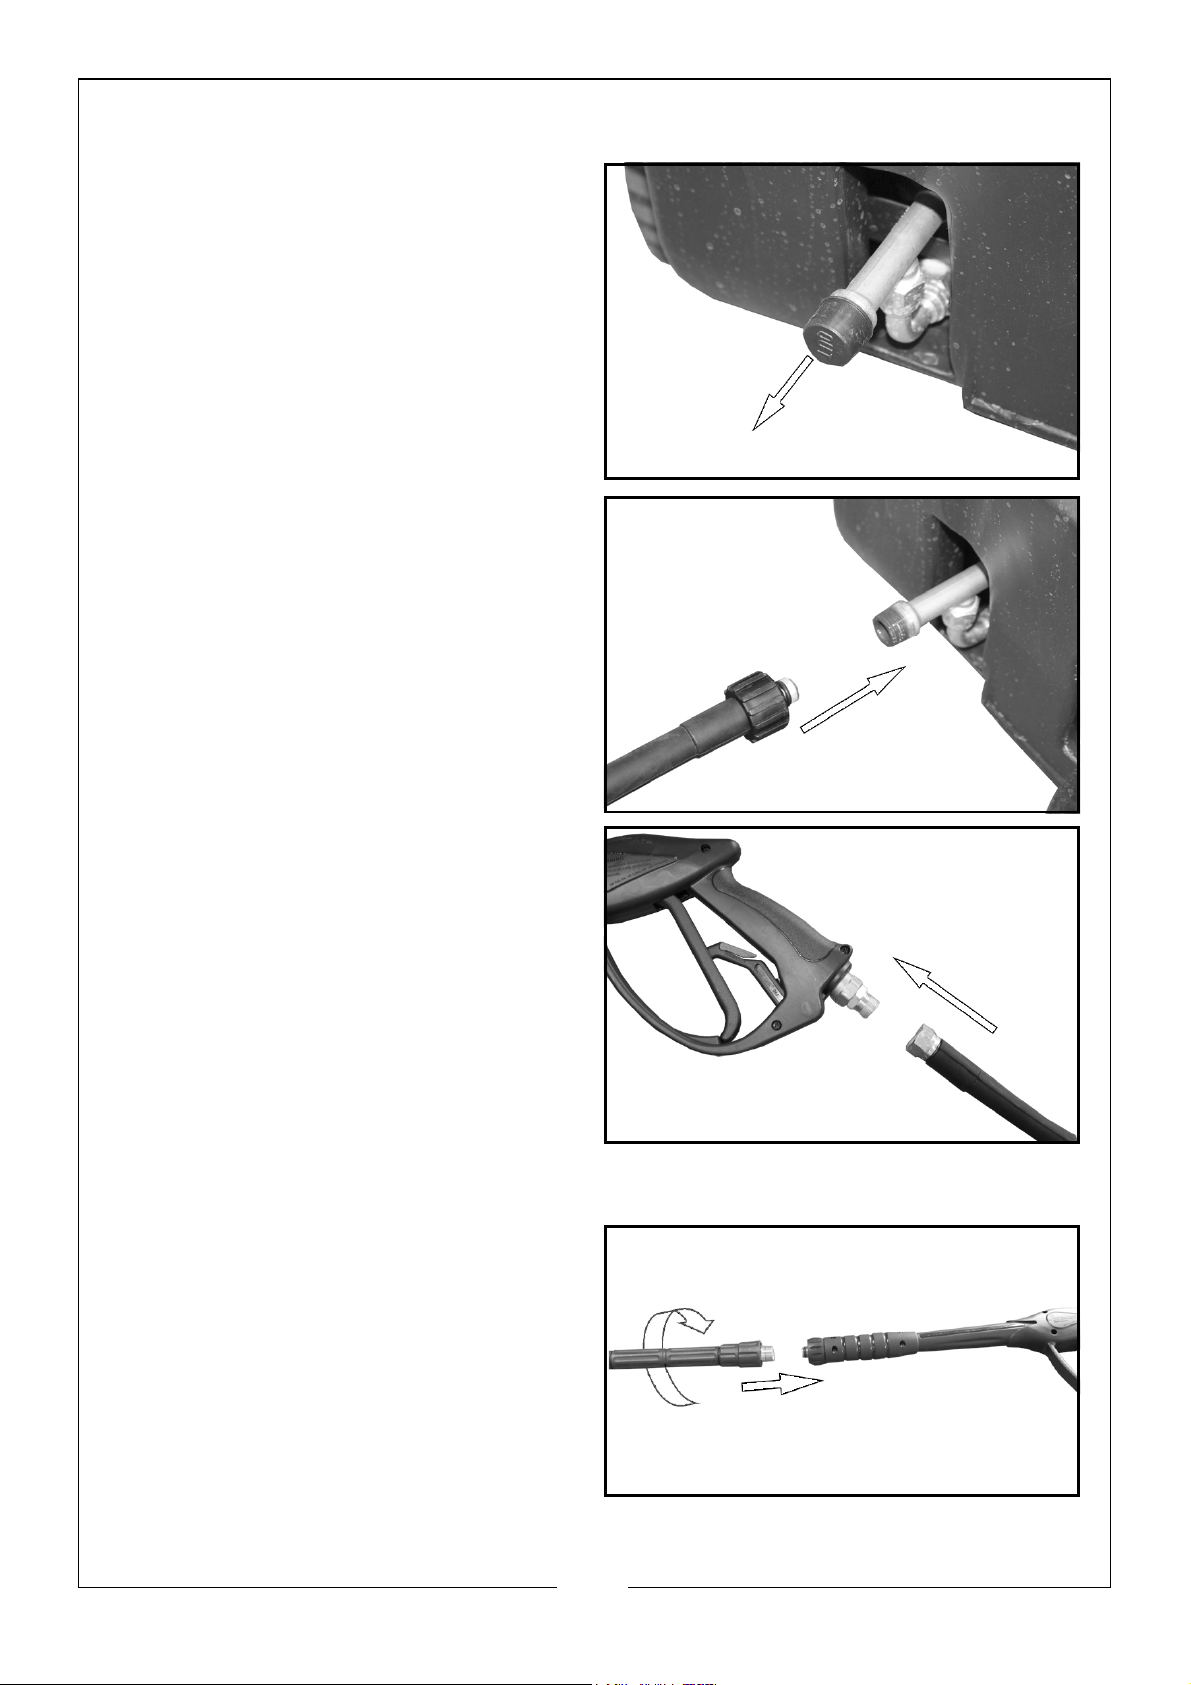
CONNECT THE HIGH PRESSURE HOSE
1. Remove the travel cap from the
high pressure hose outlet.
2. Screw the other end of the hose
on to the outlet.
• Tighten the connector by hand
only - do not use any tools.
• Make sure the connection is
secure.
3. Connect the high pressure hose to
the gun assembly.
• Make sure the connection is
secure.
ATTACH THE EXTENSION LANCE
1. Connect the extension lance to
the gun assembly.
8
Parts & Service: 020 8988 7400 / E-mail: [email protected] or [email protected]
Page 9
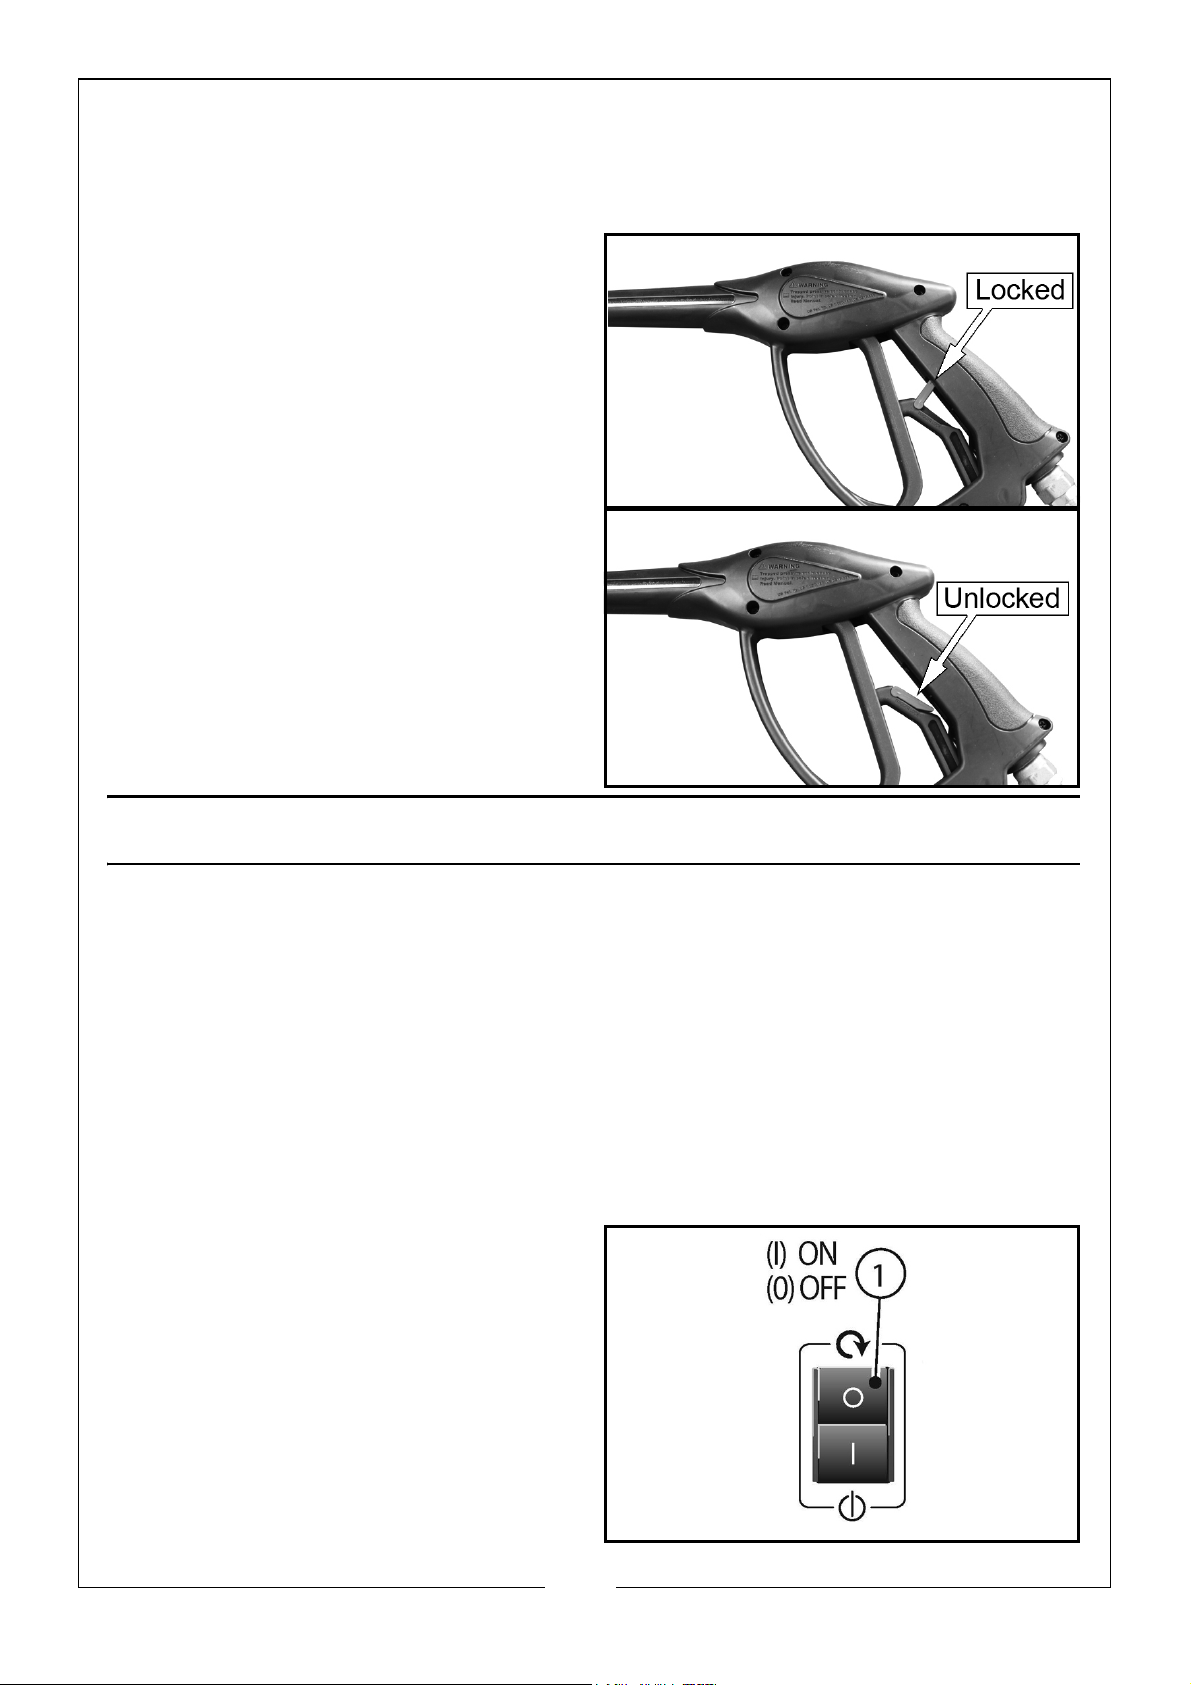
GUN ASSEMBLY SAFETY LOCK
The safety button on the gun is not there to lock the lever during operation,
but to prevent its accidental operation.
1. Lift the locking lever to the
position shown to prevent the
trigger from being pulled.
2. Fold the locking lever flat to
release the trigger lock.
AUTOMATIC STOP SYSTEM
The Automatic Stop System stops the machine during the bypass mode.
The Automatic Stop System will stop the machine and will restart it
automatically when the trigger is pulled.
• It is advisable to activate the safety lock on the gun assembly whenever
the machine is not being used in order to avoid unintentional starting.
• If the machine starts automatically without pressing the gun trigger this
will be attributable to air bubbles in the water or other similar
phenomena and does not imply the existence of any defects in the
machine.
• Do not leave the machine
unattended.
If you do not intend to used the
machine for more than 5 minutes, set
the ON/OFF switch to OFF.
9
Parts & Service: 020 8988 7400 / E-mail: [email protected] or [email protected]
Page 10
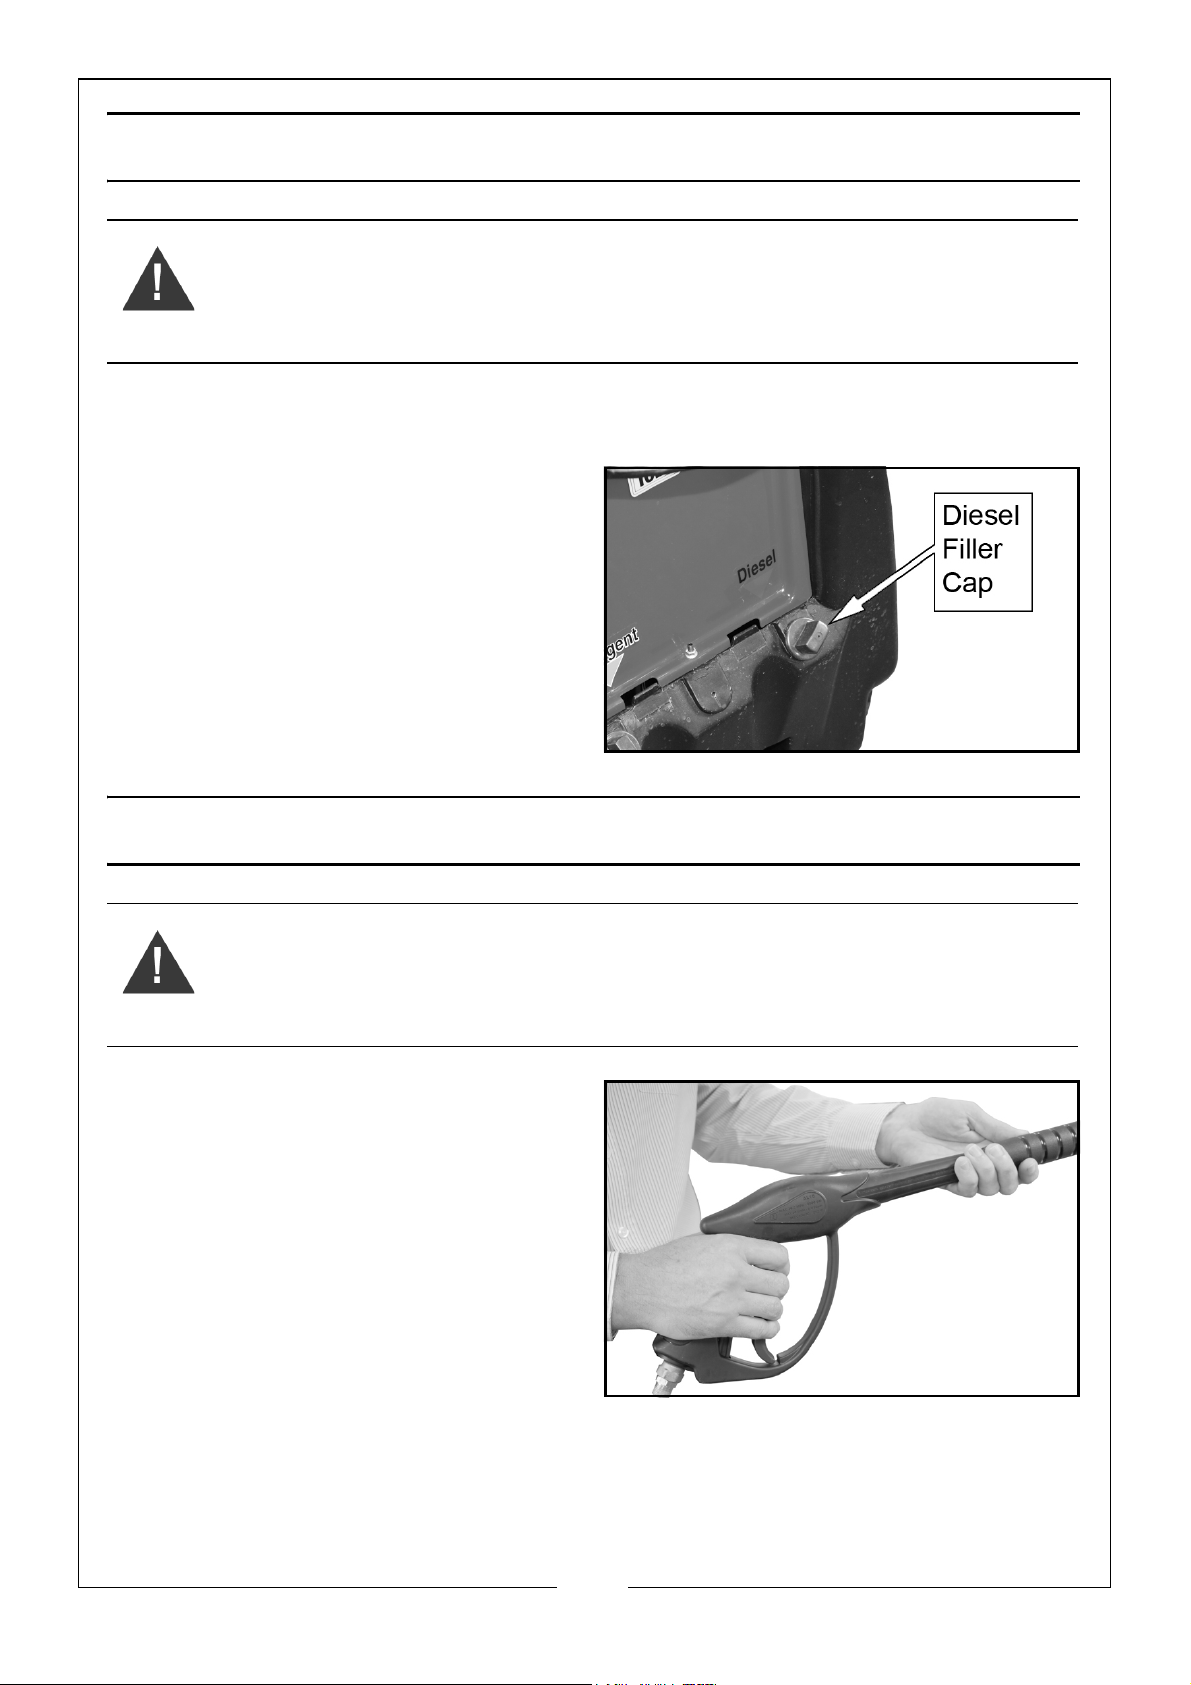
ADDING FUEL
WARNING: INCORRECT FUELS MUST NOT BE USED AS THEY MAY PROVE
HAZARDOUS.
• ALWAYS refuel in a well-ventilated area, away from sources of ignition.
• NEVER leave fuel within the reach of children.
• Refuel carefully to avoid
spillages.
1. Remove the diesel filler cap.
2. Fill the tank with diesel fuel only.
• Minimum 4 litres
• Maximum 14 litres.
3. Replace the filler cap securely.
OPERATION
WARNING: IN CASE OF OPERATION INDOORS, ADEQUATE VENTILATION
AND GAS VENTING MUST BE ASSURED.
HOLDING THE LANCE
1. Users must hold the gun in the
correct position, with one hand on
the grip and the other on the
lance as shown.
NOTE: Never touch any metal parts
of the lance as they will get
hot during use.
10
Parts & Service: 020 8988 7400 / E-mail: [email protected] or [email protected]
Page 11
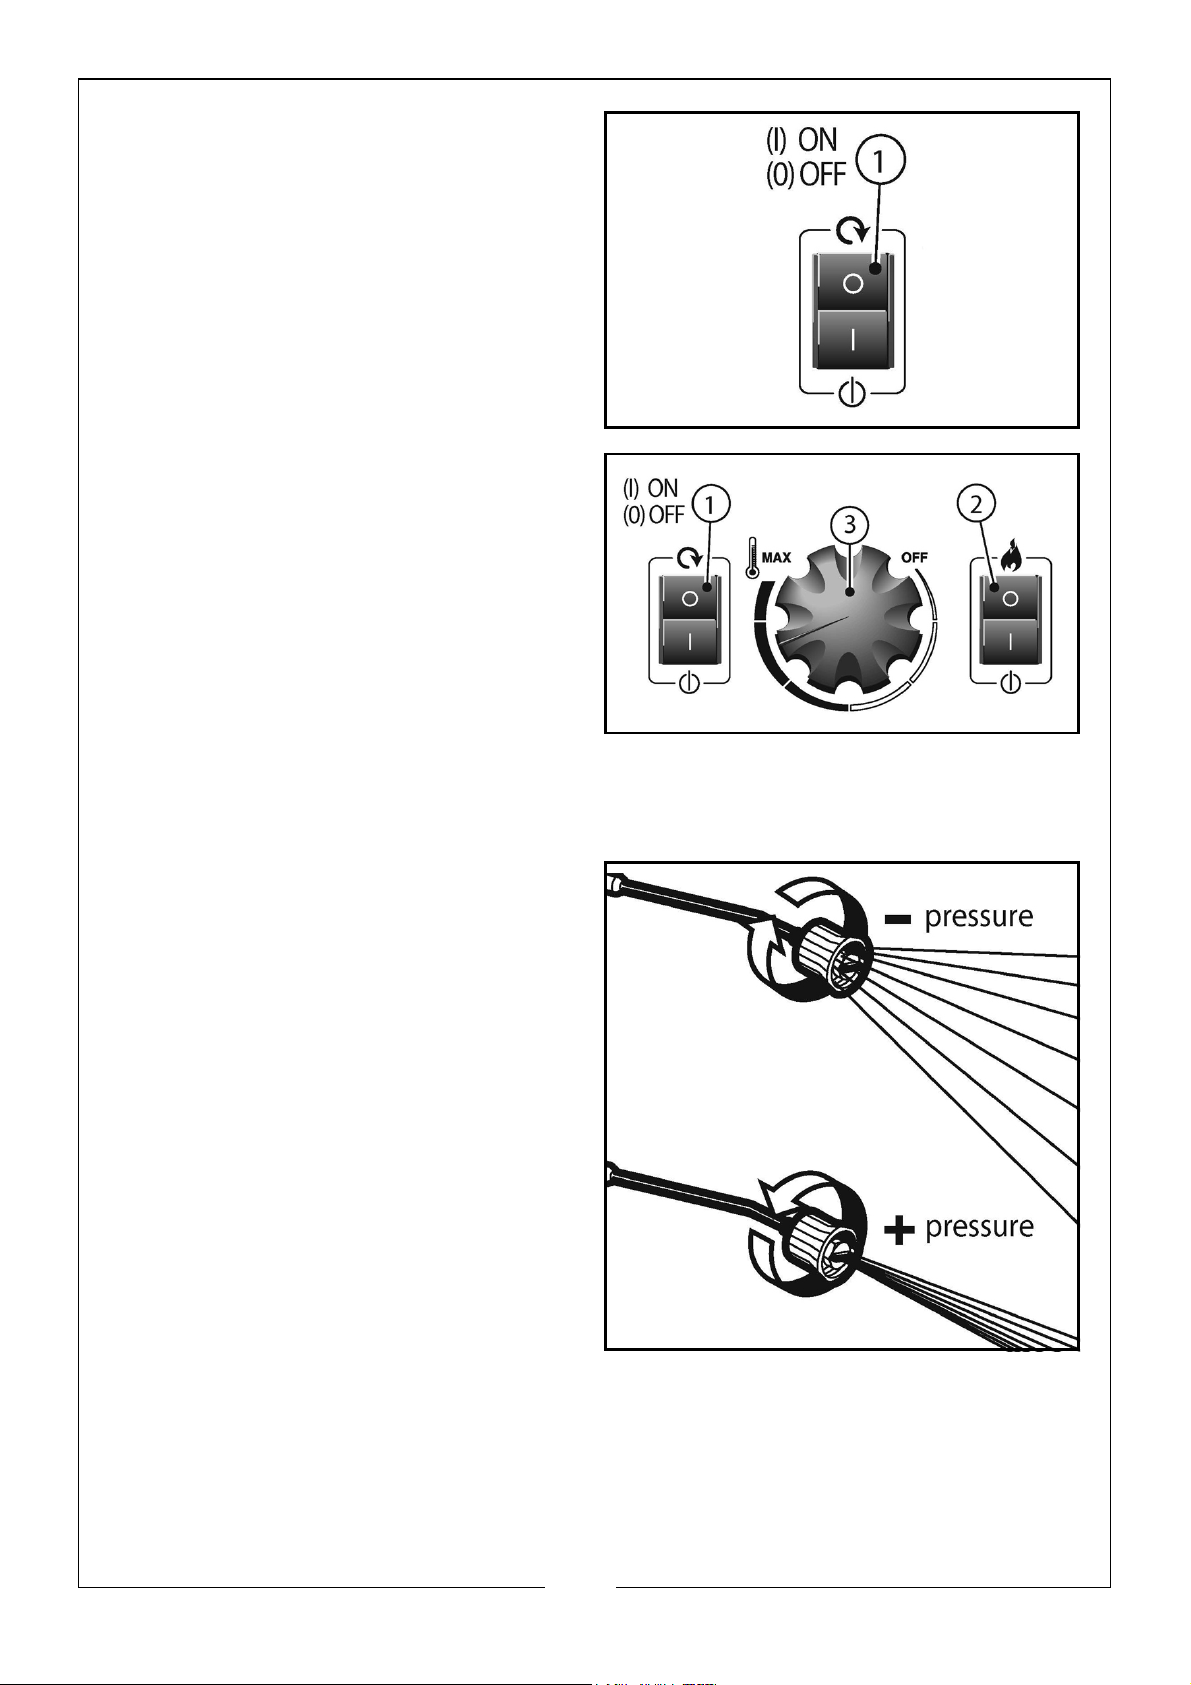
WASHING WITH COLD WATER
1. Set the ON/OFF switch to ON.
2. Squeeze the gun trigger.
WASHING WITH HOT WATER
1. Set the ON/OFF switch to ON.
2. Set the Burner ON/OFF switch to
ON.
3. Turn the burner thermostat to the
desired temperature setting.
4. Squeeze the gun trigger.
TO CHANGE THE SPRAY PATTERN (PENCIL JET / FAN SPRAY)
1. To vary the spray between Pencil
Jet and fan spray, turn the nozzle
counter-clockwise through a halfa-turn (180°).
ADJUSTING THE PRESSURE
Ways to adjust the pressure include
varying the distance you are from the
surface being cleaned or adjusting
the spray to a wider angle (lowering
the pressure).
11
Parts & Service: 020 8988 7400 / E-mail: [email protected] or [email protected]
Page 12
SHUTTING DOWN
1. Set all switches to OFF and remove the mains plug from the power supply.
2. Squeeze the trigger on the gun assembly to remove any pressure in the
hose.
3. Turn off and disconnect the water supply hose and allow it to drain fully.
4. Disconnect the high pressure hose and allow it to drain fully.
USING DETERGENTS
WARNING: THE USE OF UNSUITABLE CLEANING AGENTS MAY ADVERSELY
AFFECT THE SAFETY OF THE MACHINE. DO NOT EXCEED THE CORRECT
OPERATING TEMPERATURE FOR THE DETERGENT IN USE.
Only use detergents recommended for use with pressure washers such as:
• CLARKE Traffic Film Remover which is a powerful ‘low foaming’ agent for
car cleaning, patio cleaning etc.
• CLARKE Wash & Wax.
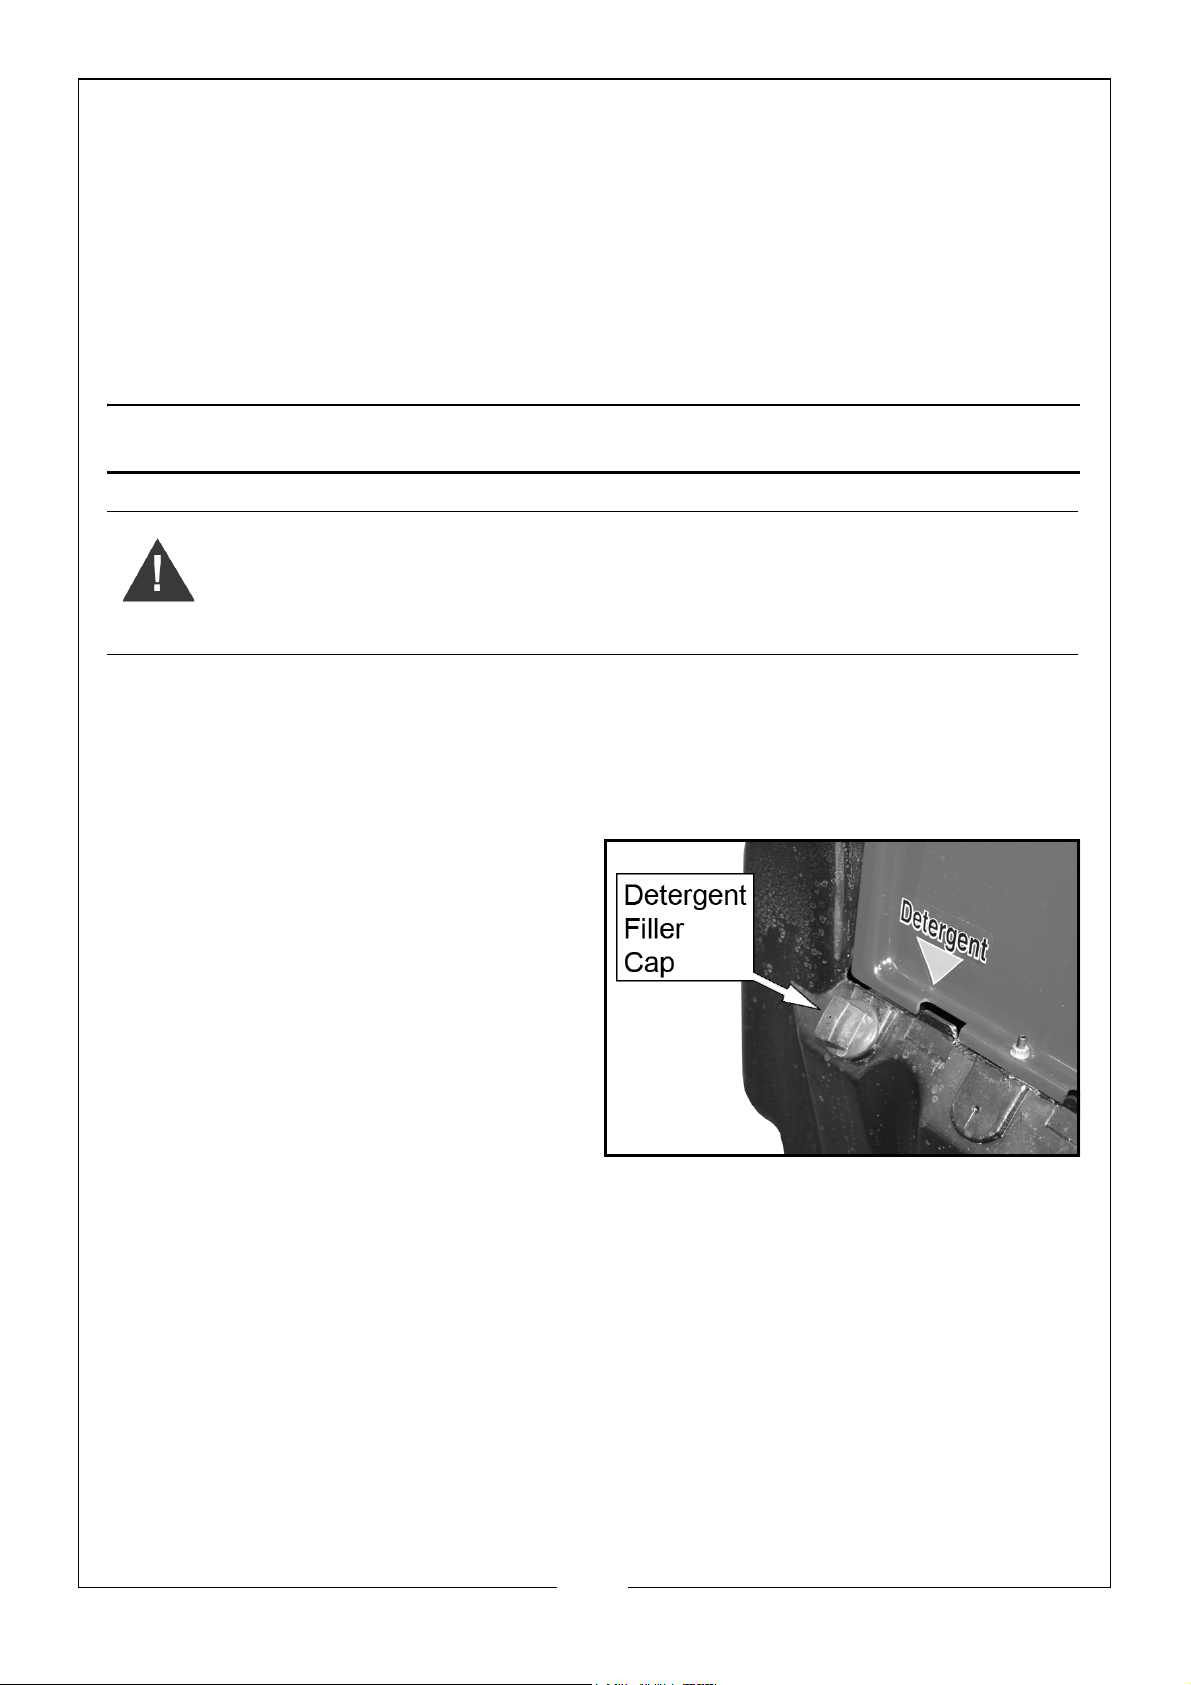
1. Remove the detergent filler cap.
2. Fill the tank with detergent.
• Maximum 2.5 litres.
3. Replace the filler cap securely.
4. When using detergent, always use
the nozzle at low pressure either
by widening the jet or standing
further from the target.
5. The detergent suction is
automatic when the adjusting head of the lance is rotate for low pressure
operation as on page 11 (anti-clockwise).
CONSUMABLES ETC
A range of suitable hoses, shampoo and traffic film remover are available
from your CLARKE dealer.
12
Parts & Service: 020 8988 7400 / E-mail: [email protected] or [email protected]
Page 13
CARE AND MAINTENANCE
WARNING: DISCONNECT THE MACHINE FROM THE POWER SOURCE
DURING CLEANING OR MAINTENANCE.
WARNING: DO NOT SPRAY THE MACHINE WITH WATER AND DO NOT USE
DETERGENTS OR AGGRESSIVE SOLVENTS AS THEY COULD DAMAGE THE
MACHINE.
1. Clean the exterior part of the machine with a dry cloth.
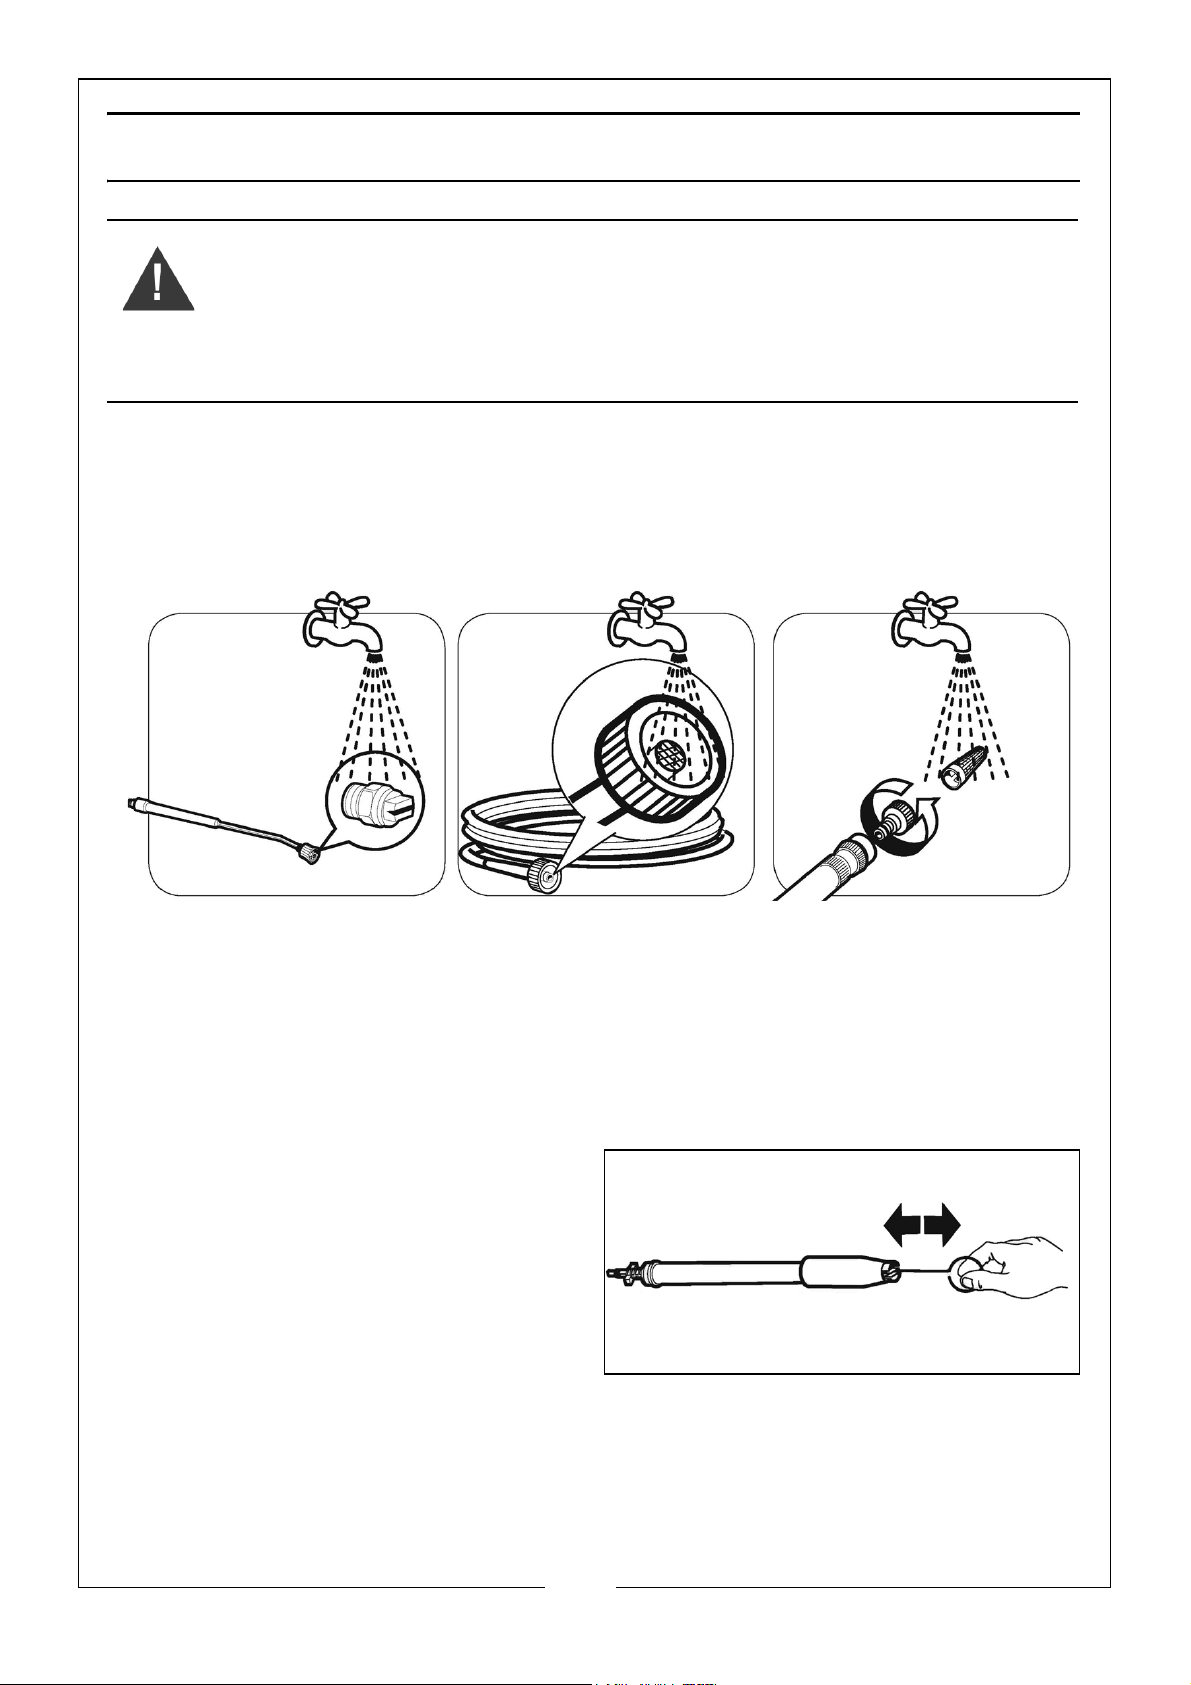
CLEANING THE WATER INLET FILTER:
To ensure the pump gives good service it is extremely important to check and
clean the water inlet filter frequently.
1. Rinse the nozzle, hose connection and water filter carefully under running
water.
CLEANING THE NOZZLE:
A blockage in the nozzle may prevent the machine from operating correctly,
so it must be kept clean.
1. Switch off the machine.
2. Remove the lance.
3. Clean the nozzle with the pin
provided.
4. Rinse the lance in running water.
13
Parts & Service: 020 8988 7400 / E-mail: [email protected] or [email protected]
Page 14
ENVIRONMENTAL PROTECTION
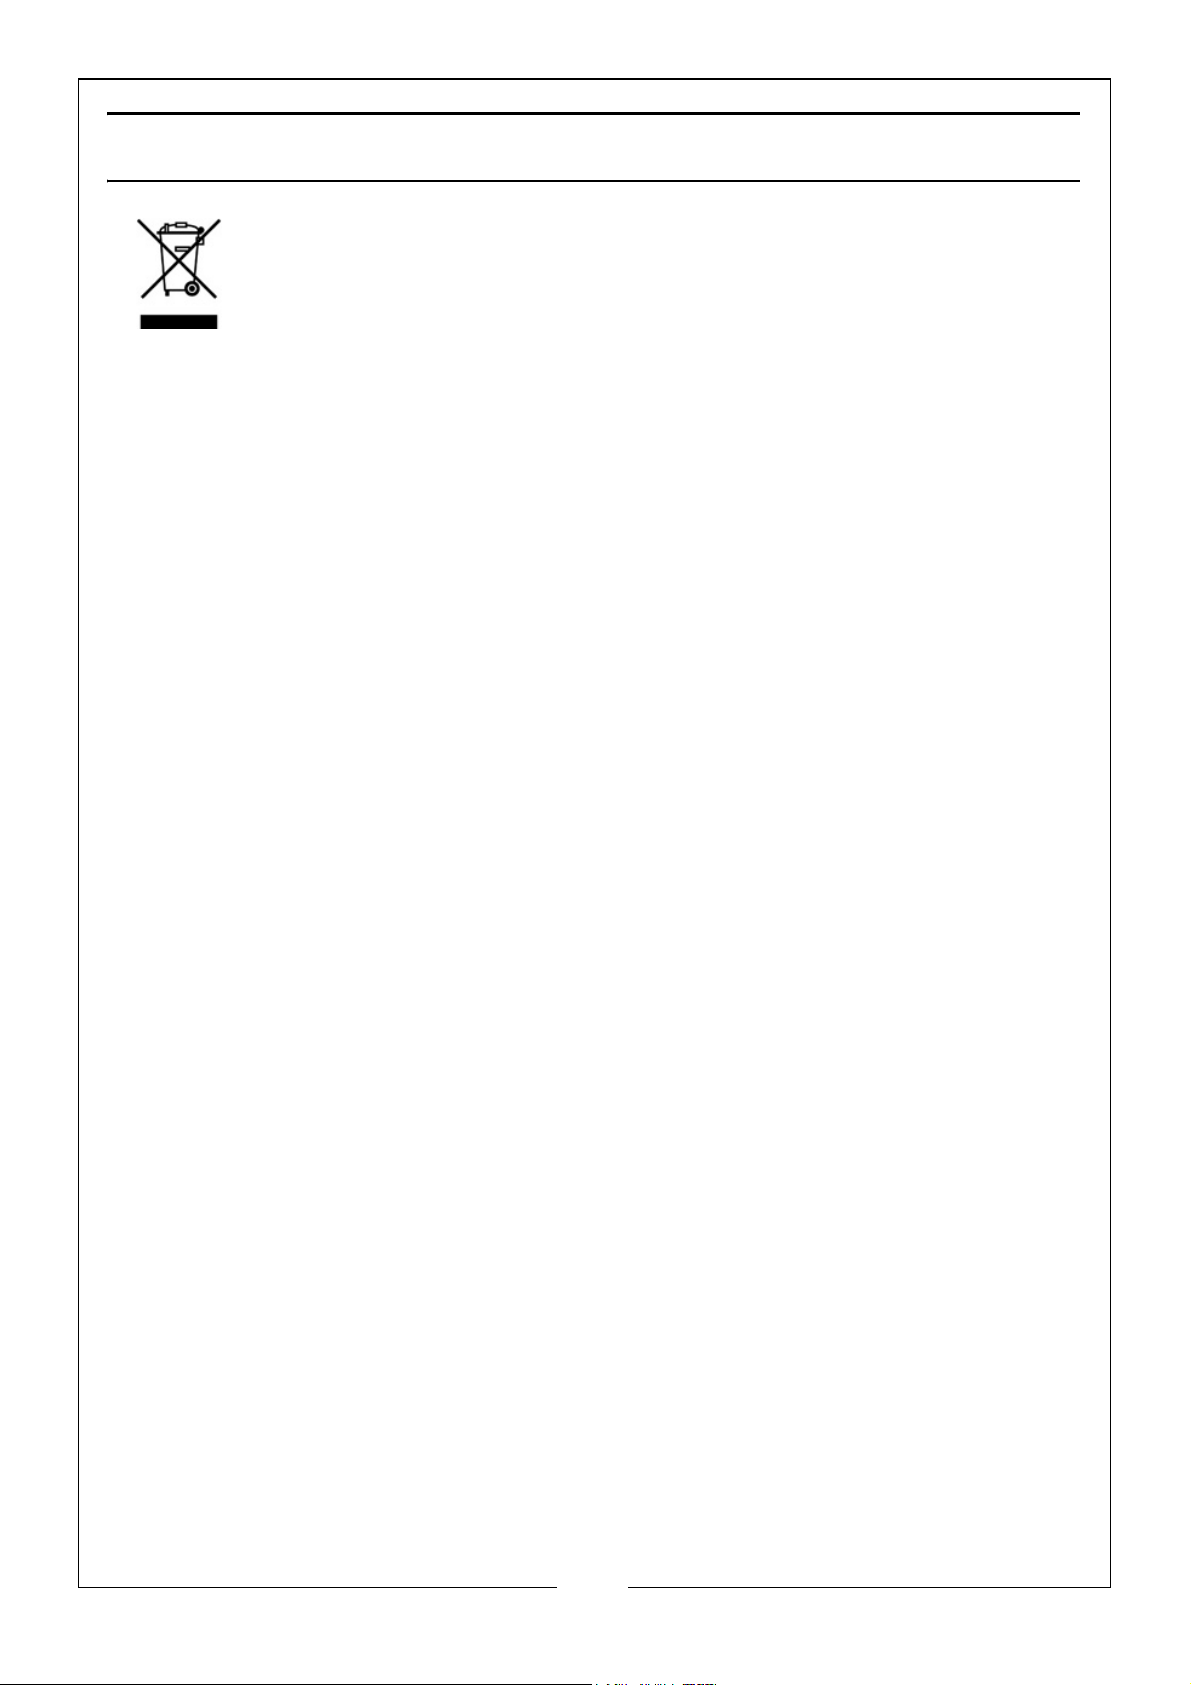
Through purchase of this machine, the customer is taking on the
obligation to deal with the WEEE in accordance with the WEEE
regulations in relation to the treatment, recycling & recovery and
environmentally sound disposal of the WEEE.
In effect, this means that this machine must not be discarded with general
waste. Refer to the laws governing Waste Electrical and Electronic Equipment
(WEEE) at a recognised disposal facility.
14
Parts & Service: 020 8988 7400 / E-mail: [email protected] or [email protected]
Page 15
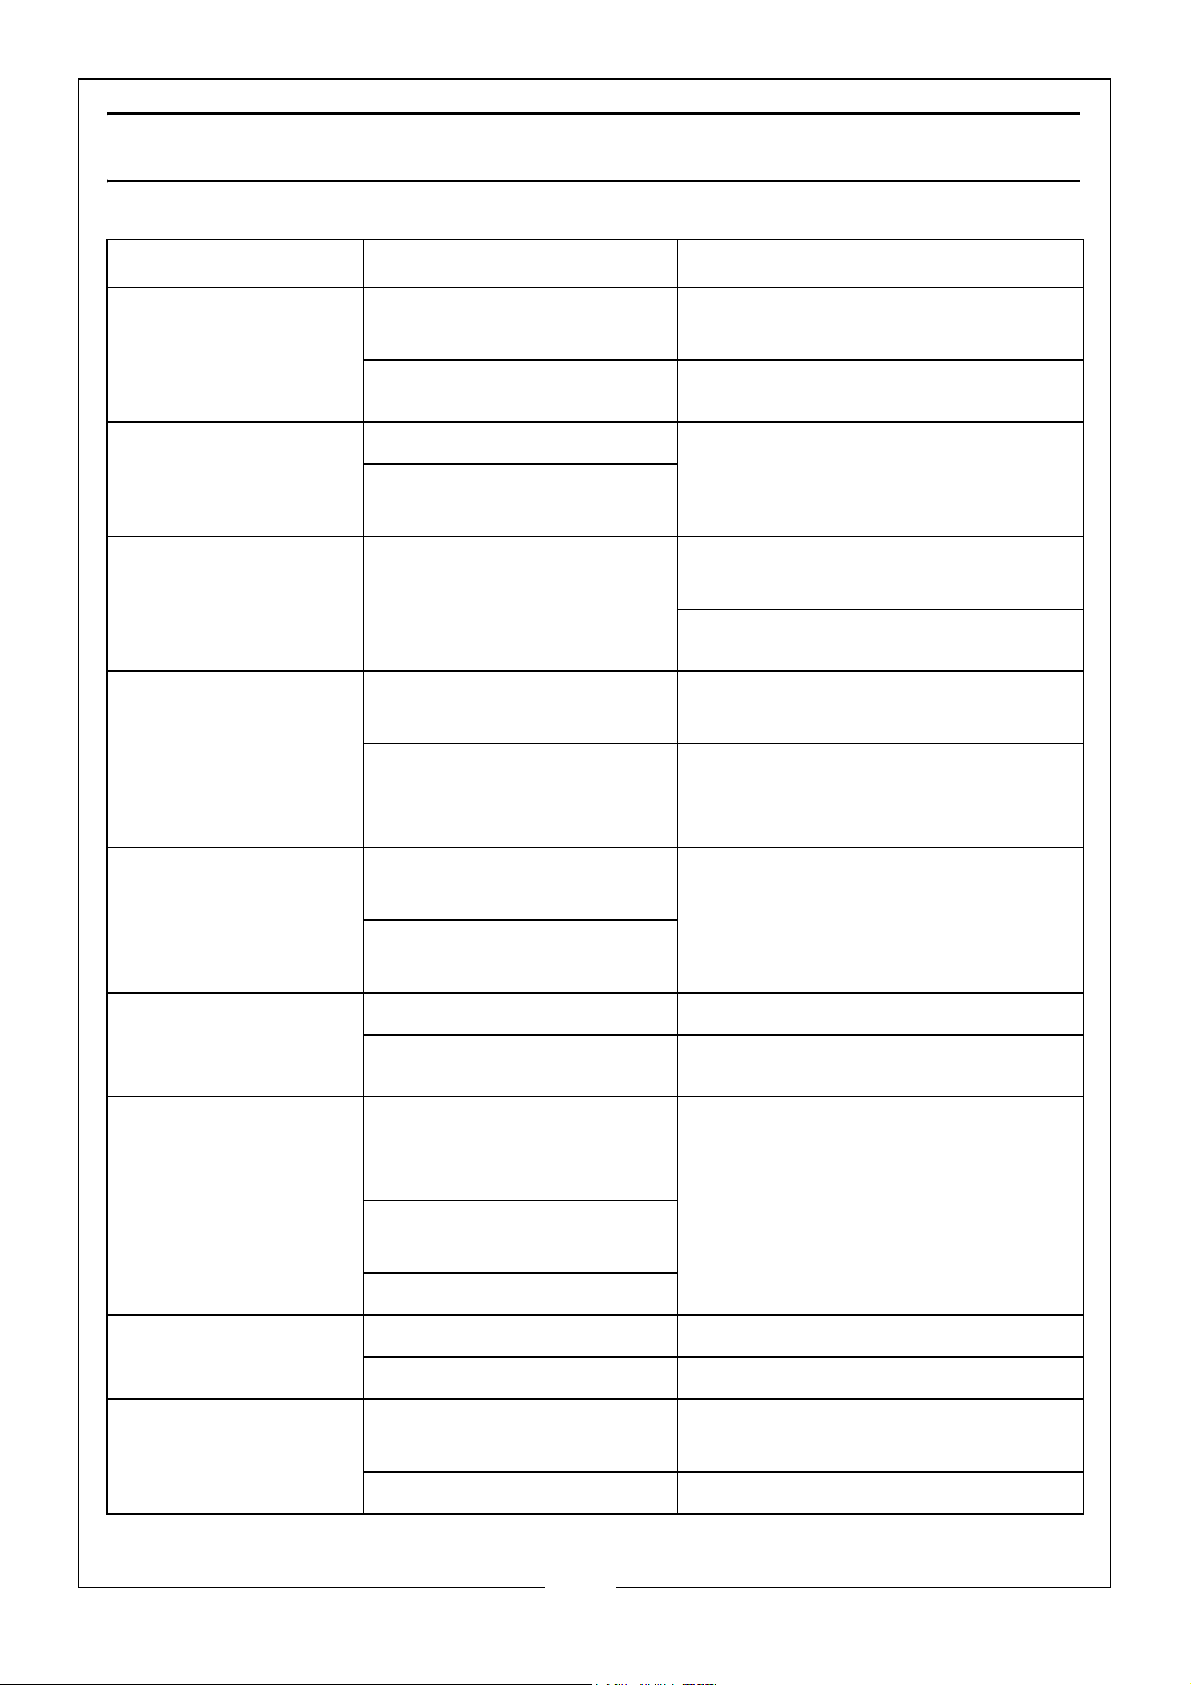
TROUBLESHOOTING
FAULT CAUSE SOLUTION
When the main
switch is turned on
the machine does
not start
The motor hums but
does not start
The motor stops
suddenly or after a
period of running.
When the lance is
turned on, pressure
decreases and
increases
Excess vibration at
the delivery
Plug not properly
connected.
Plug fuses are burnt out. Check them and replace them.
Low voltage. Contact CLARKE service.
The high pressure pump
is blocked.
The motor-protecting
switch is on because of
insufficient mains
voltage.
The nozzle is either
clogged or deformed.
Either boiler coil or lance
are clogged with
limescale.
The pressure tank is run
down.
Carefully check the plug and
the electric cable.
Check the value of the mains
voltage.
Contact CLARKE service.
Either clean it or replace it.
Contact CLARKE service.
Contact CLARKE service.
Valves are worn out or
dirty.
The pump does not
reach the fixed
pressure
Irregular pressure
fluctuations
Pressure leakage The nozzle is worn out. Replace the nozzle.
Noisy operation Inlet water temperature
The pump sucks air. Check the suction pipes.
All other causes. Contact CLARKE service.
The suction and/or
delivery valves are worn
out.
Presence of foreign
matter in the valves.
The seals are worn out.
All other causes Contact CLARKE service.
too high.
All other causes Contact CLARKE service.
Contact CLARKE service.
Reduce the water temperature.
15
Parts & Service: 020 8988 7400 / E-mail: [email protected] or [email protected]
Page 16
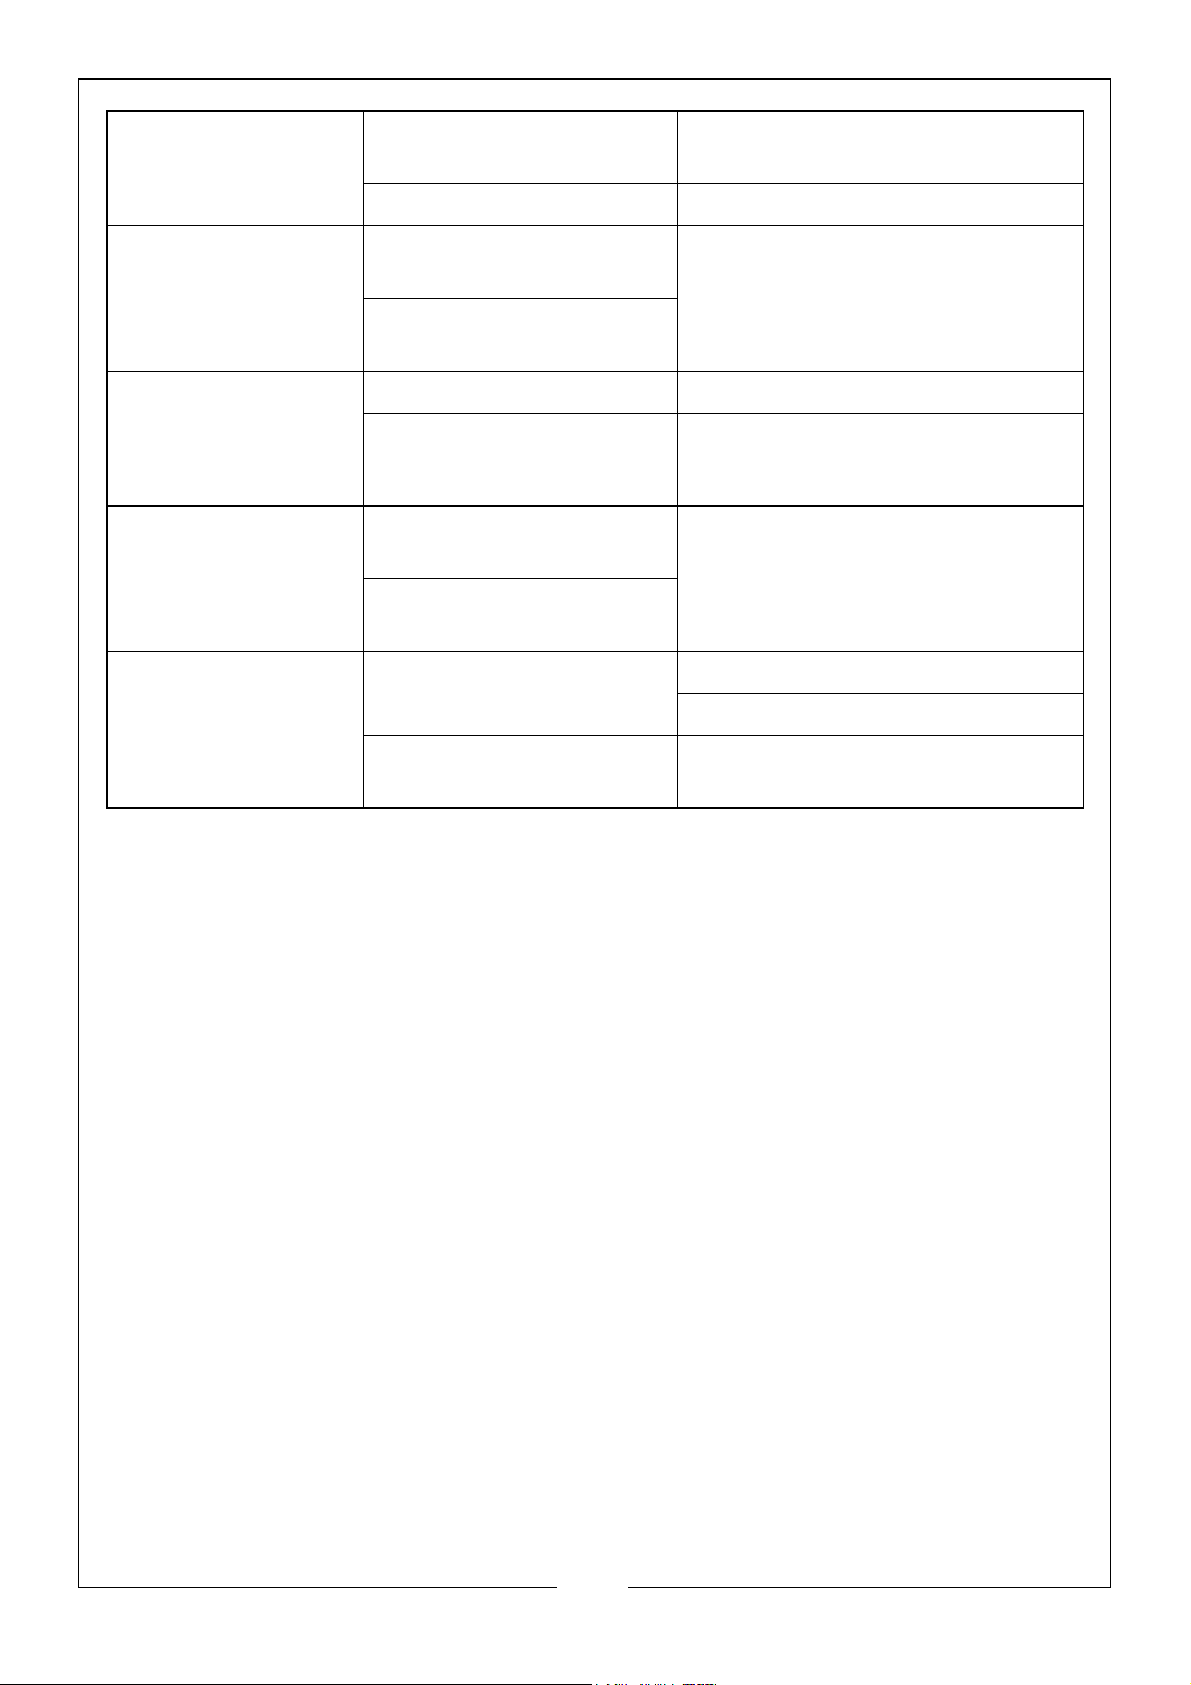
Insufficient
detergent suction
No detergent in the
Fill the detergent tank.
tank.
All other causes Contact CLARKE service.
Water in the fuel. The O-ring casing is
worn out.
The seals are
completely worn out.
When turning on
the burner switch
No fuel. Check the level in the tank.
All other causes Contact CLARKE service.
the boiler does not
start
Water is not hot
enough
Poor boiler
performance.
Boiler coil clogged with
limescale.
Excess smoke from
the exhaust
Combustion is not
correct.
Impurities or water in the
fuel.
Contact CLARKE service.
Contact CLARKE service.
Clean fuel filter.
Contact CLARKE service.
Empty the tank and clean it
carefully.
For all other problems contact the CLARKE service department.
16
Parts & Service: 020 8988 7400 / E-mail: [email protected] or [email protected]
Page 17
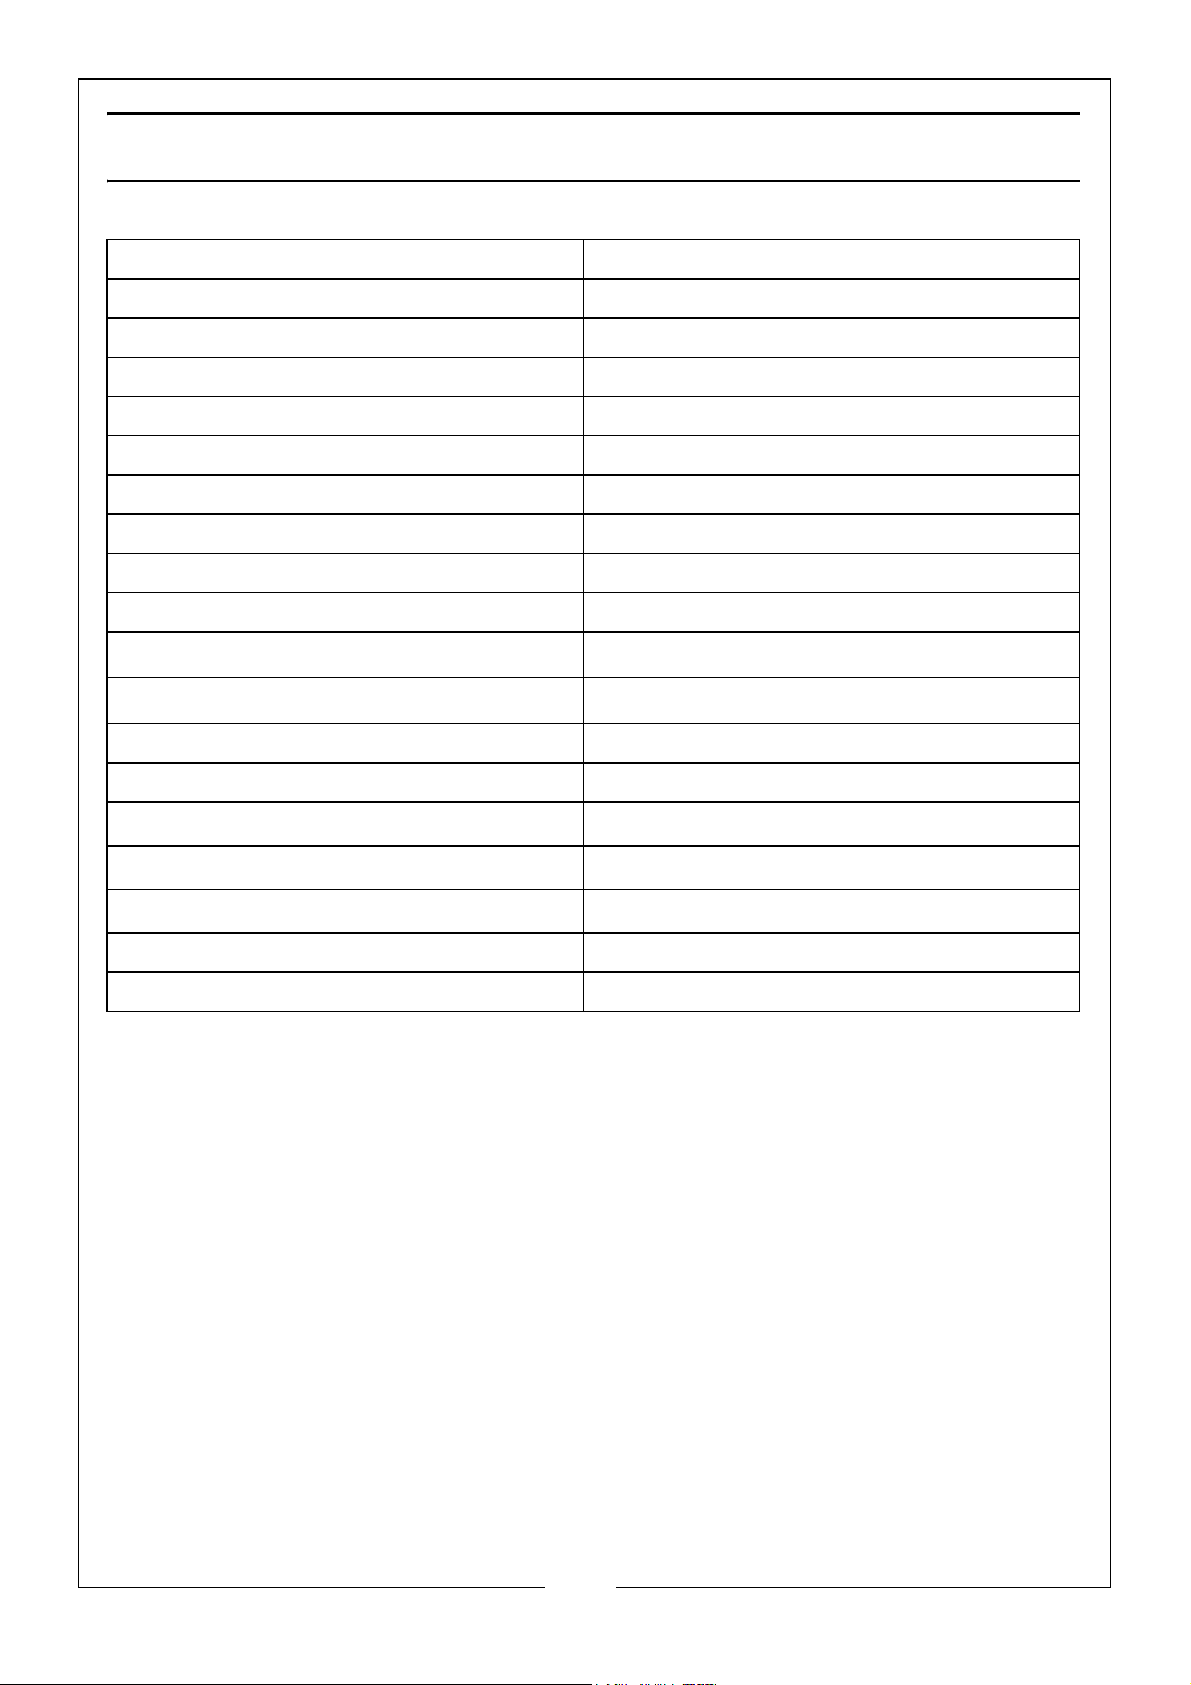
PRODUCT SPECIFICATIONS
Model Number King 200
Part Number 7320176
Voltage 230 V / 50 Hz / 1 Phase
Motor Input Power 2800W
Motor Input Current 13 A
Duty Cycle S1 (continuous)
Max Inlet Water Pressure 10 Bar
Working pressure 130 Bar
Maximum output pressure 150 Bar
Maximum output flow rate 10 Litres / min
Maximum output temperature
Maximum input temperature
90
40
o
C
o
C
Fuel tank capacity 14 Litre
Detergent capacity 2.5 Litre
Sound power level (L
Guaranteed sound power level (L
Vibration
) 101 dB
WA
) 102 dB
WA
2.2 m/s
2
Dimensions (D x W x H) 800 x 550 x 830 mm
Weight 59 kg
17
Parts & Service: 020 8988 7400 / E-mail: [email protected] or [email protected]
Page 18
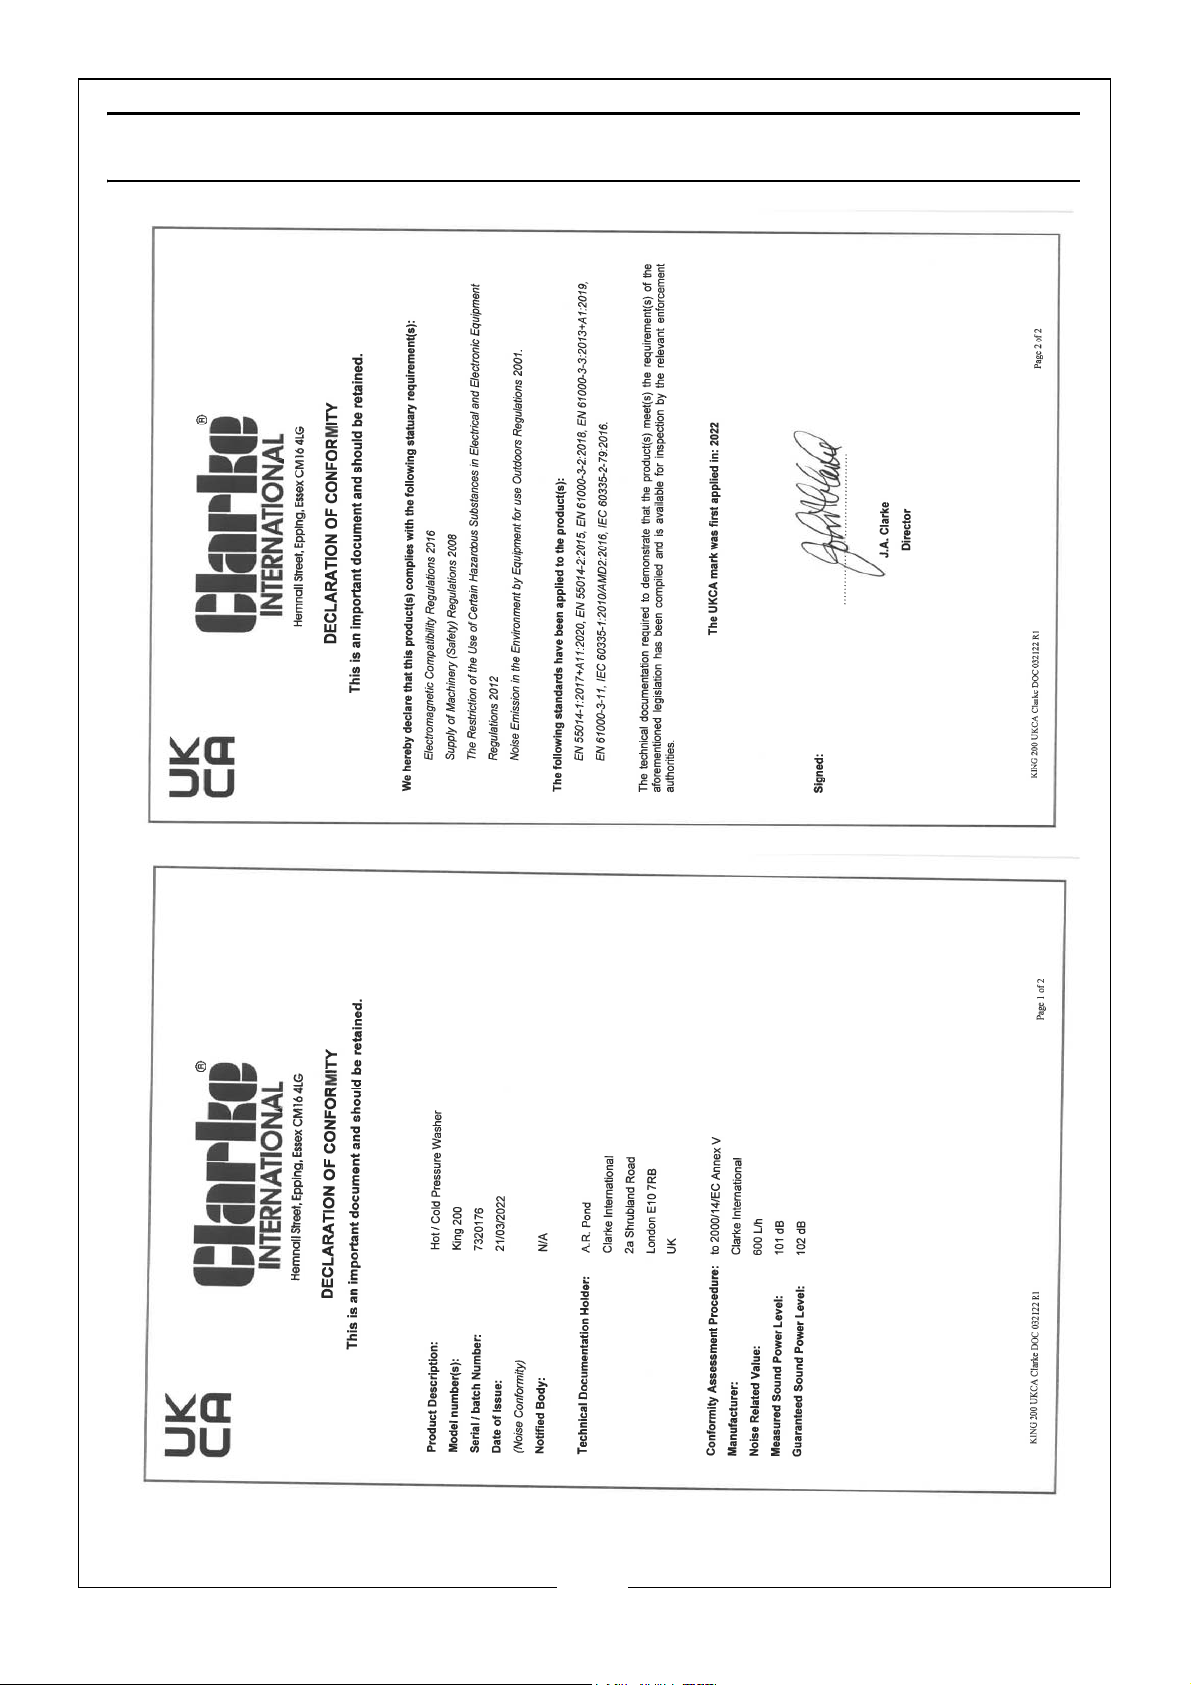
DECLARATION OF CONFORMITY - UKCA
18
Parts & Service: 020 8988 7400 / E-mail: [email protected] or [email protected]
Page 19
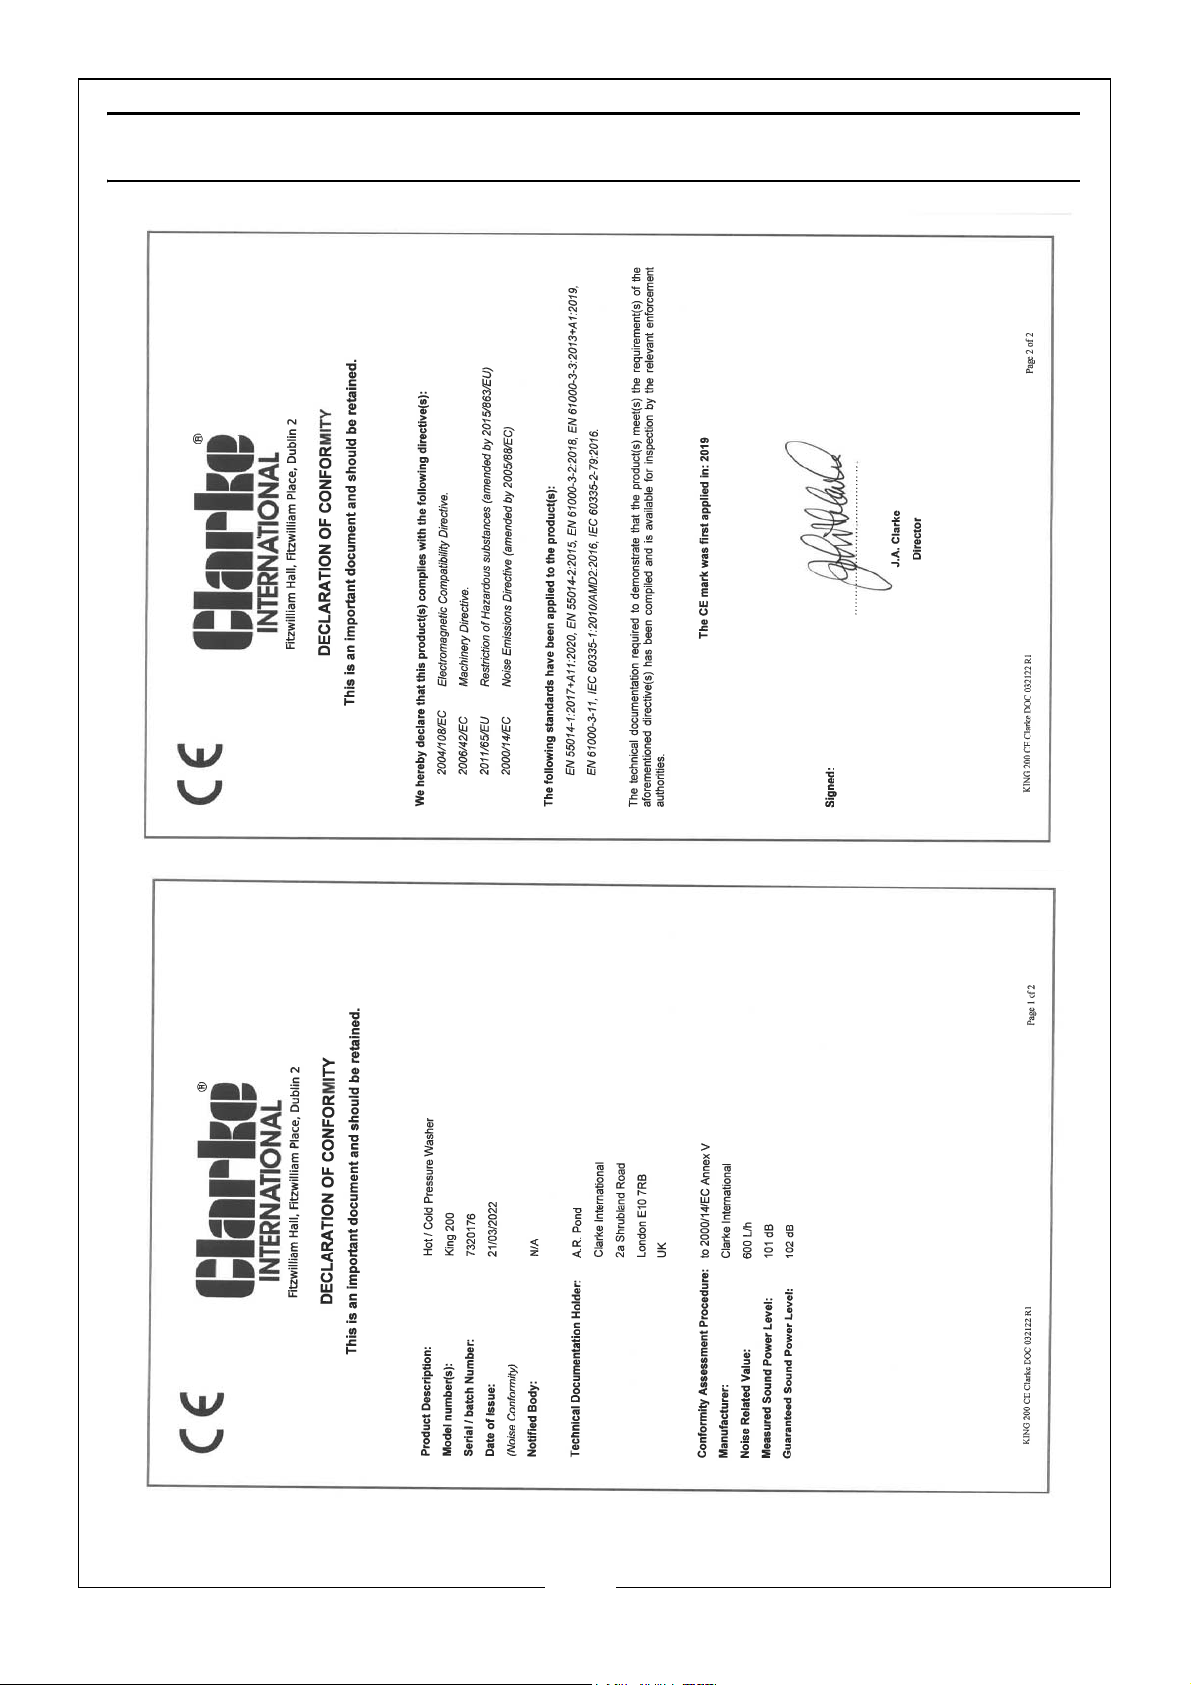
DECLARATION OF CONFORMITY - CE
19
Parts & Service: 020 8988 7400 / E-mail: [email protected] or [email protected]
Page 20

 Loading...