

Page 1
DIRTY WATER PUMP
DIRTY WATER PUMP
MODEL No: PSV1A, PSV2A
Part No: 7236035, 7236040
OPERATION & MAINTENANCE
INSTRUCTIONS
0912
Page 2

INTRODUCTION
• Thank you for purchasing this CLARKE dirty water pump.
• This pump is designed for pumping dirty water only, that is water containing
solids in suspension.
It is NOT designed for pumping slurry, sludge, mud or
heavily polluted water, or any water containing chemicals or other
acidic contaminants including salt water.
GUARANTEE
• This product is guaranteed against faulty manufacture for a period of 12 months.
Please keep your receipt as proof of purchase.
• This guarantee is invalid if the product is found to have been abused or
tampered with in any way, or not used for the purpose for which it was intended.
• Faulty goods should be returned to their place of purchase, no product can be
returned to us without prior permission.
• This guarantee does not effect your statutory rights.
CONTENTS
Introduction ..................................................................................................... 2
Guarantee ...................................................................................................... 2
Contents .......................................................................................................... 2
Specifications .................................................................................................. 3
For your own safety ........................................................................................ 4
Electrical connections ................................................................................... 5
Parts identification .......................................................................................... 6
Recommended uses ..................................................................................... 7
Preparation ..................................................................................................... 8
Using the pump .............................................................................................. 9
Cleaning and maintenance ........................................................................ 10
Troubleshooting .............................................................................................. 10
2
Page 3
SPECIFICATIONS
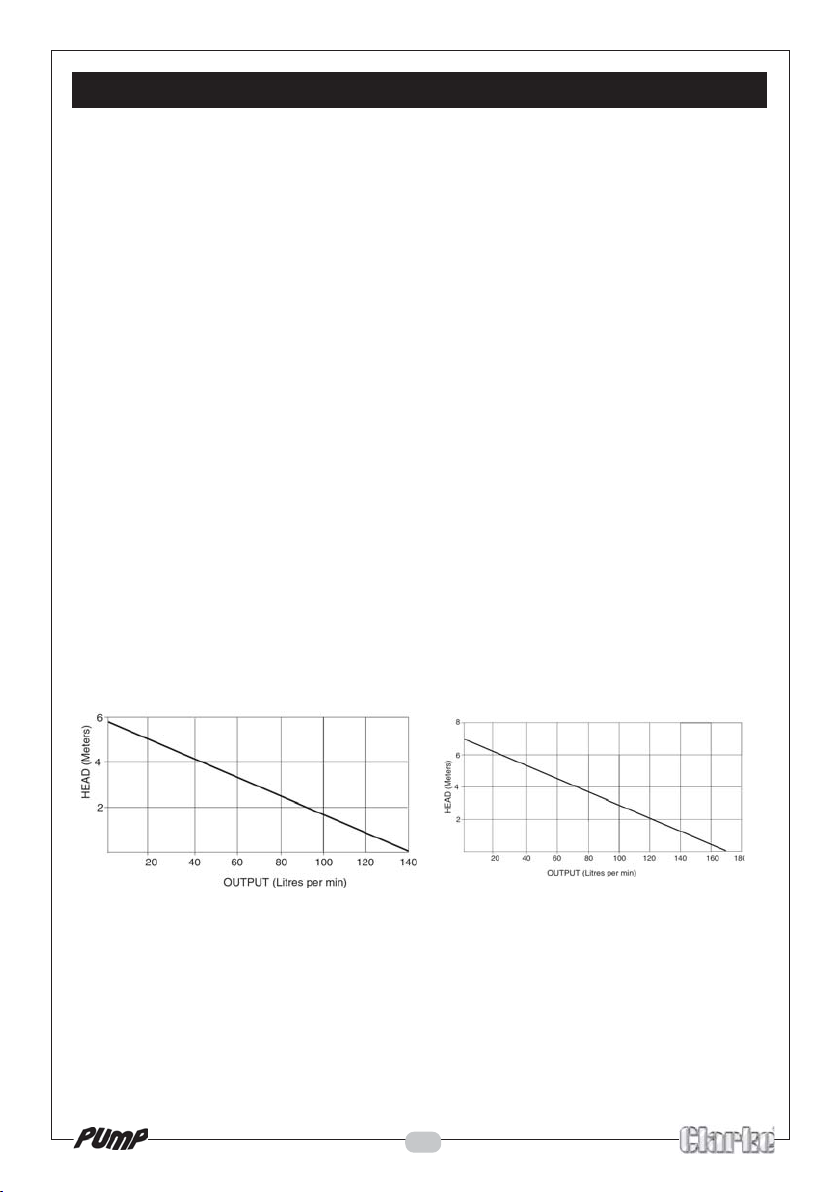
Model Number PSV1A PSV2A
Voltage 230V 50Hz 1Ph. 230V 50Hz 1Ph.
Motor Output 335 Watts 385 Watts
Head Max 5.8 meters 7 meters
Maximum Imersion Depth 8 meters 8 meters
Maximum Flow Rate 140 l/min 170 l/min
Outlet Fittings 1 ¼” BSP Threaded 1 ¼” BSP Threaded
Dimensions (L x W x H) 150 x 197 x 280 mm 150 x 197 x 280 mm
Duty Cycle S3 - 2 Hours on / 1 Hour off S3 - 2 Hours on /
1 Hour off
Sand Handling Capacity 30 g/m
3
30 g/m
3
Maximum Solid Body Diameter 30 mm 30 mm
Part Number 7236035 7236040
PSV1A PSV2A
3
Page 4

FOR YOUR OWN SAFETY
KEEP CHILDREN AWAY
• Do not allow children to touch the pump, cables or connections.
USE A RESIDUAL CURRENT DEVICE:
• The pump must be connected to a high sensitivity residual current device (RCD)
which has a tripping current of less than 30mA.
STORAGE
• When not in use, the pump should be stored in a dry, secure place out of the
reach of children.
WATER TEMPERATURE
• Do not use the pump if the water is liable to freeze, as this can cause damage to
the pump.
MAINS SUPPLY
• Disconnect the pump from the mains supply when not in use.
REPAIRS
• Have the pump repaired by a qualified person.
DO NOT ABUSE THE MAINS LEAD
• Never carry the pump by the mains lead.
• Never pull the mains lead to disconnect the pump from the mains socket.
• Keep the mains lead away from heat, oil and sharp edges.
• Always check the plug, mains cable and float switch cable for damage before
use. Do not use the pump if damaged. Refer to qualified service personnel for
repair.
• If you have to use an extension lead with this product, it must be designed for
outdoor use and incorporate a cable suitable for use with Class I appliances.
• Do not lower the pump using the mains lead, Always use the handle with a rope
or cord attached if necessary,.
DO NOT ABUSE THE FLOAT SWITCH
• Do not lift the pump by the mains or float switch cables.
4
Page 5
ELECTRICAL CONNECTIONS
Connect the mains lead to a standard, 230 Volt (50Hz) electrical supply through an
approved 13 amp BS 1363 plug, or a suitably fused isolator switch.
WARNING! THIS APPLIANCE MUST BE EARTHED
IMPORTANT: The wires in the mains lead are coloured in accordance with
the following code:
Green & Yellow - Earth
Blue - Neutral
Brown - Live
As the colours of the flexible lead of this appliance may not correspond with the
coloured markings identifying terminals in your plug proceed as follows:
• Connect GREEN & YELLOW wire to terminal marked with a letter “E” or Earth
symbol “ ” or coloured GREEN or GREEN & YELLOW.
• Connect BROWN wire to terminal marked with a letter “L” or coloured RED.
• Connect BLUE wire to terminal marked with a letter “N” or coloured BLACK.
If this appliance is fitted with a plug which is moulded onto the electric cable (i.e. nonrewireable) please note:
1 The plug must be thrown away if it is cut from the electric cable. There is a danger of
electric shock if it is inserted into a mains power socket.
2 Never use the plug without the fuse cover fitted.
3 When replacing a detachable fuse carrier, ensure the correct replacement is used
(as indicated by marking or colour code).
4 Replacement fuse covers can be obtained from your local dealer or most electrical
stockists.
FUSE RATING
The fuse in the plug must be replaced with one of the same rating (13 amps) and this
replacement must be ASTA approved to BS1362.
We strongly recommend that this machine is connected to the mains supply via a
Residual Current Device (RCD)
If in any doubt, consult a qualified electrician. DO NOT attempt any repairs yourself.
5
Page 6

RECOMMENDED USES
The recommended uses for this pump are:
• Drainage after flooding
• The transfer of liquids
• Drainage of containers
• Taking water from wells and shafts
Liquids that CAN be pumped:
• Dirty water - That is water containing solids in suspension,
• Swimming pool water
Note: After pumping chlorinated water or other liquids containing
additives, the pump should be rinsed with clean water.
• Soapy water
Liquids that MUST NOT be pumped are:
• Corrosive substances including salt water
• Combustible or explosive substances (petrol, thinners etc.)
• Fats, oils or salts
• Waste from toilets or urinals
• Slurry, sludge, mud or heavily polluted water, or any water containing chemicals
Note: After pumping dirty water or other liquids the pump should be
rinsed with clean water
6
Page 7
PARTS IDENTIFICATION
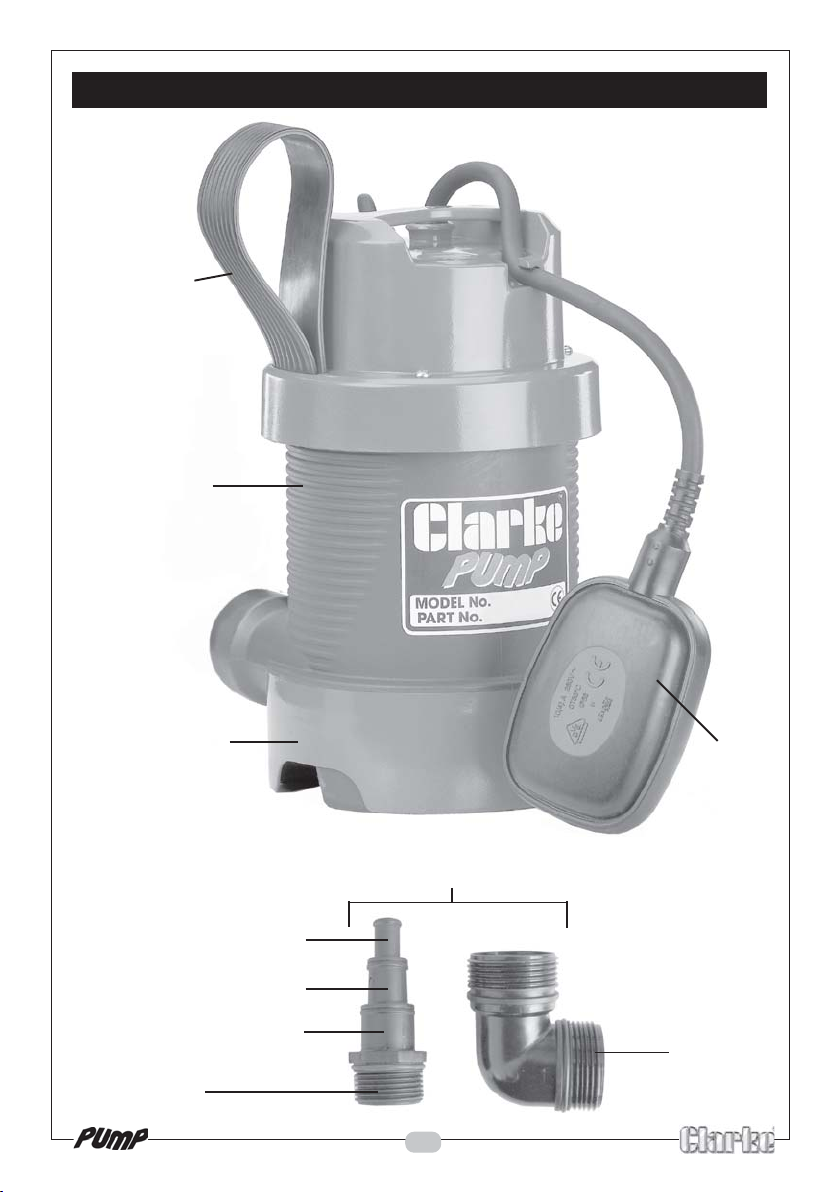
Handle
Pump
Base
Multi Hose
Adaptor
Float
Switch
May be supplied fitted to the pump
1/2”
3/4”
1”
Elbow
7
Page 8
PREPARATION
CONNECTING THE MULTI HOSE ADAPTOR
WARNING!
DISCONNECTED THE PUMP FROM THE MAINS POWER SUPPLY BEFORE
CONNECTING THE MULTI HOSE ADAPTOR
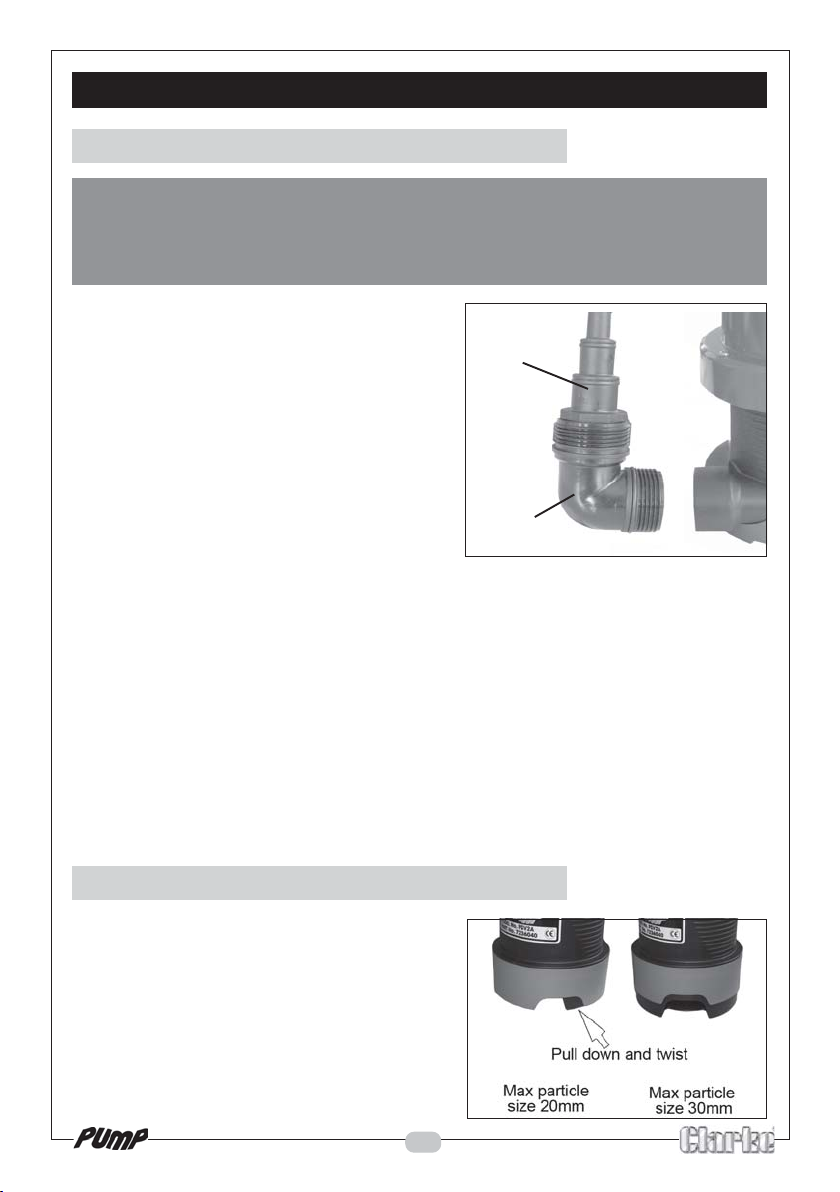
An Elbow is provided with a 1-1/4”BSP thread
at either end as shown in the diagram
opposite.
Ensure the end fitted with an O-Ring is screwed
into the pump.
Screwed on to the other end of the elbow, is a
multi hose connector capable of accepting
1”, 3/4” or 1/2” hoses. Simply cut the multi hose
connector to the required size and attach a
suitable hose using with a worm drive clip.
For maximum efficiency, we strongly
recommend that you connect a 1” diameter hose to the multi hose adapter,
Alternatively, you may remove the multi adapter altogether, and screw on a 1-1/4” BSP
hose adapter
The pump is completely submersible, and should be placed in a vertical position, on a
solid flat surface, Placing the pump on a couple of house bricks if required.
Multi Hose
Connector
Elbow
SUITABLE HOSES, and SPARE/REPLACEMENT MULTI HOSE ADAPTERS ARE
AVAILABLE FROM YOUR CLARKE DEALER
ADJUSTING THE MAXIMUM PARTICLE SIZE
The base can be adjusted to change the
maximum particle size allowed through the
pump.
Pull the base down as shown and twist to lock in
place.
In the down position the maximum particle size
allowed through the pump is 30 mm in the up
position it is 20 mm.
8
Page 9

USING THE PUMP
CAUTION!
CHECK THE PUMP FOR DAMAGE BEFORE USE, DO NOT USE THE PUMP IF IT IS
DAMAGED IN ANY WAY
1 Place the pump on a flat surface in the area that you want to drain.
• If there is sediment in the operating area, the pump should be placed on house
bricks, or similar.
• Ensure the pump is positioned with adequate space so that the movement of the
float switch is not restricted - recommended minimum area of 40 x 40cm
• ALWAYS raise and lower the pump using a rope attached to the lifting handle.
• Take all necessary precautions as described on page 4 before plugging in, and
switching ON.
WARNING!
NEVER CARRY THE PUMP USING THE MAINS POWER CABLE. DAMAGE TO
ELECTRICAL CABLES CAN BE DANGEROUS. ALWAYS USE THE HANDLE WHEN
MOVING THE PUMP.
2 Connect the mains plug to a high sensitivity residual current device (RCD) which has
a tripping current of less then 30mA.
3 Switch the mains power supply on,
• The pump incorporates a float switch, which automatically switches the pump
ON when the water is above a pre-determined level.
4 The pump will begin to drain water.
• As the water level falls, so will the float switch, until it stops the pump.
5 When the pumping is finished, disconnect the pump from the mains power supply
• The pump is fitted with a thermal cut out to protect the motor from overheating.
If the thermal cut out activates, the motor will automatically switch back on
when it has cooled down sufficiently.
CAUTION!
DO NOT ALLOW THE PUMP TO RUN DRY.
9
Page 10
CLEANING AND MAINTENANCE
WARNING!
MAKE SURE THAT THE PUMP IS DISCONNECTED FROM THE MAINS SUPPLY
BEFORE CLEANING, OR PERFORMING ANY MAINTENANCE.
• These pumps should require no maintenance other than regular cleaning. If the
pump starts to show signs of wear or damage, contact your CLARKE dealer for
advice.
• Do not attempt to repair the pump yourself, repairs must be carried out by your
CLARKE dealer, or contact the CLARKE Service Department, on 020 8988 7400.
• Check the pump regularly to ensure the base is clear of leaves or other debris.
TROUBLE SHOOTING
MELBORP ESUACELBABORP
.tratstonlliwpmuP .noitisopFFOnihctiwstaolf-wolootlevelretaW
hctiwstaolF
tontubtratslliwpmuP
.pmup
.)3egaptrahc
pmI
.potstonlliwpmuP yllufehtotgnivommorfdetneverpebyamhctiwstaolF
.noitisopnwod
.ecivda
.gninnurspotspmuP ,stsisrepnoitidnocsihtfI.detareposahdaolrevolamrehT
10
.gnivommorfdetneverp
.dekcolbtonsiesabehttahtkcehC
urtsborodeggolcebutegrahcsiD
cotpmupehtrofecnatsid
dna,elgnanata,niagapmupeht
.metsysehtnideppartriaynaevomerot
oC.ytluafebyamhctiwstaolF
esuacehtetagitsevni
.
ro,llawedistsniagademmajebyam
ebyamdaehehT.detc
ataergootretawehttfilotgniyrterauoy.e.i,taergoot
noitacificepseeS(.htiwepo
egnulP.egnulpehtgniruddecudorp,pmupehtnikcolriA
gnirewoltslihwtiekahs
.relaedEKRALCruoytlusnoC-degamadebyamrelle
rofrelaedEKRALCruoytlusn
.nitucsahhctiwstaolfro,yrdnursahpmuP
.rellepmiehtdemmajsahtcejbongierofA
Page 11

PARTS & SERVICE CONTACTS
For spare parts and service, please contact your nearest dealer,
or CLARKE International, on one of the following numbers.
PARTS & SERVICE TEL: 020 8988 7400
or e-mail as follows:
PARTS: [email protected]
SERVICE: [email protected]
11
Page 12

 Loading...