

Page 1

GAS HEATER
Model No: Little Devil II (inc ss)
PART NO: 6926020, 6926025 (SS)
OPERATION & MAINTENANCE
INSTRUCTIONS
LS0618 ISS 6
Page 2
INTRODUCTION
Thank you for purchasing this CLARKE Gas Heater.
Before attempting to use this product, please read this manual thoroughly and
follow the instructions carefully. In doing so you will ensure the safety of yourself
and that of others around you, and you can look forward to your purchase
giving you long and satisfactory service.
This manual was written for use in the United Kingdom. Please note that in
some countries there may be differences in the requirements outlined in this
manual and in these cases the local regulations should be consulted by the
user.
GUARANTEE
This product is guaranteed against faulty manufacture for a period of 12
months from the date of purchase. Please keep your receipt which will be
required as proof of purchase.
This guarantee is invalid if the product is found to have been abused or
tampered with in any way, or not used for the purpose for which it was
intended.
Faulty goods should be returned to their place of purchase, no product can
be returned to us without prior permission.
This guarantee does not effect your statutory rights.
FUNCTION AND OPERATING PARAMETERS
This is gas powered heater. It’s intended use is for drying and the warming of
commercial/industrial buildings where adequate ventilation is provided.
• It must be operated as prescribed in the operating manual.
• Is not intended to be used for domestic use or for the heating of
habitable areas.
• Is not intended to be used to reach and maintain a certain level of
human thermal comfort within an enclosed space in which the heater is
situated.
• Is not intended to be used in enclosed areas with restricted ventilation.
• Is not for use in areas with high levels of fluctuating drafts.
• Is not intended for warming animals or live stock.
2
Parts & Service: 020 8988 7400 / E-mail: [email protected] or [email protected]
Page 3

GENERAL SAFETY PRECAUTIONS
Read, and make sure you fully
understand the following precautions
and the hazards associated with this
type of equipment.
1. ONLY use with the voltage specified
and ensure the heater is properly
earthed.
2. Use only the hose and factory
preset regulator provided with the
heater.
3. Only use propane gas, set up for
vapour withdrawal.
4. Provide adequate ventilation.
Before using the heater, provide at
least a 1.5 ft.
fresh outside air.
5. For indoor use only. Do not use
heater outdoors.
6. Not to be used for the heating of
habitable areas of domestic
premises; for use in public buildings,
refer to national regulations.
7. Do not use the heater in a
basement or below ground level.
Propane gas is heavier than air. If a
leak occurs. propane gas will sink to
the lowest possible level.
8. Keep the heater area clear and
free from combustible materials,
gasoline, paint thinner and other
flammable vapours and liquids.
9. Do not use heater in areas with high
dust content. Dust is combustible.
2
(1400 cm2) opening of
10. Do not point the heater at
propane tank.
11. Keep propane tank(s) below 100oF
12. Check the heater for damage
o
(37.8
C).
before each use. Do not use a
damaged heater.
13. Check the hose before each use of
the heater. If highly worn or cut,
replace with hose specified by the
manufacturer before using the
heater.
14. Locate the heater on a stable and
level surface if the heater is hot or
operating.
15. Not intended for use on finished
floors.
16. Never block the air inlet (rear) or air
outlet (front) of the heater.
17. Keep the heater away from strong
drafts, water spray, rain or dripping
water.
18. Do not leave the heater
unattended.
19. Keep children and animals away
from the heater.
20. Never move, handle or service a
hot, operating or plugged-in heater.
21. To prevent injury wear gloves when
handling the heater.
22. Never attach duct work to front or
rear of the heater.
23. Do not alter the heater. Keep the
heater in its original state.
24. Do not use the heater if altered.
25. Turn off the propane supply and
unplug the heater when not in use.
26. Use only original replacement parts.
This heater must use design-specific
parts. Improper replacement parts
could be highly dangerous.
27. Do not place torsional stress on any
hoses.
3
Parts & Service: 020 8988 7400 / E-mail: [email protected] or [email protected]
Page 4
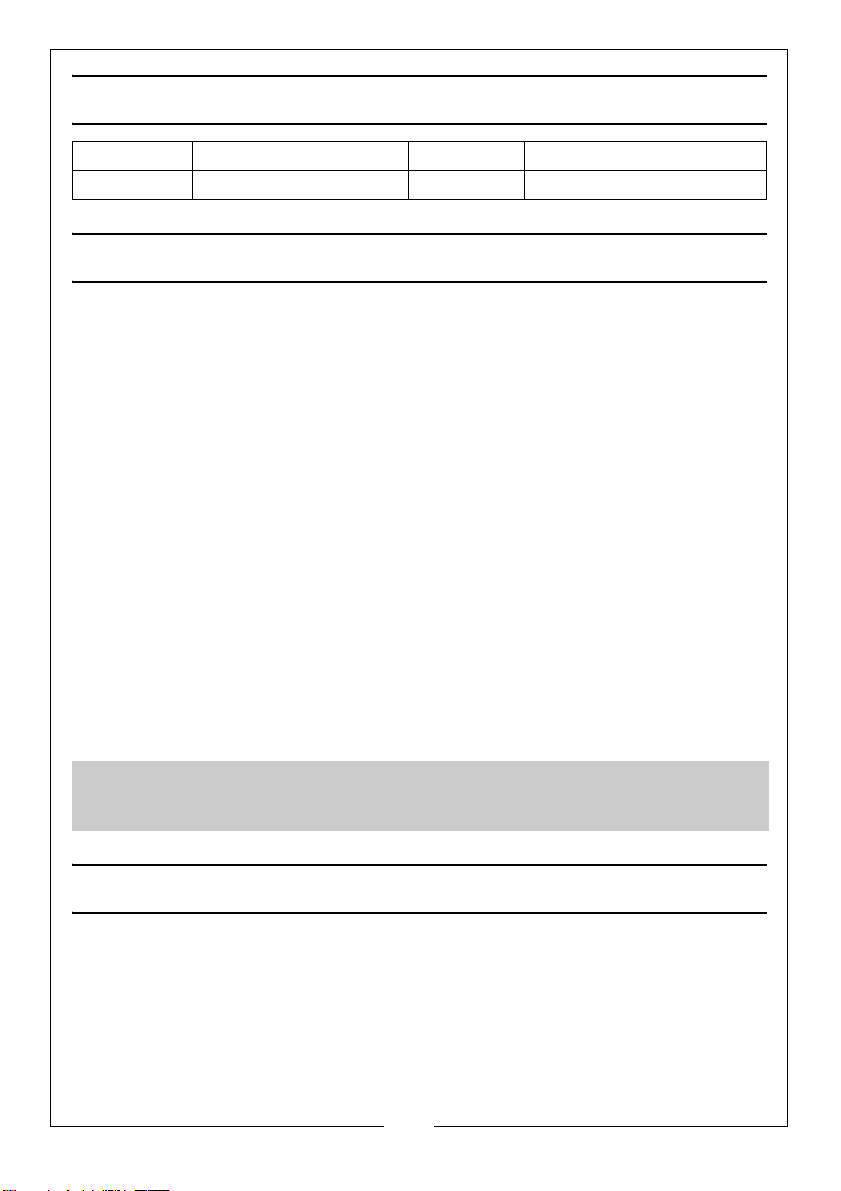
MINIMUM CLEARANCES FROM COMBUSTIBLES
Outlet 6 Ft. (1.83 m) Top 6 Ft. (1.83 m)
Sides 6 Ft. (1.83 m) Rear 2 Ft. (0.61 m)
RISKS OF CARBON MONOXIDE POISONING
Even though this heater operates very close to 100 percent combustion
efficiency, it still produces small amounts of carbon monoxide.
• Carbon Monoxide (CO) is toxic.
• Pregnant women, persons with a heart or lung condition, anaemia
or under the influence of alcohol, or those at high altitude, are more
likely to be effected by Carbon Monoxide.
• CO can build up in a confined space and failure to provide
adequate ventilation can be fatal.
The early symptoms of asphyxiation caused by inadequate ventilation are:
• headache • nausea
• dizziness • dry mouth or sore throat
Should anyone show these symptoms, they must GET FRESH AIR IMMEDIATELY.
Turn off the heater and have it serviced before using again.
Be sure to follow all warnings in this manual.
WE RECOMMEND THE USE OF A CARBON MONOXIDE
DETECTOR
UNPACKING
When unpacking, check the heater for possible shipping damage. Should any
damage be apparent, please notify your Clarke dealer immediately. Your
heater is fully assembled,- only the electrical and gas supplies need
connecting.
4
Parts & Service: 020 8988 7400 / E-mail: [email protected] or [email protected]
Page 5
ELECTRICAL CONNECTIONS
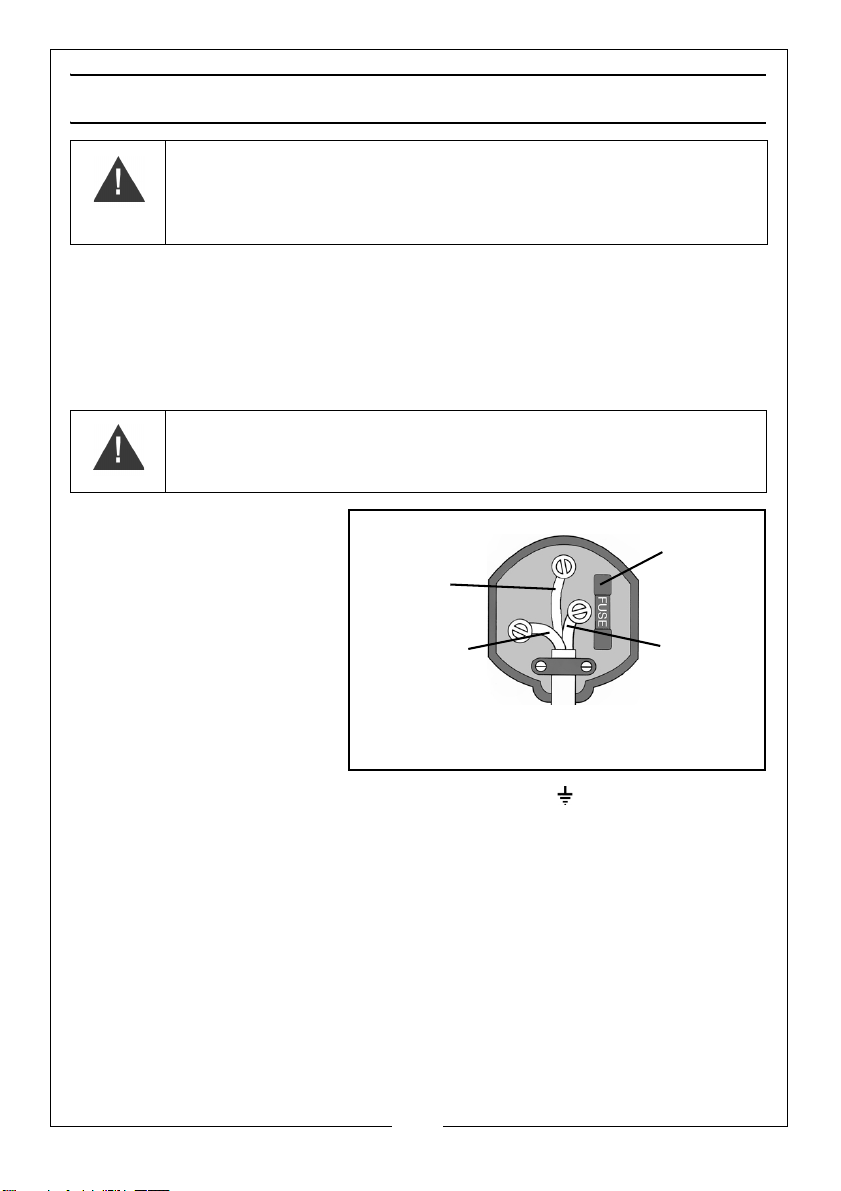
Plug must be BS1363/A approved.
Always fit
Ensure that the outer sheath of
Neutral
(Blue)
Live
(Brown)
Earth
(Green and
a 13 Amp
the cable is firmly held by the clamp
fuse.
Yel low)
WARNING: READ THESE ELECTRICAL SAFETY INSTRUCTIONS
THOROUGHLY BEFORE CONNECTING THE PRODUCT TO THE MAINS
SUPPLY.
Connect the mains lead to a standard, 230 Volt (50Hz) electrical supply
through an approved BS1363/A plug fitted with a BS1362 13 amp fuse.
If the plug has to be changed because of damage, it must be removed and a
replacement fitted, following the wiring instructions shown below. The old plug
must be discarded safely, as insertion into a power socket could cause an
electrical hazard.
WARNING: WIRES IN THE MAINS LEAD ARE COLOURED IN
ACCORDANCE WITH THE FOLLOWING CODE:
GREEN/YELLOW = EARTH, BLUE = NEUTRAL, BROWN = LIVE.
• The BLUE wire must be
connected to the
terminal which is
marked N or coloured
black.
• The BROWN wire must
be connected to the
terminal which is
marked L or coloured
red.
• The YELLOW AND
GREEN wire must be
connected to the terminal which is marked E or or coloured green.
We strongly recommend that this machine is connected to the mains supply
through a Residual Current Device (RCD)
If you are not sure, consult a qualified electrician. DO NOT try to do any
repairs.
Parts & Service: 020 8988 7400 / E-mail: [email protected] or [email protected]
5
Page 6
THEORY OF OPERATION
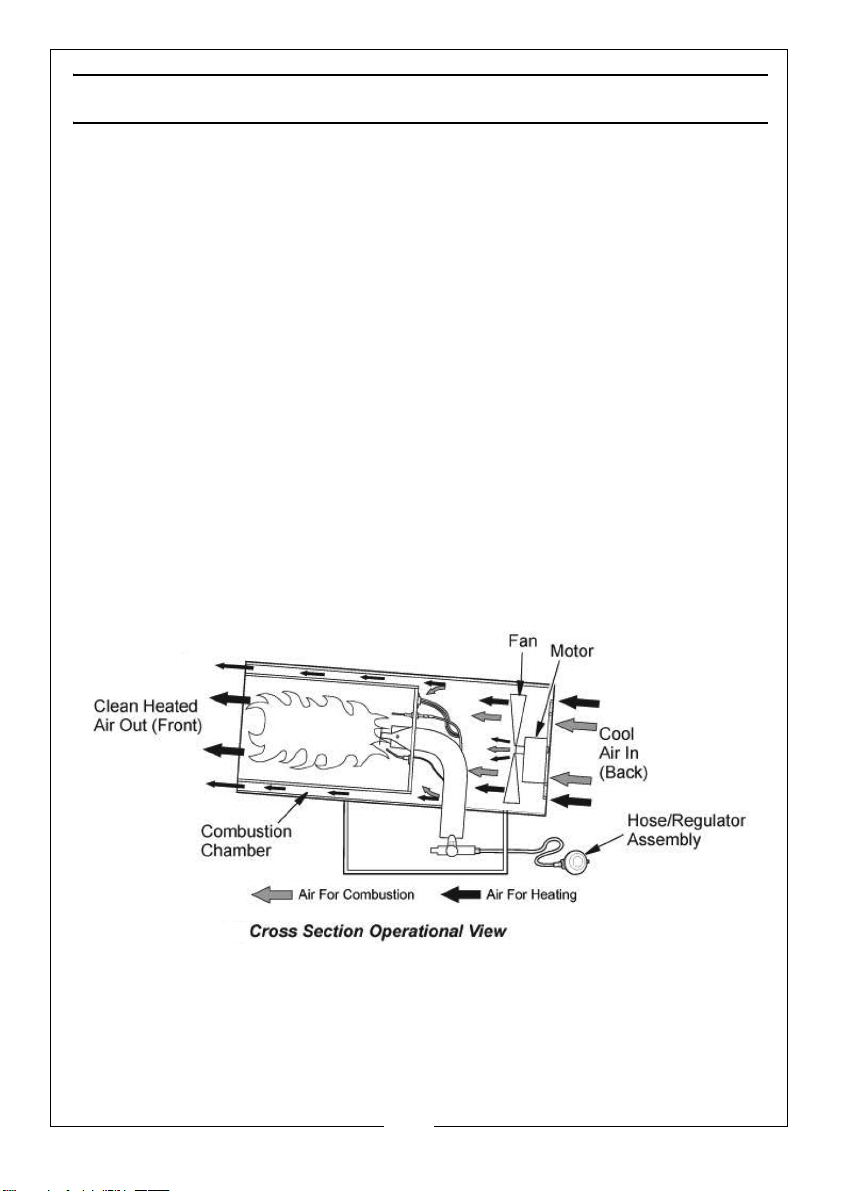
THE FUEL SYSTEM: The hose/regulator assembly attaches to the propane gas
supply. This provides fuel to the heater.
THE AIR SYSTEM: The motor turns the fan. The fan pushes air into and around
the combustion chamber. This air is heated and provides a stream of clean,
hot air.
THE IGNITION SYSTEM: The piezo ignitor lights the burner.
THE AUTOMATIC CONTROL SYSTEM: Should the flame extinguish for any reason,
the thermocouple will quickly cool, causing the Flame Failure valve to close,
shutting off the gas supply.
Similary, should there be a power failure, the safety shut off valve (solenoid) will
shut off the gas supply.
The machine is also fitted with a thermal overload protection, which will
operate should the unit overheat, shutting off the gas supply to the heater.
6
Parts & Service: 020 8988 7400 / E-mail: [email protected] or [email protected]
Page 7
PROPANE GAS SUPPLY
WARNING: THE FITTING AND CHANGING OF THE GAS CYLINDERS MUST BE
CARRIED OUT IN A FLAME FREE ATMOSPHERE.
WARNING: YOU SHOULD ONLY USE PROPANE GAS CYLINDERS AVAILABLE
FROM BUILDERS MERCHANTS OR GAS SUPPLIERS.
This range of portable, direct fired gas heaters is designed to give safe,
efficient and reliable operation, and are for use with propane gas only.
As with all mechanical equipment, optimum performance will only be
achieved if the correct application and servicing procedures are followed.
WARNING: PROPANE GAS CYLINDERS MUST BE USED AND STORED IN
ACCORDANCE WITH THE ‘HIGHLY FLAMMABLE LIQUIDS AND LIQUEFIED
PETROLEUM GASES REGULATIONS 1972’
In order to reduce the risk of icing up when operating at long periods at
maximum capacity, you should use a larger capacity gas bottle.
Ensure the Propane gas bottle, gas hose and electric cable, are positioned
behind the unit, away from the heat.
IN THE EVENT OF A GAS LEAK
1. Put out all smoking materials and other open flames.
2. Do NOT operate electric switches or light matches.
3. Close all supply valves on gas tank or cylinder.
4. Do NOT use your phone. USE a neighbor's phone or your mobile phone
from outside the building or wherever you detected the gas leak to call the
fire service.
5. Immediately get everyone out of the building or area.
6. Do NOT re-enter the building, or area until a trained service person or the
fire service advises it is safe to return.
7
Parts & Service: 020 8988 7400 / E-mail: [email protected] or [email protected]
Page 8
INSTALLATION
WARNING: READ AND UNDERSTAND THE WARNINGS IN THE SAFETY
INFORMATION SECTION, PAGE 3. THEY ARE NEEDED TO SAFELY OPERATE
THIS HEATER. FOLLOW ALL LOCAL REGULATIONS WHEN USING THIS
HEATER.
WARNING: TEST ALL GAS PIPING AND CONNECTIONS FOR LEAKS AFTER
INSTALLATION OR SERVICING. NEVER USE AN OPEN FLAME TO CHECK
FOR A LEAK. APPLY A MIXTURE OF LIQUID SOAP AND WATER TO ALL
JOINTS. BUBBLES FORMING SHOW A LEAK. CORRECT ALL LEAKS AT ONCE.
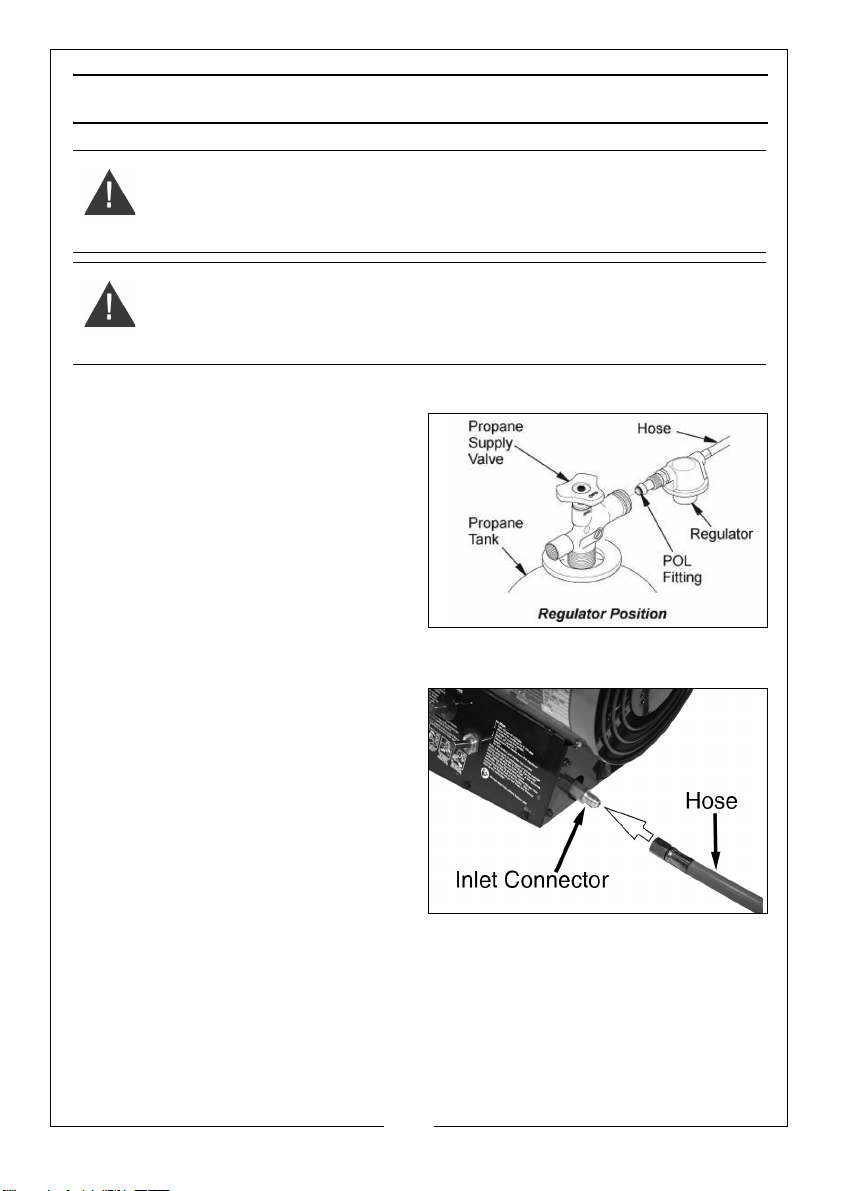
1. Provide a propane supply system (see Propane Gas Supply).
2. Connect POL (Prest-o-Lite) fitting
on hose/regulator assembly to the
propane tank(s).
• Turn POL fitting anti-clockwise
into the threads on the tank.
Tighten firmly using a wrench.
IMPORTANT: Position the regulator so
that the hose leaving the regulator is
in a horizontal position. This places
the regulator vent in the proper
position to protect it from the weather.
3. Connect the hose to the valve
inlet connector. Tighten firmly
using a wrench.
IMPORTANT: Use extra hose or piping
if needed between hose/regulator
assembly and propane tank. You
must use the regulator supplied with
heater.
4. Open the propane supply valve
on the propane tank(s) slowly.
NOTE: If the supply valve is not opened slowly, the check valve on the
propane tank will activate and stop gas flow. If this happens, close the
propane supply valve and open again slowly.
5. Check all connections for leaks. Apply a mixture of liquid soap and water
to all gas joints. Bubbles forming show a leak that must be corrected.
6. Close the propane supply valve.
8
Parts & Service: 020 8988 7400 / E-mail: [email protected] or [email protected]
Page 9
VENTILATION
WARNING: PROVIDE AT LEAST A 1.5 FT2 (1400 CM2) OPENING OF FRESH,
OUTSIDE AIR WHILE RUNNING HEATER. IF PROPER FRESH, OUTSIDE AIR
VENTILATION IS NOT PROVIDED, CARBON MONOXIDE POISONING CAN
OCCUR. PROVIDE PROPER FRESH, OUTSIDE AIR VENTILATION BEFORE
RUNNING HEATER.
STARTING PROCEDURE!
WARNING: BEFORE STARTING THE HEATER, YOU MUST ENSURE THAT THE
MINIMUM VENTILATION REQUIREMENTS ARE OBSERVED TO AVOID THE
RISK OF CARBON MONOXIDE POISONING.
TO START THE HEATER
1. Follow all installation, ventilation, and safety information.
2. Locate the heater on stable and level surface.
• Make sure strong drafts do not blow into the front or rear of the
heater.
3. Plug the heater into a suitable 230V mains socket.
4. Set the on/off switch to the on position.
• The motor will start, the fan will turn, forcing air from the front of the
heater.
5. Open the propane supply valve on the propane tank(s) slowly.
NOTE: If not opened slowly, the excess-flow check valve on the propane tank
will stop the gas flow. If this happens, close the propane supply valve
and open again slowly.
WARNING: MAKE SURE THAT THE MOTOR AND FAN ARE RUNNING BEFORE
PUSHING IN AUTOMATIC CONTROL VALVE BUTTON. FLAMES COULD
FLASH OUTSIDE HEATER IF THE MOTOR AND FAN ARE NOT RUNNING.
9
Parts & Service: 020 8988 7400 / E-mail: [email protected] or [email protected]
Page 10
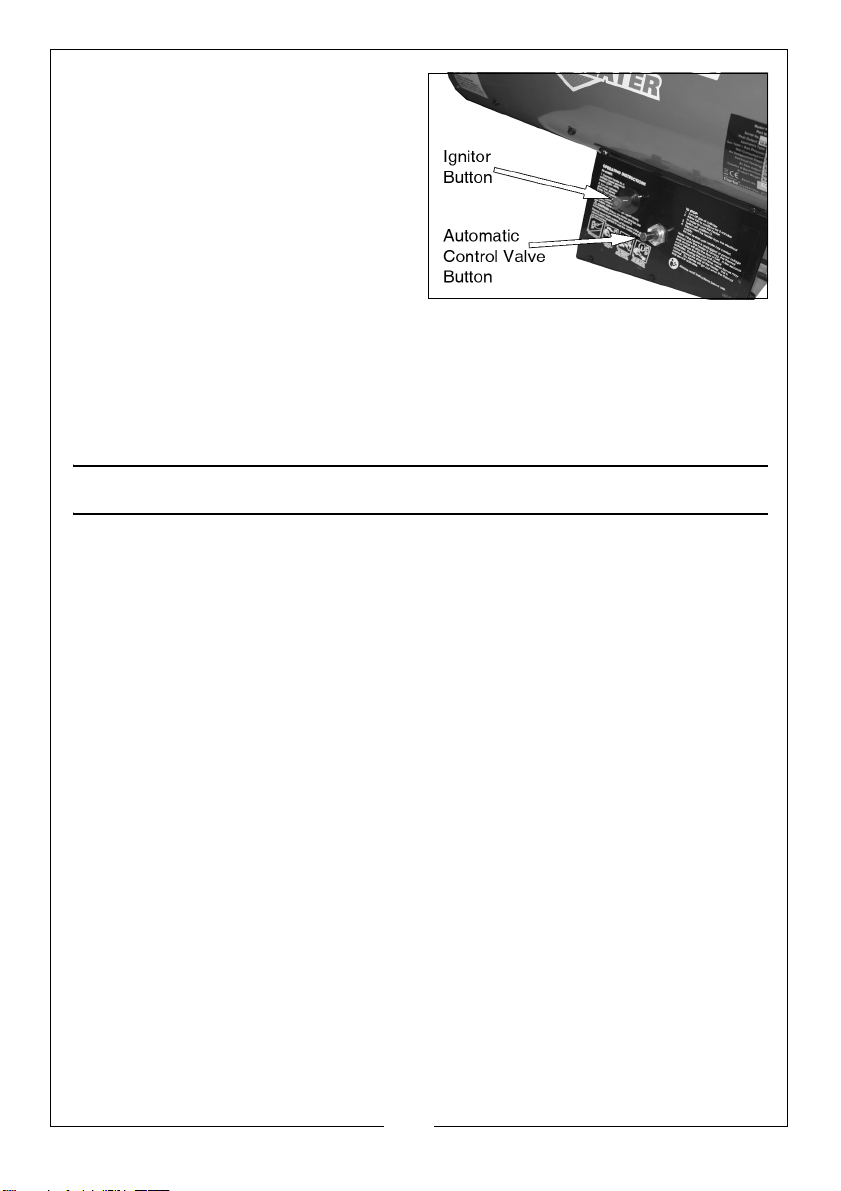
6. Push in and hold the automatic
control valve button.
7. Push the piezo ignitor button.
• You may need to push the
piezo ignitor button 3-8 times
until the burner lights.
• When the burner lights, keep
the automatic control valve
button pushed in.
8. Release the automatic control valve button after 15 seconds.
NOTE: If the heater fails to ignite, the hose may have air in it. If so, keep the
automatic control valve button pressed and wait 20 seconds. Release
the automatic control valve button and wait 20 seconds for unburned
fuel to exit the heater, repeat steps 6-8.
STOPPING PROCEDURE
TO STOP THE HEATER
1. Tightly close propane supply valve on propane tank(s).
• The heater will burn away gas left in supply hose.
2. Allow the heater to cool down for 5 minutes, then switch off the heater.
3. Unplug the heater.
TO RESTART THE HEATER
1. Wait five minutes after stopping the heater.
2. Repeat steps under 'To Start The Heater’.
10
Parts & Service: 020 8988 7400 / E-mail: [email protected] or [email protected]
Page 11
STORAGE
CAUTION: DISCONNECT THE HEATER FROM PROPANE SUPPLY TANK(S)
1. Store propane tank(s) in safe manner.
• Follow all local regulations.
• Always store propane tanks outdoors.
2. Place plastic cover caps over any brass fittings, the connector and hose/
regulator assembly.
3. Store in a dry, clean and safe place.
4. When taking heater out of storage, always check inside of heater. Insects
and small animals may place foreign objects in heater.
MAINTENANCE
WARNING: NEVER SERVICE THE HEATER WHILE IT IS PLUGGED IN,
CONNECTED TO THE PROPANE SUPPLY, OPERATING OR HOT. SEVERE
BURNS OR ELECTRIC SHOCK MAY OCCUR.
WARNING: KEEP THE HEATER CLEAR AND FREE FROM ANY COMBUSTIBLE
MATERIALS, GASOLINE AND OTHER FLAMMABLE VAPOURS AND LIQUIDS.
WARNING: DO NOT BLOCK THE FLOW OF COMBUSTION OR VENTILATION
AIR.
1. Keep heater clean. Clean heater annually or as needed to remove dust
and debris. If heater is dirty or dusty, clean heater with a damp cloth.
2. Inspect the heater before each use. Check connections for leaks. Apply
mixture of liquid soap and water to connections. Bubbles forming show a
leak. Correct all leaks at once.
3. Inspect the hose/regulator assembly before each use. If the hose is highly
worn or cut, replace with a hose specified by the manufacturer.
4. Have heater inspected yearly by a qualified service agency.
5. Keep the inside of the heater free from combustible
11
Parts & Service: 020 8988 7400 / E-mail: [email protected] or [email protected]
and foreign objects.
Page 12
TROUBLESHOOTING
WARNING: NEVER SERVICE THE HEATER WHILE IT IS PLUGGED IN,
CONNECTED TO PROPANE SUPPLY, OPERATING OR HOT. SEVERE BURNS
AND ELECTRICAL SHOCK CAN OCCUR.
OBSERVED FAULT POSSIBLE CAUSE REMEDY
Fan does not
turn when
heater is
plugged in
Heater will not
ignite
No electrical power to the
heater
Structural damage Return to your dealer for
Defective motor Return to your dealer for
User did not follow
installation or operation
instructions properly
No spark at ignitor. If no
spark seen, the fault may
be:
A) Loose or disconnected
ignitor wire
B) Wrong spark gap
C) Piezo ignitor loose
D) Bad ignitor electrode
Check voltage to
electrical outlet. If voltage
is good, check heater
power cable for breaks
repair.
repair.
Repeat installation and
operation instructions. See
Installation and Starting,
page 8+9
A) Check ignitor wire.
Tighten or reattach loose
ignitor wire.
B) Set gap between
ignitor electrode and
target plate to 0.17" (0.43
cm)
C) Tighten nut holding
piezo ignitor to base of
heater
D) Replace ignitor
electrode.
If you see a spark at the
ignitor have the heater
serviced by a qualified
service person.
12
Parts & Service: 020 8988 7400 / E-mail: [email protected] or [email protected]
Page 13
OBSERVED FAULT POSSIBLE CAUSE REMEDY
Heater shuts
down while
running
High surrounding air
temperature causing
thermal limit device to
shut down heater
This can happen when
running heater in
temperatures above 85
Only run the heater in
cooler temperatures
Restricted air flow Check heater inlet and
outlet. Remove any
obstructions
SPECIFICATIONS
Output Rating 35,000 Btu/hr
Fuel Propane Vapour
Gas Pressure 0.69 bar
Air Flow
169.8 m
Gas Consumption 0.74 kg/hr
Ignition Type Manual, Piezo
Motor Voltage 230 Volt/50 Hertz
Power rating (Watts) 35
3
/hr
o
F.
Fuse Rating (Amps) 13
Dimensions (D x W x H) 465 x 210 x 325 mm
Weight 5.4 Kg
ENVIRONMENTAL PROTECTION
These products contain valuable raw materials. Do not dispose of
this product with general household waste. All tools, accessories
and packaging should be sorted and disposed off appropriately
by taking to a recycling centre.
13
Parts & Service: 020 8988 7400 / E-mail: [email protected] or [email protected]
Page 14
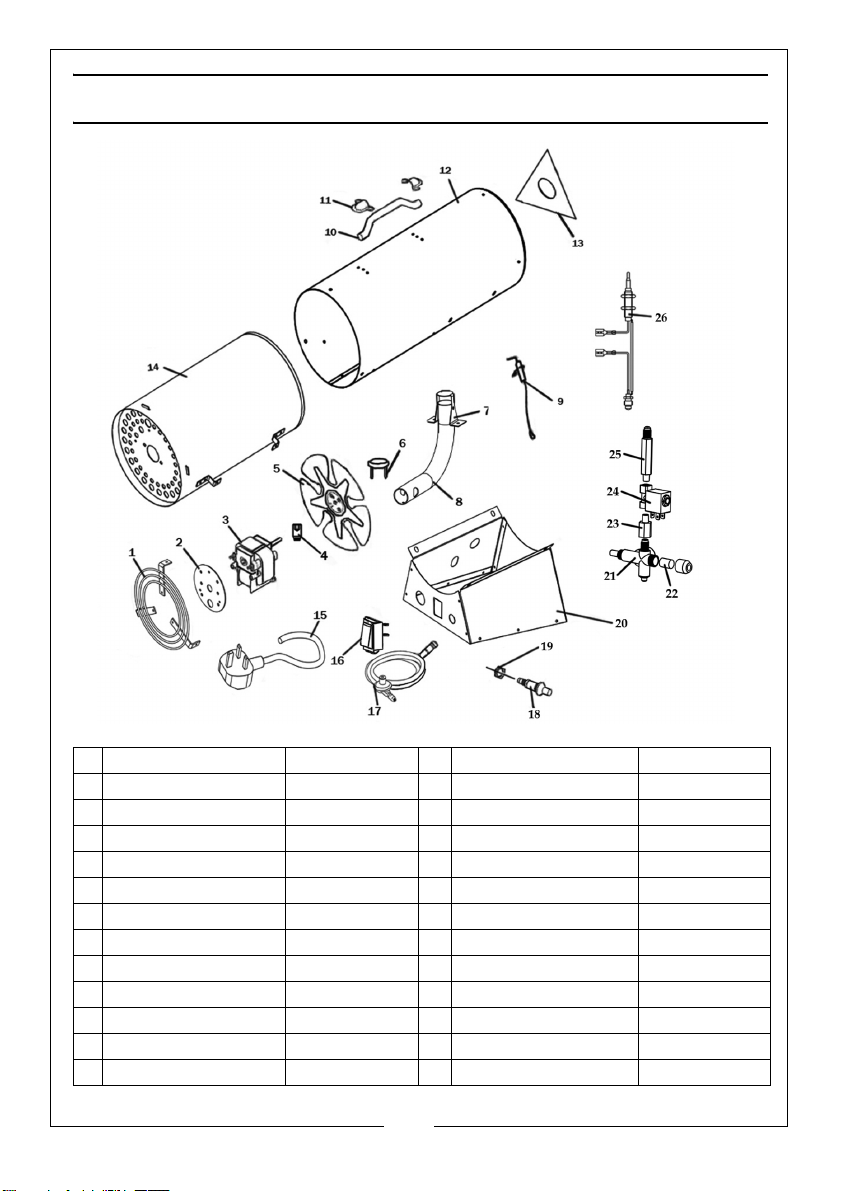
PARTS DIAGRAM
1 Grill Assembly GFLDEV201 14 Middle Cylinder Assembly GFLDEV214
2 Motor Mounting Bracket GFLDEV202 15 Power Cord GFLDEV215
3 Motor Assembly GFLDEV203 16 On/off Switch GFLDEV216
4 Screw,45# 1/4"-28*1/3 GFLDEV204 17 Hose/regulator Assembly GFLDEV217
5 Fan GFLDEV205 18 Piezo Ignitor GFLDEV218
6 Thermal Switch Kit GFLDEV206 19 Palnut Fastner GFLDEV219
7 Burner Tube Part 2 GFLDEV207 20 Control Box Assembly GFLDEV220
8 Burner Tube Part 1 GFLDEV208 21 Control Valve Assembly GFLDEV221
9 Electrode Ignitor GFLDEV209 22 Magnet Valve GFLDEV222
10 Handle GFLDEV210 23 Regulator Connector GFLDEV223
11 Handle Clip GFLDEV211 24 Magnet Valve Assembly GFLDEV224
12 Outer Cylinder GFLDEV212 25 Air Tube GFLDEV225
13 Front Guard GFLDEV213 26 Thermocouple GFLDEV226
14
Parts & Service: 020 8988 7400 / E-mail: [email protected] or [email protected]
Page 15
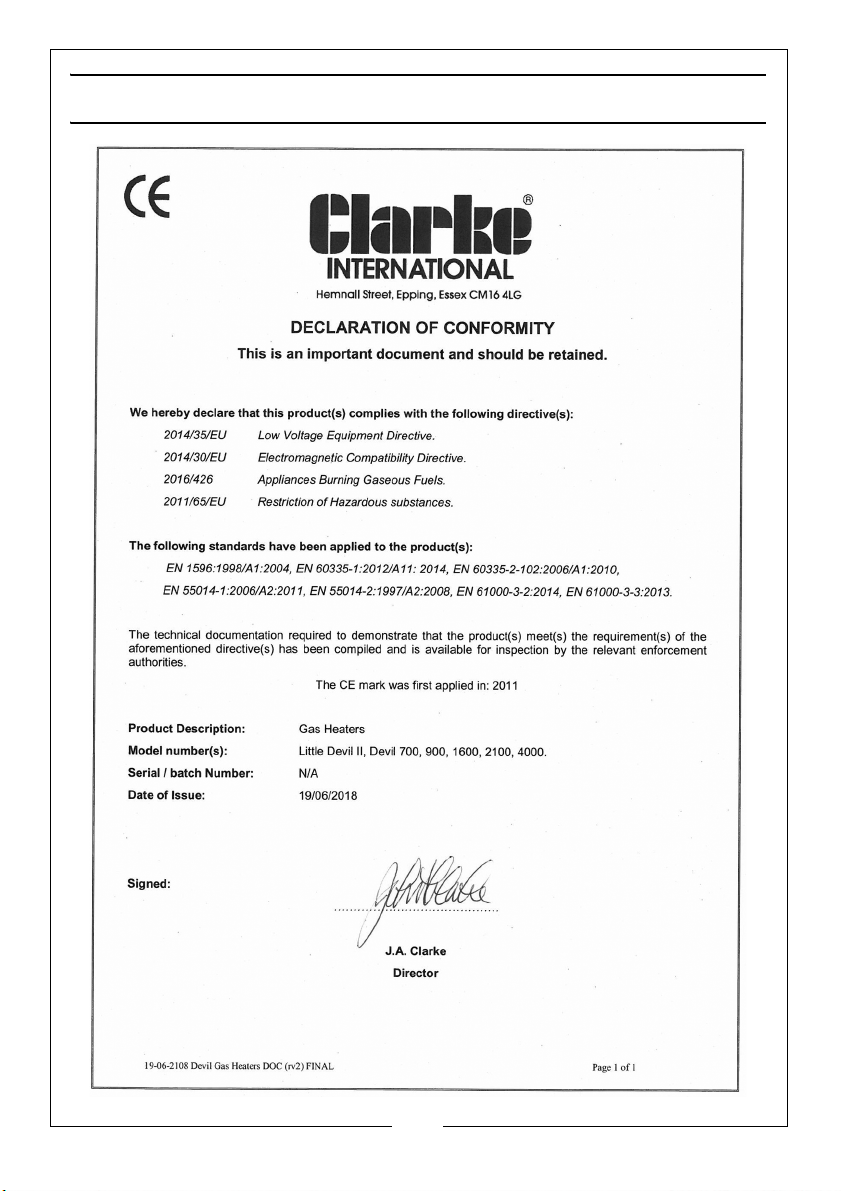
DECLARATION OF CONFORMITY
15
Parts & Service: 020 8988 7400 / E-mail: [email protected] or [email protected]
Page 16

 Loading...