

Page 1

10” TABLE SAW
MODEL NO: CTS16
PART NO: 6500748
OPERATION & MAINTENANCE
INSTRUCTIONS
ORIGINAL INSTRUCTIONS GC 0820 - ISS 3
Page 2

INTRODUCTION
Thank you for purchasing this CLARKE product.
The table saw has been designed to use a 250 mm blade to perform the
sawing operations of ripping, cross-cutting, bevelling and mitering wood and
wood products.
Before attempting to use this product, please read this manual thoroughly and
follow the instructions carefully.
GUARANTEE
This product is guaranteed against faulty manufacture for a period of 12
months from the date of purchase. Please keep your receipt which will be
required as proof of purchase.
This guarantee is invalid if the product is found to have been abused or
tampered with in any way, or not used for the purpose for which it was
intended.
Faulty goods should be returned to their place of purchase, no product can
be returned to us without prior permission.
This guarantee does not effect your statutory rights.
ENVIRONMENTAL RECYCLING POLICY
Through purchase of this product, the customer is taking on the
obligation to deal with the WEEE in acance with the WEEE regulations
in relation to the treatment, recycling & recovery and
environmentally sound disposal of the WEEE.
In effect, this means that this product must not be disposed of with general
household waste. It must be disposed of acing to the laws governing Waste
Electrical and Electronic Equipment (WEEE) at a recognised disposal facility.
2
Parts & Service: 020 8988 7400 / E-mail: [email protected] or [email protected]
Page 3

CONTENTS
The following items should be supplied in the carton. If any parts are missing,
do not operate your table saw until the missing parts are obtained.
1 x Table Saw (main unit) 2 x Long Centre Brace
2 x Table Extension 2 x Short Centre Brace
4 x Support Strut 1 x Wrench
1 x Rip Fence (Parallel Fence) 1 x Saw Blade Spindle Key
1 x Mitre Fence 2 x Leg Support
1 x Mitre Guide Assembly 1 x Riving Knife,
1 x Guide Rail (with scale) 4 x Fixings Bags (A,B,C,D)
1 x Top Guard 4 x Leg, 4 x Rubber Foot
1 x Extraction Hose 1 x Crank Handle
1 x Saw Blade, (fitted) 1 x Operating Manual
SAFETY SYMBOLS
Read this
instruction booklet
carefully before
positioning,
operating or
adjusting the
table saw.
Wear eye
protection.
Keep bystanders
away.
3
Parts & Service: 020 8988 7400 / E-mail: [email protected] or [email protected]
Wear ear
protection.
Wear a dust mask
that is specially
designed to filter
microscopic
particles.
Page 4

GENERAL SAFETY INSTRUCTIONS
WARNING: WHEN USING ELECTRIC TOOLS BASIC SAFETY PRECAUTIONS
SHOULD ALWAYS BE FOLLOWED TO REDUCE THE RISK OF FIRE, ELECTRIC
SHOCK AND PERSONAL INJURY INCLUDING THE FOLLOWING. READ ALL
THESE INSTRUCTIONS BEFORE ATTEMPTING TO OPERATE THIS PRODUCT
AND SAVE THESE INSTRUCTIONS".
SAFE OPERATION
1. Keep work area clear
• Cluttered areas and benches
invite injuries.
2. Consider work area environment
• - Do not expose tools to rain.
• - Do not use tools in damp or
wet locations.
• - Keep work area well lit.
• - Do not use tools in the
presence of flammable liquids
or gases.
3. Guard against electric shock
• Avoid body contact with
earthed or grounded surfaces
(e.g. pipes, radiators, ranges,
refrigerators).
4. Keep other persons away
• Do not let persons, especially
children, not involved in the
work touch the tool or the
extension and keep them away
from the work area.
5. Store idle tools
• When not in use, tools should be
stored in a dry locked-up place,
out of reach of children.
6. Do not force the tool
• It will do the job better and safer
at the rate for which it was
intended.
7. Use the right tool
• Do not force small tools to do
the job of a heavy duty tool.
• Do not use tools for purposes not
intended; for example do not
use circular saws to cut tree
limbs or logs.
8. Dress properly
• Do not wear loose clothing or
jewellery, they can be caught in
moving parts.
• Non-skid footwear is
recommended when working
outdoors.
• Wear protective hair covering to
contain long hair.
9. Use protective equipment
• Use safety glasses.
• Use face or dust mask if working
operations create dust.
10. Connect dust extraction
equipment
• If the tool is provided for the
connection of dust extraction
and collecting equipment,
ensure these are connected
and properly used.
4
Parts & Service: 020 8988 7400 / E-mail: [email protected] or [email protected]
Page 5

11. Do not abuse the cable
• Never yank the cable to
disconnect it from the socket.
Keep the cable away from
heat, oil and sharp edges.
12. Secure work
• Where possible use clamps or a
vice to hold the work. It is safer
than using your hand.
13. Do not overreach
• Keep proper footing and
balance at all times.
14. Maintain tools with care
• Keep cutting tools sharp and
clean for better and safer
performance.
• Follow instruction for lubricating
and changing accessories.
• Inspect tool cables periodically
and if damaged have them
repaired by an authorized
service facility.
• Inspect extension cables
periodically and replace if
damaged.
• Keep handles dry, clean and
free from oil and grease.
15. Disconnect tools
• When not in use, before
servicing and when changing
accessories such as blades, bits
and cutters, disconnect tools
from the power supply.
16. Remove adjusting keys and
wrenches
• Form the habit of checking to
see that keys and adjusting
wrenches are removed from the
tool before turning it on.
17. Avoid unintentional starting
• Ensure switch is in "off' position
when plugging in.
18. Use outdoor extension leads
• When the tool is used outdoors,
use only extension cables
intended for outdoor use and so
marked.
19. Stay alert
• Watch what you are doing, use
common sense and do not
operate the tool when you are
tired.
20. Check damaged parts
• Before further use of tool, it
should be carefully checked to
determine that it will operate
properly and perform its
intended function.
• Check for alignment of moving
parts, binding of moving parts,
breakage of parts, mounting
and any other conditions that
may affect its operation.
• A guard or other part that is
damaged should be properly
repaired or replaced by an
authorized service centre unless
otherwise indicated in this
instruction manual.
• Have defective switches
replaced by an authorized
service centre.
• Do not use the tool if the switch
does not tum it on and off.
21. Warning
• The use of any accessory or
attachment other than one
recommended in this instruction
manual may present a risk of
personal injury.
5
Parts & Service: 020 8988 7400 / E-mail: [email protected] or [email protected]
Page 6

22. Have your tool repaired by a
qualified person
• This electric tool complies with
the relevant safety rules. Repairs
should only be carried out by
qualified persons using original
spare parts, otherwise this may
result in considerable danger to
the user.
SAW BLADES
1. The maximum speed of the saw
blade must always be equal to or
greater than the no-load speed of
the table saw as specified on the
rating plate.
2. Do not use saw blades which are
damaged or deformed.
3. Only use saw blades
recommended by the
manufacturer and which are the
exact bore and diameter required
for this machine. Do not use any
spacers to make a blade fit onto
the spindle. Use only the blades
specified in this manual, which
comply with EN 847-1.
4. Clean the spindle, flanges
(especially the installing surface)
and hex nut before installing the
blade. Poor installation may cause
vibration/wobbling or slippage of
the blade.
5. Take care that the selection of the
saw blade is suitable for the
material to be cut.
6. Make sure the blade is not
contacting the riving knife or
workpiece before the switch is
turned on.
7. Wear gloves when handling saw
blades and rough material. Saw
blades shall be carried in a holder
whenever practicable.
KICKBACK
Kickback is a sudden reaction to a
pinched, bound or misaligned saw
blade, it causes the workpiece to be
ejected from the tool back towards
the operator. Kickbacks can lead to
serious personal injury.
You can avoid kickbacks by:
a. keeping the blade sharp,
b. keeping the rip fence parallel to
the blade,
c. keeping the riving knife and
blade guard in place and
operating properly,
d. by not releasing the workpiece
until you have pushed it all the
way past the blade,
e. not ripping a workpiece that is
twisted or warped or does not
have a straight edge to guide
along the fence.
If you do not have a clear
understanding of kickback and how it
occurs, DO NOT operate this table
saw!
REMAINING HAZARDS
The machine has been built in
accordance with recognized safety
rules. Some remaining hazards may still
exist.
• The rotating saw blade can
cause injuries to fingers and
hands if the work piece is
incorrectly fed.
• Thrown work pieces can lead to
injury if the work piece is not
properly secured or fed, such as
working without a limit stop.
6
Parts & Service: 020 8988 7400 / E-mail: [email protected] or [email protected]
Page 7

• Noise can be a health hazard.
The permitted noise level is
exceeded when working. Be
sure to wear personal protective
equipment such as ear
protection.
• Defective saw blades can
cause injuries. Regularly inspect
the structural integrity of saw
blades.
• The use of incorrect or
damaged mains cables can
lead to injuries caused by
electricity.
• Remaining hazards can be
minimized by following the
instructions in the operating
manual.
7
Parts & Service: 020 8988 7400 / E-mail: [email protected] or [email protected]
Page 8
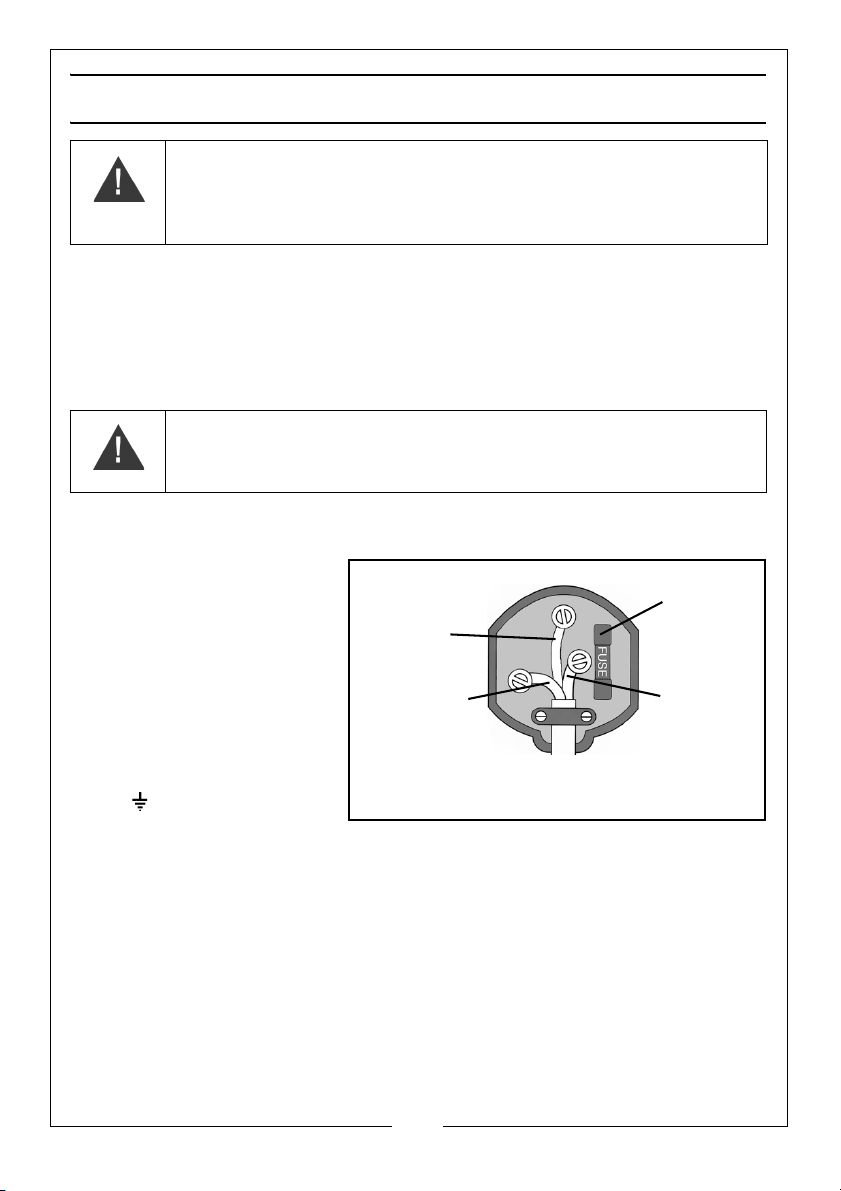
ELECTRICAL CONNECTIONS
Plug must be BS1363/A approved.
Always fit
Ensure that the outer sheath of
Neutral
(Blue)
Live
(Brown)
Earth
(Green and
a 13 Amp
the cable is firmly held by the clamp
fuse.
Yel low)
WARNING: READ THESE ELECTRICAL SAFETY INSTRUCTIONS
THOROUGHLY BEFORE CONNECTING THE PRODUCT TO THE MAINS
SUPPLY.
Connect the mains lead to a standard, 230 Volt (50Hz) electrical supply through
an approved 13 amp BS 1363 plug, or a suitably fused isolator switch.
If the plug has to be changed because it is not suitable for your socket, or
because of damage, it must be removed and a replacement fitted, following
the wiring instructions shown below. The old plug must be discarded safely, as
insertion into a power socket could cause an electrical hazard.
WARNING: THE WIRES IN THE POWER CABLE OF THIS PRODUCT ARE
COLOURED IN ACANCE WITH THE FOLLOWING CODE:
BLUE = NEUTRAL BROWN = LIVE YELLOW AND GREEN = EARTH
If the colours of the wires in the power cable do not agree with the markings on
the plug.
• The BLUE wire must be
connected to the terminal
marked N or coloured
black.
• The BROWN wire must be
connected to the terminal
marked L or coloured red.
• The YELLOW AND GREEN
wire must be connected
to the terminal marked E
or or coloured green.
We strongly recommend
that this machine is connected to the mains supply through a Residual Current
Device (RCD)
If you are not sure, consult a qualified electrician. DO NOT try to do any
repairs.
Parts & Service: 020 8988 7400 / E-mail: [email protected] or [email protected]
8
Page 9

ASSEMBLY
ATTACH THE EXTENSION TABLES
1. Turn the table saw upside down.
2. Fix the extension table to the table
saw using two of the M6 x 12 bolts,
washers and nuts supplied.
3. Fit two of the braces to the
extension table using two of the
the M6 x 12 bolts, washers and
nuts supplied.
• The end of the brace nearest to
the table saw body will be
connected later.
4. Put the remaining extension table
on the other side of the table saw
and repeat steps 2-3.
ATTACH THE GUIDE RAIL
Attach the guide rail using 3 M6 x 12
bolts, washers and nuts.
9
Parts & Service: 020 8988 7400 / E-mail: [email protected] or [email protected]
Page 10
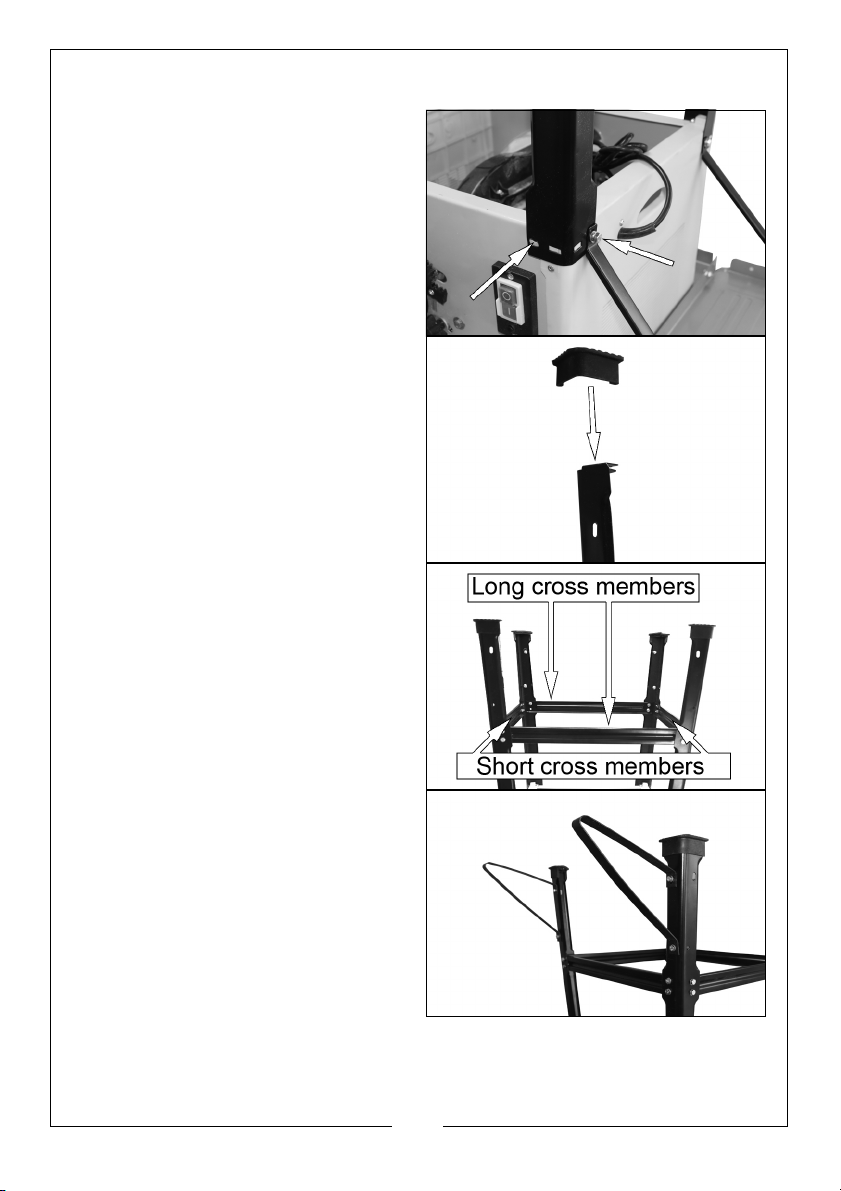
ATTACH THE LEG KIT TO THE TABLE SAW
1. Attach each leg to a corner of
the table saw using two of the M6
x 16 bolts, washers and spring
washers supplied.
• Note that one of the bolts also
passes through the brace.
2. Fit the rubber feet to the legs.
3. Attach the cross members to the
legs using 16 of the M6 x 12 bolts,
washers and nuts supplied.
• The long cross members are
placed front and rear.
• The short cross members are
placed on the sides.
4. Attach the stabilisers to the rear
legs using two of the M6 x 12 bolts,
washers and nuts supplied.
5. Check that all bolts are tightened
and then turn the table saw over
onto the feet.
10
Parts & Service: 020 8988 7400 / E-mail: [email protected] or [email protected]
Page 11

INSTALL THE HEIGHT ADJUSTING HANDLE
1. Remove the nut and washers from
the handle.
2. Place one washer back on the
handle.
3. Pass the handle through the arm
as shown and secure in place
using the remaining washer and
nut.
• Do not overtighten, the handle
must turn freely.
INSTALL THE RIVING KNIFE
1. Remove the table insert screw
and lift out the table insert.
2. Turn the blade height adjusting
handle clockwise to raise the
blade fully.
11
Parts & Service: 020 8988 7400 / E-mail: [email protected] or [email protected]
Page 12
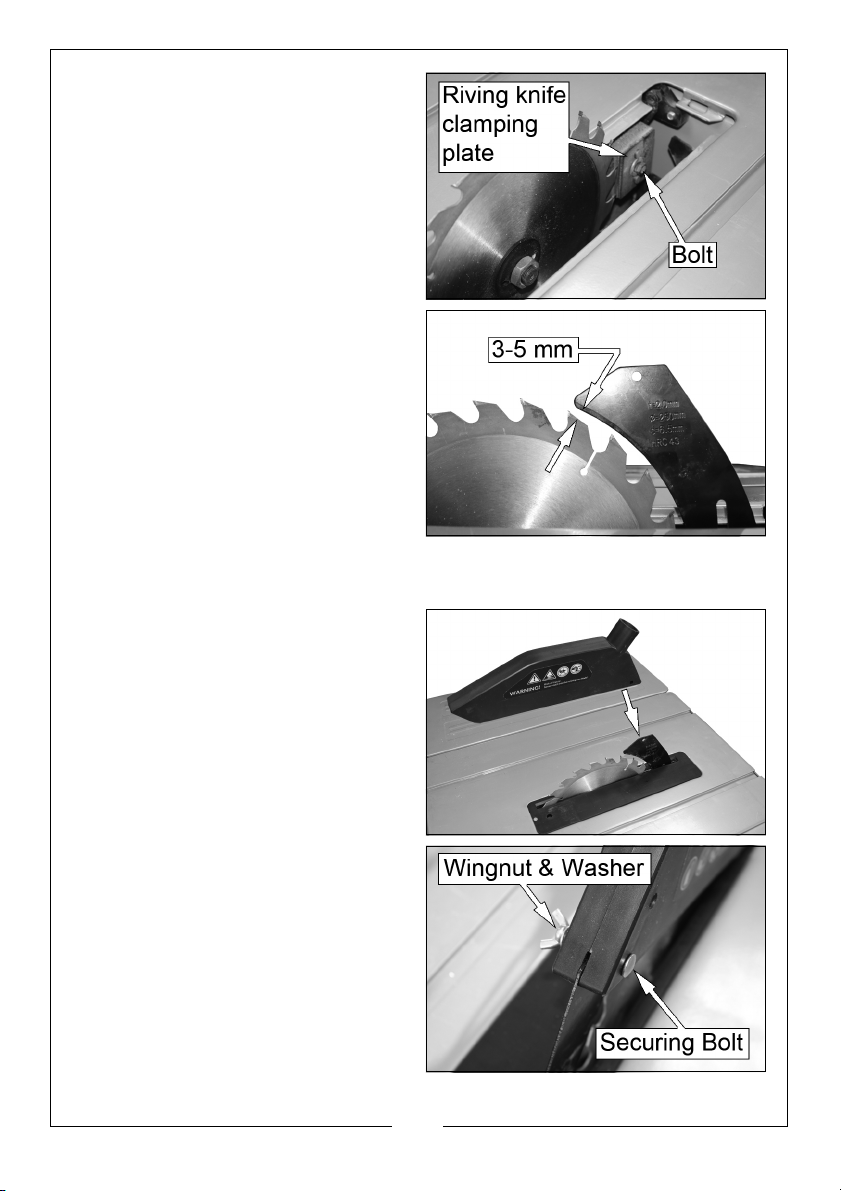
3. Loosen the bolt on the riving knife
clamping plate by a few turns.
4. Place riving knife behind the
clamp and push it all the way
down.
5. Adjust the riving knife until there is
a 3-5 mm gap between the riving
knife and the saw blade.
6. Tighten the riving knife clamp.
7. Replace the table insert.
ATTACH THE BLADE GUARD
1. Mount the blade guard on the
riving knife as shown.
2. Use the securing bolt to secure
the blade guard.
3. Do not overtighten - the blade
guard must rise and fall freely.
12
Parts & Service: 020 8988 7400 / E-mail: [email protected] or [email protected]
Page 13
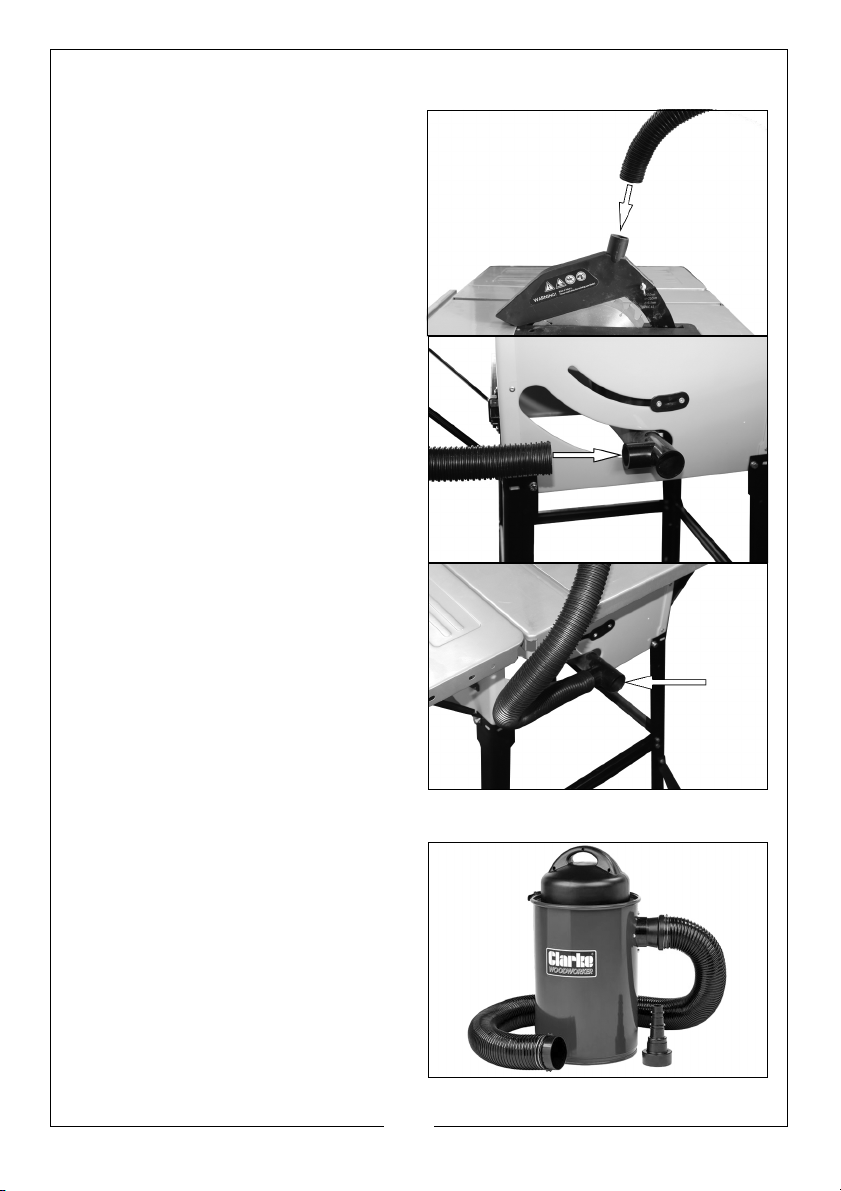
ATTACH THE DUST HOSE
1. Attach the hose to the top of the
blade guard.
2. Attach the other end of the hose
to the dust outlet on the rear of
the table saw.
3. Always use a dust extracting
device.
• The workplace should also be
well ventilated.
• The dust extraction port has an
inner diameter of 36 mm and
an outer diameter of 40 mm.
RECOMMENDED DUST EXTRACTING DEVICE
• The Clarke CWVE1 Vacuum
Extractor is an ideal companion
product for your CTS16 Table
saw and is available at your
local Clarke dealer (part
number 6471168).
13
Parts & Service: 020 8988 7400 / E-mail: [email protected] or [email protected]
Page 14

ADJUSTMENTS
After every new adjustment we recommend you to make a trial cut in order to
check the new settings.
PARALLEL FENCE
CUTTING WIDTH
The parallel fence can be mounted on either side of the saw table. If you
change the side, you will need to attach the parallel fence to the other side of
the holder.
1. Slide the parallel fence into the
guide rail of the saw table.
2. Use the scale on the guide rail to
set the parallel fence the required
distance from the blade.
3. Lock the parallel fence in the
required position by pressing
down on the locking lever.
FENCE HEIGHT
The parallel fence has two different guide faces.
• For thick material you should use the high side of the parallel fence.
• For thin material you should use the low side of the parallel fence.
To change the parallel fence from
one to the other you have to:
1. Loosen the two thumb screws.
2. Remove the parallel fence from
the holder.
3. Remount the parallel fence onto
the holder by sliding the securing
bolt heads on the holder into the
relevant mounting slot in the
parallel fence.
4. Retighten the two thumb screws.
14
Parts & Service: 020 8988 7400 / E-mail: [email protected] or [email protected]
Page 15

MITRE GAUGE
1. Insert the guide bar into one end
of the groove on the table.
2. Loosen the locking knob by
twisting it counterclockwise.
3. Rotate the gauge to the angle
you want.
4. Retighten the locking knob.
SETTING BLADE HEIGHT
Turn the blade height adjusting
handle to set the blade to the
required height.
• Clockwise to raise the blade.
• Anti-clockwise to lower the
blade.
SETTING THE BLADE ANGLE
1. Loosen the bevel lock.
2. Grasp the blade height
adjustment wheel and move it so
that the pointer is aligned with the
required angle shown on the
scale.
3. Lock the blade at the desired
angle by retightening the bevel
lock.
15
Parts & Service: 020 8988 7400 / E-mail: [email protected] or [email protected]
Page 16

OPERATION
CAUTION: BEFORE STARTING THE SAW ALWAYS CHECK THE FOLLOWING
POINTS:
1. Is the saw blade firmly tightened?
2. Are all the locking levers firmly locked?
3. Is the riving knife aligned with the saw blade?
4. Is the blade guard fitted?
5. Make sure that the fences are not touching the saw blade.
6. Can the blade rotate freely?
7. Are there any wood pieces jammed between the blade and the
table insert?
8. Have all loose workpieces been removed from the table saw?
9. Have all the setting tools been removed?
10. Wear protective goggles, ear protection and dust mask.
ON/OFF SWITCH
1. To turn the saw on, press the
green start button “I”.
• Wait for the blade to reach its
maximum speed before
commencing with the cut.
2. To turn the saw off, press the red
stop button “0”.
NOTE: The blade will spin for several
seconds after the machine is
switched off.
MOTOR BRAKE
The motor is fitted with a brake which should stop the saw blade in under 10
seconds.
If this time is exceeded, the brake must be repaired by an authorised service
centre.
A saw with a defective brake must not be used.
16
Parts & Service: 020 8988 7400 / E-mail: [email protected] or [email protected]
Page 17

OVERLOAD RESET BUTTON
This table saw has a thermal overload
protection device.
If the saw gets too hot, the thermal
overload device cuts the power
which prevents damage to the
motor.
If the thermal overload device
operates, let the motor cool down for
5 minutes and push the reset button
located just above the Start (I) button
If you start the saw and the overload cutout operates again, disconnect from
the power supply and have your table saw examined by a qualified service
agent.
CUTTING TIPS
RIPPING CUTS
Ripping is when you use the saw to cut along the grain of the wood.
The parallel fence must always be used when making ripping cuts.
1. Press one edge of the workpiece
against the parallel fence while
the flat side lies on the saw table.
• The blade guard must always
be lowered over the workpiece
and blade.
• When you make a ripping cut,
never stand in line with the
blade.
2. Set the parallel fence in
accordance with the workpiece height and the desired width.
3. Switch on the saw.
4. Place your hands (with fingers closed) flat on the workpiece and push the
workpiece along the parallel fence towards the blade.
5. Guide at the side with your left or right hand (depending on the position of
the parallel fence) only as far as the front edge of the blade guard.
17
Parts & Service: 020 8988 7400 / E-mail: [email protected] or [email protected]
Page 18

6. Always push the workpiece through to the end of the riving knife using a
push stick.
7. Do not remove the offcut piece until the blade has stopped spinning.
8. Secure long workpieces against falling off at the end of the cut (e.g. with a
roller stand etc.).
CUTTING NARROW WORKPIECES
Always use a push stick when the
workpiece is smaller than 120 mm in
width.
When not in use, place the push stick
in its storage clip on the side of the
saw.
Replace a worn or damaged push
stick immediately.
BEVEL CUTS
Bevel cuts must always be made using the parallel fence.
1. Loosen the bevel lock.
2. Select the desired angle on the
scale.
3. Retighten the bevel lock to lock
the blade at the selected angle.
4. Set the parallel fence.
5. Perform the cut as you would for
a ripping cut.
18
Parts & Service: 020 8988 7400 / E-mail: [email protected] or [email protected]
Page 19

CROSS CUTS
1. Slide the mitre gauge into one of
the grooves in the table.
2. Adjust the mitre gauge to the
required angle.
3. Press the workpiece firmly against
the mitre gauge.
4. Switch on the saw.
5. Push the mitre gauge and the
workpiece toward the blade to
make the cut.
IMPORTANT: Always hold the guided part of the workpiece. Never hold the
part which is to be cut off.
6. Push the mitre gauge forward until the workpiece is cut all the way
through.
7. Switch off the saw. Do not remove the offcut until the blade has stopped
rotating.
TRANSPORTING
1. Turn the table saw off and disconnect it from the power supply before it is
moved
2. At least two people should carry the saw. Do not lift using the table
extensions. only use the hand holds for moving this table saw. These are
found in the housing on both sides of the main body.
3. Protect the saw against knocks, jolts and strong vibrations. e.g. when it is
transported in motor vehicles.
4. Secure the saw against tilting and sliding.
5. Never hold the blade guard when lifting the table saw.
STORAGE
Store the table saw in a dry place well out of reach of children.
19
Parts & Service: 020 8988 7400 / E-mail: [email protected] or [email protected]
Page 20

MAINTENANCE
WARNING: REMOVE THE PLUG FROM THE MAINS POWER SUPPLY BEFORE
CARRYING OUT ANY ADJUSTMENT, SERVICING OR MAINTENANCE.
CLEANING
WARNING: THE TABLE SAW MUST NOT BE SPRAYED WITH WATER OR
PLACED IN WATER OTHERWISE THERE IS A RISK OF ELECTRIC SHOCK.
• Keep the safety devices, air vents and motor housing as free of dust
and dirt as possible. Wipe all dust off with a clean cloth or blow it out
with compressed air at a low pressure.
• We recommend that you clean the saw immediately after every
use.
• Clean the saw regularly with a damp cloth and some soft soap. Do
not use any detergents or solvents; these might attack the plastic
parts. Make sure that no water can get into the interior of the saw.
• Motor bearings are sealed for life and do not require oiling.
CHANGING THE BLADE
WARNING: REMOVE THE PLUG FROM THE MAINS SUPPLY BEFORE
CARRYING OUT ANY ADJUSTMENT, SERVICING OR MAINTENANCE
1. Turn the blade height adjusting
handle clockwise to raise the
blade fully.
2. Remove the table insert screw
and lift out the table insert.
20
Parts & Service: 020 8988 7400 / E-mail: [email protected] or [email protected]
Page 21

3. Undo the blade retaining nut
using the wrench and spindle key
supplied as shown.
4. Take off the nut and outer flange
and remove the old saw blade.
• Replacement blades are
available from our parts
department (part number
ZLGCTS16114).
5. Clean the blade flange faces
thoroughly before fitting the new blade.
6. Mount and fasten the new blade in reverse order.
IMPORTANT: Note the running direction. The cutting angle of the teeth must
point in the running direction, i.e. forwards (see the arrow on the blade
guard).
7. Loosen the bolt on the riving knife
clamping plate by a few turns.
8. Adjust the riving knife until there is
a 3-5 mm gap between the riving
knife and the saw blade.
9. Tighten the riving knife clamp.
10. Replace the table insert.
11. Replace the saw blade guard.
12. Check to make sure that all
components are properly
mounted and in good working
condition, before you begin working with the saw again.
WARNING: RESET THE RIVING KNIFE EACH TIME THE SAW BLADE IS
REPLACED (STEP 7 ABOVE).
21
Parts & Service: 020 8988 7400 / E-mail: [email protected] or [email protected]
Page 22

SPECIFICATIONS
Voltage 230V AC / 50Hz
Power input 1600 W
No-load speed 4100 rpm
Overload protection Yes
Table size with extension: 960 mm x 640 mm
Dust Extractor socket 36 mm (internal) - 40 mm (external)
Blade size: Outside Diameter 250 mm
Bore Diameter 30 mm
Thickness 2.4 mm
Maximum cut depth @ 90 degrees 73 mm
Maximum cut depth @ 45 degrees 53 mm
Machine weight: 22.5 kg
Sound pressure level LpA 96.2 dB (A)
Sound power level LWA: 109.2 dB (A)
Duty Cycle S6 40% 5mins
Please note that the details and specifications contained herein, are correct
at the time of going to print. We reserve the right to change specifications at
any time without prior notice.
22
Parts & Service: 020 8988 7400 / E-mail: [email protected] or [email protected]
Page 23

PARTS DIAGRAM AND LIST
23
Parts & Service: 020 8988 7400 / E-mail: [email protected] or [email protected]
Page 24

1 Rubber Foot ZLGCTS16001
2 Side Table Sup-
port
3 Washer 6 ZLGCTS16003
4 Spring Washer 6 ZLGCTS16004
5 Bolt 8.8 M6x16 ZLGCTS16005
6 Bolt 8.8 M6x12 ZLGCTS16006
7 Flange Nut M6 ZLGCTS16007
8 Screw M4x16 ZLGCTS16008
9 Screw M5x12 ZLGCTS16009
10 Rack ZLGCTS16010
11 Washer 4 ZLGCTS16011
12 Screw ST4.2x9.5 ZLGCTS16012
13 Big Washer 6 ZLGCTS16013
14 Limiting Washer ZLGCTS16014
15 Scale ZLGCTS16015
16 Capacitor ZLGCTS16016
17 Magnetic ring ZLGCTS16017
18 Switch ZLGCTS16018
19 Swich Fixing
Cover
20 Overcurrent Pro-
tector “
21 Screw M4x10 ZLGCTS16021
22 Lockwasher 4 ZLGCTS16022
23 Gasket ZLGCTS16023
24 Switch Box ZLGCTS16024
25 EU Plug& Cable ZLGCTS16025
26 Cable Clamp ZLGCTS16026
27 Cable Gland ZLGCTS16027
28 Screw M5x8 ZLGCTS16028
29 Cable Fixing
Plate
30 Handle ZLGCTS16030
31 Rocker ZLGCTS16031
32 Lock Nut M6 ZLGCTS16032
33 Spring Washer 4 ZLGCTS16033
34 Big Washer 4 ZLGCTS16034
ZLGCTS16002
ZLGCTS16019
ZLGCTS16020
ZLGCTS16029
35 Screw M4x20 ZLGCTS16035
36 Washer 8 ZLGCTS16036
37 Strut Spacer Bush ZLGCTS16037
38 Bevel Gear ZLGCTS16038
39 Motor Adjusting
Shaft
40 Motor Stop Block ZLGCTS16040
41 Roll Pin 3*16 ZLGCTS16041
42 Hand Wheel ZLGCTS16042
43 Roll Pin 4*22 ZLGCTS16043
44 Adjusting Wheel
Axle
45 Support Bush ZLGCTS16045
46 Support Bracket II ZLGCTS16046
47 Star Knob M6X15 ZLGCTS16047
48 Screw M4x12 ZLGCTS16048
49 Pointer ZLGCTS16049
50 Screw (Zn) M5*10 ZLGCTS16050
51 Screw M8*16 ZLGCTS16051
52 Spring Washer 8 ZLGCTS16052
53 Shaft Holder ZLGCTS16053
54 Shaft Fixing 1 ZLGCTS16054
55 Support Bracket I ZLGCTS16055
56 Screw (Zn) M5*14 ZLGCTS16056
57 Lock Nut M5 ZLGCTS16057
58 Screw M5*25 ZLGCTS16058
59 Needle Roller
Bearing
60 Flat Key A 5*10 ZLGCTS16060
61 Motor Holder ZLGCTS16061
62 Motor ZLGCTS16062
63 Guiding Rod ZLGCTS16063
64 Miter Gauge ZLGCTS16064
65 Circlip 15 ZLGCTS16065
66 Driven Gear ZLGCTS16066
67 Pan Head Screw
M4*10
68 Bearing 6003-2RS ZLGCTS16068
ZLGCTS16039
ZLGCTS16044
ZLGCTS16059
ZLGCTS16067
24
Parts & Service: 020 8988 7400 / E-mail: [email protected] or [email protected]
Page 25

69 Bearing Seat
Shaft
70 Bearing Seat ZLGCTS16070
71 Spring Washer 5 ZLGCTS16071
72 Screw M5*12 ZLGCTS16072
73 Shaft Fixing 2 ZLGCTS16073
74 Lock Knob ZLGCTS16074
75 Locknut ZLGCTS16075
76 Screw ST3.5*13 ZLGCTS16076
77 End Cap ZLGCTS16077
78 Cross Stop ZLGCTS16078
79 Bolt M6*25 ZLGCTS16079
80 Main Scale ZLGCTS16080
81 Front Rail ZLGCTS16081
82 Table Extension ZLGCTS16082
85 Screw ST2.9*19 ZLGCTS16085
86 Bolt M6*40 ZLGCTS16086
87/88 Guard ZLGCTS16087/
89 Wing Bolt ZLGCTS16089
90 Extraction Hose ZLGCTS16090
91 Rip Fence ZLGCTS16091
92 Bolt M6*45 ZLGCTS16092
93 End Cap For
Square Tube
94 Square Tube ZLGCTS16094
95 Screw M5*12 ZLGCTS16095
96 Screw ST4*6 ZLGCTS16096
97 Magnifier ZLGCTS16097
98 Axle ZLGCTS16098
99 Lock Pad ZLGCTS16099
100 Sliding Seat ZLGCTS16100
101 Nut M5 ZLGCTS16101
102 Lock Handle ZLGCTS16102
103 Screw M5*16 ZLGCTS16103
104 Fixing Block ZLGCTS16104
105 Fixing Clamp ZLGCTS16105
ZLGCTS16069
88
ZLGCTS16093
106 Mounting Plate ZLGCTS16106
107 Dustproof Cover ZLGCTS16107
108 Connecting Plate ZLGCTS16108
109 Bolt 8.8 M6*16 ZLGCTS16109
110 Riving Knife ZLGCTS16110
111 Pressing Plate ZLGCTS16111
112 Washer 5 ZLGCTS16112
113 Pressure Kit ZLGCTS16113
114 Saw Blade Z24 ZLGCTS16114
115 Blade Pressing
Plate
116 Thin Nut M16 ZLGCTS16116
117 Torsion Spring ZLGCTS16117
118 Splash Guard ZLGCTS16118
119 Washer 4 ZLGCTS16119
120 Blade Guard ZLGCTS16120
121 Housing ZLGCTS16121
123 Screw ST4.2*9.5 ZLGCTS16123
125 Push Stick ZLGCTS16125
126 Saw Blade Spin-
dle Key
127 Open-ended
Wrench
128 Longitudinal Strut ZLGCTS16128
129 Leg ZLGCTS16129
130 Cross Strut ZLGCTS16130
131 Stability Bar ZLGCTS16131
ZLGCTS16115
ZLGCTS16126
ZLGCTS16127
25
Parts & Service: 020 8988 7400 / E-mail: [email protected] or [email protected]
Page 26
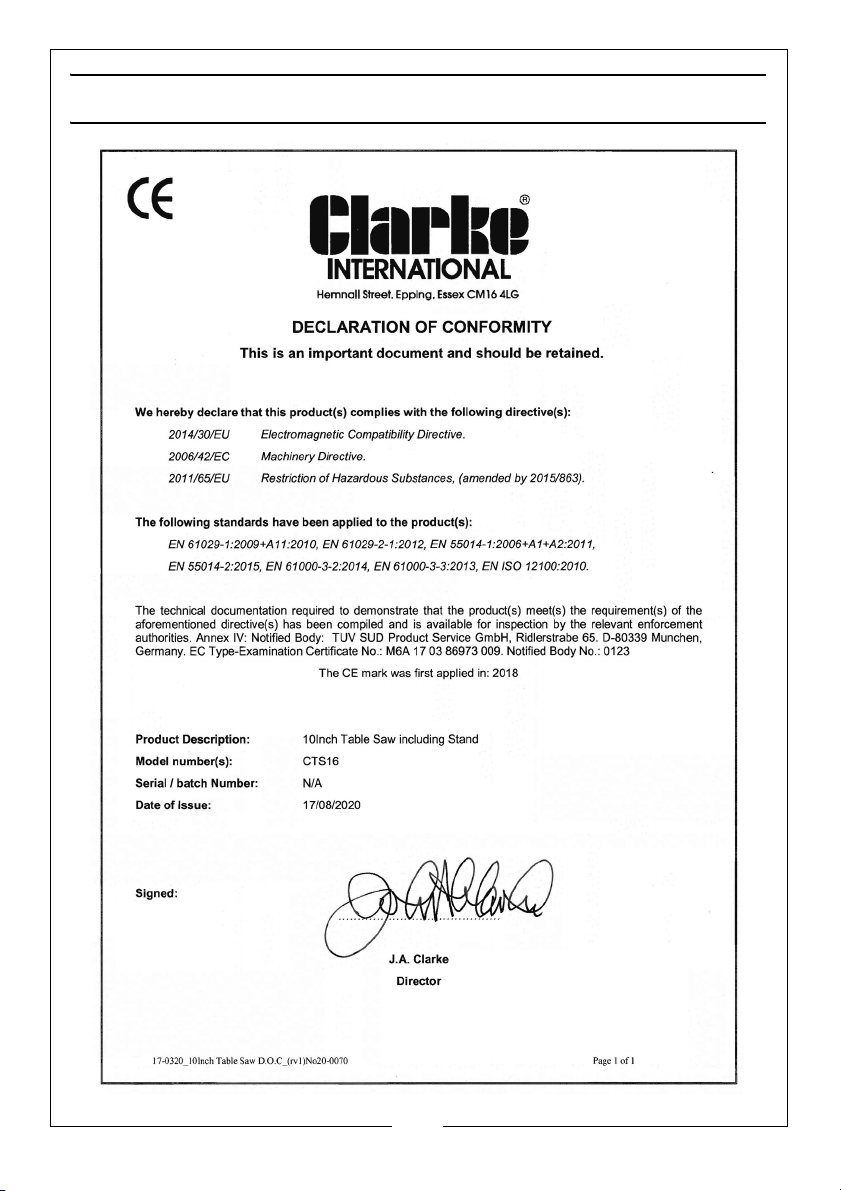
DECLARATION OF CONFORMITY
26
Parts & Service: 020 8988 7400 / E-mail: [email protected] or [email protected]
Page 27

Page 28

 Loading...