

Page 1
ALUMINIUM SACK TRUCK
MODEL NO: CAHD1PF
PART NO: 6500384
INSTRUCTIONS FOR USE
GC0315
Page 2
INTRODUCTION
Thank you for purchasing this CLARKE Sack Truck.
This sack truck has been designed to assist in the transport of heavy objects up
to the weight specified on page 7. The large wheels make it easy to move
objects on various surfaces whilst maintaining grip and control.
Before attempting to use this product, please read this manual thoroughly and
follow the instructions carefully. In doing so you will ensure the safety of yourself
and that of others around you, and you can look forward to your purchase
giving you long and satisfactory service.
GUARANTEE
This product is guaranteed against faulty manufacture for a period of 12
months from the date of purchase. Please keep your receipt which will be
required as proof of purchase.
This guarantee is invalid if the product is found to have been abused or
tampered with in any way, or not used for the purpose for which it was
intended.
Faulty goods should be returned to their place of purchase, no product can
be returned to us without prior permission.
This guarantee does not effect your statutory rights.
SAFETY PRECAUTIONS
1. Always read this manual before use.
2. Do not exceed the specified maximum working load of the sack truck.
3. Do not attempt to transport people on the sack truck.
4. Do not leave the sack truck on any steep inclines.
5. Always ensure the load is stable before attempting to move it.
6. Always ensure that all fixing screws are secure before use as prolonged
heavy work could cause them to become loose
2
Parts & Service: 020 8988 7400 / E-mail: [email protected] or [email protected]
.
Page 3
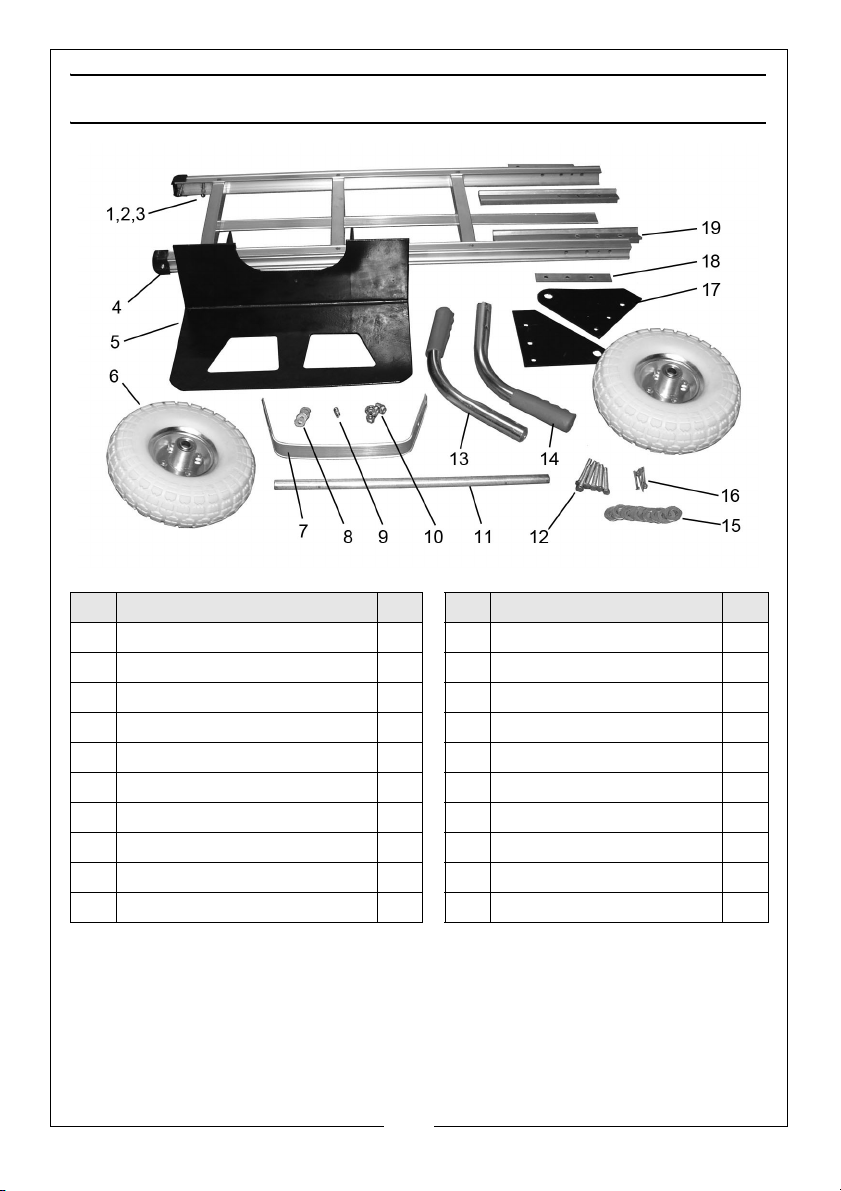
COMPONENT PARTS
No Description Qty No Description Qty
1 Fixing Bolt (M6 x 45) 4 11 Axle (16 dia) 1
2 M6 Domed Nut 4 12 Fixing Bolt (M8 x 55) 6
3 Washer M6 4 13 Handle (L/H) 1
4. Main Frame Assembly 1 14 Handle (R/H) 1
5 Toe Plate 1 15 Washer (16mm) 6
6 Puncture-Proof Wheel/Tyre 2 16 Split Pins 4
7 Cross Brace 1 17 Axle Plate 2
8 M8 Washers 6 18 Outer Clamp Plate 2
9 M6 x 12 Screw, Nut & Washer 1 19 Inner Clamp Plate 2
10 M8 Nut 6
The above parts are also available as spares. If the wheels or tyres become
worn it is suggested that they are replaced immediately as using the sack
truck could become dangerous. Puncture-proof wheels/tyres PF265 are
available from your Clarke dealer as part number 4202001.
3
Parts & Service: 020 8988 7400 / E-mail: [email protected] or [email protected]
Page 4
ASSEMBLY
Before assembly, lay out all components carefully and check to ensure that all
are present according to the component parts diagram/list on page 3.
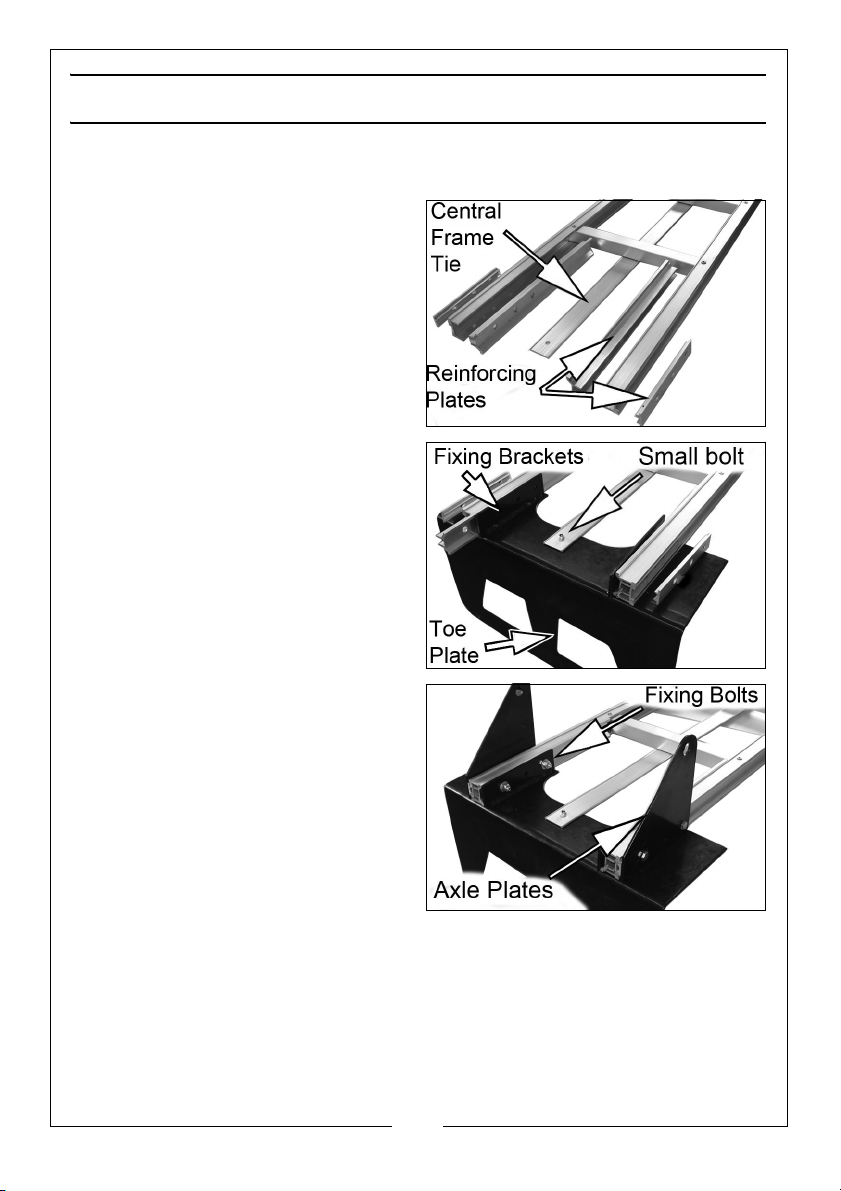
1. Lay the frame face down on a
workbench with the central frame
tie nearest the bench.
2. Remove the bolts/nut/washers
from the frame assembly, noting
the position of the inner & outer
reinforcing plates.
3. Take the toe plate and attach the
central fixing hole to the central
frame tie using the small bolt/nut.
4. Align the toe plate fixing brackets
with the main frame, ensuring the
re-inforcing plates remain in their
original positions.
5. Take the axle plates and fit them
to the outside of the frame
assembly as shown, before
passing the fixing bolts through all
the component parts and
securing with the nuts/washers.
• Only tighten fully when all the
parts are in position and
correctly aligned.
4
Parts & Service: 020 8988 7400 / E-mail: [email protected] or [email protected]
Page 5
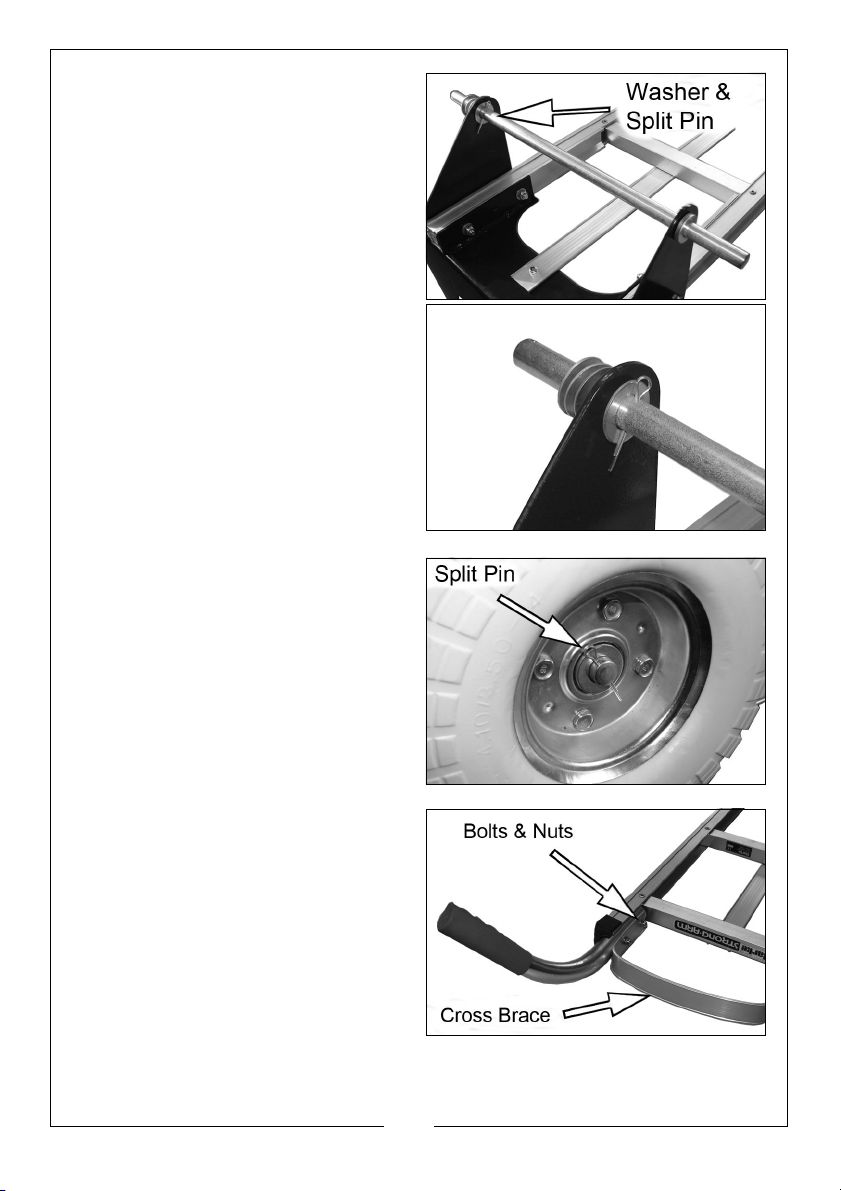
6. Pass the axle through one axle
bracket, fit two washers and pass
through the second axle bracket.
7. Fit two split pins through the
middle holes to retain the axle
centrally in place within the
brackets. Bend the split pins over
to secure them.
8. Add three washers to each end of
the axle to act as spacers before
adding a wheel to each end of
the axle.
9. Secure the wheels in place with a
two final washers and a split pin.
10. Bend the legs of the split pin over
to secure it in place.
11. Attach both handles to the frame,
complete with the cross brace
using the handle securing bolts
and nuts as shown.
• The brace needs to be sprung
into position between the
handles and that the handles
must point away from the
workbench and outwards from
the sack truck.
12. Your sack truck is now ready for use.
5
Parts & Service: 020 8988 7400 / E-mail: [email protected] or [email protected]
Page 6
USING THE TRUCK
The sack truck is suitable for moving various heavy or awkward objects,
however, care must be taken to ensure that the load does not exceed the
safe working load stated on page 7.
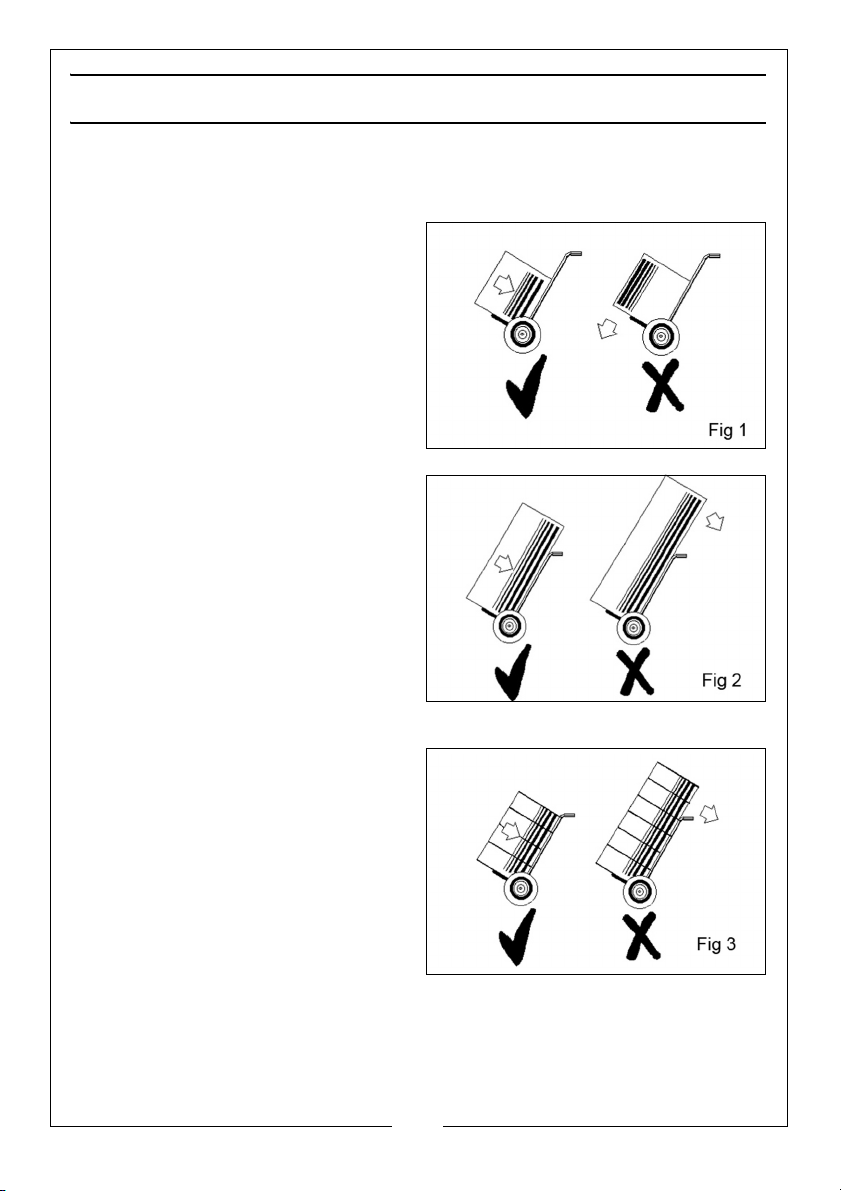
The load should be distributed as
evenly as possible on the sack truck.
If the load is heavier on one side,
always have the heavy side towards
the frame of the sack truck (see fig 1).
Tall loads should not exceed more
than one and one quarter times the
height of the sack truck. Care should
be taken to ensure that the heaviest
part of a tall load is to the bottom of
the sack truck facing the frame (see
fig 2).
When stacking loads on the sack
truck, ensure that the height of the
stack does not extend above the
handle (see Fig 3).
6
Parts & Service: 020 8988 7400 / E-mail: [email protected] or [email protected]
Page 7
MAINTENANCE
The sack truck will require little or no maintenance. The wheel/tyre assemblies
are fitted with pre-lubricated bearings which require no maintenance. It is
recommended that all the fastenings are periodically checked for tightness as
they may loosen after a long period of heavy use.
SPECIFICATIONS
CAHD1PF
Dimensions 520 x 510 x 1220 mm
Toe Plate Size 465 x 265 mm
Maximum Safe Working Load 270 kg
Wheel Diameter 265 mm
Weight 12.2 kg
7
Parts & Service: 020 8988 7400 / E-mail: [email protected] or [email protected]
Page 8
 Loading...