

Page 1
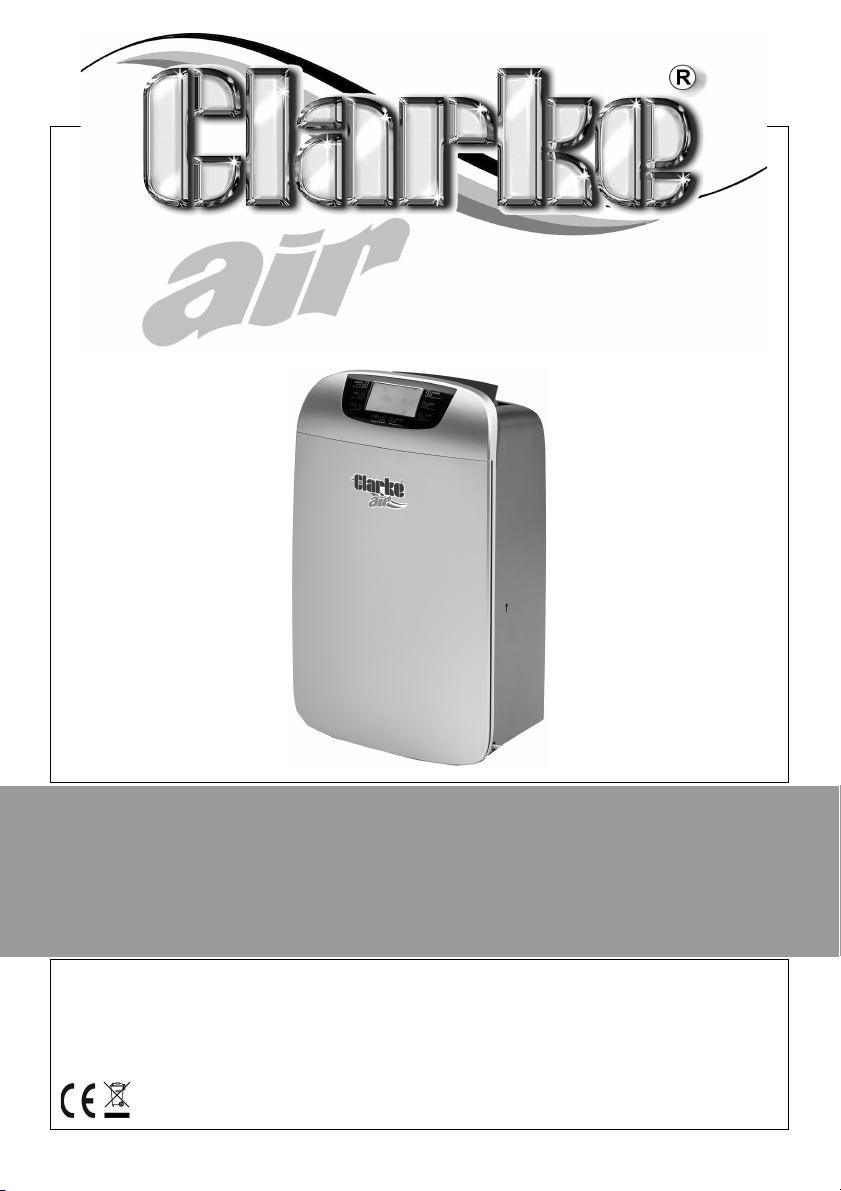
30 LITRE DEHUMIDIFIER
MODEL NO: YDH30
PART NO: 6470684
OPERATION & MAINTENANCE
INSTRUCTIONS
LS0117
Page 2
INTRODUCTION
Thank you for purchasing this CLARKE product.
Before attempting to use this product, please read this manual thoroughly and
follow the instructions carefully. In doing so you will ensure the safety of yourself
and that of others around you, and you can look forward to your purchase
giving you long and satisfactory service.
GUARANTEE
This product is guaranteed against faulty manufacture for a period of 12
months from the date of purchase. Please keep your receipt which will be
required as proof of purchase.
This guarantee is invalid if the product is found to have been abused or
tampered with in any way, or not used for the purpose for which it was
intended.
Faulty goods should be returned to their place of purchase, no product can
be returned to us without prior permission.
This guarantee does not effect your statutory rights.
ENVIRONMENTAL PROTECTION
Through purchase of this product, the customer is taking on the
obligation to deal with the WEEE in accordance with the WEEE
regulations in relation to the treatment, recycling & recovery and
environmentally sound disposal of the WEEE.
In effect, this means that this product must not be disposed of with general
household waste. It must be disposed of according to the laws governing
Waste Electrical and Electronic Equipment (WEEE) at a recognised disposal
facility.
R134a is a refrigerant that complies with EEC environmental standards;
nonetheless, the refrigerant circuit on the machine should not be punctured.
At the end of its working life, consign the air conditioning unit to a special
collection centre.
2
Parts & Service: 020 8988 7400 / E-mail: [email protected] or [email protected]
Page 3
SAFETY WARNINGS
WARNING: IF THE SUPPLY CABLE IS DAMAGED, IT MUST BE REPLACED BY
THE MANUFACTURER, ITS SERVICE AGENT OR SIMILARLY QUALIFIED
PERSONS IN ORDER TO AVOID A HAZARD.
1. Please read these instructions carefully and retain for future reference.
2. Position the mains cable so that it cannot be inadvertently pulled or
pinched and where it does not cause a trip hazard.
3. This appliance is designed to dehumidify residential environments and must
not be used for any other purposes.
4. If the appliance requires repair, always contact your CLARKE dealer.
Always insist on original spare parts. Repairs carried out by unauthorized
persons may be dangerous and invalidate the guarantee.
5. Do not use extension power cables.
6. Before cleaning or maintenance operations, always unplug the appliance
from the power supply.
7. Do not move the appliance by pulling the power cable.
8. Do not install the appliance in rooms containing gas, oil or sulphur. Do not
install near sources of heat.
9. Do not use the appliance on inclined surfaces.
10. Keep the appliance at least 50 cm away from curtains, inflammable
substances (alcohol etc) or pressurised containers (e.g. aerosol cans).
11. Do not rest heavy or hot objects on top of the appliance.
12. Always transport the appliance upright or resting on one side. Remember
to drain the tank before moving the appliance.
13. Wait at least 1 hour after transporting the appliance before using it to allow
the refrigerant gasses to settle.
14. Do not use the appliance outdoors.
15. Do not obstruct the air inlet or outlet.
16. Take care when handling water near electrical appliances.
17. Make sure that the air inlets/outlets are not covered and that the filers are
in place.
3
Parts & Service: 020 8988 7400 / E-mail: [email protected] or [email protected]
Page 4
ELECTRICAL CONNECTIONS
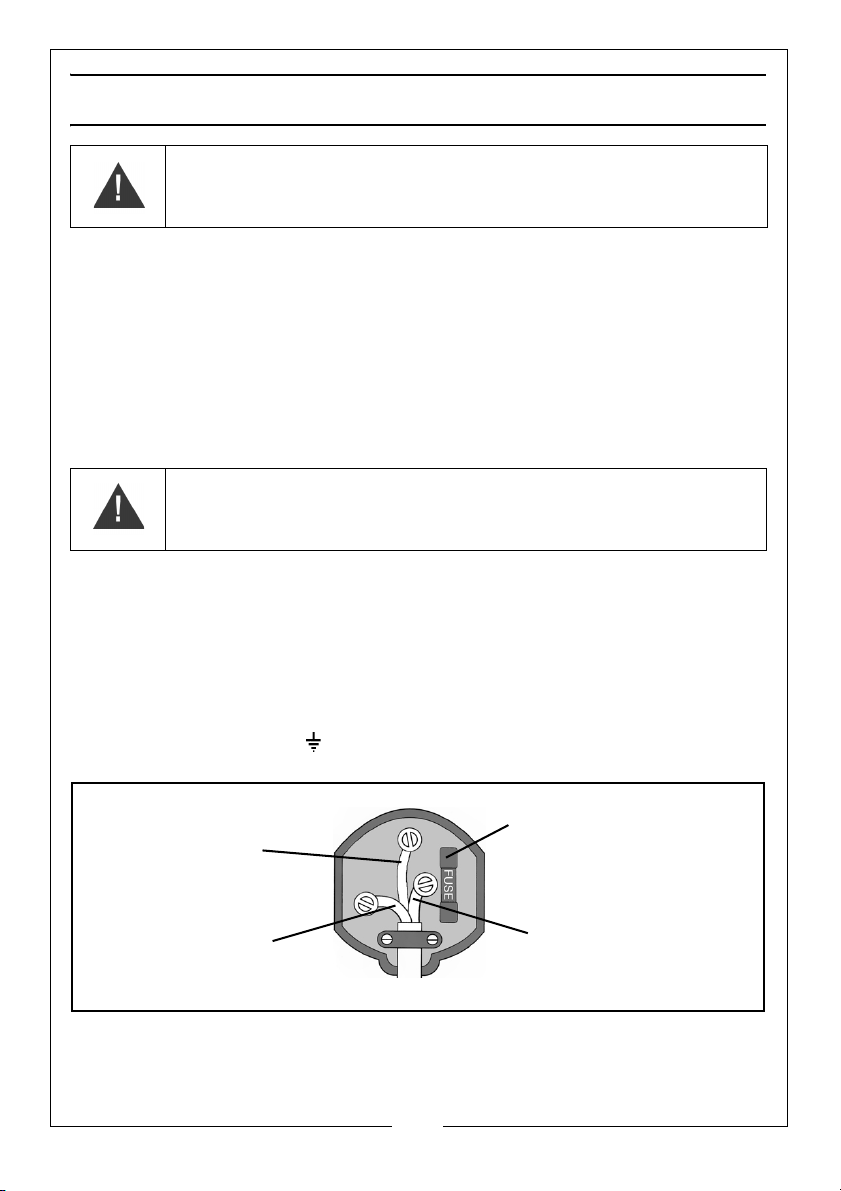
Plug must be BS1363/A approved.
Always fit a 5 Amp fuse.
Ensure that the outer sheath of the cable is firmly held by the clamp
Neutral
(Blue)
Live
(Brown)
Earth
(Green and Yellow)
WARNING: READ THESE ELECTRICAL SAFETY INSTRUCTIONS
THOROUGHLY BEFORE CONNECTING THE PRODUCT TO THE MAINS
SUPPLY.
Before switching the product on, make sure that the voltage of your electricity supply is
the same as that indicated on the rating plate. This product is designed to operate on
230VAC 50Hz. Connecting it to any other power source may cause damage.
This product may be fitted with a non-rewireable plug. If it is necessary to change the
fuse in the plug, the fuse cover must be refitted. If the fuse cover becomes lost or
damaged, the plug must not be used until a suitable replacement is obtained.
If the plug has to be changed because it is not suitable for your socket, or due to
damage, it should be cut off and a replacement fitted, following the wiring instructions
shown below. The old plug must be disposed of safely, as insertion into a mains socket
could cause an electrical hazard
WARNING: THE WIRES IN THE POWER CABLE OF THIS PRODUCT ARE
COLOURED IN ACCORDANCE WITH THE FOLLOWING CODE:
BLUE = NEUTRAL BROWN = LIVE YELLOW AND GREEN = EARTH
If the colours of the wires in the power cable of this product do not correspond with the
markings on the terminals of your plug, proceed as follows.
• The wire which is coloured Blue must be connected to the terminal which is
marked N or coloured Black.
• The wire which is coloured Brown must be connected to the terminal which is
marked L or coloured Red.
• The wire which is coloured Yellow and Green must be connected to the terminal
which is marked E or or coloured Green.
.
We strongly recommend that this machine is connected to the mains supply via a Residual
Current Device (RCD)
If in any doubt, consult a qualified electrician. DO NOT attempt any repairs yourself
Parts & Service: 020 8988 7400 / E-mail: [email protected] or [email protected]
4
Page 5
BEFORE USE
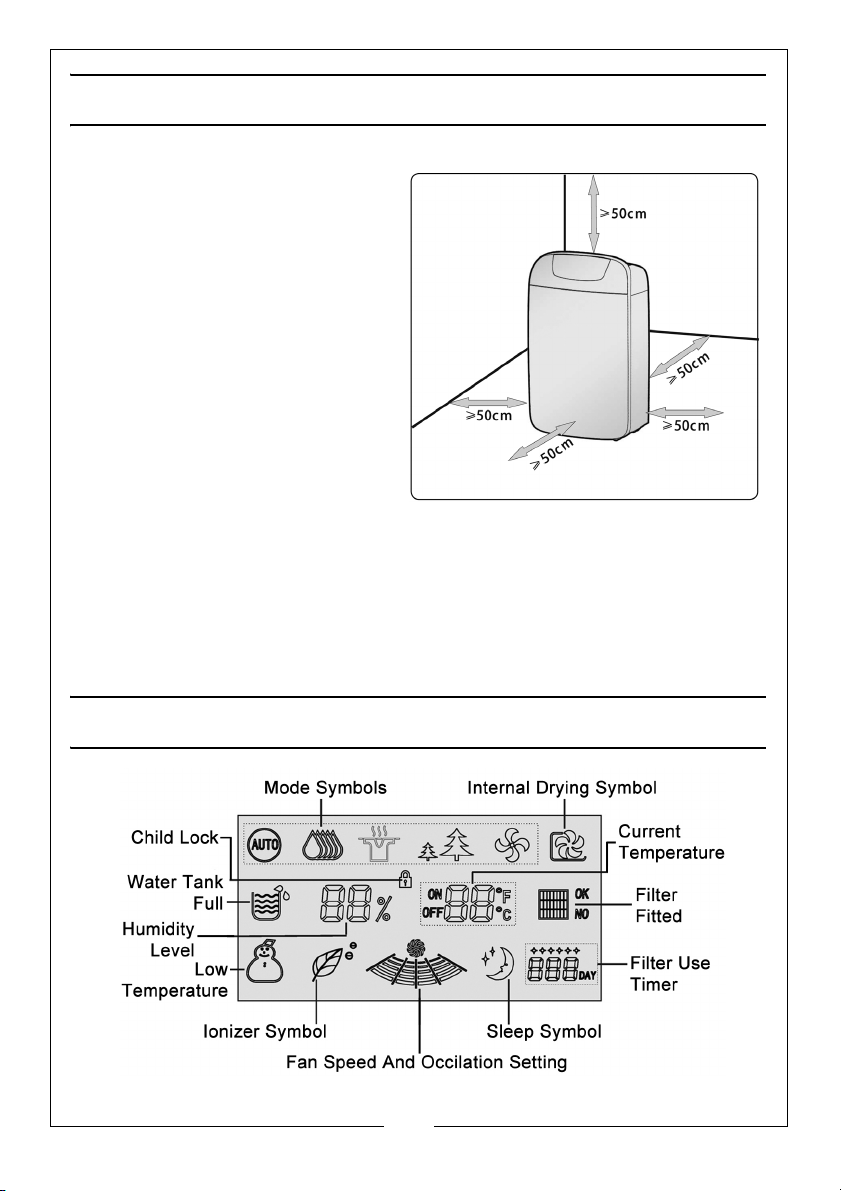
LOCATING THE DEHUMIDIFIER
• Position the dehumidifier
close to a mains supply
socket.
• Free space as shown must
be left around the
dehumidifier, so as not to
block the air flow.
• Make sure that the power
cable is not placed where it
can be inadvertently pulled
or pinched and where it
does not cause a trip
hazard.
• Do not place the dehumidifier next to a radiator or other heat source as
this will reduce the performance of your dehumidifier.
• To maximise efficiency, do not open any doors or windows during use.
• Wait at least 1 hour after transporting the appliance before
using it to allow the refrigerant gasses to settle.
DISPLAY SCREEN
5
Parts & Service: 020 8988 7400 / E-mail: [email protected] or [email protected]
Page 6
CONTROL PANEL
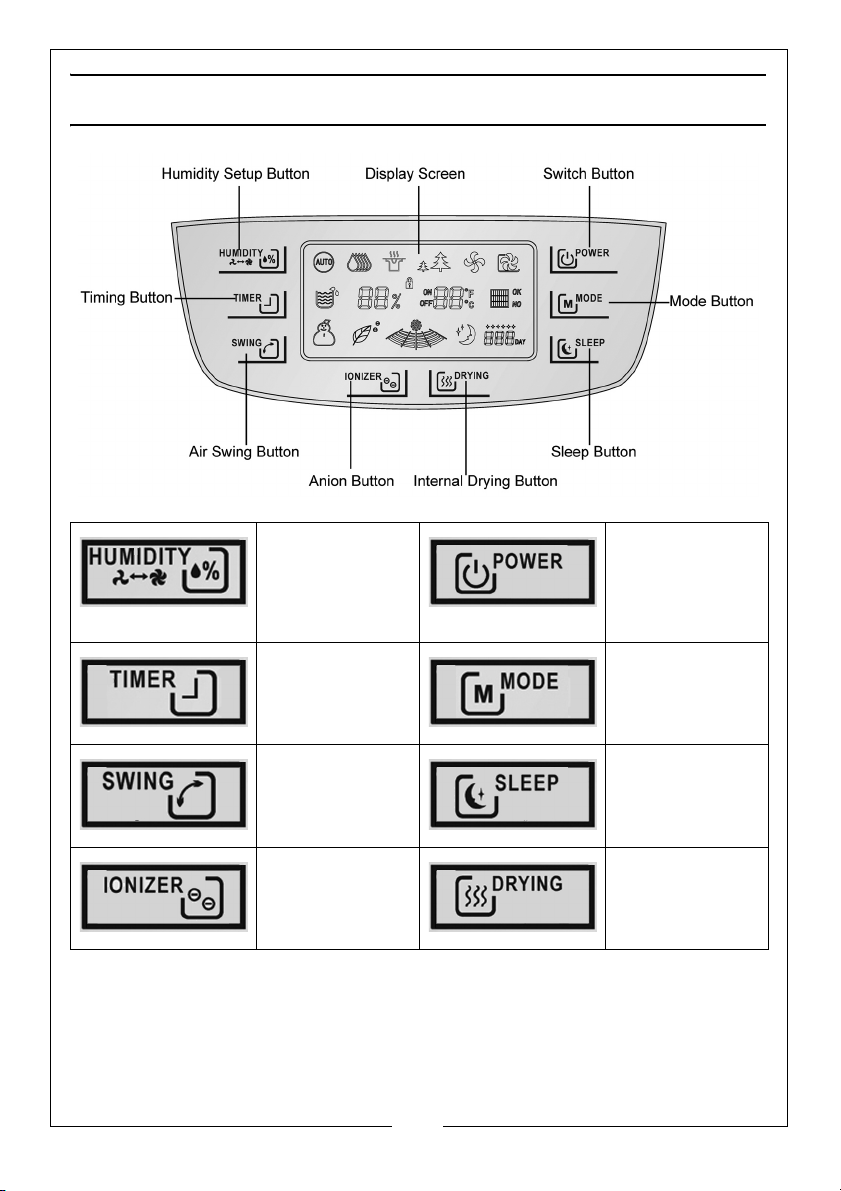
Used to adjust
the humidity
setting from 40%
- 70% (default
50%).
Set the number
of hours until the
dehumidifier is
turned on or off.
Starts or stops
the swing
function.
Activate the
ionizer function.
TO CHANGE THE DISPLAY UNITS FROM °F TO °C.
Press the Humidity and Timer buttons at the same time.
Turns the
dehumidifier on
or off.
Selects the
operating mode
also activates
the child lock.
Ultra quiet fan
mode, ideal for
overnight use.
Activate the
internal drying
function.
6
Parts & Service: 020 8988 7400 / E-mail: [email protected] or [email protected]
Page 7
OPERATION
SWITCHING ON/OFF
1. Plug into the mains supply socket
and switch on.
• The dehumidifier will begin and
the display will show the current
humidity level and temperature
of the room.
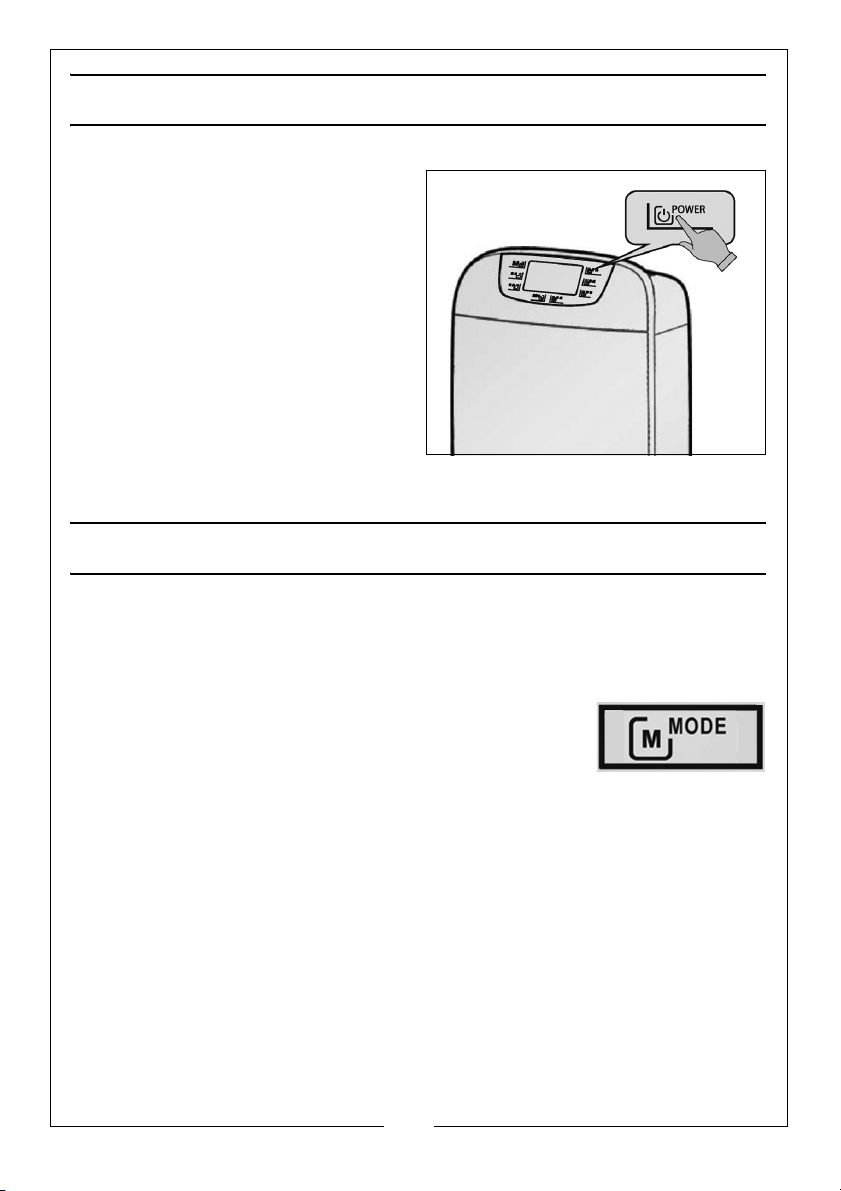
2. Press the POWER button to switch
the dehumidifier ON.
• The dehumidifier will run in the
last mode selected.
3. Press the POWER button again to switch the dehumidifier OFF.
CHILD LOCK
The child lock is used to disable the function keys, to prevent accidentally
changing the settings.
TURNING ON
1. Press and hold the MODE button for 2 seconds to turn
the child lock on.
• The child lock symbol will be shown in the display.
TURNING OFF
• Press and hold the MODE button for 2 seconds to turn the child lock off.
7
Parts & Service: 020 8988 7400 / E-mail: [email protected] or [email protected]
Page 8
TIMER
TIMER-ON SETTING (AUTO START)
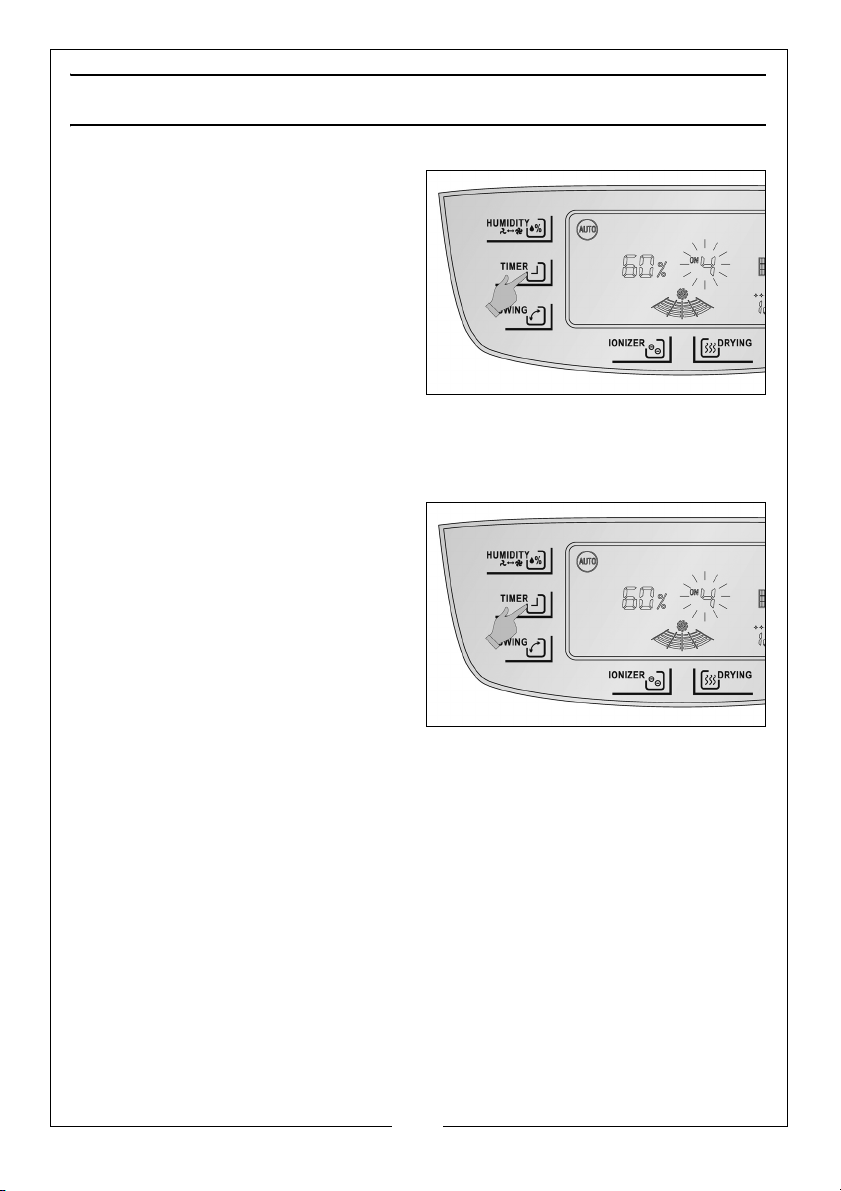
1. While the dehumidifier is NOT
running: Press TIMER key
repeatedly to set the length of
time (1-24 hours) until the
dehumidifier turns on.
• The display will show the
selected number of hours
flashing on and off for 5
seconds and then stop flashing.
2. To cancel the timer function press the TIMER key once more.
TIMER-OFF SETTING (AUTO STOP)
1. While the dehumidifier is running:
Press TIMER key repeatedly to set
the length of time (1-24 hours) until
the dehumidifier turns off.
• The display will show the
selected number of hours
flashing on and off for 5
seconds and then stop flashing.
2. To cancel the timer function press
the TIMER key once more.
8
Parts & Service: 020 8988 7400 / E-mail: [email protected] or [email protected]
Page 9
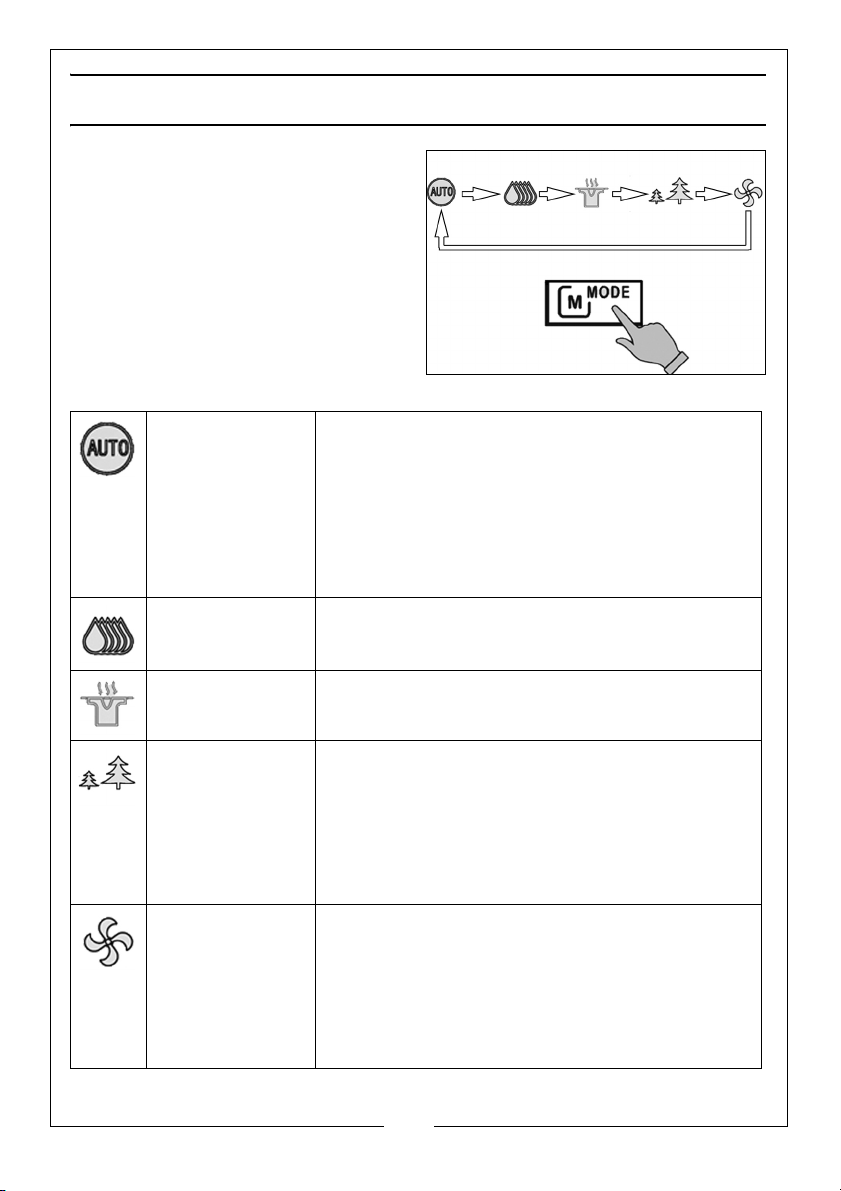
MODE SELECTION
Press the MODE key to cycle through
the modes:
Auto
Dehumidification
High
Dehumidification
Mild
Dehumidification
Air Purification The dehumidifier function is switched off and the
Ventilation
Press the humidity button repeatedly to select the
required humidity level.
• The humidity level can be set between 40%
and 70% (5% increments) and set to 50% as
default.
• The dehumidifier turns on or off if the humidity
goes above or below that level.
The dehumidifier will run continuously at high
speed regardless of the current humidity level.
The dehumidifier will run continuously at low
speed regardless of the current humidity level.
fan will run continuously through the filter.
• Fit the filter (See page 10) before using this
mode.
• Press the humidity button to change the fan
speed from high to low.
The dehumidifier function is switched off and the
fan will run continuously.
• Remove the HEPA filter (See page 10) before
using this mode.
• Press the humidity button to change the fan
speed from high to low.
9
Parts & Service: 020 8988 7400 / E-mail: [email protected] or [email protected]
Page 10
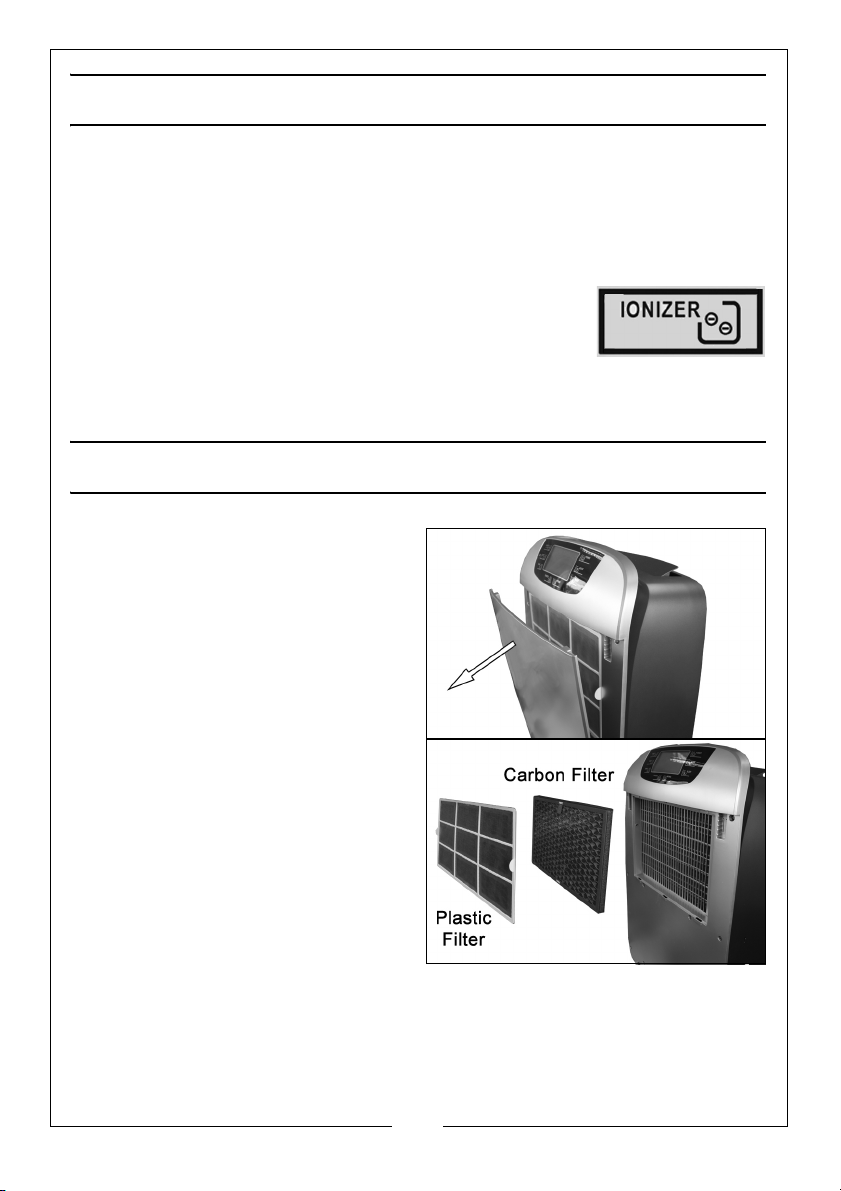
IONIZER FUNCTION
The air ionizer function is used to remove particles from the air.
Airborne particles are attracted to the electrode within the dehumidifier in an
effect similar to static electricity, this also kills some bacteria.
TO ACTIVE THE IONIZER FUNCTION,
1. Press the 'IONIZER" button.,
• A 'leaf" symbol will appear on the display to show
the ionizer function is active.
• The swing function can also be used to adjust the
position of air outlet grill.
FITTING/ REMOVING THE FILTER
1. Remove the front panel.
2. Remove the plastic filter.
3. Insert the filter into the framework.
• Make sure that the front of the
filter is facing towards you.
• An optional HEPA filter (not
supplied) is available from your
Clarke dealer.
4. Replace the plastic filter making
sure that all the lugs are seated
correctly.
10
Parts & Service: 020 8988 7400 / E-mail: [email protected] or [email protected]
Page 11
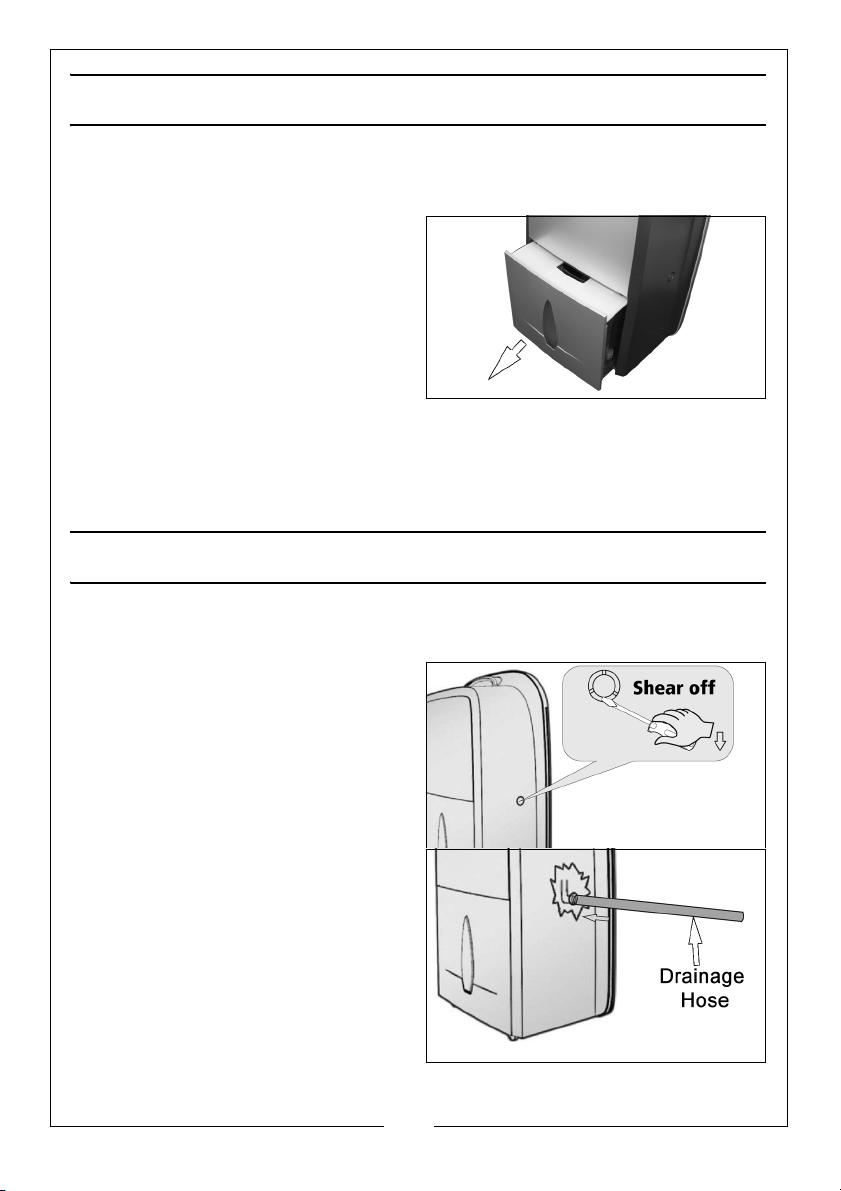
EMPTYING THE WATER TANK
1. When the full water tank symbol on the control panel illuminates, switch off
the dehumidifier and disconnect it from the mains supply.
2. Carefully remove the water tank
by placing your fingers in the
channel underneath the tank and
pulling it towards you.
• The dehumidifier will beep
several times if it is switched on
and the water tank is removed
or fitted incorrectly.
3. Remove the water tank lid and discard the water.
4. Replace the lid and refit the water tank.
NOTE: The unit will not operate unless the water tank is fitted correctly.
CONTINUOUS DRAINING
This function enables continuous dehumidifying without having to empty the
water tank.
1. Remove the knock out section in
the case using a small screwdriver.
2. Attach the drainage hose (not
supplied) to the point shown.
• Make sure that the drain hose
always runs downhill away from
the dehumidifier.
3. Replace the water tank.
NOTE: The unit will not operate
unless the water tank is fitted
correctly.
11
Parts & Service: 020 8988 7400 / E-mail: [email protected] or [email protected]
Page 12
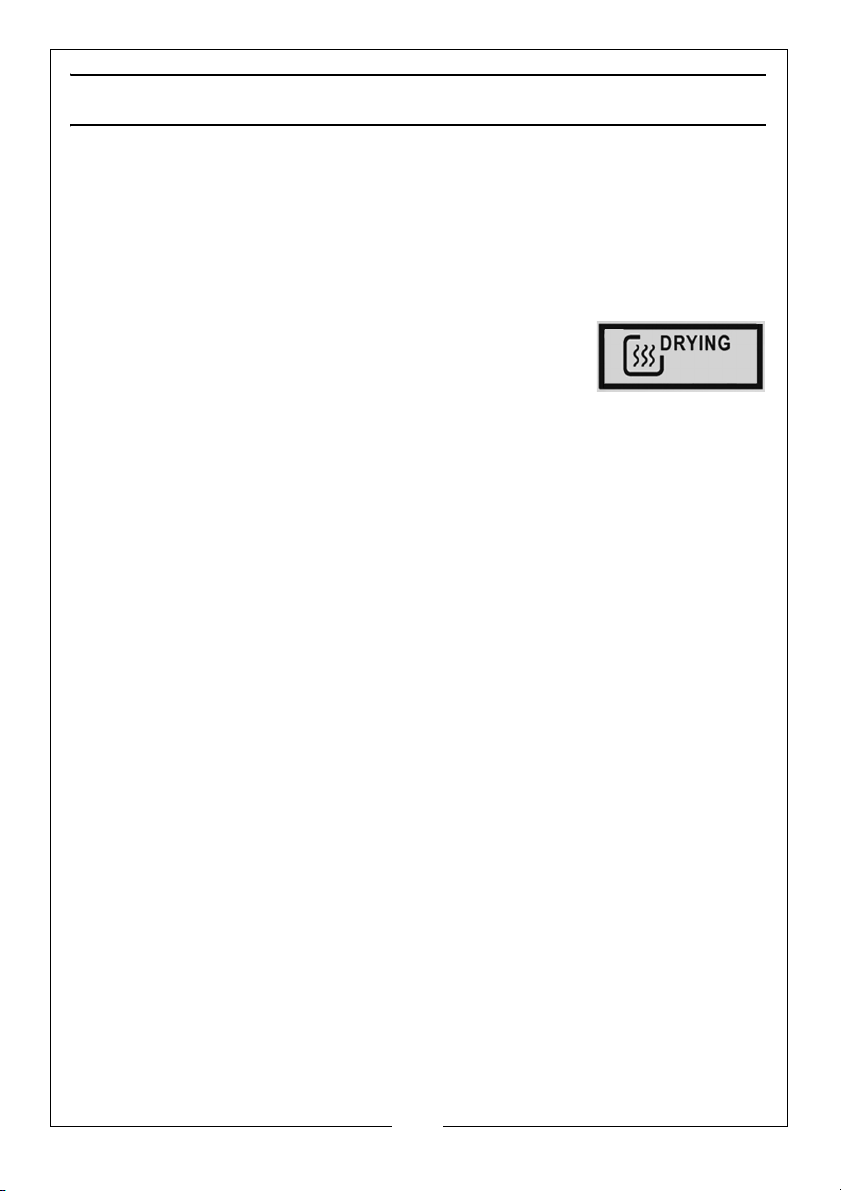
INTERNAL DRYING CYCLE
Run the internal drying cycle before storing the dehumidifier at the end of the
season or If the dehumidifier has been used continuously for a long period of
time.
Running the cycle will remove water/moisture from the unit, preventing a build
up of mildew which will affect the efficiency and life of the unit.
HOW TO START THE DRYING FUNCTION
1. Press and hold the Drying button for 2 seconds until
DRYING FUNCTION is selected.
HOW TO STOP THE DRYING MODE?
1. Press and hold the Drying button for 2 seconds to cancel the drying
function.
• The unit will be revert to the mode that was running before the DRYING
FUNCTION was selected.
12
Parts & Service: 020 8988 7400 / E-mail: [email protected] or [email protected]
Page 13
MAINTENANCE
WARNING: ALWAYS UNPLUG THE DEHUMIDIFIER BEFORE PERFORMING
ANY CLEANING OR MAINTENANCE OPERATIONS.
STORAGE
• Unplug from the mains socket and empty the tank.
• Cover the dehumidifier to prevent dust getting inside.
CLEANING THE CABINET
• Use a soft damp cloth to clean the exterior.
• Never use harsh chemicals or abrasive cleaning agents as these may
damage the casing finish.
CLEANING THE FILTERS
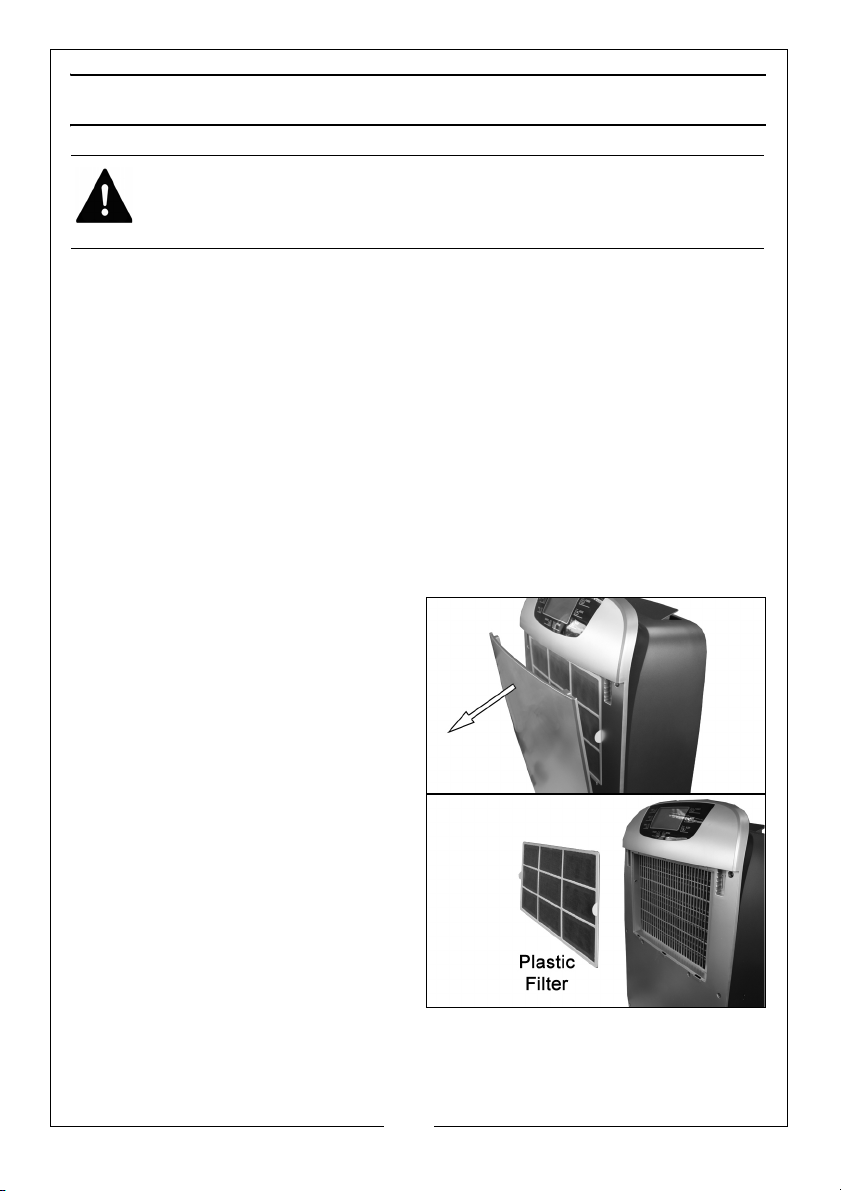
PLASTIC FILTER
1. Remove the front panel.
2. Remove the plastic filter.
3. Rinse the filter under warm water.
4. Allow the filter to dry naturally.
5. Refit parts in the reverse order.
• The frequency depends on the
duration of use and the level of
dust in the environment.
CARBON/HEPA FILTERS
• The supplied carbon filter or optional HEPA filter are not washable, and
must be replaced at least once a year in normal use, more often if used
in particularly dusty areas.
13
Parts & Service: 020 8988 7400 / E-mail: [email protected] or [email protected]
Page 14
TROUBLESHOOTING
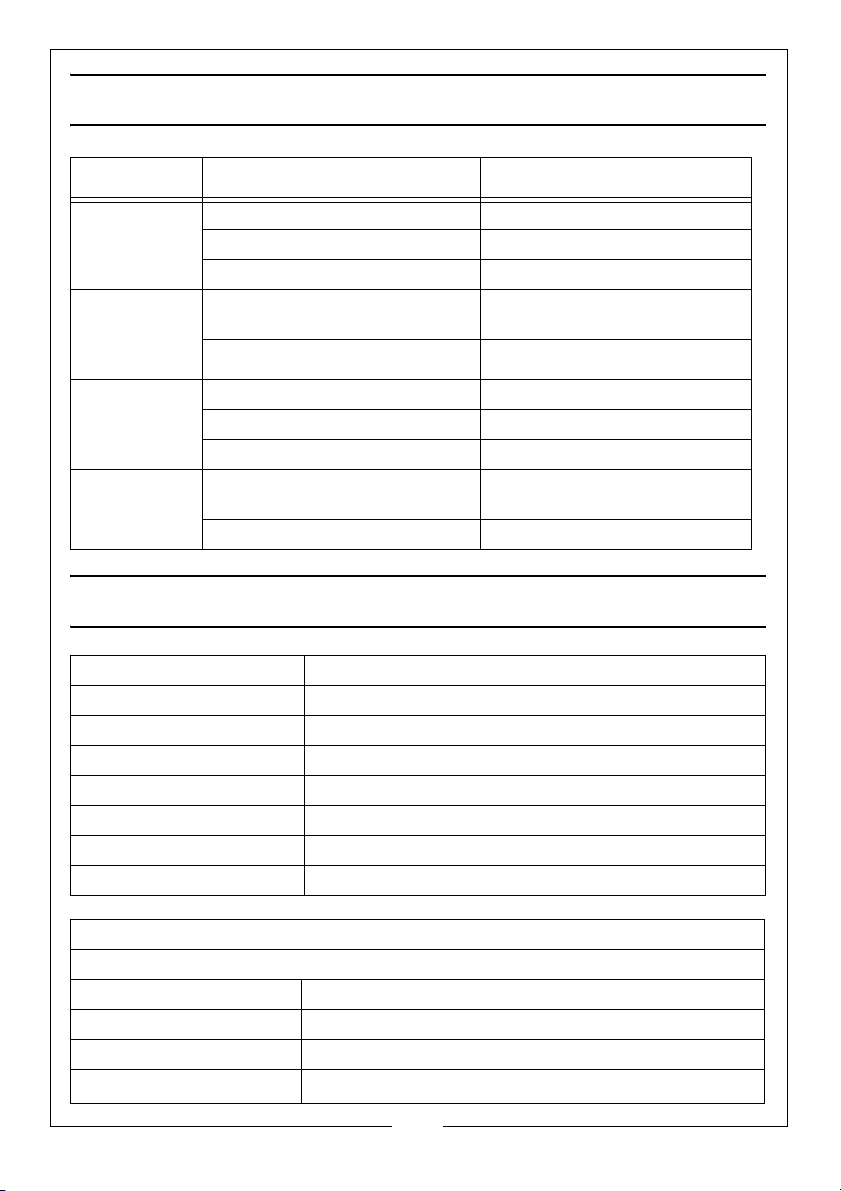
Cause Solution
Dehumidifier
does not run
Dehumidifying
function does
not
work
No air out Temperature or humidity too low?
Loud running
noise
Is power plug connected Insert power plug into socket
The water tank is full? Empty the water from the tank
Water tank is not fitted correctly. Replace the water tank.
Is room temperature or humidity
too low?
Are air outlet and inlet blocked? Clean out the air outlet and inlet.
Is air strainer blocked? Clean air strainer (See page 13).
No filter fitted Fit the filter
The dehumidifier is tilted or
unstable.
Is air strainer blocked? Clean air strainer (See page 13).
Dehumidifying capability will
decrease in dry seasons.
Please place the dehumidifier at
stable location.
TECHNICAL SPECIFICATION
Power source 230 Volts AC 50Hz
Input Power 520W
Water tank capacity 6 Litres
Weight 17.4 kg
Operation temperature 5 - 32 degrees Celsius
Dimensions (LxWxH) 265 mm x 410 mm x 665 mm
Extraction Rate up to 30 Litres per day (@ 30°C 80% RH)
Max Allowable Pressure Low pressure side 0.5 MPa, High pressure side 1.5 MPa
REFRIGERANT DATA
This product contains hemetically seald flourinated greenhouse gasses,
Type R134A
Volume 320g
GWP 1430
2
Co
Equivalent
0.458t
14
Parts & Service: 020 8988 7400 / E-mail: [email protected] or [email protected]
Page 15
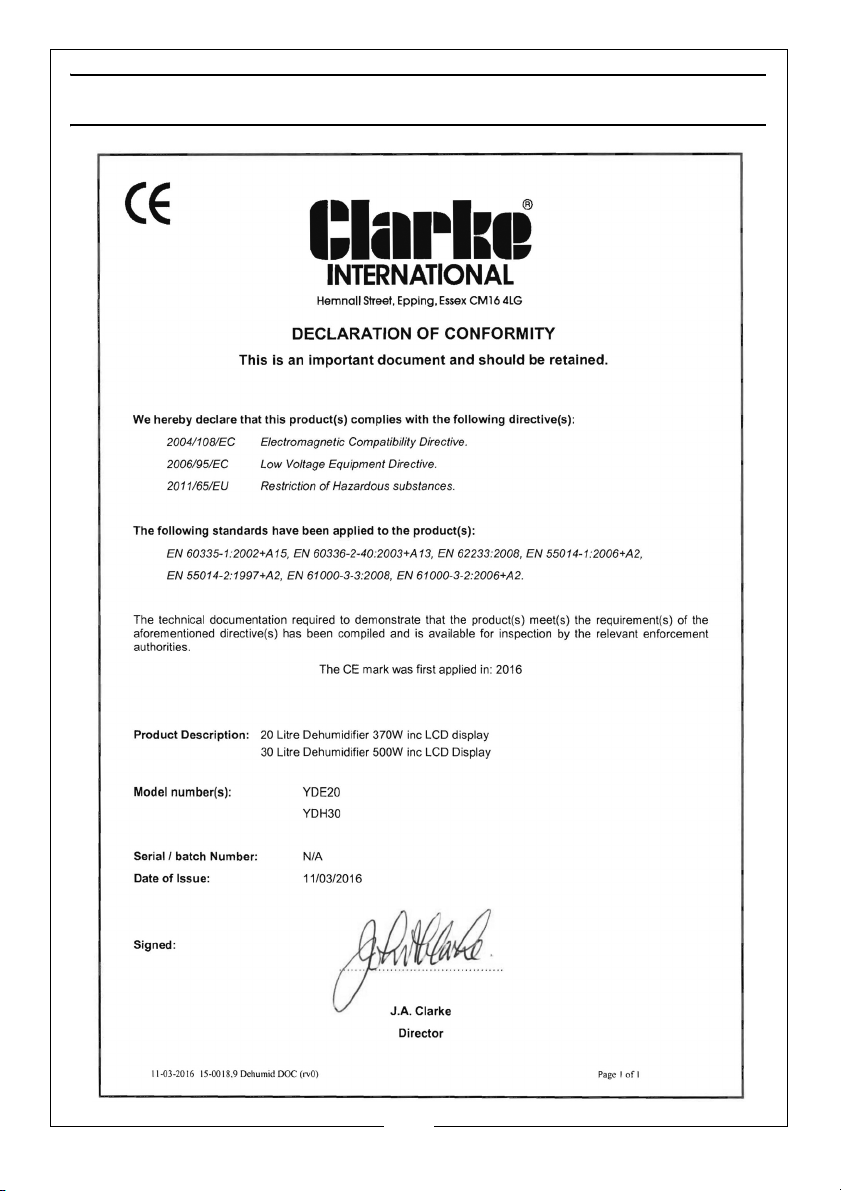
DECLARATION OF CONFORMITY
15
Parts & Service: 020 8988 7400 / E-mail: [email protected] or [email protected]
Page 16

 Loading...