

Page 1

3 IN1 MULTI SANDER
MODEL NO: CMS200
PART NO: 6462053
OPERATION & MAINTENANCE
INSTRUCTIONS
ORIGINAL INSTRUCTIONS GC0719 - ISS 2
Page 2
INTRODUCTION
Thank you for purchasing this CLARKE 3 in 1 Sander, which is designed for DIY
use.
Before attempting to use this product, please read this manual thoroughly and
follow the instructions carefully. In doing so you will ensure the safety of yourself
and that of others around you, and you can look forward to your purchase
giving you long and satisfactory service.
GUARANTEE
This product is guaranteed against faulty manufacture for a period of 12
months from the date of purchase. Please keep your receipt which will be
required as proof of purchase.
This guarantee is invalid if the product is found to have been abused or
tampered with in any way, or not used for the purpose for which it was
intended.
Faulty goods should be returned to their place of purchase, no product can
be returned to us without prior permission. This guarantee does not effect your
statutory rights.
SPECIFICATIONS
Rated Voltage 230V ~ 50Hz
Power Input 200 W
Speed Range 10,000 rpm
Sound Pressure Level LpA 75.7 dB(A), Uncertainty Factor (K) 3 dB(A)
Sound Power Level LWA 86.7 dB(A), Uncertainty Factor (K) 3 dB(A)
Net Weight 1.78 kg (unpacked)
Vibration
Dimensions (L x W x H) 290 mm x 110 mm x 200 mm
Sanding Pad size Delta sanding pad 208 x 110 mm
Parts & Service: 020 8988 7400 / E-mail: [email protected] or [email protected]
3.731 m/s
Random orbit pad 125 mm diameter
1/3 sheet sanding pad 187 x 90 mm
2
Uncertainty Factor (K) 1.5
2
Page 3

POWER TOOL SAFETY WARNINGS
WORK AREA
1. Keep the work area clean and well lit. Cluttered and dark areas invite
accidents.
2. Do not operate power tools in explosive atmospheres, such as in the
presence of flammable liquids or gases. Power tools create sparks which
may ignite the dust or fumes.
3. Keep children and bystanders away while operating a power tool.
Distractions can cause you to lose control.
ELECTRICAL SAFETY
1. Power tool plugs must match the outlet. Never modify the plug in any way.
Do not use adaptor plugs with earthed (grounded) power tools. Unmodified
plugs and matching outlets will reduce the risk of electric shock.
2. Do not expose power tools to rain or wet conditions. Water entering a
power tool will increase the risk of electric shock.
3. Do not abuse the cable. Never use it for carrying, pulling or unplugging the
power tool. Keep the cable away from heat, oil, sharp edges or moving
parts. Damaged or entangled cables increase the risk of electric shock.
4. When operating a power tool outdoors, use an extension cable suitable for
outdoor use. Use of a cable suitable for outdoor use reduces the risk of
electric shock
5. If operating the power tool in a damp location is unavoidable, use a
residual current device (RCD) protected supply.
PERSONAL SAFETY
1. Stay alert, watch what you are doing and use common sense when
operating a power tool. Do not use a power tool while you are tired or
under the influence of drugs, alcohol or medication. A moment of
inattention while operating power tools may result in personal injury.
2. Use safety equipment. Always wear eye protection. Safety equipment such
as dust mask, non-skid safety shoes, hard hat, or hearing protection used
for appropriate conditions will reduce personal injuries.
3. Avoid accidental starting. Ensure the switch is in the off position before
plugging in. Carrying power tools with your finger on the switch or plugging
in power tools that have the switch on invites accidents.
4. Remove any wrench before turning the power tool on. A wrench left
attached to a rotating part may result in personal injury.
3
Parts & Service: 020 8988 7400 / E-mail: [email protected] or [email protected]
Page 4

5. Do not overreach. Keep proper footing and balance at all times. This
enables better control of the power tool in unexpected situations.
6. Dress properly. Do not wear loose clothing or jewellery. Keep your hair,
clothing and gloves away from moving parts. Loose clothes, jewellery or
long hair can be caught in moving parts.
POWER TOOL USE AND CARE
1. Do not force the power tool. Use the correct accessories for your
application. The correct power tool will do the job better and safer at the
rate which it was designed for.
2. Do not use the power tool if the switch does not turn it on and off. Any
power tool that cannot be controlled with the switch is dangerous and
must be repaired.
3. Disconnect the plug from the power source before changing accessories,
or storing power tools. Such preventive safety measures reduce the risk of
starting the power tool accidentally.
4. Store idle tools out of the reach of children and do not allow persons
unfamiliar with the power tool or these instructions to operate it. Power tools
are dangerous in the hands of untrained users.
5. Maintain power tools. Check for misalignment or binding of moving parts,
breakage of parts and any other condition that may affect the power
tool’s operation. If damaged, have the power tool repaired before use.
Many accidents are caused by poorly maintained power tools.
6. Use the power tool and accessories in accordance with these instructions
and in the manner intended, taking into account the working conditions
and the work to be performed. Use of the power tool for operations
different from intended could result in a hazardous situation.
7. The performance of this tool may vary, depending upon variations in line
voltage. Extension cable usage may also affect performance.
SERVICE
1. Have your power tool serviced by qualified service personnel using only
identical replacement parts. This will ensure that the safety of the power
tool is maintained.
ADDITIONAL SAFETY WARNINGS FOR SANDERS
1. Secure the workpiece to a stable platform. Holding the workpiece by hand
or against your body may lead to loss of control.
2. Dust arising from sanding may endanger the health of the operator and
possible bystanders. Wear a dust mask and ensure that persons entering
the work area are also protected.
3. Remove all dust after sanding.
4
Parts & Service: 020 8988 7400 / E-mail: [email protected] or [email protected]
Page 5
4. Take care when sanding lead based paint or when sanding wood or metal
which may produce toxic dust, - do not let children or pregnant women
enter the work area.
VIBRATION
The declared vibration emission values stated in the specification have been
measured in accordance with a standard test method provided by EN 60745
and may be used for comparing one tool with another. The declared vibration
emission value may also be used in a preliminary assessment of exposure.
WARNING: THE VIBRATION EMISSION VALUE DURING ACTUAL USE OF THE
POWER TOOL CAN DIFFER FROM THE DECLARED VALUE DEPENDING ON
THE WAYS IN WHICH THE TOOL IS USED. THE VIBRATION LEVEL MAY
INCREASE ABOVE THE LEVEL STATED.
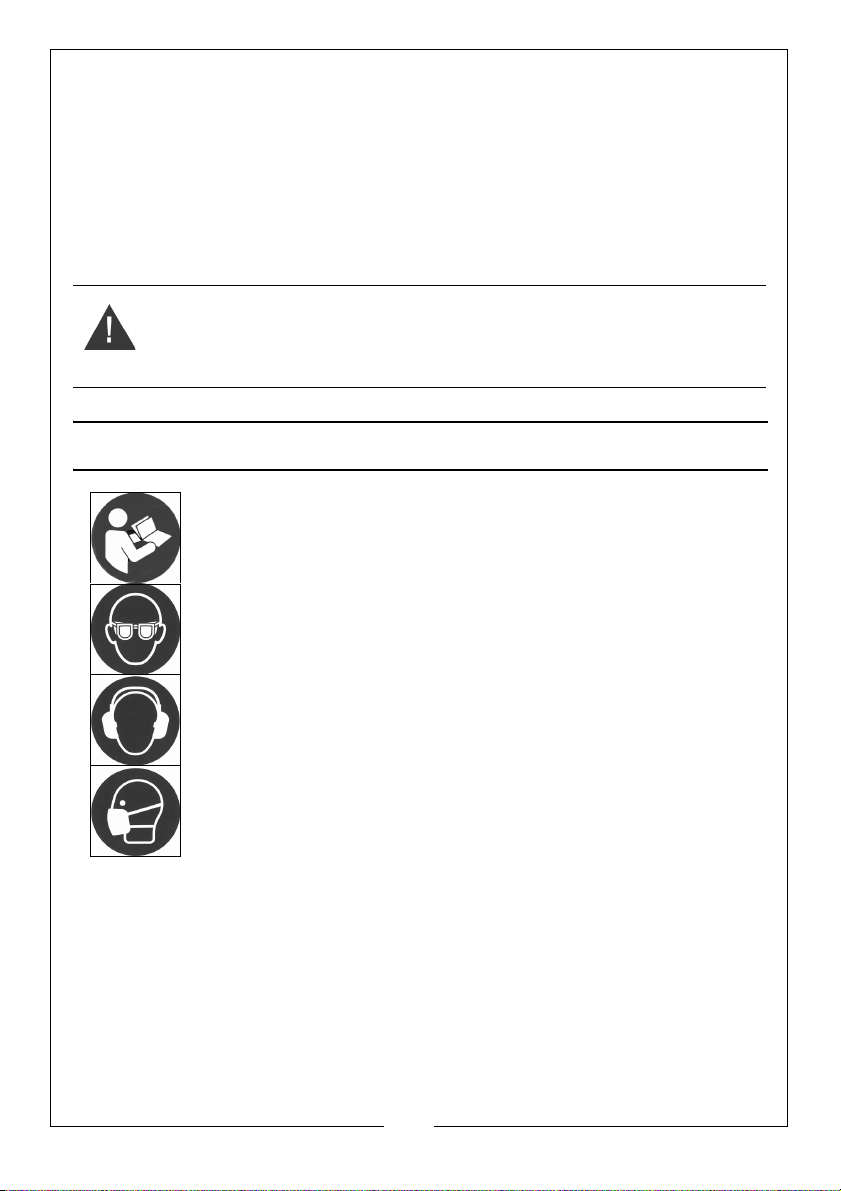
EXPLANATION OF SYMBOLS & PICTOGRAMS
Read instruction manual before use.
Wear safety glasses or goggles when using the tool.
Wear ear protection when using this tool.
Wear a dust mask when using this tool.
5
Parts & Service: 020 8988 7400 / E-mail: [email protected] or [email protected]
Page 6
ELECTRICAL CONNECTIONS
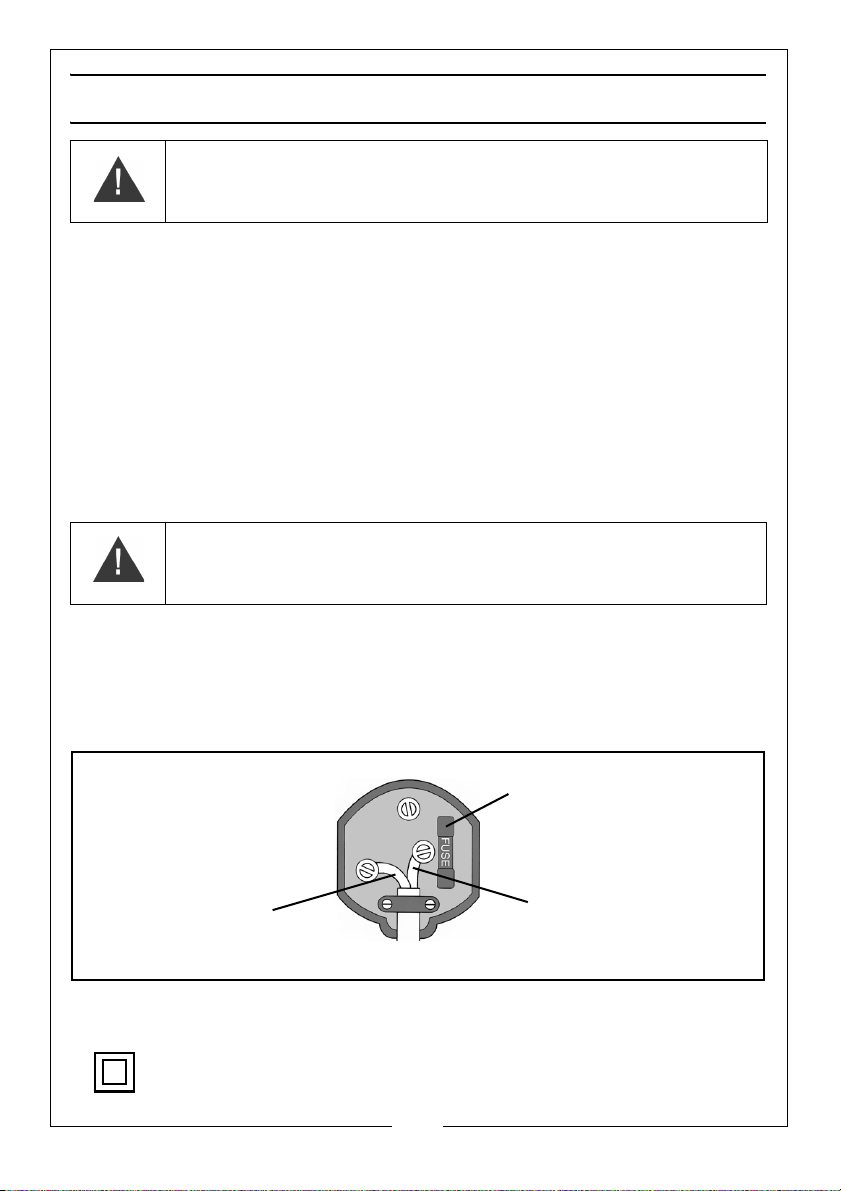
Plug must be BS1363/A approved.
Always fit a 5 Amp fuse.
Ensure that the outer sheath of the cable is firmly held by the clamp
Neutral
(Blue)
Live
(Brown)
WARNING: READ THESE ELECTRICAL SAFETY INSTRUCTIONS
THOROUGHLY BEFORE CONNECTING THE PRODUCT TO THE MAINS
SUPPLY.
Before switching the product on, make sure that the voltage of your electricity
supply is the same as that indicated on the rating plate. This product is
designed to operate on 230VAC 50Hz. Connecting it to any other power
source may cause damage.
This product may be fitted with a non-rewireable plug. If it is necessary to
change the fuse in the plug, the fuse cover must be refitted. If the fuse cover
becomes lost or damaged, the plug must not be used until a suitable
replacement is obtained.
If the plug has to be changed because it is not suitable for your socket, or due
to damage, it should be cut off and a replacement fitted, following the wiring
instructions shown below. The old plug must be disposed of safely, as insertion
into a mains socket could cause an electrical hazar
WARNING: THE WIRES IN THE POWER CABLE OF THIS PRODUCT ARE
COLOURED IN ACCORDANCE WITH THE FOLLOWING CODE:
BLUE = NEUTRAL BROWN = LIVE
If the colours of the wires in the power cable of this product do not correspond
with the markings on the terminals of your plug, proceed as follows.
•The Blue wire must be connected to the terminal marked N.
•The Brown wire must be connected to the terminal marked L.
d.
We strongly recommend that this sander is connected to the mains supply via
a Residual Current Device (RCD)
This symbol indicates that this is a Class II product and does not require
an earth connection.
Parts & Service: 020 8988 7400 / E-mail: [email protected] or [email protected]
6
Page 7

BEFORE USE
The sander is supplied with the following items:
• Delta Sanding Baseplate (fitted)
includes 1 x 60 grit Delta sanding sheet
1 x 80 grit Delta sanding sheet
• Random Orbit Sanding Baseplate
includes 1 x 60 grit Random orbit sanding sheet
1 x 80 grit Random orbit sanding sheet
• 1/3 Sheet Sanding Baseplate
includes 1 x 60 grit 1/3 sanding sheet
1 x 80 grit 1/3 sanding sheet
• Dust collection adaptor
• Integral dust filter canister (fitted)
•Hex key
Your sander should be received with the Delta baseplate and dust filter
canister already attached.
DUST COLLECTION
WARNING: HARMFUL OR TOXIC DUST MAY BE PRODUCED WHEN
SANDING LEAD PAINTED SURFACES, WOODS OR METAL. CONTACT WITH,
OR INHALATION OF THESE DUSTS CAN ENDANGER THE HEALTH OF THE
OPERATOR OR BYSTANDERS. CERTAIN DUSTS LIKE OAK AND BEECH ARE
CONSIDERED TO BE CANCEROUS IN CONJUNCTION WITH ADDITIVES IN
WOOD TREATMENTS (CHROMATE, WOOD PRESERVATIVES). ASBESTOSCONTAINING MATERIALS MAY ONLY BE HANDLED BY EXPERTS.
WARNING: - USE A VACUUM CLEANER TO COLLECT LOOSE DUST.
WARNING: - WORK IN A WELL VENTILATED ROOM. - THE USE OF A DUST
MASK FILTER CLASS P2 IS RECOMMENDED. - OBSERVE LOCAL
REGULATIONS REGARDING THE HANDLING OF CERTAIN MATERIALS.
7
Parts & Service: 020 8988 7400 / E-mail: [email protected] or [email protected]
Page 8
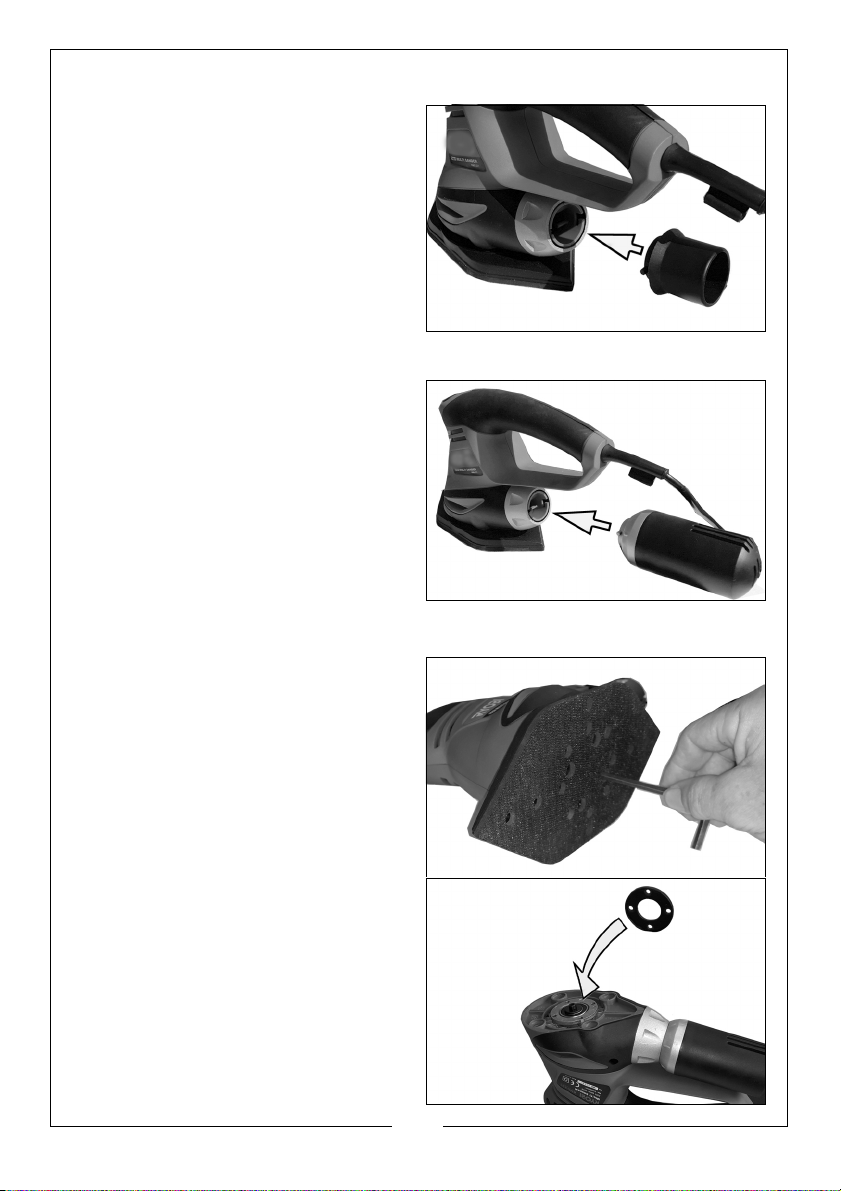
FITTING THE DUST EXTRACTION ADAPTER OR FILTER CANISTER
Dust extraction equipment (not
supplied), can be used with your
sander by connecting a suitable
hose to the outlet port in place of the
dust filter canister.
1. Attach the dust extraction
adaptor by pushing it onto the
rear of the sander and locking in
place with a half twist.
NOTE: The user should still wear a
dust mask to prevent the inhalation of dust.
2. Alternatively, fit the filter canister
onto the rear of the sander and
lock in place with a half twist.
NOTE: Due to the nature of the
sander, some of the dust
produced will be forced into
the surrounding atmosphere
and will not be collected.
FITTING THE BASEPLATE AND SANDING PADS
1. Using the hex key supplied,
remove the 4 x bolts and install
the baseplate of your choice.
2. Between the baseplate and the
sander is a spacer disc. Fit the disc
into place, noting that there is a
small peg which aligns with a
corresponding hole in the sander.
3. Fit the new baseplate, resting
each of the four feet into the
corresponding socket.
4. Re-tighten the 4 x bolts securely.
8
Parts & Service: 020 8988 7400 / E-mail: [email protected] or [email protected]
Page 9
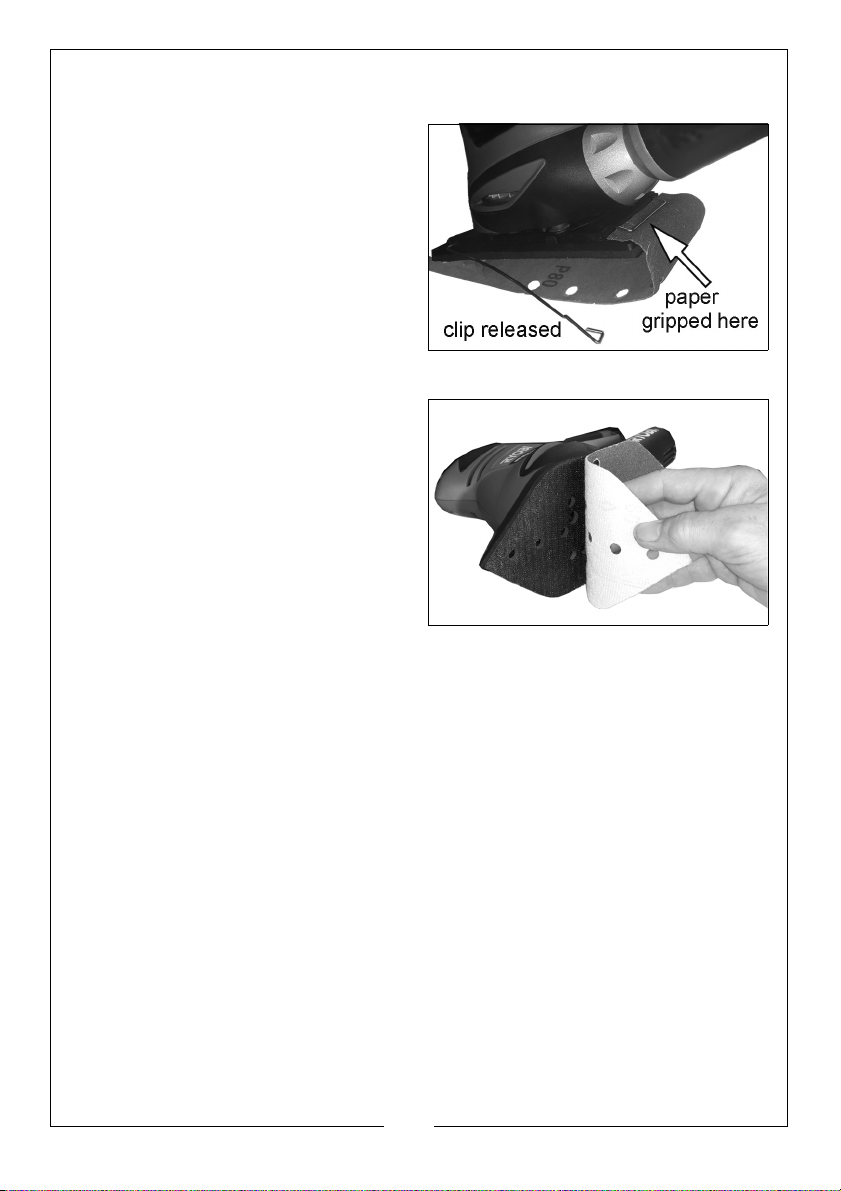
SANDING SHEETS
1. When attaching the 1/3 sanding
sheet to the baseplate, release
the two spring clips - one at each
end.
2. Position the sanding sheet so that
the holes are aligned with those in
the base plate and bend the
ends over, securing at each end
with the spring clip.
• It is important that the sanding
sheet should be taught across the base when the second clip is secured.
3. If using hook and eye backed
sanding sheets, position the sheet
so that the holes are aligned with
those in the baseplate.
• This is necessary for dust
extraction.
4. Press the sheet firmly onto the
baseplate to attach it.
9
Parts & Service: 020 8988 7400 / E-mail: [email protected] or [email protected]
Page 10
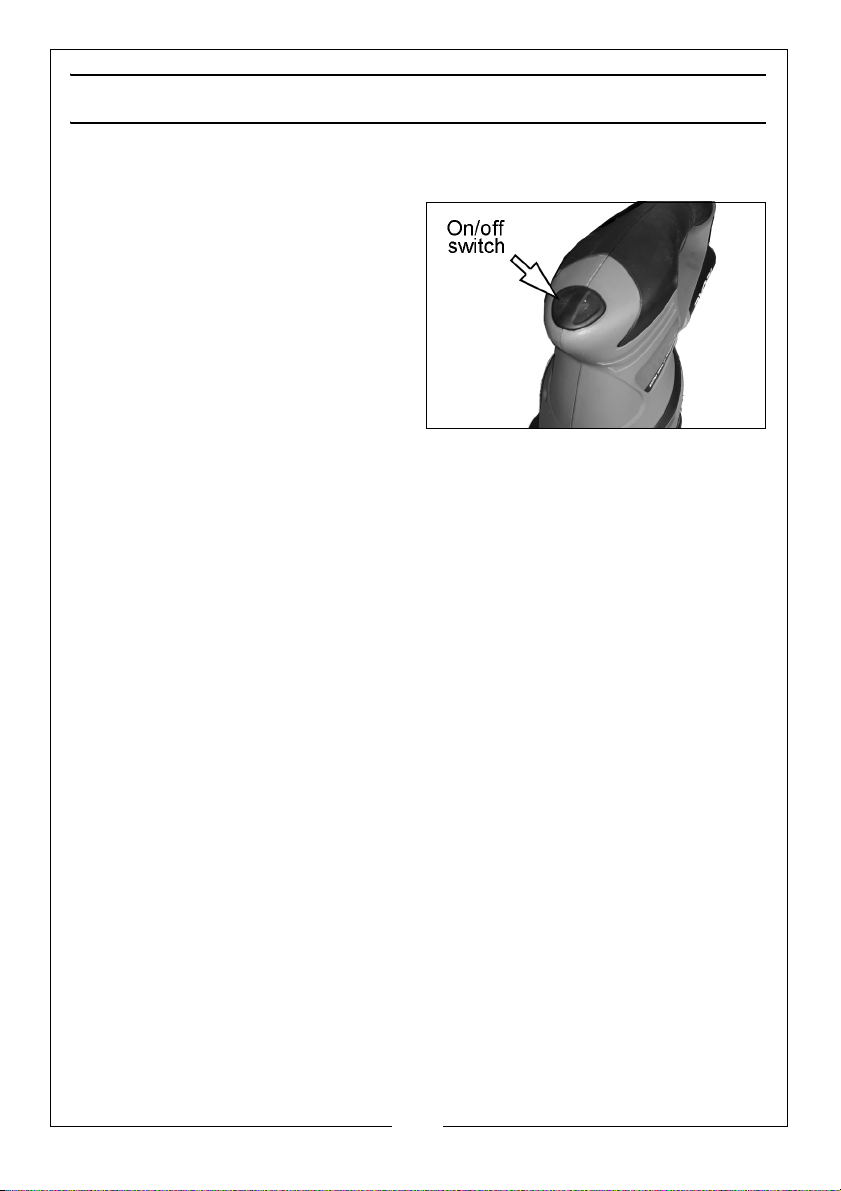
OPERATION
STARTING UP
1. With the sander disconnected
from the power supply, select the
sanding sheet and baseplate
appropriate for the job and
attach it to the sander as shown
on pages 8 & 9.
2. To switch the machine ON or OFF
press the rocker switch.
OPERATING TECHNIQUE
1. Always hold the sander securely.
2. Regularly check the condition of the sanding sheet and replace when
necessary.
3. On very uneven surfaces or when removing layers of paint, start with a
coarse grit. On other surfaces, start with a medium grit. In both cases,
gradually change to a fine grit for a smooth finish.
4. Always use a sanding sheet that is in good condition as damaged backing
will cause damage to the baseplate. Please note that baseplates are NOT
covered by your warranty.
5. Always place the sander on the workpiece before switching ON. This will
prevent the workpiece from being scored by the edge of a moving
sanding sheet.
6. Move the sander evenly and smoothly over the surface of the workpiece
with light even pressure. This helps to expel dust particles and produce an
even finish and will also prolong the life of the sanding paper.
7. Let the sander do the work, ensuring it is flat on the work surface. Do not
apply heavy pressure as this will not only produce an uneven finish but will
overload the motor causing it to burn out.
8. Wait until the sander has stopped completely before putting it down.
10
Parts & Service: 020 8988 7400 / E-mail: [email protected] or [email protected]
Page 11

MAINTENANCE
WARNING: BEFORE PERFORMING ANY MAINTENANCE, SWITCH OFF AND
UNPLUG THE SANDER.
Your sander has been designed to operate over a long period of time with a
minimum of maintenance. Continuous satisfactory operation depends upon
proper care.
Regularly clean the ventilation slots using a soft dry brush or dry cloth. Only
clean the motor housing using a clean damp cloth. Do not use any abrasive
or solvent-based cleaner.
A damaged power cable should be replaced by your CLARKE dealer or
qualified electrician.
The bearings in this sander are sealed for life and require no maintenance.
FAULTFINDING
SANDER IS OVERHEATING
This indicates the machine is dirty. Clean the ventilation holes, and blow out
with compressed air. Always wear eye protection when using compressed air
Overloading the machine will also cause overheating. Do not use for heavy
duty work and do not apply heavy pressure.
EXCESSIVE SPARKING OCCURS
This indicates worn brushes. This problem is quickly remedied but you should
consult your CLARKE dealer for parts and advice.
SANDER DOES NOT OPERATE WHEN SWITCHED ON
Check to ensure the fuse is sound and replace if necessary. If the fuse is sound
or blows repeatedly, consult your CLARKE dealer.
POOR ABRASION
If the sander is not removing material efficiently, check the sanding paper. If
the abrasive is worn down replace the paper. The paper must always be
stored in a dry place as if it allowed to become damp, the abrasive particles
will detach from the paper and will not abrade.
11
Parts & Service: 020 8988 7400 / E-mail: [email protected] or [email protected]
Page 12

CONSUMABLES
The following hook and loop backed sanding sheets are available from your
CLARKE dealer.
Grit Size (mm) Part No
Pack of 5 60 125 mm diameter 6502060
Pack of 5 80 125 mm diameter 6502061
Pack of 5 120 125 mm diameter 6502062
Pack of 5 60 93 x 187 mm 6502075
Pack of 5 80 93 x 187 mm 6502076
Pack of 5 120 93 x 187 mm 6502077
Pack of 5 60 110 x 210 mm 6-sided 6502079
Pack of 5 80 110 x 210 mm 6-sided 6502080
Pack of 5 120 110 x 210 mm 6-sided 6502081
ENVIRONMENTAL PROTECTION
Recycle unwanted materials instead of disposing of them as waste.
All unwanted accessories and packaging should be sorted and
taken to a recycling centre for disposal in a manner which is
compatible with the environment.
Through purchase of this product, the customer is taking on the obligation to
deal with the WEEE in accordance with the WEEE regulations in relation to the
treatment, recycling & recovery and environmentally sound disposal of the
WEEE.
In effect, this means that this product must not be disposed of with general
household waste. It must be disposed of according to the laws governing
Waste Electrical and Electronic Equipment (WEEE) at a recognised disposal
facility.
12
Parts & Service: 020 8988 7400 / E-mail: [email protected] or [email protected]
Page 13
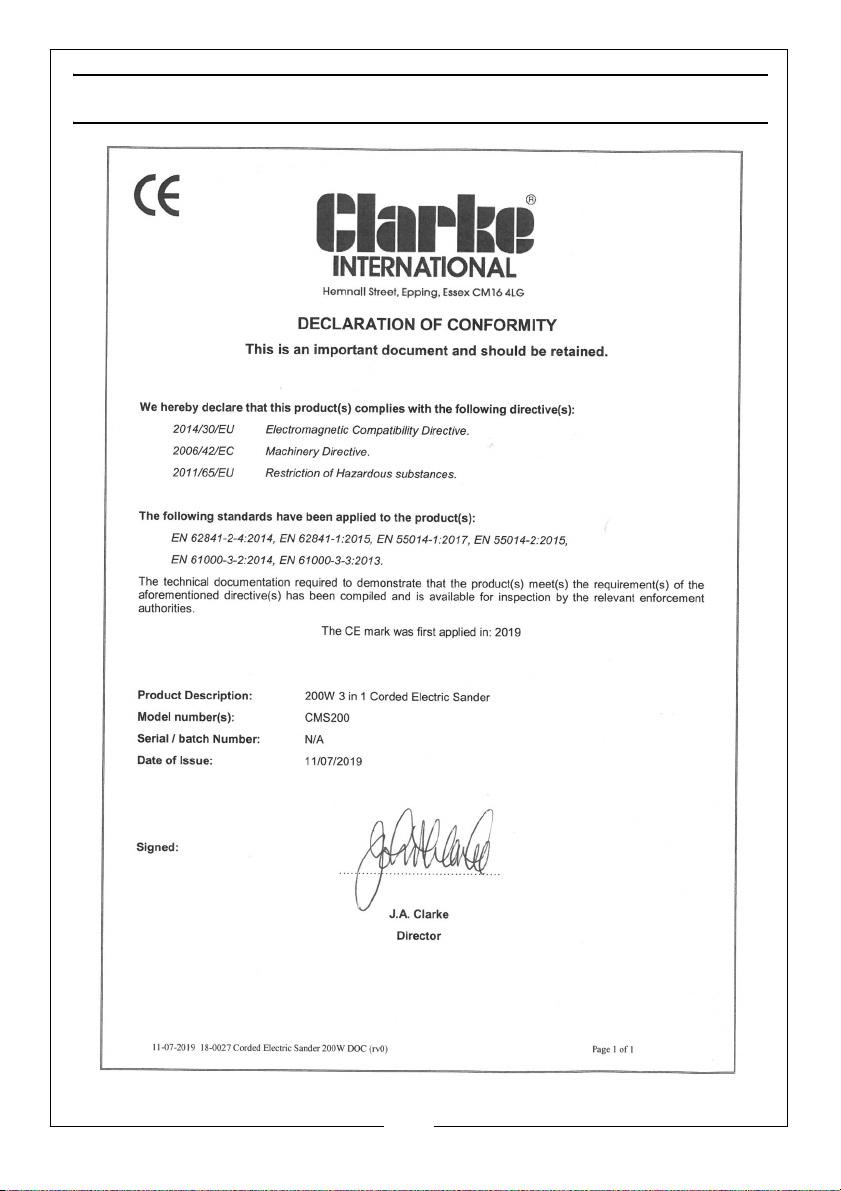
DECLARATION OF CONFORMITY
13
Parts & Service: 020 8988 7400 / E-mail: [email protected] or [email protected]
Page 14
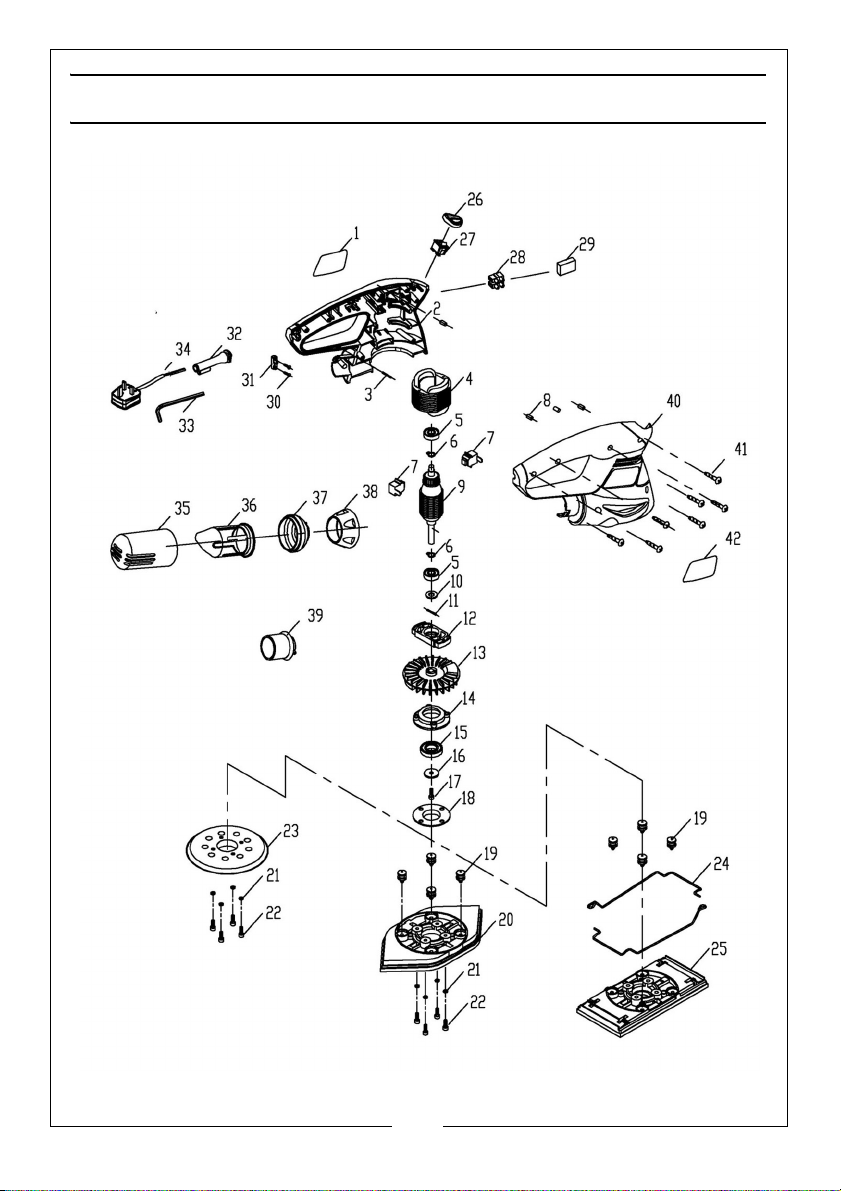
Page 15
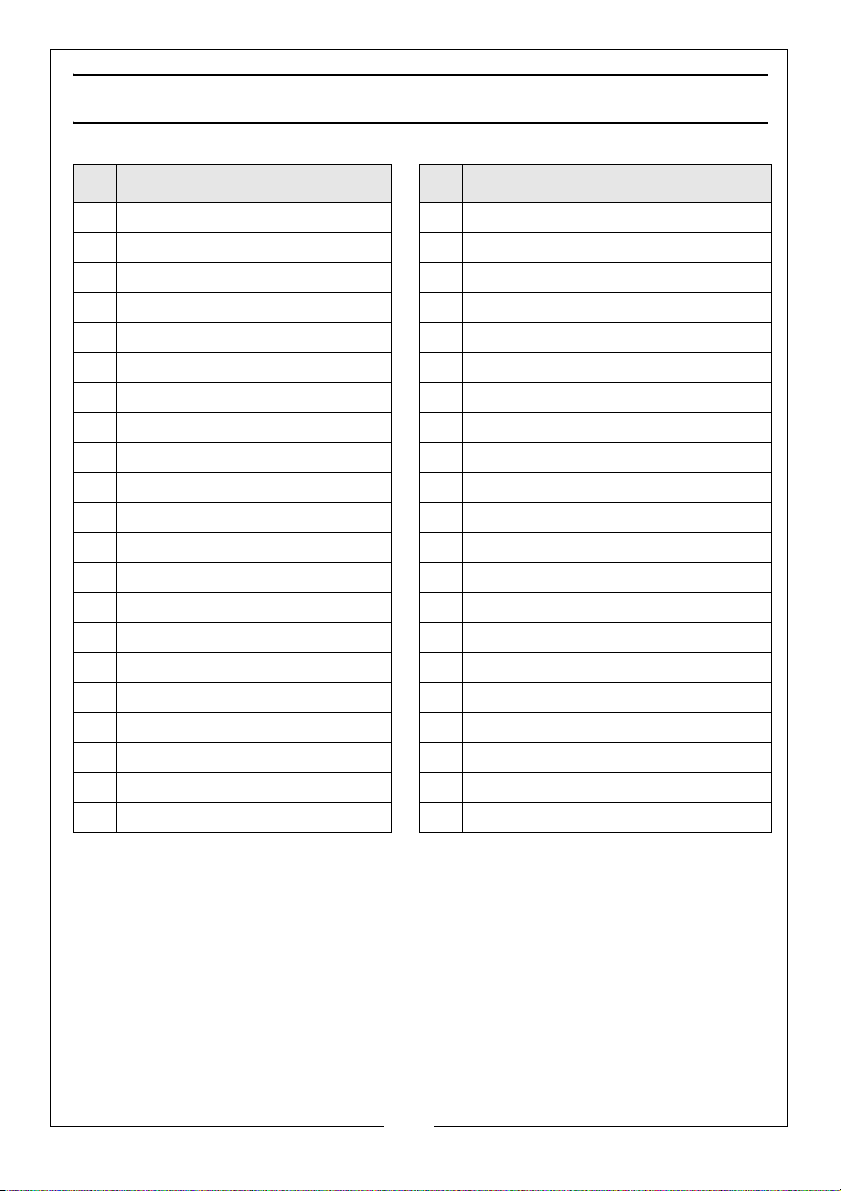
COMPONENT PARTS
NO Description NO Description
1 Clarke Label 22 Screw
2 Left Housing 23 125 mm Baseplate
3 Roll Pin 24 Sanding Sheet Retaining Clip
4 Stator 25 Rectangular Baseplate (1/3 sheet)
5 Bearing 26 Switch Cover
6 Circlip 27 On/Off Switch
7 Carbon Brush 28 Connecting Block
8 Pin 29 Capacitor 0.22uF
9 Rotor 30 Screw
10 Flat Washer 31 Cable Clamp
11 Dowel Pin 32 Cable Protector
12 Bracket 33 4mm Allen Key
13 Fan 34 Power Cable
14 Bearing Base 35 Dust Canister
15 Bearing 36 Dust Collecting Bag
16 Shim 37 Bayonet Connector
17 Screw 38 Clasp
18 Shim 39 Adaptor
19 Synthetic Foot 40 Right Housing
20 Delta Baseplate 41 Screw
21 Spacer 42 Clarke Label
15
Parts & Service: 020 8988 7400 / E-mail: [email protected] or [email protected]
Page 16

 Loading...