

Page 1

ROTARY ORBITAL SANDER
MODEL NO: CROS1
PART NO: 6462010
OPERATION & MAINTENANCE
INSTRUCTIONS
GC0913
Page 2
INTRODUCTION
Thank you for purchasing this CLARKE Variable Speed Orbital Sander, which is
designed for DIY and light workshop use only.
Before attempting to use this product, please read this manual thoroughly and
follow the instructions carefully. In doing so you will ensure the safety of yourself
and that of others around you, and you can look forward to your purchase
giving you long and satisfactory service.
GUARANTEE
This product is guaranteed against faulty manufacture for a period of 12
months from the date of purchase. Please keep your receipt which will be
required as proof of purchase.
This guarantee is invalid if the product is found to have been abused or
tampered with in any way, or not used for the purpose for which it was
intended.
Faulty goods should be returned to their place of purchase, no product can
be returned to us without prior permission.
This guarantee does not effect your statutory rights.
SPECIFICATION
Electrical Supply 230V 50Hz 1 ph
Power rating 420 Watt motor
Fuse rating 5 Amp
No Load Speed (variable) 4,000 - 11,000 rpm
Net Weight 2.2kg
Pad Size 125mm
Vibration Emissions
Parts & Service: 020 8988 7400 / E-mail: [email protected] or [email protected]
3.2m/s
2
2
/ uncertainty value (k) =1.28m/s
2
Page 3

GENERAL SAFETY RULES
WARNING: WHEN USING ELECTRIC TOOLS, BASIC SAFETY PRECAUTIONS
SHOULD ALWAYS BE FOLLOWED TO REDUCE THE RISK OF FIRE, ELECTRIC
SHOCK AND PERSONAL INJURY INCLUDING THE FOLLOWING. READ ALL
THESE INSTRUCTIONS BEFORE ATTEMPTING TO OPERATE THIS PRODUCT
AND SAVE THESE INSTRUCTIONS FOR FUTURE REFERENCE.
GENERAL SAFETY IN THE WORKPLACE
1. ALWAYS ensure that air can circulate around the machine and that the air
vents are unobstructed.
2. ALWAYS keep work area clean & tidy. Cluttered work areas and benches
invite accidents.
3. NEVER over-reach. Keep proper footing and balance at all times.
4. NEVER store equipment in a wet/damp environment or expose to rain.
5. KEEP other persons away. Do not let persons, especially children, not
involved in the work, touch the tool or extension cable and keep them
away from the work area.
6. NEVER operate a machine when under the influence of alcohol, drugs or
medication.
7. ALWAYS ensure the workplace is well lit. Ensure that lighting is placed so that
you will not be working in your own shadow.
8. Do not use tools in the presence of flammable liquids or gasses.
9. Stay alert, watch what you are doing, use common sense and do not
operate the tool when you are tired.
CARE OF POWER TOOLS
1. Read this manual carefully. Learn the machines applications and
limitations, as well as the specific potential hazards peculiar to it.
2. ALWAYS keep guards in place and in working order. A guard or other part
that is damaged should be properly repaired or replaced by an authorised
service centre, unless otherwise indicated in this instruction manual.
3. Don’t force the machine and use the correct tool. It will do the job better
and safer, at the rate for which it was intended.
4. ALWAYS disconnect the machine from the power supply before carrying
out any servicing or changing of accessories.
3
Parts & Service: 020 8988 7400 / E-mail: [email protected] or [email protected]
Page 4

5. Before further use of the tool, it should be carefully checked to determine
that it will operate properly and perform its intended function. Check for
alignment of moving parts, binding of moving parts, breakage of parts,
mounting or other condition that may affect its operation.
6. Have defective switches repaired by an authorised service centre. Do not
use a tool if the switch does not turn it on and off.
7. ALWAYS check for any damage or any condition that could affect the
operation of the machine. Damaged parts should be properly repaired.
8. Have your tool repaired by a qualified person. This tool complies with the
relevant safety rules. Repairs should only be carried out by qualified
persons using original spare parts, otherwise this may result in considerable
danger to the user.
9. NEVER use this product for any other purpose than that described in this
booklet.
10. NEVER abuse the power cable by yanking the cable to disconnect it from
the socket. Keep the cable away from heat, oil or sharp edges.
11. Guard against electric shock. Avoid body contact with earthed or
grounded surfaces.
12. If the tool should be used outdoors, use only extension cables intended for
outdoor use and marked accordingly.
13. Avoid accidental starting by making sure the power switch is off before
plugging in the power cable.
DUST EXTRACTION
The sander is provided with a dust extraction facility. Please note however,
that this does not preclude the user from wearing a face mask to prevent the
inhalation of dust particles.
It is an EEC requirement that a dust extraction facility be provided on power
tools, however, due to the nature of the tool, some of the dust produced will
be forced into the surrounding atmosphere and will not be collected.
4
Parts & Service: 020 8988 7400 / E-mail: [email protected] or [email protected]
Page 5
ELECTRICAL CONNECTIONS
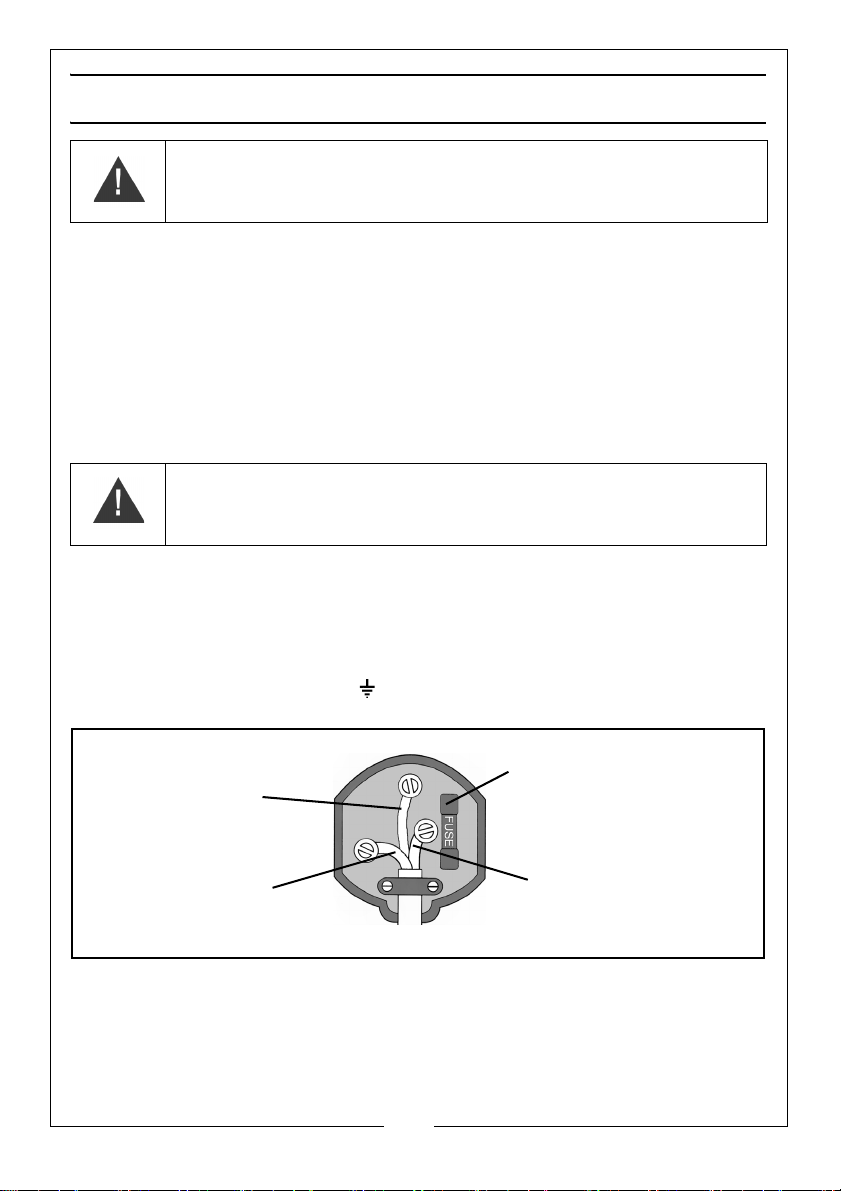
Plug must be BS1363/A approved.
Always fit a 5 Amp fuse.
Ensure that the outer sheath of the cable is firmly held by the clamp
Neutral
(Blue)
Live
(Brown)
Earth
(Green and Yellow)
WARNING: READ THESE ELECTRICAL SAFETY INSTRUCTIONS
THOROUGHLY BEFORE CONNECTING THE PRODUCT TO THE MAINS
SUPPLY.
Before switching the product on, make sure that the voltage of your electricity supply is
the same as that indicated on the rating plate. This product is designed to operate on
230VAC 50Hz. Connecting it to any other power source may cause damage.
This product may be fitted with a non-rewireable plug. If it is necessary to change the
fuse in the plug, the fuse cover must be refitted. If the fuse cover becomes lost or
damaged, the plug must not be used until a suitable replacement is obtained.
If the plug has to be changed because it is not suitable for your socket, or due to
damage, it should be cut off and a replacement fitted, following the wiring instructions
shown below. The old plug must be disposed of safely, as insertion into a mains socket
could cause an electrical hazard.
WARNING! The wires in the power cable of this product are
coloured in accordance with the following code:
Blue = Neutral Brown = Live Yellow and Green = Earth
• The wire which is coloured Blue must be connected to the terminal which is
marked N or coloured Black.
• The wire which is coloured Brown must be connected to the terminal which is
marked L or coloured Red.
• The wire which is coloured Yellow and Green must be connected to the
terminal which is marked E ( ) or coloured Green.
WE STRONGLY RECOMMEND THAT THIS MACHINE IS CONNECTED TO THE MAINS
SUPPLY VIA A RESIDUAL CURRENT DEVICE (RCD)
If in any doubt, consult a qualified electrician. DO NOT attempt any repairs
yourself.
Parts & Service: 020 8988 7400 / E-mail: [email protected] or [email protected]
5
Page 6
PRODUCT OVERVIEW
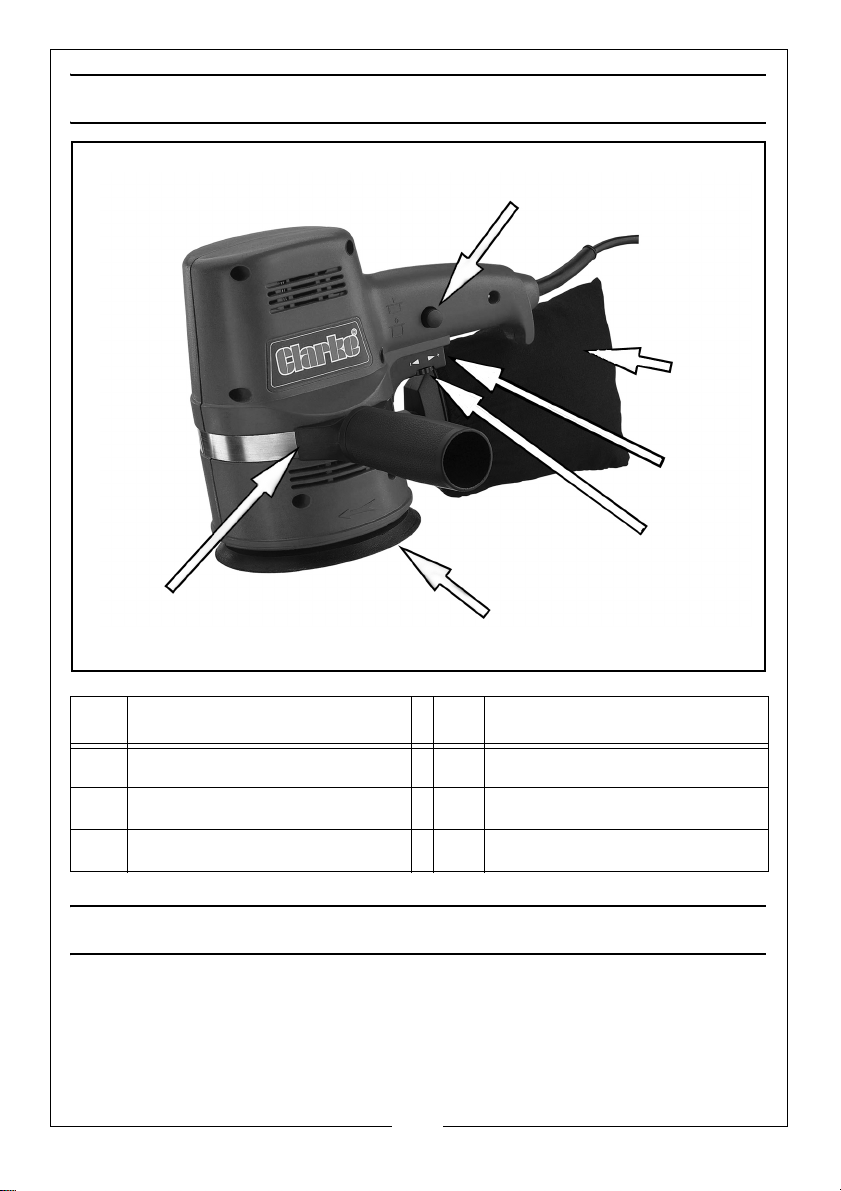
1
3
6
5
4
2
NO DESCRIPTION NO DESCRIPTION
1 Lock-On Button 4 Speed Control
2 Dust Bag 5 Sanding Pad
3 Trigger 6 Adjustable Handle
PREPARATION AND USE
FITTING A SANDING DISC
1. Select the disc to be used. (this MUST be correct 125m dia disc with hook
and loop backing).
2. Ensure the sander is switched off and the plug is removed from the socket.
6
Parts & Service: 020 8988 7400 / E-mail: [email protected] or [email protected]
Page 7

3. Line up the holes in the disc with those on the machine sanding pad. (This is
necessary for dust extraction purposes). Press the disc firmly onto the pad
to secure it.
FITTING THE HANDLE
Your sander is fitted with an adjustable support handle. This can be adjusted
for position by loosening handgrip lightly, (unscrew anticlockwise) and rotating
the handgrip around the body of the machine to the desired position, then
tightening securely.
DUST COLLECTION
The dust collection bag is fitted by inserting the holder into the waste duct
below the ON/OFF switch.
The dust bag must be emptied regularly:- do not wait until it is completely full.
The dust bag is emptied as follows.
1. Ensure the sander is switched OFF.
2. Gently remove the dust bag assy from the sander by turning whilst pulling.
3. Take the dust bag to the dustbin and slip the bag off, (the bag has an
elasticated top), empty the bag into the bin.
4. Reassemble the dust bag assy and fit back on to the sander.
OPERATION
To operate, plug into the mains socket and switch on, holding the sander firmly
with both hands. Squeeze the ON/Off switch located below the handle.
To control the speed, turn the knob located on the switch in the direction
marked, i.e. - = lower speed + = higher speed.
The ON/Off switch can be locked for continuous sanding; to release the
switch, just depress again and release.
Place the disc on the workpiece and switch on, working gently backwards
and forwards across the work until finished. Release the switch, (wait until the
motor has stopped fully before putting the sander down).
7
Parts & Service: 020 8988 7400 / E-mail: [email protected] or [email protected]
Page 8

MAINTENANCE
Always inspect the sander before use and ensure it is in top condition.
Ensure all air vents are clear. (Use compressed air to clean the machine where
possible).
Check the power cable to ensure it is sound and free from cracks, bare wires
etc. Avoid using solvents when cleaning plastic parts, (most plastics are
susceptible to damage from the various types of commercial solvents).
All bearings etc., in this tool are lubricated with sufficient high grade lubricant
for the machine’s lifetime under normal operating conditions, therefore no
further lubrication is required.
TROUBLESHOOTING
SANDER IS OVERHEATING
Overheating indicates the machine is blocked with dust. Clean the ventilation
holes, and blow out with compressed air. Wipe the exterior with a dry cloth.
Overloading the machine will also cause overheating. Do not use for heavy
duty work and do not apply excessive pressure.
EXCESSIVE SPARKING
This indicates worn brushes. This problem is easily remedied but you should
consult your CLARKE dealer for parts and advice.
SANDER DOES NOT OPERATE WHEN SWITCHED ON
Check to ensure the fuse in the plug is sound and replace if necessary. If the
fuse is sound or blows repeatedly, consult your CLARKE dealer.
DUST IS NOT EXTRACTED
The dust bag is full or the dust extractor flue is blocked, This is usually caused by
allowing the bag to become too full. Remove and empty the bag, also clear
any blockage.
8
Parts & Service: 020 8988 7400 / E-mail: [email protected] or [email protected]
Page 9
PARTS DIAGRAM
PARTS LIST
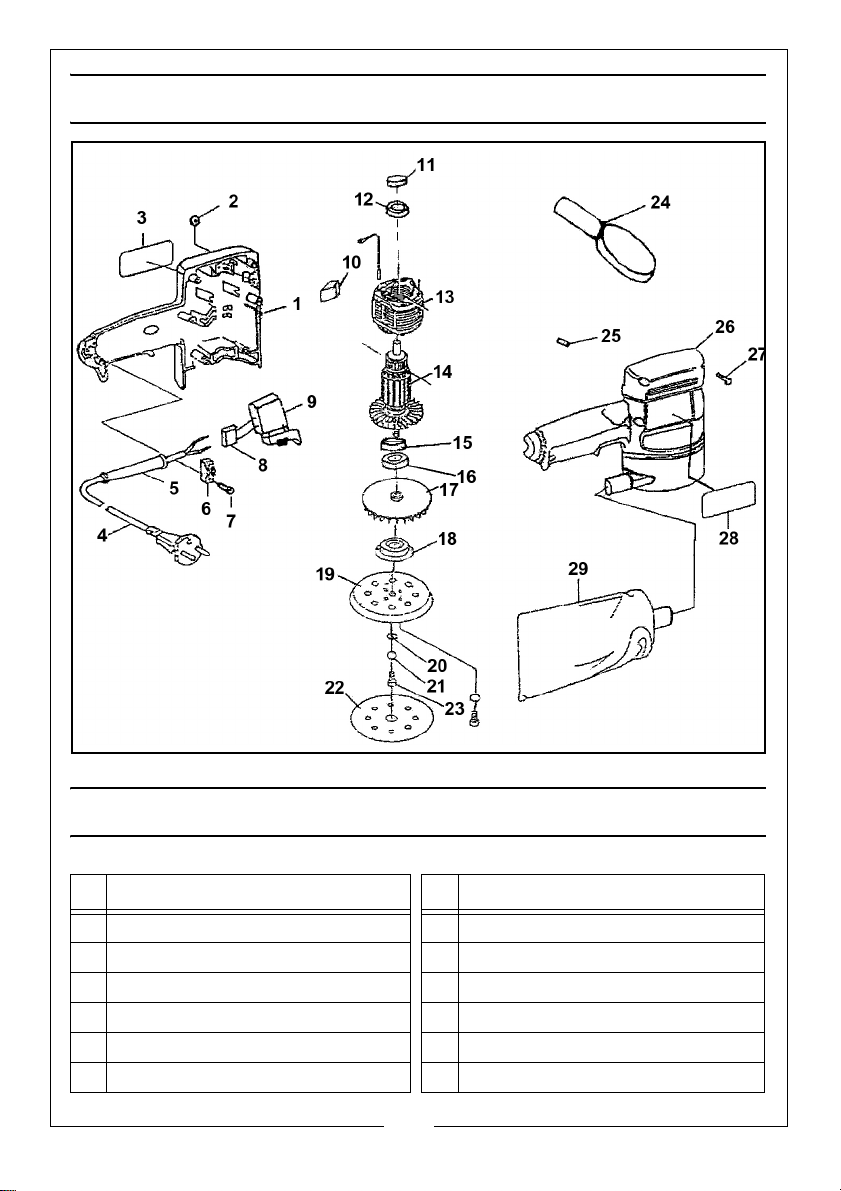
ID DESCRIPTION ID DESCRIPTION
1 Left Housing 16 6002 Bearing
2 Screw 17 Fan Blade
3 Nameplate 18 Shaft Base
4Power Cable 19Base
5 Cable Sleeve 20 Washer
6 Cable Clamp 21 Spring Washer
9
Parts & Service: 020 8988 7400 / E-mail: [email protected] or [email protected]
Page 10
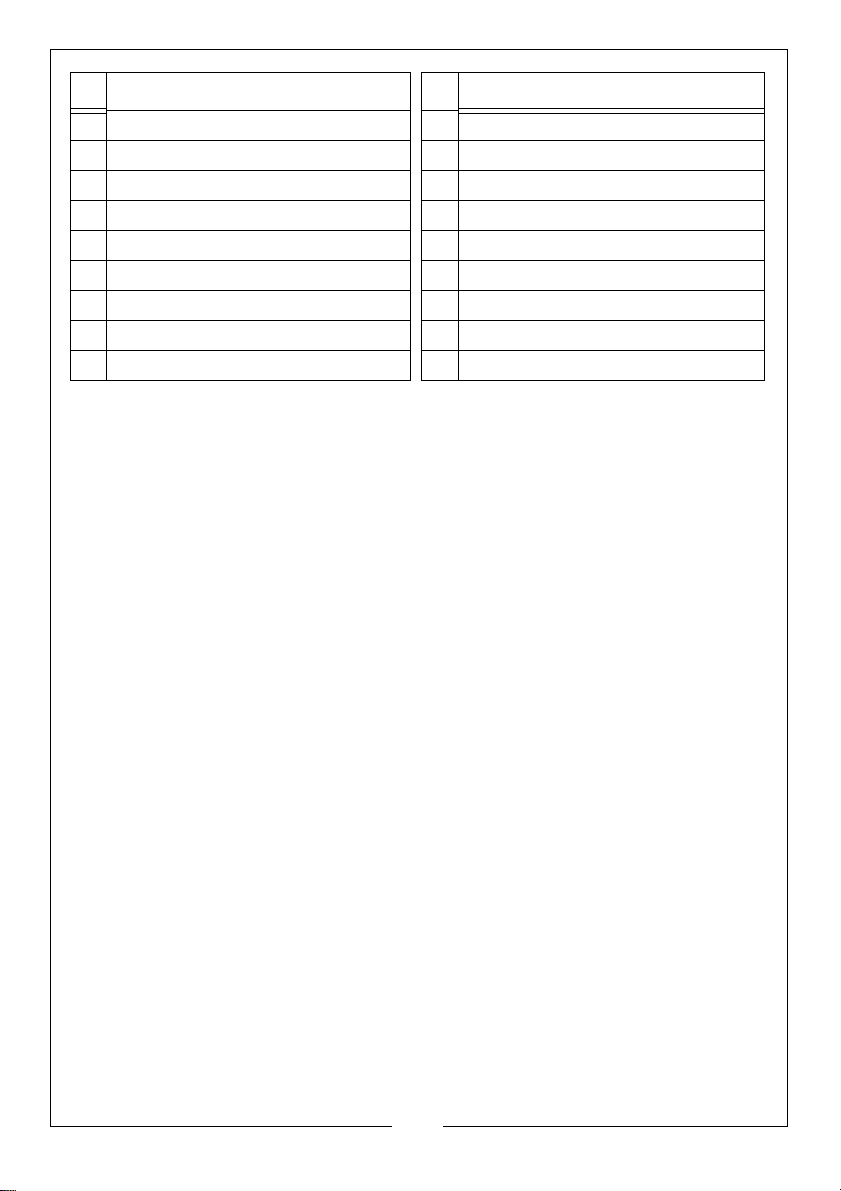
ID DESCRIPTION ID DESCRIPTION
7Screw 22Sanding Disc
8 Capacitor 23 Screw
9 Variable Switch 24 Handle
10 Carbon Brush 25 Rubber Pin
11 Bearing Holder 26 Right Housing
12 6002 Bearing 27 Screw
13 Motor Stator 28 Data Plate
14 Motor Rotor 29 Dust Bag
15 Bearing Holder
When requesting spare parts, please quote the reference GR-CROS1 followed by
the number listed.
REPLACEMENT DISCS
Random Orbit Sanding Discs 60 grit (pack of 5). Part No: 6463051
Random Orbit Sanding Discs 100 grit (pack of 5). Part No: 6463052
Random Orbit Sanding Discs 150 grit (pack of 5). Part No: 6463053
10
Parts & Service: 020 8988 7400 / E-mail: [email protected] or [email protected]
Page 11
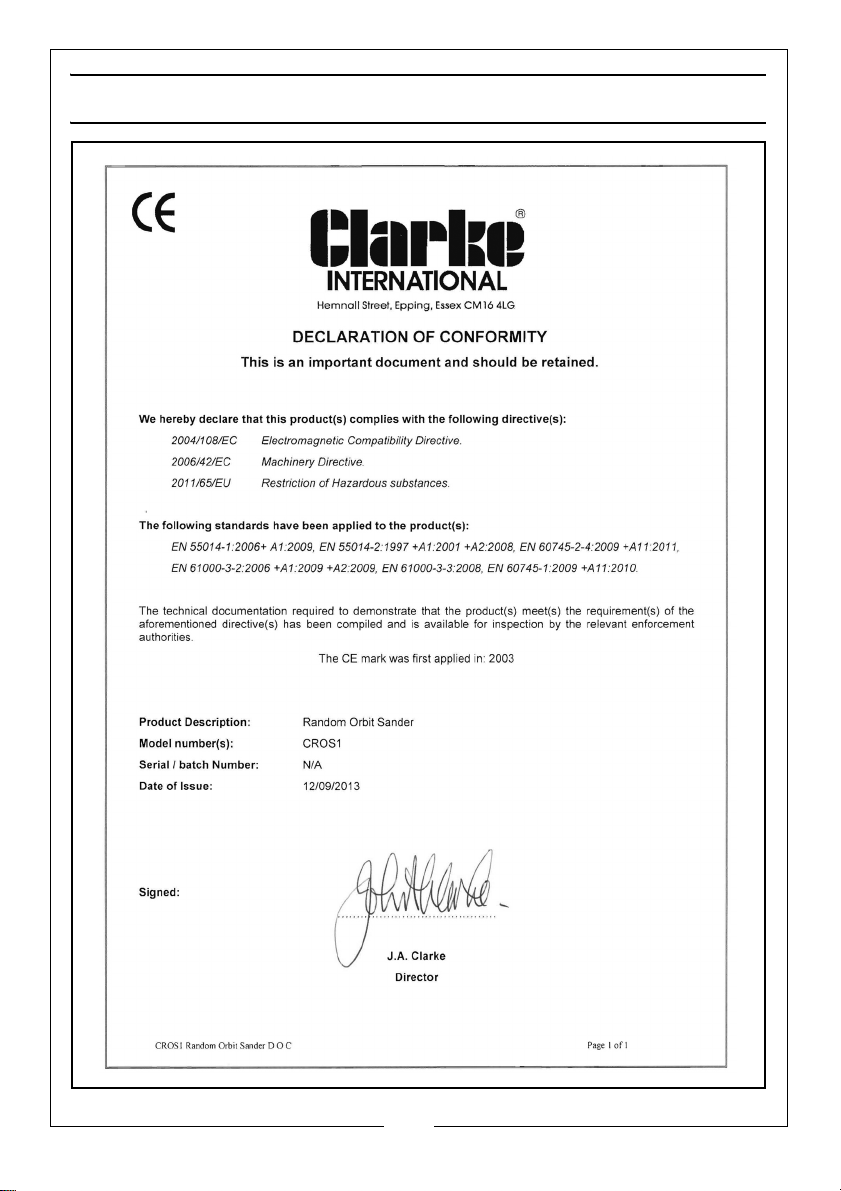
DECLARATION OF CONFORMITY
11
Parts & Service: 020 8988 7400 / E-mail: [email protected] or [email protected]
Page 12

 Loading...