

Page 1

ROTARY TOOL SET
MODEL NO: CRT130
PART NO: 6462000
OPERATION & MAINTENANCE
INSTRUCTIONS
ORIGINAL INSTRUCTIONS GC0421 -rev 2
Page 2
INTRODUCTION
Thank you for purchasing this CLARKE Rotary Tool Kit.
Before attempting to use this product, it is essential that you read this manual
thoroughly and carefully follow all instructions given. In doing so you will ensure
the safety of yourself and that of others around you, and you can also look
forward to the product giving you long and satisfactory service.
Please keep these instructions in a safe place for future reference.
SPECIFICATION
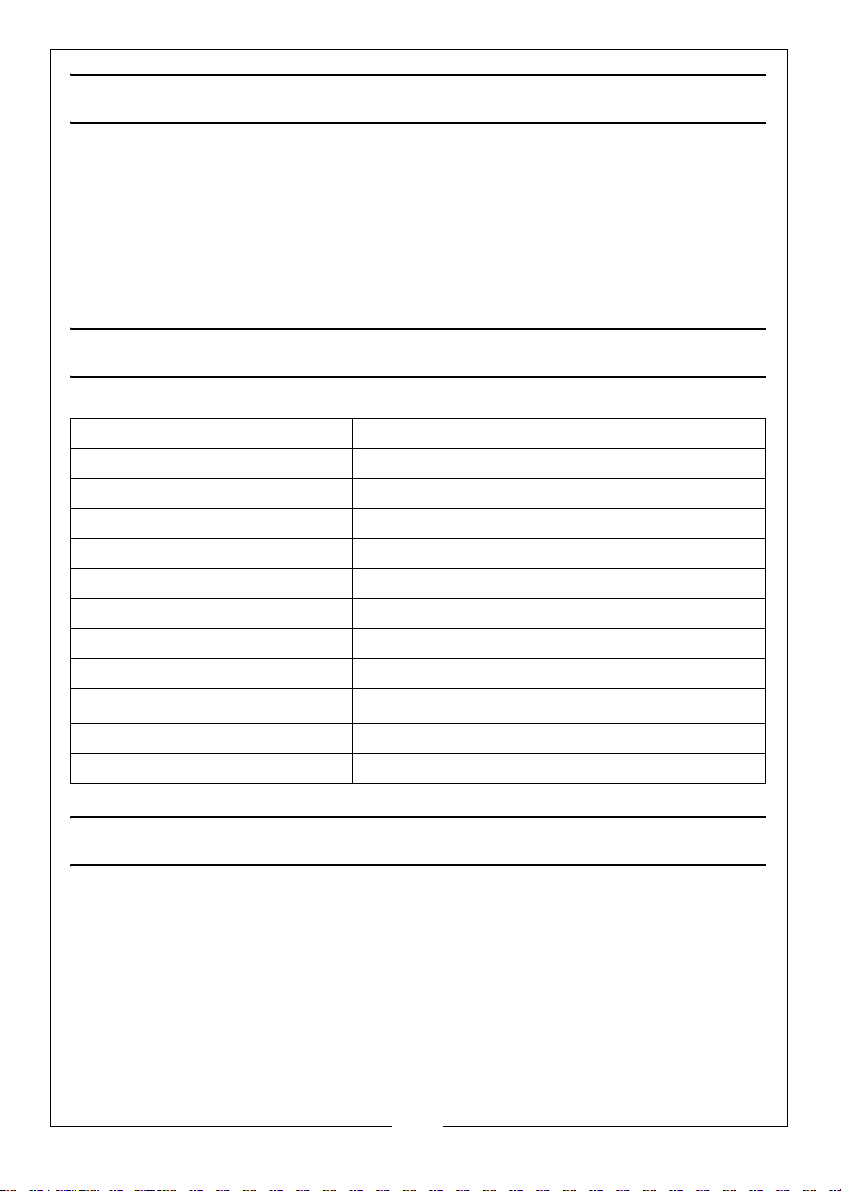
Voltage 230V, 50Hz
Power rating 130 W
IP Rating 20
Electrical insulation class II
No-load speed 10,000 - 35,000 rpm
Collet capacity max 3.2 mm
Max grinding disc 35 mm
Max drill bit 3.2 mm
Weight 1.22 kg
Vibration
Sound pressure level 72 dB LpA
Sound power level 83 dB LpA (uncertainty factor = 3)
1.42 m/s
2
(uncertainty factor 1.5m/s2)
GUARANTEE
This CLARKE product is guaranteed against faulty manufacture for a period of
12 months from the date of purchase. Please keep your receipt as proof of
purchase.
This guarantee is invalid if the product is found to have been abused or
tampered with in any way, or not used for the purpose for which it was
intended. Faulty goods should be returned to their place of purchase, no
product can be returned to us without prior permission.
This guarantee does not effect your statutory rights.
2
Parts & Service: 020 8988 7400 / E-mail: [email protected] or [email protected]
Page 3

SAFETY PRECAUTIONS
WARNING: READ ALL INSTRUCTIONS. FAILURE TO FOLLOW ALL
INSTRUCTIONS LISTED BELOW MAY RESULT IN ELECTRIC SHOCK, FIRE AND/
OR SERIOUS INJURY. THE TERM “POWER TOOL” IN ALL WARNINGS LISTED
BELOW REFERS TO YOUR TOOL KIT.
WORK AREA
1. Keep work area clean and well lit. Cluttered and dark areas invite
accidents.
2. Do not operate power tools in explosive atmospheres, such as in the
presence of flammable liquids, gases or dust. Power tools create sparks
which may ignite the dust or fumes.
3. Keep children and bystanders away while operating a power tool.
Distractions can cause you to lose control.
ELECTRICAL SAFETY
1. Avoid body contact with earthed or grounded surfaces such as pipes,
radiators, ranges or refrigerators. There is an increased risk of electric shock
if your body is earthed or grounded.
2. Do not expose power tools to rain or wet conditions. Water entering a
power tool will increase the risk of electric shock.
3. When operating a power tool outdoors, use an extension cord suitable for
outdoor use. Use of a cord suitable for outdoor use reduces the risk of
electric shock.
PERSONAL SAFETY
1. Stay alert, watch what you are doing and use common sense when
operating a power tool. Do not use a power tool while you are tired or
under the influence of drugs, alcohol or medication. A moment of
inattention while operating power tools may result in personal injury.
2. Use safety equipment. Always wear eye protection. Safety equipment such
as dust mask, non-skid safety shoes, or hearing protection used for
appropriate conditions will reduce personal injuries.
3. Avoid accidental starting. Ensure the switch is in the off position before
plugging in.
4. Remove any adjusting key or wrench before turning the power tool on. A
wrench or a key left attached to a rotating part of the power tool may
result in personal injury.
3
Parts & Service: 020 8988 7400 / E-mail: [email protected] or [email protected]
Page 4

5. Do not overreach. Keep proper footing and balance at all times. This
enables better control of the power tool in unexpected situations.
6. Dress properly. Do not wear loose clothing or jewellery. Keep your hair,
clothing and gloves away from moving parts. Loose clothes, jewellery or
long hair can be caught in moving parts.
POWER TOOL USE AND CARE
1. Do not force the power tool. Use the correct power tool for your
application. The correct power tool will do the job better and safer at the
rate which it was designed.
2. Do not use the power tool if the switch does not turn it on and off. Any
power tool that cannot be controlled with the switch is dangerous and
must be repaired.
3. Disconnect the tool before making any adjustments, changing
accessories, or storing power tools. Such preventive safety measures
reduce the risk of starting the power tool accidentally.
4. Store idle tools out of the reach of children and do not allow persons
unfamiliar with the power tool or these instructions to operate the power
tool. Power tools are dangerous in the hands of untrained users.
5. Maintain power tools. Check for misalignment or binding of moving parts,
breakage of parts and any other condition that may affect the power
tools operation. If damaged, have the power tool repaired before use.
Many accidents are caused by poorly maintained power tools.
6. Keep cutting tools sharp and clean. Well maintained cutting tools with
sharp cutting edges are less likely to bind and are easier to control.
7. Use the power tool, accessories and tool bits etc., in accordance with
these instructions and in the manner intended for the particular type of
power tool, taking into account the working conditions and the work to be
performed. Use of the power tool for operations different from intended
could result in a hazardous situation.
SERVICING
1. Have your power tool serviced by a qualified repair person using only
identical replacement parts. This will ensure that the safety of the power
tool is maintained.
ADDITIONAL INSTRUCTIONS FOR ROTARY TOOLS
1. Only use accessories supplied for use with this tool.
2. Never use worn or cracked accessories.
4
Parts & Service: 020 8988 7400 / E-mail: [email protected] or [email protected]
Page 5

3. Hold the tool away from your face when switching on.
4. Keep your fingers away from rotating accessories.
5. Be careful not to accidently hit any foreign objects in the workpiece.
6. If an accessory jams, switch the tool off and disconnect from the power
supply before attempting to free the accessory.
7. Clamp the workpiece securely whenever possible.
8. Thoroughly remove all dust after sanding.
9. Take special care when sanding paint which is possibly lead based or
when sanding some laminates and metal which may produce toxic dust.
• Wear a dust mask specifically designed for protection against lead paint
dust and fumes and ensure that persons within or entering the work area
are also protected.
• Do not let children or pregnant women enter the work area.
• Do not eat, drink or smoke in the work area.
10. Abrasive wheels should be stored and handled with care. (when not in use,
accessories should be stored in the box provided for protection).
11. Inspect grinding wheels/accessories before use. Do not use chipped,
cracked or otherwise defective products.
12. Ensure that all accessories are fitted in accordance with the manufacturers
instructions.
13. Ensure that the abrasive accessory is correctly mounted and tightened
before use. Run the tool with no-load for 30 seconds in a safe position and
stop immediately if there is vibration or if other defects are detected. If this
condition occurs, check the machine to determine the cause.
14. Check that the work piece is properly supported.
15. Do not use a cut-off wheel for side grinding.
16. Ensure that sparks resulting from use do not create a hazard or ignite
flammable substances.
17. Ensure ventilation openings are kept clear when working in dusty
conditions. If it should become necessary to clear dust, first disconnect the
tool.
18. Personal protective equipment such as dust masks and gloves should worn
as appropriate.
19. Remember the wheel continues to briefly rotate after switching off.
5
Parts & Service: 020 8988 7400 / E-mail: [email protected] or [email protected]
Page 6
ELECTRICAL CONNECTIONS
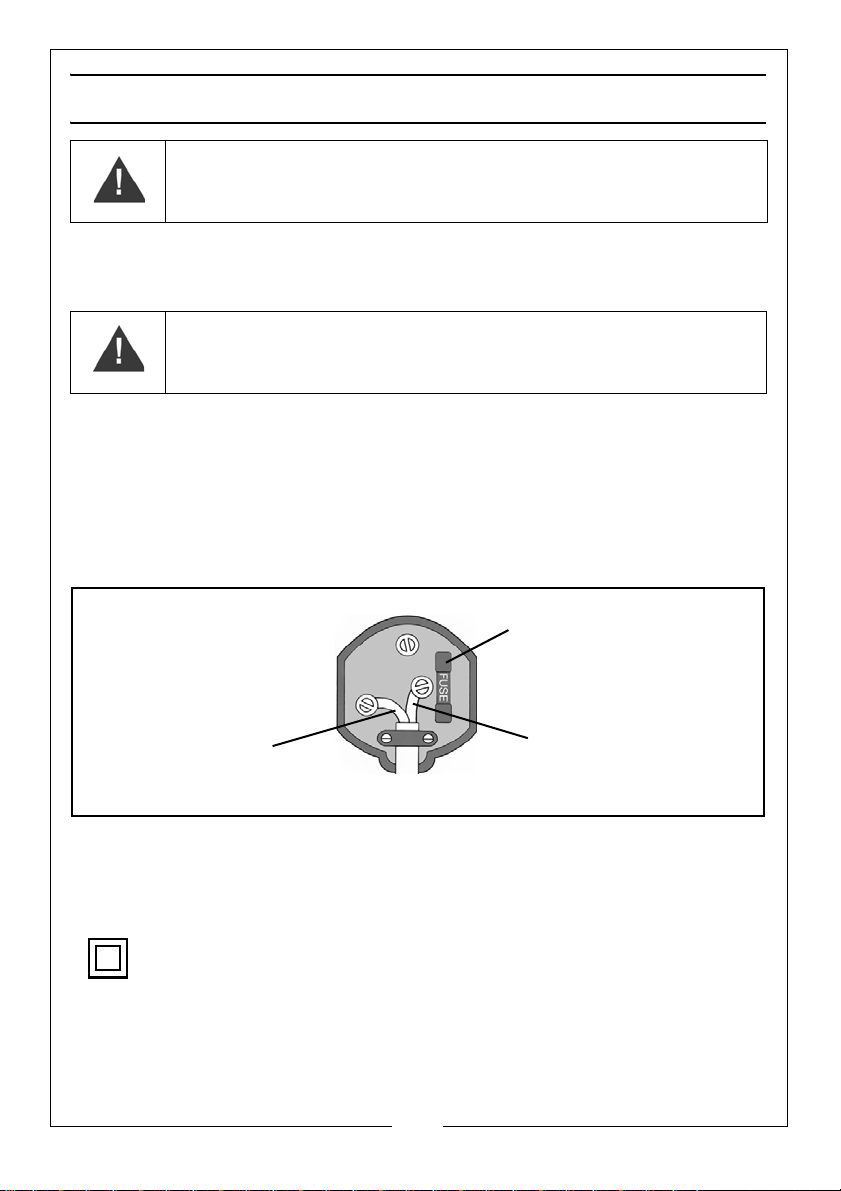
Plug must be BS1363/A approved.
Always fit a 3 Amp fuse.
Ensure that the outer sheath of the cable is firmly held by the clamp
Neutral
(Blue)
Live
(Brown)
WARNING: READ THESE ELECTRICAL SAFETY INSTRUCTIONS
THOROUGHLY BEFORE CONNECTING THE PRODUCT TO THE MAINS
SUPPLY.
This product is provided with a standard BS 1363 plug, for connection to a
standard, domestic electrical supply. Should the plug need changing at any
time, ensure that a plug of identical specification is used.
WARNING: THE WIRES IN THE POWER CABLE OF THIS PRODUCT ARE
COLOURED IN ACCORDANCE WITH THE FOLLOWING CODE:
BLUE = NEUTRAL BROWN = LIVE
If the colours of the wires in the power cable of this product do not correspond
with the markings on the terminals of your plug, proceed as follows.
•The Blue wire must be connected to the terminal marked N or
coloured Black.
•The Brown wire must be connected to the terminal marked L or
coloured Red.
We strongly recommend that this machine is connected to the mains supply
via a Residual Current Device (RCD)
If in any doubt, consult a qualified electrician. DO NOT attempt any repairs
yourself.
This symbol indicates that this is a Class II product, and does not require
an earth connection.
Parts & Service: 020 8988 7400 / E-mail: [email protected] or [email protected]
6
Page 7
CARTON CONTENTS
The following items should be supplied. If any parts are missing or damaged,
please contact the dealer where you purchased the rotary tool.
• Rotary tool
• Flexible drive
• Tool stand clamp
• Telescopic tool stand column
• Collection of miscellaneous accessories including chuck spanner
• Blow-moulded case
ASSEMBLING THE COMPONENTS
ERECTING THE STAND
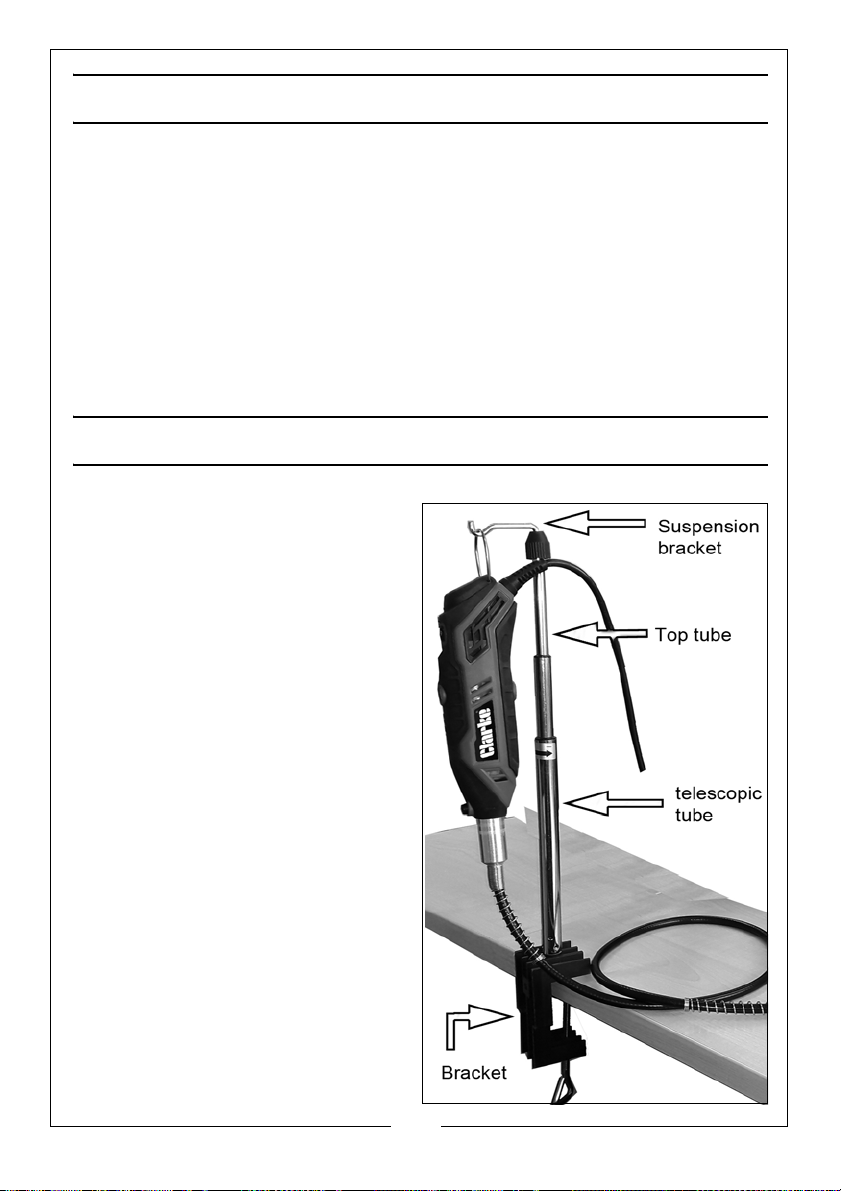
Screw the telescopic tube into the
bracket and tighten.
Clamp the bracket to a workbench
or worktop with a maximum thickness
of 65mm.
Slacken the top tube by turning the
black knob anticlockwise. Draw the
tube out to its maximum height and
secure it by turning the knob
clockwise.
Turn the middle tube anticlockwise
and extend as required. Lock in
position by turning the tube
clockwise.
• The rotary tool can now be
supported by the suspension
bracket of the stand as shown.
(the suspension bracket can be
turned 360o).
7
Parts & Service: 020 8988 7400 / E-mail: [email protected] or [email protected]
Page 8
FITTING DISCS & GRINDING STONES TO THE MANDREL
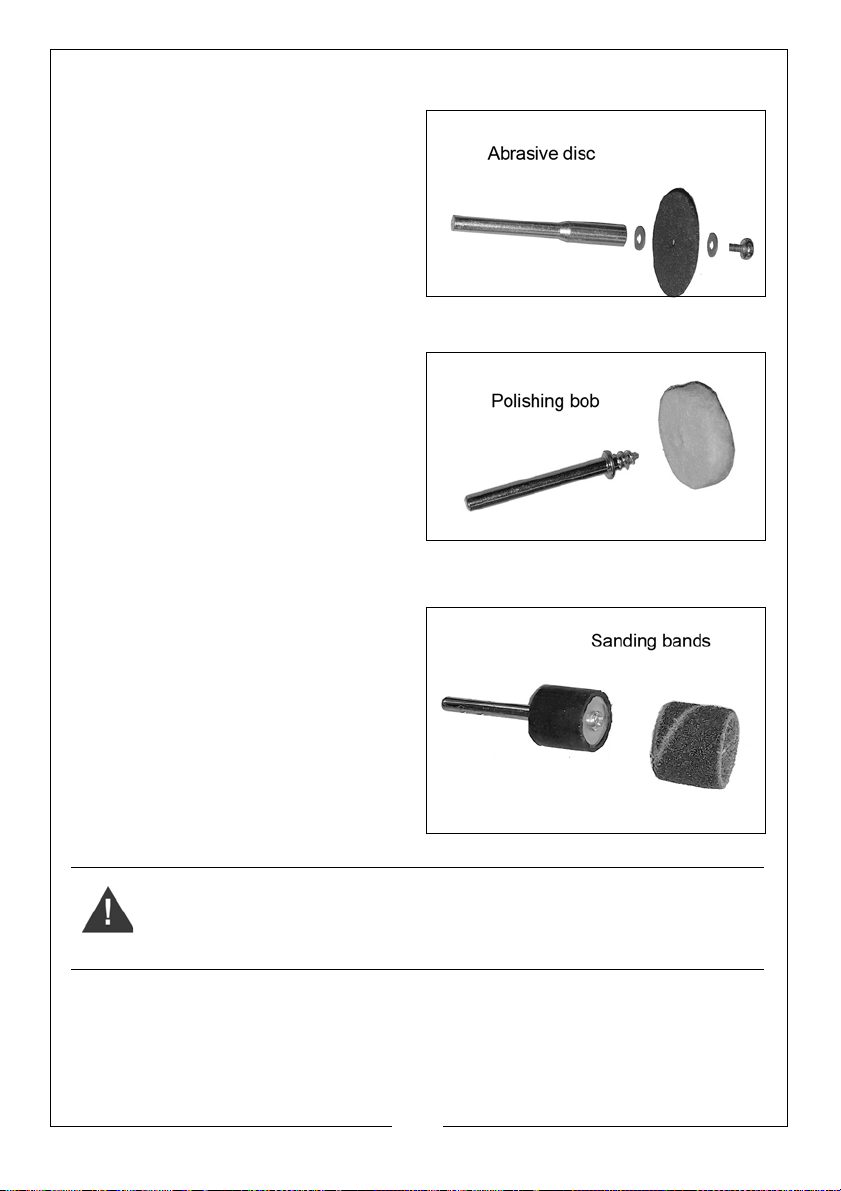
1. Mount the selected disc on to the
mandrel as shown, ensuring the
two washers are in place.
• DO NOT overtighten the screw.
FITTING CLOTH POLISHING WHEELS
1. Screw the cloth wheel onto the
mandrel firmly but do not
overtighten.
ASSEMBLING SANDING BANDS
1. Slacken the screw on the end of
the mandrel and slide the
appropriate abrasive band fully
onto the rubber former.
2. Tighten the screw to secure the
band to the former.
FITTING THE COLLET
WARNING: MAKE SURE THAT THE TOOL HAS BEEN DISCONNECTED FROM
THE POWER SUPPLY BEFORE REMOVING OR FITTING A COLLET OR
ACCESSORY
The rotary tool is supplied with 2 interchangeable collets; 2.3mm and 3.2mm
(one supplied already fitted to the rotary tool).
Select the collet to be fitted according to the shaft size of the mandrel or other
accessory to be used.
8
Parts & Service: 020 8988 7400 / E-mail: [email protected] or [email protected]
Page 9
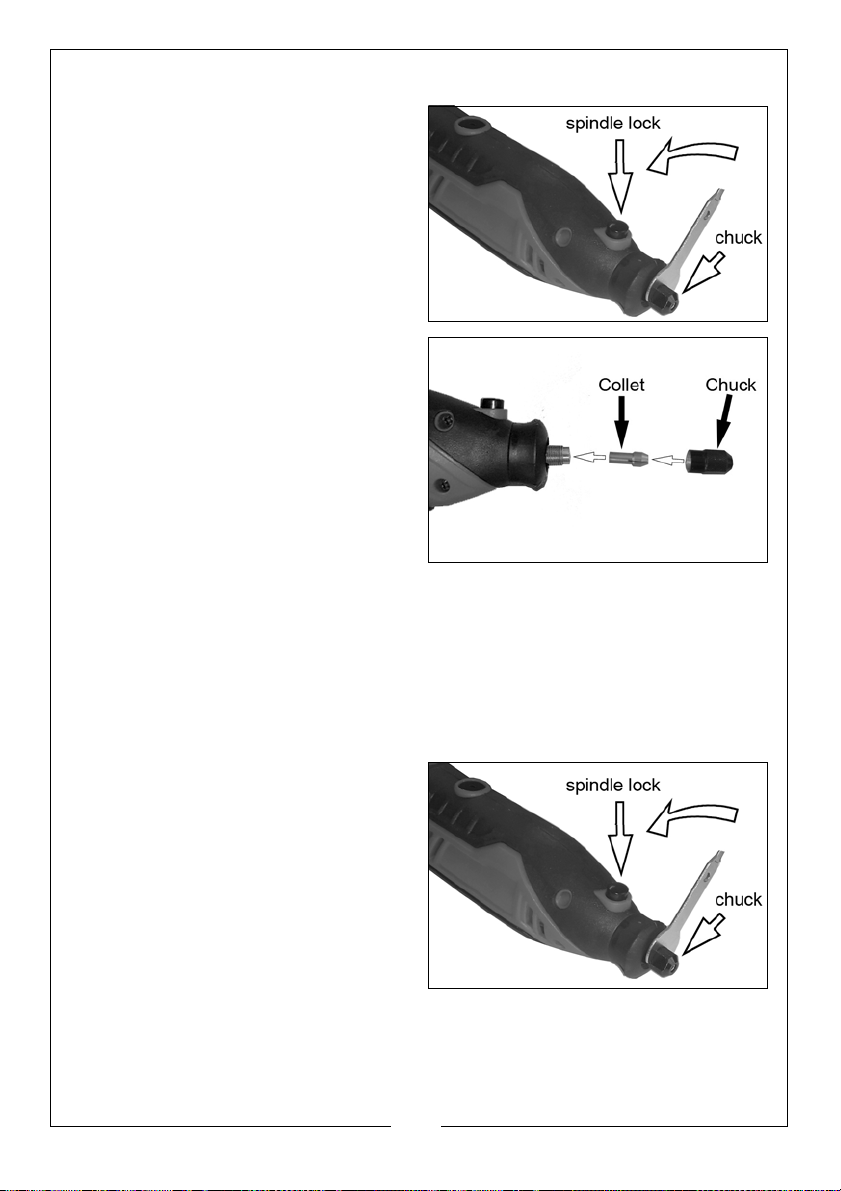
To fit a collet, proceed as follows.
1. Press and hold down the spindle
lock.
• It may be necessary to rotate the
chuck to fully engage the spindle
lock.
2. Remove the chuck by rotating the
chuck sleeve in an anti-clockwise
direction.
• A spanner is supplied for this
purpose.
3. Pull the collet out of the spindle.
4. Insert the collet required, pushing it
into the spindle as far as it will go.
5. Refit the chuck, pressing the
spindle lock to tighten it.
FITTING AN ACCESSORY TO THE TOOL
IMPORTANT: Ensure the tool is switched OFF
TO FIT AN ACCESSORY PROCEED AS FOLLOWS.
1. Make sure that the correct size collet has been fitted.
2. Press and hold down the spindle
lock.
3. It may be necessary to rotate the
chuck to engage the spindle lock.
4. Rotate the chuck sleeve in an
anticlockwise direction until the
collet jaws are open sufficiently to
accept the accessory.
9
Parts & Service: 020 8988 7400 / E-mail: [email protected] or [email protected]
Page 10
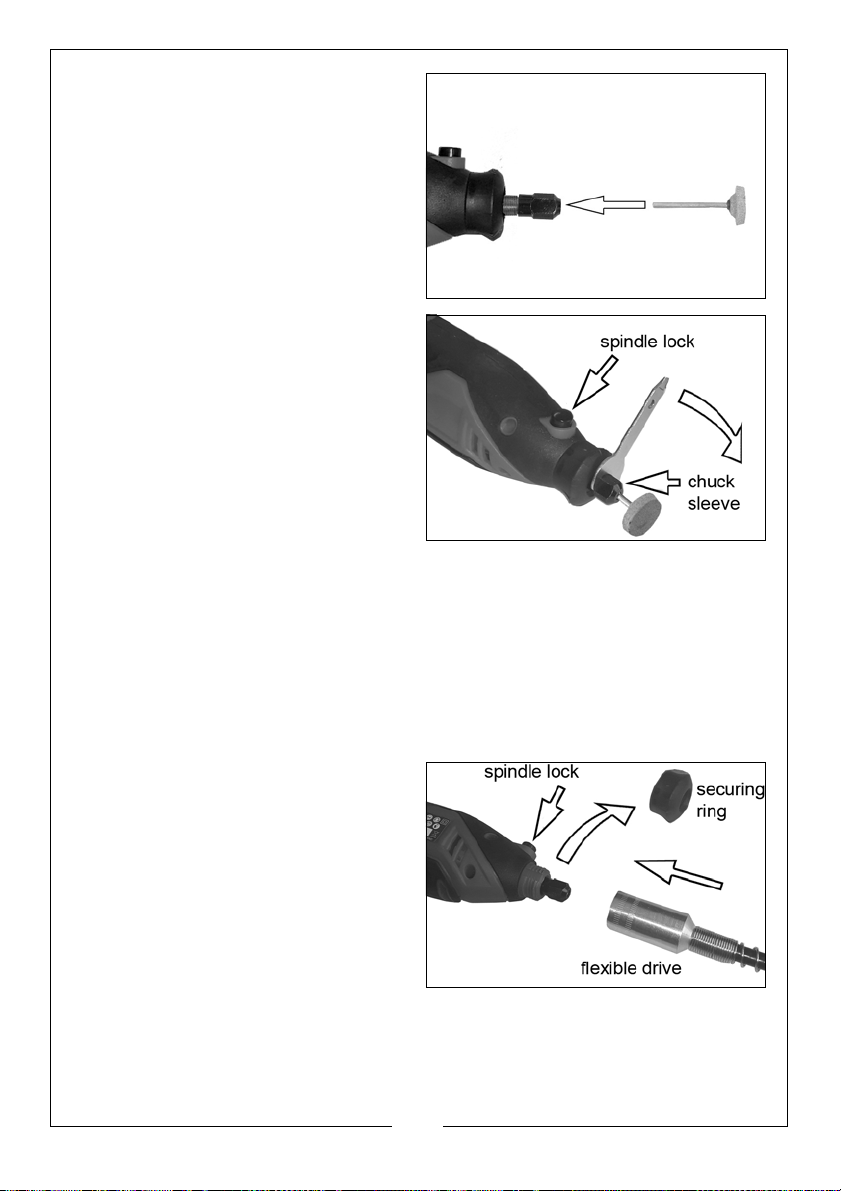
5. Insert the accessory into the collet
as far as it will go.
6. Press and hold down the spindle
lock and tighten the chuck sleeve
using the spanner supplied.
REMOVING THE ACCESSORY FROM THE COLLET
1. Press and hold down the spindle lock.
2. Using the spanner supplied, rotate the chuck sleeve in an anti-clockwise
direction.
3. When the accessory is released, remove it.
ATTACHING THE FLEXIBLE DRIVE ASSEMBLY
1. Unscrew and remove the securing
ring and store safely.
2. Slacken the chuck using the
spanner provided while pressing
and holding the locking button.
3. Slide the flexible drive through the
chuck and fully into the collet.
4. Press and hold the locking button
and screw the flexible drive
assembly onto the end of the tool
to secure it, taking GREAT CARE to not to cross-thread it.
10
Parts & Service: 020 8988 7400 / E-mail: [email protected] or [email protected]
Page 11
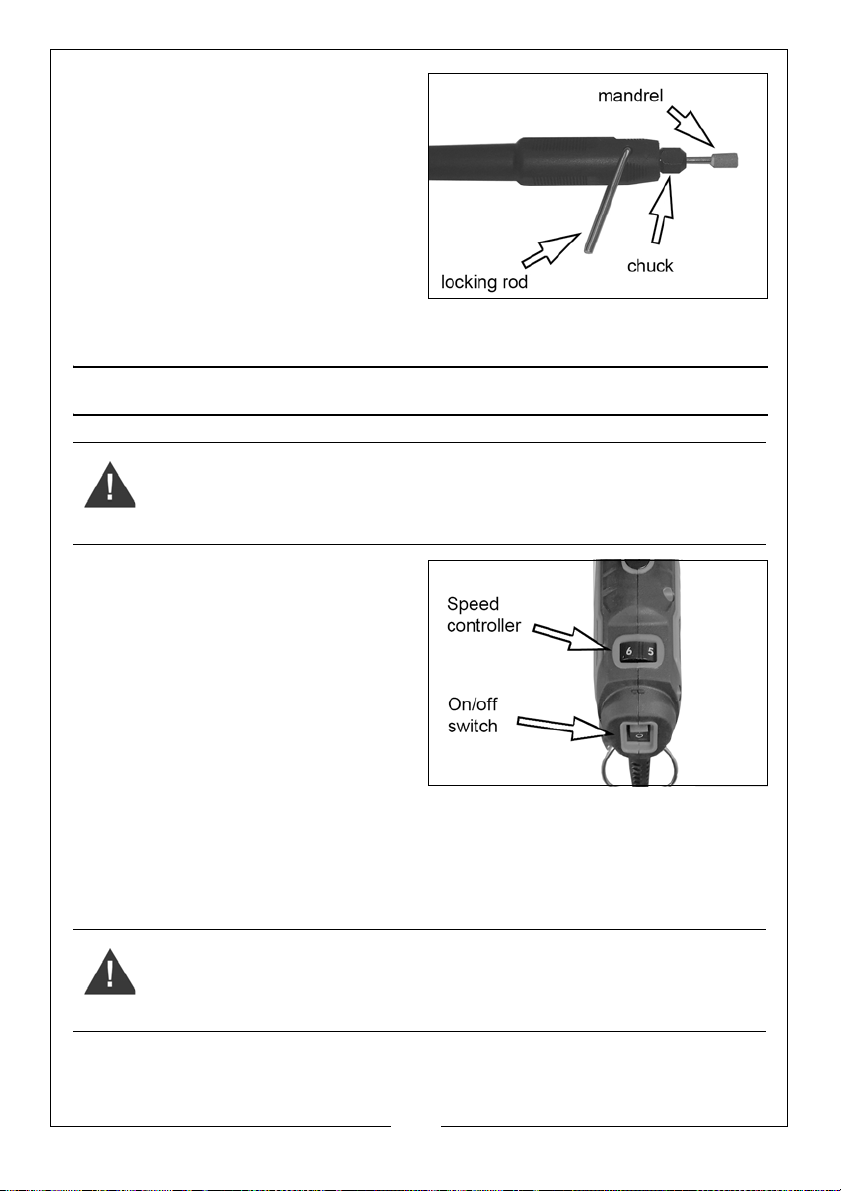
5. At the opposite end of the flexible
drive rotate the drive until the hole
in the flexible drive shaft lines up
with the hole in the outer part so
that the locking rod can be
inserted.
• The spanner may now be used to
tighten the collet and secure the
mandrel.
6. Loosen the chuck and insert your
chosen the mandrel before tightening.
OPERATION
WARNING: BEFORE OPERATING THE ON/OFF SWITCH, MAKE SURE THAT
THE COLLET AND ACCESSORIES HAVE BEEN CORRECTLY AND SECURELY
FITTED.
1. To switch the rotary tool on, use
the on/off switch.
2. Select a suitable speed using the
speed controller.
• The low speed settings (1-2) should
be used for removing rust and
polishing.
• The medium speed settings (3-4)
should be used for drilling,
engraving, sharpening and
removing paint.
• The high speed settings (5-6) should be used for cutting metal and sanding
wood.
3. Switch the rotary tool off, set the on/off switch to 0.
WARNING: NEVER PUT THE TOOL DOWN UNTIL IT HAS COMPLETELY
STOPPED.
4. DO NOT use force when using this tool. A light pressure is all that is required.
11
Parts & Service: 020 8988 7400 / E-mail: [email protected] or [email protected]
Page 12
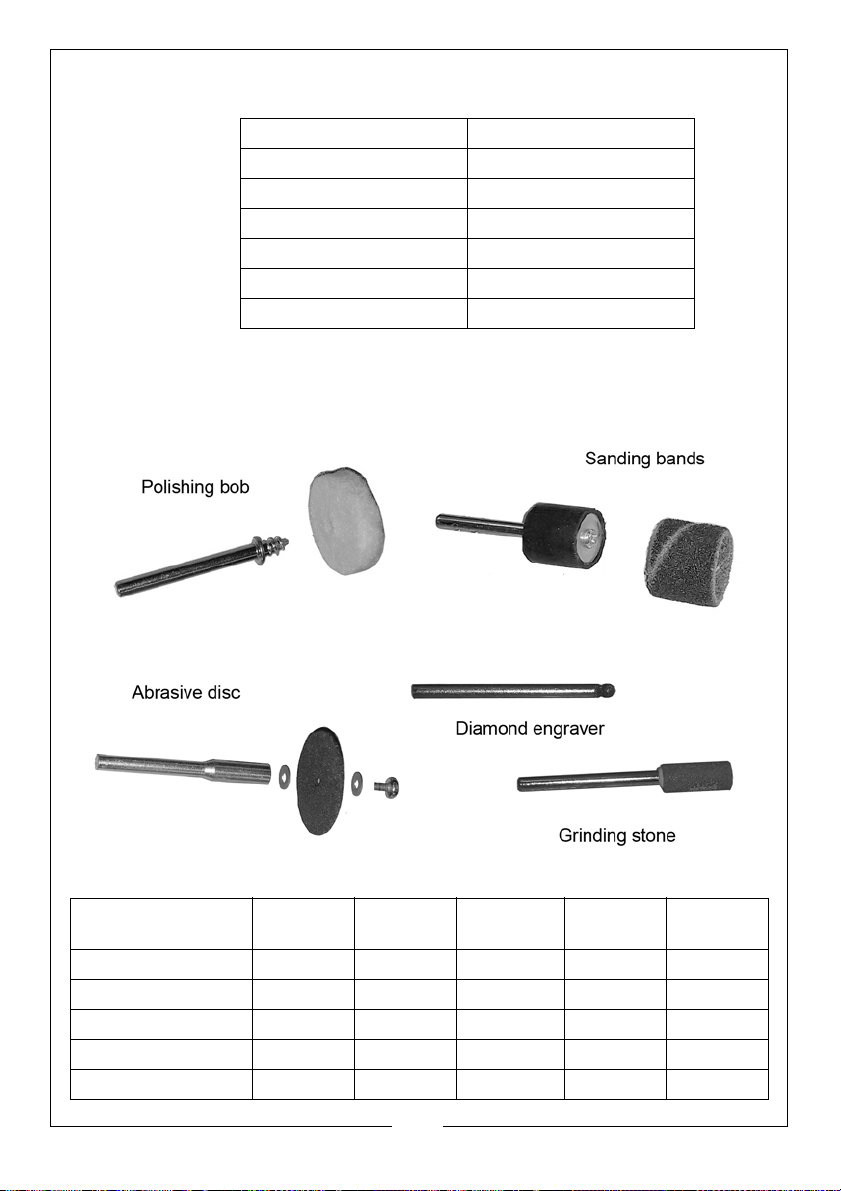
TOOL ROTATIONAL SPEEDS
Speed indicator position RPM
1 10,000
2 17,500
3 23,000
4 27,200
5 29,500
6 35,000
OPERATING SPEEDS
The following speeds are for guidance for working with different materials..
Stone Steel Aluminium,
brass
Grinding stones 1 5 2 1 n/a
Abrasive disc 6361n/a
Sanding bands n/a 1 3 1 6
Diamond engraver 6 3 6 1 n/a
Polishing bobs n/a 5 3 5 n/a
12
Parts & Service: 020 8988 7400 / E-mail: [email protected] or [email protected]
Polymer,
plastic
Wood
Page 13
CLEANING AND MAINTENANCE
WARNING: MAKE SURE THAT THE TOOL HAS BEEN DISCONNECTED FROM
THE POWER SUPPLY BEFORE REMOVING OR FITTING A COLLET OR
ACCESSORY
1. ALWAYS unplug the tool from the mains supply and ensure it is switched OFF
when performing maintenance tasks.
2. The tool should be kept clean at all times. Ensure the ventilation ducts are
clear and the power cable is in good condition. Get into the habit of
cleaning thoroughly after each use and before storing.
3. After use, thoroughly clean all chippings and dust from the rotary tool,
taking special care to clean the cooling vents.
4. Never clean with solvents. Use a moist cloth with soapy water if necessary.
5. Clean the spindle lock, the chuck and the spindle collar.
6. Keep all accessories sharp and clean.
The tool incorporates sealed for life bearings and does not require lubrication.
There are no user serviceable parts inside this tool.
Worn or damaged parts should be replaced by qualified personnel.
Refer to qualified service personnel if internal maintenance is required.
ACCESSORIES
Accessory Kits are available from your dealer. Please quote part number
6468025 (CRT100A - 100 piece) or part no 6462001 (CRT40 - 40 piece kit).
ENVIRONMENTAL RECYCLING POLICY
By purchasing this product, the customer is taking on the obligation to
deal with its safe disposal in accordance with the Waste Electrical and
Electronic Equipment (WEEE).
This product must not be disposed of with general household waste but be
disposed of according to the laws governing Waste Electrical and Electronic
Equipment (WEEE) at a recognised disposal facility.
This product contains valuable raw materials. Metal products should be taken
to your local civic amenity site for recycling.
13
Parts & Service: 020 8988 7400 / E-mail: [email protected] or [email protected]
Page 14
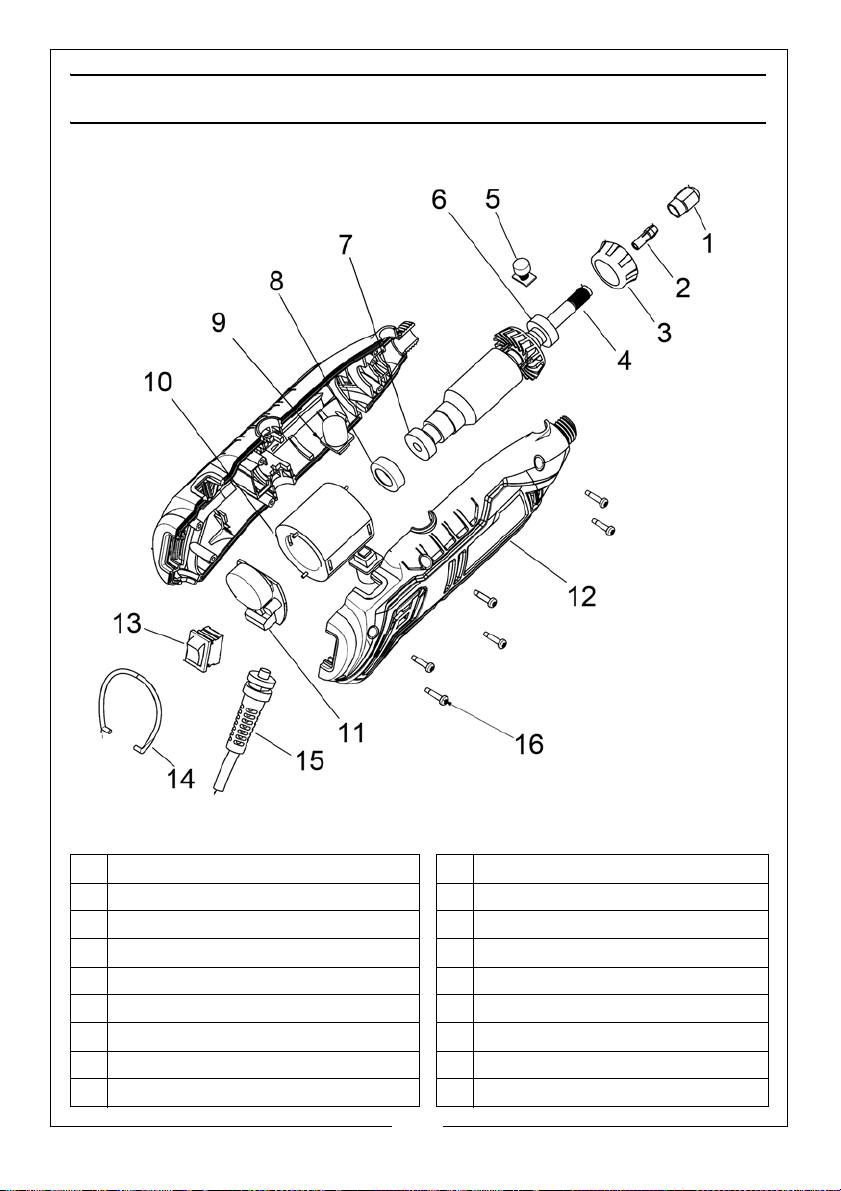
COMPONENT PARTS
No Description No Description
1 Chuck sleeve 9 Carbon brush
2 Collet 10 Stator
3 Cap body 11 Circuit board
4 Rotor 12 Housing
5 Spindle lock button 13 Switch
6 Bearing 968z 14 Hanger
7 Bearing 626z 15 Cable & plug
8 Bearing sleeve 16 Screw
14
Parts & Service: 020 8988 7400 / E-mail: [email protected] or [email protected]
Page 15
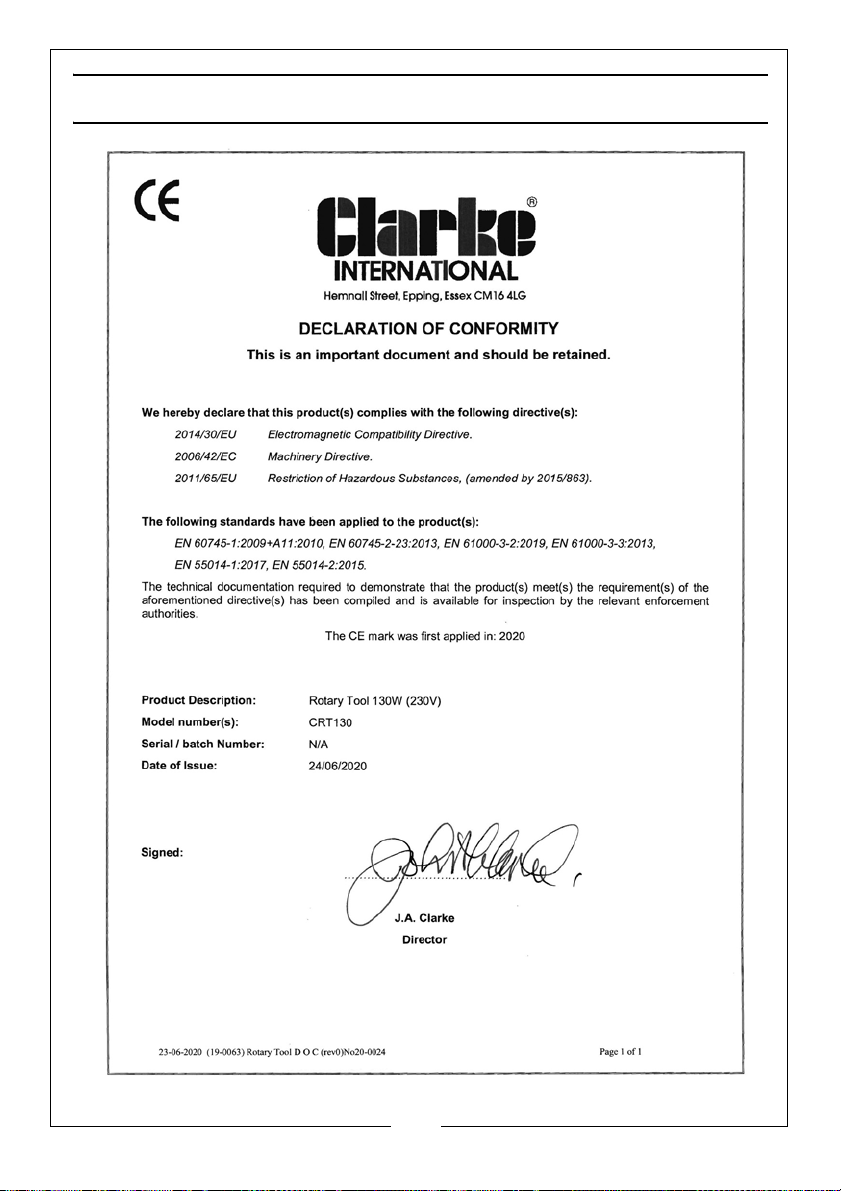
DECLARATION OF CONFORMITY
15
Parts & Service: 020 8988 7400 / E-mail: [email protected] or [email protected]
Page 16

 Loading...