

Page 1

10”(250MM) TABLE SAW
MODEL NO: CTS17
PART NO: 6500752
OPERATION & MAINTENANCE
INSTRUCTIONS
ORIGINAL INSTRUCTIONS GC0322
Page 2

INTRODUCTION
Thank you for purchasing this CLARKE product. This table saw has been
designed to perform the sawing operation of ripping, cross-cutting, bevelling
and mitering wood and wood products. This unit is designed for use with an
10” (250mm) carbide tipped blade.
Before attempting to use this product, please read this manual thoroughly and
follow the instructions carefully. In doing so you will ensure the safety of yourself
and that of others around you, and you can look forward to your purchase
giving you long and satisfactory service.
SPECIFICATIONS
Model CTS17
Voltage 230V - 50 Hz
Power input 2000 W
No-load speed 4800 rpm
Ingress protection (IP) rating IPX0
Table size 643 mm x 546 mm (ex extension)
Dust Extractor connector 34.9 (internal) / 39.5 mm (external)
Blade size: Outside Diameter 250 mm
Bore Diameter 30 mm
Thickness 2.8 mm
Number of teeth 24 TCT
Maximum cut depth @ 90 Degrees 72 mm
Maximum cut depth @ 45 Degrees 50 mm
Machine weight: 22 kg
Machine size (L x W x H) 695 x 917 x 1030mm (max)
Sound pressure level LpA 93.7 dB (A)
Guaranteed sound power level LWA: 106.7 dB (A)
This saw is NOT suitable for cutting:
• Timber greater than 70mm
• Metal, stone, rubber, plastic etc
•Logs or round timber
2
Parts & Service: 020 8988 7400 / E-mail: [email protected] or [email protected]
Page 3

GUARANTEE
This product is guaranteed against faulty manufacture for a period of 12
months from the date of purchase. Please keep your receipt which will be
required as proof of purchase.
This guarantee is invalid if the product is found to have been abused or
tampered with in any way, or not used for the purpose for which it was
intended. Faulty goods should be returned to their place of purchase, no
product can be returned to us without prior permission.
This guarantee does not effect your statutory rights.
ENVIRONMENTAL RECYCLING POLICY
By purchasing this product, the customer is taking on the obligation to
deal with its safe disposal in accordance with the Waste Electrical and
Electronic Equipment (WEEE).
In effect, this means that this product must not be disposed of with general
household waste. It must be disposed of according to the laws governing
Waste Electrical and Electronic Equipment (WEEE) at a recognised disposal
facility.
If disposing of this product or any damaged components, do not dispose of
with general waste. This product contains valuable raw materials. Metal
products should be taken to your local civic amenity site for recycling of metal
products.
3
Parts & Service: 020 8988 7400 / E-mail: [email protected] or [email protected]
Page 4

SAFETY SYMBOLS
Read instruction
manual before use
Wear safety glasses Wear ear defenders
Indoor Use Only Danger of cut hand
The above safety symbols appear on the product.
Wear dust mas k
injury. Ensure guards are
in place.
SAFETY WARNINGS
CAUTION: DO NOT LET FAMILIARITY WITH YOUR TABLE SAW MAKE YOU
CARELESS. REMEMBER THAT A CARELESS FRACTION OF A SECOND IS
SUFFICIENT TO CAUSE SEVERE INJURY.
PERMITTED USAGE
The table saw is constructed exclusively for the sawing of wood. The
appropriate saw blade should be fitted according to the wood type (solid
wood, chipboard or plywood).
• Read and understand the entire owner's manual before attempting
assembly or operation.
• Read and understand the warnings posted on the machine and in
this manual. Failure to comply with all of these warnings may cause
serious injury.
HEALTH
When sawing, dust particles will be produced which in some instances can be
harmful (e.g. lead from old gloss paint, arsenic and chromium from chemically
treated lumber).
To reduce the risk you should:
4
Parts & Service: 020 8988 7400 / E-mail: [email protected] or [email protected]
Page 5

• Work in a well-ventilated area.
• Work with approved safety equipment such as dust masks that are
specially designed to filter microscopic particles.
• If possible use/connect to a suitable dust extractor.
GENERAL
1. DO NOT expose the saw to rain.
2. DO NOT use the saw in damp or wet conditions.
3. Keep the work area well lit.
4. DO NOT use the saw in the presence of flammable liquids and gases.
5. Remove loose items and unnecessary work pieces from the area before
starting the saw.
6. Clean out sawdust from the interior of the saw to prevent a potential fire
hazard. Attach a vacuum cleaner to the dust port for additional sawdust
removal.
7. Wear ear protectors (plugs or muffs) during extended periods of operation.
8. Wear safety glasses. Everyday eyeglasses are not suitable as safety glasses.
9. Wear a dust mask when sawing wood.
10. NEVER wear gloves during operation.
11. Before operating this table saw, remove any neck tie, rings, watches and
other jewellery and roll sleeves up past the elbows. Remove all loose
clothing and confine long hair. Non-slip footwear or anti-skid floor strips are
recommended.
12. Make sure that the machine stands stable on a firm, flat surface.
13. Before use, carefully check the saw and mains cable for damage or any
other condition that may affect its operation. DO NOT use the saw if any
part is damaged or defective.
14. DO NOT use the saw if the switch does not turn it on and off.
15. Remove keys and wrenches. Ensure that keys and wrenches are removed
from the saw before turning it on following blade replacement.
16. Use the right tool for the task - DO NOT force small tools to do the job of a
heavy duty tool. It will do the job better and safer at the rate for which it
was intended. DO NOT use tools for purposes not intended; for example DO
NOT use table saws to cut tree limbs or logs.
17. The use of any accessory or attachment other than one recommended in
this instruction manual may present a risk of personal injury.
18. Connect table saws to a dust-collecting device when sawing wood.
5
Parts & Service: 020 8988 7400 / E-mail: [email protected] or [email protected]
Page 6

19. Guard against electric shock - Avoid body contact with earthed or
grounded surfaces.
20. Extension cables - Before use, inspect the extension cable and replace if
damaged.
21. Avoid unintentional starting. Make sure the switch is in the OFF position
before connecting the machine to the power supply.
22. DO NOT abuse the cable. Never yank the cable to disconnect it from the
mains supply. Keep the cable away from heat, oil, water and sharp edges.
23. This table saw is designed and intended for use by properly trained and
experienced personnel only. If you are not familiar with the proper and
safe operation of a table saw, DO NOT use until proper training and
knowledge have been obtained.
24. Stay alert, watch what you are doing. Use common sense. DO NOT
operate the saw when you are tired or under the influence of drugs,
alcohol or any medication.
25. Keep hands clear of the saw blade.
26. Maintain a balanced stance at all times so that you do not fall on to the
blade. DO NOT overreach or use excessive force to perform any operation.
27. Use push-sticks or push blocks to feed the workpiece past the saw blade.
Keep your hands and fingers well away from the blade.
28. The push-stick should always be stored with the machine when not in use.
29. Pay particular attention to instructions on reducing risk of kickback on
page 9.
30. NEVER perform any operation freehand, which means using only your
hands to support or guide the workpiece. Always use either the fence or
the mitre fence to position and guide the work.
WARNING: FREEHAND CUTTING IS THE MAJOR CAUSE OF KICKBACK AND
FINGER AMPUTATIONS.
31. Give your work undivided attention. Looking around, carrying on a
conversation and “horse-play” are careless acts that can result in serious
injury.
32. When not in use, store the saw in a dry place out of reach of children and
animals.
33. Replace the warning labels if they become obscured or removed.
6
Parts & Service: 020 8988 7400 / E-mail: [email protected] or [email protected]
Page 7

34. Turn off and unplug the saw before cleaning. Use a brush or compressed
air to remove chips or debris — DO NOT use your hands. Eye protection
should be used when using compressed air.
35. Disconnect the saw from the mains supply before changing blades or
carrying out maintenance.
36. Keep blades sharp and clean for better and safer performance. Inspect
power cables periodically and if damaged have them repaired.
37. Repairs should only be carried out by qualified persons using original spare
parts, otherwise this may result in considerable danger to the user.
38. Keep handles dry, clean and free from oil and grease.
39. Unplug the saw - switch off and wait for the blade to come to a complete
standstill before leaving it unattended.
ADDITIONAL SAFETY RULES FOR TABLE SAWS
1. The thickness of the saw blade must be greater than the thickness of the
riving knife.
2. DO NOT stand on the table saw.
3. During transportation make sure that the upper part of the saw blade is
covered by the guard.
4. DO NOT use the guard for handling or transportation.
5. Check that the workpiece is properly supported. Always provide additional
support for long workpieces.
6. DO NOT exert side pressure on the saw blade.
7. Make sure that the blade rotates in the correct direction and that the teeth
are pointing to the front of the saw.
8. DO NOT apply lubricants to the blade when it is running.
9. NEVER reach around or over the saw blade. NEVER reach for a workpiece
until the saw blade has completely stopped.
10. Make sure that the blade and retaining discs are clean. Tighten the
retaining screw securely.
11. Keep the saw blade sharp.
12. Make sure that the riving knife is adjusted to the correct distance from the
blade.
13. NEVER operate the saw without the guard in place.
14. DO NOT use abrasive discs or diamond cutting wheels.
15. Rebating, slotting or grooving is not allowed.
7
Parts & Service: 020 8988 7400 / E-mail: [email protected] or [email protected]
Page 8

16. DO NOT use a moulding head cutter with this saw.
17. Remove the rip fence when crosscutting. NEVER use the rip fence as a cutoff gauge when crosscutting.
18. Knock out any loose knots from the workpiece before you begin to cut.
19. Provide adequate support to the rear and the sides of the saw table for
long or wide workpieces.
20. NEVER leave the saw running unattended. Turn the power off and DO NOT
leave the saw until it comes to a complete stop.
21. Before using the saw on an actual workpiece, let it run for a few moments.
Watch for vibration or wobbling that could indicate poor installation or a
poorly balanced blade.
22. ALWAYS hold work firmly against the mitre gauge or rip fence.
23. NEVER stand or have any part of your body in line with the path of the saw
blade. keep your hands out of the saw blade path.
24. Feed work into the blade against the direction of rotation only.
25. NEVER attempt to free a stalled saw blade without first turning the saw off.
Turn the power switch off immediately to prevent motor damage.
26. Avoid awkward operations and hand positions where a sudden slip could
cause your hand to move into the saw blade.
27. Avoid abrupt, fast feeding. Feed as slowly as possible when cutting hard
workpieces. DO NOT bend or twist the workpiece while feeding. If you stall
or jam the blade in the workpiece, turn the table saw off immediately.
Unplug the saw, then clear the jam.
28. NEVER remove cut-off pieces near the blade or touch the blade guard
while the blade is running.
SAW BLADES
1. The maximum speed of the saw blade must always be equal to or greater
than the no-load speed of the table saw as specified on the rating plate.
2. Only use saw blades recommended by the manufacturer and which are
the exact bore and diameter required for this machine. DO NOT use any
spacers to make a blade fit onto the spindle. Use only the blades specified
in this manual.
3. Clean the spindle, retaining discs (especially the installing surface) and
retaining bolt before installing the blade. Poor installation may cause
vibration/wobbling or slippage of the blade.
4. DO NOT use saw blades which are damaged or deformed.
8
Parts & Service: 020 8988 7400 / E-mail: [email protected] or [email protected]
Page 9

5. Take care that the selection of the saw blade is suitable for the material to
be cut.
6. Make sure the blade is not contacting the riving knife or workpiece before
the switch is turned on.
7. Wear gloves when handling saw blades and rough material. Saw blades
shall be carried in a holder whenever practicable. Take care that gloves
can catch on rotating blades.
KICKBACK
Kickback is a sudden reaction to a pinched, bound or misaligned saw blade,
it causes the workpiece to be ejected from the tool back towards the
operator. Kickbacks can lead to serious personal injury.
You can avoid kickbacks by:
a. Keeping the blade sharp,
b. Keeping the rip fence parallel to the blade,
c. Keeping the riving knife and blade guard in place and operating properly,
d. Not releasing the workpiece until you have pushed it all the way past the
blade,
e. Not ripping a workpiece that is twisted or warped or does not have a
straight edge to guide along the fence.
If you do not have a clear understanding of kickback and how it occurs, DO
NOT use the table saw.
REMAINING HAZARDS
The machine has been built in accordance with recognized safety standards
but some remaining hazards may still exist.
These can be minimized by following the instructions in the operating manual.
9
Parts & Service: 020 8988 7400 / E-mail: [email protected] or [email protected]
Page 10

ELECTRICAL CONNECTIONS
Plug must be BS1363/A approved.
Always fit a 13 Amp fuse.
Ensure that the outer sheath of the cable is firmly held by the clamp
Neutral
(Blue)
Live
(Brown)
WARNING! READ THESE ELECTRICAL SAFETY INSTRUCTIONS
THOROUGHLY BEFORE CONNECTING THE PRODUCT TO THE
MAINS SUPPLY.
Before switching the product on, make sure that the voltage of your electricity
supply is the same as that indicated on the rating plate. This product is
designed to operate on 230VAC 50Hz. Connecting it to any other power
source may cause damage.
This product may be fitted with a non-rewireable plug. If it is necessary to
change the fuse in the plug, the fuse cover must be refitted. If the fuse cover
becomes lost or damaged, the plug must not be used until a suitable
replacement is obtained.
If the plug has to be changed because it is not suitable for your socket, or due to
damage, it should be cut off and a replacement fitted, following the wiring instructions
shown below. The old plug must be disposed of safely, as insertion into a mains socket
could cause an electrical hazard.
WARNING: THE WIRES IN THE POWER CABLE OF THIS PRODUCT ARE
COLOURED IN ACCORDANCE WITH THE FOLLOWING CODE:
BLUE = NEUTRAL BROWN = LIVE
If the colours of the wires in the power cable of this product do not correspond
with the markings on the terminals of your plug, proceed as follows.
•The Blue wire must be connected to the terminal marked N or coloured Black.
•The Brown wire must be connected to the terminal marked L or coloured Red
We strongly recommend that this machine is connected to the mains supply
via a Residual Current Device (RCD)
If in any doubt, consult a qualified electrician. DO NOT attempt any repairs
yourself.
This symbol indicates that this is a Class II product and does not
require an earth connection.
Parts & Service: 020 8988 7400 / E-mail: [email protected] or [email protected]
10
Page 11

COMPONENT OVERVIEW
1 Table extension 9 Tilt adjusting knob
2 Mitre square assembly 10 On/Off switch
3 Blade Guard 11 Dust extract duct
4 Blade 12 Tilt angle scale
5 Parallel Guide Fence assembly 13 Height adjusting handle
6 Work table 14 Stand stabilisers
7 Fence securing handle/clamp 15 Blade removal wrench & key
8 Push stick
11
Parts & Service: 020 8988 7400 / E-mail: [email protected] or [email protected]
Page 12

ASSEMBLY
The following items should be supplied in the carton. If any parts are missing,
do not use your table saw until the missing parts are obtained.
Table Saw Fixings Pack
Parallel Guide Fence assembly Push Stick
Mitre Guide/fence 10” TCT Blade (fitted)
Blade Guard Assembly Hex key
Sliding table extension x 2 Ring spanners (large & small)
Stand components:
4 x legs
4 x Upper crossbars
4 x Lower crossbars
4 x Rubber feet
2 x Stand stabilisers
ASSEMBLING THE STAND
NOTE: The table saw can be operated without the stand if required.
1. Assemble the stand as shown by
joining the cross members to the
legs using the bolts, flat washers,
spring washers and nuts supplied.
• The long cross members are
fitted nearer to the feet.
2. Fit the rubber feet to the legs.
12
Parts & Service: 020 8988 7400 / E-mail: [email protected] or [email protected]
Page 13
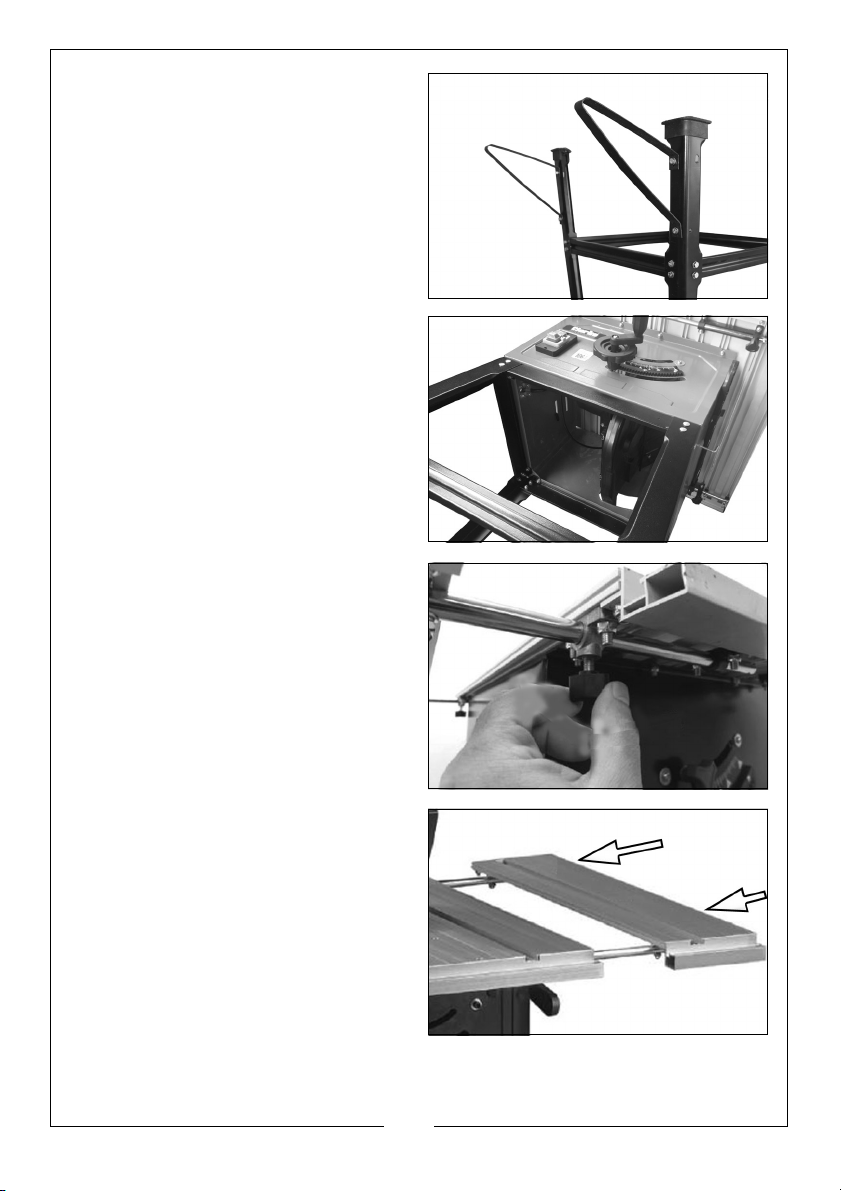
3. Attach the stabilisers to the rear
legs using the bolts, washers and
nuts supplied.
4. Check that all bolts are tightened
and then turn the table saw and
stand over onto the feet.
5. Fit the table saw to the stand.
Secure the assemblies together by
bolting the stand to the base of
the machine.
FITTING THE TABLE EXTENSION
Fit the table extensions by slackening
the wingnuts on each support arm
and sliding both the rods into the
brackets under the table top.
Slide the table extension to the
required position and tighten the
knobs to secure.
13
Parts & Service: 020 8988 7400 / E-mail: [email protected] or [email protected]
Page 14

FITTING THE BLADE GUARD
1. With the blade and riving knife
fitted, fit the blade guard to the
riving knife. Engage the socket in
the guard with the slot in the riving
knife and tighten the screw/
locknut to pinch it to the knife
ensuring it can still move up and
down in use.
FITTING THE MITRE ASSEMBLY
1. Fit the fence to the mitre angle
attachment and secure with the
two thumbscrews. Slide the heads
of the bolts into the channel in the
fence and attach the thumb nuts.
2. Slide the mitre attachment into
the groove in the table top.
FITTING THE PARALLEL FENCE
The parallel fence is essential to
ensure straight line cutting and
should always be used when rip
sawing.
The parallel fence can be mounted
on either side of the table. If you
change the side you will need to fit
the fence the other way round.
1. Engage the parallel fence over
the ends of the table.
2. Use the scale on the table to set the parallel fence to the required distance
from the blade.
3. Lock the parallel fence in the required position by tightening the locking
handle at the end.
The fence may be set at any suitable position on the table to either left or right
of the saw blade.
• Measurement scales (in mm) are provided at the front and back of
the table. These may be used to position the rip fence for rough
cutting. If precision is required, use a ruler between the rip fence and
the front and back of the blade.
14
Parts & Service: 020 8988 7400 / E-mail: [email protected] or [email protected]
Page 15

CONNECTING THE DUST EXTRACT
This table saw is equipped with a dust
extraction port. For safe operation,
we recommend that a suitable dust
extraction device or vacuum cleaner
is connected during operation.
WARNING: EXCESSIVE SAWDUST BUILD UP AROUND THE MOTOR COULD
POSSIBLY IGNITE AND CAUSE DAMAGE TO THE MOTOR, TABLE SAW OR
YOUR WORKSHOP.
15
Parts & Service: 020 8988 7400 / E-mail: [email protected] or [email protected]
Page 16

OPERATION
CAUTION: BEFORE STARTING UP THE SAW ALWAYS CHECK THE
FOLLOWING POINTS:
1. Is the saw blade firmly tightened and can the blade rotate freely?
2. Are all the locking levers firmly locked?
3. Is the riving knife aligned with the saw blade?
4. Is the blade guard fitted?
5. Make sure that the fences are not touching the blade.
6. Are there any wood pieces jammed between the saw blade and
the table?
7. Have all loose workpieces been removed from the table?
8. Have all the setting tools been removed?
9. Wear protective goggles, ear protection and dust mask.
BEFORE STARTING WORK
All covers including the blade cover guard and side cover must be properly
fitted before switching on.
When working with wood that has been used before, take care to remove all
foreign bodies such as nails or screws etc before cutting.
Always stand the table saw on a flat and firm surface.
USE OF THE ON/OFF SWITCH
1. To turn the saw on, press the
green button “I”.
• Wait for the blade to reach its
maximum speed before
making the cut.
2. To turn the saw off again, press
the red button “0”.
NOTE: The blade will spin for several
seconds after the machine is
switched off.
NOTE: The guard must always be lowered over the workpiece before you
begin to cut.
16
Parts & Service: 020 8988 7400 / E-mail: [email protected] or [email protected]
Page 17

ADJUSTMENTS
After every new adjustment, we recommend you to make a trial cut in order
to check the new settings.
PARALLEL FENCE
The parallel fence can be mounted on either side of the table. If you change
the side you will need to fit the fence the other way round.
1. Engage the parallel fence over
the ends of the table.
2. Use the scale on the table to set
the parallel fence to the required
distance from the blade.
3. Lock the parallel fence in the
required position by tightening the
locking handle at the end.
MITRE GAUGE
1. Insert the guide bar into the
groove in the table top.
2. Loosen the knob to set the angle
required.
3. Rotate until the pointer points to
the angle on the scale you want.
4. Retighten the knob.
• If required you can remove the
fence from the mitre assembly
using the 2 locking knobs, or slide it in either direction to suit the task
before re-tightening.
SETTING THE BLADE ANGLE
1. Release the bevel locking handle.
2. Tilt the saw blade and motor
assembly until the saw blade is at
the desired angle.
3. Tighten the bevel lock to lock the
blade at the required angle
shown on the scale.
17
Parts & Service: 020 8988 7400 / E-mail: [email protected] or [email protected]
Page 18

CUTTING TIPS
RIPPING CUTS & CROSS CUTS
Ripping is when you use the saw to cut along the grain of the wood.
The parallel fence must always be used when making ripping cuts.
1. Press one edge of the workpiece
against the parallel fence while
the flat side lies on the saw table.
• The blade guard must always
be lowered over the workpiece
and blade.
• When you make a ripping cut,
never stand in line with the
blade.
2. Set the parallel fence in
accordance with the desired width.
3. Switch on the saw.
4. Place your hands (with fingers
closed) flat on the workpiece and
push the workpiece along the
parallel fence towards the blade.
5. Guide at the side with your left or
right hand (depending on the
position of the parallel fence) only
as far as the front edge of the
guard hood.
6. Always push the workpiece
through to the end of the riving knife using a push stick.
7. Do not remove the offcut piece until the blade has stopped spinning.
8. Secure long workpieces against falling off at the end of the cut (e.g. with a
roller stand etc).
CUTTING NARROW WORKPIECES
Always use a push stick when the workpiece is narrow and for holding the
workpiece flat on the table.
• Take extra care to keep you thumbs away from the saw blade when
feeding the workpiece past the blade.
18
Parts & Service: 020 8988 7400 / E-mail: [email protected] or [email protected]
Page 19

When not in use, store the push stick
in its holder on the side of the
machine.
Replace a damaged push stick
immediately.
MITRE CUTS
1. Slide the mitre gauge into the
groove in the table.
2. Adjust the mitre gauge to the
required angle.
3. Press the workpiece firmly against
the mitre gauge.
4. Switch on the saw.
5. Push the mitre gauge and the
workpiece toward the blade to
make the cut.
IMPORTANT: Always hold the guided part of the workpiece. Never hold the
part which is to be cut off.
6. Push the mitre gauge forward until the workpiece is cut all the way
through.
7. Switch off and do not remove the offcut until the blade has stopped.
BEVEL CUTS
Bevel cuts must always be made using the parallel fence.
1. Undo the bevel lock handle and
set the saw to the desired angle
on the scale.
2. Tighten the bevel handle to lock
the blade at the selected angle.
3. Set the parallel fence.
4. Perform the cut as you would for
a ripping cut.
NOTE: If precision is required, use a
protractor between the blade and table.
19
Parts & Service: 020 8988 7400 / E-mail: [email protected] or [email protected]
Page 20

MAINTENANCE
WARNING: REMOVE THE PLUG FROM THE MAINS POWER SUPPLY BEFORE
CARRYING OUT ANY ADJUSTMENT OR MAINTENANCE.
Your saw has been designed to operate over a long period of time with a
minimum of maintenance. Continuous satisfactory operation depends upon
proper tool care and regular cleaning.
Never use caustic agents to clean plastic parts.
1. Remove dust regularly from the machine. Cleaning is best carried out with
a fine brush.
2. Regularly clean the table top.
3. Regularly clean the dust collection outlet.
4. Use a half-round file where necessary to keep the teeth sharp. A blade that
is badly dulled or with damaged teeth should be replaced immediately.
CHANGING THE BLADE
WARNING: WEAR SAFETY GLOVES WHEN CHANGING THE SAW BLADE.
WARNING: THE REPLACEMENT BLADE MUST BE RATED TO AT LEAST 7000
RPM.
1. Remove the transparent blade
guard.
2. Remove the table cover panel by
unscrewing the three securing
screws.
• The edge furthest from the
blade has a tongue and
groove joint with the table top.
20
Parts & Service: 020 8988 7400 / E-mail: [email protected] or [email protected]
Page 21

3. Using the open spanner and hex
key provided, hold the spindle to
prevent the motor from turning
and undo the saw blade securing
nut (normal thread).
4. Remove the outer retaining disc
followed by the saw blade by
lifting it clear of the motor shaft
and carefully withdrawing it from
above.
5. Replace in reverse order ensuring the saw blade teeth face downwards at
the front of the table.
• The arrow on the face of the blade will show the rotation to be
anticlockwise.
6. Hold the blade firmly when tightening the centre nut, taking care to avoid
injuring your hand on the sharp teeth.
IMPORTANT: Note the running direction. The cutting angle of the teeth must
point in the running direction, i.e. forwards (see arrow on the blade guard).
7. Check that the riving knife lines up with the saw blade.
8. Refit the table insert and the transparent blade guard.
9. Check that all components are properly mounted and in good working
condition before you begin working with the saw again.
21
Parts & Service: 020 8988 7400 / E-mail: [email protected] or [email protected]
Page 22

TROUBLE SHOOTING
Problem Probable cause Solution
Saw will not start 1. Saw not plugged in
2. Fuse blown
3. Power cable damaged
Does not make accurate
O
45
and 90O cuts
Material pinches blade 1. Fence not aligned with
Material binds on the
riving knife
Saw makes unsatisfactory
cuts
Material kicked back
from blade slot
Blade does not tilt freely 1. Sawdust in tilting
Blade does not come up
to speed
Machine vibrates 1. Saw not standing securely
1. Table adjuster not set
correctly
blade.
• Warped wood.
• Edge not set square to
fence.
1. Riving knife not aligned
correctly
1. Dull blade
2. Blade mounted backwards
3. Gum or pitch on blade
4. Incorrect blade for work
5. Gum or pitch on table
causing erratic feed
1. Rip fence out of alignment
2. Riving knife not aligned with
blade
3. Feeding stock without rip
fence
4. Riving knife not in place
5. Letting go of wood before
it is all the way past the saw
blade
6. Dull blade
mechanism
1. Extension cable too long 1. Replace or use shorter
on bench
2. Damaged saw blade
1. Plug in the machine
2. Replace fuse
3. Have cable replaced by
your dealer.
1. Check blade with a set
square and adjust pointer
to zero.
1. Check and adjust fence.
Select another piece of
wood.
2. Select another piece of
wood.
1. Check that riving knife is
correctly aligned with blade
1. Replace blade
2. Turn blade around
3. Remove blade and clean
with turpentine and
coarse steel wool
4. Change the blade
5. Clean table with
turpentine and steel wool
and apply wax
1. Align rip fence with blade
2. Align riving knife with
blade
3. Install and use rip fence
4. Install and use riving knife
with guard
5. Push work fully past blade
before releasing work
6. Replace blade
1. Brush or blow out loose
dust
cable
1. Reposition on flat level
surface
2. Replace blade.
22
Parts & Service: 020 8988 7400 / E-mail: [email protected] or [email protected]
Page 23

DECLARATIONS OF CONFORMITY
23
Parts & Service: 020 8988 7400 / E-mail: [email protected] or [email protected]
Page 24

Page 25

PARTS LIST
No Item No Item No Item
1 Work table assembly 31 Stop nut 61 Stand upright
2 Drive motor 32 Threaded rod 62 Flat washer
3 Blade guard 33 Bevel gear 63 Spring washer
4 Locknut 34 S/t screws 64 Nut
5 Washer 35 Screw rod sleeve 65 Short crossbar
6 Tilting frame 36 Screw,washer & nut 66 Rubber foot
7 Retaining ring 37 Drive Base plate 67 Long lower crossbar
8 Connection plate 38 Handwheel mount 68 Long upper crossbar
9 Socket headed bolt 39 Bracket 69 Switchbox
10 Brake column 40 Blade lifting shaft 70 Grommet
11 Brake spring 41 Blade lifting handle 71 Stop sleeve
12 Riving knife 42 Handle end cap 72 Screw
13 Retaining plate 43 Screw, washer & nut 73 Connecting sheet
14 Hex flange bolt 44 Angle locking knob 74 Nut
15 Saw blade 45 Washer 75 Right angle bracket
16 Outer retaining disc 46 Screw 76 Rack
17 Large washer 47 Pointer needle 77 Screw
18 Socket head screw 48 Machine casing 78 Screw
19 Lower guard 49 Nut 79 On/Off switch
20 Rotating stop plate 50 Open bracket 80 Screw
21 Torsion spring 51 Closed bracket 81 Angle degree label
22 Stop plate stand 52 Screw 82 Screw
23 S/t screw 53 Carriage bolt 83 Washer
24 Washer 54 Pushstick 84 Screw
25 Screw 55 Storage hook 85 Cable gland
26 Inner retaining disc 56 Nut 86 Power cable
27 Blade guard 57 Small spanner 87 Hook
28 Riving knife mount 58 Ring spanner 88 Hex key
29 Spring pad 59 Carriage bolt 89 Winding clip
30 Socket head screw 60 Support arm 90 Screw
25
Parts & Service: 020 8988 7400 / E-mail: [email protected] or [email protected]
Page 26

91 Handle grip 95 Slide bar 99 End block-left
92 Thumbscrew 96 End block 100 Hex screw
93 Screw 97 Endcap-right 101 Mitre base
94 Pointer needle 98 Mitre fence
FENCE COMPONENTS SET A
No Item No Item No Item
1a Phillips s/t screw 9a Flat washer 17a Locknut
2a Washer 10a Side fence 18a Clamp block
3a Pointer 11a Fence end cap LH 19a Tie rod
4a Roll pin 12a Fence end cap RH 20a Washer 4
5a Washer 13a Carriage bolt 21a Flat washer
6a Cam handle 14a Guide fence 22a Spring washer
7a End casting 15a Clamp arm 23a Bolt
8a Knob 16a Spring
TABLE COMPONENTS SET B
No Item No Item No Item
1b Hex screw M6x30 12b Locknut M6 23b Left side plate
2b Connect rod pad 13b Phillips screw M6x20 24b Right side plate
3b Slide rod 14b Hex screw M6x20 25b Hex screw M5x14
4b Washer 6 15b Fixed sheet 26b Hex screw M6x12
5b Spring washer 6 16b Hex screw M6x12 27b Connecting sheet
6b Wingnut M6 17b Long fixing plate 28b LH scale plate cover
7b Fixing plate cover 18b Hex screw M6x14 29b Left scale plate
8b Locknut M6 19b Slide extend table 30b Scale plate
9b Short fixing plate 20b Hex screw M6x12 31b Right scale plate
10b Triangular knob 21b Table - right part 32b RH scale plate cover
11b Slide rod stand 22b Table -left part 33b Cover nut
26
Parts & Service: 020 8988 7400 / E-mail: [email protected] or [email protected]
Page 27

TABLE COMPONENTS SET B
USEFUL ITEMS FROM THE CLARKE CATALOGUE
Refer to the Clarke website www.clarkeinternational.com for a full range of
items for use with this saw. See also the following accessories;
CARS1 Roller Stand Part No: 6500980
CARS 3 in 1 Roller Stand Part No: 6500983
CEWVE1 Vacuum Dust Extractor Part No: 6471168
CVAC20P Vacuum Cleaner Part No: 6471100
27
Parts & Service: 020 8988 7400 / E-mail: [email protected] or [email protected]
Page 28

 Loading...