

Page 1
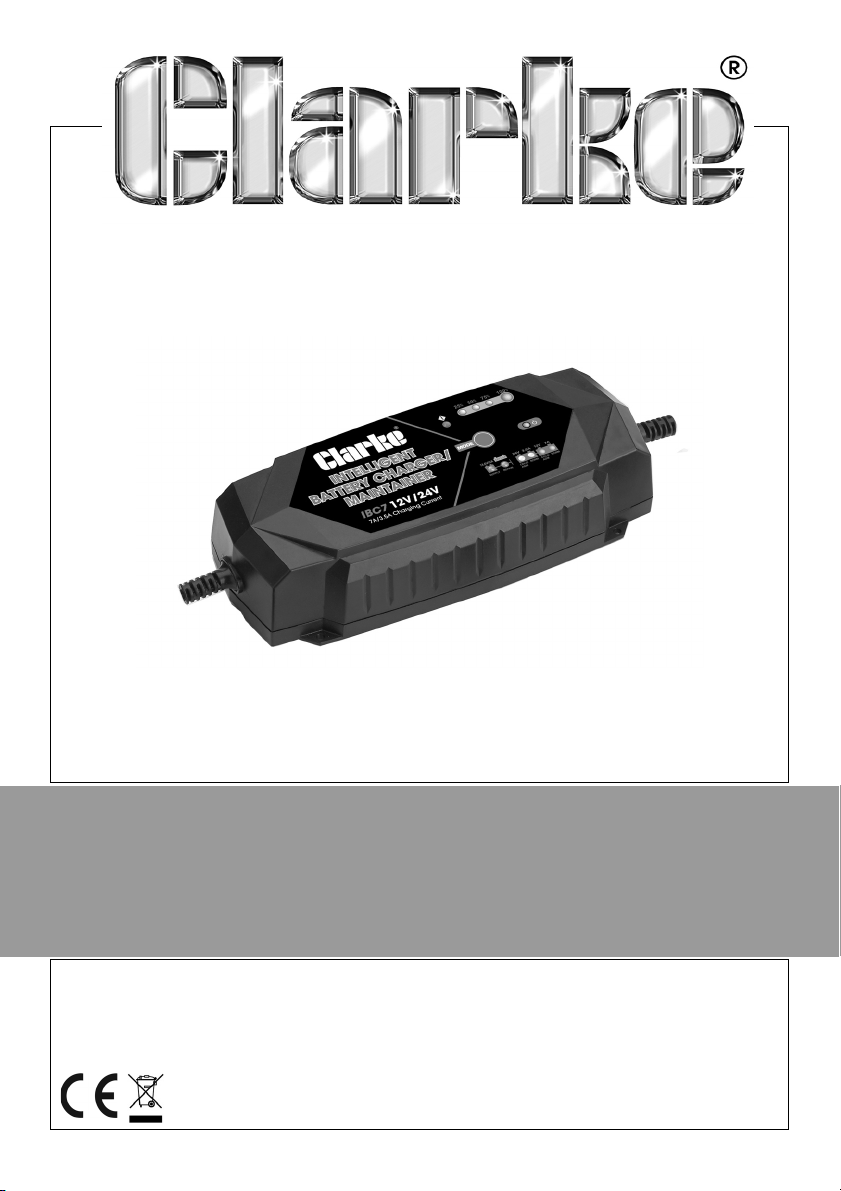
INTELLIGENT BATTERY CHARGER / MAINTAINER
MODEL NO: IBC7
PART NO: 6267008
OPERATION & MAINTENANCE
INSTRUCTIONS
ORIGINAL INSTRUCTIONS GC1020 - ISS 2
Page 2
INTRODUCTION
Thank you for purchasing this CLARKE Battery Charger.
Please read this manual thoroughly, before attempting to operate this
product, and carefully follow all instructions given.
It is vitally important that ALL precautions are taken, as specified, which will not
only provide protection for yourself and that of others around you, but will also
ensure that the Battery Charger will give you long and satisfactory service.
GUARANTEE
This CLARKE product is guaranteed against faulty manufacture for a period of
12 months from the date of purchase. Please keep your receipt as proof of
purchase.
This guarantee is invalid if the product is found to have been abused or
tampered with in any way, or not used for the purpose for which it was
intended.
Faulty goods should be returned to their place of purchase, no product can
be returned to us without prior permission.
This guarantee does not effect your statutory rights.
ENVIRONMENTAL RECYCLING POLICY
Through purchase of this product, the customer is taking on the
obligation to deal with the WEEE in accordance with the WEEE
regulations in relation to the treatment, recycling & recovery and
environmentally sound disposal of the WEEE.
In effect, this means that this product must not be disposed of with general
household waste. It must be disposed of according to the laws governing
Waste Electrical and Electronic Equipment (WEEE) at a recognised disposal
facility.
2
Parts & Service: 020 8988 7400 / E-mail: [email protected] or [email protected]
Page 3
SAFETY PRECAUTIONS
WARNING: ALWAYS SWITCH OFF THE CHARGER WHEN CONNECTING OR
DISCONNECTING LEADS TO AVOID SPARKING AS HIGHLY INFLAMMABLE
HYDROGEN GAS IS RELEASED IN THE PROCESS OF BATTERY CHARGING
PLEASE READ BEFORE USING THIS UNIT
1. Battery acid is highly corrosive. If spillage occurs, wipe off immediately and
wash copiously with water. Particularly avoid contact with the eyes, but if
this occurs, you must seek medical advice.
2. Before charging ensure the battery terminals are clean and that the cells
are filled with electrolyte to the correct level by adding distilled water
where necessary.
3. This product is not intended for use by persons with reduced physical,
sensory or mental capabilities or lack of experience and knowledge.
4. Children must not play with the charger.
5. Do not expose this charger to rain.
6. Never touch the negative and positive leads together.
7. Never attempt any repairs yourself. If you have a problem with your
charger contact your local Clarke dealer or contact
[email protected]
8. When charging is completed, ensure that the vehicle battery leads are
secured to the proper terminals which should be clean, and lightly
smeared with petroleum jelly to prevent corrosion. Finally, re-check the
electrolyte level.
WARNING: CERTAIN TYPES OF SEALED OR MAINTENANCE-FREE BATTERIES
NEED EXTRA CARE WHEN CHARGING. PLEASE CONSULT THE BATTERY
MANUFACTURERS INSTRUCTIONS BEFORE USING THIS UNIT.
WARNING: SINCE TOXIC FUMES MAY BE RELEASED DURING BATTERY
CHARGING, ONLY USE THIS UNIT IN A WELL VENTILATED AREA.
3
Parts & Service: 020 8988 7400 / E-mail: [email protected] or [email protected]
Page 4
ELECTRICAL CONNECTIONS
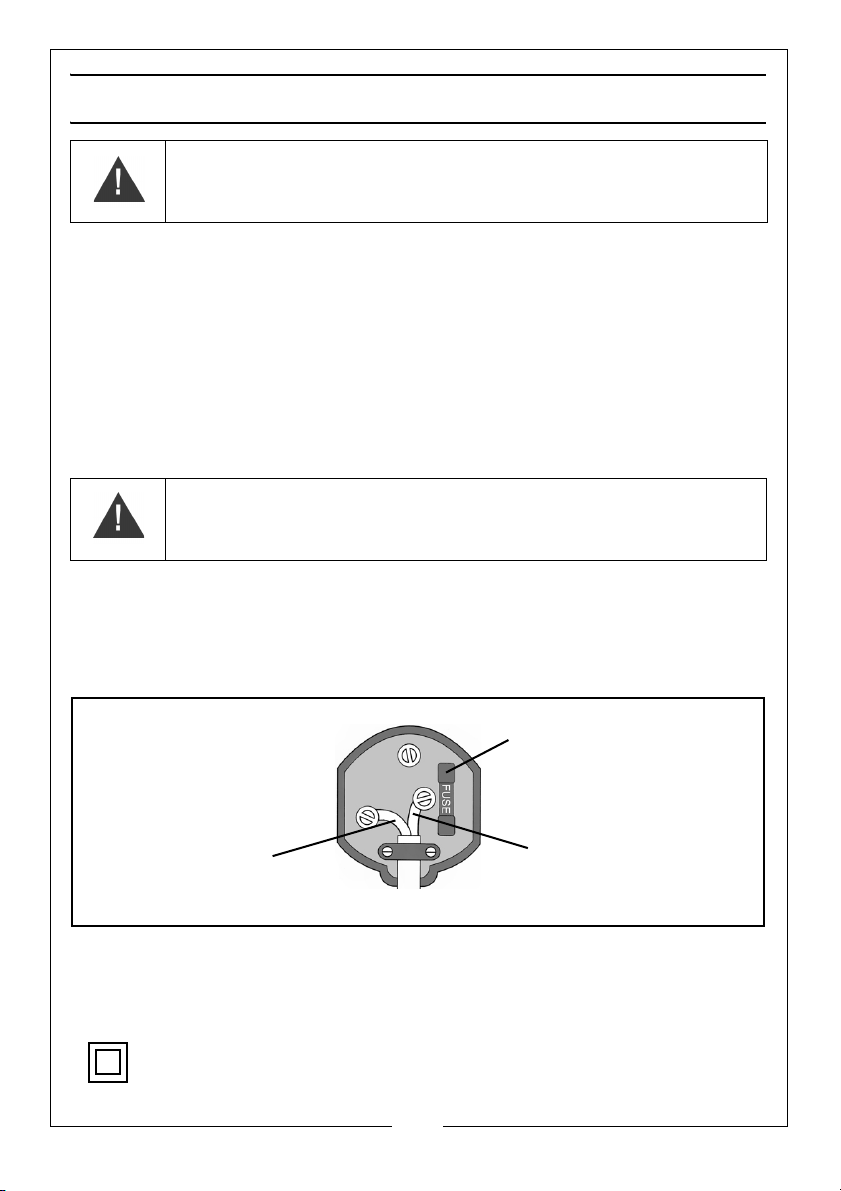
Plug must be BS1363/A approved.
Always fit a 5 Amp fuse.
Ensure that the outer sheath of the cable is firmly held by the clamp
Neutral
(Blue)
Live
(Brown)
WARNING! READ THESE ELECTRICAL SAFETY INSTRUCTIONS
THOROUGHLY BEFORE CONNECTING THE PRODUCT TO THE
MAINS SUPPLY.
Before switching the product on, make sure that the voltage of your electricity supply is
the same as that indicated on the rating plate. This product is designed to operate on
230VAC 50Hz. Connecting it to any other power source may cause damage.
This product may be fitted with a non-rewireable plug. If it is necessary to change the
fuse in the plug, the fuse cover must be refitted. If the fuse cover becomes lost or
damaged, the plug must not be used until a suitable replacement is obtained.
If the plug has to be changed because it is not suitable for your socket, or due to
damage, it should be cut off and a replacement fitted, following the wiring instructions
shown below. The old plug must be disposed of safely, as insertion into a mains socket
could cause an electrical hazard.
WARNING! THE WIRES IN THE POWER CABLE OF THIS PRODUCT
ARE COLOURED IN ACCORDANCE WITH THE FOLLOWING CODE:
Blue = Neutral Brown = Live
If the colours of the wires in the power cable of this product do not correspond with the
markings on the terminals of your plug, proceed as follows.
•The Blue wire must be connected to the terminal marked N or coloured Black.
•The Brown wire must be connected to the terminal marked L or coloured Red.
We strongly recommend that this machine is connected to the mains supply
via a Residual Current Device (RCD)
If in any doubt, consult a qualified electrician. DO NOT attempt any repairs
yourself.
This symbol indicates that this is a Class II product, and does not require
an earth connection.
Parts & Service: 020 8988 7400 / E-mail: [email protected] or [email protected]
4
Page 5
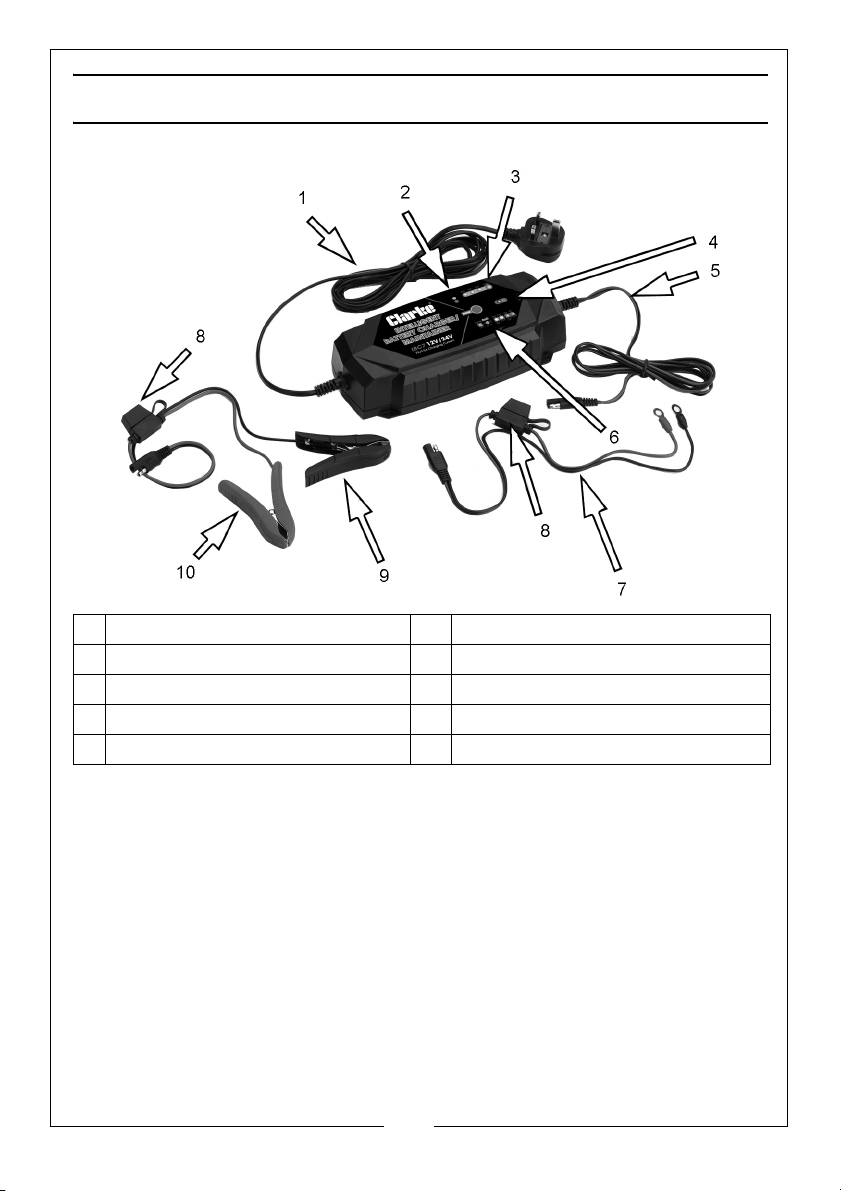
OVERVIEW
1 Mains power lead/plug 6 Charging Mode Indicator
2 Error LED 7 Output leads (eyelet connectors)
3 Charge Status LEDs 25-100% 8 Fuse Holder (15 Amp blade fuse)
4 Standby LED 9 Charging lead negative clamp
5 Output (charging) lead 10 Charging lead positive clamp
CHARACTERISTICS
The IBC7 is designed for charging all types of 12V/24V lead-acid batteries
including WET (flooded), GEL, MF (Maintenance Free), EFB (Enhanced flooded
battery), and AGM (Absorbed Glass Mat) batteries. It is suitable for charging
battery capacities from 14 to 200 Amp-Hours (12V) / 14 to 100 Amp-Hours
(24V) and maintaining all battery sizes.
The in-built microprocessor provides fast and safe charging using its safety
features to protect against sparking, reversed polarity, short circuit,
overcurrent, overcharge and over heating.
The CHARGE indicator LED will be on during charging until completion. If the
charger remains connected, it will automatically switch from full charging to
Maintenance status to maintain the batteries during periods of storage.
5
Parts & Service: 020 8988 7400 / E-mail: [email protected] or [email protected]
Page 6
WALL MOUNTING
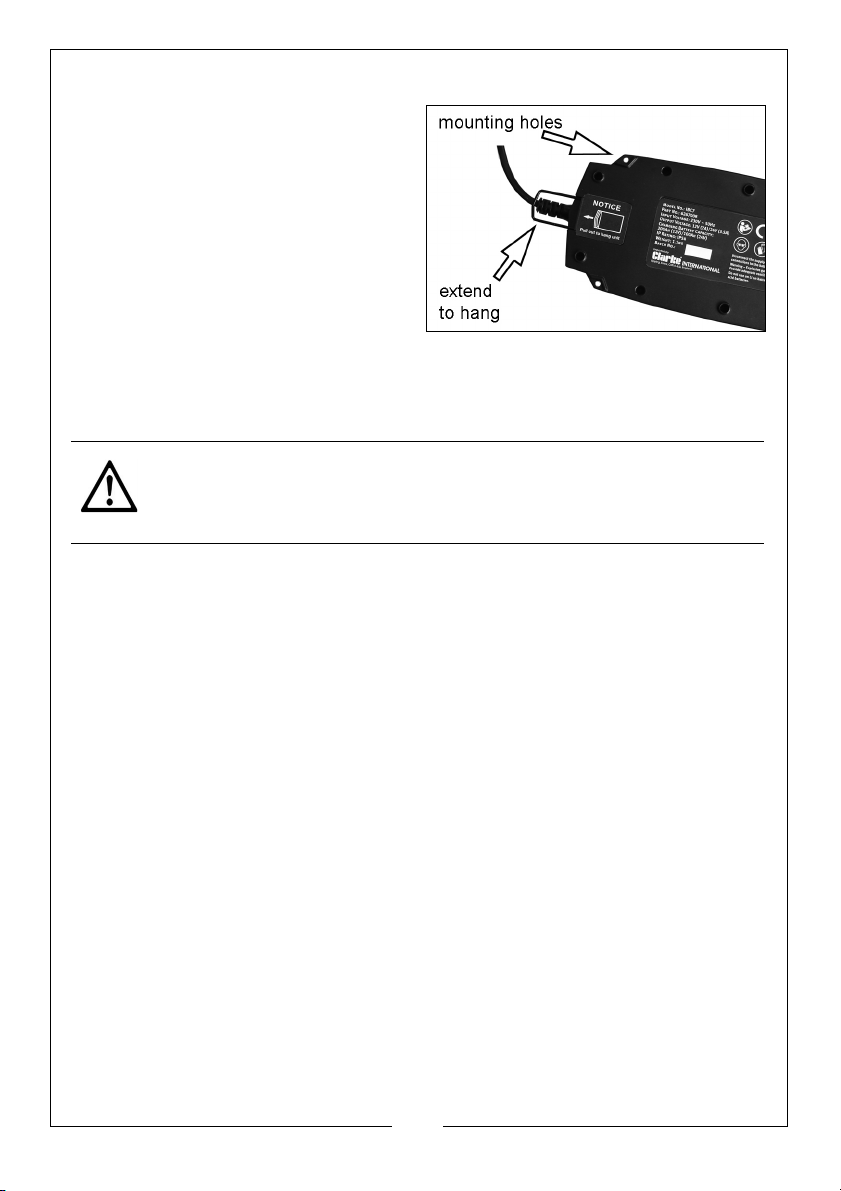
The IBC7 has four external holes for
mounting. Mount the charger in the
desired location with M3 self-tapping
screws. Make sure there are no
obstructions behind the mounting
surface.
It is important to consider the distance
of the charger mounting from the
vehicle battery location. The DC
cable length from the charger, with
either the battery clamp or the eyelet
terminal connectors is approximately 75 inches (1900 mm).
Alternatively the charger can be hung from a hook or peg by extending the
loop shown.
CAUTION: DO NOT HANG THE UNIT FROM THE POWER LEAD.
6
Parts & Service: 020 8988 7400 / E-mail: [email protected] or [email protected]
Page 7

PREPARATION
1. If necessary, remove the battery from a vehicle to charge it.
2. Always remove the grounded terminal from the battery first.
3. Ensure all accessories in the vehicle are switched off to prevent sparking.
4. Clean the battery terminals. Be careful to keep any corrosive matter from
coming in contact with eyes.
5. Where possible, add distilled water to each cell until the battery acid
reaches the level specified by the battery manufacturer. This helps remove
unwanted gas from the cell. Do not overfill. For a battery without cell caps,
follow the manufacturer's instructions.
6. Study all the battery manufacturer's specified precautions: for example,
removing or not removing cell caps while being charged, and
recommended rates of charge.
7. Refer to the vehicle manual to find the voltage of the battery and make
sure that the output is set to the correct voltage.
8. If the charger has adjustable charge rate, charge the battery initially at the
lowest rate.
CHARGER LOCATION
1. Place the charger as far away from the battery as possible.
2. Do not position the charger above the battery during the charging
procedure. Gases from the battery will corrode and damage the charger.
3. Do not let battery acid drip on the charger when reading a hydrometer for
specific gravity or when you fill the battery.
4. Do not use the charger in an enclosed space with reduced airflow.
CONNECTING TO A BATTERY
WARNING: A SPARK NEAR THE BATTERY MAY CAUSE BATTERY EXPLOSION.
TO REDUCE THE RISK OF A SPARK NEAR THE BATTERY:
• Turn off the charger before you connect/disconnect the DC
output clips.
• Do not let the clamps touch each other.
• Attach the clamps to the battery terminals and make sure that
you get a good connection.
7
Parts & Service: 020 8988 7400 / E-mail: [email protected] or [email protected]
Page 8

WHEN THE BATTERY IS INSTALLED IN THE VEHICLE
1. Route the leads carefully to reduce the risk of damage by the bonnet,
door, or engine parts.
2. Keep away from the fan blades, belts, pulleys, and other parts that can
cause injury.
3. Check the polarity of the battery posts.
4. Refer to the vehicle manual to find out if the vehicle has a Negative or
Positive earth.
• For negative earth vehicles, connect the POSITIVE (RED) lead from the
battery charger to the POSITIVE terminal on the battery. Connect the
NEGATIVE (BLACK) lead to the vehicle chassis, engine block or suitable
earthing point away from the battery. Do not connect the lead to the
carburettor, (if fitted) fuel lines, or sheet metal body parts.
• For positive earth vehicles, (very rare today) connect the NEGATIVE
(BLACK) lead from the battery charger to the NEGATIVE terminal on the
battery. Connect the POSITIVE (RED) lead to the vehicle chassis or
engine block away from the battery. Do not connect the lead to the
carburettor (if used) fuel lines, or sheet metal body parts.
NOTE: If the battery clamps are reversed, the ERROR LED will be on.
5. When charging is completed, switch off the charger and disconnect the
plug from the power supply. Remove the lead from the vehicle chassis,
and then remove the leads from the battery.
WHEN THE BATTERY HAS BEEN REMOVED FROM THE VEHICLE
1. Make sure that you know the polarity of the battery posts.
2. Connect the POSITIVE (RED) lead to the POSITIVE post on the battery.
3. Reach over and connect the NEGATIVE (BLACK) lead at arms length to the
NEGATIVE post on the battery.
4. When charging is completed, switch off the charger and disconnect the
plug from the power supply. When you disconnect the charger from the
battery always do it in the opposite order to the sequence of connection
and break the first connection at arms length from the battery.
NOTE: A marine (boat) battery must be removed and charged on shore. To
charge it on board requires equipment specially designed for marine
use.
8
Parts & Service: 020 8988 7400 / E-mail: [email protected] or [email protected]
Page 9
THE CHARGING PROCESS
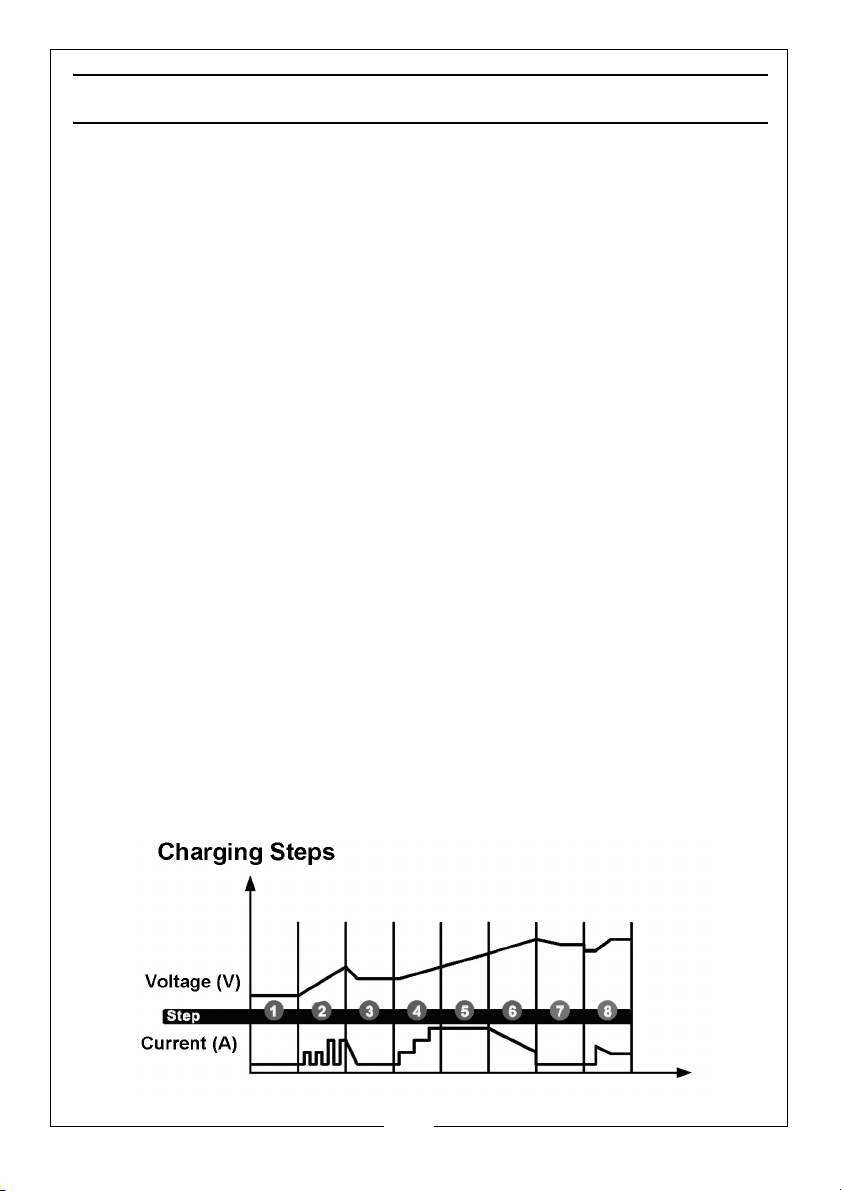
The IBC7 has a sophisticated computer system that performs a 7 - stage
automatic charging cycle as follows:
STEP 1: DIAGNOSIS
Checks that the battery has connected with the charger and also checks the
battery voltage.
STEP 2: DESULPHATION
If battery voltage is too low, this step automatically generates a pulsing
current to remove sulphate.
STEP 3: ANALYSE
Checks if the battery voltage reaches the threshold after desulphation and
charging begins if the battery voltage is OK.
STEP 4: SOFT START
Charges with constant current.
STEP 5: BULK
Charges with constant maximum current until battery voltage has reached
the threshold.
STEP6: ABSORPTION
A gradually declining current charge for maximum battery voltage.
STEP 7: ANALYSE
Testing if the battery can hold a charge
STEP 8: MAINTENANCE
Continuously monitors the battery and charging current and will intelligently
adapt to the variable battery voltage.
9
Parts & Service: 020 8988 7400 / E-mail: [email protected] or [email protected]
Page 10

CHARGING SETTINGS
The IBC7 has the following selectable charging settings:
MODE EXPLANATION
In Standby mode, the charger is not charging or providing any
STANDBY
12V
NORM
12V
COLD/
AGM
24V
NORM
24V
COLD/
AGM
power to the battery. Energy Save is activated during this mode,
drawing microscopic power from the electrical outlet. When
selected, a green LED will illuminate.
NO POWER
For charging 12-volt Wet Cell, Gel Cell, Enhanced Flooded,
Maintenance-Free and Calcium batteries. When selected, a
green LED will illuminate.
For charging 12-volt batteries in cold temperatures below 50
o
C) or AGM batteries. When selected a green LED will
(10
illuminate.
For charging 24-volt Wet Cell, Gel Cell, Enhanced Flooded,
Maintenance-Free and Calcium batteries. When selected, a blue
LED will illuminate.
For charging 24-volt batteries in cold temperatures below 50
o
C) or AGM batteries.
(10
When selected a blue LED will illuminate.
o
F
o
F
An advanced battery recovery mode for repairing idle,
12V/24V
REPAIR
damaged, stratified or sulfated batteries.
When selected a yellow LED and green (12V) or Blue (24V) LED will
illuminate. (16.5V/1.5A)
Converts to a DC power supply for powering any 12V DC device
13.6V
SUPPLY
such as a tire inflator, oil changer or as a memory retainer when
replacing a battery. When selected, a yellow LED will illuminate.
(13.6V/5A)
10
Parts & Service: 020 8988 7400 / E-mail: [email protected] or [email protected]
Page 11
USING THE 12V/24V REPAIR MODE
12V/24V Repair is an advanced battery recovery mode for repairing idle,
damaged, stratified or sulfated batteries. Not all batteries can be recovered.
Batteries tend to become damaged if kept at a low charge and/or never
given the opportunity to receive a full charge. The most common battery
problems are battery sulfation and stratification. Both battery sulfation and
stratification will artificially raise the open circuit voltage of the battery,
causing the battery to appear fully charged, while providing low capacity.
Use 12V/4V Repair in attempt to reverse these problems. For optimal results,
take the battery through a full charge cycle, bringing the battery to full
charge before using this mode.
12V/24V Repair can take up to eight hours to complete the recovery process
and will return to Standby when completed.
CAUTION: USE THIS MODE WITH CARE. THIS MODE IS FOR 12/24 VOLT
LEAD-ACID BATTERIES ONLY. THIS MODE USES A HIGH CHARGING
VOLTAGE AND MAY CAUSE SOME WATER LOSS IN WET (FLOODED) CELL
BATTERIES. BE ADVISED, SOME BATTERIES AND ELECTRONICS MAY BE
SENSITIVE TO HIGH CHARGING VOLTAGES. TO MINIMIZE RISKS TO
ELECTRONICS, DISCONNECT THE BATTERY BEFORE USING THIS MODE.
USING THE 13.6V SUPPLY
The 13.6V Supply converts the charger to a constant current, constant voltage
DC power supply. It can be used to power 12VDC devices, including; tire
inflators, oil changers, coffee pots, seat heaters and more. As a power supply,
it can also be used to retain a vehicle's on-board computer settings during
battery repair or replacement. The 13.6V Supply provides 13.6-volts at 5A with
overload protection at 6A (Max).
CAUTION: PRIOR TO USE, READ YOUR 12VDC DEVICE MANUAL TO
DETERMINE IF IT IS SUITABLE FOR USE WITH THIS MODE. BOTH THE SPARK
PROOF AND REVERSE POLARITY SAFETY FEATURES ARE DISABLED IN THIS
MODE. DO NOT ALLOW THE POSITIVE AND NEGATIVE BATTERY CLAMP
OR EYELET TERMINAL CONNECTORS TO TOUCH OR CONNECT TO EACH
OTHER AS THE CHARGER COULD GENERATE SPARKS. CHECK THE
POLARITY OF THE BATTERY TERMINALS BEFORE USING THIS MODE
11
Parts & Service: 020 8988 7400 / E-mail: [email protected] or [email protected]
Page 12
OPERATION
TO START CHARGING THE BATTERY
1. Verify the voltage and chemistry of the battery.
2. Confirm that the battery clamps are correctly connected or eyelet
connectors secure and that the power plug is plugged into a power outlet.
3. All LEDs will flash once after starting and will go into the last memory mode
automatically after 10 seconds.
4. Press the mode button to toggle to the appropriate charge mode (press
and hold for three seconds to enter an advanced charge mode) for the
voltage and chemistry of your battery.
5. The mode LED will illuminate the selected charge mode and the Charge
LEDs will illuminate (depending on the health of the battery) indicating the
charging process has started.
6. When connected, the battery charger can stay in place, providing
continuous charging.
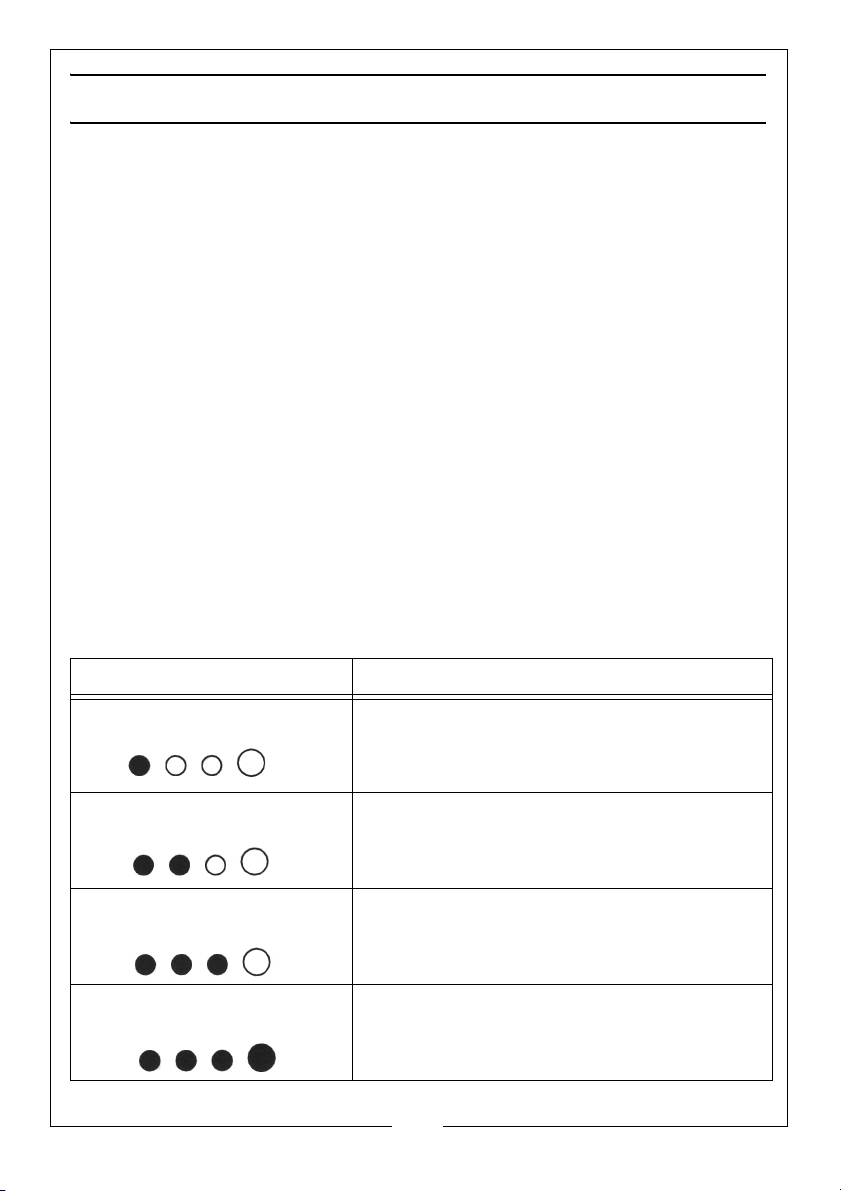
UNDERSTANDING THE CHARGE LEDS
The charger has four Charge LEDs - 25%, 50%, 75% and 100% which indicate
the connected battery state of charge as shown below.
LED E
The 25% Charge LED (red) will flash when the
25% 50% 75% 100%
25% 50% 75% 100%
25% 50% 75% 100%
25% 50% 75% 100%
Parts & Service: 020 8988 7400 / E-mail: [email protected] or [email protected]
battery is less than 25% charged.
When the battery is 25% charged, the charge
LED remains on.
The 50% Charge LED (red) will flash when the
battery is less than 50% charged.
When the battery is 50% charged, the charge
LED remains on.
The 75% Charge LED (red) will flash when the
battery is less than 75% charged.
When the battery is 75% charged, the charge
LED remains on.
The 100% Charge LED (green) will flash when
the battery is less than 100% charged.
When the battery is 100% charged, the charge
LEDs will switch off.
12
XPLANATION
Page 13

UNDERSTANDING ADVANCED DIAGNOSTICS
When the ERROR LED warning is flashing it denotes a potential error condition.
Only use the charger after correcting the error. If the cause is not apparent,
consult a qualified person such as your Clarke dealer.
The following error warnings can occur.
1. Battery is not connected.
2. Battery voltage is too low.
3. Reverse polarity.
4. Overload.
CHARGING TIME DURATION
Different battery capacity, residual voltage and charging current will all affect
charging time.
The following table is for guidance in the case of a fully discharged battery.
• when discharging a 12V lead-acid battery to 9V, with 5A discharge
current:
• when discharging a 24V lead acid battery to 18V with 10A discharge
current.
B
ATTERY SIZE/
H
A
APPROXIMATE TIME TO CHARGE
IN HOURS (12V)
A
PPROXIMATE TIME TO CHARGE
IN HOURS (24V)
Switch off the charger and disconnect the mains plug from the power socket.
Remove the leads from the battery and store them safely with the charger.
After the full charging cycle, use the battery to start the vehicle’s engine. If the
engine does not start (excluding a defect with the vehicle its-self), it indicates
this battery has declined any storage capacity and needs to be replaced.
13
Parts & Service: 020 8988 7400 / E-mail: [email protected] or [email protected]
Page 14
CARE & MAINTANENCE
This battery charger requires minimal maintenance. As with any appliance or
tool, a few common sense rules will prolong its working life.
WARNING: ALWAYS BE SURE THE CHARGER IS UNPLUGGED BEFORE
PERFORMING ANY MAINTENANCE OR CLEANING. ANY REPAIRS MUST BE
DONE BY A QUALIFIED SERVICE TECHNICIAN.
1. Wind up the leads when not in use. Examine the leads at regular intervals
for damage and have them replaced if necessary.
2. Clean the case and leads if necessary with a moist cloth and clean any
corrosion from the clamps with a solution of water and baking soda.
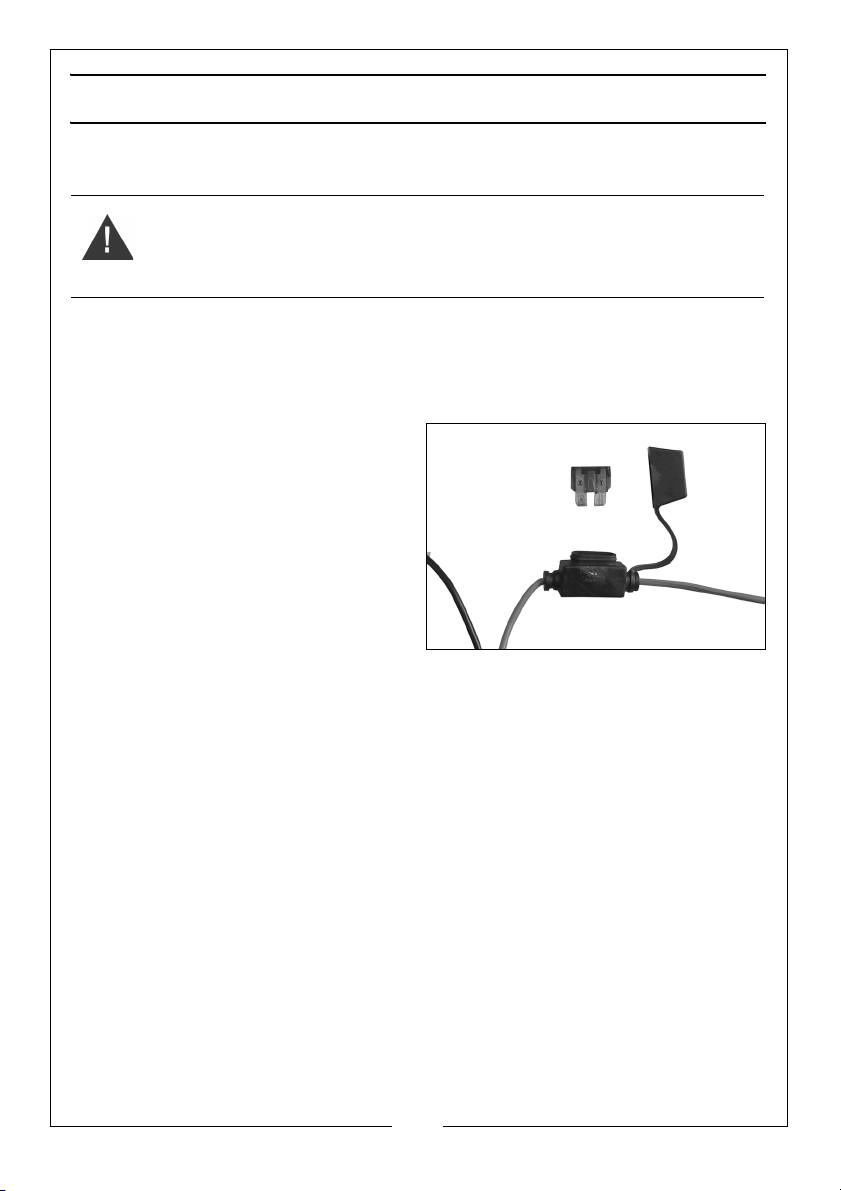
3. Both the output cables (eyelet or
crocodile clip) are fitted with a
fuse as protection against short
circuit when connecting to the
battery.
4. Lift the cap and pull out the blown
fuse.
• Replacement 15 amp blade
fuses are available from motor
factors.
14
Parts & Service: 020 8988 7400 / E-mail: [email protected] or [email protected]
Page 15
TROUBLESHOOTING
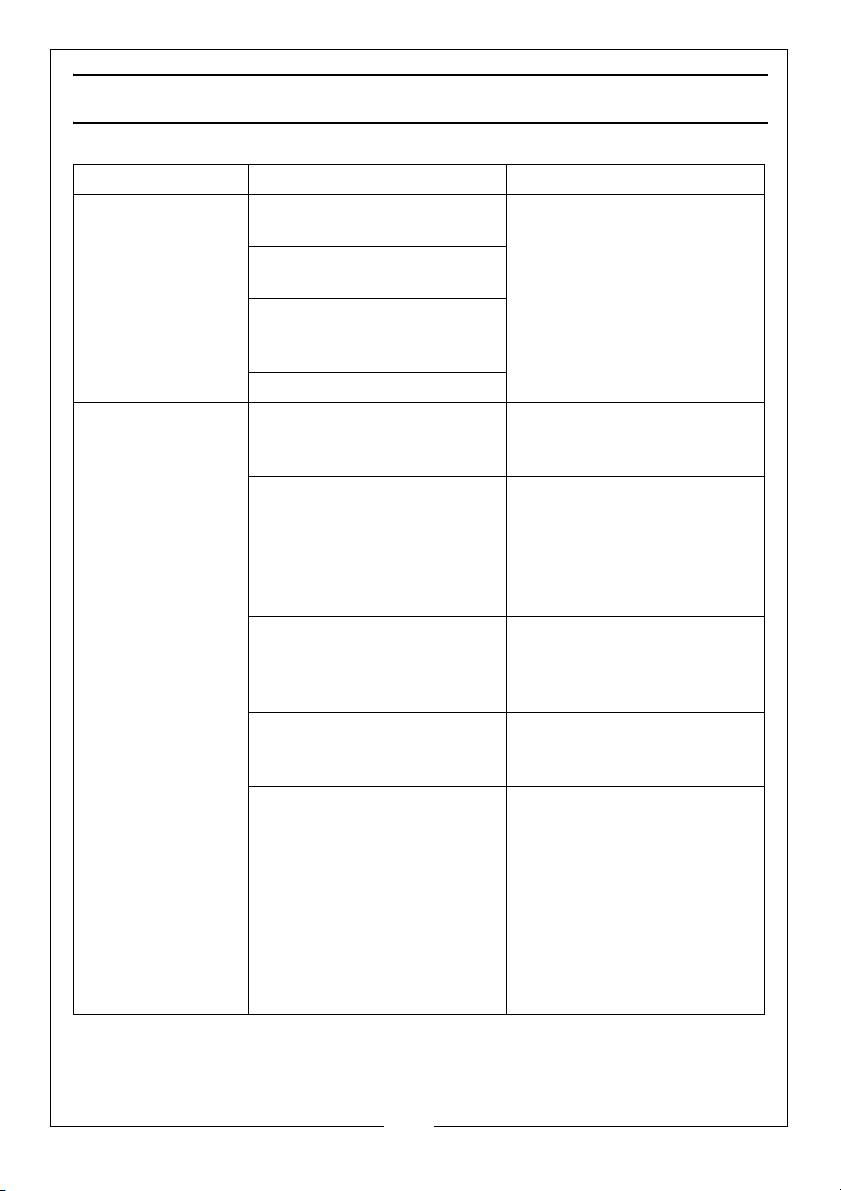
Problem Cause Solution
ERROR light flashes Battery not connected or
open circuit
The battery voltage is to low
to accept a charge.
The battery is wrongly
connected (reverse
polarity)
Overload
Battery does not
charge
Lack of AC input power. Make sure that the charger
Faulty connections to
battery terminals.
Wrong charge voltage
selection.
Battery voltage too low. Ensure enough charging
Charging a very cold
battery.
Connect battery correctly.
If unsuccessful have the
battery tested by a
qualified technician.
is plugged into AC outlet
and the POWER LED is lit.
Unplug the charger and
check the battery
connection; ensure that
there is a good connection
at the battery terminal/post
and/or vehicle chassis.
Check that the correct
charge voltage was
selected for the battery
being charged.
time was allowed to charge
battery.
If the battery being
charged is extremely cold, it
will not accept a high rate
of charge, so the initial
charge rate will be slow.
The rate of charger will
increase as the battery
warms up.
Never attempt to charge a
frozen battery.
15
Parts & Service: 020 8988 7400 / E-mail: [email protected] or [email protected]
Page 16
COMPONENT PARTS
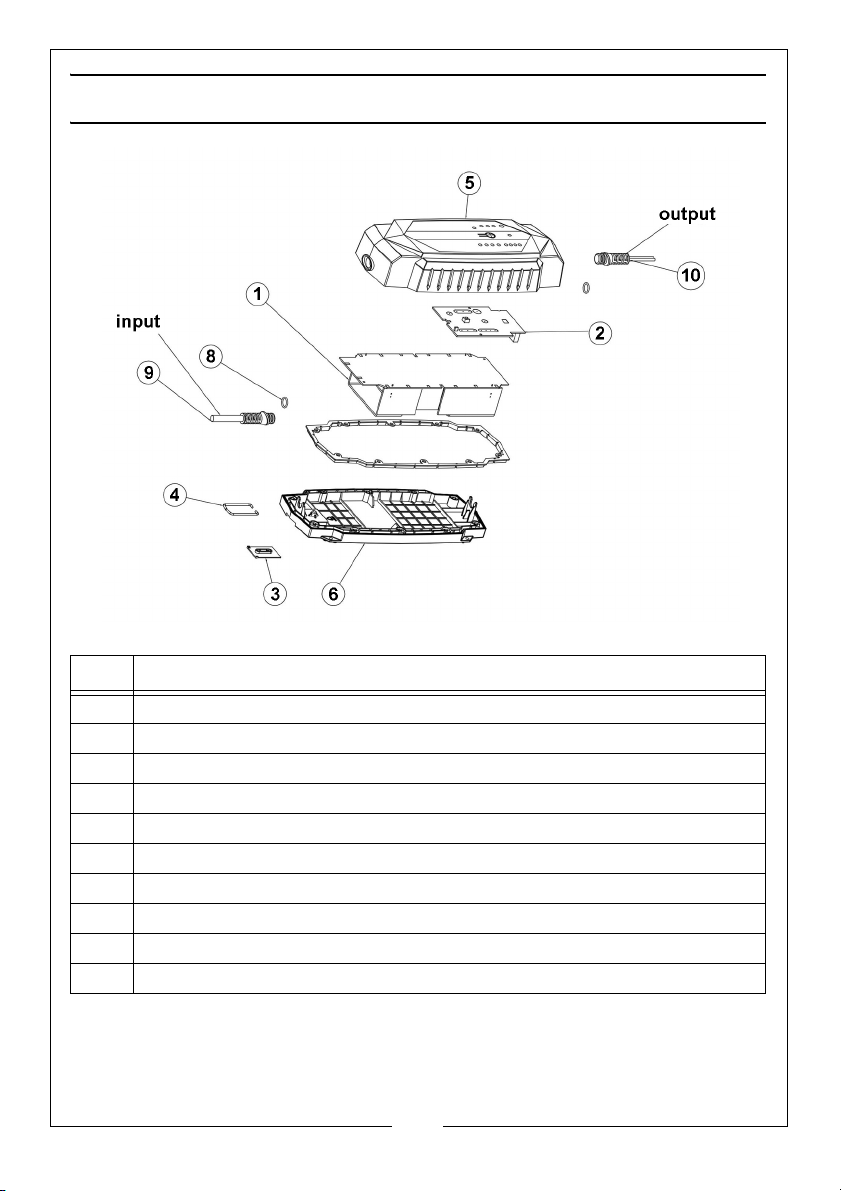
NO DESCRIPTION
1PCB-A
2PCB-B
3 CT7000 clamp
4 CT7000 steel hanging hook
5 CT7000 top shell
6 CT7000 bottom shell
7 CT7000 Sealing ring
80-ring
9Input cable
10 Outlet cable
16
Parts & Service: 020 8988 7400 / E-mail: [email protected] or [email protected]
Page 17
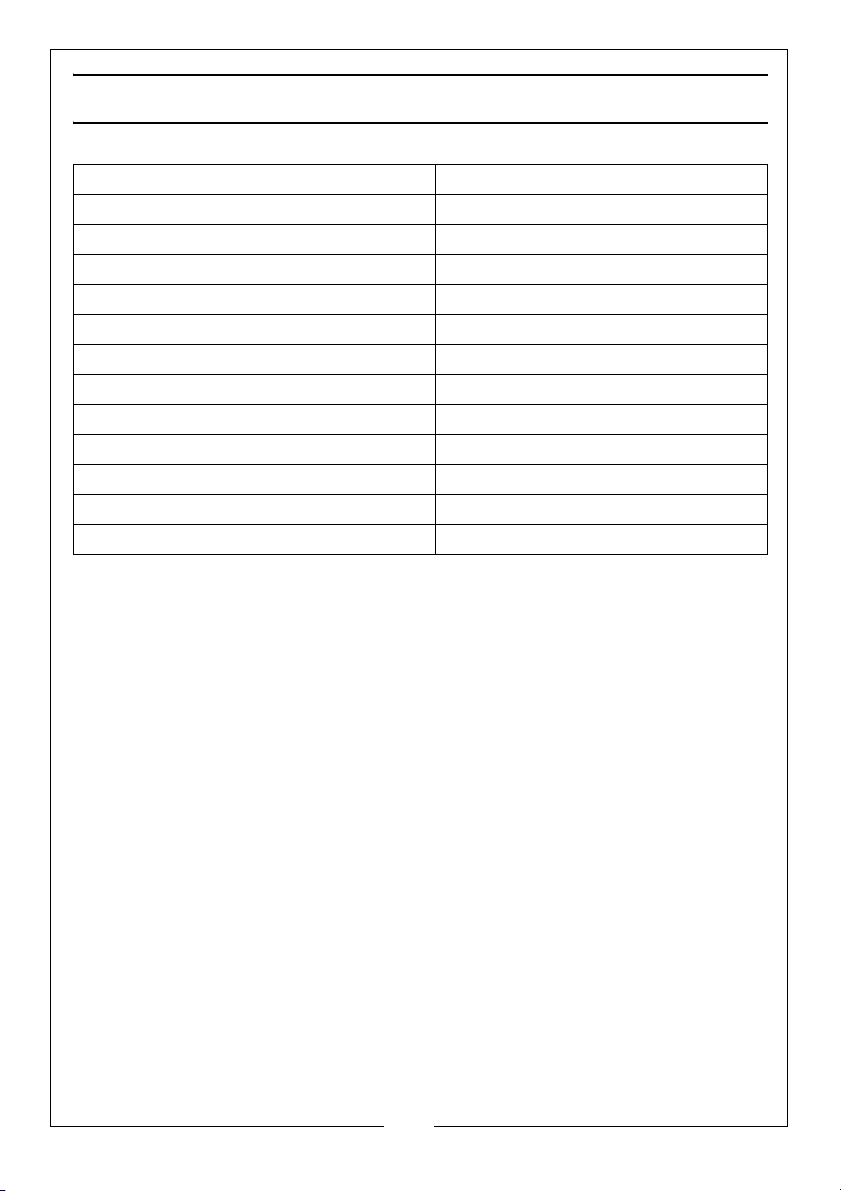
SPECIFICATIONS
Model Number IBC7
Input voltage / Current 220-240V, 50Hz, 1A
Battery charging voltages: 12V and 24V
Power Max 120W
Output current 7A (12V), 3.5A (24V)
Charging steps 8 steps, (smart charger)
Charging Battery Capacity 14-200 Ah (12V), 14-100 Ah (24V)
IP Rating IP54
Operating Temperature Range -10 to 40°C
Dimensions (D x W x H) 300 x 106 x 61 mm
Supply cable length 2900 mm
Charging lead length (Black and Red) 1900 mm
Weight 1.09 kg
17
Parts & Service: 020 8988 7400 / E-mail: [email protected] or [email protected]
Page 18
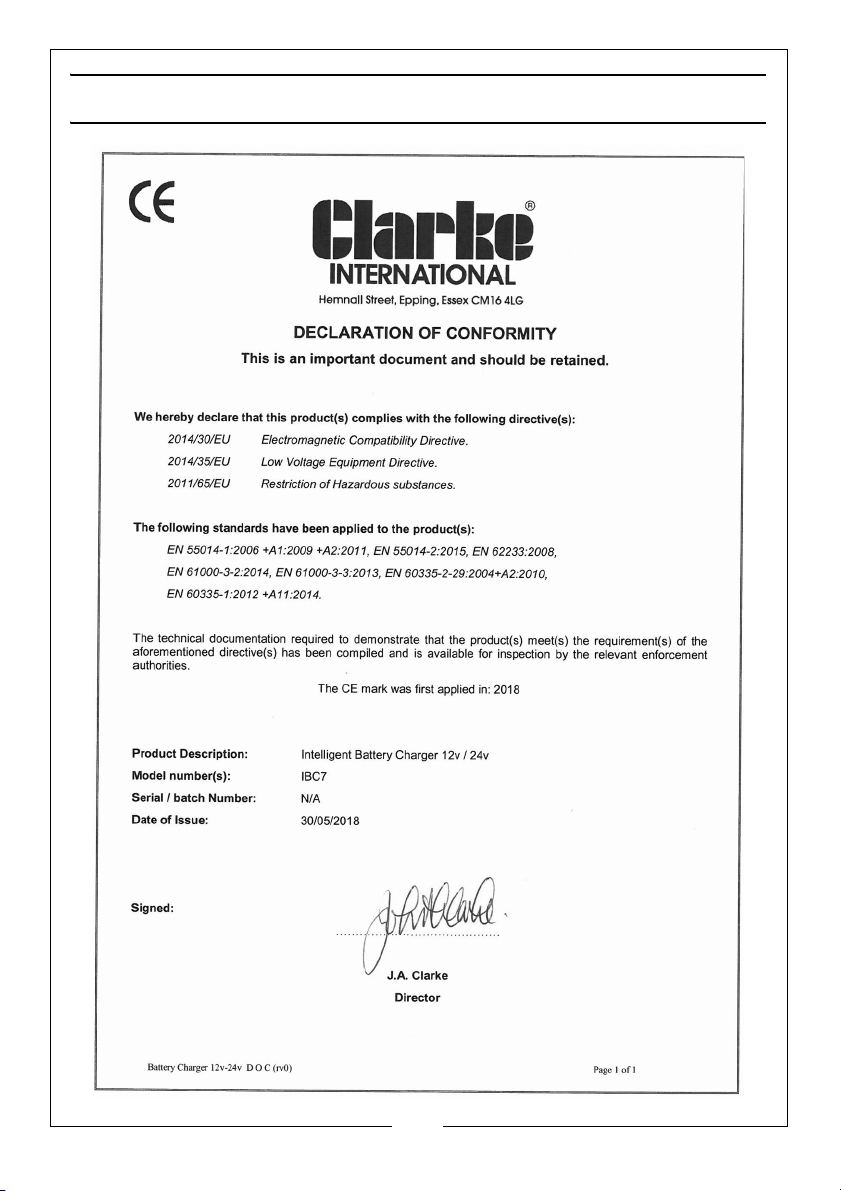
DECLARATION OF CONFORMITY
18
Parts & Service: 020 8988 7400 / E-mail: [email protected] or [email protected]
Page 19

NOTES
__________________________________________________________________________
__________________________________________________________________________
__________________________________________________________________________
__________________________________________________________________________
__________________________________________________________________________
__________________________________________________________________________
__________________________________________________________________________
__________________________________________________________________________
__________________________________________________________________________
__________________________________________________________________________
__________________________________________________________________________
__________________________________________________________________________
__________________________________________________________________________
19
Parts & Service: 020 8988 7400 / E-mail: [email protected] or [email protected]
Page 20

 Loading...