

Page 1
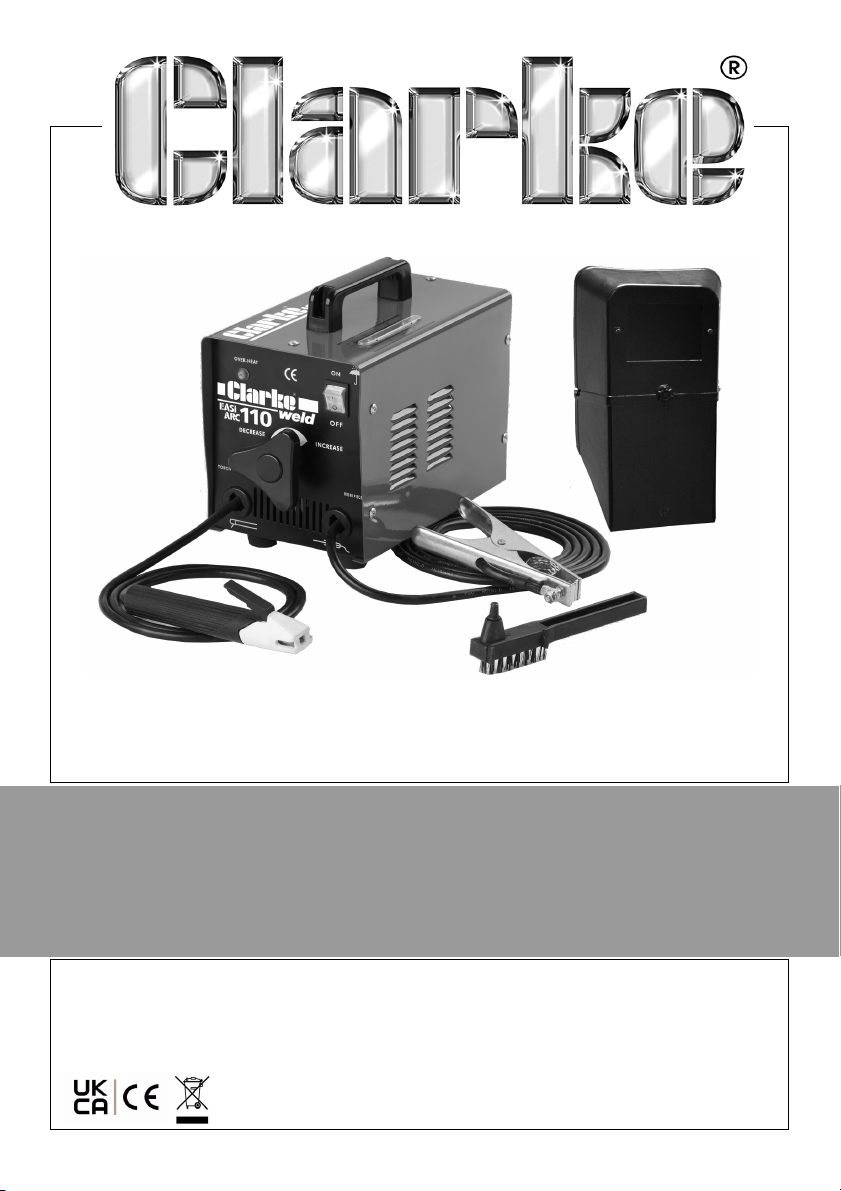
WARNING: Read these instructions before using the machine
WARNING: The welding headshield must be worn during use
100 AMP ARC WELDER
MODEL NO: EASIARC 110
PART NO: 6010942
OPERATION & MAINTENANCE
INSTRUCTIONS
ORIGINAL INSTRUCTIONS GC0122 rev 8
Page 2
INTRODUCTION
Thank you for purchasing this CLARKE Welder.
Before attempting to operate the machine, it is essential that you read this
manual thoroughly and carefully follow all instructions given. In doing so you
will ensure the safety of yourself and that of others around you, and you can
also look forward to the welder giving you long and satisfactory service.
GUARANTEE
This CLARKE product is guaranteed against faulty manufacture for a period of
12 months from the date of purchase. Please keep your receipt as proof of
purchase.
This guarantee is invalid if the product is found to have been abused or
tampered with in any way, or not used for the purpose for which it was
intended.
Faulty goods should be returned to their place of purchase, no product can
be returned to us without prior permission.
This guarantee does not effect your statutory rights.
ENVIRONMENTAL RECYCLING POLICY
Through purchase of this product, the customer is taking on the
obligation to deal with the WEEE in accordance with the WEEE
regulations in relation to the treatment, recycling & recovery and
environmentally sound disposal of the WEEE.
In effect, this means that this product must not be disposed of with general
household waste. It must be disposed of according to the laws governing
Waste Electrical and Electronic Equipment (WEEE) at a recognised disposal
facility.
2
Parts & Service: 020 8988 7400 / E-mail: [email protected] or [email protected]
Page 3

GENERAL SAFETY INSTRUCTIONS
WARNING: WHEN USING ELECTRICAL TOOLS, BASIC SAFETY
PRECAUTIONS SHOULD ALWAYS BE FOLLOWED TO REDUCE THE RISK OF
FIRE, ELECTRIC SHOCK AND PERSONAL INJURY.
WARNING: READ ALL THESE INSTRUCTIONS BEFORE ATTEMPTING TO
OPERATE THIS PRODUCT AND KEEP THESE INSTRUCTIONS IN A SAFE PLACE.
ELECTRIC SHOCK
• Remove the plug from the socket
and wait 5 minutes to allow the
capacitors to discharge before
carrying out servicing or
maintenance.
• Do not touch live electrical parts.
• Never use electrode holders or
cables which are damaged.
• Keep the working environment,
equipment, cables and clothing
free from grease, oil, moisture and
dirt.
• Ensure the welding machine has
been correctly earthed.
• The operator must be insulated
from the floor and work bench,
using a dry insulation mat.
• Always ensure a second person is
present in case of accident.
• Never change electrodes with
bare hands or damp gloves.
• Keep welding cables away from
power cables.
• Regularly inspect the condition of
the cables for signs of damage.
• Remove the plug from the mains
socket when not in use, do not
leave the machine unattended.
• Ensure the earth clamp is secured
to bare metal adjacent to the weld
seam, and when not in use, is
Parts & Service: 020 8988 7400 / E-mail: [email protected] or [email protected]
insulated for safety. - Keep all
equipment well maintained.
• The operator shall prevent gas
cylinders in the vicinity of the
workpiece from becoming part of
the welding circuit.
FUMES & GASES
• The welding process generates
hazardous fumes as a by-product.
Inhalation of these fumes is
hazardous to health.
• Keep your head away from the
weld to avoid breathing the fumes.
• If welding in confined spaces,
ensure adequate ventilation and
use a fume extractor.
• By-products of welding can react
to create a toxic/explosive
environment.
FIRE OR EXPLOSION
Welding can cause fire and
explosions. Precautions should be
taken to prevent these hazards.
• Before starting work ensure the
area is clear of flammable
materials.
• Move any combustible materials to
a safe distance, especially
substances likely to generate a
dangerous vapour.
3
Page 4

• The welding arc can cause serious
burns. Avoid contact with the skin.
• Sparks and molten metal are
ejected during welding. Take
precautions to prevent fire.
• Sparks and molten metal can pass
through gaps. Be aware that fire
can start out of sight.
• Do not weld pressurised containers.
or containers containing
flammable vapours e.g. fuel tanks.
• Always have appropriate fire
fighting equipment to hand
suitable for use in electrical
environments.
• Avoid carrying any fuels with you
e.g. cigarette lighters or matches.
PERSONAL PROTECTION
• The body should be protected by
suitable clothing.
• The use of neck protection may be
necessary against reflected
radiation.
• Arc welding machines generate a
magnetic field which is detrimental
to pacemakers. Consult your
doctor before going near active
welding equipment/operations.
• The UV and IR radiation generated
by welding is highly damaging to
the eyes, causing burns. This can
also affect the skin.
• Always use a suitable welding
shield equipped with appropriate
protective filters.
• Where there are pedestrians and
traffic, ensure a protective screen is
used to avoid accidental arc glare.
• Do not weld in the vicinity of
children or animals and ensure no
one is looking before striking an
arc.
• Wear hearing protection if
required.
• Allow the weld time to cool. Hot
metal should never be handled
without gloves
• Take care when adjusting or
maintaining the torch, make sure it
has had time to cool sufficiently
and the welder is disconnected
from the mains supply.
• First aid facilities and a qualified first
aid person should be available
unless medical facilities are close
by, for immediate treatment of
flash burns of the eyes and for skin
burns.
• A hard hat should be worn when
others are working overhead.
• Flammable hair sprays/gels should
not be used by persons intending
to weld or cut.
PROTECTIVE CLOTHING
• Wear gauntlet gloves designed for
use in welding,
• Wear an apron, and protective
shoes.
• Wear cuffless trousers to avoid
entry of sparks and slag.
• Avoid oily, greasy clothing.
• Protective head and shoulder
coverings should be worn when
overhead welding.
4
Parts & Service: 020 8988 7400 / E-mail: [email protected] or [email protected]
Page 5
• Wear a welding headsheild with
appropriate filter lenses or plates
(protected by clear glass). This is a
MUST for welding (and chipping) to
protect the eyes from radiant
energy and splatter. Replace cover
glass when broken, pitted, or
splattered.
NOTE: ALL protective wear inc. masks
& head shields MUST comply with PPE
Directive 89/686/EEC
ADDITIONAL SAFETY PRECAUTIONS
FOR ARC WELDERS
• NEVER attempt to remove any of
the exterior panels unless the
machine is disconnected from the
supply.
• NEVER use the machine with any of
the panels removed.
• NEVER attempt any electrical or
mechanical repair unless your are
a qualified technician. If you have
a problem with the machine
contact your local CLARKE dealer.
• NEVER use or store in a wet/damp
environment. DO NOT EXPOSE TO
RAIN.
• NEVER allow children or animals in
the vicinity of a welding operation.
• ALWAYS remove all flammable
materials from the welding area.
• ALWAYS ensure that there is full free
air circulating around the outer
casing of the machine, and that
the louvres are unobstructed.
• Welding arc can seriously damage
your eyes. Both the operator and
any spectators should always use a
proper welding face shield or
helmet, with suitable filter lenses.
Proper gloves and working clothes
should be worn at all times.
• ALWAYS wear a pair of safety
spectacles/goggles when
chipping away slag after welding,.
Remember, ordinary eye glasses
are not safety gasses.
• ALWAYS ensure there is adequate
ventilation or extraction in the work
area, as the welding process gives
off toxic fumes.
• ALWAYS ensure there is a fire
extinguisher on hand.
• ALWAYS ensure that a medical
supply is on hand, and that
treatment for burns is available
SAFETY SYMBOLS
General Warning,
indicates that failing to
follow these instruction
could result in injury or
damage to the machine.
sorted, taken to a recycling centre
and disposed of in a manner which is
compatible with the environment.
5
Parts & Service: 020 8988 7400 / E-mail: [email protected] or [email protected]
Recycle unwanted
materials instead of
disposing of them as
waste. All tools,
accessories and
packaging should be
Page 6
ELECTRICAL CONNECTIONS
WARNING: READ THESE ELECTRICAL SAFETY INSTRUCTIONS
THOROUGHLY BEFORE CONNECTING THE PRODUCT TO THE SUPPLY.
WARNING: NEVER FIT A STANDARD 230V, 13AMP (BS1363) PLUG TO
THESE MACHINES
Connect the mains lead to a suitably fused 230 Volt (50Hz) electrical supply.
The fuse rating should be suitable to the current drawn by this unit, see the
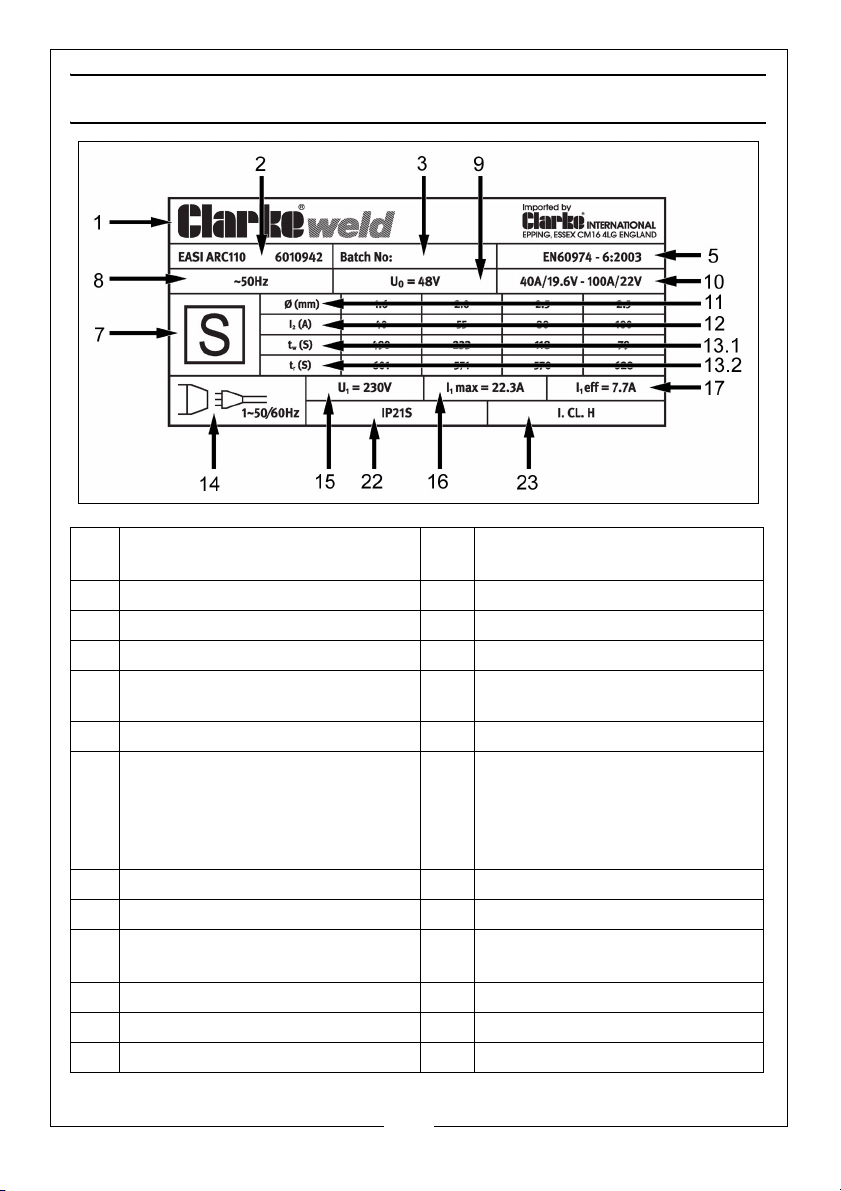
rating plate for details. For a full explanation of the rating plate, see page 13.
WARNING: THE WIRES IN THE POWER CABLE OF THIS PRODUCT ARE
COLOURED IN ACCORDANCE WITH THE FOLLOWING CODE:
BLUE = NEUTRAL BROWN = LIVE YELLOW AND GREEN = EARTH
If the colours of the wires in the power cable of this product do not correspond
with the markings on the terminals of your plug, proceed as follows.
• The wire which is coloured Blue must be connected to the terminal
which is marked N or coloured Black.
• The wire which is coloured Brown must be connected to the terminal
which is marked L or coloured Red.
• The wire which is coloured Yellow and Green must be connected to
the terminal which is marked E or or coloured Green.
6
Page 7
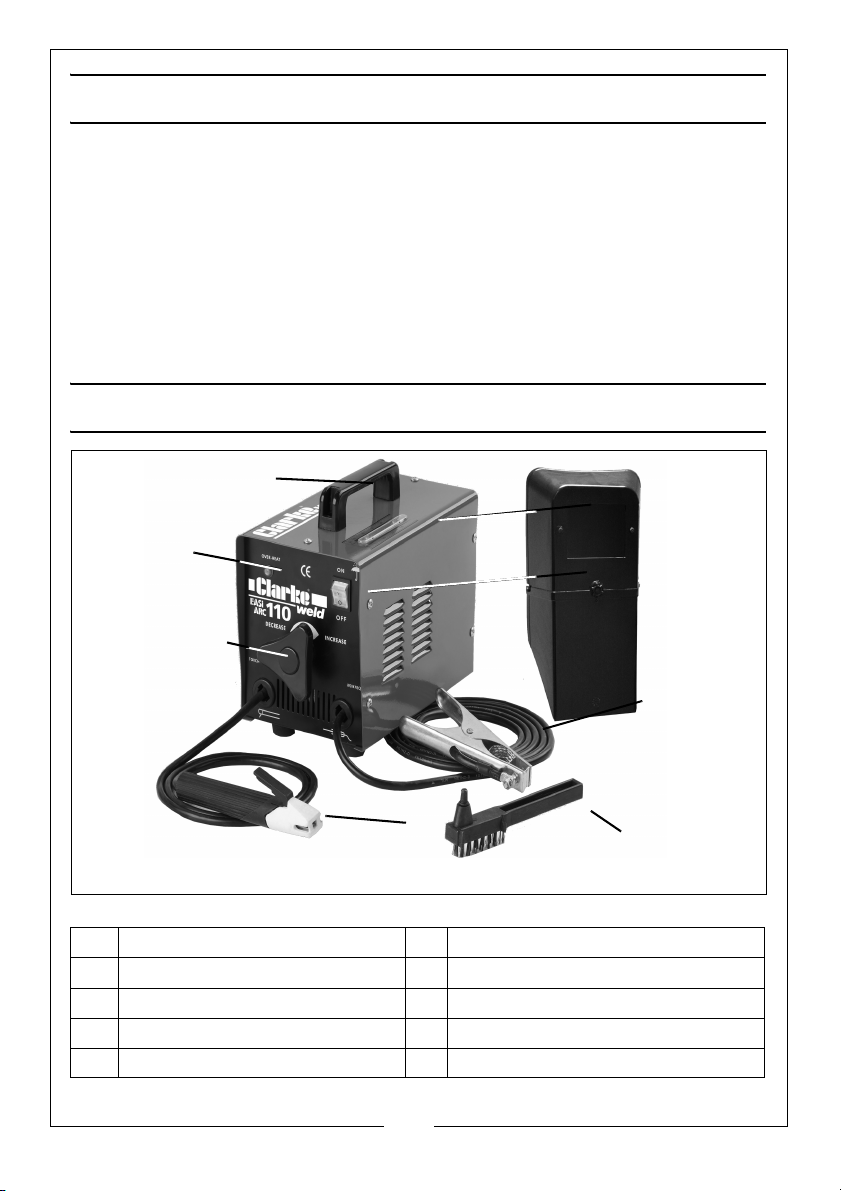
UNPACKING
7
8
1
2
3
4
5
6
Any damage or deficiency should be reported to your CLARKE dealer
immediately.
The components include the following:
• 1 x 100 Amp AC Arc Welder
• 1 x Combination Wire Brush & Hammer
• 1 x Clarke Instruction Manual
• 1 x Headsheild
OVERVIEW
NO DESCRIPTION NO DESCRIPTION
1 Handle 5 Welding Current Scale
2 Overload Indicator 6 On/Off Switch
3 Welding Current Dial 7 Earth Clamp
4 Welding Rod (Electrode) Holder 8 Combination Wire Brush & Hammer
Parts & Service: 020 8988 7400 / E-mail: [email protected] or [email protected]
7
Page 8
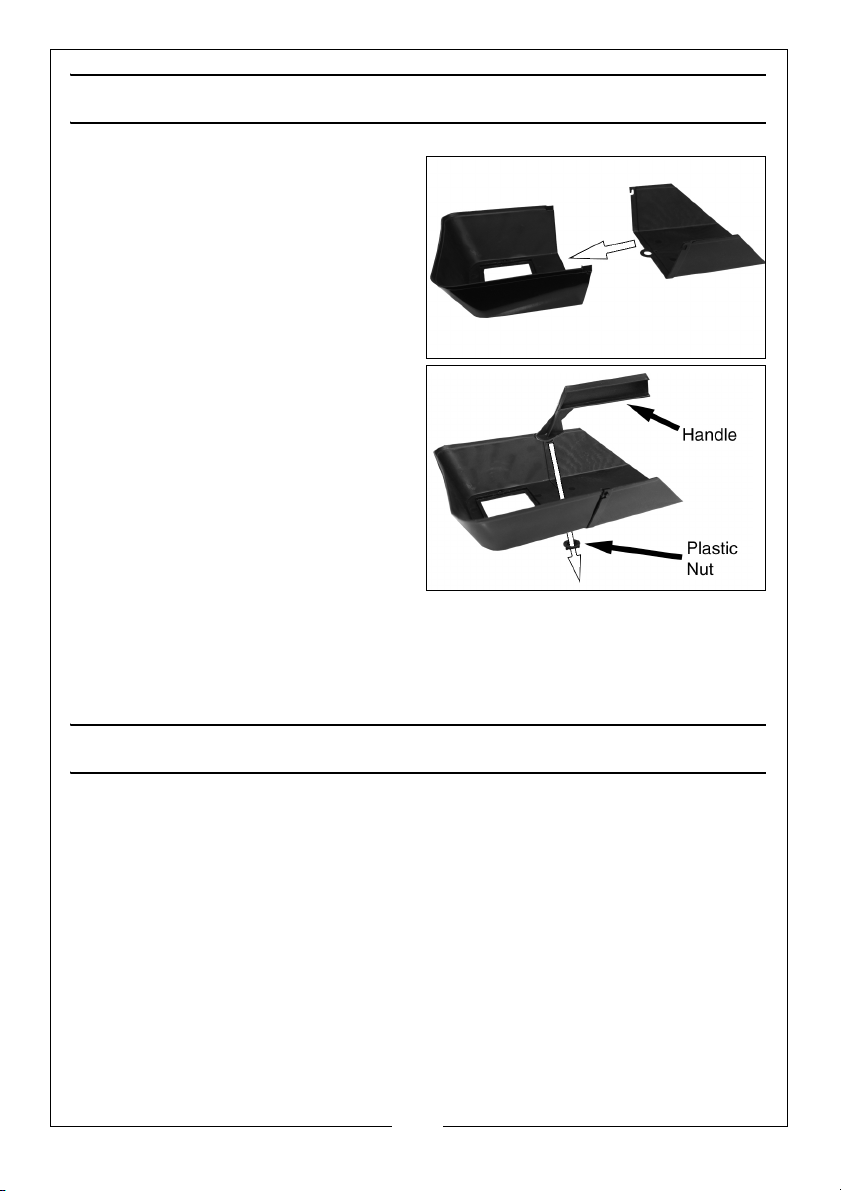
THE WELDING SHIELD
1. Push the two halves of the shield
together as shown, making sure
the hooks and pins on the side
engage correctly.
2. Place the handle into position
and secure using the plastic nut
provided.
3. Working from the inside of the
shield, insert the clear glass panel
into the recess in the shield,
followed by the dark glass panel.
• The clear glass must be inserted
first.
4. Insert the two plastic screws to
clamp the glass panels from the
inside of the mask.
When replacing the glass panels,
only use parts supplied by Clarke International. The dark panel is a certified,
specific optical class, and should not be exchanged for any other type.
The clear glass panel should be replaced when it becomes badly pitted.
PREPARATION FOR USE
FITTING THE WELDING ROD
1. Select the appropriate welding rod, and insert it into the welding rod
holder.
• It should be approximately the same thickness as the workpieces
being welded.
PREPARING THE WORKPIECE
The area being welded should be perfectly clean. Any coating, plating or
corrosion must be removed, otherwise a good weld will be impossible to
achieve.
8
Parts & Service: 020 8988 7400 / E-mail: [email protected] or [email protected]
Page 9
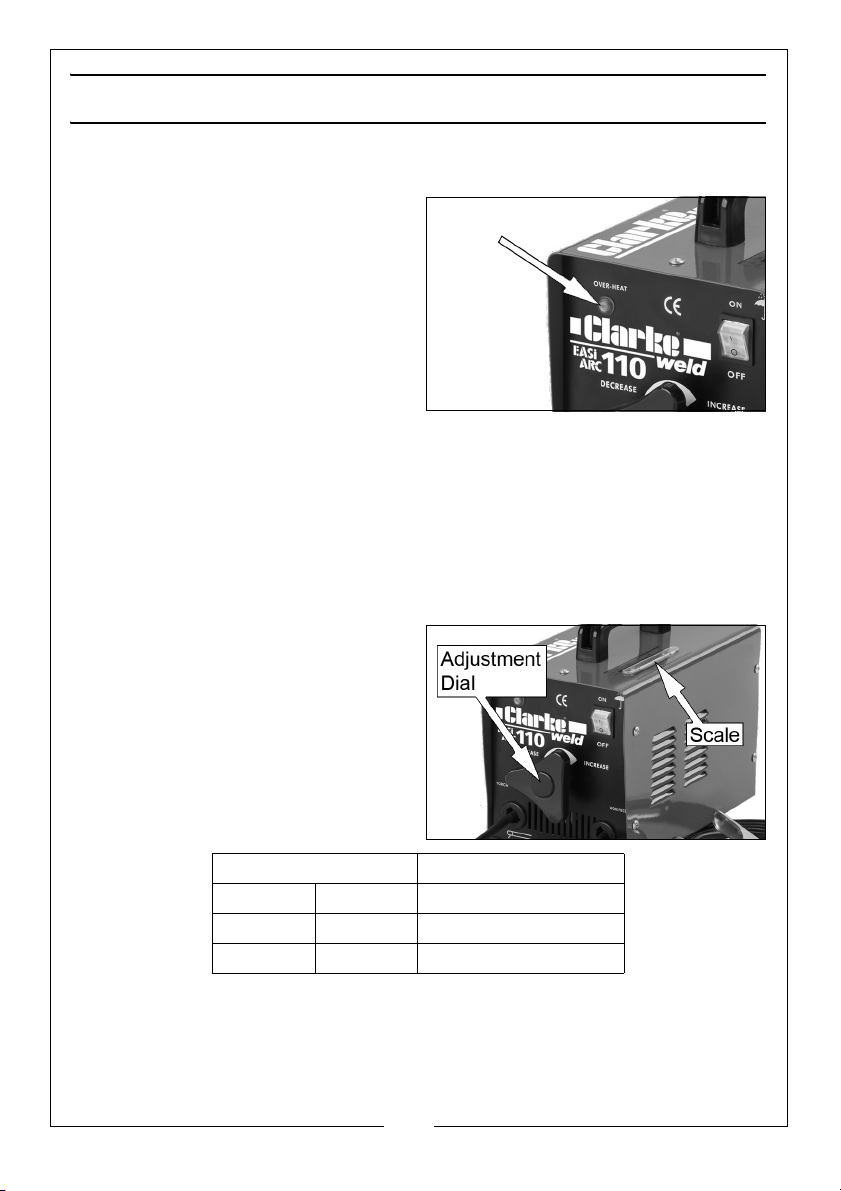
OPERATING THE WELDER
THERMAL CUTOUT
If the machine stops at any time and
the amber light on the front panel
illuminates, the thermal cutout has
activated.
Wait until the transformer has cooled
sufficiently (the amber light goes out)
before restarting work.
ATTACHING THE EARTH CLAMP
Attach the earth clamp firmly to the workpiece as close as possible to the
point of weld.
IMPORTANT: Ensure that the earth clamp is attached to clean, solid metal.
necessary, thoroughly clean with a wire brush or similar to guarantee a
good connection.
SWITCHING ON
1. Select the welding current by
turning the handwheel and
observing the setting on the scale,
on top of the machine.
The chart below is an indicator of the
thickness of material/ welding rod
thickness and the corresponding
welding current. This is intended as a
guide only.
Size of welding rod Amperage setting
16 swg 1.5 mm 40-55 Amps
14 swg 2.0 mm 50-70 Amps
12 swg 2.5 mm 75-95 Amps
NOTE: With practice you will get a feel for the best current settings for
different welding rod thicknesses.
2. Switch ON the machine.
9
Parts & Service: 020 8988 7400 / E-mail: [email protected] or [email protected]
Page 10

STRIKING AN ARC
IMPORTANT: BEFORE you strike an arc, always bring the face shield up to
protect your eyes.
1. Line up the electrode exactly over the spot where you want to
strike.
2. Position your shield in front of your face and tap the electrode
down firmly. Once you tap down and contact is made, you must
instantly raise the electrode to the required arc gap.
•The arc gap should be roughly the same as the diameter of the
electrode.
• If you withdraw the electrode too far once the arc is struck, you will
lose the arc and have to try again.
NOTE: One thing that usually happens when you are striking an arc is that
the electrode sticks to the work. It should come unstuck with a
sharp tug. If it will not free easily, turn off the welder immediately
as it will quickly overheat, then give the join a tap fro m the chi ppin g
hammer. As you get more experienced, this will happen less.
3. Once the arc is struck, move the electrode along its intended path,
keeping the tip in the molten pool at all times.
• You must also get used to feeding down the electrode steadily
as it burns away.
• An even crackling noise should be heard, which is an indication of a
good weld.
4. Inspect the job carefully, the area of weld should be complete fusion of
the electrode and parent metal(s).
• Any slag which forms on the surface should be chipped away with
the hammer/brush supplied.
• If the resultant weld looks messy and irregular, this is an indication of
porosity or slag contamination, and you have almost certainly failed
to achieve the correct combination of speed and current. This is a
common problem, so do not worry as practice will quickly cure this.
• When using the welder outside, you may need to take measures to
erect a wind break to make sure the shielding gas is not blown
away, thereby leaving a poor quality weld.
10
Parts & Service: 020 8988 7400 / E-mail: [email protected] or [email protected]
Page 11
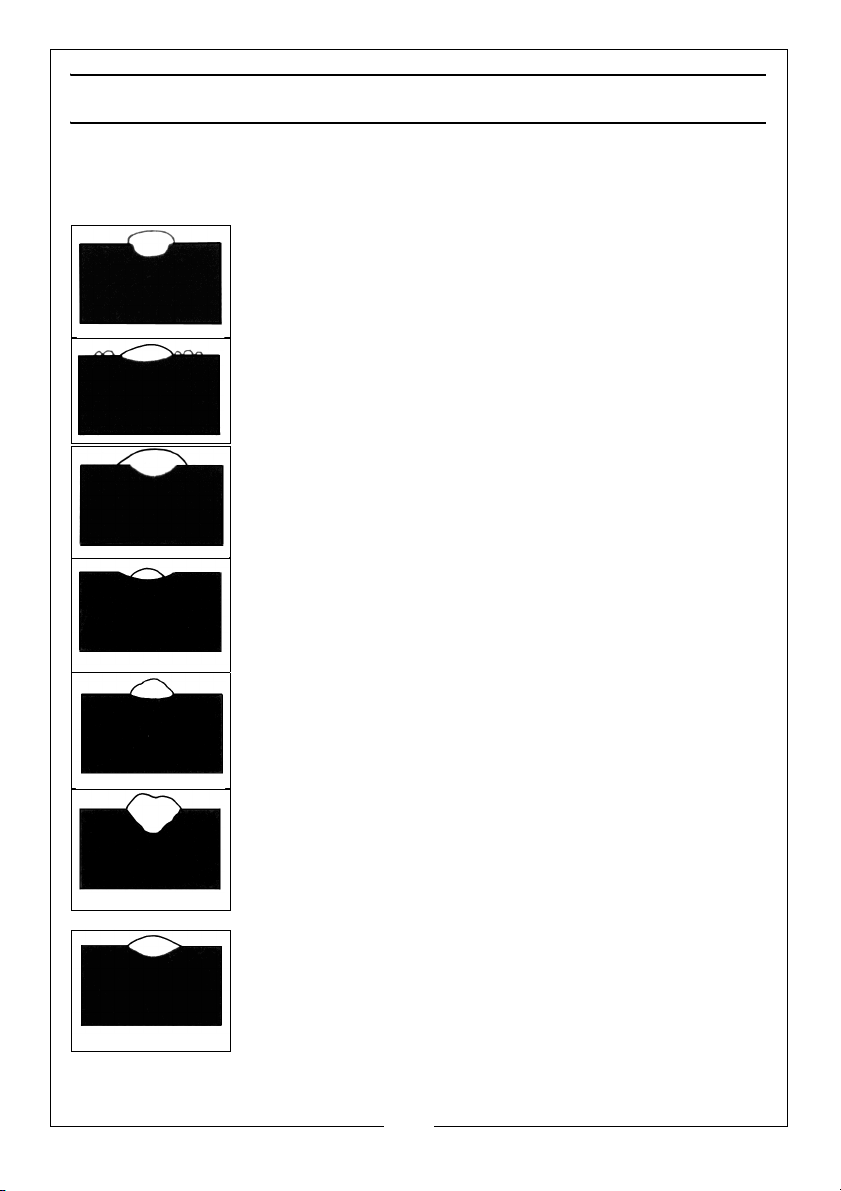
WELDING PITFALLS
The arc welding technique is an acquired skill and requires considerable
practice before perfect results are obtained. The diagrams below will help to
explain the pitfalls in your technique and how to overcome them.
ARC TOO SHORT
This causes irregular masses of weld to be deposited, with
slag contamination on an uneven surface.
ARC TOO LONG
This causes poor penetration resulting in a weak weld with
excessive spatter and porosity. Surface of the weld is rough
and the arc makes a hissing sound
ELECTRODE MOVED TOO SLOWLY
This causes a very wide and heavy deposit which overlaps
at the sides. It is wasteful both in terms of time and electrode
use.
ELECTRODE MOVED TOO QUICKLY
This causes poor penetration with a ‘stringy’ and incomplete
weld deposit. Slag is very hard to remove.
CURRENT TOO LOW
This causes poor penetration and causes the electrode to
stick to the workpiece too readily. Also results in a very
irregular and high weld deposit. Slag is very hard to remove.
CURRENT TOO HIGH
This causes excessive penetration with spatter and deep
pointed crater. It may also cause holes to be burned in the
workpiece.
Burns electrodes very quickly.
THE PERFECT WELD
With the correct combination of arc length, current
regulation, inclination and speed of the electrode, you will,
with practice, produce the perfect weld.
This should be regular with uniform ripples and no slag
contamination. The arc will make a steady crackling sound.
11
Parts & Service: 020 8988 7400 / E-mail: [email protected] or [email protected]
Page 12
MAINTENANCE
WARNING: ELECTRICITY CAN KILL - NEVER TOUCH LIVE ELECTRICAL
COMPONENTS.
WARNING: DISCONNECT THE POWER SUPPLY BEFORE ALL INSPECTIONS
AND MAINTENANCE OPERATIONS
WARNING: BEWARE HOT SURFACES.
WARNING: ALWAYS LET THE POWER SUPPLY COOL DOWN BEFORE
ACCESSING INTERNAL COMPONENTS.
Frequency of maintenance operations depends on the operating conditions,
how intensively the welder is used and how clean or dirty the welding site is
(aggressive atmospheres etc).
Always inspect the earth return and torch hose before use, to ensure they are
in perfect condition and that the earth clamp is clean and secured correctly
to the cable.
As a general rule, the power supply should be inspected at least annually.
Consult your CLARKE dealer for advice if necessary.
ACCESSORIES
The following are some of the accessories available from your CLARKE dealer.
Please quote the part numbers shown below:
DESCRIPTION PART NUMBER
CWH6 Arc Activated Welding Headshield 6000671
1.6 mm Welding Electrodes 3050550
2 mm Welding Electrodes 3050555
2.5 mm Welding Electrodes 3050560
12
Parts & Service: 020 8988 7400 / E-mail: [email protected] or [email protected]
Page 13
RATING PLATE
1 Name and address of
manufacturer
2 Model number, part number 14 Energy Input symbol
3 Batch number 15 Rated supply voltage
4 N/A 16 Rated maximum supply current
5 British Standards applied 17 Maximum effective supply
6N/A 18N/A
7 This symbol indicates that the unit
is suitable for carrying out
welding operations in an
environment which has an
increased risk of electric shock.
8 Welding Current symbol 20 N/A
9 Rated no-load voltage 21 N/A
10 Max welding current and
corresponding load voltages
11 Electrode Diameter Symbol 23 Class of protection.
12 Rated Welding current 24 N/A
13.1 Average load time
13.2 Average reset time
current
19 N/A
22 Degree of protection
13
Parts & Service: 020 8988 7400 / E-mail: [email protected] or [email protected]
Page 14
SPECIFICATIONS
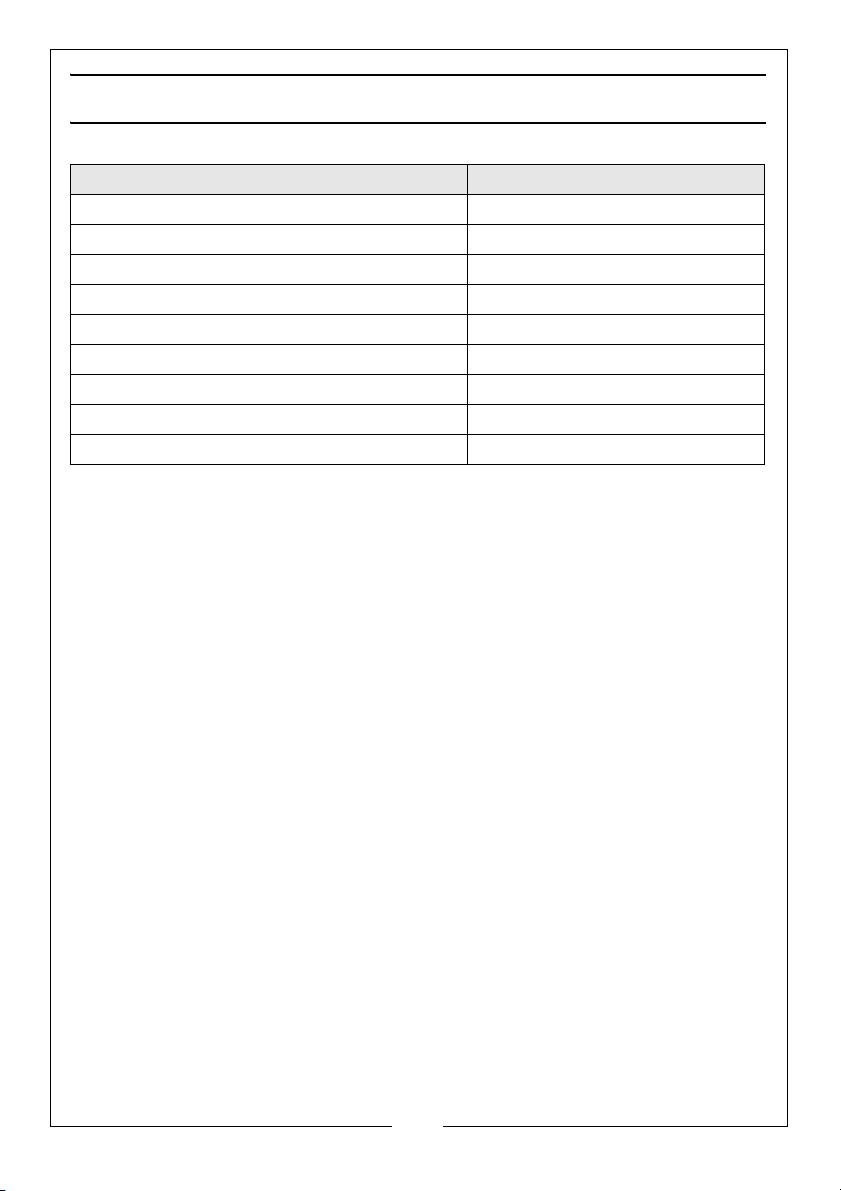
Model Easiarc110
Power Supply 230V @ 50Hz
Rated Max Input Current I1Max/I1eff 22.3/7.7 A
Open Circuit Voltage 48V
IP Rating IP21S
Output Min./Max Current 40 - 100 Amps
Usable Electrodes 1.6 mm - 2.5 mm
Dimensions (l x w x h) 313 x 172 x 250 mm
Weight 11.85 kg
Part Number 6010942
NOTE: The details and specifications contained herein, are correct at the time of
going to print. However, CLARKE International reserve the right to change
specifications at any time without prior notice.
14
Parts & Service: 020 8988 7400 / E-mail: [email protected] or [email protected]
Page 15
DECLARATION OF CONFORMITY
15
Parts & Service: 020 8988 7400 / E-mail: [email protected] or [email protected]
Page 16

 Loading...