

Page 1
AIR TEXTURE GUN
MODEL NO: CTG8
PART NO: 5091120
OPERATING & MAINTENANCE
INSTRUCTIONS
ORIGINAL INSTRUCTIONS GC0718 ISS 2
Page 2
INTRODUCTION
Thank you for purchasing this CLARKE product.
Before attempting to use this product, please read this manual thoroughly and
follow the instructions carefully. In doing so you will ensure the safety of yourself
and that of others around you, and you can look forward to your purchase
giving you long and satisfactory service.
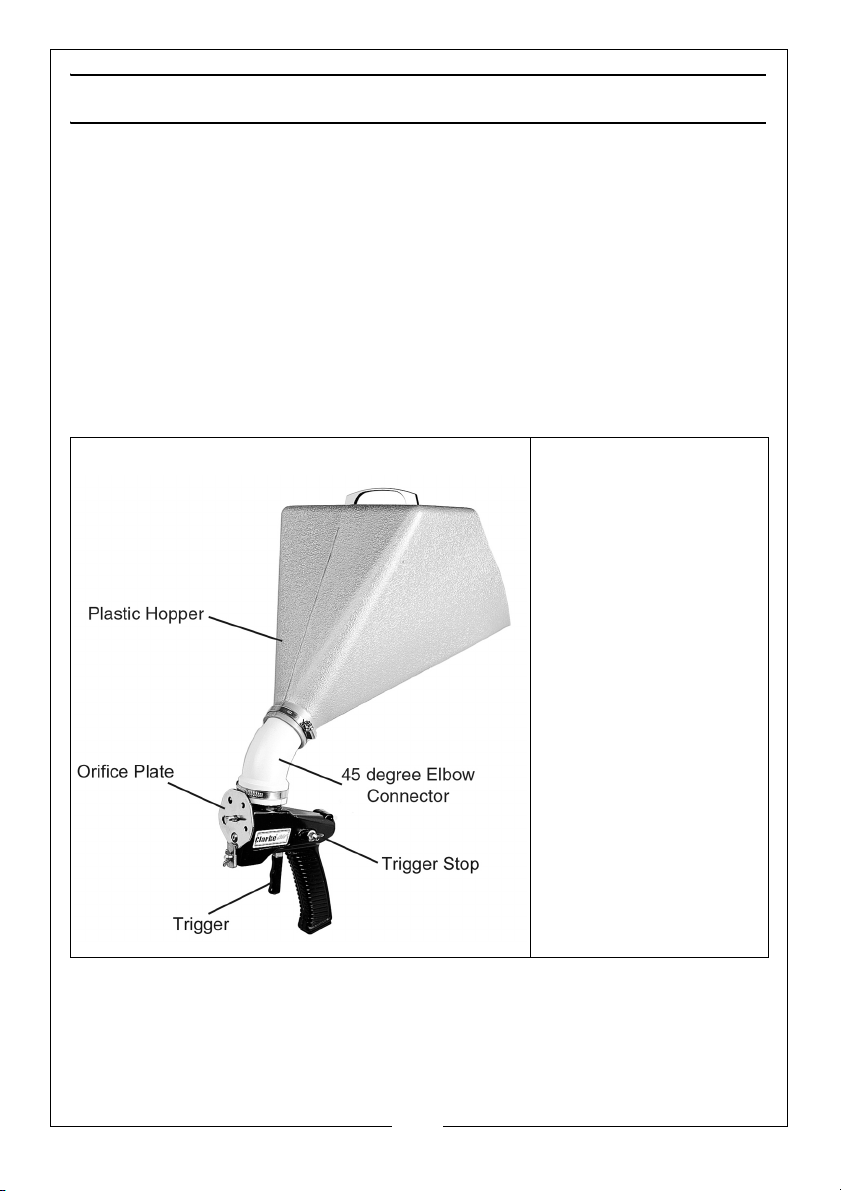
The CTG8 Air Texture Gun is a high capacity unit designed for large surface
coverage, handling most textured wall and ceiling finishes. It can spray most
liquid dry wall materials from joint cement, ceiling acoustics, wall texture,
splatter, semi-fog or any such material that will feed through the hopper. Use
of the 4 nozzles and 5-spray pattern orifice plate gives a total of 20 different
spraying combinations.
The following items are supplied with the gun:
When opening the carton for the first time, check against the following list that
all the items are present. Any damage or deficiency should be reported to
your CLARKE dealer immediately.
1 x Air Texture Gun
1 x Plastic Hopper
1 x 45-degree Elbow
Connector
1 x Spare Orifice Plate
Rubber Backing
2 x Hexagon Wrenches
(2.5mm & 4mm)
2 x Jubilee Clips
Stored inside the gun
4 x Spraying Nozzles:-
1.5mm, 2.7mm, 3.5mm
& 3.6mm
1 x 3/8” Box Spanner
2
Parts & Service: 020 8988 7400 / E-mail: [email protected] or [email protected]
Page 3
SPECIFICATIONS
Hopper Capacity 7.95 litre (1.75 gal)
Weight 1.5 kg
Air Inlet /Outlet Size 1/4“BSP (female)
Nozzle sizes 1.5mm, 2.7mm,3.5mm & 3.6mm
Air consumption 6-25 cfm
GUARANTEE
This product is guaranteed against faulty manufacture for a period of 12
months from the date of purchase. Please keep your receipt which will be
required as proof of purchase.
This guarantee is invalid if the product is found to have been abused or
tampered with in any way, or not used for the purpose for which it was
intended.
Faulty goods should be returned to their place of purchase, no product can
be returned to us without prior permission.
This guarantee does not effect your statutory rights.
3
Parts & Service: 020 8988 7400 / E-mail: [email protected] or [email protected]
Page 4
GENERAL SAFETY PRECAUTIONS
CAUTION: FAILURE TO FOLLOW THESE PRECAUTIONS COULD RESULT IN
PERSONAL INJURY, AND/OR DAMAGE TO PROPERTY.
WORK ENVIRONMENT
1. Keep the work area clean and tidy.
2. Dress appropriately - do not wear loose clothing or jewellery. Tie long hair
out of the way.
3. Keep children and visitors away - do not let children handle the tools.
4. Do not operate air tools where there are flammable liquids or gases.
5. Do not overreach - Keep proper footing and balance at all times.
USE OF AIRLINE EQUIPMENT
1. Stay alert and use common sense - do not operate an air tool when you
are tired or under the influence of alcohol, drugs or medication.
2. Never use oxygen, CO2, combustible gasses or any type of bottled gas as
a source of power for air tools.
3. Do not exceed the maximum pressure for the airline component.
4. Check airline hoses for leaks or worn condition before use and ensure that
all connections are secure. Keep the hose away from heat, oil and sharp
edges.
5. Avoid damaging the component for example by applying excessive force
of any kind.
USE OF SPRAY GUN EQUIPMENT
NOTE: Paint products used may be covered by COSHH Regulations.
1. Always check the manufacturers data sheets on the products being
sprayed for any particular hazards and follow the manufacturers
instructions. Take particular care if spraying isocyanate paints.
2. Always wear a suitable approved breathing mask when spraying, to
protect against inhalation of paint spray or fumes. An air feed mask may
be required when spraying some types of paint. If in doubt, check with the
paint manufacturer.
4
Parts & Service: 020 8988 7400 / E-mail: [email protected] or [email protected]
Page 5
3. Always make sure there is adequate ventilation. Do not spray in confined
or enclosed areas.
4. Always disconnect the spray gun from the air supply when it is not in use
and before any disassembly.
5. Always thoroughly clean the spray gun after use.
6. Never spray paint towards people or animals. In the case of injury, seek
expert medical advice immediately.
7. Never smoke while spraying or preparing solvent based paints, or spray
near a naked flame, heat source or electrical sparks. Solvent-based paints
are flammable.
8. Always store this product in a dry, secure place out of reach of children.
9. Never use this product if it is defective/operating abnormally.
10. Never attempt any repairs yourself. If you have a problem with this product
contact your local CLARKE dealer.
COMPRESSED AIRLINE REQUIREMENTS
WARNING: COMPRESSED AIR CAN BE DANGEROUS. ENSURE THAT YOU
ARE FAMILIAR WITH ALL PRECAUTIONS RELATING TO THE USE OF
COMPRESSORS AND COMPRESSED AIR SUPPLY.
Your air texture gun comes complete with 4 different size nozzles. The larger
the nozzle, the more compressed air is required and a minimum of 6.5 cfm will
be required from the compressor if the largest nozzle is being used.
Ensure your compressor is able to supply sufficient air pressure for the gun. The
air supply to the spray gun must be clean and dry, without any oil or water
contamination.
Follow the air compressor operating guidelines to ensure that your air supply is
as clean as possible. The compressed air supply line to the spray gun must be
fitted with an oil and water filter and a suitable air pressure regulator.
• Connect the air supply to the spray gun using a suitable 1/4” BSP
fitting. If an unusually long airline is required, the line pressure may
need to be increased.
• Use only clean, dry, regulated compressed air as a power source.
• A build-up of moisture in the air compressor will accelerate wear
and corrosion in the air tool. Ensure any moisture is drained from the
compressor daily and the airline filter is kept clean.
5
Parts & Service: 020 8988 7400 / E-mail: [email protected] or [email protected]
Page 6
• If an unusually long air hose is required, (over 8 metres), the line
pressure or the hose inside diameter may need to be increased.
• The air hose must be rated at least 150% of the maximum operating
pressure of the air tool.
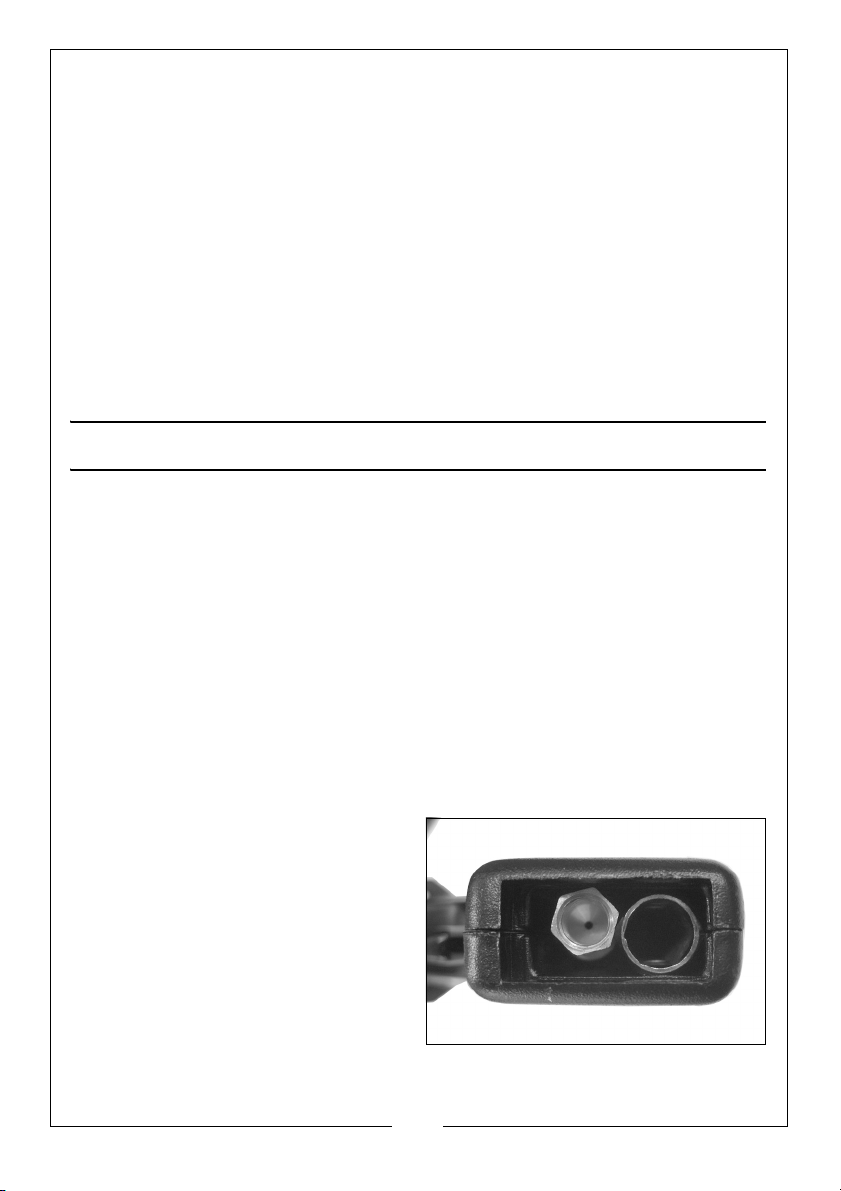
• A typical air line layout is shown above. If an automatic in-line filter/
regulator is used, it will keep the tool in good condition, but should
be regularly checked and topped up with oil. SAE 10 oil should be
used, and the lubricator adjusted to approx 2 drops per minute.
• Never exceed the maximum operating pressure for the air tool.
Ensure that air pressure does not exceed that stated in the
specification for the tool when running. Higher pressures and
contaminated air will shorten the life of the air tool due to faster
wear and is a possible safety hazard.
OPERATION
ASSEMBLY
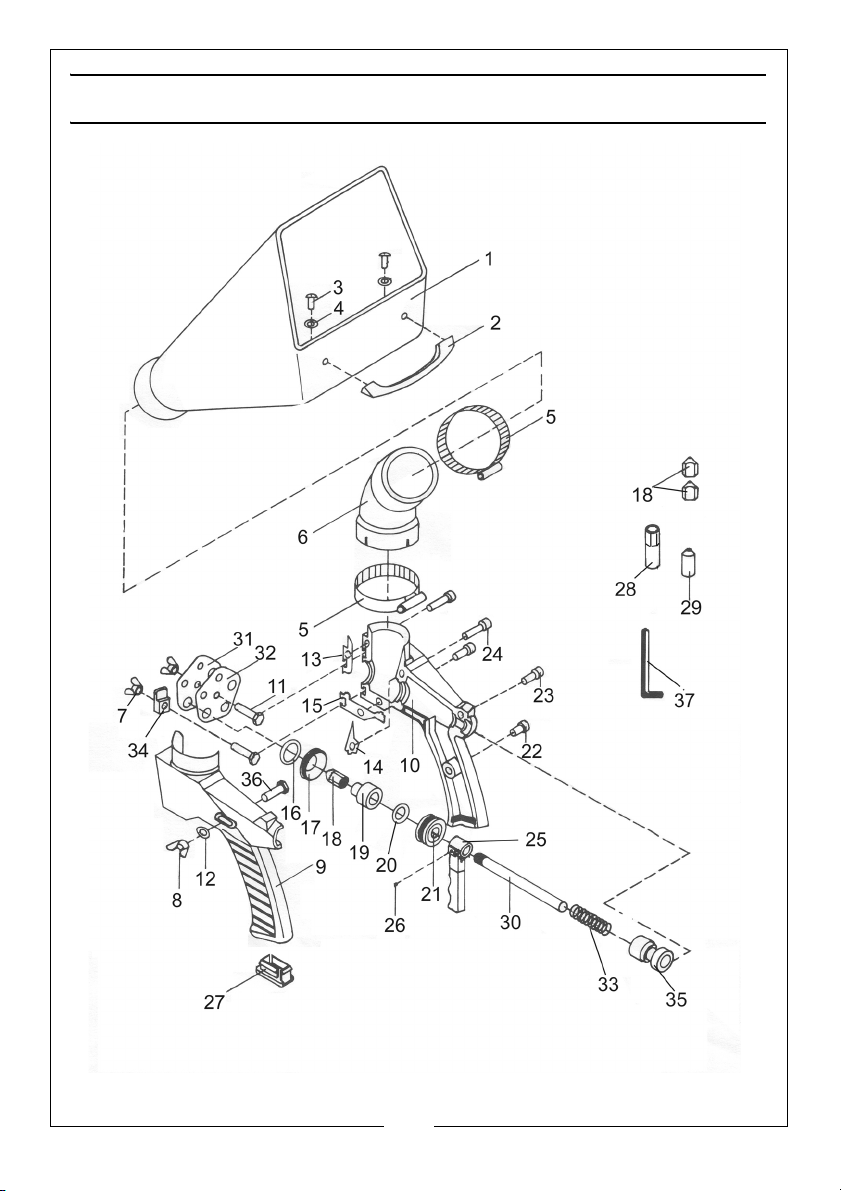
Assemble the texture spray gun as follows. The numbers in brackets refer to the
Parts List & Parts Diagram on pages 10/11.
1. With the jubilee clip (5) around the hopper base loosened off, fit the
hopper (1) to the gun body, pushing the hopper onto body neck, (the
handle on hopper should be in line with the gun body). Tighten the clamp
sufficiently to prevent the hopper from moving.
2. When spraying upwards towards a ceiling, the 45deg elbow (6) should be
adjusted to keep the hopper in an upright position, securing it with both the
jubilee clips.
INSTALLING THE NOZZLE
1. To select a nozzle, prize off the
retaining cap (27) and choose
your nozzle from the selection
stored inside the body of the gun.
2. Depending on the viscosity of the
material to be sprayed, fit the
appropriate nozzle, (e.g, 1.5mm
and 2.7mm nozzles for medium
viscosity materials and 3.5 mm
nozzle for high viscosity materials),
as follows.
6
Parts & Service: 020 8988 7400 / E-mail: [email protected] or [email protected]
Page 7
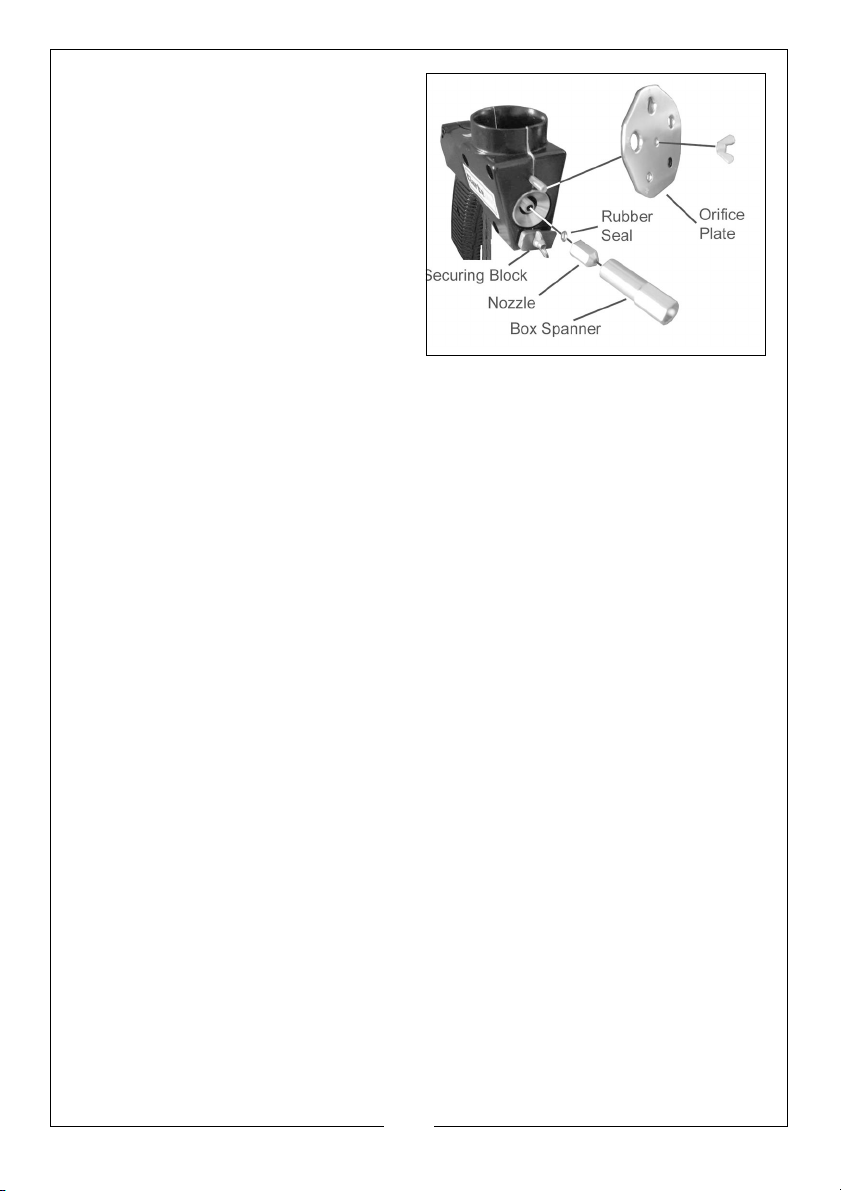
3. Loosen the securing block (34),
and remove the orifice plate (31).
Unscrew the nozzle (18) currently
fitted and screw the chosen nozzle
onto the end of the inlet tube (30),
taking care not to lose the white
rubber seal ring (42) from inside the
nozzle. Tighten the nozzle with the
box spanner (28) stored inside the
handle. Replace the orifice plate
and securing block.
NOTE: The largest (3.6 mm) nozzle
cannot be tightened with the
box spanner. Instead, the 4mm Allen key must be used.
CONNECTING AND FILLING
1. Connect the air hose using an appropriate connector as necessary. An air
regulator can be fitted to the gun first, which can be used to control the
droplet size produced by the spray gun, turning clockwise to restrict the air
flow. (The greater the flow, the smaller the droplet).
2. Turn the air supply on and check the functionality of the gun by squeezing
the trigger before filling with paint etc.
3. Turn air off and fill hopper with material to be sprayed, (1.75 gallons max)
Always mix the paint to the correct viscosity for spraying according to the
manufacturer’s instructions. (DO NOT OVERFILL - the more paint the heavier
the spray gun).
4. Hold the gun approximately 12” from wall to be covered, supporting the
gun using the handle on the hopper.
5. Gently squeeze the trigger until resistance is felt whilst moving the gun from
side to side. Check the coverage and change the orifice/nozzle size if
necessary, or adjust the air flow regulator adjustment, if fitted.
6. Before using the gun, practice getting the feel of the trigger with the
chosen settings.
7. The trigger stop can be used in order to select the same setting for repeat
operations. Wait until the trigger is in the desired position before tightening
the wingnut (8) to limit trigger movement.
SPRAYING DIFFERENT MATERIALS
The paint flow from the gun is adjustable. This is achieved by turning the orifice
plate to a different setting and replacing the nozzle with one of a different size
as above. If a pressure regulator is used this can also be adjusted to increase
or reduce airflow, according to the material being sprayed.
7
Parts & Service: 020 8988 7400 / E-mail: [email protected] or [email protected]
Page 8
The following starting points are suggested. However, adjustment is partly trial
and error, depending on the viscosity of the material and coverage required.
Always take care that the paint material is free of lumps. Follow the
manufacturers instructions when mixing materials.
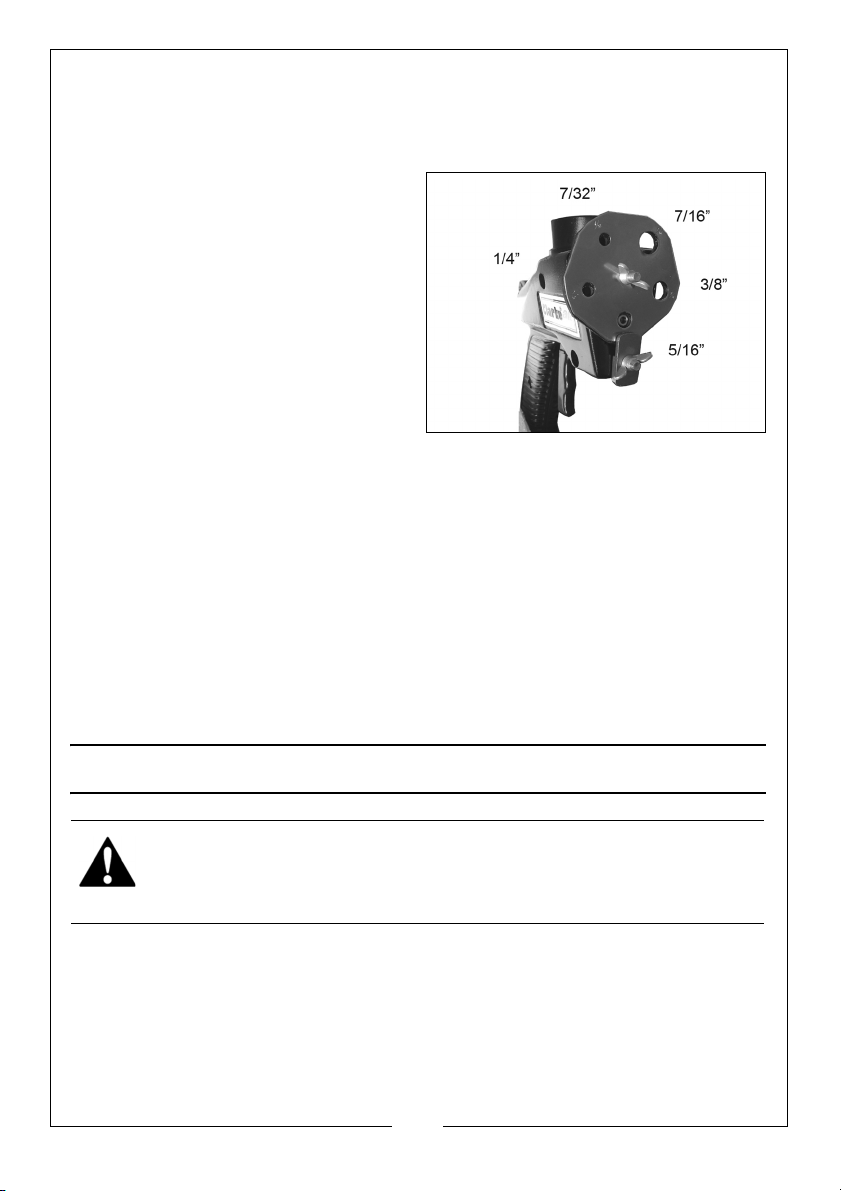
a When spraying acoustic panels,
set the orifice plate to the third
smallest size (5/16”) opening.
b When spraying sand finish with dry-
walling material, set the orifice
plate to the smallest size (7/32”)
opening.
c When spraying orange peel
texture, set the orifice plateto the
third smallest size (7/32”) opening.
Set the stop lock on the gun, so
that the spraying nozzle is approx 1/16” from the orifice plate. This will
reduce the amount of material flowing from the gun, causing it to leave an
orange peel texture.
d When spraying a splatter texture, use the air regulator to deliver approx 4-
6psi. Set the orifice plate to the third (5/16”) or fourth smallest size (1/4”)
opening
e The air texture gun can also spray glitter if the material and gun are both
kept dry. Approx 15 psi is recommended to apply glitter to panelling and
25-30 psi to cement and stucco surfaces. The glitter should be sprayed on
while the underlying material is still tacky enough to receive it and to form
an effective bond.
MAINTENANCE
WARNING: DISCONNECT THE SPRAY GUN FROM THE AIR SUPPLY AND
RELIEVE ANY PRESSURE IN THE GUN AND HOSE BEFORE DISASSEMBLY.
After use, always clean the gun and hopper with clean water ready for the
next use. It is essential that the spray gun is kept clean. Dried paint in the nozzle
assembly or airways will stop the gun from working correctly.
For the gun to perform at it’s best the moving parts should be lubricated
regularly using a light machine oil. Use a couple of drops of oil inside the air
inlet (35) to lubricate the inlet tube (30) and repeat this through the trigger
8
Parts & Service: 020 8988 7400 / E-mail: [email protected] or [email protected]
Page 9
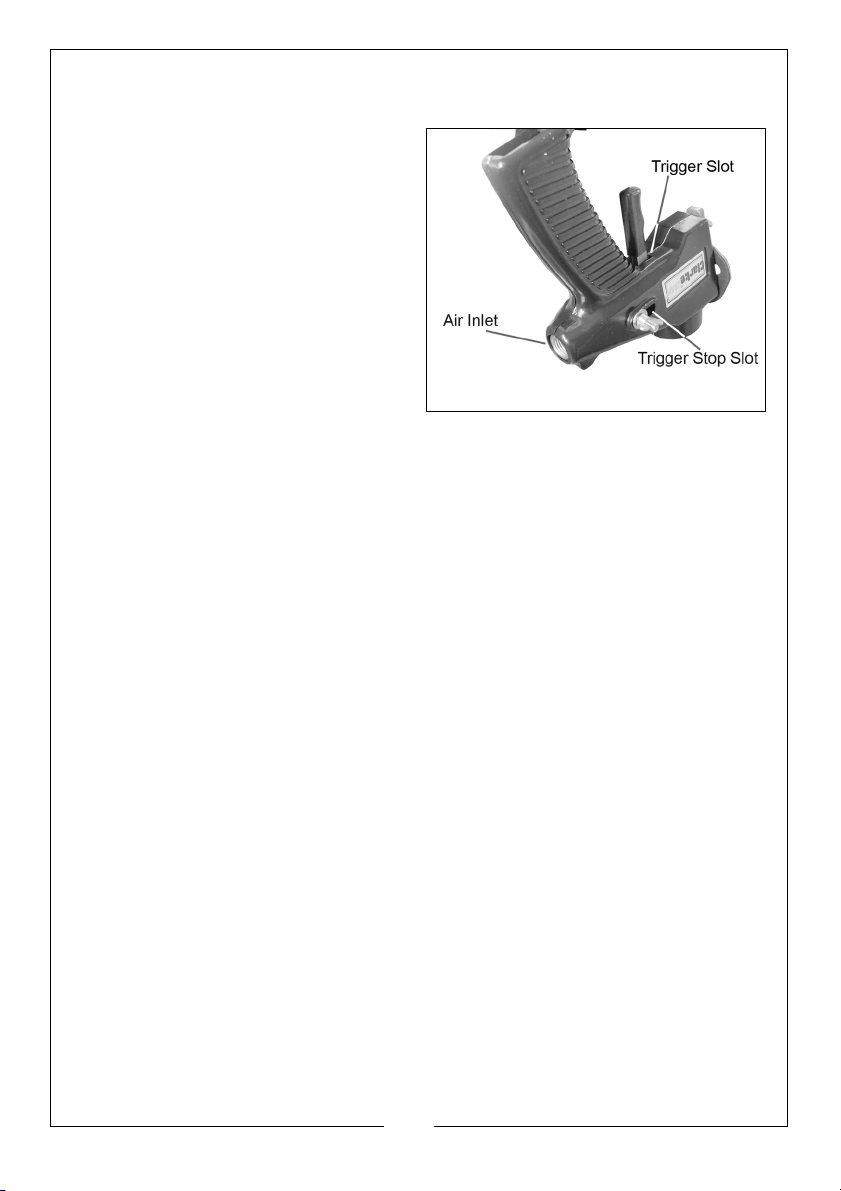
stop slot and with the gun upside down, pull back the trigger and apply oil to
the inlet tube.
Remove all excess oil with a clean
cloth.
When re-assembling the gun after
cleaning, adjust the trigger on the
inlet tube, so that the nozzle protrudes
1/6” past the nose piece when the
trigger is in the fully forward position, or
it will not seat properly. (The small
hexagonal wrench is provided for this
purpose). Check that the front of the
orifice plate bears against the front of
the gun to avoid any leaks at this
point.
If leaks are observed around the gun body, replace the gaskets shown on
pages 10 & 11. If this is not successful, use sealant between the two halves of
the gun body to prevent leakage.
CAUTION: Never use silicon based lubricants as this may cause damage to the
paint finish.
Do not overtighten components, and be careful not to cross thread any parts
on re-assembly.
Please be aware that certain parts of this spray gun will wear, requiring
replacement and that these parts may not be covered by your guarantee.
The wear on certain parts depends on the abrasive nature of the materials
being sprayed. More abrasive materials such as latex paint (emulsions) will
cause these parts to wear much faster.
Use only Clarke replacement parts, available from your nearest Clarke dealer.
9
Parts & Service: 020 8988 7400 / E-mail: [email protected] or [email protected]
Page 10
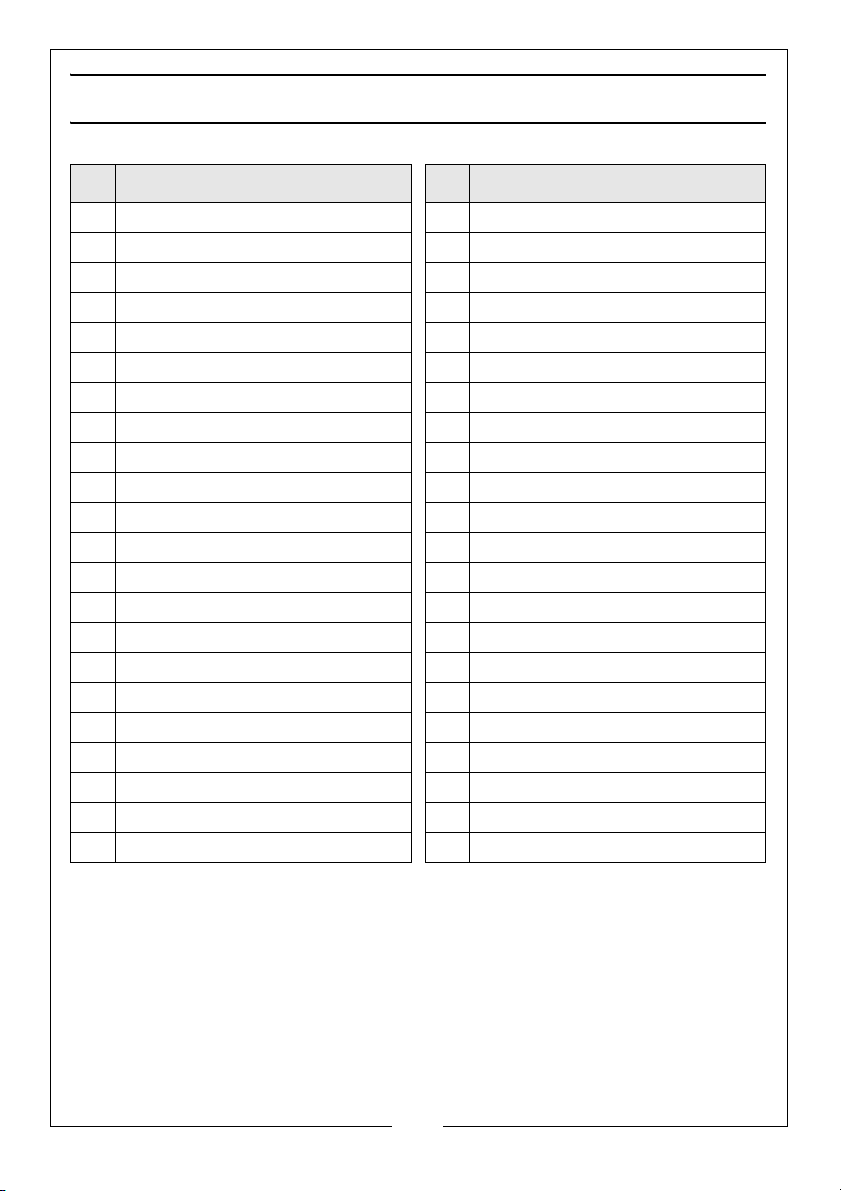
PARTS LIST & DIAGRAM
No Description No Description
1 Hopper 21 Air Inlet Support Bush
2 Handle 22 Socket Head Screw (12mm)
3 Screw 23 Socket Head Screw (15mm)
4 Washer 24 Socket Head Screw (25mm)
5 Jubilee Clip 25 Throttle Lever
6 45 deg Elbow 26 2.5mm Set Screw
7 Retaining Wingnut 27 Retaining Cap
8 Adjusting Wingnut 28 Box Spanner
9 Gun Body (left) 29 Rubber Bonnet
10 Gun Body (right) 30 Inlet Tube
11 Bolt 31 Front Orifice Plate
12 Washer 32 Adhesive Rubber Backing
13 Gasket (A) 33 Coil Spring (38mm)
14 Gasket (B) 34 Securing Block
15 Gasket (C) 35 Air Inlet
16 O-ring 36 Hexagon Bolt
17 Outer Ring 37 Hexagonal Wrench (2.5mm)
18a Nozzle (2.7 mm) 38 Hexagonal Wrench (4mm)
18b Nozzle (1.5 mm) 39 Circlip (7mm i/d)
18c Nozzle (3.5 mm) 40 Coil Spring 18mm
19 Nozzle (3.6 mm Jumbo size) 41 Washer
20 O-ring 42 White Rubber Seal Ring
IMPORTANT: The use of parts other than genuine CLARKE replacement parts
may result in safety hazards, decreased performance, and will invalidate
your warranty.
A wide range of accessories is available including filter/regulators, lubricators,
high-pressure hoses (5 to 50 metres) etc. Contact your CLARKE dealer for
further information or CLARKE International Service Department.
10
Parts & Service: 020 8988 7400 / E-mail: [email protected] or [email protected]
Page 11
Page 12
 Loading...