

Page 1
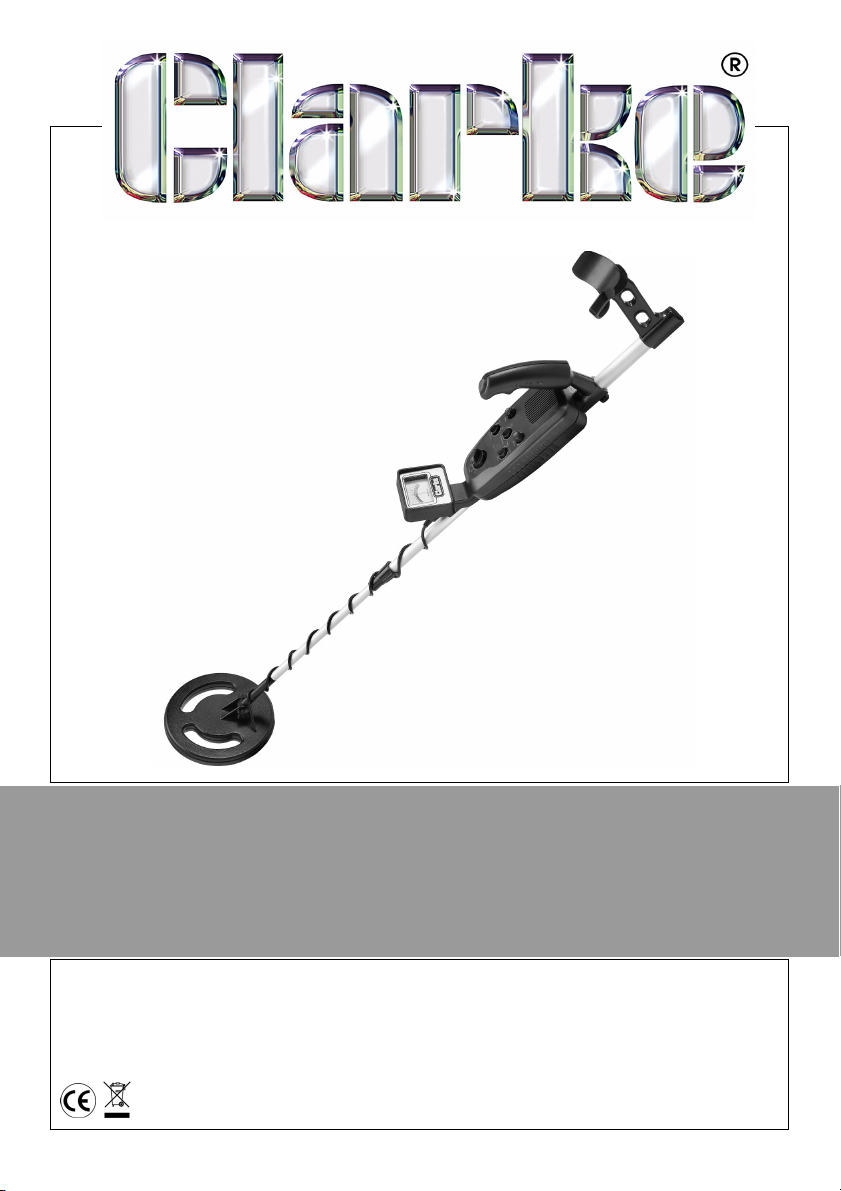
SEMI PROFESSIONAL METAL DETECTOR
MODEL NO: MD1200
PART NO: 4501210
OPERATION & MAINTENANCE
INSTRUCTIONS
05/08
Page 2

INTRODUCTION
Thank you for purchasing this CLARKE Metal Detector.
Before you try to use this product, read this manual and follow the instructions
carefully. In doing so you will ensure your safety and the safety of others
around you.
You can also look forward to a purchase that gives you long and satisfactory
service.
GUARANTEE
This product is guaranteed against faulty manufacture for a period of 12
months from the date of purchase. Please keep your receipt which will be
required as proof of purchase.
This guarantee is invalid if the product is found to have been abused or
tampered with in any way, or not used for the purpose for which it was
intended.
Faulty goods should be returned to their place of purchase, no product can
be returned to us without prior permission.
This guarantee does not effect your statutory rights.
IN THE BOX
• 1 x Instruction Manual
• 1 x Control Unit
• 1 x Arm Brace
• 1 x Search Coil
SPECIFICATIONS
Model Number .............................................. MD1200
Power Supply: ................................................ 2 x 9 Volt PP3 Batteries
Sensitivity, Max Depth: .................................. 120 mm
Low Battery Indication: ................................. LED
2
Page 3

CODE OF ETHICS
When metal detecting, here are some basic rules that you should follow.
• Always get consent of the landowner before you search any site.
• Respect the rights and property of others.
• Observe all national and local laws when you use the metal
detector.
• Do not destroy historical and archaeological treasures. If you do not
know what you have found, contact your local museum or historical
society.
• Fill any holes that you have made and leave the land as you found
it.
• Only use the metal detector where safe to do so.
• Dispose of any rubbish that you find in a safe area, do not leave it for
somebody else to find.
• Always follow procedures relating to finds as laid down in the
Treasure Act 1996.
3
Page 4
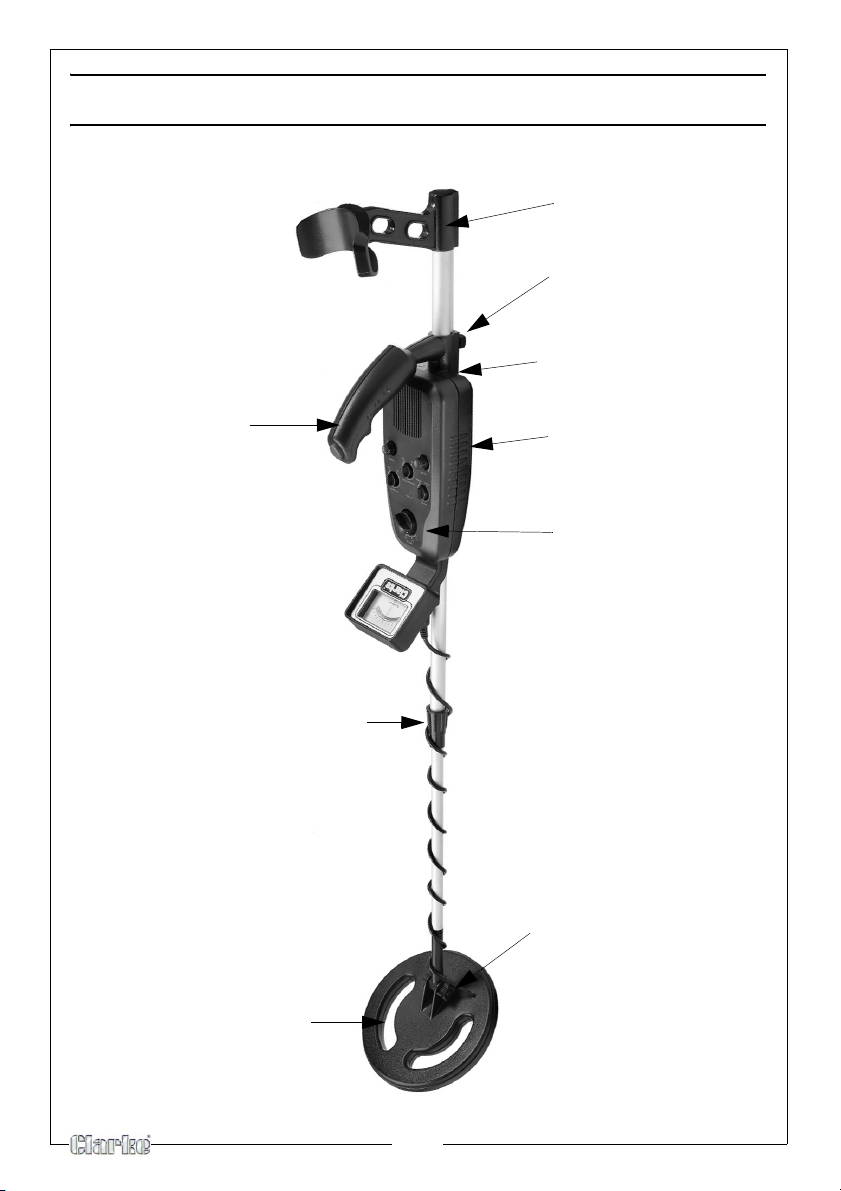
OVERVIEW
Arm brace
Arm brace locking bolt
Headphones socket
Handle
Stem locking nut
Battery compartment
Control panel and
meter
Search coil
adjustment nut
Search coil
4
Page 5
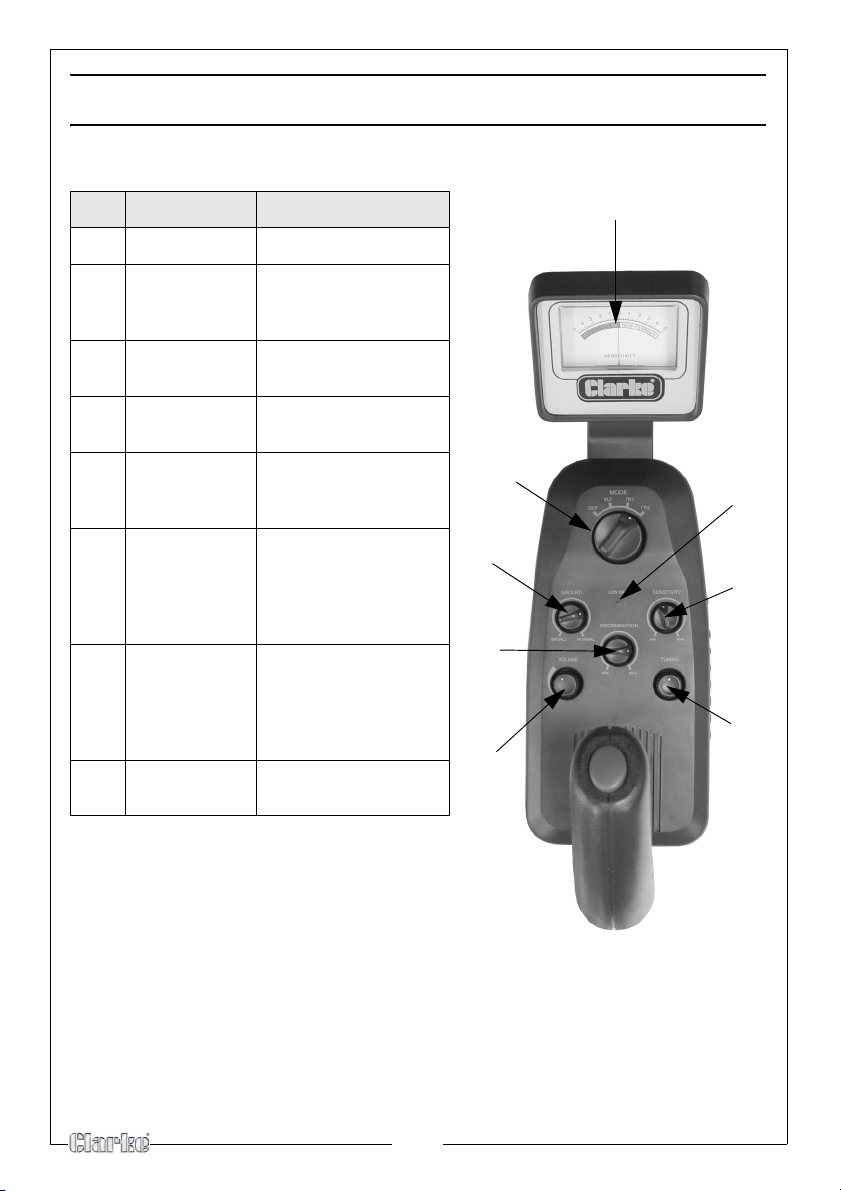
THE CONTROL PANEL
NO NAME DESCRIPTION
1Meter
2 Low Batt Low battery indicator,
replace the batteries
when this is lit
3 Sensitivity Used to adjust the
sensitivity
4 Tuning Allows you to tune
the detector
5 Volume Used to adjust the
volume level
6 Discrimination Lets you adjust the
detectors ability to
distinguish between
different types of
metal
7 Ground Corrects for the
metalic mineral
deposits that
normally occur in the
ground
8 Mode Lets you select from
OFF, VLF, TR1 and TR2
1
8
2
7
3
6
4
5
5
Page 6
PREPERATION
ASSEMBLING THE METAL DETECTOR
Assembling your detector is easy and requires no special tools. Just follow
these steps.
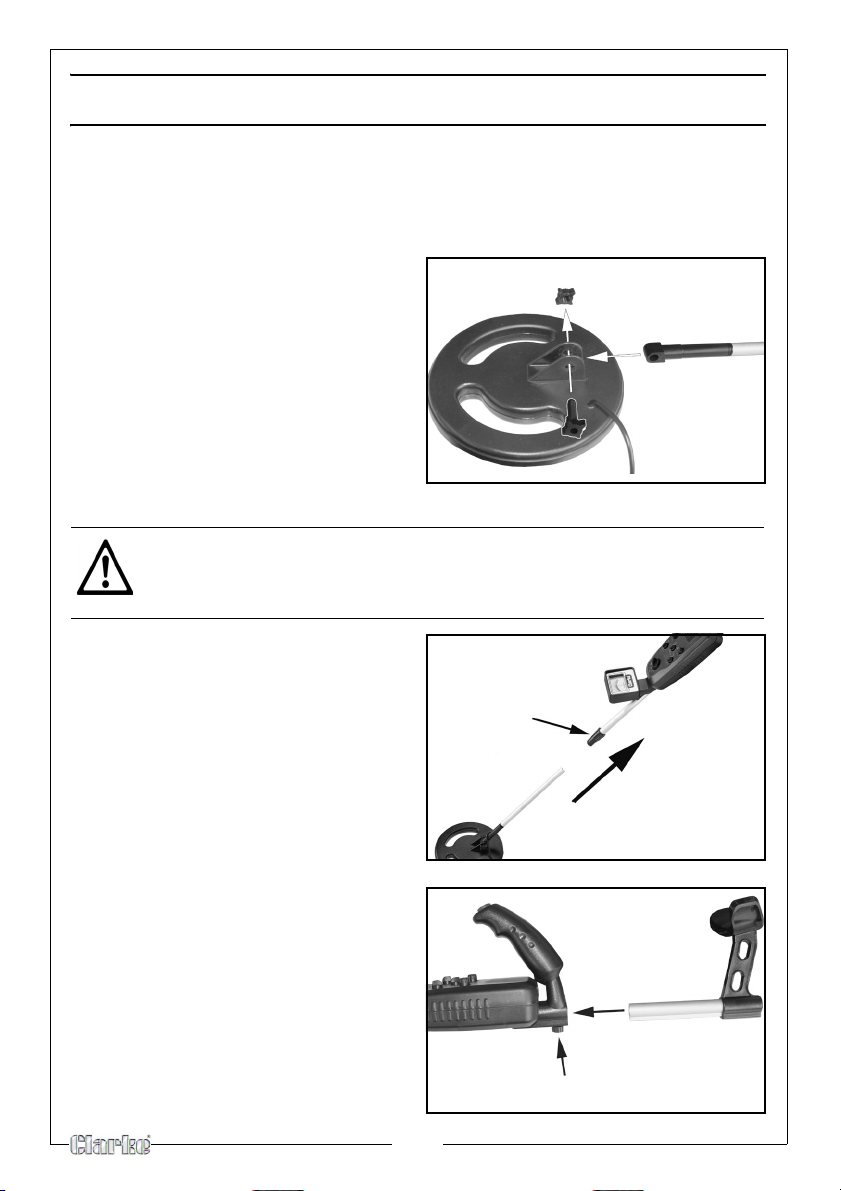
1. Unscrew the nut on the search
coil and remove the knobs and
connector. Insert the stem and
align the holes on the search coil
bracket and the stem.
• Push the connector through
the holes, then replace and
tighten the nut.
2. Push the connector through the
holes, then replace and tighten
the knobs.
CAUTION: DO NOT OVERTIGHTEN THE SEARCH COIL OR USE TOOLS
SUCH AS PLIERS TO TIGHTEN IT.
3. Turn the stem locking nut
clockwise until it loosens.
4. Lengthen or shorten the stem so
when you stand upright with the
detector in your hand, the search
coil is about 2.5-5 cm above the
ground with your arm relaxed at
your side.
5. Turn the stem's lock nut counterclockwise to lock it in place.
6. Loosen the arm brace locking bolt
and slide the arm bace into the
control housing as shown.
7. Tighten the arm brace locking
bolt to secure into place.
stem locking nut
arm brace locking bolt
6
Page 7
8. Wind the search coil cable
around the stem. Leave enough
slack in the cable to let you adjust
the search coil when you are
hunting on uneven ground.
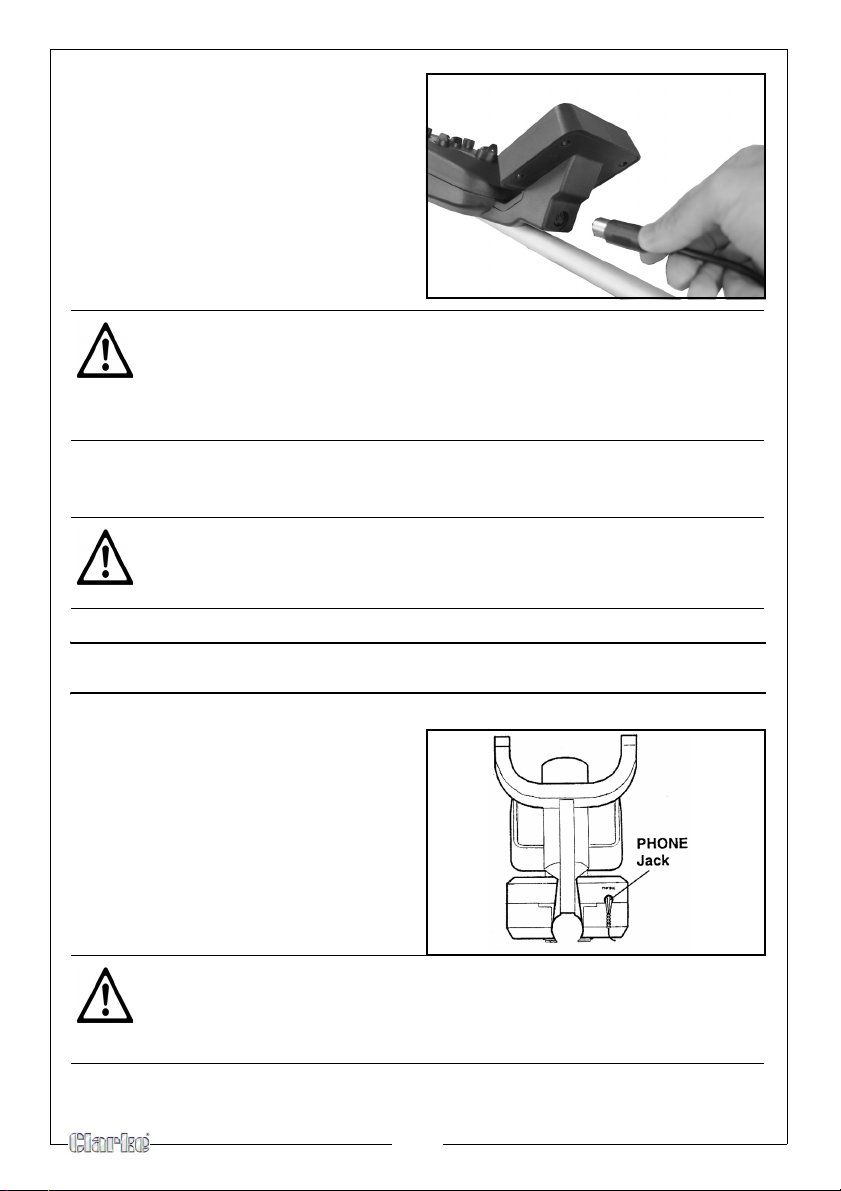
9. Insert the search coil plug into the
jack on the control housing.
CAUTION: THE PLUG FITS INTO THE CONNECTOR ONLY ONE WAY. DO
NOT FORCE THE PLUG OR YOU COULD DAMAGE IT.
CAUTION: TO DISCONNECT THE SEARCH COIL'S CABLE FROM THE
DETECTOR, GRASP THE PLUG AND PULL IT OUT OF THE CONNECTOR.
NEVER PULL ON THE CABLE.
10. Adjust the search coil to the desired angle.
• The search coil should be parallel with the ground.
CAUTION: DO NOT OVERTIGHTEN THE SEARCH COIL OR USE TOOLS
SUCH AS PLIERS TO TIGHTEN IT.
USING HEADPHONES
1. Insert your headphones into the
headphone socket on the control
housing.
Connecting stereo headphones
automatically disconnects the
loudspeaker. Headphones give
slightly more sensitivity as they reduce
external noise.
CAUTION: Set the volume to the lowest level before putting on the
headphones. Then adjust the volume to a comfortable level.
CAUTION: Do not wear headphones when operating near roads or
traffic.
7
Page 8
INSTALLING BATTERIES
Your detector requires two 9V alkaline batteries (not supplied).
CAUTION: USE ONLY FRESH BATTERIES.
CAUTION: DO NOT MIX OLD AND NEW BATTERIES OR DIFFERENT TYPES OF
BATTERIES.
1. If the detector is on, turn MODE to OFF.
• When you turn the mode switch to OFF, the LOW BATT indicator
flashes once.
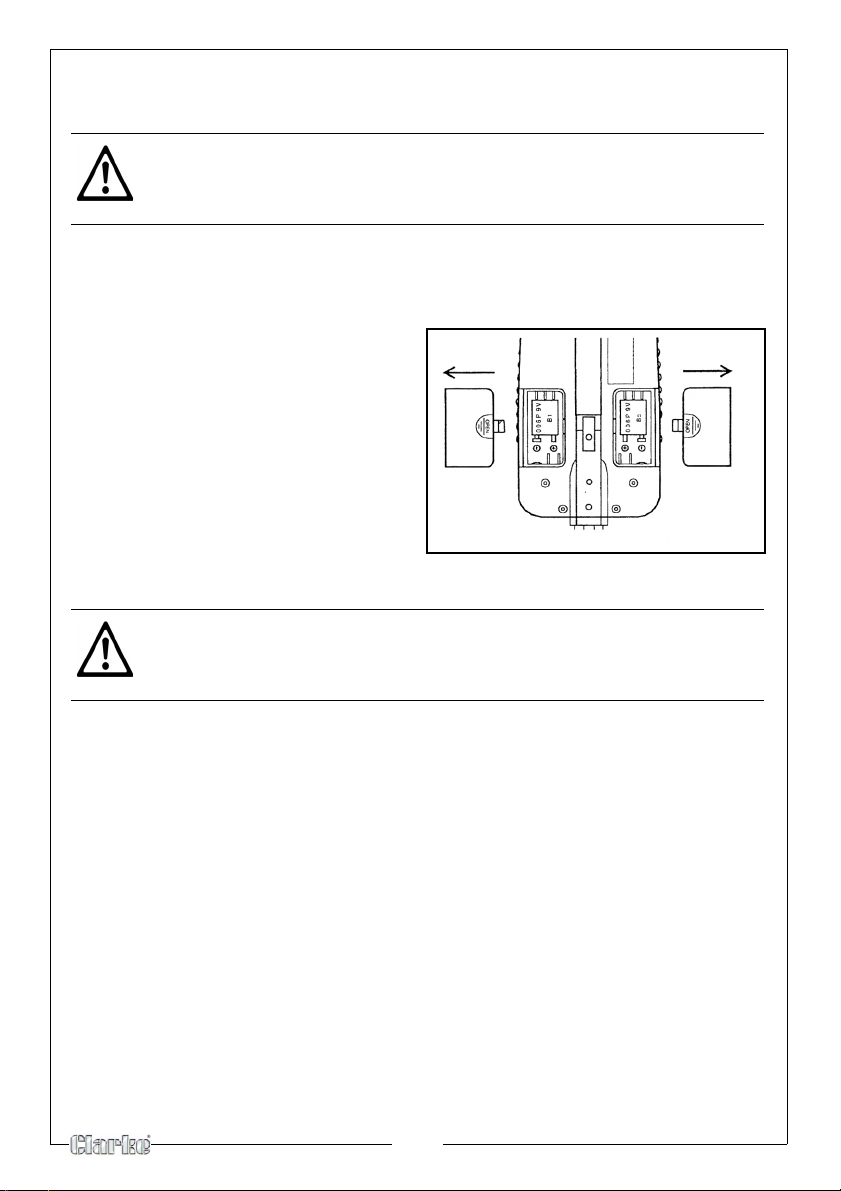
2. Press the right battery
compartment cover's tab and
slide the cover off in the direction
of the arrow.
3. Place a 9-volt battery into the
battery compartment on top of
the ribbon, matching the polarity
symbols (+ and -) marked inside.
4. Replace the right battery
compartment cover.
5. Repeat steps 2-4 with the left battery compartment.
CAUTION: IF YOU DO NOT PLAN TO USE THE DETECTOR FOR A WEEK OR
MORE, REMOVE THE BATTERIES. BATTERIES CAN LEAK CHEMICALS THAT
CAN DESTROY ELECTRONIC PARTS.
• Change all batteries at the same time.
• You can extend battery life by using headphones, which require less
power than the built-in speaker. See "Using Headphones."
• If the LOW BATT indicator lights during normal use or the detector
does not function properly, replace the batteries. If it still does not
function properly, you might need to reset the detector.
8
Page 9

OPERATION
Your Metal Detector distinguishes between ferrous and non-ferrous metals.
Ferrous metals contain iron, while non-ferrous metals such as gold, silver,
copper, platinum, aluminum, lead, and zinc do not.
When the detector senses a metallic object, the meter reading changes and
the detector sounds one of three tones. The tone depends on what metal is
detected. The higher the tone's pitch, the stronger the detection.
HOW TO TURN THE DETECTOR ON OR OFF
1. Hold the detector in a comfortable position, then rotate MODE to the
desired position.
• VLF (Very Low Frequency) - to adjust TUNE and GROUND. (See
“Adjusting Ground” on page 12. and "Tuning the Detector' below.)
• TR1 (Transmit 1) - to detect extreme differences in metals, such as
iron and gold. The difference between iron and gold shows on the
meter (iron in the ferrous section, gold in the non-ferrous section).
• TR2 (Transmit 2) - to detect finer distinctions between metals, such as
aluminum and gold (See “Adjusting Discrimination” on page 12.)
TUN I NG THE D E TECTOR
The TUNE control fine-tunes the balance between the detector's receiver and
transmitter circuitry to provide consistent pointer and tone indications. Follow
these steps to set TUNE.
1. Rotate VOLUME to the 10 o'clock position.
2. Set MODE to VLF.
3. Set GROUND, DISCRIMINATION, and SENSITIVITY to mid-range.
4. Hold the search coil at least 25cm away from the ground and any metal
object, hold down the red button on the handle and slowly rotate TUNE
until the meter pointer resets at or near 0.
As you search, you can fine-tune the detector using the other controls (See
“FINE-TUNING THE DETECTOR” on page 12.).
NOTE: Press the red button on the handle at any time during operation
to automatically return the pointer to 0.
9
Page 10

TESTING AND USING THE DETECTOR
To learn how the detector reacts to different metals, you should test it before
you use it for the first time. You can test the detector indoors or outdoors.
INDOOR TESTING
1. Remove any watches, rings, or other metal jewellery you are wearing, then
place the detector on a wooden or plastic table.
2. Adjust the search coil's angle so the flat part faces the ceiling.
NOTE: Never test the detector on a floor inside a building. Most buildings
have metal of some kind in the floor, which might interfere with
the objects you are testing or mask the signal completely.
3. Set MODE to TR1.
4. Move a sample of the material you want the detector to find (such as a
gold ring or a coin) about 5cm above the search coil.
NOTE:
• The search coil will not detect without motion. You must move the
object since you are not sweeping with the detector at this time.
• If you are using a coin, the detector detects it more easily if you hold
it so a flat side (not the edge) is parallel with the flat side of the
search coil.
• If the detector detects the material, the pointer moves to FERROUS
or NON-FERROUS while the detector determines the type of metal it
is detecting. If it detects non-ferrous metal, it also sounds a tone.
• If the detector does not detect the material, check the LOW BATT
indicator and verify that the search coil is properly connected. Also,
you might need to fine-tune the detector SSee “FINE-TUNING THE
DETECTOR” on page 12.
10
Page 11

OUTDOOR TESTING AND USE
1. Find an area on the ground outside where there is no metal.
2. Place a sample of material you want the detector to find (such as a gold
ring or a coin) on the ground.
3. Set MODE to TR1.
4. While holding the search coil level about 2.5-5cm above the ground, slowly
move the search coil over the sample, sweeping the search coil in a sideto-side motion.
SEARCH COIL SWEEPING HINTS:
• Never sweep the search coil as if it were a pendulum. Raising the
sides of the search coil, will cause false readings.
•Sweep slowly and methodically.
If the detector detects the item, it sounds a tone and the pointer moves to the
type of metal it found. When you detect metal, switch MODE TR1 to TR2 to
determine the quality of the metal.
If the detector does not detect the material, make sure you are moving the
search coil correctly.
NOTE:
• The detector responds with a strong signal when it detects metal
objects. If a signal does not repeat after you sweep the search coil
over the target a few times, the target is probably junk metal.
• False signals can be caused by areas containing large amounts of
trash, electrical interference, or large irregular pieces of junk metal.
5. Try finding other metal in the area. When you find a metal item, wait a few
seconds after the tone stops before continuing to allow the detector time
to reset (or, press the red button on the handle to return the pointer to the
center of the meter).
11
Page 12

FINE-TUNING THE DETECTOR
After you become familiar with how your detector works, you can fine-tune it
to make it less sensitive to interference and more selective in what it finds.
ADJUSTING SENSITIVITY
To adjust the search coil's ability to detect objects at different depths in the
soil, rotate SENSITIVITY between MIN and MAX. For maximum detection depth,
leave SENSITIVITY set as high as possible. If the detector makes a "chattering"
noise, decrease SENSITIVITY until the chatter stops.
ADJUSTING GROUND
Setting GROUND takes a little time, but is critical for accurate operation.
GROUND tunes out false signals from mineralized soil.
1. Set MODE to VLF and lower the search coil to 1.3-5cm above the ground.
• If the pointer swings to the right (Nonferrous), turn GROUND to
NORMAL.
• If the pointer swings to left (Ferrous), turn GROUND to BASALT.
2. Raise the search coil about 25cm from the ground and press the red
button on the handle. The pointer returns to the center.
3. Repeat Steps 1-2 until the pointer stays close to the center each time you
lower the search coil to the ground.
After you set GROUND, the detector is set for the soil type at that particular
site. Do not reset it until you use the detector at a different site.
ADJUSTING DISCRIMINATION
Discrimination is the detector's ability to differentiate between ferrous and
non-ferrous metals.
If MODE is set to TR2, start with DISCRIMINATION set to mid-range. While you use
the detector, adjust DISCRIMINATION to the best position. As you set
DISCRIMINATION higher, the detector becomes more sensitive to the
differences between large aluminum and gold pieces, for example, but some
small valuable pieces, such as coins and small rings, might be overlooked.
At setting 'Min' the detector will detect nearly all metal. as you increase the
setting more objects will be rejected. On a high setting only the most
conductive metals will be found.
NOTE: Each time you use the detector in a different area, you must
readjust DISCRIMINATION.
12
Page 13

PINPOINTING A TARGET
Accurately pinpointing a target makes digging it up easier. This takes practice,
and we suggest you practice finding and digging up small metal objects on
your own property before you search other locations.
Sometimes, targets are difficult to accurately locate due to the sweep
direction. Try changing your sweep direction to pinpoint a target.
1. When the detector locates a buried target, continue sweeping the search
coil over the target, in a narrowing side-to-side motion.
2. Make a visual note of the exact spot on the ground where the detector
beeps.
3. Stop the search coil directly over this spot on the ground. Then move the
search coil straight away from you and straight back towards you a couple
of times.
4. Make a visual note of the exact spot on the ground where the detector
beeps.
5. Repeat Steps 1-3 at a right angle to the original searchline, making an "X"
pattern. The target will be directly below the "X" at the point of the loudest
response.
NOTE:
• If trash in an area is so heavy that you get false signals, slow your
sweep speed and use shorter sweeps.
• Recently buried coins might not respond the same as coins buried
for a long period of time because of oxidation.
• Some nails, nuts, bolts, and other iron objects (such as old bottle
caps) oxidize and create a "halo" effect. A halo effect is caused by
a mixture of natural elements in the ground and the oxidation
created by different metals. Because of the metal mixtures, target
signals might not be in a "fixed" position. This effect makes these
objects very hard to detect accurately.
13
Page 14
DETECTION HINTS
No detector is 100 percent accurate. Various conditions influence metal
detection. The detector's reaction depends on a number of factors:
• the angle at which the object rests in the ground
• the depth of the object
• the amount of iron in the object
• the size of the object
FALSE SIGNALS
Because your detector is extremely sensitive, rubbish-induced signals and
other sources of interference might cause false signals.
To reduce false signals when searching areas containing large amounts of
trash, scan only a small area at a time using slow, short overlapping sweeps.
PARTS AND SERVICING
For Parts & Servicing, please contact your nearest dealer, or
CLARKE International, on one of the following numbers.
PARTS & SERVICE TEL: 020 8988 7400
PARTS & SERVICE FAX: 020 8558 3622
or e-mail as follows:
PARTS: [email protected]
SERVICE: [email protected]
14
Page 15

NOTES
15
Page 16

 Loading...