

Page 1
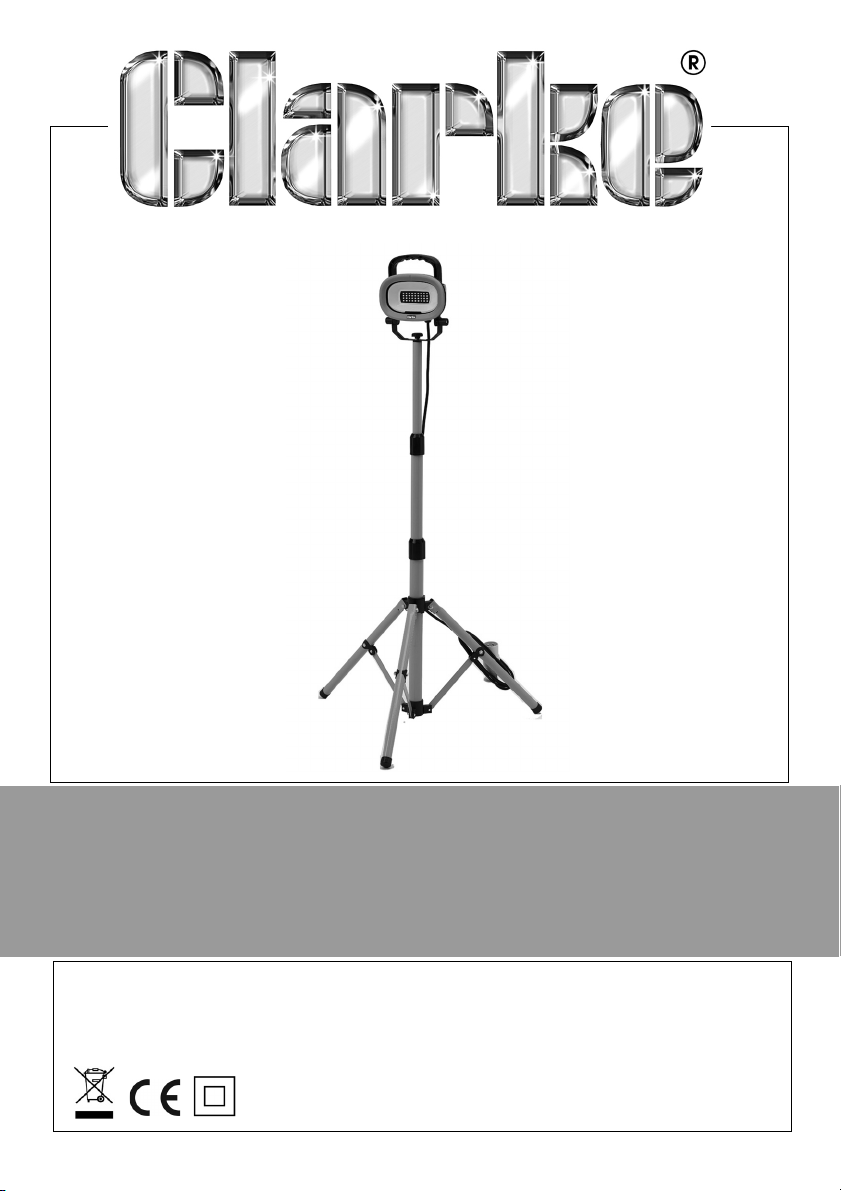
110V LED WORKLIGHT
MODEL NO: SMD42T/110
PART NO: 4003630
ASSEMBLY & USER
INSTRUCTIONS
ORIGINAL INSTRUCTIONS GC1119 ISS 2
Page 2
INTRODUCTION
Thank you for purchasing this CLARKE portable LED floodlight, suitable for both
indoor and outdoor use.
Before attempting to use this product, please read this manual thoroughly and
follow the instructions carefully. In doing so you will ensure the safety of yourself
and that of others around you, and you can look forward to your purchase
giving you long and satisfactory service.
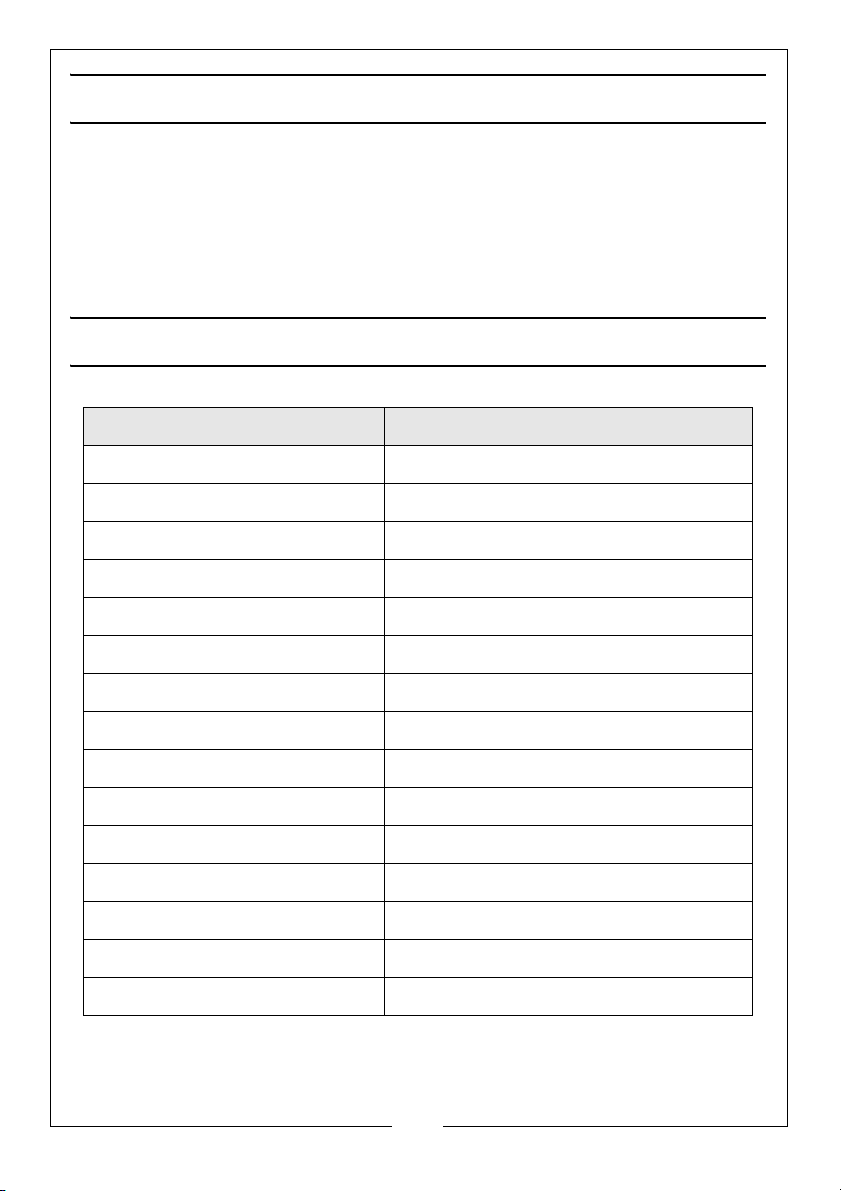
SPECIFICATIONS
Model SMD42T/110
Model type L3305SJ
Dimensions (L x W x H) 58 x 870 x 1720 mm
Weight 3.5 kg
Light Source SMD LED array
Operating Temperature -20 to +50oC
Input power 21 W
Light Output (luminous flux) 1650 @ 1m (lumen)
Power Supply 110V/ 50 HZ
Insulation Class II
Ingress Protection Rating IP54
Energy Efficiency Class A+
Colour Temperature 6500 K
Weighted Energy Consumption 21 kWh/1000h
Efficiency 80 Lm/W
Life Expectancy of LEDs 20,000 hours
2
Parts & Service: 020 8988 7400 / E-mail: [email protected] or [email protected]
Page 3

SAFETY PRECAUTIONS
1. This worklight must not be immersed in water.
2. Do not look directly into the lamp when switched on as this can damage
the eyes.
3. If used with an extension cable always ensure that the extension cable is
fully unwound.
4. Do not use this worklight if it has a broken lens, casing or damaged cable.
5. Always unplug the worklight before moving it or performing maintenance.
Do not touch the lamp when your hands are wet.
6. Do not attempt to disassemble or repair the worklight.
7. Do not leave the worklight unattended when switched on. Always unplug
the worklight when it is not in use.
8. Always unplug the worklight by holding the plug, never only the cable.
9. Never use the worklight if the cable or plug are damaged.
10. When assembling the tripod, ensure that the ground is level and firm.
11. Take extra care not to push or knock the tripod over when fully extended.
12. Ensure the lamp is a safe distance from other objects in the workplace.
GUARANTEE
This product is guaranteed against faulty manufacture for a period of 12
months from the date of purchase. Please keep your receipt which will be
required as proof of purchase.
This guarantee is invalid if the product is found to have been abused or
tampered with in any way, or not used for the purpose for which it was
intended.
Faulty goods should be returned to their place of purchase, no product can
be returned to us without prior permission. This guarantee does not effect your
statutory rights.
ENVIRONMENTAL RECYCLING POLICY
Through purchase of this product, the customer is taking on the obligation to
deal with WEEE in accordance with the WEEE regulations in relation to the
treatment, recycling, recovery & environmentally sound disposal of the WEEE.
This means that this product must not be disposed of with general household
waste. It must be disposed of according to the laws governing Waste
Electrical and Electronic Equipment (WEEE) at a recognised disposal facility.
3
Parts & Service: 020 8988 7400 / E-mail: [email protected] or [email protected]
Page 4
ELECTRICAL CONNECTIONS
WARNING! READ THESE ELECTRICAL SAFETY INSTRUCTIONS
THOROUGHLY BEFORE CONNECTING THE PRODUCT TO A
POWER SUPPLY.
This product can be connected to one of the following power supplies:
• 110V generator
• 110V isolating transformer
• 110V site supply
• 230V generator via a 110V transformer.
Connecting it to any other power source may cause damage.
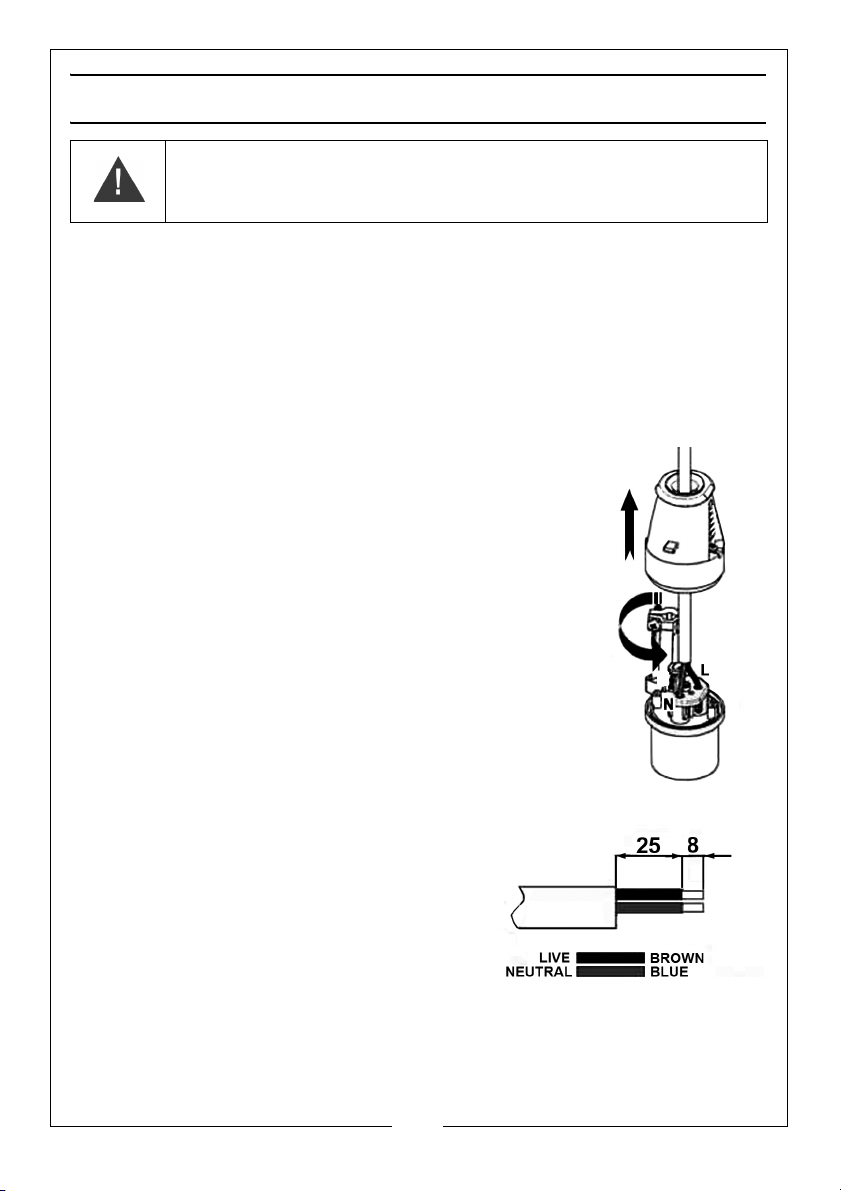
This product includes a fitted industrial plug to BS-EN
60309 and cable for use with a 110 volt supply. On no
account may a 230V/13amp (BS1363) plug be used.
If using a portable 110V transformer make sure it has a
rated capacity sufficient to take the load of the
worklight.
Should the plug need changing at any time, ensure
that a plug of identical specification is used and
proceed as follows:
1. Undo the socket screws & remove the rear section.
2. Rotate the cable clamp clear of the terminals.
3. Feed the cable through the rear gland in the plug.
4. Remove the cable sheath to the required lengths
as shown in the diagram.
5. Terminate the correct wires in the
correct terminal blocks as shown.
6. Remove the cable clamp screws. Clip
the cable clamp back into position and
place the clamp around the outer
sheath of the cable. Replace the screws
and tighten until the cable is securely
held.
7. Replace the rear cover and tighten the cover screws.
If in any doubt, consult a qualified electrician. DO NOT attempt any repairs
yourself.
4
Parts & Service: 020 8988 7400 / E-mail: [email protected] or [email protected]
Page 5
The user should purchase a suitable connecting lead which is compatible with
the appliance socket. The length should give mobility to the worklight but
without becoming a trip hazard.
ASSEMBLY & MOUNTING
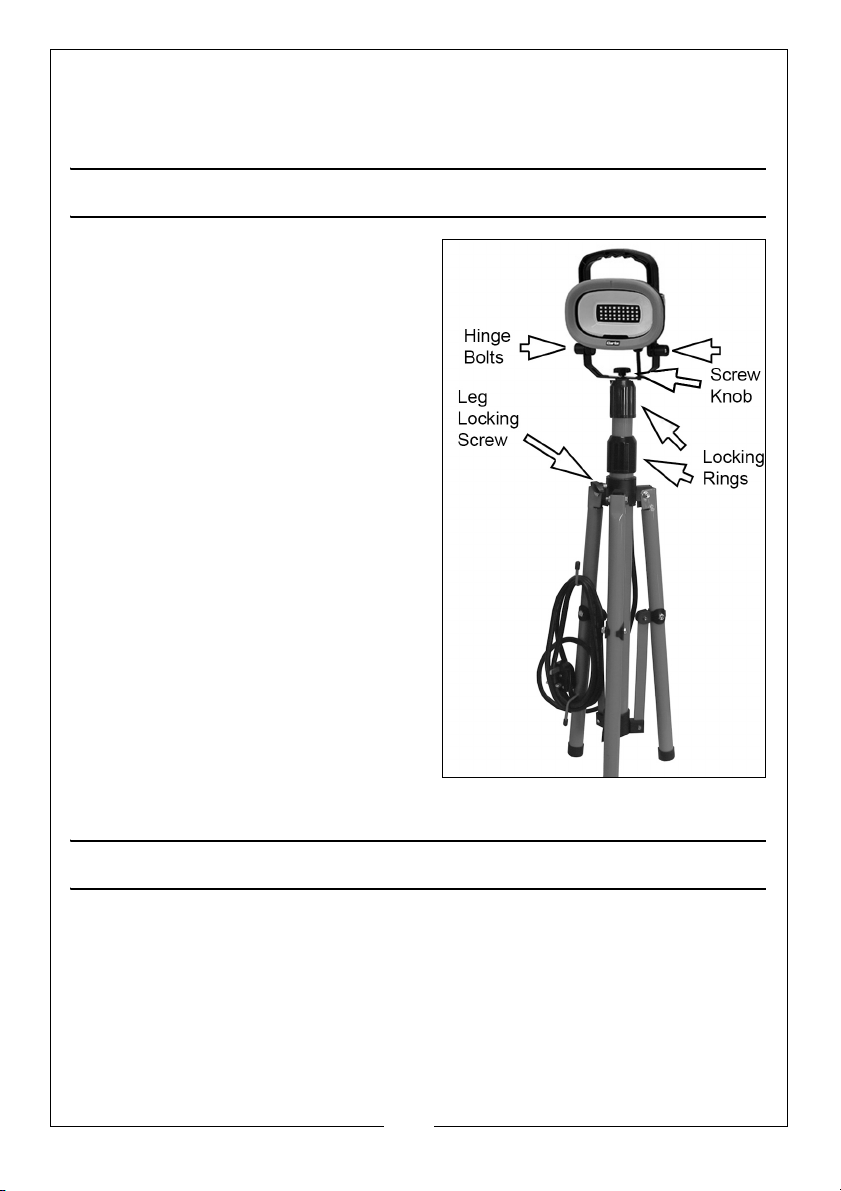
The tripod stand is supplied fully
assembled. If the end/upper tripod
extension is not visble, turn the locking
ring and tilt the tripod to slide the
extension to greater height.
1. Pull the legs apart to erect the
tripod and set in position with the
leg locking screw.
2. Adjust the height of the tripod
column by twisting the locking rings
anti-clockwise to release, & sliding
the tubes to the required height
before twisting clockwise to lock.
3. Attach the worklamp to the column
by securing with the screw knob.
• The worklamp can be swivelled if
required by loosening the screw
knob.
4. Tighten the hinge bolts on either
side of the lamp to set the angle of
elevation as required.
5. The on/off switch is located onthe
back of the lamp unit.
CARE & STORAGE
1. When not in use, switch off & unplug from the power supply. Coil the cable
around the storage hooks provided on the tripod for tidy storage.
2. Store in a secure, dry place, out of the reach of children. DO NOT leave it
exposed to the elements and avoid direct sunlight, direct heat, rain/
moisture etc.
3. Keep the external surfaces clean. Avoid impact damage & do not allow
this product to come into contact with abrasive or corrosive materials.
5
Parts & Service: 020 8988 7400 / E-mail: [email protected] or [email protected]
Page 6
4. Do not use solvents, thinners or alcohol for cleaning, as these chemicals will
damage the finish. With the lamp unplugged from the power supply, use a
dry cloth to wipe over the lamp components.
5. The LED light source cannot be replaced but has a life expectancy of
approximately 20000 hours.
6. Never use unauthorized accessories or attachments which can cause
personal injury or damage to the product.
7. Do not attempt to repair or modify this product or attempt any electrical
repair yourself. Consult the Clarke Service Department on 020 8988 7400..
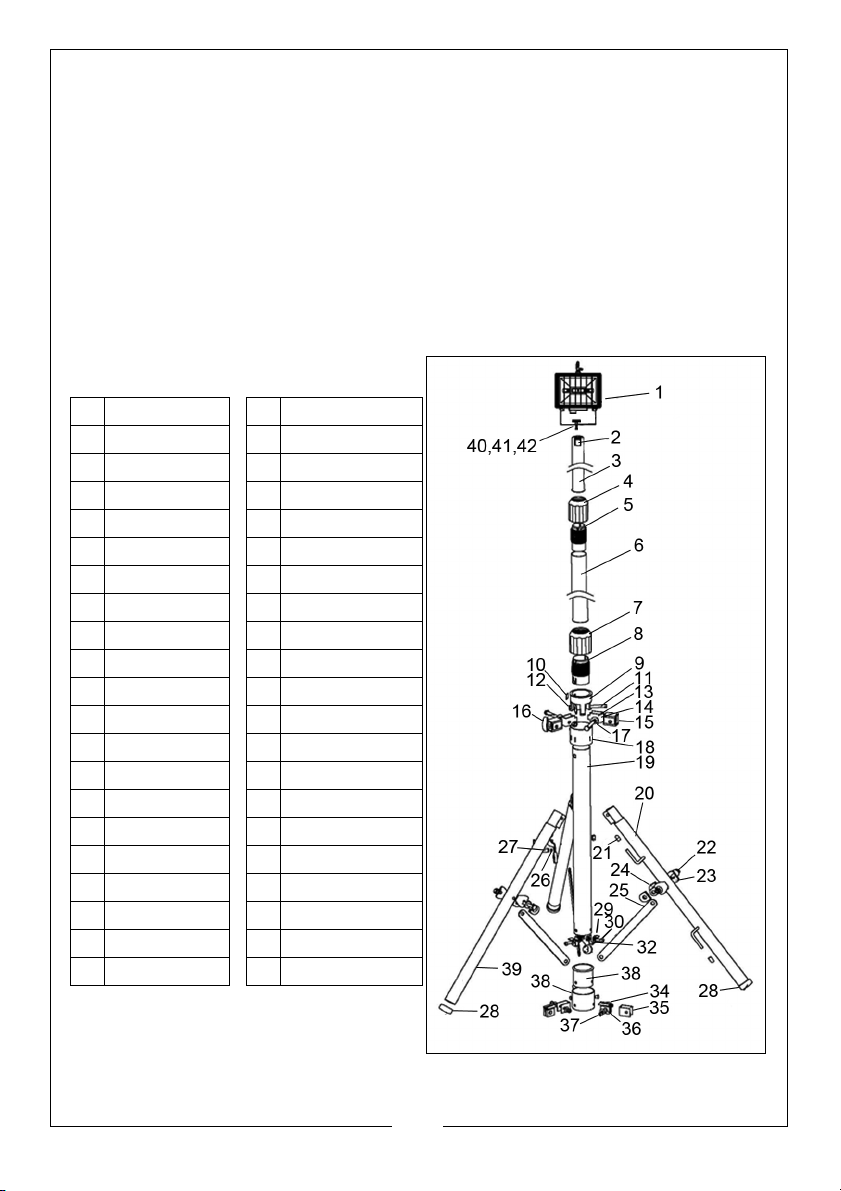
REPLACEMENT TRIPOD PARTS
1 Lamp Head 22 Bolt
2Top End 23Bracket
3 Upper Tube 24 Packer
4 Locking Ring 25 Connecting Arm
5 Screwed Tube 26 Open Washer
6 Middle Tube 27 Bolt
7 Locking Ring 28 End cap
8 Screwed Tube 29 Connection
9 Washer 30 Pan Head Screw
10 Washer 31 Nut
11 Outer Hex Bolt 32 Flat Washer
12 Locknut 33 Washer
13 Fixing Bracket 34 Plastic Cover
14 Flat Washer 35 Adapting Piece
15 Plastic Cover 36 Inner Bolt
16 Oval Screw 37 Cross Screws
17 Spring Washer 38 End Connection
18 Connector 39 Leg
19 Stand Tube 40 Screw Knob
20 Leg with Hook 41 Spring Washer
21 Hook End Cap 42 Flat Washer
6
Parts & Service: 020 8988 7400 / E-mail: [email protected] or [email protected]
Page 7

DECLARATION OF CONFORMITY
7
Parts & Service: 020 8988 7400 / E-mail: [email protected] or [email protected]
Page 8

 Loading...