

Page 1
LB7S Log Buster Stand.fm Page 1 Thursday, February 9, 2017 11:11 AM
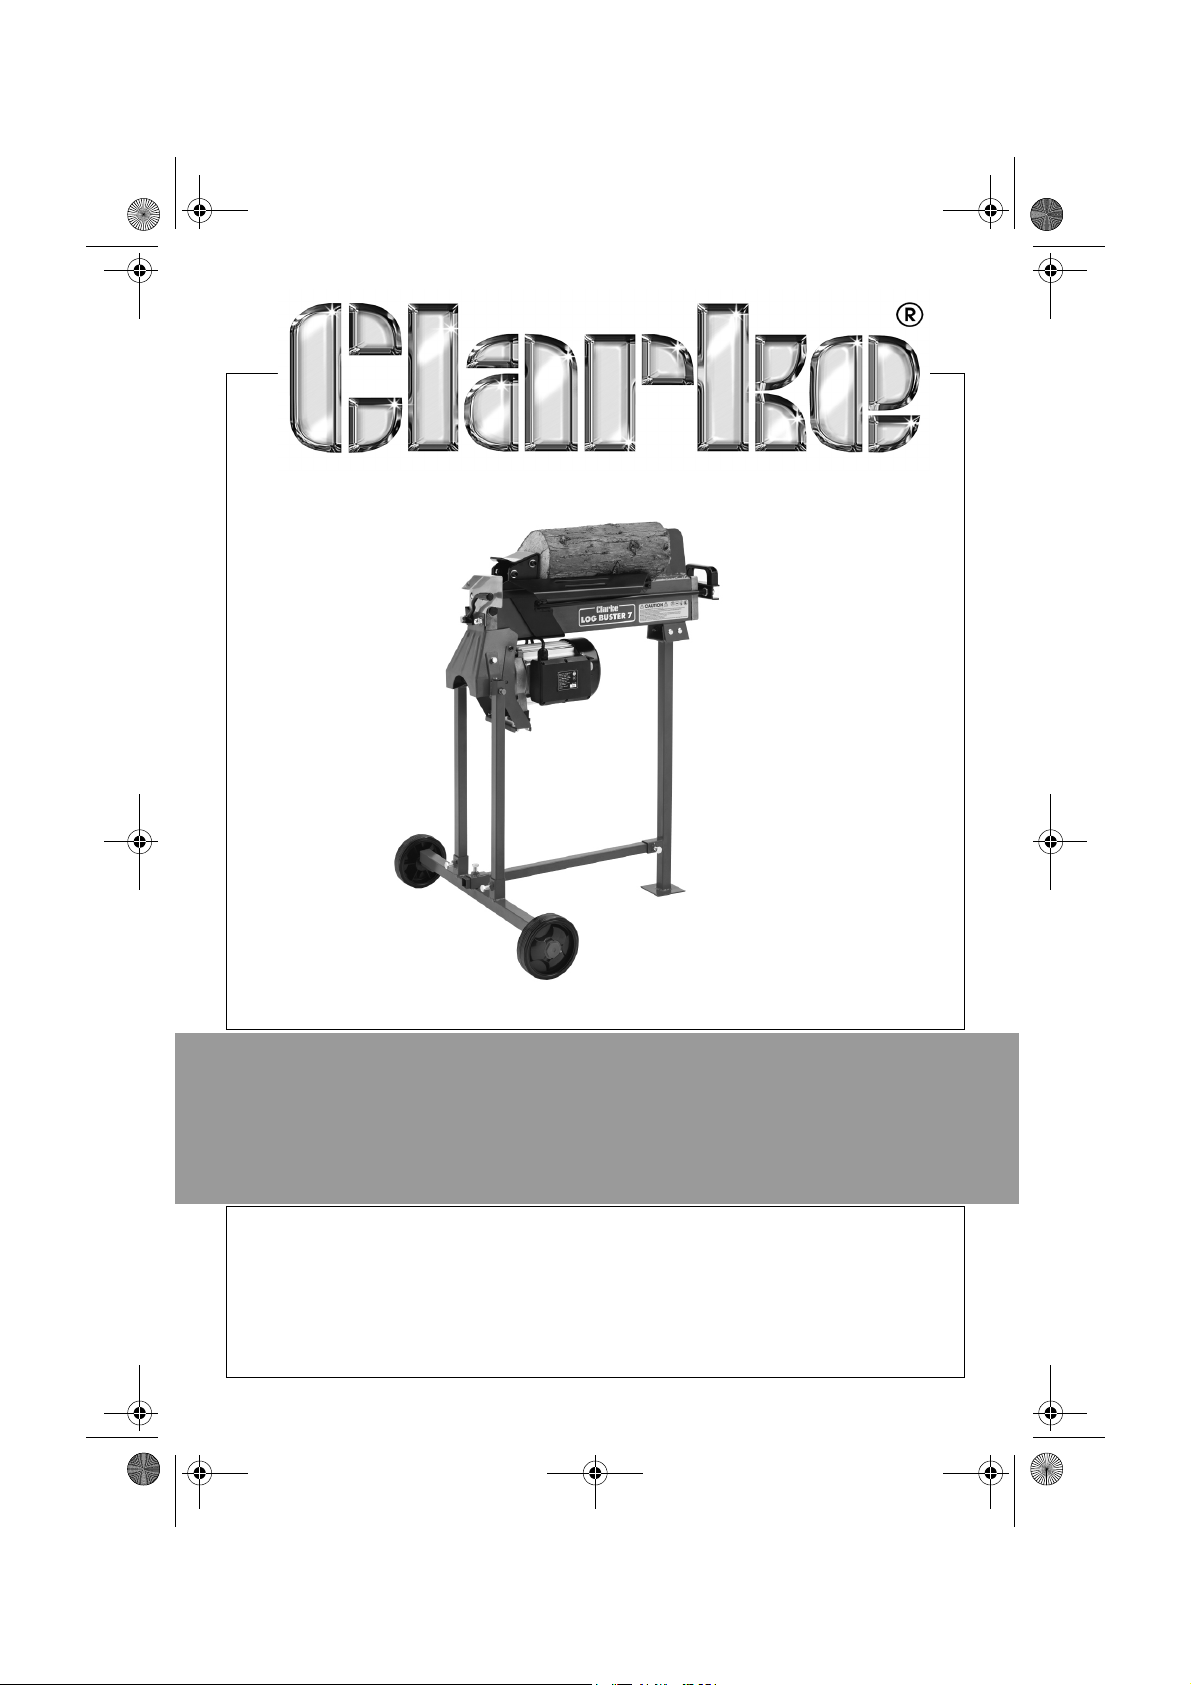
STAND FOR LOGBUSTER 7
MODEL NO: LB7S
PART NO: 3402047
OPERATION & MAINTENANCE
INSTRUCTIONS
LS0217
Page 2
LB7S Log Buster Stand.fm Page 2 Thursday, February 9, 2017 11:11 AM
INTRODUCTION
Thank you for purchasing this CLARKE logbuster Stand.
Before attempting to use this product, please read this manual thoroughly and
follow the instructions carefully. In doing so you will ensure the safety of yourself
and that of others around you, and you can look forward to your purchase
giving you long and satisfactory service.
GUARANTEE
This product is guaranteed against faulty manufacture for a period of 12
months from the date of purchase. Please keep your receipt which will be
required as proof of purchase.
This guarantee is invalid if the product is found to have been abused or
tampered with in any way, or not used for the purpose for which it was
intended.
Faulty goods should be returned to their place of purchase, no product can
be returned to us without prior permission.
This guarantee does not effect your statutory rights.
SPECIFICATIONS
Model Number: LB7S
Part Number: 3402047
Dimensions (Stand only): 667 x 725 x 735 mm
Net Weight: 6.1 kg
2
Parts & Service: 020 8988 7400 / E-mail: [email protected] or [email protected]
Page 3
LB7S Log Buster Stand.fm Page 3 Thursday, February 9, 2017 11:11 AM
PART IDENTIFICATION
UNPACKING
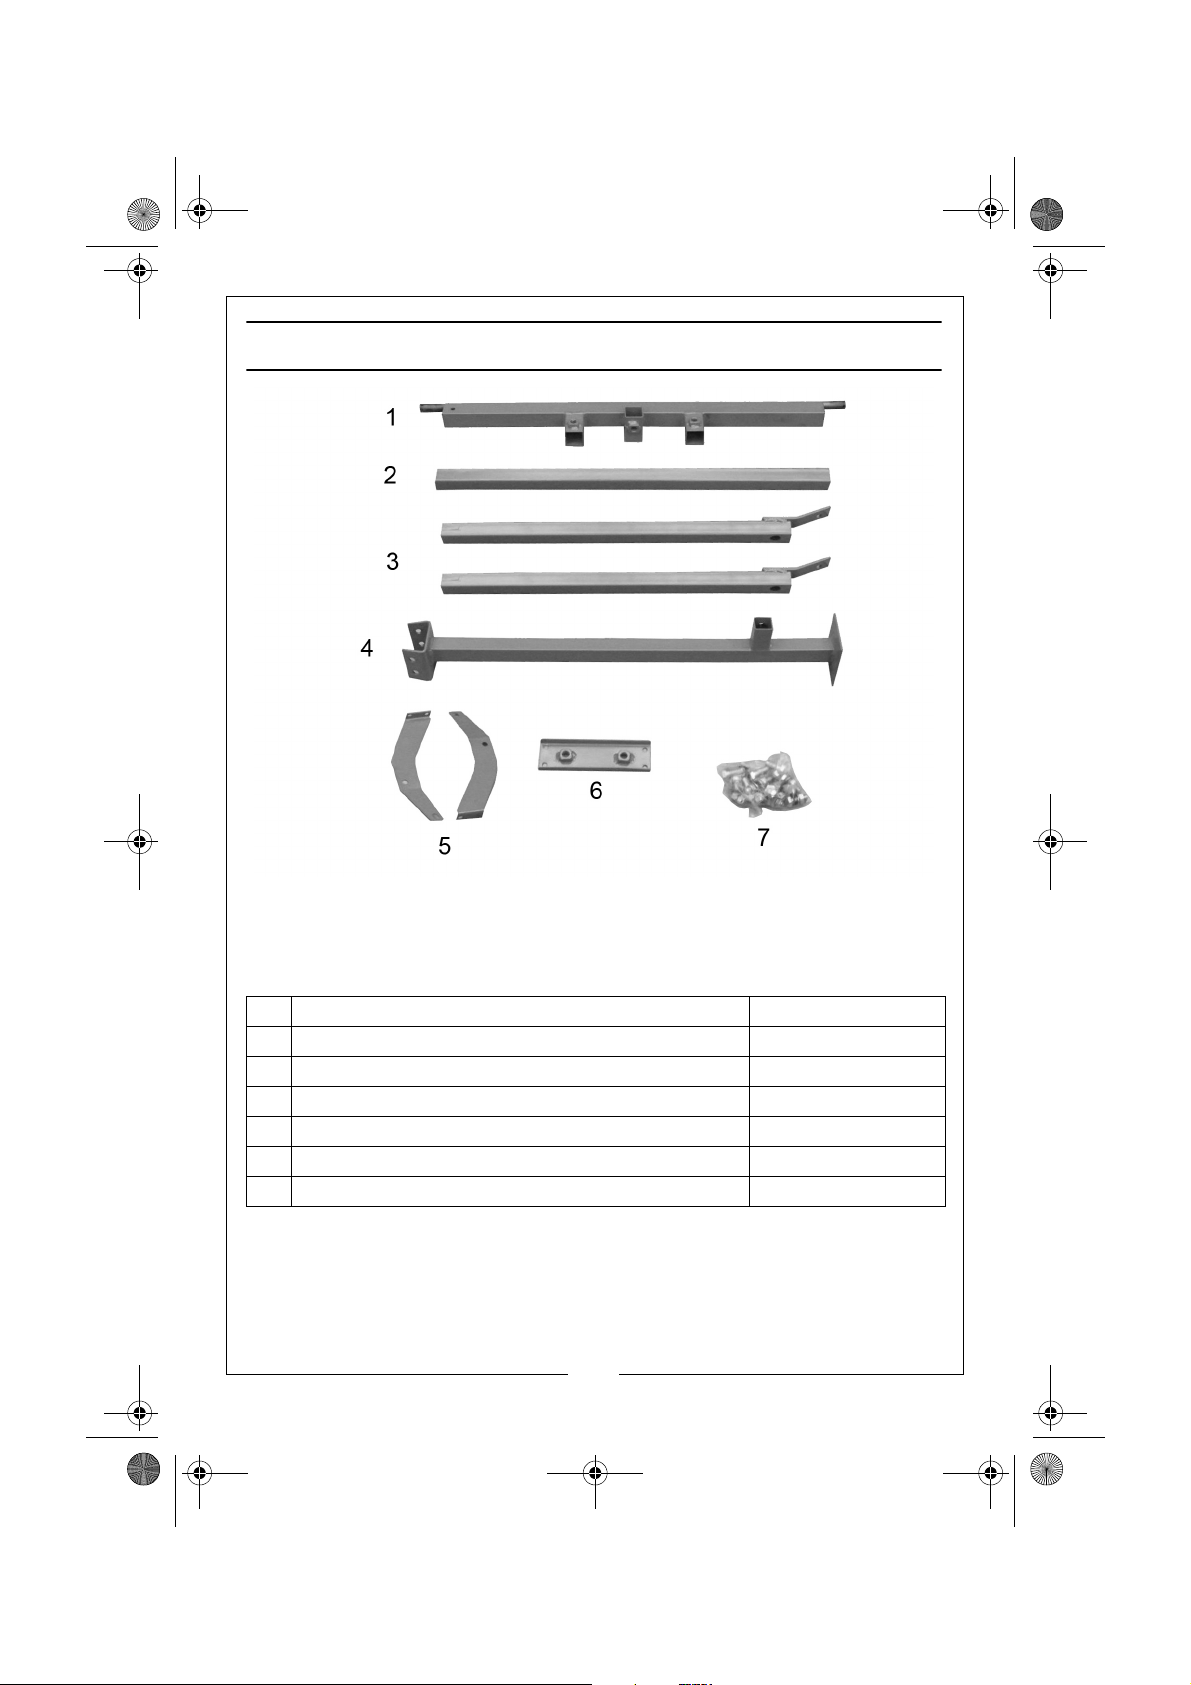
The following items should be supplied in the carton. If any parts are missing or
damaged, please consult your Clarke dealer where you purchased the stand.
1 1 x Wheel support beam LGLB7S01
2 1 x Cross beam LGLB7S02
3 2 x Vertical support column LGLB7S03
4 1 x Vertical support column with bracket (front) LGLB7S04
5 2 x Motor support brackets - left and right hand LGLB7S05
6 1 x Motor support cross-member LGLB7S06
7 1 x Fixings pack LGLB7S07
3
Parts & Service: 020 8988 7400 / E-mail: [email protected] or [email protected]
Page 4
LB7S Log Buster Stand.fm Page 4 Thursday, February 9, 2017 11:11 AM
ASSEMBLY
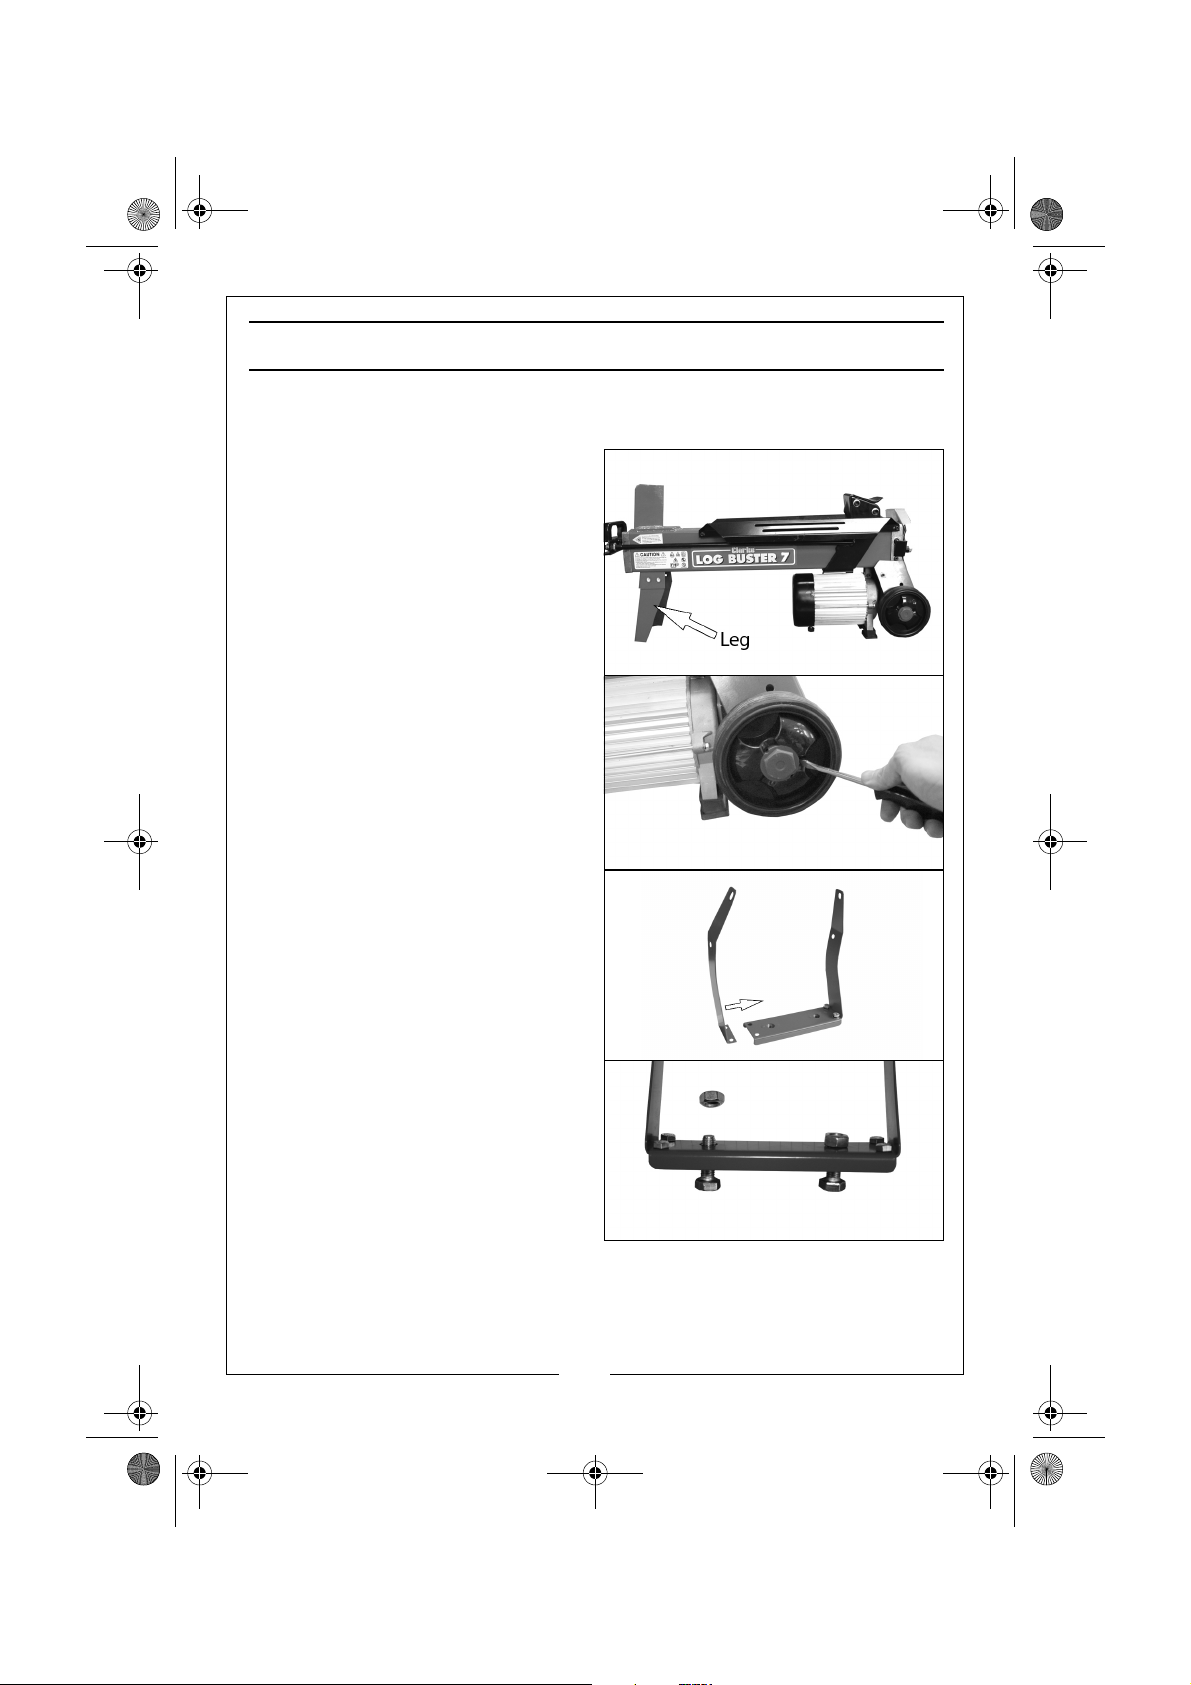
PREPARING THE LOGBUSTER
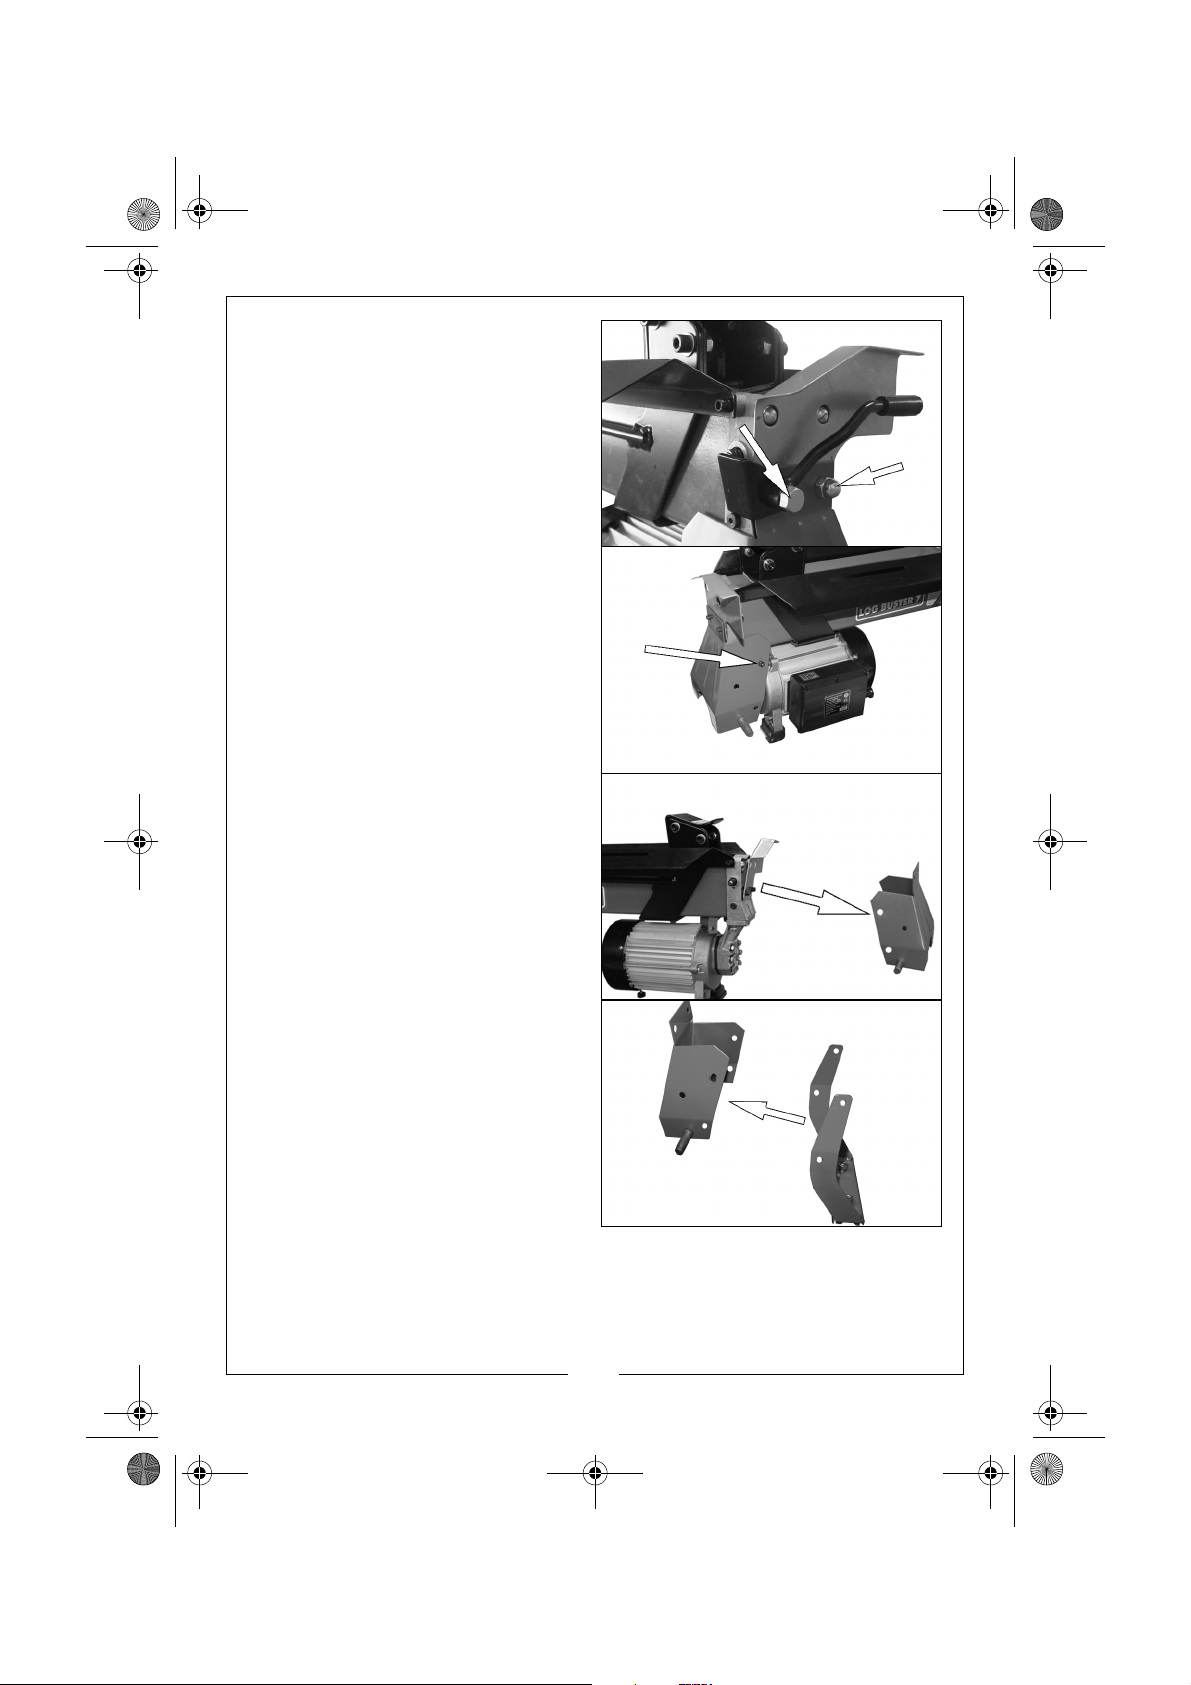
1. Remove the four nuts that attach
the front leg to the logbuster and
remove the leg.
2. Use a flat screwdriver to remove
the wheel axle cover.
3. Remove the circlip and the wheel.
• The wheels, circlips and covers
will be attached to the frame
later (page 7).
4. Assemble the motor support
brackets as shown.
• Use the four small bolts, washers
and nuts supplied.
5. Thread the two support bolts
supplied through the bottom of
the motor support bracket and
put a lock nut on the other side.
4
Parts & Service: 020 8988 7400 / E-mail: [email protected] or [email protected]
Page 5
LB7S Log Buster Stand.fm Page 5 Thursday, February 9, 2017 11:11 AM
6. Remove the safety handle and
nut (shown on the right) from the
logbuster.
7. Remove the machine screws
shown (one on each side of the
logbuster).
8. Remove the pump cover.
9. Position the motor support
bracket inside the pump cover.
5
Parts & Service: 020 8988 7400 / E-mail: [email protected] or [email protected]
Page 6
LB7S Log Buster Stand.fm Page 6 Thursday, February 9, 2017 11:11 AM
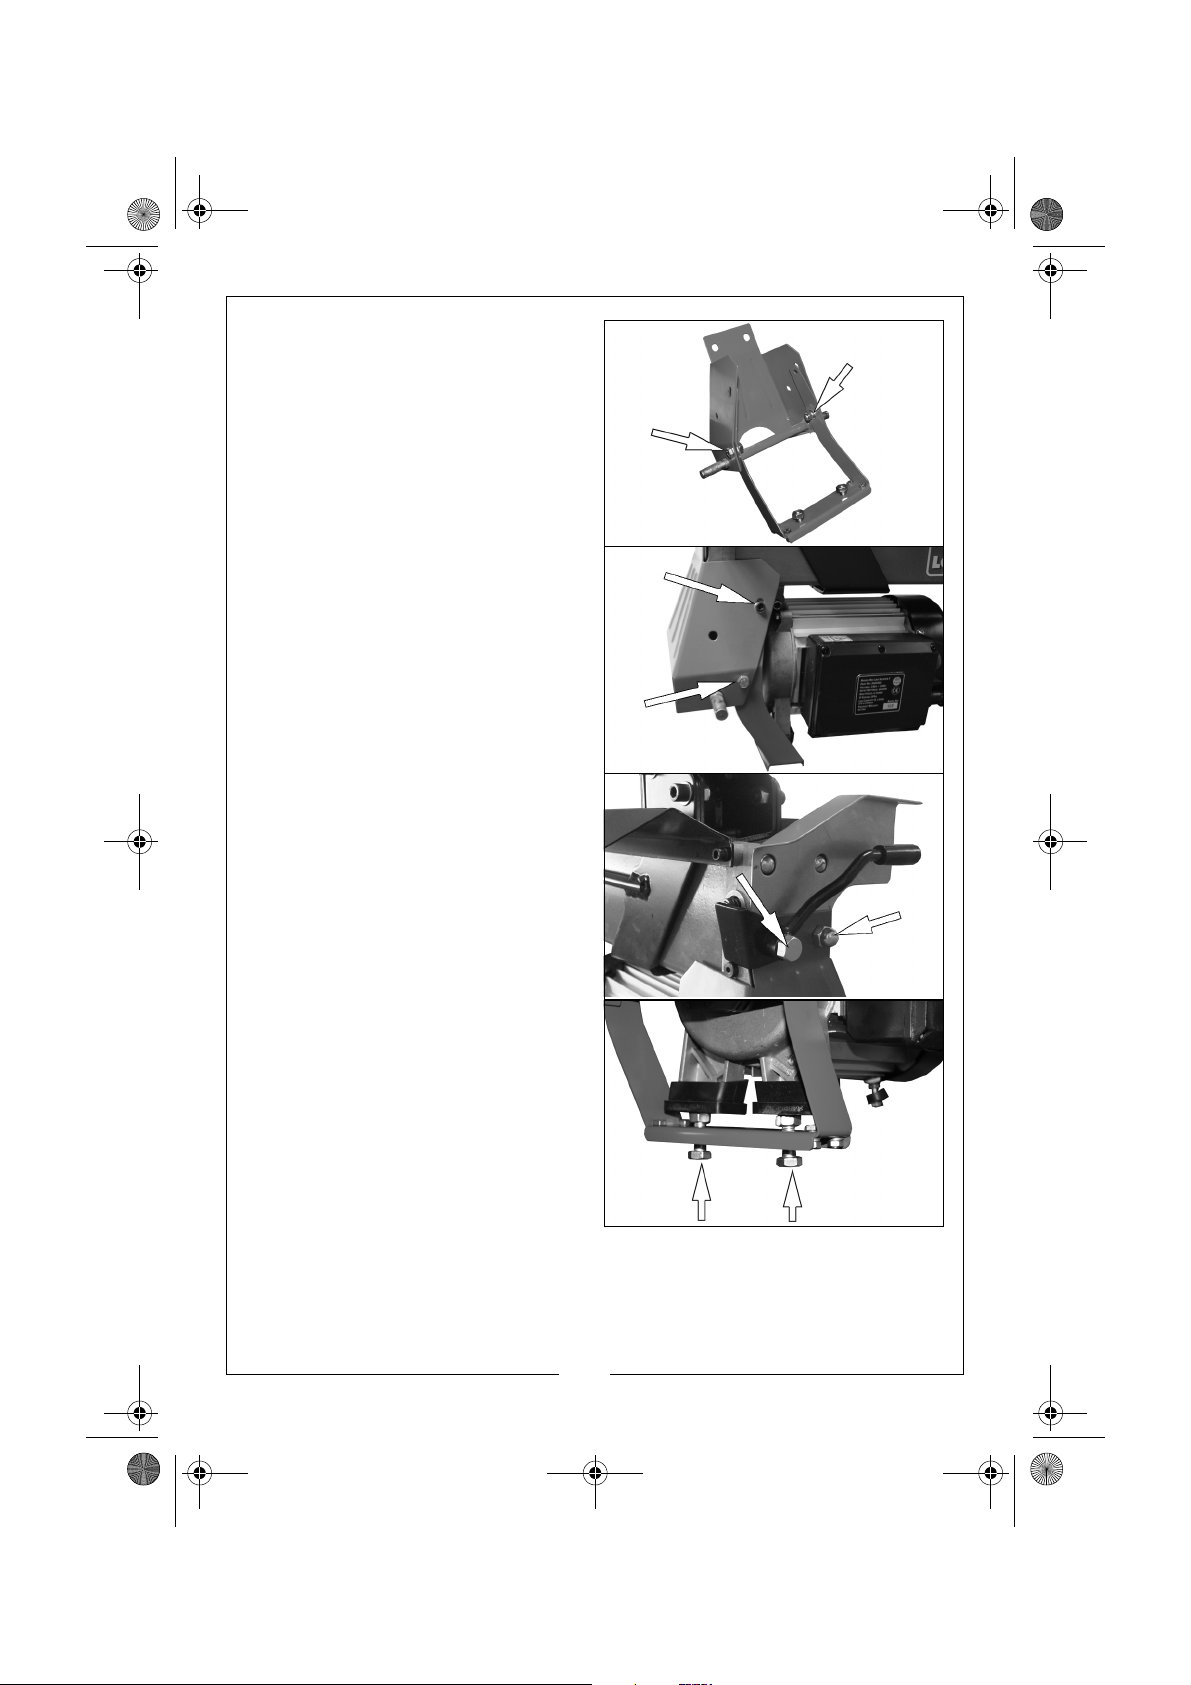
10. Use the bolts/washers and nuts
supplied to attach the motor
support bracket to the pump
cover.
11. Install the pump cover / motor
support bracket assembly onto
the logbuster and use the
machine screw removed in step 7
to lock into position.
12. Refit the safety handle and the nut
removed in step 6.
13. Tighten the support bolts until they
touch the bottom of the motor
feet.
6
Parts & Service: 020 8988 7400 / E-mail: [email protected] or [email protected]
Page 7
LB7S Log Buster Stand.fm Page 7 Thursday, February 9, 2017 11:11 AM
FRAME ASSEMBLY AND FIXING THE LOGBUSTER
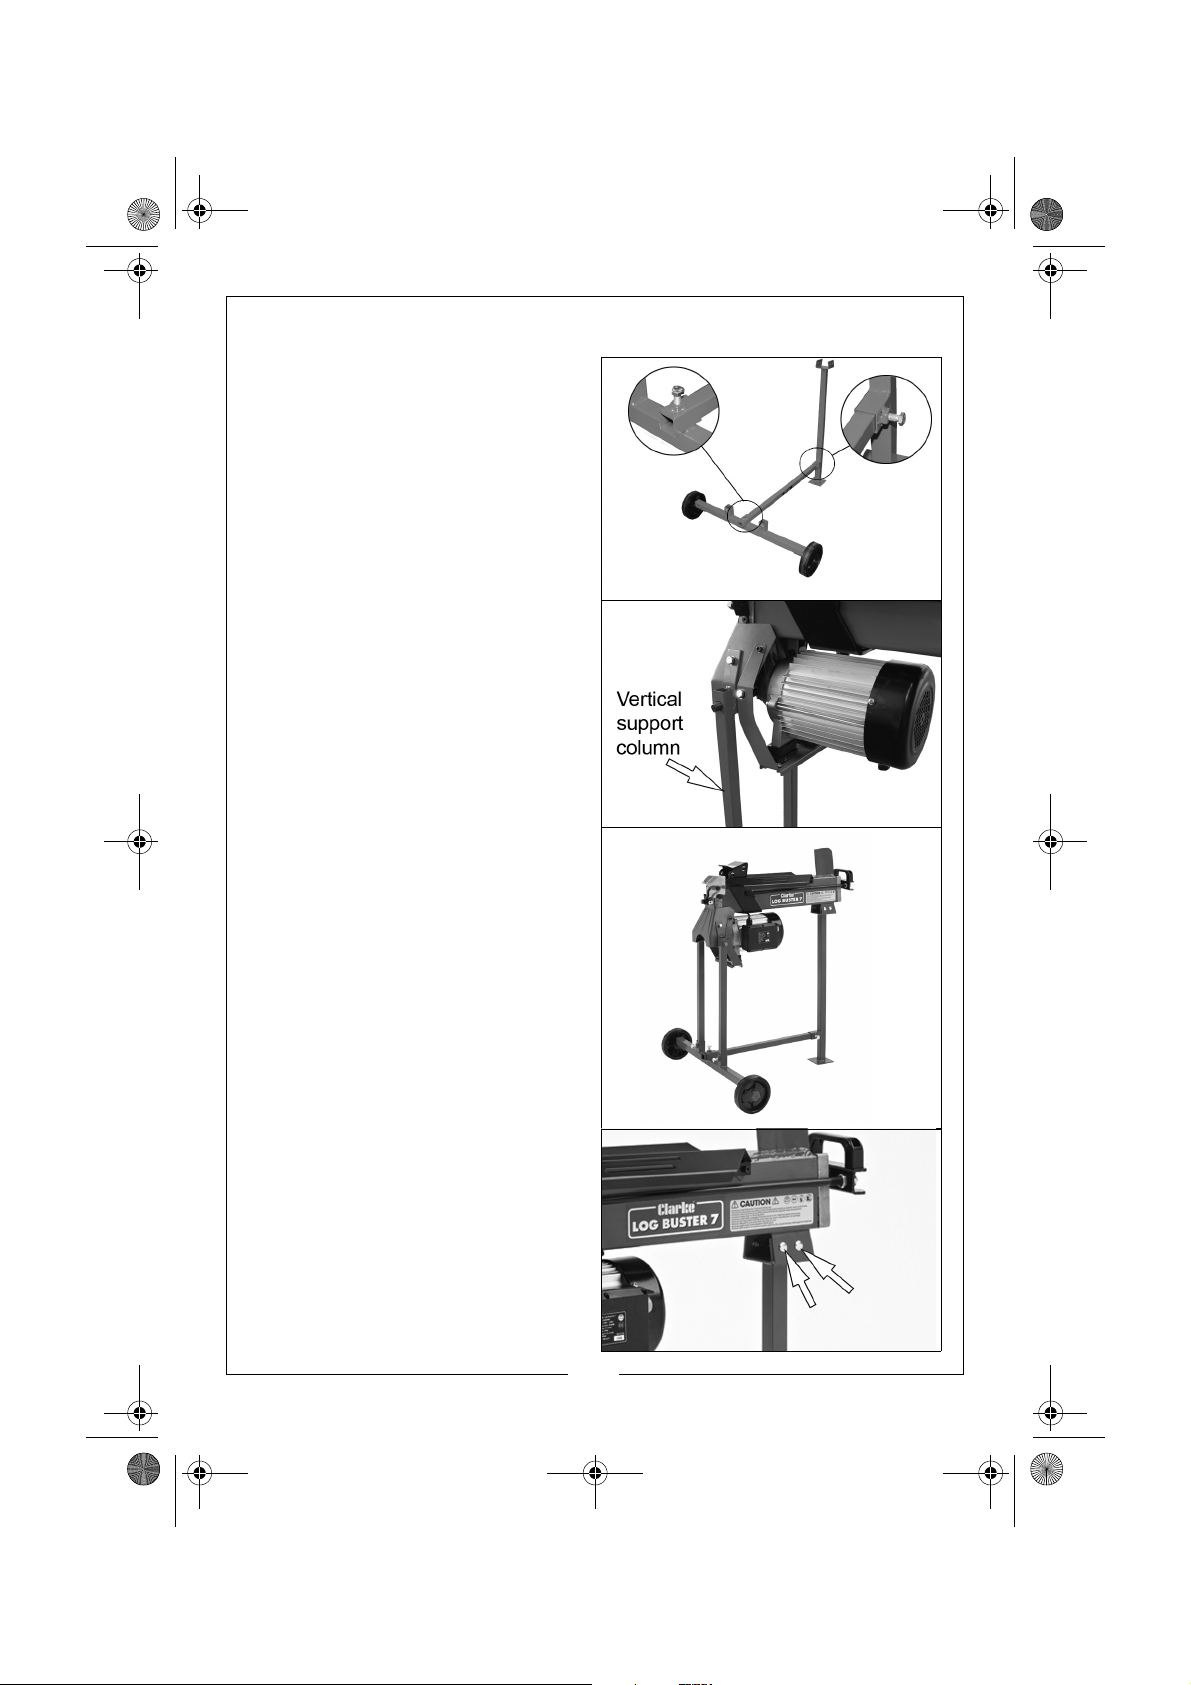
1. Assemble the frame as shown.
2. Attach the wheels you removed
from the logbuster to the logbuster
stand.
3. Fix the vertical support columns to
the wheel mount / pump cover
assembly as shown.
• You may need someone to hold
the other end of the logbuster
whilst you do this.
4. Fit the logbuster to the stand as
shown.
• Make sure the vertical support
columns are inserted into the
wheel support beam correctly
and fixed in place using the
bolts provided.
5. Secure the front vertical support
column to the logbuster using the
four fixings originally used to
secure the foot.
6. The logbuster is now ready for use.
• Lift the logbuster by the front
handle before moving it.
• Only use on a firm level surface.
7
Parts & Service: 020 8988 7400 / E-mail: [email protected] or [email protected]
Page 8
LB7S Log Buster Stand.fm Page 8 Thursday, February 9, 2017 11:11 AM
 Loading...