

Page 1
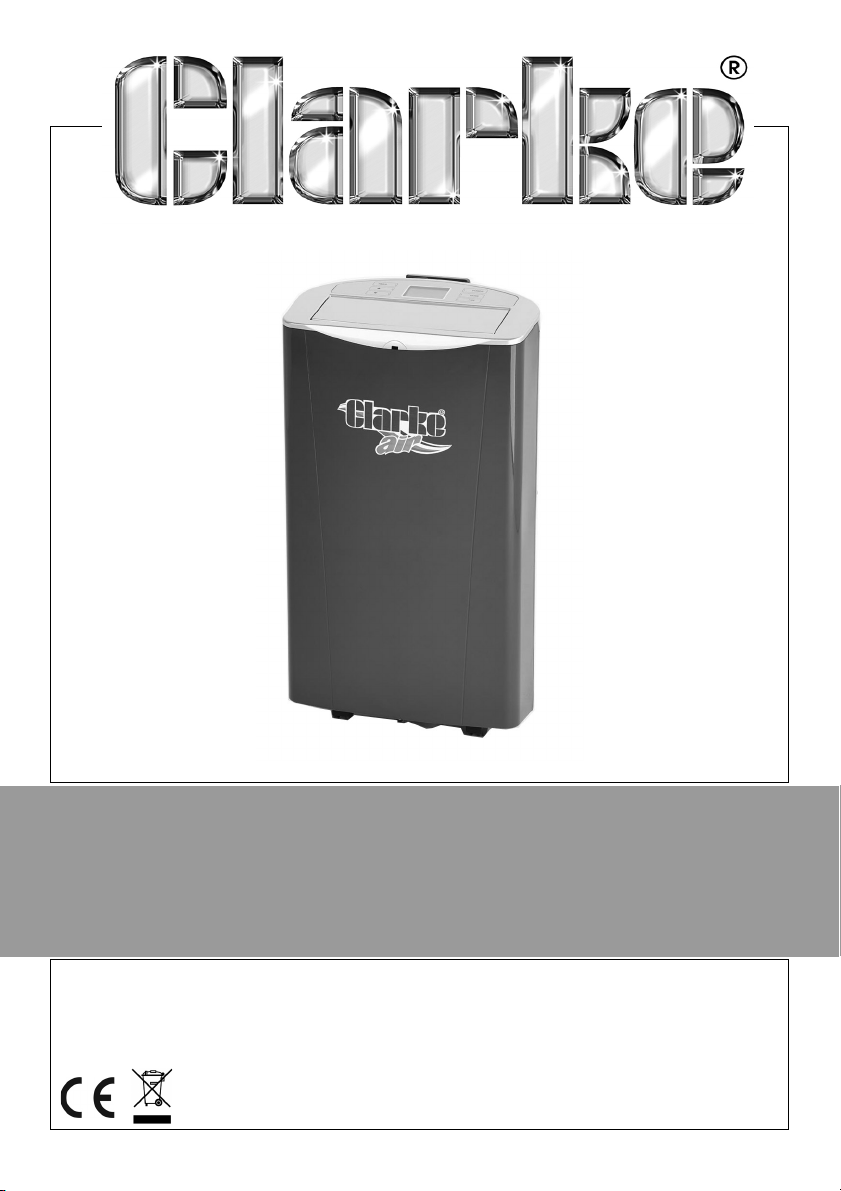
PORTABLE AIR CONDITIONER
MODEL NO: AC10000/13000
PART NO: 3230574/3230576
OPERATION & MAINTENANCE
INSTRUCTIONS
ORIGINAL INSTRUCTIONS GC0518 Iss 3
Page 2
INTRODUCTION
Thank you for purchasing this CLARKE Portable Air Conditioner.
Before attempting to operate the machine, it is essential that you read this
manual thoroughly and carefully follow all instructions given. In doing so you
will ensure the safety of yourself and that of others around you, and you can
also look forward to the product giving you long and satisfactory service.
GUARANTEE
This CLARKE product is guaranteed against faulty manufacture for a period of
12 months from the date of purchase. Please keep your receipt as proof of
purchase.
This guarantee is invalid if the product is found to have been abused or
tampered with in any way, or not used for the purpose for which it was
intended.
Faulty goods should be returned to their place of purchase, no product can
be returned to us without prior permission.
This guarantee does not affect your statutory rights.
ENVIRONMENTAL PROTECTION
Recycle unwanted materials instead of disposing of them as
waste. All unwanted accessories and packaging should be sorted
and taken to a recycling centre for disposal in a manner which is
compatible with the environment.
R410A is a refrigerant that complies with EEC environmental
standards. Nonetheless, the refrigerant circuit on the machine
should never be punctured. At the end of its working life, consign
the air conditioning unit to a special collection centre.
Through purchase of this product, the customer is taking on the obligation to
deal with the WEEE in accordance with the WEEE regulations in relation to the
treatment, recycling & recovery and environmentally sound disposal of the
WEEE.
In effect, this means that this product must not be disposed of with general
household waste. It must be disposed of according to the laws governing
Waste Electrical and Electronic Equipment (WEEE) at a recognised disposal
facility.
2
Parts & Service: 020 8988 7400 / E-mail: [email protected] or [email protected]
Page 3
SAFETY WARNINGS
WARNING: IF THE SUPPLY CABLE IS DAMAGED, IT MUST BE REPLACED BY
THE MANUFACTURER, ITS SERVICE AGENT OR SIMILARLY QUALIFIED
PERSONS IN ORDER TO AVOID A HAZARD.
1. Please read these instructions carefully and retain for future reference.
2. Position the power cable so that it cannot be inadvertently pulled or
pinched, and where it does not cause a trip hazard.
3. This appliance is designed for use in residential environments and must not
be used for other purposes.
4. If the appliance requires repair, always contact your CLARKE dealer.
Always insist on original spare parts. Repairs carried out by unauthorized
persons may be dangerous and invalidate the guarantee.
5. This appliance must only be used by adults. Children should not be allowed
to play with this appliance.
6. Do not use extension power cables.
7. Before cleaning or maintenance operations, always unplug the appliance
from the power supply.
8. Do not move the appliance by pulling the power cable.
9. Do not install the appliance close to sources of gas, oil or sulphur. Do not
install near sources of heat.
10. Do not use the appliance on inclined surfaces.
11. Always keep the appliance at least 50 cm away from walls or furniture.
12. Keep the appliance at least 50 cm away from flammable substances
(solvents etc) or pressurised containers (e.g. aerosol cans).
13. Do not rest heavy or hot objects on top of the appliance.
14. Do not use the appliance outdoors.
15. Do not obstruct or restrict the airflow to the inlet or from the air outlet.
3
Parts & Service: 020 8988 7400 / E-mail: [email protected] or [email protected]
Page 4
ELECTRICAL CONNECTIONS
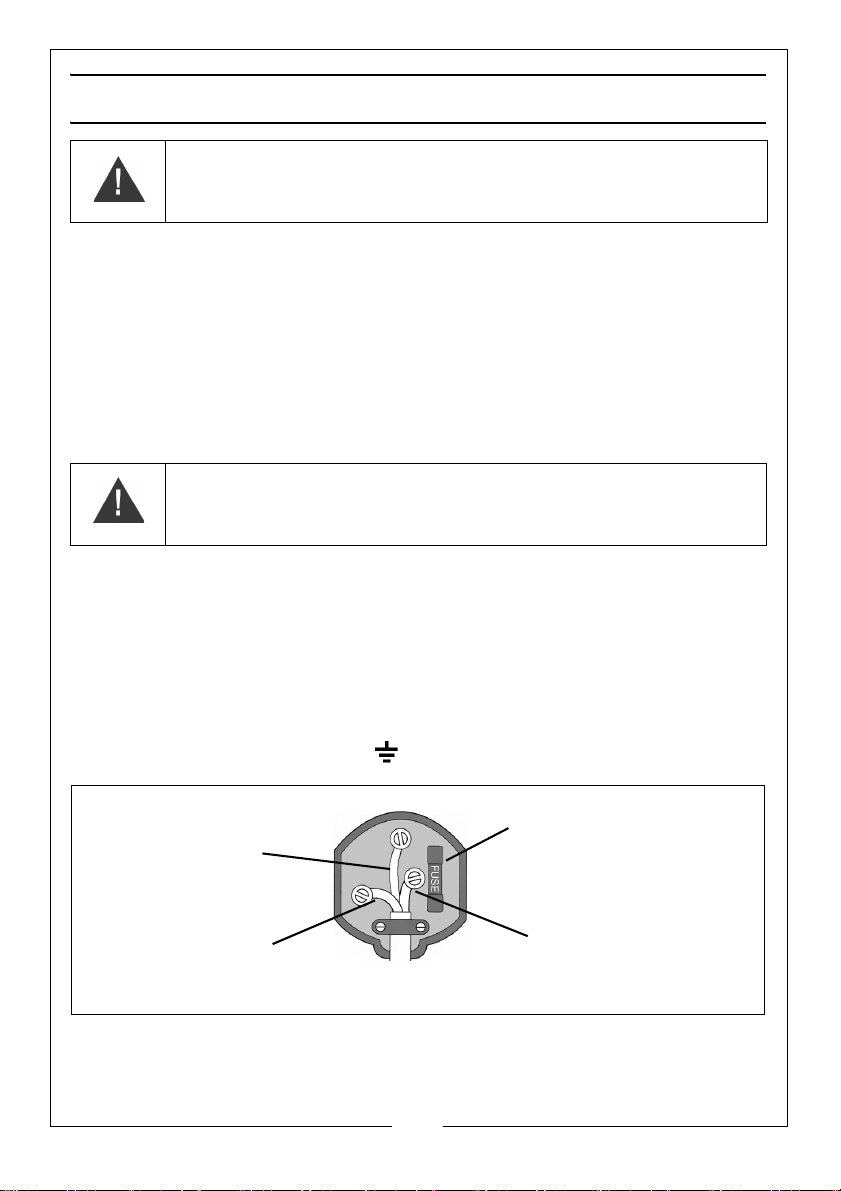
Plug must be BS1363/A approved.
Always fit a 13 Amp fuse.
Ensure that the outer sheath of the cable is firmly held by the clamp
Neutral
(Blue)
Live
(Brown)
Earth
(Green and Yellow)
WARNING! READ THESE ELECTRICAL SAFETY INSTRUCTIONS
THOROUGHLY BEFORE CONNECTING THE PRODUCT TO THE
MAINS SUPPLY.
Before switching the product on, make sure that the voltage of your electricity supply is
the same as that indicated on the rating plate. This product is designed to operate on
230 V AC 50Hz. Connecting it to any other power source may cause damage.
This product may be fitted with a non-rewireable plug. If it is necessary to change the
fuse in the plug, the fuse cover must be refitted. If the fuse cover becomes lost or
damaged, the plug must not be used until a suitable replacement is obtained.
If the plug has to be changed because it is not suitable for your socket, or due to
damage, it should be cut off and a replacement fitted, following the wiring instructions
shown below. The old plug must be disposed of safely, as insertion into a mains socket
could cause an electrical hazard
WARNING! THE WIRES IN THE POWER CABLE OF THIS PRODUCT
ARE COLOURED IN ACCORDANCE WITH THE FOLLOWING CODE:
Blue = Neutral Brown = Live Yellow and Green = Earth
If the colours of the wires in the power cable of this product do not correspond with the
markings on the terminals of your plug, proceed as follows.
• The wire which is coloured Blue must be connected to the terminal which is
marked N or coloured Black.
• The wire which is coloured Brown must be connected to the terminal which
is marked L or coloured Red.
• The wire which is coloured Yellow and Green must be connected to the
terminal which is marked E or or coloured Green.
.
.
We strongly recommend that this machine is connected to the mains supply via a Residual
Current Device (RCD)
If in any doubt, consult a qualified electrician. DO NOT attempt any repairs yourself.
Parts & Service: 020 8988 7400 / E-mail: [email protected] or [email protected]
4
Page 5
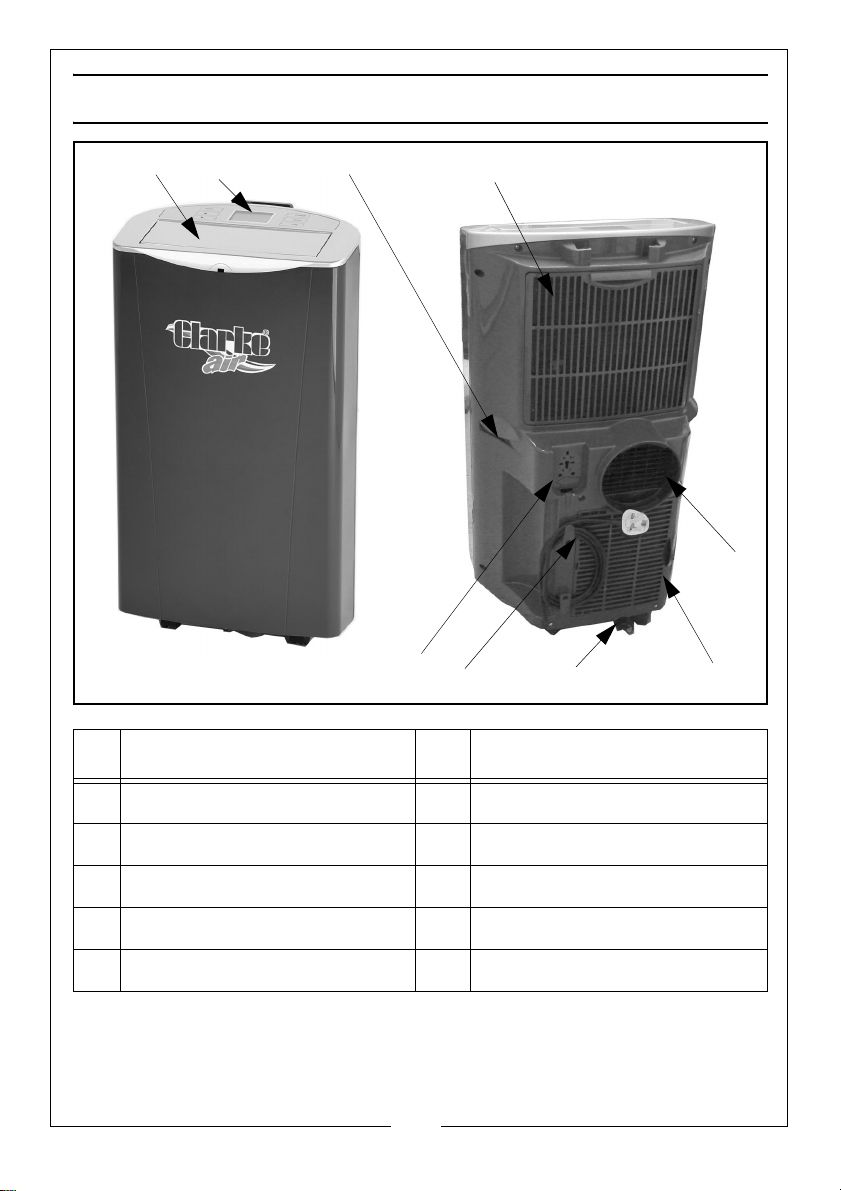
OVERVIEW
1
3
2
4
6
8
5
7
9
NO DESCRIPTION NO DESCRIPTION
1 Air Outlet Flap 6 Lower Air Filter Frame
2 Control Panel 7 Power Cable with storage
3 Handle 8 Water Drain Port
4 Upper Air Filter Frame (Air Intake) 9 Power Plug Storage Socket
5 Air Outlet Port
5
Parts & Service: 020 8988 7400 / E-mail: [email protected] or [email protected]
Page 6
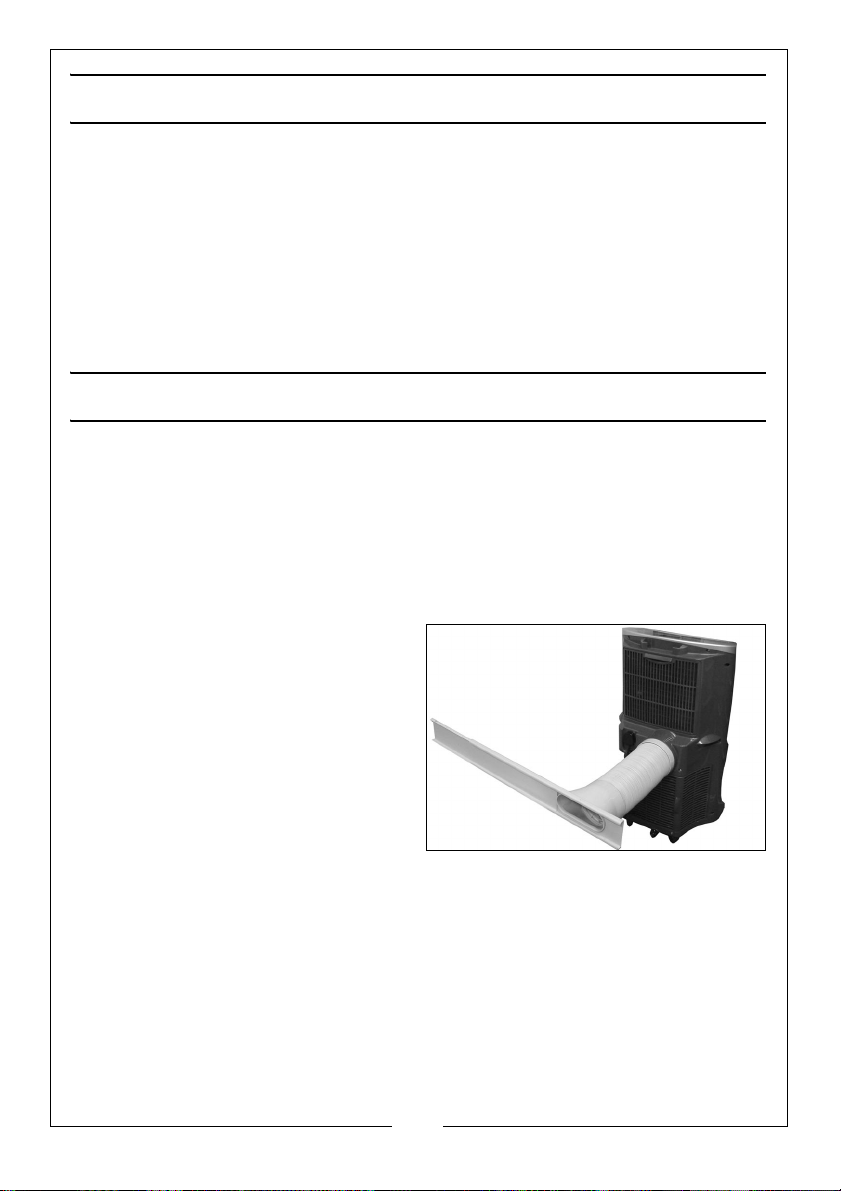
CONTENTS
Ensure the air conditioner and its components suffered no damage during
transit and that all components are present. Should any loss or damage be
apparent, please contact your CLARKE dealer immediately.
The following components are supplied with the unit;
1. Flexible exhaust duct.
2. Adjustable window slider plate.
3. Remote control unit.
INSTALLATION
IMPORTANT: Do not position your air conditioner where it will be exposed to
sources of heat above 40
1. Always transport the air conditioner upright or resting on one side.
Remember to drain the tank before moving the appliance.
• It is recommended to wait up to 24 hours after transporting the air
conditioner before using it, to allow the refrigerant gasses to settle.
2. Position the unit on a level, dry
surface with at least 50 cm of free
air space around the unit.
NOTE: Do not use the air exhaust
duct when in DRY or FAN
only modes.
3. Fit the flexible exhaust duct by
pushing some of the ducting ribs
past the locking channels and
then keep twisting the whole
ducting anti-clockwise until the ducting tightens in the outlet port.
4. Fit the window exhaust adaptor to the other end of the duct.
5. Move the air conditioner into position, and extend the flexible exhaust duct
to suit your window layout.
6. Pass the discharge end out of the nearest window.
NOTE: The length of the exhaust duct is variable between 480 mm and
1500 mm (adaptors included). Using a shorter length of ducting
uses less energy.
o
C.
6
Parts & Service: 020 8988 7400 / E-mail: [email protected] or [email protected]
Page 7
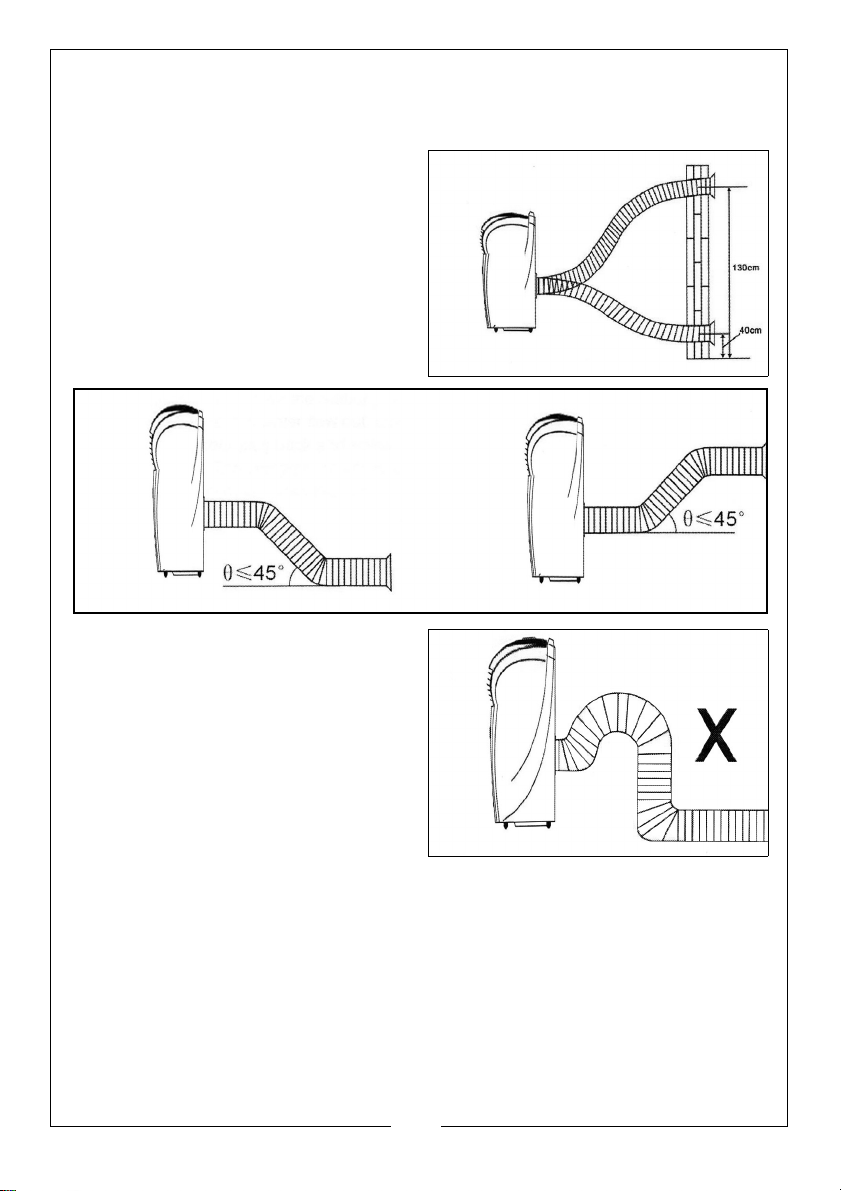
NOTE: The length of duct has been designed to suit the specification of
the air conditioner. Do not use an extension or change to a
different size duct as it may lead to poor performance.
7. The flexible exhaust ducting can
be bent to an angle if followed by
a straight section, but tight curves
and kinks must always be
avoided.
7
Parts & Service: 020 8988 7400 / E-mail: [email protected] or [email protected]
Page 8
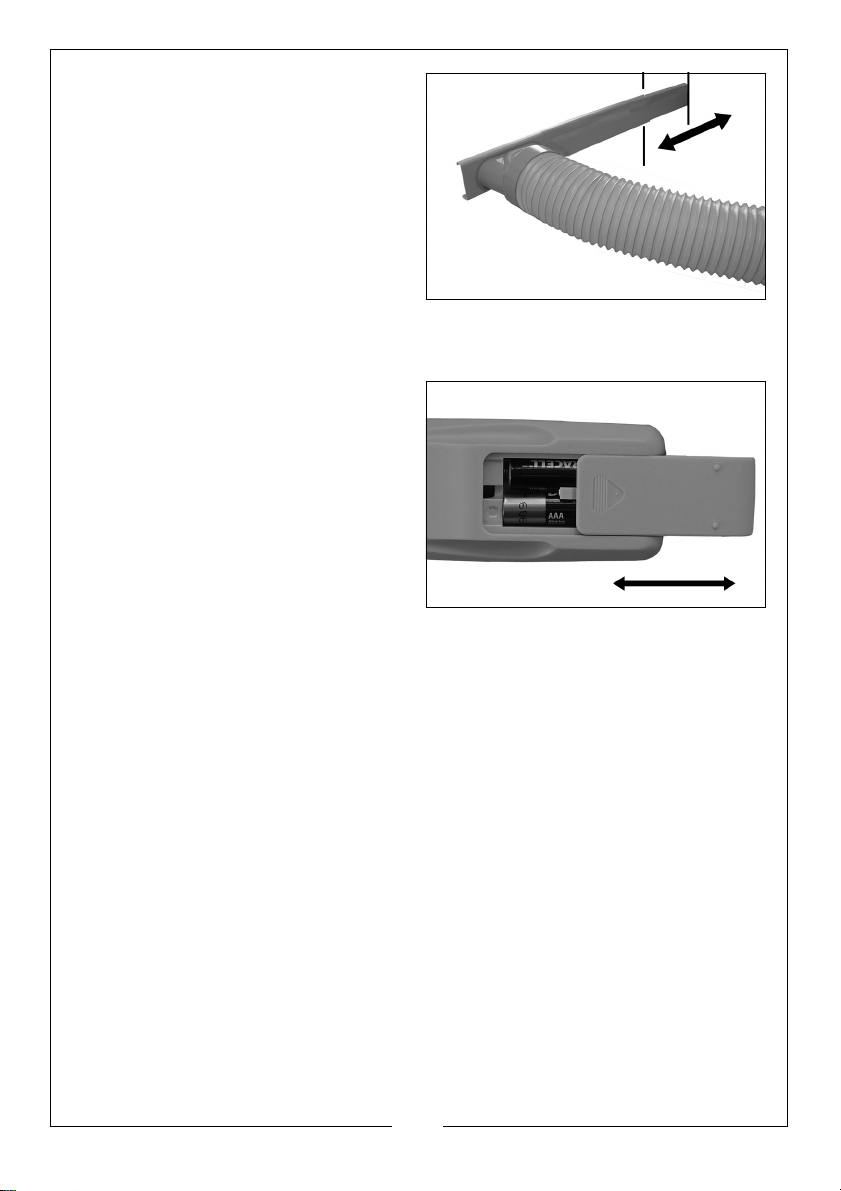
8. The window slider plate is
designed to fit most standard
vertical sash type and horizontal
sliding windows. However, it may
be necessary for you to adapt the
installation procedure for various
other types of window.
9. Extend the two parts of the
window slider and fit into the
window opening, below or beside
the window panel. Secure in
position by closing the window, or if not secure, wedge or otherwise secure
the window slider plate so that it cannot fall out.
10. Fit two AAA size batteries to the
remote control unit by sliding the
battery cover away and installing
the batteries to face in opposing
directions as indicated by the
symbols inside the unit.
• Follow the polarity diagram inside
the battery compartment.
8
Parts & Service: 020 8988 7400 / E-mail: [email protected] or [email protected]
Page 9
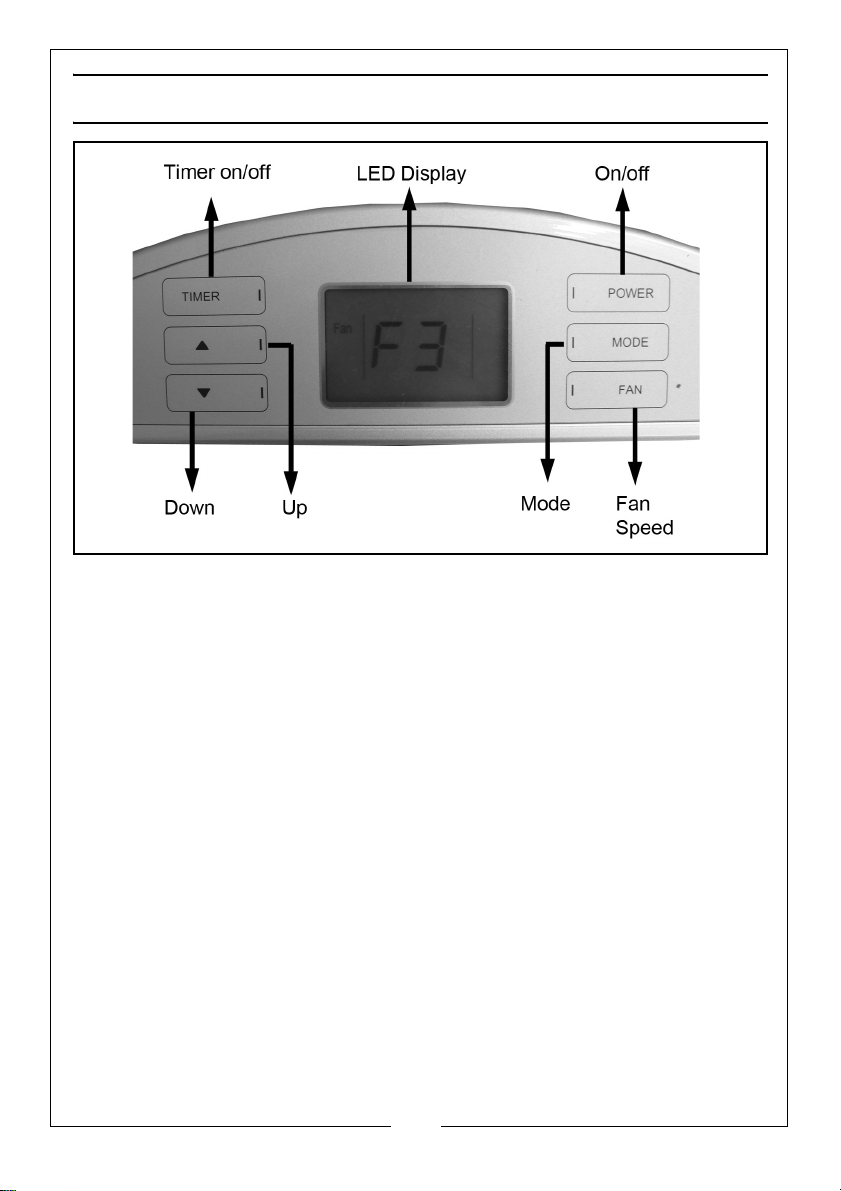
CONTROL PANEL
The control panel has the following buttons:
1. POWER: Press this button to turn the unit on & off. When turned on, the
machine will start running in the previously selected mode.
• If the ambient temperature is above 35
enter standby mode.
o
• If it is below 5
C it will indicate “L” and the unit will enter standby mode.
2. TIMER: Press this to select the timer mode and the main display will initially
show “0”. Set the running time from 0-24 hours using the UP/DOWN buttons.
3. MODE: Press this button to select from COOLING, FAN, DRYING or ENERGY
SAVER modes.
4. UP/DOWN: Press the UP or DOWN buttons to set the required temperature
or adjust the running time in the TIMER mode.
• Press these buttons simultaneously to switch from Celsius to Fahrenheit
display.
5. FAN: Press this button to select Low, Medium or High (F1-F3) fan speed. If
switching between cooling and fan mode, the fan speed remains the
same. During dehumidifying, the fan will run at low speed. "In fan mode,
press this button for 5s, the up motor and down motor will start
simultaneously. This function is to dry the water on the evaporator, to avoid
the damp and mildew."
o
C, the display will indicate “H” and
9
Parts & Service: 020 8988 7400 / E-mail: [email protected] or [email protected]
Page 10
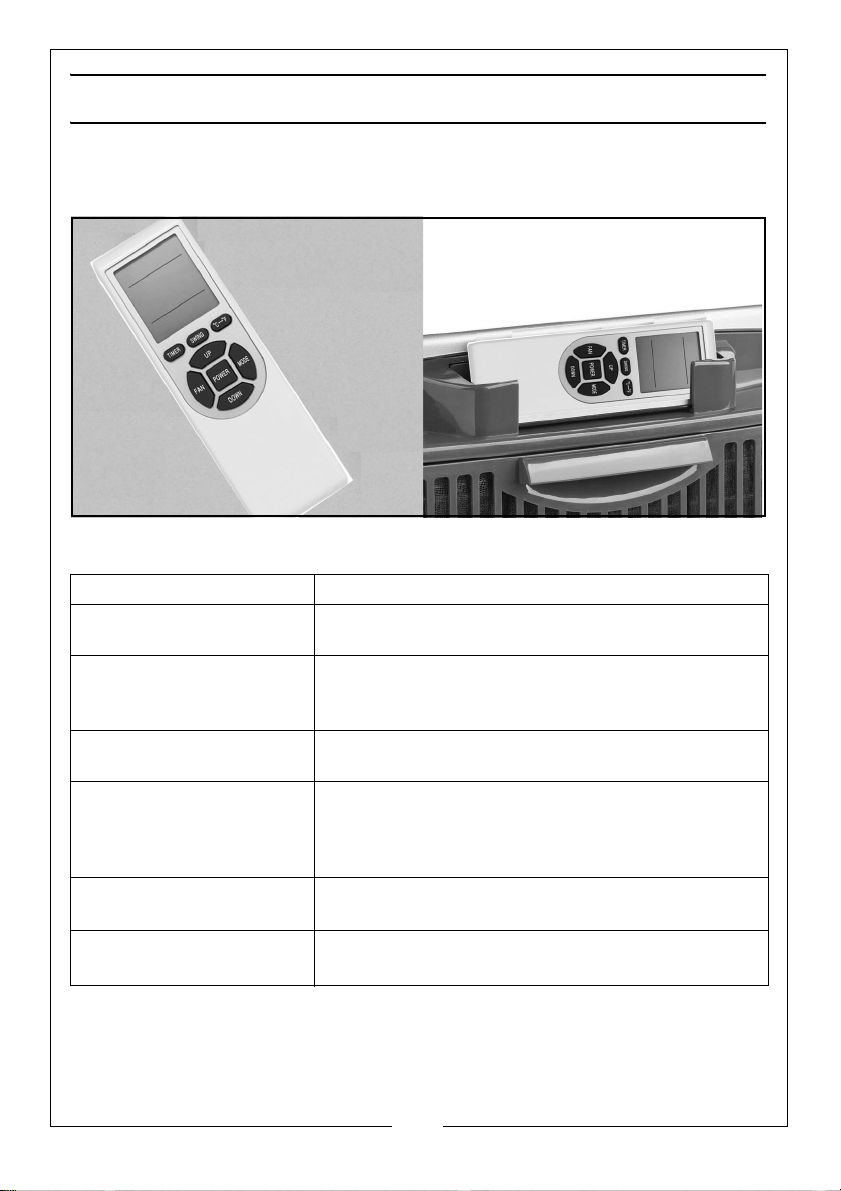
REMOTE CONTROL
The remote control can be stored in the holder provided at the top of the air
conditioning unit as shown. It requires 2 x AAA batteries to be installed as
shown on page 8.
The remote control incorporates the following pushbuttons:
POWER Turns the unit on or off.
TIMER Sets the timer On/Off and allows the running time
duration to be adjusted using the Up/Down arrows.
SWING Sets the air outlet cover to open and close. The
cover automatically closes when the unit is
switched off to prevent the ingress of dust.
oC/o
F
MODE Selects either: COOLING mode
UP or DOWN (arrows) Sets the target temperature or adjusts the run time
FAN
Switches the display between degrees Celsius to
degrees Fahrenheit.
DRYING mode
FAN mode
duration in TIMER mode
.
"Selects the fan speed to HIGH(F3), MID(F2) or
LOW(F1).
10
Parts & Service: 020 8988 7400 / E-mail: [email protected] or [email protected]
Page 11
OPERATION
GENERAL OPERATION
If the room is exposed to direct sunlight, draw any curtains during the sunniest
part of the day.
NOTE: Always drain any remaining water from the unit via the drain plug
after operating in DRY mode. The unit will automatically stop
working when water reaches the high level.
NOTE: Do not use the air exhaust duct when in DRY or FAN modes.
SETTING THE TIMER
1. Press TIMER button once, the "TIMER" on the LED display and the double 8
area will be light and flashing, then press UP or DOWN button to adjust the
set time.
2. This function can work whether the machine in on or off, and when the set
time has elapsed, the unit will switch off or switch on automatically.
3. When the timer is set, press TIMER button once to show the remaining time;
and press TIMER button twice within 5s to cancel the timer.
4. Turn on or turn off the unit will cancel the timer.
SETTING COOLING MODE (TARGET TEMPERATURE)
1. With the unit turned on, press the MODE button & choose COOLING mode.
2. Press the UP/DOWN button to set the desired room temperature.
• The selectable range is 16-30
3. Press the FAN button to choose a fan speed from F1 to F3.
4. Press the swing button to set the air outlet flap moving up and down to
o
C or 1oF each time the button is pressed.
by 1
circulate the air more freely if required.
o
C (61-86oF) and the temperature will change
SETTING DRYING (DEHUMIDIFYING) MODE
1. With the unit turned on, press MODE button on the panel to select DRY
mode.
• The fan speed will run at F1and the LED will display the actual room
temperature.
11
Parts & Service: 020 8988 7400 / E-mail: [email protected] or [email protected]
Page 12
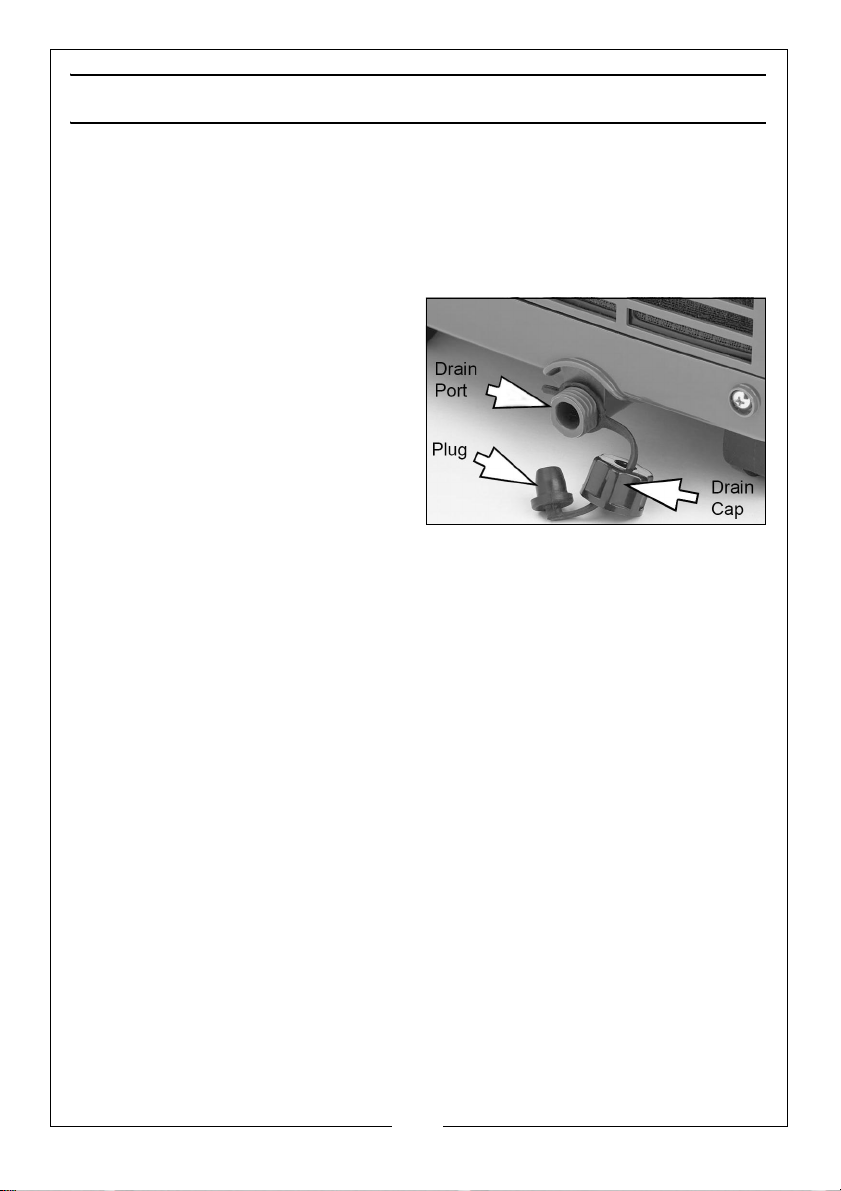
DRAINING OFF THE WATER
The air conditioner has a self-evaporating system. The condensing water will
recycle to cool the condenser, which improves cooling efficiency but also
saves energy and reduces noise. The condensation may eventually collect
faster than the system can cycle and the water container will become full.
When the water container is full, ‘FL’ will flash on the LCD and the appliance
will stop running.
1. Before emptying the water, switch
off and disconnect from the
power supply. Take care not to tilt
the machine causing water to spill
from the collection tray.
2. Remove the drain cap and plug
from the drain port and let the
water flow out into a container.
3. Once drained, replace the plug
and drain cap and switch back
on.
12
Parts & Service: 020 8988 7400 / E-mail: [email protected] or [email protected]
Page 13
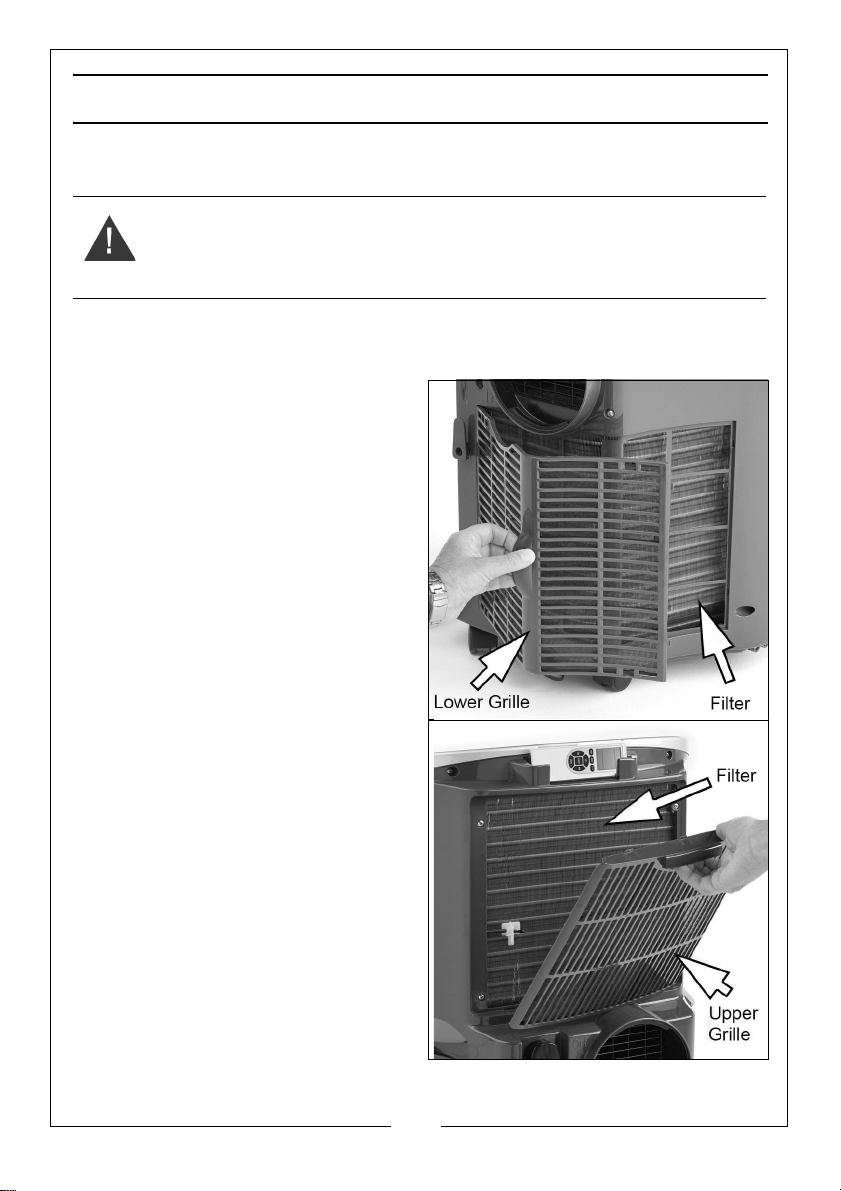
MAINTENANCE
CLEANING
WARNING: ALWAYS TURN OFF THE UNIT AND DISCONNECT FROM THE
POWER SUPPLY BEFORE CLEANING.
1. Clean the outside surfaces of the unit with a duster or a soft, moist cloth.
• Do not use solvents which could damage the plastic components.
2. If the air filters are blocked with
dust, the efficiency of the unit will
be reduced. Clean the filters after
approximately four weeks of use.
3. To remove the air filters, unclip the
grilles and lift away the filters from
inside the grille.
4. Wash the air filters gently in warm
water with a mild detergent. Rinse
the filters and dry them gently out
of direct sunlight.
• Make sure the filter is dry before
use.
5. Clip the filters back into position
and re-fit the grilles.
13
Parts & Service: 020 8988 7400 / E-mail: [email protected] or [email protected]
Page 14
STORAGE
1. If the appliance is not going to be used for some time, remove the drain
cap/plug and ensure all the water is removed.
2. Operate the unit in FAN mode at low speed until all the drain outlet is dry.
This will discourage the growth of mould inside the unit.
3. Switch off the unit and disconnect the power cable. Coil it around the
hooks at the back of the machine and set the plug in the socket provided.
4. Remove and contract the exhaust duct and store it carefully.
5. Remove the batteries from the remote control to preserve battery life.
6. Cover the unit with a plastic bag and store it in a dry location.
FAULT CODES
The following fault codes can be displayed on the control panel.
Fault Code Diagnosis of Fault Action Required
E1 Coil temperature is
abnormal
E2 Room temperature is
abnormal
E4 Anti-freezing protection Waiting for defrosting,
FL Water is full inside the
machine.
Return to Clarke Service
Department to check
coil temperature sensor
or relevant circuit
Return to Clarke Service
Department to check
room temperature
sensor or relevant circuit
function will recover
automatically.
Drain water from drain
port at bottom rear of
unit.
14
Parts & Service: 020 8988 7400 / E-mail: [email protected] or [email protected]
Page 15
TROUBLESHOOTING
Problem Check Solution
The unit fails to
operate
Check for power failure if
unit is plugged in.
Plug the unit into the
socket.
Check the switch is on and
that the fuse is not blown.
Is the set running time
correct?
Check that the water full
alarm is not on.
Room temperature is
unsuitable.
Inefficient cooling Unit is standing in direct
sunlight.
Is air inlet or outlet blocked?
Doors or windows open or
another source of heat in
the room?
Are the air filters very dirty?
Is the set temperature
suitable?
Noise or vibration Is the unit standing on an
uneven surface?
Compressor doesn't
work
The remote control
doesn't work
Heat protection circuit has
cut in.
The unit is too far away
Batteries are flat.
Remote control not pointing
at the air conditioner.
Replace fuse or switch
on.
Change the set time
duration.
Drain the water
container.
Check that room
temperature is between
O
C
5-35
Draw the curtains to
shield form sunlight.
Clear blockage.
Close windows/doors.
Remove the heat source.
Clean the air filters.
Change the temperature
Stand the unit on a flat,
firm surface.
Wait 3 minutes before restarting unit.
Move closer to the unit
Replace the batteries
Aim the remote control
at the unit.
15
Parts & Service: 020 8988 7400 / E-mail: [email protected] or [email protected]
Page 16
Page 17
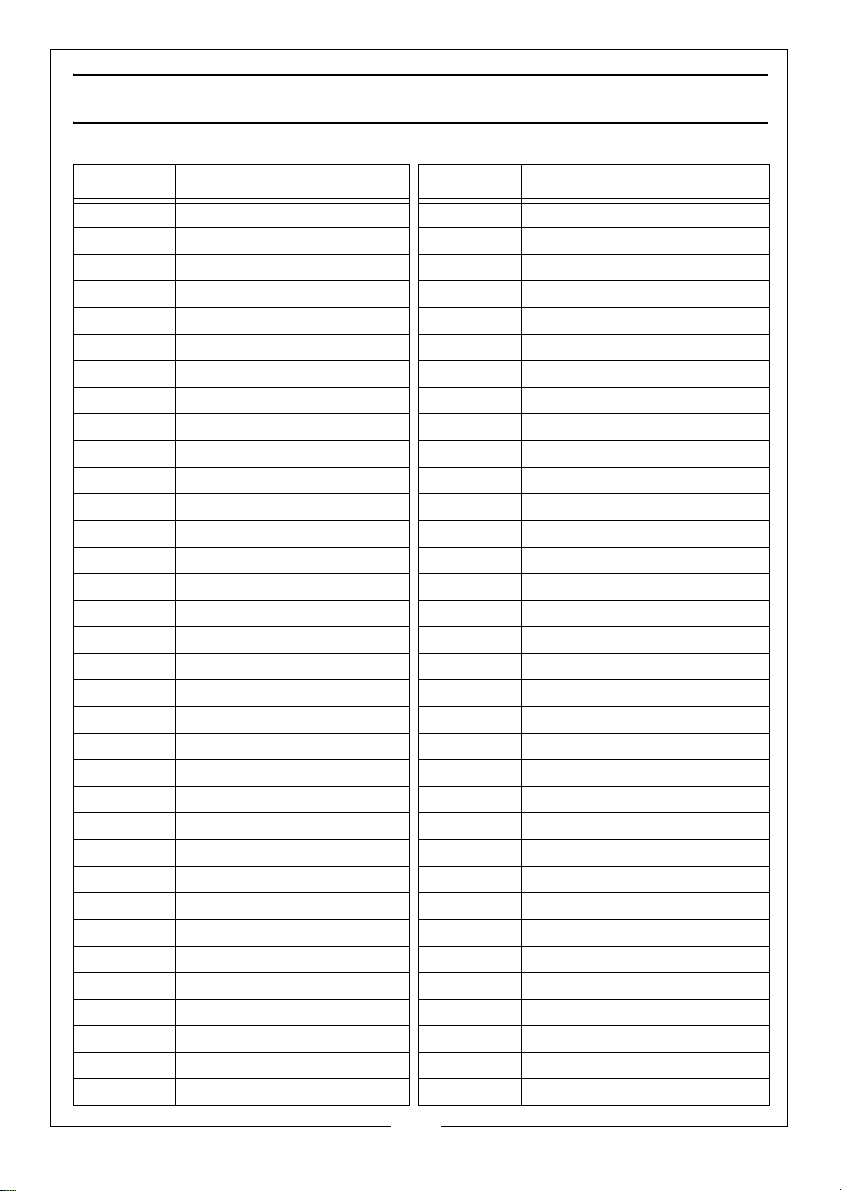
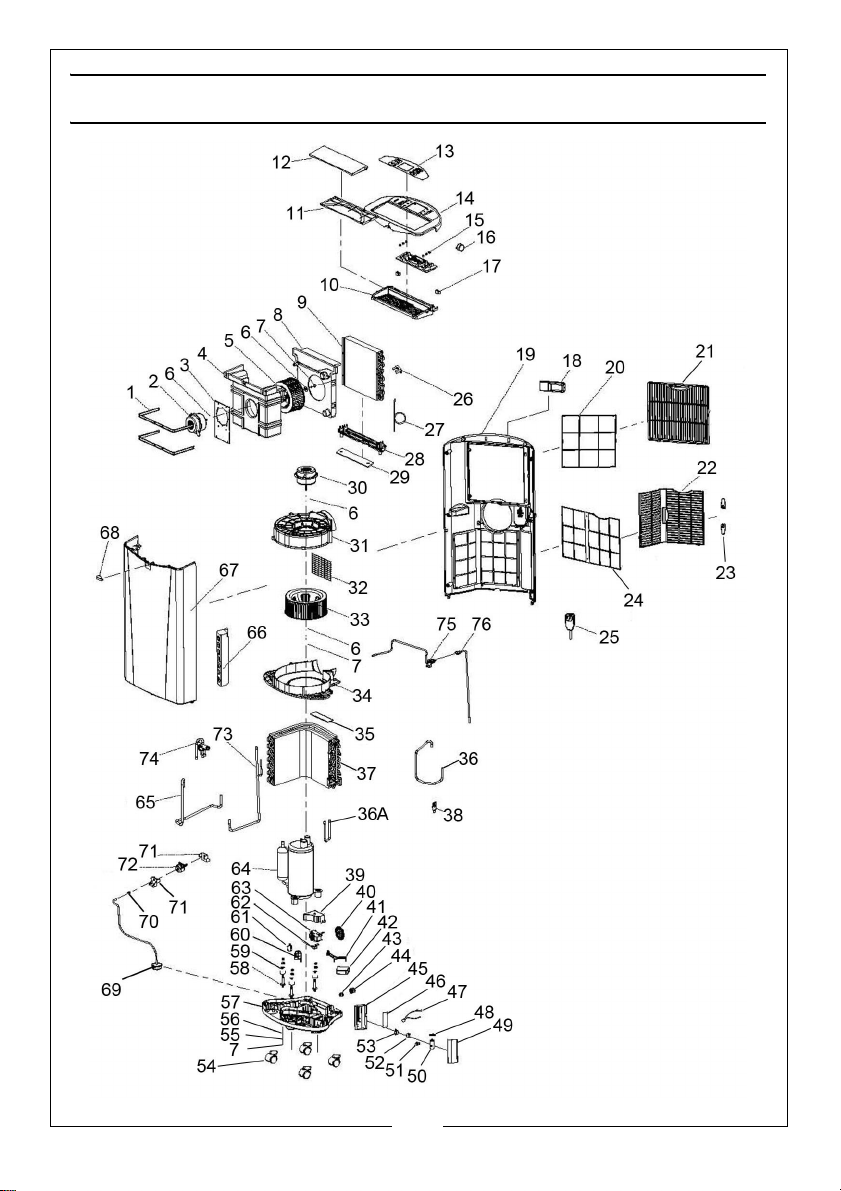
PARTS LIST
PART NO DESCRIPTION PART NO DESCRIPTION
1 Retaining Bracket 35 Upper Foam Seal
2 Discharge Fan Motor 36 Compressor Exhaust Duct
3 Fan Housing Bracket 37 Condenser Assembly
4 Discharge Fan Front Casing 38 Connecting Pipe Filter
5 Discharge Fan 39 Motor Cover
6 Metal Gasket 40 Pump Flywheel
7Nut 41Float Holder
8 Discharge Fan Rear Casing 42 Float
9 Evaporator 43 Sealing Plug
10 Air Outlet Grille 44 Drain Socket
11 Moving Cover Base 45 Control Box
12 Moving Cover top 46 Control Board
13 Display Panel 47 Temperature Sensor
14 Top Cover Panel 48 Capacitor Holder
15 Touch Control Panel 49 Control Box Cover
16 Stepping Motor 50 Capacitor (compressor)
17 Fixing Clip 51 Connector
18 Remote Control 52 Capacitor
19 Rear Shell 53 Transformer
20 Upper Filter Screen 54 Caster Assembly
21 Upper Air Grille 55 Spring Washer
22 Lower Air Grille 56 Compressor Fixing
23 Cable Storage Hook 57 Base
24 Lower Filter Screen 58 Mounting Bolt
25 Power Cable 59 Compressor Foot
26 Temperature Sensor PCB 60 Switch Fixing
27 Capillary 61 Micro Switch
28 Water Tray 62 Support
29 Water Tray Sealing Foam 63 Pump Motor
30 Motor 64 Compressor
31 Motor Support Duct 65 Suction Pipe 1
32 Grille 66 Air Diffuser
33 Lower Fan 67 Front Cover Panel
34 Lower Fan Ducting 68 Receiving Mirror
17
Parts & Service: 020 8988 7400 / E-mail: [email protected] or [email protected]
Page 18
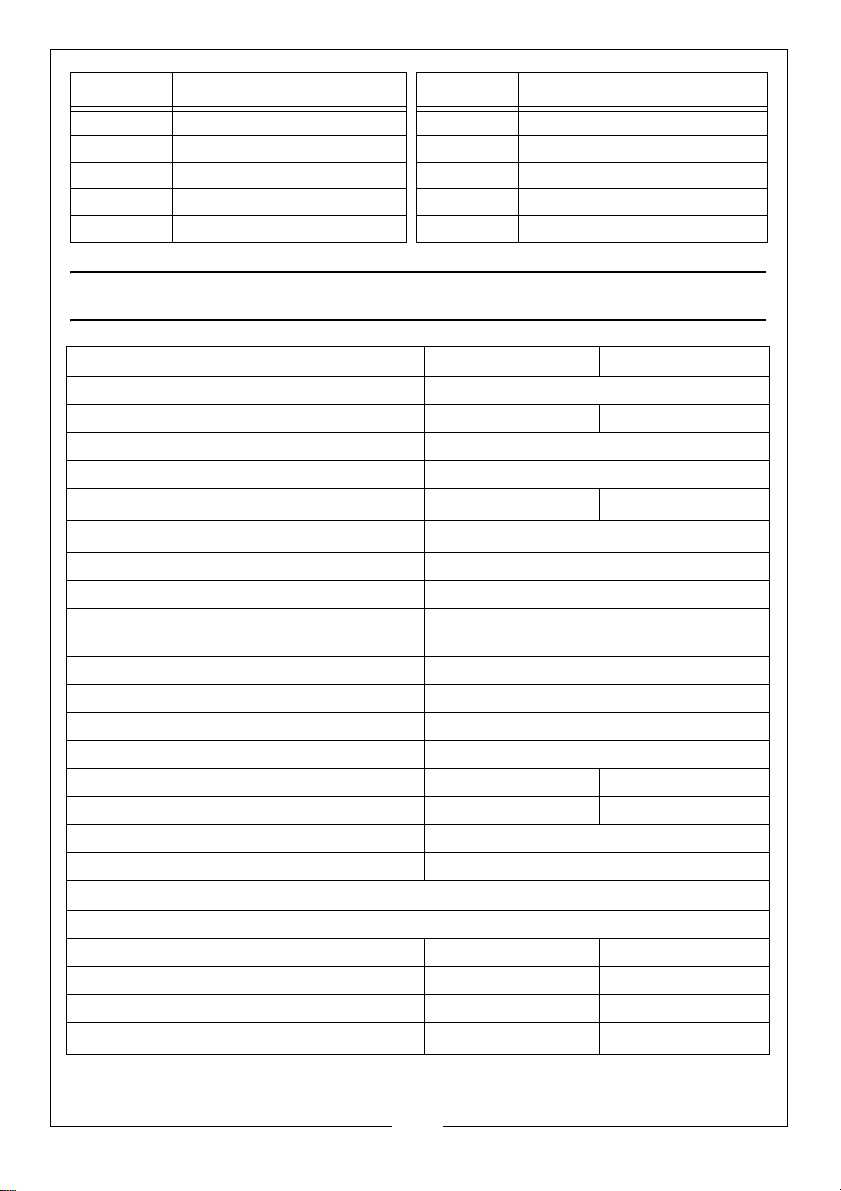
PART NO DESCRIPTION PART NO DESCRIPTION
69 Filter Assembly 74 Four-Way Valve
70 Special Spring 75 Fittings Assembly
71 Anti-vibration Rubber 76 Cover Assembly
72 Electromagnetic Pump 36A Four-Way Valve Connect Pipe
73 Suction Pipe 2
TECHNICAL SPECIFICATIONS
AC10000 AC13000
Power Supply 230V/50Hz
Weight 30 kg 33 kg
Dimensions (L x W x H) 355 x 465 x 850 mm
Water Holding Capacity 0.5 L
Air Flow Volume
Operating Temperature
Exhaust Duct Diameter 135 mm
Exhaust Duct Length (expanded) 1500 mm
Permissible Excessive Operating Pressure
(suction/discharge)
Max Pressure (Low/High Pressure Side) 1.5 Mpa/5.5MPa
Sound Pressure Level Under 70 dB LpA
Sound Power Level 65 dB LwA
Energy Efficiency EU Class A
Energy Consumption 1.2 kWh/60min 1.4 kWh/60min
Cooling Capacity 2.60 kW 3.50 kW
Electrical Insulation Class 1
Energy Efficiency rate (EER) 2.6
REFRIGERANT DATA
This product contains hemetically seald flourinated greenhouse gasses,
Type R410A R410A
Volume 480 g 620 g
GWP 2088 2088
2
Equivalent
Co
3
/h 435 m3/h
430 m
o
C
5 - 35
1.0 Mpa/3.5MPa
1.002 t 1.295 t
18
Parts & Service: 020 8988 7400 / E-mail: [email protected] or [email protected]
Page 19
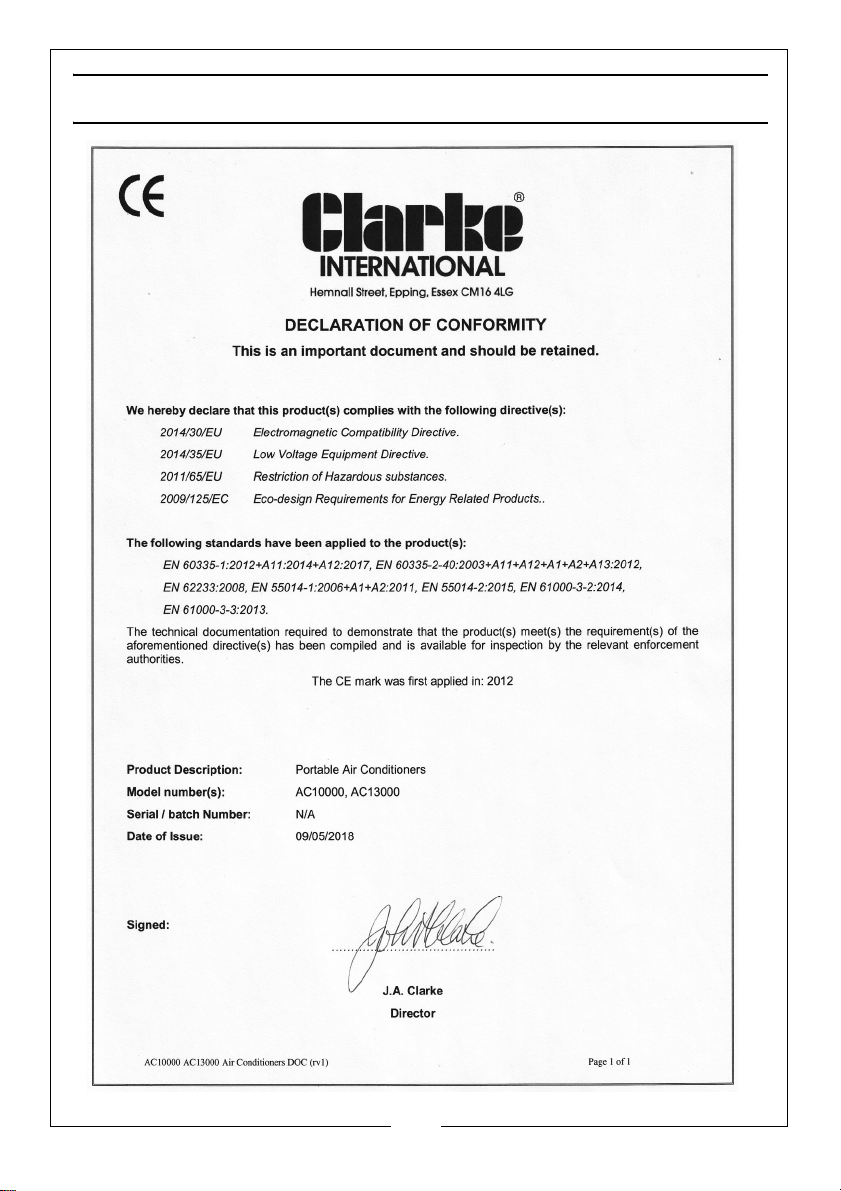
DECLARATION OF CONFORMITY
19
Parts & Service: 020 8988 7400 / E-mail: [email protected] or [email protected]
Page 20

 Loading...