

Page 1
HIGH SPEED BELT SANDER
MODEL NO: CAT40B
PART NO: 3110440
OPERATING & MAINTENANCE
INSTRUCTIONS
GC0814
Page 2

INTRODUCTION
Thank you for purchasing this CLARKE Air Sander.
The CAT40B Sander is ideal for use in garages and workshops. The narrow belt
and adjustable handle allow access in awkward places.
Before attempting to use this product, please read this manual thoroughly and
follow the instructions carefully. In doing so you will ensure the safety of yourself
and that of others around you, and you can look forward to your purchase
giving you long and satisfactory service.
GUARANTEE
This product is guaranteed against faulty manufacture for a period of 12
months from the date of purchase. Please keep your receipt which will be
required as proof of purchase.
This guarantee is invalid if the product is found to have been abused or
tampered with in any way, or not used for the purpose for which it was
intended.
Faulty goods should be returned to their place of purchase, no product can
be returned to us without prior permission. This guarantee does not effect your
statutory rights.
2
Parts & Service: 020 8988 7400 / E-mail: [email protected] or [email protected]
Page 3

GENERAL SAFETY RULES
CAUTION: FAILURE TO FOLLOW THESE PRECAUTIONS COULD RESULT IN
PERSONAL INJURY, AND/OR DAMAGE TO PROPERTY.
WORK ENVIRONMENT
1. Keep the work area clean and tidy.
2. Dress appropriately - Do not wear loose clothing or jewellery. Tie long hair
out of the way.
3. Keep children and visitors away - Do not let children handle the tool.
4. Do not operate the sander where there are flammable liquids or gases.
USE OF POWER TOOLS
1. Stay alert and use common sense - do not operate the tool when you are
tired or under the influence of alcohol, drugs or medication.
2. Always wear eye protectors when using the sander. Eye protectors must
provide protection from flying particles from the front and the side. Ear
protectors should also be worn.
3. Do not overreach - Keep proper footing and balance at all times.
4. Never use oxygen, CO
a source of power for this tool.
5. Do not connect the air supply hose with your finger on the trigger.
6. Do not exceed the maximum pressure for the tool of 90 psi / 6.2 bar.
7. Check hoses for leaks or worn condition before use, and ensure that all
connections are secure.
8. Keep the air supply hose away from heat, oil and sharp edges.
9. Do not use the tool for any purpose than that described in this manual.
10. Do not fit the tool to any stand or clamping device that may damage it.
11. Do not carry out any alterations or modifications to the tool.
12. Always disconnect from the air supply when:
• Performing any maintenance
• The tool is not in use.
• The tool will be left unattended.
2
, combustible gasses or any type of bottled gas as
3
Parts & Service: 020 8988 7400 / E-mail: [email protected] or [email protected]
Page 4

• Moving to another work area.
• Passing the tool to another person.
13. Never use the tool if it is defective or operating abnormally.
14. This tool should be serviced at regular intervals by qualified personnel.
15. Avoid damaging the tool by applying excessive force of any kind.
16. Always maintain the tool with care. Keep it clean for the best and safest
performance.
17. Quick change couplings should not be located at the tool. They add
weight and could fail due to vibration.
18. DO NOT force or misuse the tool. It will do a better and safer job at the rate
for which it was designed.
19. Do not remove any labels. Damaged labels should be replaced.
20. This tool vibrates with use. Vibration may be harmful to your hands or arms.
Stop using the tool if discomfort, a tingling feeling or pain occurs. Seek
medical advice before resuming use.
SANDER-SPECIFIC SAFETY RULES
1. Inspect the sanding belt before use. Do not use if frayed.
2. Avoid contact with the moving sanding belt and wear suitable gloves to
protect the hands.
3. Never run the tool unless the abrasive belt is applied to the workpiece.
4. Beware of potentially explosive atmospheres being caused by dust / fumes
resulting from sanding and used dust extraction systems where possible.
5. Always wear a face mask when using the sander as protection from
airborne particles of sanded material. Avoid disturbing existing dust and
minimise the scattering of dust in the workplace environment. Take steps to
control the dust at the point of emission.
TRANSPORT & STORAGE
1. Never carry the tool by the air hose.
2. Never carry the tool with your finger on the trigger.
3. When not in use the tool must be disconnected from the air supply and
stored in a dry place out of the reach of children (preferably in a locked
cabinet).
4. Avoid storing the tool where the temperature is below 0
4
Parts & Service: 020 8988 7400 / E-mail: [email protected] or [email protected]
o
C.
Page 5
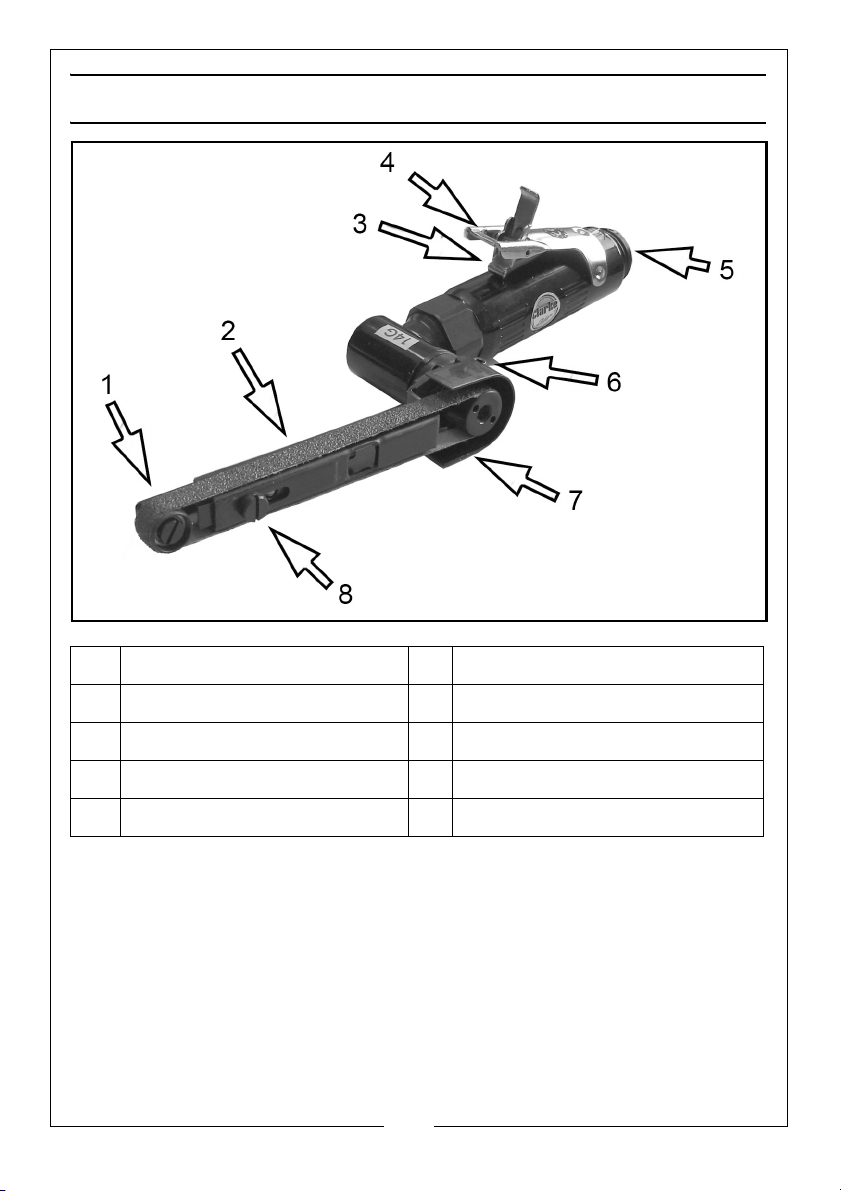
OVERVIEW
NO DESCRIPTION NO DESCRIPTION
1 Idler Pulley 5 Airline Connector
2 Abrasive Belt 6 Angle Adjuster
3 Throttle Lever Lock 7 Dust Guard
4 Throttle Lever 8 Tension Screw
When unpacking the tool, any damage or deficiency should be reported to
your CLARKE dealer immediately. The carton contains:
•Sander
• 80 and 100 grit sanding belts
• Allen (hex) key
Your sander has been designed to give long and trouble free service. If,
however, having followed the instructions in this booklet carefully, you
encounter problems, take the unit to your local CLARKE dealer.
5
Parts & Service: 020 8988 7400 / E-mail: [email protected] or [email protected]
Page 6
COMPRESSED AIR REQUIREMENTS
WARNING: COMPRESSED AIR CAN BE DANGEROUS. ENSURE THAT YOU
ARE FAMILIAR WITH ALL PRECAUTIONS RELATING TO THE USE OF
COMPRESSORS AND COMPRESSED AIR SUPPLY.
• Use only clean, dry, regulated compressed air as a power source.
• Air compressors used with the tool must comply with the appropriate
European Community Safety Directives.
• A build-up of moisture or oil in the air compressor will accelerate
wear and corrosion in the tool. Ensure any moisture is drained from
the compressor daily and the inlet filter is kept clean.
• If an unusually long air hose is required, (over 8 metres), the line
pressure or the hose inside diameter may need to be increased.
• The air hose must be rated at least 150% of the maximum operating
pressure of the tool.
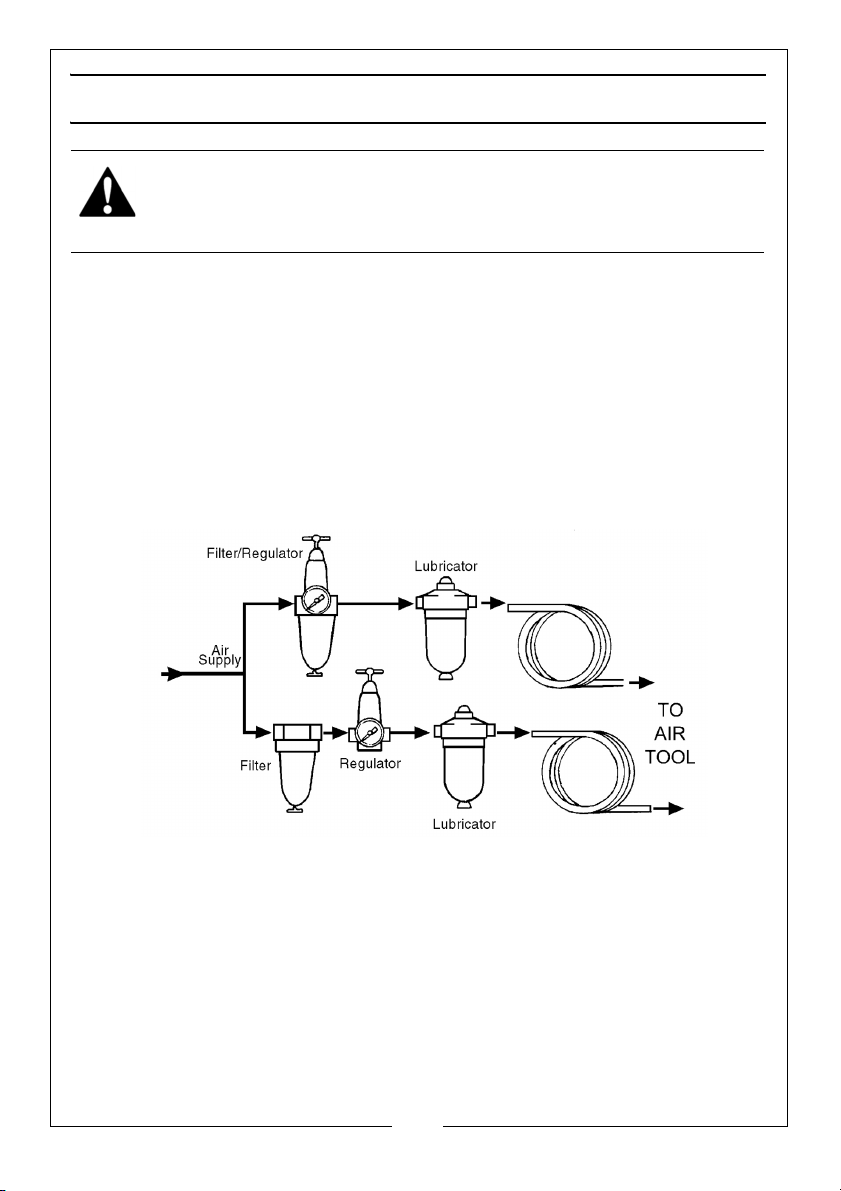
• A typical air line layout is shown above. If an automatic in-line filter/
regulator is used, it will keep the tool in good condition, but should
be regularly checked and topped up with oil. clarke airline oil should
be used, and the lubricator adjusted to approx 2 drops per minute.
• For optimum performance it is recommended that a 3/8” ID hose is
used.
• Never exceed the maximum operating pressure for the tool. It is
recommended that air pressure to this tool does not exceed 90 psi
at the tool when running. Higher pressures and dirty air will shorten
the life of the tool due to faster wear and is a possible safety hazard.
6
Parts & Service: 020 8988 7400 / E-mail: [email protected] or [email protected]
Page 7
BEFORE USE
CONNECTING THE AIR SUPPLY
WARNING: COMPRESSED AIR CAN BE DANGEROUS. ENSURE THAT YOU
ARE FAMILIAR WITH ALL PRECAUTIONS RELATING TO THE USE OF AIR
COMPRESSORS AND COMPRESSED AIR SUPPLY.
1. Pour 2-3 drops of CLARKE airline oil into the air inlet. This should be done
regardless of whether or not a lubricated air supply is to be used.
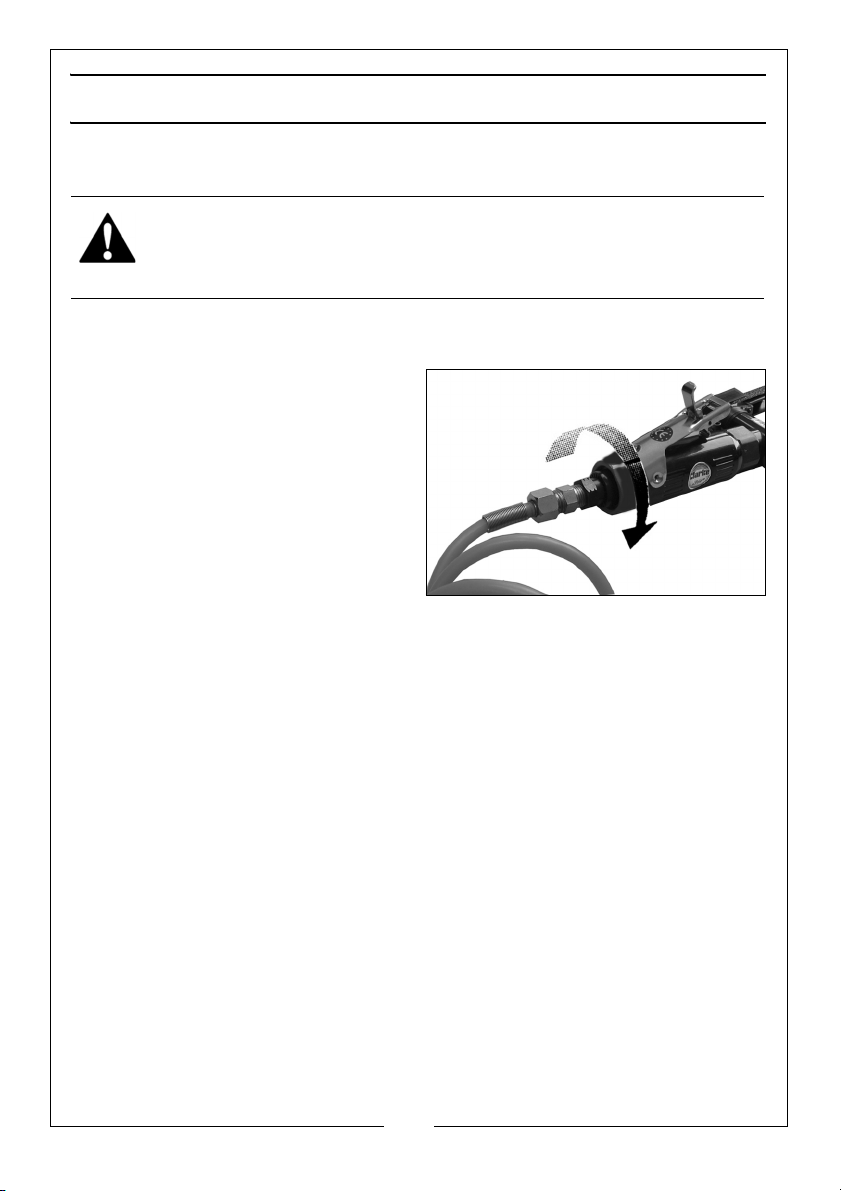
2. Connect a suitable hose to the
tool as shown using the airline
connector supplied with the tool.
3. If required, connect an in-line mini
oiler to the tool.
• A mini oiler helps to prolong the
life of the air tool. Remove the
oil fill screw from the side of the
mini oiler and fill with air-line oil
available from your CLARKE
dealer. Replace the screw before using the tool.
4. If a mini-oiler is not being used, run a few drops of oil through the tool
before use. It can be entered through the air inlet or via the hose at the
nearest connection to the air supply.
5. Connect the other end of the hose to the compressor.
6. Turn on the air supply and check for air leaks. Rectify any found before
proceeding. PTFE tape may be useful for sealing threaded connections.
7. Your air tool is now ready for use.
• You can fit a whip hose with a quick fit coupling if required
(available from your Clarke dealer.)
INSTALLING THE BELT
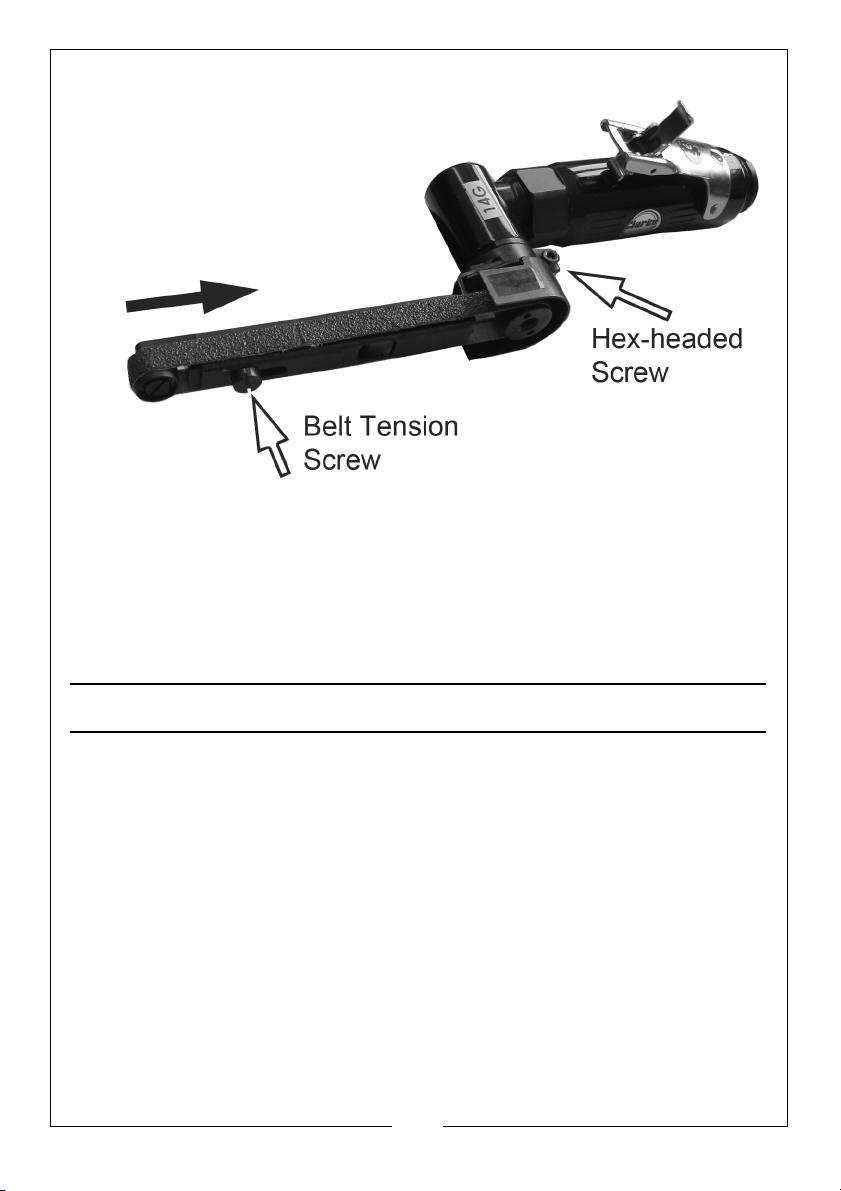
1. To install or replace sanding belt, slacken the tensioning screw and push
the idler pulley assembly towards the handle against the tension of the
spring, enabling the belt to be removed. Replace the belt and retightening the screw.
7
Parts & Service: 020 8988 7400 / E-mail: [email protected] or [email protected]
Page 8
.
• The belt should be correctly tracked.
2. To adjust the handle position, slacken the hex headed screw, rotate the
handle to the required position, then secure by re-tightening the hex screw.
3. Connect to the airline and turn the air on.
• Only use sanding belts designed for use with this type of sander.
OPERATING
1. Squeeze the trigger against the body of the tool to start the sander and
control the speed. Evaluate the speed and adjust to suit.
2. Ensure your fingers are clear of the sanding belt. Allow the motor to reach
max speed before offering the belt to the workpiece.
3. To begin work, rest the belt on the workpiece and start the sander.
• Let the tool do the work. The actual weight of the machine is
normally sufficient for efficient sanding. Do not put additional
pressure on the machine, which would only slow down the speed of
the belt, reducing efficiency and placing an additional burden on
the motor.
4. Take care to keep the sander moving around at all times. Avoid dwelling in
one place for more than a moment.
5. Release the trigger to stop the tool.
8
Parts & Service: 020 8988 7400 / E-mail: [email protected] or [email protected]
Page 9
6. When finished sanding, release the throttle lever and allow the motor to
stop before carefully putting the tool down.
DISCONNECTING THE AIR SUPPLY
1. Do not disconnect the air supply hose until the compressor has been shut
down and the compressed air released.
2. Refer to the compressor instruction manual for the procedure to shut down
and vent the compressed air.
3. Once the pressure has been released, disconnect the air supply hose from
the air tool.
MAINTENANCE
WARNING: MAKE SURE THAT THE AIR TOOL IS DISCONNECTED FROM THE
AIR SUPPLY BEFORE STARTING ANY CLEANING OR MAINTENANCE
PROCEDURES.
DAILY
1. Before use, drain water from the airline filter and compressor.
2. Pour a few drops of Clarke air-line oil, into the tool air inlet. This should be
carried out regardless of whether or not an in-line mini oiler is used. If an inline mini oiler is not used, this procedure should be repeated after every
two to three hours of use.
3. Check the air inlet screen filter for blockage and clean if necessary.
CLEANING
1. Keep the body of the tool clean and free from debris.
2. Grit or gum deposits in the tool may also reduce efficiency. This condition
can be corrected by cleaning the air strainer and flushing out the tool with
gum solvent oil, or failing this, the tool should be disassembled, thoroughly
cleaned, dried and reassembled. This is better left to your Clarke dealer.
3. After extensive use, flush out the mechanism with gum solvent oil or an
equal mixture of Clarke air-line oil and paraffin. Allow to dry before use.
4. If the tool runs erratically or becomes inefficient, and the air supply is of
good quality, it may be necessary to dismantle the air motor and replace
worn or damaged parts. You may prefer to take the tool to your Clarke
dealer if internal maintenance is required.
9
Parts & Service: 020 8988 7400 / E-mail: [email protected] or [email protected]
Page 10

PERFORMANCE
Please note that factors other than the tool may effect its operation and
efficiency such as reduced compressor output, excessive drain on the airline,
moisture or restrictions in the air-line, or the use of connectors of improper size
or poor condition which will reduce air supply.
**Clarke Air Line Oil (part no. 3050825) is available from your Clarke dealer.
Your Clarke air tool has been designed to give long and trouble free service. If,
however, having followed the instructions in this booklet carefully, you
encounter problems, take the unit to your local Clarke dealer.
STORAGE
When not in use, disconnect from air supply, clean & store in a safe, dry place.
If the tool is to be stored, or is idle for longer than 24 hours, run a few drops of
Clarke air line oil into the air inlet, and run the tool for 5 seconds in order to
lubricate the internal parts.
ACCESSORIES
A wide range of accessories is available including filter/regulators, lubricators,
high-pressure hoses (5 to 50 metres) etc. Contact your Clarke dealer for further
information.
ABRASIVE BELTS
Replacement abrasive belts are available from your CLARKE dealer:
CAT57 - 2x80 grit /2 x 100 grit
(pack of 4) - 10 x 330mm
10
Parts & Service: 020 8988 7400 / E-mail: [email protected] or [email protected]
Part no. 3110507
Page 11
TROUBLESHOOTING
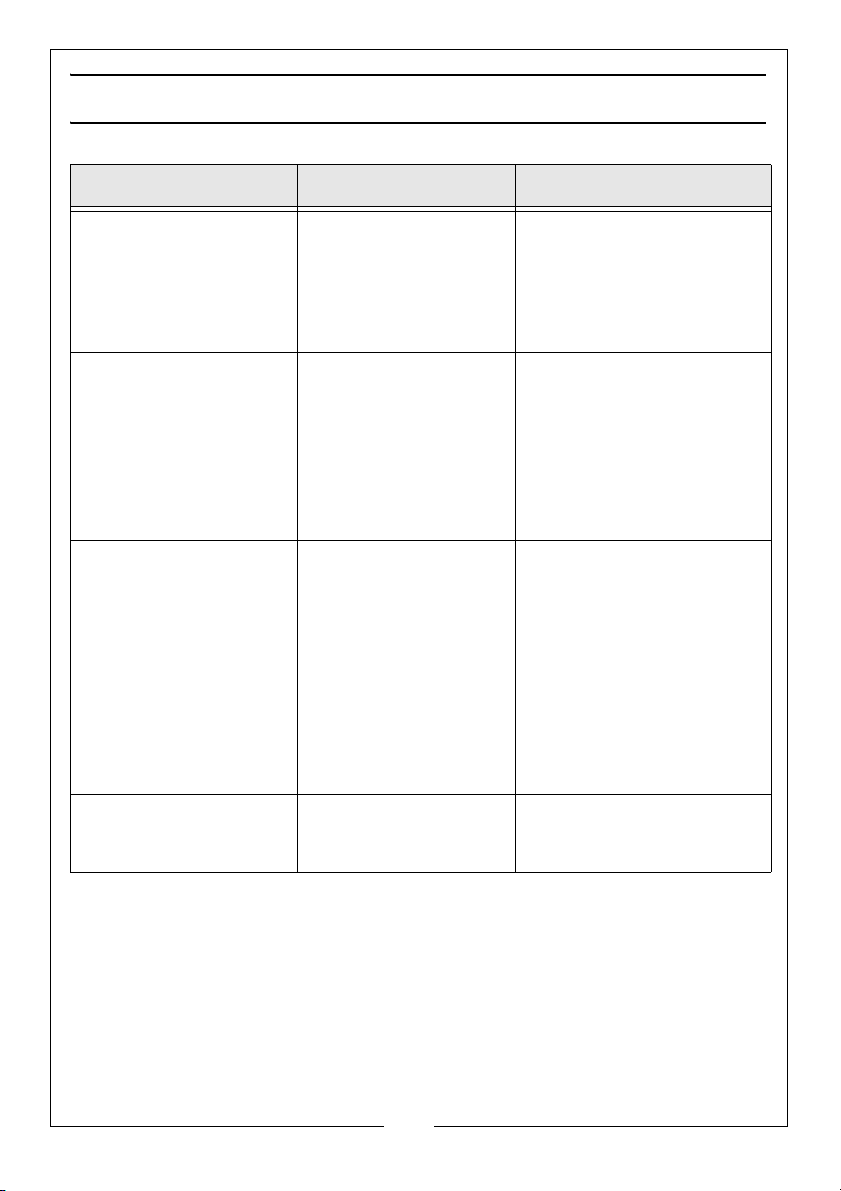
SYMPTOM PROBLEM SOLUTION
Tool runs at normal
speed but slows down
under any load.
Tool runs slowly. Air flows
weakly from exhaust.
Tool will not run. Air flows
freely from exhaust.
1. Motor parts worn.
2. Worn or sticking
mechanism due to
lack of lubricant.
1. Motor parts jammed
with gum/dirt.
2. Air-line regulator in
closed position.
3. General airflow
blocked by dirt.
1. Motor vanes stuck
due to buildup of
foreign material.
1. Return to Clarke dealer
for repair.
2. Drip air tool lubricating
oil into air inlet. Allow oil
to soak moving parts
before using.
1. Examine inlet air filter for
blockage. Drip a few
drops of air tool lubricat ing oil into air inlet.
2. Adjust in-line regulator to
open position.
3. Operate tool in short
bursts.
1. Disconnect air supply
and rotate tool assembly
manually.
2. Try operating tool in
short bursts.
3. Tap motor housing gently
with a rubber mallet.
4. Drip a few drops of air
tool lubricating oil into air
inlet to soak moving
parts.
Tool will not shut off. 1. Throttle O-rings
damaged or ill-fitting
in seat.
11
Parts & Service: 020 8988 7400 / E-mail: [email protected] or [email protected]
1. Return to Clarke dealer
for repair.
Page 12
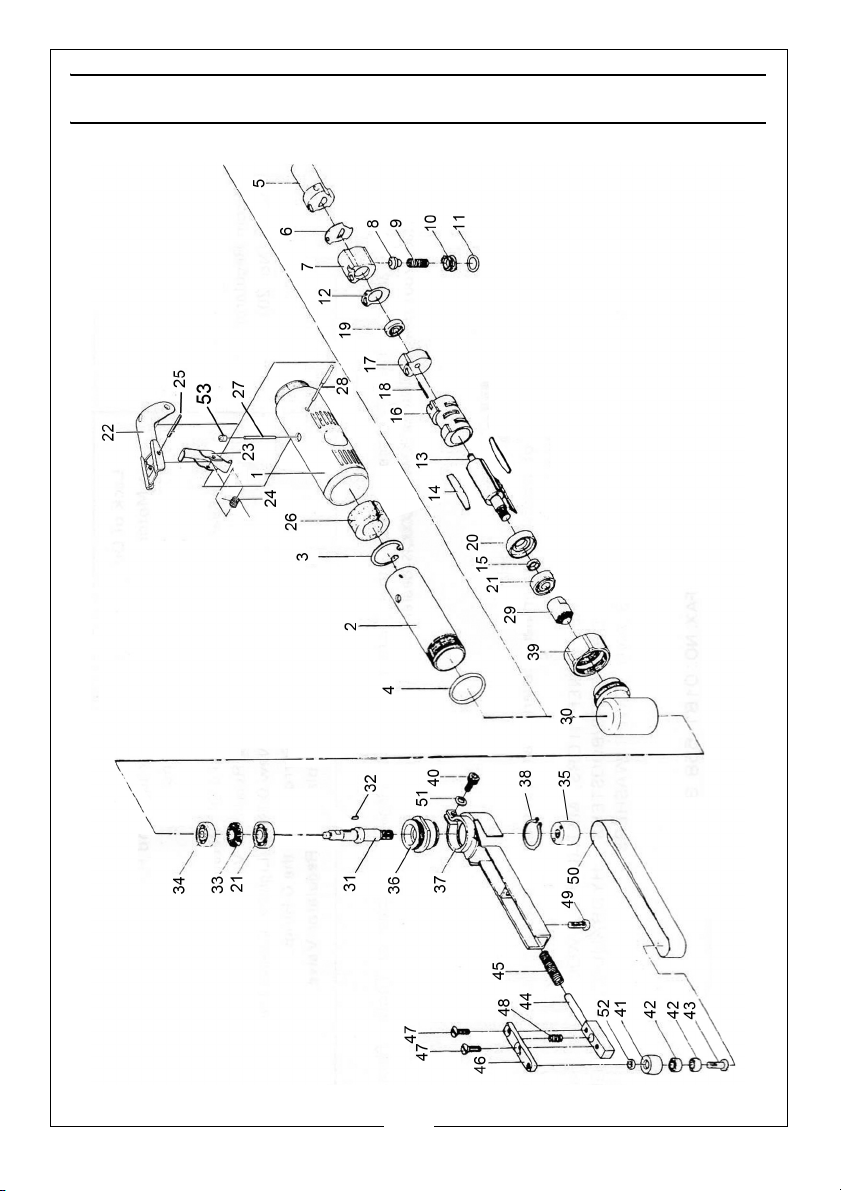
PARTS LIST
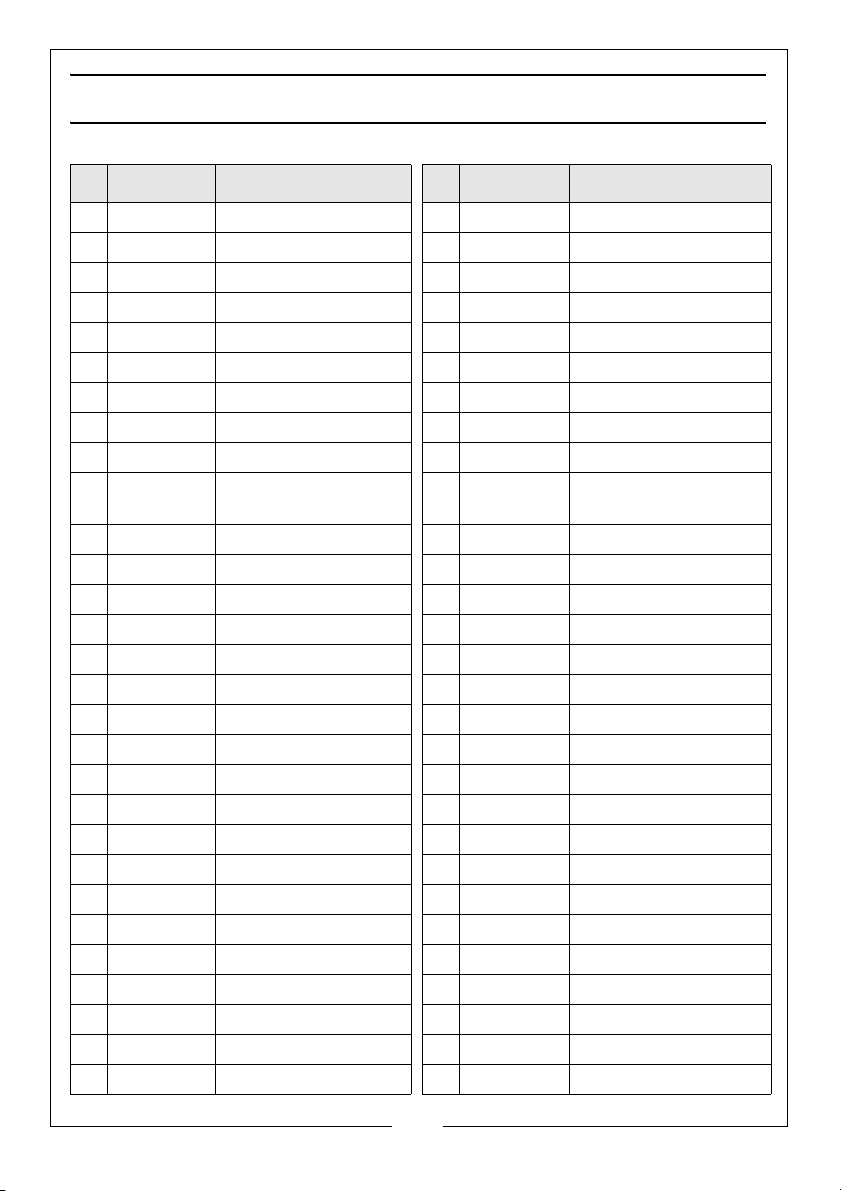
No Part No Description No Part No Description
1 DG-14001 Exhaust Deflector 30 ADG-14034 Arbor Casing
2 DG-14003 Motor Housing 31 BS-10035 Arbor
3 IRTW-026 Circlip 32 K-030306 Key
4 DG-14005 O-Ring 33 ADG-14037 Bevel Gear
5 DG-14006 Inlet 34 BB-06262 Ball Bearing
6 DG-14008 Inlet Gasket 35 BS-10040 Roller (Large)
7 DG-14009 Throttlevalve housing 36 BS-10041 Bearing Support
8 DG-14010 Throttle Valve 37 BS-14042 Frame
9 DG-14011 Throttle Valve Spring 38 STW-022 Circlip
10 DG-14012 Throttle Valve
Housing Plug
11 ORP-0100 O-Ring 40 B2-0412A Hex Skt Hd Cap Bolt
12 DG-14014 End Plate Gasket 41 BS-10046 Roller (small)
13 DG-14015 Rotor 42 BB-06952 Ball Bearing (2)
14 DG-14016 Rotor Blades 43 BS-10048 Idler Shaft
15 DG-14017 Spacer 44 BS-10A49 Support
16 DG-14018 Cylinder 45 BS-10050 Spring
17 DG-14019 Rear End Plate 46 BS-10A51 Adjusting Plate
18 SP-25180 Spring Pin 47 S2-4014A CSK Screw (2)
19 BB-06252 Ball Bearing 48 BS-10A53 Spring
20 DG-14024 Front End Plate 49 BS-10A54 Fixing Screw
21 BB-06082 Ball Bearing 50 BS-10052 Sanding Belt (10x330)
22 DG-14026 Throttle Lever 51 SW2-040A Spring Washer
23 DG-14027 Throttle Lever Lock 52 BS-10054 Washer
24 DG-14028 Spring (Lever Lock) 53 DG-14045 Plunge Cap
25 SP-25220 Spring Pin BS-10055 Hex Wrench
26 DG-14030 Muffler Felt DG-14045 Plunge Cap
27 DG-14031 Throttle Plunger BS-10K01 Throttle Lever Kit
28 DG-14032 Throttle Lever Pin BS-10K02 Throttle Valve Kit
29 ADG14033 Bevel Pinion BS-10K03 Bevel Gear Kit
39 AR-14029 Clamp Nut
12
Parts & Service: 020 8988 7400 / E-mail: [email protected] or [email protected]
Page 13
Page 14
SPECIFICATION
Model Number CAT40B
Part Number 3110440
Min. Hose Size (ID) 1/4” BSP
Max Operating Pressure 90 psi (6.2 bar)
Air Consumption 4 cfm (nominal)
Belt Speed 1200 m/min @ 90psi
Air Inlet Size 1/4“BSP
Sound Pressure Level (LpA dB) 93.8 dB(A)
Vibration Levels
1.43 m/s
2
(uncertainty factor K= 1.5 m/s
2)
Weight 0.6 kg
Sanding Belt Size 10 mm x 330 mm
Please note that the details and specifications contained herein are correct
at the time of going to print. However Clarke International reserve the right to
change specifications at any time without prior notice.
14
Parts & Service: 020 8988 7400 / E-mail: [email protected] or [email protected]
Page 15

DECLARATION OF CONFORMITY
15
Parts & Service: 020 8988 7400 / E-mail: [email protected] or [email protected]
Page 16
 Loading...