

Page 1
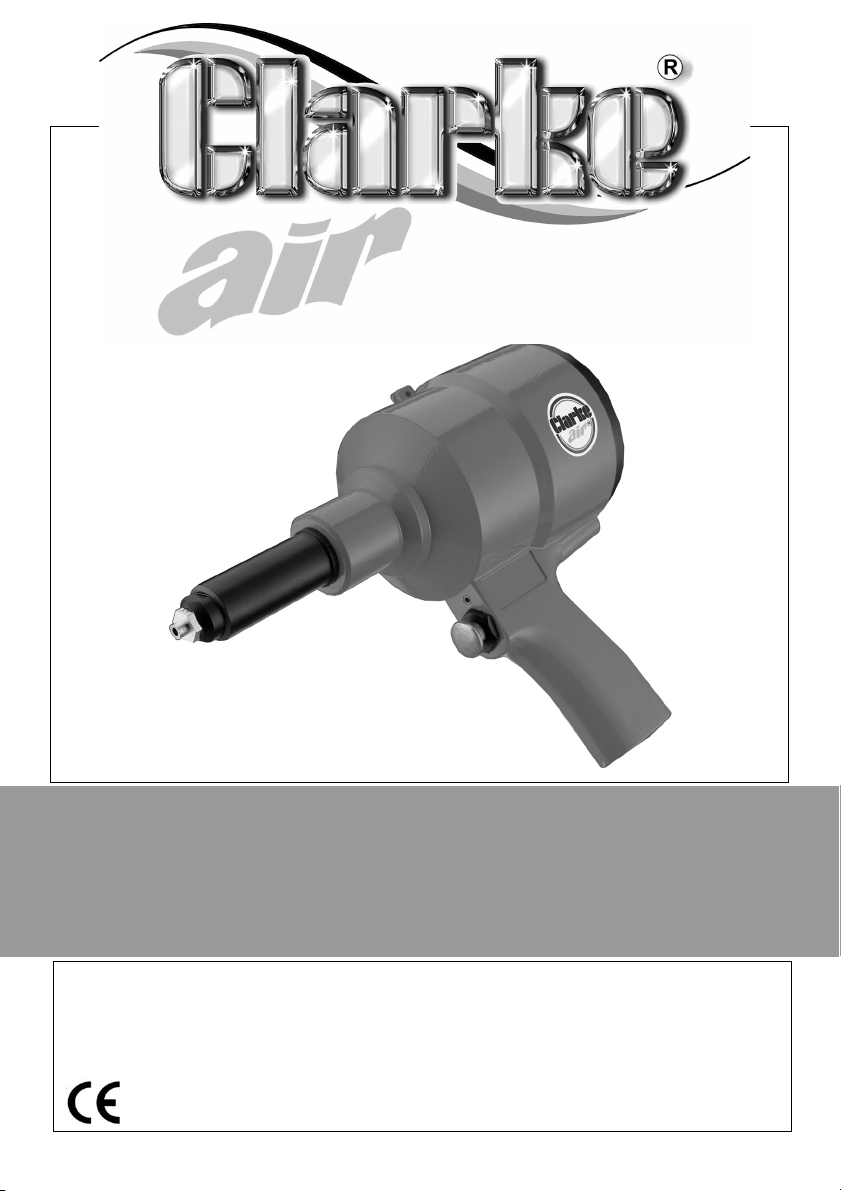
OIL FREE RIVETER
MODEL NO: CPR2
PART NO: 3110285
OPERATING & MAINTENANCE
INSTRUCTIONS
GC0615
Page 2
INTRODUCTION
Thank you for purchasing this CLARKE Riveter.
Before attempting to use this product, please read this manual thoroughly and
follow the instructions carefully. In doing so you will ensure the safety of yourself
and that of others around you, and you can look forward to your purchase
giving you long and satisfactory service.
SPECIFICATION
Model Numbers CPR2
Rivet Sizes 2.4 to 4.8 mm
Min. Hose Size (ID) 8 mm (5/16”)
Operating Pressure 90 psi (6.2 bar)
Air Consumption 0.03 cu.ft/stroke
Air Inlet Size 1/4“BSP Female
Sound Pressure Level (LpA dB) 77.3 dB(A)
Sound Power Level (LwA dB) 88.3 dB(A)
Vibration Levels
Weight 1.4 kg
Please note that the details and specifications contained herein are correct at
the time of going to print. However CLARKE International reserve the right to
change specifications at any time without prior notice.
2.5 m/s
2
GUARANTEE
This product is guaranteed against faulty manufacture for a period of 12
months from the date of purchase. Please keep your receipt which will be
required as proof of purchase. This guarantee is invalid if the product is found
to have been abused or tampered with in any way, or not used for the
purpose for which it was intended.
Faulty goods should be returned to their place of purchase, no product can
be returned to us without prior permission. This guarantee does not effect your
statutory rights.
2
Parts & Service: 020 8988 7400 / E-mail: [email protected] or [email protected]
Page 3

GENERAL SAFETY RULES
CAUTION: FAILURE TO FOLLOW THESE PRECAUTIONS COULD RESULT IN
PERSONAL INJURY, AND/OR DAMAGE TO PROPERTY.
WORK ENVIRONMENT
1. Keep the work area clean and tidy.
2. Dress appropriately - Do not wear loose clothing or jewellery. Tie long hair
out of the way.
3. Keep children and visitors away - Do not let children handle the tool.
4. Do not operate the tool where there are flammable liquids or gases.
USE OF POWER TOOLS
1. Stay alert and use common sense - do not operate the tool when you are
tired or under the influence of alcohol, drugs or medication.
2. Always wear eye protectors when using the tool - eye protectors must
provide protection from flying particles from the front and the side.
3. Always wear ear protectors when using the tool.
4. Do not overreach - keep proper footing and balance at all times.
5. Never use any type of bottled gas as a source of power for the tool.
6. Do not connect the air supply hose with your finger on the trigger.
7. Do not exceed the maximum pressure of 90 psi / 6.2 bar.
8. Check hoses for leaks or worn condition before use, and ensure that all
connections are secure.
9. Keep the air supply hose away from heat, oil and sharp edges.
10. Do not use the tool for any purpose than that described in this manual.
11. Do not fit the tool to any stand or clamping device that may damage it.
12. Do not carry out any modifications to the tool.
13. Always disconnect from the air supply when:
• Performing any maintenance
• The tool is not in use.
• The tool will be left unattended.
3
Parts & Service: 020 8988 7400 / E-mail: [email protected] or [email protected]
Page 4

• Moving to another work area.
• Passing the tool to another person.
14. Never use the tool if it is defective or operating abnormally.
15. The tool should be serviced at regular intervals by qualified service
personnel.
16. Avoid damaging the tool, for example by applying excessive force of any
kind.
17. Always maintain the tool with care. Keep it clean for the best and safest
performance.
18. Quick change couplings should not be located at the tool. They add
weight and could fail due to vibration.
19. Do not force or misuse the tool. It will do a better and safer job at the rate
for which it was designed.
20. Do not remove any labels. Damaged labels should be replaced.
21. This tool may vibrate with use. Vibration may be harmful to your hands or
arms. Stop using the tool if discomfort, a tingling feeling or pain occurs.
Seek medical advice before resuming use.
TRANSPORTATION
1. Never carry the tool by the air supply hose.
2. Never carry the tool with your finger on the trigger.
STORAGE
1. When not in use the tool must be disconnected from the air supply and
stored in a dry place out of the reach of children.
o
2. Avoid storing the tool in environments where the temperature is below 0
C.
THE COMPRESSED AIR SUPPLY
AIR SUPPLY REQUIREMENTS
WARNING: COMPRESSED AIR CAN BE DANGEROUS. ENSURE THAT YOU
ARE FAMILIAR WITH ALL PRECAUTIONS RELATING TO THE USE OF
COMPRESSORS AND COMPRESSED AIR SUPPLY.
• Use only clean, dry, regulated compressed air as a power source.
4
Parts & Service: 020 8988 7400 / E-mail: [email protected] or [email protected]
Page 5
• Air compressors used with the impact wrench must comply with the
appropriate European Community Safety Directives.
• A build-up of moisture or oil in the air compressor will accelerate
wear and corrosion in the impact wrench. ensure any moisture is
drained from the compressor daily and the inlet filter is kept clean.
• If an unusually long air hose is required, (over 8 metres), the line
pressure or the hose inside diameter may need to be increased.
• The air hose must be rated at least 150% of the maximum operating
pressure of the tool.
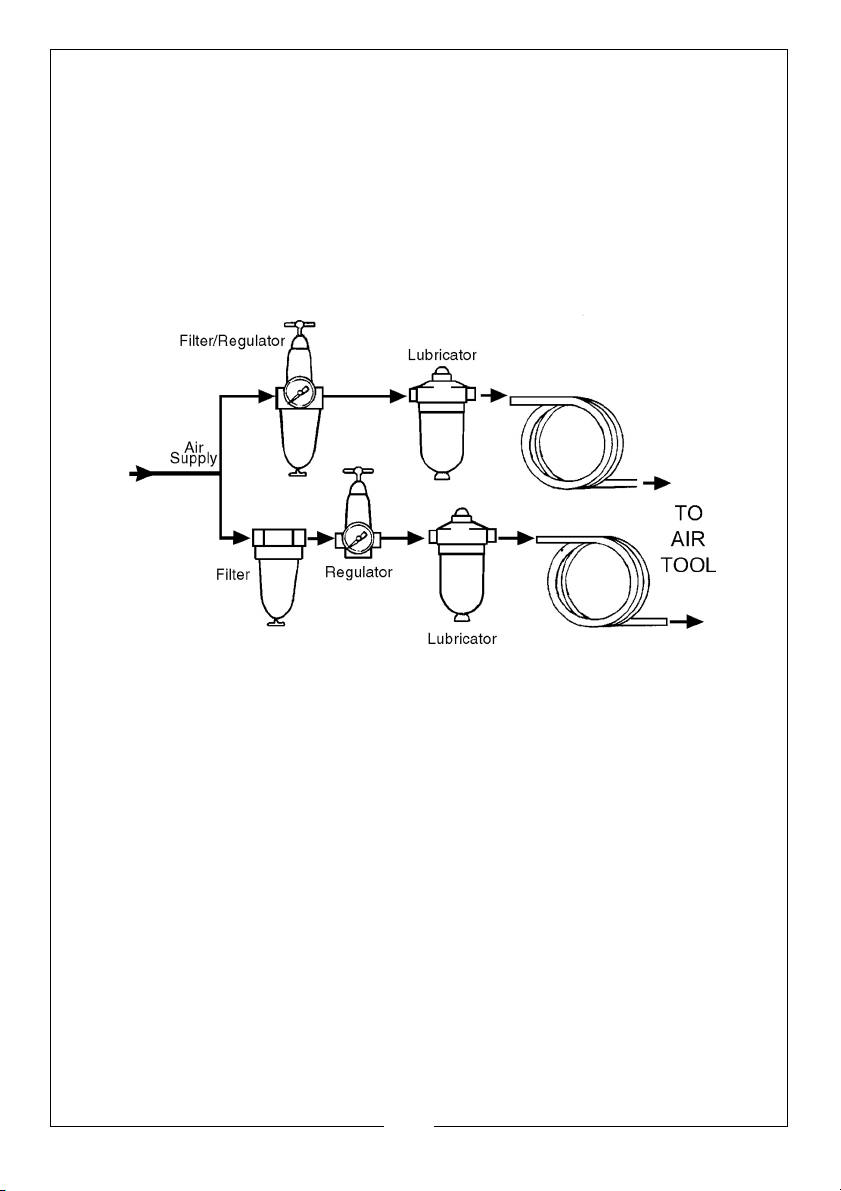
• A typical air line layout is shown above. If an automatic in-line filter/
regulator is used, it will keep the tool in good condition, but should
be regularly checked and topped up with oil. SAE 10 oil should be
used, and the lubricator adjusted to approx 2 drops per minute.
• The minimum hose diameter should be 5/16”(8mm) ID and fittings
should have the same internal dimensions.
• Never exceed the maximum operating pressure for the tool. It is
recommended that air pressure to this tool does not exceed 90 psi
at the tool when running. Higher pressures and unclean air will
shorten the life of the tool due to faster wear and is a possible safety
hazard.
5
Parts & Service: 020 8988 7400 / E-mail: [email protected] or [email protected]
Page 6
BEFORE USE
WARNING: COMPRESSED AIR CAN BE DANGEROUS. ENSURE THAT YOU
ARE FAMILIAR WITH ALL PRECAUTIONS RELATING TO THE USE OF AIR
COMPRESSORS AND COMPRESSED AIR
NOTE: Ensure the air supply is turned off.
1. If required, connect an in-line mini oiler to the tool.
• A mini oiler helps to prolong the life of the air tool.
2. If a mini-oiler is not being used, run a few drops of oil through the tool
before use. It can be entered through the air inlet.
3. Connect a suitable hose to the female air inlet.
4. Connect the other end of the hose to the air supply.
5. Turn on the air supply and check for air leaks.
• Rectify any found before proceeding.
Your air tool is now ready for use.
You can fit a whip hose with a quick fit coupling if required (available from
your Clarke dealer.).
OPERATION
Before starting work, drain any water from the air tank and blow condensation
from the air line. Drain compressor more frequently in hot humid weather.
Note: item Nos refer to parts list, Page 10.
Ensure the correct nosepiece (item 1x) is installed for the size of the rivet
mandril being used, insert the mandril until the rivet buts snugly against the
nosepiece.
Insert the rivet into the workpiece to be secured, pressing firmly depress the
trigger. The riveter will ‘fire’, breaking off the mandril, allowing the riveter to be
removed from the workpiece and re-loaded. Spent mandrills will be ejected
from the rear of the riveter.
To change the nosepiece, unscrew and remove the installed nosepiece, a
slight spring resistance will be felt.
Choose the nosepiece to be installed, push firmly against spring resistance into
the head (item 2), screw home and tighten with the wrench supplied.
6
Parts & Service: 020 8988 7400 / E-mail: [email protected] or [email protected]
Page 7
DISCONNECTING THE AIR SUPPLY
Do not disconnect the air supply hose until the air supply has been shut down
and the compressed air released.
1. Refer to the compressor instruction manual for the procedure to shut down
and release the compressed air.
2. Once the pressure has been released, disconnect the air supply hose from
the air tool.
Store the tool safely in its box in a dry, secure environment.
MAINTENANCE
WARNING: MAKE SURE THAT THE TOOL IS DISCONNECTED FROM THE AIR
SUPPLY BEFORE STARTING ANY CLEANING, OR MAINTENANCE
PROCEDURES.
DAILY
1. Before use, drain water from the compressed air supply.
2. Pour a few drops of CLARKE airline oil, into the air inlet. This should be
carried out regardless of whether or not an in-line mini oiler is used. If an
inline mini oiler is not used, this procedure should be repeated after every
two to three hours of constant use.
CLEANING
1. Keep the body of the tool clean and free from debris. Grit or gum deposits
in the tool may reduce efficiency.
If the riveting action becomes erratic or the riveter operates but fails to form a
rivet successfully, it is possible that the jaw housing assembly (items 3 - 8) has
worked itself loose and requires adjusting. Should this occur, proceed as
follows:
1. Unscrew and remove the head assy (item 2).
2. Using the wrench supplied, hold the jaw housing coupler (item 7), undo the
locknut (item 8).
3. Place the 56mm gauge (on the edge of the wrench provided), alongside
the jaw housing assembly, and screw the jaw assy in or out, so that the lip
of the gauge is in line with the end face of the jaw housing (item 3.) Secure
in position with the locknut (item 8).
7
Parts & Service: 020 8988 7400 / E-mail: [email protected] or [email protected]
Page 8

Additionally, following prolonged use, the jaws may fail to grip the mandril
effectively, and will therefore need replacing. Dis-assemble the jaw housing
assembly, and re-assemble using genuine parts supplied from your nearest
CLARKE dealer, ensure you carry out the adjustment above.
TROUBLESHOOTING
SYMPTOM PROBLEM SOLUTION
Tool runs at normal
speed but slows down
under any load.
Tool runs slowly. Air flows
weakly from exhaust.
Tool will not run. Air flows
freely from exhaust.
1. Excessive pressure on
tip.
2. Motor parts worn.
3. Worn or sticking
mechanism due to
lack of lubricant.
1. Motor parts jammed
with gum/dirt.
2. Regulator in closed
position.
3. General airflow
blocked by dirt.
1. Motor vanes stuck
due to buildup of
foreign material.
1. Reduce the force
applied
2. Return to Clarke dealer
for repair.
3. Drip air tool lubricating
oil into air inlet. Allow oil
to soak moving parts
before using.
1. Examine inlet air filter for
cleanliness.
2. Adjust regulator to open
position.
3. Operate tool in short
bursts.
1. Disconnect air supply
and rotate tool assembly
manually.
2. Try operating tool in
short bursts.
3. Tap motor housing gently
with a rubber mallet.
4. Drip a few drops of air
tool lubricating oil into air
inlet to soak moving
parts.
PERFORMANCE
Please note that factors other than the tool may effect its operation and
efficiency such as reduced compressor output, excessive drain on the airline
moisture or restrictions in the air-line, or the use of connectors of improper size
or poor condition which will reduce air supply.
Grit or gum deposits inside the tool may also reduce its efficiency. This
condition can be corrected by cleaning out the air strainer and flushing out
the tool with gum solvent or oil, or failing this, the motor may require
dismantling.
8
Parts & Service: 020 8988 7400 / E-mail: [email protected] or [email protected]
Page 9

**Clarke Air Line Oil (part no. 3050825) is available from your CLARKE dealer.
SERVICE AND REPAIRS
If the tool runs erratically or becomes inefficient although the air supply is in
good order, it may be necessary to dismantle the tool. Such servicing and
repair work should be carried out by qualified service technicians.
STORAGE
If the tool is to be stored, or is idle for longer than 24 hours, run a few drops of
Clarke air line oil into the air inlet, and run the tool for 5 seconds in order to
lubricate the internal parts.
When not in use, disconnect from air supply, clean tool and store in a safe, dry
place.
ACCESSORIES
A wide range of accessories is available including filter/regulators, lubricators,
high-pressure hoses (5 to 50 metres) etc. Contact your CLARKE dealer for
further information or CLARKE International Service Department on 01992
565333.
9
Parts & Service: 020 8988 7400 / E-mail: [email protected] or [email protected]
Page 10
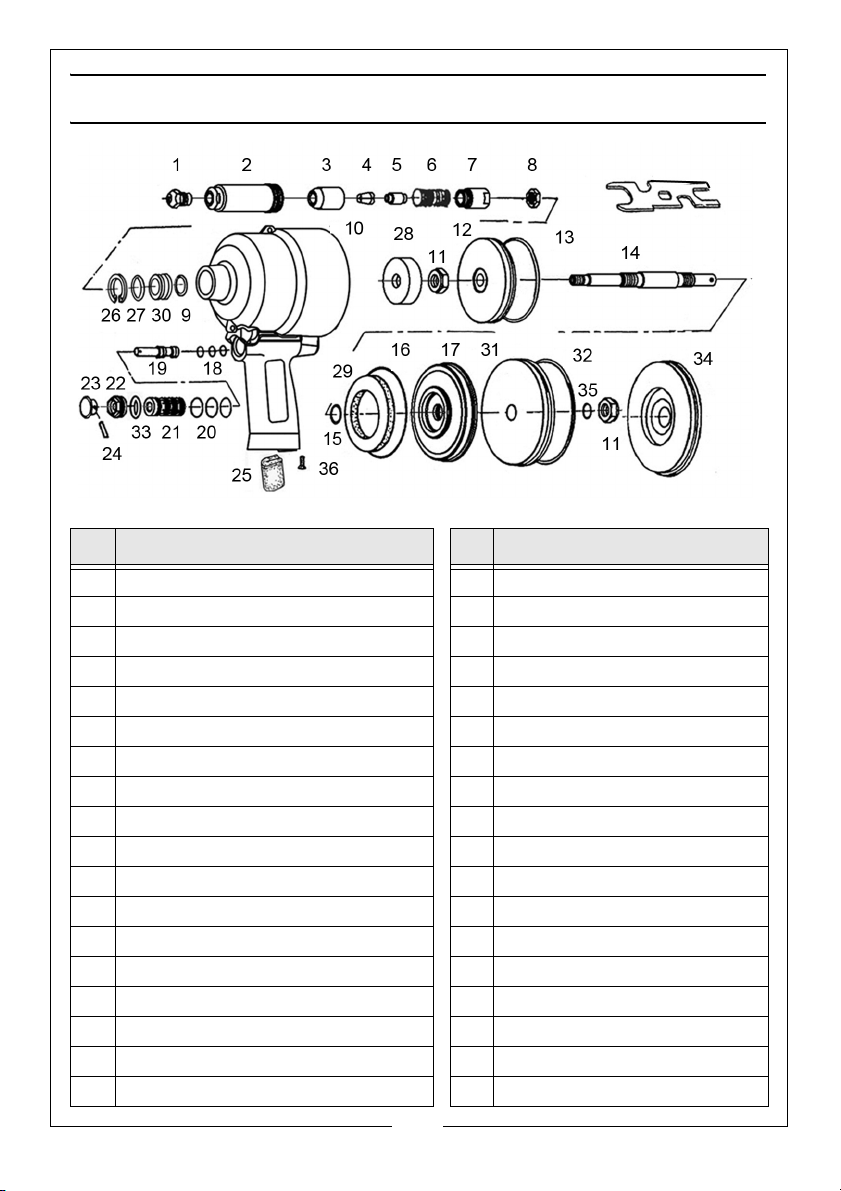
PARTS LIST & DIAGRAM
No Description No Description
1 Nosepiece (3/16”, 5/32”,1/8”3/32”) 19 Valve Stem
2 Head 20 O- Ring Seal (4)
3 Jaw Housing 21 Valve Bushing
4 Jaw (2) 22 Valve Screw
5 Jaw Pusher 23 Bottom cap
6 Spring 24 Pin
7 Jaw HSG Coupler 25 Silencer
8Nut 26Snap Ring
9O-Ring Seal 27O-Ring
10 Housing 28 Damping Ring
11 Nut (2) 29 Damping Ring
12 Front Piston 30 Bush
13 O-Ring Seal 31 Rear Piston
14 Piston Rod 32 O-Ring Seal
15 X-Ring Seal 33 O-Ring
16 O-Ring 34 Housing Cap (alum)
17 Cylinder Cap 35 O-Ring
18 O-Ring Seal (3) 36 Screw
10
Parts & Service: 020 8988 7400 / E-mail: [email protected] or [email protected]
Page 11

DECLARATION OF CONFORMITY
11
Parts & Service: 020 8988 7400 / E-mail: [email protected] or [email protected]
Page 12

 Loading...