

Page 1
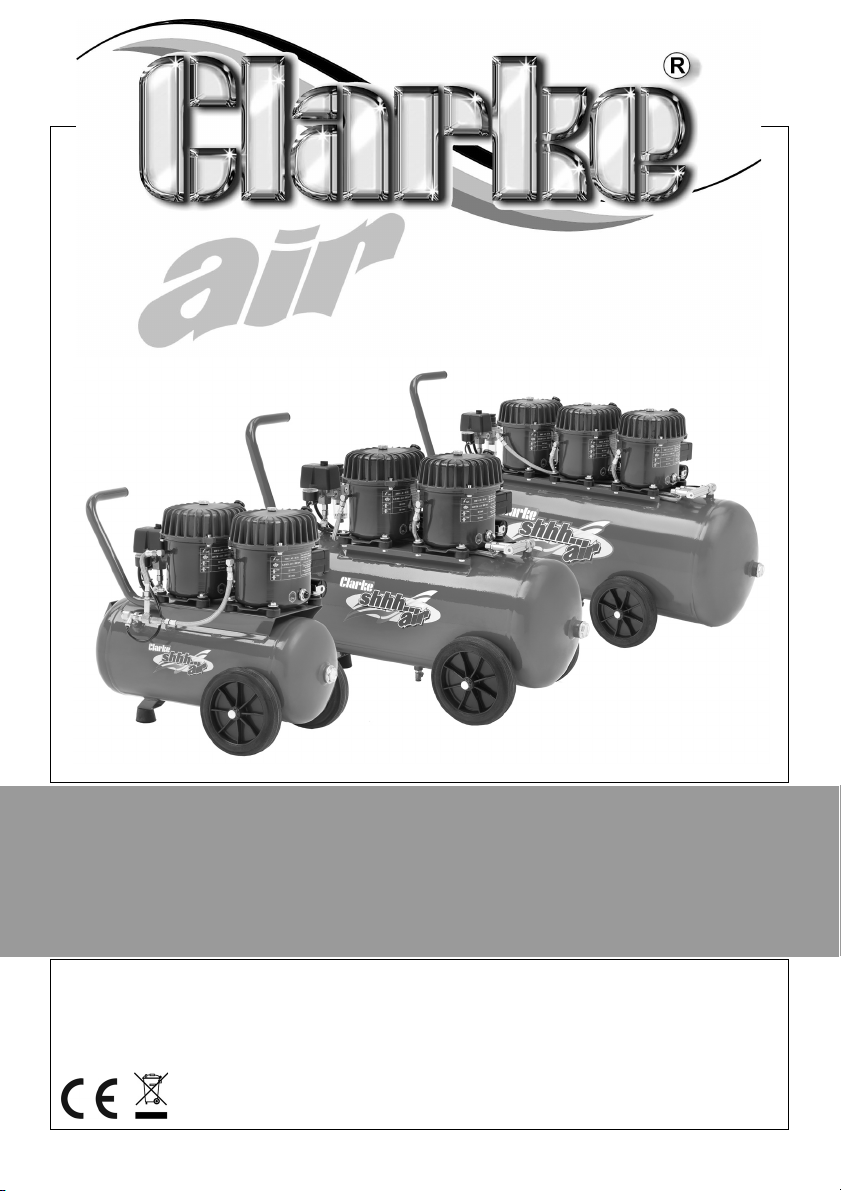
SILENT AIR COMPRESSOR
MODEL NO: SHHHAIR 100/24,100/50,150/100
PART NO: 2320880, 2320885 & 2320890
OPERATION & MAINTENANCE
INSTRUCTIONS
ORIGINAL INSTRUCTIONS GC1220 - rev 7
Page 2
INTRODUCTION
Thank you for purchasing this Air Compressor.
Before attempting to operate the machine, it is essential that you read this
manual thoroughly and carefully follow all instructions given. In doing so you
will ensure the safety of yourself and that of others around you, and you can
also look forward to the product giving you long and satisfactory service.
SPECIFICATION
Model 100/24 100/50 150/100
Power supply 230 V/ 50 Hz
Dimensions (LxHxW)mm 650 x 550 x 360 860x750x400 1150x630x450
Weight 48 kg 60kg 86kg
Receiver capacity 24L 50L 100L
Compressor oil 500ml synthetic oil
Max working pressure 8 Bar/116 psi
Max flow rate@100 psi 70 L/min 70 L/min 105 L/min
Sound power level 42 dBA 42 dBA 43 dBA
Duty cycle 50% (15mins on/15 minutes off)
Please note that the details and specifications contained herein are correct
at the time of going to print
.
GUARANTEE
This product is guaranteed against faulty manufacture for a period of 12
months from the date of purchase. Please keep your receipt as proof of
purchase.
This guarantee is invalid if the product is found to have been abused or
tampered with in any way, or not used for the purpose for which it was
intended.
Faulty goods should be returned to their place of purchase, no product can
be returned to us without prior permission. This guarantee does not effect your
statutory rights.
2
Page 3

GENERAL SAFETY WARNINGS
WARNING: WHEN USING ELECTRICAL TOOLS, BASIC SAFETY
PRECAUTIONS SHOULD ALWAYS BE FOLLOWED TO REDUCE THE RISK OF
FIRE, ELECTRIC SHOCK AND PERSONAL INJURY
WARNING: READ ALL THESE INSTRUCTIONS BEFORE ATTEMPTING TO
OPERATE THIS PRODUCT AND KEEP THESE INSTRUCTIONS IN A SAFE PLACE.
WORK AREA
1. Keep the work area clean and well lit. Floors should always be kept clear.
Cluttered or dark areas invite accidents.
2. Keep children and bystanders away while operating a power tool.
Distractions can cause loss of control.
3. The compressor should only be used in areas with adequate ventilation
and should not be exposed to heat or used near flammable substances
PERSONAL SAFETY
1. ALWAYS stay alert, watch what you are doing and use common sense
when operating the compressor. Do not use the compressor while you are
tired or under the influence of medication, drugs or alcohol. A moment of
inattention can result in personal injury.
2. ALWAYS use eye protection when operating compressed air equipment,
and ensure that others in the work area are protected from flying particles
from the front and from the side.
3. ALWAYS protect yourself against electric shock. Never operate the
compressor in wet or damp locations.
4. NEVER over-reach. Keep your proper footing and balance at all times to
enable better control of the compressor in unexpected situations.
5. NEVER attempt any complex repairs yourself. If you have a technical
problem contact your local dealer.
6. ALWAYS store the compressor out of reach of children.
7. ALWAYS protect your hearing. Ear protection should be worn when
operating this compressor and it’s associated power tools.
8. NEVER direct the air stream at people or animals, as injury may result.
Compressed air can cause soft tissue damage and propel dirt and other
particles at high speed.
9. NEVER insert your fingers or other objects inside the motor housing. Never
operate the compressor without the cover in place.
3
Page 4

GENERAL MACHINE USE AND CARE
1. Prior to use, all operators should become familiar with the instructions in this
booklet especially the ON/OFF switch for emergency stopping.
2. ALWAYS maintain the compressor with care and keep it clean for best /
safest performance.
3. NEVER use this compressor if any part is damaged. Have it inspected and
repaired by your dealer.
4. NEVER attempt to modify the air compressor, tank, fittings or attachments in
any way. Doing so will invalidate the guarantee and could result in
personal injury.
5. NEVER abuse the power cable. Never pull on the cable when removing the
plug from the socket, or lift the compressor by the power cable.
6. ONLY use extension leads that are of an appropriate power rating and
suitable for the work environment. Extension leads must have an earth
connection. Inspect the extension lead regularly and replace if damaged.
7. ONLY USE RECOMMENDED PARTS: To avoid the risk of bursting, only hoses
with a rated pressure of 10 bar, or more should be used. Never attempt to
repair damaged hoses.
8. NEVER abuse the compressor by standing on it.
AIRLINE HOSES
1. ALWAYS ensure that equipment or power tools used in conjunction with the
compressor have a safe working pressure exceeding that of the machine.
2. ALWAYS keep the air hose away from any attached power tools and
ensure that the operator is not restricted by the length of the hose.
3. ALWAYS take care when a long air hose is required in the work area as it
presents a trip hazard. Coil the hose away as soon as the job is finished.
4. ALWAYS avoid kinking or trapping the air hose. Always replace faulty hoses
and never attempt a repair if a leak is detected.
5. NEVER abuse hoses or connectors. NEVER carry an air tool by the hose, or
yank it to disconnect from the air supply. Keep hoses away from heat, oil
and sharp edges. Check hoses for leaks or worn condition before use and
ensure that all connections are secure.
6. ALWAYS ensure that the air supply is turned off at the machine outlet and
any air pressure vented from within the compressor and any attached
equipment when disconnecting air hoses or other equipment.
4
Page 5

AIR COMPRESSOR SAFETY INSTRUCTIONS
1. ONLY USE WITHIN THE RECOMMENDED OPERATING TEMPERATURE RANGE:
This compressor should only be used in an ambient temperature of
between +5
2. NEVER USE AN AIR COMPRESSOR WHICH APPEARS DEFECTIVE OR IS
OPERATING ABNORMALLY: If the compressor operates unusually or makes
strange noises, switch off immediately and purge the air reservoir. Arrange
repairs with your nearest dealer.
3. BREATHING QUALITY AIR: This compressor should not be used to supply
breathing quality air.
4. SAFETY VALVE: Never remove or attempt to adjust the safety valve. The
maximum pressure is factory set. Keep the safety valve free from paint and
other accumulations.
5. AVOID UNINTENTIONAL STARTING: Do not move the compressor when it is
connected to the mains power supply.
6. BEFORE EACH USE CHECK THE COMPRESSOR AND HOSE FOR DAMAGED
PARTS: Never use the compressor if it has been damaged in any way. Have
the compressor repaired by a qualified service engineer. Do not use the
compressor if the On/Off switch does not operate correctly.
7. KEEP THE MOTOR AIR VENTS CLEAR: Keep the motor vents clear and free
from dust. Wipe regularly to maintain an adequate supply of clean air.
Avoid using in dusty conditions.
8. OPERATE THE COMPRESSOR AT THE CORRECT VOLTAGE: Make sure that the
mains supply voltage is the same as the voltage shown on the label.
9. ALWAYS adjust the pressure regulator to the recommended setting for the
particular spray gun or air tool being used.
10. When using the compressor for painting:
• DO NOT work in enclosed areas or near naked flames.
• Ensure that the area in which you are working has good ventilation.
• Protect your nose and mouth with a suitable face mask.
• ALWAYS check the safety data sheets for substances being sprayed &
ensure manufacturer’s instructions are followed.
11. DO NOT USE THIS COMPRESSOR TO INFLATE SMALL, LOW-PRESSURE OBJECTS:
Items such as children's toys or footballs can explode if over-inflated.
12. NEVER STOP THE COMPRESSOR BY REMOVING THE PLUG OR SWITCHING OFF
AT THE MAINS SUPPLY: Always use the On/Off switch on the compressor.
O
C and +40OC (never at or below freezing temperatures).
5
Page 6
ELECTRICAL CONNECTIONS
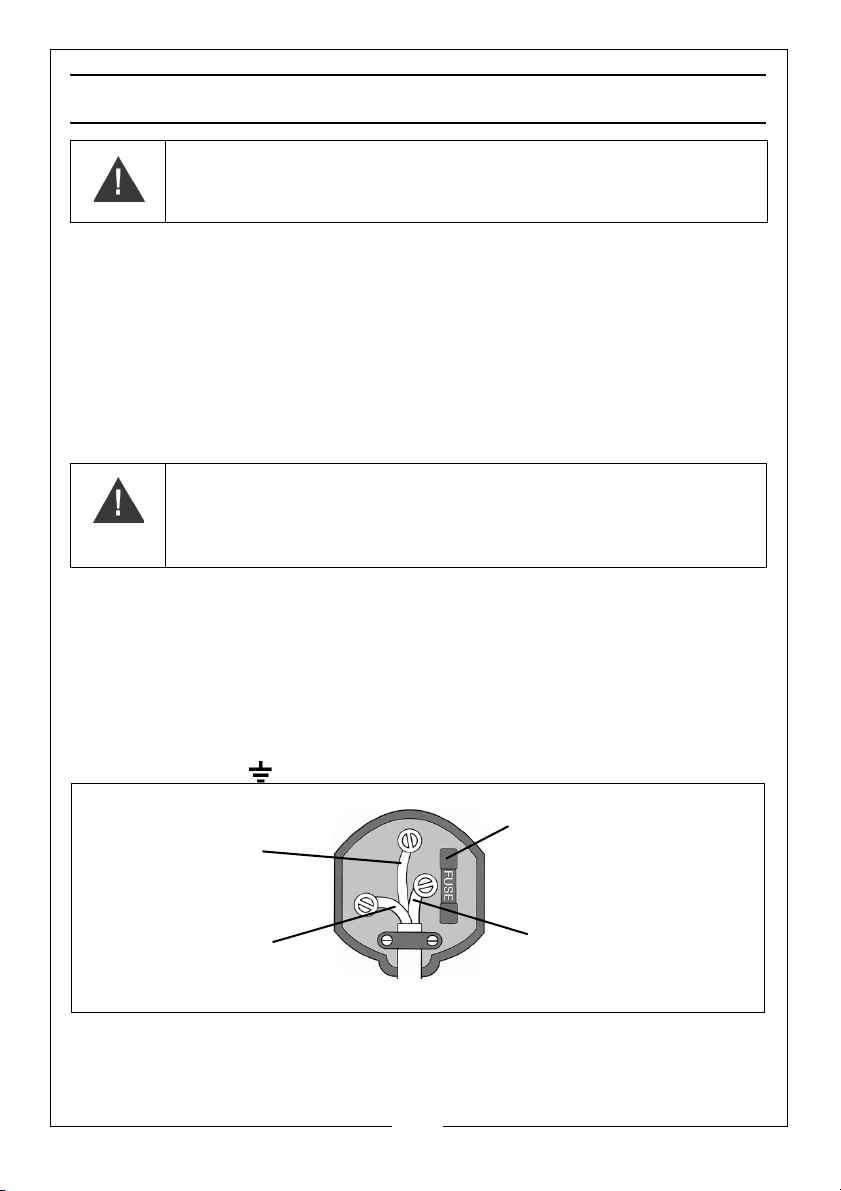
Plug must be BS1363/A approved.
Always fit a 13 Amp fuse.
Ensure that the outer sheath of the cable is firmly held by the clamp
Neutral
(Blue)
Live
(Brown)
Earth
(Green and Yellow)
WARNING! READ THESE ELECTRICAL SAFETY INSTRUCTIONS
THOROUGHLY BEFORE CONNECTING THE PRODUCT TO THE
MAINS SUPPLY.
Before switching the product on, make sure that the voltage of your electricity supply is
the same as that indicated on the rating plate. This product is designed to operate on
230VAC 50Hz. Connecting it to any other power source may cause damage.
This product may be fitted with a non-rewireable plug. If it is necessary to change the
fuse in the plug, the fuse cover must be refitted. If the fuse cover becomes lost or
damaged, the plug must not be used until a suitable replacement is obtained.
If the plug has to be changed because it is not suitable for your socket, or due to
damage, it should be cut off and a replacement fitted, following the wiring instructions
shown below. The old plug must be disposed of safely, as insertion into a mains socket
could cause an electrical hazard.
WARNING! THE WIRES IN THE POWER CABLE OF THIS PRODUCT
ARE COLOURED IN ACCORDANCE WITH THE FOLLOWING CODE:
BLUE = NEUTRAL BROWN = LIVE YELLOW AND GREEN =
EARTH
If the colours of the wires in the power cable of this product do not correspond
with the markings on the terminals of your plug, proceed as follows.
•The Blue wire must be connected to the terminal marked N or
coloured Black.
•The Brown wire must be connected to the terminal marked L or
coloured Red.
•The Yellow and Green wire must be connected to the terminal
marked E or or coloured Green.
We strongly recommend that this machine is connected to the mains supply
via a Residual Current Device (RCD). If in any doubt, consult a qualified
electrician. DO NOT attempt any repairs yourself.
6
Page 7
PREPARING FOR USE
Before connecting your compressor
to the mains supply, check the
following:-
• Firstly, ensure the compressor is
on level ground. Do not allow it
to run if it is standing on an
incline.
• Check also that the mains
voltage corresponds with that
shown on the data label on the
side of the compressor.
• The ON/OFF switch is in the OFF position.
ADDING OIL
The compressor is supplied without
any oil inside.
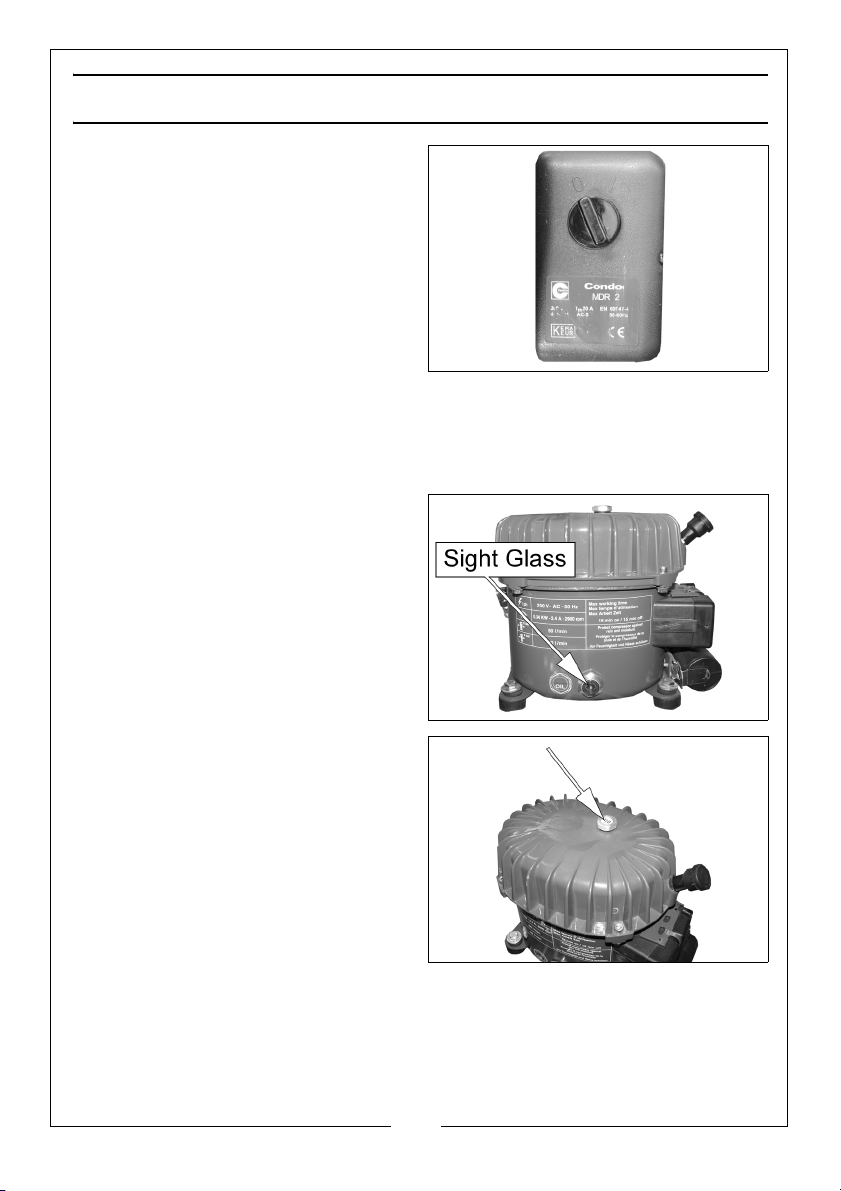
1. Make sure that the oil level is half
way up the oil sight glass.
2. If not, remove the oil cap and top
up the reservoir.
• Only use Clarke synthetic
compressor oil, available from
your Clarke dealer (Part No.
3050795).
7
Page 8
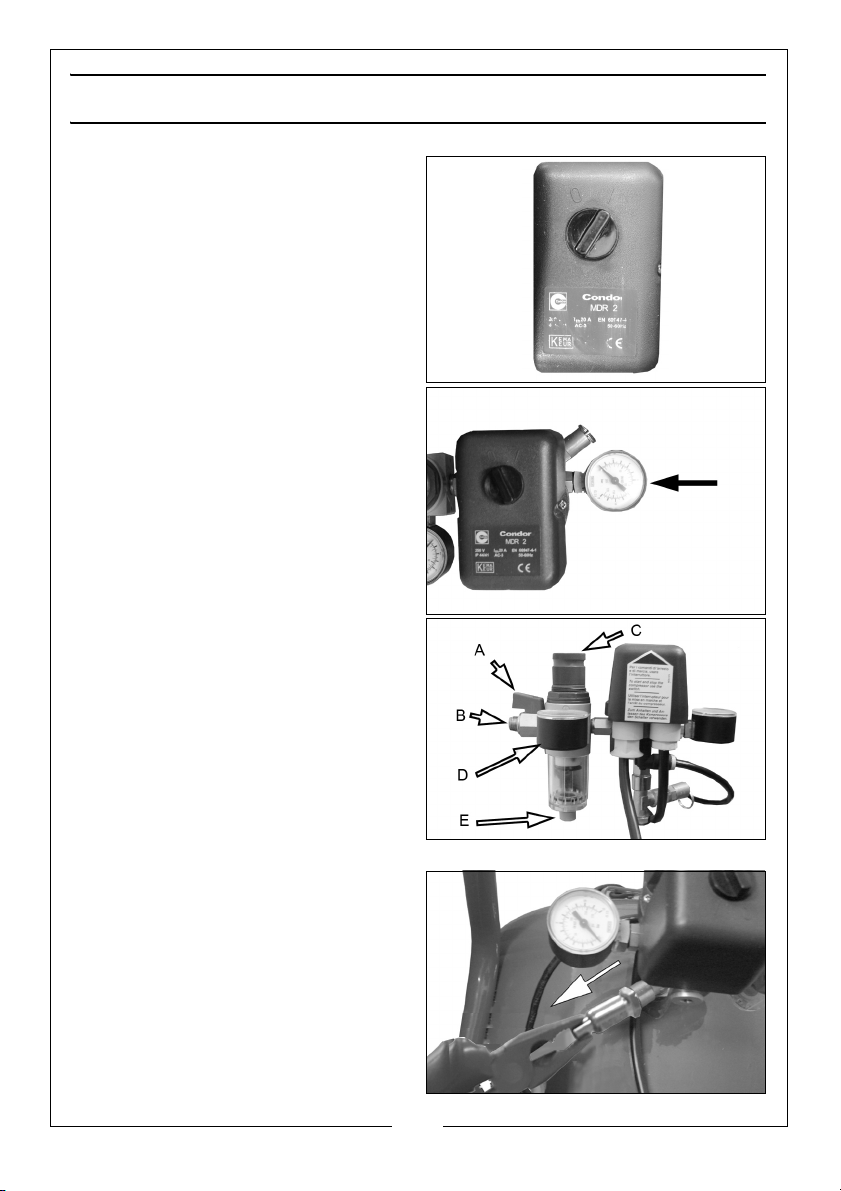
SWITCHING THE AIR COMPRESSOR ON
1. To start the compressor, turn the
ON/OFF switch to the ‘I’ (ON)
position - the motor should start
immediately.
NOTE: If the motor fails to start
immediately, the air receiver
may already be full of air.
Check the tank pressure
gauge (shown on the right).
If you release air, by opening
the air outlet tap, the motor
will start automatically once
the cut-in pressure is
reached.
2. Allow the compressor to run for 10
- 15 seconds, with the air outlet
tap, (A) open.
• This will distribute the lubricating
oil.
3. Close the outlet tap and connect
a suitable air hose to the filter/
regulator outlet (B). Connect the
other end to the equipment to be
used.
4. Check the safety valve by pulling
on the ring shown, air should hiss
out when pulled.
8
Page 9

5. Adjust the pressure regulator.
• To do this, lift the pressure regulator knob (C), and turn it clockwise to
increase the pressure, anticlockwise to decrease the pressure. The
pressure is shown on the outlet gauge (D).
• To lock the pressure regulator knob, push the pressure regulator knob
down until it clicks into place.
IMPORTANT: Always refer to the accessory manufacturers
recommendations for optimum operating pressures for their equipment.
6. With operating pressure set, open the air outlet tap.
NOTE: If the machine pumps continuously without cutting out then the
compressor is too small for the application/tool being used, and
damage may result. Consult your Clarke dealer.
NOTE: DO NOT exceed the duty cycle for the machine (see
Specifications).
SHUTTING DOWN THE COMPRESSOR
1. To shut off the compressor, simply turn the ON/OFF switch to the O (OFF)
position.
2. Close the air outlet tap and trigger the equipment (spray gun, air tool etc,
to release air from the air hose before disconnecting the hose from the
machine.
3. Before transporting your compressor or when leaving overnight, expel all
air from the receiver by opening the vent valve and drain the reservoir.
9
Page 10
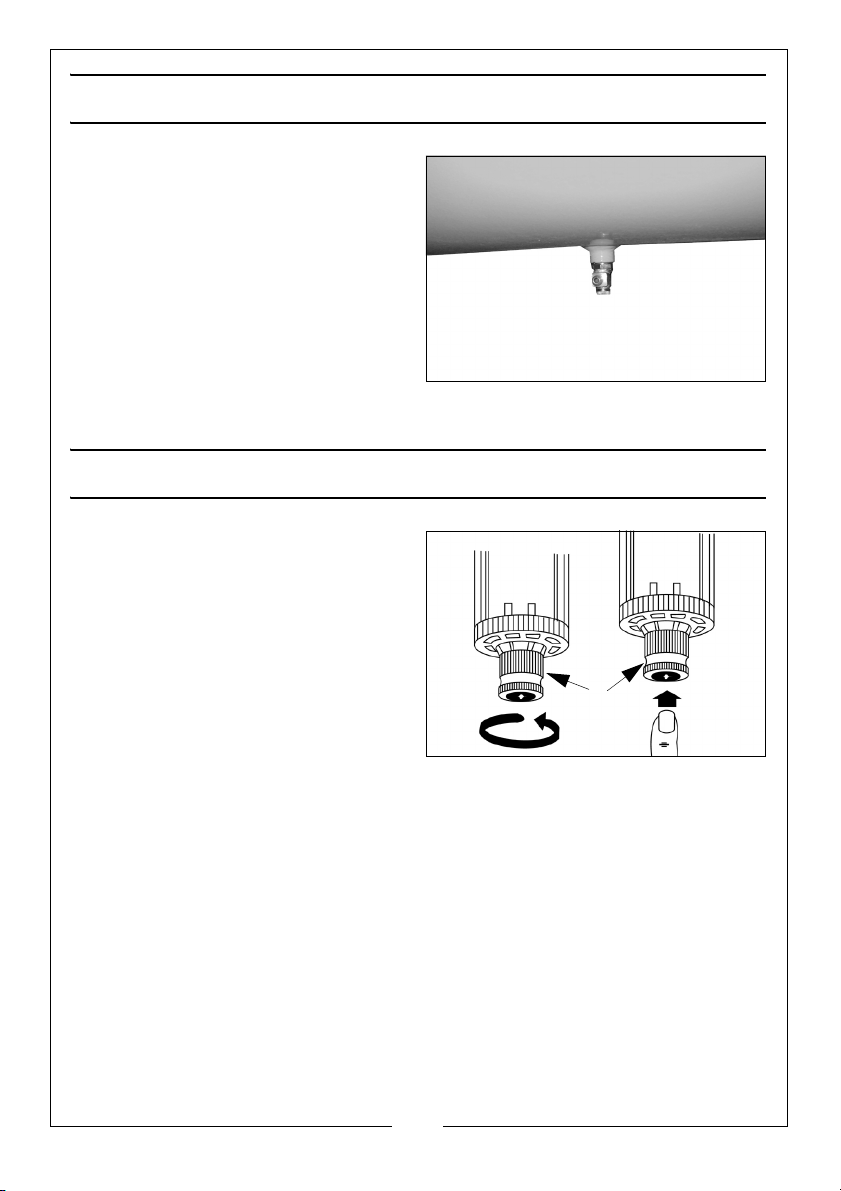
DRAINING THE RESERVOIR
Valve (E)
1. Pressurise the reservoir slightly and
then turn the compressor off.
2. Attach the small hose supplied to
the vent valve as shown.
3. Take the compressor to the sink
and place the free end of the
small hose in the sink.
4. Slowly open the vent valve.
5. When the reservoir has been
drained, re-tighten the vent valve and remove the hose.
DRAINING THE AIR OUTLET FILTER
1. Drain any liquid that may have
accumulated in the air filter
chamber, by first twisting and then
pushing the valve (E) upwards.
10
Page 11
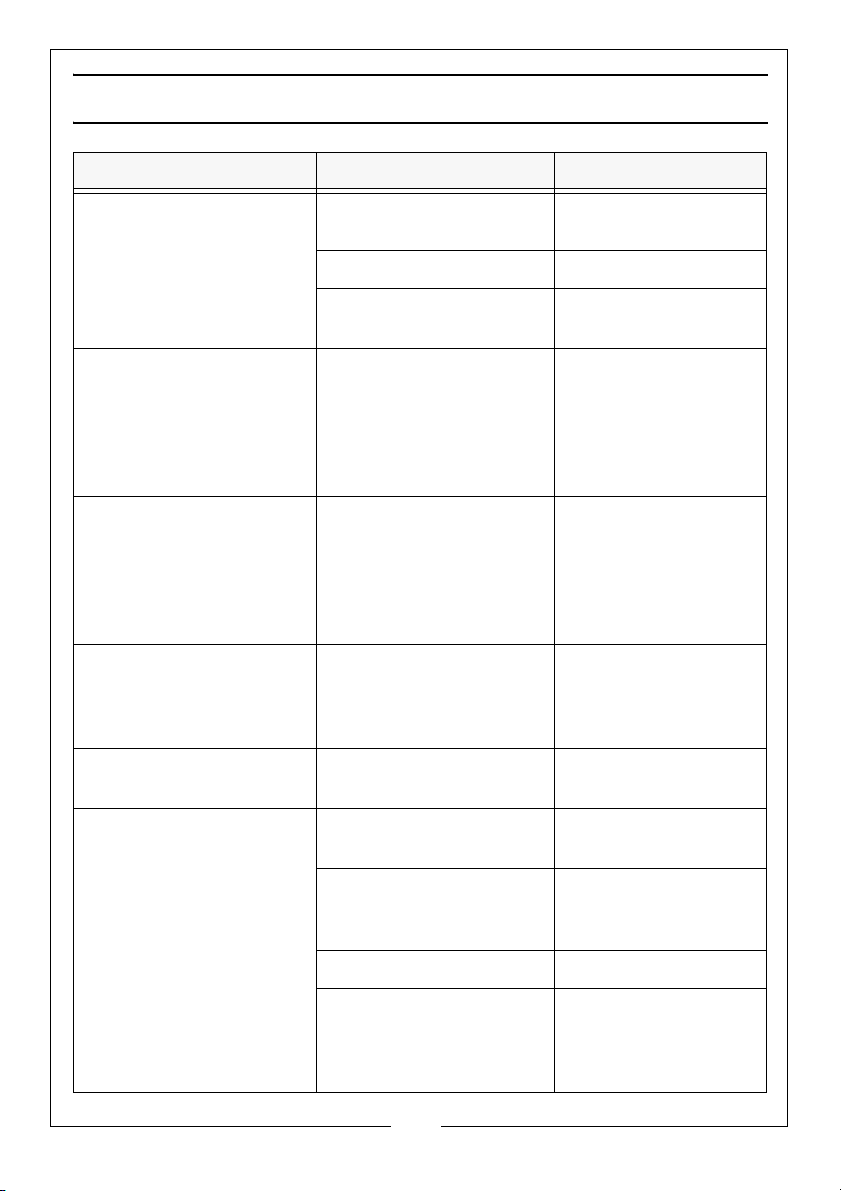
TROUBLESHOOTING
PROBLEM PROBABLE CAUSE REMEDY
The compressor will not
start, or stops and will not
start again
Compressor does not start Air receiver charged Open drain valve to
The compressor does not
reach the set pressure
and overheats easily
Air leaking from the
pressure switch valve
when the compressor is
not running
Air pressure from the
regulator will not adjust
Bad connections Check the electrical
connections
Blown fuse Replace fuse
Overload cutout switch
has tripped
Inlet air filter is blocked
NOTE: It is also possible
that you are trying to use
more air than the
compressor is capable of
delivering
Faulty non-return valve First drain the receiver
Broken diaphragm within
the regulator body
Wait 25-20 mins before
attempting to restart
expel air. Compressor
should start again
when pressure
reduces to approx 95
psi.
Renew oil filler/air Filter
plug
completely of air.
Renew the non-return
valve
Replace regulator
Compressor operating,
but no air from outlet
Inlet air filter blocked Renew oil filler/air Filter
plug
Pressure regulator closed Turn regulator
clockwise to set
required pressure
Drain valve open Close vent valve
Bleed pipe (from pressure
switch to non-return
valve) broken or
disconnected
11
Reconnect or replace
bleed pipe
Page 12
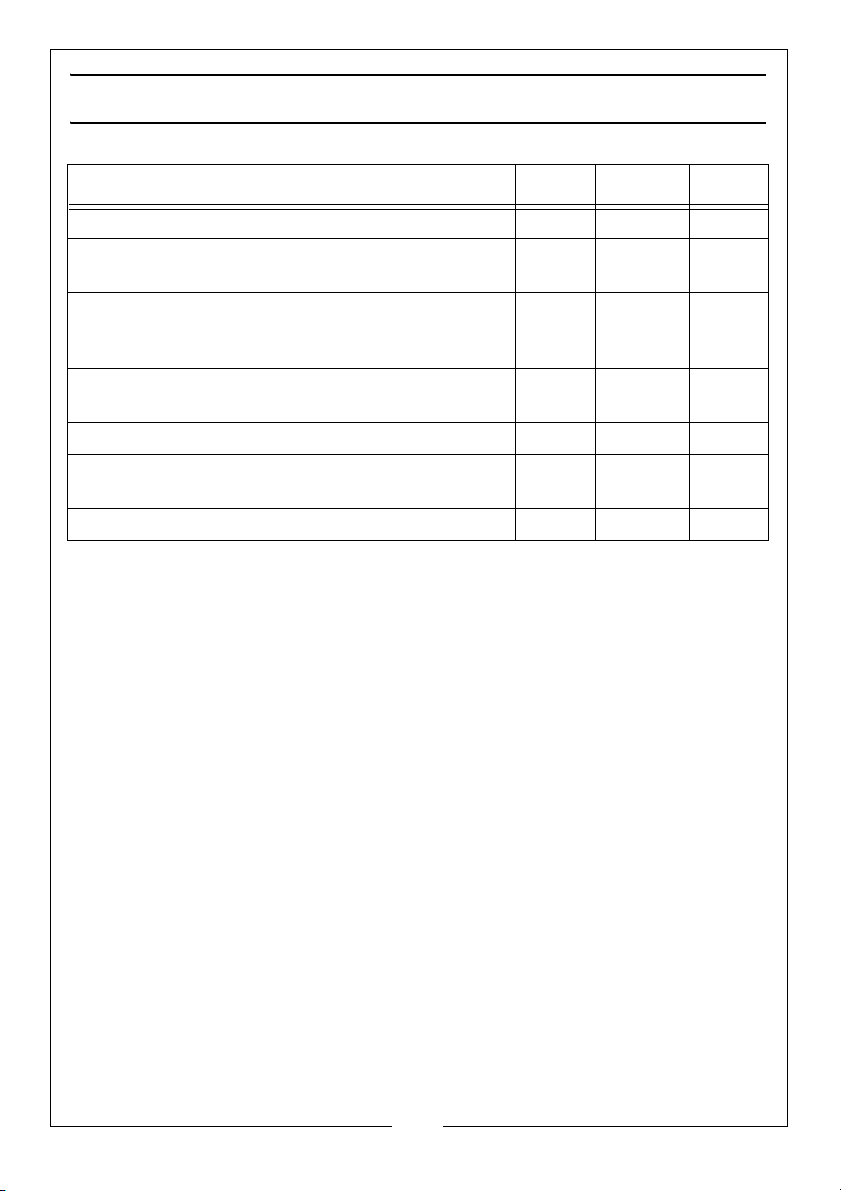
MAINTENANCE
Daily Monthly Yearly
Check the oil level X
Drain the water collected in the air outlet filter.
See Draining the Reservoir on page 10.
Remove the condensate that has collected in
the air tank. See Draining the Reservoir on page
10.
Once a month check the compressor for loose
connections, wear, etc.
Clean the compressor with a soft cloth. X
Check the safety valve when there is pressure in
the tank.
Total replacement of oil. See below. X
DRAIN AND REPLACE THE OIL
Drain and replace the oil annually, as follows:
1. Loosen the collar securing screw and remove the collar.
2. Pull off the head, complete with sealing ring.
3. Tilt the compressor carefully on to its side, so that the oil is drained into a
suitable container.
• Dispose of the oil according to local regulations.
4. Reassemble the head ensuring the sealing ring is in perfect condition and is
located correctly.
X
X
X
X
12
Page 13
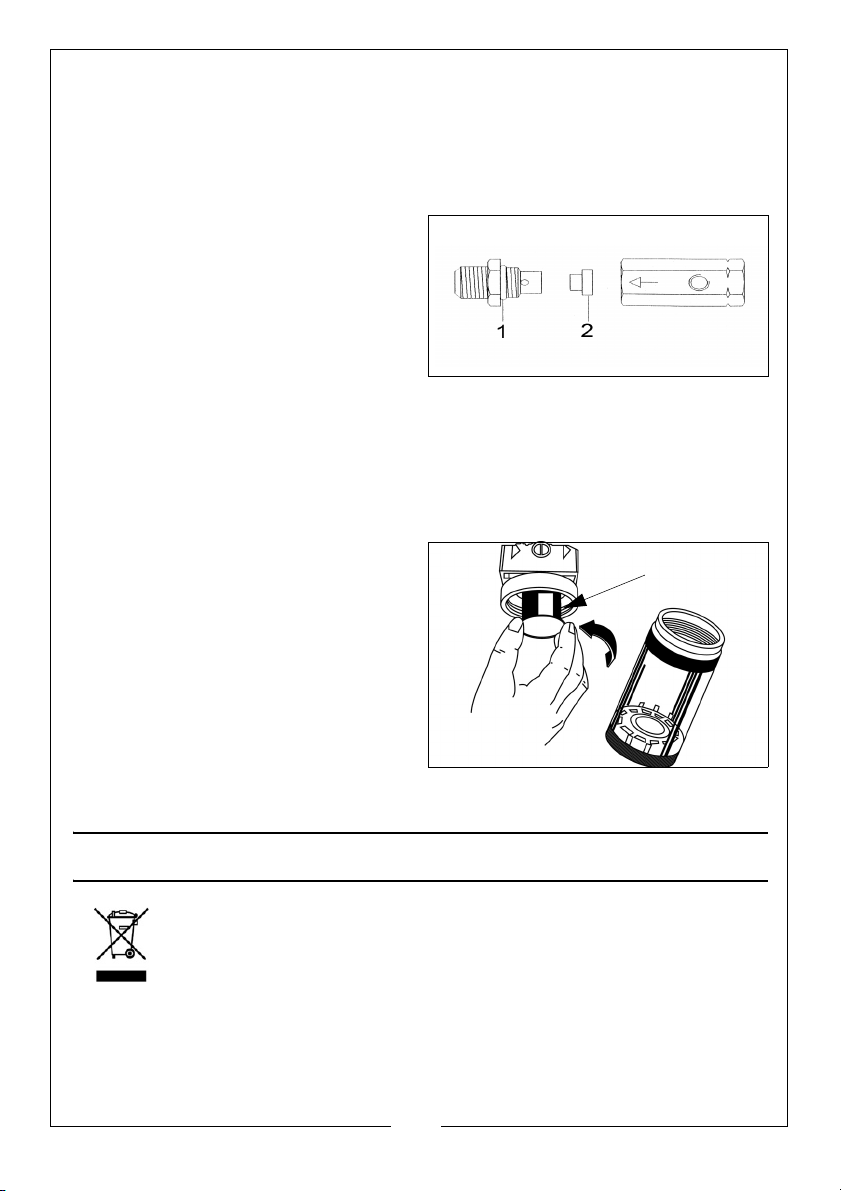
CHECK THE NON RETURN VALVE
Air Filter
If the tank pressure decreases for no apparent reason, it is possible that the
non-return valve is leaking. To check, ensure the tank is under pressure and the
machine switched OFF.
1. Take off the flexible hose and check if air leaks out from the valve.
2. If so, unscrew the valve from the
connection and disassemble it as
shown.
3. Clean all the components with a
dry cloth and reassemble the
valve taking care to place the
internal rubber disc(2) as shown.
4. Fasten the valve to the connection and join the flexible hose. If the
leakage persists, the whole valve must be replaced.
REPLACING THE AIR OUTLET FILTER
The compressor must be completely depressurised before carrying out this
procedure.
1. Unscrew the cartridge from the air
filter assembly.
2. Unscrew and replace the small air
filter.
STORAGE
Disconnect the mains plug and
ventilate the compressor and any
connected pneumatic tools. Store
the compressor in a dry location.
Always store upright.
ENVIRONMENTAL RECYCLING POLICY
By purchasing this product, the customer is taking on the obligation
to comply with current WEEE regulations.
This means that this product must not be disposed of with general
household waste. It must be disposed of according to the laws
governing Waste Electrical and Electronic Equipment (WEEE) at a recognised
disposal facility.
This product contains valuable raw materials. Metal products should be taken
to your local civic amenity site for recycling of metal products.
13
Page 14
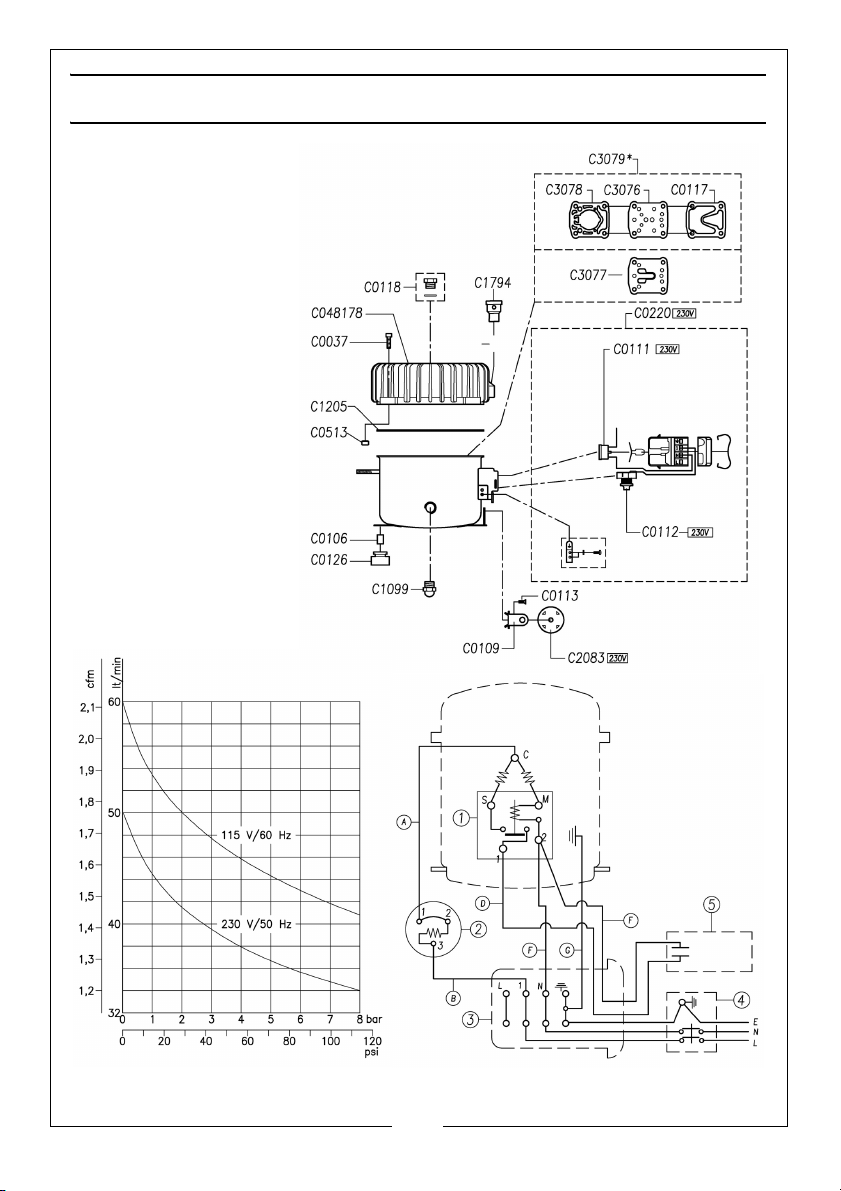
PART S DIA GRA M
14
Page 15
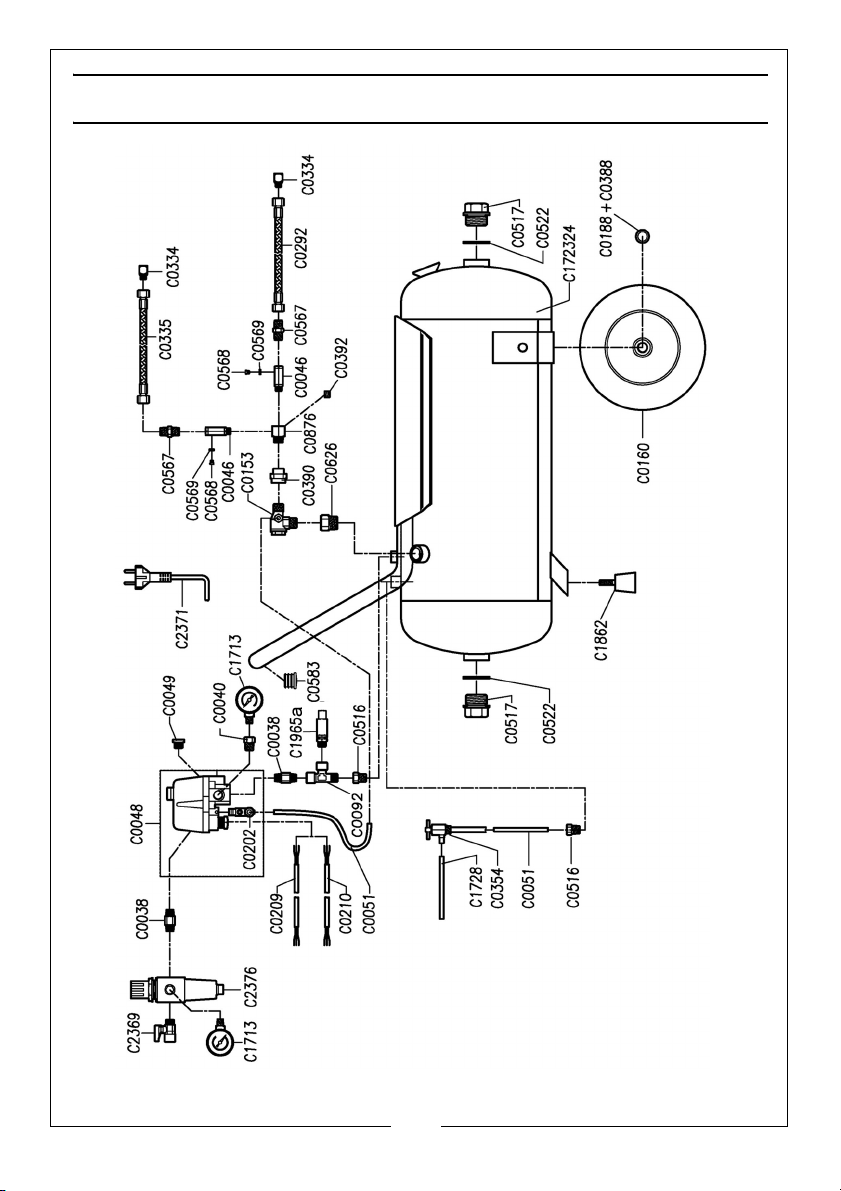
PARTS DIAGRAM - SHHHAIR 100/24
15
Page 16
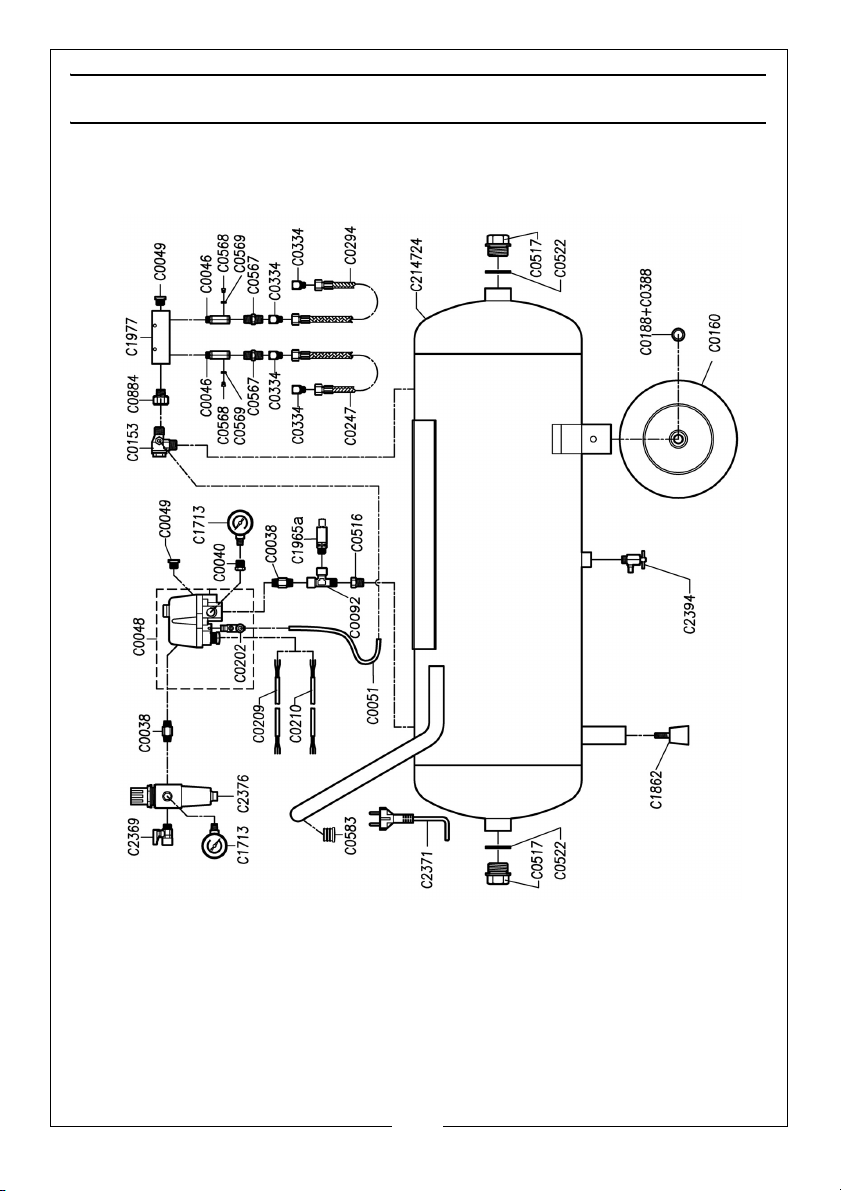
PARTS DIAGRAM - SHHHAIR 100/50
16
Page 17
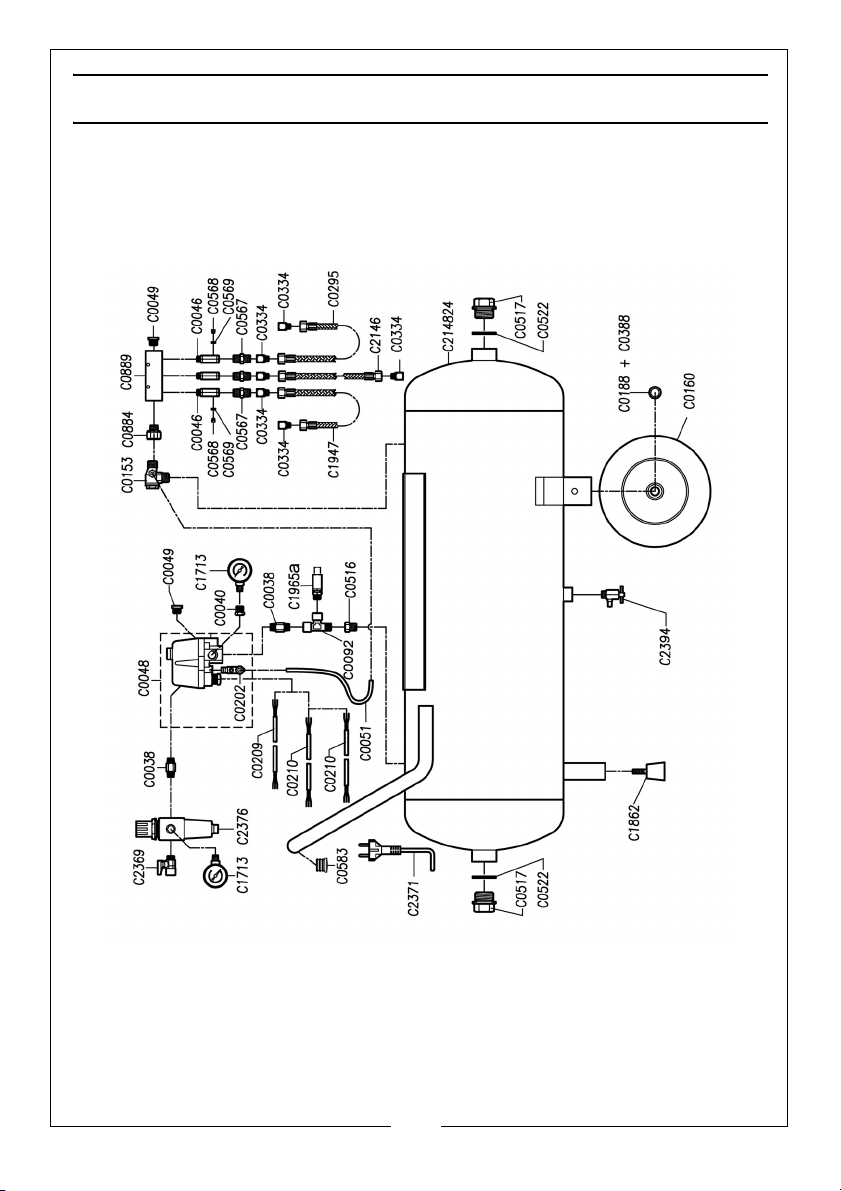
PARTS DIAGRAM - SHHHAIR 150/100
17
Page 18
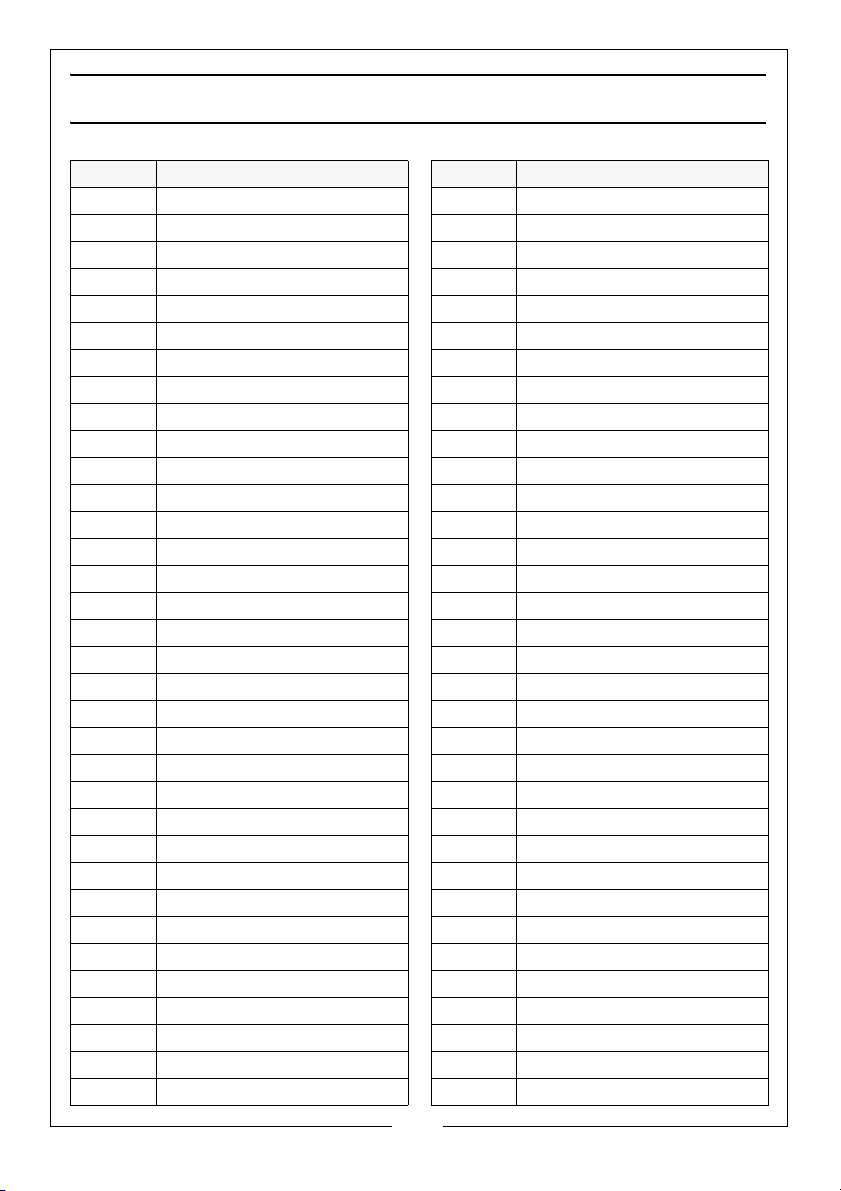
COMPONENT PARTS LIST
NO DESCRIPTION NO DESCRIPTION
C0037 Screw TCEI 6X20 C0209 Electric Cable MM 700
C0106 Spacer T21 C0210 Electric Cable
C0109 Capacitor Bracket C247 Air hose
C0111 Overload Protector T2134A C0292 Air pipe MM260 rotatable
C0112 Start Relay T21 (230V) C0293 Air pipe MM300 rotatable
C0113Screw C0297Air hose
C3078Cylinder Gasket C0334Connector
C3076 Valve Plate T21 with Valve C0335 Air pipe MM140 rotatable
C0117 Head Gasket C0354 Draincock M 1/4 90
C0118 Oil Plug 3/8+O Ring C0388 Wheel axle
C0126 Rubber Grommet T21 C0390 Coupling F-F 1/4x3/8 NI
C0220 Kit Terminal Box T21 (230V) C0392 Plug M1/8
C3077 Intake Valve C0516 Reducer M-F 3/8”- 1/4”
C3079 Valve Plate Set (from s/n18E) C0517 Plug M1
C048178 Rubber Head C0522 Aluminium Washer 1"
C0513 Nut with Washer C538 Plug M1/8”
C0567 Nipple 1/8" C0567 Nipple 1/8”
C1099 Oil Level Glass 1/2" C0568 Screw M5x6 UNI7687
C1205 O Ring 4700 C0569 Nylon washer 5x10
C1235 Valve Plate Set (until s/n17s) C0583 Rubber foot
C1794 Kit - Intake Filter C0626 Reducer M-F 3/8x3/8 NI
C2083Capacitor C0876Connector
C0038 Nipple1/4”X35 C0884 Reducer M-F 31/4x3/8 NI
C0040 ReducerM-F 1/4” x1/9 C0889 5-way extension piece
C0046 Non Return Valve M-F 1/8" C1713 Gauge R40
C0048 Bipole pressure switch 4-way C172324 Tank 100/24
C0049Plug M1/4 C1728Hose
C0051 Rylsan Hose ?4/6 C1862 Rubber support
C0092 "T" Connection F-F-F 1/4" C1947 Air Hose
C0153 Non-return valve M-M 3/8”C C1965a Pressure Relief Valve
C0160 Wheel D200 C214724 5oL reservoir
C0164 Filter Regulator C214824 5oL reservoir
C0188 Block ring 20 C2369 Outlet tap
C0202 Exhaust Valve 90 C2371 Cable
18
Page 19
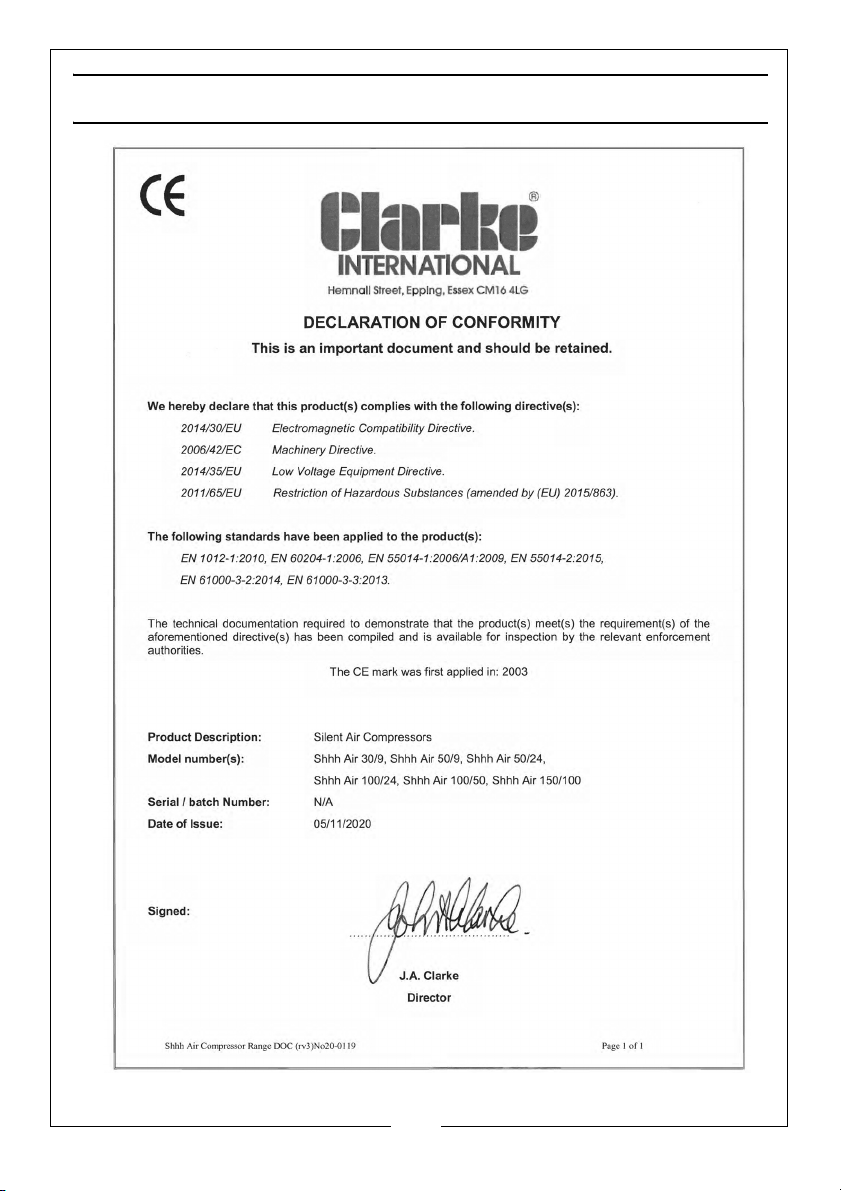
DECLARATION OF CONFORMITY
19
Page 20

 Loading...