

Page 1

12LTR TROLLEY HAND SPRAYER
MODEL:12LST
PART NO: 3402235
USER INSTRUCTIONS
ORIGINAL INSTRUCTIONS GC0718 ISS1
Page 2
INTRODUCTION
Thank you for purchasing this CLARKE Sprayer, designed only for use with
insecticides or other water-based products.
Before attempting to use this product, please read this manual thoroughly and
follow the instructions carefully. In doing so you will ensure the safety of yourself
and that of others around you, and you can look forward to your purchase
giving you long and satisfactory service.
GUARANTEE
This product is guaranteed against faulty manufacture for a period of 12
months from the date of purchase. Please keep your receipt which will be
required as proof of purchase.
This guarantee is invalid if the product is found to have been abused or
tampered with in any way, or not used for the purpose for which it was
intended.
Faulty goods should be returned to their place of purchase, no product can
be returned to us without prior permission.
This guarantee does not effect your statutory rights.
GENERAL SAFETY PRECAUTIONS
1. Never use this sprayer to store or spray flammable solvent-based
chemicals.
2. Empty the contents if the sprayer is not to be used for long periods.
3. If insecticide is being sprayed, always wear a protective mask, safety
glasses, footwear, overalls and gloves to protect the skin and face. Never
spray chemical products facing into the wind.
4. Never spray pesticide towards other people, animals or foodstuffs.
5. Never use the sprayer for handling hot liquids and avoid operating in
excessively hot environments.
6. Always comply with any applicable insecticide manufacturers safety
instructions/directives before use.
7. Stop using the sprayer if the container or hose is found to be damaged.
8. Always ensure all hose and lance connections are tight and leak-free.
2
Parts & Service: 020 8988 7400 / E-mail: [email protected] or [email protected]
Page 3
SPECIFICATION
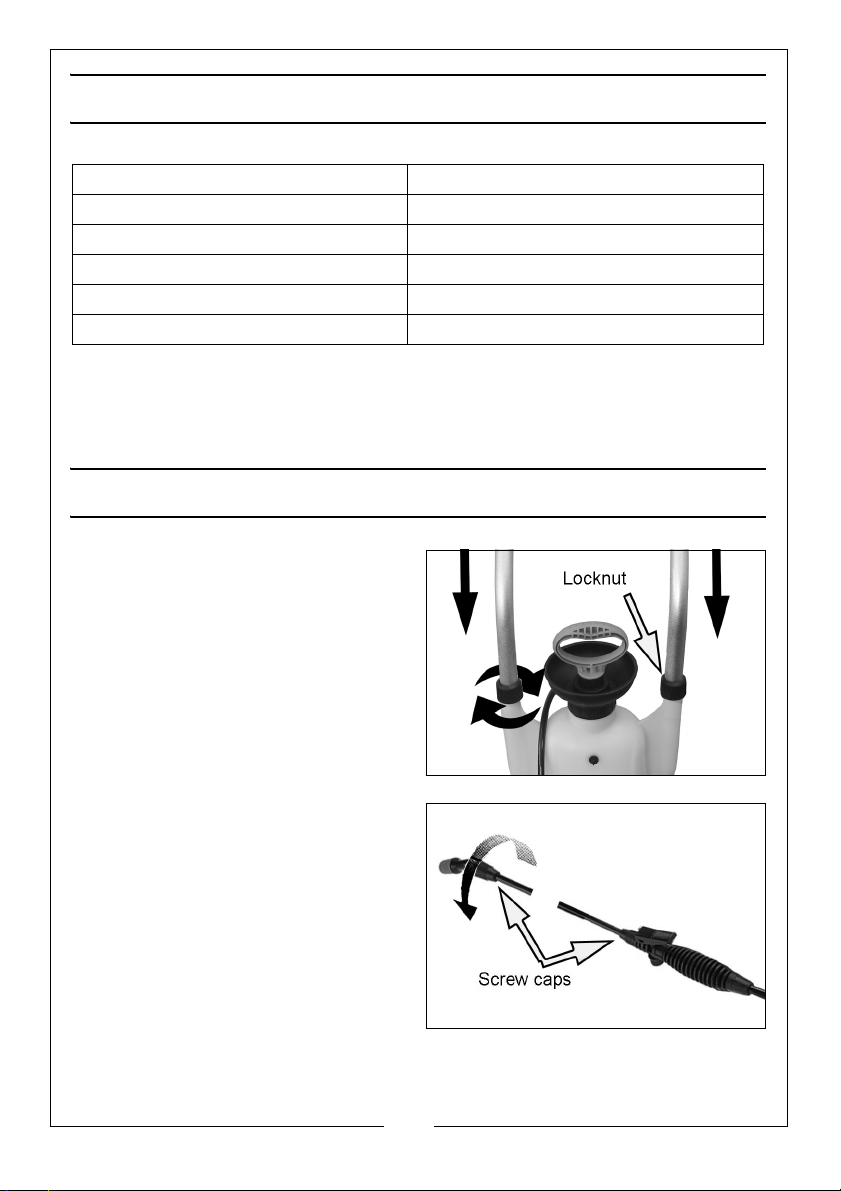
Overall Size 630 x 600 x 700 mm
Weight 3.8 kg
Rated Volume 12 Litres
Pressure 3 bar
Hose Length 2.5 m
Flow rate 0.32 - 0.36 L/min (2 bar)
Please note that the details and specifications contained herein, are correct
at the time of going to print. However, CLARKE International reserve the right
to change specifications at any time without prior notice.
ASSEMBLY
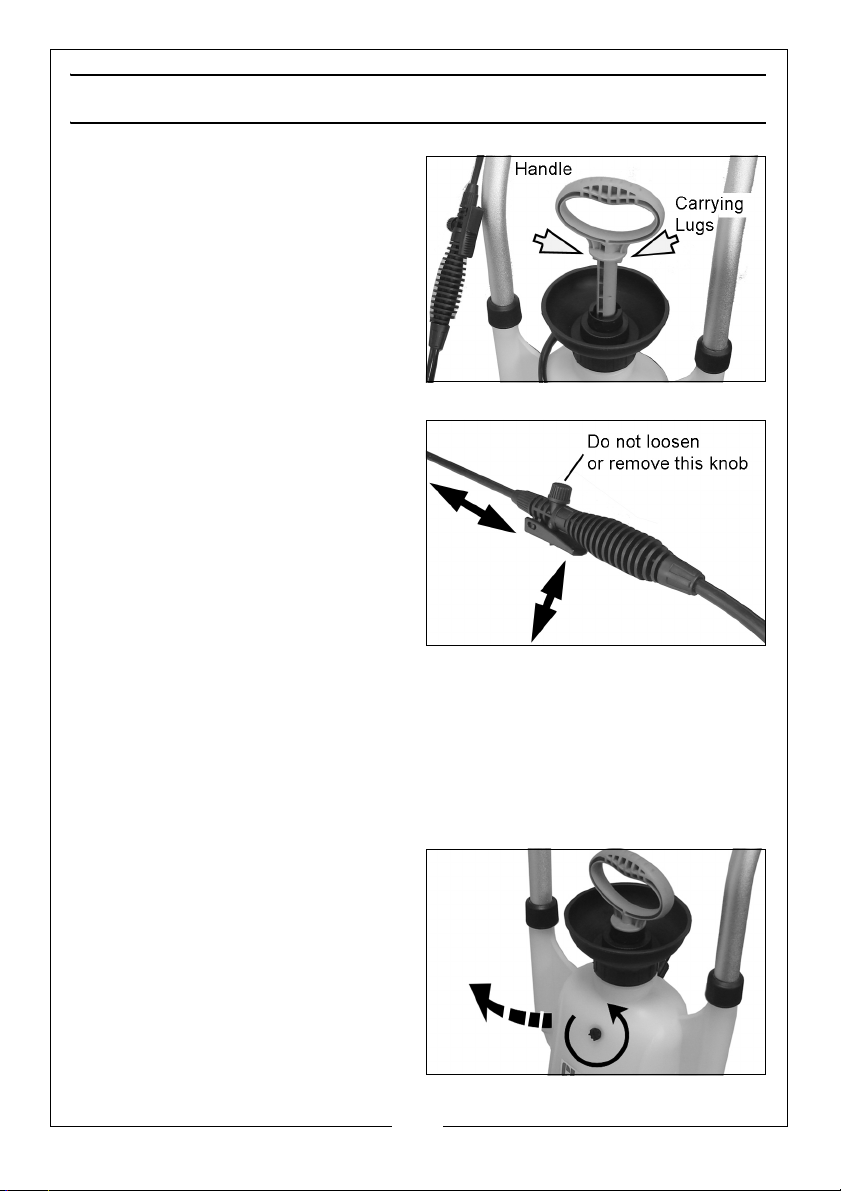
1. Insert the pulling handle into the
two holes on both sides of the
tank and adjust to the required
height, Tighten the locknut on
each side to secure the handle.
2. Push the lance into the spray gun
assembly and secure with the
screw cap.
3. Attach the nozzle to the other end
of the lance and secure with the
screw cap.
4. Do not over tighten at either end,
leaving a small gap between the
screw cap and nozzle or spray
gun.
3
Parts & Service: 020 8988 7400 / E-mail: [email protected] or [email protected]
Page 4
OPERATION
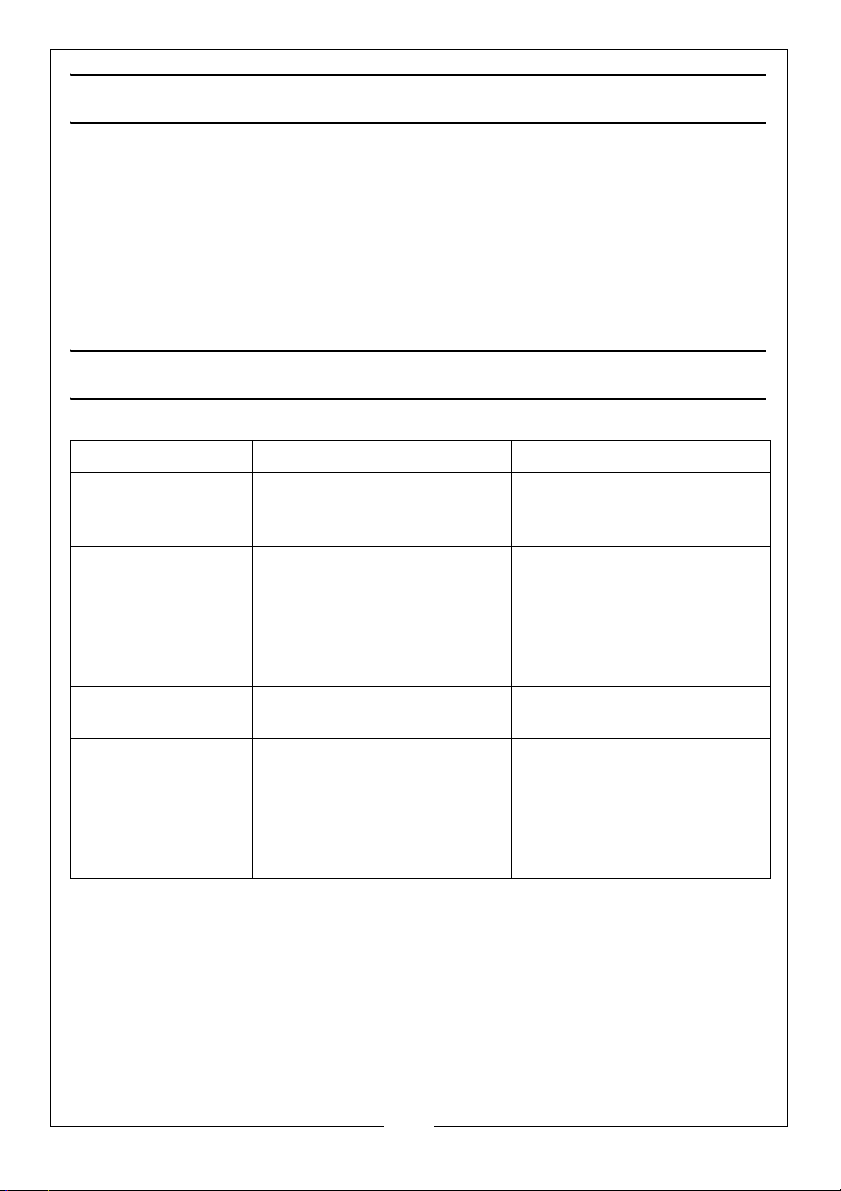
1. Unscrew the handle and pump
assembly in order to fill the
container with the desired liquid.
2. Screw the pump and handle
assembly back on firmly.
3. Release the carrying lugs from the
pump body by twisting the handle
anticlockwise.
4. Pressurise the container by
pumping the handle.
5. Squeeze the trigger to begin
spraying. When the spray
weakens, pump the handle to repressurise the container.
6. Push the trigger forward to lock in
position & maintain a constant
spray without needing to hold the
trigger. Slide the trigger back to
release.
7. Adjust the width of the spray by
twisting the tip of the nozzle.
8. Pump the operating handle when necessary to maintain pressure.
• If leaks or poor delivery occurs, check the hose connections.
9. Push the pump handle downward and twist left or right to engage the
carrying lugs in the cap when lifting the unit.
10. When not in use, clip the spray lance to the side of the pulling handle.
11. If a hissing sound is heard from the
relief valve, the valve has
reached its operating limit and is
venting to prevent damage to
the sprayer.
12. At the end of spraying, relieve
tank air pressure by unscrewing
the relief valve.
4
Parts & Service: 020 8988 7400 / E-mail: [email protected] or [email protected]
Page 5
AFTER USE
After use, the sprayer should be flushed thoroughly with clean water to avoid
the possibility of blockages from product residue, or any cross-contamination
between different products.
If not used for long periods or used continuously for several days, add a light
smear of vaseline to the sealing washers and moving parts to reduce wear
and assist free movement.
Always release any pressure before storage.
FAULTFINDING
Symptom Cause Remedy
Poor delivery and
leaking lance.
Extra high pumping
pressure.
Very low pumping
pressure.
Sprayer only
discharges air without water.
Loose connections or
damaged connecting
o-rings.
Spray head is blocked.
Poor lubrication of piston
o-ring.
Extra high pressure in tank.
Piston o-ring is worn or
damaged.
The suction hose in the tank
may have come off.
Inspect condition of
connecting o-rings &
replace if necessary.
Clean out the spray head.
Remove piston and apply
vaseline to piston o-ring.
Check the relief valve for
possible jamming of the
spring & piston.
Replace piston o-ring.
Unscrew the hose
connector from the tank.
Locate the loose suction
hose inside the tank and refit to the connector assembly, tightening securely.
5
Parts & Service: 020 8988 7400 / E-mail: [email protected] or [email protected]
Page 6
Page 7
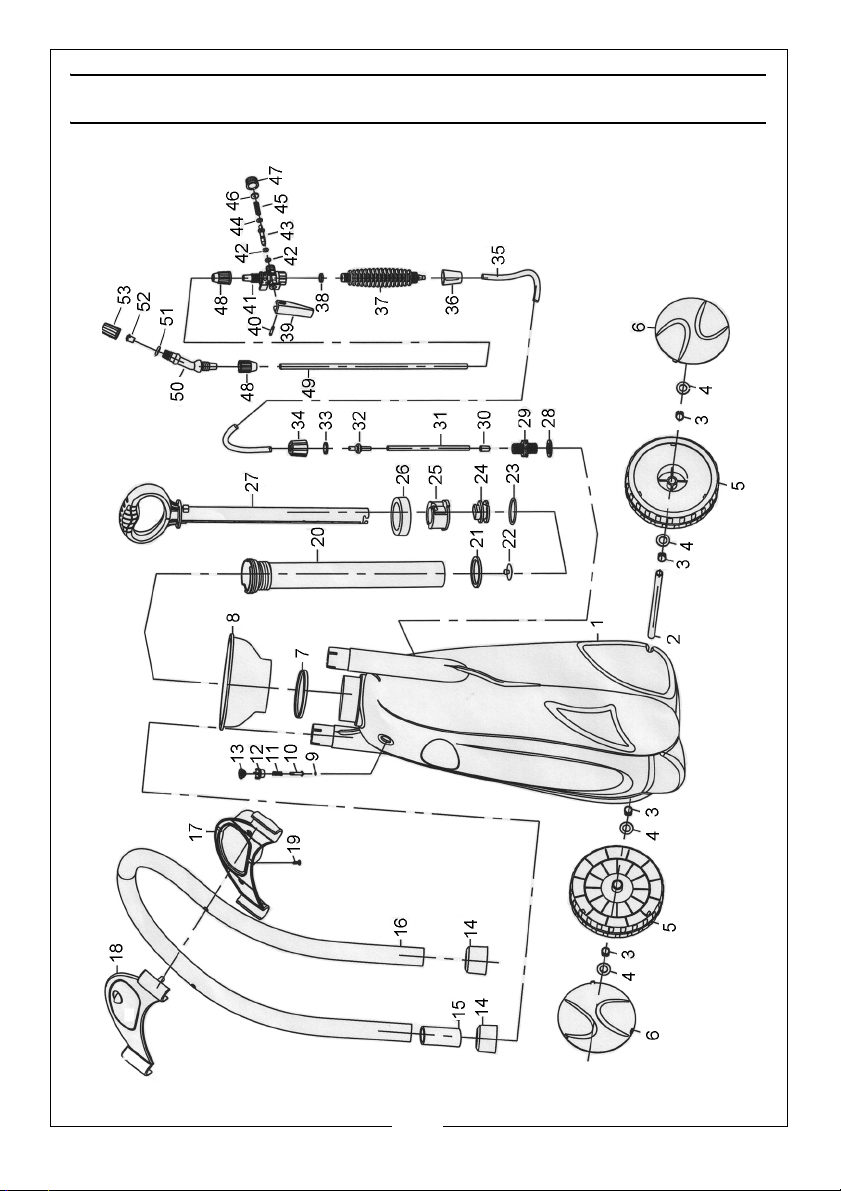
COMPONENT PARTS
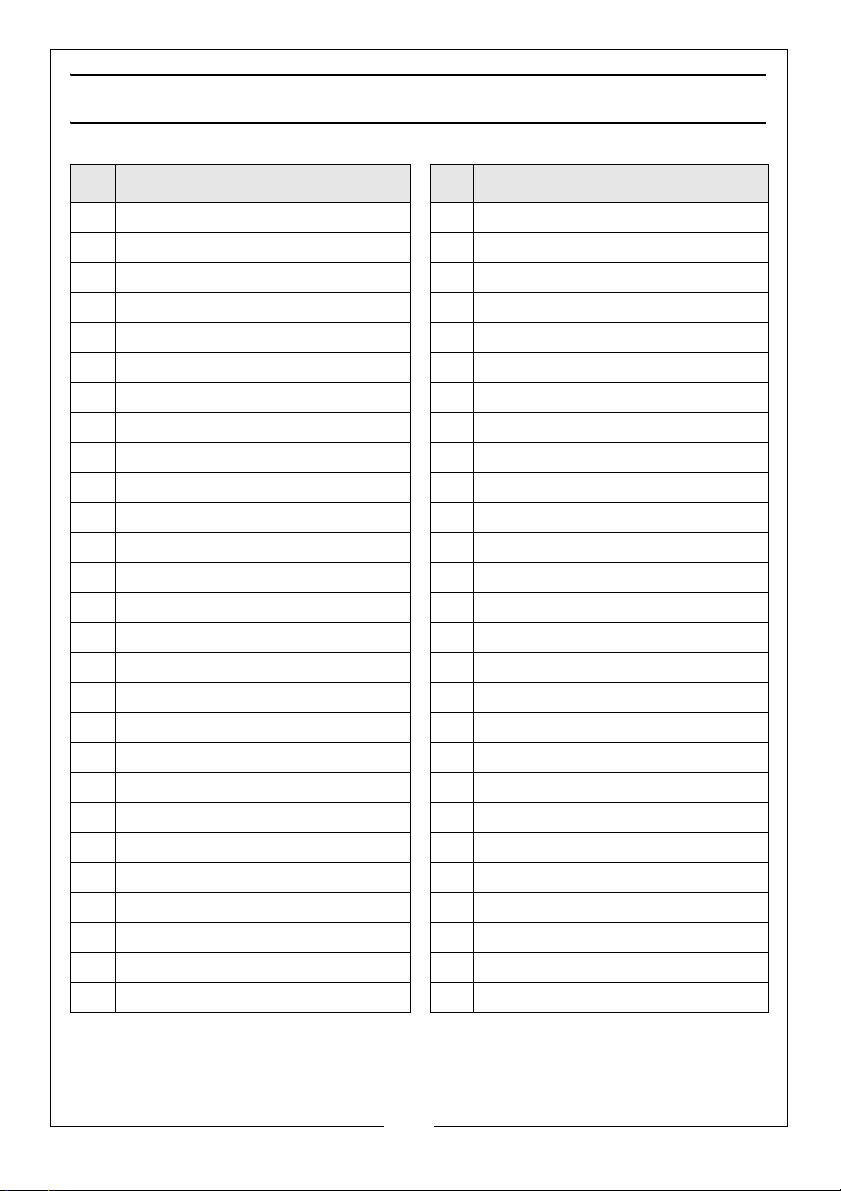
No Description No Description
1Tank 28Gasket
2 Axle 29 Outlet coupling
3 Circlip 30 Filter screen
4Washer 31Suction hose
5 Wheel 32 Coupler
6 Wheel Cover 33 Flat washer
7 Sealing Ring 34 Hose cap B
8Funnel 35Hose
9 Relief valve O-ring 36 Hose cap A
10 Relief valve plug 37 Spray gun handle
11 Relief valve spring 38 Sealing ring
12 Relief valve seat 39 Trigger
13 Relief valve cap 40 Pivot pin
14 Handle lock nut 41 Spray gun body
15 Handle cover 42 Valve sealing ring
16 Pulling handle 43 Valve plunger
17 Lower compartment cover 44 Valve sealing ring
18 Upper compartment cover 45 Spring
19 Self-tapping screw 46 Sealing ring
20 Pump cylinder 47 Retaining nut
21 Sealing ring 48 Screw cap
22 Waterproof washer 49 Spray lance tube
23 Piston O-ring 50 Nozzle elbow
24 Piston 51 O-ring
25 Guide seat 52 Swirl core
26 Pump nut 53 Spray head cap
27 Handle
7
Parts & Service: 020 8988 7400 / E-mail: [email protected] or [email protected]
Page 8

 Loading...