

Page 1

Owner’s manual
OHM106/156
English
OVERHEAD MONITOR SYSTEM
OHM106/156 1
OHM.pmd 2006-02-28, 13:001
Page 2

English
Thank you for purchasing this Clarion product.
• Please read this owner’s manual in its entirety before operating this equipment.
• After reading this manual, keep it handy, such as in your glove compartment.
• Save your sales receipt. The warranty at the end of this manual and your sales
receipt are essential for warranty service.
FCC Approval
The Clarion OHM106/156 have been tested and found to comply within the limits of a
Class B digital device, pursuant of Part 15 of the FCC rules. These limitations are
designed to provide reasonable protection against harmful interference in a residential
installation. This equipment generates and uses radio frequency energy and if not
installed and used in accordance with the instructions, may cause harmful interference
to radio communications.
There is no guarantee that interference will not occur in a particular installation. If this
equipment does cause harmful interference to a radio or television reception, turn off
the equipment and contact a local Clarion Dealer for assistance. Changes or
modifications to this product not approved by the manufacturer will void the warranty
and violate FCC Approval.
2 OHM106/156
OHM.pmd 2006-02-28, 13:002
Page 3

Contents
1. FEATURES ............................................................................................................. 4
2. PRECAUTIONS ...................................................................................................... 5
Installation ............................................................................................................... 5
3. CONTROLS ............................................................................................................ 6
Monitor closed (view looking up from directly below).............................................. 6
Monitor open ........................................................................................................... 6
Remote control ....................................................................................................... 7
Headphones ........................................................................................................... 7
4. OPERATIONS ......................................................................................................... 8
Using the headphones ............................................................................................ 8
Opening the monitor ............................................................................................... 9
Closing the monitor ................................................................................................. 9
Getting started ........................................................................................................ 9
Changing image aspect ratio ................................................................................ 10
Viewing two video sources at once ....................................................................... 10
Adjusting screen brightness .................................................................................. 11
Care and maintenance ......................................................................................... 11
Changing the battery in the remote control .......................................................... 12
Changing the dome lights ..................................................................................... 12
5. INSTALLATION AND WIRING.............................................................................. 13
What is included in the box ................................................................................... 13
Tools and additional components ......................................................................... 14
Before you begin ................................................................................................... 14
Mounting and wiring precautions .......................................................................... 14
Installation procedure ........................................................................................... 15
Wiring diagram ...................................................................................................... 19
6. SAVING YOUR PREFERENCES .......................................................................... 20
Accessing the on-screen display menus............................................................... 20
Example: Setting options while using the monitor ................................................ 21
On-screen display menus reference ..................................................................... 22
7. TROUBLESHOOTING .......................................................................................... 32
8. GLOSSARY .......................................................................................................... 32
9. SPECIFICATIONS ................................................................................................ 32
10. LIMITED WARRANTY INFORMATION .............................................................. 33
English
OHM106/156 3
OHM.pmd 2006-02-28, 13:003
Page 4

English
1. FEATURES
WARNING
The Clarion OHM106/156 overhead monitor system is
designed strictly for rear-seat entertainment. Viewing the
monitor while operating a motor vehicle can result in serious
injury and/or property damage. Clarion is not responsible for
any injury and/or property damage as a result of the improper
use or viewing of the monitor.
The Clarion OHM106/156 overhead monitor system is engineered with advanced
technological designs and components for the best picture quality and ease-of-use. This
system combines flexibility, reliability, and expandability.
Flexibility. Designed primarily for rear seat entertainment, the audio from the OHM106/
156 can be enjoyed privately through wireless headphones and/or incorporated into any
head unit.
Reliability. High-grade electronic components and heightened electronic connections
provide years of service in extremely harsh, mobile environments.
Expandability. The unit’s built-in A/V switcher allows you to add multiple A/V sources.
Feature summary:
• 10.2” or 15.4” wide-screen (depends on model), flip-down thin film transistor (TFT)
active matrix display screen with 16:9/4:3 format
• Easy-fit universal metal mounting bracket
• WVGA LCD with 16:9 or 4:3 formats
• On-screen display (OSD)
• Picture-in-picture (PIP)
• Adjustable split-screen viewing
• 4 audio/video inputs and 1 audio/video output
• 800 x 400 pixel resolution (1.15M pixels) - OHM106
1280 x 800 pixel resolution (3.07M pixels) - OHM156
• FM modulator control
• Built-in dual IR transmitters for wireless headphones (includes 1 WH204H)
• IR receiver and remote control included
• Supports NTSC and PAL
• Built-in dome lights
With the ability to access all the features and functions through an IR remote control,
rear-seat passengers don’t have to leave the comfort and safety of their seat.
4 OHM106/156
OHM.pmd 2006-02-28, 13:004
Page 5

2. PRECAUTIONS
• Do not operate this product in ways other than those described in this manual.
• Do not disassemble or modify this unit. You may damage the monitor, void the
warranty, and suffer electric shock.
• Do not leave the monitor extended when you’re not using it. Direct sunlight can
cause the monitor to malfunction.
• In extremely cold temperatures the picture may appear dark and move slowly. The
display returns to normal when the temperature rises.
• Do not hang onto or hang items from the overhead monitor.
• Do not pour liquid or poke foreign objects into the unit. Water and humidity may
damage internal circuitry.
• If the unit becomes wet, turn off all power and ask your authorized Clarion Dealer to
clean or service the unit.
Failure to observe these precautions may damage your car, the monitor, or the video
source, and may void the warranty.
If you have any questions or problems concerning the monitor that are not covered in
this manual, contact your local Clarion Dealer.
Installation
Installation of mobile audio and video components requires experience with a variety of
mechanical and electrical procedures. Although this manual provides general
installation and operation instructions, it does not show the exact installation methods
for your particular vehicle.
If you do not have the required knowledge, experience, and/or tools to successfully
complete the installation, consult an authorized Clarion Dealer about professional
installation options.
English
OHM106/156 5
OHM.pmd 2006-02-28, 13:005
Page 6
English
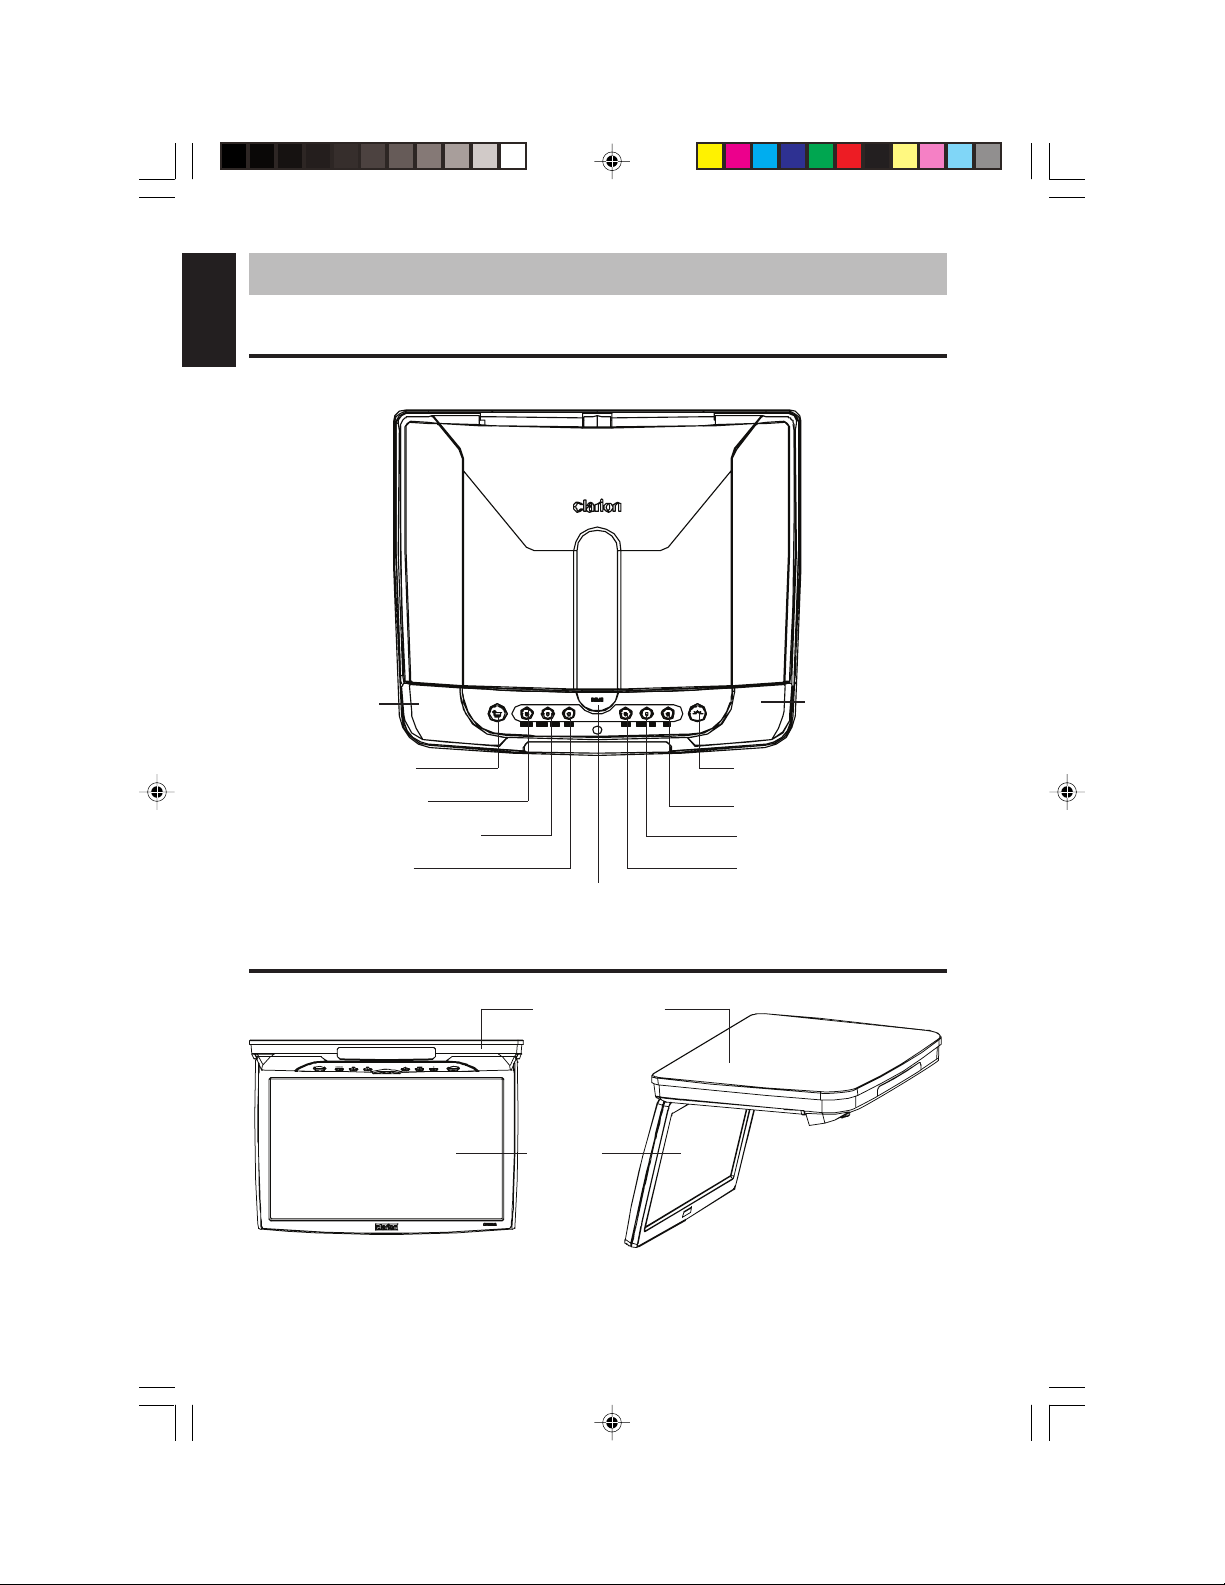
3. CONTROLS
Monitor closed (view looking up from directly below)
The controls face the back seat of the car.
Dome light
Door detect ON/OFF
Power button ON/OFF
Main input select (AV1 - AV4)
PIP - SWAP position
Monitor open
View from rear car seat View from the side
Release button for
opening the monitor
Monitor housing
Thin Film
Transistor
(TFT) screen
Dome light
Lamp control (ON/AUTO)
Picture In Picture (PIP)
Sub input select (AV1 - AV4)
SIZE
6 OHM106/156
OHM.pmd 2006-02-28, 13:006
Page 7
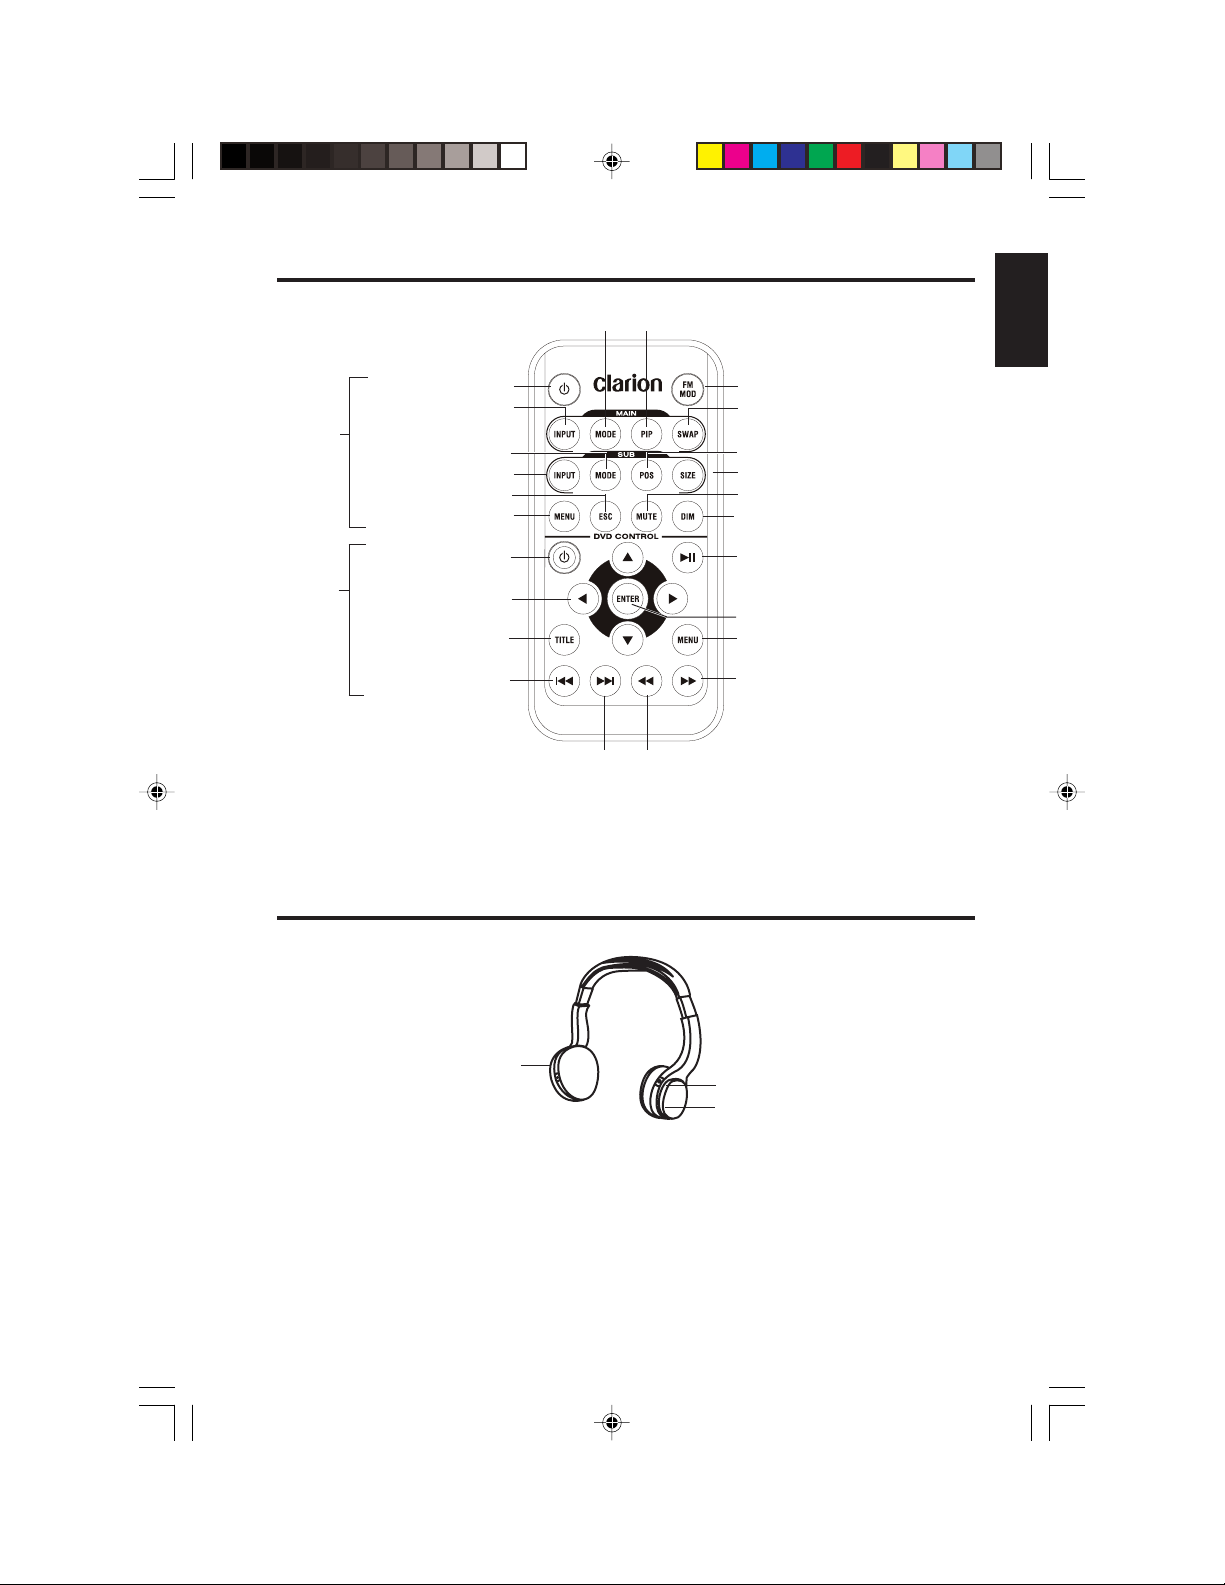
Remote control
Display mode for main picture
Monitor power
Main picture source
Monitor
controls
DVD
controls
(Vs755
only)
*FM200 not included
The remote control allows you to select programming and configure the monitor. You
can adjust display options using the remote control buttons or the on-screen menus.
Display mode for
sub picture
Sub picture source
Exit current page
Monitor setup menu
DVD power
Selection buttons
Display title
information
Previous chapter
Picture in pitcure: displays sub picture
FM modulator on and off*
Switch between main and sub
pictures
Position sub picture
Set size of sub picture
Audio off
Dimmer (set display brightness)
Play and pause DVD
Confirm selection
DVD setup menu
Fast forward
Fast reverseNext chapter
English
Headphones
Power
Source selector
Volume
OHM106/156 7
OHM.pmd 2006-02-28, 13:007
Page 8

English
4. OPERATIONS
This monitor works in conjunction with a DVD player or other video source mounted
usually in the dashboard of your car. Headphones provide the audio.
If your car is equipped with more than one audio/video source, such as a DVD and a
game player, one person can watch a movie the other plays the game. The output from
one video source displays in the main window and the output from the second video
source either displays in a sub window, or the screen splits into two equal-sized
pictures (split screen).
Using the headphones
To hear the audio requires headphones.
WARNING
Do not use the headphones while driving.
Installing batteries in the headphones
If this is the first time you’re using the system, you’ll need to
install batteries in the headphones.
1. Slide the battery cover down.
2. If you’re replacing the batteries, remove the discharged
batteries.
3. Insert the new AAA batteries according to the polarity
marked inside the battery compartment.
4. Slide the battery cover back into place.
Note:
Change the batteries when you begin to hear distorted audio that cuts in
and out.
Setting the volume
The volume control is on the headphones. Turn
the volume switch up or down.
Note:
Some noise may be audible depending on
the type of encoder software used while
recording. This noise is not caused by the
OHM106/156.
Direct sunlight and temperature extremes
8 OHM106/156
Page 9
An IR receiver in the headphones that is exposed to direct sunlight for an extended
period of time may cause poor sound quality. Let the headphones cool off before you
use them.
Opening the monitor
1. Press the open button to release the overhead monitor.
2. Gently push down on the button of the monitor until it reaches the desired position.
Release button
Looking up at the monitor from directly below
The monitor turns on automatically when you fully open it (assuming the ignition
switch is on or in the ACC position).
Note:
Do not place any object between the monitor and its housing. Doing so
can seriously damage the TFT screen.
English
Closing the monitor
Gently push the back side of the monitor until it clicks into the overhead housing. The
monitor turns off automatically when you return it to the closed position.
Getting started
1. Turn the ignition to either ACC or ON.
2. Turn the audio/video source power on.
3. Put the headphones on your head and turn the headphone
power on.
4. Insert a DVD into the player, game cartridge into the game
player, etc.
5. Press INPUT in the Main section of the remote.
OHM106/156 9
OHM.pmd 2006-02-28, 13:009
OFF
AC C
ON
Page 10
English
Changing image aspect ratio
A common display setting to change is screen mode, which controls the aspect ratio
used to display images.
To change the aspect ratio of the main screen, press MODE in the Main or Sub
sections of the remote.
Note:
If you don’t select a mode, the system waits for five seconds and returns
to the previous mode selection.
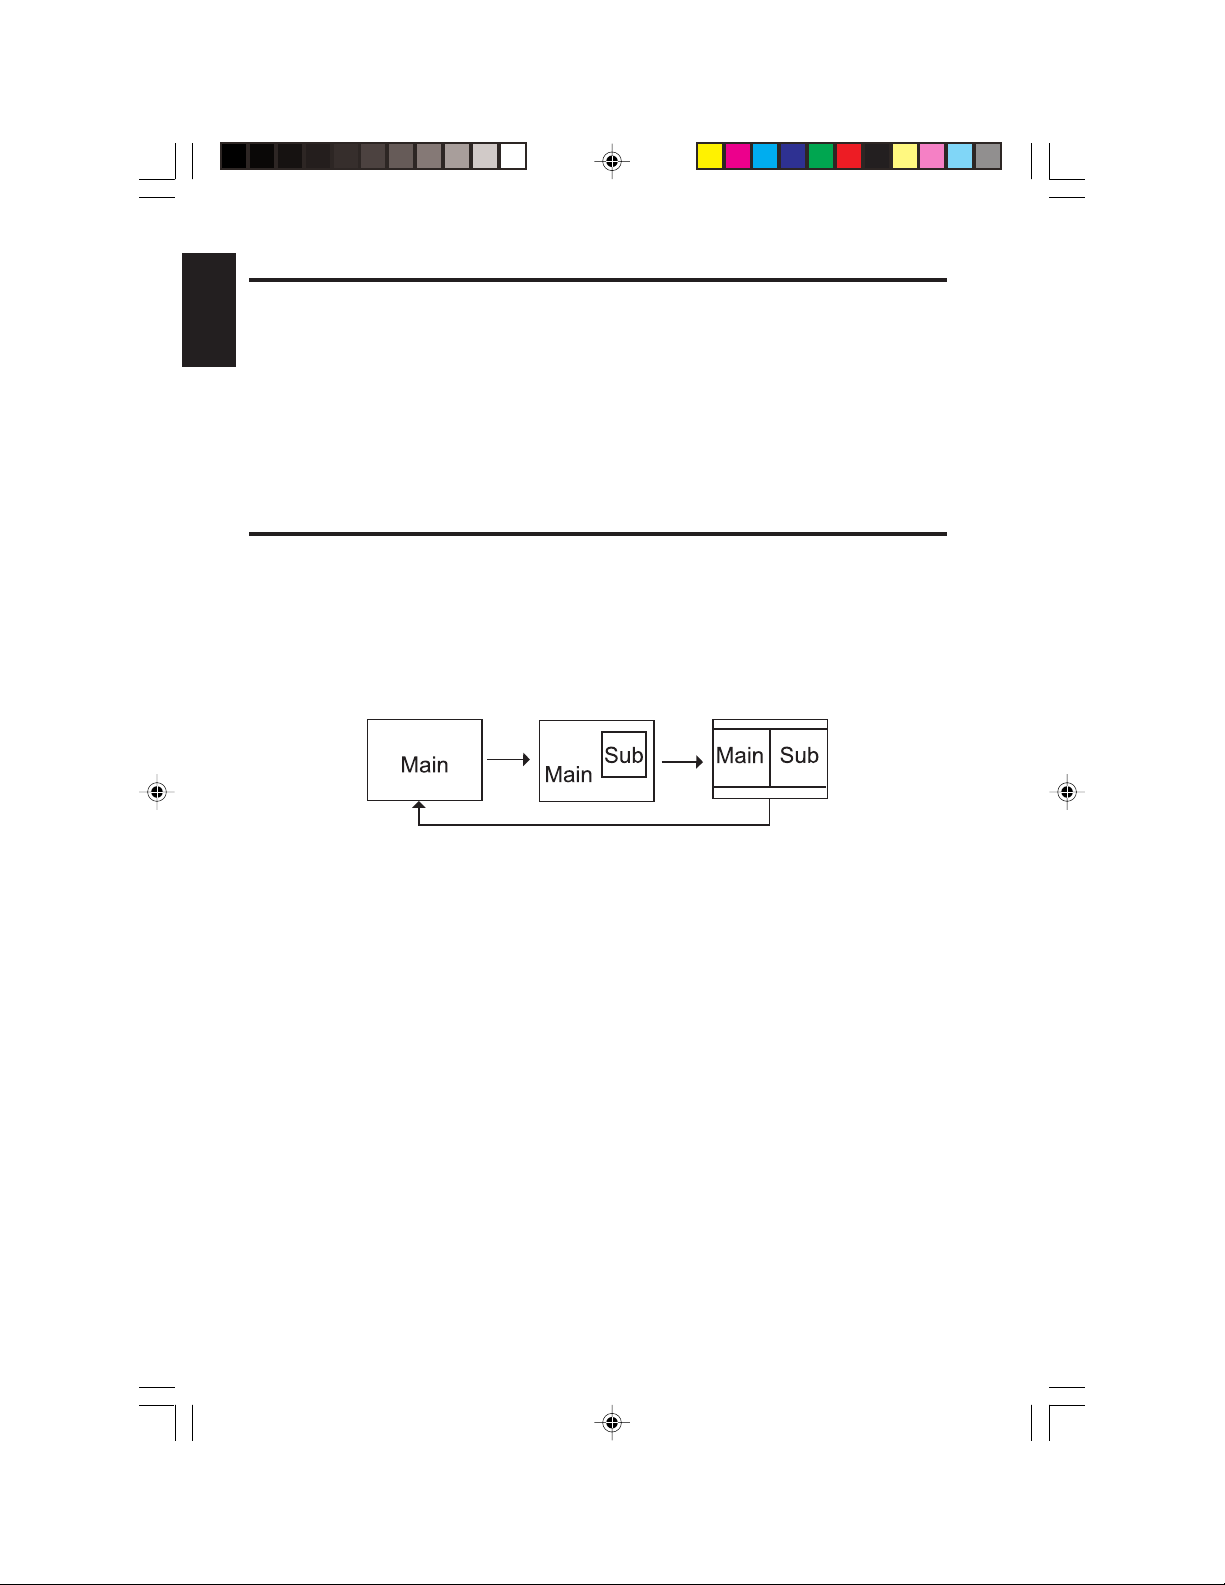
Viewing two video sources at once
First, choose how to view both video sources. Then, decide which source to view in the
main display and which to view in the sub display.
Select how to view the two sources
1. Press PIP in the Main section of the remote.
2. Press SIZE in the Sub section of the remote control.
Show only Show Show primary
one video secondary source and secondary sources
source in small window side by side
Assign the sources to the main and sub screens
1. Press INPUT in the Main section of the remote to select the primary audio/video
source.
2. Press INPUT in the Sub section of the remote to select the secondary audio/video
source.
10 OHM106/156
OHM.pmd 2006-02-28, 13:0010
Page 11
Notes:
To switch video output from the main screen to the sub screen and vice
versa, press SWAP in the Main section of the remote.
The small sub screen can appear in any of the four corners of the main
screen. To switch corners, press POS (position) in the Sub section of the
remote control.
To change the aspect ratio of the sub screen, press MODE in the Sub
section of the remote
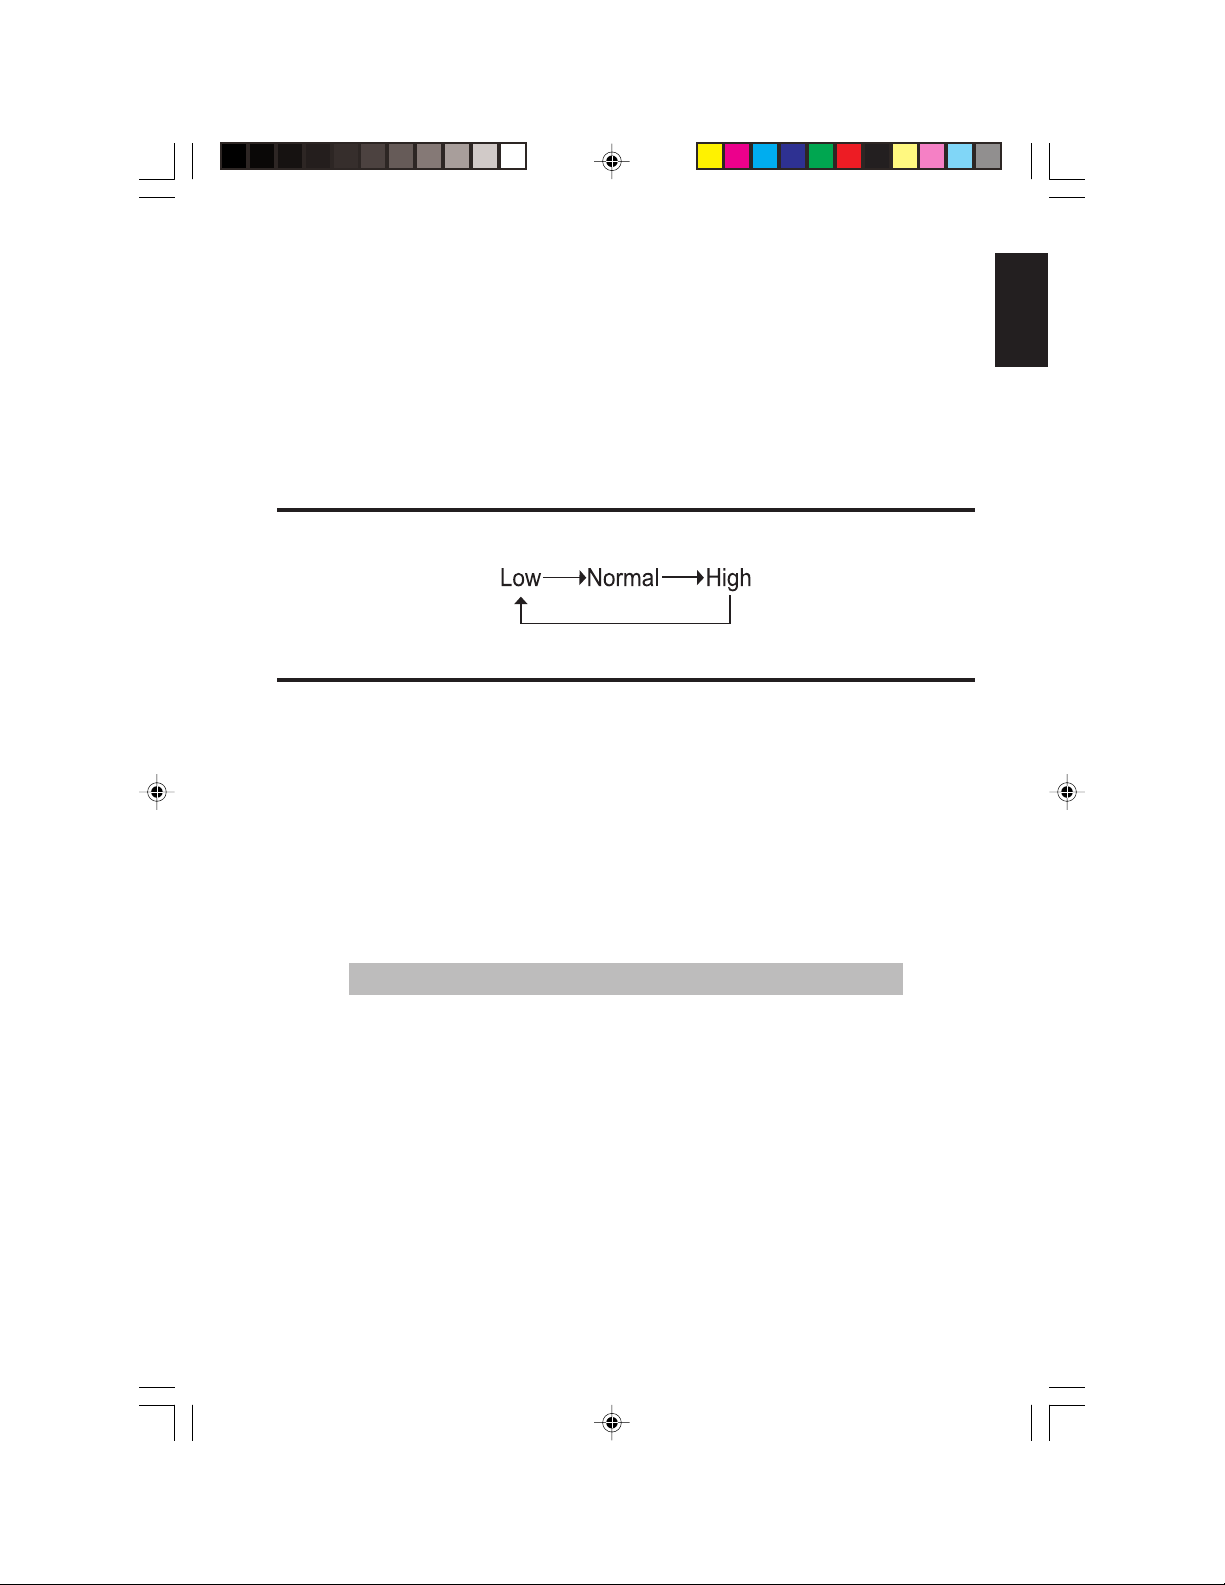
Adjusting screen brightness
Press DIM in the Sub section of the remote. Keep pressing the Dim button
Care and maintenance
Cleaning the monitor
Use a clean, soft, dry cloth to gently wipe dust and dirt from the screen.
Do not use benzene, thinner, car cleaner, or other cleaners. These substances may
damage the monitor system or cause the paint to peel.
Servicing the monitor
In the event that trouble arises, never open the monitor case, disassemble the unit or
attempt to repair it yourself. The internal parts are not serviceable by the user. Opening
any components will void the warranty. All warranty service should be performed by an
authorized Clarion service center.
English
CAUTION!
Changes or modifications to this product not approved by the
manufacturer will void the warranty and will violate FCC approval.
Cleaning the remote control
Use only a clean, soft, damp cloth to clean the remote control. Do not use lighter fluid,
methyl alcohol or other solvents.
OHM106/156 11
OHM.pmd 2006-02-28, 13:0011
Page 12
English
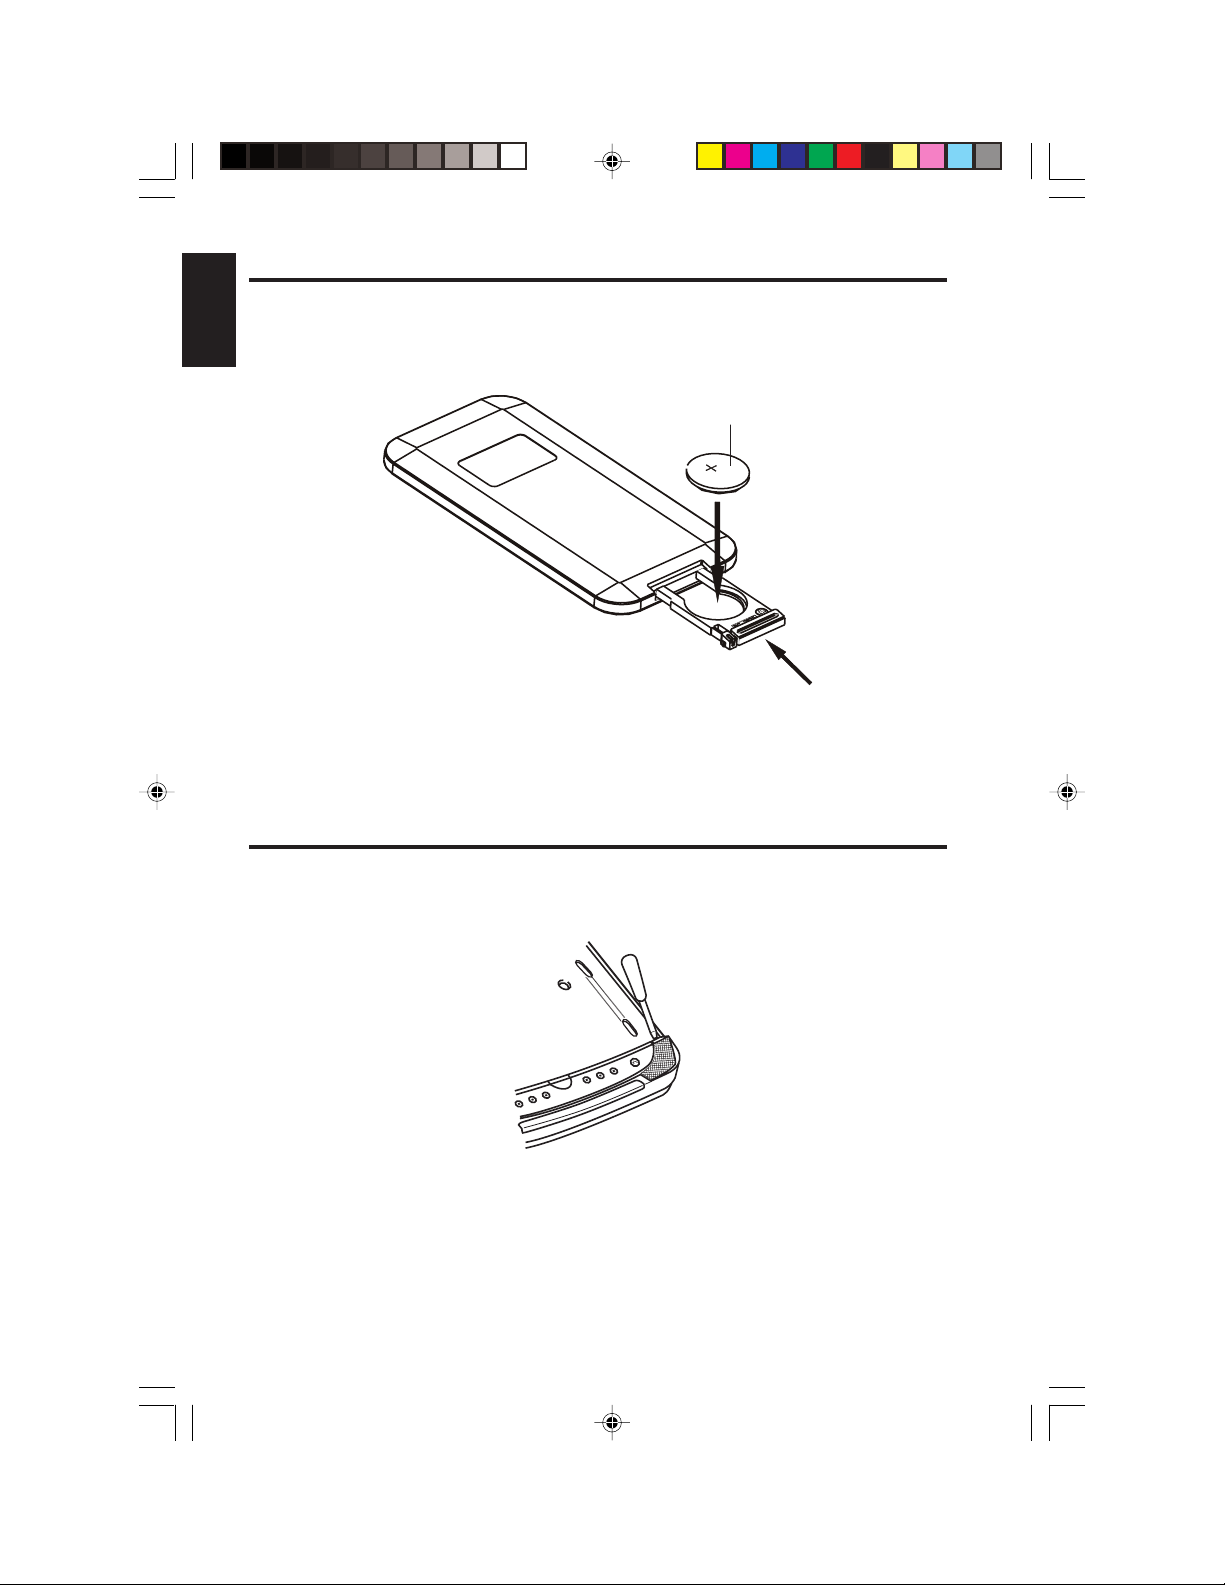
Changing the battery in the remote control
The battery needs changing when the buttons stop working.
1. Using a small screwdriver, pry open the transparent battery cover.
Coin battery
Put the battery into
the space provided
Push gently in to snap closed
Replacing the battery in the remote control
2. Replace the battery with the same type (Model CR2025) and snap the cover closed.
Changing the dome lights
1. Using a small straight-edged screwdriver, gently pry the cover away from the light
fixture.
Opening the light cover
2. Using the same small straight-edged screwdriver, gently remove the light bulb.
12 OHM106/156
OHM.pmd 2006-02-28, 13:0012
Page 13

Removing the bulb
3. Replace the bulb with the same type bulb.
5. INSTALLATION AND WIRING
Read these instructions and precautions carefully. Improper installation can damage the
monitor and the vehicle.
What is included in the box
In addition to this manual, the box contains:
• 1 OHM106 or OHM156
• 1 remote control
• 1 audio/video RCA accessory
• 1 four-pin power harness
• 1 metal mounting bracket
• 2 mounting keys
• 2 plastic covers to cover the key holes
• 4 screws and plastic covers for attaching the unit to the ceiling bracket
• 1 soft, black rubber gasket (usually attached to the unit)
• 1 EMC cover (wiring harness cover)
• 3 screws for the EMC cover
• 1 FM modulator control cable (FM MOD only; FM200 not included)
• 1 dual-channel set of head phones (WH204H)
English
OHM106/156 13
OHM.pmd 2006-02-28, 13:0013
Page 14

English
Tools and additional components
You will need:
• A Phillips-head screwdriver when mounting the unit in the vehicle
• 4-6 screws to attach the ceiling bracket to the ceiling of the vehicle (not included)
• High-quality RCA input-output cables
Extra cable can cause signal loss and act as an antenna for noise. Use only highquality RCA cables that are no longer than necessary to make a direct connection
with the source unit(s) and monitor.
Before you begin
1. Verify that the vehicle electrical components function, including: power windows,
power door locks, air conditioning, lights, etc.
2. Test fit the location of the overhead monitor system to ensure it will not interfere with
the operation of the vehicle.
3. If applicable, verify that the monitor, when mounted, will not interfere with the
operation of the sun roof.
4. Determine the location of the audio/video source(s).
5. Disconnect the negative battery terminal before making any wiring connections.
CAUTION
Do not open the case. There are no serviceable parts inside. If
you drop anything into the unit during installation, consult with
your Clarion Dealer or an authorized Clarion service center.
Mounting and wiring precautions
The OHM106/156 should be mounted in the ceiling of the vehicle. The front panel
controls should be easily accessible from the rear seat. In addition:
• This unit is exclusively for vehicles with a negative ground, 12V power supply.
• This unit requires additional mobile audio components, such as a DVD player, for
proper operation.
• Always use great care when attaching anything to a vehicle! Check clearances on
both sides of the planned installation before drilling any holes or installing any
screws.
14 OHM106/156
OHM.pmd 2006-02-28, 13:0014
Page 15

• A good chassis ground connection is critical to minimize resistance and avoid noise
problems. Use the shortest wire possible and securely connect it to the car chassis
and the source unit ground.
• When routing RCA cables, keep them away from the power cables and output
speaker wires, engine, exhaust system, etc. Heat may damage wires.
• If the fuse should blow, make sure all connections are correct and no wires are
damaged before replacing the fuse. Always use fuses that are the same amperage
value as the original fuse. When replacing a fuse, never let the battery side touch
any metal part or any other wire.
WARNING!
To prevent short circuits during installation, disconnect the
vehicle’s negative (-) battery lead before making any power
connections.
Installation procedure
The OHM106/156 replaces the car’s dome light. This section provides basic tips and
techniques to aid the installation. These are not vehicle specific, but should be used as
guidelines for performing the installation.
Preparation
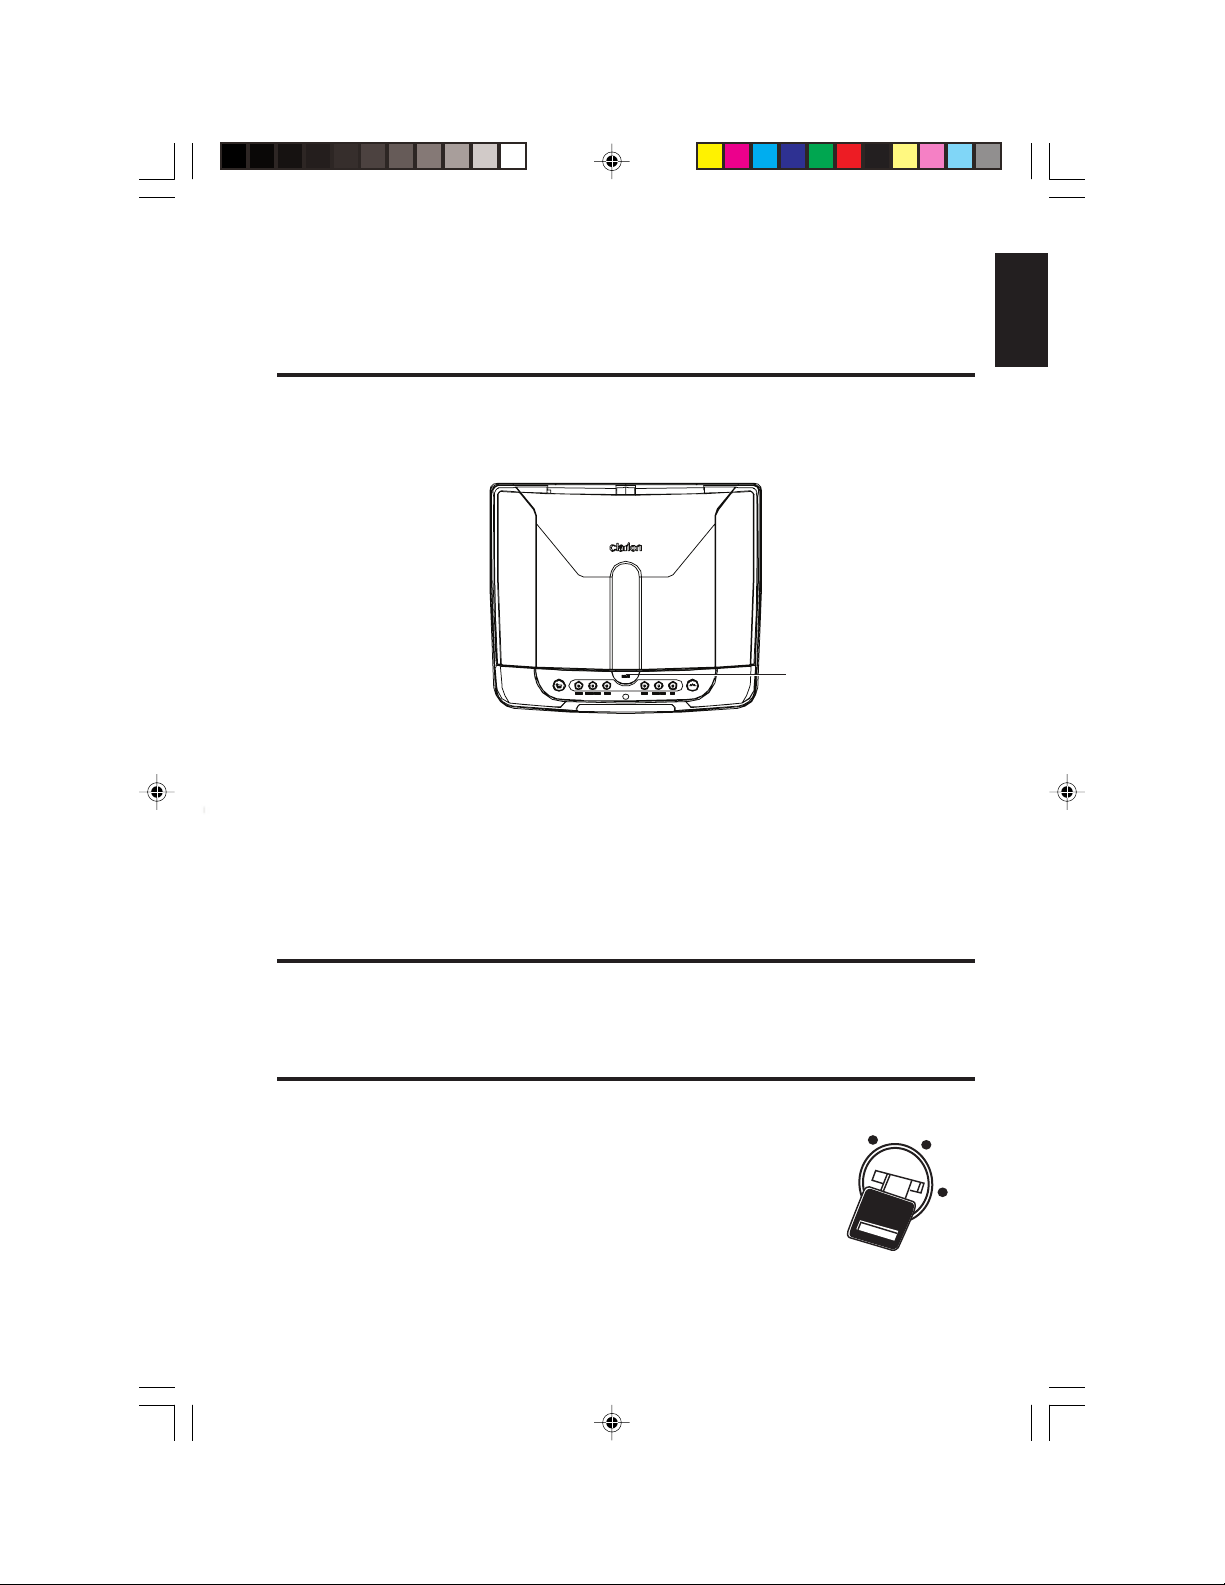
1. Identify the polarity of the dome light circuit and set the switch on the bottom of the
overhead monitor housing.
2. Test fit the overhead monitor system on the ceiling of the vehicle. Verify that it will
not interfere with the save operation of the vehicle.
3. Carefully mark the location with masking tape.
4. Lower the vehicle’s headliner down to see if a roof support beam is available to
screw the mounting bracket to.
If a support beam is not available, use a 3/4 inch piece of plywood cut to the
appropriate size. Attach the plywood to the roof of the vehicle using silicone. Allow
for adequate drying time.
5. Double-check the length of the mounting screws (not included) to make sure they
will hold the unit securely.
English
OHM106/156 15
OHM.pmd 2006-02-28, 13:0015
Page 16

English
Install the ceiling bracket and cables
1. Screw the ceiling bracket to the beam or plywood.
16 OHM106/156
Page 17

Install the monitor
1. Carefully hold the overhead monitor up to the ceiling bracket.
2. Insert both keys to help you align the mounting screw holes.
Keys
English
Using the keys to hold the monitor in place
3. Screw in the screws making sure the wires are not in the way.
OHM106/156 17
OHM.pmd 2006-02-28, 13:0017
Page 18

English
Ceiling bracket
Screws
(not included)
EMC cover
Two of four rubber caps to
cover screws
One of two rubber cap to cover key holes
Two keys help align the unit
Locating all the screws and rubber caps
3. Remove the keys.
4. Cover the key holes and screws with the rubber caps provided.
5. Ground the black wire of the power harness to a clean ground spot.
Note:
Keep the ground wires from the monitor and the audio/video source as
short as possible to prevent unwanted vehicle noise.
18 OHM106/156
OHM.pmd 2006-02-28, 13:0018
Page 19
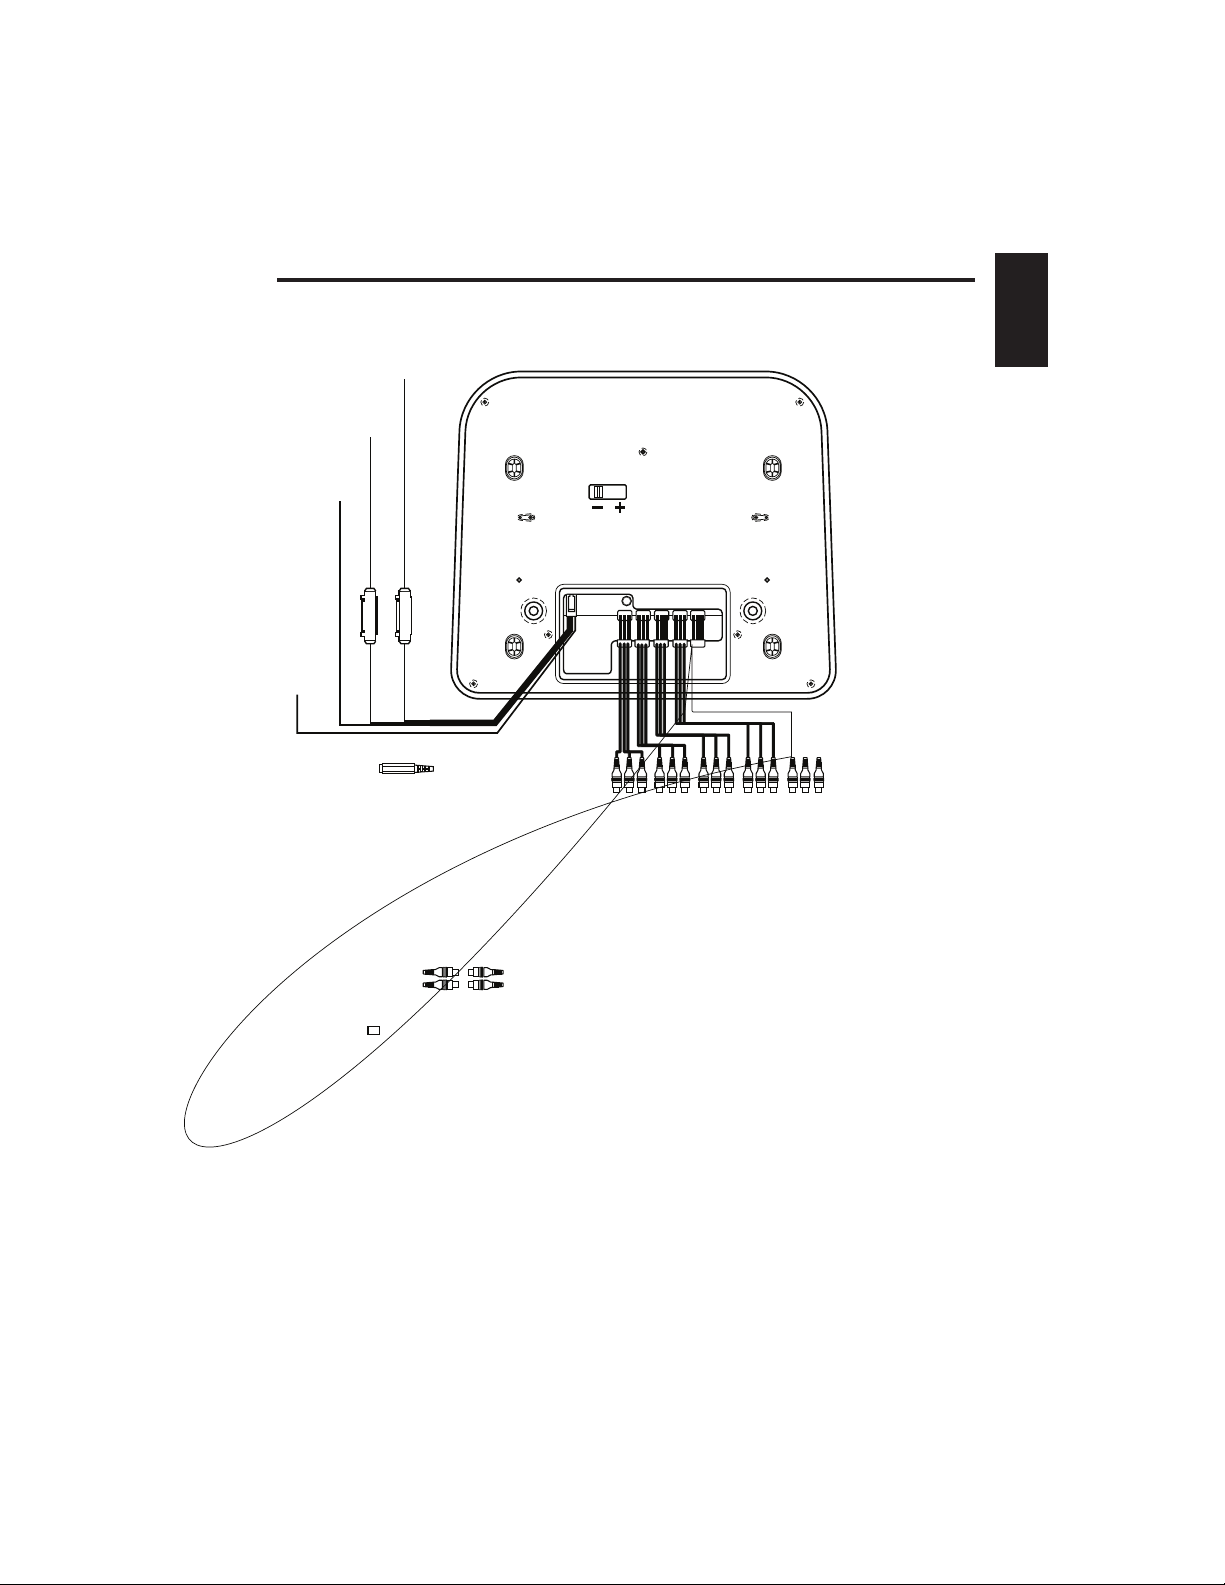
Wiring diagram
English
OHM106/156 19
Page 20

English
6. Saving your preferences
Changes you make by pressing the buttons in the Main and Sub sections of the remote
control affect only your current viewing session. If you define your viewing preferences
using the on-screen display (OSD) menus, the monitor stores your preferences so that
you don’t have to reconfigure the monitor every time you use the system.
For example, by default, picture-in-picture always displays in the upper right corner of
the main picture. Through the main and sub OSD menus, you can change the location
of the sub picture to anywhere on the screen.
Accessing the on-screen display menus
• Press MENU on the remote to access the OSD menus.
The main Display menu appears.
To configure options, use the
MENU, arrow keys and
ENTER.
(The ENTER and arrow keys
also control the DVD player.)
• Press MENU again to access each of the other option menus: MAIN > SUB > OSD
> FACTORY DEFAULT
• Press
alternate among the options on the current menu.
• Press
currently-selected option.
• Once you’ve selected a setting, press
the setting.
• Press ENTER on the remote to confirm your selection and exit the on-screen
display menus.
20 OHM106/156
OHM.pmd 2006-02-28, 13:0020
(left arrow) and (right arrow) in the DVD control section of the remote to
(up arrow) and (down arrow) to alternate menu settings for the
to increase and to decrease the value for
Page 21
Example: Setting options while using the monitor
The four on-screen display menus overlay whatever is currently playing on the monitor.
You can configure the system to fade out the background of the OSD menus. With this
feature enabled, you can continue watching whatever is playing while you configure
preferences.
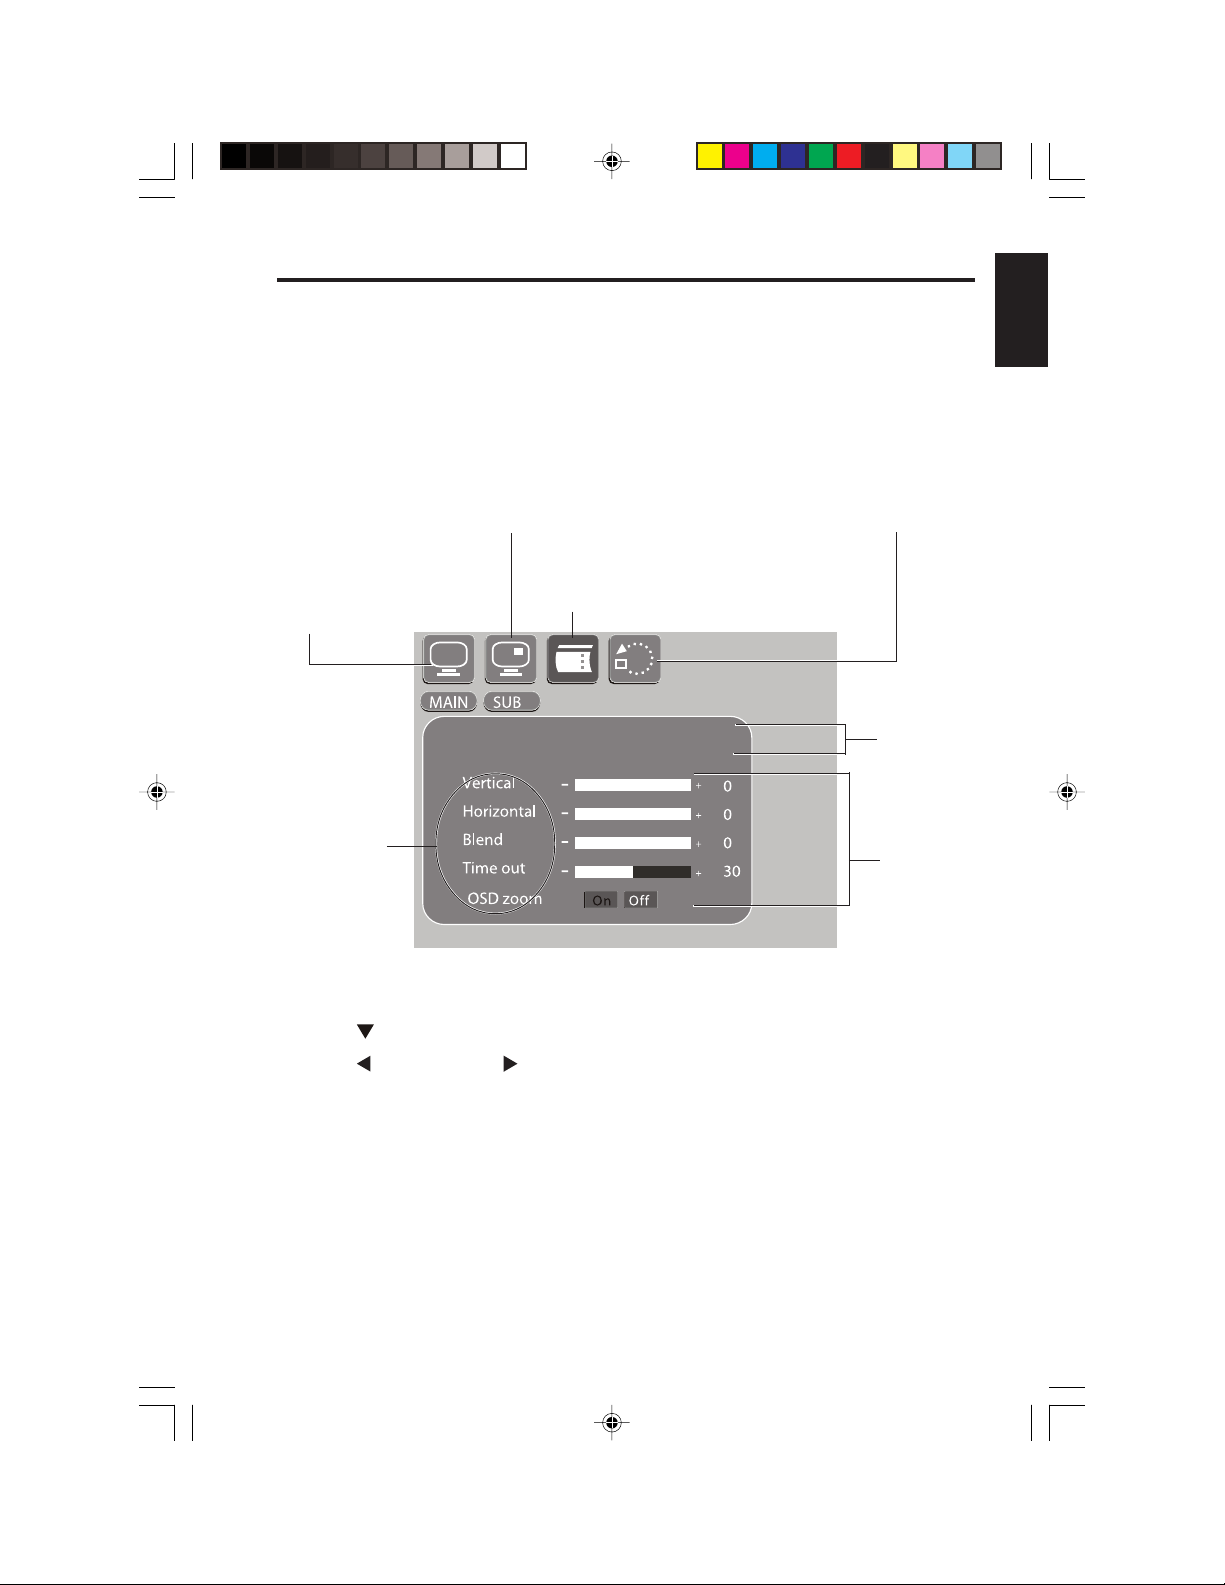
1. Press MENU three times to display the on-screen display menu.
The system displays the OSD menu.
English
Sub menu
Controls picture-in-picture and split screen display
Main menu
Controls the primary
display
Settings
On-screen display menu
Controls on-screen display (OSD) settings
Factory default menu
Returns to factory defaults
Options
appear
in this
area
Values
appear
in this
area
On-screen display menu
2. Press three times to select Blend.
3. Press
4. Press ENTER to save this preference and exit the on-screen display menus.
The next time you access the on-screen display menus you’ll notice that they float
on top of whatever you’re watching.
to increase and to decrease the transparency of the background.
OHM106/156 21
OHM.pmd 2006-02-28, 13:0021
Page 22

English
On-screen display menus reference
Main on-screen display menu
Main picture menu
Controls the display settings for the main picture.
Setting Description
Brightness Sets screen brightness.
Contrast Adjusts the difference between light and dark areas.
Hue Balance Adjusts the way each color displays.
Color Saturation Adjusts the overall color of the picture.
22 OHM106/156
OHM.pmd 2006-02-28, 13:0022
Page 23

English
OHM106/156 23
Page 24

English
24 OHM106/156
Page 25

English
OHM106/156 25
Page 26

English
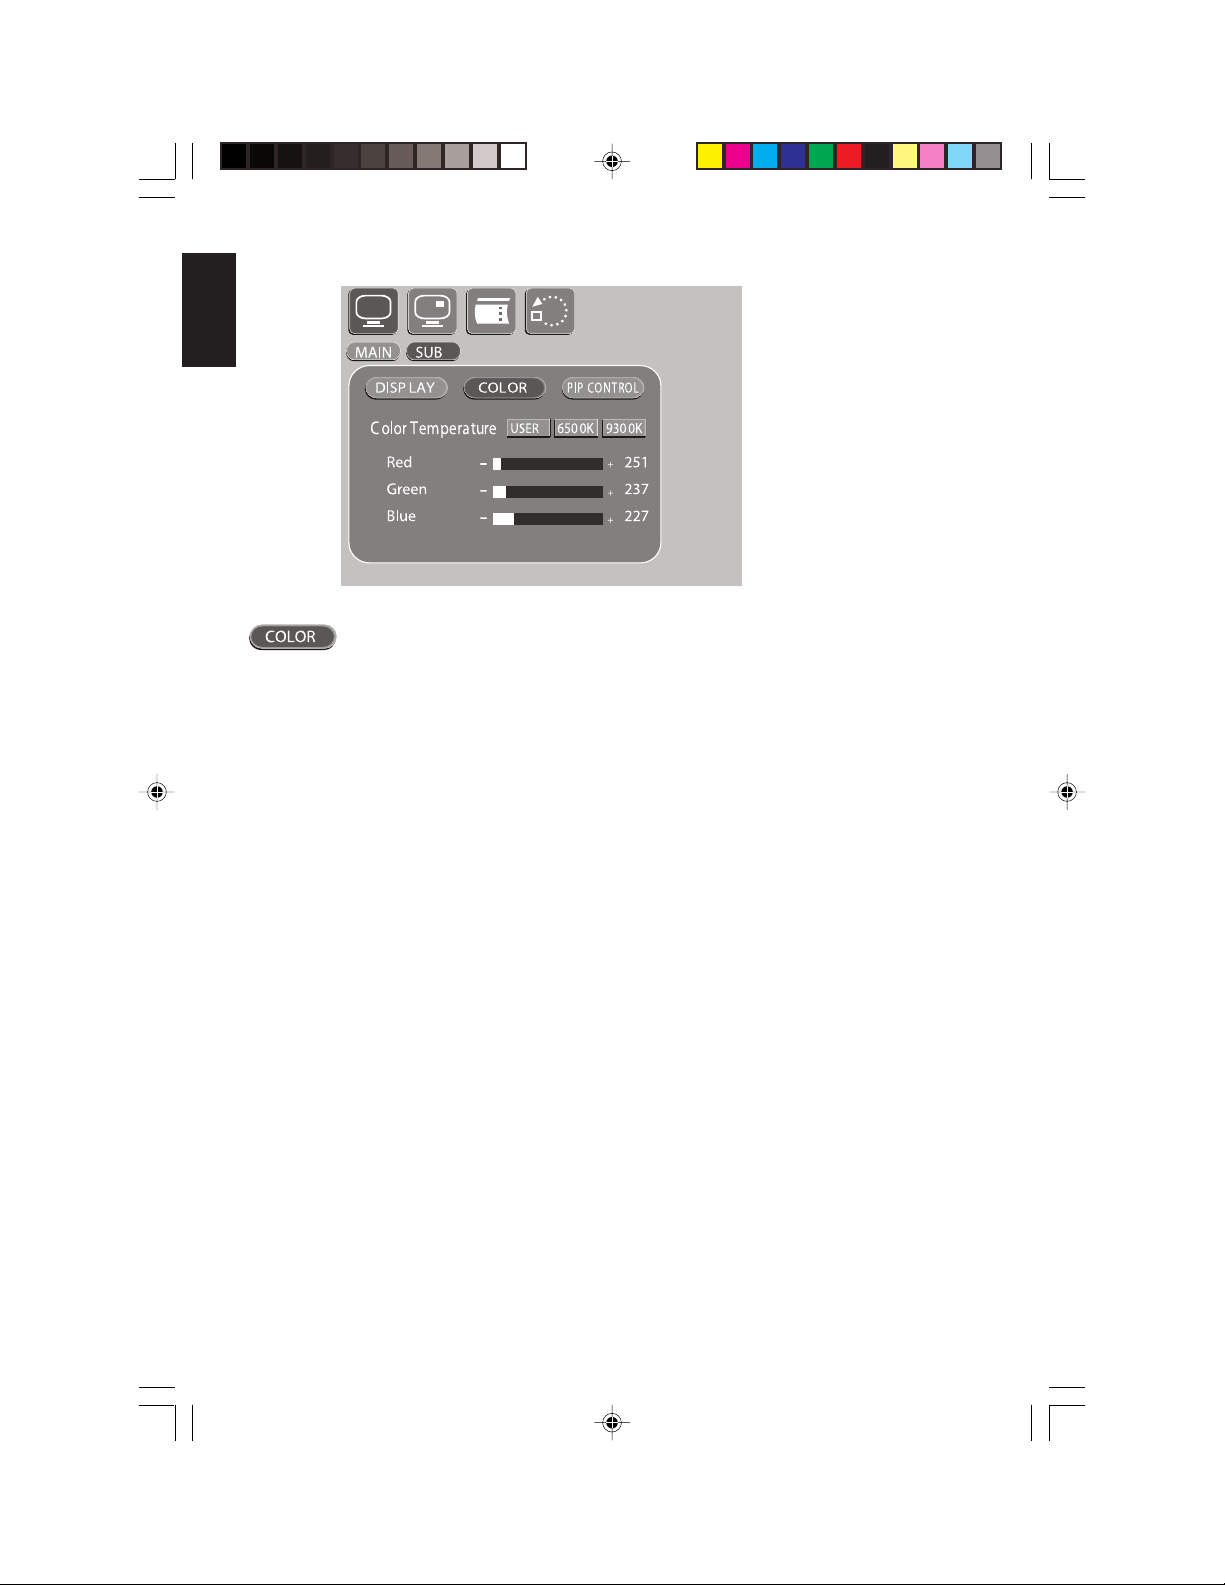
Controls how color displays on the screen.
Setting Value Description
Color temperature Adjusts colors in combination.
User Allows you to configure the mixture of red, green
and blue.
6500K Selects a pre-configured combination of the three
colors that could be described as “warm.”
9300K Selects a pre-configured combination of the three
colors that could be described as “cooler.”
You can still adjust individual colors after choosing 6500K or
9300K .
Red Increases and decreases the amount of red.
Green Increases and decreases the amount of green.
Blue Increases and decreases the amount of blue.
26 OHM106/156
OHM.pmd 2006-02-28, 13:0026
Page 27

Sub picture on-screen display menu
Sub picture menu
Controls the display settings for the sub picture.
Setting Description
Brightness Sets screen brightness.
Contrast Adjusts the difference between light and dark areas.
Hue Balance Adjusts the way each color displays.
Color Saturation Adjusts the overall color of the monitor.
English
OHM106/156 27
OHM.pmd 2006-02-28, 13:0027
Page 28
English
Controls how color displays on the screen.
Setting Value Description
Color temperature Adjusts colors in combination.
User Allows you to configure the mixture of red, green
and blue.
6500K Selects a pre-configured combination of the three
colors that could be described as “warm.”
9300K Selects a pre-configured combination of the three
colors that could be described as “cooler.”
You can still adjust individual colors after choosing
6500K or 9300K .
Red Increases and decreases the amount of red.
Green Increases and decreases the amount of green.
Blue Increases and decreases the amount of blue.
28 OHM106/156
OHM.pmd 2006-02-28, 13:0028
Page 29

Controls the sub picture, also called the picture-in-picture.
Setting Value Description
PIP Mode Turns the sub picture on and off, and selects the style of sub picture.
Off No sub picture.
Single Sub picture overlays a portion of the main picture.
PA P Both pictures split the screen equally.
Choosing PAP locks out the ability to size and move the sub
picture.
PIP Size Controls the size of the sub picture.
Small Smallest sub picture.
Medium Larger sub picture.
Large Largest sub picture.
Vertical Moves the PIP image up and down. The image starts out in the upper right
corner.
Pressing
Pressing moves the picture up.
Horizontal Moves the PIP image right and left.
Pressing
Pressing moves the image to the left.
moves the picture down.
moves the image to the right.
English
OHM106/156 29
OHM.pmd 2006-02-28, 13:0029
Page 30

English
OSD (on-screen display) menu
On-screen display menu
Setting Value/Description
Vertical Moves the on-screen display menus up and down.
Horizontal Moves the on-screen display menus left and right.
Blend Fades out the background of the on-screen display so that you can see
what’s playing behind the menus.
Time Out Defines the number of seconds (0-30) before the on-screen display turns
itself off. This value displays next to the timeout configuration bar.
OSD Zoom Controls the size of the on-screen menus.
On Enlarges the size of the menus.
Off Selects normal menu size.
30 OHM106/156
OHM.pmd 2006-02-28, 13:0030
Page 31

English
OHM106/156 31
Page 32

English
7. Troubleshooting
System or DVD does not work
1. Turn on the ignition.
2. Turn on the DVD player.
3. Make sure there’s a DVD in the DVD player.
4. Press play on the remote control.
Possible remedies
If the monitor does not respond:
• Check the fuses at the end of the monitor installation cables and on the vehicle.
• Check all connections. See the installation instructions.
• Change the batteries in the remote control.
• Dirt may be covering the remote’s infrared lens. Clean the lens with a damp cloth.
In rare cases your DVD system may not function the way you expect it to. Before
calling for service, read the operating instructions for the DVD.
8. Glossary
audio/video source
such as a DVD player, game player, VCR, digital camera, etc.
Main screen
Sub screen
OSD
: on-screen display
: any audio and/or video device that has a composite RCA output,
: primary area of the screen for displaying output from a video source.
: secondary area of the screen for displaying output from a video source.
9. Specifications
Power supply 12V DC (10V-16V)
Test voltage 12V, negative ground
Current consumption OHM106: 1 Amp OHM156: 1.9 Amps
Max current consumption OHM106: 1.1 Amps OHM156: 2 Amps
Operating temperature OHM106: 0 ~ 60° C OHM156: 0 ~ 50° C
Storage temperature OHM106: -30 ~ 85° C OHM156: -20 ~ 60° C
Video system Auto NTSC and PAL
Screen OHM106: 10.2” diagonal OHM156: 15.4” diagonal
Resolution OHM106: 800 x 480 OHM156: 1280 x 800
Weight OHM106: 3.8 lbs. OHM156: 7.2 lbs.
Video signal 1Vp-p with 75-Ohm load 200mV to 8 Volts
Note:
For the sake of technical improvements, this technical data and the
design of the equipment may change without prior notice.
32 OHM106/156
OHM.pmd 2006-02-28, 13:0032
Page 33

WARRANTY INFORMATION
For USA and Canada only
English
OHM106/156 33
Page 34

English
34 OHM106/156
OHM.pmd 2006-02-28, 13:0034
Page 35

English
OHM106/156 35
OHM.pmd 2006-02-28, 13:0035
Page 36

English
Clarion Corporation of America
All Rights Reserved. Copyright © 2006: Clarion Corp. of America
36 OHM106/156
OHM.pmd 2006-02-28, 13:0036
Printed in China
 Loading...