

Page 1

11
WW
Fully charge your watch before use by exposing
it to sufficient light
WW
The second hand will move at 2-second intervals when the
watch is insufficiently charged. Charge your watch as
indicated in "Guide to Charging Time" (p. 22).
SS
It is recommended that the watch be exposed to direct
sunlight for a long time once a month to fully charge it.
English
Page 2

32
7. Characteristics of the Solar Powered Watch ................................. 18
• Insufficient Charge Warning Function ............................................ 20
• Overcharging Prevention Function ................................................. 21
• Quick Start ...................................................................................... 21
• Guide to Charging Time .................................................................. 22
Precautions ................................................................................................. 24
8. Specifications.................................................................................... 30
1. Your Watch ...................................................................................... 04
2. Operating the Crown ...................................................................... 05
3. Part Names ....................................................................................... 06
4. Setting the Time and Date ............................................................. 08
5. Adjusting the Time and Date .......................................................... 10
• Adjusting the day of week ............................................................... 10
• Adjusting the moon phase .............................................................. 10
• Adjusting the day of month and month ........................................... 12
• Setting the Time ............................................................................. 14
Solar Power
6. Solar Power Function ...................................................................... 16
Table of Contents
Page 3
54
iThis watch includes a solar cell surrounding its face and is driven by converting
solar energy into electric energy.
Other Features
1. For the date, the numbered day of the month is indicated using a special hand,
and the month and day of the week are indicated in display windows.
2. The watch is equipped with a moon phase indicator.
1. Your Watch
2. Operating the Crown
There are two models available for the crown: normal and screw lock.
In the case of normal crown watch, simply pull out the crown.
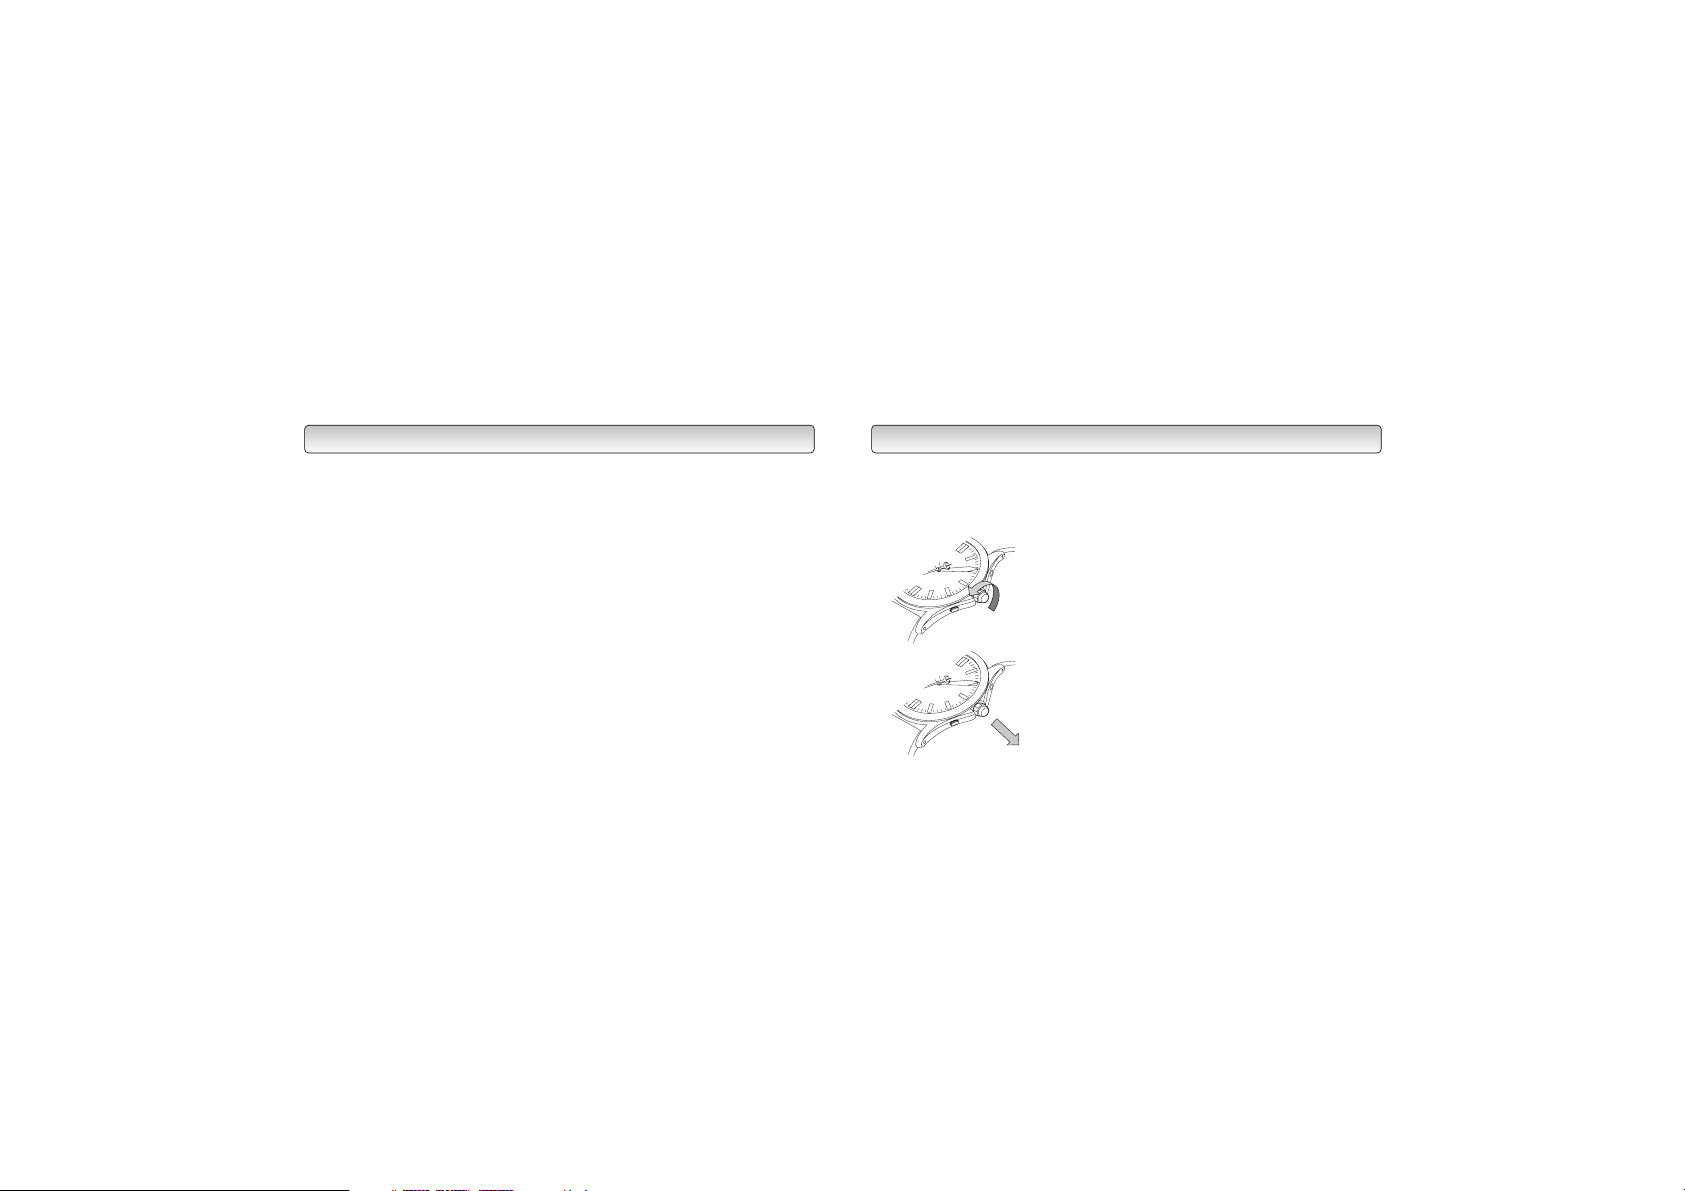
<Operating the screw lock crown>
Turn to the left
1. Turn the crown to the left.
2. When the screw lock is released, the
crown pops out a little and stops in
the normal position.
3. After finishing the operation, turn the
crown to the right to lock it.
Page 4

76
Second hand
Moon phase
Normal position
Day of week
(English only)
Day hand
<Illustration 1> <Illustration 2>
Month
(English only)
Crown
Time adjustment position
(Time and day of week adjustment)
Date adjustment position
(Day of month and moon phase adjustment)
Month adjustment
button
The illustrations shown in this manual may differ from the actual watch you have purchased.
This manual describes the operation procedures for watch models that have a push button at the 2:00 position
and a crown at the 3:00 position.
This manual describes the operation procedures for watch models of the illustration 1.
LL
Use an object with a slender
tip to press the hidden push
button.
Second hand
Moon phase
Normal position
Day of week
(English only)
Day hand
Month
(English only)
Crown
Time adjustment position
(Time and day of week adjustment)
Date adjustment position
(Day of month and moon phase adjustment)
Month adjustment
button
3. Part Names
Page 5
8 9
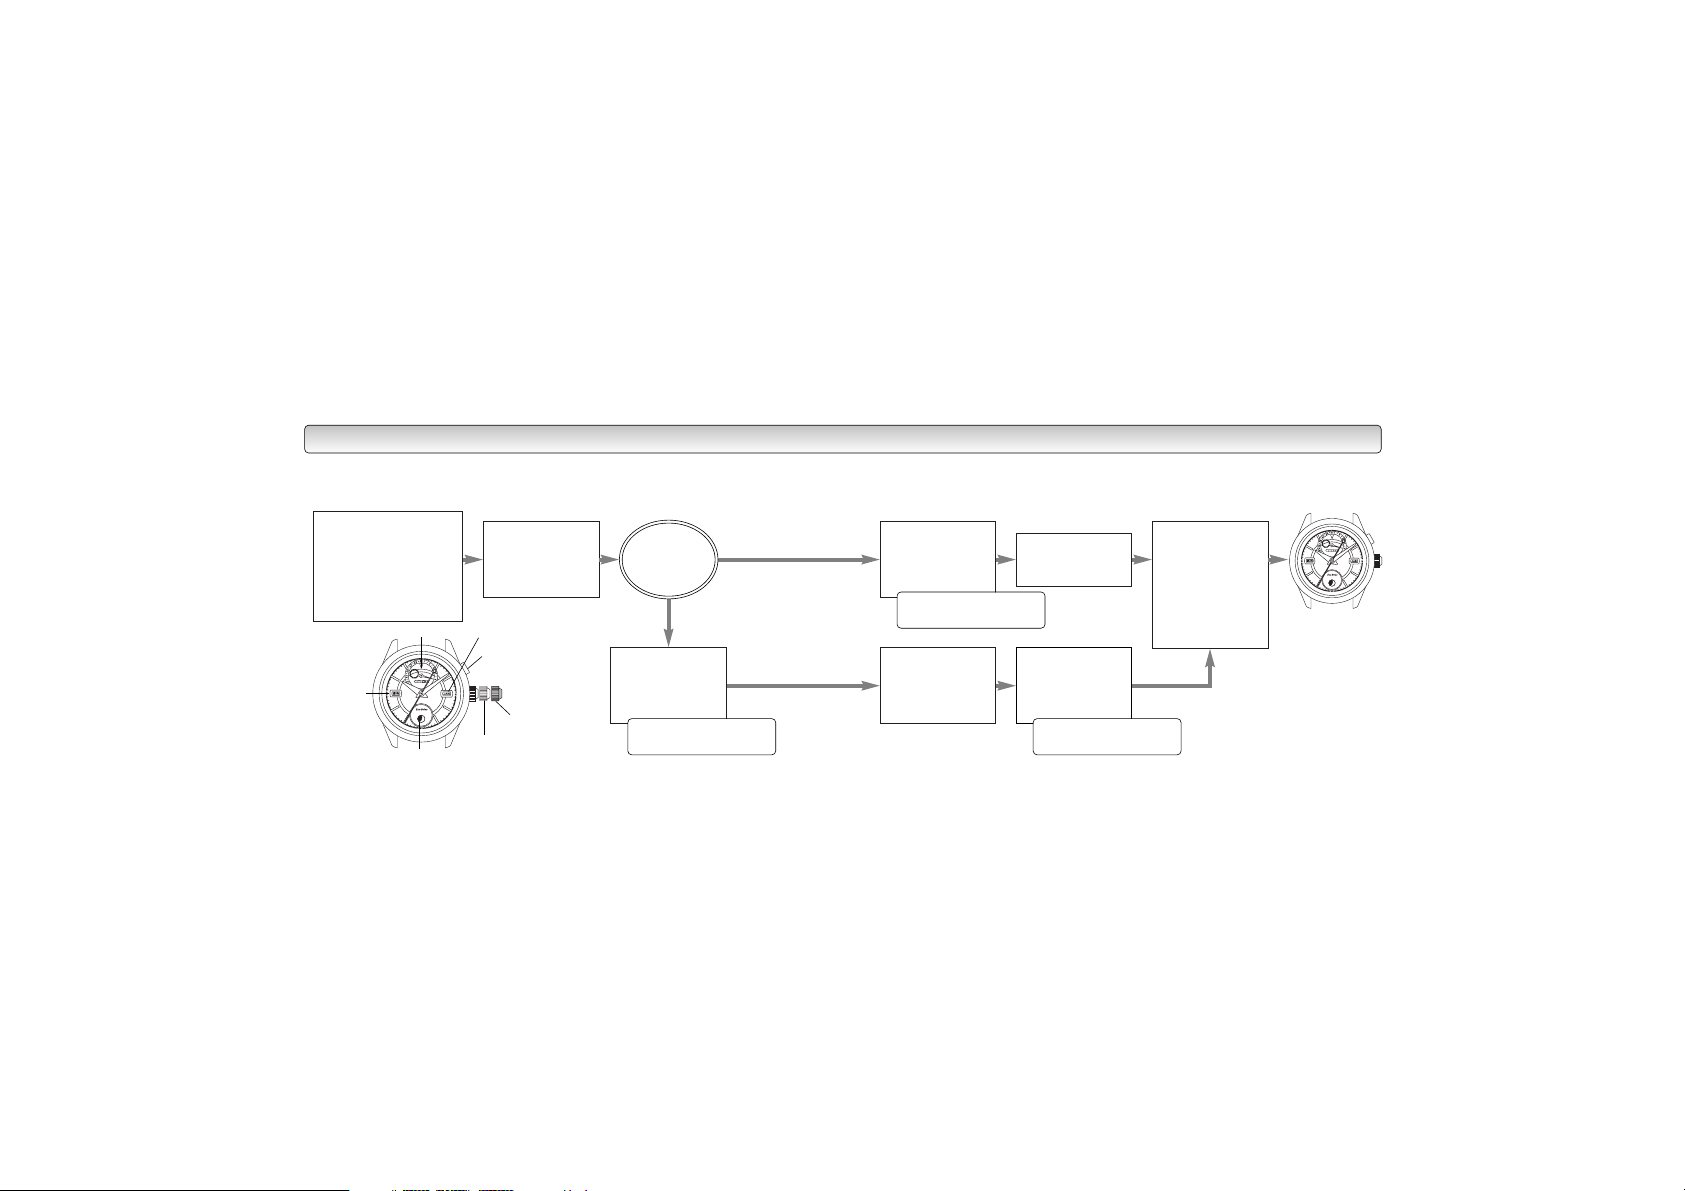
When adjusting both the time and date, it is convenient to make
settings in the order of "day of week", "moon phase", "month and day
of month", and then "time of day".
Adjusting the day of week
• Crown in position 2
• Turn the crown to the right
(The day of week begins
changing at the 12:00
position. To change to the
next day of week, make the
hour hand go around twice.)
Adjusting the
moon phase
• Crown in position 1
• Turn the crown to
the right
Adjusting the day
of month
• Crown in position 1
• Turn the crown to
the left
Adjusting the month
• Press the month
adjustment button
Setting the time
• Crown in position 2
• Advance the minute
hand and hour hand
by turning the
crown to the right
Turn the crown to
the left to move the
hands back
Adjusting the day
of month
• Crown in position 1
• Turn the crown to
the left
Adjusting the month
• The month changes
each time the month
adjustment button is
pressed
Temporarily set the day of
month to "30"
Adjust to the day of month
for the current day
Adjusting the day
of month
• Crown in position 1
• Turn the crown to
the left
Adjust to the day of month
for the current day
When the day of month
to be set is from the
31st to the 2nd
When the day
of month to be
set is from the
3rd to the 30th
Moon phase
Day of week
(English only)
Day of month
Month
Crown
Position 2
Adjusting the time
and day of week
Position 1
Adjusting the day of
month and moon phase
Month adjustment button
Return the
crown to the
normal position.
4. Setting the Time and Date
Confirm the
day of month
to be set.
Page 6

1110
Moon phase
Day of
week
Day of month Month
Crown
Position 2
Adjusting the
time and day
of week
Position 1
Adjusting the day of
month and moon phase
Month adjustment
button
Adjusting the day of week
1. Pull out the crown to position 2 (time and day of week adjustment).
2. Turn the crown to the right (clockwise) to set the day of week for the current day.
• The day of week begins to change starting at about midnight and is finished
changing by about 5:00 a.m.
Adjusting the moon phase
1. Pull out the crown to position 1 (date
adjustment position).
2. Turn the crown to the right (clockwise)
to set the moon phase for the current
day.
Look up the moon phase for today in the
newspaper or another source and adjust
while referring to "Viewing the moon
phase".
<Viewing the moon phase>
The moon phase indicator does not display the exact shape of the moon. Use it as
a guide to estimate the moon phase.
<To Set the Moon Phase Accurately>
The moon phase can be more accurately adjusted by adjusting on the day of the new
moon (when the moon indicator is completely hidden on the moon phase, day 0) or
full moon (when the moon indicator is straight up on the moon phase, day 15).
* The indicator may differ depending on the model.
New moon
Moon phase:
Day 0
(Spring tide)
First quarter moon
Moon phase:
Approx. day 7
(Neap tide)
Full moon
Moon phase:
Approx. day 15
(Spring tide)
Last quarter
Moon phase:
Approx. day 22
(Neap tide)
5. Adjusting the Time and Date
Page 7

1312
1. Pull out the crown to position 1 (date adjustment
position).
2. Adjust the day of month and the month.
• The day of month rotates to the right when the
crown is turned to the left.
• Pressing the month adjustment button changes
the month.
Adjusting the day of month and month
[When the day of month to be set is from the 3rd to the 30th]
A Turn the crown to the left to set the day hand to the current day of the month.
B Press the month adjustment button to set the month to the current month.
[When the day of month to be set is the 31st]
A First, temporarily set the day of month to the 30th.
B Press the month adjustment button to set the month to the current month.
C Turn the crown to the left to set the day to the 31st for the correct day of month.
Crown
Position 1
Month
adjustment
button
[When the day of month to be set is the 1st or 2nd]
A First, temporarily set the day of month to the 30th.
B Press the month adjustment button to temporarily set the month to one month
before the current month.
Example: Set to December when making settings for January.
Set to February when making settings for March.
C Turn the crown to the left to set the day to the 1st or the 2nd for the correct
day of month.
The month changes to the current month at the same time the day of month
changes from the 31st to the 1st.
3. Return the crown to the normal position.
• Due to the construction of the mechanism, temporary adjustment is required in order
to set the correct date.
Page 8

1514
1. When the second hand reaches the 12:00
position, pull out the crown to position 2
(time adjustment position).
2. Turn the crown to the right (clockwise) to
adjust the time.
Adjust the time while paying attention to
a.m./p.m. by noting the time at which the
date changes.
3. Set the time to the time signal time, etc. and
return the crown to the normal position.
Setting the Time
[Hints for accurate adjustment]
The time can be more accurately adjusted by first stopping the second hand at the
12:00 position, advancing 4 to 5 minutes past the time that the hour and minute
hand are to be set to, and then set the current time by backing the hands into
position by rotating the hands counterclockwise.
Crown
Position 2
[NOTE]
A If you adjust the day of month when a time between 9:00 p.m. and 12:00
midnight is being displayed, the day of month sometimes does not change to the
next day even if the actual date changes. Avoid changing the day of month
during this time period.
B The day of month indicated by this watch follows a 31-day cycle. To advance
to the 1st of the next month after a short month (a month having 30 days or
February), pull out the crown to position 1 and turn it to the left.
C Avoid adjusting the month when the day hand indicates a day from the 31st to
the 2nd.
To make adjustment during this period, first set the day of month outside the
range of the 31st to the 2nd, and then adjust the month. Then, set the day of
month that the day hand should point to.
Page 9

1716
This watch uses a secondary battery to store electrical energy. When the watch is
fully charged, it will maintain its accuracy for about 6 months.
<Ensuring best operation of the watch>
Always store the watch in a bright location for best results.
j Placing the watch near a window where its face can
receive sunlight or near another source of light when
you are not wearing it will ensure that the watch is
regularly charged, allowing it to maintain its accuracy.
j Wearing clothes with long sleeves makes it difficult for the watch to get the
necessary light, resulting in insufficient charging.
We recommended that you charge the watch for a long time in direct sunlight
once a month.
[NOTE]
Do not charge on surfaces that can easily
become hot, such as a car dashboard.
Solar Power
6. Solar Power Function
Page 10

1918
i When the watch is insufficiently charged, the indication will be changed as follows:
[Normal indication]
The second hand moves at 1-second intervals
[Insufficient charge warning]
The second hand moves at 2-second intervals
[Stopped status]
The watch stops
The watch has been insufficiently charged because
the watch face has not received sufficient light
As secondary battery
capacity diminishes
without charging
As the battery recharges
The watch must be subjected to enough light for a sufficient charge until the watch
hands begin moving.
The second hand starts moving at 2-second intervals.
The display time will be incorrect because the watch has
stopped due to insufficient charge. Adjust to the correct time.
7. Characteristics of the Solar Powered Watch
2 second
2 second
Page 11

2120
Insufficient Charge Warning Function
When the watch is insufficiently charged, the
second hand begins moving at 2-second
intervals to notify you that the watch charge is
insufficient.
Although the watch keeps accurate time during
this period, the watch will stop completely if
operation with an insufficient charge continues
for approximately three or more days. Restore
the 1-second interval movement of the second
hand by subjecting the watch to light so that it
recharges. To use the watch with complete
peace of mind, be sure to fully recharge the
battery even after the second hand returns to the 1-second interval movement.
Although the watch can be started again by subjecting it to light after it stops due
to insufficient charge, the time given will no longer be correct, so be sure to fully
charge the battery and adjust to the correct time.
Overcharging Prevention Function
No matter how much the watch is charged, it will not affect the secondary battery,
timekeeping, functions or performance of the watch.
When the secondary battery becomes fully charged by exposing the watch face to
light, the overcharging prevention function is automatically activated to prevent the
battery from being charged further.
Quick Start
The watch stops if there is absolutely no charge. Subject the watch to light and the
hands will start moving in about 10 seconds. (The time required for the hands to
begin moving varies depending on the model and brightness of the light.)
Note, however, that the watch will stop again if the light is blocked at this time
because the charge may still be insufficient.
2 second
2 second
Page 12

2322
Guide to Charging Time
The charging time varies according to the model (including the color of the watch
face). The following data should only be used as a guideline.
Illuminance
(lx)
500
Environment
Indoor lighting
Charging time (approximate)
4 hours
Time from stopping
to resuming the
1-second interval
movement
-----
Time for full
charging
-----
1,000
60 - 70 cm (24 - 28 in) beneath
a 30 W fluorescent light
2 hours 60 hours -----
3,000
20 cm (8 in) beneath a
30 W florescent light
50 minutes 25 hours 150 hours
10,000 Cloudy sky 30 minutes 14 hours 90 hours
100,000 Direct summer sunlight 6 minutes 3 hours 19 hours
For a 1-day
movement
charging time
* The charging time is based on continuous exposure.
CAUTION Charging precautions
j Do not charge the watch in a high-temperature environment (about 60°C / 140°F
or more).
Overheating while charging can cause the watch exterior to become discolored,
the watch to deform or the movement to be damaged.
Example:
• Charging close to incandescent lighting, halogen lamps, or other lighting
sources that easily become hot.
• Charging on surfaces that can easily become hot, such as a car dashboard.
j When charging with incandescent lighting, halogen lamps, or other lighting
sources that easily become hot, place the watch at least 50 cm (20 in) away
from the source to avoid overheating.
Page 13

2524
NO NO NO NO
OK NO NO NO
OK OK NO NO
Moderate exposure to
water (washing, kitchen
work, swimming, etc.)
Marine sports
(skin diving)
Scuba diving
(with air tank)
Examples of use
For correct use within the design limits of the watch, confirm the level of waterresistance of your watch, as indicated on the dial and case, and consult the table.
OK
OK
OK
Minor exposure to water
(washing face, rain, etc.)
Indication
WATER RESIST
or no indication
WATER
RESIST(ANT)
Water-resistant to
3 atmospheres
WR 50 or WATER
RESIST 50
WATER
RESIST(ANT) 5 bar or
WATER RESIST(ANT)
Water-resistant to
5 atmospheres
WR 100/200 or
WATER RESIST
100/200
WATER RESIST(ANT)
10bar/20 bar or
WATER RESIST(ANT)
Water-resistant to
10/20 atmospheres
Dial
Case
(case back)
Specifications
WARNING: Water-resistance performance
There are several types of water-resistant watches, as shown
in the following table.
The unit "bar" is roughly equal to 1 atmosphere.
* WATER RESIST(ANT) xx bar may also be indicated as
W.R. xx bar.
Operation of the
crown or button
with moisture visible
Precautions
Page 14

2726
• If seawater enters the watch, place the watch in a box or plastic bag and immediately take it
in for repair. Otherwise, pressure inside the watch will increase, and parts (crystal, crown,
buttons, etc.) may come off.
CAUTION: Keep your watch clean.
• Leaving dust and dirt deposited between the case and crown may result in difficulty in
pulling the crown out. Rotate the crown while in its normal position, from time to time, to
loosen dust and dirt and then brush it off.
• Dust and dirt tend to be deposited in gaps in the back of the case or band.
Deposited dust and dirt may cause corrosion and soil your clothing. Clean the watch
occasionally.
Cleaning the Watch
• Use a soft cloth to wipe off dirt, perspiration and water from the case and crystal .
• Use a soft, dry cloth to wipe off perspiration and dirt from the leather band.
• To clean a metal, plastic, or rubber watchband, wash away dirt with mild soap and water.
Use a soft brush to remove dust and dirt jammed in the gaps in the metal band. If your
watch is not water-resistant, take it to your dealer.
NOTE: Avoid using solvents (thinner, benzine, etc.), as they may damage the finish.
WARNING: Water-resistance performance
• Water-resistance for daily use (to 3 atmospheres): This type of watch is water-resistant to
minor exposure to water. For example, you may wear the watch while washing your face;
however, it is not designed for use underwater.
• Upgraded water-resistance for daily use (to 5 atmospheres): This type of watch is waterresistant to moderate exposure to water. You may wear the watch while swimming;
however, it is not designed for use while skin diving.
• Upgraded water-resistance for daily use (to 10/20 atmospheres): This type of watch may be
used for skin diving; however, it is not designed for scuba or saturated diving using helium
gas.
CAUTION
• Be sure to use the watch with the crown pressed in (normal position). If your watch has a
screw-lock type crown, be sure to tighten the crown completely.
• Do NOT operate the crown or button with wet fingers or when the watch is wet. Water
may enter the watch and compromise water-resistance.
• If the watch is used in seawater, rinse with fresh water afterward and wipe with a dry cloth.
• If moisture has entered the watch, or if the inside of the crystal is fogged up and does not
become clear within a day, immediately take the watch to your dealer or Citizen Service
Center for repair. Leaving the watch in such a state will allow corrosion to form inside.
Page 15

29
• Avoid using the watch in an environment where it may be exposed to chemicals or
corrosive gases.
If solvents, such as thinner and benzine, or substances containing such solvents come in
contact with the watch, discoloration, melting, cracking, etc. may result. If the watch comes
in contact with mercury used in thermometers, the case, band or other parts may become
discolored.
Periodical inspections
Your watch needs inspection once in every two or three years for safety and long use.
To keep your watch water-resistant, the packing needs to be replaced regularly.
Other parts need to be inspected and replaced if necessary.
Ask for Citizen geuine parts upon replacement.
28
CAUTION: Operating environment
• Use the watch within the operating-temperature range specified in the instruction manual.
Using the watch where temperatures are outside the specified range, may result in
deterioration of functions or even stoppage of the watch.
• Do NOT use the watch in places where it is exposed to high temperature, such as in a
sauna.
Doing so may result in a skin burn.
• Do NOT leave the watch in a place where it is exposed to high temperature, such as the
glove compartment or dash-board of a car.
Doing so may result in deterioration of the watch, such as deformation of plastic parts.
• Do NOT place the watch close to a magnet.
Timekeeping will become inaccurate if you place the watch close to magnetic health
equipment such as a magnetic necklace or a magnetic latch of a refrigerator door or
handbag clasp or the earphone of a mobile phone. If this has occurred, move the watch
away from the magnet and reset the time.
• Do NOT place the watch close to household appliances that generate static electricity.
Timekeeping may become inaccurate if the watch is exposed to strong static electricity,
such as is emitted from a TV screen.
• Do NOT subject the watch to a strong shock such as dropping it onto a hard floor.
Page 16

3130
8. Specifications
1. Cal. No. : 8730
2. Type : Analogue solar powered watch
3. Time accuracy : Average monthly deviation ±15 seconds when used in room
temperature (+5°C to +35°C / 41°F to 95°F)
4. Acceptable temperature range : -10°C to +60°C / 14°F to 140°F
5. Display functions : Time: Hour, minute and second
Date : • Day of week, month, and day of month display
indicated by special hand
• Moon phase indicator
6. Additional functions : • Insufficient charge warning function (2-second interval
movement)
• Overcharging prevention function
• Quick start
7. Operation time : Time from a full charge until the watch stops without charging:
About 6 months
Time from insufficient charge warning to watch stopping due to
insufficient charging: About 3 days
8. Battery : Secondary battery 1
*Specifications may change without notice.
 Loading...