

Page 1

Cisco Unified IP Phone 7931G
Phone Guide for
Cisco Unified Communications
Manager
7. 0
(SCCP and SIP)
Americas Headquarters
Cisco Systems, Inc.
170 West Tasman Drive
San Jose, CA 95134-1706
USA
http://www.cisco.com
Tel: 408 526-4000
800 553-NETS (6387)
Fax: 408 527-0883
Page 2

Page 3

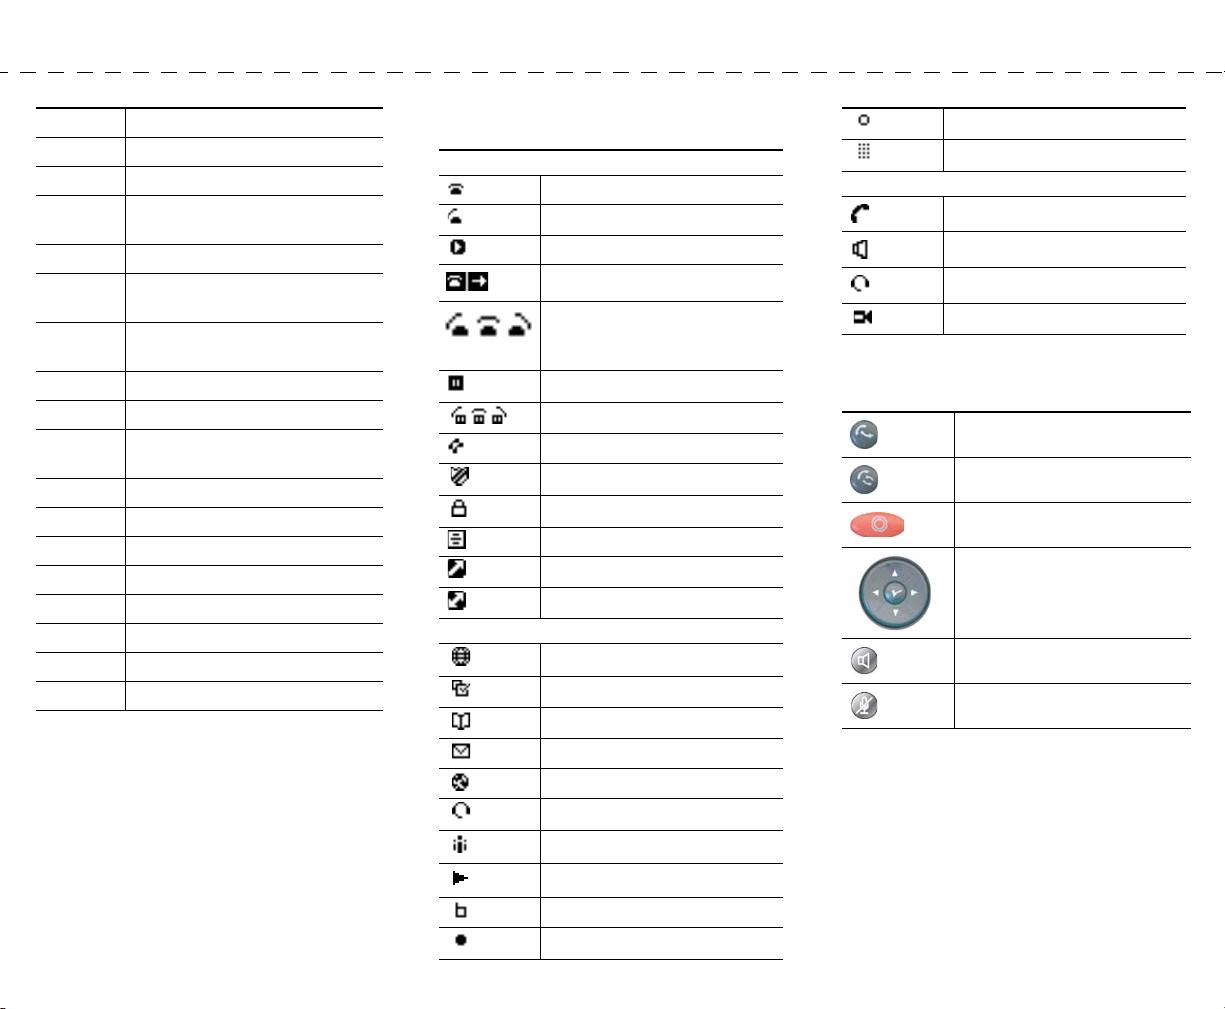
Common Phone Tasks
Softkey Definitions
View online help
on phone
Place a call Press and enter a
Redial a number Press .
Use a headset Press
Mute your phone Press .
Hold a call Press .
Resume a call Press (flashing).
Transfer a call to
new number
Place an intercom
call
Speed dial a
number
Initiate a
conference call
Cisco, Cisco Systems, the Cisco logo, and the Cisco Systems logo are
registered trademarks or trademarks of Cisco Systems, Inc. and/or its affiliates
in the United States and certain other countries. All other trademarks
mentioned in this document or Website are the property of their respective
owners. The use of the word partner does not imply a partnership relationship
between Cisco and any other company. (0705R)
© 2008 Cisco Systems, Inc. All rights reserved.
Press ( ) > .
number.
().
Press .
Press
Press
Press ().
().
().
OL-15791-01
QUICK REFERENCE
Cisco Unified IP Phone
7931G for Cisco Unified
Communications
Manager 7.0
(SCCP and SIP)
Softkey Definitions
Phone Screen Icons
Button Icons
Common Phone Tasks
AbbrDial Dial using a speed dial index
number
Answer Answer a call
Back Return to the previous Help topic
CallBack Receive notification when a busy
extension becomes available
Cancel Cancel an action or exit a screen
without applying changes
Clear Delete records or settings
Close Close the current window
Confrn Create a conference call
ConfList View conference participants
Delete Remove characters to the right of
the cursor when using EditDial
Details Open the Details record for a
multiparty call in the Missed Calls
and Received Calls logs
Dial Dial a phone number
iDivert Divert or redirect a call to a voice
message system
DND Turn on/off Do Not Disturb
EditDial Edit a number in a call log
EndCall Disconnect the current call or the
current intercom call
Erase Reset settings to their defaults
Exit Return to the previous screen
CFwdALL Setup/cancel call forwarding
GPickUp Answer a call that is ringing in
another group or on another line
Links View related Help topics
Main Display the Help main menu
Page 4
MeetMe Host a Meet-Me conference call
more Display additional softkeys
NewCall Make a new call
OPickUp Answer a call that is ringing in an
associated group
Park Store a call using Call Park
PickUp Answer a call that is ringing on
another phone in your group
Redial Redial the most recently dialed
number
Remove Remove a conference participant
Resume Resume a call on hold
RmLstC Drop the last party added to a
conference call
Save Save the chosen settings
Search Search for a directory listing
Select Select a menu item or call
Transfer Transfer a call
Update Refresh content
VidMode Choose a video display mode
<< Delete entered characters
>> Move through entered characters
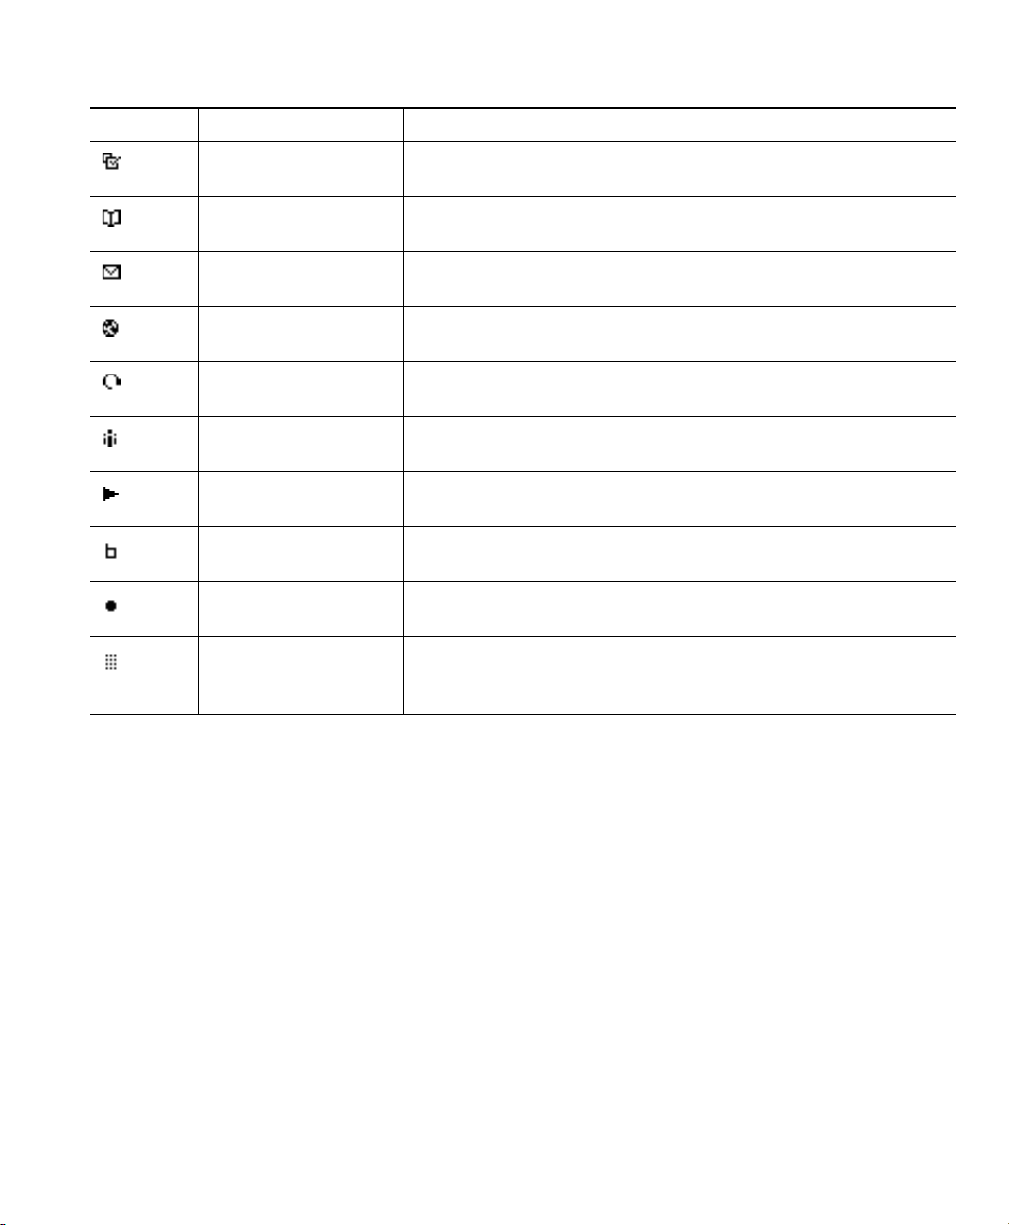
Phone Screen Icons
Call State
On-hook line
Off-hook line
Connected call
Call Forwarding enabled
Ringing call, or a BLFmonitored line is ringing (BLF
Pickup)
Call on hold
Hold Reversion
Remote-in-use
Authenticated call
Encrypted call
Idle intercom line
One-way intercom call
Two-way intercom call
Feature Access
Application menu
Settings menu
Directories menu
Messages menu
Services menu
Headset button
Conference button
Other call features
Mobility
Feature enabled
Feature disabled
Speed dial button
Audio or Video Mode
Handset in use
Speakerphone in use
Headset in use
Video
Button Icons
Redial
Tra n sfer
Hold
Navigation and Select
Speaker
Mute
Page 5

Contents
Getting Started 9
Using this Guide 9
Finding Additional Information 9
Safety and Performance Information 10
Cisco Product Security Overview 11
Accessibility Features 11
Connecting Your Phone 12
An Overview of Your Phone 15
Understanding Buttons and Hardware 15
Understanding Lines and Calls 19
Understanding Line and Call Icons 20
Understanding Phone Screen Features 21
Accessing the Application Menu 23
Accessing the Help System on Your Phone 23
Understanding Feature Availability 23
Understanding SIP vs. SCCP 24
Basic Call Handling 25
Placing a Call—Basic Options 25
Placing a Call—Additional Options 26
Answering a Call 28
Ending a Call 30
Using Hold and Resume 30
Using Mute 31
Switching Between Multiple Calls 31
Cisco Unified IP Phone 7931G for Cisco Unified Communications Manager 6.0 5
Page 6

Switching an In-Progress Call to Another Phone 32
Transferring Calls 32
Sending a Call to a Voice Message System 33
Forwarding Calls to Another Number 33
Using Do Not Disturb 35
Making Conference Calls 36
Using Conference Features 36
Viewing or Removing Conference Participants 38
Placing or Receiving Intercom Calls 39
Advanced Call Handling 41
Speed Dialing 41
Picking Up a Redirected Call on Your Phone 42
Storing and Retrieving Parked Calls 43
Logging Out of Hunt Groups 44
Using a Shared Line 44
Understanding Shared Lines 44
Working with Shared Lines 45
Using BLF to Determine a Line State 46
Making and Receiving Secure Calls 46
Tracing Suspicious Calls 48
Prioritizing Critical Calls 48
Using Cisco Extension Mobility 49
Managing Business Calls Using a Single Phone Number 50
Using a Handset, Headset, and Speakerphone 52
Using a Handset 52
Using a Headset 52
Using a Speakerphone 53
Using AutoAnswer with a Headset or Speakerphone 54
Changing Phone Settings 55
Customizing Rings and Message Indicators 55
6 OL-15791-01
Page 7

Customizing the Phone Screen 56
Using Call Logs and Directories 57
Using Call Logs 57
Directory Dialing 59
Using Corporate Directory on Your Phone 59
Using Personal Directory on Your Phone 60
Accessing Voice Messages 63
Using the User Options Web Pages 64
Accessing Your User Options Web Pages 64
Configuring Features and Services on the Web 65
Using Personal Directory on the Web 65
Setting Up Speed Dials on the Web 68
Setting Up Phone Services on the Web 69
Controlling User Settings on the Web 71
Controlling Line Settings on the Web 71
Setting Up Phones and Access Lists for Mobile Connect 74
Using Cisco WebDialer 77
Understanding Additional Configuration Options 79
Troubleshooting Your Phone 81
General Troubleshooting 81
Viewing Phone Administration Data 82
Cisco One-Year Limited Hardware Warranty Terms 83
Index 85
Cisco Unified IP Phone 7931G for Cisco Unified Communications Manager 6.0 7
Page 8

8 OL-15791-01
Page 9

Getting Started
Using this Guide
This guide provides you with an overview of the features available on your phone. You can read it
completely for a solid understanding of your phone’s capabilities or refer to the table below for
pointers to commonly used sections.
If you want to... Then
Explore your phone on your own Press ( ) > on the phone when you need assistance.
Review important safety information See Safety and Performance Information, page 10.
Connect your phone See Connecting Your Phone, page 12.
Use your phone after it is installed See An Overview of Your Phone, page 15.
Learn about the buttons and softkeys See Understanding Buttons and Hardware, page 15.
Make calls See Placing a Call—Basic Options, page 25.
Put calls on hold See Using Hold and Resume, page 30.
Mute calls See Using Mute, page 31.
Transfer calls See Transferring Calls, page 32.
Make conference calls See Making Conference Calls, page 36.
Set up speed dialing See Speed Dialing, page 41.
Share a phone number See Picking Up a Redirected Call on Your Phone, page 42.
User your phone as a speakerphone See Using a Handset, Headset, and Speakerphone, page 52.
Change the ring or call volume See Customizing Rings and Message Indicators, page 55.
View your missed calls See Using Call Logs, page 57.
Listen to your voice messages See Accessing Voice Messages, page 63.
See softkey and icon definitions Refer to the Quick Reference Card in the front of this guide.
Finding Additional Information
You can access the most current Cisco Unified IP Phone documentation on the World Wide Web at
this URL:
Cisco Unified IP Phone 7931G for Cisco Unified Communications Manager 6.0 9
Page 10

http://www.cisco.com/en/US/products/hw/phones/ps379/tsd_products_support_series_home.html
You can access the Cisco website at this URL:
http://www.cisco.com/
International Cisco websites can be accessed from this URL:
http://www.cisco.com/public/countries_languages.shtml
You can access the most current Licensing Information at this URL:
http://www.cisco.com/en/US/docs/voice_ip_comm/cuipph/all_models/openssl_license/7900_ssllic.htm
l
Safety and Performance Information
Refer to these sections for information about the impact of power outages and other devices on your
Cisco Unified IP Phone.
Power Outage
Your accessibility to emergency service through the phone is dependent on the phone being powered.
If there is an interruption in the power supply, Service and Emergency Calling Service dialing will not
function until power is restored. In the case of a power failure or disruption, you may need to reset or
reconfigure equipment before using the Service or Emergency Calling Service dialing.
Using External Devices
The following information applies when you use external devices with the Cisco Unified IP Phone:
Cisco recommends the use of good quality external devices (such as headsets) that are shielded against
unwanted radio frequency (RF) and audio frequency (AF) signals.
Depending on the quality of these devices and their proximity to other devices such as mobile phones
or two-way radios, some audio noise may still occur. In these cases, Cisco recommends that you take
one or more of the following actions:
• Move the external device away from the source of the RF or AF signals.
• Route the external device cables away from the source of the RF or AF signals.
• Use shielded cables for the external device, or use cables with a better shield and connector.
• Shorten the length of the external device cable.
• Apply ferrites or other such devices on the cables for the external device.
Cisco cannot guarantee the performance of the system because Cisco has no control over the quality
of external devices, cables, and connectors. The system will perform adequately when suitable devices
are attached using good quality cables and connectors.
10 OL-15791-01
Page 11

Caution In European Union countries, use only external speakers, microphones, and headsets that
are fully compliant with the EMC Directive [89/336/EC].
Getting Started
Cisco Product Security Overview
This product contains cryptographic features and is subject to United States and local country laws
governing import, export, transfer and use. Delivery of Cisco cryptographic products does not imply
third-party authority to import, export, distribute or use encryption. Importers, exporters, distributors
and users are responsible for compliance with U.S. and local country laws. By using this product you
agree to comply with applicable laws and regulations. If you are unable to comply with U.S. and local
laws, return this product immediately.
Further information regarding U.S. export regulations may be found at
http://www.access.gpo.gov/bis/ear/ear_data.html.
Accessibility Features
A list of accessibility features is available upon request. You can find more information about Cisco
accessibility features at this URL:
www.cisco.com/go/accessibility
Cisco Unified IP Phone 7931G for Cisco Unified Communications Manager 6.0 11
Page 12
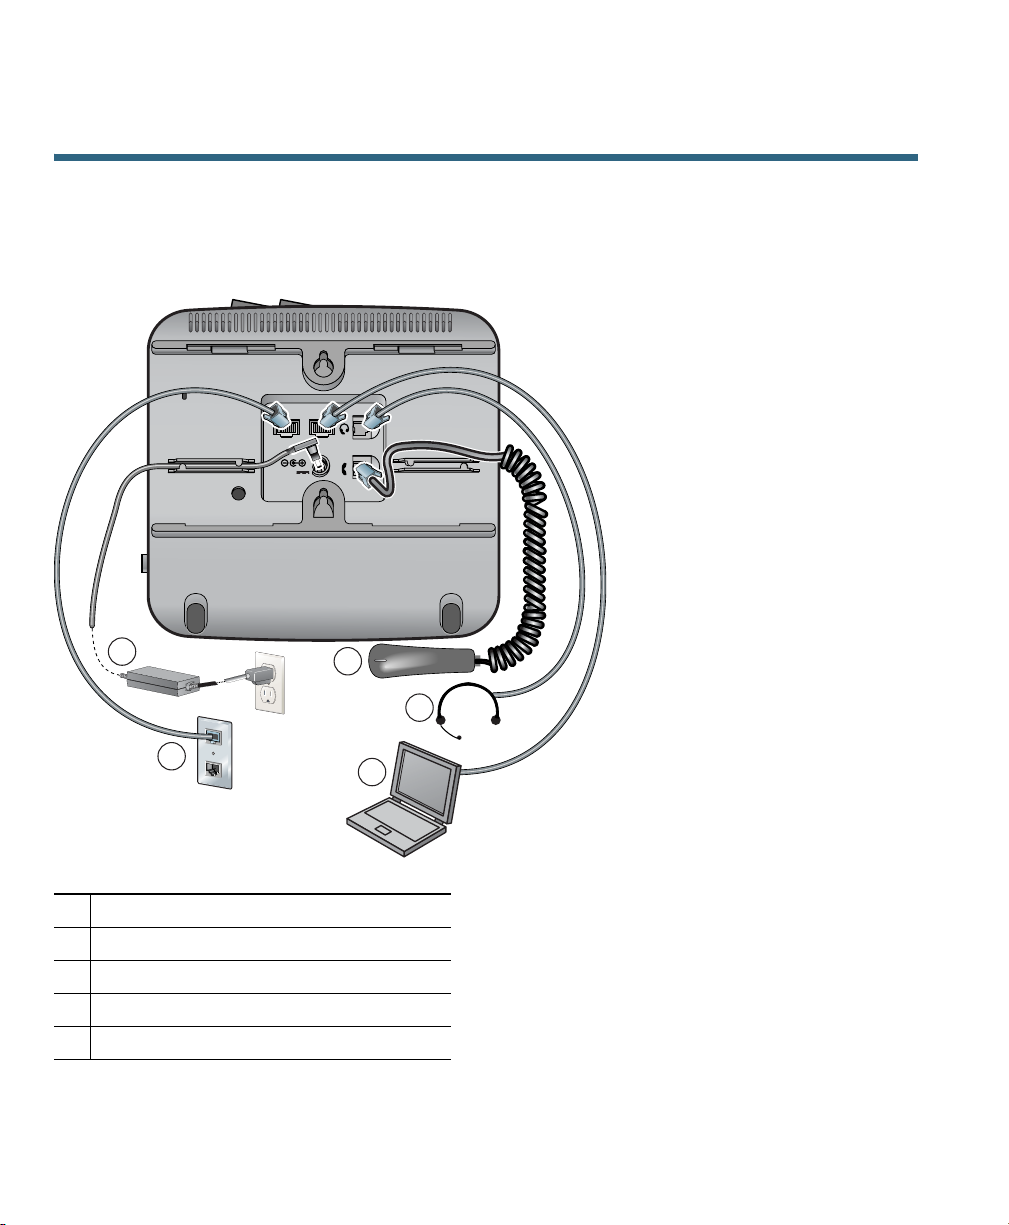
Connecting Your Phone
Your system administrator will likely connect your new Cisco Unified IP Phone to the corporate IP
telephony network. If that is not the case, refer to the graphic and table below to connect your phone.
10/100 SW 10/100 PC
DC48V
1
5
4
2
DC Adaptor port (DC48V) (optional)
1
Network port (10/100 SW)
2
Access port (10/100 PC)
3
Headset port
4
Handset port
5
12 OL-15791-01
3
170686
Page 13
Connecting Your Phone
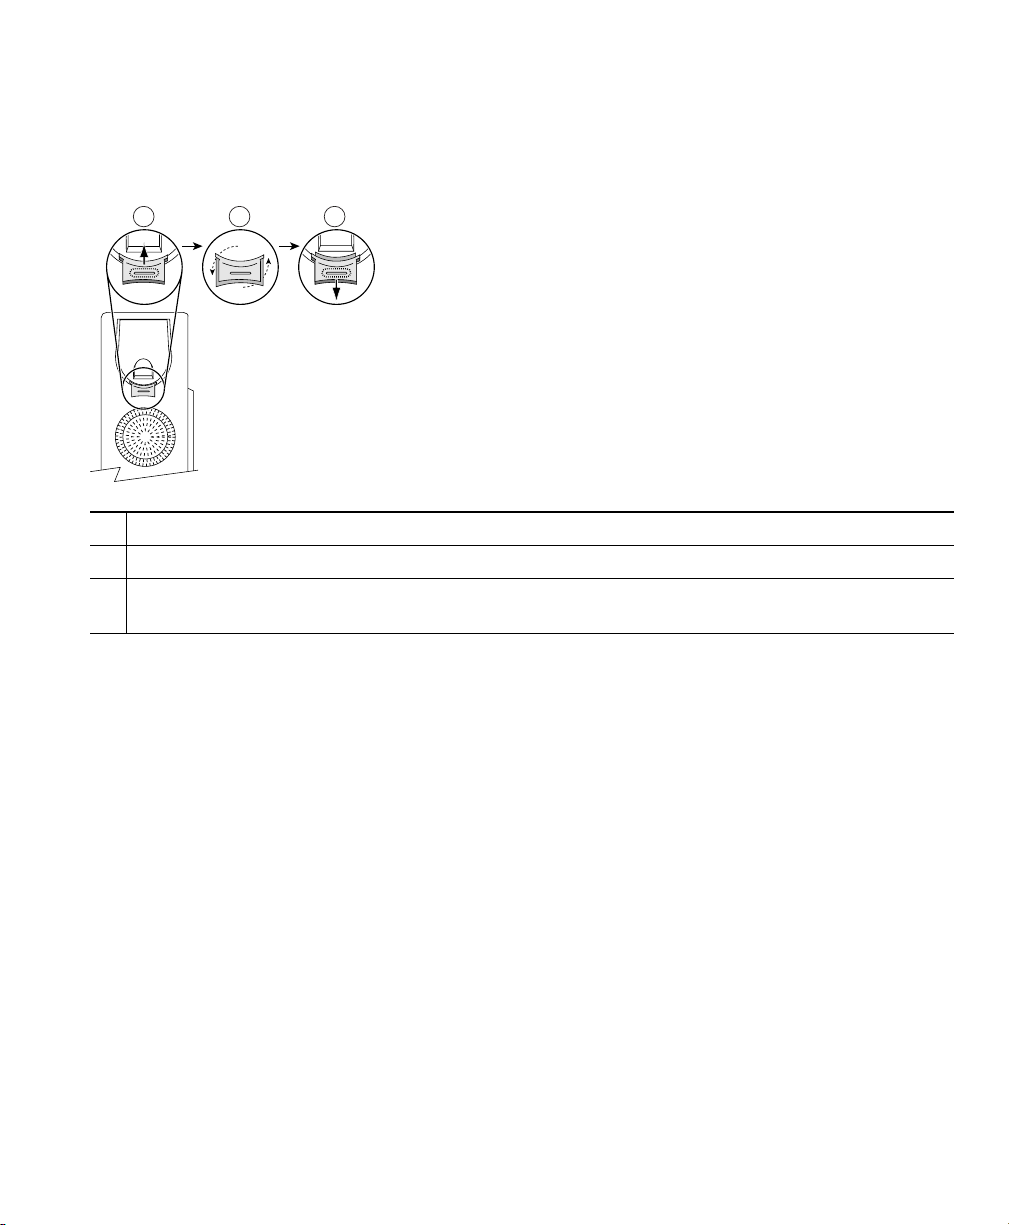
Adjusting the Handset Rest
When you connect your phone, you might want to adjust the handset rest to ensure that the receiver
will not slip out of the cradle. See the table below for instructions.
1 2 3
77354
Set the handset aside and pull the square plastic tab from the handset rest.
1
Rotate the tab 180 degrees.
2
Slide the tab back into the handset rest. An extension protrudes from the top of the rotated tab.
3
Return the handset to the handset rest.
Registering with TAPS
After your phone is connected to the network, your system administrator might ask you to
auto-register your phone using TAPS (Tool for Auto-Registered Phones Support). TAPS might be used
either for a new phone or to replace an existing phone.
To register with TAPS, pick up the handset, enter the TAPS extension provided by your system
administrator, and follow the voice prompts. You might need to enter your entire extension, including
the area code. After your phone displays a confirmation message, hang up. The phone will re-start.
Headset Support
Although Cisco Systems performs limited internal testing of third-party headsets for use with the
Unified IP Phones, Cisco does not certify or support products from headset or handset vendors.
Cisco
Cisco recommends the use of good quality external devices, for example headsets that are screened
against unwanted radio frequency (RF) and audio frequency (AF) signals. Depending on the quality of
these devices and their proximity to other devices such as mobile phones and two-way radios, some
audio noise or echo may still occur. An audible hum or buzz may be heard by either the remote party
or by both the remote party and the Cisco Unified IP Phone user. Humming or buzzing sounds can be
caused by a range of outside sources: for example, electric lights, electric motors, or large PC monitors.
Using External Devices, page 10 for more information.
See
Cisco Unified IP Phone 7931G for Cisco Unified Communications Manager 6.0 13
Page 14

Note In some cases, hum may be reduced or eliminated by using a local power cube or power
injector.
These environmental and hardware inconsistencies in the locations where Cisco Unified IP Phones are
deployed means that there is not a single headset solution that is optimal for all environments.
Cisco recommends that customers test headsets in their intended environment to determine
performance before making a purchasing decision and deploying en masse.
Audio Quality Subjective to the User
Beyond the physical, mechanical and technical performance, the audio portion of a headset must
sound good to the user and to the party on the far end. Sound quality is subjective and Cisco cannot
guarantee the performance of any headsets However, a variety of headsets from leading headset
manufacturers have been reported to perform well with Cisco Unified IP Phones. See manufacturer’s
sites for details.
For information about wireless headsets that work in conjunction with the wireless headset remote
hookswitch control feature, got to the following URL: http://www.cisco.com/pcgi-bin/ctdp/Search.pl
1. Choose IP Communications from the Enter Solution drop-down list box. The Select a Solution
Category drop-down list box displays.
2. Choose IP Phone Headsets to see a list of Technology Development Program partners.
If you want to search for a particular Technology Development Program partner, enter the partner’s
name in the Enter Company Name box.
14 OL-15791-01
Page 15

An Overview of Your Phone
An Overview of Your Phone
The Cisco Unified IP Phone 7931G is a full-feature telephone that provide voice communication over
the same data network that your personal computer uses, allowing you to place and receive phone
calls, put calls on hold, transfer calls, make conference calls, and so on.
The Cisco Unified IP Phone 7931G is designed to meet the communication needs with moderate
telephone traffic and specific call requirements. It provides you with dedicated hold, redial, and
transfer keys to facilitate call handling. In addition to basic call-handling features, your Cisco Unified
IP Phone provides enhanced productivity features that extend your call-handling capabilities:
• Access to network data, XML applications, and web-based services.
• Online customizing of phone features and services from your Cisco Unified CM User Options web
pages.
• A comprehensive online help system that displays information on the phone screen.
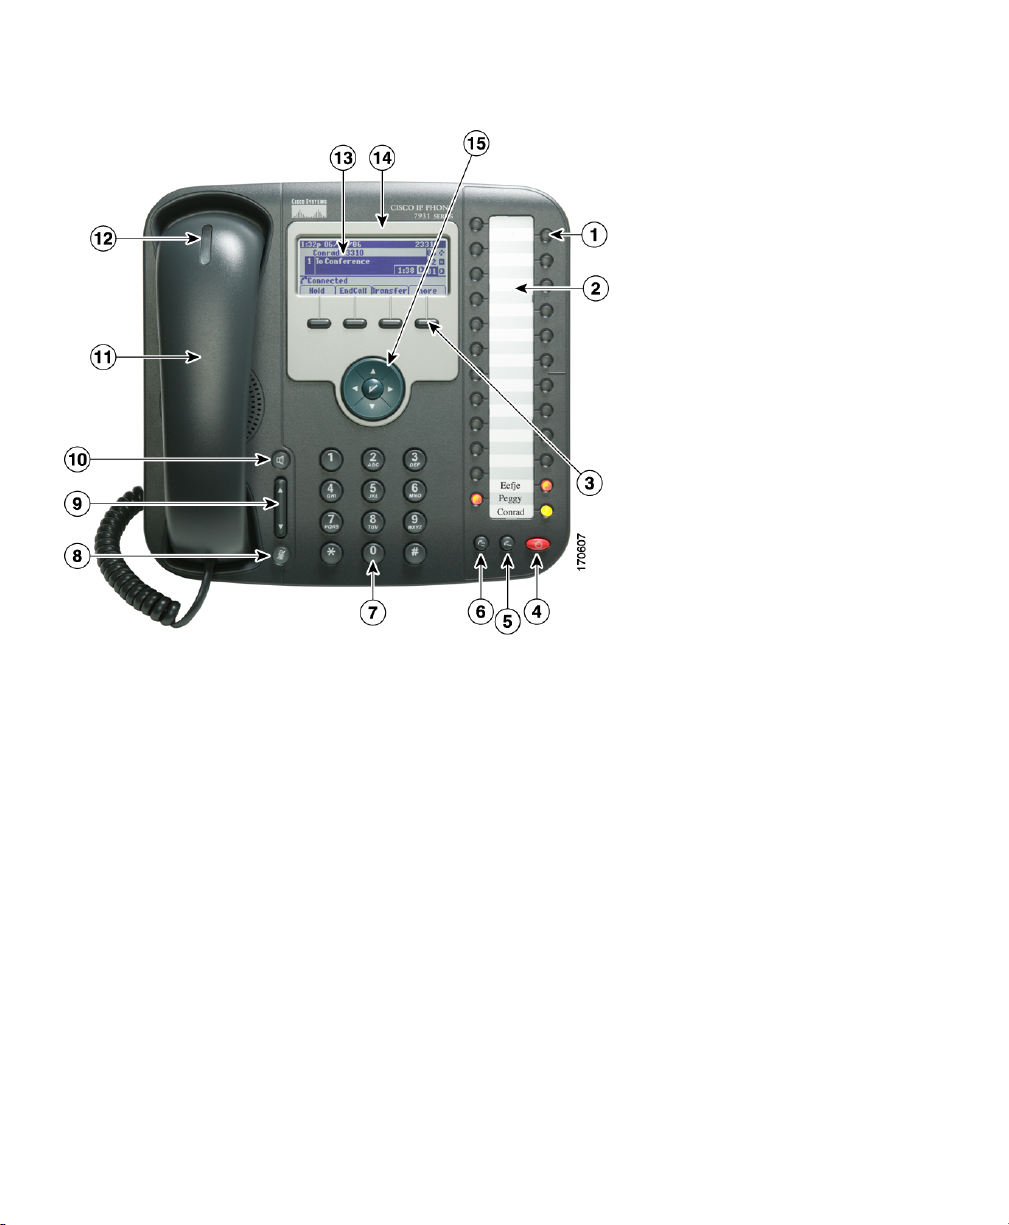
Understanding Buttons and Hardware
You can use the graphic below to identify buttons and hardware on your phone.
Cisco Unified IP Phone 7931G for Cisco Unified Communications Manager 6.0 15
Page 16
.
16 OL-15791-01
Page 17
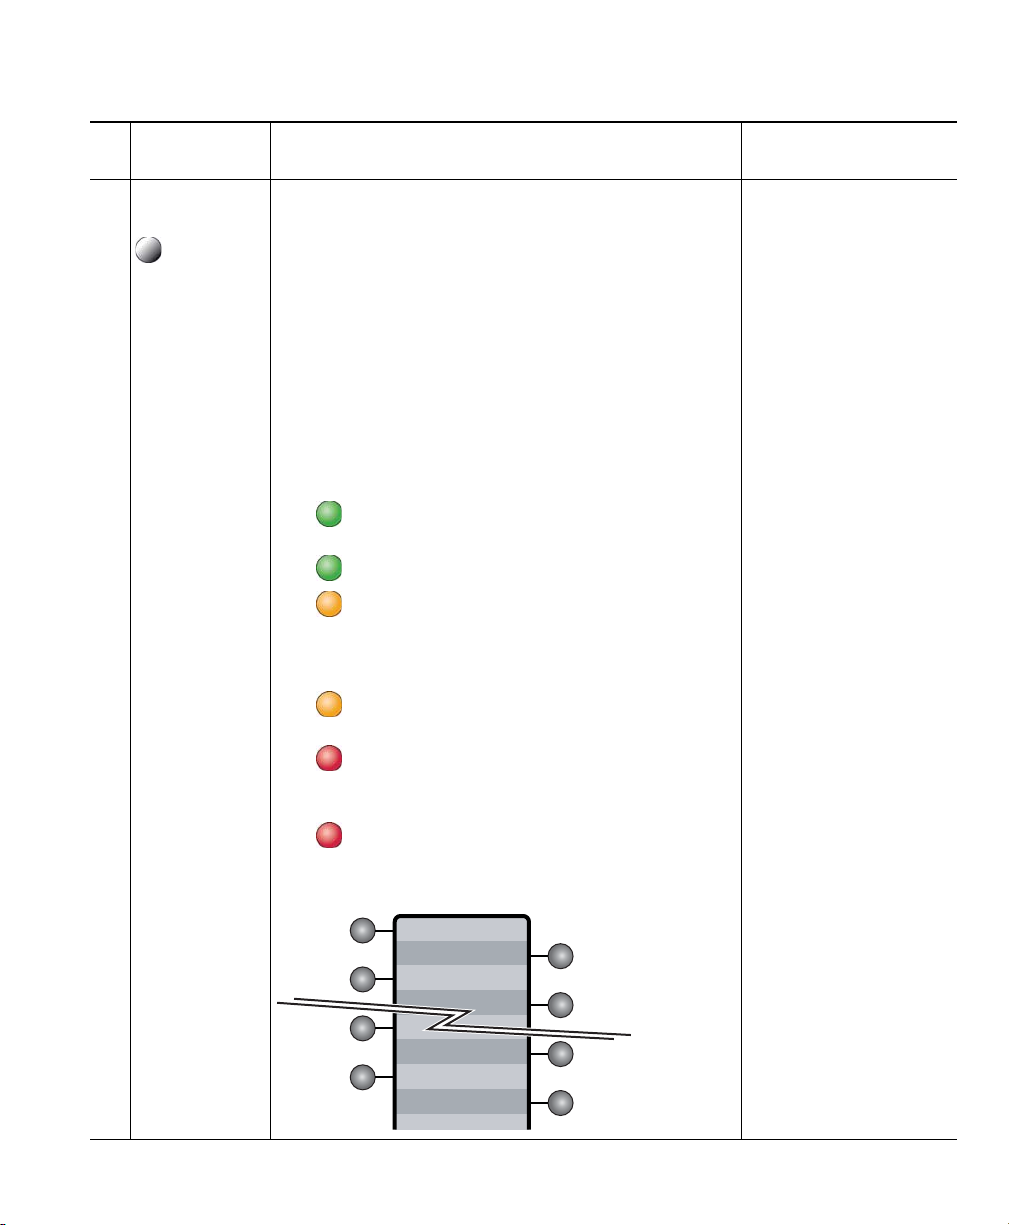
Item Description
Programmable
1
buttons
Depending on configuration, programmable buttons
(or line keys) provide access to:
• Phone lines and intercom lines (line buttons)
• Speed-dial numbers (speed-dial buttons,
• Web-based services (for example, a Personal
• Call features (for example, Privacy, Conference)
• Local features (for example, Application menu,
Buttons illuminate to indicate status:
including the BLF speed-dial feature)
Address Book button)
Headset, Settings)
Green, steady—Active call or two-way
intercom call
Green, flashing—Held call
Amber, steady—Privacy in use, one-way
intercom call, DND, logged into Hunt
Group, headset or other local feature
enabled
Amber, flashing—Incoming call or
reverting call
Red, steady—Remote line in use (shared
line, BLF status, or active Mobile Connect
call)
Red, flashing—Remote call on hold
An Overview of Your Phone
For more information,
see...
• Understanding
Phone Screen
Features, page 21
• Basic Call
Handling, page 25
• Speed Dialing,
page 41
• Using a Shared
Line, page 44
• Using BLF to
Determine a Line
State, page 46
• Placing or
Receiving Intercom
Calls, page 39
• Using Hold and
Resume, page 30
Line keys are numbered 24-1 in descending order,
alternating from left to right.
24
23
22
21
4
3
2
1
182285
Cisco Unified IP Phone 7931G for Cisco Unified Communications Manager 6.0 17
Page 18
For more information,
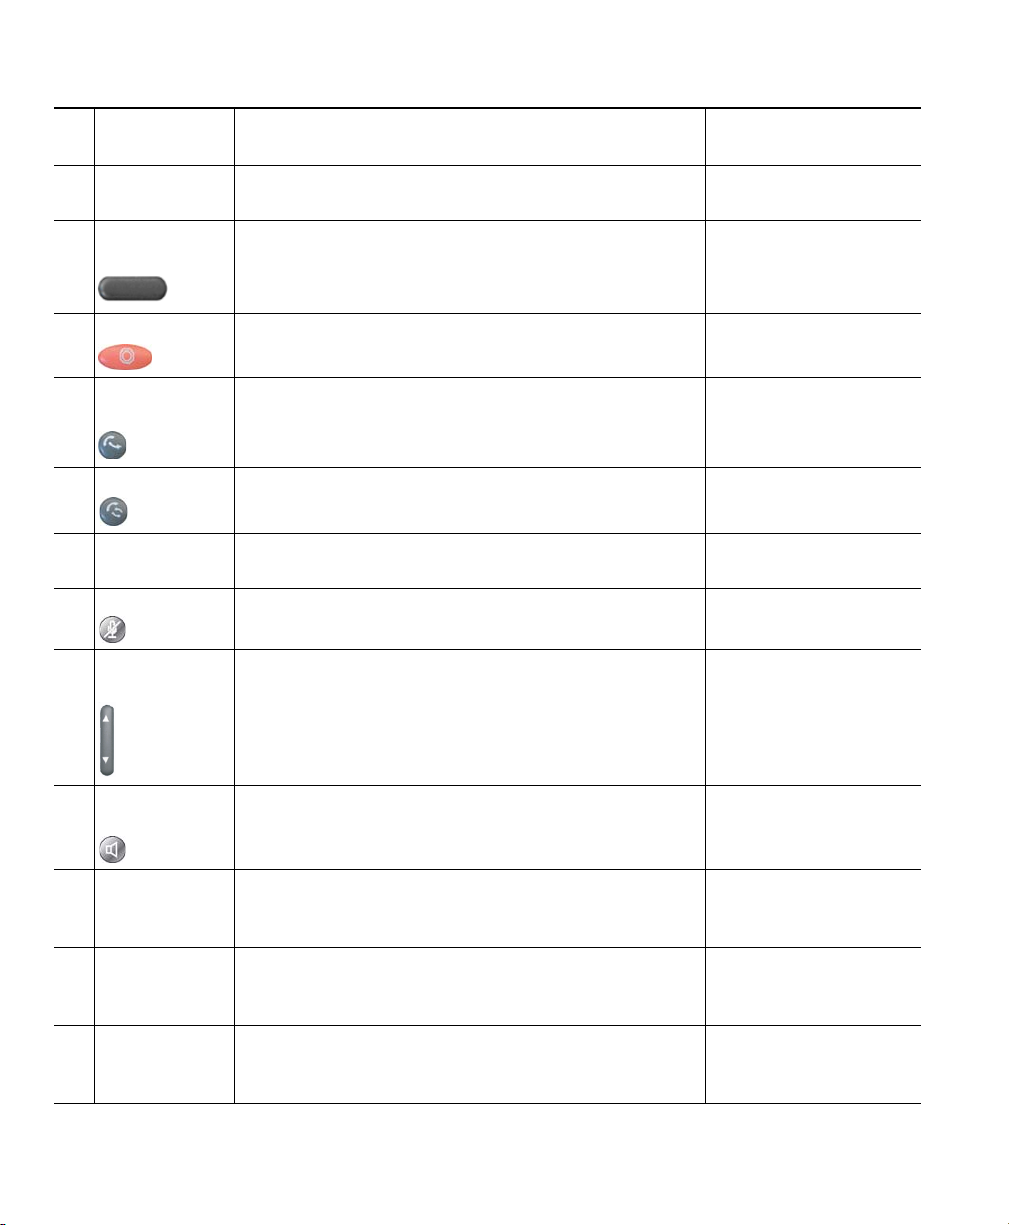
Item Description
Paper label Allows you to identify each button with line or feature
2
information.
Softkey
3
buttons
Hold button Places calls on hold. Using Hold and
4
Each activates a softkey option (displayed on your
phone screen).
see...
Understanding Line
and Call Icons, page 20
Understanding Phone
Screen Features,
page 21
Resume, page 30
Transfer
5
button
Redial button Connects to the last dialed number. Placing a Call—Basic
6
Keypad Allows you to dial phone numbers, enter letters, and
7
Mute button Toggles the microphone on or off. When the
8
Volu m e
9
button
Speaker
10
button
Handset Functions like a traditional handset. Using a Handset,
11
Handset
12
indicator light
Phone screen Displays information such as line/call status, phone
13
Connects a call to another number. Transferring Calls,
page 32
Options, page 25
Basic Call Handling,
choose menu items.
microphone is muted, the button is lit.
Controls the handset, headset, and speakerphone
volume (off-hook) and the ringer volume (on-hook).
Toggles the speakerphone on or off. When the
speakerphone is on, the button is lit.
Indicates an incoming call or new voice message.
Flashes for an incoming call and remains on when
there is a message waiting.
number, and soft key tabs.
page 25
Using Mute, page 31
Using a Handset,
Headset, and
Speakerphone, page 52
Using a Handset,
Headset, and
Speakerphone, page 52
Headset, and
Speakerphone, page 52
Accessing Voice
Messages, page 63
Understanding Phone
Screen Features,
page 21
18 OL-15791-01
Page 19
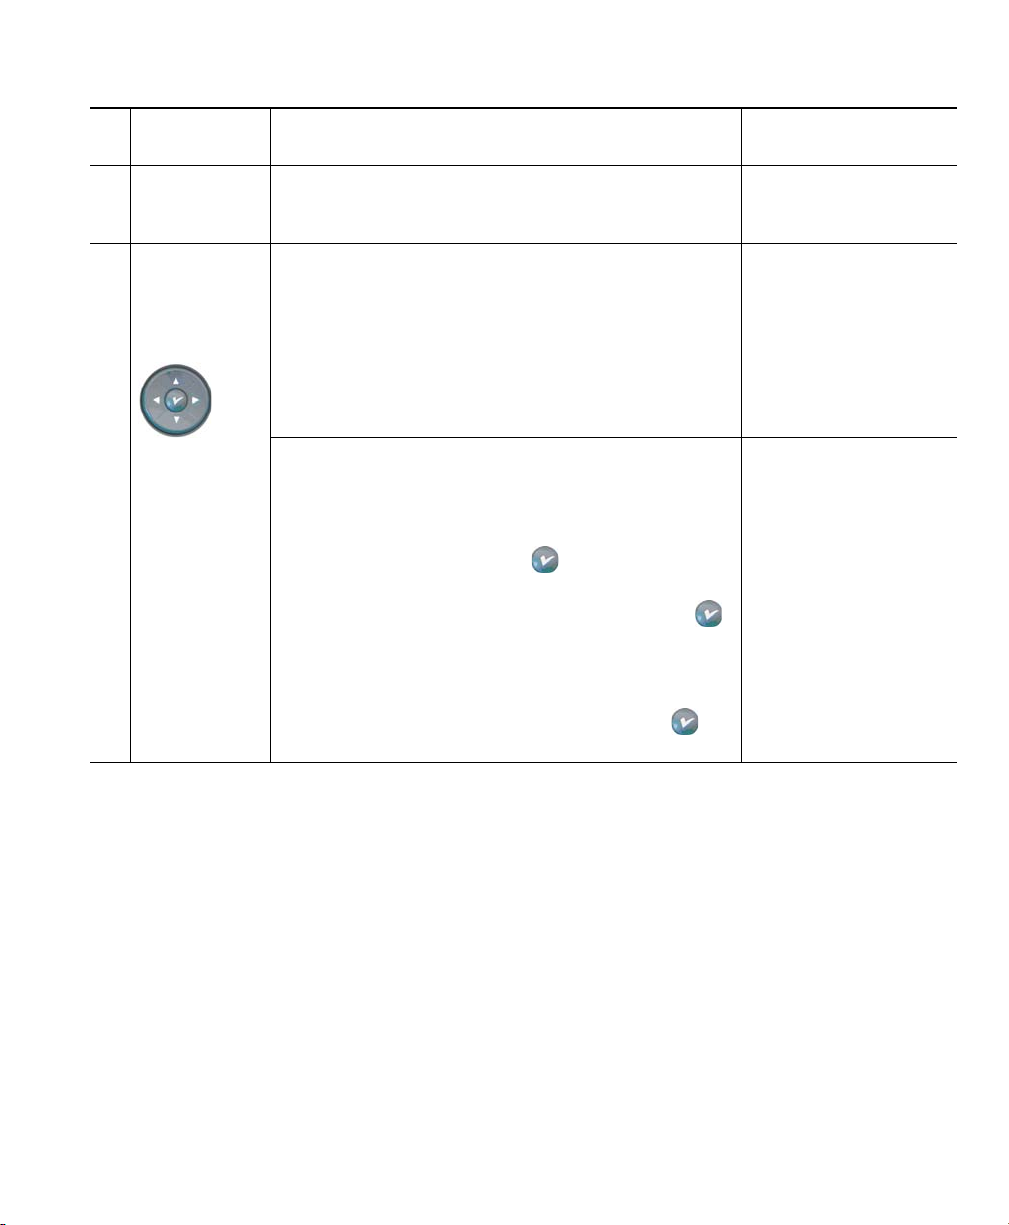
Item Description
Cisco Unified
14
IP Phone
model
4-way
15
navigation
pad and Select
button
(center)
Shows the Cisco Unified IP Phone model number.
Navigation button
• Scroll up and down to see menus and highlight
• Scroll left to open the Details view and see
• Scroll right to close the Details view
Select button—scroll to select a line using the
Navigation button, then:
• If the button is mapped to a directory number,
• If the button is mapped to a feature, press to
items
directory numbers and features assigned to each
line button (when on call screen)
and:
–
The line is idle, press to initiate a new
call.
–
There is an on-hold call on the line, press
to resume the call.
–
There is an active call on the line, the Select
button has no effect.
access the feature.
An Overview of Your Phone
For more information,
see...
Understanding Phone
Screen Features,
page 21
Understanding Phone
Screen Features,
page 21
Understanding Lines and Calls
To avoid confusion about lines and calls, refer to these descriptions:
• Lines—There are 24 programmable buttons (see Understanding Buttons and Hardware, page 15).
Typically, your system administrator assigns some of these lines (up to 24) to be used as lines for
making and receiving calls. Each corresponds to a directory number or intercom number that
others can use to call you.
Some of your lines might share the same directory number, and others might have unique directory
numbers. To see your phone lines, use the Navigation button to scroll through the list of
programmable button display (see
Buttons configured as lines display their assigned directory number and associated button number.
For example, if you have directory number “3105” assigned to button 1, the line appears as
3105:01 on the phone screen. Each line also has an associated icon to help you identify its purpose
Understanding Line and Call Icons, page 20).
(see
Cisco Unified IP Phone 7931G for Cisco Unified Communications Manager 6.0 19
Understanding Phone Screen Features, page 21).
Page 20
• Calls—Each line can support a single call. If multiple lines share a directory number, each line can
still support one call each.
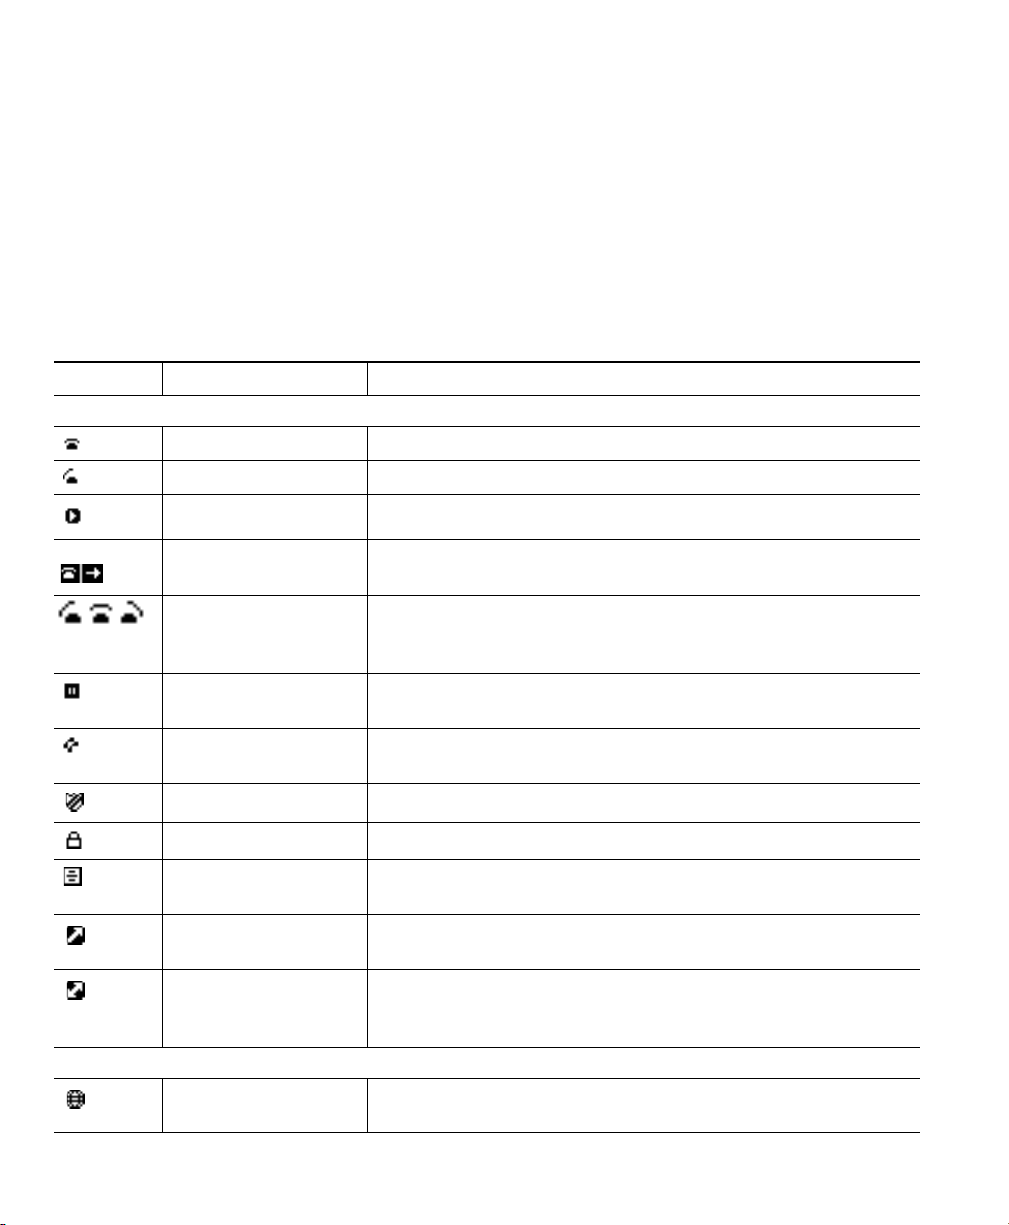
Understanding Line and Call Icons
Your phone displays icons to help you determine the line and call state and feature accessibility on
each line.
Icon Line or call state Description
Call State
On-hook line No call activity on this line.
Off-hook line You are dialing a number or an outgoing call is ringing.
Connected call You are connected to the other party.
Feature Access
Call Forwarding
enabled
Ringing call A call is ringing on one of your lines, or a BLF- monitored line
Call on hold You have put the call on hold. See Using Hold and Resume,
Remote-in-use Another phone that shares your line has a connected call. See
Authenticated call See Making and Receiving Secure Calls, page 46.
Encrypted call See Making and Receiving Secure Calls, page 46.
Idle Intercom line The intercom line is not in use. See Placing or Receiving
One-way intercom The intercom line is sending or receiving one-way audio. See
Two-way intercom The recipient pressed the intercom line to activate two-way
Application menu The Application menu is assigned to this line key. See Accessing
Call forwarding is enabled on this line.
is ringing (BLF Pickup). See
State, page 46.
page 30.
Using a Shared Line, page 44.
Intercom Calls, page 39.
Placing or Receiving Intercom Calls, page 39.
audio with the caller. See Placing or Receiving Intercom Calls,
page 39.
the Application Menu, page 23.
Using BLF to Determine a Line
20 OL-15791-01
Page 21
Icon Line or call state Description
Settings menu The Settings menu is assigned to this line key. See Changing
Phone Settings, page 55.
Directories menu The Directories menu is assigned to this line key. See Using Call
Logs and Directories, page 57.
Messages menu The Messages menu is assigned to this line key. See Accessing
Voice Messages, page 63.
Services menu The Services menu is assigned to this line key. See Setting Up
Phone Services on the Web, page 69.
Headset button You can use this option to use a headset with your phone. See
Using a Handset, Headset, and Speakerphone, page 52.
Conference button Conference is assigned to this line key. See Making Conference
Calls, page 36.
Other Calling feature A call feature is assigned to this line key. Refer to the text
description next to this icon to verify the feature.
Mobility Mobility access is assigned to this line key. See Managing
Business Calls Using a Single Phone Number, page 50.
Feature enabled A call feature assigned to this line key is enabled. Refer to the
text description next to this icon to verify the feature.
Speed dial or BLF
speed dial button
A speed dial button is assigned to this line key. See Speed
Dialing, page 41, Setting Up Phone Services on the Web,
page 69, and Using BLF to Determine a Line State, page 46.
An Overview of Your Phone
Tip
To help you remember the line key assignments, your system administrator might provide you with a
pre-printed paper label. If not, remove the blank one and make your own labels.
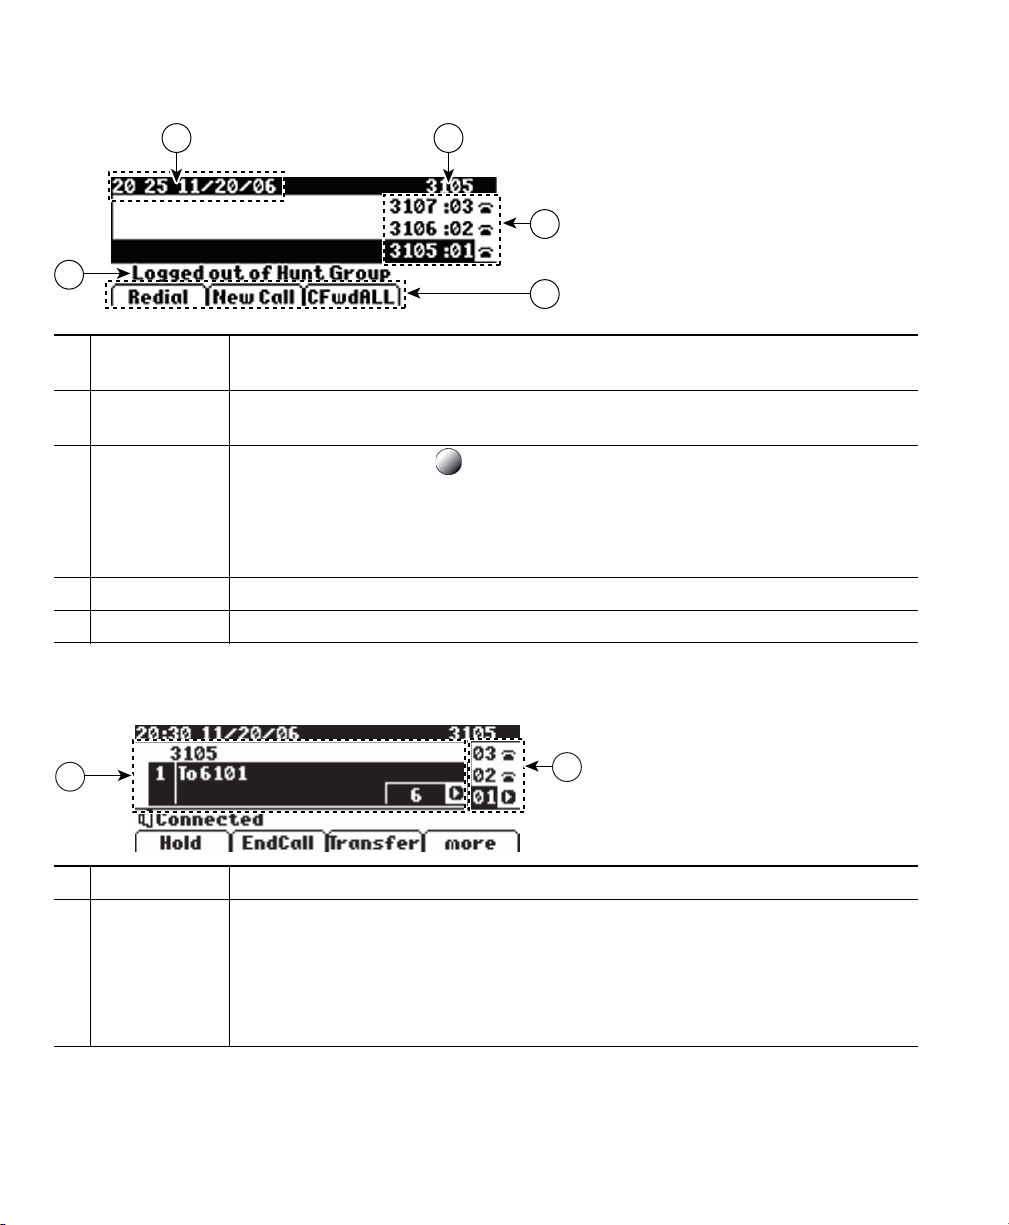
Understanding Phone Screen Features
This is what your phone screen might look like when idle. This view is called “Overview.”
Cisco Unified IP Phone 7931G for Cisco Unified Communications Manager 6.0 21
Page 22
1
2
3
5
4
182016
Date and time
1
display
Primary phone
2
line
Programmable
3
button
indicators
Softkey labels Each displays a softkey function.
4
Status line Displays audio mode icons, status information, and prompts.
5
This is what your phone screen might look like when connected to a call. This view is called “Details.”
Displays the current date and time.
Displays the phone number (directory number) for your primary phone line.
Programmable buttons can serve as phone line buttons, intercom line
buttons, speed-dial buttons, phone service buttons, call feature buttons, or local
feature buttons.
Icons and text descriptions indicate how these buttons are configured. For an
icon reference, see
Understanding Line and Call Icons, page 20.
2
Overview Displays line number and icon state for all lines.
1
Details View Displays details about the assigned call and local features for the selected line
2
key. In this example, information about the connected call displays, such as
directory number, time connected, and call status display. Use the Navigation
button to scroll and view details about other lines. Call and local features
display label names and icons in their Details view (see
Call Icons, page 20).
22 OL-15791-01
1
182032
Understanding Line and
Page 23

An Overview of Your Phone
Accessing the Application Menu
Use the Applications menu to access local phone features.
If you want to... Then...
Access the Application
menu
Scroll through a list or
menu
Select a menu item Use the Navigation button to scroll and highlight a menu item,
Go back one level in a menu Press Exit. (If you press Exit from the top-level of a menu, the
Close a menu (and return to
the Applications menu)
Exit the Applications menu Press or Exit.
Press > to display a list of Applications: Messages,
Directory, Settings, Services, and Help. (Typically, the
Application menu is assigned to
of the left column.)
Use the Navigation button.
then press
keypad that corresponds to the number for the menu item.
menu will close.)
Press Exit one or more times until the menu closes.
or Select. You can also press the number on the
button 24, located at the top
Tip
Some Application menu items (Settings, Directories, Services, Messages) can also be assigned to their
own button. Use the Navigation button to scroll through the Overview and refer to
Line and Call Icons, page 20 to identify these lines.
Understanding
Accessing the Help System on Your Phone
Your phone provides a comprehensive online help system. To view the phone help, press > >
Help. (Typically, the Application menu is assigned to button 24, located at the top of the left
column.)
Understanding Feature Availability
Depending on your phone system configuration, features included in this Phone Guide might not be
available to you or might work differently on your phone. Contact your support desk or system
administrator for information about feature operation or availability.
You can access features using softkeys or pressing a line key. You can configure some of these features,
but your system administrator controls most of them.
Cisco Unified IP Phone 7931G for Cisco Unified Communications Manager 6.0 23
Page 24
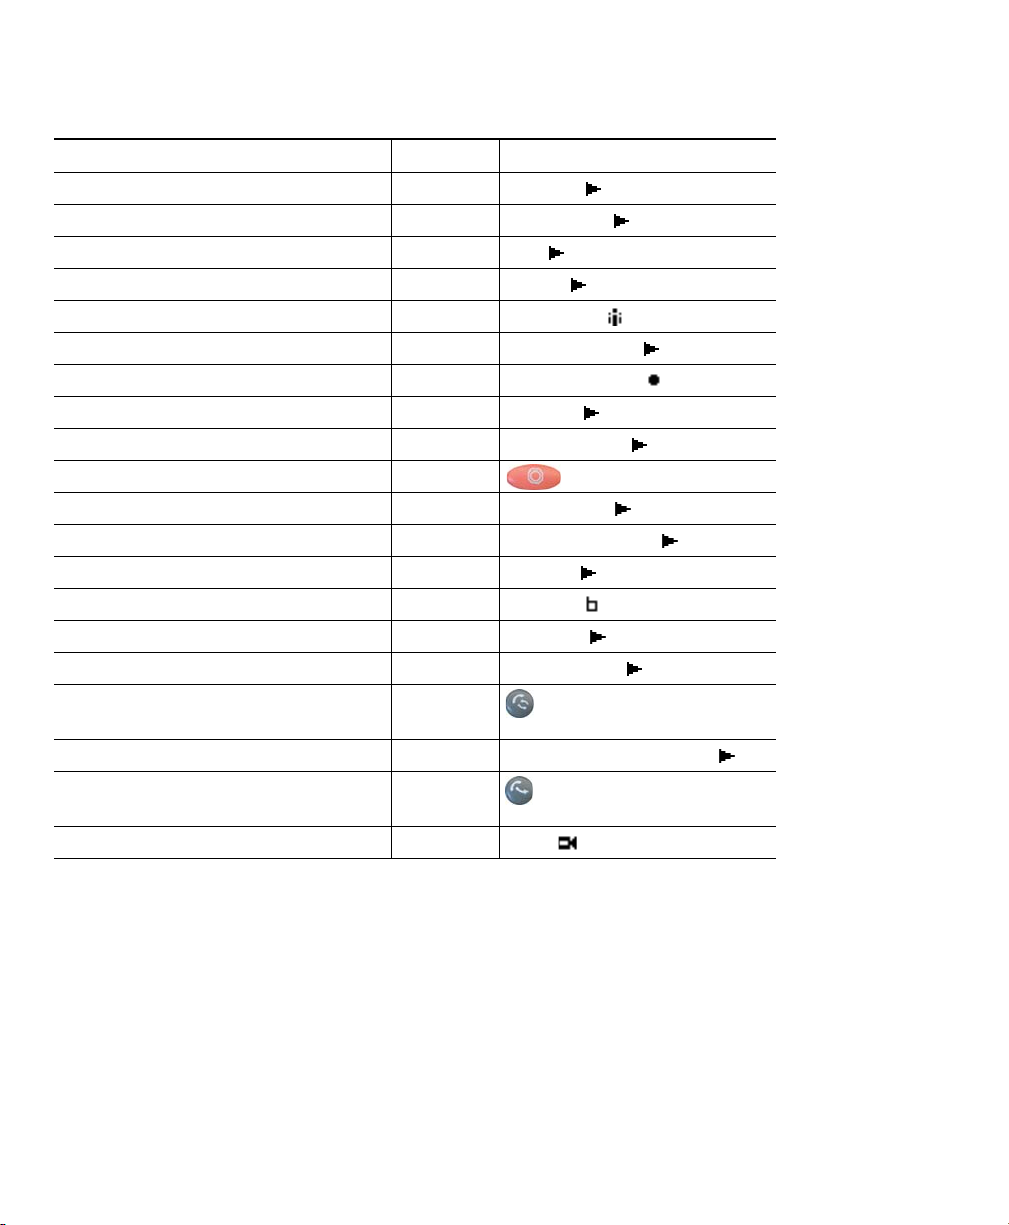
Here are some details about using softkeys and line buttons to access features:
Feature Softkey Line Button Label and Icon
CallBack CallBack CallBack
Call Forward CFwdALL Forward All
Call Park Park Park
Call PickUp PickUp PickUp
Conference Confrn Conference
Conference List ConfList Conference List
Do Not Disturb DND Do Not Disturb
End Call EndCall End Call
Group PickUp GPickUp Group PickUp
Hold Hold button
Hunt Group HLog Hunt Group
Malicious Call Identification MCID Malicious Call ID
Meet Me Conferencing MeetMe MeetMe
Mobility Mobility Mobility
New Call New Call New Call
Other PickUp OPickUp Other PickUp
Redial Redial button
Remove Last Conference Participant RmLstC Remove Last Participant
Tra n sfer Tra n sfer button
Video Mode VidMode Video
Understanding SIP vs. SCCP
Your phone can be configured to work with one of two signaling protocols: SIP (Session Initiation
Protocol) or SCCP (Skinny Call Control Protocol). Your system administrator determines this
configuration.
Phone features can vary depending on the protocol. This Phone Guide indicates which features are
protocol-specific. To learn which protocol your phone is using, you can ask your system administrator.
24 OL-15791-01
Page 25

Basic Call Handling
Basic Call Handling
You can perform basic call-handling tasks using a range of features and services. Feature availability
can vary; see your system administrator for more information.
Placing a Call—Basic Options
Here are some easy ways to place a call on your Cisco Unified IP Phone.
For more information,
If you want to... Then...
Place a call using the handset Pick up the handset and enter a number. Using a Handset,
Place a call using the
speakerphone
Place a call using a headset Press ( ) and enter a number.
Redial a number Press to dial the last number. Placing a Call—Basic
Dial from a call log 1. Press ( ) > Directories.
Press and enter a number. Using a Handset,
(Typically, button 23 is assigned to the
headset.)
2. Choose Missed Calls, Received
Calls, or Placed Calls.
3. Press Dial.
see...
Headset, and
Speakerphone, page 52
Headset, and
Speakerphone, page 52
Using a Handset,
Headset, and
Speakerphone, page 52
Options, page 25
Using Call Logs, page 57
Tips
• You can dial on-hook, without a dial tone (pre-dial). To pre-dial, enter a number, then go
off-hook by lifting the handset, pressing Dial, or pressing ( ) or .
• When you pre-dial, your phone tries to anticipate the number you are dialing by displaying
matching numbers (if available) from your Placed Calls log. This is called Auto Dial. To call a
number displayed with Auto Dial, scroll to it and go off-hook or press the Select button.
• If you make a mistake while dialing, press << to erase digits.
• If parties on a call hear a beep tone, the call might be monitored or recorded. Ask your system
administrator for more information.
Cisco Unified IP Phone 7931G for Cisco Unified Communications Manager 6.0 25
Page 26

• Your phone might be set up for international call logging, which is indicated by a “+” symbol on
the call logs, redial, or call directory entries. See your system administrator for more information.
Placing a Call—Additional Options
You can place calls using special features and services that might be available on your phone. See your
system administrator for more information about these additional options.
For more information,
If you want to... Then...
Place a call while another call
is active (using a different
line)
Speed dial a number Do one of the following:
Dial from a corporate
directory on your phone
Use Cisco CallBack to receive
notification when a busy or
ringing extension is available
See if a line associated with a
speed-dial is busy before
placing a call to that line
Make a priority (precedence)
call
Dial from a Personal Address
Book (PAB) entry
1. Press for a new line. The first call
is automatically placed on hold.
2. Enter a number.
• Press ( ).
• Use the Abbreviated Dial feature.
• Use the Fast Dial feature.
1. Press ( ) > Directories >
Corporate Directory (name can
vary).
2. Enter a name and press Search.
3. Highlight a listing and go off-hook.
1. Press CallBack while listening to the
busy tone or ring sound.
2. Hang up. Your phone alerts you
when the line is free.
3. Place the call again.
Look for Busy Line Feature indicators. Using BLF to Determine a
Enter the MLPP access number, then
enter a phone number.
1. Press ( ) > Directories >
Personal Directory to log in.
2. Choose Personal Address Book and
search for a listing.
see...
Using Hold and Resume,
page 30
Speed Dialing, page 41
Using Call Logs, page 57
Your system
administrator
Line State, page 46
Prioritizing Critical Calls,
page 48
Using Personal Directory
on Your Phone, page 60
26 OL-15791-01
Page 27

If you want to... Then...
Place a call using a billing or
tracking code
Place a call using your
Extension Mobility profile
Make a call from a mobile
phone using Mobile Voice
Access
1. Dial a number.
2. After the tone, enter a client matter
code (CMC) or a forced
authorization code (FAC).
Log in to the Extension Mobility service
on a phone.
1. Obtain your Mobile Voice Access
number and End user PIN from your
system administrator.
2. Dial your assigned Mobile Voice
access number.
3. Enter your mobile phone number (if
requested) and PIN.
4. Press 1 to make a call to an
enterprise IP phone.
5. Dial a desktop phone number other
than your desktop phone number.
Basic Call Handling
For more information,
see...
Your system
administrator
Using Cisco Extension
Mobility, page 49
Managing Business Calls
Using a Single Phone
Number, page 50
Cisco Unified IP Phone 7931G for Cisco Unified Communications Manager 6.0 27
Page 28
If you want to... Then...
Place a call using Fast Dial
Place a call using your PAB
Note Before using this option, your
1. Press the Fast Dial line button.
2. Scroll to or press the index number
to find the entry.
3. Press Dial.
Note Before using this option, your
1. Press the PAB line button.
2. Access the contact and select the
number.
3. Press Dial.
system administrator must
configure this feature and assign a
service URL to the line button.
Contact your system administrator
for more information.
system administrator must
configure this feature and assign a
service URL to the line button.
Contact your system administrator
for more information.
For more information,
see...
Configuring Fast Dials on
the Web, page 66
Using Your Personal
Address Book on the
Web, page 65
Configuring Fast Dials on
the Web, page 66
Using Your Personal
Address Book on the
Web, page 65
Answering a Call
You can answer a call by lifting the handset, or you can use other options if they are available on your
phone.
If you want to... Then... For more information, see...
Answer with a headset Press ( ), if unlit. Or, if ( )
is lit, press Answer or (flashing).
Answer with the
speakerphone
Switch from a connected
call to answer a new call
Answer using call waiting Press Answer. Using Hold and Resume,
28 OL-15791-01
Press , Answer, or (flashing). Using a Handset, Headset,
Press Answer or, if the call is ringing on
a different line, press (flashing).
Using a Handset, Headset,
and Speakerphone, page 52
and Speakerphone, page 52
Using Hold and Resume,
page 30
page 30
Page 29

Basic Call Handling
If you want to... Then... For more information, see...
Send a call to a voice
message system
Auto-connect calls Use AutoAnswer. Using AutoAnswer with a
Retrieve a parked call on
another phone
Use your phone to answer
a call ringing elsewhere
Answer a priority call Hang up the current call and press
Answer a call on your
mobile phone or other
remote destination
Press iDivert. Sending a Call to a Voice
Message System, page 33
Headset or Speakerphone,
page 54
Use Call Park or Directed Call Park. Storing and Retrieving Parked
Calls, page 43
Use Call Pickup. Picking Up a Redirected Call
on Your Phone, page 42
Prioritizing Critical Calls,
Answer.
Set up Mobile Connect and answer your
phone.
When you enable Mobile Connect:
• Your desktop and remote
destinations receive calls
simultaneously.
• When you answer the call on your
desktop phone, the remote
destinations stop ringing, are
disconnected, and display a missed
call message.
• When you answer the call on one
remote destination, the other remote
destinations stop ringing, are
disconnected, and a missed call
message is shown on the other
remote destinations.
page 48
Managing Business Calls
Using a Single Phone Number,
page 50
Tip
If parties on a call hear a beep tone, the call might be monitored or recorded. Ask your system
administrator for more information.
Cisco Unified IP Phone 7931G for Cisco Unified Communications Manager 6.0 29
Page 30

Ending a Call
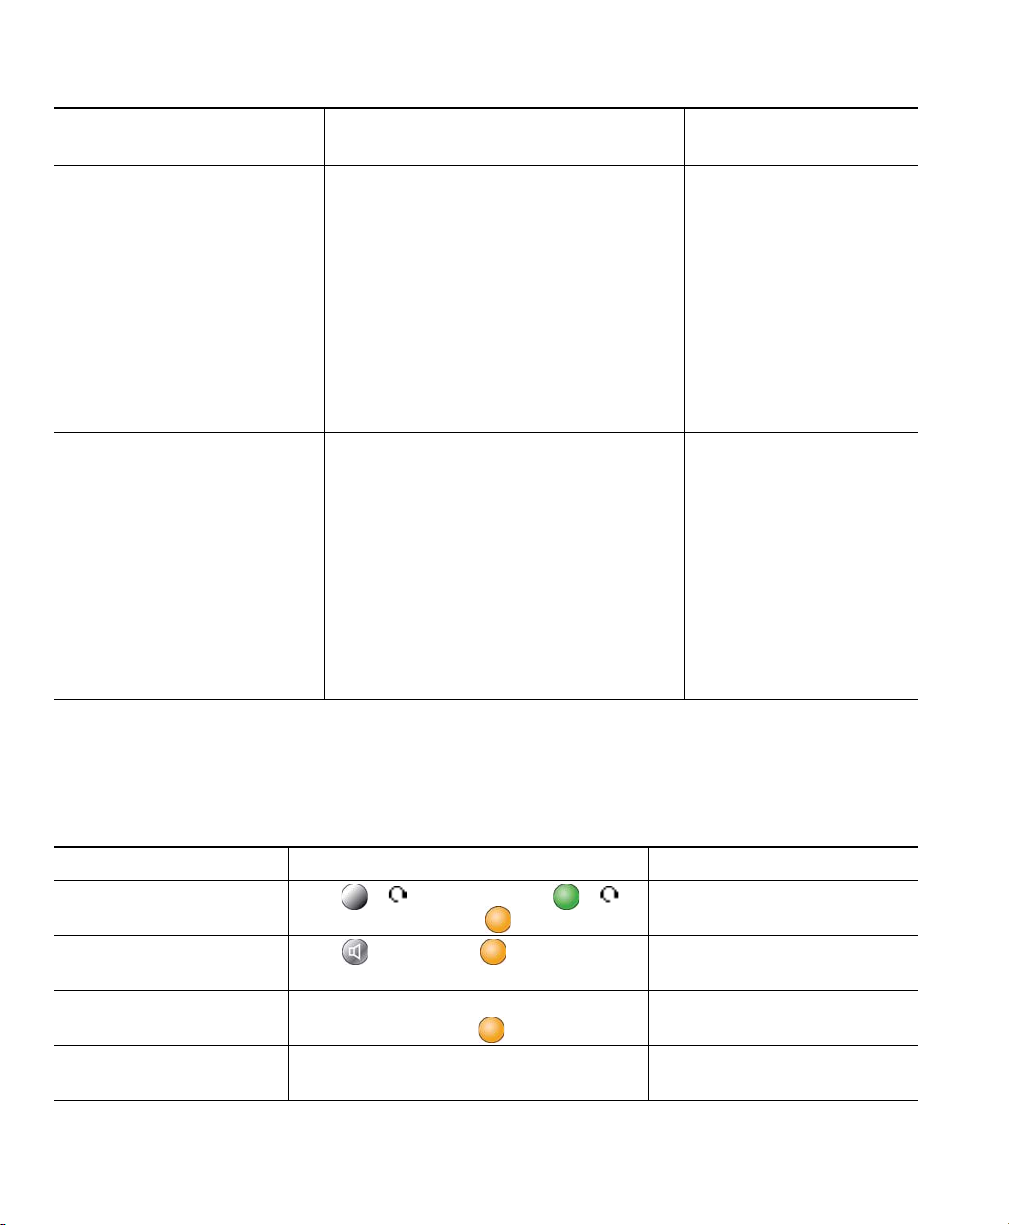
To end a call, simply hang up. Here are some more details.
If you want to... Then...
Hang up while using the handset Return the handset to its cradle. Or press EndCall.
Hang up while using a headset Press ( ). Or, to keep headset mode active, press
EndCall.
Hang up while using the speakerphone Press or EndCall.
Using Hold and Resume
You can hold and resume calls. When you put a call on hold, the Hold icon appears next to the
line display on the phone screen, and the corresponding line button flashes green .
If another user put a shared line on hold, its associated line button displays (flashing). You (and
anyone else sharing that line) can resume the call.
If the Hold Reversion feature is enabled for your phone, a call that you put on hold reverts back to
ringing after a certain period of time. The “reverting” call remains on hold until you resume it or until
Hold Reversion times out.
Your phone indicates the presence of a reverting call by:
• Alerting you at intervals with a single ring (or flash or beep, depending on your phone line setting).
• Briefly displaying a “Hold Reversion” message in the status bar at the bottom of the phone screen.
• Displaying the animated Hold Reversion icon next to the caller ID for the held call.
• Displaying a line button (flashing, depending on the line state).
If you want to... Then...
Put a call on hold 1. Make sure the appropriate call is highlighted.
2. Press .
Remove a call from
hold on the current line
Tips
• Engaging the Hold feature typically generates music or a beeping tone.
30 OL-15791-01
• Press (flashing), (flashing), or (flashing) for the held call, or
• Make sure the appropriate call is highlighted and do one of the
following:
–
Press Resume.
–
Press .
Page 31

• If you receive an alert for an incoming call and a reverting call at the same time, by default your
phone will shift the focus of the phone screen to display the incoming call. Your system
administrator can change this focus priority setting.
• If you use a shared line, Hold Reversion rings only on the phone that put the call on hold, not on
the other phones that share the line.
• Your system administrator determines the duration between Hold Reversion alerts.
Basic Call Handling
Using Mute
With Mute enabled, you can hear other parties on a call but they cannot hear you. You can use Mute
with the handset, speakerphone, or a headset.
If you want to... Then...
Toggle microphone on Press .
Toggle microphone off Press .
Switching Between Multiple Calls
You can switch between multiple calls on multiple lines.
If you want to... Then...
Switch to a held call on
another line
Switch from a
connected call to
answer a ringing call
Cisco Unified IP Phone 7931G for Cisco Unified Communications Manager 6.0 31
Press (flashing) for the line that you are switching to.
Press (flashing). Any active call is placed on hold and the selected call
is resumed.
Page 32

Switching an In-Progress Call to Another Phone
You can switch in-progress calls between the desktop phone and your mobile phone or other remote
destination.
If you want to... Then...
Switch an in-progress
call on your desktop
phone to a mobile
phone
Switch an in-progress
call from a mobile
phone to your desktop
phone
1. Press the Mobility softkey and select Send call to mobile.
2. Answer the in-progress call on your mobile phone.
The desktop phone line button turns red and handset icons and
the calling party number appear on the phone display. You cannot use
same phone line for any other calls, but if your desk phone supports
multiple lines, you can use another line to make or receive calls.
1. Hang up the call on your mobile phone to disconnect the mobile
phone, but not the call.
2. Press Resume on your desk phone within 4 seconds and start talking
on the desk phone.
Transferring Calls
Transfer redirects a connected call. The target is the number to which you want to transfer the call
When you transfer a call, your phone uses a new line to initiate the transfer.
If you want to... Then...
Transfer a call without
talking to the transfer
recipient
Talk to the transfer
recipient before transferring
a call (consult transfer)
Redirect a call to a voice
message system
32 OL-15791-01
1. From an active call, press .
2. Enter the target number.
3. Press again to complete the transfer or EndCall to cancel.
Note If your phone has on-hook transfer enabled, complete the transfer
by hanging up.
1. From an active call, press .
2. Enter the target number.
3. Wait for the transfer recipient to answer.
4. Press again to complete the transfer or EndCall to cancel.
Note If your phone has on-hook transfer enabled, complete the transfer
by hanging up.
Press iDivert. For more information, see Sending a Call to a Voice
Message System, page 33.
Page 33

Basic Call Handling
Tips
• If on-hook transfer is enabled on your phone, you can either hang up to complete the call, or press
and then hang up.
• If on-hook transfer is not enabled on your phone, hanging up without pressing again places
the call on hold.
• You cannot use to redirect a call on hold. Press Resume to remove the call from hold before
transferring it.
Sending a Call to a Voice Message System
You can use iDivert to send an active, ringing, or on-hold call to your voice message system.
Depending on the type of call and your phone configuration, you can also use iDivert to send the call
to another party's voice message system.
• If the call was originally sent to someone else's phone, iDivert allows you to redirect the call either
to your own voice message system or to the original called party’s voice message system. Your
system administrator must make this option available to you.
• If the call was sent to you directly (not transferred or forwarded to you), or if your phone does
not support the option described above, using iDivert redirects the call to your voice message
system.
If you want to... Then...
Send an active, ringing, or on-hold call
to a voice message system
Press iDivert. One of two things occurs:
• The call is transferred to your voice message system.
• Your phone screen displays a menu that allows you to
choose between your voice message system or the voice
message system of the original called party. Choose an
option to redirect the call.
Tip
If your phone displays a menu that disappears before you make your selection, you can press iDivert
again to re-display the menu. You can also ask your system administrator to configure a longer time-out
value.
Forwarding Calls to Another Number
You can use the call forwarding features to redirect incoming calls from your phone to another
number.
Your system administrator might allow you to choose from two types of call forwarding features:
• Unconditional call forwarding (Call Forward All)—Applies to all calls that you receive.
Cisco Unified IP Phone 7931G for Cisco Unified Communications Manager 6.0 33
Page 34

• Conditional call forwarding (Call Forward No Answer, Call Forward Busy, Call Forward No
Coverage)—Applies to certain calls that you receive, according to conditions.
You can access Call Forward All on your phone or from your Cisco Unified CM User Options web
pages; conditional call forwarding features are accessible only from your User Options web pages.
Your system administrator determines which call forwarding features are available to you.
If you want to... Then...
Set up Call Forward All on
your primary line
Cancel Call Forward All on
Press CFwdALL and enter a target phone number.
Note Your phone might have additional line keys assigned to the same
directory number as your primary line. If so (and you want all
calls to that directory number forwarded) you need to set call
forwarding for each of these lines.
Press CFwdALL.
your primary line
Verify that Call Forward All is
enabled on your primary line
Look for:
• The call forward icon next to the primary phone number: ,
which is always on line key 1.
• The call forward target number in the status line.
Set up or cancel call
forwarding remotely, or for a
non-primary line
1. Log in to your User Options web pages. (See Accessing Your
User Options Web Pages, page 64.)
2. Access your call forwarding settings. (See Controlling Line
Settings on the Web, page 71.)
Note When call forwarding is enabled for any line other than the
primary line, your phone does not provide you with
confirmation that calls are being forwarded. Instead, you must
confirm your settings in the User Options web pages.
Tips
• Enter the call forward target number exactly as you would dial it from your phone. For example,
enter an access code or the area code, if necessary.
• You can forward your calls to a traditional analog phone or to another IP phone, although your
system administrator might restrict the call forwarding feature to numbers within your company.
• Call forwarding is phone line specific. If a call reaches you on a line where call forwarding is not
enabled, the call will ring as usual.
• Your system administrator can enable a call forward override feature that allows the person
receiving your forwarded calls to reach you. With override enabled, a call placed from the target
phone to your phone is not forwarded, but rings through.
34 OL-15791-01
Page 35

Basic Call Handling
• Your phone may reject your attempt to set up Call Forward All directly on the phone if the target
number that you enter would create a call forwarding loop or would exceed the maximum number
of links permitted in a call forwarding chain.
Using Do Not Disturb
You can use the Do Not Disturb (DND) feature to turn off only the ringer on your phone or to turn
off all audible and visual notifications of incoming calls. Your system administrator enables DND for
your phone.
When DND and Call Forward are both enabled on your phone, calls are forwarded and the caller does
not hear a busy tone.
DND interaction with other types of calls includes:
• DND does not affect intercom calls or non-intercom priority calls.
• If both DND and auto-answer are enabled, only intercom calls will be auto-answered.
If you want to... Then...
Turn on DND Press DND.
“Do Not Disturb” displays on the phone, the DND lights
(solid), and the ring tone is turned off.
Turn off DND Press DND.
Customize DND settings 1. Log in to your User Options web pages. See Accessing Your
User Options Web Pages, page 64.
2. Choose User Options > Device.
3. Set the following options:
• Do Not Disturb—Set to enable/disable DND.
• DND Option—Choose either Call Reject (to turn
off all audible and visual notifications) or Ringer
Off (to turn off only the ringer).
• DND Incoming Call Alert (applies to either DND
option set)—Set the alert to beep only, flash only,
disable the alert, or choose “None” (to use the
“Alert” setting configured by your system
administrator).
Cisco Unified IP Phone 7931G for Cisco Unified Communications Manager 6.0 35
Page 36

Making Conference Calls
Your Cisco Unified IP Phone allows you to join three or more people into one telephone conversation,
creating a conference call.
Using Conference Features
You can create a conference in various ways, depending on your needs and the features that are
available on your phone.
• Conference—Allows you to create a standard (ad hoc) conference by calling each participant. Use
the Confrn softkey or the Conference button. Conference is available on most phones.
• Join—Allows you to create a standard (ad hoc) conference by combining existing calls. Use the
Join softkey.
• Meet-Me—Allows you to create or join a conference by calling a conference number. Use the
MeetMe softkey or button.
Using Conference
Conference allows you to call each participant. Conference is available on most phones.
If you want to... Then...
Create a conference by calling
participants
Add new participants to an
existing conference
See a list of participants or
remove participants
1. From a connected call, press Confrn or Conference. (You may
need to press the more softkey to see Confrn.)
2. Enter the participant’s phone number.
3. Wait for the call to connect.
4. Press Confrn or Conference again to add the participant to your
call.
5. Repeat to add additional participants.
Repeat the steps listed above.
Your system administrator determines whether non-initiators of a
conference can add or remove participants.
Press ConfList or Conference List. (You may need to press the more
softkey first.) See
page 38.
Viewing or Removing Conference Participants,
Tips
• If you frequently join more than two parties into a single conference, you might find it useful to
first select the calls that you want to join, then press Join to complete the action.
• When Join completes, caller ID changes to “Conference.”
36 OL-15791-01
Page 37

Basic Call Handling
Using Join
Join allows you to combine two or more existing calls to create a conference in which you are a
participant.
If you want to... Then...
Create a conference by joining
together existing calls
Create a conference by joining
together existing calls that are
on multiple phone lines
See a list of participants or
remove participants
1. From an active call, press Join. (You may need to press the more
softkey to see Join.)
2. Press the green flashing line button for the call(s) that you
want to include in the conference.
One of the following occurs:
• The calls are joined.
• A window opens on your phone screen prompting you to select
the call(s) that you want to join. Highlight the call(s) and press
Select, then press Join to complete the action.
Note If your phone does not support Join for calls on multiple lines,
transfer the calls to a single line before using Join.
Press ConfList or Conference List. (You may need to press the more
softkey first.) See
page 38.
Viewing or Removing Conference Participants,
Tips
• If you frequently join more than two parties into a single conference, you might find it useful to
first select the calls that you want to join, then press Join to complete the action.
• When Join completes, caller ID changes to “Conference.”
Cisco Unified IP Phone 7931G for Cisco Unified Communications Manager 6.0 37
Page 38

Using Meet-Me
Meet-Me conferencing allows you to start or join a conference by calling the conference number.
If you want to... Then...
Start a Meet-Me conference 1. Obtain a Meet-Me phone number from your system administrator.
2. Distribute the number to participants.
3. When you are ready to start the meeting, go off-hook to get a dial
tone, then press MeetMe.
4. Dial the Meet-Me conference number.
Participants can now join the conference by dialing in.
Note Participants hear a busy tone if they call the conference before the
initiator has joined. In this case, participants must call back.
Join a Meet-Me conference Dial the Meet-Me conference number (provided by the conference
initiator).
Note You will hear a busy tone if you call the conference before the
initiator has joined. In this case, try your call again.
End a Meet-Me conference All participants must hang up.
The conference does not automatically end when the conference
initiator disconnects.
Tip
If you call a secure Meet-Me conference number from a non-secure phone, your phone displays the
message, “Device Not Authorized.” For more information, see
page 46.
Making and Receiving Secure Calls,
Viewing or Removing Conference Participants
During a standard (ad hoc) conference, you can view a list of participants and remove participants.
View a list of conference
participants
Get an updated list of
conference participants
See who initiated the
conference
Remove any conference
participant
38 OL-15791-01
Press ConfList or Conference List.
Participants are listed in the order in which they join the conference
with the most recent additions at the top.
While viewing the conference list, press Update.
While viewing the conference list, locate the participant listed at the
bottom of the list with an asterisk (*) next to the name.
While viewing the conference list, highlight the participant’s name
and press Remove.
Page 39

Basic Call Handling
Drop the last participant
added to the conference
Verify that a conference call is
secure
Verify that a participant is
calling from a secure phone
Add more participants See Using Conference, page 36.
While viewing the conference list, press RMLstC or Remove Last
Participant.
Look for the or icon after “Conference” on the phone
screen.
Look for the or icon beside the participant’s name on the
phone screen.
Placing or Receiving Intercom Calls
You can make an intercom call to a target phone that auto-answers the call in speakerphone mode
with mute activated. The one-way intercom call allows you to deliver a short message to the recipient.
If the recipient’s handset or headset is in use, the audio is sent to the device in use. Any current call
activity that your recipient is engaged in continues simultaneously.
The target destination receives an intercom-alert tone and can then choose to:
• Listen to the caller with your microphone muted (you can hear the caller, but the caller cannot
hear you).
• End the intercom call by pressing the EndCall softkey with the intercom call in focus. Do this if
you do not want to hear the message.
• Talk to the caller by pressing the active intercom button and using either the handset, headset or
speaker. The intercom call becomes a two-way connection so that you can converse with the caller.
When using the intercom feature, be aware of the following:
• From an intercom line, you can only dial other intercom lines.
• You can use only one intercom line at a time.
• When your active call is being monitored or recorded, you cannot receive or place intercom calls.
• You cannot place an intercom call on hold.
Note If you log into your desk phone every day using your Extension Mobility profile, make sure
that your system administrator configures your Extension Mobility profile to include the
intercom feature.
Cisco Unified IP Phone 7931G for Cisco Unified Communications Manager 6.0 39
Page 40

If you want to... Then...
Place an intercom call to a
preconfigured target intercom
number
Place an intercom call to a
non-preconfigured target
intercom number
Receive an intercom call When you hear the intercom-alert tone, handle the call in one of
Press (intercom target line) and, after you hear the
intercom-alert tone, begin speaking.
Press ( . Enter the intercom target number or press a
speed-dial number for your target. After you hear the
intercom-alert tone, begin speaking.
these ways:
• Listen to the message in one-way audio.
• Speak to the caller by pressing (active intercom line).
• Press EndCall with the intercom call in focus.
40 OL-15791-01
Page 41

Advanced Call Handling
Advanced Call Handling
Advanced call-handling tasks involve special features that your system administrator might configure
for your phone depending on your call-handling needs and work environment.
Speed Dialing
Speed dialing allows you to enter an index number, press a button, or select a phone screen item to
place a call. Depending on configuration, your phone can support several speed-dial features:
• Speed-dial buttons
• Abbreviated Dialing
• Fast Dials
Note • To set up speed-dial buttons and Abbreviated Dial, you must access your User Options
web pages. See
• To set up Fast Dials, you must access the Personal Directory feature. See Using Personal
Directory on Your Phone, page 60.
• Alternately, your system administrator can configure speed-dial features for you.
Accessing Your User Options Web Pages, page 64.
If you want to... Then...
Use speed-dial
buttons
Use Abbreviated
Dial
Use Fast Dial 1. Create a Personal Address Book entry and assign a Fast Dials code. See Using
Cisco Unified IP Phone 7931G for Cisco Unified Communications Manager 6.0 41
1. Set up speed-dial buttons. See Setting Up Speed Dials on the Web, page 68.
2. To place a call, press ( ).
Note If your phone supports the Busy Lamp Field (BLF) speed-dial feature, you can
see if the speed-dial number is busy before dialing. See
Determine a Line State, page 46.
1. Set up Abbreviated Dialing codes. See Setting Up Speed Dials on the Web,
page 68.
2. To place a call, enter the Abbreviated Dialing code and press AbbrDial.
Personal Directory on the Web, page 65.
2. To place a call, access the Fast Dial service on your phone. See Using Personal
Directory on the Web, page 65.
Using BLF to
Page 42

Picking Up a Redirected Call on Your Phone
Call PickUp allows you to answer a call that is ringing on a coworker’s phone by redirecting the call
to your phone. You might use Call PickUp if you share call-handling tasks with coworkers.
If you want to... Then...
Answer a call that is ringing on
another extension within your call
pickup group
Answer a call that is ringing on
another extension outside of your
call pickup group
Answer a call that is ringing on
another extension in your group or
in an associated group
Answer a call that is ringing on a
particular extension (line number)
1. Press the PickUp softkey or button. (You might have to go
off-hook to display the softkey.)
If your phone supports auto-pickup, you are now
connected to the call.
2. If the call rings, press Answer to connect to the call.
1. Press the GPickUp softkey or the Group PickUp button.
(You might have to go off-hook to display the softkey.)
2. Enter the group pickup number.
If your phone supports auto-pickup, you are now
connected to the call.
3. If the call rings, press Answer to connect to the call.
1. Press the OPickUp softkey or the Other PickUp button.
(You might have to go off-hook to display the softkey.)
If your phone supports auto-pickup, you are now
connected to the call.
2. If the call rings, press Answer to connect to the call.
1. Press the GPickUp softkey or the Group PickUp button.
(You might have to go off-hook to display the softkey.)
2. Enter the line number with the call that you want to pick
up. For example, if the call that you want to pick up is
ringing on line 12345, enter 12345.
3. If your phone supports auto-pickup, you are now
connected to the call.
4. If the call rings, press Answer to connect to the call.
Tips
• If multiple calls are available for pick up, your phone picks up the oldest call first (the call that
has been ringing for the longest time).
• If you press GPickUp or Group PickUp and enter a line number, your phone picks up the ringing
call on that particular line (if available).
• If you have multiple lines and want to pick up the call on a non-primary line, first press for
the desired line, then press a Call PickUp softkey or button.
42 OL-15791-01
Page 43

Advanced Call Handling
• Depending on how your phone is configured, you might receive an audio and/or visual alert about
a call to your pickup group.
• If you use the BLF Pickup feature on your phone, see Using BLF to Determine a Line State,
page 46.
Storing and Retrieving Parked Calls
You can park a call when you want to store the call so that you or someone else can retrieve it from
another phone in the Cisco Unified Communications Manager system (for example, a phone at a
co-worker’s desk or in a conference room). You can park a call by using these methods:
• Call Park—Use the Park softkey to store the call. Your phone displays the call park number where
the system stored your call. You must record this number and then use the same number to retrieve
the call.
• Directed Call Park—Use the button to direct the call to an available directed call park number
that you dial or speed dial. To retrieve the call from a directed call park number, dial the park
retrieval prefix, then dial or speed dial the same directed call park number.
You can use a Directed Call Park button to speed-dial the directed call park number and to
monitor whether a directed call park number is occupied or available.
If you want to... Then...
Store an active call
using Call Park
Retrieve a parked call Enter the call park number from any Cisco Unified IP Phone in your
Direct and store an
active call at a directed
call park number
Retrieve a parked call
from a directed call
park number
1. During a call, press Park. (You may need to press the more softkey to
see Park.)
2. Note the call park number displayed on your phone screen.
3. Hang up.
network to connect to the call.
1. During a call, press .
2. Press Directed Call Park ( ) to speed dial the directed call park
number.
A Directed Call Park (flashing) ( ) indicates the directed call park
number is not available.
3. Press Tr a nsf e r again to finish storing the call.
From any Cisco Unified IP Phone in your network, enter the park retrieval
prefix and dial the directed call park number. Or after entering the park
retrieval prefix, press the
(flashing) ( ) to connect to the call.
Tips
• You have a limited time to retrieve a parked call before it reverts to ringing at the original number.
See your system administrator for details.
Cisco Unified IP Phone 7931G for Cisco Unified Communications Manager 6.0 43
Page 44

• Your system administrator can assign Directed Call Park buttons to available line buttons on your
phone.
• You can dial directed call park numbers if you do not have Directed Call Park buttons on your
phone. However, you will not be able to see the status of the directed call park number.
Logging Out of Hunt Groups
If your organization receives a large number of incoming calls, you might be a member of a hunt group.
A hunt group includes a series of directory numbers that share the incoming call load. When the first
directory number in the hunt group is busy, the system hunts for the next available directory number
in the group and directs the call to that phone.
When you are away from your phone, you can prevent hunt group calls from ringing your phone by
logging out of hunt groups.
If you want to... Then...
Log out of hunt groups to
temporarily block hunt group
calls
Log in to receive hunt group
calls
Press HLog. Your phone screen displays, “Logged out of Hunt
Group.”
Press HLog. When logged in, the Hunt Group button is lit.
Tip
Logging out of hunt groups does not prevent non-hunt group calls from ringing your phone.
Using a Shared Line
Your system administrator might ask you to use a shared line if you:
• Have multiple phones and want one phone number
• Share call-handling tasks with coworkers
• Handle calls on behalf of a manager
Understanding Shared Lines
Remote-in-Use Icon
The remote-in-use icon appears when another phone that shares your line has a connected call. You
can place and receive calls as usual on the shared line, even when the remote-in-use icon appears.
44 OL-15791-01
Page 45

Advanced Call Handling
Sharing Call Information and Barging
Phones that share a line each display information about calls that are placed and received on the shared
line. This information might include caller ID and call duration (See
If you are sharing a line with co-workers using a different model Cisco Unified IP Phone, they might
be able to add (or barge) themselves to your active call on the shared line. Your phone does not
typically support this feature. If you need it, contact your system administrator for assistance.
Otherwise, enable privacy to prevent co-workers from joining your calls.
Privacy, page 45 for exceptions).
Privacy
If you do not want coworkers who share your line to see information about your calls, enable the
Privacy feature. Doing so also prevents others who share the line from viewing or barging your calls.
Working with Shared Lines
You can view information about calls on your shared lines, retrieve a call on a shared line placed on
hold by a co-worker, and prevent others from barging calls.
If you want to... Then...
See if the shared line is in use Look for the remote-in-use icon next to a red line button
(steady).
View details about current calls on
the shared line
Retrieve a held call on a shared line Press the red line button (flashing) for the remote-in-use
Prevent others from viewing or
barging calls on a shared line
Allow others to view or barge calls
on a shared line
Press the red line button (steady) for the remote-in-use line.
All non-private calls appear in the call activity area of the phone
screen.
line.
1. Press Private ( ).
2. To verify that Privacy is on, look for the feature-enabled
icon
1. Press Private ( ).
2. To verify that Privacy is off, look for the feature-disabled
icon next to an unlit line button .
next to an amber line button .
Tips
• If the phone that shares your line has Privacy enabled, you can make and receive calls using the
shared line as usual.
• The Privacy feature applies to all shared lines on your phone. Consequently, if you have multiple
shared lines and Privacy is enabled, coworkers cannot view or barge calls on any of your shared
lines.
Cisco Unified IP Phone 7931G for Cisco Unified Communications Manager 6.0 45
Page 46

Using BLF to Determine a Line State
Busy Lamp Field features (BLF) allow you to view the state of a phone line that is associated with a
speed-dial button, call log, or directory listing on your phone. If you use BLF Pickup, you can answer
a ringing call for the line that you are monitoring. Your system administrator determines which BLF
features are configured for your phone.
If you want to... Then...
See the state of a line
listed in a call log or
directory
See the state of a
speed-dial line
Look for BLF indicators next to the line number:
Line is in-use.
Line is idle.
Look for BLF indicators next to the line number:
Line is in-use.
Line is idle.
BLF- monitored line is ringing (BLF Pickup)
Use BLF Pickup to
answer a call ringing on
a coworker’s phone
Press the BLF Pickup button while the line is ringing.
The call is redirected to the next available line on your phone. (If you want
to specify a line, first press a line button, then press the BLF button.)
If your phone supports auto-pickup, the call connects automatically.
Otherwise, the call rings on your phone for you to answer.
If you press the BLF Pickup button when the monitored line is not ringing,
your phone will speed dial the line number.
Tips
• Your phone might play an audible indicator to alert you when a call is ringing on the monitored
line (BLF Pickup only).
• BLF Pickup answers the oldest ringing call first (if the line that you are monitoring has more than
one ringing call).
Making and Receiving Secure Calls
Depending on how your system administrator has configured your phone system, your phone might
support making and receiving secure calls.
Your phone can support these types of calls:
• Authenticated call—The identities of all phones participating in the call have been verified.
• Encrypted call—The phone is receiving and transmitting encrypted audio (your conversation)
within the Cisco IP network. Encrypted calls are also authenticated.
46 OL-15791-01
Page 47

Advanced Call Handling
• Protected call—The phone is receiving and transmitting encrypted audio (your conversation) with
another phone. A protected call provides a similar level of security as an encrypted call, but adds
additional security. If the call is protected at both ends, a security tone plays at the beginning of
the conversation. Some features, such as conference calling, shared lines, Extension Mobility, and
join across lines are not available when protected calling is configured. Protected calls are not
authenticated.
• Non-secure call—At least one of the participating phones or the connection does not support these
security features, or the phones cannot be verified.
If you want to... Then...
Check the security level of a call or
conference
Look for a security icon in the top right corner of the call
activity area, next to the call duration timer:
Authenticated call or conference
Encrypted call or conference
Non-secure call or conference
Verify that the phone on the other
end of the connection is also secure
Determine if secure calls can be
made in your company
Note There are interactions, restrictions, and limitations that affect how security features work on
your phone. For more information, ask your system administrator.
Look for the encrypted lock icon and listen for a security tone
at the beginning of the call.
When encrypted calling is configured on your phone, the lock
icon is displayed. However, the conversation is protected only
when the security tone plays at the beginning of a call,
indicating that the call is protected on both ends of the call. If
your call is connected to a non-protected phone, the secure
tone is not played.
Contact your system administrator.
Cisco Unified IP Phone 7931G for Cisco Unified Communications Manager 6.0 47
Page 48

Tracing Suspicious Calls
If you are receiving suspicious or malicious calls, your system administrator can add the Malicious Call
Identification (MCID) feature to your phone. This feature enables you to identify an active call as
suspicious, which initiates a series of automated tracking and notification messages.
If you want to... Then...
Notify your system
administrator about a
suspicious or harassing call
Press MCID.
Your phone plays a tone and displays the message, “MCID
successful.”
Prioritizing Critical Calls
In some specialized environments, such as military or government offices, you might need to make and
receive urgent or critical calls. If you have the need for this specialized call handling, your system
administrator can add Multilevel Precedence and Preemption (MLPP) to your phone.
Keep these terms in mind:
• Precedence indicates the priority associated with a call.
• Preemption is the process of ending an existing, lower priority call while accepting a higher
priority call that is sent to your phone.
If you... Then...
Want to choose a priority
(precedence) level for an outgoing call
Want to make a priority (precedence)
call
Hear a special ring (faster than usual)
or special call waiting tone
48 OL-15791-01
Contact your system administrator for a list of
corresponding precedence numbers for calls.
Enter the MLPP access number (provided by your system
administrator) followed by the phone number.
You are receiving a priority (precedence) call. An MLPP icon
on your phone screen indicates the priority level of the call.
Page 49

Advanced Call Handling
Want to view priority level of a call Look for an MLPP icon on your phone screen:
Priority call
Medium priority (immediate) call
High priority (flash) call
Highest priority (flash override) or Executive
Override call
Higher priority calls are displayed at the top of your call list.
If you do not see an MLPP icon, the priority level of the call
is normal (routine).
Hear a continuous tone interrupting
your call
You or the other party are receiving a call that must preempt
the current call. Hang up immediately to allow the higher
priority call to ring through.
Tips
• When you make or receive an MLPP-enabled call, you will hear special ring tones and call waiting
tones that differ from the standard tones.
• Multilevel Precedence and Preemption (MLPP) overrides the Do Not Disturb (DND) feature.
• If you enter an invalid MLPP access number, a verbal announcement will alert you of the error.
• An MLPP-enabled call retains its priority and preemptive status when you:
–
Put the call on hold
–
Transfer the call
–
Add the call to a three-way conference
–
Answer the call using PickUp
Using Cisco Extension Mobility
Cisco Extension Mobility (EM) allows you to temporarily configure a Cisco Unified IP Phone as your
own. Once you log in to EM, the phone adopts your user profile, including your phone lines, features,
established services, and web-based settings. Your system administrator must configure EM for you.
If you want to... Then...
Log in to EM 1. Choose ( )> Services > EM Service (name can vary).
2. Enter your user ID and PIN (provided by your system administrator).
3. If prompted, select a device profile.
Log out of EM 1. Choose ( )> Services > EM Service (name can vary).
2. When prompted to log out, press Yes .
Cisco Unified IP Phone 7931G for Cisco Unified Communications Manager 6.0 49
Page 50

Tips
• EM automatically logs you out after a certain amount of time. Your system administrator
establishes this time limit.
• Changes that you make to your EM profile from your Cisco Unified CM User Options web pages
take effect immediately if you are logged in to EM on the phone; otherwise, changes take effect
the next time you log in.
• Changes that you make to the phone from your User Options web pages take effect immediately
if you are logged out of EM; otherwise, changes take effect after you log out.
• Local settings controlled by the phone are not maintained in your EM profile.
Managing Business Calls Using a Single Phone Number
With Mobile Connect and Mobile Voice Access installed, you can use your mobile phone to handle
calls associated with your desktop phone number.
If you want to... Then...
Configure Mobile Connect Use the User Options web pages to set up remote destinations and
create access lists to allow or block calls from specific phone numbers
from being passed to the remote destinations. See
Cisco WebDialer, page 77.
Answer a call using your
mobile phone
Switch an in-progress call
between your desk phone
and mobile phone
Put a call that has been
picked up on your mobile
phone on hold
Connect to Mobile Voice
Access
See Answering a Call, page 28.
See Switching an In-Progress Call to Another Phone, page 32.
1. Press the Enterprise Hold (exact softkey name can vary) softkey.
The other party is placed on hold.
2. On your mobile phone, press the Resume (name may vary) softkey
on the mobile phone. See
Phone, page 32.
1. From any phone, dial your assigned Mobile Voice Access number.
2. Enter the number you are calling from, if prompted, and your PIN.
Using
Switching an In-Progress Call to Another
50 OL-15791-01
Page 51

If you want to... Then...
Turn on Mobile Connect
from your mobile phone
1. Dial your assigned Mobile Voice access number.
2. Enter your mobile phone number (if requested) and PIN.
3. Press 2 to enable Mobile Connect.
4. Choose whether to turn Mobile Connect on for all configured
phones or just one:
–
–
Make a call from your
See Placing a Call—Additional Options, page 26.
mobile phone
Turn off Mobile Connect
from your mobile phone
1. Dial your assigned Mobile Voice Access number.
2. Enter your mobile phone number (if requested) and PIN.
3. Press 3 to disable Mobile Connect.
4. Choose whether to turn Mobile Connect off for all configured
phones or just one:
–
–
Turn on or off Mobile
Connect access to all your
remote destinations from
your desk phone
1. Press Mobility to display the current remote destination status
(Enabled or Disabled).
2. Press Select to change the status.
3. Press Exit.
Advanced Call Handling
All phones—Enter 2.
One phone—Enter 1 and enter the number you want to add as
a remote destination, followed by #.
All phones—Enter 2.
One phone—Enter 1 and enter the number you want to
remove as a remote destination, followed by #.
Tips
• When calling Mobile Voice Access, you must enter the number you are calling and your PIN if any
of the following are true
–
The number you are calling from is not one of your remote destinations.
–
The number is blocked by you or your carrier (shown as “Unknown Number”).
–
The number is not accurately matched in the Cisco Unified Communications Manager
:
database; for example, if your number is 510-666-9999, but it is listed as 666-9999 in the
database, or your number is 408-999-6666, but it is entered as 1-408-999-6666 in the
database.
• If you incorrectly enter any requested information (such as mobile phone number or PIN) three
times in a row, the Mobile Voice Access call disconnects, and you are locked out for a period of
time. Contact your system administrator if you need assistance.
Cisco Unified IP Phone 7931G for Cisco Unified Communications Manager 6.0 51
Page 52

Using a Handset, Headset, and Speakerphone
You can use your phone with these audio devices: a handset, headset, or speakerphone.
The phone is off-hook when the handset is lifted or another audio device is in use.
The phone is on-hook when the handset is in its cradle and other audio devices are not in use.
Using a Handset
If you want to... Then...
Go off-hook Lift the handset.
Go on-hook Replace the handset in the cradle.
Switch to the speakerphone or a
headset during a call
Adjust the volume level for a
call
Press or ( ), then hang up the handset.
Press the Volume button during a call or after invoking a dial tone.
Press Save to preserve the volume level for future calls.
Using a Headset
Your phone supports four- or six-wire headset jacks for wired headsets.For information about
purchasing headsets, see
You can use a headset with all of the controls on your phone, including the Volume button and .
If you want to... Then...
Toggle headset mode on and off Press ( ) to toggle headset mode on and off. (Typically,
Switch to a handset Lift the handset (without pushing any buttons).
Adjust the volume level for a
call
If you use AutoAnswer, see Using AutoAnswer with a Headset or Speakerphone, page 54.
52 OL-15791-01
Headset Support, page 13.
headset is assigned to button 23.)
Press the Volume button during a call or after invoking a dial tone.
Press Save to preserve the volume level for future calls.
Page 53

Using a Handset, Headset, and Speakerphone
Using Wideband with your Headset
If you use a headset that supports wideband, you might experience improved audio sensitivity if you
enable the wideband setting on your phone (this setting is disabled by default). To access the setting,
choose
If the Wideband Headset setting shows as dimmed, then this setting is not user controllable.
Check with your system administrator to be sure your phone system is configured to use wideband. If
the system is not configured for wideband, you may not detect any additional audio sensitivity even
when using a wideband headset. To learn more about your headset, refer to the headset documentation
or ask your system administrator for assistance.
( ) > Settings > User Preferences > Audio Preferences > Wideband Headset.
Using a Speakerphone
Many of the actions you can take to dial a number or answer a call will automatically trigger
speakerphone mode, assuming that the handset is in its cradle and
If you want to... Then...
Toggle speakerphone mode on
or off
Switch to a handset Lift the handset (without pushing any buttons).
Adjust the volume level for a
call
Press .
Press the Volume button during a call or after invoking a dial tone.
Press Save to preserve the volume level for future calls.
(headset) is not lit.
Cisco Unified IP Phone 7931G for Cisco Unified Communications Manager 6.0 53
Page 54

Using AutoAnswer with a Headset or Speakerphone
When AutoAnswer is enabled, your phone answers incoming calls automatically after a few rings.
Your system administrator configures AutoAnswer to use either the speakerphone or a headset. You
might use AutoAnswer if you receive a high volume of incoming calls.
If you... Then...
Use AutoAnswer with a
headset
Use AutoAnswer with the
speakerphone
Keep headset mode active (in other words, keep ( ) illuminated),
even when you are not on a call.
To keep headset mode active, do the following:
• Press EndCall to hang up.
• Press New Call or Dial to place new calls.
If your phone is set up to use AutoAnswer in headset mode, calls are
automatically answered only if
ring normally and you must manually answer them.
Keep the handset in the cradle and headset mode inactive ( ( )
unlit).
Otherwise, calls ring normally and you must manually answer them.
( ) is illuminated. Otherwise, calls
Tip
AutoAnswer is disabled when the Do Not Disturb feature is active.
54 OL-15791-01
Page 55

Changing Phone Settings
Changing Phone Settings
You can personalize your Cisco Unified IP Phone by adjusting the ring tone, volume, and other
settings.
Customizing Rings and Message Indicators
You can customize how your phone indicates an incoming call and a new voice mail message. You can
also adjust the ringer volume for your phone.
If you want to... Then...
Change the ring tone per
line
Adjust the volume level for
the phone ringer
Change the way that the
voice message light on your
handset works
Change the way the audible
voice message indicator
sounds on your phone
1. Choose ( ) > Settings > User Preferences > Rings.
2. Choose a phone line or the default ring setting.
3. Choose a ring tone to play a sample of it.
4. Press Select and Save to set the ring tone, or press Cancel.
Press the Volume button while the handset is in the cradle and the
headset and speakerphone buttons are off. The new ringer volume is
saved automatically.
1. Log in to your Cisco Unified CM User Options web pages. (See
Accessing Your User Options Web Pages, page 64.)
2. Access your message indicator settings. (See Controlling Line
Settings on the Web, page 71.)
Note Typically, the default system policy is to indicate a new voice
message by displaying a steady light on the handset light strip.
1. Log in to your User Options web pages. (See Accessing Your User
Options Web Pages, page 64.)
2. Access your message indicator settings. (See Controlling Line
Settings on the Web, page 71.)
Cisco Unified IP Phone 7931G for Cisco Unified Communications Manager 6.0 55
Page 56

Customizing the Phone Screen
You can adjust the characteristics of the phone screen.
If you want to... Then...
Change the phone
screen brightness
Change the language on
your phone screen
Change the line text
label
Adjust contrast 1. Choose ( ) > Settings > User Preferences > Contrast.
Turn off the backlight Contact your system administrator to see if this optional feature is
1. Choose ( ) > Settings > User Preferences > Brightness.
2. To make adjustments, press the Volume button.
3. Press Save, or press Cancel.
Note If you change the brightness setting on your phone, do not unplug the
phone from its power source for at least one minute, or the brightness
setting will not get saved.
1. Log in to your User Options web pages. (See Accessing Your User
Options Web Pages, page 64.)
2. Access your user settings. (See Controlling User Settings on the Web,
page 71.)
1. Log in to your User Options web pages. (See Accessing Your User
Options Web Pages, page 64.)
2. Access your line label settings. (See Controlling Line Settings on the
Web, page 71.)
2. To make adjustments, press the Volume button.
3. Press Save, or press Cancel.
available to you. This feature allows you to turn off the backlight for a
pre-determined time (as set by your system administrator).
56 OL-15791-01
Page 57

Using Call Logs and Directories
Using Call Logs and Directories
This section describes how you can use call logs and directories. To access both features, use the
Directories button
Using Call Logs
Your phone maintains call logs. Call logs contain records of your missed, placed, and received calls.
If you want to... Then...
View your call logs Choose ( ) > Directories > Missed Calls, Placed Calls, or Received Calls.
Display details for
a single call record
Erase all call
records in all logs
Erase all call
records in a single
log
Erase a single call
record
( ) > Directories.
Each stores up to 100 records.
1. Choose ( ) > Directories > Missed Calls, Placed Calls, or Received
Calls.
2. Highlight a call record.
3. Press Details. Doing so displays information such as called number, calling
number, time of day, and call duration (for placed and received calls only).
Choose ( ) > Directories, then press Clear.
1. Choose ( ) > Directories > Missed Calls, Placed Calls, or Received
Calls.
2. Highlight a call record.
3. Press Clear. (You may need to press the more softkey to display Clear.)
1. Choose ( ) > Directories > Missed Calls, Placed Calls, or Received
Calls.
2. Highlight a call record.
3. Press Delete.
Cisco Unified IP Phone 7931G for Cisco Unified Communications Manager 6.0 57
Page 58

If you want to... Then...
Dial from a call log
(while not on
another call)
1. Choose ( ) > Directories > Missed Calls, Placed Calls, or Received
Calls.
2. Highlight a call record.
Note If the Details softkey appears, the call is the primary entry of a multiparty
3. If you need to edit the displayed number, press EditDial followed by << or
>>. To delete the number, press EditDial followed by Delete. (You may
need to press the more softkey to display Delete.)
4. Go off-hook to place the call.
Dial from a call log
(while connected to
another call)
1. Choose ( ) > Directories > Missed Calls, Placed Calls, or Received
Calls.
2. Highlight a call record.
Note If the Details softkey appears, the call is the primary entry of a multiparty
3. If you need to edit the displayed number, press EditDial followed by << or
>>. To delete the number, press EditDial followed by Delete. (You may
need to press the more softkey to display Delete.)
4. Press Dial.
5. Choose a menu item to handle the original call:
–
–
–
–
call. See the Tips section below.
call. See the
Tips section below.
Hold—Puts the first call on hold and dials the second.
Tran s fer —Transfers the first party to the second and drops you from
the call. (Press
again after dialing to complete the action.)
Conference—Creates a conference call with all parties, including you.
(Press
( ) again after dialing to complete the action.)
EndCall—Disconnects the first call and dials the second.
Tips
• (SCCP and SIP phones) Your phone might be set up for international call logging, which is
indicated by a "+" symbol on the call logs, redial, or call directory entries. See your system
administrator for more information.
• (SCCP phones only) To view the complete call record of a multiparty call (for example, of call that
has been forwarded or transferred to you), highlight the call record and press Details. The Details
record shows two entries for each missed or received multiparty call. The entries are listed in
reverse chronological order:
–
The first logged entry is the name/number of the last completed call of a multiparty call
received on your phone.
58 OL-15791-01
Page 59

Using Call Logs and Directories
–
The second logged entry is the name/number of the first completed call of a multiparty call
received on your phone.
Directory Dialing
Depending on configuration, your phone can provide corporate and personal directory features:
• Corporate Directory—Corporate contacts that you can access on your phone. Your system
administrator sets up and maintains your Corporate Directory.
• Personal Directory—If available, personal contacts and associated speed-dial codes that you can
configure and access from your phone and Cisco Unified CM User Options web pages. Personal
Directory is comprised of Personal Address Book (PAB) and Fast Dials:
–
PAB is a directory of your personal contacts.
–
Fast Dials allows you to assign codes to PAB entries for quick dialing.
Using Corporate Directory on Your Phone
You can use a corporate directory to place calls to coworkers.
If you want to... Then...
Dial from a corporate
directory (while not on
another call)
Dial from a corporate
directory (while on
another call)
1. Choose ( ) > Directories > Corporate Directory (exact name can
vary).
2. User your keypad to enter a full or partial name and press Search.
3. To dial, press the listing, or scroll to the listing and go off-hook.
1. Choose ( ) > Directories > Corporate Directory (exact name can
vary).
2. User your keypad to enter a full or partial name and press Search.
3. Scroll to a listing and press Dial.
4. Choose a menu item to handle the original call:
–
Hold—Puts the first call on hold and dials the second.
–
Tran s fer —Transfers the first party to the second and drops you
from the call. (Press again after dialing to complete the
action.)
–
Conference—Creates a conference call with all parties, including
you. (Press
–
EndCall—Disconnects the first call and dials the second.
( ) again after dialing to complete the action.)
Cisco Unified IP Phone 7931G for Cisco Unified Communications Manager 6.0 59
Page 60

Tip
Use the numbers on your keypad to enter characters on your phone screen. Use the Navigation button
on your phone to move between input fields.
Using Personal Directory on Your Phone
The Personal Directory feature set contains your Personal Address Book (PAB) and Fast Dials. This
section describes how to set up and use Personal Directory on your phone. Alternately, see
Personal Directory on the Web, page 65.
If you want to... Then...
Access Personal
Directory (for PAB
and Fast Dial codes)
Search for a PAB
entry
Dial from PAB entry 1. Search for a listing.
Delete a PAB entry 1. Search for a listing.
Edit a PAB entry 1. Search for a listing.
1. Choose ( ) > Directories > Personal Directory (exact name can
vary).
2. Enter your Cisco Unified Communications Manager user ID and PIN,
then press Submit.
1. Access Personal Directory, then choose Personal Address Book.
2. Enter search criteria and press Submit.
3. You can choose Previous or Next to move through listings.
4. Highlight the PAB listing that you want and press Select.
2. Highlight the listing and press Select.
3. Press Dial. (You may need to press the more softkey to see Dial.)
4. Enter the participant’s phone number.
5. Highlight the number that you want to dial and press OK.
6. Press OK again to dial the number.
2. Highlight the listing and press Select.
3. Press Delete.
4. Choose OK to confirm the deletion.
2. Highlight the listing and press Edit to modify a name or email address.
3. If necessary, choose Phones to modify a phone number.
4. Press Update.
Using
60 OL-15791-01
Page 61

Using Call Logs and Directories
If you want to... Then...
Add a new PAB entry 1. Access Personal Directory, then choose Personal Address Book.
2. Access the Search page by choosing Submit. (You do not need to input
search information first.)
3. Press New.
4. Use your phone keypad to enter a name and email information.
5. Choose Phones and use the keypad to enter phone numbers. Be sure to
include any necessary access codes such as a 9 or 1.
6. Choose Submit to add the entry to the database.
Assign a Fast Dial
code to a PAB entry
Add a new Fast Dial
code (not using a PAB
entry)
Search for Fast Dial
codes
Place a call using a
Fast Dial code
1. Search for a PAB entry.
2. Highlight the listing and press Select.
3. Press Fast Dial.
4. Highlight the number that you want to dial and press Select.
5. Highlight the Fast Dial code that you want to assign to the number and
press Select.
1. Choose ( ) > Directories > Personal Directory > Personal Fast
Dials.
2. Press Fast Dial.
3. Highlight a Fast Dial code that is unassigned and press Select.
4. Press Assign.
5. Enter a phone number.
6. Press Update.
1. Choose ( ) > Directories > Personal Directory > Personal Fast
Dials.
2. You can choose Previous or Next to move through listings.
3. Highlight the listing that you want and press Select.
1. Search for a Fast Dial code.
2. Highlight the listing you want and press Select.
3. Press Dial.
4. Choose OK to complete the action.
Cisco Unified IP Phone 7931G for Cisco Unified Communications Manager 6.0 61
Page 62

If you want to... Then...
Delete a Fast Dial
code
Log out of Personal
Directory
1. Search for a Fast Dial code.
2. Highlight the listing you want and press Select.
3. Press Remove.
1. Choose ( ) > Directories > Personal Directory (exact name can
vary).
2. Choose Logout.
Tips
• Your system administrator can provide you the user ID and PIN that you need to log in to Personal
Directory.
• Personal Directory automatically logs you out after a certain amount of time. This time limit can
vary. Ask your system administrator for more information.
• Use the numbers on your keypad to enter characters on your phone screen. Use the Navigation
button on your phone to move between input fields.
• Your phone might be set up for international call logging, which is indicated by a “+” symbol on
the call logs, redial, or call directory entries. See your system administrator for more information.
62 OL-15791-01
Page 63

Accessing Voice Messages
Accessing Voice Messages
To access voice messages, use the Messages button ( ) > Messages.
Note Your company determines the voice message service that your phone system uses. For the most
accurate and detailed information, refer to the documentation that came with your voice
message service.
If you want to... Then...
Set up and personalize
your voice message
service
Check for your new
voice messages
Press ( ) > Messages and follow the voice instructions.
If a menu appears on your phone screen, choose an appropriate menu item.
Look for:
• A steady red light on your handset. (This indicator can vary. See
Customizing Rings and Message Indicators, page 55.)
• A message waiting icon and text message on your phone screen.
Note The red light and message waiting icon display only when you have a
message on your primary line, even if you receive voice messages on
other lines.
Listen for:
• A stutter tone from your handset, headset, or speakerphone when you
place a call.
Note The stutter tone is line-specific. You hear it only when using the line
with the waiting message.
Listen to your voice
messages or access the
voice messages menu
Send a call to a voice
message system
Cisco Unified IP Phone 7931G for Cisco Unified Communications Manager 6.0 63
Press ( ) > Messages.
Depending on your voice message service, doing so either auto-dials the
message service or provides a menu on your phone screen.
Press iDivert. For more information, see Sending a Call to a Voice Message
System, page 33.
Page 64

Using the User Options Web Pages
Your Cisco Unified IP Phone is a network device that can share information with other network
devices in your company, including your personal computer. You can use your computer to log in to
your Cisco Unified CM User Options web pages, where you can control features, settings, and services
for your Cisco Unified IP Phone. For example, you can set up speed-dial buttons from your
Options web pages.
User
Accessing Your User Options Web Pages
This section describes how to log in and select a phone device.
If you want to... Then do this...
Log in to your User
Options web pages
Select a device after
logging in
Select a
configuration
option after
logging in
1. Obtain a User Options URL, user ID, and default password from your
system administrator.
2. Open a web browser on your computer, enter the URL, and log on.
3. If prompted to accept security settings, click Yes or Install Certificate.
The Cisco Unified Communications Manager User Options main web page
displays. From this page you can choose User Options to access User
Settings, Directory features, a Personal Address Book, and Fast Dials.
Or, to access phone-specific options, select a device (see below).
1. After you have logged in to your User Options web pages, choose User
Options > Device.
The Device Configuration page displays.
2. If you have multiple devices assigned to you, choose the appropriate device
(phone model, Extension Mobility profile, or Remote Destination profile)
from the Name drop-down menu.
Note Toolbar buttons located at the top of the Device Configuration page are
specific to the selected device type.
1. After you have logged in to your User Options web pages, choose User
Options to access User Settings, Directory, Personal Address Book, Fast
Dials, and Mobility Settings.
2. To return to the Device Configuration page from another page, choose
User Options > Device.
64 OL-15791-01
Page 65

Using the User Options Web Pages
Configuring Features and Services on the Web
The topics in this section describe how to configure features and services from your User Options web
pages after logging in. See Accessing Your User Options Web Pages, page 64.
Using Personal Directory on the Web
The Personal Directory feature set that you can access on your computer consists of:
• A Personal Address Book (PAB)
• Fast Dials
• Cisco Unified Communications Manager Address Book Synchronizer
Note You can also access PAB and Fast Dials from your phone. See Using Personal Directory on
Your Phone, page 60.
Using Your Personal Address Book on the Web
This section describes how to use your PAB from your User Options web pages.
If you want to... Then do this after you log in...
Add a new PAB entry 1. Choose User Options > Personal Address Book.
2. Click Add New.
3. Enter information for the entry.
4. Click Save.
Search for a PAB entry 1. Choose User Options > Personal Address Book.
2. Specify search information and click Find.
Edit a PAB entry 1. Search for a PAB entry.
2. Click a name or nickname.
3. Edit the entry as needed and click Save.
Delete a PAB entry 1. Search for a PAB entry.
2. Select one or more entries.
3. Click Delete Selected.
Cisco Unified IP Phone 7931G for Cisco Unified Communications Manager 6.0 65
Page 66

Configuring Fast Dials on the Web
This section describes how to assign Fast Dials from your User Options web pages.
If you want to... Then do this after you log in...
Assign a Fast Dial code
to a PAB entry
Assign a Fast Dial code
to a phone number
(without using a PAB
entry)
Search for a Fast Dial
entry
Edit a Fast Dial phone
number
Delete a Fast Dial entry 1. Search for a Fast Dial.
1. Create a PAB entry. See Using Your Personal Address Book on the
Web, page 65.
2. Choose User Options > Fast Dials.
3. Click Add New.
4. Use the Search Options area to find the appropriate PAB entry.
5. Click a phone number in the Search Results area.
6. Change the Fast Dial code, if desired.
7. Click Save.
1. Choose User Options > Fast Dials.
2. Click Add New.
3. Change the Fast Dial code, if desired.
4. Enter a phone number.
5. Click Save.
1. Choose User Options > Fast Dials.
2. Specify search information and click Find.
1. Choose User Options > Fast Dials.
2. Search for the Fast Dial entry that you want to edit.
3. Click on a component of the entry.
4. Change the phone number.
5. Click Save.
2. Select one or more entries.
3. Click Delete Selected.
66 OL-15791-01
Page 67

If you want to... Then do this after you log in...
Assign a line button for
Fast Dial
Assign a line button for
PAB
Note Before you can assign a line button for Fast Dial, your system
administrator must configure the phone to display services. Contact
your system administrator for more information.
1. Choose User Options > Device.
2. Click Service URL.
3. Choose the Fast Dial service from the Button drop-down list box.
4. Enter a phone label for the button.
5. Click Save.
6. Click Reset and then click Restart to refresh the phone configuration.
You can now press the line button to access Fast Dial codes.
Note Before you can assign a line button for PAB, your system administrator
must configure the phone to display services. Contact your system
administrator for more information.
1. Choose User Options > Device.
2. Click Service URL.
3. Choose the Personal Address Book service from the Button drop-down
list box.
4. Enter a phone label for the button.
5. Click Save.
6. Click Reset and then click Restart to refresh the phone configuration.
You can now press the line button to access PAB codes.
Using the User Options Web Pages
Tips
• You can create up to 500 Fast Dial and PAB entries.
• You can create a new Fast Dial entry without using a PAB entry. Such Fast Dial entries are labeled
“raw” in the User Options web pages and do not display a configurable text label.
Using the Address Book Synchronization Tool
You can use the Address Book Synchronization Tool (TABSynch) to synchronize your existing
Microsoft Windows Address Book (if applicable) with your PAB.
From a Microsoft Windows application—Users can use the TABSynch tool to synchronize their PABs
with Microsoft Windows Address Book (WAB). Customers who want to use the Microsoft Outlook
Address Book (OAB) should begin by importing the data from the OAB into the Windows Address
Book (WAB). TabSync can then be used to synchronize the WAB with Personal Directory.
Cisco Unified IP Phone 7931G for Cisco Unified Communications Manager 6.0 67
Page 68

Your system administrator can give you access to TABSynch and provide detailed instructions.
Setting Up Speed Dials on the Web
Depending on configuration, your phone can support several speed-dial features:
• Speed-dial buttons
• Abbreviated Dialing
• Fast Dials
Note For help using speed-dial features, see Speed Dialing, page 41.
If you want to... Then do this after you log in...
Set up speed-dial
buttons
Set up Abbreviated
Dialing
Set up Fast Dials See Configuring Fast Dials on the Web, page 66.
1. Choose User Options > Device.
2. Choose a phone from the Name drop-down menu.
3. Click Speed Dials.
4. Enter a number and label for a speed-dial button (programmable button)
on your phone.
5. Click Save.
Note Your phone uses the ASCII Label field.
1. Choose User Options > Device.
2. Choose a phone from the Name drop-down menu.
3. Click Speed Dials.
4. Enter a number and label for an Abbreviated Dialing code.
5. Click Save.
You can also set up Fast Dials on your phone. See Using Personal Directory on
Your Phone, page 60.
68 OL-15791-01
Page 69

Using the User Options Web Pages
Setting Up Phone Services on the Web
Phone services can include special phone features, network data, and web-based information (such as
stock quotes and movie listings). You must first subscribe to a phone service before accessing it on
your phone.
If you want to... Then do this after you log in...
Subscribe to a service 1. Choose User Options > Device.
Search for services 1. Select a device.
Change or end services 1. Search for services.
Change a service name 1. Search for services.
2. Choose a phone from the Name drop-down menu.
3. Click Phone Services.
4. Click Add New.
5. Choose a service from the drop-down list and click Next.
6. Change the service label and/or enter additional service information, if
available (optional).
7. Click Save.
2. Click Phone Services.
3. Click Find.
2. Select one or more entries.
3. Click Delete Selected.
2. Click on the service name.
3. Change the information and click Save.
Cisco Unified IP Phone 7931G for Cisco Unified Communications Manager 6.0 69
Page 70

If you want to... Then do this after you log in...
Add a service to an
available
programmable phone
button
1. Choose User Options > Device.
2. Choose a phone from the Name drop-down menu.
3. Click Service URL.
Note If you do not see this option, ask your system administrator to
configure a service URL button for your phone.
4. Choose a service from the Button Service drop-down list.
5. If you want to rename the service, edit the label fields.
Note Your phone uses the ASCII Label field if the phone does not support
double-byte character sets.
6. Click Save.
7. Click Reset to reset your phone (necessary to see the new button label
on your phone).
Access a service on your
phone
Use the line key buttons to select the Services, Messages, and Directories
menus:
( ) > Services
( ) > Messages
( ) > Directories
Note The services available for your phone depend on the phone system
configuration and the services you subscribed to. Ask your phone
system administrator for more information.
Note If only one service is configured, the service opens by default. If more
than one service is configured, select an option fromthe menu on the
screen.
70 OL-15791-01
Page 71

Using the User Options Web Pages
Controlling User Settings on the Web
User settings include your password, PIN, and language (locale) settings.
If you want to... Then do this after you log in...
Change your password 1. Choose User Options > User Settings.
2. In the Browser Password area, enter information.
3. Click Save.
Change your PIN 1. Choose User Options > User Settings.
2. In the Phone PIN area, enter information.
3. Click Save.
Change the language (locale) for
your User
Change the language (locale) for
your phone screen
Options web pages
1. Choose User Options > User Settings.
2. In the User Locale area, choose an item from the Locale
drop-down list.
3. Click Save.
1. Choose User Options > User Settings.
2. Choose an item from the User Locale drop-down list.
3. Click Save.
Tip
Your PIN and password allow you to access different features and services. For example, use your PIN
to log in to Cisco Extension Mobility or Personal Directory on your phone. Use your password to log
in to your User Options web pages and Cisco WebDialer on your personal computer. For more
information, ask your system administrator.
Controlling Line Settings on the Web
Line settings affect a specific phone line (directory number) on your phone. Line settings can include
call-forwarding, voice message indicators, ring patterns, and line labels.
You can set up other line settings directly on your phone:
• Set up call forwarding for your primary phone line—see Forwarding Calls to Another Number,
page 33.
• Change rings, display, and other phone-model specific settings—see Changing Phone Settings,
page 55.
Cisco Unified IP Phone 7931G for Cisco Unified Communications Manager 6.0 71
Page 72

If you want to... Then do this after you log in...
Set up call forwarding
per line
1. Choose User Options > Device.
2. Choose a phone from the Name drop-down menu.
3. Click Line Settings.
4. If you have more than one directory number (line) assigned to your
phone, choose a line from the Line drop-down menu.
5. In the Incoming Call Forwarding area, choose call forwarding settings
for various conditions.
6. Click Save.
Change the voice
message indicator
(lamp) setting per line
1. Choose User Options > Device.
2. Choose a phone from the Name drop-down menu.
3. Click Line Settings.
4. If you have more than one directory number (line) assigned to your
phone, choose a line from the Line drop-down menu.
5. In the Message Waiting Lamp area, choose from various settings.
Note Typically, the default message waiting setting prompts your phone to
display a steady red light from the handset light strip to indicate a new
voice message.
6. Click Save.
72 OL-15791-01
Page 73

If you want to... Then do this after you log in...
Change the audible
voice message indicator
setting per line
1. Choose User Options > Device.
2. Choose a phone from the Name drop-down menu.
3. Click Line Settings.
4. If you have more than one directory number (line) assigned to your
phone, choose a line from the Line drop-down menu.
5. In the Audible Message Waiting Indicator area, choose from various
settings.
Note Typically, the default message waiting setting prompts your phone to
display a steady red light from the handset light strip to indicate a new
voice message.
6. Click Save.
Change or create a line
text label that appears
on your phone screen
1. Choose User Options > Device.
2. Choose a phone from the Name drop-down menu.
3. Click Line Settings.
4. If you have more than one directory number (line) assigned to your
phone, choose a line from the Line drop-down menu.
5. In the Line Text Label area, enter a text label.
6. Click Save.
Note Your phone uses the ASCII Label field if the phone does not support
double-byte character sets.
Using the User Options Web Pages
Cisco Unified IP Phone 7931G for Cisco Unified Communications Manager 6.0 73
Page 74

Setting Up Phones and Access Lists for Mobile Connect
When using Cisco Mobile Connect, you must add your mobile and other phones that you want to use
to make and receive calls using the same directory numbers as your desk phone. These phones are
called remote destinations. You can also define access lists to restrict or allow calls from certain
numbers to be sent to your mobile phone.
If you want to... Then do this after you log in...
Create an access list 1. Choose User Options > Mobility Settings > Access Lists.
2. Click Add New.
3. Enter a name to identify the access list and a description (optional).
4. Choose whether the access list will allow or block specified calls.
5. Click Save.
6. Click Add Member to add phone numbers or filters to the list.
7. Select an option from the Filter Mask drop-down list box. You can filter
a directory number, calls with restricted caller ID (Not Available), or
calls with anonymous caller ID (Private).
8. If you select a directory number from the Filter Mask drop-down list
box, enter a phone number or filter in the DN Mask field. You can use
the following wild cards to define a filter:
–
X (upper or lower case)—Matches a single digit. For example,
408555123X matches any number between 4085551230 and
4085551239.
–
!—Matches any number of digits. For example, 408! matches any
number starts with 408.
–
#—Used as a single digit for exact match.
9. To add this member to the access list, click Save.
10. To save the access list, click Save.
74 OL-15791-01
Page 75

If you want to... Then do this after you log in...
Add a new remote
destination
1. Choose User Options > Mobility Settings > Remote Destinations.
2. Click Add New.
3. Enter the following information:
–
Name—Enter a name for the mobile (or other) phone.
–
Destination Number—Enter your mobile phone number.
4. Select your remote destination profile from the drop-down list box. Your
remote destination profile contains the settings that apply to remote
destinations that you create.
5. Select the Mobile Phone check box to allow your remote destination to
accept a call sent from your desktop phone.
6. Select the Enable Mobile Connect check box to allow your remote
destination to ring simultaneously with your desktop phone.
7. Choose one of the following options in the Ring Schedule area:
–
All the time—Choose this option if you do not want to impose day
and time restrictions on ringing the remote destination.
–
As specified below—Choose this option and select from the
following items to set up a ring schedule based on day and time:
• Select a check box for each day of the week you want to allow calls
to ring the remote destination.
• For each day, select All Day or select the beginning and ending times
from the drop-down lists.
• Select the time zone from the drop-down list box.
8. Choose one of the following ringing options:
–
Always ring this destination.
–
Ring this destination only if the caller is in the allowed access list that
you select.
–
Do not ring this destination if the caller is in the blocked access list
that you select.
Note The ring schedule drop-down list boxes include only the access lists that
you have created.
Using the User Options Web Pages
9. Click Save.
Cisco Unified IP Phone 7931G for Cisco Unified Communications Manager 6.0 75
Page 76

If you want to... Then do this after you log in...
Add a new remote
destination
1. Choose User Options > Mobility Settings > Remote Destinations.
2. Select the device from the Name drop-down list box.
3. Click Remote Destinations.
4. Click Add New.
5. Enter the following information:
–
Name—Enter a name for the mobile (or other) phone.
–
Destination Number—Enter your mobile phone number.
–
Answer Too Soon Timer—Enter the amount of time before you can
pick up a call on the remote destination (in milliseconds).
–
Answer Too Late Timer—Enter the amount of time after which it is
too late to pick up a call on the remote destination (in milliseconds).
–
Delay Before Ringing Timer—Enter the amount of time before the
call rings on the remote destination (in milliseconds).
–
Remote Destination Profile—Select a remote destination profile,
which contains the settings that apply to all of your remote
destinations.
–
Allowed Access List—Select a phone number or rule that allows your
mobile phone to ring when a call comes in to your desktop phone.
You can select an allowed access list or blocked access list, but not
both.
–
Blocked Access List—Select a phone number or rule for which your
mobile phone does not ring when a call comes in to your desktop
phone. You can select an allowed access list or blocked access list,
but not both.
–
Mobile Phone—Select to allow your mobile phone can accept a call
sent from your desktop phone.
–
Enable Mobile Connect—Select to allow your mobile phone to ring
simultaneously with your desktop phone.
–
Smart Client Installed—Select to indicate that the remote destination
you are setting up is a smartphone.
6. Click Save.
76 OL-15791-01
Page 77

Using the User Options Web Pages
Using Cisco WebDialer
Cisco WebDialer allows you to make calls on your Cisco Unified IP Phone to directory contacts by
clicking items in a web browser. Your system administrator must configure this feature for you.
If you want to... Then...
Use WebDialer with
your User Options
directory
Use WebDialer with
another online
corporate directory
(not your User
Options directory)
1. Log into your User Options web pages. See Accessing Your User Options
Web Pages, page 64.
2. Choose User Options > Directory and search for a coworker.
3. Click the number that you want to dial.
4. If this is your first time using WebDialer, set up preferences and click
Submit. (See the last row in this table for details).
5. If the Make Call page appears, click Dial. (See the last row in this table
to learn how to suppress this page in the future, if desired.)
The call is now placed on your phone.
6. To end a call, click Hangup or hang up from your phone.
1. Log into a WebDialer-enabled corporate directory and search for
coworkers.
2. Click the number that you want to dial.
3. When prompted, enter your user ID and password.
4. If this is your first time using WebDialer, set up preferences and click
Submit. (See the last row in this table for details.)
5. If the Make Call page appears, click Dial. (See the last row in this table
to learn how to suppress this page in the future, if desired.)
The call is now placed on your phone.
6. To end a call, click Hangup or hang up from your phone.
Cisco Unified IP Phone 7931G for Cisco Unified Communications Manager 6.0 77
Page 78

If you want to... Then...
Log out of WebDialer Click the logout icon in the Make Call or Hang Up page.
Set up, view, or
change WebDialer
preferences
Access the Preferences page.
The Preferences page appears the first time that you use WebDialer (after you
click the number that you want to dial.)
To return to Preferences in the future, click the preferences icon from the
Make Call or Hang Up page.
The Preferences page contains the following options:
• Preferred language—Determines the language used for WebDialer
settings and prompts.
• Use permanent device—Identifies the Cisco Unified IP Phone and
directory number (line) that you will use to place WebDialer calls. If you
have one phone with a single line, the appropriate phone and line are
automatically selected. Otherwise, choose a phone and/or line. Phones
are specified by host name. (To display the host name on your phone,
choose Press
Name.)
• Use Extension Mobility—If selected, prompts WebDialer to use the
Unified IP Phone that is associated with your Extension Mobility
Cisco
profile (if available).
• Do not display call confirmation—If selected, prompts WebDialer to
suppress the Make Call page. This page appears by default after you click
a phone number in a WebDialer-enabled online directory.
( ) > Settings > Network Configuration > Host
78 OL-15791-01
Page 79

Understanding Additional Configuration Options
Understanding Additional Configuration Options
Your system administrator can configure your phone to use specific button and softkey templates
along with special services and features, if appropriate. This table provides an overview of some
configuration options that you might want to discuss with your phone system administrator based on
your calling needs or work environment.
Note You can locate Phone Guides and other documents listed in this table on the web:
http://www.cisco.com/en/US/products/hw/phones/ps379/tsd_products_support_series_home.
html
If you... Then... For more information...
Need more than one
phone line
Need more speed-dial
buttons
Want to use one
extension for several
phones
Share phones or office
space with coworkers
Ask your system administrator to
configure one or more additional
directory numbers for you.
First make sure that you are using all
of your currently available speed-dial
buttons.
If you need additional speed-dial
buttons, try using Abbreviated Dialing
or subscribing to the Fast Dial service.
Request a shared line. This allows you
to use one extension for your desk
phone and lab phone, for example.
Consider using:
• Call Park to store and retrieve
calls without using the transfer
feature.
• Call Pickup to answer calls ringing
on another phone.
• A shared line to view coworkers’
calls.
• Cisco Extension Mobility to apply
your phone number and user
profile to a shared
Unified IP Phone.
Cisco
Talk to your system administrator
or phone support team.
See Speed Dialing, page 41.
See Using a Shared Line, page 44.
Ask your system administrator
about these features and see:
• Advanced Call Handling,
page 41.
• Using a Shared Line, page 44.
• Using Cisco Extension
Mobility, page 49.
Cisco Unified IP Phone 7931G for Cisco Unified Communications Manager 6.0 79
Page 80

If you... Then... For more information...
Answer calls frequently
or handle calls on
someone’s behalf
Need to make video
calls
Determine the state of a
phone line associated
with a speed-dial
button on your phone
Want to temporarily
apply your phone
number and settings to
a shared
Unified IP Phone
Cisco
Ask your system administrator to set
up the AutoAnswer feature for your
phone.
Consider using Cisco Unified Video
Advantage, which enables you to make
video calls using your Cisco Unified IP
Phone, your personal computer, and
an external video camera.
Ask your administrator to set up the
Busy Lamp Field (BLF) feature for
your phone.
Ask your system administrator about
the Cisco Extension Mobility Service.
See Using AutoAnswer with a
Headset or Speakerphone,
page 54.
Contact your system
administrator for additional
assistance and see the
Unified VT Advantage
Cisco
Quick Start Guide and User
Guide.
See Using BLF to Determine a Line
State, page 46.
See Using Cisco Extension
Mobility, page 49.
80 OL-15791-01
Page 81

Troubleshooting Your Phone
Troubleshooting Your Phone
This section provides troubleshooting information for your Cisco Unified IP Phone.
General Troubleshooting
This section provides information to help you troubleshoot general problems with your phone. For
more information, see your system administrator.
Symptom Explanation
You cannot hear a dial
tone or complete a call
Settings is unavailable
in the Application
menu.
The softkey that you
want to use does not
appear
Cisco CallBack fails The other party might have call forwarding enabled.
The phone shows an
error message when
you attempt to set up
Call Forward All
One or more of the following factors might apply:
• You must log into the Extension Mobility service.
• You must enter a client matter code (CMC) or forced authorization
code (FAC) after dialing a number.
• Your phone has time-of-day restrictions that prevent you from using
some features during certain hours of the day.
Your system administrator might have disabled Settings on your phone.
One or more of the following factors might apply:
• You must press more to reveal additional softkeys.
• You must change the line state (for example, go off-hook or have a
connected call).
• Your phone is not configured to support the feature associated with
that softkey.
Your phone may reject your attempt to set up Call Forward All directly on
the phone if the target number that you enter would create a Call Forward
All loop or would exceed the maximum number of links permitted in a Call
Forward All chain (also known as a maximum hop count). Ask your system
administrator for details.
Cisco Unified IP Phone 7931G for Cisco Unified Communications Manager 6.0 81
Page 82

Viewing Phone Administration Data
Your system administrator might ask you to access administration data on your phone for
troubleshooting purposes.
If you are asked to... Then...
Access network
configuration data
Access status data Choose ( ) > Settings > Status and select the status item that you
Access phone model
information
Access phone call and
voice quality
information
Choose ( ) > Settings > Network Configuration and select the
network configuration item that you want to view.
want to view.
Choose ( ) > Settings > Model Information.
Choose ( ) > Settings > Status > Call Statistics.
82 OL-15791-01
Page 83

Cisco One-Year Limited Hardware Warranty Terms
Cisco One-Year Limited Hardware Warranty Terms
There are special terms applicable to your hardware warranty and various services that you can use
during the warranty period. Your formal Warranty Statement, including the warranties and license
agreements applicable to Cisco software, is available on Cisco.com at the following URL:
http://www.cisco.com/en/US/docs/general/warranty/English/1Y1DEN__.html
Cisco Unified IP Phone 7931G for Cisco Unified Communications Manager 6.0 83
Page 84

84 OL-15791-01
Page 85

Index
A
Abbreviated Dialing 41, 68
Address Book Synchronization Tool 67
answering calls 28
ASCII label field support 68
audio, quality of 14
authenticated calls 46
Auto Dial 25
AutoAnswer 54
B
barge
and shared lines 44
BLF 46
BLF Pickup 4, 20, 46
Busy Lamp Field 46
button 40
C
call forwarding
configuring from web page 71
configuring on phone 33
call logs
erasing 57
viewing and dialing from 57
call park 43
call pickup 42
call waiting 28
CallBack 26
calls
answering 28
barging 45
blocking 35
compared to lines 19
conference features for 36
ending 30
forwarding 33, 71
handling multiple 31
icons for 20
maximum per line 20
multiple parties on 36
multiple, switching between 31
muting 31
parking 43
placing 25, 26
prioritizing 48
redirecting while ringing 42
secure 46
storing and retrieving 43
transferring 32
using DND 35
Cisco Extension Mobility 49
Cisco Unified IP Phone 7931G for Cisco Unified Communications Manager 6.0 85
Page 86

Cisco Unified Communications Manager
Address Book Synchronizer 67
Cisco Unified IP Phone
troubleshooting 81
web-based services for 64
Cisco Unified Video Advantage 80
Cisco WebDialer 77
Client Matter Code, see CMC
CMC 27, 81
conference calls
Meet-Me 38
removing participants from 38
security-level for 38
viewing participants for 38
connected 20
corporate directory
using from web page 77
using on phone 57, 59
D
Details softkey, viewing multiparty calls with
58
device configuration page 64
dialing, options for 25, 26
directory
corporate 59
personal 59, 60
using from web page 77
using on phone 59
DND 35
Do Not Disturb 35
E
EM 49
encrypted calls 46
ending a call, options for 30
Extension Mobility 49
F
FAC 27, 81
Fast Dials
configuring from web page 66
using on phone 60
Forced Authorization Code, see FAC
forwarding calls, options for 33
G
group call pickup 42
H
handset
using 52
hanging up, options for 30
headset
answering calls with 28
hanging up with 30
placing calls with 25
using 52
headset performance, general 13
hold
and switching calls 31
and transferring 32
86 OL-15791-01
Page 87

Hunt groups, logging out 44
I
icons
for call states 20
for lines 20
idle 20
intercom line 20, 40
international call logging 26, 58, 62
L
language (locale) settings 71
lines
and call forwarding 33, 71
and call states 20
and using BLF 46
description of 19
icons for 20
number of calls supported on 19
ring patterns for 71
ring tones for 55
shared 44
switching between 31
text label for 71
voice message indicator setting for 71
logging out of hunt groups 44
M
Malicious Call Identification 48
MCID 48
Meet-Me conferences 38
messages
indicator for 55, 63
listening to 63
missed calls, records of 57
MLPP, using 48
mobile connect
enabling 75
multiparty calls
identifying in call logs 58
viewing details of 58
multiple calls, handling 31
mute, using 31
N
network configuration data, locating 81
O
on-hook dialing 25
P
PAB
using from web page 65
using on phone 60
password, changing 71
Personal Address Book, see PAB
Personal Directory
using from web page 65
using on phone 60
phone lines
Cisco Unified IP Phone 7931G for Cisco Unified Communications Manager 6.0 87
Page 88

description of 19
phone screen
adjusting contrast 56
changing language 56
illumination setting 56
phone services
configuring
see also User Options web pages
PIN, changing 71
placed calls, records of 57
placing calls, options for 25, 26
pre-dial 25
prioritizing calls 48
privacy
and shared lines 44
R
received calls, records of 57
redial 25
remote destination
creating 75
ring schedule 75
remote-in-use icon for shared lines 44
ring patterns, changing 71
ring schedule for remote destinations 75
ring tones, changing 55
ringer
customizing 55
volume for 55
S
secure calls 46
secure conferences 38
security, for calls 46
services, subscribing to 69
shared lines
and remote-in-use icon 44
description of 44
softkey buttons
description of 18
speakerphone
answering calls with 28
hanging up with 30
placing calls with 25
using 52
speed dial
configuring 41, 68
description of 41
labels 68
using 26
using BLF with 41
status data, locating 81
subscriptions, for phone services 69
suspicious calls, tracing 48
switching calls 31
T
TABSynch 67
transferring
options for 32
troubleshooting
general 81
88 OL-15791-01
Page 89

see also QRT
U
User Options web pages
accessing 64
configuring features and services with 65
subscribing to phone services with 69
V
voice message indicator
changing setting for 71
description of 63
voice message service 63
volume
for handset, headset or speakerphone 52
for phone ringer 55
W
web-based services
configuring 64
see also User Options web pages
WebDialer 77
whisper 20
Cisco Unified IP Phone 7931G for Cisco Unified Communications Manager 6.0 89
Page 90

90 OL-15791-01
Page 91

Americas Headquarters
Cisco Systems, Inc.
San Jose, CA
Asia Pacific Headquarters
Cisco Systems (USA) Pte. Ltd.
Singapore
Europe Headquarters
Cisco Systems International BV
Amsterdam, The Netherlands
Cisco has more than 200 offices worldwide. Addresses, phone numbers, and fax numbers are listed on the
Cisco Website at www.cisco.com/go/offices.
CCDE, CCENT, Cisco Eos, Cisco Lumin, Cisco Nexus, Cisco StadiumVision, the Cisco logo, DCE, and Welcome to the Human Network are trademarks; Changing the Way We
Work, Live, Play, and Learn is a service mark; and Access Registrar, Aironet, AsyncOS, Bringing the Meeting To You, Catalyst, CCDA, CCDP, CCIE, CCIP, CCNA, CCNP,
CCSP, CCVP, Cisco, the Cisco Certified Internetwork Expert logo, Cisco IOS, Cisco Press, Cisco Systems, Cisco Systems Capital, the Cisco Systems logo, Cisco Unity,
Collaboration Without Limitation, EtherFast, EtherSwitch, Event Center, Fast Step, Follow Me Browsing, FormShare, GigaDrive, HomeLink, Internet Quotient, IOS, iPhone, iQ
Expertise, the iQ logo, iQ Net Readiness Scorecard, iQuick Study, IronPort, the IronPort logo, LightStream, Linksys, MediaTone, MeetingPlace, MGX, Networkers, Networking
Academy, Network Registrar, PCNow, PIX, PowerPanels, ProConnect, ScriptShare, SenderBase, SMARTnet, Spectrum Expert, StackWise, The Fastest Way to Increase Your
Internet Quotient, TransPath, WebEx, and the WebEx logo are registered trademarks of Cisco Systems, Inc. and/or its affiliates in the United States and certain other countries.
All other trademarks mentioned in this document or Website are the property of their respective owners. The use of the word partner does not imply a partnership relationship
between Cisco and any other company. (0805R)
The Java logo is a trademark or registered trademark of Sun Microsystems, Inc. in the U.S. or other countries.
© 2008 Cisco Systems, Inc. All rights reserved.
OL-15791-01
Page 92

 Loading...