

Cisco TelePresence Profile Series, TelePresence C-Series, TelePresence Quick Set C20, TelePresence Quick Set C20 Plus User Manual
Page 1

Page 2

Cisco TelePresence System Profile-series, C-series codecs, Quick Set C20 User guide
Contents
Contact us
Getting started
Making calls
Phone book usage
In-call features
Advanced settings
Getting started
D145 82. 04 User guide Cisco TelePresence Profile, C -series codecs, Quick Set C20, N ov. 2010.
All contents are Copyright © 2010 Cisco Sys tems, Inc. All rights reser ved.
Chapter 1
Getting started
3
www.cisco.com
Page 3

Cisco TelePresence System Profile-series, C-series codecs, Quick Set C20 User guide
Contents
Contact us
Getting started
Making calls
Phone book usage
In-call features
Advanced settings
Getting started
Waking up the system
To make a call you need to wake up the system from standby. However, if someone calls
you, the system will wake up by itself.
• To wake up the system just pick up the TRCV remote control or press any key. You
may have to point the remote control towards the system to make sure it discovers
you.
• The system will now display the wallpaper.
• The dial-in address (H.323 Alias ID) or dial-in number (H.323 Alias E164) of your
system is displayed in the upper left corner. If you have questions about the dial-in
address or number, contact your system administrator.
• The screen will also indicate if there are any calls you have missed.
After wake-up, the screen will typically look like this:
The dial-in address (H.323 Alias ID) or dial-in number
(H.323 Alias E164) of your system is displayed in the
upper left corner.
norah.dollhouse@somecompany.com
Softkeys (described on the following pages).
Date and time of day.
Sept
20
.
If the system fails to respond to the remote control or to incoming calls, make sure that:
• The system is connected to line voltage.
• The remote control has working batteries.
• The internal cables, such as the monitor cable and/or the camera cables are properly
connected, see the installation sheet for details, if needed.
D145 82. 04 User guide Cisco TelePresence Profile, C -series codecs, Quick Set C20, N ov. 2010.
All contents are Copyright © 2010 Cisco Sys tems, Inc. All rights reser ved.
4
www.cisco.com
Page 4

Cisco TelePresence System Profile-series, C-series codecs, Quick Set C20 User guide
Recent calls
Missed calls
Placed calls
Received calls
Contents
Contact us
Getting started
Making calls
Phone book usage
In-call features
Advanced settings
Getting started
The TRC5 remote control
The Function keys in the upper part of the remote
control reflect the softkeys on screen.
The middle part of the remote control is used to handle
video, sound, phone book, menus and navigation.
The lower part of the remote control is similar to the
keypad of a mobile phone.
MICROPHONE: Press this key to
switch between setting the
microphone to on and to off.
VOLUME: Press the + or
the – on this key to adjust the
volume. Press – to mute an
incoming call.
PRESENTATION: Press this key to
show or hide a presentation.
ZOOM: Press
the + or – on this key
to zoom the camera in
and out.
RECENT CALLS
alice.wonderland@company.co.nla
Received 20.09.10 16.29
hedda.gabler@somecompany.org
Placed 20.09.10 15.10
dorian.grey@myself.net
Missed 20.09.10 14.55
frodo,b.aggins@myshire.org
Received 20.09.10 12.20
floria.tosca@somecompany.org
Placed 20.09.10 08.17
HOME
Call
Call
Presentation
Phone book
Camera control
Recent calls
Settings
Add another participant
FUNCTION KEYS: Each key
corresponds to a soft key on
the screen and represents
shortcuts and advanced
functions.
ARROW UP/DOWN: Use the and Arrow keys to navigate in the menu and to move the
camera (pan, tilt) when the menu on screen is not displayed.
ARROW LEFT: Press the
Arrow key to go one step
back in the menu or to move
to the left in a text field.
ARROW RIGHT: Press the
Arrow key to expand the
selected menu item or to
move to the right in a text
field.
D145 82. 04 User guide Cisco TelePresence Profile, C -series codecs, Quick Set C20, N ov. 2010.
All contents are Copyright © 2010 Cisco Sys tems, Inc. All rights reser ved.
OK/SE LECT: Press the center key to confirm your choice or selection.
5
www.cisco.com
Page 5

Cisco TelePresence System Profile-series, C-series codecs, Quick Set C20 User guide
Contents
Contact us
Getting started
Making calls
Phone book usage
In-call features
Advanced settings
Getting started
Alphanumeric keypad: Use the keypad in the same way as you would use a mobile phone.
PHONE BOOK: Press
this key to display the
phone book.
HOME: Press this key
to go back to the Home
menu.
CALL: Press this key to
place a call.
Press this key to accept
an incoming call.
LAYO UT: Press this key
to display the Layout
menu, then select a view
in the menu.
END C ALL / STANDBY: Press
this key
to reject an incoming call, to
end an ongoing call
or—when idle—to go
into standby mode.
When navigating in the menus
the key is used to exit the menu
system.
Press and hold this key to
have the system enter standby
mode.
0-9, a-z, period (.), @,
space, *: Press a key
repeatedly to toggle
between the options
displayed on each key.
CLEAR: Press the
remove characters in a text
field.
abc/12 3 # : Press and hold
the # key to toggle between
characters and numbers.
key to
D145 82. 04 User guide Cisco TelePresence Profile, C -series codecs, Quick Set C20, N ov. 2010.
All contents are Copyright © 2010 Cisco Sys tems, Inc. All rights reser ved.
6
www.cisco.com
Page 6
Cisco TelePresence System Profile-series, C-series codecs, Quick Set C20 User guide
Recent calls
Missed calls
Placed calls
Received calls
Contents
Contact us
Getting started
Making calls
Phone book usage
In-call features
Advanced settings
Getting started
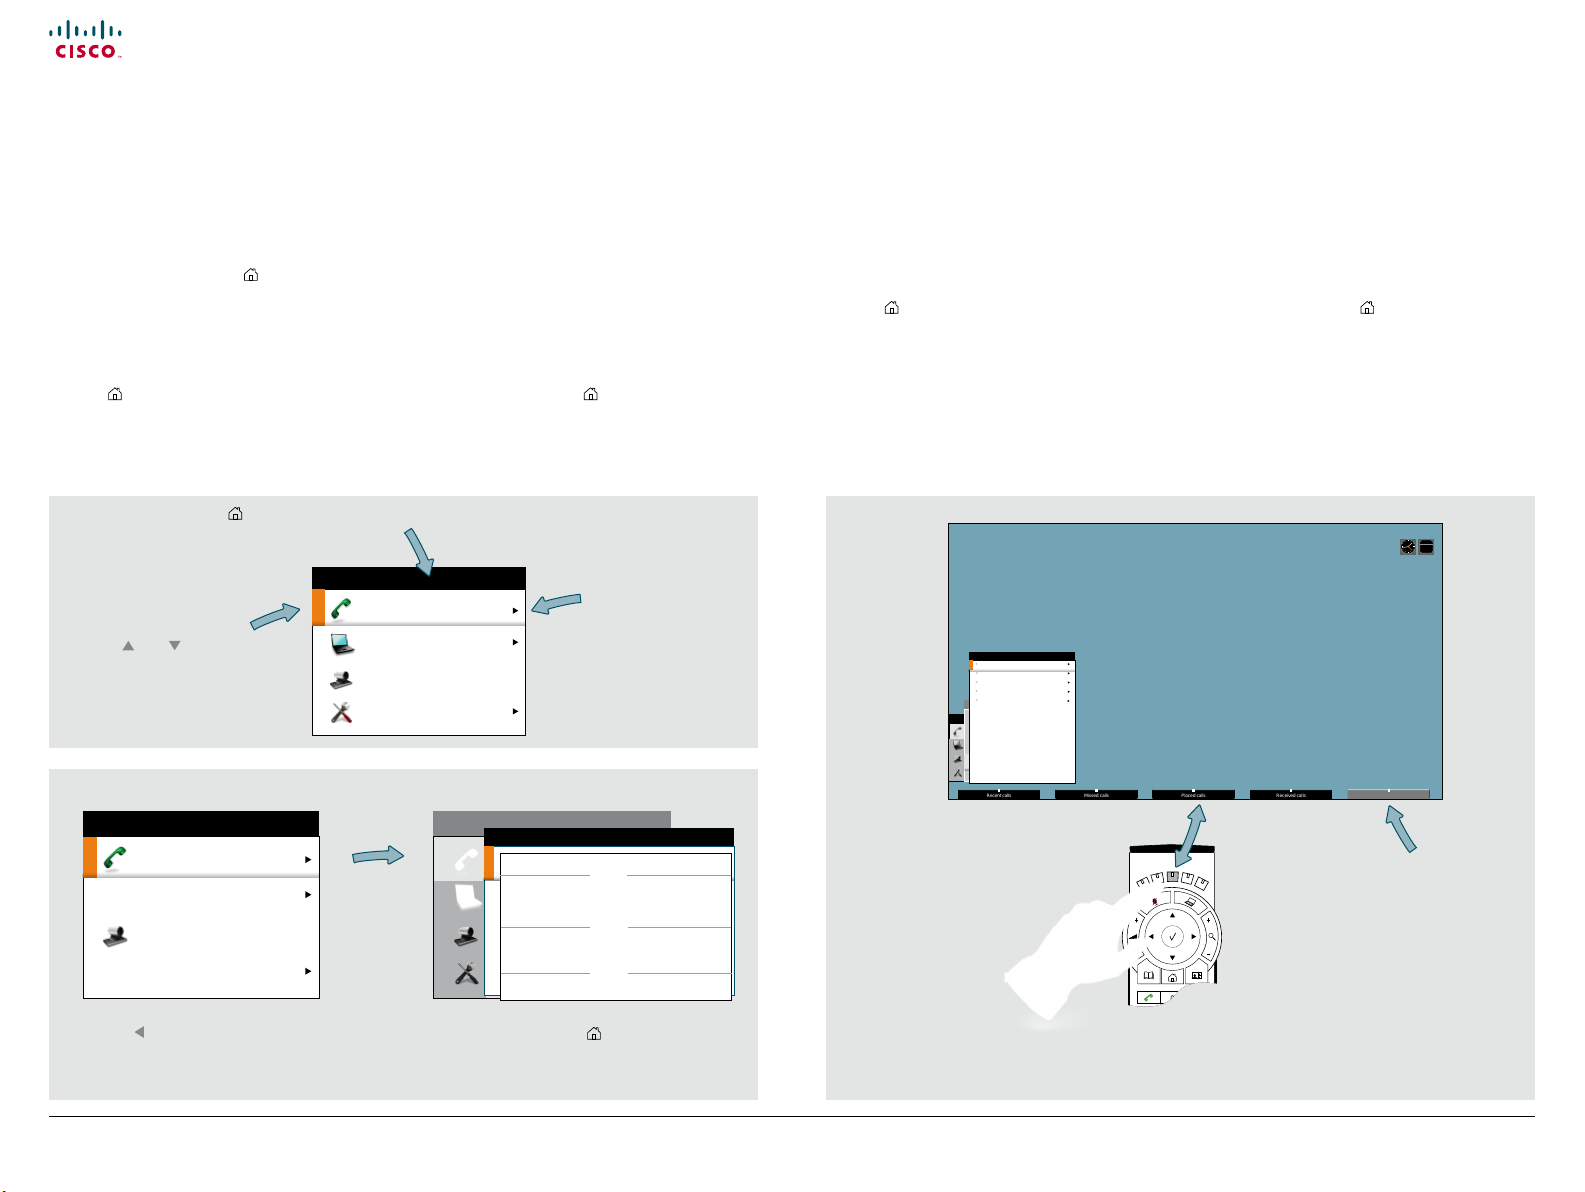
Navigating in the menus
Use the remote control to operate your video system. A few basic navigation principles
are all you need to know to get started.
• Press the Home key (
) to show the Home menu or wake up the system by lifting the
remote control.
• The Arrow keys in the center of the upper part of the remote control are used to
navigate in the menus.
• When the system shows the Home menu only (see the Fig. below), pressing Home
) will hide the menu. To bring it back, press the Home key ( ) again.
key (
Press the key to display the Home menu on the screen.
The element currently
selected is indicated by an
orange rectangle.
Use the
and Arrow
keys to navigate up and
down in a menu.
Call
Presentation
Camera control
Settings
HOME
Example showing a submenu displayed by pressing the right arrow key.
HOME
Call
Presentation
Camera control
Settings
Call
Presentation
Camera control
Settings
The little triangle
indicates that
a submenu is
available.
HOME
a
alice.wonderland@every where.co.nl
norah.dollhouse@somecompany.com
Dorian Grey
Hedda Gabler
Floria Tosca
Recent call s
My contac ts
Phone book
CALL
abc
• In an input field, pressing
C
will delete characters/numbers to the left of the cursor
position.
• When the system shows the Home menu only (see the Fig. below), pressing Home
) will hide the menu. To bring it back, press the Home key ( ) again.
key (
C
• In an input field, pressing
will delete characters/numbers to the left of the cursor
position.
Sept
20
HOME
Call
Phone book
Recent calls
Add another participant
RECENT CALLS
Softkeys not used in a
given context are shown
ghosted (grey).
alice.wonderland@company.co.nla
Received 20.09.10 16.29
hedda.gabler@somecompany.org
Placed 20.09.10 15.10
dorian.grey@myself.net
Missed 20.09.10 14.55
frodo,b.aggins@myshire.org
Received 20.09.10 12.20
floria.tosca@somecompany.org
Placed 20.09.10 0 8.17
Call
Presentation
Camera control
Settings
Context sensitive softkeys
corresponding to the function
keys of the
remote control.
Use the Arrow key key to collapse the
menu expansion (to go back one level).
D145 82. 04 User guide Cisco TelePresence Profile, C -series codecs, Quick Set C20, N ov. 2010.
All contents are Copyright © 2010 Cisco Sys tems, Inc. All rights reser ved.
Use the Home key ( ) to exit all menus
and return to showing the Home menu
only.
7
www.cisco.com
Page 7

Cisco TelePresence System Profile-series, C-series codecs, Quick Set C20 User guide
Sept
20
abc/123
Special characters
Call rate: 784 kbps
Call
Presentation
Camera control
Settings
HOME
Call
Phone book
Recent c alls
Add another participant
CALL
abc
norah
Contents
Contact us
Getting started
Making calls
Phone book usage
In-call features
Advanced settings
Getting started
Entering text in text fields
Some menu fields expect text information to be entered. This is used to enter the
number or the identity of the person you want to call. It is also used for such things as to
search in the phone book and maintain your list of contacts (My contacts).
What happens when you press a number key?
• If you press a number key when you are not in a call, the Call menu will be shown.
• The system will automatically switch to text mode (abc) inside entry fields expecting
text entries. Entering letters is similar to as on a mobile phone.
• The system will automatically switch to number mode (123 ) inside entry fields
expecting number entries. Dial with the number keys as usual.
• Press the key that corresponds to the required letter as many times as needed to
produce that letter.
• Switch between text mode (abc) and number mode (123) by keeping the # abc/123
key depressed for more than a second.
• To insert space, press the 0 _ key.
• To insert the @ sign, press the 1-key twice, while the keypad is in text mode.
• To insert the . sign, press the
.-key once, while the keypad is in number mode.
*
• To write digits and numbers in a text input field, repeatedly press the corresponding
key until the digit appears.
• To erase incorrect inputs, use the C key.
Special characters
Sometimes you will need to use special characters, for example when entering names
in My contacts.
The softkey Special characters will then be displayed. This will give you access to the
special characters menu, as shown to the left.
Special characters
If needed, press this key
repeatedly until the input
field is set as required (123/
D145 82. 04 User guide Cisco TelePresence Profile, C -series codecs, Quick Set C20, N ov. 2010.
All contents are Copyright © 2010 Cisco Sys tems, Inc. All rights reser ved.
abc).
The special characters available with Latin language settings
+ , / \ ? ( ) & #
[ ] ! $ ‘ * ~ à á
ä â ã å æ ç è é ë
ê ì í ï î ñ ò ó ö
ô õ ø ß ù ú ü û ÿ
8
www.cisco.com
Page 8

Cisco TelePresence System Profile-series, C-series codecs, Quick Set C20 User guide
Remote layout
Contents
Contact us
Getting started
Making calls
Phone book usage
In-call features
Advanced settings
Getting started
Screen layout
The layout of the screen can be changed as shown to the right.
To show the display options screen, press the
key. Alternatively, you may get to it
through Settings > Layout.
• Use the Arrow keys to move between the alternatives and use
to select the
alternative you want to use.
• You may—or may not—include selfview (to show the outgoing video signal from
your own system). This will show you what others will see from your system.
Tip: Adding wallpaper to your screen
In the Home menu, navigate
down to Settings and press the
key.
HOME
Call
Presentation
Camera control
Settings
Select between the options
available and press the
key to leave the menu
putting your choice into
effect. See also page
18 for more on this.
Layout
Main sour ce: Camera
Call settings
Language: English
Date and t ime
Sounds a nd alerts
Call
Wallpaper: Growing
Presentation
System information
Camera control
Advanced
Settings
Restart
Layout
Main sour ce: Camera
Call settings
Language: English
Date and t ime
Sounds a nd alerts
Call
Wallpaper: Growing
Presentation
System information
Camera control
Advanced
Settings
Restart
HOME
HOME
SETTINGS
In the Settings
submenu navigate
down to Wallpaper.
Press again.
SETTINGS
None
Growing
Summersky
Custom
Layout control outside a
SETTINGS
Layout
Main sour ce: Camera
Call settings
Language: English
Date and t ime
Sounds a nd alerts
Call
Wallpaper: Growing
Presentation
System information
Camera control
Advanced
Settings
Restart
HOME
Show selfview
Wallpaper
call is limited to the choice
between showing selfview
and showing a wallpaper...
LAYOUT CONTROL
selfview, the menu
will give you these
options when you
However, if you
already have
activated the
enter the menu
Layout
Main sour ce: Camera
Call settings
Language: English
Date and t ime
Sounds a nd alerts
Call
Wallpaper: Growing
Presentation
System informatio n
Camera control
Advanced
Settings
Restart
again.
Layout control used during a call gives you the possibility to include selfview...
SETTINGS
Layout control when in a
Layout
Main sour ce: Camera
Call settings
Language: English
End call
Date and t ime
Call
Sounds a nd alerts
Presentation
Wallpaper: Growing
System information
Camera control
Advanced
Settings
Restart
HOME
Show selfview
Full screen participant
call provides the choice
of showing selfview or full
screen participant...
However, if you
LAYOUT CONTROL
selfview, you may
select where the
selfview should
appear in the image
when you enter the
already have
activated the
Layout
Main sour ce: Camera
Call settings
Language: English
Date and t ime
End call
Sounds a nd alerts
Call
Wallpaper: Growing
Presentation
System informatio n
Camera control
Advanced
Restart
Settings
menu again.
Change remote layout (the outgoing video) when hosting
MultiSite Conference...
Pressing Layout will
produce a softkey
letting you choose
the layout of the
LAYOUT CONTROL
Show selfview
Speaker participant
Full screen participant
outgoing video.
Select among all
defined layouts
available.. Note that
you have no influence
on the actual layout
on the remote system.
SETTINGS
HOME
Hide selfview
Wallpaper with selfview
Full scr een selfvi ew
SETTINGS
HOME
Show selfview
Speaker participant
Full screen participant
LAYOUT CONTROL
LAYOUT CONTROL
D145 82. 04 User guide Cisco TelePresence Profile, C -series codecs, Quick Set C20, N ov. 2010.
All contents are Copyright © 2010 Cisco Sys tems, Inc. All rights reser ved.
9
www.cisco.com
Page 9

Cisco TelePresence System Profile-series, C-series codecs, Quick Set C20 User guide
Camera presets
Camera settings
Main source
Exit
Contents
Contact us
Getting started
Making calls
Phone book usage
In-call features
Advanced settings
Getting started
Camera presets
You may create predefined settings of where the camera points and the zoom. This is
referred to as camera presets. See the next page for more.
Do as follows:
1. Press the key on the remote control to display the Layout menu. Select Selfview
to be shown as required. In this way you will see what other will see of you in a call.
2. Press the key on the remote control to display the Home menu and select
Camera control.
3. Softbuttons will now appear. Press the Function key corresponding to Camera
presets (Function key number 2 from the left).
4. To hide the Camera presets, use the same Function key again.
Where to find camera presets
Sept
20
Using the presets (I)
CAMERA PRESETS
Pos. 2
Pos. 2
Pos. 3
Add camer a preset
Camera presets must have been defined before you do this.
Press the
Camera control. Use the and Arrow keys to navigate in the menu. Use to
select a preset. The camera will now move accordingly. Note that this feature may
be used any time.
key on the remote control to display the Home menu and select
CAMERA PRESETS
Pos. 2
Pos. 2
Pos. 3
Add camer a preset
Using the presets (II)
D145 82. 04 User guide Cisco TelePresence Profile, C -series codecs, Quick Set C20, N ov. 2010.
All contents are Copyright © 2010 Cisco Sys tems, Inc. All rights reser ved.
Camera presets must have been defined before you do this.
Press the
key on the remote control to display the Home menu and select
Camera control. Use the 0~9 keys to select a preset. The camera will now move
accordingly. Note that this feature may be used any time.
10
www.cisco.com
Page 10

Cisco TelePresence System Profile-series, C-series codecs, Quick Set C20 User guide
Contents
Contact us
Getting started
Making calls
Phone book usage
In-call features
Advanced settings
Getting started
Adding a camera preset
For more on camera presets, as such, see the previous page.
To add a camera preset, do as follows:
1. Press the key on the remote control to display the Layout menu. Select Selfview
to be shown. In this way you will see what other will see of you in a call.
2. Adjust where the camera points and the zoom using the four Arrow keys and the
Zoom key.
3. Press the key on the remote control to display the Home menu and select Camera
control.
4. This will cause softbuttons to appear. Press the Function key corresponding to
Camera presets (Function key number 2 from the left).
5. Follow the procedure shown to the right.
Moving and zooming the camera
Adding a camera preset
In the Camera presets menu
navigate to Add camera preset and
press the key.
Navigate to the preset to define (or
redefine, if it already existed). Press
to produce the submenu.
Give it a descriptive name, use
special characters, if needed.
Pos. 2
Pos. 2
Pos. 3
Add camer a preset
SET CA MERA PRE SETS
Default
Zoom out
Whiteboard
Not defined
Not defined
Not defined
Not defined
Not defined
Not defined
CAMERA PRESETS
Name Table end
Save new p reset
Cancel
Use the Arrow keys and
the Zoom keys.
D145 82. 04 User guide Cisco TelePresence Profile, C -series codecs, Quick Set C20, N ov. 2010.
All contents are Copyright © 2010 Cisco Sys tems, Inc. All rights reser ved.
SET CA MERA PRE SETS
Default
Zoom out
Whiteboard
Not defined
Not defined
Not defined
Save the new preset.
Not defined
Not defined
Not defined
11
Name Table end
Save new p reset
Cancel
www.cisco.com
Page 11

Cisco TelePresence System Profile-series, C-series codecs, Quick Set C20 User guide
Contents
Contact us
Getting started
Making calls
Phone book usage
In-call features
Advanced settings
Getting started
Setting date and time manually
You may specify date and time zone settings along with date and time format and the
date and time of day itself.
Do as follows:
1. Start from the Home menu and navigate down to Settings and press the key. Then
navigate to Date and time and press the
2. Use Arrow keys and the key to set everything as required.
CALL SETTINGS
Set date and time: Manual
Day: 10
Month: September
Year: 2010
Time: 13:37
Date format: Day, Month, Year
Time format: 2 4 hours
The options shown here are
available when manual settings
have been chosen only.
key.
10
February
2010
13:37
Year.Month.Day (yyy y.mm.dd)
Month.Day.Year (mm.dd.yyy y)
Day.Month.Year (dd.mm.yyy y)
24 hours
12 hours (am/pm)
Setting date and time automatically
You may have the date and time of day set automatically. However, you must still specify
time and date formats as well as the time zone.
Do as follows:
1. Start from the Home menu and navigate down to Settings and press the key. Then
navigate to Date and time and press the
2. Use Arrow keys and the key to set everything as required.
Scroll with the
and Arrow keys
to access settings
not shown.
DATE AND TIME
Set dat e and time: Auto
Time zon e: GMT–11:00 (M idway Isla nd
Date fo rmat: Day, Mont h, Year
Time fo rmat: 24 hour s
key.
GMT- 12:0 0
International Da te Line West
GMT- 11:0 0
Midway Island, Sa moa
GMT- 10:0 0
Hawaii
GMT-09:00
Alaska
GMT- 08: 00
Pacific time
GMT- 07:0 0
Arizona
GMT- 07:0 0
Mountain Time
GMT- 07:0 0
Chihuahua, La Paz, Mazattan
GMT-06:00
Central America
GMT-06:00
Saskatchewan
GMT-06:00
Guadalajara, Mexico City, Monterrey
Year.Month.Day (yyy y.mm.dd)
Month.Day.Year (mm.dd.yyyy)
Day.Month.Year (dd.mm.yyyy)
TIME ZONES
D145 82. 04 User guide Cisco TelePresence Profile, C -series codecs, Quick Set C20, N ov. 2010.
All contents are Copyright © 2010 Cisco Sys tems, Inc. All rights reser ved.
24 hours
12 hour s (am/pm)
16
www.cisco.com
Page 12

Cisco TelePresence System Profile-series, C-series codecs, Quick Set C20 User guide
Contents
Contact us
Getting started
Making calls
Phone book usage
In-call features
Advanced settings
Getting started
Selecting ring tone
The system lets you choose between a multitude of ring tones.
Do as follows:
1. Start from the Home menu and navigate down to Settings and press the key.
2. Then navigate to Sounds and alerts and press the key. Navigate to Ring tone and
press the key. Use the and Arrow keys to move among the ring tones. Each ring
tone will be played when you position the cursor at it.
3. Press the key to exit the menu putting changes into effect or the
Arrow key to leave the menu going one step back.
SETTINGS
Layout
Main source: Camera
Call settings
Language: English
Date and t ime
Sounds and aler ts
Call
Wallpaper: Growing
Presentation
Ring tone: Marbles
System information
Camera control
Ring tone volume: 40
Advanced
Key tone: On
Settings
Restart
HOME
SOUNDS AND ALERTS
Marbles
IceCrystals
Polaris
Alert
Discreet
Fantasy
Jazz
Nordic
Echo
Rhythmic
Setting ring tone volume
The system lets you set the ring tone volume.
Do as follows:
1. Start from the Home menu and navigate down to Settings and press the key.
2. Then navigate to Sounds and alerts and press the key. Navigate to Ring tone
volume and press the key. Use the and Arrow keys to set the volume.
3. Press the key to exit the menu putting changes into effect or the
Arrow key to leave the menu going one step back.
SETTINGS
Layout
Main source: Camera
Call settings
Language: English
Date and t ime
Sounds and aler ts
Call
Wallpaper: Growing
Presentation
Ring tone: Marbles
System information
Camera control
Ring tone volume: 40
Advanced
Key tone: On
Settings
Restart
HOME
SOUNDS AND ALERTS
D145 82. 04 User guide Cisco TelePresence Profile, C -series codecs, Quick Set C20, N ov. 2010.
All contents are Copyright © 2010 Cisco Sys tems, Inc. All rights reser ved.
17
www.cisco.com
Page 13

Cisco TelePresence System Profile-series, C-series codecs, Quick Set C20 User guide
Contents
Contact us
Getting started
Making calls
Phone book usage
In-call features
Advanced settings
Making calls
D145 82. 04 User guide Cisco TelePresence Profile, C -series codecs, Quick Set C20, N ov. 2010.
All contents are Copyright © 2010 Cisco Sys tems, Inc. All rights reser ved.
Chapter 2
Making calls
21
www.cisco.com
Page 14

Cisco TelePresence System Profile-series, C-series codecs, Quick Set C20 User guide
Call rate: 6000 kbps
Contents
Contact us
Getting started
Making calls
Phone book usage
In-call features
Advanced settings
Making calls
Making calls by dialing the number
The term “number” has a wide definition here—you may use the procedure outlined on
this page to call people by their alphanumeric address as well, for example:
“helen.karr@company.com”
Do as follows:
1. Press the key to produce the Call menu.
2. Key in the “number” to call. If needed, switch to alphanumeric or numeric setting by
means of the ab c/123 softkey.
3. Press the softkey Special characters to access non-standard characters, if
needed. See “ Special characters” on page 8 for more on this.
4. Press followed by or, press twice to start calling.
The system will search for matches as you write along.
You may alter the call rate setting before you place the call, if needed. Look for Softkey
number two from the right (
display the Call rate setting menu. Select a new setting, if required.
Press the
Call menu, if needed. Position
the cursor at Call and press
to display the submenu.
key to produce the
). Press the corresponding Function key to
As soon as you start to key in, the system
will look for possible matches in the
Recent calls list, My contacts, and the
Phone book.
When someone is calling
Respond to an incoming call by pressing the key on the remote control to accept it, or
press the key to reject it.
Press the
on the remote
control to answer
an incoming call.
key
reject an incoming
Press the
key on the
remote control to
call.
Terminating an ongoing call
Terminating an ongoing call is similar to terminating calls on a cell phone—just press the
key on the remote control.
HOME
Call
Presentation
Camera control
Settings
D145 82. 04 User guide Cisco TelePresence Profile, C -series codecs, Quick Set C20, N ov. 2010.
All contents are Copyright © 2010 Cisco Sys tems, Inc. All rights reser ved.
Call
a
alice.wonderland@every where.co.nl
Presentation
norah.dollhouse@somecompany.com
Camera control
Dorian Grey
Hedda Gabler
Settings
Floria Tosca
Recent call s
My contac ts
Phone book
HOME
CALL
abc
22
Press the key on the remote
control to terminate an ongoing
call.
www.cisco.com
Page 15

Cisco TelePresence System Profile-series, C-series codecs, Quick Set C20 User guide
Contents
Contact us
Getting started
Making calls
Phone book usage
In-call features
Advanced settings
Making calls
Making calls using phone book
Using the phone book is time saving and prevents you from calling the wrong number by
accident.
The phone book entries are sorted alphabetically.
Phone book entries are also called contacts.
Method 1:
Press the
Phone book
key…
If you know your way, then navigate down to the folder required and press
the contents of that folder. Use the Arrow keys to locate whom to call. Press to
place the call.
As you key in someone’s “number”, the system will immediately search for matches.
Alternatively, you may search for an entry in the phone book. This is described in
“Searching in the phone book” on page 31.
… to show the Phone book.
PHONE BOOK
Search
My cont acts
0.1 - Beijin g Office
0.2 - Lon don Offic e
0.3 - New Yor k Office
0.4 - Osl o Office
0.5 - San J ose Offic e
0.5 - Wash ington Offi ce
to produce
Method 2:
Press the key to produce the Call menu, if needed.
Position the cursor at
submenu…
...then navigate down to
Phone book.
Press
to display the phone
book.
If you know your way, navigate down
to the folder required and press
to produce the contents of that
folder.
Use the Arrow keys to locate whom
to call and press
Alternatively, you may search for
an entry in the phone book . This is
described in
phone book” on page 31.
Call and press to produce the
to place the call.
“Searching in the
Search
My contacts
0.1 - Beijing Off ice
0.2 - Lo ndon Of fice
0.3 - New Yor k Office
0.4 - Oslo Off ice
0.5 - San Jose Of fice
0.5 - Washington Offi ce
Call
Presentation
Camera control
Settings
Call
Call
Presentation
Phone book
Camera control
Recent call s
Settings
Add another participant
HOME
CALL
HOME
PHONE BOOK
D145 82. 04 User guide Cisco TelePresence Profile, C -series codecs, Quick Set C20, N ov. 2010.
All contents are Copyright © 2010 Cisco Sys tems, Inc. All rights reser ved.
23
www.cisco.com
Page 16

Cisco TelePresence System Profile-series, C-series codecs, Quick Set C20 User guide
Recent calls
Missed calls
Placed calls
Received calls
Contents
Contact us
Getting started
Making calls
Phone book usage
In-call features
Advanced settings
Making calls
Making calls using the recent calls list
CALL
If you have called somebody, or somebody has called you, this will be listed in the list of
recent calls.
To gain access to the recent calls list, press the
key on the remote control.
You may also copy entries in the recent calls list to your personal phone book (My
contacts)—see
When you have selected whom to call press the
“Phone book usage” on page 29 for details.
key again to call the selected entry.
Call
Presentation
Camera control
Settings
alice.wonderland@company.co.nla
Received 20.09.10 16.29
hedda.gabler@somecompany.org
Placed 20.09.10 15.10
dorian.grey@myself.net
Missed 20.09.10 14.55
frodo,b.aggins@myshire.org
Received 20.09.10 12.20
floria.tosca@somecompany.org
Placed 20.0 9.10 08.17
Call
Call
Presentation
Phone book
Camera control
Recent call s
Settings
Add another participant
HOME
RECENT CALLS
HOME
Call
Call
Presentation
Phone book
Camera control
Recent call s
Settings
Add another participant
HOME
Sept
20
The icons used
The icon is used for calls made by you.
The icon is used for calls received.
The icon is used for calls you have missed.
D145 82. 04 User guide Cisco TelePresence Profile, C -series codecs, Quick Set C20, N ov. 2010.
All contents are Copyright © 2010 Cisco Sys tems, Inc. All rights reser ved.
Select what type of recent calls to show; all recent calls, just the missed calls, just the
placed calls or just the received calls, by means of the softkeys.
24
www.cisco.com
Page 17

Cisco TelePresence System Profile-series, C-series codecs, Quick Set C20 User guide
Contents
Contact us
Getting started
Making calls
Phone book usage
In-call features
Advanced settings
Making calls
Management systems booking list
If your video network makes use of the Cisco Telepresence Management System (TMS),
your video system may be set up for scheduled meetings from remote.
Typically, the TMS works with tools like Microsoft Outlook, permitting employees to book
and schedule video calls and conferences.
Any bookings applicable to your system will appear on the screen as shown in the below
example.
john.doe@videocompany.co.nl a
NOW - 14:3 0
Align weekly
14:30 - 1 5:00
Sales meeting planning
15:00 - 1 5:30
Release planning
TODAY’S BOOKINGS
Sept
20
D145 82. 04 User guide Cisco TelePresence Profile, C -series codecs, Quick Set C20, N ov. 2010.
All contents are Copyright © 2010 Cisco Sys tems, Inc. All rights reser ved.
25
www.cisco.com
Page 18

Cisco TelePresence System Profile-series, C-series codecs, Quick Set C20 User guide
Contents
Contact us
Getting started
Making calls
Phone book usage
In-call features
Advanced settings
Phone book usage
D145 82. 04 User guide Cisco TelePresence Profile, C -series codecs, Quick Set C20, N ov. 2010.
All contents are Copyright © 2010 Cisco Sys tems, Inc. All rights reser ved.
Chapter 3
Phone book usage
29
www.cisco.com
Page 19

Cisco TelePresence System Profile-series, C-series codecs, Quick Set C20 User guide
Contents
Contact us
Getting started
Making calls
Phone book usage
In-call features
Advanced settings
Phone book usage
Basic phone book features
Your video system contains a phone book. The phone book is organized in a way very
similar to what you find in a mobile phone.
It contains a section where you can add your own list of contacts, and most corporate
solutions will also include a corporate phone list.
This corporate phone list is normally installed and maintained from remote by your
system administrator through a management system like the Cisco Telepresence
Management Suite (TMS), which is available separately.
You cannot edit the corporate list yourself, but you may add entries to My Contacts.
These may be edited as much as you want.
Navigating in the phone book
• Navigate in the phone book with the Arrow and keys.
• A folder icon indicates that there is a folder here. Press the
Arrow key to display the
contents of this folder. Repeat, if needed, if there are more levels.
• Whenever you are at a lower level, use the
Arrow key to move one level back.
Calling an entry in the phone book
When an entry is located, just press the key to place the call.
You can also open the phone book via the menu system, see ”Making calls using
phone book” on page 23.
Opening the phone book:
Press the
... the Phone book menu will now open…
Folders contain
phone book
entries (and they
may even contain
subfolders).
key…
PHONE BOOK
Search
My contacts
0.1 - Beijing Off ice
0.2 - Lo ndon Of fice
0.3 - New Yor k Office
0.4 - Oslo Off ice
0.5 - San Jose Of fice
0.5 - Washington Offi ce
Need to search for an entry in the phone book? See ”Searching in the phone book ”
on page 31.
D145 82. 04 User guide Cisco TelePresence Profile, C -series codecs, Quick Set C20, N ov. 2010.
All contents are Copyright © 2010 Cisco Sys tems, Inc. All rights reser ved.
30
The phone book typically contains your own My contacts and a corporate phone book.
You may create your own list of contacts in My contacts.
www.cisco.com
Page 20

Cisco TelePresence System Profile-series, C-series codecs, Quick Set C20 User guide
Contents
Contact us
Getting started
Making calls
Phone book usage
In-call features
Advanced settings
Phone book usage
Searching in the phone book
The My contacts may contain up to 200 entries, but the entire phone book can be
virtually unlimited in size. Consequently, using the arrow keys as the only navigation
device can easily mean a lot of work. What to do?
You may then use Quick Search by Letters. Whenever you are inside the phone book,
navigating in the list of entries, the numerical keypad automatically switches from
mode to abc mode. To locate a specific entry, just type in the first letter as with a mobile
phone. The system will then display all matches. Add more letters to refine your search.
123
Entering text in the search field
Example: How do I write “alice 123” in the Search input field in the phone book?
Do as follows:
1. Press the 2-key once to get an a
2. Press the 5-key three times to get an l
3. Press the 4-key three times to get an i
4. Press the 2-key three times to get a c
5. Press the 3-key twice to get an e
6. Press the 0-key once to get space
7. Press the 1-key ten times to get a 1
8. Press the 2-key four times to get a 2
9. Press the 3-key four times to get a 3
How to open the phone book is described in “Basic phone book features” on page
30.
D145 82. 04 User guide Cisco TelePresence Profile, C -series codecs, Quick Set C20, N ov. 2010.
All contents are Copyright © 2010 Cisco Sys tems, Inc. All rights reser ved.
Quick search by letters
Just type the letter (or switch to 123 mode by pressing the # key to key in digits) and the
Search field will be activated immediately. The phone book will then look something like this:
PHONE BOOK
Search
The search will begin immediately. Add more letters to narrow and refine your search.
Example: Keying in da, will return entries like Dave Olson and David Jones, but also John Dahl
and Vittorio Dalmazzino. There is no case sensitivity.
31
da
My contacts
0.1 - Beijing Off ice
0.2 - Lo ndon Of fice
0.3 - New Yor k Office
0.4 - Oslo Off ice
0.5 - San Jose Of fice
0.5 - Washington Offi ce
abc
www.cisco.com
Page 21

Cisco TelePresence System Profile-series, C-series codecs, Quick Set C20 User guide
Contents
Contact us
Getting started
Making calls
Phone book usage
In-call features
Advanced settings
In-call features
D145 82. 04 User guide Cisco TelePresence Profile, C -series codecs, Quick Set C20, N ov. 2010.
All contents are Copyright © 2010 Cisco Sys tems, Inc. All rights reser ved.
Chapter 4
In-call features
34
www.cisco.com
Page 22

Cisco TelePresence System Profile-series, C-series codecs, Quick Set C20 User guide
Contents
Contact us
Getting started
Making calls
Phone book usage
In-call features
Advanced settings
In-call features
Sharing a PC presentation
General recommendations tips for making your video meeting room as good as possible
are described in the Administrator guide for this product. The Administrator guide may
be downloaded from www.tandberg.com or www.cisco.com/go/telepresence/docs.
Dual video stream
With dual video stream you can view two different live video streams simultaneously—
the main video and one additional source. This could for example be both a PC
presentation and the person who gives the presentation.
If one of the video systems does not support dual video stream, no second video stream
will be established and the PC presentation will be shown as the main video.
Sharing a presentation
To share a presentation, do as follows:
1. Make sure the PC does not cover any of the microphones. This will reduce the audio
quality at the far end.
2. Locate the DVI cable and connect the PC to the video system. Connect the audio
mini-jack output from the PC, or any other source—including Ipod—to the mini-jack
socket of the cable to get sound. Connect the RCA connectors to the corresponding
sockets on the codec/endpoint.
3. When pressing the Presentation button on the remote control the default
presentation source is activated.
The DVI/VGA input is compliant with VESA Extended Display Identification Data (EDID)
and will be able to notify the PC of the supported output formats.
If the presentation fails to show
• Normally you must press a special key combination to switch the PC image from the
PC screen to the video screen.
• Check that the presentation source is correctly defined. Access to this setting may be
password protected by your system administrator. The procedure is described in the
Administrator guide for this product.
• Make sure your PC is set to activate your VGA output.
Other presentation sources
You can also connect other presentation sources like:
• DVD
• Document camera
To specify which source to serve as presentation source select it as shown here. Note that
the name of each source can be changed, consult your administrator for details on this.
D145 82. 04 User guide Cisco TelePresence Profile, C -series codecs, Quick Set C20, N ov. 2010.
All contents are Copyright © 2010 Cisco Sys tems, Inc. All rights reser ved.
35
Call
Presentation
Camera control
Settings
HOME
Secondar y camera (no signal)
Call
PC
Presentation
DVD
Camera control
Document camera
Settings
No presentation
HOME
PRESENTATION
www.cisco.com
Page 23

Cisco TelePresence System Profile-series, C-series codecs, Quick Set C20 User guide
Contents
Contact us
Getting started
Making calls
Phone book usage
In-call features
Advanced settings
In-call features
Controlling the cameras
During a call, you may control where your own camera is pointing and the zoom.
However, far end systems with remotely controllable cameras may also permit you to
control their camera’s panning and zooming. This is called Far end camera control.
For video conferences with more than two participants, far end is an ambiguous term.
Consequently, far end camera control is not accessible unless you are in a point-to-point
call.
Controlling your own camera (near side)
1. During a call, enter camera control mode by means of either of the and Arrow
keys.
The display will now typically look like below, note that selfview has been activated
by the system (even if it was not in advance).
• Use the Arrow keys to change where the camera points and use the Zoom keys to
adjust the zoom.
Camera Presets, Camera settings and Main source are all explained in the section
Getting started.
Controlling the far end camera
1. During a call, enter camera control mode by means of either of the and Arrow
keys.
2. Press the leftmost Function key to access the far end camera.
Access to far
end camera (if
far end camera
is remotely
controllable).
D145 82. 04 User guide Cisco TelePresence Profile, C -series codecs, Quick Set C20, N ov. 2010.
All contents are Copyright © 2010 Cisco Sys tems, Inc. All rights reser ved.
Access to your
own camera
presets, if defined.
Access to your
own camera’s
settings.
Access to your
own system’s main
source setting.
Exit this
mode.
Back to near end
camera control.
Exit this
mode.
3. Far end camera control is restricted to controlling where the camera points and to
zooming. Nothing else. Use the arrow keys to change where the camera points and
the zoom keys to set the far end camera zoom.
36
www.cisco.com
Page 24

Cisco TelePresence System Profile-series, C-series codecs, Quick Set C20 User guide
Contents
Contact us
Getting started
Making calls
Phone book usage
In-call features
Advanced settings
Contact us
THE SPECIFICATIONS AND INFORMATION REGARDING THE PRODUCTS
IN THIS MANUAL ARE SUBJECT TO CHANGE WITHOUT NOTICE. ALL
STATEMENTS, INFORMATION, AND RECOMMENDATIONS IN THIS MANUAL
ARE BELIEVED TO BE ACCURATE BUT ARE PRESENTED WITHOUT
WARRANTY OF ANY KIND, EXPRESS OR IMPLIED. USERS MUST TAKE FULL
RESPONSIBILITY FOR THEIR APPLICATION OF ANY PRODUCTS.
THE SOFTWARE LICENSE AND LIMITED WARRANTY FOR THE
ACCOMPANYING PRODUCT ARE SET FORTH IN THE INFORMATION PACKET
THAT SHIPPED WITH THE PRODUCT AND ARE INCORPORATED HEREIN BY
THIS REFERENCE. IF YOU ARE UNABLE TO LOCATE THE SOFTWARE LICENSE
OR LIMITED WARRANTY, CONTACT YOUR CISCO REPRESENTATIVE FOR A
COPY.
The Cisco implementation of TCP header compression is an adaptation of a
program developed by the University of California, Berkeley (UCB) as part of
UCB’s public domain version of the UNIX operating system. All rights reserved.
Copyright © 1981, Regents of the University of California.
NOTWITHSTANDING ANY OTHER WARRANTY HEREIN, ALL DOCUMENT
FILES AND SOFTWARE OF THESE SUPPLIERS ARE PROVIDED “AS IS” WITH
ALL FAULTS. CISCO AND THE ABOVE-NAMED SUPPLIERS DISCLAIM ALL
WARRANTIES, EXPRESSED OR IMPLIED, INCLUDING, WITHOUT LIMITATION,
THOSE OF MERCHANTABILITY, FITNESS FOR A PARTICULAR PURPOSE AND
NONINFRINGEMENT OR ARISING FROM A COURSE OF DEALING, USAGE, OR
TRADE PRACTICE.
On our web site you will find an overview of the worldwide Cisco contacts.
Go to: http://www.cisco.com/web/siteassets/contacts/index.html
IN NO EVENT SHALL CISCO OR ITS SUPPLIERS BE LIABLE FOR ANY
INDIRECT, SPECIAL, CONSEQUENTIAL, OR INCIDENTAL DAMAGES,
INCLUDING, WITHOUT LIMITATION, LOST PROFITS OR LOSS OR DAMAGE TO
DATA ARISING OUT OF THE USE OR INABILITY TO USE THIS MANUAL, EVEN
IF CISCO OR ITS SUPPLIERS HAVE BEEN ADVISED OF THE POSSIBILITY OF
SUCH DAMAGES.
Cisco and the Cisco Logo are trademarks of Cisco Systems, Inc. and/or its
affiliates in the U.S. and other countries. A listing of Cisco’s trademarks can
be found at www.cisco.com/go/trademarks. Third party trademarks mentioned
are the property of their respective owners. The use of the word partner does
not imply a partnership relationship between Cisco and any other company.
(1005R)
Any Internet Protocol (IP) addresses and phone numbers used in this document
are not intended to be actual addresses and phone numbers. Any examples,
command display output, network topology diagrams, and other figures
included in the document are shown for illustrative purposes only. Any use of
actual IP addresses or phone numbers in illustrative content is unintentional and
coincidental.
D145 82. 04 User guide Cisco TelePresence Profile, C -series codecs, Quick Set C20, N ov. 2010.
All contents are Copyright © 2010 Cisco Sys tems, Inc. All rights reser ved.
44
Corporate Headquarters
Ciso Systems, Inc.
170 West Tasman Dr.
San Jose, CA 95134 USA
www.cisco.com
 Loading...