

Page 1
D 14067.02
02.2010
1
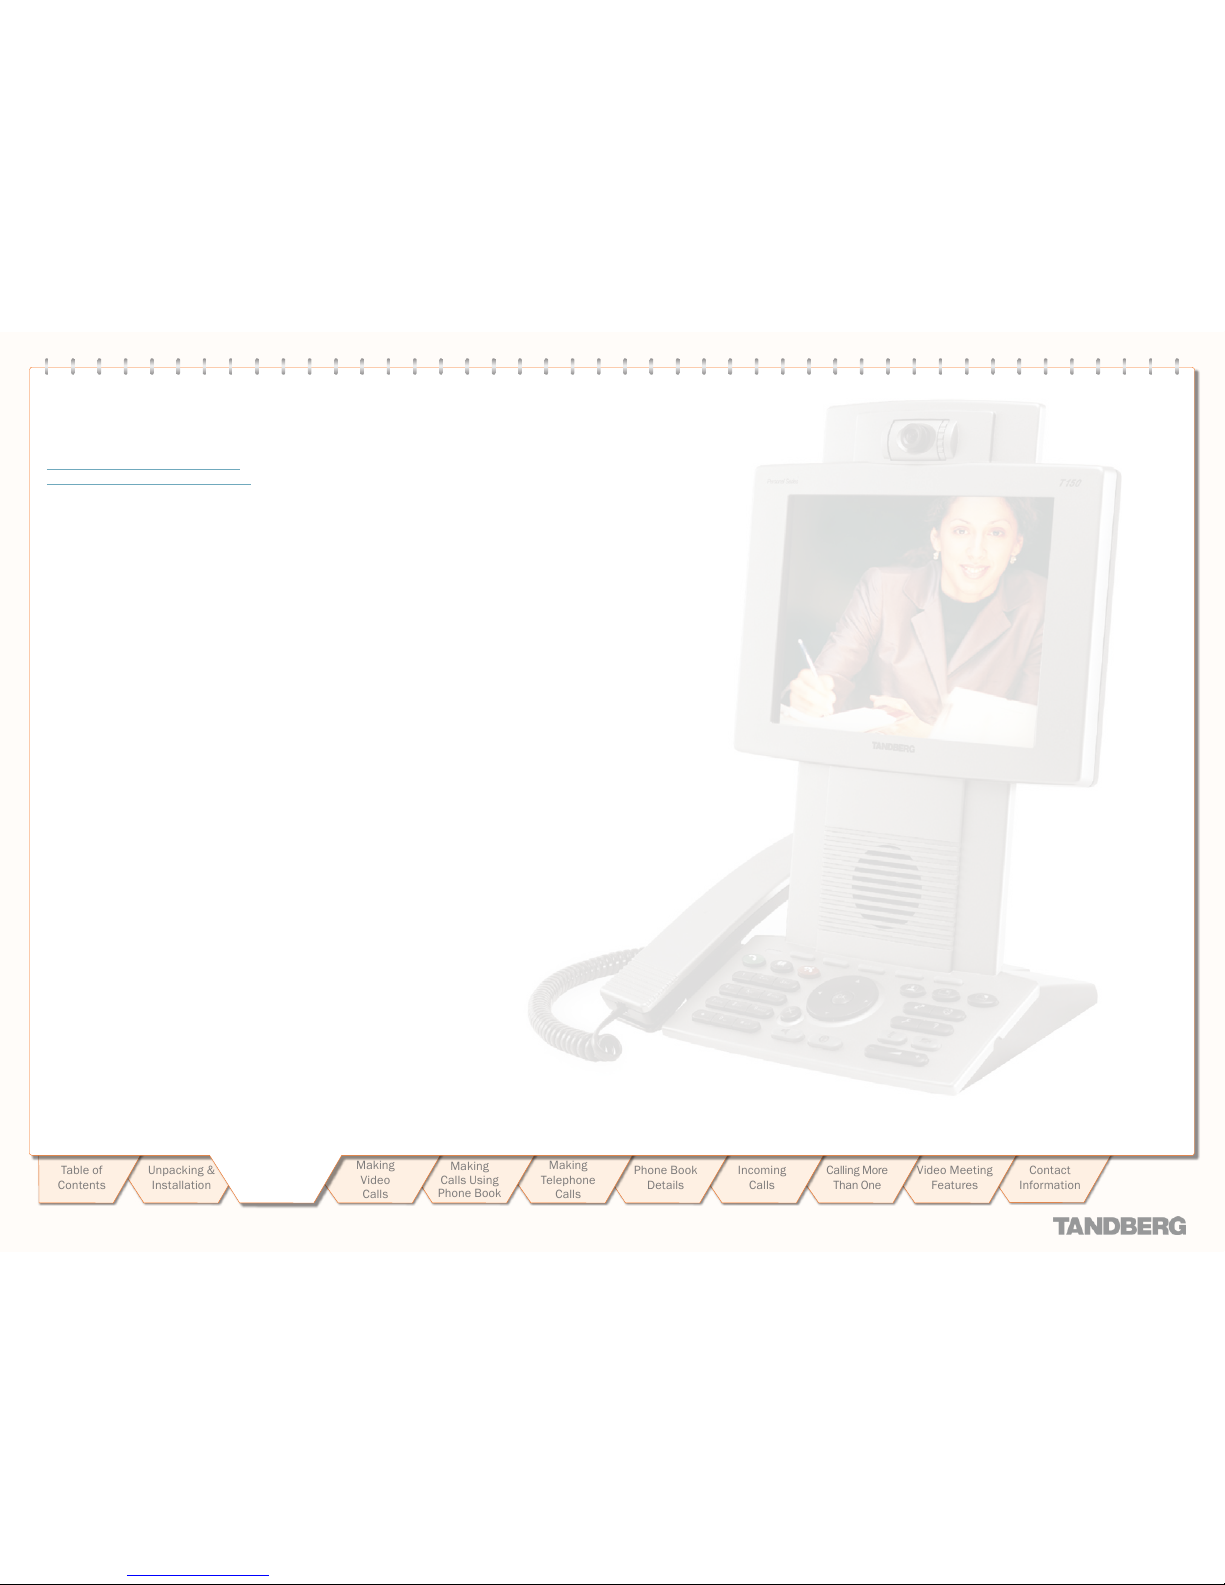
TANDBERG 150
USER GUIDE
Table of
Contents
Operating
Principles
Making
Video
Calls
Making
Calls Using
Phone Book
Phone Book
Details
Incoming
Calls
Calling More
Than One
Video Meeting
Features
Contact
Information
Unpacking &
Installation
Making
Telephone
Calls
USER GUIDE
Page 2
D 14067.02
02.2010
2
TANDBERG 150
USER GUIDE
Table of
Contents
Operating
Principles
Making
Video
Calls
Making
Calls Using
Phone Book
Phone Book
Details
Incoming
Calls
Calling More
Than One
Video Meeting
Features
Contact
Information
Unpacking &
Installation
Making
Telephone
Calls
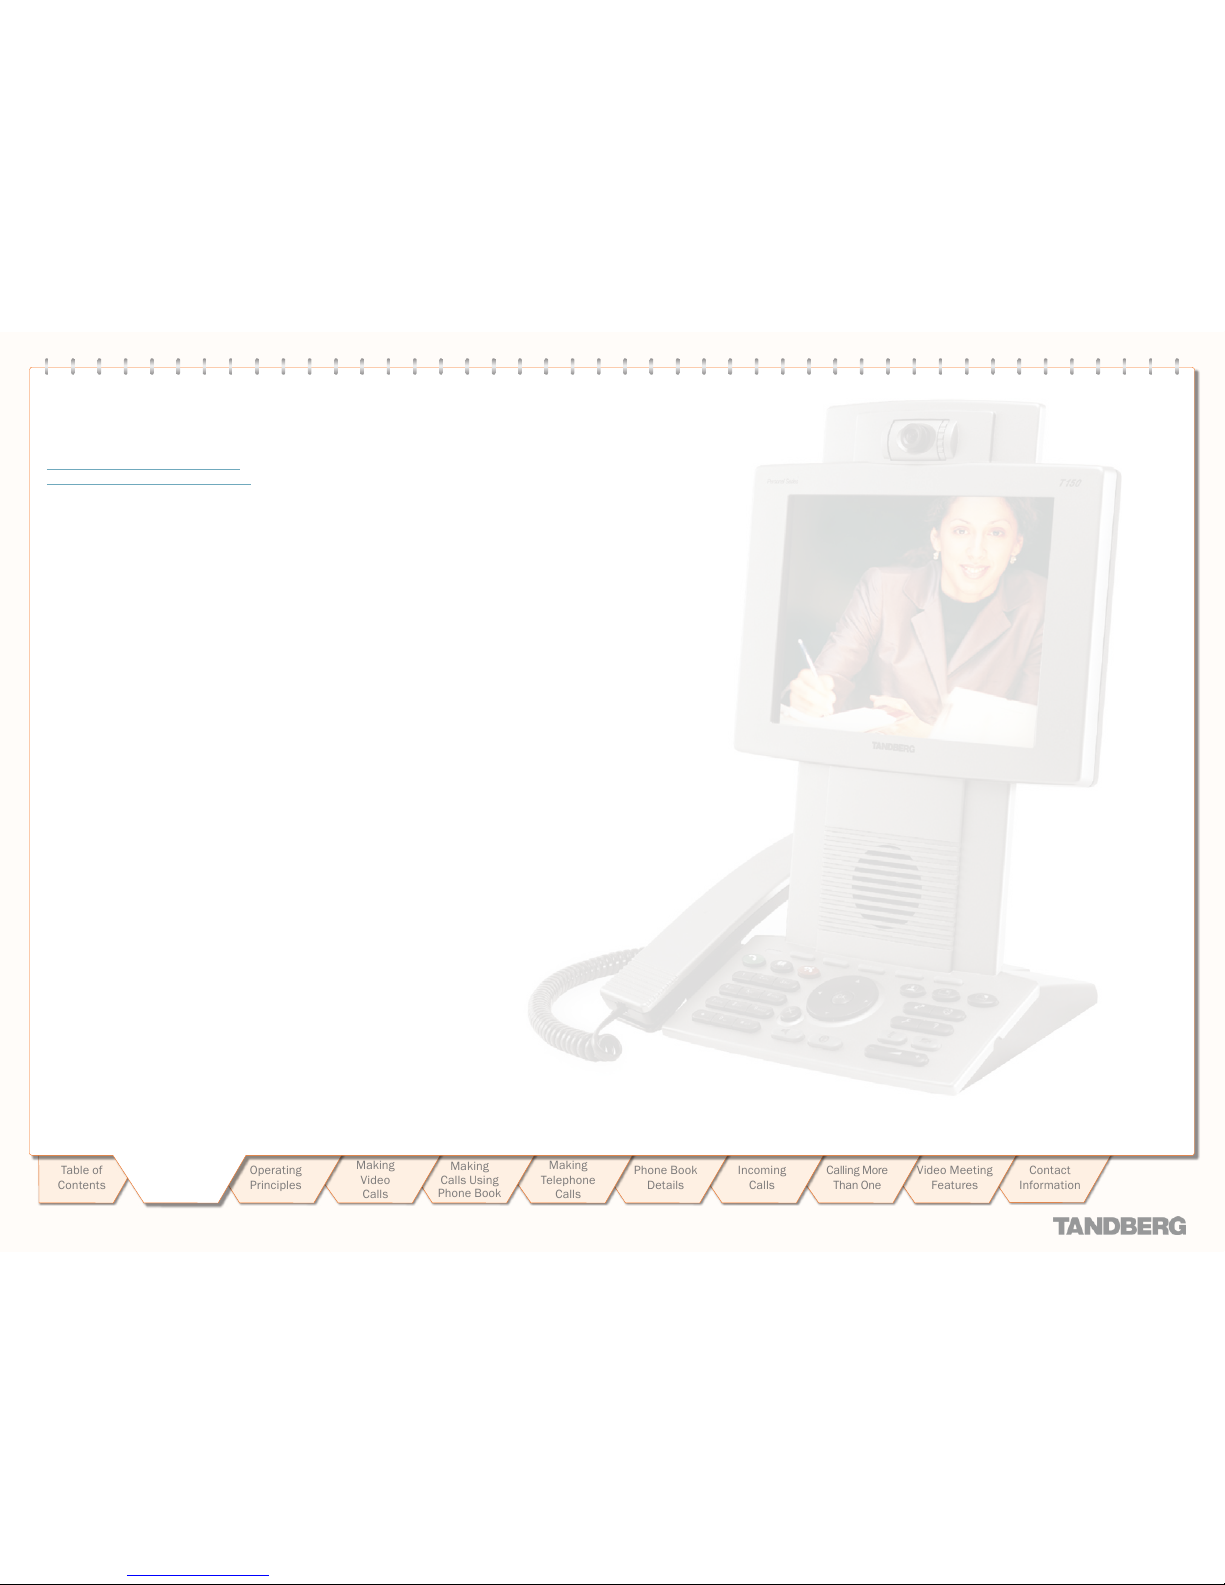
Table of
Contents
What’s in this
User Guide?
150
Unpacking and Installation
Unpacking and Installation ..............................................................4
Assembling the Unit ...................................................................4
Mounting the (optional) Handset .............................................4
Connecting Cables .....................................................................4
Operating Principles
Introduction ......................................................................................6
About Making and Receiving Calls ............................................6
Using TT Y for Text Exchange ......................................................6
The Icons Appearing on the Screen ..........................................6
Your TANDBERG 150 Keypad at a Glance ........................6
The Different Parts of Your 150
The Keyboard in Detail ....................................................................7
Navigating in the Menus ..................................................................8
Basic Menu Navigation Rules ....................................................8
Speed Dials .................................................................................... 10
About Speed Dials ...................................................................10
Using Speed Dials to Make Calls ........................................... 10
Making Video Calls
Making Video Calls Dialling Manually .......................................... 12
Calling Someone Not Listed in Your Phone Book .................12
Want to Make a Simple Telephone Call Instead? .................12
Want to Make a Call Using the Phone Book instead? .......... 12
Accessing the Alphanumeric Characters ..............................12
Dialling Tips ..............................................................................12
Call Settings ...................................................................................13
Adjusting the Call Settings ......................................................13
Making Calls Using the Phone Book
About the Phone Book ............................................................ 15
Calling Someone Listed in Your Phone Book ........................ 15
Making Telephone Calls
Opening the Call Menu ............................................................ 17
Requirements .......................................................................... 17
Making a Manual Telephone Call ........................................... 17
Making a Telephone Call Using Speed Dialling ..................... 17
Making a Telephone Call Using the Phone Book .................. 17
Phone Book Details
Accessing the Phone Book ..................................................... 19
The Call Log – Placed, Missed & Received Calls ..................19
Call Log Options ....................................................................... 19
Searching in the Phone Book .................................................19
Adding a New Contact to My Contacts Manually ..................20
Adding a New Contact Directly from the Call Log ................. 20
Deleting a Contact in My Contacts ........................................ 20
Editing a Contact in My Contacts ...........................................20
Incoming Calls
About Incoming Calls ...............................................................22
Three Ways of Rejecting an Incoming Call ............................ 22
Five Ways of Accepting an Incoming Call .............................. 22
A Few Words on Privacy .......................................................... 23
About Do Not Disturb .............................................................. 23
Want to Change the Aler t Signal? .......................................... 23
Do Not Disturb ......................................................................... 23
Calling More Than One
Calling Another Participant Whilst In a Call (Call Swapping) .......... 25
About Calling Another Participant ..........................................25
Calling Two Persons at a Time ................................................25
Call Transfer ................................................................................... 26
About Call Transfer .................................................................. 26
Blind Call Transfer ................................................................... 26
Consultative Call Transfer ....................................................... 26
Initiating a Video Conference From Your 150 27
Requirements .......................................................................... 27
Setting Up a Conference (optional feature) ........................... 27
Video Meeting Features
Video Meeting Features – an Overview ...................................... 29
Requesting and Releasing Floor ..................................................30
About Requesting Floor........................................................... 30
Requesting and Releasing Floor ............................................ 30
View Other Par ticipant s ................................................................ 31
About View Par ticipant ............................................................31
Viewing a List of Participants ................................................. 31
Far End Camera Control ............................................................... 32
About Far End Camera Control ............................................... 32
About Camera Presets ............................................................ 32
Controlling the Far End Camera .............................................32
Far End Video Source .................................................................... 33
About Far End Video Sources .................................................33
Controlling the Far End Video Source ....................................33
Snapshot ........................................................................................34
About Snapshots .....................................................................34
Viewing Snapshots ..................................................................34
Text Chat ........................................................................................ 35
About Text Chatting .................................................................35
Chatting .................................................................................... 35
Contact Information ......................................................................36
Page 3
D 14067.02
02.2010
3
TANDBERG 150
USER GUIDE
Table of
Contents
Operating
Principles
Making
Video
Calls
Making
Calls Using
Phone Book
Phone Book
Details
Incoming
Calls
Calling More
Than One
Video Meeting
Features
Contact
Information
Unpacking &
Installation
Making
Telephone
Calls
Unpacking &
Installation
Unpacking and Installation
Your TANDBERG 150 works right out of the box. All you
have to do is to connect the cables. This section shows you
how.
We recommend that you check out the
TANDBERG web site regularly for updated
versions of this manual:
http://www.tandberg.com/suppor t/
documentation.php?p=User_Manuals
Page 4
D 14067.02
02.2010
4
TANDBERG 150
USER GUIDE
Table of
Contents
Operating
Principles
Making
Video
Calls
Making
Calls Using
Phone Book
Phone Book
Details
Incoming
Calls
Calling More
Than One
Video Meeting
Features
Contact
Information
Unpacking &
Installation
Making
Telephone
Calls
Unpacking &
Installation
TANDBERG 150 MXP
USER GUIDE
Unpacking and Installation
Assembling the unit is really easy. The system lies fully assembled
in the box. Remove the accessories box and carefully lift the
system out of the box. To protect the camera lens while installing,
we recommend that you let the camera lens cap remain on. In the
accessories box you should find:
• LAN cable
• Power adapter and power cable
Please repor t any discrepancies to your TANDBERG Representative
immediately.
Handset is an optional device that must be ordered separately.
Contact your TANDBERG representative for more information.
Handset is an optional device that must be ordered separately.
Contact your TANDBERG representative for more information.
How to configure the unit is
described in Administrator Settings
(separate document).
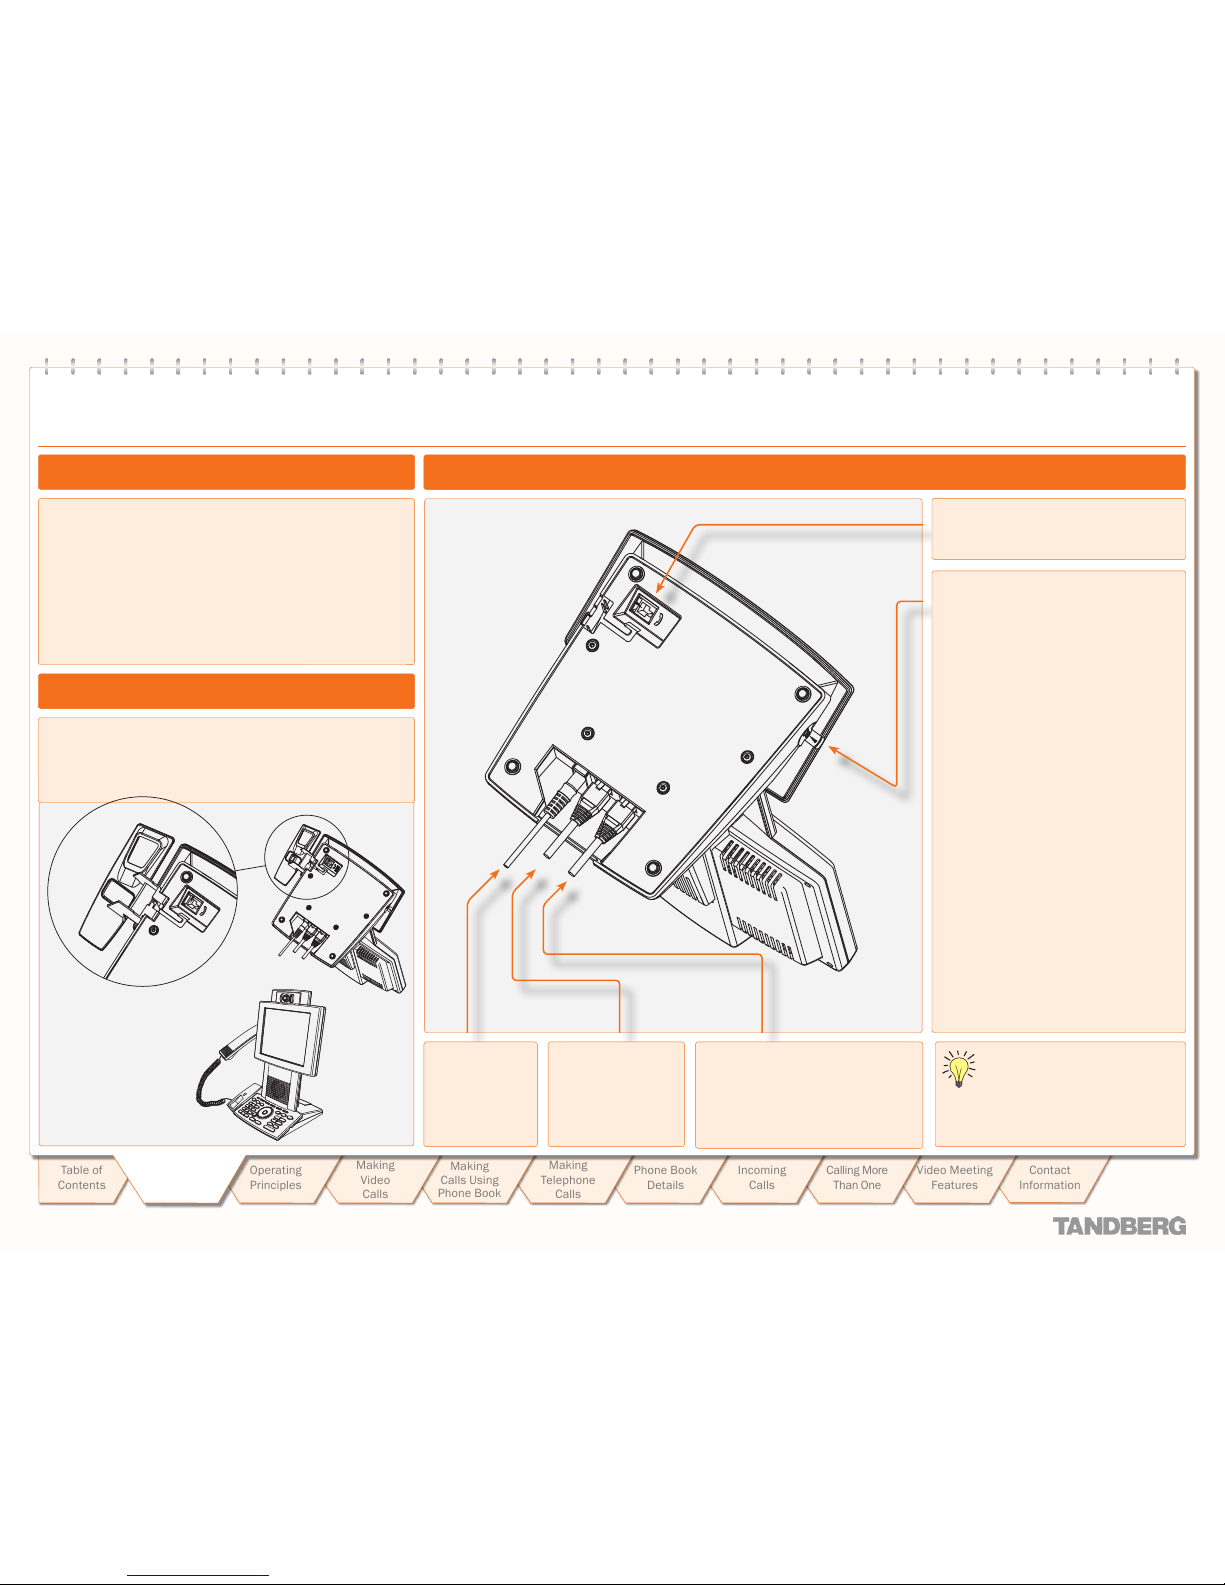
Assembling the Unit
Mounting the (optional) Handset
Slide the handset bracket
into the system’s bottom
plate tracks. Place the
system in an upright
position and lay the
handset in its place. The
handset is held in place
by magnets.
Connecting Cables
Socket for optional handset’s cable. See
lower left corner of this page for details.
Socket for optional headset. The
TANDBERG 150 has a 2.5mm 3-pole
mini-jack connector at its right side marked
with a headset symbol. This allows the user
to connect a standard telecommunications
headset to the system.
Headsets with the microphone positioned
in front of the user’s mouth, connected
to the earphone through a rod, tend to
give more echo than earbud headsets
with the microphone attached to the cord.
TANDBERG recommends the Plantronics
MX100 headset (http://www.plantronics.
com, products > mobile).
Note that the maximum outer diameter of
the plug must be 9.0 mm or smaller. A plug
with a bigger outer diameter will not fit the
unit. Alternatively an extension cord may
be used.
Connect your L AN
(Local Area Network)
here.
If you have a single LAN connection
only and this is in use by your PC
already, connect your PC to the
150 and the 150 to the LAN
to let both units have internet access.
Connect Power
here.
Page 5
D 14067.02
02.2010
5
TANDBERG 150
USER GUIDE
Table of
Contents
Operating
Principles
Making
Video
Calls
Making
Calls Using
Phone Book
Phone Book
Details
Incoming
Calls
Calling More
Than One
Video Meeting
Features
Contact
Information
Unpacking &
Installation
Making
Telephone
Calls
Operating
principles
Operating Principles
There are a few simple principles that you need to know
before you start using your TANDBERG 150 . This section
outlines these principles.
We recommend that you check out the
TANDBERG web site regularly for updated
versions of this manual:
http://www.tandberg.com/suppor t/
documentation.php?p=User_Manuals
Page 6
D 14067.02
02.2010
6
TANDBERG 150
USER GUIDE
Table of
Contents
Operating
Principles
Making
Video
Calls
Making
Calls Using
Phone Book
Phone Book
Details
Incoming
Calls
Calling More
Than One
Video Meeting
Features
Contact
Information
Unpacking &
Installation
Making
Telephone
Calls
Operating
principles
TANDBERG 150 MXP
USER GUIDE
Your TANDBERG 150MXP is capable of making
and receiving simple telephone calls in addition
to its main objective; video meeting calls.
Calls can be made by means of speed dialling
(five presets available for immediate dialling);
by means of the Phone Book (which typically
consists of My Contacts and a Corporate Phone
Directory) as well as manual dialling (entering
the “number” manually).
When dialling manually you may also define
settings applying to your call. For presets
(Speed Dialling and Phone Book usage) these
call settings will be a part of each preset entry,
hence there will be no need to define these
every time you make a call.
Privacy. There are some aspects of privacy
regarding incoming calls that you may want to
consider.
In particular we are thinking of such things as:
Should the microphone, as default, be switched
off, so that the far end will be unable to hear
you until you physically switch the microphone
back on? This is described in the Adminstrator’s
Guide (separate document).
What about the the camera? Should the camera
also remain switched off until you physically
switch it back on? If so, press the Camera Off
key whilst outside a call (must be done ever y
time you want it).
1
2
3
abc
def
4
5
6
jkl
mno
ghi
7
8
9
tuv
wxyz
pqrs
0
a/A
Soft keys, call
keys and picture
keys
Alphanumerical
keypad
Call register,
Administrator settings
and Help
Microphone Of f,
Privacy On (Camera
Off), and Volume
Control
Cursor keys, OK and
Cancel keys
You may hook up a TTY (Text telephone) to the
150MXP. The TTY is a device allowing hearing-
or speech impaired people to communicate
by typing and reading messages – see Audio
Settings in the Adminstrator’s Guide for more.
The Icons Appearing on the Screen
Introduction
About Making and Receiving Calls
Using TTY for Text Exchange
Microphone Off. This indicator is shown when the microphone is
turned off. Pres s the Mic Off key again to turn the microphone back
on.
Privacy. This indicator is shown when the Privacy key on the keypad
is activated. No camera images are sent from your system when
the privacy indicator is displayed. Press the Privacy key again to
deactivate the feature.
Volume Off. This indicator is shown when the volume is turned off.
Press Volume + to turn the volume back on.
Secure Conference, AES. This double padlock indicator is shown
when AES encryption (Secure Conference) is active.
Secure Conference, DES. This padlock indicator is shown when
DES encryption (Secure Conference) is active.
Not Secure Conference. This open padlock indicator is shown during
the initialization phase for encryption. During this period the call is not
secure.
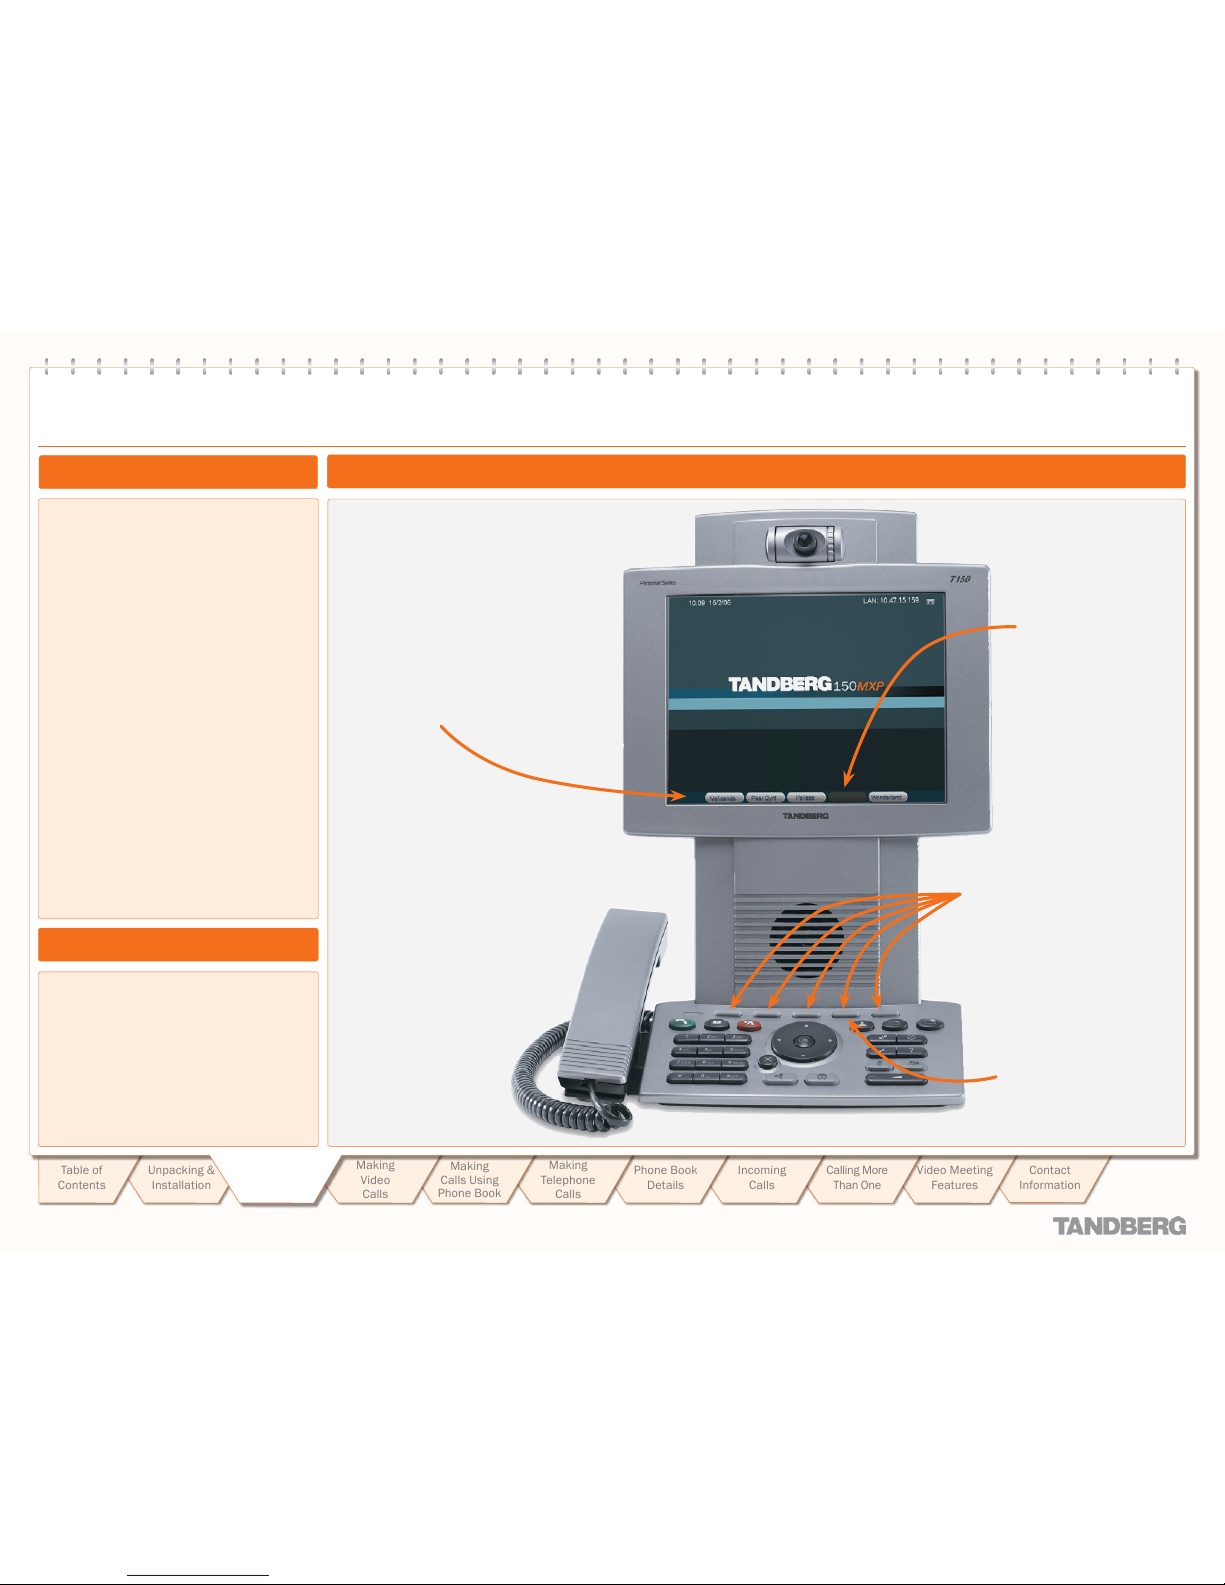
Your TANDBERG 150 Keypad at a Glance
Camera. The camera has manual tilt and focus. Turn the
lens to adjust focus.
TIP! Press Selfview first to see your video picture.
Tilt the camera by manually adjusting the Tilt Angle with
the wheel to the right of the lens.
Microphone. Located
at the top of the unit.
Screen
Handset.
Handset is an
optional device.
Contact your
TANDBERG
representative for
more
information.
Use the Camera lens cap
located at the rear of the
unit to cover the lens when
the unit is not in use. The
camera lens cap protects
the lens and also assures
you from involuntary
broadcasting of your video
image.
Keypad. The keypad contains all
the keys you need to control the
system.
Selfview key
Loudspeaker
The Different Parts of Your 150
Camera
The soft keys are context sensitive keys, whose functions
will change in accordance with what you are doing. In some
contexts they are used for Speed Dialling, in other contexts
they will be used for other functions, such as call transfer.
Details on the keys can be found
on the next page.
Page 7
D 14067.02
02.2010
7
TANDBERG 150
USER GUIDE
Table of
Contents
Operating
Principles
Making
Video
Calls
Making
Calls Using
Phone Book
Phone Book
Details
Incoming
Calls
Calling More
Than One
Video Meeting
Features
Contact
Information
Unpacking &
Installation
Making
Telephone
Calls
Operating
principles
TANDBERG 150 MXP
USER GUIDE
1
2
3
abc
def
4
5
6
jkl
mno
ghi
7
8
9
tuv
wxyz
pqrs
0
a/A
Numerical keypad. Use Number keys to dial video
numbers. Use the * key to produce the dot sign when
dialling an IP number.
When you are in an input field where letters are
required, the system automatically switches to letter
mode. Letter input works like on a mobile phone. Press
the key that corresponds to the letter required. Press
the key as many times as you need to get the right
letter. Change to lower or upper case letters with the #
key, and space with the 0 key.
Call key. Press this key to open the call menu. When
you have dialled a number, press the key to place the
call.
Notication lamp. A red lamp is illuminated to indicate
that you have an incoming call. The lamp is also lit
when you power up the system and when you are in a
call. When the lamp turns off, the system is ready for
use.
Phone Book. Press this key to open the systems
phone book. Store and recall your video contacts via
the system Phone Book for easy placement of calls.
End Call. Use this key to end the current call.
Soft keys. Context-sensitive
soft keys whose functions are
displayed on the screen.
Cancel. Cancel takes you back one step in the menu system. Use
Cancel also to delete characters whilst in an input field.
Speaker. Press this key to activate the speaker. The key is
illuminated when the speaker is active. Press again to turn the
speaker off.
The Keyboard in Detail
Selfview. Displays the picture of yourself. Press again to turn selfview off.
PIP (Picture in Picture). Press this key) to get a smaller
picture in addition to the full screen picture. The PIP is
placed in the top right corner of the screen. Press PIP
again to move it to the other corners of the screen. The
fifth time you press PIP, it will disappear.
Display Settings. Brightness let s you adjust the
monitor brightness camera brightness, hue, and
saturation.
External Services. Your adminstrator or service
provider may provide ex ternal services enhancing the
applications available.
Help. Press this key to get a quick guide about how to
use the system.
Call List. Press this key to see a list of your latest calls,
both outgoing, incoming and lost calls.
Administrator Settings. Press this key to open the
settings menu. Administrator Settings contain all the
settings of the system.
Privacy. When this key is pressed, no camera image will be sent out
from your system. The Privacy key is illuminated when the camera
is off. An indicator on the screen also appears as you press Privacy.
Press the Privacy key again to deactivate privacy. Use Privacy to
prevent others from seeing your video image.
Volume. Volume + and – adjusts the volume of the speaker. An
indicator on the screen shows the volume level.
Mic Off. Press this key to mute your microphone. The key is illuminated when the
microphone is off. An indicator on the screen also appears as you press Mic Off. Press the
key again to deactivate the setting. Use Mic Off to mute your outgoing audio.
Headset. Press this key to activate headset. Remember to plug in your headset in
advance (see Unpacking and Installation). The key is illuminated when activated.
Press again to deactivate.
Navigation keys and OK. Use
the Cursor keys to navigate in
the menus.
Press OK to select menu
items.
Page 8

D 14067.02
02.2010
8
TANDBERG 150
USER GUIDE
Table of
Contents
Operating
Principles
Making
Video
Calls
Making
Calls Using
Phone Book
Phone Book
Details
Incoming
Calls
Calling More
Than One
Video Meeting
Features
Contact
Information
Unpacking &
Installation
Making
Telephone
Calls
Operating
principles
TANDBERG 150 MXP
USER GUIDE
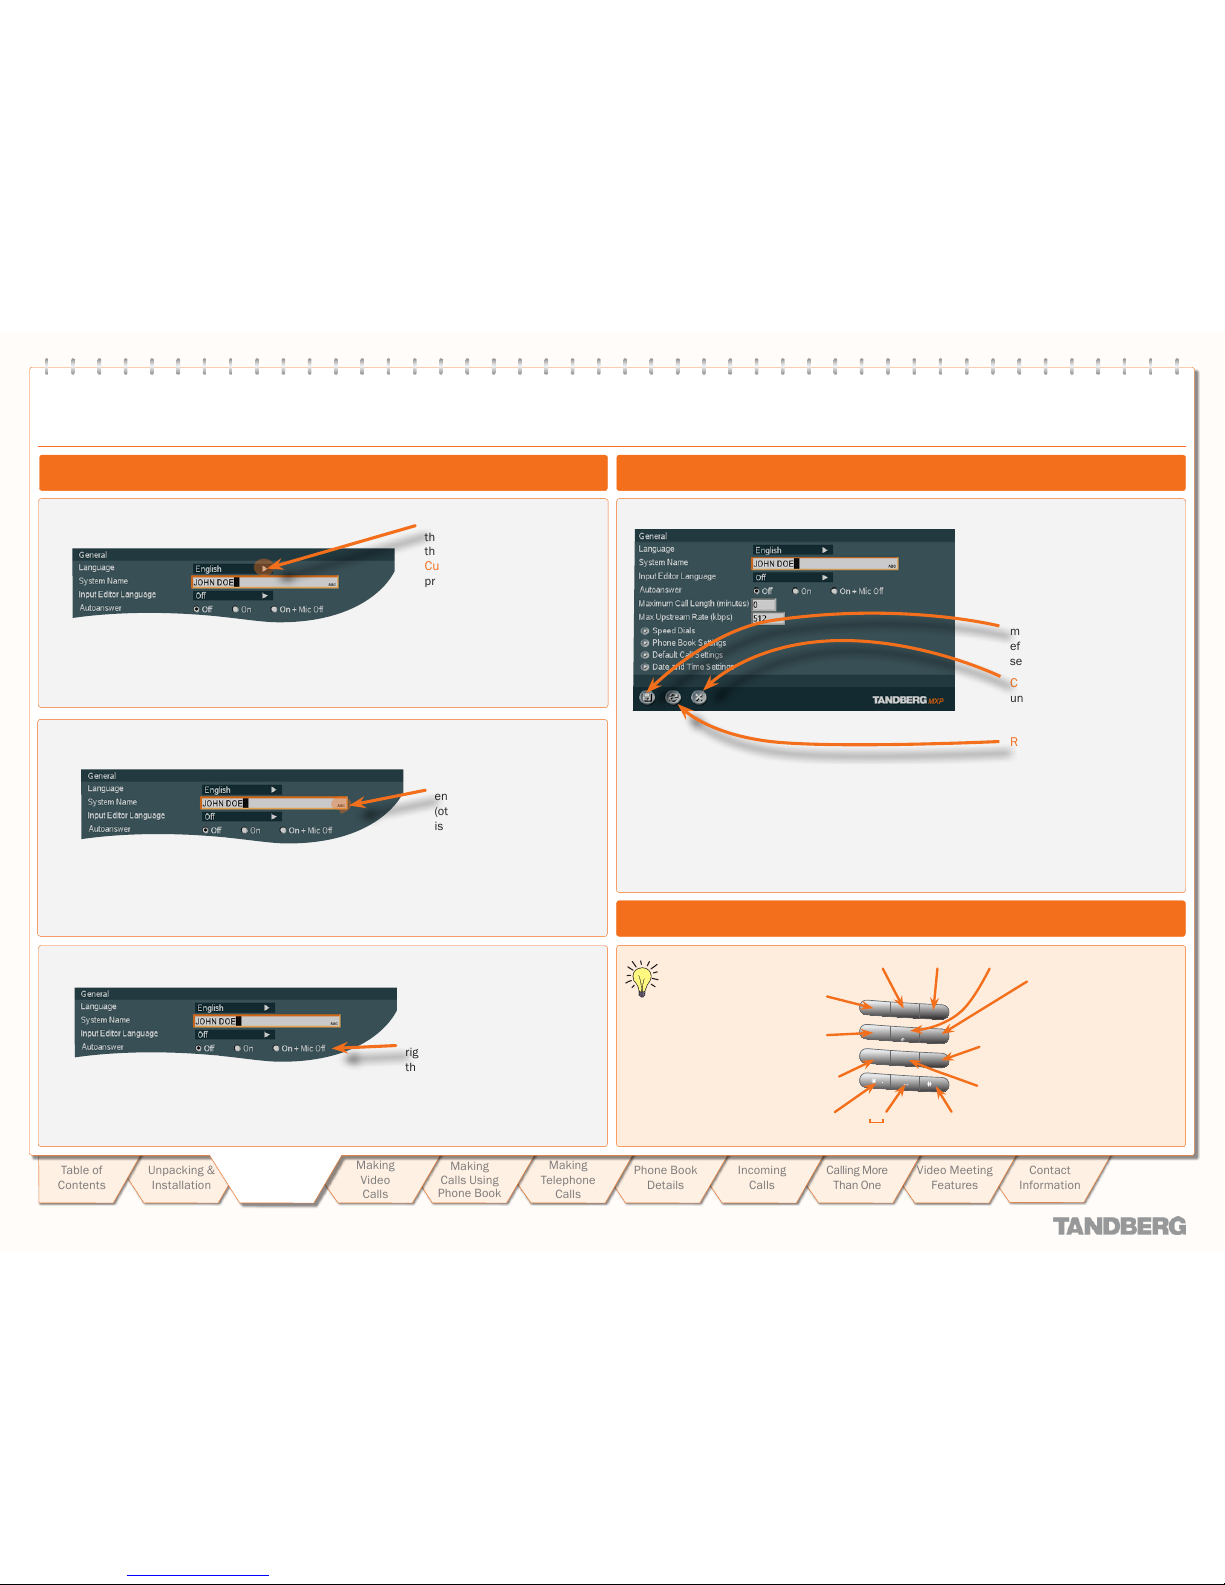
Basic Menu Navigation Rules
Navigating in the Menus (I)
Press the Settings key…
1
2
3
abc
def
4
5
6
jkl
mno
ghi
7
8
9
tuv
wxyz
pqrs
0
a/A
…to produce the on-screen menu.
Press Cancel to leave the menu immediately.
1
2
3
abc
def
4
5
6
jkl
mno
ghi
7
8
9
tuv
wxyz
pqrs
0
a/A
Otherwise, use the Arrow keys to move about the menu…
1
2
3
abc
def
4
5
6
jkl
mno
ghi
7
8
9
tuv
wxyz
pqrs
0
a/A
Example: Use the right Cursor key to move one step to the right…
When a menu item is highlighted…
press OK to enter the associated submenu…
1
2
3
abc
def
4
5
6
jkl
mno
ghi
7
8
9
tuv
wxyz
pqrs
0
a/A
and the submenu is displayed!
1
2
3
abc
def
4
5
6
jkl
mno
ghi
7
8
9
tuv
wxyz
pqrs
0
a/A
The right cursor key
Page 9
D 14067.02
02.2010
9
TANDBERG 150
USER GUIDE
Table of
Contents
Operating
Principles
Making
Video
Calls
Making
Calls Using
Phone Book
Phone Book
Details
Incoming
Calls
Calling More
Than One
Video Meeting
Features
Contact
Information
Unpacking &
Installation
Making
Telephone
Calls
Operating
principles
TANDBERG 150 MXP
USER GUIDE
There Are Three Ways to Edit a Setting: There Are Three Options When Leaving a Menu:
Revert to default settings.
Cancel. Leave the menu
undoing any changes.
Save changes. Leave the
menu putting changes into
effect by storing the updated
settings.
Navigate to the bottom line and
select the appropriate way to
exit:
To access a submenu…
This little arrow indicates that
there are more than meets
the eye here. Use the Right
Cursor key of the keypad to
produce the submenu of this
item (or just press OK) and
navigate in this submenu in
the normal manner.
To enter alphanumeric information…
This little icon indicates
that the system expects
alphanumeric text
entry. Consequently, the
(otherwise) numerical keypad
is set to alphanumeric mode.
Key in alphanumeric text
in the same way as for a
cellular phone.
To edit a setting using radio buttons…
Radio buttons, use left &
right cursor keys to select
the appropriate setting.
Navigating in the Menus (II)
1
2
3
abc
def
4
5
6
jkl
mno
ghi
7
8
9
tuv
wxyz
pqrs
0
a/A
- @ 1
GHI4Í Ì Î Ï
PQRS7ß
.
*
+ :;’/ \? = &_( )
ABC2БАВГДЕЖ DEF2ÈÉËÊ JKL5
MNO6СТУФХЦШ
WXYZ9
TUV8ÙÚÜÛ
123/ABC/abc #
0
Toggle between ABC
and abc mode by
pressing the # key. To
switch to 123 mode,
press the # key for one
second.
The Alphanumerical Keypad
Page 10
D 14067.02
02.2010
10
TANDBERG 150
USER GUIDE
Table of
Contents
Operating
Principles
Making
Video
Calls
Making
Calls Using
Phone Book
Phone Book
Details
Incoming
Calls
Calling More
Than One
Video Meeting
Features
Contact
Information
Unpacking &
Installation
Making
Telephone
Calls
Operating
principles
TANDBERG 150 MXP
USER GUIDE
Wouldn’t it be nice to have your five most
prominent contacts available for calling by the
push of a button?
This is what is all about. The
five soft keys at the top of the keypad can be
assigned for this – pretty much in the same way
as favourites or bookmarks in your web browser.
Note that you are not restricted to use Speed
Dials for video calls only. Any mixture of video
and telephone calls is fully acceptable.
You assign those five buttons in the General
Settings menu described in Adminstrator’s
Guide (separate document). Note that your
System Adminstrator may, or may not, have
password protection activated to prevent
unauthorized alterations of these and other
settings. If in doubt, consult your System
Adminstrator.
The soft key assignments
are shown here.
Speed Dials soft keys
not assigned, appear
ghosted.
In our example, with four out
of five Speed Dials soft keys
assigned to Phone Book entries,
this key is not assigned.
The Speed Dials soft keys.
Using Speed Dials to make calls is ver y easy.
Just press the corresponding soft key and the
call will be made. No need to worry about the
Call Settings – they are defined by the Phone
Book settings for that par ticular entr y.
NOTE! You must assign at
least one of your contacts
to the Speed Dials feature
to make these sof t keys
appear.
Speed Dials
About Speed Dials
Using Speed Dials to Make Calls
Example Showing Four Out of Five Speed Dials Soft keys Assigned
Page 11
D 14067.02
02.2010
11
TANDBERG 150
USER GUIDE
Table of
Contents
Operating
Principles
Making
Video
Calls
Making
Calls Using
Phone Book
Phone Book
Details
Incoming
Calls
Calling More
Than One
Video Meeting
Features
Contact
Information
Unpacking &
Installation
Making
Telephone
Calls
Making
Video
Calls
Making Video Calls
This section shows you how to make video calls when dialling
manually.
We recommend that you check out the
TANDBERG web site regularly for updated
versions of this manual:
http://www.tandberg.com/suppor t/
documentation.php?p=User_Manuals
Page 12

D 14067.02
02.2010
12
TANDBERG 150
USER GUIDE
Table of
Contents
Operating
Principles
Making
Video
Calls
Making
Calls Using
Phone Book
Phone Book
Details
Incoming
Calls
Calling More
Than One
Video Meeting
Features
Contact
Information
Unpacking &
Installation
Making
Telephone
Calls
Making
Video
Calls
TANDBERG 150 MXP
USER GUIDE
• Toggle between abc and 123 by holding the # button
depressed for one second.
• Toggle between ABC and abc by pressing the # button.
• Use
*
as separator in IP addresses. If a system is registered
on a gatekeeper or border controller with DNS support, there
are several ways to call into the system:
• <IP address>
• <E.164>
• <H.323 ID>
• <H.323 ID>@<domain>
• <E.164>@<domain>
• To locate the @ character press the 1 button
whilst in ABC mode.
1
2
3
abc
def
4
5
6
jkl
mno
ghi
7
8
9
tuv
wxyz
pqrs
0
a/A
Open the Call Menu using any of these five methods:
Dial (i.e. enter using the keypad) a video number manually.
Press the green Call key
Press any digit 0–9
Press the Loudspeaker key
Press the Headphone key
Lift the optional handset.
You may want to adjust the Call Settings before you start
your video call, see Call Settings for more.
Making calls using the Phone Book is explained in Making Calls
Using the Phone Book and more on the Phone Book itself can be
found in Phone Book Details.
Making simple telephone calls (without using video) is explained in
Making Telephone Calls.
Press the Call Now key or use the
Cursor keys to navigate to the
Place Video Call icon and
click OK
to start the
video call.
Making Video Calls Dialling Manually
Calling Someone Not Listed in Your Phone Book
Accessing the Alphanumeric Characters Dialling TipsWant to Make a Simple Telephone Call Instead?
Want to Make a Call Using the Phone Book Instead?
1
2
3
abc
def
4
5
6
jkl
mno
ghi
7
8
9
tuv
wxyz
pqrs
0
a/A
- @ 1
GHI4Í Ì Î Ï
PQRS7ß
.
*
+ :;’/ \? = &_( )
ABC2БАВГДЕЖ DEF2ÈÉËÊ JKL5
MNO6СТУФХЦШ
WXYZ9
TUV8ÙÚÜÛ
123/ABC/abc #
0
Page 13

D 14067.02
02.2010
13
TANDBERG 150
USER GUIDE
Table of
Contents
Operating
Principles
Making
Video
Calls
Making
Calls Using
Phone Book
Phone Book
Details
Incoming
Calls
Calling More
Than One
Video Meeting
Features
Contact
Information
Unpacking &
Installation
Making
Telephone
Calls
Making
Video
Calls
TANDBERG 150 MXP
USER GUIDE
Open the Call Menu using any of these five methods:
1
2
3
abc
def
4
5
6
jkl
mno
ghi
7
8
9
tuv
wxyz
pqrs
0
a/A
Press the green Call key
Press any digit 0–9
Press the Loudspeaker key
Press the Headphone key
Lift the optional handset.
Use the Cursor keys to navigate to Call Settings
Press OK or press the Right Cursor key again to produce the
submenu.
Adjust settings as required.
If you want to change the Default Call
Settings, make the required changes
to the Call Settings and navigate to
Set as Default. Press OK to save these
settings, which now will be the default
settings for all future manually dialled
calls.
Navigate to this icon and
press OK to leave menu
undoing any changes –
including any new default
setting you may have
introduced.
Navigate to this icon
and press OK to leave
menu putting changes
into effect.
Bandwidth determines the
quality of the video picture. The
system will, by default, connect
using Auto Bandwidth. This
means that the system will
establish a connection using a
proper bandwidth for your call.
The typical bandwidth used
for IP calls is 384 kbps. When
bandwidth is set to Auto, the unit
will default to 384kbps.
The Net
alternatives are:
H.323 and SIP.
If a gatekeeper is present, you may
place IP-calls using “telephone-style”
numbers (an E.164 alias), according
to the numbering plan implemented
in the gatekeeper. The gatekeeper will
then translate the dialled number into
an IP-addres s (see H.323 Set tings
in the Adminstrator’s Guide for more
information about gatekeepers).
Adjusting the Call Settings
Call Settings
Page 14

D 14067.02
02.2010
14
Table of
Contents
Operating
Principles
Making
Video
Calls
Making
Calls Using
Phone Book
Phone Book
Details
Incoming
Calls
Calling More
Than One
Video Meeting
Features
Contact
Information
Unpacking &
Installation
Making
Telephone
Calls
Making
Calls Using
Phone Book
Making Calls Using the Phone Book
This section shows you to make video calls when using the
phone book of the system. Details on phone book usage can
be found in the section Phone Book Details.
We recommend that you check out the
TANDBERG web site regularly for updated
versions of this manual:
http://www.tandberg.com/suppor t/
documentation.php?p=User_Manuals
Page 15

D 14067.02
02.2010
15
Table of
Contents
Operating
Principles
Making
Video
Calls
Making
Calls Using
Phone Book
Phone Book
Details
Incoming
Calls
Calling More
Than One
Video Meeting
Features
Contact
Information
Unpacking &
Installation
Making
Telephone
Calls
Making
Calls Using
Phone Book
TANDBERG 150 MXP
USER GUIDE
Open the Call Menu using any of these five methods:
Press the green Call key
Press any digit 0–9
Press the Loudspeaker key
Press the Headphone key
Lift the optional handset.
1
2
3
abc
def
4
5
6
jkl
mno
ghi
7
8
9
tuv
wxyz
pqrs
0
a/A
Using the Phone Book is time saving and
prevents you from inadvertently calling the
wrong number. The contacts are sorted
alphabetically. The contact names are displayed
in the list and the telephone or video numbers
of the selected contact will be displayed at the
bottom line.
When selecting Phone Book the Phone Book
opens showing the folders Placed Calls, Missed
Calls, Received Calls and My Contacts. Global
Contacts (if applicable), will be listed below
these folders. See also Phone Book Details.
Making Video Calls Using the Phone Book
About the Phone Book
Calling Someone Listed in Your Phone Book
Use the Cursor keys to navigate to the
Phone Book icon and click OK.
Use the Cursor keys to navigate in the
list. Any entry with an arrow appended is
expandable using the Cursor keys. Navigate
in the expanded list using the Cursor keys
as usual. You may key in letters to navigate
in the list – see also Phone Book Details for
details on the use of the Phone Book.
Once you have located whom to call
select the corresponding entry by means
of the Cursor keys.
Indicates selected entr y.
Press the green Call Now key on the
keypad,
or...
press the Left Cursor key to select the
Call Now icon, followed by OK
or...
just hit the OK key whilst the entry is
selected.
The name of the selected entry will now
appear on the screen. Call settings will be
set as specified with this particular entry.
Wait for the call to connect.
The call will be a video or a telephone call
depending on the settings for the entry
selected
Page 16

D 14067.02
02.2010
16
TANDBERG 150
USER GUIDE
Table of
Contents
Operating
Principles
Making
Video
Calls
Making
Calls Using
Phone Book
Phone Book
Details
Incoming
Calls
Calling More
Than One
Video Meeting
Features
Contact
Information
Unpacking &
Installation
Making
Telephone
Calls
Making
Telephone
Calls
Making Telephone Calls
Your video system can be used to make regular telephone
calls as well. Since the system uses IP communication only,
the telephone calls will be of the VoIP (Voice over IP) type.
This will require the presence of a certain infrastructure.
Contact your adminstrator for details.
We recommend that you check out the
TANDBERG web site regularly for updated
versions of this manual:
http://www.tandberg.com/suppor t/
documentation.php?p=User_Manuals
Page 17

D 14067.02
02.2010
17
TANDBERG 150
USER GUIDE
Table of
Contents
Operating
Principles
Making
Video
Calls
Making
Calls Using
Phone Book
Phone Book
Details
Incoming
Calls
Calling More
Than One
Video Meeting
Features
Contact
Information
Unpacking &
Installation
Making
Telephone
Calls
Making
Telephone
Calls
TANDBERG 150 MXP
USER GUIDE
Open the Call Menu using any of these five methods*:
1
2
3
abc
def
4
5
6
jkl
mno
ghi
7
8
9
tuv
wxyz
pqrs
0
a/A
Press the green Call key
Press any digit 0–9
Press the Loudspeaker key
Press the Headphone key
Lift the optional handset.
Move the cursor to hilight the Call Type icon
Press OK to produce the submenu and use the cursor keys to
move down to Telephone and press OK to select.
Now enter the phone number and do the same as when Making a
Video Call – Dialling Manually – see that part for more on this.
You may want to adjust the Call Settings before you start
your telephone call, see Adjusting Call Settings for more.
Use the Cursor keys to navigate to the Phone Book icon and
press OK.
Wait for the call to connect.
Use the procedure described in Making Video Call Using the
Phone Book. to locate the entr y you want to call and to make
the call.
The call setup for an entry will specify the type of call that will
be made. If the entr y is listed as a telephone type of call, a
telephone call will be made, so there should be no reason to
worry about the possibility of making the wrong type of call.
The TANDBERG 150MXP comes with an internet interface only, it
cannot be connected to a traditional telephone socket. Telephone calls
from the 150MXP to the public switched telephone network (PSTN)
will require the presence of certain infrastructure. Consult your System
Adminstrator to get information on this and the prefixes you may need
to dial to connect to the PSTN.
* Not needed when using Speed Dialling
Press the soft key corresponding to whom you want to call.
Making a Telephone Call Using the Phone Book
Making a Telephone Call Using Speed Dialling
Making a Manual Telephone Call
Opening the Call Menu
Requirements
Making Telephone Calls
Telephone style calls selected
Page 18

D 14067.02
02.2010
18
TANDBERG 150
USER GUIDE
Table of
Contents
Operating
Principles
Making
Video
Calls
Making
Calls Using
Phone Book
Phone Book
Details
Incoming
Calls
Calling More
Than One
Video Meeting
Features
Contact
Information
Unpacking &
Installation
Making
Telephone
Calls
Phone Book
Details
Phone Book Details
Typically, your phone book will consist of two parts; a global or
corporate part and your personal part.
The corporate part is maintained by your administrator, while
the personal part is yours to fill with contacts as you like. You
may, for example, copy contacts from the corporate part to
your personal part to make entries easy to locate. Note that
changes made by the administrator to the corporate part,
will not affect any contacts that you have copied into your
personal part.
We recommend that you check out the
TANDBERG web site regularly for updated
versions of this manual:
http://www.tandberg.com/suppor t/
documentation.php?p=User_Manuals
Page 19

D 14067.02
02.2010
19
TANDBERG 150
USER GUIDE
Table of
Contents
Operating
Principles
Making
Video
Calls
Making
Calls Using
Phone Book
Phone Book
Details
Incoming
Calls
Calling More
Than One
Video Meeting
Features
Contact
Information
Unpacking &
Installation
Making
Telephone
Calls
Phone Book
Details
TANDBERG 150 MXP
USER GUIDE
The – listing , and
– is essentially a set of lists of your system’s call history. The lists
contain the most recent numbers placed, mis sed, and received,
limited to a maximum of 30 numbers for each list. The numbers
remain in these lists until the system is restarted or the list is
deleted manually.
lists all calls that were not received – either because
you declined the call or just because you were not there when the
call attempt took place.
Navigate in the menu in the usual manner:
Use Vertical Cursor keys to move up and down in the menu.
Press OK or use the Right Cursor key to expand items with an
arrow appended.
To access the Phone Book, press the Phone Book button
on the keypad or select the Phone Book icon in the Call menu –
see Making a Video Call Using the Phone Book for more.
Let us consider an expanded log of as an example.
The log and the log are exactly similar
– with identical features.
Expand Missed Calls as explained in the frame to the left.
Call this number now
Copy to my Contacts
Delete the selected entry
Delete all entries of this call log
Cancel (exit the menu)
Navigate in the menu in the usual manner:
Use the Left Cursor key to move the leftmost column.
Use Vertical Cursor keys to move up and down.
When you have located the icon representing what you want to do,
press OK.
TIP!
Any member of these lists already listed in your Phone Book
will appear with the name you have assigned to them and not just
with the number.
The number of
unreviewed missed
calls is shown in the
Welcome screen
TIP! The contents of your Phone Book may have been arranged in a
tree structure with several subfolders. Use the back line to navigate
back up in the tree structure.
The may contain up to 200 entries and the entire
Phone Book (which may include server based
can be virtually unlimited in size. Hence, using the Cursor keys
as the only navigation device can easily be a cumbersome
experience. What to do?
Enter . Whenever you are inside the
Phone Book navigating in the list of entries, the numerical keypad
automatically switches from 123 mode to ABC mode. To locate a
specific entry, just type in the first letter as with a cellular phone –
see the lower lef t frame on this page.
If you need to refine your search, use the function:
In the Phone Book use the Cursor keys to move to the Task
column and then down to the Search icon.
Search icon
Call Now icon
Copy to My Contacts icon
Cancel/Back
Press OK to open the Search dialogue box:
Enter the search string (the name) and press the OK key or move
down to the OK icon and press the OK key.
(To leave the menu cancelling your search, pres s Cancel
or move down to the Cancel icon and press OK).
Use the Cursor keys to move to the requested entry, if needed.
To dial the selected entry, move the cursor to the green Call Now
icon and press OK.
TIP! When a search in the Phone Book is made by means of the
function, contacts matching the search text are displayed
only. Navigate to and click on the Back line
to return to the initial view.
Toggle between ABC
and abc mode by
pressing the # key. To
switch to 123 mode,
press the # key for one
second.
Call Log Options
Accessing the Phone Book
Searching in the Phone Book
The Call Log – Placed, Missed & Received Calls
Phone Book Features (I)
1
2
3
abc
def
4
5
6
jkl
mno
ghi
7
8
9
tuv
wxyz
pqrs
0
a/A
- @ 1
GHI4Í Ì Î Ï
PQRS7ß
.
*
+ :;’/ \? = &_( )
ABC2БАВГДЕЖ DEF2ÈÉËÊ JKL5
MNO6СТУФХЦШ
WXYZ9
TUV8ÙÚÜÛ
123/ABC/abc #
0
Page 20

D 14067.02
02.2010
20
TANDBERG 150
USER GUIDE
Table of
Contents
Operating
Principles
Making
Video
Calls
Making
Calls Using
Phone Book
Phone Book
Details
Incoming
Calls
Calling More
Than One
Video Meeting
Features
Contact
Information
Unpacking &
Installation
Making
Telephone
Calls
Phone Book
Details
TANDBERG 150 MXP
USER GUIDE
In the Phone Book use the Cursor keys to navigate down to My
Contacts and press OK to produce the contents of My Contacts.
Use the Cursor keys to navigate to the New Contact icon in the
Task Column.
New Entry icon
Task Column
Press OK to produce the Add New Contact dialogue box.
Enter the name of the new contact using the numerical keypad
(which automatically enters ABC mode). The maximum name
length is 30 characters. For details on this – see the lower left
frame on the previous page.
Enter the number of your new contact by means of the number keys
on the keypad (which now enters 123 mode) The maximum number
length is 60 digits. Use * as separator in IP addresses. To switch to
ABC mode, press # for one second.
Alter the default setting of Call Type, Network, and the default
setting of Bandwidth, if needed.
Navigate to the OK icon and press OK to save putting changes into
effect or navigate to the Cancel icon to leave menu undoing any
changes.
In the Phone Book use the Cursor keys to navigate down to My
Contacts and press OK to produce the contents of My Contacts.
Use the Cursor keys to navigate down to the entry to edit.
Selected entry to be edited
Edit Entry icon
Task Column
Now, while the entry to be edited remains selected, use the Cursor
keys to navigate to the Edit Contact icon in the Task Column. Press
OK to produce the Edit Contact dialogue box.
ALICE WONDERL AND
If needed, edit the name of the contact using the numerical
keypad (which automatically enters ABC mode). The maximum
name length is 30 characters. For details on this – see the lower
left frame on the previous page.
If needed, edit the number of your new contact by means of the
number keys on the keypad (which now enters 123 mode) The
maximum number length is 60 digits. Use * as separator in IP
addresses. To switch to ABC mode, press # for one second.
Alter the default setting of Call Type, Network, and the default
setting of Bandwidth, if needed.
Navigate to the OK icon and press OK to save putting changes
into effect or navigate to the Cancel icon to leave menu undoing
any changes.
In the Phone Book use the Cursor keys to navigate down to Placed
Calls, Missed Calls, or Received Calls and press OK to produce
the contents of the selected item.
Use the Cursor keys to navigate down to the entry you want to add
to My Contacts.
Now, while the entry to be added remains selected use the Cursor
keys to navigate to the Add to My Contacts icon in the Task
Column and press OK.
The entry you want to
add to My Contacts
Add to My
Contacts
The Add New Contact dialogue box will now be produced – see
Adding a New Contact to My Contacts Manually to the left.
In the Phone Book use the Cursor keys to navigate down to My
Contacts and press OK to produce the contents of My Contacts.
Use the Cursor keys to navigate down to the entry you want to
delete.
Selected entr y to be deleted
Delete Entry icon
Task Column
Now, while the entry to be deleted remains selected, use the Cursor
keys to navigate to the Delete icon in the Task Column and press
OK. You will be prompted to confirm
or decline your intentions:
We strongly recommend that you copy contacts often used
to My Contacts. Note, however, that the local copy will not
be updated if the Global Contacts are updated from the
management system.
Phone Book Features (II)
Adding a New Contact Directly from the Call Log
Adding a New Contact to My Contacts Manually
Editing a Contact in My Contacts
Deleting a Contact in My Contacts
Page 21

D 14067.02
02.2010
21
Table of
Contents
Operating
Principles
Making
Video
Calls
Making
Calls Using
Phone Book
Phone Book
Details
Incoming
Calls
Calling More
Than One
Video Meeting
Features
Contact
Information
Unpacking &
Installation
Making
Telephone
Calls
TANDBERG ENTRYPOINT
USER GUIDE
Incoming
Calls
Incoming Calls
This section shows how to receive and reject calls, how to
alter the ringtone (alert signal) and how to use the Do Not
Disturb feature.
We recommend that you check out the
TANDBERG web site regularly for updated
versions of this manual:
http://www.tandberg.com/suppor t/
documentation.php?p=User_Manuals
Page 22

D 14067.02
02.2010
22
Table of
Contents
Operating
Principles
Making
Video
Calls
Making
Calls Using
Phone Book
Phone Book
Details
Incoming
Calls
Calling More
Than One
Video Meeting
Features
Contact
Information
Unpacking &
Installation
Making
Telephone
Calls
TANDBERG ENTRYPOINT
USER GUIDE
Incoming
Calls
TANDBERG 150 MXP
USER GUIDE
Three Ways of Rejecting an Incoming Call
The below menu appears when you receive an incoming call. Observe that the
menu will not appear if Do Not Disturb has been activated or if Autoanswer (see
Adminstrator’s Guide for details) has been set to On or On + Mic Off.
Accept the incoming call Reject the incoming call
Handling Incoming Calls (I)
About Incoming Calls
Five Ways of Accepting an Incoming Call
Press the green Call Now key on the keypad.
1
2
3
abc
def
4
5
6
jkl
mno
ghi
7
8
9
tuv
wxyz
pqrs
0
a/A
Use the Cursor keys to navigate to the green Accept icon
in the menu (see About Incoming Calls to the lef t) and
press the OK key on the keypad.
Lift the handset, if applicable. The handset is an optional
device, which must be ordered separately.
Press the Loudspeaker key on the keypad.
Press the Headset key if a headset is connected.
1
2
3
abc
def
4
5
6
jkl
mno
ghi
7
8
9
tuv
wxyz
pqrs
0
a/A
1
2
3
abc
def
4
5
6
jkl
mno
ghi
7
8
9
tuv
wxyz
pqrs
0
a/A
1
2
3
abc
def
4
5
6
jkl
mno
ghi
7
8
9
tuv
wxyz
pqrs
0
a/A
Activate Do Not Disturb
Press the red Call Reject key
on the keypad.
Use the Cursor keys to navigate to
the red Reject icon in the menu, (see
About Incoming Calls above), and
press the OK key on the keypad.
Use the Do Not Disturb feature – see
next page for details.
1
2
3
abc
def
4
5
6
jkl
mno
ghi
7
8
9
tuv
wxyz
pqrs
0
a/A
1
2
3
abc
def
4
5
6
jkl
mno
ghi
7
8
9
tuv
wxyz
pqrs
0
a/A
Page 23

D 14067.02
02.2010
23
Table of
Contents
Operating
Principles
Making
Video
Calls
Making
Calls Using
Phone Book
Phone Book
Details
Incoming
Calls
Calling More
Than One
Video Meeting
Features
Contact
Information
Unpacking &
Installation
Making
Telephone
Calls
TANDBERG ENTRYPOINT
USER GUIDE
Incoming
Calls
TANDBERG 150 MXP
USER GUIDE
You may want to set up your system so that the
microphone and/or the camera are switched off
whenever you receive an incoming call.
By pressing
• the Microphone Off key and
• the Camera Off key
you will prevent callers from hearing you and seeing
you without your control (press again to reactivate).
To combine convenience and privacy, your 150
may be set up to automatically accept an incoming
call, but with the microphone switched off. In this
case you must switch the microphone back on
manually yourself (just press the Microphone Off
key to reactivate a disabled microphone).
You may also have your system set up so that you
always must answer all incoming calls manually.
These settings are parts of the Adminstrator’s
Guide available. Your System Adminstrator, may
or may not, have password protection activated
to prevent unauthorized alterations of these and
other settings. If in doubt, consult your System
Adminstrator.
Whenever microphone and camera are disabled,
these icons appear on your screen:
Do Not Disturb
A Few Words on Privacy
You are not stuck with the audio signal alerting
you that an incoming call is on its way. This
may be changed, see Audio Settings in the
Adminstrator’s Guide.
Do observe, however, that these settings may be
password protected by your System Adminstrator.
Want to Change the Alert Signal?
An alternative to the above could be the
use of the Do Not Disturb feature to the
right.
A message will be sent to the far end
whenever you have disabled your
microphone and/or your camera.
There is a Do Not Disturb function available on
your system. When set to On, all incoming calls
are blocked from your system.
Outside a call, press the red Call Reject
key. A dialogue box will appear:
Press OK to activate the feature. The
screen will now turn black, and the
following text will appear:
Press any key to clear Do Not Disturb
Press Reject to leave the menu, keeping
the feature deactivated.
When Do Not Disturb has been activated
and you receive an incoming call, the
following dialogue box will be produced:
Use the Cursor keys to navigate and OK
to make your selection and proceed.
Whenever Do Not Disturb is activated,
the far end will be informed that the
called is busy.
Assume Do Not Disturb has not been
activated. Choosing Do Not Disturb
when receiving an incoming call will then
do two things: It rejects the incoming call
(in the same way as choosing Reject), and set s
the Do Not Disturb functionality to On.
About Do Not Disturb
1
2
3
abc
def
4
5
6
jkl
mno
ghi
7
8
9
tuv
wxyz
pqrs
0
a/A
1
2
3
abc
def
4
5
6
jkl
mno
ghi
7
8
9
tuv
wxyz
pqrs
0
a/A
Handling Incoming Calls (II)
Page 24

D 14067.02
02.2010
24
TANDBERG 150
USER GUIDE
Table of
Contents
Operating
Principles
Making
Video
Calls
Making
Calls Using
Phone Book
Phone Book
Details
Incoming
Calls
Calling More
Than One
Video Meeting
Features
Contact
Information
Unpacking &
Installation
Making
Telephone
Calls
Calling More
Than One
Calling More Than One
Your TANDBERG 150 can be used to call more than
one person at a time. Two persons may be called and you
may swap whom you are talking to. This is referred to as call
swapping. You may also transfer calls to other video systems.
In addition, you may – under certain conditions – use the
150 to initiate video conferences. This is an optional
feature requiring additional infrastructure. Contact your
administrator for details on this.
We recommend that you check out the
TANDBERG web site regularly for updated
versions of this manual:
http://www.tandberg.com/suppor t/
documentation.php?p=User_Manuals
Page 25

D 14067.02
02.2010
25
TANDBERG 150
USER GUIDE
Table of
Contents
Operating
Principles
Making
Video
Calls
Making
Calls Using
Phone Book
Phone Book
Details
Incoming
Calls
Calling More
Than One
Video Meeting
Features
Contact
Information
Unpacking &
Installation
Making
Telephone
Calls
Calling More
Than One
TANDBERG 150 MXP
USER GUIDE
Calling Another Participant Whilst In a Call (Call Swapping)
Your TANDBERG 150 may be used to call
another person while you are in a call already.
You cannot talk to the two persons at the same
time, but you may put one on hold and talk to
the other and use the swap feature to change
whom you are talking to.
Calling Two Persons at a Time
Whilst in a call, press OK to produce the
soft keys needed for this.
About Calling Another Participant
Press the soft key Hold to put the current
call on hold. This will enable you to call
another person.
Press the soft key Add Call to produce
the Call Another menu. To go back to the
person put on hold (cancel this operation)
press Resume instead.
Call the other person in the usual way,
either by dialling directly or by using the
phone book.
Now you are in contact with two persons,
but only one at a time. To switch between
the two press the soft key Swap. The one
put on hold will see the text “Attention
Please wait...” on the screen.
To end the call currently connected (the call
that has not been put on hold), press the
soft key End Call. You will then be back in a
regular point-to-point call.
Page 26

D 14067.02
02.2010
26
TANDBERG 150
USER GUIDE
Table of
Contents
Operating
Principles
Making
Video
Calls
Making
Calls Using
Phone Book
Phone Book
Details
Incoming
Calls
Calling More
Than One
Video Meeting
Features
Contact
Information
Unpacking &
Installation
Making
Telephone
Calls
Calling More
Than One
TANDBERG 150 MXP
USER GUIDE
Call Transfer
You may transfer an ongoing call to somebody
else in a way similar to what you can do on most
corporate telephone systems.
Basically, there are two transfer modes; Blind
and Consultative:
• Blind takes place when you receive a call
and decides to transfer this call to another
person without speaking to that person.
In other words, you assume that the other
person is present and ready to receive the
call.
• Consultative takes place when you put the
person you are talking to on hold, then call
another person, talk to that person and
finally decide to transfer the call to that
person.
Alternatively, you may, of course, receive a
second call whilst you are in a already. This
will, however, impose no change to the above
principles.
Blind Call Transfer
Whilst in a call, press OK to produce the soft
keys, if applicable.
About Call Transfer
Press Transfer to initiate the transfer
process.
Call the person to whom the call is to be
transferred in the usual way, either by
dialling directly or by using the phone book.
Once you launch the call, transfer becomes
effective.
Consultative Call Transfer
Whilst in a call press OK to produce the soft
keys, if applicable, and set the current call
on hold as described on the previous page.
Call the other person, to whom the call is to
be transferred.
After you have talked to this person, press
the Transfer key, and the two parties will be
connected, while you are disconnected.
Page 27

D 14067.02
02.2010
27
TANDBERG 150
USER GUIDE
Table of
Contents
Operating
Principles
Making
Video
Calls
Making
Calls Using
Phone Book
Phone Book
Details
Incoming
Calls
Calling More
Than One
Video Meeting
Features
Contact
Information
Unpacking &
Installation
Making
Telephone
Calls
Calling More
Than One
TANDBERG 150 MXP
USER GUIDE
Initiating a Video Conference From Your 150
Your TANDBERG 150 may be used
to initiate video conferences with several
participants, provided that:
• You are connected to an MCU (Multi-
Conference Unit) supporting this.
• Your TANDBERG 150 is set up to allow
the use of external Multiway™. This is set up
by your administrator and is described in the
Administrator Guide.
Setting Up a Conference (optional feature)Requirements
Assuming you are in a call, press the
softbut ton Hold.
Press the softbutton the Add Call.
Call second participant.
Press the softbutton Join to create the
conference.
The system will now disconnect you and
transfer the video conference to the MCU
(Multi-Conference Unit).
Repeat
–
until all participants
required have been added.
If the softkeys along the bot tom of the
display are no longer shown, just press any
of the softkey buttons of the keypad.
If any of the participants (including you as
the initiator) disconnects, the conference
continues without the disconnected
person.
All participants, including yourself will be
called by the MCU and the conference can
start.
Page 28

D 14067.02
02.2010
28
TANDBERG 150
USER GUIDE
Table of
Contents
Operating
Principles
Making
Video
Calls
Making
Calls Using
Phone Book
Phone Book
Details
Incoming
Calls
Calling More
Than One
Video Meeting
Features
Contact
Information
Unpacking &
Installation
Making
Telephone
Calls
Video Meeting
Features
Video Meeting Features
When you are in a video meeting, there are quite a few
features available for you. You may view a list of all the
participants; you may control the far end camera; you
may request floor; enjoy a presentation; send and receive
snapshots; and do text chatting.
We recommend that you check out the
TANDBERG web site regularly for updated
versions of this manual:
http://www.tandberg.com/suppor t/
documentation.php?p=User_Manuals
Page 29

D 14067.02
02.2010
29
TANDBERG 150
USER GUIDE
Table of
Contents
Operating
Principles
Making
Video
Calls
Making
Calls Using
Phone Book
Phone Book
Details
Incoming
Calls
Calling More
Than One
Video Meeting
Features
Contact
Information
Unpacking &
Installation
Making
Telephone
Calls
Video Meeting
Features
TANDBERG 150 MXP
USER GUIDE
When you are in a video meeting, there are soft keys available
to let you request floor, view a list of the other participants,
control the far end camera, and do text chatting.
In addition you may adjust display settings.
Request Floor
When requesting floor, your video will be broadcasted in full
screen to all other participants in the conference. Request
Floor is useful when you want to speak or display something in
front of all participants.
View a List of the Participants
Although your TANDBERG 150MXP is unable to generate a
multisite video meeting (several participants simultaneously)
by itself, it may, of course, be part of a multisite meeting. By
pressing Par t Names a list of the other par ticipants will be
shown on the screen.
Controlling the Far End Camera
By means of this feature you will be able to control the zoom and
presets of the far end camera (the camera in the other end) in
addition to move it using your own cursor keys and select video
sources. Note that this requires that the far end unit allows
Far End camera control and that it has a movable camera. The
150MXP camera is not a movable camera.
Snapshot
Other participants may send you a snapshot,
e.g. a picture of something during the video
meeting. To produce the snapshot on your
screen, use the Snapshot soft key (which
appears whenever there is a snapshot only).
Text Chat
Imagine you want to send over a phone
number, an e-mail addres s, or just inform
the far end that their microphone must
be switched back on – these are typical
applications of the Text Chat feature.
Dual Stream Video
Some systems are capable of generating a dual stream
video, e.g. to give viewers the option to see a Microsoft®
Powerpoint presentation and the video meeting
simultaneously. Your 150MXP cannot show two streams
simultaneously. However, if the far end sends dual stream
your system will show the presentation only. You may
press the Selfview key to see what your own camera
sees instead of the presentation, but no other options are
available.
Display Settings
You may adjust the monitor brightness,
camera brightness, camera hue, and
camera saturation.
Do as follows:
1. Press the Display Settings key (
) to
produce the below menu.
2. Use the Vertical Cursor keys to select
a function, and the Horizontal Cursor
keys to adjust a set ting.
3. Leave the menu in the usual manner.
Video Meeting Features – an Overview
Page 30

D 14067.02
02.2010
30
TANDBERG 150
USER GUIDE
Table of
Contents
Operating
Principles
Making
Video
Calls
Making
Calls Using
Phone Book
Phone Book
Details
Incoming
Calls
Calling More
Than One
Video Meeting
Features
Contact
Information
Unpacking &
Installation
Making
Telephone
Calls
Video Meeting
Features
TANDBERG 150 MXP
USER GUIDE
When requesting floor, your video will be
broadcasted in full screen to all other
participants in a multipar t video meeting.
Request Floor is useful when you want to speak
or display something in front of all participants.
Press the soft key Release Floor when you are
finished to make the floor available for other
participants in the video meeting.
This feature is accessible and applies
during a multipart video meeting only.
In general, multipar t video meetings
cannot be initiated by a 150MXP, but
your 150MXP may take part in multipart video
meetings initiated by other systems.
Under certain conditions, however, multipart
video meetings may be initiated from a
150MXP – this is described in Initiating a Video
Conference From Your 150 MXP
Requesting and Releasing Floor
The Selfview icon will now indicate that
the floor is yours.
Press Relase Floor to hand over the floor
to someone else.
In a multipart video meeting, press the
soft key Request Floor.
Normally, you will retain the floor until
you release it yourself. However, in
multipart video meetings there may be
a chair person with the ability to determine who
should have the floor and therefore also with
the power to give the floor to someone else than
you.
The soft key will now change to
Release Floor.
Requesting and Releasing Floor
About Requesting Floor
Page 31

D 14067.02
02.2010
31
TANDBERG 150
USER GUIDE
Table of
Contents
Operating
Principles
Making
Video
Calls
Making
Calls Using
Phone Book
Phone Book
Details
Incoming
Calls
Calling More
Than One
Video Meeting
Features
Contact
Information
Unpacking &
Installation
Making
Telephone
Calls
Video Meeting
Features
TANDBERG 150 MXP
USER GUIDE
In a multipart video meeting you may produce a
list of the other participants.
In a multipart video meeting, press the
soft key More.
A list of System Names for the other video
systems connected will now be produced.
View Other Participants
Viewing a List of ParticipantsAbout View Participant
Then press the soft key
View Participants.
Press Cancel to return to the previous displayPress More to return to the previous display
Page 32

D 14067.02
02.2010
32
TANDBERG 150
USER GUIDE
Table of
Contents
Operating
Principles
Making
Video
Calls
Making
Calls Using
Phone Book
Phone Book
Details
Incoming
Calls
Calling More
Than One
Video Meeting
Features
Contact
Information
Unpacking &
Installation
Making
Telephone
Calls
Video Meeting
Features
TANDBERG 150 MXP
USER GUIDE
Press the Presets sof t key to utilize the far end presets.
The soft keys will now change to show far end control features.
This is a feature that lets you pan, tilt, and zoom the far end
camera. If far end presets are available you may access these as
well, and you may also make use of any video sources that the
far end may have at its disposal.
This feature requires a movable camera in the far end – i.e.
communication between two 150 units will not provide far
end camera control.
This feature is not accessible in multipart video meetings.
In a point-to-point video meeting, press the soft key
Far End.
Press the Zoom soft key to gain zoom control of the far end
camera.
The far end may use camera presets to easily vary between predefined
camera angles in their own end. Thus they eliminate the need to move
their camera about in a manual way.
Your 150MXP may get access to these settings. If no presets have been
stored and you try to access far end presets nothing will happen.
Move Zoom Presets Video Source Back
1
2
3
abc
def
4
5
6
jkl
mno
ghi
7
8
9
tuv
wxyz
pqrs
0
a/A
Use the Numerical keypad
0–9 to select far end presets.
Press the Move soft key to gain pan control of the far end
camera.
Use the Cursor keys to
pan (move) the
far end camera.
Press OK
when done.
Press OK
when done.
Press OK
when done.
Back lets you
exit this menu
any time.
Video source
is explained
overleaf.
Far End Camera Control
Controlling the Far End CameraAbout Far End Camera Control
About Camera Presets
Use the Cursor keys to
pan (move) the
far end camera.
Page 33

D 14067.02
02.2010
33
TANDBERG 150
USER GUIDE
Table of
Contents
Operating
Principles
Making
Video
Calls
Making
Calls Using
Phone Book
Phone Book
Details
Incoming
Calls
Calling More
Than One
Video Meeting
Features
Contact
Information
Unpacking &
Installation
Making
Telephone
Calls
Video Meeting
Features
TANDBERG 150 MXP
USER GUIDE
Use the Cursor keys to navigate to the video source to be selected
and click OK.
Press the Video Source sof t key to produce the far end video
sources.
The far end system may have external video
sources connected, such as Document camera,
a VCR or DVD, a PC, and/or a PC connected via a
Virtual Network Computing. In addition there may
be an auxiliary input available. Through the Far
End Video Source control you may get access to all
these sources.
Note that this feature does not apply to multipart
video meetings.
Main
Camera
Auxiliary
Input
Document
Camera
VCR/DVD
PC
Virtual
Network
Computing
Cancel/Back
Select Cancel or Main Camera to go back to normal display mode.
Far End Video Source
Controlling the Far End Video SourceAbout Far End Video Sources
Page 34

D 14067.02
02.2010
34
TANDBERG 150
USER GUIDE
Table of
Contents
Operating
Principles
Making
Video
Calls
Making
Calls Using
Phone Book
Phone Book
Details
Incoming
Calls
Calling More
Than One
Video Meeting
Features
Contact
Information
Unpacking &
Installation
Making
Telephone
Calls
Video Meeting
Features
TANDBERG 150 MXP
USER GUIDE
You can receive snapshots to your 150M XP.
Once viewed and discarded a snapshot cannot be
recalled.
You will be notified when the far end has sent you a snapshot. At the same time the display will seem to freeze. View the snapshot, press OK to return to
normal display.
Snapshot
Viewing SnapshotsAbout Snapshots
Page 35

D 14067.02
02.2010
35
TANDBERG 150
USER GUIDE
Table of
Contents
Operating
Principles
Making
Video
Calls
Making
Calls Using
Phone Book
Phone Book
Details
Incoming
Calls
Calling More
Than One
Video Meeting
Features
Contact
Information
Unpacking &
Installation
Making
Telephone
Calls
Video Meeting
Features
TANDBERG 150 MXP
USER GUIDE
Press the Text Chat soft key to activate the text chatting
feature.
Use the Numerical keypad in alphabetical mode to enter a
text message. The text is sent as you type.
You may use your 150MXP to send and receive text messages
using the chatting function available.
All you need is to select the Text Chat function and use the keypad
as you would when sending text messages (SMS) using your
cellular phone.
Note! This will not work unless the far side a) supports text chat
and b) has activated that feature.
Text chatting does not apply to multipart video meetings.
Text Chat message
Text Chat
ChattingAbout Text Chatting
Page 36

D 14067.02
02.2010
36
TANDBERG 150
USER GUIDE
Table of
Contents
Operating
Principles
Making
Video
Calls
Making
Calls Using
Phone Book
Phone Book
Details
Incoming
Calls
Calling More
Than One
Video Meeting
Features
Contact
Information
Unpacking &
Installation
Making
Telephone
Calls
Contact
Information
Contact Information
 Loading...