

Page 1

CE9.12
1 2 3
.@
4 5 6
ghi jkl mno
7 8 9
pqrs tuv wxyz
defabc
Cisco TelePresence User Guide
SX10 & SX20
*
0
#
D15097.22 Cisco TelePresence SX10, SX20 User Guide APRIL 2020
All contents © 2020 Cisco Systems, Inc. All rights reserved
1
Page 2

Contents
What’s in this guide
Introduction to Video Conferencing
The Home Screen
The Remote Control (I)
The Remote Control (II)
Video Calls
Place a Call From the Contact List
Edit a Contact Before the Call
Edit the Call Rate, then Place the Call
Place a Call Using Name, Number, or IP-Address
Add Additional Participants to an Existing Call
Disconnect a Participant From a Conference
Receive a Call ......................................................................... 14
..................................................................... 4
.............................................................. 5
............................................................. 6
............................................ 8
................................................... 9
..................................... 10
.................. 11
........................ 12
.......................... 13
Contacts
Add Someone to Favorites, Outside a Call
Add Someone to Favorites, While in a Call
Camera Control
View Camera Settings (Local camera)
Far-End Camera Control
Move the Selfview PiP
Turn Camera On or O
Settings
Access Settings
...................................................................... 37
......................................................... 33
............................................................ 34
........................................................... 35
.................................... 32
.............................. 29
............................. 30
All entries in the table of contents are
active hyperlinks that take you to the
corresponding article.
To go between chapters, you can click
on the icons in the sidebar.
Note: Some of the features described
in this user guide are optional and they
may not apply to your device.
Receive Additional Calls While Already In a Call ..................... 15
Transfer an Ongoing Call
Change the Layout of the Screen
Enable Do Not Disturb
Enable Standby
Forward All Calls
Intelligent Proximity
Cisco Proximity Ultrasound Signal
Content Sharing
Start and Stop Presentation
Change Presentation Layout In a Call
....................................................................... 19
..................................................................... 20
......................................................... 16
........................................... 17
............................................................. 18
........................................... 22
.................................................... 24
..................................... 25
Scheduled Meetings
Join a Scheduled Meeting
D15097.22 Cisco TelePresence SX10, SX20 User Guide APRIL 2020
All contents © 2020 Cisco Systems, Inc. All rights reserved
...................................................... 27
2
Page 3
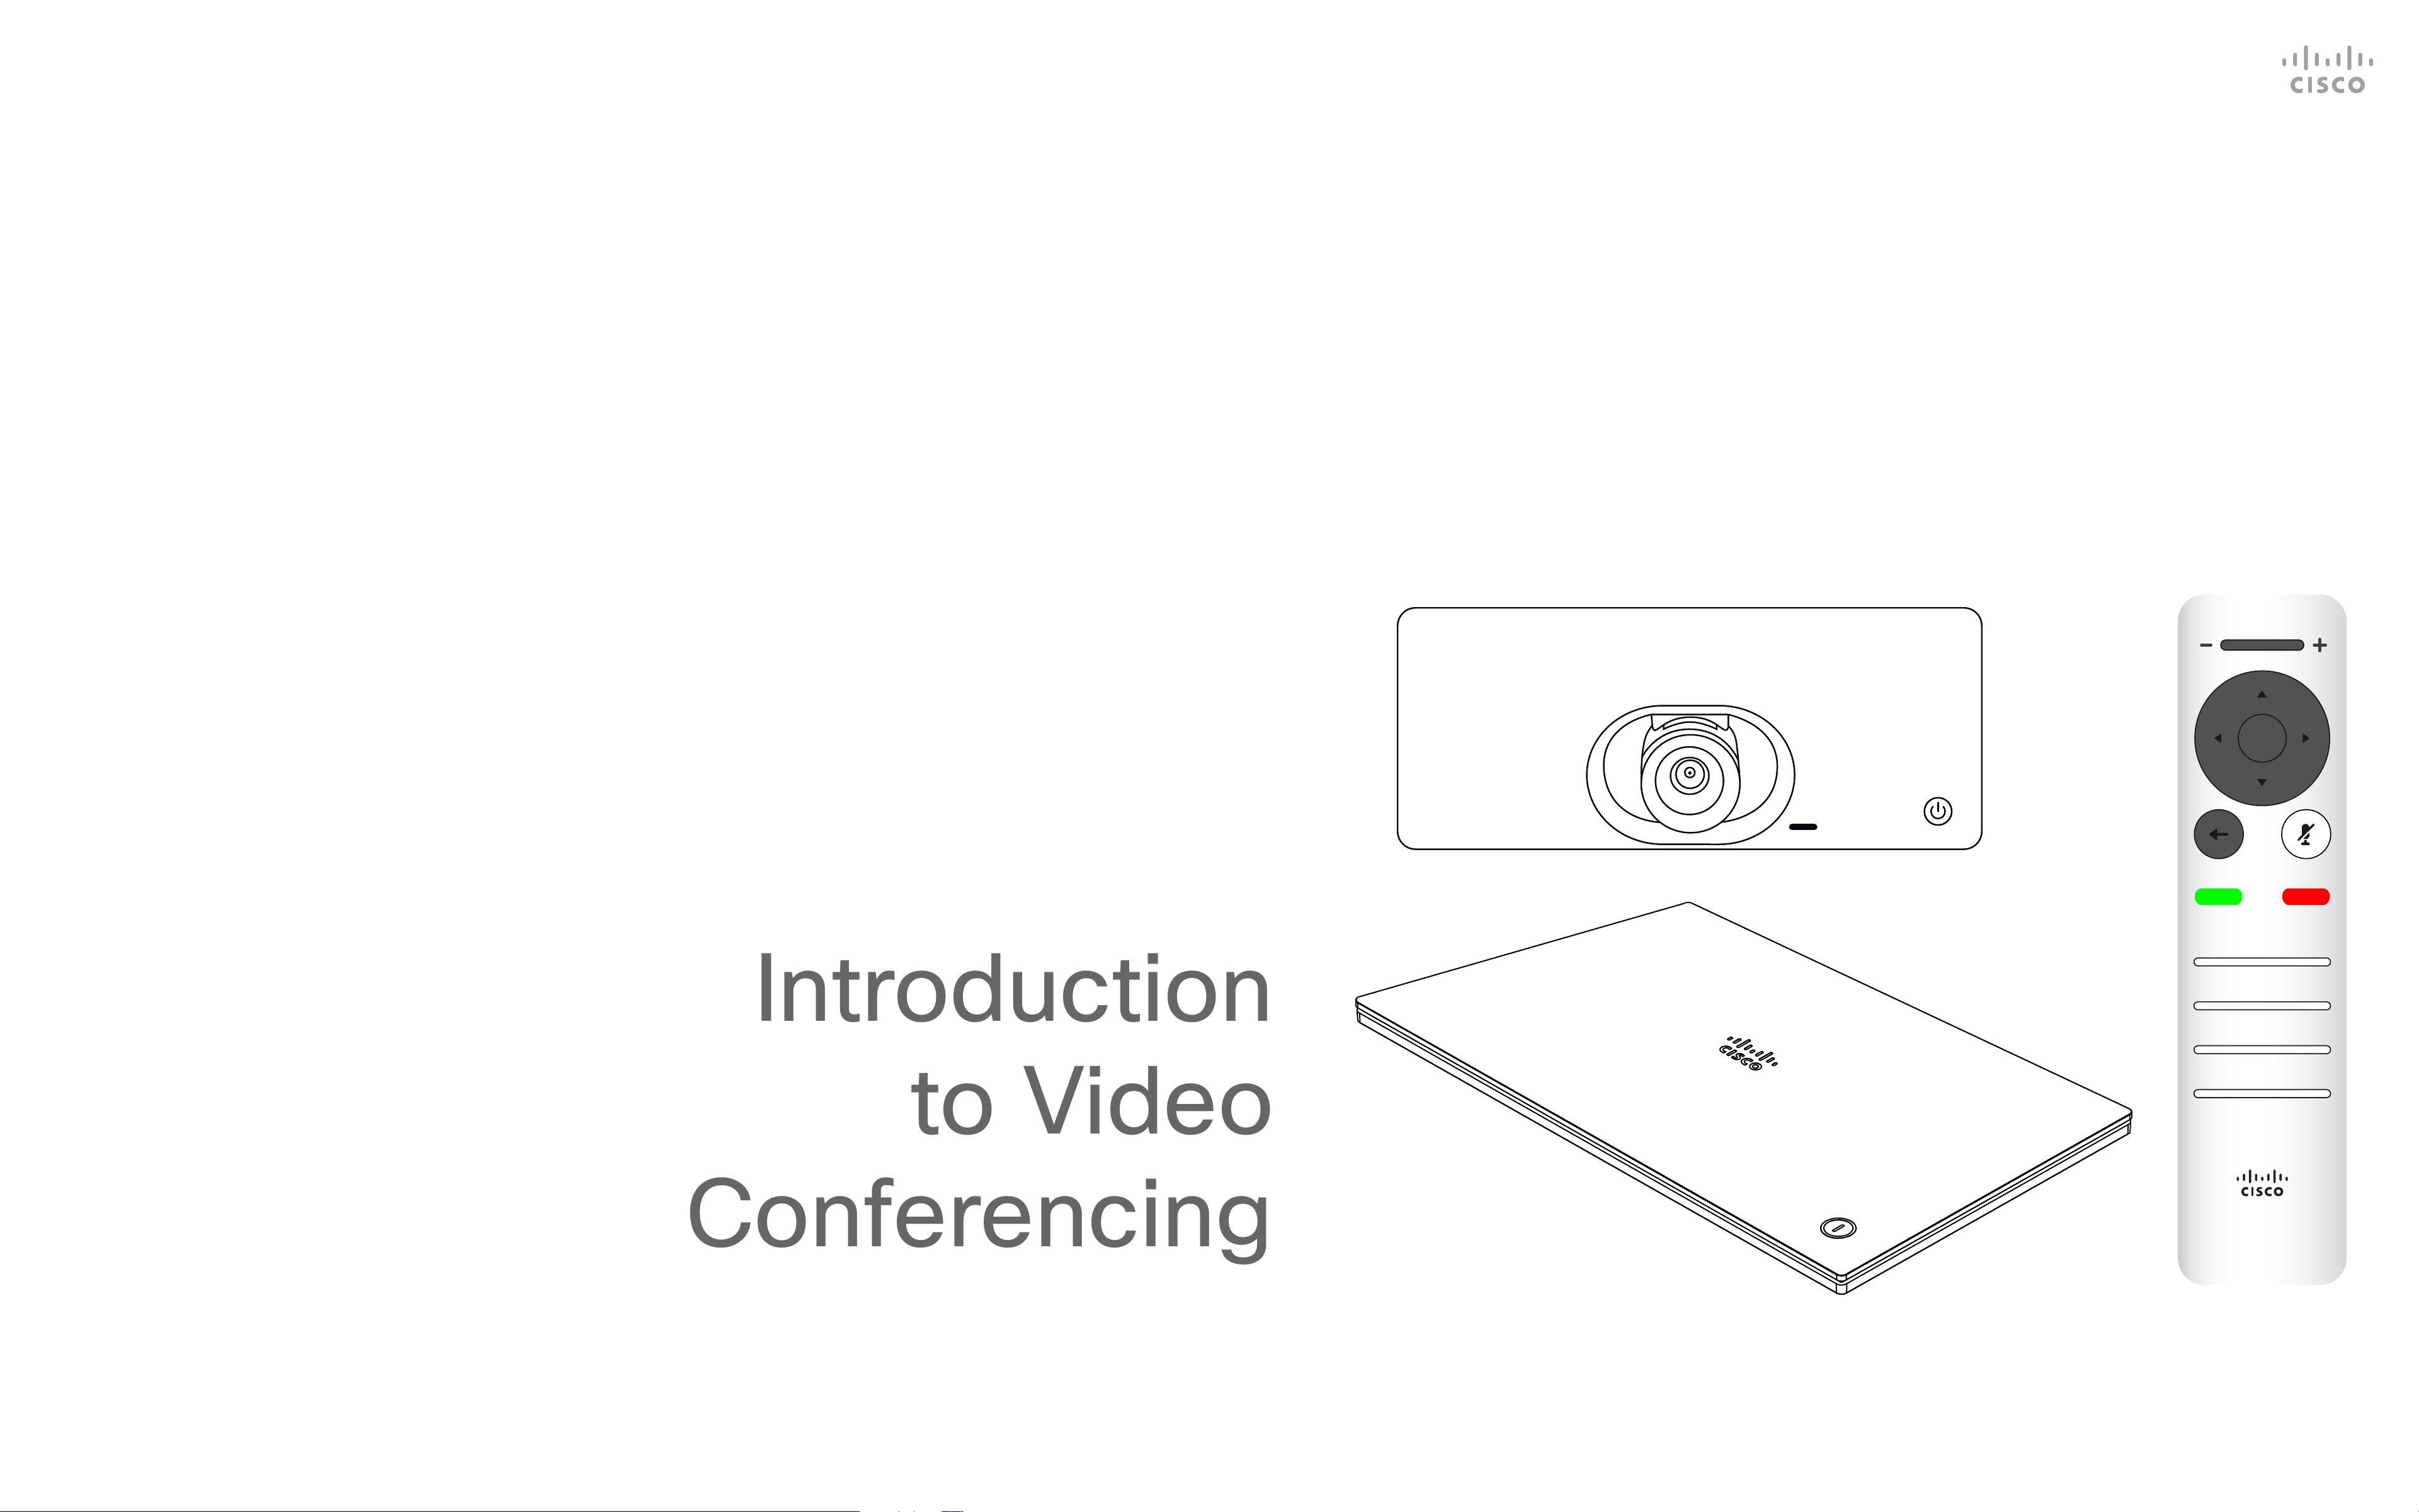
Introduction
to Video
Conferencing
1 2 3
.@
4 5 6
ghi jkl mno
7 8 9
pqrs tuv wxyz
defabc
*
0
#
D15097.22 Cisco TelePresence SX10, SX20 User Guide APRIL 2020
All contents © 2020 Cisco Systems, Inc. All rights reserved
3
Page 4
Introduction
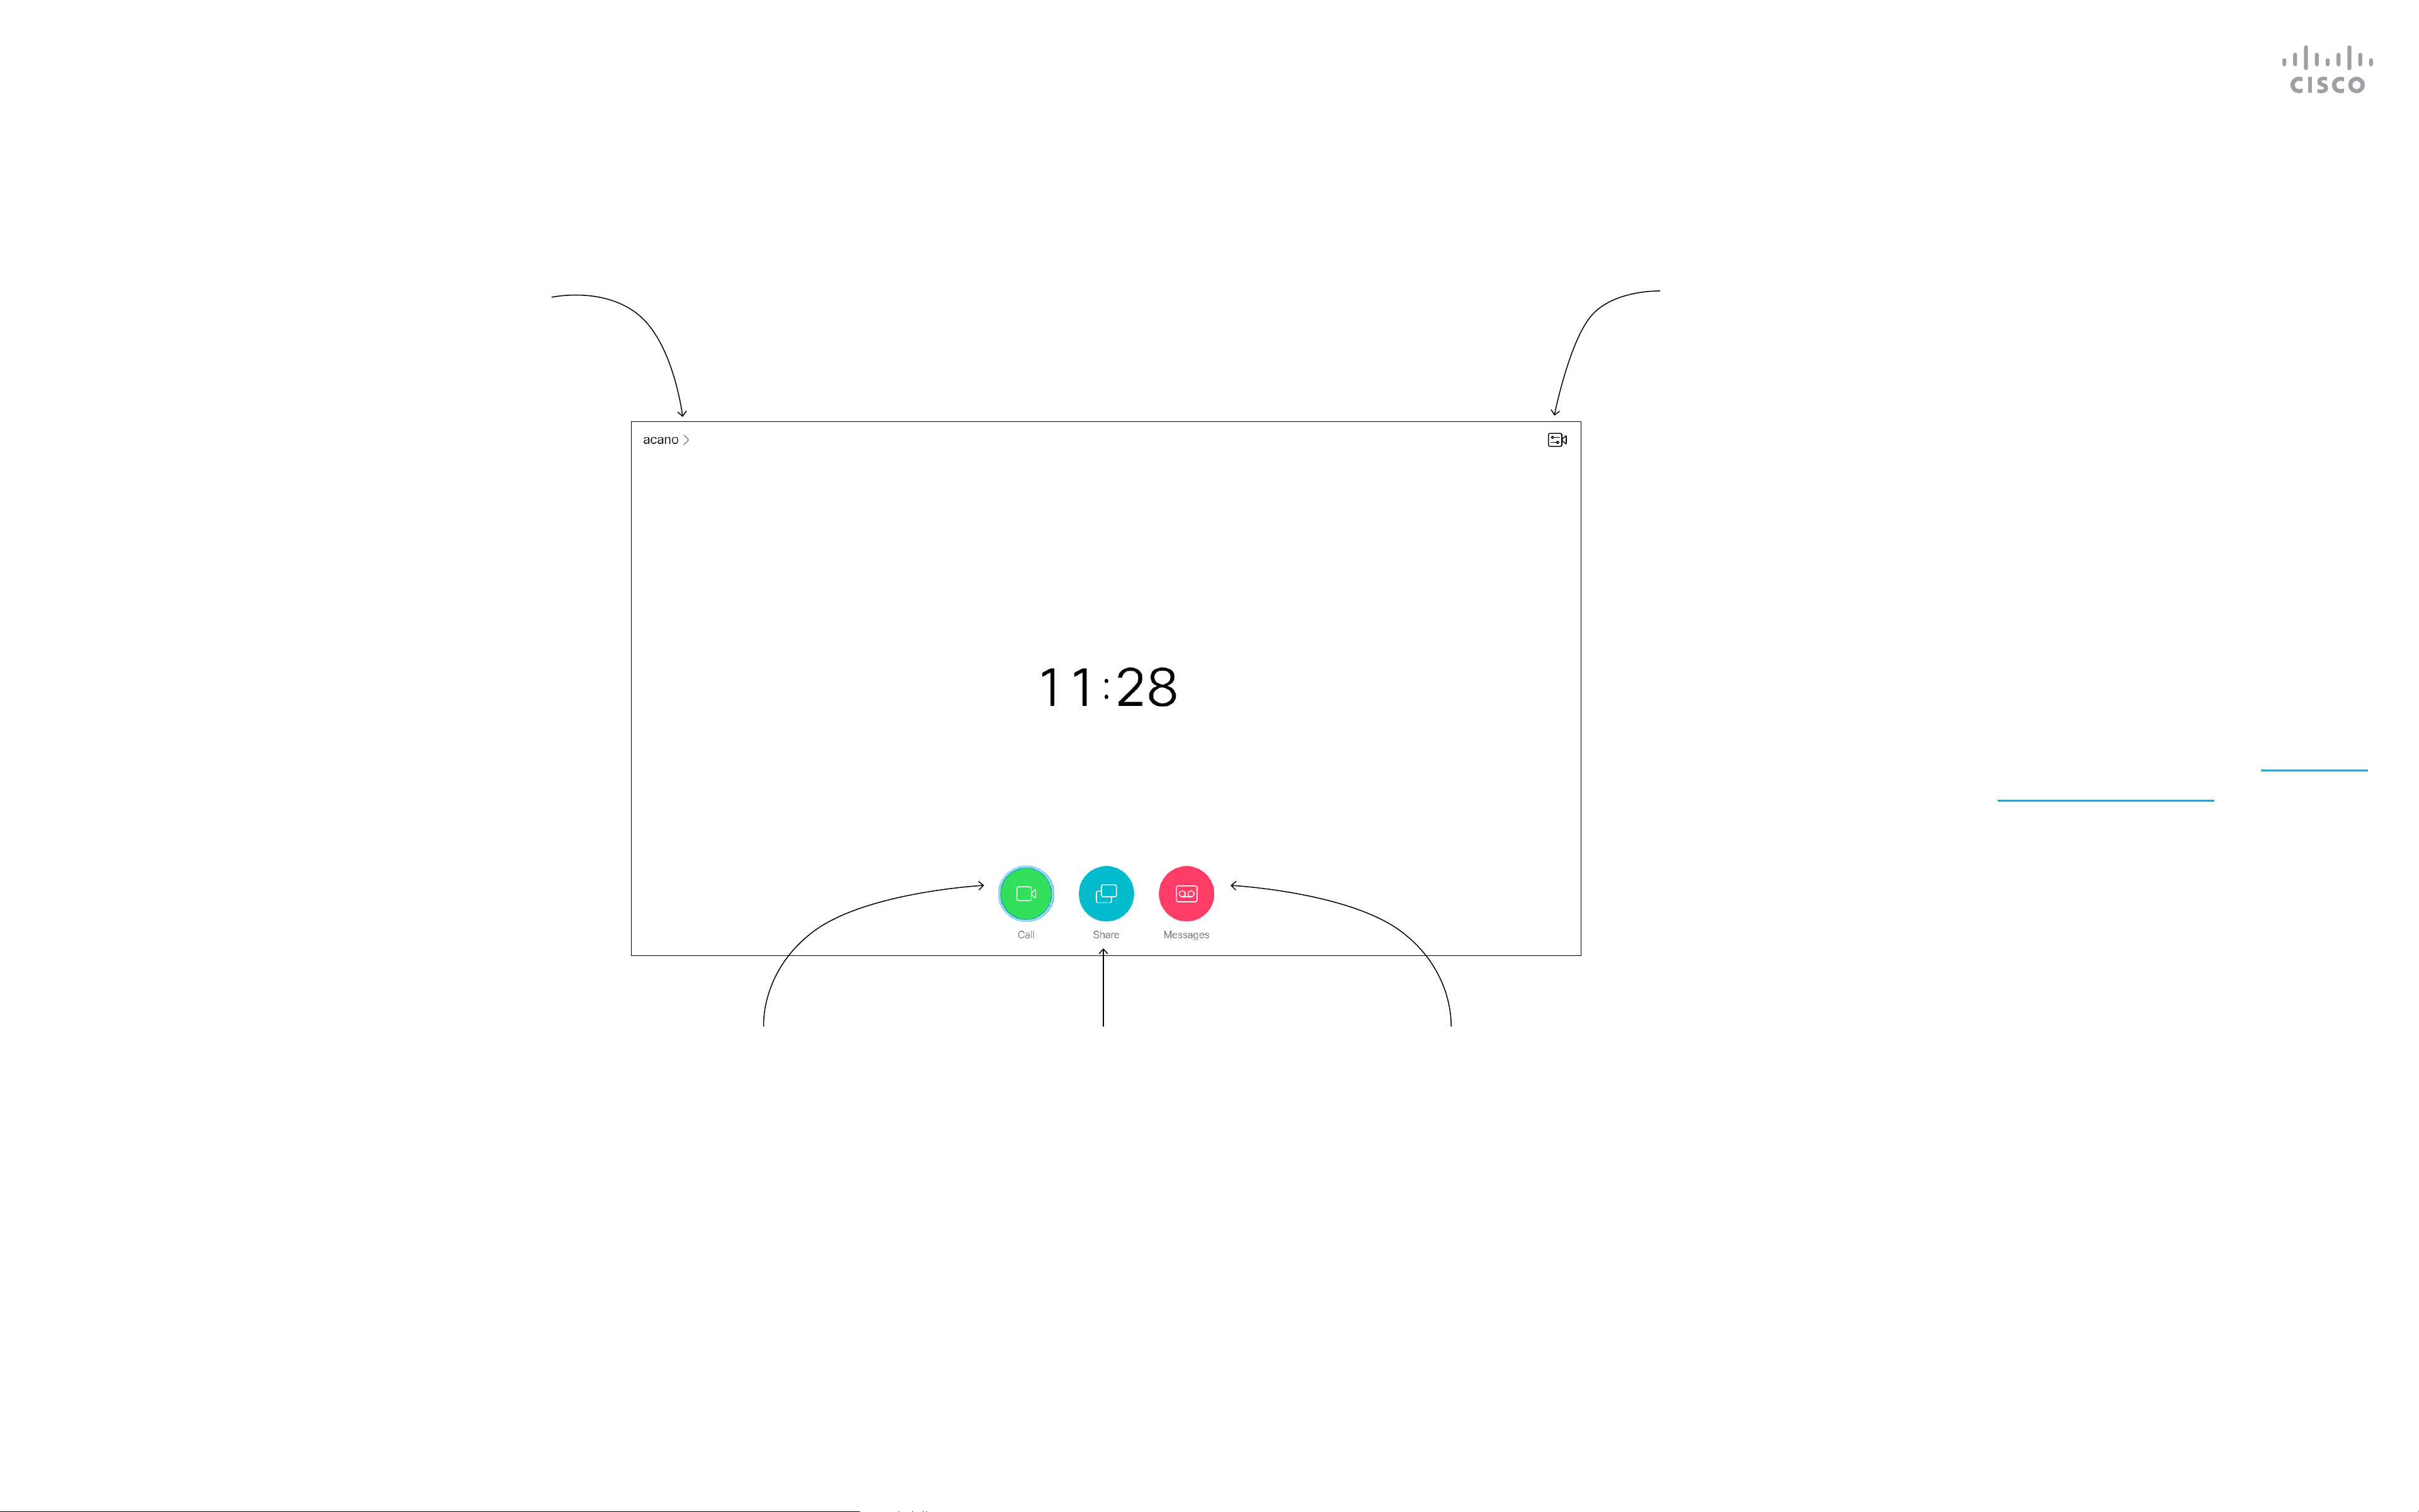
The Home Screen
Upper left corner
of the screen
contains the More
icon (>) which
provides access
to Standby mode,
System information
and the Do Not
Disturb feature.
The Camera
Control menu icon
is located in the
upper right corner
of the display.
Operating tips
Use the Cursor controls the remote
control to move about the screen
and press OK/Enter to open the
selected menu eld.
Use the Cancel key to exit a menu
(and return to the Home screen)
undoing any changes. Use the Back
key to go one step back.
The remote control buttons are
described on the following pages.
The Intelligent Proximity feature
allows you to share, see and capture
content from a video device wirelessly
on your own device. You can also use
your own device to control calls on
the video device. See also “Intelligent
Proximity” on page 21.
The Call button
located to the left
in the lower part
of the display.
Tip When set to Do Not Disturb, ringtones are muted and call attempts made by
others to reach you appear as missed calls. You may, however, place calls as
The Share button
is located to
the right in the
lower part of the
display.
much as you like.
If a messaging
system exists
for your device,
access messages
from here.
As default, there is a 60 minutes timeout on the Do not disturb (after which the
device returns to normal operation), but this may have been changed to a dierent
setting by your Video Support Team.
D15097.22 Cisco TelePresence SX10, SX20 User Guide APRIL 2020
All contents © 2020 Cisco Systems, Inc. All rights reserved
4
Page 5
Introduction
The Remote Control (I)
Operating tips
Use the Cursor controls to move
about the screen and press OK/
Enter to open the selected menu
eld.
Use the Cancel key to exit a menu
(and return to the Home screen)
undoing any changes. Use the Back
key to go just one step back.
1 2 3
.@
4 5 6
ghi jkl mno
7 8 9
pqrs tuv wxyz
0
*
defabc
#
1 2 3
.@
4 5 6
ghi jkl mno
7 8 9
pqrs tuv wxyz
0
*
defabc
#
1 2 3
.@
4 5 6
ghi jkl mno
7 8 9
pqrs tuv wxyz
0
*
defabc
#
1 2 3
.@
4 5 6
ghi jkl mno
7 8 9
pqrs tuv wxyz
0
*
defabc
#
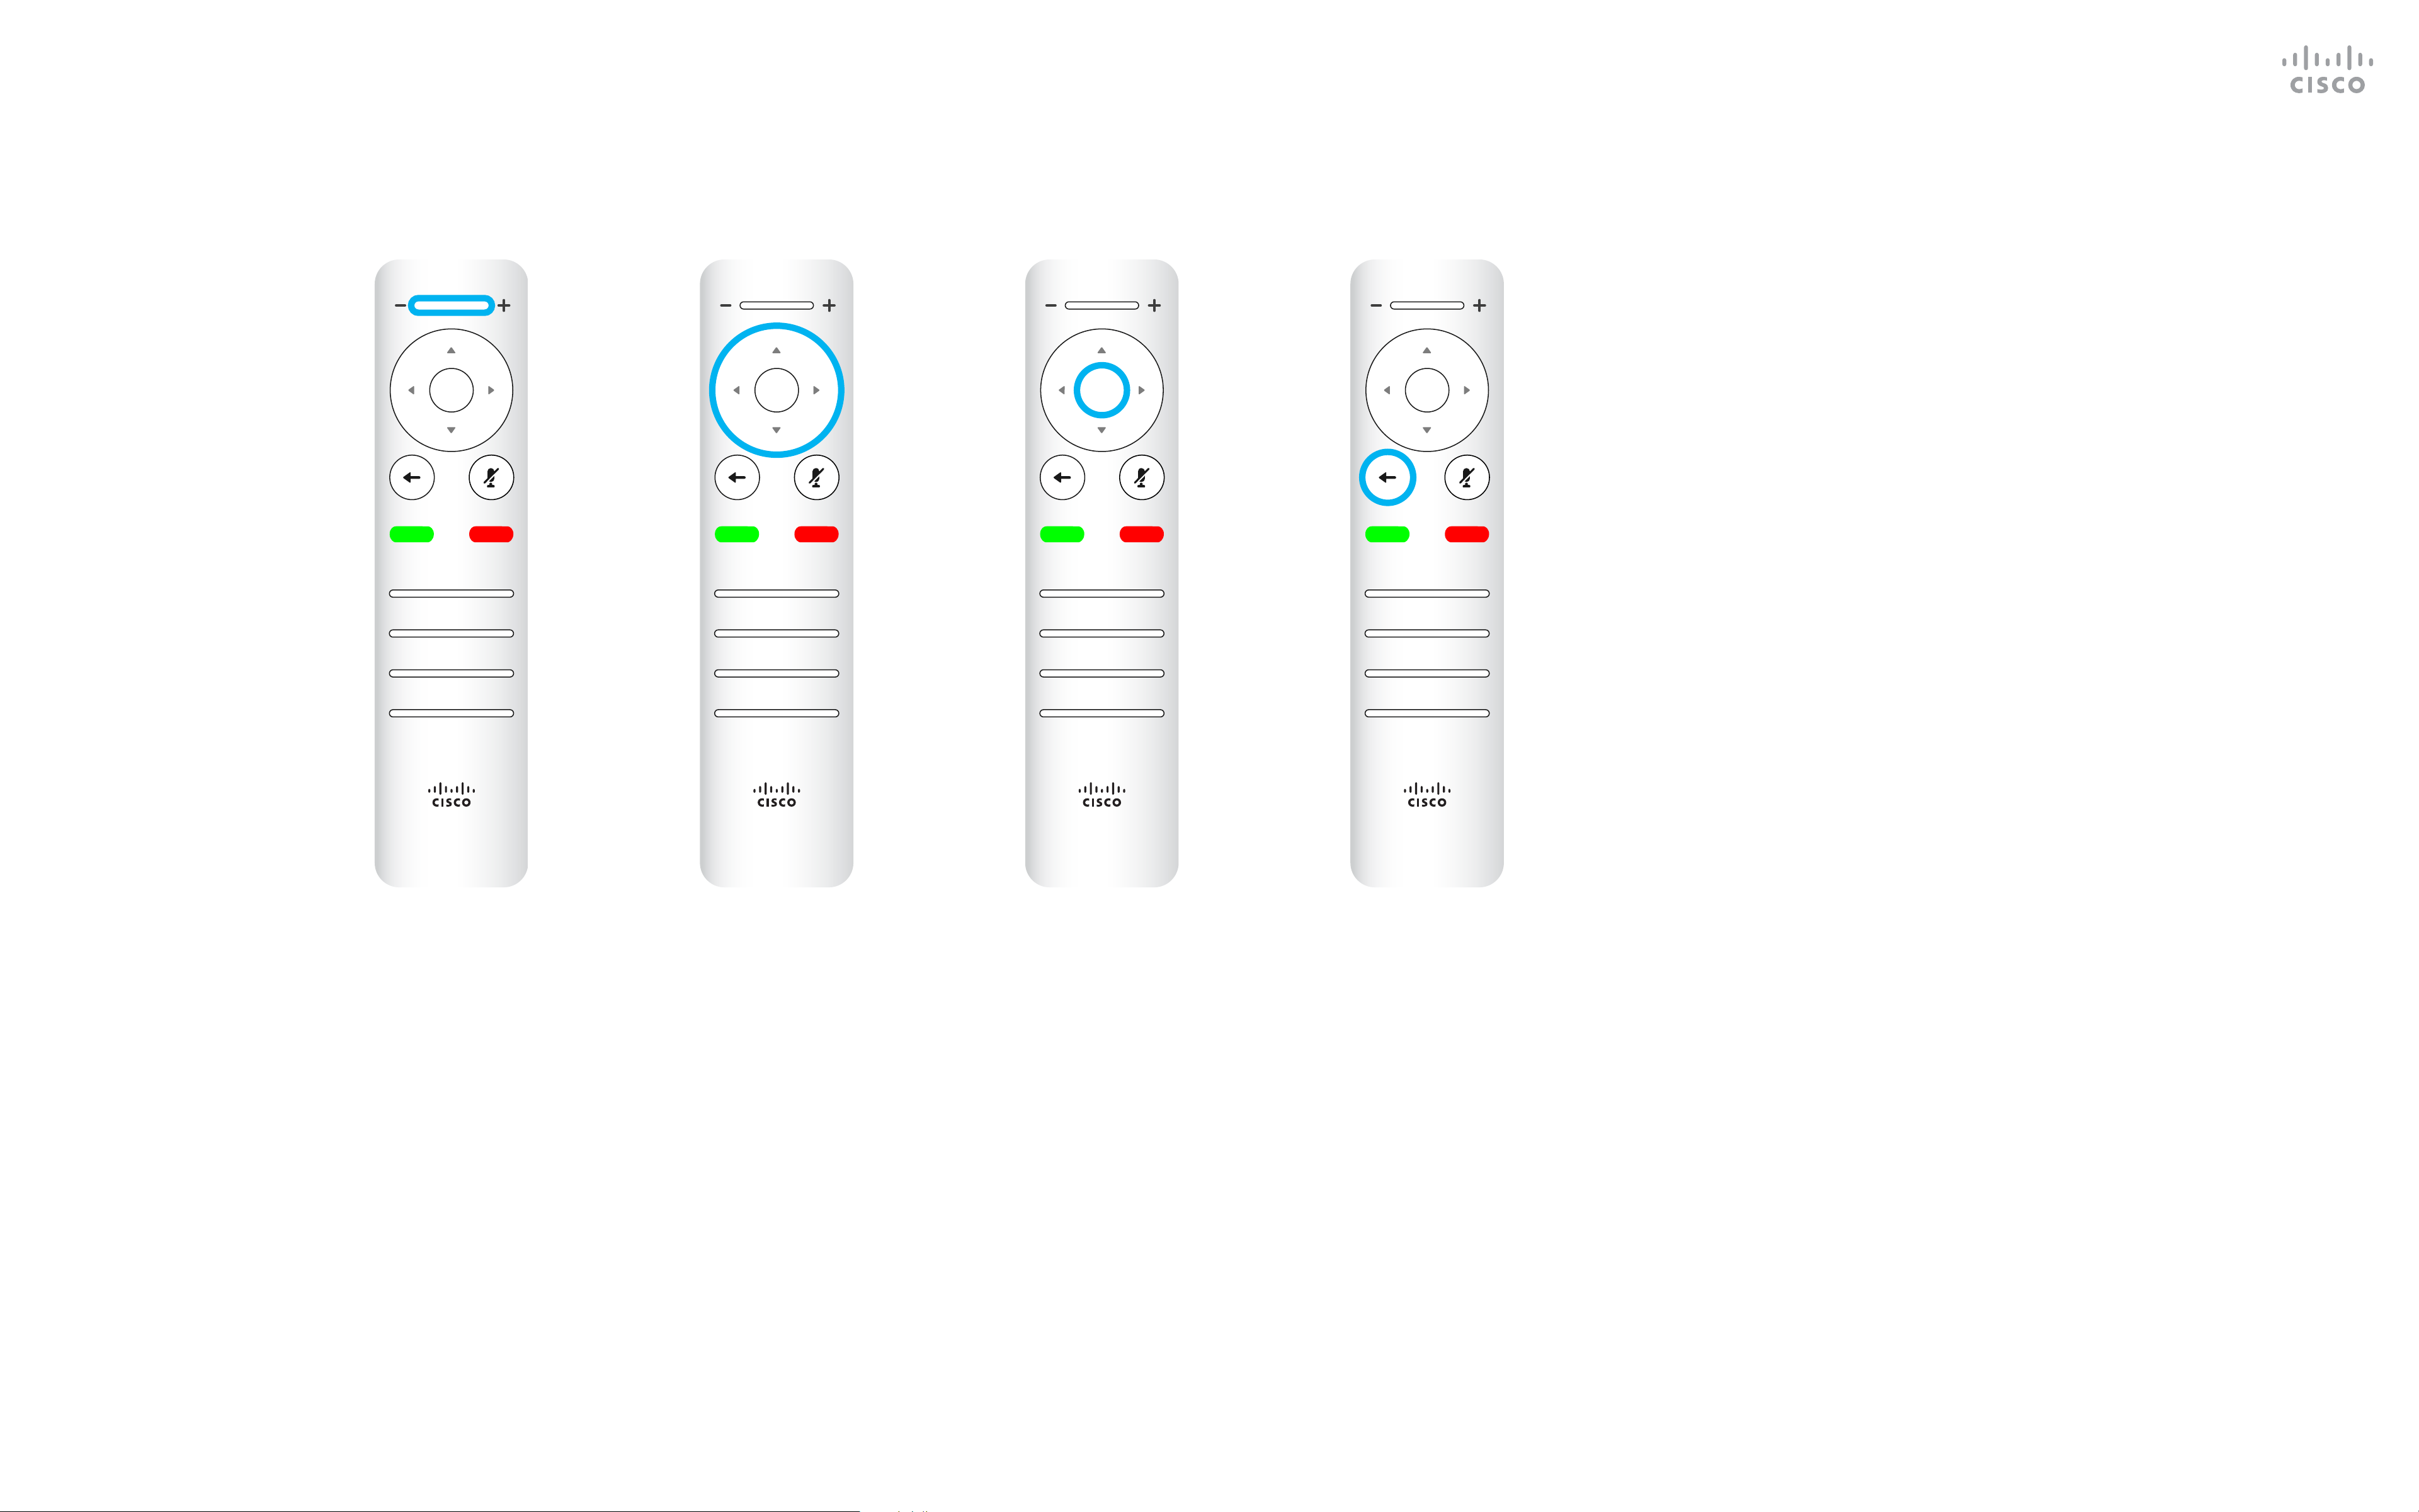
Left part of the uppermost
button controls
Lower volume /Decrease.
Right part of the uppermost
button controls
Higher volume /Increase.
To operate
Field selector /Cursor
keys use the perimeter
keys of the circular eld
(Left/Right/Up/Down).
OK / Enter is
done by means
of the center
circular key.
Go back one step
is done by means of
the left circular key
D15097.22 Cisco TelePresence SX10, SX20 User Guide APRIL 2020
All contents © 2020 Cisco Systems, Inc. All rights reserved
5
Page 6
Introduction
The Remote Control (II)
Operating tips
Use the Cursor controls to move
about the screen and press OK/
Enter to open the selected menu
eld.
Use the Cancel key to exit a menu
(and return to the Home screen)
undoing any changes. Use the Back
key to go just one step back.
1 2 3
.@
4 5 6
ghi jkl mno
7 8 9
pqrs tuv wxyz
0
*
defabc
#
1 2 3
.@
4 5 6
ghi jkl mno
7 8 9
pqrs tuv wxyz
0
*
defabc
#
1 2 3
.@
4 5 6
ghi jkl mno
7 8 9
pqrs tuv wxyz
0
*
defabc
#
1 2 3
1 2 3
.@
.@
4 5 6
4 5 6
ghi jkl mno
ghi jkl mno
7 8 9
7 8 9
pqrs tuv wxyz
pqrs tuv wxyz
0
0
*
*
defabc
defabc
#
#
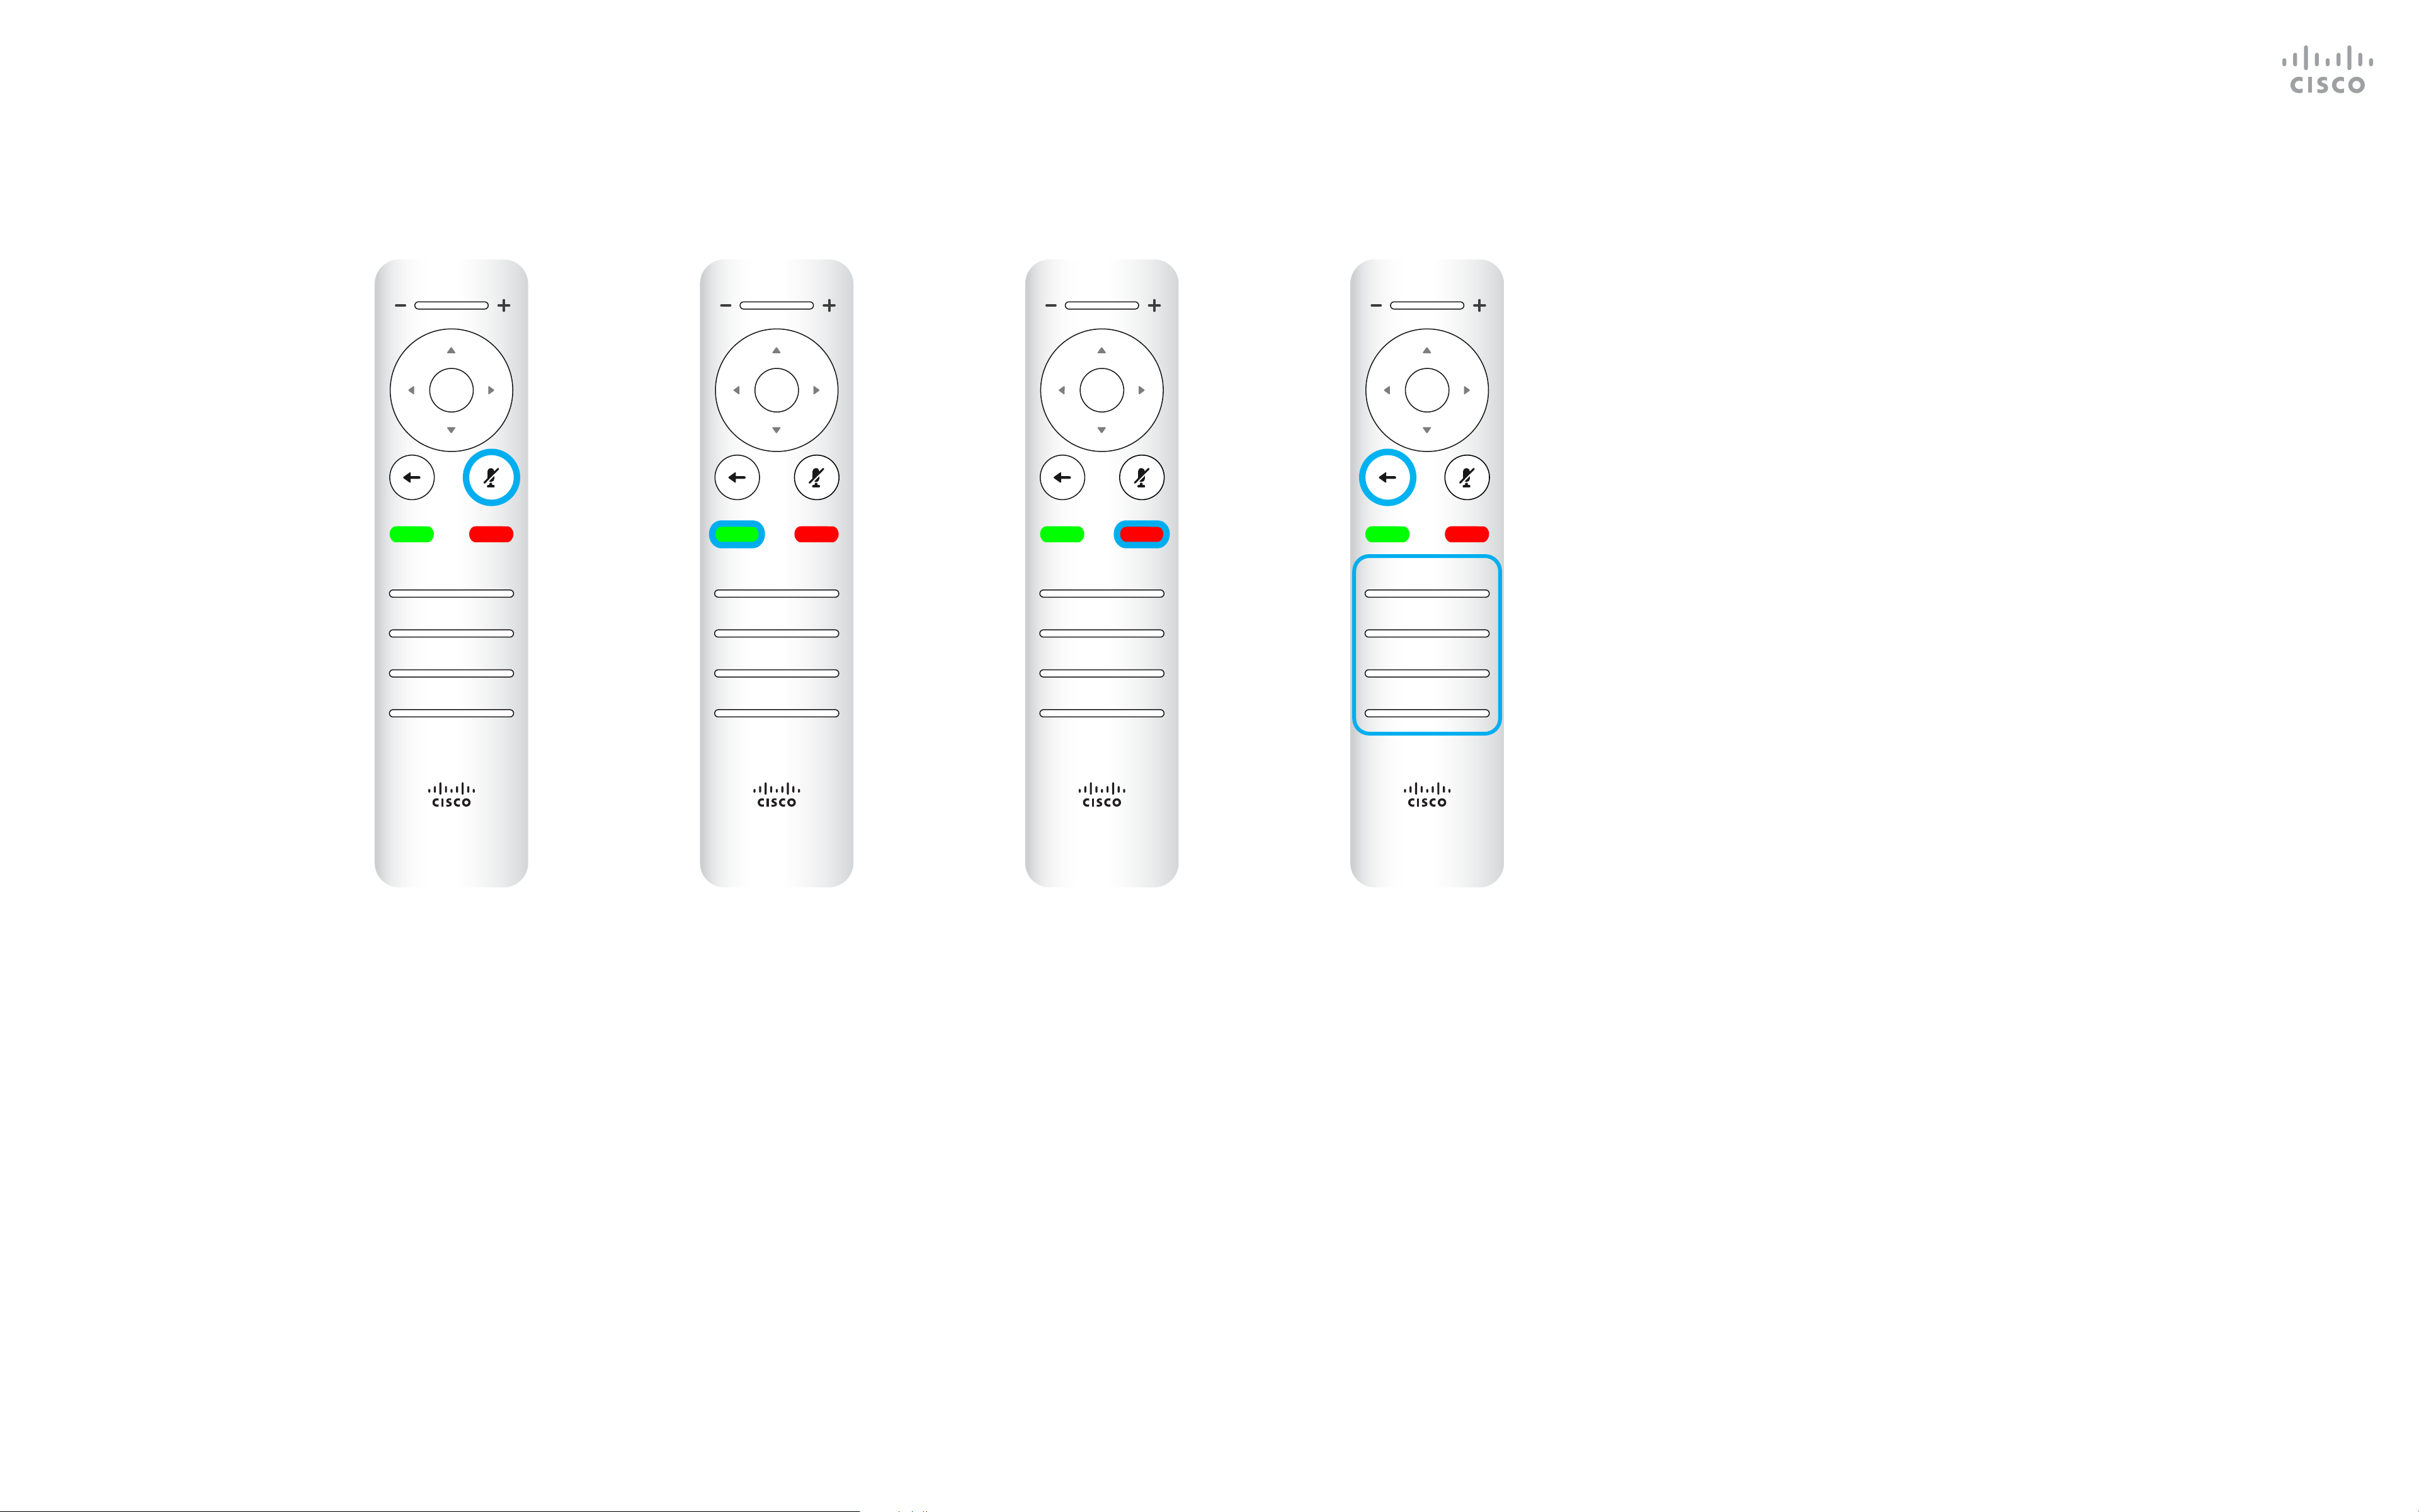
Microphone mute/unmute
is the right circular key.
The key below the Go back is
the green Call button /
Accept incoming call.
The key below the Mute
key is the Reject incoming
call / End call / Cancel /
Back to Home screen
(outside calls).
The Keypad is used to
dial someone or input
numerals. There is a
raised bump on digit 5 to
identify the keys.
D15097.22 Cisco TelePresence SX10, SX20 User Guide APRIL 2020
All contents © 2020 Cisco Systems, Inc. All rights reserved
6
Page 7

Video Calls
1 2 3
.@
4 5 6
ghi jkl mno
7 8 9
pqrs tuv wxyz
0
defabc
#
*
D15097.22 Cisco TelePresence SX10, SX20 User Guide APRIL 2020
All contents © 2020 Cisco Systems, Inc. All rights reserved
7
Page 8
Video Calls
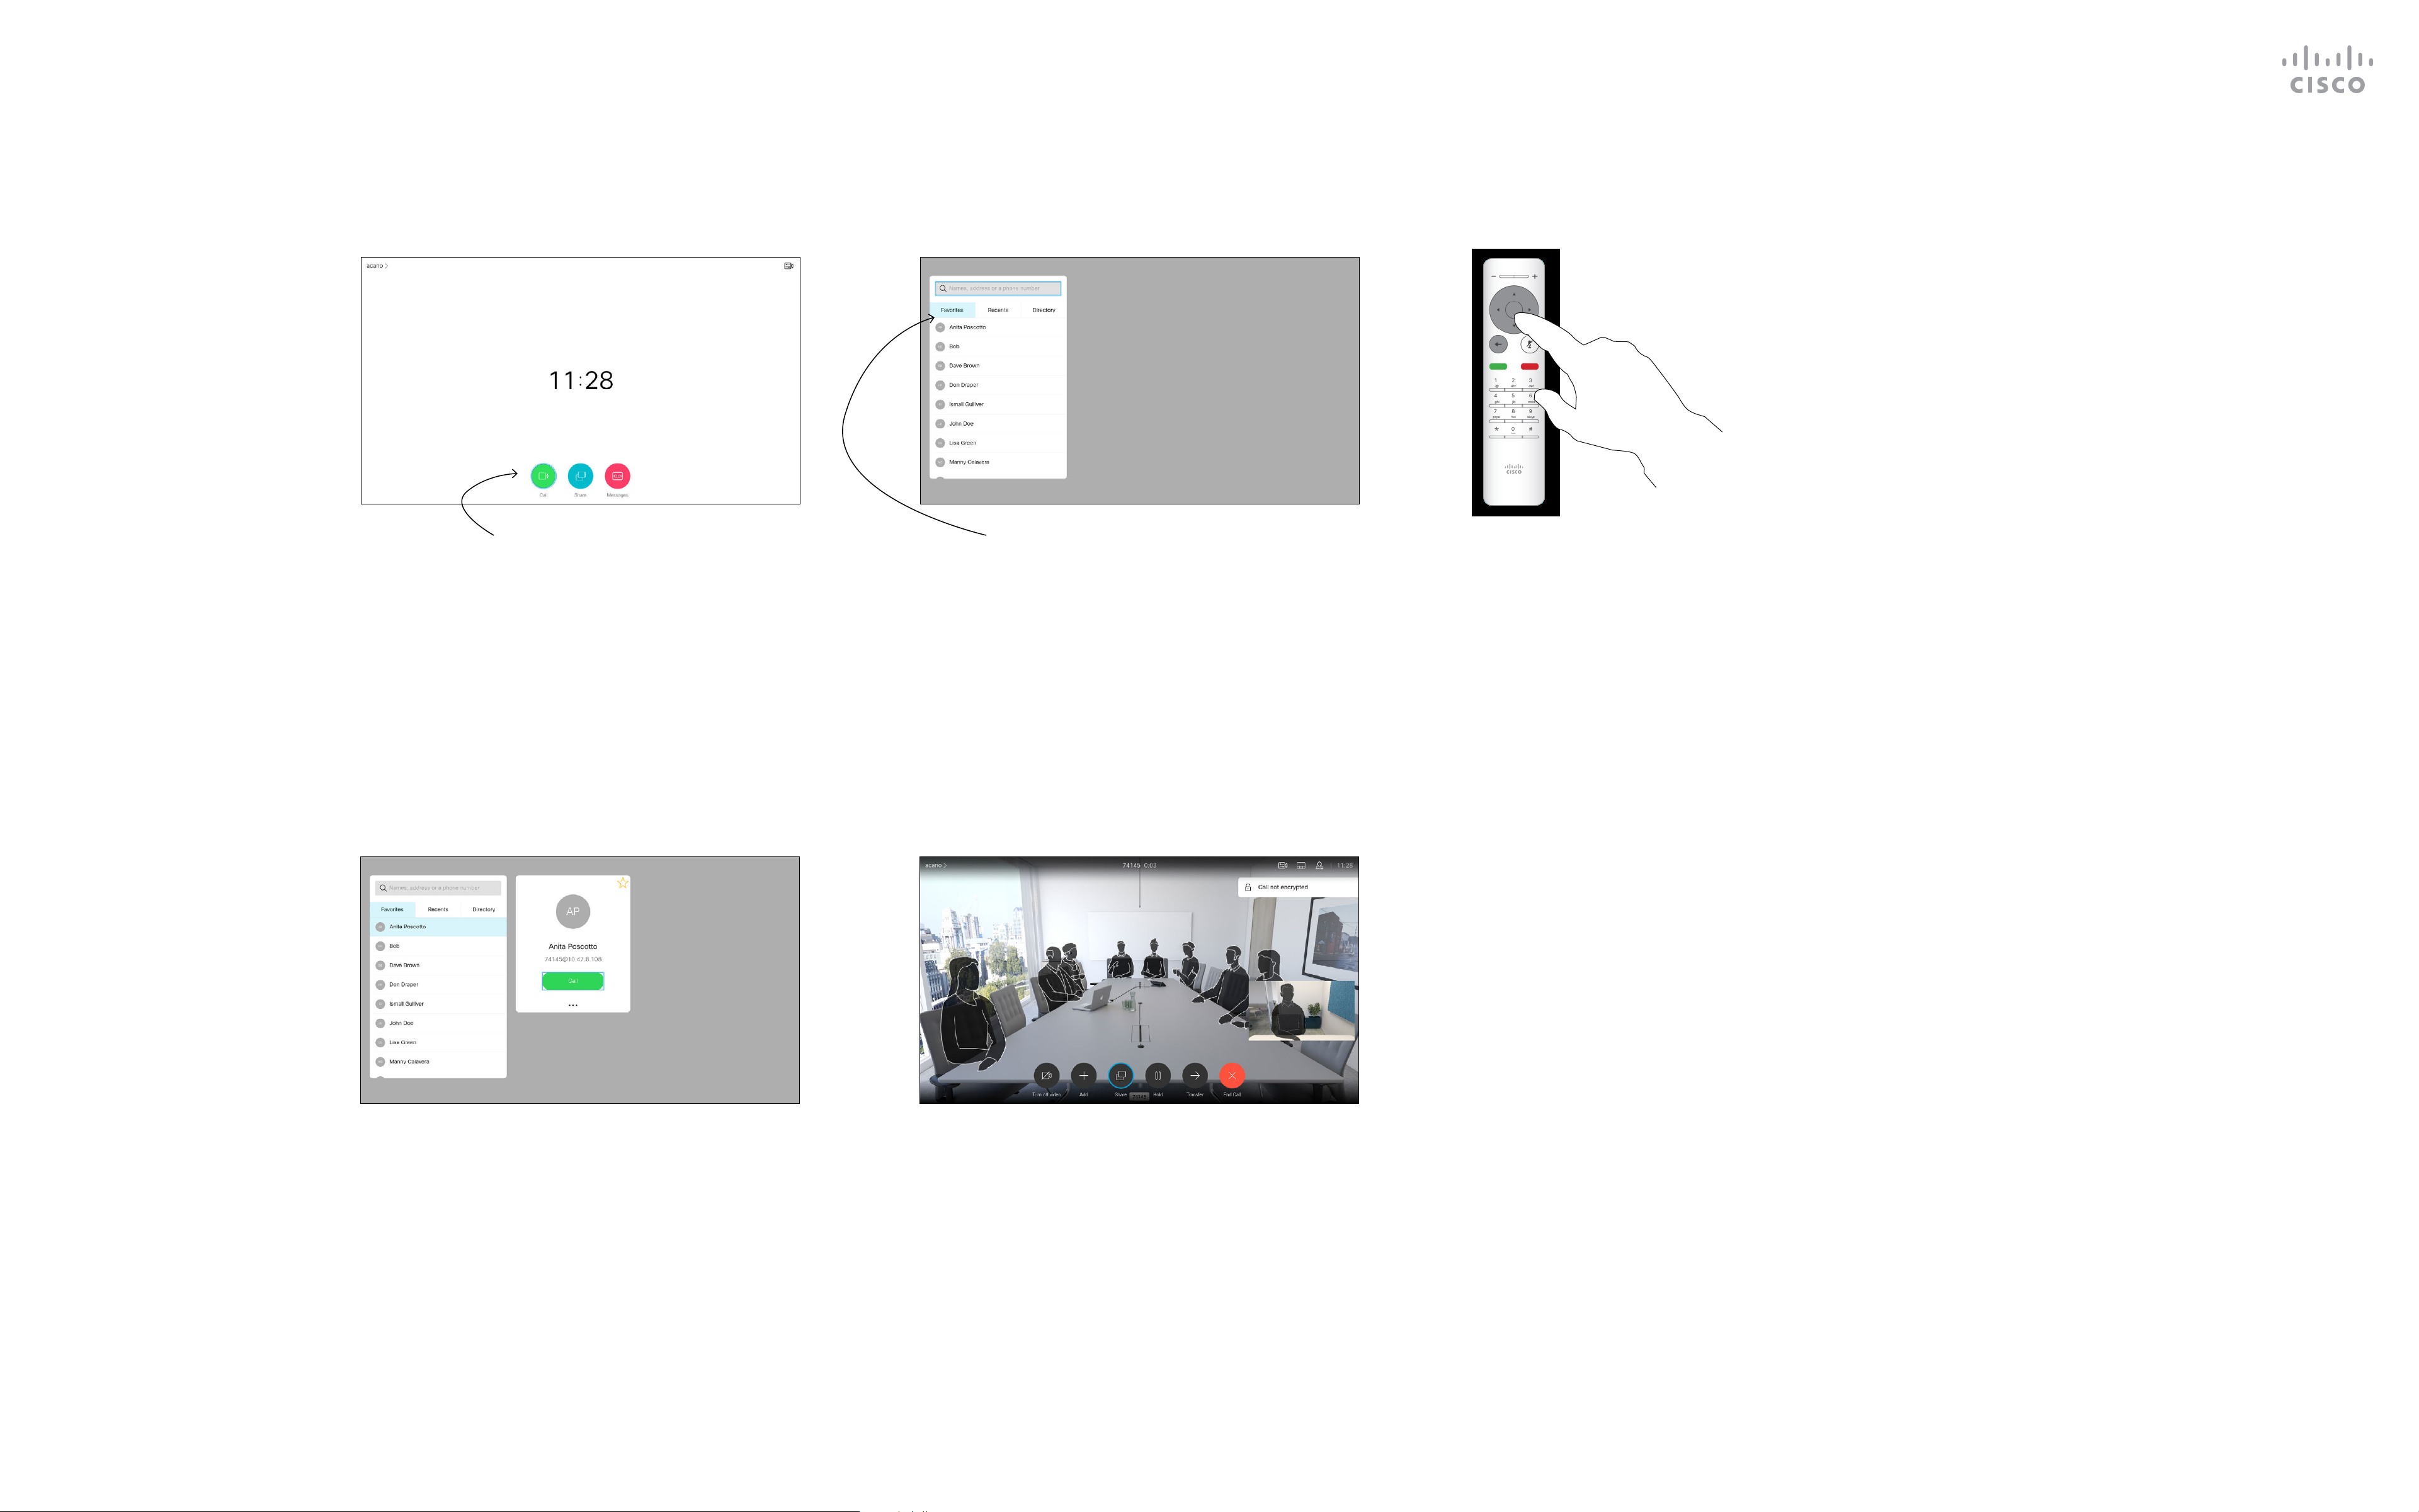
Place a Call From the Contact List
1 2 3
About List of Contacts
Your list of Contacts consists of
three parts:
Favorites. These contacts have
been added by you. These
entries are typically those you call
frequently or otherwise need to
access in a swift and convenient
manner from time to time. A favorite
Make sure Call is selected (the leftmost icon
along the bottom of the screen) and press
OK on the remote control or press the
green Call button on the remote control.
The Contact list appears. Use the Cursor keys
on the remote control to navigate between
Favorites, Recents and Directory (horizontally)
and then down in one of the lists.
Once an entry has been located, press OK
on the remote control to invoke the Call
menu.
is denoted by a golden asterisk
Directory is typically a corporate
directory installed on your device by
your video support team.
Recents is a list of calls you have
placed, received, or missed earlier.
The following options apply:
You can key in a name, number, or
•
an IP address and the device looks
in all lists for you.
You can select a tab and then scroll
•
4 5
In the Call menu, press OK or the green
Call button on the remote control to place
the call.
Press the red End Call button on the
remote control, or use the Cursor keys
to select End Call on the screen and then
press OK to terminate the call.
through the list or key in a name
or number. Your search is then
restricted to that specic list.
You can add the entry to the list of
•
Favorites; edit aspects of the entry
before calling and/or change the
call rate (the bandwidth applied to
the call).
D15097.22 Cisco TelePresence SX10, SX20 User Guide APRIL 2020
All contents © 2020 Cisco Systems, Inc. All rights reserved
8
Page 9

Video Calls
Edit a Contact Before the Call
1 2 3
About Editing
For more on the Contacts list, see
the previous page.
You may need to edit an entry in
one of the lists of Contacts before
you place the call, such as to add
a prex, a sux, or otherwise alter
the entry to ensure success.
Make sure Call is selected (the leftmost icon
along the bottom of the screen) and press
OK on the remote control or press the
green Call button on the remote control.
Use the Cursor keys on the remote control
to navigate between Favorites, Recents and
Directory and then down in one of the lists.
4 5 6
Once an entry has been located, press OK
on the remote control to invoke the Call
menu.
Use the Cursor keys on the remote control
to navigate to the More eld (
OK.
D15097.22 Cisco TelePresence SX10, SX20 User Guide APRIL 2020
All contents © 2020 Cisco Systems, Inc. All rights reserved
...
) and press
Navigate down to Edit and Call (center
eld in the More menu) an press OK.
Edit the entry as required and press the
green Call button on the remote control to
place the call.
9
Page 10
Video Calls
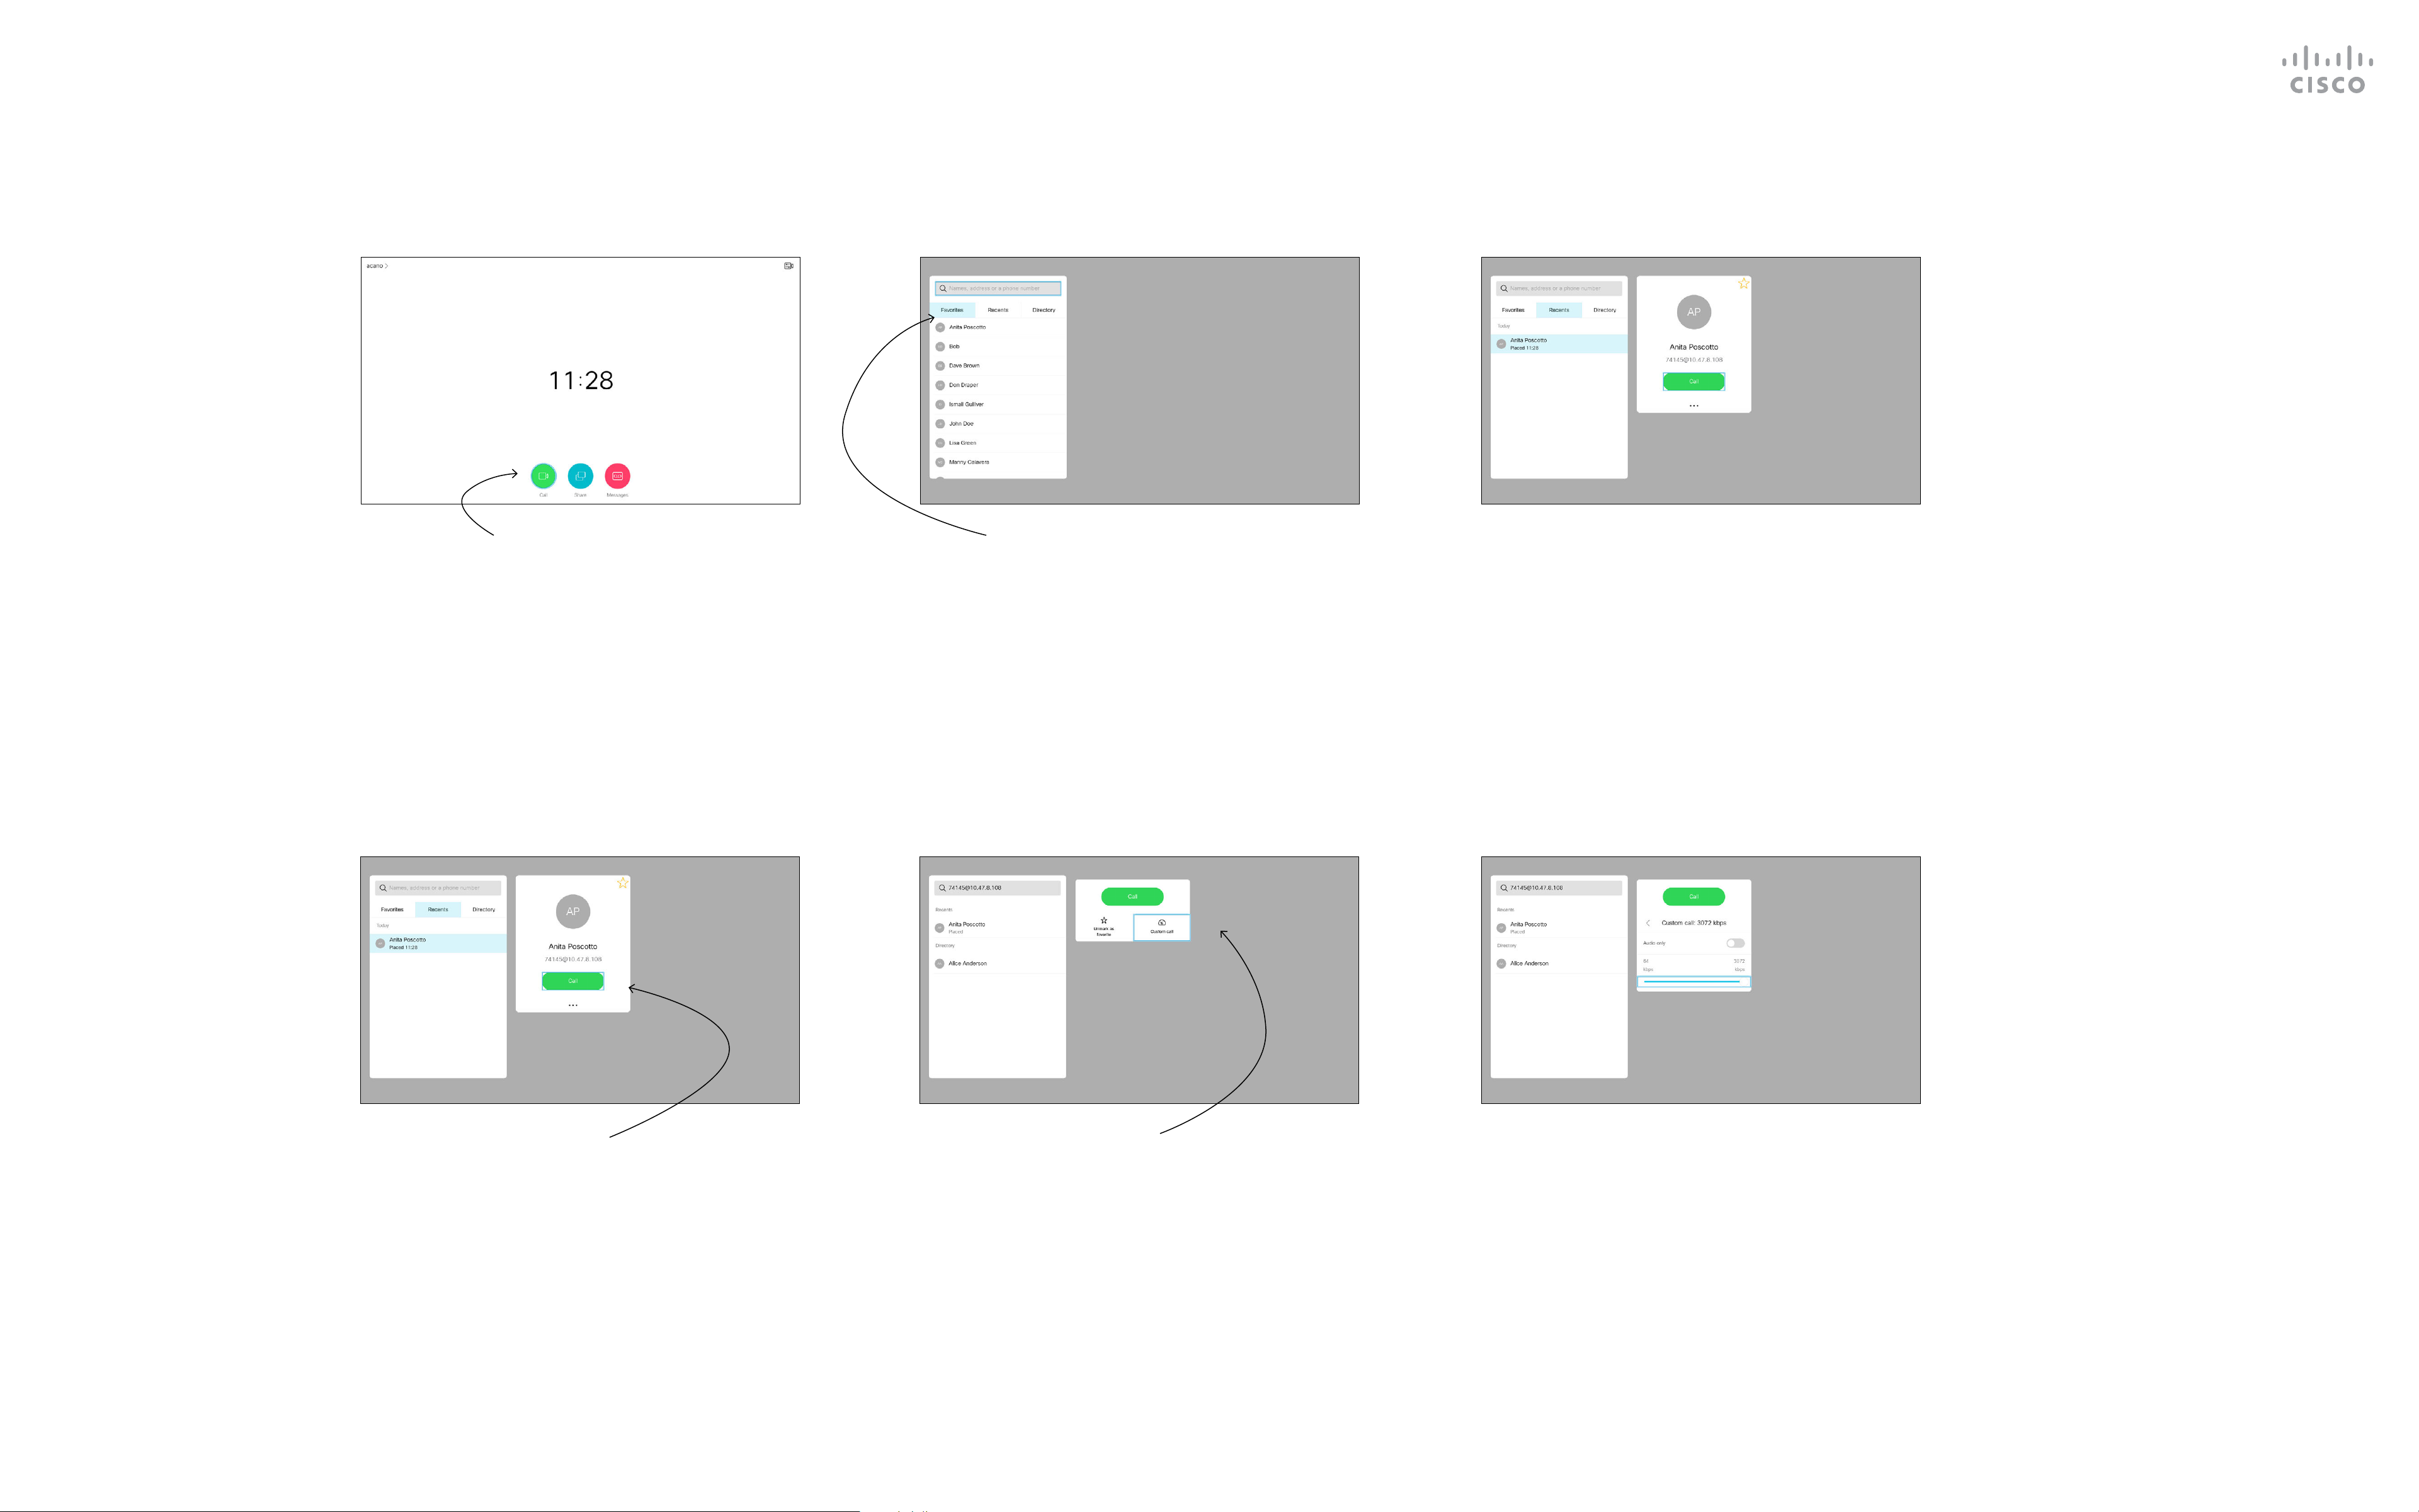
Edit the Call Rate, then Place the Call
1 2 3
About Call Rate
Call rate is the term used to express
the amount of bandwidth allocated
to the call. It’s measured in kbps
(kilobits per second).
The higher the call rate is, the better
the quality is, but on the expense of
higher bandwidth consumption.
The device comes with a default
Make sure Call is selected (the leftmost icon
along the bottom of the screen) and press
OK on the remote control or press the
green Call button on the remote control.
Use the Cursor keys on the remote control
to navigate between Favorites, Recents and
Directory and then down in one of the lists.
Once an entry has been located, press OK
on the remote control to invoke the Call
menu.
call rate. This is normally set by
your video support team. Under
normal conditions the call rate
is adjusted automatically by the
device, whenever needed. This is
done to avoid choking the video call
when you try to call someone at a
higher rate than their device and
connection support.
If the automatic call rate setting fails,
you can also do this manually as a
last resort.
4 5 6
Use the Cursor keys on the remote control
to navigate to the More eld (
OK.
...
) and press
Move down to Custom call and press OK. Use the Cursor keys as required and
Call rate cannot be changed during
a call, but you may change it just
before you place a call, as shown at
left.
press the green Call button on the remote
control to place the call.
D15097.22 Cisco TelePresence SX10, SX20 User Guide APRIL 2020
All contents © 2020 Cisco Systems, Inc. All rights reserved
10
Page 11
Video Calls
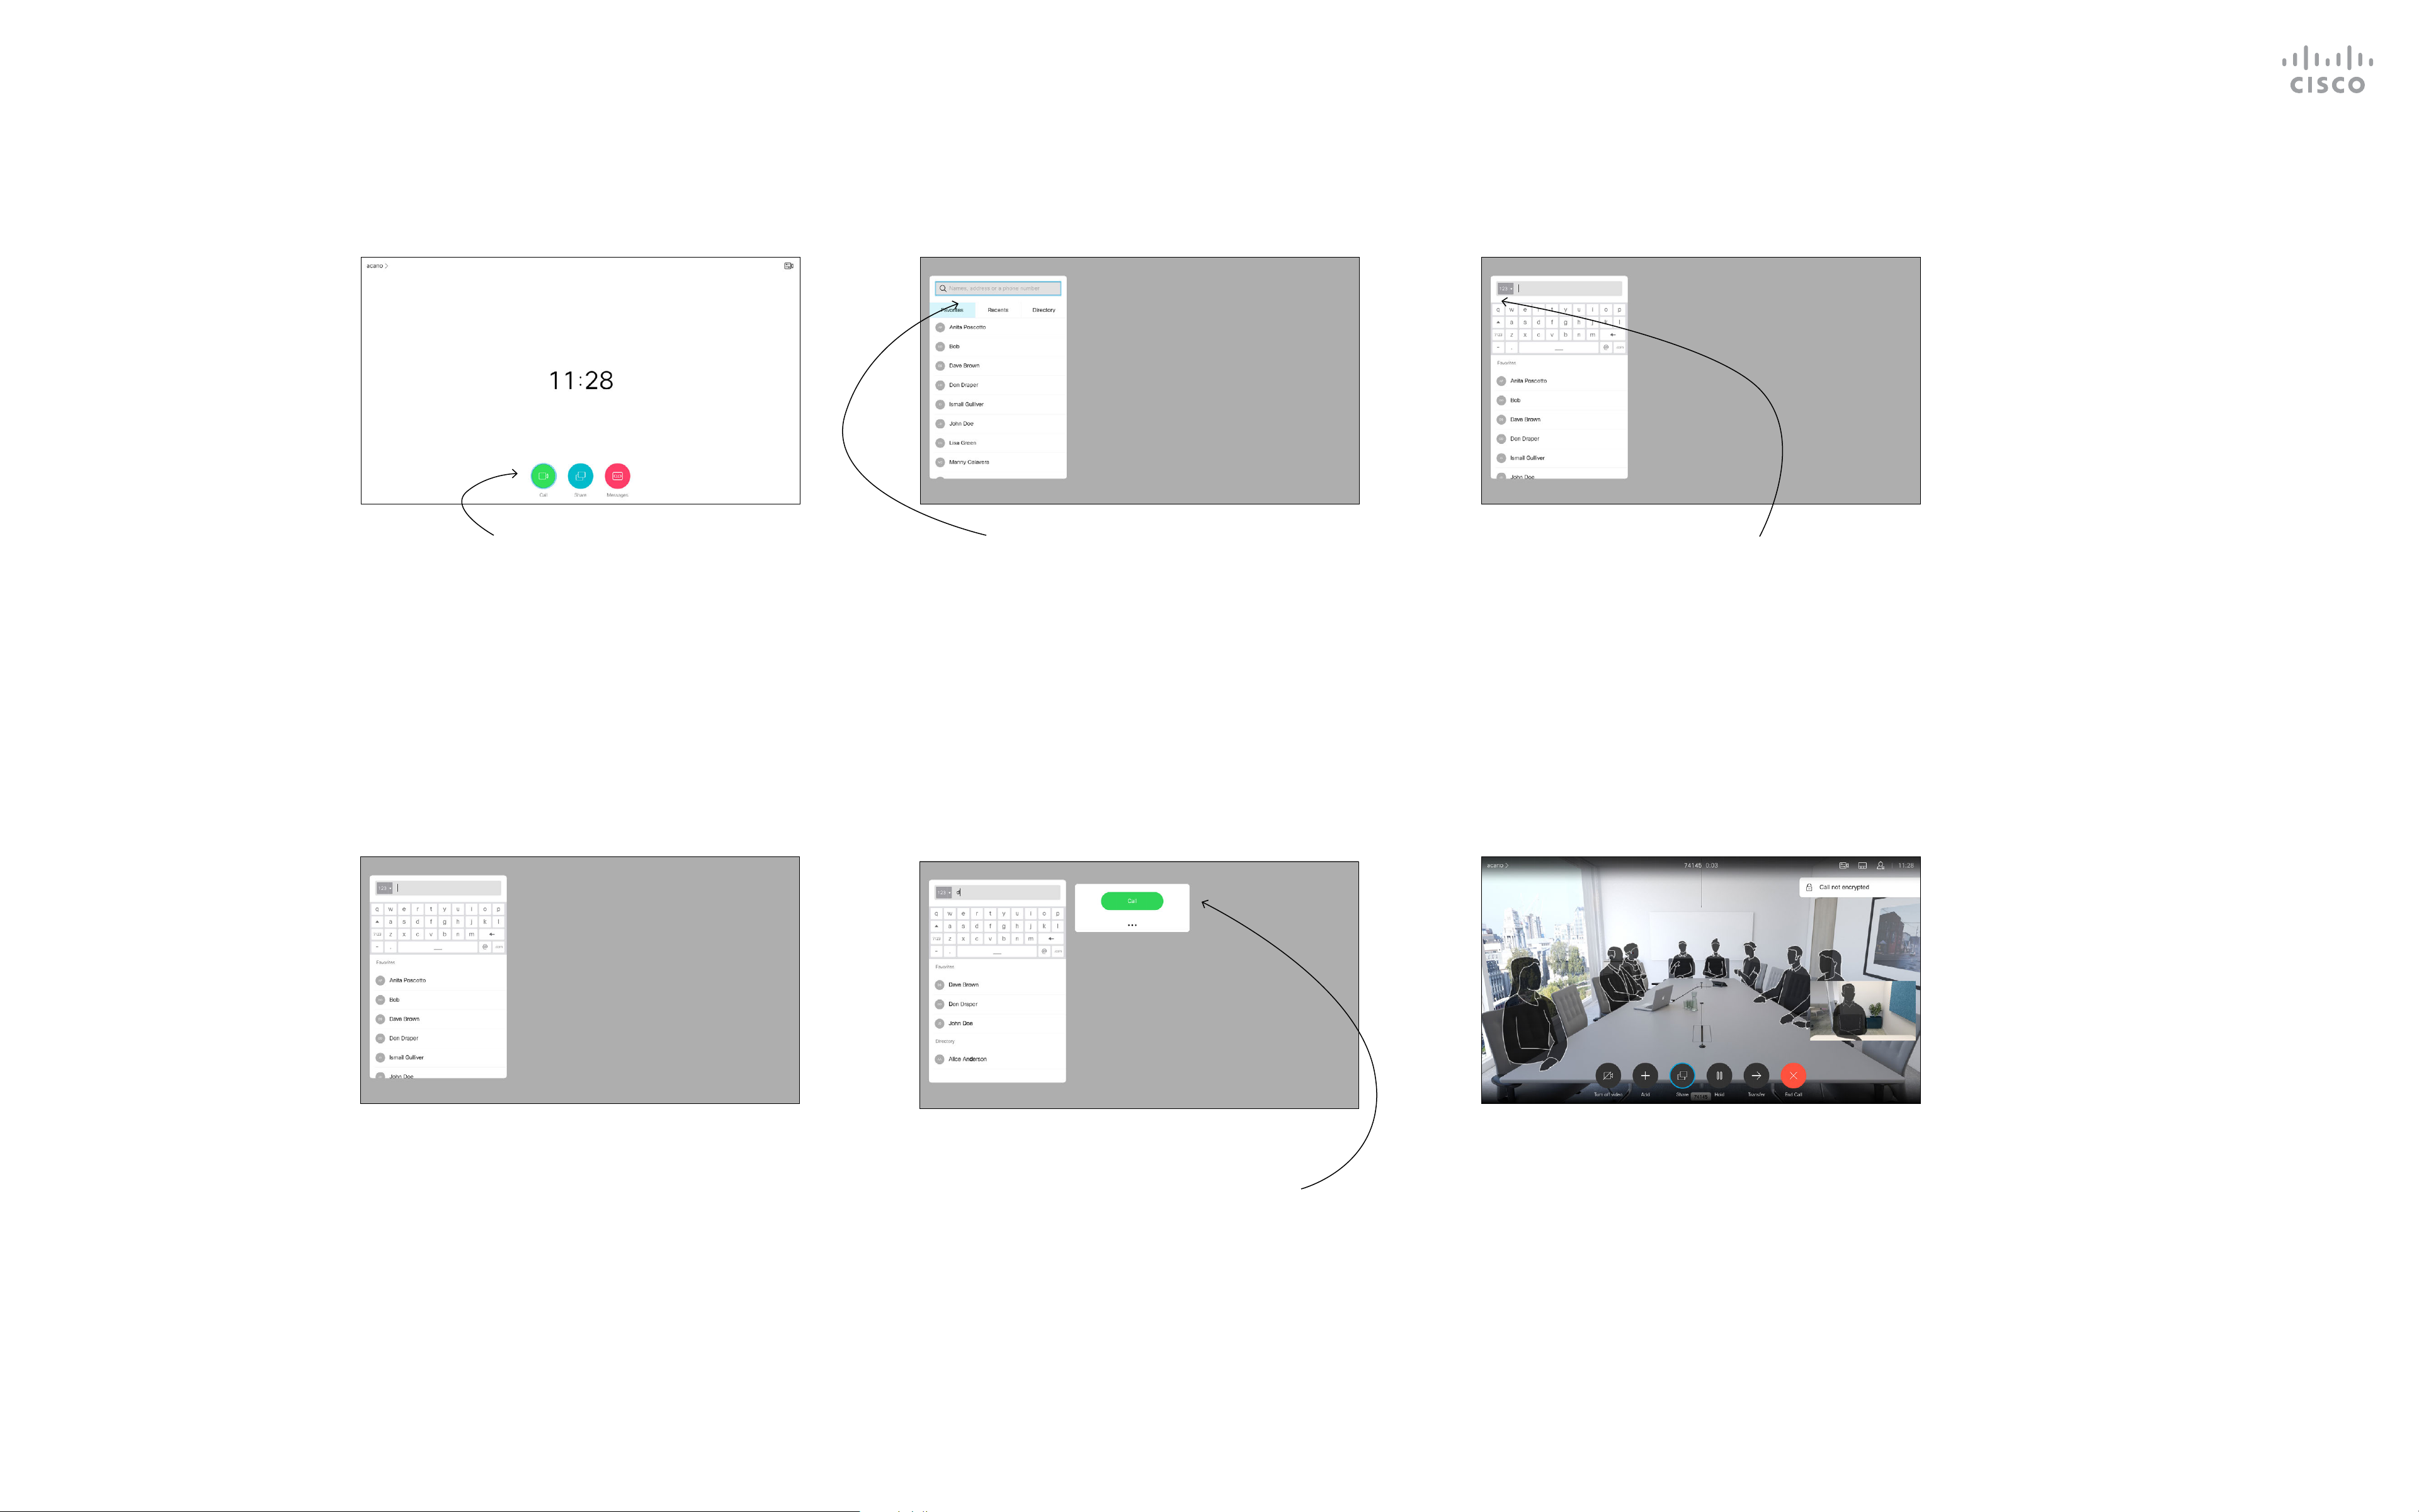
Place a Call Using Name, Number, or IP-Address
1 2 3
About Placing Calls
You can call someone who is not
listed in your list of contacts by
keying in their name, address or
number using the virtual keyboard.
Anyone you have previously called
appears in the Recents list and you
can then add any of them to your list
of Favorites. This is described in the
Make sure Call is selected (the leftmost icon
along the bottom of the screen) and press
OK on the remote control or press the
green Call button on the remote control.
Use the Cursor keys to navigate to the
Search or Dial eld at the top of the menu.
Press OK.
4 5 6
section Contacts.
To enter numbers select 123.
Call Using Video Address
The procedure when using an IP
type video address to call someone
is similar. Just key in the address
and use * (the asterisk button in
the lower left corner on the remote
control) as separator. The device
interprets this as a valid IP address
separator so that the video address
appears as correctly entered.
To use the virtual keyboard, navigate down
to and about the keyboard and select
characters. Press OK to select a character.
D15097.22 Cisco TelePresence SX10, SX20 User Guide APRIL 2020
All contents © 2020 Cisco Systems, Inc. All rights reserved
Then press the green Call button on
the remote control to place the call.
Alternatively, navigate to the Call icon and
press OK.
Press the red End Call button on the
remote control, or use the Cursor keys
to select End Call and then press OK to
terminate the call.
11
Page 12
Video Calls
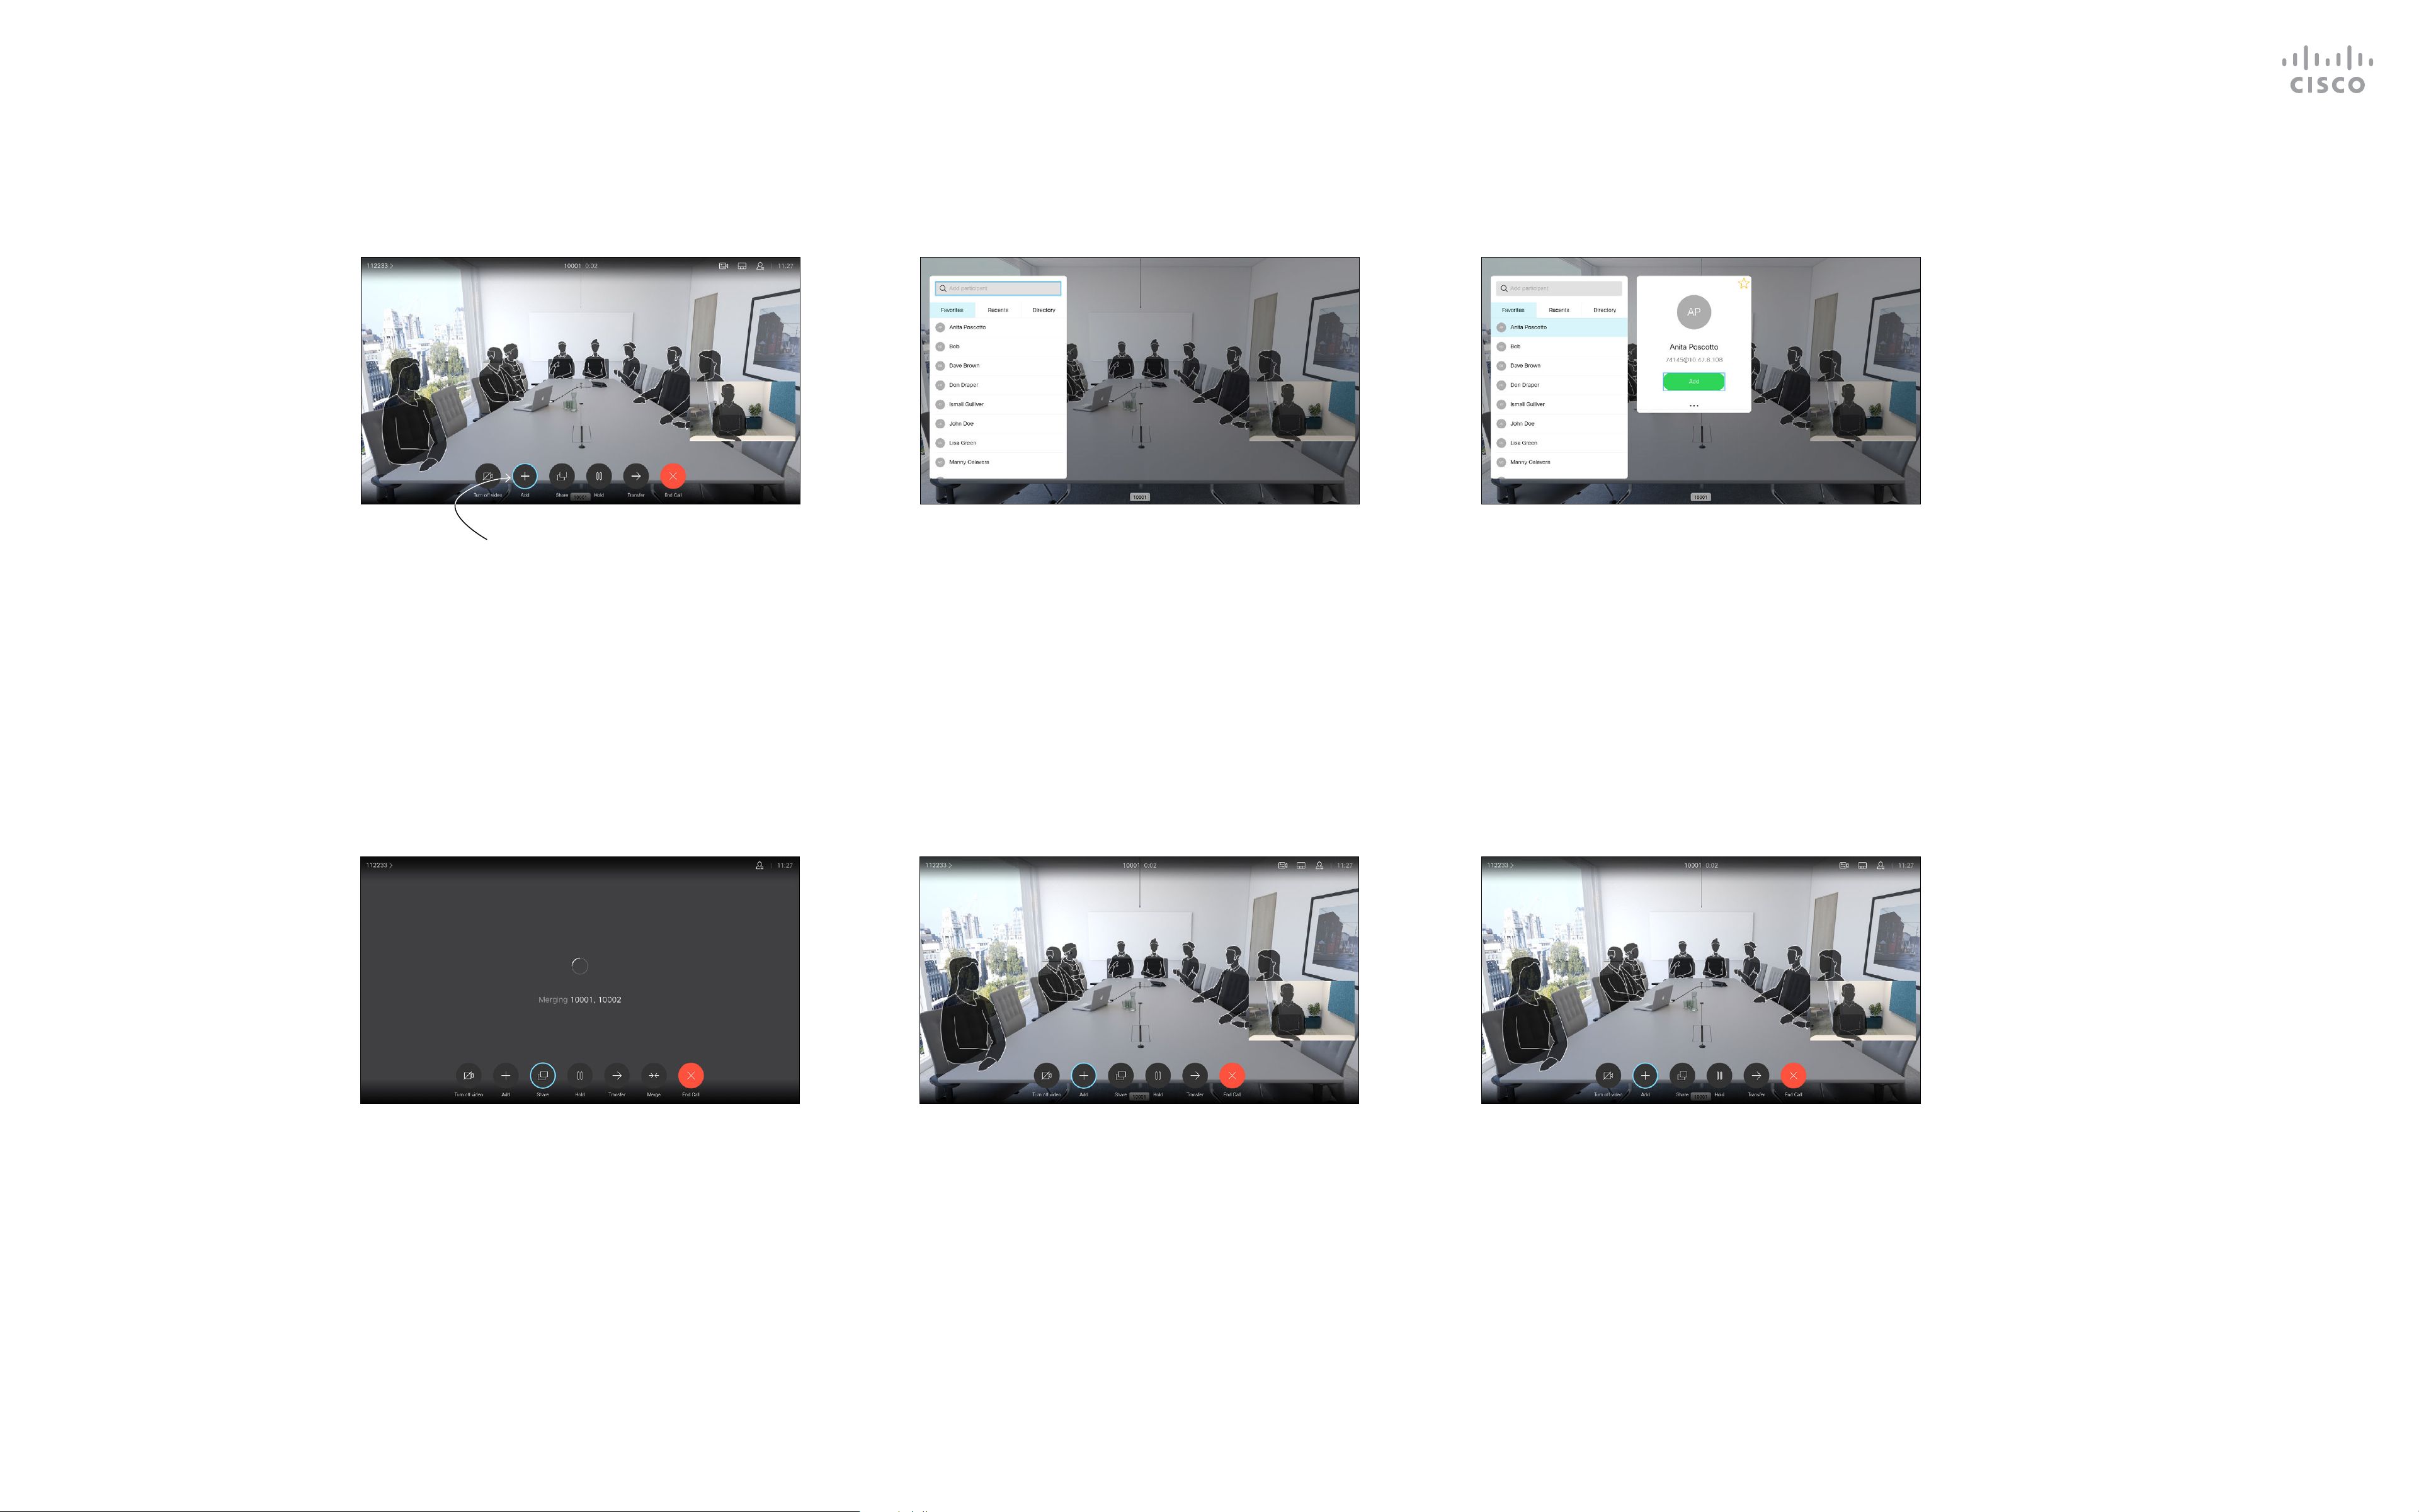
Add Additional Participants to an Existing Call
1 2 3
About
Video Conferences
Your network may be equipped
with the capability to initiate a video
conference with several participants.
The maximum number of
participants supported by your
video device depends on device
conguration and the video
infrastructure. If in doubt, contact
In a call, navigate to Add and press OK on
the remote control. This will put the current
call on hold.
Locate the participant to be added in the
usual way. Press OK.
Navigate to Add and press OK to expand
the call into a conference.
your video support team.
If you want to initiate a video
conference, you must call each
participant one by one.
If you are the one who initiated the
conference, you can end the entire
conference. The other participants
can only disconnect themselves
from the conference.
4 5 6
The calls are now merged together.
Repeat the process to add more
participants, if needed.
Press the red End Call button on the
remote control, or use the Cursor keys
to select End Call and then press OK to
terminate the call.
D15097.22 Cisco TelePresence SX10, SX20 User Guide APRIL 2020
All contents © 2020 Cisco Systems, Inc. All rights reserved
12
Page 13

Video Calls
Disconnect a Participant From a Conference
1 2
About
Video Conferences
The ability to conduct a video
conference from your video device
is an optional feature that may,
or may not, be available for your
device.
3
In a call, navigate to the Participants icon in
the upper right corner, as shown, and press
OK to invoke the list of participants.
Navigate down to the participant to be
dropped from the conference and press OK.
Navigate to Drop and press OK.
D15097.22 Cisco TelePresence SX10, SX20 User Guide APRIL 2020
All contents © 2020 Cisco Systems, Inc. All rights reserved
13
Page 14
Video Calls
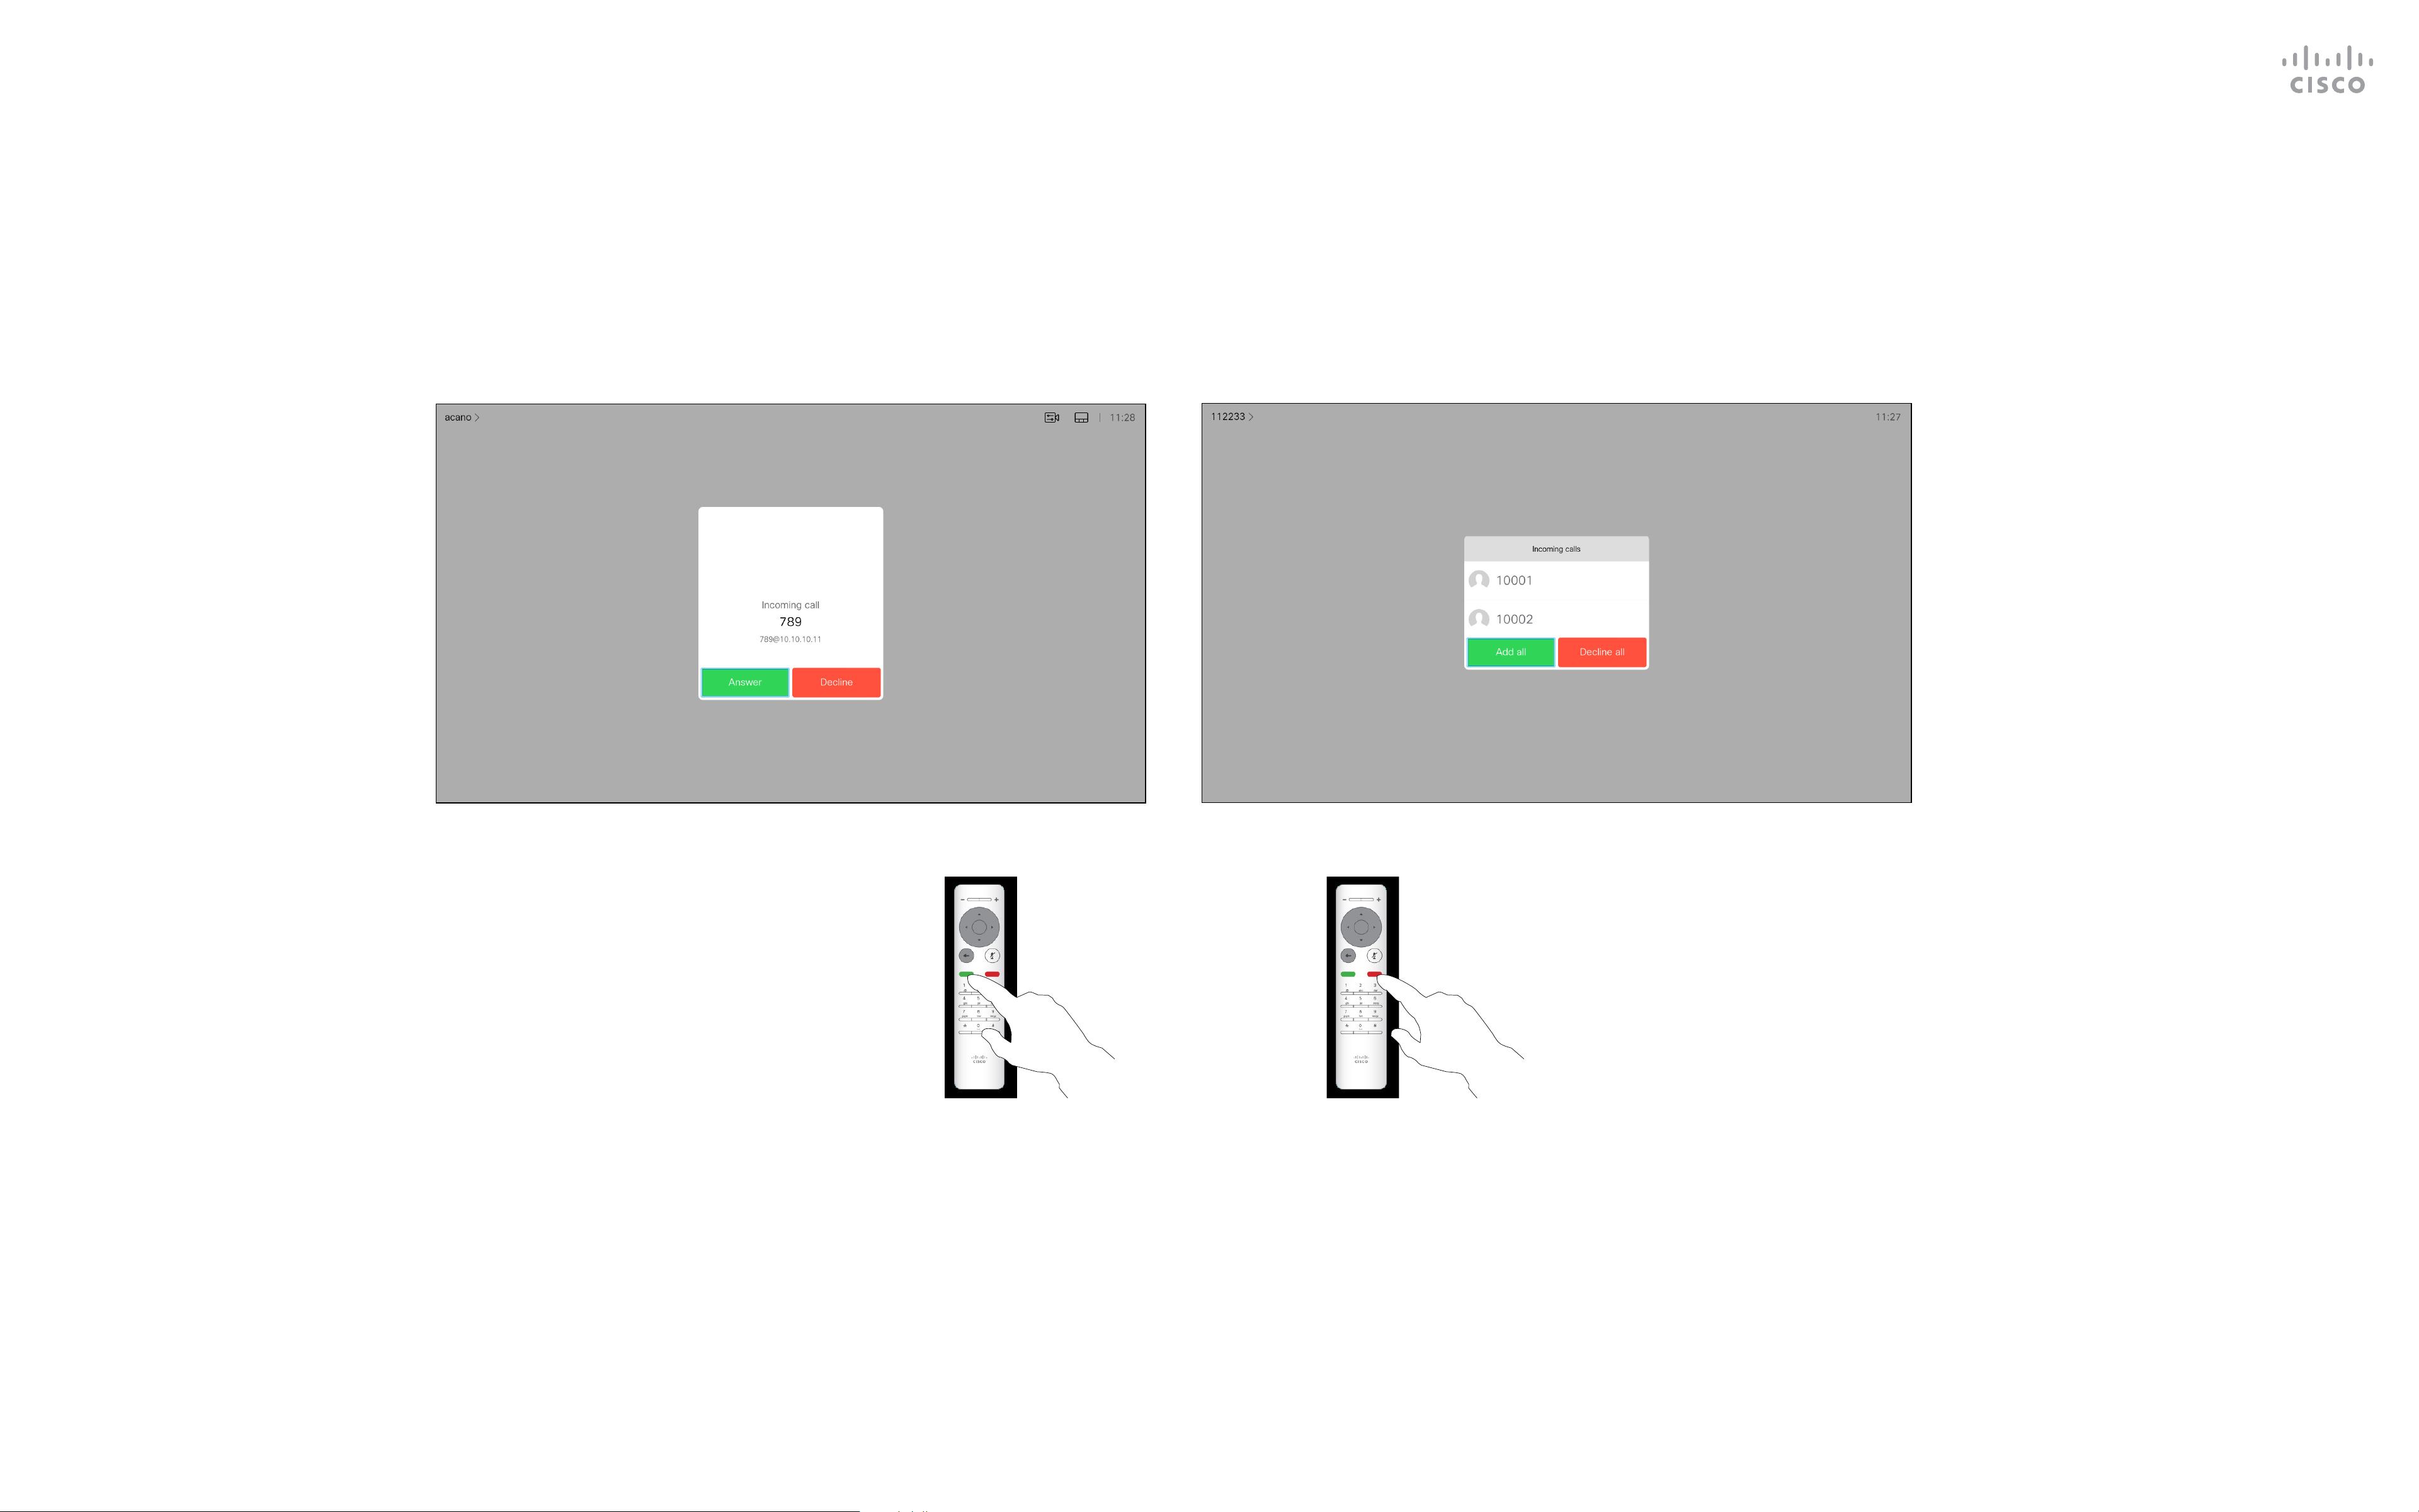
Receive a Call
If Someone Calls You
If someone calls you, you can
•
accept, decline or ignore the call.
If you decline the call, busy
•
information is sent to the caller.
If you ignore the call, the caller
•
perceives this as if you were
absent (you didn’t pick up the call).
Your video infrastructure may allow
•
you to receive multiple incoming
calls. Consult your video support
team, if needed.
D15097.22 Cisco TelePresence SX10, SX20 User Guide APRIL 2020
All contents © 2020 Cisco Systems, Inc. All rights reserved
You can also use the Call keys
below the circular buttons on the
remote control directly (the green
left key to accept the call and the
red right key to decline).
14
Page 15

Video Calls
Receive Additional Calls While Already In a Call
Expanding the Call
If someone calls you, you can
•
accept, decline, or ignore the call.
If you decline the call, busy
•
information issent to the caller.
If you ignore the call, the caller
•
perceives this as if you were
absent (you didn’t pick up the call).
Your video infrastructure may allow
•
you to receive multiple incoming
calls. Consult your video support
team, if needed.
If you are already in a call, and someone calls you, you can
decline the call, add the caller to the existing call, or put the
existing call on hold while receiving
D15097.22 Cisco TelePresence SX10, SX20 User Guide APRIL 2020
All contents © 2020 Cisco Systems, Inc. All rights reserved
15
Page 16

Video Calls
Transfer an Ongoing Call
1 2
Navigate to Transfer and press OK on the remote control. This
will cause the current call to be put on hold.
3 4
Share in call
Search for whom to call in the usual way.
Select the green Call icon and press OK or use the green Call
button on the remote control.
D15097.22 Cisco TelePresence SX10, SX20 User Guide APRIL 2020
All contents © 2020 Cisco Systems, Inc. All rights reserved
Talk to the person to conrm that transfer is OK to do. The
person to be transferred is still on hold. Select Complete
Transfer and press OK on the remote control.
16
Page 17

Video Calls
Change the Layout of the Screen
1 2
About Layout
Whenever you share content or
you are in a video conference, you
can change the layout of the video
shown on the screen.
Your device can’t initiate video
conferences unless certain
infrastructure exists in your
organization. If in doubt, consult your
Navigate to Layout in the upper right corner and press OK on
the remote control. This icon only appears when relevant.
Use the Cursor keys to navigate to the new layout you would like to
use and press OK.
video support team.
You can, however, be invited to a
video conference by others. The
ability to change the screen layout is
then available.
Note that the layout change options
oered by the device depend
on the context and number of
participants.
Any changes you make here do not
aect the others.
D15097.22 Cisco TelePresence SX10, SX20 User Guide APRIL 2020
All contents © 2020 Cisco Systems, Inc. All rights reserved
17
Page 18

Video Calls
Enable Do Not Disturb
1 2
About Do Not Disturb
Your device can be set up so that it
doesn’t respond to incoming calls.
When set to Do Not Disturb,
ringtones are muted and call
attempts made by others to reach
you appear as missed calls. You can,
however, place calls.
As default, there is a 60 minutes
Starting from Home screen, use the Cursor keys on the remote
control to select the More icon (>) in the upper left corner of
the screen.
timeout on the Do not disturb (after
which the device returns to normal
operation), but this may have been
changed to a dierent setting by
your Video Support Team.
Press OK on the remote control.
3 4
Use the Cursor keys on the remote control to navigate down to
Do Not Disturb and use the OK button on the remote control to
set it to On or O (toggling).
D15097.22 Cisco TelePresence SX10, SX20 User Guide APRIL 2020
All contents © 2020 Cisco Systems, Inc. All rights reserved
Press the OK key on the remote control to exit the menu, putting
changes into eect.
18
Page 19

Video Calls
Enable Standby
1 2
About Standby
Your device can be set to Standby
to save power. You can still receive
calls as usual.
Starting from Home screen, use the Cursor keys on the remote
control to select the More icon (>) in the upper left corner of
the screen.
3 4
Press OK on the remote control.
Use the Cursor keys to navigate down to Standby. Press the OK key on the remote control to exit the menu, putting
D15097.22 Cisco TelePresence SX10, SX20 User Guide APRIL 2020
All contents © 2020 Cisco Systems, Inc. All rights reserved
changes into eect.
19
Page 20

Video Calls
Forward All Calls
1 2
About Forwarding
Your video support team may have
activated the option of forwarding all
calls received. You can then choose
between voicemail and a receiver
appointed by you.
If you select Forward all calls, the
familiar Call menu appears and
you can choose the number that
Starting from Home screen, use the Cursor keys on the remote
control to select the More icon (>) in the upper left corner of
the screen.
receives your calls.
Press OK on the remote control.
3 4
Use the Cursor keys to navigate to Forward all calls to... . If
you want to forward all calls to Voicemail instead, navigate to
Forward all calls to Voicemail, press OK and you are done.
D15097.22 Cisco TelePresence SX10, SX20 User Guide APRIL 2020
All contents © 2020 Cisco Systems, Inc. All rights reserved
Choosing Forward all calls to... opens the Call menu. Select whom
to receive all calls in the same way as if you were about to call that
person.
20
Page 21

D15097.22 Cisco TelePresence SX10, SX20 User Guide APRIL 2020
All contents © 2020 Cisco Systems, Inc. All rights reserved
Intelligent Proximity
21
Page 22

Intelligent Proximity
Cisco Proximity Ultrasound Signal
Cisco video devices emit ultrasound as part of
the Proximity feature. Most people are exposed
to ultrasound more or less daily in many
environments, including industry, commercial
applications and home appliances.
Even if airborne ultrasound may cause subjective
eects for some individuals, it is very unlikely
that any eects will occur for sound pressure
These guidelines state that sound pressure levels
lower than 120 dB have not been demonstrated
to cause hearing losses, neither permanently nor
temporarily.
For Cisco video devices for group use with
integrated loudspeakers the ultrasound sound
pressure level is below 75 dB at a distance of
50 cm or more from the loudspeaker.
Due to the limited levels it is believed that while
the signal is clearly audible it is not bothersome
to dogs.
A dog in an oce or meeting room will be
subject to ultrasound at levels comparable
to normal background noise, or at most
conversational levels. There has been no reports
of animals being bothered by the signals in the
About Proximity
The Intelligent Proximity feature
allows you to share content from a
computer wirelessly on the video
device. Smart phones and tablets
are also able to view the shared
content directly on their own
screens.
You can even use your own smart
levels below 75 dB. Guidelines for ultrasound
exposure limits vary heavily between countries,
but 75 dB is the lowest limit presently found for
the frequency band around 20 kHz, which is
where the Cisco proximity signal is emitted.
A good reference for this information is Health
Canada´s guidelines, http://www.hc-sc.gc.ca/
ewh-semt/pubs/radiation/safety-code_24securite/index-eng.php#a2.2.2.
In most practical cases the level at the ear of
the user will be much lower than these max
levels, due to loudspeaker directivity, distance
attenuation, and high degree of high frequency
absorption in typical rooms. The levels will range
from what for audible sound would be typical
background / ambient noise levels in meeting
spaces up to so-called conversational levels of
normal speech.
It is therefore deemed safe for humans to be
continously subjected to the proximity signal.
Most people will not be aware of the presence
of the signal, and suer no eects from it. A few
individuals with especially acute high frequency
years we have had this feature in our products.
However, the question of ultrasound eect on
dogs is fair, since dog repeller devices using
ultrasound do exist. These devices typically claim
to use discomforting, but not harmful ultrasound.
Cisco does not have insight into dog repeller
design, but scanning the specications of such
devices typically reveals that the exposure levels
typically are 100 dB and upwards.
For solutions using Cisco video codecs with
3rd party loudspeaker systems Cisco is not
able to control the ultrasound sound pressure
level. In most cases the necessary loudspeaker
sensitivity and frequency response will result
phone, tablets, PC or MAC to
control calls on the video device.
Observe the following:
You will need to download (free
of charge) the Cisco Intelligent
Proximity app from App Store or
Google Play.
Windows or OS X users, go to
https://proximity.cisco.com/.
Your video support team may have
activated none of the features, all of
them, or just a subset of them.
hearing can, however, be able to hear it, this
is most likely to happen directly in front of and
close to the loudspeaker.
It is obvious that animals like dogs will hear the
proximity signal, since their frequency range of
hearing is so much wider.
However, the eect of sound is also level
dependent, and the level range of a dog´s
hearing is not signicantly dierent from that
of a human. The hearing threshold of dogs at
20 kHz can be as low as 0–10 dB, similar to the
threshold of a human ear in its most sensitive
in levels below the 75 dB limit. However, if
excessive external amplication is applied, or the
loudspeaker system has an emphasized highfrequency response, levels in excess of the limit
can be produced.
Intelligent Proximity makes use of
ultrasound when connecting users
(see more at left). Do not block the
microphone of your computer, smart
phone or tablet.
Intelligent Proximity has been
designed not to work outside the
meeting room when doors to the
room are kept closed. You will need
to be in close proximity of the video
endpoint to use the feature.
D15097.22 Cisco TelePresence SX10, SX20 User Guide APRIL 2020
All contents © 2020 Cisco Systems, Inc. All rights reserved
frequency range.
Cisco has not done testing or qualication of the
possible eects the signal can have on dogs.
When privacy dictates, always
keep the meeting room entrance
doors closed to avoid possible
eavesdropping from adjacent rooms.
22
Page 23

1 2 3
.@
4 5 6
ghi jkl mno
7 8 9
pqrs tuv wxyz
defabc
Content
Sharing
*
0
#
D15097.22 Cisco TelePresence SX10, SX20 User Guide APRIL 2020
All contents © 2020 Cisco Systems, Inc. All rights reserved
23
Page 24

Content Sharing
Start and Stop Presentation
1 2
About Content Sharing
Use this feature to share content
on your PC in a call or outside a
call. The procedure is the same, but
shown here is the in-call way only.
To share content using Proximity,
make sure your presentation source
has Cisco Proximity installed and
activated. Allow some time for the
Make sure your presentation source is connected and On. You
may need to select Share and press OK on the remote control.
pairing to take place. Follow onscreen instructions.
Share in call
You may now select Local preview to inspect the contents
without sharing it with the others, before you select Share in
call to share it with the others.
3 4
Stop sharing
The size of the shared image is controlled by means of the
Minimize/Maximize icon. Select this and press OK on the
remote control, if needed.
D15097.22 Cisco TelePresence SX10, SX20 User Guide APRIL 2020
All contents © 2020 Cisco Systems, Inc. All rights reserved
To stop sharing content, select Stop sharing and press OK on the
remote control.
24
Page 25

Content Sharing
Change Presentation Layout In a Call
1 2
About
Presentation Layout
You can change the layout of
the screen during presentations.
Typically you can choose between
with or without showing the
presenter and showing the
presenter as either a PiP (Picture
in Picture) or PoP (Picture outside
Picture).
Navigate to Layout in the upper right corner and press OK on
the remote control. This icon will appear only when relevant.
The layout options available on
your device may dier from those
shown here, but the layouts shown
are always those you may choose
between.
Use the Cursor keys to navigate to the new layout you would like to
use and press OK.
D15097.22 Cisco TelePresence SX10, SX20 User Guide APRIL 2020
All contents © 2020 Cisco Systems, Inc. All rights reserved
25
Page 26

1 2 3
.@
4 5 6
ghi jkl mno
7 8 9
pqrs tuv wxyz
defabc
Scheduled
Meetings
*
0
#
D15097.22 Cisco TelePresence SX10, SX20 User Guide APRIL 2020
All contents © 2020 Cisco Systems, Inc. All rights reserved
26
Page 27

Scheduled Meetings
Join a Scheduled Meeting
A meeting allowing
you to join in, can be
Joining a Meeting
Your video device may be
connected to a management
system capable of scheduling video
meetings. Any scheduled meetings
then appear as shown at left.
Use Join to participate in the
meeting.
If the meeting has already started,
joined by navigating
to the green Join icon.
Then click OK on the
remote control.
the Join button is still available..
There may be a Snooze icon
available. Use this icon to postpone
the oer to join for another 5
minutes.
D15097.22 Cisco TelePresence SX10, SX20 User Guide APRIL 2020
All contents © 2020 Cisco Systems, Inc. All rights reserved
27
Page 28
1 2 3
.@
4 5 6
ghi jkl mno
7 8 9
pqrs tuv wxyz
defabc
Contacts
*
0
#
D15097.22 Cisco TelePresence SX10, SX20 User Guide APRIL 2020
All contents © 2020 Cisco Systems, Inc. All rights reserved
28
Page 29

Contacts
Add Someone to Favorites, Outside a Call
1 2
About Directory,
Recents and Favorites
The Directory serves as your cor-
porate phone book. This directory can’t be edited by you. You can
copy entries to your list of Favorites
and edit them there.
Select a folder to show its contents.
Scroll, if needed, to locate a folder
or an entry within a folder.
Make sure Call is selected (leftmost eld along the bottom
of the screen) and press OK or the green Call button on the
remote control .
The Call menu opens. Use the Cursor keys to navigate between
Recents and Directory (the two rightmost) and then down in
one of those lists.
When searching within the corpo-
rate Directory, the search applies to
the current directory folder and its
subfolders only. To go one level up,
navigate back. To make the search
apply to the entire corporate directory, do not select any folder before
you search.
It may happen that an entry copied
from the directory to the list of favorites later is updated in the direc-
tory. This update isn’t reected in
3 4
your list of favorites — you must then
manually update the entry in the list
of favorites. Use Edit and Call for
this.
Once an entry has been located, press OK on the remote
control to invoke the Call menu and use the Cursor keys to
navigate to More (...) Press OK.
D15097.22 Cisco TelePresence SX10, SX20 User Guide APRIL 2020
All contents © 2020 Cisco Systems, Inc. All rights reserved
Then use the Cursor keys to navigate to Mark as Favorite. Press OK
on the remote control to make the selected entry a favorite.
Repeat this procedure to remove someone from the list of Favorites.
29
Page 30

Contacts
Add Someone to Favorites, While in a Call
1 2
About Favorites
Favorites is your own personal di-
rectory. Entries can come from the
corporate directory (for more on
this, see the previous page) or from
someone you call or someone who
calls you.
3
In a call, use the remote control to navigate to the Participants
icon in the upper right corner, and press OK on the remote
control.
A menu showing a list of the participants in the call opens. Use
the Cursor keys to navigate to the participant to become a
favorite and press OK on the remote control. A submenu opens.
Then navigate to Favorite in this submenu (far left) and press
OK on the remote control. The selected participant has now
become a Favorite.
Repeat to undo.
D15097.22 Cisco TelePresence SX10, SX20 User Guide APRIL 2020
All contents © 2020 Cisco Systems, Inc. All rights reserved
30
Page 31

1 2 3
.@
4 5 6
ghi jkl mno
7 8 9
pqrs tuv wxyz
defabc
Camera Control
*
0
#
D15097.22 Cisco TelePresence SX10, SX20 User Guide APRIL 2020
All contents © 2020 Cisco Systems, Inc. All rights reserved
31
Page 32

Camera Control
View Camera Settings (Local camera)
1 2
About Camera Settings
The camera settings let you control
the zoom, pan, and tilt of your own
camera.
The self-view (the image that the
others see from your device) can
be turned on and o as well as be
shown minimized or maximized (full
screen).
In a call or outside a call (as shown here), move cursor up to
the upper right corner to the Camera icon. Press OK on the
remote control.
You may want the self-view to be
always shown, this is called to make
it sticky.
The camera icon appears. Press OK again on the remote
control.
3 4
Adjust the pan, zoom, and tilt of the camera. Use the Increase/
Decrease controls of the remote control to adjust the zoom and
the Cursor keys to adjust pan and tilt.
D15097.22 Cisco TelePresence SX10, SX20 User Guide APRIL 2020
All contents © 2020 Cisco Systems, Inc. All rights reserved
You can make the self-view image sticky (always shown) and/or
maximize it by selecting the icons in the upper right corner of this
menu.
Press Back on the remote control to exit the menu.
32
Page 33

Camera Control
Far-End Camera Control
1 2
About Far-End
Camera Control
Many video devices have a remotely
controllable camera. Such devices
allow you to use a remote control to
change pan, tilt, and zoom.
If the far-end (those you are in a
meeting with) have such a device,
you may be able to control their
camera during the call.
Navigate to Participants in the upper right corner and press OK
on the remote control.
3 4
A menu showing a list of the participants in the call opens. Navigate to
the participant, whose camera you want to control and press OK on
the remote control. A submenu opens
.
To control the far-end camera navigate to Camera (number two
from the right) and click OK on the remote control.
D15097.22 Cisco TelePresence SX10, SX20 User Guide APRIL 2020
All contents © 2020 Cisco Systems, Inc. All rights reserved
Adjust Pan, Tilt, and Zoom as per your liking. Use OK or Back on the
remote control to exit.
33
Page 34

Camera Control
Move the Selfview PiP
1 2 3
Why Move the Selfview?
Selfview shows what others see
from your video device. You can use
it to conrm that they see what you
want them to see.
The selfview appears as a PiP
(Picture-in-Picture).
From time to time you may want
to have the selfview activated
With self-view activated or a layout involving
a picture-in-picture, navigate to Layout in
the upper right corner and press OK on the
remote control. The Layout icon appears
only when relevant.
The layout menu opens. Press the down
Arrow of the Cursor keys on the remote
control to navigate to the self-view image.
The self-view image turns blue to show
that it has been selected. Click OK on the
remote control. Arrows appear to indicate
that the self-view image can be moved.
Possible new locations are indicated.
during the meeting. This could, for
example, be to ensure that you
remain seen on the screen.
It may happen that the current
position of the selfview blocks
important parts of the image on
your screen. Change the selfview
position to view those important
parts.
4 5
Use the Cursor keys on the remote control
to move the image. Press OK when nished.
The image on the screen changes to its
original size with the selfview in its new
position.
D15097.22 Cisco TelePresence SX10, SX20 User Guide APRIL 2020
All contents © 2020 Cisco Systems, Inc. All rights reserved
34
Page 35

Camera Control
Turn Camera On or O
1 2
About Video O
The video turn o feature has
been designed to let you control
the video transmission from your
camera on devices that do not have
the option of mechanically blocking
the camera.
Navigate to Turn video o, as shown, and press OK on the
remote control.
The icon turns red to indicate that the camera is no longer transmitting
video. Click again to reactivate the camera.
D15097.22 Cisco TelePresence SX10, SX20 User Guide APRIL 2020
All contents © 2020 Cisco Systems, Inc. All rights reserved
35
Page 36

1 2 3
.@
4 5 6
ghi jkl mno
7 8 9
pqrs tuv wxyz
defabc
Settings
*
0
#
D15097.22 Cisco TelePresence SX10, SX20 User Guide APRIL 2020
All contents © 2020 Cisco Systems, Inc. All rights reserved
36
Page 37

Settings
Access Settings
1 2
About Settings
From the Settings menu you can
check device information and
change several settings. Which
settings are available may have been
restricted by your administrator.
You can change the ringtone and
volume, restart the device, and nd
device information among other
To gain access to the Settings menu,
navigate to the upper left corner of the
screen and press OK on the remote
control. Then navigate down to System
Information (number two from the
bottom of the menu) and press OK
again.
things.
The available settings depend on
which you product you have and
what has been enabled by your
administrator.
D15097.22 Cisco TelePresence SX10, SX20 User Guide APRIL 2020
All contents © 2020 Cisco Systems, Inc. All rights reserved
37
Page 38

1 2 3
.@
4 5 6
ghi jkl mno
7 8 9
pqrs tuv wxyz
defabc
Americas Headquarters
Cisco Systems, Inc.
San Jose, CA
Cisco has more than 200 oces worldwide. Addresses, phone numbers, and fax numbers are listed on the Cisco Website at www.cisco.com/go/oces.
Cisco and the Cisco logo are trademarks or registered trademarks of Cisco and/or its aliates in the U.S. and other countries. To view a list of Cisco trademarks, go to this URL: www.cisco.com/go/trademarks. Third-party trademarks mentioned are the property of their respective
owners. The use of the word partner does not imply a partnership relationship between Cisco and any other company. (1110R)
D15097.22 Cisco TelePresence SX10, SX20 User Guide APRIL 2020
All contents © 2020 Cisco Systems, Inc. All rights reserved
Asia Pacic Headquarters
Cisco Systems (USA) Pte. Ltd.
Singapore
Europe Headquarters
Cisco Systems International BV Amsterdam,
The Netherlands
*
0
#
38
 Loading...