

Page 1

Cisco Support Tools
User Guide
Release 1.0(1)
May 2004
Updated January 2006
Cisco Support Tools 1.0(1).
Page 2

Table of Contents
About Cisco Support Tools Documentation............................................... 6
PART 1: SUPPORT TOOLS OVERVIEW.........................................................9
About Cisco Support Tools 1.0(1) ..........................................................10
About Support Tools Components..........................................................12
About Support Tools Network Topology ..................................................14
About Support Tools Utilities.................................................................16
About the Support Tools Dashboard.......................................................24
About Support Tools Security................................................................26
About Support Tools Platforms..............................................................27
Frequently Asked Questions About Support Tools.....................................29
PART 2: INSTALLING AND CONFIGURING SUPPORT TOOLS.....................31
Section I. Installing Support Tools.......................................................32
About Installing Support Tools ..............................................................33
How to Collect Information for a Support Tools Installation .......................37
How to Create Support Tools User Groups ..............................................39
How to Create the Distinguished User Account.........................................41
About Support Tools Server Hardware and Software Prerequisites..............43
How to Install the Support Tools Server..................................................45
About Support Tools Node Hardware and Software Prerequisites................48
How to Install the Support Tools Node....................................................49
How to Enable Ports for Support Tools....................................................51
How to Test the Support Tools Installation..............................................53
Section II. Configuring Support Tools..................................................55
About Configuring Support Tools ...........................................................56
How to Modify Support Tools Basic Configuration.....................................57
How to Disable Continuous Virus Scan for the Repository..........................60
How to Configure the Dashboard Login for SSL........................................61
How to Modify the Process Information List.............................................63
How to Configure SQL for Use with the System Interrogate Tool ................66
Section III. Uninstalling/Reinstalling Support Tools ...........................67
How to Uninstall Support Tools..............................................................68
How to Re-Install Support Tools ............................................................70
PART 3: USING THE SUPPORT TOOLS DASHBOARD..................................72
About Using the Dashboard for the First Time..........................................73
How to Access the Support Tools Dashboard...........................................75
Cisco Support Tools 1.0 User Guide Table of Contents 2
Page 3

How to Use the Select System Screen....................................................76
How to Use the System Management Screen...........................................78
How to End a Dashboard Session...........................................................80
About Dashboard Troubleshooting .........................................................81
PART 4: USING SUPPORT TOOLS UTILITIES ............................................84
Section I. Using Cisco Web Utilities .....................................................85
About Cisco Web Utilities......................................................................86
Section II. Using Cisco Web Utilities from the Dashboard....................87
How to Use the System Interrogate Screen.............................................88
How to Use the Registry Screen ............................................................92
How to Use the Files Screen..................................................................94
How to Use the Compare Registries Screen.............................................96
How to Use the Processes Screen ........................................................101
How to Use the Services Screen ..........................................................103
How to Use the Log Collector ..............................................................106
How to Use the Create Log Group Screen .............................................109
How to Use the Log Groups Screen......................................................111
How to Use the Create Log Collection Screen.........................................114
How to Use the Log Collections Screen.................................................116
Section III. Using Cisco Web Utilities from a Command Line .............118
About Using Cisco Web Utilities from a Command Line............................119
How to Use the Services Utility from a Command Line............................123
How to Use the Processes Utility from a Command Line..........................127
How to Use the System Interrogate Utility from a Command Line.............131
How to Use the Registry Utility from a Command Line ............................134
How to Use the Compare Registries Utility from a Command Line.............138
How to Use the Log Groups Utility from a Command Line........................143
How to Use the Log Collection Utility from a Command Line ....................147
Section IV. Using Cisco Common Utilities...........................................152
About Cisco Common Utilities..............................................................153
How to Use the CICMan Utility ............................................................158
How to Use the CTITest Utility.............................................................160
How to Use the DBDiff Utility ..............................................................165
How to Use the DumpCfg Utility ..........................................................167
How to Use the ICMDBA Utility............................................................169
How to Use the MPTrace Utility............................................................170
How to Use the NICROI Utility.............................................................172
How to Use the NMStart Utility............................................................177
How to Use the NMStop Utility ............................................................179
Cisco Support Tools 1.0 User Guide Table of Contents 3
Page 4

How to Use the OPCTest Utility............................................................181
How to Use the Procmon Utility ...........................................................186
How to Use the RTRTrace Utility..........................................................191
How to Use the RTTest Utility..............................................................192
How to Use the SS7NICTrace Utility.....................................................201
How to Use the VRUTrace Utility.......................................................... 202
Section V. Using Common Utilities .....................................................204
About Common Utilities...................................................................... 205
How to Use the Arp -a Utility...............................................................209
How to Use the CAT Utility..................................................................210
How to Use the CHMOD Utility.............................................................212
How to Use the CP Utility....................................................................214
How to Use the DF Utility ...................................................................216
How to Use the Diff Utility ..................................................................218
How to Use the DU Utility................................................................... 221
How to Use the FGrep Utility...............................................................223
How to Use the Findstr Utility..............................................................225
How to Use the Grep Utility ................................................................228
How to Use the Head Utility................................................................231
How to Use the IPConfig -all Utility ......................................................233
How to Use the ISQL/W Utility ............................................................235
How to Use the LS Utility....................................................................236
How to Use the MV Utility...................................................................239
How to Use the NBTStat Utility............................................................241
How to Use the Net Session Utility.......................................................243
How to Use the Net Statistics Server Utility...........................................244
How to Use the Net Statistics Workstation Utility ...................................246
How to Use the NetStat Utility.............................................................248
How to Use the NSLookup Utility .........................................................250
How to Use the PathPing Utility ........................................................... 251
How to Use the Ping Utility .................................................................253
How to Use the PStat Utility................................................................255
How to Use the RM Utility...................................................................257
How to Use the Route -print Utility ......................................................259
How to Use the Shutdown Tool Utility...................................................261
How to Use the SQLEW Utility.............................................................262
How to Use the Stopshut Utility...........................................................263
How to Use the Strings Utility .............................................................264
How to Use the Tail Utility ..................................................................266
How to Use the Touch Utility...............................................................268
How to Use the Tracert Utility .............................................................270
How to Use the WC Utility ..................................................................271
Cisco Support Tools 1.0 User Guide Table of Contents 4
Page 5

How to Use the Which Utility...............................................................273
How to Use the WinMSD Utility............................................................275
PART 5: REFERENCE...............................................................................276
How to Stop and Start the Support Tools Dashboard/Tomcat ................... 277
How to Stop and Start the Support Tools Server....................................278
How Stop and Start the Node Agent Service..........................................279
How to Confirm the Support Tools Build Number....................................280
Cisco Support for Support Tools ..........................................................281
Copyright.........................................................................................283
Index ..............................................................................................285
Cisco Support Tools 1.0 User Guide Table of Contents 5
Page 6

About Cisco Support Tools Documentation
Welcome to the User Guide for Cisco Support Tools, version 1.0(1). This guide
contains:
• An overview of Support Tools
• Installation and configuration instructions
• Instructions for using the Support Tools Dashboard
• Instructions for using Support Tools utilities from the Su pport Tools Dashboard
• Instructions for using Support Tools utilities from a command-line
Audience
This guide is intended for all Support Tools users, including individuals who deploy,
install, administer, and use the product. It assumes that readers are familiar with:
• For Support Tools installation specialists: The platforms and operating systems
on which Cisco ICM (Enterprise, Hosted, and IPCC) runs; basic Web server and
firewall configuration.
• For Support Tools users: Cisco ICM and ICM components; the platforms and
operating systems on which ICM runs.
Cisco Support Tools 1.0 User Guide About Cisco Support Tools Documentation 6
Page 7

The Support Tools Documentation Set
The following documentation is available for the Support Tools 1.0(1):
Document: Primary Audience: Description:
Support Tools User
Guide
Support Tools
Release Notes
All Support Tools users Provides information on:
y Support Tools features and deployment;
y How to install and configure Support Tools;
y How to use the Support Tools Dashboard;
y How to use Support Tools utilities from the
Support Tools Dashboard;
y How to use Support Tools utilities from a
command line;
The Support Tools User Guide also provides contextsensitive Help for screens in the Support Tools
Dashboard.
Available formats: HTML and PDF
All Support Tools users The Support Tools Release Notes contain up-to-date
information on known issues and workarounds and any
special instructions not covered in this guide.
Available formats: PDF
To Access Support Tools Documentation
After installation, to access the Support Tools User Guide:
• On the Support Tools CD, open getstart.htm at the top level of the CD.
• After installation, from the Support Tools Dashboard, click the Help icon.
• After installation, on the Support Tools Server, open index.htm (for HTML) or
icm_10_st_userguide.pdf (for PDF) in
<icm_root_directory>\support_tools\documentation.
• On a Support Tools Node, open index.htm (for HTML) or
icm_10_st_userguide.pdf (for PDF) from
<icm_root_directory>\support_tools\documentation.
Note: The Support Tools Release Notes are not installed with the product. They are
only available on the Support Tools CD.
Support Tools documentation is also available for download from the techn ical
publication section of Cisco's Web site at: www.cisco.com.
Cisco Support Tools 1.0 User Guide About Cisco Support Tools Documentation 7
Page 8

Support Tools Document Conventions
Support Tools documentation uses the following conventions:
Note Indicates information of particular interest or significance.
Caution Indicates the possibility of an adverse condition, such as poor or improper
performance, data loss, or a security risk.
Courier
font
Indicates a file or path name, user entry, or a code snippet.
<> Indicates a variable. For example: <servername> represents a server's
host name. When prefaced by "Press," a bracketed term represents a
keystroke. For example, "Press <Enter>" means to press the Enter
Cisco Support Tools 1.0 User Guide About Cisco Support Tools Documentation 8
Page 9

Part 1: Support Tools Overview
Cisco Support Tools 1.0 User Guide About Cisco Support Tools Documentation 9
Page 10

About Cisco Support Tools 1.0(1)
Cisco Support Tools 1.0(1) is a suite of over fifty utilities th at allow you to manage
and troubleshoot the ICM servers which process call load, routing, and reporting.
Through Support Tools, you can troubleshoot configuration and performance
problems on these systems from a single machine in your network--the Support
Tools Server.
Access to utilities in the Support Tools suite is through a browser-based interface-the Support Tools Dashboard--installed on the Support Tools Server. Levels of
security control both access to the Dashboard and the ability to use specific tools
once logged in. In low bandwidth conditions (for example, via dialup access) or when
Web browsing is otherwise impractical, most Support Tools utilities can also be
accessed and run via command line.
Key Features
The Support Tools suite includes the full set of standard diagnostic tools delivered
with earlier ICM versions. It also provides key new functionality including:
• The ability to interrogate individual Support Tools nodes for their hardware/OS,
Cisco component, and third party product information.
• The ability to view, stop, and start services running on Support Tools nodes.
• The ability to view and terminate processes running on Support Tools nodes.
• The ability to compare and synchronize registry settings from different Support
Tools nodes.
• The ability to pull logs from most Support Tools nodes including ICM call routers,
loggers, peripheral gateways (PGs), admin workstations (AWs), CTI Object
Server (CTIOS), Cisco Collaboration Server (CCS), Cisco Email Manager (CEM),
Cisco Media Blender (CMB), as well as Cisco CallManager.
• The ability to create enhanced time-synchronized merged logs across servers.
See Also
For related information, see:
About Support Tools Components
About Support Tools Network Topology
About Support Tools Platforms
About Support Tools Security
Cisco Support Tools 1.0 User Guide About Cisco Support Tools 1.0(1) 10
Page 11

About the Support Tools Dashboard
About the Support Tools Utilities
Frequently Asked Questions
Cisco Support Tools 1.0 User Guide About Cisco Support Tools 1.0(1) 11
Page 12

About Support Tools Components
Support Tools uses a client/server architecture to support remote ICM systems. The
architecture is comprised of the Support Tools Server and the Support Tools Node.
The server and node connect using TCP/IP and can exchange large volumes of
messages with only a minimal impact to ICM system performance.
The Support Tools Server
The Support Tools Server is installed on a system that has little or no performance
load, such as a standalone network server or a client ICM Admin Workstation (AW).
To ensure redundancy, the Support Tools Server can be inst alled to multiple
systems.
Major components of the Support Tools Server include:
• The Support Tools Dashboard, a browser-based interface that allows access to all
Support Tools utilities.
• Cisco Web utilities-- a set of system management tools specifically designed for
use with Support Tools.
• The Support Tools Repository, the central storage location for files (for example,
logs, registries, etc.) gathered and saved through Support Tools. These files can
be downloaded, viewed, and used for system comparison or restoration. Note
that multiple installations of the Support Tools Server do not share a common
repository--each will maintain its own instance.
The Support Tools Node
The Support Tools Node serves as the client to the Support Tools Server. It is
installed to each ICM node to be managed through Support Tools.
Major components of the Support Tools Node include:
• The Node Agent Service, used to accept connections from the Support Tools
Server.
• Command-line versions of Cisco Web utilities, allowin g these tools to be run from
a node when access to the Support Tools Server is unavailable or otherwise
impractical (for example, during a network outage).
• A local Repository used to store saved and downloaded files when Support Tools
utilities are run directly from a node (via a command line) outside of the
Dashboard interface.
Cisco Support Tools 1.0 User Guide About Support Tools Components 12
Page 13

Note: The Support Tools Server installation automatically installs the Node Agent
Service to the Support Tools Server, ensuring that this machine can also be
managed through Support Tools.
See Also
For related information, see:
About Support Tools 1.0(1)
About Support Tools Network Topology
About the Support Tools Dashboard
About the Support Tools Utilities
Frequently Asked Questions
Cisco Support Tools 1.0 User Guide About Support Tools Components 13
Page 14
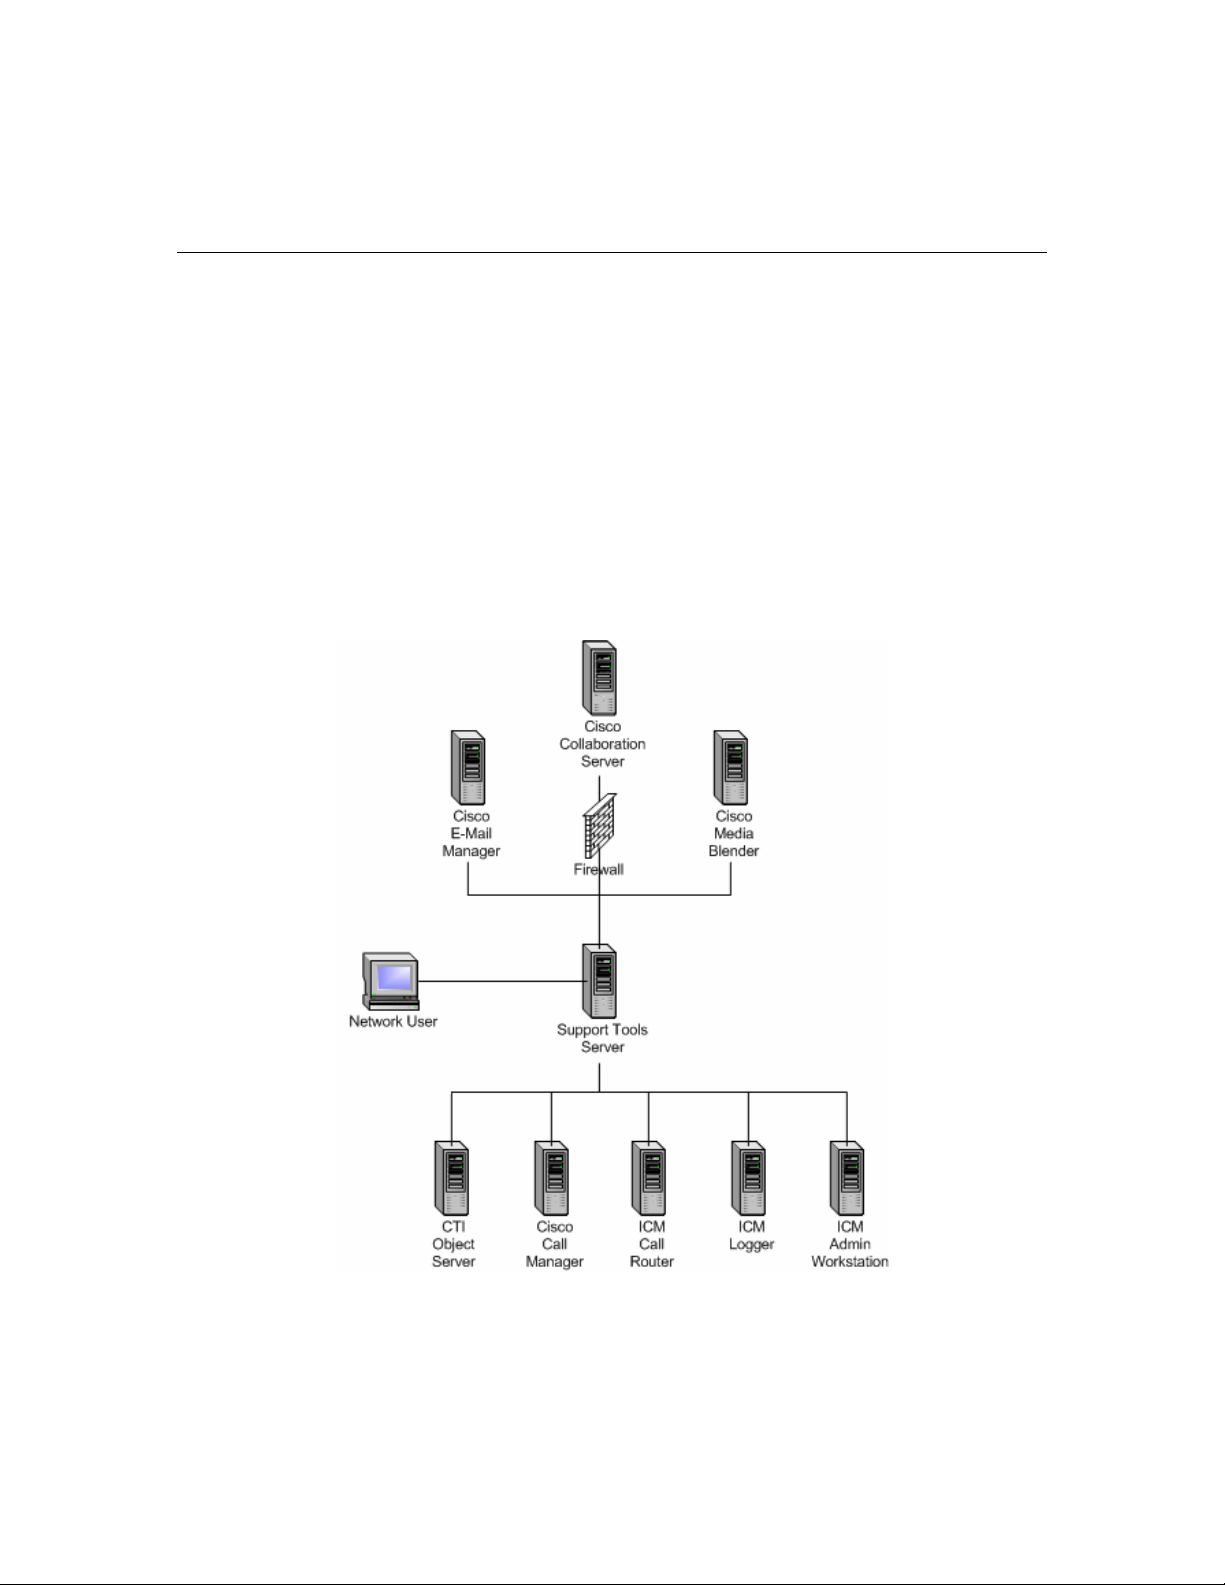
About Support Tools Network Topology
The Support Tools Server is installed to a standalone server or a client ICM Admin
Workstation in your network. To ensure redundancy, the Support Tools Server can
be installed to multiple systems. Note however, these multiple installations do not
have the ability to share data with one another.
The Support Tools Server can communicate with Support Tools nodes through a
firewall provided the appropriate ports on the firewall has been enabled.
User access to Support Tools is limited to your network. Remote users wishing to use
the Support Tools Dashboard must first connect to the network--remote access via
the Internet is not supported.
The following diagram illustrates a Support Tools deployment in a simplified ICM
network.
See Also
For related information, see:
Cisco Support Tools 1.0 User Guide About Support Tools Network Topology 14
Page 15

About Support Tools Components
About Support Tools Platforms
About Support Tools Security
How to Enable Ports for Support Tools
Cisco Support Tools 1.0 User Guide About Support Tools Network Topology 15
Page 16

About Support Tools Utilities
Support Tools includes over fifty utilities to monitor, administer, and configure ICM
systems on which the Support Tools Node is installed. Utilities are grouped into these
categories:
• Cisco Web utilities: Four new Cisco utilities created for distribution with Support
Tools 1.0(1).
• Cisco Common utilities: Pre-existing Cisco utilit ies which in most cases will
already exist on ICM nodes as part of a standard ICM installation.
• Common utilities: Bundled third-party Windows, DOS, and Unix utilities. Windows
and DOS utilities will already exist on ICM nodes as part of a standard Windows
installation. Unix utilities are install ed as part of the Support Tools node
installation.
Utility Installation Locations
Support Tools utilities exist and can be run from individual ICM nodes (note that the
Support Tools Server is itself treated as a Support Tools node). When you run one of
these utilities through the Support Tools Dashboard, you are actually running the
utility remotely from the currently selected node.
Not every utility is installed on every node. For the most part, Cisco Common Tools
are installed on core ICM components only: AWs, PGs, Call Routers, and Loggers. For
example, CICMan is only present on NAM Call Routers. See the table in the next
section for more information.
If you attempt to launch a utility that is not present on the curren t syst em, the
Support Tools Dashboard returns a message stating that the command is not
recognized.
Non-Dashboard Utilities
Certain ICM and third-party utilities are only available for use through their own GUI;
they have no command line access. This also precludes the ability to launch an d run
these utilities from the Support Tools Dashboard. Note th at while these utilities are
listed on the Dashboard menu, they cannot in fact be run from there.
These utilities include:
• icmdba
• isql/w
Cisco Support Tools 1.0 User Guide About Support Tools Utilities 16
Page 17

• rtrtrace
• sqlew
• ss7nictrace
• winmsd
Privileged Utilities
Some utilities, when accessed through the Support Tools Dash board, can only be
used by members of the Support Tools privileged user group. If you are not a
member of the privileged user group, these utilities will not appear on the Support
Tools Dashboard menu. These utilities include:
• ctitest
• icmdba
• nicroi
• nmstart
• nmstop
• procmon
• registry compare and repair
• rttest
• shutdown
• upcctest
• Processes and services
Note that these privilege levels only apply to utilities when accessed through the
Dashboard; they do not preclude users from running any utility th rough an
independent command line on a node.
Command-Line vs GUI Access
For users who prefer command-lines to GUIs, note that in addition to access via the
Support Tools Dashboard, most Support Tools utilities can also be run from an
independent command line. For more information, see the instruction s f or individual
utilities.
Also note that certain utilities (see Non-Dashboard Utilities above) have no command
line access.
Cisco Support Tools 1.0 User Guide About Support Tools Utilities 17
Page 18

Support Tools Utilities List
The following tables list and describe the utilities accessible through Support Tools.
Utilities are grouped into these categories:
• Cisco Web utilities
• Cisco Common utilities
• Common utilities
Cisco Web Utilities
The following Support Tools utilities were created by Cisco specifically for use with
Support Tools 1.0(1). They can be run from within the Dashboard interface or from
an external command line on either the Support Tools Server or an individual node.
Utility Name: Description: Installed On: Dashboard
Log Collector Use to collect and view log files from
Registry Compare
and Repair
System Interrogate Use to display system information
Processes and
Services
ICM nodes. Allows you to create
merged logs from two ICM nodes for
comparative analysis.
Use to view, compare and repair ICM
node registry entries.
(for example, OS, hardware, ICM,
SQL).
Use to view and stop Processes and
services running on an ICM node.
All Support
Tools nodes
All Support
Tools nodes
All Support
Tools nodes
All Support
Tools nodes
Privileged
Users Only:
X
X
External GUI-
-No
Dashboard or
CommandLine Access:
Cisco Support Tools 1.0 User Guide About Support Tools Utilities 18
Page 19

Cisco Common Utilities
The following Support Tools utilities were created by Cisco specifically for use with
ICM. Most can be run both from within the Dashboard interface, or from an external
command line.
Utility Name: Description: Installed On: Dashboard
cicman Use on a NAM CallRouter to view and
set NAM to CICM session information.
ctitest Use for debugging or demonstration
in a Cisco ICM CTI environment. Can
be used in place of an Interactive CTI
client application.
dbdiff Third-party (Microsoft) tool to
compare database tables. Invoked
with the diffconfig.bat tool.
dumpcfg Dump Config ICM audit utility. Use to
analyze the ICM Config_Message_Log
table. Allows you to determine WHO
did WHAT, WHEN, from WHERE, using
WHICH program.
icmdba ICM Database Administration tool.
Use to create, monitor, and edit ICM
databases, including Logger, HDS,
and AWDB databases. ICMDBA is also
used to manage various SQL Server
operating parameters.
NAM Call
Routers
CTIOS PGs X
Nodes on
which SQL
Server is
installed
Loggers (but
can be run
from any ICM
component)
AWs, Loggers
(ICM
components
with DBs)
Privileged
Users Only:
X
External GUI-
-No
Dashboard or
CommandLine Access:
mptrace Use to provide a playback from the
Nortel Meridian Automatic Call
Distributor (ACD) to troubleshoot
potential issues.
nicroi NIC Remote Operator Interface. Use
to configure and debug the (old-style
DOS-based) AT&T NIC. Often invoked
with the NIC.BAT batch program.
nmstart Node Manager Start. Use to start an
ICM service on a CallRouter, Logger,
AW, or PG.
nmstop Node Manager Stop. Use to stop an
ICM Service on a CallRouter, Logger,
AW, or PG.
Cisco Support Tools 1.0 User Guide About Support Tools Utilities 19
MerPim PGs
Routers for
customers
running an
AT&T NIC
AWs, PGs, Call
Routers,
Loggers
AWs, PGs, Call
Routers,
Loggers
X
X
X
Page 20

opctest Use to interpret a Peripheral
Gateways (PG) status, statistics, etc.
It is also possible to enable specific
debug tracing in the OPC process.
PGs X
procmon General-purpose debugging tool. Can
be used in conjunction with various
Network Interface Controller (NIC)
and Peripheral Interface Manager
(PIM) processes. Use to verify status,
set debug trace bits, etc.
rtrtrace Use to set various debug tracing on a
CallRouter. The additional tracing is
output to the .EMS log files, and
viewed with the Log Collector.
rttest Use to interpret a Call Router's events
and states live without interruption to
the running router processes. Rttest
has several subroutines that allow
viewing status, statistics, etc. It is
also possible to enable specific debug
tracing in the call router.
ss7nictrace Use to view and set various debug
trace bits on a new style NT SS7 NIC
PG.
vrutrace Use to output tracing information
from a Voice Response Unit (VRU)
device and to and from its PIM
process. VRUTrace allows capture and
playback of session data.
PGs, Call
Routers
Call Routers X
Call Routers
(but can be run
from any ICM
component)
PGs X
VRU PGs
X
X
Common Utilities
The following Support Tools utilities are bundled third-party Windows, DOS, and Unix
utilities. Most can be run both from within the Dashboard interface, or from an
external command line.
Utility Name: Description: Installed On: Dashboard
Arp-a Use to find the media access control
address of a host on the same
physical network.
cat Use the CAT utility to display, print,
and combine files. Equivalent of the
DOS type command.
chmod Use to change file permissions.
Equivalent of the DOS attrib
command.
All Support
Tools nodes
All Support
Tools nodes
All Support
Tools nodes
Privileged
Users Only:
No
Dashboard or
CommandLine Access:
Cisco Support Tools 1.0 User Guide About Support Tools Utilities 20
Page 21

Utility Name: Description: Installed On: Dashboard
Privileged
Users Only:
No
Dashboard or
CommandLine Access:
cp Equivalent of the DOS copy
command.
df Use to view disk free information. All Support
diff Use to compare two text files or two
directories.
du Use to view disk usage information. All Support
fgrep Use to search for text patterns within
a set of files.
findstr Use to find strings in logs or text files.
Similar to UNIX's grep command.
Useful when parsing log files or other
text files to find a snippet of text.
grep Use to search for text patterns within
a set of files.
head Use to view user-defined number of
lines from the start of a file.
IPConfig -all Use to get host computer
configuration information, including
the IP address, subnet mask, and
default gateway.
All Support
Tools nodes
Tools nodes
All Support
Tools nodes
Tools nodes
All Support
Tools nodes
All Support
Tools nodes
All Support
Tools nodes
All Support
Tools nodes
All Support
Tools nodes
isql/w Interactive SQL for Windows. Use to
query and update Microsoft SQL
Server databases.
ls Use to view directory listings.
Equivalent of the DOS dir command.
mv Use to move files and directories.
Equivalent of the DOS move or
rename command.
NBTStat Use to troubleshoot NetBIOS name
resolution problems.
Net Session Use to view information about all
current client sessions with the
current system.
NetStat Use to view network information for
the current system, including protocol
statistics and current TCP/IP network
connections.
Net Statistics Server Use to view statistics for the local
Server service.
Nodes on
which SQL
Server is
installed
All Support
Tools nodes
All Support
Tools nodes
All Support
Tools nodes
All Support
Tools nodes
All Support
Tools nodes
All Support
Tools nodes
X
Cisco Support Tools 1.0 User Guide About Support Tools Utilities 21
Page 22

Utility Name: Description: Installed On: Dashboard
Privileged
Users Only:
No
Dashboard or
CommandLine Access:
Net Statistics Works Use to view statistics for the local
Workstation service.
NSLookup Use to get the IP address and fully
qualified DNS of the current system's
DNS name server.
PathPing A route tracing tool that combines
features of the ping and tracert
commands with additional
information.
ping Low-level connectivity test. Use to
verify end-to-end TCP/IP network
infrastructure.
pstat Use to list all NT or Win2K processes,
their process ID (PID), memory and
cpu utilization, etc.
rm Use to delete files and directories.
Equivalent of the DOS delete,
recursive del subdirectories
commands.
Route-print Use to view the contents of the
network routing tables.
shutdown Use to shut down a remote host.
When used from the Dashboard,
shutdown will automatically restart
the host after 60 seconds.
All Support
Tools nodes
All Support
Tools nodes
All Support
Tools nodes
All Support
Tools nodes
All Support
Tools nodes
All Support
Tools nodes
All Support
Tools nodes
All Support
Tools nodes
X
sqlew SQL Enterprise Manager. Use to
monitor and update SQL Server
operating parameters, expand
databases, etc.
stopshut Use to stop a system from shutting
down due to an application or
operating system failure.
strings Use to find printable strings in a
binary file.
tail Use to view user-defined number of
lines from end of a file.
touch Use to change the creation date/time
for any file.
tracert Related to ping command. Use to
show each intermediary Hop in the
TCP/IP network. Useful in
troubleshooting LAN and WAN faults.
wc Use to view a count of characters,
words, or lines in a file.
Nodes on
which SQL
Server is
installed
All Support
Tools nodes
All Support
Tools nodes
All Support
Tools nodes
All Support
Tools nodes
All Support
Tools nodes
All Support
Tools nodes
X
Cisco Support Tools 1.0 User Guide About Support Tools Utilities 22
Page 23

Utility Name: Description: Installed On: Dashboard
Privileged
Users Only:
No
Dashboard or
CommandLine Access:
which Use to view the name of the first file
encountered while traversing a path
or directory tree.
winmsd Windows NT Diagnostics. Use to
gather detailed configuration
information about computers running
Windows NT.
See Also
For related information, see:
About Support Tools 1.0(1)
About Support Tools Components
About Cisco Web Utilities
About Cisco Common Utilities
About Common Utilities
All Support
Tools nodes
All Support
Tools nodes
X
Cisco Support Tools 1.0 User Guide About Support Tools Utilities 23
Page 24
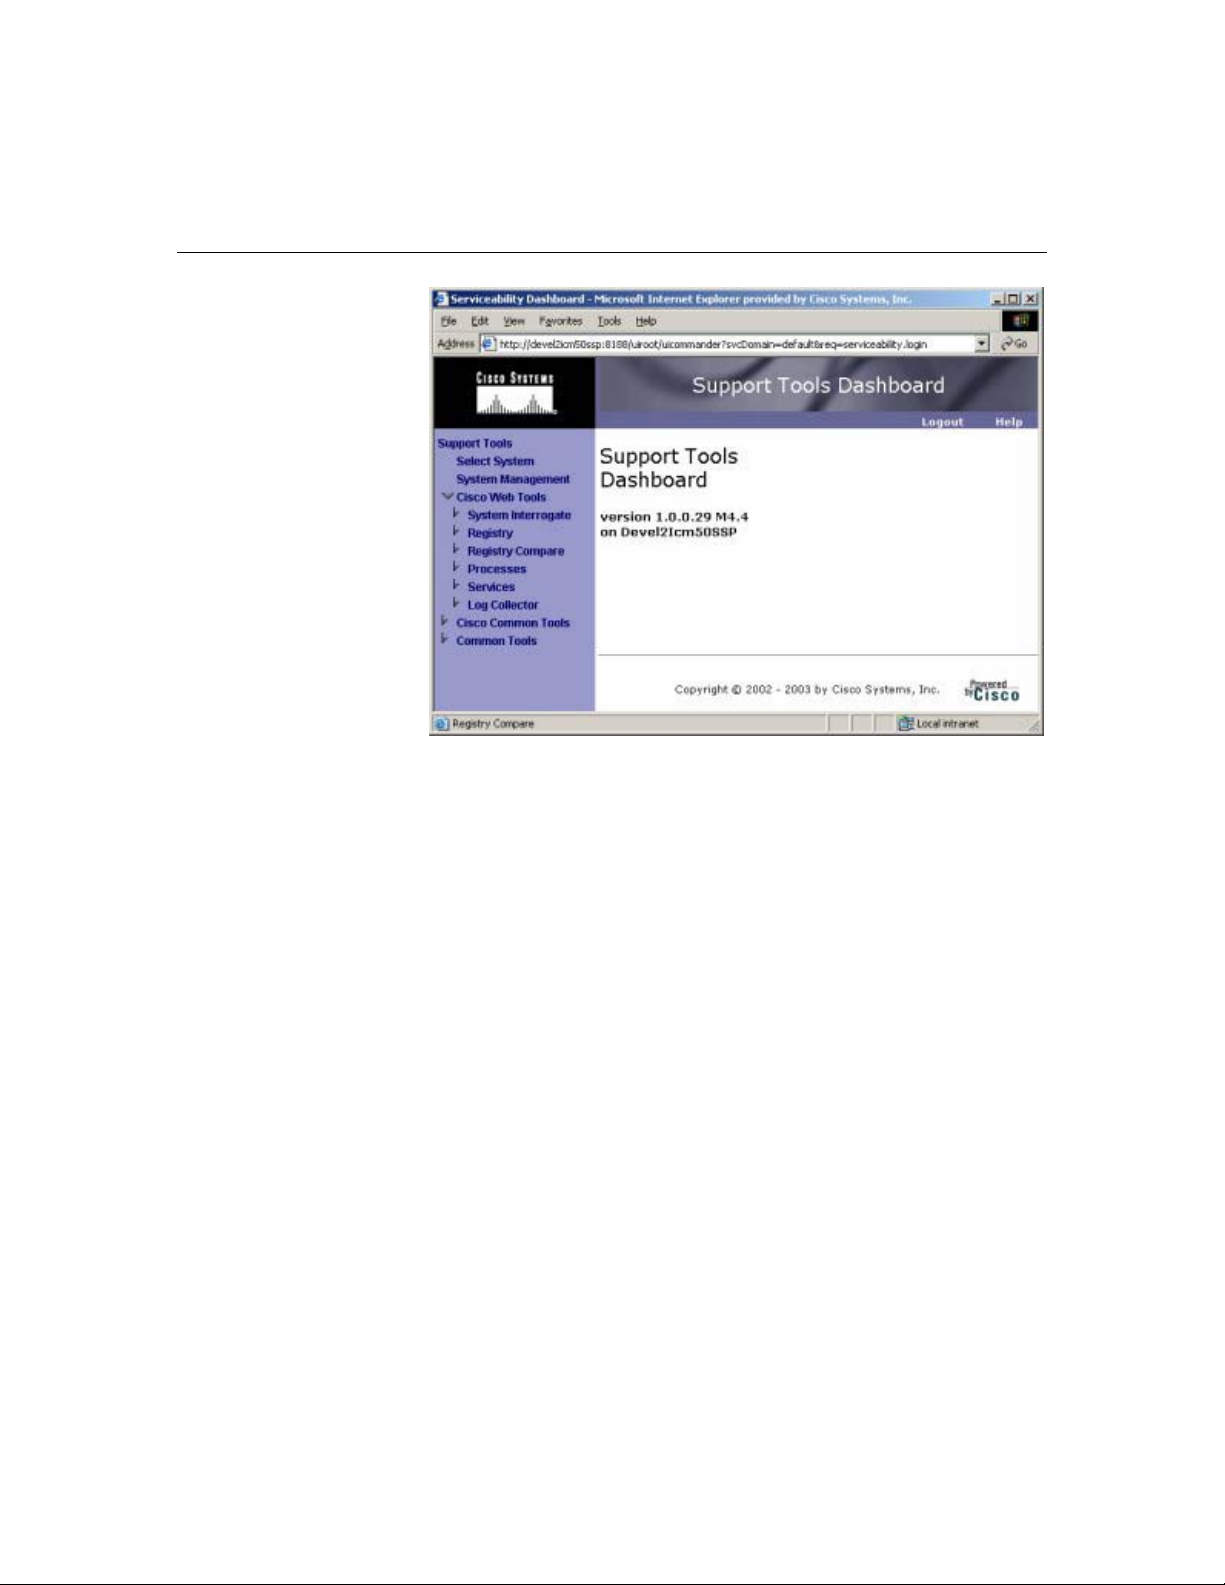
About the Support Tools Dashboard
The Support Tools
Dashboard is a
browser-based
desktop that allows
you to access and use
all Support Tools
utilities through a
single interface. The
Dashboard integrates
access to all ICM
systems, eliminating
the need to manually
connect to each
remote system.
Accessing the
Dashboard
Users access the Dashboard via a URL
(http://<hostname_or_ip_address>:<Tomcat_HTTP_port>) entered in a browser
window. Upon connecting, users must login by providing their Windows NT user
name and password, or the user name and password of a privileged account.
Access to the Dashboard is restricted to the local network: access via the Internet is
not supported. To access the Dashboard from a remote location, a user must connect
and authenticate against the corporate network.
Dashboard Privileges
The Support Tools Dashboard recognizes two categories of users:
• Privileged users have full access to all Support Tools functionality, including tools
and commands that can be used to modify system settings, registries, etc.
• Regular users have limited access to information gathering functionality only.
Tools capable of system modification are not available to regular Support Tools
users.
Support Tools assigns privilege based on regular Windows user groups (defined on
your domain controller or through Active Directory). During the Support Tools Server
installation, you are prompted to enter the name of one (and only one) Windows
Cisco Support Tools 1.0 User Guide About the Support Tools Dashboard 24
Page 25

user group that will serve as the Support Tools privileged group. Users in all other
groups are treated as regular Support Tools users.
See Also
For related information, see:
About Support Tools Components
How to Access the Dashboard
About Using the Dashboard for the First Time
Cisco Support Tools 1.0 User Guide About the Support Tools Dashboard 25
Page 26

About Support Tools Security
Support Tools operates with the following security restrictions:
A. Access to Support Tools is limited to the local network. Remote access via the
Internet is not supported. Users must authenticate against the network in order
to use Support Tools.
B. Users must login to the Support Tools Dashboard using their network ID and
password, or the ID and password of a valid network account. If desired, you can
configure the Support Tools Login page to use SSL so that user passwords are
encrypted when they are sent to the server.
C. Within the Support Tools Dashboard, access to specific utilities is determined by
Windows User Group membership. Only members of the user group designated
as the Support Tools privileged group can use utilities capable of system
modification from the Dashboard. Non-privileged users are limited to information
gathering functionality only. Note that Support Tools utilities used outside of the
Dashboard environment (namely, via command-line) do not impose these levels
of privilege.
The use of Support Tools utilities outside of the Dashboard environment
(accessed via a command line on a node) is not controlled by a login/password.
System administrators can use Windows NTFS directory privileges to limit this
method of access to specific users or groups.
See Also
For related information, see:
About Support Tools Components
About the Support Tools Dashboard
How to Create Support Tools User Groups
How to Configure the Dashboard Login for SSL
Cisco Support Tools 1.0 User Guide About Support Tools Security 26
Page 27

About Support Tools Platforms
This section provides platform support information for Support Tools 1.0(1) ,
including:
• ICM Platform
• Support Tools Server Platform
• Support Tools Node Platforms
• Support Tools Dashboard Browser Support
ICM Platform
Support Tools 1.0(1) is designed for use with ICM version 5.0 and 6.0 (Enterprise,
Hosted and IPCC).
Support Tools Server Platform
The Support Tools Server can be installed on a standalone server (that is, one on
which no ICM products are installed), or on a client ICM Admin Workstation (AW) in
your ICM network.
Caution: Due to possible performance issues, do not install the Support Tools Server
on a distributor AW; AW installation should be limited to client AWs.
The Support Tools Server runs on the following platform:
Server Type: Operating System: Web
Windows Windows 2000 with
service pack 3 or 4
Server/Servlet
Engine:
Apache Tomcat 4.0.6
(included in Support
Tools Server
installer)
Java:
Java Runtime
Environment 1.3.1
(included in Support
Tools Server
installer)
Cisco Support Tools 1.0 User Guide About Support Tools Platforms 27
Page 28

Support Tools Node Platform
The Support Tools Node can be installed on any ICM nodes listed below that you
want to manage through Support Tools. All ICM 5.0 nodes run on the Windows 2000
Server sp3 platform:
• Cisco CallManager (CCM)
• Cisco Collaboration Server (CCS)
• Cisco E-Mail Manager (CEM)
• Cisco Media Blender (CMB)
• CTI Object Server (CTIOS)
• ICM Admin Workstations (AWs)
• ICM Call Routers
• ICM Peripheral Gateways (PGs)
• ICM Loggers
Support Tools Dashboard Browser Support
The Support Tools Dashboard is designed to work with Microsoft Internet Explorer
5.5 SP 2 or greater. Other browser platforms are not supported.
See Also
For related information, see:
About Support Tools Components
About the Support Tools Dashboard
About Installing Support Tools
Cisco Support Tools 1.0 User Guide About Support Tools Platforms 28
Page 29

Frequently Asked Questions About Support Tools
This section gives brief answers some to some common questions about Support
Tools. All of the subjects addressed here are described in greater detail elsewhere in
this guide.
What is the benefit of Support Tools?
Support Tools provides a common interface (the Support Tools Dashboard) to
approximately fifty utilities you can use to examine and troubleshoot Cisco ICM
components.
What ICM version does Support Tools 1.0(1) work with?
Support Tools 1.0(1) is designed to work with ICM 5.0 and 6.0 (Enterprise, Hosted
and IPCC). Earlier ICM versions are not supported.
What components make up Support Tools?
The Support Tools Server provides the engine and interface through which users
access Support Tools utilities. The Support Tools Node is the listening agent that
allows the Support Tools Server to interact with ICM components.
Where do I install the Support Tools Server?
The Support Tools Server can be installed on a client ICM Admin Workstation (AW) or
(recommended) on its own dedicated network machine.
Caution: Because Support Tools Server installs the Apache Tomcat Web Server as a
service, and with specific port requirements, DO NOT install it on a machine with a
pre-existing installation of Tomcat in use by other applications.
Where do I install the Support Tools node?
The Support Tools node should be installed on each ICM component that you want to
manage with Support Tools. See About Support Tools Platforms for a complete list of
supported components.
What performance impact will running Support Tools have on my ICM
system?
Support Tools processes run silently with minimum performance impact. It is
recommended that: 1) the Support Tools Server be installed on its on its own
dedicated machine, 2) because of the possible need to reboot, the Support Tools
node be installed on ICM components during an off-production maintenance period,
3) large log collections be performed at times of low system traffic, and 4) the
Support Tools Repository and its subdirectories be excluded from continuous virus
scans.
Who can use Support Tools?
Cisco Support Tools 1.0 User Guide Frequently Asked Questions About Support Tools 29
Page 30

Any ICM user can use Support Tools. Permissions can be set to limit access to certain
sensitive utilities in the Support Tools Dashboard to a privileged group.
What configuration does Support Tools require after installation?
While some optional configuration is available (see the Configuring Support Tools
section) no post-installation configuration is required to use Support Tools out of the
box.
Note, however, that to use Support Tools' merged log capabilities, each Support
Tools Server and node must be able to communicate with the same Simple Network
Time Protocol (SNTP or NTP) server. See How to Collect Information for a Support
Tools Installation for more information.
See Also
For related information, see:
About Support Tools Components
About Support Tools Platforms
About Support Tools Security
About Configuring Support Tools
How to Collect Information for a Support Tools Installation
How to Create Support Tools User Groups
Cisco Support Tools 1.0 User Guide Frequently Asked Questions About Support Tools 30
Page 31

Part 2: Installing and Configuring Support
Tools
Cisco Support Tools 1.0 User Guide Frequently Asked Questions About Support Tools 31
Page 32

Section I. Installing Support Tools
Cisco Support Tools 1.0 User Guide Frequently Asked Questions About Support Tools 32
Page 33

About Installing Support Tools
Installing Support Tools 1.0(1) consists of:
A. Installing the Support Tools Server to a central server with access to your ICM
system. If desired, you can install the Support Tools on multiple servers to
provide redundancy. Note, however, that data is not shared between these
separate installations.
B. Installing the Support Tools Node on each ICM node to be managed through
Support Tools. Note that the Node Agent is automatically included in the Support
Tools Server installation; a separate installation of th e node on this machine is
not required.
Support Tools Installation Tasks
To install Support Tools, follow the sequence of steps in the checklist below. Each of
these steps is described in greater detail in following sections. Cisco recommends
you review this list before proceeding with the installation .
Note: Before proceeding with installation, also be sure to review the Support Tools
Release Notes for any updates pertaining to Support Tools installation. The Release
Notes are available at the top level of the Support Tools CD
(st_10_release_notes.htm) and at http://www.cisco.com.
Caution: In some instances, the Support Tools Server and Node installations may
require a reboot to complete. For this reason, it is strongly suggested that you
perform the installation during a regular maintena nce period when machines are not
in production mode.
Step 1. Collect information for the install
Prior to installing Support Tools, collect the information that you will need to provide
during the install.
Step 2. Create the Support Tools privileged user group
Create and assign users to the Windows user group that will serve as the Support
Tools privileged user group.
Cisco Support Tools 1.0 User Guide About Installing Support Tools 33
Page 34

Step 3. Create the Distinguished User Account
The Support Tools Server installs the Tomcat Web server which runs as a service.
This service must run as a distinguished user. To do this:
A. Prior to installing the Support Tools Server, create the Distinguished User.
B. After installing the Support Tools Server, assign the Distinguished User the
requisite directory privileges.
Step 4. Review the Support Tools Server hardware and software
prerequisites
Prior to installing the Support Tools Server, ensure that the machine you are
installing it on meets the minimum hardware and software prerequisites.
Step 5. Install the Support Tools Server
The Support Tools Server installation includes:
• The Support Tools Dashboard
• The Support Tools Node
• Support Tools documentation
• Java Development Kit (JDK) 1.3.1
• Apache Tomcat 4.0.6
Step 6. Review the Support Tools Node hardware and software prerequisites
Prior to installing the Support Tools Node, ensure that the ICM nodes you are
installing it on meet the minimum hardware and software prerequisites.
Step 7. Install the Support Tools Node
Install the Support Tools Node on each ICM node you want to manage through
Support Tools. The Support Tools Nodes installation includes:
• The Support Tools Node Agent
• Support Tools Web utilities and certain Unix-style common utilities.
• Support Tools documentation
Note: Other Support Tools utilities are not part of the Support Tools installation.
Rather, these utilities already exist on each node, distributed as part of standard ICM
and Win2K installations.
Cisco Support Tools 1.0 User Guide About Installing Support Tools 34
Page 35

Step 8. Enable ports for Support Tools
Support Tools uses the following ports:
• Tomcat (the Support Tools Web server) by default listens for HTTP requests on
port 8188. It listens for HTTPS requests (used if you configure the Dashboard
Login page for SSL) by default on port 8189.
• Support Tools requires a port (39100 by default) to communicate with ICM
nodes. Ensure that this port is available on each node managed by Support Tools.
If a firewall stands between the Support Tools Server and any Support Tools node,
and/or between the Support Tools Server and remote users, you must enable these
ports on the firewall.
Step 9. Test the installation
After installing Support Tools, perform a few simple tests to verify that the install
was successful.
Post-Installation Configuration
All basic configuration required by Support Tools is set during installation.
Immediately after installation, no further configuration is necessary to begin using
the product.
However, as desired, after installation you can modify the settings chosen during
installation, or use certain optional behaviors (such as configuring the Dashboard
Login page for SSL) that require further configuration. For more information, see
About Configuring Support Tools.
Cisco Support Tools 1.0 User Guide About Installing Support Tools 35
Page 36

See Also
For related information, see:
About Support Tools Platforms
How to Collect Information for a Support Tools Installation
How to Create Support Tools User Groups
About Support Tools Server Hardware and Software Prerequisites
How to Install the Support Tools Server
About Support Tools Client Hardware and Software Prerequisites
How to Install the Support Tools Node
How to Enable Ports for Support Tools
How to Create the Distinguished User Account
How to Test the Support Tools Installation
About Configuring Support Tools
Cisco Support Tools 1.0 User Guide About Installing Support Tools 36
Page 37

How to Collect Information for a Support Tools Installation
Installation Step 1
Prior to installing Support Tools, collect the following information that you will need
to provide during the install:
For the Support Tools Server:
A. Determine the name of the Support Tools privileged user group. Determine which
users will be members of this group.
B. Determine the username, domain, and password of the distinguished user for the
Tomcat Web server.
C. Determine the IP address or fully-qualified DNS of your network time server (see
below for more).
For the Support Tools Node:
A. Ta ke an inventory of the ICM nodes on which you want to install Support Tools.
B. D etermine the IP address or fully-qualified DNS of your network time server.
C. Determine whether a firewall stands between the Support Tools Server and any
ICM nodes it will manage.
About the Network Time Server
To use Support Tools merged log capabilities, each Support Tools Server and node
must be able to communicate with the same Simple Network Time Protocol (SNTP or
NTP) server. This is required even for networks that have fully synchronized
Windows 2000 systems as the allowable machine drift is greater than the tolerance
of the log event times.
Note that Support Tools does not make time adjustment to host machines. Instead,
the time offsets are tracked in a database to use for log merging only. Your SNTP or
NTP server must support unauthenticated requests. Refer to RFC-2030 for more
details on SNTP. Most Cisco IP Routers support the SNTP / NTP protocol. Consult with
your IT department on available SNTP / NTP servers in your network.
If any system in a merged log collection cannot communicate with the SNTP server,
the merge will fail, and the outputted log will contain the alert: "Missing SNTP data
for all of the following files logs prevented merging logs:..."
Cisco Support Tools 1.0 User Guide How to Collect Information for a Support Tools Installation 37
Page 38

See Also
For related information, see:
About Installing Support Tools
How to Create Support Tools User Groups
About Support Tools Server Hardware and Software Prerequisites
How to Enable Ports for Support Tools
How to Create Support Tools User Groups
Cisco Support Tools 1.0 User Guide How to Collect Information for a Support Tools Installation 38
Page 39

How to Create Support Tools User Groups
Installation Step 2
Support Tools recognizes two categories of users:
• Privileged users have full access to all Support Tools functionality, including tools
and commands that can be used to modify system settings, registries, etc.
• Regular users have limited access to information gathering functionality only.
Tools capable of system modification are not available to regular Support Tools
users.
To Create Support Tools User Groups
Support Tools assigns privilege based on regular Windows user groups. This can be
either a local group you define on the Support Tools Server machine or a domain
group you define using Active Directory).
During the Support Tools Server installation, you are prompted to enter the name of
one (and only one) Windows user group that will serve as the Support Tools
privileged group. Users in all other groups are treated as regular Support Tools
users.
Note: The privileged user group name is case-sensitive. It must match in case its
corresponding Windows user group name.
Note: All Support Tools users must be members of the Windows Everyone group;
anonymous users will not have access to Support Tools.
After installation, if necessary, you can modify the privileged group name by running
the Support Tools Server configuration.
Creating Local Accounts on the Support Tools Server
To ensure you have local access to the Support Tools Dashboard in situations when
network authentication is unavailable (for example, due to a downed network or
authentication server) it is a good idea to create one or more local user accounts on
the Support Tools Server.
To ensure full access to all utilities, these local accounts should be made members of
a local user group named identically to your Support Tools privileged user group.
When logging into the Dashboard using a local account, enter
<hostname>\<Windows_username> as your username; for example,
my_server\my_username.
Cisco Support Tools 1.0 User Guide How to Create Support Tools User Groups 39
Page 40

See Also
For related information, see:
About Installing Support Tools
About Support Tools Utilities
How to Collect Information for a Support Tools Installation
About Support Tools Security
Cisco Support Tools 1.0 User Guide How to Create Support Tools User Groups 40
Page 41

How to Create the Distinguished User Account
Installation Step 8
The Support Tools Server installs the Tomcat Web server which runs as a service.
This service must run as a distinguished user. To do this:
A. Prior to installing the Support Tools Server, create the Distinguished User account
as described below.
B. After installing the Support Tools Server, assign the Distinguished User the
requisite directory privileges as described below.
How to Create the Distinguished User Account
Before installing the Support Tools Server, on the machine on which the
Support Tools Server will be installed, create a local or domain account to be used
for the Tomcat HTTP service.
Note: This account is only used to run the Tomcat HTTP Service and should not be
an administrator or user account for any other purpose. It is recommended that a
local account be created since this will restrict access of the Tomcat HTTP Service to
the one machine. In some scenarios using a local account for the Tomcat HTTP
Service will prevent users from authenticating with a domain account. If this
condition exists, you will need to use a domain account in stead.
How to Assign Directory Privileges to the Distinguished User
If your Support Tools Server uses NTFS directory security that limits directory access
to specific users, after installing the Support Tools Server, ensure that, in
addition to the <machine>\System account, the distinguished user for the Tomcat
HTTP Service has the following privileges to the Support Tools root directory and all
of its subdirectories:
• Modify
• Read & Execute
• List Folder Contents
• Read
• Write
For example,
Cisco Support Tools 1.0 User Guide How to Create the Distinguished User Account 41
Page 42

If the Distinguished User specified during installation is my_domain\TomcatSvcAcct,
then my_domain\TomcatSvcAcct must be given the rights listed above to the Support
Tools root directory and all of its subdirectories.
See your Windows documentation for instructions on granting NTFS security
privileges.
Cisco Support Tools 1.0 User Guide How to Create the Distinguished User Account 42
Page 43

About Support Tools Server Hardware and Software
Prerequisites
Installation Step 3
The machine on which you install the Support Tools Server must meet the following
requirements for:
• Hardware
• Software
• Network Access
Support Tools Server Hardware Prerequisites
The recommended minimum hardware configuration for your Support Tools Server is
a Pentium-class PC with 512 Mb RAM and at least 50 Mb of available hard disk space.
You can install the Support Tools Server on a standalone server (that is, one on
which no ICM products are installed), or on an existing ICM Admin Workstation (AW)
in your ICM network.
Caution: Due to possible performance issues, do not install the Support Tools Server
on a distributor AW; AW installation should be limited to client AWs.
Support Tools Server Software Prerequisites
Prior to installing the Support Tools Server, the following prerequisite software must
be installed and properly configured:
Prerequisite: Version: Notes:
Microsoft Windows
2000
Additional Software Prerequisites
The following additional software prerequisites are installed automatically with the
Support Tools Server:
• Java Runtime Environment (JRE), version 1.3.1.
Server (with service
pack 3 or 4)
Cisco Support Tools 1.0 User Guide About Support Tools Server Hardware and Software Prerequisites 43
Page 44

• Apache Tomcat 4.0.6
Caution: Because Support Tools Server installs the Apache Tomcat Web Server
as a service, and with specific port requirements, DO NOT install it on a machine
with a pre-existing installation of Tomcat in use by other applications.
Note: Optionally, if you plan to configure the Support Tools dashboard Login
page to use SSL (so that passwords are sent encrypted) an appropriate server
certificate must be installed and SSL configured in Tomcat.
Network Access to ICM Nodes
Ensure that the machine on which you will be installing Su pport Tools Server has
network access and administration rights to each ICM node on which the Support
Tools Client will be installed.
See Also
For related information, see:
About Installing Support Tools
How to Install the Support Tools Server
About Support Tools Components
How to Configure the Dashboard Login for SSL
Cisco Support Tools 1.0 User Guide About Support Tools Server Hardware and Software Prerequisites 44
Page 45

How to Install the Support Tools Server
Installation Step 4
You can install the Support Tools Server on any server with access to your ICM
system. Before installing the Support Tools Server, ensure that the machine meets
the prerequisite hardware and software requirements.
Caution: In some instances, the Support Tools Server installation may require a
reboot to complete. For this reason, it is strongly suggested that you perform the
installation during a regular maintenance period when the machine is in offproduction mode.
The Support Tools 1.0(1) CD includes a Server Install Wizard that installs:
• The Support Tools Dashboard
• The Support Tools Node
• Support Tools documentation
• Java Development Kit (JDK) 1.3.1
• Apache Tomcat 4.0.6
Caution: Because Support Tools Server installs the Apache Tomcat Web Server
as a service, and with specific port requirements, DO NOT install it on a machine
with a pre-existing installation of Tomcat in use by other applications.
To Install the Support Tools Server
Note: The installation instructions below describe only those installer dialogs that
require user input.
To install the Support Tools Server:
1. Log into the machine on which you are installing the Support Tools Server under
an account with local Windows Administrator privileges for that machine.
2. Insert the Support Tools CD in the server's CD-ROM drive.
3. From the Windows Start Menu, select Run.
4. Browse to and double-click the Support Tools Server executable file located at:
Server\setup.exe.
5. If the installer detects a previous, earlier installation of the JDK (less than 1.3.1),
you will be prompted to confirm an overwrite. Click Yes.
Cisco Support Tools 1.0 User Guide How to Install the Support Tools Server 45
Page 46

6. Specify values for each of the following:
Destination Path: Specify the location to install the Support Tools Server, or
accept the default: c:\Cisco\CCBU\supporttools. You can install the Support
Tools Server to any location on the local machine.
Note: If you plan on using the Cisco Security Agent (CSA) you can only change
the drive letter and must leave the remaining defa ult path information. This is
because CSA security rules are written specifically based on the path names.
Repository Base Directory: Specify the path to the Support Tools Server
Repository. This is the location where log files and saved registries and processes
lists are stored. You can specify any location on the Support Tools Server's
physical drive. The default is <destination_path>\Repository.
TCP/IP Port: The port the Support Tools Server uses to communicate with
Support Tools Nodes. The default is 39100.
Administration Group Name: The name of the Windows User Group that has
access to Support Tools functions capable of system modification (nonadministration group users can use Support Tools for information gathering only).
The default is Administrators.
Note: The Administration Group name is case-sensitive. It must match in case its
corresponding Windows user group name.
Distinguished User Information: Specify the domain or local machine
hostname, username, and password of the account that the Tomcat HTTP Service
will run as. For more information, see How to Create the Distinguished User
Account.
HTTP and HTTPS Ports: Specify the ports that the Tomcat Web server should
use for HTTP and HTTPS requests. The Support Tools defaults are 8188 (HTTP)
and 8189 (HTTPS).
Network Time Server: Specify the static IP address or fully-qualified DNS of
your network time server. Also specify the frequency (in minutes) with which this
machine should reconcile its clock against the network time server.
Note: As necessary, these values can also be modified after installation.
7. When the installation is complete, click Finish.
Depending on your local machine's configuration, you may be prompted by the
installer to reboot the machine to complete the installation. The Support Tools
Server and Tomcat will start automatically upon reboot.
8. If you are not prompted to reboot, the Support Tools Server and Tomcat will st art
automatically and is ready for use.
Cisco Support Tools 1.0 User Guide How to Install the Support Tools Server 46
Page 47

See Also
For related information, see:
About Installing Support Tools
About Support Tools Server Hardware and Software Prerequisites
About Support Tools Components
How to Modify Support Tools Basic Configuration
Cisco Support Tools 1.0 User Guide How to Install the Support Tools Server 47
Page 48

About Support Tools Node Hardware and Software Prerequisites
Installation Step 5
The machine on which you install the Support Tools Node must meet the following
requirements for:
• Hardware
• Software
Support Tools Node Hardware Prerequisites
The hardware requirements for ICM nodes are predetermined by the ICM software
they run.
The Support Tools Node requires a minimum of 20 Mb of available disk space.
Support Tools Node Software Prerequisites
Prior to installing the Support Tools Node, the following prerequisite software must
be installed and properly configured:
Prerequisite: Version: Notes:
Microsoft Windows
2000
Microsoft Internet
Explorer
Server (with service
pack 3 or 4)
5.5 Recommended but not required.
Used to access the Support Tools Dashboard and Support Tools
documentation.
See Also
For related information, see:
About Installing Support Tools
How to Install the Support Tools Server
About Support Tools Components
Cisco Support Tools 1.0 User Guide About Support Tools Node Hardware and Software Prerequisites 48
Page 49

How to Install the Support Tools Node
Installation Step 6
You can install the Support Tools Node on any ICM node that you want to manage
through Support Tools. Note that the Node Agent is automatically included in the
Support Tools Server installation; a separate installation of the node on this machine
is not required.
Note: Before installing the Support Tools Node, ensure that the machine meets the
prerequisite hardware and software requirements.
Caution: In some instances, the Support Tools Node installation may require a
reboot to complete. For this reason, it is strongly suggested that you perform the
installation during a regular maintenance period when the machine is in offproduction mode.
The Support Tools 1.0(1) CD includes a Node Install Wizard that installs the:
• Support Tools node agent
• Support Tools Web utilities and certain Unix-style common utilities.
• Support Tools documentation
To Install the Support Tools Node
Note: The installation instructions below describe only those installer dialogs that
require user input.
To begin the Support Tools Node installation:
1. Log into the machine on which you are installing the Support Tools Server under
an account with Windows Administrator privileges.
2. Insert the Support Tools CD in the server's CD-ROM drive.
3. From the Windows Start Menu, select Run.
4. Browse to and double-click the Support Tools Node executable file located at:
nodes\setup.exe.
5. Specify values for the following:
TCP/IP Port: The port the Support Tools Server uses to communicate with
Support Tools Nodes. The default is 39100.
Cisco Support Tools 1.0 User Guide How to Install the Support Tools Node 49
Page 50

Destination Path: Specify the location to install the Support Tools Node, or
accept the default: c:\Cisco\CCBU\supporttools. You can install the Support
Tools Node to any location on the local machine.
Note: If you plan on using the Cisco Security Agent (CSA) you can only change
the drive letter and must leave the remaining defa ult path information. This is
because CSA security rules are written specifically based on the path names.
Network Time Server: Specify the static IP address or fully-qualified DNS of
your network time server. Also specify the frequency (in minutes) with which this
machine should reconcile its clock against the network time server.
Note: As necessary, this value can also be modified after installation.
6. When the installation is complete, click Finish.
7. Depending on your local machine's configuration, you may be prompted by the
installer to reboot the machine to complete the installation. The Support Tools
Node will start automatically upon reboot.
If you are not prompted to reboot, the Support Tools Node will start
automatically and is ready for use.
See Also
For related information, see:
About Installing Support Tools
About Support Tools Node Hardware and Software Prerequisites
About Support Tools Components
How to Modify Support Tools Basic Configuration
Cisco Support Tools 1.0 User Guide How to Install the Support Tools Node 50
Page 51

How to Enable Ports for Support Tools
Installation Step 7
Support Tools has the following port requirements:
Tomcat HTTP and HTTPS Port
Tomcat bundled with Support Tools by default listens for HTTP requests on port 8188
and HTTPS requests on port 8189.
If a firewall stands between the Support Tools Server and any Support Tools node,
and/or between the Support Tools Server and remote users, you must enable these
ports on the firewall.
As desired, during installation or subsequent reconfiguration you can modify Tomcat
to use different HTTP and HTTPS ports. Note, however, that if you install the Support
Tools Server on an ICM AW, ports 80 and 443 (the standard HTTP and HTTPS ports)
are likely already being used by the ICM WebView reporting tool.
Note: Enabling the HTTPS port on a firewall is only necessary if you configure the
Dashboard Login page for SSL. For more information, see How to Configure the
Dashboard Login for SSL.
Support Tools Listening Port
Support Tools requires a port to initiate connections with and listen for responses
from ICM nodes. By default, the Support Tools Server uses port 39100. As desired,
you can specify a different port during installation, or during subsequent modification
to the Support Tool Server's configuration settings.
As part of the Support Tools installation/configuration:
• Ensure that the port used by the Support Tools Server is available on the ICM
nodes it manages.
• If a firewall stands between the Support Tools Server and any of its ICM nodes,
you must enable that port on the firewall to allow a one-way outbound
connection from the Support Tools Server.
See Also
For related information, see:
Cisco Support Tools 1.0 User Guide How to Enable Ports for Support Tools 51
Page 52

About Installing Support Tools
Cisco Support Tools 1.0 User Guide How to Enable Ports for Support Tools 52
Page 53

How to Test the Support Tools Installation
Installation Step 9
After installing Support Tools, you should test your installation by:
• Accessing the Support Tools Dashboard.
• Testing the connection to Support Tools Nodes.
To Access the Support Tools Dashboard
To access the Support Tools Dashboard:
1. Open a Web browser (ST supports IE 5.5 or greater) and in the Address line,
enter: http<hostname_or_ip_address>:<Tomcat_HTTP_port>.
Note that as shipped with Support Tools, Tomcat's default HTTP port is 8188.
This default can be modified during installation.
2. Press <Enter>. The Support Tools Dashboard Login screen opens.
3. In the Login Name field, enter <Windows_domain>\<Windows_username>. For
example, my_domain\my_username.
4. In the Password field, enter your Windows password (case-sensitive)
5. Click Login.
To Test the Connection to a Support Tools Node
To test the connection between the Support Tools Server and a node:
1. Login to the Support Tools Dashboard.
2. On the System Management screen, add the node(s) you want to test to the
system list.
3. On the System Management screen, use the Test Connection utility to confirm
the connection to individual nodes.
See Also
For related information, see:
Cisco Support Tools 1.0 User Guide How to Test the Support Tools Installation 53
Page 54

How to Use the System Management Screen
Cisco Support Tools 1.0 User Guide How to Test the Support Tools Installation 54
Page 55

Section II. Configuring Support Tools
Cisco Support Tools 1.0 User Guide How to Test the Support Tools Installation 55
Page 56

About Configuring Support Tools
All basic configuration required by Support Tools is set during installation.
Immediately after installation, no further configuration is necessary to begin using
the product.
However, at some point you may want to modify the settings chosen during
installation, or use certain optional behaviors that require further configuration.
These post-installation configuration options inclu d e:
• Modifying the basic Support Tools setting specified during installation (network
time server, privileged use group, Repository path, and TCP/IP port).
• Excluding the Support Tools Repository from continuous virus scans.
• Configuring the Dashboard Login page to use SSL (so that passwords are
encrypted).
• Installing Windows Management Instrumentation (WMI) on ICM nodes running
SQL 2000 so that this information can be reported on by the Support Tools
System Interrogate utility.
• Adding information about specific processes and services that display in the
Processes & Services screen.
See Also
For related information, see:
How to Modify Support Tools Basic Configuration
How to Configure the Dashboard Login for SSL
How to Modify the Process Information List
How to Configure SQL for Use with the System Interrogate Tool
How to Disable Continuous Virus Scan for the Repository
Cisco Support Tools 1.0 User Guide About Configuring Support Tools 56
Page 57

How to Modify Support Tools Basic Configuration
The basic configuration settings necessary to run Support Tools (network time
server, privileged use group, Repository path, and TCP/IP port) are specified during
installation.
At any point after installation you can modify these setting, as necessary. You can:
• Modify the Support Tools Server configuration
• Modify the Support Tools Node configuration
To Modify Support Tools Server Configuration
To modify configuration settings for the Support Tools Server after it has been
installed:
1. Rerun the Support Tools Server installer (Server\setup.exe) from your Support
Tools CD.
2. During the reinstallation, the Install Wizard displays the configuration settings
(TCP/IP Port, Administrator Group Name, etc.) from the current installation,
rather than the installation defaults. As desired, modify the current values for
these options:
Destination Path: Specify the location to install the Support Tools Server, or
accept the default: c:\Cisco\CCBU\supporttools. You can install the Support
Tools Server to any location on the local machine.
Repository Base Directory: Specify the path to the Support Tools Server
Depository. This is the location where log files and saved registries and processes
lists are stored. You can specify any location on the Support Tools Server's
physical drive.
Administration Group Name: The name of the Windows User Group that has
access to Support Tools functions capable of system modification (regular users
can use Support Tools for information gathering only).
Note: The Administration Group name is case-sensitive. It must match in case its
corresponding Windows user group name.
Distinguished User Information: Specify the domain or local machine
hostname, username, and password of the account that the Tomcat HTTP Service
will run as. For more information, see How to Create the Distinguished User
Account.
Cisco Support Tools 1.0 User Guide How to Modify Support Tools Basic Configuration 57
Page 58

TCP/IP Port: The port the Support Tools Server uses to communicate with
Support Tools Nodes.
Note: When changing this value, remember to ensure that the port you choose is
available on all Support Tool Nodes, and that it is enabled on firewalls standing
between the Support Tools Server and its nodes.
HTTP and HTTPS Ports: Specify the ports that the Tomcat Web server should
use for HTTP and HTTPS requests.
Network Time Server: Specify the static IP address or fully-qualified DNS of
your network time server. Also specify the frequency (in minutes) with which this
machine should reconcile its clock against the network time server.
3. When the reconfiguration is complete, click Finish.
Note: Support Tools includes several files that can be customized by users after an
initial installation. Because rerunning basic configuration overwrites these customized
files, Support Tools automatically creates backup copies (with the extension .bak).
These backups can be restored re-introduce customization.
For more information, see How to Re-Install Support Tools.
To Modify Support Tools Node Configuration
To modify configuration settings for the Support Tools Node after it has been
installed:
1. Rerun the Support Tools Node installer (nodes\setup.exe) from your Support
Tools CD.
2. During the reinstallation, the Install Wizard displays the configuration settings
(TCP/IP Port, Administrator Group Name, etc.) from the current installation,
rather than the installation defaults. As desired, modify the current values for
these options:
Destination Path: Specify the location to install the Support Tools Node. You
can install the Support Tools Node to any location on the local machine.
Network Time Server: Specify the static IP address or fully-qualified DNS of
your network time server. Also specify the frequency (in minutes) with which this
machine should reconcile its clock against the network time server.
3. When the reconfiguration is complete, click Finish.
Note: Support Tools includes several files that can be customized by users after an
initial installation. Because rerunning basic configuration overwrites these customized
files, Support Tools automatically creates backup copies (with the extension .bak).
These backups can be restored re-introduce customization.
For more information, see How to Re-Install Support Tools.
Cisco Support Tools 1.0 User Guide How to Modify Support Tools Basic Configuration 58
Page 59

See Also
For related information, see:
About Configuring Support Tools
About Support Tools Components
How to Collect Information for a Support Tools Installation
How to Create Support Tools User Groups
How to Enable Ports for Support Tools
Cisco Support Tools 1.0 User Guide How to Modify Support Tools Basic Configuration 59
Page 60

How to Disable Continuous Virus Scan for the Repository
Support Tools writes a large number of files (.log, .txt, and .zip) to the Repositor y in
the course of normal use. The quantity of these files, if used in conjunction with
continuous virus scanning, could result in a negative impact on performance.
If this performance degradation is not acceptable, Cisco recommends that you
restrict continuous virus scanning in the Repository directory and its subdirectories to
known file types only (which should omit .log and .txt file s from scanning).
If performance degradation persists, Cisco recommends that:
A. You exclude the Repository directory and its subdirectories from continuous virus
scans run on the Support Tools Server and Node machines. Instead, limit scans
on these directories to a nightly basis.
B. After disabling virus scanning for the Repository directory and its subdirectories,
use NTFS directory security to limit full access to these directories to
administrators, NT Authority\System, NT Authority\Service and any other
distinguished users that require direct access to these directories.
Caution: Steps A and B above should be used in concert with each other; that is, do
not disable continuous virus scanning without also implementing NTFS directory
security on the affected directories.
The default location of the Support Tools Repository on both the server and node is
<support_tools_root>\Repository.
See Also
For related information, see:
About Configuring Support Tools
About the Support Tools Dashboard
How to Access the Support Tools Dashboard
About Support Tools Security
Cisco Support Tools 1.0 User Guide How to Disable Continuous Virus Scan for the Repository 60
Page 61

How to Configure the Dashboard Login for SSL
If desired, for extra security, you can configure the Support Tools Dashboard Login
page to use SSL. This ensures that user passwords are encrypted when they are sent
to the Support Tools Server.
Note the only the Login page will use SSL. Once logged int o the application, all other
page requests are sent over HTTP.
To Configure the Dashboard Login for SSL
To configure the Dashboard Login page to use SSL:
1. Ensure that an appropriate server certificate is installed on your Support Tools
Server machine, and that Tomcat has been configured for SSL.
Instructions on how to configure Tomcat for SSL are available at:
http://jakarta.apache.org/tomcat/tomcat-4.0-doc/ssl-howto.html
2. In a text editor, open the web.xml file located at:
<support_tools_root>\UIServer\uiroot\WEB-INF\.
3. Locate the following closing tag: </web-app>.
4. Just before that tag, enter the following:
<security-constraint>
<web-resource-collection>
<web-resource-name>IServer</web-resource-name>
<description>
This pattern matches the url to the login page
</description>
<url-pattern>/default/serviceability/secure_login.jsp</url-
pattern>
</web-resource-collection>
<user-data-constraint>
<description>
All patterns matching the pattern above will use
confidential
data constraints, namely, all data will be encrypted over
SSL.
</description>
<transport-guarantee>CONFIDENTIAL</transport-guarantee>
</user-data-constraint>
</security-constraint>
5. Save the file.
Cisco Support Tools 1.0 User Guide How to Configure the Dashboard Login for SSL 61
Page 62

6. Restart Tomcat.
7. If a firewall stands between your Support Tools Server and Support Tools nodes
and/or remote users, remember to enable the appropriate SSL port on the
firewall. For more information, see How to Enable Ports for Support Tools.
Note: After configuring the Login page for SSL, users can continue to specify HTTP
in the URL path to the Dashboard Login page. Entering HTTPS is not necessary.
Similarly, users can continue to specify the HTTP port number in the URL. Entering
the SSL port number is not necessary. User will be automatically redirected to the
correct port.
Therefore, the URL to the Support Tools login page using SSL is identical to that used
for non-SSL:
http://<hostname>:8188
See Also
For related information, see:
About Configuring Support Tools
About the Support Tools Dashboard
How to Access the Support Tools Dashboard
About Support Tools Security
Cisco Support Tools 1.0 User Guide How to Configure the Dashboard Login for SSL 62
Page 63

How to Modify the Process Information List
The process information list stores information about specific processes and services.
The information from this file is then displayed to Support Tools u sers when they use
the Processes and Services utility.
For each process or service defined therein, the file includes:
• The name of the process
• Whether the process is known, unknown, or critical
• Explanatory text about the process
Out-of-the-box, the process information list includes information on the following
processes:
• All Cisco processes are identified as Known.
• Certain critical Microsoft OS-related processes are identified as Critical.
• Certain SQL and common Microsoft processes are identified as Known.
Modifying the Process Information List
As desired, you can modify the process information list to add new information about
processes or services. For example, if you are running a virus checker, you may want
to tag it as critical.
To modify the process information list:
1. Use a text editor to open processinfo.xml located on the Support Tools Server
at <support_tools_root>\repository\system files\
2. Using proper well-formed XML syntax, add or modify entries as follows:
Process Type: Known, Unknown or Critical. Note: Use only these designations.
Others will not parse correctly. Designating a process as Critical will prevent
Dashboard users from stopping it (on the Services screen).
Name: The name of the process or service. Can include, but does not require, an
.exe extension.
Manufacturer: Optionally, the manufacturer of the process or service.
Help: Any explanatory information you wish to display about the process or
service.
Cisco Support Tools 1.0 User Guide How to Modify the Process Information List 63
Page 64

Example: <process type="known" name="notepad.exe"
manufacturer="Microsoft"><help>This is Microsoft's Notepad text
editor</help>
When editing the file, consider the following:
• Cisco processes and services not identified in processinfo.xml are nonetheless
automatically detected by the Processes and Services utility and labeled as
Known.
• Non-Cisco processes and services not identified in processinfo.xml are labeled
as Unknown.
• Be aware that Support Tools Dashboard users will be unable to stop services and
processes tagged Critical.
• Consider that there is value in leaving less important processes and services
tagged as Unknown. It allows Support Tools users to bulk select these items for
termination when troubleshooting a node.
• Be careful to use correct XML syntax when editing the file. Incorrect syntax
makes the file unreadable to the Support Tools parser, causing all but Cisco
processes and services to display as Unknown.
Distributing a Modified Process Information List
The current processinfo.xml file is automatically propagated from the Support
Tools Server to individual Support Tools nodes when these systems are selected for
use from the Dashboard. In this way, an updated version of the file is available to
users who launch the Processes and Services utility directly from a node via
command line.
Note however that there may be instances where you may want or need to manually
copy an updated processinfo.xml file from the Support Tools Server to another
machine: for example, if you are running multiple inst allations of the Support Tools
Server, or if you have nodes that are rarely selected for use from the Dashboard, but
on which users may run the Processes and Services utility from a command line.
Cisco Support Tools 1.0 User Guide How to Modify the Process Information List 64
Page 65

See Also
For related information, see:
About Configuring Support Tools
How to Use the Processes Screen
How to Use the Services Screen
Cisco Support Tools 1.0 User Guide How to Modify the Process Information List 65
Page 66

How to Configure SQL for Use with the System
Interrogate Tool
In order for the Support Tools System Interrogate utility to access and report on an
ICM system's SQL database information, it must have access to Microsoft's Windows
Management Instrumentation (WMI). WMI is not part of a standard Wind ows SQL
install, and in most cases will therefore need to be installed separately.
To Install WMI
To install WMI:
1. Obtain the SQL 2000 Server CD, or download WMI at:
http://msdn.microsoft.com/downloads/list/wmi.asp.
2. On each ICM system that has SQL installed (and with which you want to use the
System Interrogate utility--(for example, loggers, AWs) run setup from the
\x86\OTHER\wmi directory.
Note: For additional information on installing and using WMI, see the MSDN library
at: http://msdn.microsoft.com/library/default.asp?url=/library/enus/wmisdk/wmi/sql_for_wmi.asp
See Also
For related information, see:
About Configuring Support Tools
How to Configure SQL for Use with the System Interrogate Tool
Cisco Support Tools 1.0 User Guide How to Configure SQL for Use with the System Interrogate Tool 66
Page 67

Section III. Uninstalling/Reinstalling
Support Tools
Cisco Support Tools 1.0 User Guide How to Configure SQL for Use with the System Interrogate Tool 67
Page 68

How to Uninstall Support Tools
As desired, you can uninstall the Support Tools Server or Node by following the steps
below. Note that it is not necessary to uninstall either as a precursor to reinstalling
the product.
This topic describes how to:
• Uninstall the Support Tools Server
• Uninstall the Support Tools Node
To Uninstall the Support Tools Server
Uninstalling the Support Tools Server removes the Support Tools Server, its
associated utilities, and registry entries associated with Support Tools. N ote that
uninstalling the Support Tools Server does not automatically remove Repository files,
Tomcat 4.0.6 and the JDK 1.3.1.
To uninstall the Support Tools Server:
1. Stop Tomcat.
2. Use the Windows Services panel or a similar services tool to stop the Support
Tools Appserver service, listed as Cisco CCBU Support Tools Appserver.
3. From the Windows Start menu, select Settings > Control Panel > Add/Remove
Programs > Cisco Support Tools 1.0(1).
4. Click Remove.
5. If desired, after running the uninstaller, use Windows Explorer or a similar file
management tool to delete the Support_Tools directory.
To Uninstall the Support Tools Node
Uninstalling the Support Tools Node removes the Node Agent only--it does not
remove utilities or other items that are part of a standard ICM installat ion .
To uninstall the Support Tools Node from an ICM node:
1. Use the Windows Services panel or a similar services tool to stop the Support
Tools node service, listed as Cisco CCBU Support Tools NodeAgent.
2. From the Windows Start menu, select Settings > Control Panel > Add/Remove
Cisco Support Tools 1.0 User Guide How to Uninstall Support Tools 68
Page 69

Programs > Cisco Support Tools 1.0(1).
3. If desired, after running the uninstaller, use Windows Explorer or a similar file
management tool to delete the Support_Tools directory.
Note: After removing Support Tools from an ICM node, you should also remove that
node's entry in the Support Tools System List (in the Support Tools Dashboard).
See Also
For related information, see:
How to Re-install Support Tools
How to Stop and Start the Support Tools Dashboard/Tomcat
Cisco Support Tools 1.0 User Guide How to Uninstall Support Tools 69
Page 70

How to Re-Install Support Tools
As desired, you can re-install the Support Tools Server or the Support Tools Node,
using the same steps employed for an initial installation.
The following guidelines apply to reinstalling both the Support Tools Server and the
Support Tools Node:
• It is not necessary to remove a current install prior to re-insta llation. Both the
Support Tools Server and Node can be re-installed over themselves. Note that reinstallation will not remove any files (for example, logs, registries, etc.) that have
been saved to the Repository).
• It is not necessary to stop the Tomcat Web server or any Support Tools-related
services in preparation for a re-install.
• If re-installing over a current installation, the Install Wizard displays the
configuration settings (TCP/IP Port, Administrator Group Name, etc.) from the
current installation, rather than the installation defaults.
• Following a re-install, you may want to restore backup copies of any customized
files (see next section).
Restoring Customized .bak Files After Re-installation
Support Tools includes several files that can be customized by users aft er an initial
installation.
Because re-installing the product overwrites these customized files, Support Tools
automatically creates backup copies (with the extension .bak). These backups can be
restored after re-installation to re-introduce customization.
Affected files include:
File: Typically customized to: Location:
processinfo.xml Include additional information on system
services and processes for display in the
Dashboard's Processes and Services
screens.
server.xml Configure Tomcat for SSL. <support_tools_root>\jakarta-tomcat-
<support_tools_root>\repository\system
files\
(On Support Tools Server and Nodes).
4.0.6\conf\
(On Support Tools Server only).
Cisco Support Tools 1.0 User Guide How to Re-Install Support Tools 70
Page 71

File: Typically customized to: Location:
systemlist.xml Include list of user-added Support Tools
systems recognized by the Dashboard.
web.xml Configure the Dashboard Login page for
SSL.
See Also
For related information, see:
About Installing Support Tools
<support_tools_root>\repository\system
files\
(On Support Tools Server only).
<support_tools_root>\UIServer\uiroot\WE
B-INF\
(On Support Tools Server only).
Cisco Support Tools 1.0 User Guide How to Re-Install Support Tools 71
Page 72

Part 3: Using the Support Tools Dashboard
Cisco Support Tools 1.0 User Guide How to Re-Install Support Tools 72
Page 73

About Using the Dashboard for the First Time
This topic describes some basic, important information on using the Support Tools
Dashboard that all new users should be aware of.
Accessing Utilities in the Dashboard
All Support Tools utilities are accessed from the Support Tools menu. The men u
groups utilities as:
• Cisco Web Tools: A set of four new Cisco management and troubleshooting
utilities designed specifically for use from the Support Tools D a shboard.
• Cisco Common Tools: A set of previously released Cisco management and
troubleshooting utilities.
• Common Tools: A set of common third-party utilities useful in troubleshooting
ICM components.
Note that if you are not a member of the privileged user group, certain utilities will
not be available to you and will not appear on the Support Tools menu. See About
the Support Tools Utilities for a list of these privileged tools.
Selecting a System to Work With
The first action you typically take after logging in to the Dashboard is to select the
system (ICM node) that you want to work with. M o st Support Tools utilities cannot
be used until you first select a system.
Note: The exception to this is the Log Collector; it is not necessary to select a
system prior to log collection.
Select the current system using the Select System utility. After you have completed
working with that node, you can use the Select System utility to choose a different
system to work with.
Adding a System to the System List
In order to select a system to work with, you may first need to add it to the Support
Tools system list (if it is not already defined in the list). You can do this using the
Select System or System Management screens. In order to add an ICM node to the
list:
Cisco Support Tools 1.0 User Guide About Using the Dashboard for the First Time 73
Page 74

1) The Support Tools node must have been installed on the node, and...
2) You must know the node's DNS entry or IP address.
It is important to note that the Support Tools Server has no automatic system
discovery capability. That is, it does not automatically detect and list machines in
your network running the Support Tools node. These must be added manually to the
system list.
Navigating and Refreshing Pages in the Dashboard
When using the Dashboard, it's important to navigate and refresh pages using only
the controls in the Dashboard interface.
Avoid navigating and refreshing using controls belonging to your browser, specifically
the browser Forward, Back, and Refresh commands. Dashboard pages expire as soon
as a request for a subsequent page is made; therefore, using the browser's Forward
and Back commands may return you to an expired page. Because the Dashboard
uses a frameset, its pages may not refresh properly using the browser Refresh
command.
See Also
For related information, see:
About the Support Tools Dashboard
About Support Tools Utilities
How to Use the System Management Screen
Cisco Support Tools 1.0 User Guide About Using the Dashboard for the First Time 74
Page 75

How to Access the Support Tools Dashboard
To access the Support Tools Dashboard:
1. Open a Web browser (ST supports IE 5.5 or greater) and in the Address line,
enter: http<hostname_or_ip_address>:<Tomcat_HTTP_port>.
Note that as shipped with Support Tools, Tomcat's default HTTP port is 8188.
This default can be modified during installation.
2. Press <Enter>. The Support Tools Dashboard Login screen opens.
3. In the Login Name field, enter <Windows_domain>\<Windows_username>. For
example, my_domain\my_username.
4. In the Password field, enter your Windows password (case-sensitive)
5. Click Login.
Note: Support Tools access is limited to individuals logged into your network.
Remote access via the Internet is not supported.
See Also
For related information, see:
About Support Tools Components
About the Support Tools Dashboard
How to Create Support Tools User Groups
Cisco Support Tools 1.0 User Guide How to Access the Support Tools Dashboard 75
Page 76

How to Use the Select System Screen
Use the Select System screen to:
• Select the Support Tools node you want to work with
• Add a node to the system list
You must select a system before you can interact with it through utilities in the
Support Tools Dashboard.
To open the Select System Screen, from the Dashboard menu, select Select System.
To Select the Current System
Selecting a system specifies the Support Tools node you want to work with. You
must select a system before you can interact with it through the Support Tools
Dashboard. This is required even to use utilities that connect to multiple systems,
such as registry compare.
To select the current system:
1. To select a system from the existing System list, click the Select System radio
button, and then highlight the system you want, OR...
To select a system not on the System list, click the Enter System Name radio
button, and then enter the DNS entry or IP address for that node. Optionally, to
also add this node to the System list, check Add To List Of Systems.
2. Click Select System. The node is thereafter displayed as the current system at
the top of each Dashboard Screen. Also indicated are the ICM product type(s)
installed on the system. Can include:
ICM (AWs, PGs, Call Routers, and Loggers)
Call Manager (CCM)
Collaboration Server (CCS)
CTIOS
E-Mail Manager (CEM)
Media Blender (CMB)
Note: If the system you attempt to select is not available, an error message
displays. Check that: the node's DNS or IP address was entered correctly; the
Cisco Support Tools 1.0 User Guide How to Use the Select System Screen 76
Page 77

network connection to the node is active; the Support Tools Node Agent Service is
installed and running on the node.
To Add a Support Tools Node to the System List
Adding a node to the system list makes it available for quick selection during future
Dashboard sessions. Adding a node to the system list also specifies it as the current
system.
To add a new node to the system list:
1. Click the Enter System Name radio button, and then enter the DNS entry or IP
address for that node.
2. Check Add To List Of Systems.
3. Click Select System. The node is displayed as the current system at the top of
the screen.
Note: If the system you attempt to select is not available, an error message
displays. Check that: the node's DNS was entered correctly; the network connection
to the node is active; the Support Tools Node Agent Service is installed and running
on the node.
Note: To add multiple nodes more quickly, use the System Management Screen.
See Also
For related information, see:
About Using the Dashboard for the First Time
How to Use the System Management Screen
Cisco Support Tools 1.0 User Guide How to Use the Select System Screen 77
Page 78

How to Use the System Management Screen
Use the System Management screen to:
• Add Support Tools nodes to the Support Tools system list
• Delete nodes from the system list
• Test the connection between the Support Tools Server and a node
To open the System Management screen, from the Dashboard menu, select System
Management.
To Add a Node to the System List
Adding a node to the system list makes it available for quick selection during future
Dashboard sessions.
To add a new node to the system list:
1. In the Add Systems box, add the DNS entry or IP address of one or more Support
Tools nodes.
Add each node on a separate line. Do not use a delineator (for example, a
comma) to separate entries.
Note that entries are not validated for correctness.
2. Click the Add System Button.
To Test the Connection to a Node
Testing the connection tests the connection between the Support Tools Server and
that node
To test the connection to a node:
1. In the System Management box, highlight the Support Tools node you want to
test.
2. Click the Test Connection button.
If the system you attempt to test is not available, an error message displays.
Check that: the node's DNS or IP address was entered correctly in the system
Cisco Support Tools 1.0 User Guide How to Use the System Management Screen 78
Page 79

list; the network connection to the node is active; the Support Tools Node Agent
Service is installed and running on the node.
To Delete a Node from the System List
To delete a Support Tools node from the system list:
1. In the System Management box, highlight the Support Tools node you want to
delete from the list. Use Shift-Click or Control-Click to select multiple list items.
2. Click the Delete System button.
See Also
For related information, see:
About Using the Dashboard for the First Time
Cisco Support Tools 1.0 User Guide How to Use the System Management Screen 79
Page 80

How to End a Dashboard Session
To terminate a Dashboard session, click the Logout link in the Dashboard. Dashboard
sessions also time out automatically after 60 minutes after you close your browser.
Note that:
• Sessions will not time out as long as your browser remains open.
• Terminating a session will not terminate any Dashboard processes that may be
running (for example, log collection). These will continue to run to completion.
• The Dashboard does not place a restriction on multiple logons. It is not necessary
to terminate a session in order to begin a new one.
Cisco Support Tools 1.0 User Guide How to End a Dashboard Session 80
Page 81

About Dashboard Troubleshooting
This topic lists some basic problems you may encounter accessing and using the
Support Tools Dashboard and some possible workarounds.
Login/Connection Problems
The following table describes possible errors encountered when attempting to access
or login to the Support Tools Dashboard.
Symptom: Possible Cause: Possible Workaround:
Unable to access Support Tools
Login page
AND
Browser returns a Page Not Found
(404) error.
1. Incorrect URL entered
OR
2. Incorrect port entered in URL
OR
3. Tomcat Web server not started
on Support Tools server
OR
4. Support Tools Server or LAN
connectivity down.
1. Re-type URL:
http://<hostname>:8188.
2. By default, Tomcat bundled with
Support Tools uses ports 8188
(HTTP). Confirm with your
administrator that this default has
not been modified.
3. Confirm with your administrator
that the Tomcat Web server is
started and running properly on the
Support Tools server.
4. Confirm with your administrator
that the Support Tools server
machine is up and running
properly, and that LAN connectivity
exists.
For more information, see: How to
Access the Support Tools
Dashboard
Cisco Support Tools 1.0 User Guide About Dashboard Troubleshooting 81
Page 82

Symptom: Possible Cause: Possible Workaround:
Can Access Dashboard Login Page
but cannot log in
Incorrect or invalid username or
password entered.
Re-enter username and password
as follows:
Network Users:
Name:
<windows_network_domain>\<use
rname>
Password: <network password>
Local Users:
Name: <localhost>\<username>
Password: <local_password>
Note: Local users are typically
administrators for whom Windows
user accounts have been set up on
the Support Tools Server machine.
This allows them to access the
Dashboard in scenarios when
normal network authentication is
unavailable.
For more information, see: About
Support Tools Security
Utility Problems
The following table describes possible errors encountered when attempting to use
Dashboard utilities following a successful login.
Symptom: Possible Cause: Possible Workaround:
Error returned when attempting to
select a specific host as the current
system
1. The machine, or LAN connection
to that machine, is down
OR
2. Machine is identified incorrectly
in Support Tools System List
OR
3. Support Tools Node not installed
on that machine
OR
4. Support Tools Node Agent
Service stopped on that machine
1. Confirm that the machine is
running and that LAN connectivity
is available.
2. Confirm that the computer name
for that machine as defined in the
Support Tools System List
(displayed on the Dashboard's
System Management screen) is
correct.
3. Confirm with your administrator
that the Support Tools Node is
installed on that machine.
4. Confirm with your administrator
that the Support Tools Node Agent
Service is started on that machine.
For more information, see: How to
Use the System Management
Screen
Cisco Support Tools 1.0 User Guide About Dashboard Troubleshooting 82
Page 83

Symptom: Possible Cause: Possible Workaround:
Certain utilities are missing from the
Dashboard menus (e.g., Services
screen, Processes screen)
Error Processing Request message
returned when attempting to run a
utility
See Also
You are not a member of the
Support Tools privileged user
group.
1. That utility is not installed on the
current system
OR
2. Appserver service not stated on
the Support Tools Server
Certain utilities are only available
for members of the Support Tools
privileged user group. Contact your
administrator if you believe you
should have access to these
utilities.
For more information, see: About
the Support Tools Dashboard
1. Some utilities are only available
for use on specific ICM
components. Consult the online
Help for that utility to determine if
its use is limited to specific
components.
For more information, see: About
Support Tools Utilities
2. Confirm with your administrator
that the Support Tools Appserver
service is started on the Support
Tools Server machine.
For more information, see: How to
Stop and Start the Support Tools
Server
For related information, see:
How to Access the Support Tools Dashboard
About the Support Tools Dashboard
About Support Tools Utilities
How to Use the System Management Screen
About Support Tools Security
Cisco Support Tools 1.0 User Guide About Dashboard Troubleshooting 83
Page 84

Part 4: Using Support Tools Utilities
Cisco Support Tools 1.0 User Guide About Dashboard Troubleshooting 84
Page 85

Section I. Using Cisco Web Utilities
Cisco Support Tools 1.0 User Guide About Dashboard Troubleshooting 85
Page 86

About Cisco Web Utilities
Cisco Web utilities are a set of Cisco-authored utilities specifically designed for use
with the Support Tools 1.0(1). They are installed to all Support Tools nodes.
All Cisco Web utilities can be run either from the Support Tools Dashboard or via
command line on an individual node. Command-line access to individual nodes can
be local or remote (via methods like TelNet, pcAnywhere, etc.). However, they were
primarily designed for Web access through the Dashboard.
All Cisco Web utilities allow you to save (to the Repository) and download file images
of the data they collect.
Note: Within the Dashboard, the functionality of some Cisco Web utilities is
distributed among several different screens (pages). For example, Processes and
Services utility functionality is divided among a Processes screen and a Serv ices
screen.
Cisco Web Utilities at a Glance
Utility Name: Description: Installed On: Dashboard
Log Collector Use to collect and view log files from
Registry Compare
and Repair
System Interrogate Use to display system information
Processes and
Services
ICM nodes. Allows you to create
merged logs from two ICM nodes for
comparative analysis.
Use to view, compare and repair ICM
node registry entries.
(for example, OS, hardware, ICM,
SQL).
Use to view and stop Processes and
services running on an ICM node.
All Support
Tools nodes
All Support
Tools nodes
All Support
Tools nodes
All Support
Tools nodes
Privileged
Users Only:
X
X
External GUI-
-No
Dashboard or
CommandLine Access:
Cisco Support Tools 1.0 User Guide About Cisco Web Utilities 86
Page 87

Section II. Using Cisco Web Utilities
from the Dashboard
Cisco Support Tools 1.0 User Guide About Cisco Web Utilities 87
Page 88

How to Use the System Interrogate Screen
Use the System Interrogate screen to view information about the current system.
You can:
• View system information on:
i. Operating system and hardware
ii. ICM node
iii. Third-party products
• Save current system information to a file
To open the System Interrogate screen, from the Dashboard menu, select Cisco Web
Tools > System Interrogate.
To View System Information
To view operating system and hardware information for the current system:
1. Click the Interrogate System button. The screen displays:
OS/Hardware Information
Field: Description:
OS Type The operating system and the partition on which the OS is installed.
OS SP Level OS Service Pack number.
OS Version OS build number and service pack.
CPU Info Processor type and speed in Mhz.
Total Physical Memory Amount of physical memory installed on the system.
Free Physical Memory Amount of physical memory not in use at the time of the query.
Total Virtual Memory Total amount of virtual memory the system is configured to support.
Free Virtual Memory Amount of virtual memory available at the time of the query.
Disk Space Disk space available and used on all local disk drives.
Page File Size Maximum size of the paging file.
ICM Information
Cisco Support Tools 1.0 User Guide How to Use the System Interrogate Screen 88
Page 89

Field: Description:
ICM Version Major version number of the ICM product installed on the System.
Build Number Build number of the currently installed ICM product.
ICM NODE Unique identifier for an ICM node (for example, PG2A). The ICM node types
Engineering Special
(Patch) Level
Patches Applied
Install Drive Drive on which ICM product is installed.
Install Side In a duplexed system, the side of the ICM that was last installed.
Customer Name(s) Customer name, or names, for a CICM.
Current Instance Defines which customer is selected for processing by the AW.
include:
y Router
y Logger
y PG
y AW
y Distributor
Indicates how many Engineering Special (patches) have been installed on the
system.
Actual patches applied to the system can fall into two categories:
y Limited Release Patches (LRPs)
y RollUp Patches (RUPs)
MDS Buffer
Domain Controller The Domain Controller or Active Directory server.
Version/Patch Info Version/patch information for all ICM components installed.
ICM Message Delivery System component information. Includes:
y Buffer Limit
y Buffer Max Free
y Clients
Cisco Support Tools 1.0 User Guide How to Use the System Interrogate Screen 89
Page 90

Third-Party Information
Field: Description:
SQL Server
Internet Information
Server (IIS)
ODBC Drivers
ICM database information. Includes:
y SQL Service Pack Version
y SQL Config Settings
y SQL Database Memory Available
y SQL Database Memory In Use
y SQL Disk Space Used
y SQL Disk Space Free
Information on the IIS Web server. Includes:
y IIS Settings
y Version
Information on Open Data Base Connectivity drivers utilized by various ICM
components. Includes:
y ODBC driver versions
y Service Pack Number
y Hot Fixes
JTAPI Information on the Java Telephony API component of the IPCC solution.
Includes:
Version
To Save System Information to a File
As desired, you can save current system information to a file in the Support Tools
Repository (for example, as a backup before editing).
To save system information to a file:
1. If desired, click the Refresh button to ensure that the latest system data is
displayed on the screen.
2. Click the Save button. A Save dialog box opens, displaying a default name for the
file (Sysquery_<Hostname>_<Datetime>.xml).
3. Accept the default name or enter an alternate. Note that:
Files can only be saved to the Repository. Entering a path while saving has no
effect.
Cisco Support Tools 1.0 User Guide How to Use the System Interrogate Screen 90
Page 91

All files are saved to an XML-formatted text file. While you can enter any
extension you like, this will not affect the format in which the file is saved.
4. Click OK. The file is saved to the Repository on the Support Tools Server.
Subsequent to saving, you can view or download saved files by selecting System
interrogate > Files from the Dashboard menu.
See Also
For related information, see:
About Cisco Web Utilities
How to Configure SQL for Use with the System Interrogate Tool
Cisco Support Tools 1.0 User Guide How to Use the System Interrogate Screen 91
Page 92

How to Use the Registry Screen
Use the Registry screen to:
• View the ICM Windows registry settings for the current system
• Save registry settings to a file
To open the Registry screen, from the Dashboard menu, select Cisco Web Tools >
Registry.
Note: This utility is available to privileged users only . It will not appear on the
Dashboard menu for non-privileged users.
To View an ICM Registry
The Registry screen automatically displays the ICM windows registry settings for the
current system. Only ICM registry settings can be viewed through the screen;
registry settings for other applications are not visible.
To view an ICM registry:
1. Click the Get Registry button. The Cisco branch of the current system's registry
displays.
2. Expand any key branch by clicking its right arrow. View any key by clicking its
name.
Note: If you suspect the system's registry settings have changed since you first
connected to it, click the Refresh button to refresh the view of the current registry.
Viewing Registries for Multiple Customer Instances
For machines with multiple customer instances, the Registry screen only retrieves
and displays the registry settings for one instance at a time. By default, the screen
retrieves the registry for the first customer instance it encounters based on an
alphabetical listing of instance names.
To retrieve the registry for a different instance:
1. In the registry tree, navigate to and expand the ICM branch. All customer
instances are displayed. The currently loaded instance will display an arrow to the
left of its name, indicating content.
2. Click the name of the instance whose registry you want to retrieve. A message
Cisco Support Tools 1.0 User Guide How to Use the Registry Screen 92
Page 93

displays stating: "Data for this key has not been fetched."
3. Click the Fetch Registry link to retrieve registry data for that instance.
To Save Registry Settings to a File
As desired, you can save current registry settings to a file in the Support Tools
repository (for example, as a backup before editing). Note that:
• Support Tools automatically downloads registry files at the time you connect to a
system. If you suspect the system's registry settings have changed since you
first connected to it, click the Refresh button to download the current registry.
• Saving saves the complete Cisco branch of your registry tree--not just the
currently expanded portion of that branch.
To save registry settings to a file:
1. Click the Save button. A Save dialog box opens, displaying a default name for the
file (Registry<Hostname><Datetime>.xml).
2. Accept the default name or enter an alternate. Note that:
Files can only be saved to the Repository. Entering a path while saving has no
effect.
All files are saved to an XML-formatted text file. While you can enter any
extension you like, this will not affect the format in which the file is saved.
3. Click OK. The file is saved to the Repository on the Support Tools Server.
Subsequent to saving, you can view or download saved files by selecting Registry >
Files from the Dashboard menu.
See Also
For related information, see:
About Cisco Web Utilities
How to Use the Files Screen
How to Use the Compare Registries Screen
For more information on specific ICM registry keys and settings, see:
Cisco TAC ICM Technical Notes on Cisco.com
Your ICM (Enterprise, IPCC, and Hosted) Technical Documentation
Cisco Support Tools 1.0 User Guide How to Use the Registry Screen 93
Page 94

How to Use the Files Screen
Use the Files screen to work with Support Tools files previously saved to the Support
Tools Repository. You can:
• View saved files
• Rename saved files
• Delete saved files
• Download saved files
You can access the following saved file types through the screen:
• System Interrogate files
• Registry files
• Registry Comparison files
• Process files
• Services files
To open the Files screen, from the Dashboard menu, select Cisco Web Tools >
<file_type> > Files. For example to view saved registry files, select Registry >
Files. The Files screen automatically displays all of the files of that type currently
stored in the Repository.
Note: This utility is available to privileged users only . It will not appear on the
Dashboard menu for non-privileged users with the following exception: nonprivileged users can view System Interrogate files.
To View a Saved File
To view a saved file:
1. Check the file's Select check box.
2. Click the View button. The contents of the file displays.
3. To return to the file list, on the Dashboard menu, select <file_type> > Files.
Cisco Support Tools 1.0 User Guide How to Use the Files Screen 94
Page 95

To Rename a File
To rename a saved file:
1. Check the file's Select check box.
2. Click the Rename button. A Save dialog opens, displaying the current name of
the file.
3. Modify the name as desired. Note that all files are saved to an XML-formatted
text file. While you can enter any extens ion you like, this will not affect the
format in which the file is saved.
To Delete a File
To delete a file from the Repository:
1. Check the file's Select check box.
2. Click the Delete button.
To Download a File
As desired, you can download a copy of a file from the Repository to your local
computer.
To download a file from the Repository:
1. Check the file's Select check box.
2. Click the Download button. A popup window opens containing two links:
Download Text and Download XML.
3. To download a file:
As plain text with no XML formatting, right-click the Download Text link and
select Save Target As from the popup menu. A Save As dialog box opens.
With any XML formatting intact, right-click t he Download XML link and select
Save Target As from the popup menu. A Save As dialog box opens.
4. Specify the location where you want to save the download.
5. Click Save.
Cisco Support Tools 1.0 User Guide How to Use the Files Screen 95
Page 96

How to Use the Compare Registries Screen
Use the Compare Registries screen to:
• Compare the ICM Windows registry settings between:
i. The current system and another system
ii. The current system and a registry file stored in the Support Tools repository
iii. Two registry files in the repository
• Copy values from one system to another, or from a file to the current system
• Save a comparison to a file in the Repository
To open the Compare Registries screen, from the Dashboard menu, select Cisco Web
Tools > Compare Registries.
Note: This utility is available to privileged users only . It will not appear on the
Dashboard menu for non-privileged users.
To Compare the Current System to Another
To compare registry settings from the current system to those of another system:
1. Select the Compare to Another System radio button.
2. Click the Compare Registries button. The systems list displays, showing all nodes
defined in Support Tools.
3. Highlight the system you want to use.
4. Click the Compare Registries button.
To Compare the Current System to a Saved Registry File
To compare registry settings from the current system to those of a registry file
previously saved in the Support Tools Repository:
1. Select the Compare to Saved Registry File radio button.
2. Click the Compare Registries button. A list of registry files saved in the
Repository displays.
Cisco Support Tools 1.0 User Guide How to Use the Compare Registries Screen 96
Page 97

3. Select the file you want to compare to.
4. Click the Compare Registry to File button.
To Compare Two Saved Registry Files
To compare the contents of registry settings from two registry files previously saved
to the Support Tools Repository:
1. Select the Compare Two Saved Registry Files radio button.
2. Click the Compare Registries button. A list of registry files saved in the
Repository displays.
3. Select the files you want to compare.
4. Click the Compare Registries Files button.
Understanding the Compare Registries Display
Once you have selected the systems or files you want to compare, the Compare
Registries screen displays the comparison in a three-pane view as shown in this
example:
A. The top pane shows the systems or files being compared. System 1, the current
system or first file being compared, is color-coded in brown bold. System 2 is
color-coded in green italic bold.
B. The left-hand pane shows a tree view of keys which includes keys from both
systems.
Cisco Support Tools 1.0 User Guide How to Use the Compare Registries Screen 97
Page 98

C. The right-hand pane shows (at the top) the path for the selected key, and
(beneath) values for that key. Each value is composed of three parts: a name, a
type, and data. These are color coded as follows:
Parts of a value are identical on both systems are shown in black normal font .
Parts of a value that exist only on System 1 are shown in brown bold.
Parts of a value that exist only on System 2 are shown in green italic bold.
Note: For information on how to copy key values from one system to another, see
To Copy Keys Between Registries and Files below.
Viewing Registry Keys for Multiple Customer Instances
For machines with multiple customer instances, the Compare Registries screen only
retrieves and displays the registry settings for one instance at a time. By default, the
screen retrieves the registry for the first customer instance it encounters on each
machine based on an alphabetical listing of instance names. (The currently loaded
instance will display an arrow to the left of its name, indicating content.)
To retrieve the registry for a different instance:
1. In the registry tree, navigate to and expand the ICM branch. All customer
instances are displayed. The currently loaded instance will display an arrow to the
left of its name, indicating content.
2. Click the name of the instance whose registry you want to retrieve. A message
displays stating: "Insufficient data available for comparison. "
3. Click the Compare Registries Again link to retrieve registry data for that instance.
To Copy Key Values Between Registries and Files
After initiating a registry comparison, you can copy specific key values from on e
system to another in order to synchronize similar systems, or to correct missing or
incorrect values on a system.
You can copy key values from one system to another or from a file to the current
system. Note that you cannot copy values between files, or from a system to a file.
Caution: Incorrect modification of registry settings can have serious consequences.
Do not change ICM registry settings unless it is absolutely necessary and you are
fully aware of the ramifications. It is strongly advised that you first save a registry
comparison to a file before making changes.
To copy registry key values:
1. With a comparison displayed, navigate the registry tree to the key whose value
Cisco Support Tools 1.0 User Guide How to Use the Compare Registries Screen 98
Page 99

you want to copy.
2. Select the value by clicking its radio button. Values whose data cannot be copied
(for example, because the values are already identical, or because you are
comparing two files) will not have a radio button.
Note: For an explanation of key value color-coding, see Understanding th e
Compare Registries Display above.
3. Click the appropriate Copy button (Copy 1 > 2 or Copy 2 >1) to indicate the
direction in which the value should be copied. If you are comparing a system to a
file, you can only copy to the system.
4. Continue selecting additional values, as desired. Values selected for copying are
listed in the lower-right portion of the screen. As necessary, to undo:
The most recent selection, click the Cancel button
All selections, click the Cancel All button
5. To proceed with changes, click the View Changes/Submit button. All pending
changes are listed.
6. Click Submit to finalize your changes.
To Save a Registry Comparison to a File
As desired, you can save a registry comparison to a file in the Support Tools
repository for future study or reference. Saving saves the complete retrieved Cisco
branch of both registry trees--not just the currently expanded portion of that branch.
Note that in the case of machines with multiple customer instances, only values from
the currently retrieved instances are included in the file.
To save a registry comparison to a file:
1. Click the Save button. A Save dialog box opens, displaying a default name for the
file (RegCompare_<system1>_<system2>_<Datetime>.xml)...
2. Accept the default name or enter an alternate. Note that:
Files can only be saved to the Repository. Entering a path while saving has no
effect.
All files are saved to an XML-formatted text file. While you can enter any
extension you like, this will not affect the format in which the file is saved.
3. Click OK. The file is saved to the Repository on the Support Tools Server.
Subsequent to saving, you can view or download saved files by selecting Compare
Registries > Files from the Dashboard menu.
Cisco Support Tools 1.0 User Guide How to Use the Compare Registries Screen 99
Page 100

See Also
For related information, see:
About Cisco Web Utilities
How to Use the Files Screen
How to Use the Registry Screen
For more information on specific ICM registry keys and settings, see:
Cisco TAC ICM Technical Notes on Cisco.com
Your ICM (Enterprise, IPCC, and Hosted) Technical Documentation
Cisco Support Tools 1.0 User Guide How to Use the Compare Registries S creen 100
 Loading...