

Page 1

Cisco StadiumVision SV-4K Media Player Deployment Guide
Release 4.0
September 8, 2015
Cisco Systems, Inc.
www.cisco.com
Cisco has more than 200 offices worldwide.
Addresses, phone numbers, and fax numbers
are listed on the Cisco website at
www.cisco.com/go/offices.
Page 2

THE SPECIFICATIONS AND INFORMATION REGARDING THE PRODUCTS IN THIS MANUAL ARE SUBJECT TO CHANGE WITHOUT NOTICE.
ALL STATEMENTS, INFORMATION, AND RECOMMENDATIONS IN T HIS MANUAL ARE BELIEVED TO BE ACCURATE BUT ARE PRESENTED
WITHOUT WARRANTY OF ANY KIND, EXPRESS OR I MPLIED. USERS MUST TAKE FULL RESPONSIBILITY FOR THEIR APPLICATION OF ANY
PRODUCTS.
THE SOFTWARE LICENSE AND LIMITED WARRANTY FOR THE ACCOMPANYING PRODUCT ARE SET F ORTH IN THE INFORMATION PACKET
THAT SHIPPED WITH THE PRODUCT AND ARE INCORPORATED HEREIN BY THIS REFERENCE. IF YOU ARE UNABLE TO LOCATE THE
SOFTWARE LICENSE OR LIMITED WARRANTY, CONTACT YOUR CISCO REPRESENTATIVE F OR A COPY.
The Cisco implementation of TCP header compression is an adaptation of a program developed by the University of California, Berkeley (UCB) as part of
UCB’s public domain v ersion of the UNIX operating sys tem. All rights reserved. Copyright © 1981, Regents of the University of California.
NOTWITHSTANDING ANY OTHER WARRANTY HEREIN, ALL DOCUMENT FILES AND SOFTWARE OF THESE SUPPLIERS ARE PROVIDED “AS
IS” WITH ALL FAULTS. CISCO AND THE ABOVE-NAMED SUPPLIERS DISCLAIM ALL WARRANTIES, EXPRESSED OR IMPLIED, I NCLUDI NG,
WITHOUT LIMITATION, THOSE OF MERCHANTABILITY, FITNESS FOR A PARTI CULAR PURPOSE AND NONINFRINGEMENT OR ARISING
FROM A COURSE OF DEALING, USAGE, OR TRADE PRACTICE.
IN NO EVENT SHALL CISCO OR I TS SUPPLIERS BE LIABLE FOR ANY INDIRECT, SPECIAL, CONSEQUENTI AL, OR INCIDENT AL DAMAGES,
INCLUDING, WI THOUT LIMITATION, LOST PROFITS OR LOSS OR DAMAGE TO DATA ARISING OUT OF THE USE OR INABILITY TO USE THI S
MANUAL, EVEN IF CISCO OR ITS SUPPLIERS HAVE BEEN ADVISED OF THE POSSIBILITY OF SUCH DAMAGES.
Cisco and the Cisco logo are t rademarks or registered trademarks of Cisco and/or its affiliates in the U. S. and other countries. To view a list of Cisco
trademarks, go t o this URL: www.cisco.com/go/trademarks. Third-party trademarks mentioned are the property of their respective owners. The use of
the word partner does not imply a partnership relationship between Cisco and any other company. (1110R)
Google, GooglePlay, Android and certain other marks are trademarks of Google Inc.
Any Internet Protocol (IP) addresses and phone numbers used in this document are not intended to be act ual addresses and phone numbers. Any
examples, command display output, network topology diagrams, and other figures included in the document are shown f or illustrative purposes only. Any
use of act ual IP addresses or phone numbers in illustrative content is unintentional and coincidental.
Copyright © 2015 Cisco Systems, Inc. All rights reserved.
Page 3
Contents
About This Guide
Revision History vii
Getting Started with the SV-4K Media Player
Workflow Summary to Get Started with the SV-4K Media Player 1
Information About the SV-4K Media Player Hardware 2
Operating Environment for the SV-4K Media Player 3
Dimensions of the SV-4K Media Player 3
Ports on the SV-4K Media Player 4
Cabling Information for the SV-4K Media Player 6
Other Cabling Considerations 6
SV-4K RS-232 Serial Pinout 7
Guidelines for Mounting the SV-4K 7
LEDs on the SV-4K Media Player 8
IRRemote for Cisco StadiumVision Director 11
IR Remote Sensor and IR Extender 11
Default Settings for the SV-4K Media Player 12
RS-232 Default Settings on SV-4K 12
vii
1
Other Default Settings 12
Feature Summary for the SV-4K Media Player 12
Cisco StadiumVision Director Software Feature Map for the SV-4K 13
Unsupported SV-4K Hardware Features 14
Key Considerations for the SV-4K 15
Firmware Provisioning on the SV-4K 15
Auto-Provisioning on the SV-4K 16
IR Receiver for the SV-4K 16
Storage on the SV-4K 17
Synchronization on the SV-4K 17
Switch Communication on the SV-4K 17
© Cisco Systems, Inc. All rights reserved.
iii
Page 4

Best Practices for SV-4K Deployment 18
Using Bar Code Scanners and TVLabels at Installation Time 18
Installer Workflow Example 18
Planning the SV-4K Media Player Deployment
Workflow Summary to Plan Deployment of the SV-4K Media Player 19
Zones, Groups and Locations Planning 20
TV Planning for the SV-4K Media Player 20
TV Requirements for SV-4K Compliance 20
Guidelines for TVand Content Resolution with the SV-4K Media Player 21
Restrictions for Control Panel TV Display Specifications with the SV-4K Media Player 21
Configuring Resolution Under Control Panel Display Specifications 22
Network and Switch Planning 23
External DHCPServer Requirements 23
DHCPConfiguration Guidelines for the SV-4K Media Player 24
Connected Stadium Switch Requirements 24
Deploying the SV-4K Media Player
Workflow Summary to Deploy the SV-4K Media Player for the First Time 27
Prerequisites for SV-4K Deployment 28
Provisioning the SV-4K Firmware 28
Obtaining the SV-4K Firmware 29
19
27
Uploading the SV-4K Firmware From the Management Dashboard 29
Configuring the SV-4K for Auto-Registration 31
Configuring the SV-4K Global Settings 32
Information About Time Protocols and Synchronization on the SV-4K Media Players 32
How to Configure NTP and PTPon the SV-4K Media Players 34
Restrictions for PTP on the SV-4K Media Players 35
Guidelines for NTP and PTP on the SV-4K Media Players 35
NTPGuidelines 35
PTPGuidelines 36
Modifying the PTP and NTP Configuration on the SV-4K Media Players 37
Verifying PTPOperation for the SV-4K Media Player 39
Verifying the Deployment of the SV-4K Media Player
Verifying the SV-4K Startup Sequence 41
Startup Sequence Flow for the SV-4K Media Player 41
Monitoring and Maintaining the SV-4K Media Player
41
44
iv
© Cisco Systems, Inc. All rights reserved.
Page 5

Performing a Regular Reboot of the SV-4K Media Players 44
Verifying SV-4K Media Player Compliance 44
Clearing the Storage on the SV-4K Media Player 46
Clearing Registries on the SV-4K Media Player by Restoring Factory Defaults 48
Troubleshooting the SV-4K Media Player
Before You Begin Troubleshooting the SV-4K 49
RMA Process for the SV-4K 49
SV-4K Diagnostic URL 49
Troubleshooting PTPOperation for the SV-4K Media Player 50
Symptom: Local PNGs are not synchronized across SV-4K devices 50
Symptom: Playlists do not advance to the next content item on the SV-4K 51
Troubleshooting SV-4K Hardware Operation 52
Symptom: "Please Insert Card" message on SV-4K startup screen 52
Symptom: Pwr and Eth LEDs are not lit and no signs of activity on the SV-4K 53
Symptom: SV-4K Err or Err/Upd LEDs blinking 53
Symptom: SV-4K rebooting automatically after startup 53
Troubleshooting SV-4K TV and Video Display Problems 54
Symptom: Black screen on the SV-4K TVdisplay/no multicast video stream 54
Symptom: No local control when external volume strategy configured 55
Appendix: Management Dashboard Commands for the SV-4K Media Player
Auto-Registration Commands for the SV-4K Media Player 57
49
57
DMP Commands for the SV-4K Media Player 57
DMP Install Commands for the SV-4K Media Player 58
Global Settings Commands for the SV-4K Media Player 58
Monitoring Commands for the SV-4K Media Player 59
Switch Commands for the SV-4K Media Player 59
TV Commands for the SV-4K Media Player 59
Appendix: Serial Commands for the SV-4K Media Player
New SV-4K Serial Commands for RS-232 TV Control 61
Appendix: SV-4K and DHCP Option 43
© Cisco Systems, Inc. All rights reserved.
61
63
v
Page 6

vi
© Cisco Systems, Inc. All rights reserved.
Page 7
About This Guide
This guide is for installers and administrators of Cisco StadiumVision venues who are
responsible for both the physical installation and initial configuration of the SV-4k media
player with TVdisplays.
Revision History
Table 1 provides information about when this document was changed.
Table 1. Revision History Table
Date Description
September 8, 2015 Updated the document with the following changes:
l Added topic "Operating Environment for the SV-4K Media
Player" on page3.
l Reorganized the Management Dashboard commands content
in "Appendix: Management Dashboard Commands for the
SV-4K Media Player" on page57.
l Performed general document and topic cleanup.
June 30, 2015 Updated the document with the following changes:
l Enhanced the "Troubleshooting the SV-4K Media Player" on
page49 and added several new troubleshooting topics.
l Added the "RMA Process for the SV-4K" on page49.
l Revised the "SV-4K Diagnostic URL" on page49.
May 1, 2015 Updated for Cisco StadiumVision Director Release 4.0.0-525 with
the following changes:
l Added information about the audio output port line-level
impedences in the "Ports on the SV-4K Media Player" on
page4.
l Added support for the SPDIFport.
© Cisco Systems, Inc. All rights reserved.
vii
Page 8

Revision History
Date Description
May 1, 2015 (continued)
March 20, 2015 Initial version for Cisco StadiumVision Director Release 4.0.0-402.
l Modified the figure for auto-registration settings in
"Configuring the SV-4K for Auto-Registration" on page31
l Removed the requirement for a second reboot of the SV-4K
device after configuring PTPsettings in "Modifying the PTP
and NTP Configuration on the SV-4K Media Players" on
page37.
viii
© Cisco Systems, Inc. All rights reserved.
Page 9

Getting Started with the SV-4K Media Player
This module provides a workflow summary with information about the SV-4K hardware,
software features, and key considerations before deploying the SV-4K media player.
It is intended for anyone who is responsible for installing and configuring the SV-4K
media player, and for anyone interested in understanding its general operation.
It includes the following topics:
l Workflow Summary to Get Started with the SV-4K Media Player, Page 1
l Information About the SV-4K Media Player Hardware, Page 2
l Feature Summary for the SV-4K Media Player, Page 12
l Key Considerations for the SV-4K, Page 15
l Best Practices for SV-4K Deployment, Page 18
Workflow Summary to Get Started with the SV4K Media Player
NOTE: Before you deploy the SV-4K media player, be sure that
you have alreadyinstalled Cisco StadiumVision Director and that
you are familiar with the Cisco StadiumVision Director software.
Table 2 provides a summary of the tasks and related information to get familiar with the
SV-4K media player.
© Cisco Systems, Inc. All rights reserved.
1 of 68
Page 10

Table 2. Getting Started Task Summary
Getting Started Task For more information see:
Understand the SV-4K hardware.
l "Ports on the SV-4K Media Player" on
page4
l "Cabling Information for the SV-4K
Media Player" on page6
l "LEDs on the SV-4K Media Player" on
page8
l "IRRemote for Cisco StadiumVision
Director" on page11
l "Default Settings for the SV-4K Media
Player" on page12
Understand the SV-4K features.
l "Unsupported SV-4K Hardware
Features " on page14
l "Cisco StadiumVision Director Software
Feature Map for the SV-4K" on page13
Understand the Differences Between the SV-4K and
Cisco DMP 4310G.
"Key Considerations for the SV-4K" on
page15.
Review deployment best practices. "Best Practices for SV-4K Deployment" on
page18
Perform pre-deployment site planning and
configuration.
"Planning the SV-4K Media Player
Deployment" on page19
Information About the SV-4K Media Player Hardware
This section includes the following topics:
l Operating Environment for the SV-4K Media Player, Page 3
l Dimensions of the SV-4K Media Player, Page 3
l Ports on the SV-4K Media Player, Page 4
l Cabling Information for the SV-4K Media Player, Page 6
l Guidelines for Mounting the SV-4K, Page 7
l LEDs on the SV-4K Media Player, Page 8
l IRRemote for Cisco StadiumVision Director, Page 11
l Default Settings for the SV-4K Media Player, Page 12
2 of 68
© Cisco Systems, Inc. All rights reserved.
Page 11
Operating Environment for the SV-4K Media Player
Table 3 describes the supported environment for proper operation of the SV-4K media
player.
Table 3. Supported Operating Environment for the SV-4K
Operating Environment Supported Conditions
Temperature 0° C to 40° C
Humidity Up to 90% maximum humidity, non-condensing
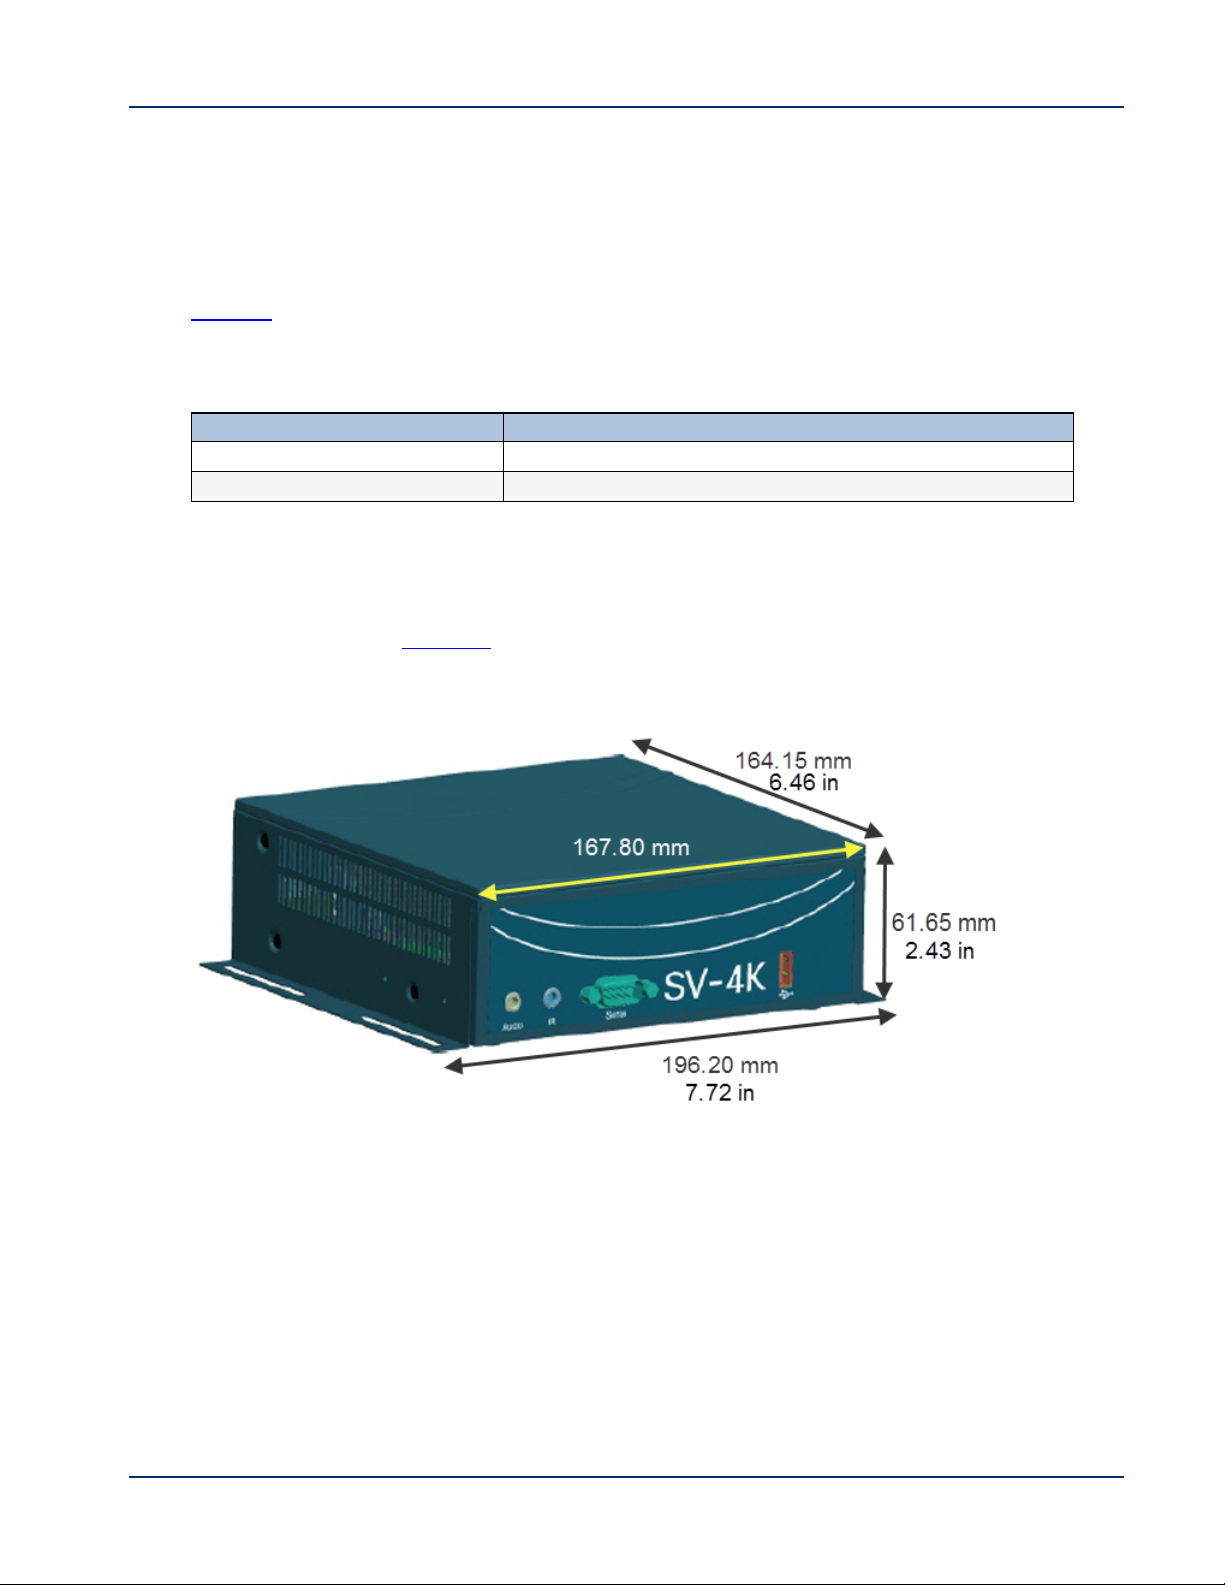
Dimensions of the SV-4K Media Player
The SV-4K media player is larger than the
Cisco DMP 4310G. Figure 1 shows the dimensions of the SV-4K device.
Figure 1. SV-4K Dimensions
© Cisco Systems, Inc. All rights reserved.
3 of 68
Page 12
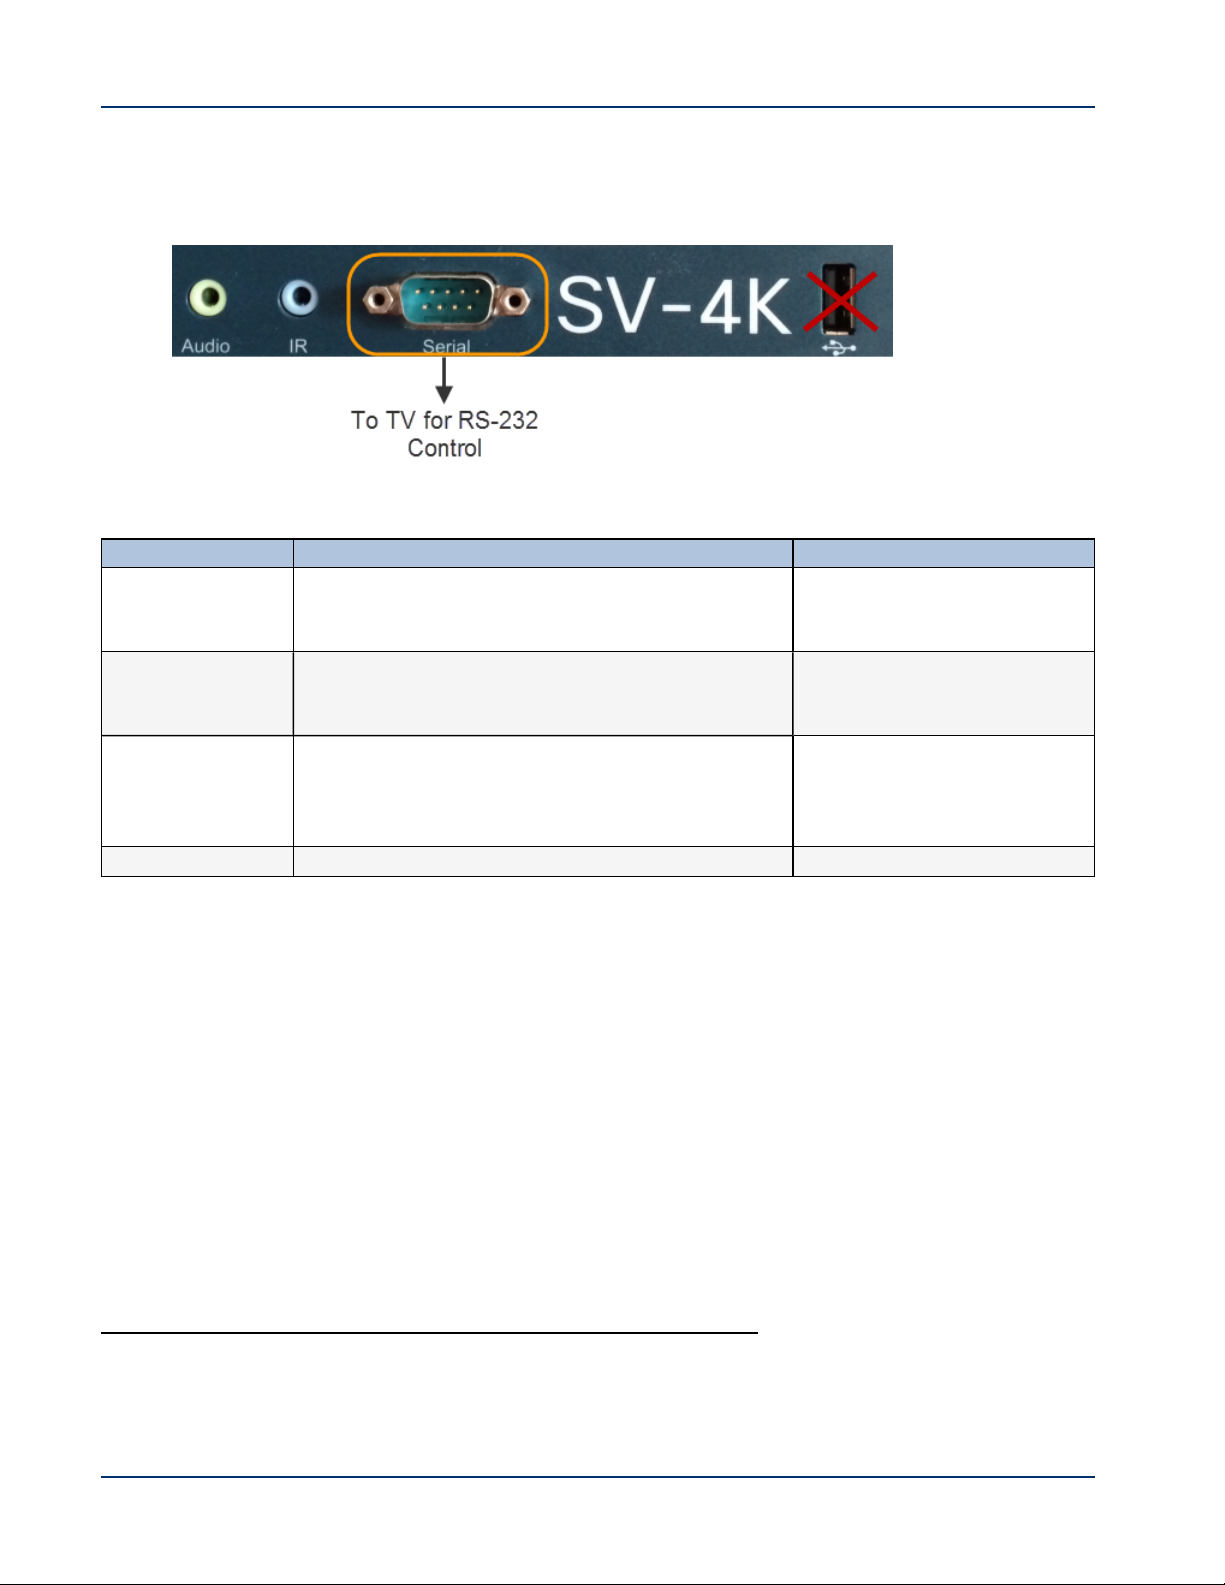
Ports on the SV-4K Media Player
Figure 2. SV-4K Front Panel
Table 4. SV-4K Front Panel Port Descriptions
Port Name Usage Description
1
Audio
IR The SV-4K does not have an internal infrared
Serial Connect to TV serial port for control of the TV via
USB Not supported. USB 2.0 port
Required only for connections that do not support
audio, such as HDMI-to-DVI connections from
SV-4K to the TV.
receiver. You must use the included IR extender
cable to support an IRremote.
RS-232 commands.
3.5 mm female audio
connector for analog stereo
signal.
3.5 mm infrared in/out.
RS-232 serial interface with
male DE-9 connector. This
connection is used for
TVcontrol.
1
The analog audio out port is designed to drive line-level impedances in the higher Ohm range, such as
for commercial grade speaker systems. Headphones are typically just a few Ohms and not recommended
for use with this port.
4 of 68
© Cisco Systems, Inc. All rights reserved.
Page 13
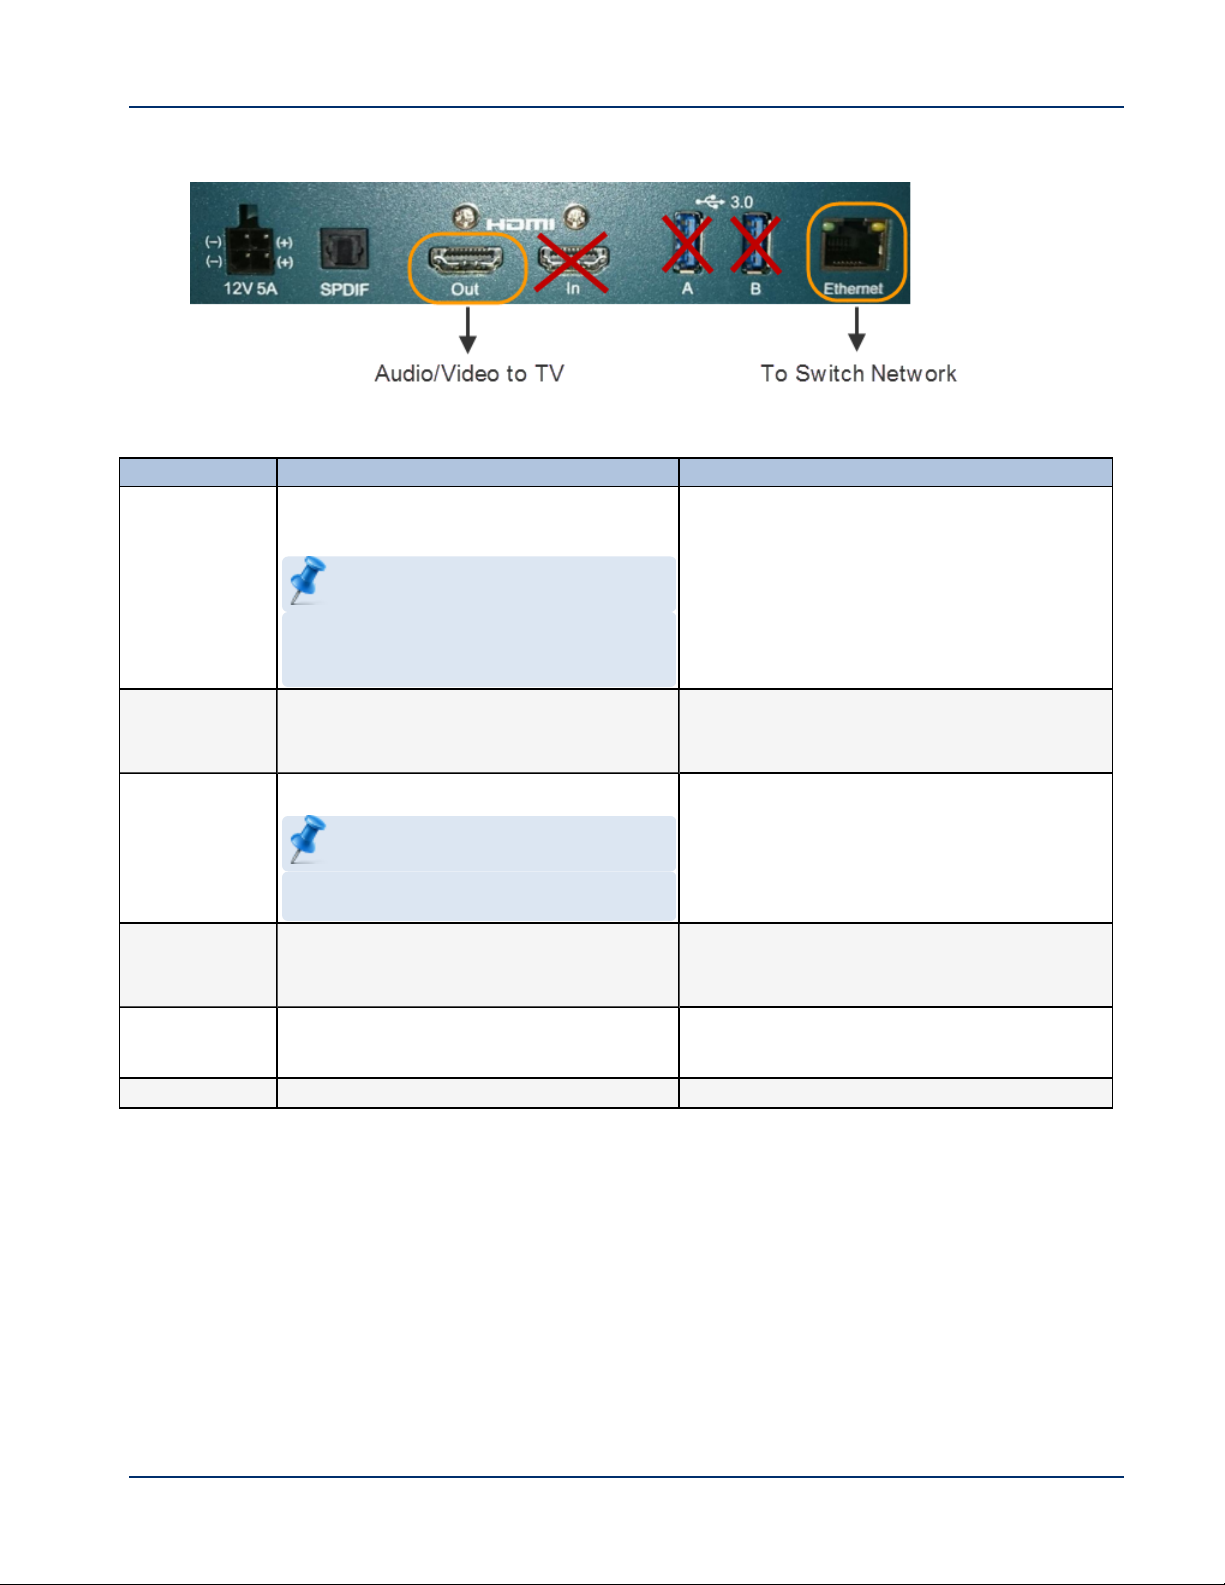
Figure 3. SV-4K Rear Panel
Table 5. SV-4K Rear Panel Port Descriptions
Port Name Usage Description
12V 5A Not for production use in
60-watt/12-volt/5-amp power supply.
Cisco StadiumVision Director.
NOTE: The SV-4K is qualified for Cisco Sta-
diumVision Director using Power over Ethernet (PoE+) via the Ethernet port.
SPDIF Provides audio from the primary video
Sony/Phillips Digital Interface.
routed by Cisco StadiumVision
Director to the SPDIFport.
HDMIOut Connect to HDMI In port on the TV.
High-Definition Multimedia Interface
(HDMI) output connector to transmit digital
audio/video content.
NOTE: Consumer Electronics Control
(CEC) is not supported.
HDMI In Not supported. HDMIinput connector to receive digital
audio/video content from an HDMI-
enabled source.
USB 3.0
A B
Not supported. Two USB3.0 ports
(backward-compatible).
Ethernet Connect to switch network for PoE+. RJ-45 10/100/1000 Base-T Ethernet port.
© Cisco Systems, Inc. All rights reserved.
5 of 68
Page 14

Cabling Information for the SV-4K Media Player
Table 6 describes the cables that ship with the SV-4K hardware.
Table 6. Cables Shipped with the SV-4K Hardware
Cable Length Purpose
HDMI-to-HDMI 2 M (Required) Connects the SV-4K HDMIOut (male) to the HDMIIn
(male) port on the TV for digital audio and video support.
RS-232 DE-9
DCE/DTE
Straight Through
IRExtender 2 M (Required for IRRemote) Connects to the IRport on the SV-4K front
Other Cabling Considerations
It is important for you to assess the ports available on the TVs at the venue so that you
can get any additional adapters or cable types that are needed to connect the SV-4K to
the TV.
2 M (Required for TVcontrol) Connects the SV-4K serial DTE (male) port
to a serial DCE (female) port on the TV.
panel to serve as an infrared signal receiver for the SV-4K.
Null Modem (Crossover) Cable
The SV-4K is a DTEserial device. Therefore, if the TV also has a DTE (male) serial
port, then you will need to use a null modem (crossover) cable for the TV control
connection.
HDMI-to-DVIAdapter
If the TVdoes not support HDMI In, then you cannot use the standard HDMI-toHDMIcable that ships with the SV-4K. However, if the TVsupports a DVI-D
connection, then you can acquire a DVIadapter for the HDMIcable to make the HDMIto-DVIconnection.
Since this type of connection only supports video, you will also need to connect the SV4K audio port to the audio input ports on the TV if audio support is required.
6 of 68
© Cisco Systems, Inc. All rights reserved.
Page 15

Audio Cables
Audio cables are not generally needed. However, there are a couple of cases where
you might need to make an audio connection to the SV-4K:
l If you need to support an HDMI-to-DVIconnection from the SV-4K to the TV since
this supports video only.
l If you need to connect to external audio distribution equipment when audio is to
be distributed within an area.
SV-4K RS-232 Serial Pinout
Table 7 provides the pinout for the DE-9 serial connector on the front panel of the SV-
4K.
Table 7. SV-4K Serial DE-9 Pinout
Pin Description Pin Description
1 NC 2 Receive data into the
3 Transmit data out of the
device
5 Ground 6 NC
7 RTS 8 CTS
9 NC
device
4 Available 5V@500mA
Guidelines for Mounting the SV-4K
Consider the following guidelines before mounting the SV-4K:
l Does not fit in Sunbrite cases that might be in use for some Cisco DMP 4310G
outdoor deployments.
l Full dimensions with mounting brackets:
196.20 mm long / 164.15 mm wide / 61.65 mm high
(7.72 in long / 6.46 in wide / 2.43 in high)
l Weight: 28 oz / 793.8 grams.
l Attach to the wall using the brackets on each side of the device using 4 screws
(one for each bracket slot) that measure between 3.5 mm and 4.2 mm in diameter.
l Avoid blocking the right side panel so that LEDs can be seen for troubleshooting.
l Ensure all air vents are clear for proper cooling.
© Cisco Systems, Inc. All rights reserved.
7 of 68
Page 16

l Choose a location that works with the required IRextender cable for infrared
support.
Unlike the DMP 4310G, there is no IR receptor built into the SV-4K device.
IMPORTANT: The tested range is about 20 ft. However,
to achieve this range you must be sure to have the
receiver facing outward. The receiver is enclosed and not
visible.
LEDs on the SV-4K Media Player
The SV-4K has 8 LEDs in two banks of 4 on the right panel of the device. (Figure 4)
shows normal operation for the SV-4K on a Cisco StadiumVision network.
Figure 4. SV-4K LED Bank
NOTE: Some of the LEDs apply to hardware features that are
not enabled for Cisco StadiumVision Director Release 4.0.
Table 8 identifies the SV-4K LEDs that are applicable to operation in Cisco
StadiumVision Director Release 4.0.
8 of 68
© Cisco Systems, Inc. All rights reserved.
Page 17

Table 8. SV-4K LED Descriptions
LED LED LED LED
1 Svr
N/A
2 WiFi
N/A
3 Eth
(green)
Flashes
when
connecting
to Ethernet
network.
Displays
when
connected.
5 Err (red)
Flashes a
certain
number of
times to
indicate
errors
(Table 9).
6 Upd
(yellow)
Flashes
when the
device is
being
upgraded.
The
Update
7 Pwr
(green)
Displays
when the
device is
powered
on and not
in reset
mode.
and Error
LEDs will
flash in
unison to
indicate
an error
during
firmware
update
(Table
10).
4 µSD
N/A
8 Bsy(green)
Flashes when
there is filesystem activity.
© Cisco Systems, Inc. All rights reserved.
9 of 68
Page 18
Table 9. Error (Err) LEDDescriptions
Error LED
(number of
flashes)
Description
2 Unspecified error.
3 Device is in network recovery mode and using DHCPOption 43 to contact Cisco
StadiumVision Director for provisioning.
4 No upgrade file found.
5 Failed to load kernel module.
or
OSinitialization failed (Init shell script failed).
6 Board is not capable of running the current firmware version.
7 A piece of on-board hardware is not working correctly.
8 Problem related to storage device (USBor SD card). (Not applicable in Release 4.0)
9 Problem related to the registry/NAND.
10 The autorun script encountered a load/run error.
11 WiFi related error.
12 Unable to find a bootable image.
13 The root file system has failed verification, which is used to detect whether the file
system has been tampered with. You can recover a unit that is showing this error code
by performing an update using safe mode.
14 Boot loader failure.
Table 10. Update (Upd) LED Descriptions
Update LED(number
of flashes)
Description
2 Erase failed.
3 Write failed.
4 Verify failed.
5 Failed to find UBI partition.
6 Attempt to write unsigned CFE to unit with secure boot enabled.
7 Failed to find UBIpartition.
8 Failed to create/attach UBI partition.
9 Unexpected error.
10 Upgrade script exited abnormally.
11 Upgrade took longer than expected.
12 Update completed but update file could not be deleted.
10 of 68
© Cisco Systems, Inc. All rights reserved.
Page 19

IRRemote for Cisco StadiumVision Director
Both the Cisco DMP 4310G and the SV-4K media players use the same IRRemote
device shown in Figure 5. Generally, the IRRemote is used for TV control. However,
even if you are not using the IR Remote for TVcontrol, it is important to realize that the
IRRemote also allows you to get information to troubleshoot the media player.
NOTE: The IRRemote is not automatically shipped with the
Cisco StadiumVision Director media players and must be
ordered separately.
Figure 5 shows the description for each of the buttons on the Cisco StadiumVision
Director IRRemote.
Figure 5. Cisco StadiumVision IRRemote Button Descriptions
IR Remote Sensor and IR Extender
Unlike the DMP 4310G, the IR extender is required for the SV-4K media player
because the SV-4K does not have its own IR receiver. For more information, see the
"Guidelines for Mounting the SV-4K" on page7.
The IR remote also is a critical troubleshooting tool so it is important to ensure that all
media players can be IR-controlled even if it is not needed during normal operation.
© Cisco Systems, Inc. All rights reserved.
11 of 68
Page 20

Default Settings for the SV-4K Media Player
The SV-4K device ships from the factory with certain default settings. Upon running the
start-up sequence and in communication with Cisco StadiumVision Director, the SV-4K
default settings are changed.
RS-232 Default Settings on SV-4K
After processing the HTML run-time module from Cisco StadiumVision Director, the
SV-4K is set to the following RS-232 default settings:
NOTE: The SV-4K uses the same defaults as the Cisco DMP
4310G, which matches the default settingsof most TVs.
l Baud—9600 (factory default is 115200)
l Parity—None
l Data Bits—8
l Stop Bits—1
l Flow Control—None (factory default is hardware flow control only)
For information about the new RS-232 commands for the SV-4K, see "Appendix: Serial
Commands for the SV-4K Media Player" on page61.
Other Default Settings
By default, the following functionality is disabled on the SV-4K media player:
l Secure Shell (SSH)
l Video encoding
Feature Summary for the SV-4K Media Player
This section includes the following topics:
l Cisco StadiumVision Director Software Feature Map for the SV-4K, Page 13
l Unsupported SV-4K Hardware Features , Page 14
12 of 68
© Cisco Systems, Inc. All rights reserved.
Page 21

Cisco StadiumVision Director Software Feature Map for the SV-4K
Table 11 provides an at-a-glance view of the supported software features in Cisco
StadiumVision Director for the SV-4K.
Table 11. Software Feature Map for the SV-4K
Cisco StadiumVision Director Feature SV-4K DMP 4310G
Auto-Registration Yes Yes
Bulk Administration Tool (BAT) Yes Yes
Cisco StadiumVision Director Remote Server No Yes
Closed Caption Yes
Content Replacement
Content Synchronization Between Same Media Player Models
(not between SV-4K and 4310 models)
Custom applications using GAR No Yes
Custom fonts (through Software Manager) Yes Yes
Dual Video Regions
External Content Integration Yes Yes
Event Script Scheduler
Flash content (SWF) No Yes
Group/Zone configuration Yes Yes
Luma key support for second video region.
Management Dashboard Commands
Management Dashboard Firmware configuration Yes Yes
Management Dashboard Model Filtering
Management Dashboard Monitoring Yes Yes
Network Time Protocol (NTP) configuration Yes Yes
Precision Time Protocol (PTP) configuration Yes No
POS Integration with Dynamic Menu Board (DMB) GAR
application
POS Integration with DMB using Widgets
Proof of Play (PoP) Yes Yes
Proxy device support
Self-Service Content (SSC) No Yes
Suite Ordering No Yes
Ticker (legacy) from Control Panel Setup No Yes
Ticker (RSSin External Content Integration) Yes Yes
Touchscreen No Yes
TV Control using RS-232 and IRRemote Yes Yes
Widgets tool Yes Yes
1
2
2
2
3
2
Yes Yes
Yes Yes
Yes No
Yes Yes
Yes No
Yes Yes
Yes Yes
No Yes
Yes Yes
4
No Yes
Yes
1
Content replacement for the SV-4K is only supported through an update of the playlist.
© Cisco Systems, Inc. All rights reserved.
13 of 68
Page 22

Performing content replacement from the Control screen using the content replacement icon is
unsupported.
2
Introduced in Cisco StadiumVision Director Release 4.0.
3
SV-4K supports a subset of original Dashboard commands. See the "Appendix:
Management Dashboard Commands for the SV-4K Media Player" on page57.
4
Cisco DMP 4310G proxy support works only with scripts that are being run exclusively on
Cisco DMP 4310G devices.
Unsupported SV-4K Hardware Features
The following SV-4K hardware features are not supported in Cisco StadiumVision
Release 4.0:
l Dolby digital audio AC3+ decode
NOTE: AC3 decodes are automatically supported by the SV-4K
hardware. However, the SV-4K passes AC3+ through to the TV.
Therefore, to obtain AC3+ decode, the TV display must support
AC3+ decode functionality.
l TV control via HDMI/CEC
l Unsupported hardware ports:
o
HDMI In
o
SD (and microSD)
o
USB (2.0 and 3.0)
l Video and audio encoding and local streaming
l WiFi
IMPORTANT: The SV-4K does not support content import
and/or playback using the HDMI In, SD, or USB ports.
14 of 68
© Cisco Systems, Inc. All rights reserved.
Page 23

Key Considerations for the SV-4K
When you deploy an SV-4K, there are several things that you should know about its
operation.This section highlights some of the important differences from the Cisco DMP
4310G that you should be aware of when deploying the SV-4K media player.
This section includes the following topics:
l Firmware Provisioning on the SV-4K, Page 15
l Auto-Provisioning on the SV-4K, Page 16
l IR Receiver for the SV-4K, Page 16
l Storage on the SV-4K, Page 17
l Synchronization on the SV-4K, Page 17
l Switch Communication on the SV-4K, Page 17
Firmware Provisioning on the SV-4K
The SV-4K firmware is not provisioned the same way as the Cisco DMP 4310G. The
primary difference is that the SV-4K firmware upgrade cannot be manually launched by
Management Dashboard DMP command, but is done automatically when the SV-4K
device boots.
IMPORTANT: Before you power on the SV-4K device for the
first time, be sure that you have completed the following
configuration and tasks:
l Switch configuration, including the required LLDP for
proper POE+ operation.
l DHCPserver configuration.
l Uploaded the released firmware to Cisco StadiumVision
Director.
l Configured the auto-registration settings for the SV-4K to
properly provision its firmware.
However there are some common configuration tasks. Table 12 provides a summary of
the firmware provisioning tasks for the SV-4K and DMP 4310G in the Management
Dashboard.
© Cisco Systems, Inc. All rights reserved.
15 of 68
Page 24

Table 12. Summary of Firmware Provisioning Tasks on the SV-4K and DMP 4310G
Firmware Provisioning Tasks SV-4K
Upload firmware to Cisco StadiumVision Director in the
Management Dashboard
Configure "Firmware image to use" and "init.version" under Auto
Registration Settings.
Upgrade the firmware from the Management Dashboard by
selecting DMPs and running the Firmware Upgrade command to
push the firmware to the device.
1
The DMP 4310G also uses the "init.build" property which does not apply to the SV-4K media
Yes Yes
Yes Yes
No Yes
DMP
4310G
1
player.
Auto-Provisioning on the SV-4K
l The SV-4K is automatically provisioned with global configuration settings from
Cisco StadiumVision Director—but not in the same way as occurs for the Cisco
DMP 4310G.
As part of the start-up sequence, the SV-4K retrieves the Cisco StadiumVision
Director configuration, which includes all of the global settings for the SV-4K, such
as NTPconfiguration, jitter settings, and so on.
l The SV-4K global settings are configured in the Management Dashboard by
going to:
SV Director Configuration > Global DMP Settings > SV-4K Settings.
l The SV-4K configuration in Cisco StadiumVision Director is provisioned each
time that the SV-4K device boots.
IMPORTANT: If you are running Cisco StadiumVision Director
on a virtual server, then you should reference a reliable
NTPserver running on a bare metal server, rather than relying on
a clock from a VM environment that can drift and is not accurate.
NTPfor Cisco StadiumVision Director is configured using the
TUI, and can be the same external server as is used for the Cisco
DMP 4310G devices. For more information, see the Cisco
StadiumVision Director Server Administration Guide.
IR Receiver for the SV-4K
There is not an embedded IRreceiver on the SV-4K. You must use the IRextender
cable to use the IRRemote.
16 of 68
© Cisco Systems, Inc. All rights reserved.
Page 25

Storage on the SV-4K
The SV-4K provides a minimum of 120 GB of total solid-state storage, with 100
GBavailable for content.
To find information about available storage, select an SV-4K device in the
Management Dashboard device list. Then, go to Settings > Storage in the device
details area of the dashboard.
NOTE: The amount of available storage shown in the
Management Dashboard reflects the total amount of space
available on the SSD, not the actual storage pool available for
content.
Synchronization on the SV-4K
The SV-4K supports synchronization of content played among a group of SV-4K
devices using the Network Time Protocol (NTP) and Precision Time Protocol (PTP).
NTPand PTPsettings are provisioned globally for all SV-4K media players.
The Cisco StadiumVision Director server is provisioned as the default NTPsource for
both the Cisco DMP 4310G and SV-4K media players. When PTPis configured, only
the SV-4KPTPmaster derives its clock using NTP.
IMPORTANT: If you are running Cisco StadiumVision Director
on a virtual server, then you should reference a reliable
NTPserver running on a bare metal server, rather than relying on
a clock from a VM environment that can drift and is not accurate.
NTPfor Cisco StadiumVision Director is configured using the
TUI, and can be the same external server as is used for the Cisco
DMP 4310G devices. For more information, see the Cisco
StadiumVision Director Server Administration Guide.
Switch Communication on the SV-4K
The SV-4K communicates with the Cisco Connected Stadium switch using the
required Link Layer Discovery Protocol (LLDP) rather than MediaNet. The SV-4K
determines available power (when using PoE+) over LLDP.
© Cisco Systems, Inc. All rights reserved.
17 of 68
Page 26

Best Practices for SV-4K Deployment
Using Bar Code Scanners and TVLabels at Installation
Time
NOTE: This practice requires that you have already defined your
Location names in Cisco StadiumVision Director.
To increase the speed and accuracy of media player deployment:
l Prepare TVlabels with the Cisco StadiumVision Director Location name in bar
code format.
l Obtain a bar code scanner to record the Location bar code and MACaddress from
the media player.
l Use the BATtool to upload data to Cisco StadiumVision Director.
Installer Workflow Example
An installer can follow these steps to use a bar code scanner with TV labels:
1. Mount the TV and media player.
2. Connect the TV and media player cables.
3. Attach a pre-printed label to TV.
4. Scan the Location bar code on the TV.
5. Scan the MAC address bar code on the media player.
6. Provide scanner to the supervisor or network administrator who downloads the
data and formats it to be compatible with the Cisco StadiumVision Director BAT
TSV format.
For more information, see the Cisco StadiumVision Director Bulk Adminstration
Tool guide.
18 of 68
© Cisco Systems, Inc. All rights reserved.
Page 27

Planning the SV-4K Media Player Deployment
This module describes aspects of the SV-4K deployment that need to be considered
and executed prior to the actual installation and provisioning of the SV-4K media
players.
It is intended for installers, network administrators, and administrators of Cisco
StadiumVision Director.
Workflow Summary to Plan Deployment of the SV-4K Media Player
Table 13 provides a summary of the tasks and related information to plan for the
deployment of the SV-4K media player.
Table 13. Deployment Planning Task Summary
Planning Task For more information see:
Plan Groups/Zones/Locations. "Zones, Groups and Locations Planning" on the
next page
Perform TV qualification.
Prepare for SV-4K installation.
Determine cabling requirements. "Best Practices for SV-4K Deployment" on
Plan the Connected Stadium switch
configuration.
l "TV Requirements for SV-4K Compliance" on
the next page
l "Guidelines for TVand Content Resolution
with the SV-4K Media Player" on page21
l "Using Bar Code Scanners and TVLabels at
Installation Time " on page18
l "Guidelines for Mounting the SV-4K" on
page7
page18
"Connected Stadium Switch Requirements" on
page24
© Cisco Systems, Inc. All rights reserved.
19 of 68
Page 28

Planning Task For more information see:
Plan the DHCP server configuration. "External DHCPServer Requirements" on
page23
Determine the network time (clocking) sources. "How to Configure PTPfor the SV-4K Media
Player" on page1
Zones, Groups and Locations Planning
IMPORTANT: Mixed groups that contain both SV-4K devices
and Cisco DMP 4310G devices are not recommended. Cisco
StadiumVision Director will provide a warning about such groups
if you attempt to configure them.
TV Planning for the SV-4K Media Player
This section includes the following topics:
l TV Requirements for SV-4K Compliance, Page 20
l Guidelines for TVand Content Resolution with the SV-4K Media Player, Page 21
l Restrictions for Control Panel TV Display Specifications with the SV-4K Media
Player, Page 21
l Configuring Resolution Under Control Panel Display Specifications, Page 22
TV Requirements for SV-4K Compliance
For the optimal experience with the SV-4K media player, be sure that the site
TVdisplays are compliant with the following specifications and resolution:
l High-bandwidth Digital Content Protection (HDCP)
l High-Definition Multimedia Interface (HDMI)
l RS-232 serial interface
l Capable of 1080p HDdisplay
20 of 68
© Cisco Systems, Inc. All rights reserved.
Page 29

Guidelines for TVand Content Resolution with the SV-4K
Media Player
The SV-4K is set to run in full high-definition (HD) 1920x1080 mode by the runtime
software.
IMPORTANT: It is highly recommended that your TV supports a
minimum of 1080p HDresolution. Lower resolution displays
might need some additional configuration of the TV Display
Specification configuration in Cisco StadiumVision Director to
attempt to optimize the display. In some cases these TVs might
cut off an area of the screen, rather than resize the graphics to the
area as the Cisco DMP 4310G does.
The quality and expected resolution for video and graphics display for the SV-4K can
be affected by several things:
l The resolution of the TVdisplay and its ability to negotiate to 1080p.
l The configuration of the sv4k.videoMode serial command in the Display
Specifications area of the Cisco StadiumVision Director Control Panel:
o
When set to a resolution, this value specifies the SV-4K signal resolution.
o
If the resolution is set to auto-detection, then the TV negotiates the signal
resolution with the SV-4K.
l The template region size.
l The size of the original graphic and whether any scaling needs to happen.
NOTE: For more information about content and template
guidelines, see the Content Creation Design and Specifications
Guide for the DMP 4310G and SV-4K.
Restrictions for Control Panel TV Display Specifications
with the SV-4K Media Player
Before you configure TVdisplay specifications for use with the SV-4K media player,
consider the following restrictions:
l The following Basic Info options are not supported:
o
X Position / Y Position
o
X Scaling / Y Scaling
© Cisco Systems, Inc. All rights reserved.
21 of 68
Page 30

Configuring Resolution Under Control Panel Display Specifications
The Display Specification for a TV can either be configured for auto-detection of
resolution by the TV, or set to a fixed resolution in the Cisco StadiumVision Director
Control Panel.
Figure 6. SV-4K and Display Signal Resolution
22 of 68
l If the resolution is set to auto-detection, then the TV and the SV-4K negotiate the
signal resolution (Figure 6).
l If a resolution is specified in the Control Panel, then the content is resized
according to that setting. This is the requested SV-4K signal resolution shown in
red in Figure 6.
l If the signal resolution of the SV-4K is set below 1920x1080 for any reason, the
content will be resized according to the template in use.
l The template in use and the corresponding content must match the signal
resolution.
To set the resolution for a display, complete the following steps:
1. Go to Control Panel > Setup > Devices > Display Specifications.
2. Select the TV that you want to configure.
© Cisco Systems, Inc. All rights reserved.
Page 31

3. Click Serial Commands.
4. Find the sv4k.videoMode command (Figure 7).
Figure 7. SV-4K Resolution Setting in Display Specifications
5. Specify one of the values in Table 14 according to the desired resolution
behavior.
Table 14. SV-4K Resolution Values
sv4k.videoMode Value Resolution
1920x1080x60p Fixed at 1080p
1280x720x60p Fixed at 720p
Not Configured Auto-detected
Auto Auto-detected
6. Click Save.
7. Reboot the SV-4K device.
Network and Switch Planning
This section includes the following topics:
l External DHCPServer Requirements, Page 23
l Connected Stadium Switch Requirements, Page 24
External DHCPServer Requirements
The SV-4K media player requires configuration of an external DHCPserver to provide
IPaddressing to the devices. This service can be configured using Cisco Network
Registrar (CNR) or another external server at the venue.
This section highlights some of the key requirements to plan your DHCP configuration.
However, it does not describe all of the details for you to perform the configuration.
© Cisco Systems, Inc. All rights reserved.
23 of 68
Page 32

NOTE: For more information and details about DHCP
configuration, see the Cisco Connected Stadium Design Guide
available on ciscoet.com to qualified Cisco StadiumVision
partners.
DHCPConfiguration Guidelines for the SV-4K Media Player
Consider the following guidelines before configuring a DHCPserver for the SV-4K:
l Do not configure the Connected Stadium Switch as the IOSDHCPserver for
Cisco StadiumVision.
l Be sure to set the DHCP server for an infinite lease of IPaddresses to the SV-
4Kdevices.
l If you are supporting a deployment with both Cisco DMP 4310G and SV-4K
devices, you will need to configure an Option 43 string for each model.
l If the DHCP server is limited to a single Option 43 string per DHCP pool (such as
with a Cisco DHCP server), then be sure to configure a separate DHCP scope for
the SV-4K media players.
l Configure the DHCP Option 60, Vendor Class Identifier string:
o
SV-4K string for North America: "Cisco SV-4K-NA"
o
SV-4K string for all other regions: "Cisco SV-4K-ROW"
l Configure the converted DHCPOption 43, Vendor Specific Option URL:
http://x.x.x.x:8080/StadiumVision/dmp_v4/scripts/boot.brs
where “x.x.x.x” is the IP address of the Cisco StadiumVision Director server.
IMPORTANT: The option 43 string must be converted to TLV
format for compatibility with the SV-4K. For more information,
see "Appendix: SV-4K and DHCP Option 43" on page63
Connected Stadium Switch Requirements
This section highlights some of the key requirements to plan your Connected Stadium
switch configuration. However, it does not describe all of the details for you to perform
the configuration. For configuration details, see the Cisco Connected Stadium Design
Guide available on ciscoet.com to qualified Cisco StadiumVision partners.
Switch Configuration Requirements for the SV-4K Media Player
24 of 68
Be sure that the Connected Stadium switch meets the following configuration
requirements to support the deployment of the SV-4K media players:
© Cisco Systems, Inc. All rights reserved.
Page 33

l Supports PoE+ (IEEE 802.3at) with 30W of port power.
l Configures Internet Group Management Protocol (IGMP).
IGMPv1, IGMPv2, and IGMPv3 are supported.
l Configures Link Layer Discovery Protocol (LLDP), which is required to determine
available power using PoE+ and also supports the IOSCivic Location feature.
NOTE: For more information and details about the switch
configuration, see the Cisco Connected Stadium Design Guide
available on ciscoet.com to qualified Cisco StadiumVision
partners.
© Cisco Systems, Inc. All rights reserved.
25 of 68
Page 34

26 of 68
© Cisco Systems, Inc. All rights reserved.
Page 35

Deploying the SV-4K Media Player
This module describes the workflow and tasks to deploy the SV-4K media player.
It is intended for Cisco StadiumVision Director administrators and installers.
Workflow Summary to Deploy the SV-4K Media Player for the First Time
Table 15 provides a summary of the tasks and related information to deploy the SV-4K
media player.
IMPORTANT: It is essential to follow the order of deployment
tasksprovided in Table 15 to be sure that the SV-4K device can
be properly provisioned.
Table 15. SV-4K Deployment Task Workflow
Deployment Task For more information see:
Configure the Connected Stadium switch for SV-4K
operation (LLDP, IGMP).
l "Connected Stadium Switch
Requirements" on page24
Configure the DHCPserver with Option 60 and
Option 43.
Upload the firmware.
© Cisco Systems, Inc. All rights reserved.
l For details about the configuration, see
the Cisco Connected Stadium Design
Guide available to qualified Cisco
StadiumVision partners on ciscoet.com.
l For requirements, see "External
DHCPServer Requirements" on
page23
l For CiscoCNR configuration , see the
Cisco Connected Stadium Design Guide
available to qualified Cisco
StadiumVision partners on ciscoet.com.
l "Obtaining the SV-4K Firmware" on
page29
l "Uploading the SV-4K Firmware From
the Management Dashboard" on
page29
27 of 68
Page 36

Deployment Task For more information see:
Configure firmware settings for auto-registration. "Configuring the SV-4K for Auto-
Registration" on page31
Configure global SV-4K settings. "Configuring the SV-4K Global Settings" on
page32
Power on the SV-4K device. —
Verify the startup sequence. "Verifying the SV-4K Startup Sequence" on
page41
Prerequisites for SV-4K Deployment
Before you deploy SV-4K media players, be sure that the following requirements are
met:
l The pre-deployment tasks are completed. For more information, see "Planning the
SV-4K Media Player Deployment" on page19.
l The SV-4K hardware is not yet powered up.
Provisioning the SV-4K Firmware
Each time the SV-4K device powers on or reboots, a compliance check is done against
the firmware that is loaded on the device against the Cisco StadiumVision Director
auto-registration settings. If the firmware versions do not match, the SV-4K initiates a
firmware upgrade automatically.
Before the SV-4K device can update the firmware, the firmware must be uploaded to
Cisco StadiumVision Director and the auto-registration settings must be configured.
28 of 68
© Cisco Systems, Inc. All rights reserved.
Page 37

IMPORTANT: Before you power on the SV-4K device for the
first time, be sure that you have completed the following
configuration and tasks:
l Switch configuration, including the required LLDP for
proper POE+ operation.
l DHCPserver configuration.
l Uploaded the released firmware to Cisco StadiumVision
Director.
l Configured the auto-registration settings for the SV-4K to
properly provision its firmware.
Obtaining the SV-4K Firmware
The SV-4K firmware image is not bundled with the Cisco StadiumVision Director
software. You must download the firmware image separately from the external vendor
site and then upload it to Cisco StadiumVision Director.
TIP: Be sure to download the firmware to a device that you also
can use to access the Cisco StadiumVision Director software.
For information about how to download the SV-4K firmware, see the “How to Download
SV-4K Firmware” document, available to qualified Cisco StadiumVision partners on
ciscoet.com.
Uploading the SV-4K Firmware From the Management Dashboard
After you have obtained the SV-4K firmware image from the external vendor, you must
upload the image to Cisco StadiumVision Director.
To upload the SV-4K firmware, complete the following steps:
1. From the device where you downloaded the SV-4K firmware, log into Cisco
StadiumVision Director as an administrator.
2. Go to the Management Dashboard.
3. Go to DMP and TVControls > DMP Install > Firmware Upgrade.
© Cisco Systems, Inc. All rights reserved.
29 of 68
Page 38

4. Select the SV-4K Parameters tab and click the upload icon (Figure 8).
Figure 8. SV-4K Firmware Upload
5. Navigate to the SV-4K firmware image file and click OK.
An upload status string appears at the bottom of the screen that indicates when
the firmware upload is complete.
30 of 68
© Cisco Systems, Inc. All rights reserved.
Page 39

Configuring the SV-4K for Auto-Registration
Before the firmware can be provisioned to the SV-4K media player, it must be uploaded
to Cisco StadiumVision Director, and then configured in the auto-registration settings.
To configure the SV-4K for auto-registration, complete the following steps:
1. From the Management Dashboard, go to SV Director Configuration > System
Configuration > Auto Registration Settings.
2. In the Configuration Property panel, find and configure the following properties
(Figure 9):
IMPORTANT: Be sure that you configure the "Firmware image
to use" and "init.version" properties that are labeled for the SV4K.
a. Firmware image to use (SV-4K)—Select from dropdown box.
TIP: If you have just uploaded the firmware image, you need to
click the green Refresh icon next to the drop-down box for the
new file to appear.
b. init.version (SV-4K)—Type the version.
Figure 9. SV-4K Auto Registration Settings
3. Save the changes.
© Cisco Systems, Inc. All rights reserved.
31 of 68
Page 40

Configuring the SV-4K Global Settings
This section includes the following topics:
l Information About Time Protocols and Synchronization on the SV-4K Media
Players, Page 32
l How to Configure NTP and PTPon the SV-4K Media Players, Page 34
Information About Time Protocols and Synchronization on the SV-4K Media Players
This section includes the following topics:
l Network Time Sources for the SV-4K Media Players, Page 32
l PTP Master and Members, Page 33
l DMP-to-DMP Content Synchronization, Page 33
l Zone-Based Video Wall Synchronization, Page 33
l Use Cases for Video DMP-to-DMP Synchronization with PTP, Page 34
Network Time Sources for the SV-4K Media Players
The SV-4K supports two different network time sources under the global SV-4K
settings:
l Network Time Protocol (NTP)—This is the default.
l Precision Time Protocol (PTP)—Required for video wall synchronization feature
and for DMP-to-DMP synchronization.
NTPand PTPsettings are provisioned globally for all SV-4K media players.The Cisco
StadiumVision Director server is provisioned as the default NTPsource for both the
Cisco DMP 4310G and SV-4K media players.
NOTE: When PTPis configured, only the SV-4KPTPmaster
derives its clock using NTP.
For the most accurate synchronization for video playback across SV-4K devices, the
time on the target SV-4K players must be almost the same. NTP does not provide this
level of time synchronicity and accuracy, so PTP is also required.
32 of 68
© Cisco Systems, Inc. All rights reserved.
Page 41

PTP Master and Members
The SV-4K DMP is capable to serve as a PTP master or as a PTP member, where
members obtain their time from the master. The PTP master, in turn, will get its time
from an NTP server.
By default, all SV-4K devices are designated as eligible master candidates.
DMP-to-DMP Content Synchronization
The DMP-to-DMP Content Synchronization feature for the SV-4K media player
synchronizes content rendering of playlist items on the displays.
This synchronization includes transitioning from one item to the next (such as for still
images), and more accurate playback and rendering of local video content. For local
video, this serves as the foundation for implementing video ribbon boards and video
walls. This requires cabling of a single SV-4K media player per display.
NOTE: Widgets, external URLs, and multicast video tuning
synchronization are outside the scope of this feature.
Improved content synchronization was first introduced in Cisco StadiumVision Director
Release 3.2 on the DMP 4310G through the use of the Network Time Protocol (NTP).
Cisco StadiumVision Director Release 4.0 supports enhanced content synchronization
methods for the SV-4Konly, with close synchronization of playlist item transition using
the Precision Time Protocol (PTP).
Zone-Based Video Wall Synchronization
Zone-based video wall synchronization is an alternative form of synchronization
available for SV-4K devices participating in a video wall.
The primary benefit of this form of synchronization is that if any SV-4Kdevice that is not
the leader in the video wall reboots, it will "catch up" to play whatever content item that
the rest of the video wall is currently playing. This form of synchronization is
recommended for dedicated video walls that are running video content longer than 15
minutes.
If an SV-4Kdevice reboots in a video wall that is not using zone-based video wall
synchronization (using normal DMP-to-DMP synchronization), the tradeoff is that the
rebooting SV-4K synchronizes with the rest of the video wall at the next content item in
the playlist, or at replay of a single-item playlist.
© Cisco Systems, Inc. All rights reserved.
33 of 68
Page 42

Use Cases for Video DMP-to-DMP Synchronization with PTP
PTPis particularly beneficial for the following use cases in the Cisco StadiumVision
network:
l Using video background for Dynamic Menu Boards (DMBs) that show a PiP of the
live event.
With the DMP 4310 devices, the background is implemented as a SWF, whereas
with the secondary video feature on the SV-4K, the background can be more
visually appealing by using local video content.
l Sponsored moment of exclusivity.
When a team scores a goal, a secondary video using the luma key feature can be
shown onscreen overlaying a full screen video showing the live event.
l Video-based ads.
Ads in region 2 or 3 (or L-wraps) can now be video content. For L-wraps, the luma
key will need to be used so that the live multicast video can be seen.
How to Configure NTP and PTPon the SV-4K Media
Players
By default, both NTP and PTP services are automatically enabled for SV-4K media
players. The SV-4K media players use PTP to achieve optimal synchronization.
However, an NTP source also must be used to provide initial clocking to the SV-4K
devices that are elected PTP masters in the network.
This section includes the following topics:
l Restrictions for PTP on the SV-4K Media Players, Page 35
l Guidelines for NTP and PTP on the SV-4K Media Players, Page 35
l Modifying the PTP and NTP Configuration on the SV-4K Media Players, Page 37
l Verifying PTPOperation for the SV-4K Media Player, Page 39
34 of 68
© Cisco Systems, Inc. All rights reserved.
Page 43

Restrictions for PTP on the SV-4K Media Players
Before you configure PTP on the SV-4K media players, consider the following
restrictions:
l PTP messages will not cross VLANs. Therefore, PTP master candidates need to
be identified for each VLAN and configured in the Management Dashboard.
NOTE: For ease of configuration for venues with multiple VLANs,
the system is configured by default to list all SV-4K devices as
eligible PTP master candidates. However, be aware that
although this simplifies configuration, the time that it takes for the
SV-4Ks to arbitrate a master SV-4K device in each network will
vary, and depends on the number of eligible devices in each
network.
l Content synchronization for video playback on the SV-4K media player relies on
precise time across DMPs using PTP. The behavior is similar to content
synchronization on the Cisco DMP 4310G. If SV-4K devices are playing video
and one of the devices reboots, the rebooting unit will restart video playback from
the beginning and will only synchronize with the other players when the next item
in the playlist is rendered.
If SV-4Ks are participating in zone-based content synchronization for video walls,
with some enhanced synchronization capability, the rebooting unit will
synchronize with the current item being played by the device leader in the video
wall. For more information, see the “Working with Video Walls” section of the
Cisco StadiumVision Director Operations Guide.
Guidelines for NTP and PTP on the SV-4K Media Players
Before you configure NTP and PTP on the SV-4K media players, consider the
following guidelines:
l For new installations of Cisco StadiumVision Director Release 4.0, PTP is the
default time source for the SV-4K media players, with NTP as the default time
source for the elected SV-4K PTP master.
NTPGuidelines
l Each SV-4K media player designated as PTP master (per VLAN) will use NTPas
its time source. The other SV-4K devices in the network operate using a
PTPreference clock from the elected PTPmaster.
l When PTP is disabled (not recommended), all SV-4K players use NTP to set their
local clock.
© Cisco Systems, Inc. All rights reserved.
35 of 68
Page 44

l The default NTP synchronization interval with the host time server is one hour and
is configurable.
l An NTPsource must be configured in Cisco StadiumVision Director. By default,
the Cisco StadiumVision Director server is configured as the SV-4K NTP host
(just as with the Cisco DMP 4310G).
For more information about configuring an NTPsource in Cisco StadiumVision
Director, see the "Configuring the Cisco StadiumVision Director Server System
Settings" module in the Cisco StadiumVision Director Server Administration
Guide.
PTPGuidelines
NOTE: For synchronized video playback, NTP alone cannot be
relied upon for SV-4K devicesand PTP must be used.
CAUTION: If you are running Cisco StadiumVision Director on a
virtual server, then you should reference a reliable NTP server
running on a bare metal server, rather than relying on a clock from
a VM environment that can drift and is not accurate.
l PTP version 2 is supported only for the SV-4Kmedia players and applies globally
to all devices in the Cisco StadiumVision Director network when configured.
l PTP configuration includes a PTP domain and a set of master candidates:
o
PTP domain—Default is 0.
Be sure that this domain does not conflict with any other PTP domain (and
multicast addressing) in use in your network, and revise as needed. See Table
3 for more information.
o
PTP master candidates—Default is *.
This specifies that all SV-4K devices in the network are eligible as master
candidates and will go through arbitration to designate a master for their
respective subnets.
l If you revise the default PTP master candidates configuration, you must configure
one or more SV-4K devices as master candidates in a semicolon-separated list of
IP addresses for each VLAN.
A minimum of two master candidates per network is recommended.
l If there is an in-house PTP master for your network, leave the “PTP master
candidates” property value blank. However, this configuration is only supported for
venues without multiple subnets.
36 of 68
© Cisco Systems, Inc. All rights reserved.
Page 45

Modifying the PTP and NTP Configuration on the SV-4K Media Players
By default the NTP and PTP services are automatically enabled and configured for SV4K media players.
Use this task if you need to modify the default settings described in Table 16 and Table
17.
To modify the standard NTP and PTPconfiguration on the SV-4K media players,
complete the following tasks:
1. From the Management Dashboard, go to:
SV Director Configuration > System Configuration > Global DMP Settings >
SV-4K Settings
Figure 10. Overview of the SV-4K PTP Properties
2. (Optional) Change the global NTP properties as required for your network. Refer
to Table 16.
3. (Optional) Change the global PTP properties as required for your network. Refer
to Table 17.
4. Click the disk icon to Save changes.
5. Reboot the SV-4K devices.
© Cisco Systems, Inc. All rights reserved.
37 of 68
Page 46

Table 16. Global SV-4K Settings—NTP Properties
Property
(Registry Key)
NTP Host
(Globaldmpsetting.sv4k.deploy.ntpc. hostname)
NTP sync interval
(Globaldmpsetting.sv4k.deploy.ntpc.interval)
Timezone
(Globaldmpsetting.sv4k.deploy.ntpc.timezone)
Description Values
IPv4
addressof
the NTP
server from
which the
PTP master
Default—IP
addressof the
Cisco
StadiumVision
Director
server.
(or if PTP is
disabled, all
SV-4K
devices) will
synchronize
clocks.
Number of
3600 (Default)
seconds
that the SV4K waits
before
trying to
synchronize
its time with
the
configured
NTP host.
Code for
GMT (Default)
the
timezone to
be used.
38 of 68
© Cisco Systems, Inc. All rights reserved.
Page 47

Table 17. Global SV-4K Settings—PTP Properties
Property
(Registry Key)
PTP domain
(Globaldmpsetting.sv4k.init.ptp.
domain)
PTP master candidates
(Globaldmpsetting.sv4k.init.ptp.
master.host)
Description Values
Domain number
for the SV-4K PTP
network, which
defines the
multicast address
for PTP
communication.
The value must be
a valid domain
number per IEEE
For IEEE-1588 PTP, possible values
are:
0—(Default) 224.0.1.129
1—224.0.1.130
2—224.0.1.131
3—224.0.1.132
PTPis disabled when the property is
unset (blank).
1588-2008 and
correspond to your
network
PTPconfiguration.
Possible values are:
Note: In a multi-
venue scenario, or
multi-VLANscenario,
where PTP multicast
traffic does not cross
venues, designate
PTP master(s) in
each venue or VLAN,
or use the default "*"
configuration.
Eligible SV-4K
devices for master
candidate
selection.
l *—(Default). Wildcard pattern
that specifies all SV-4K devices
in the network as eligible PTP
master candidates.
l Semicolon-separated IPv4
addresses of SV-4K devices for
each subnet.
l blank—Specifies that a
PTPmaster source external to
Cisco StadiumVision Director is
used. This configuration is only
valid for a venue without SV-4K
devices in multiple subnets.
Verifying PTPOperation for the SV-4K Media Player
This section describes how to verify the PTPconfiguration and also the operation of
PTP for your SV-4K devices.
To verify the PTPoperation for the SV-4K media player, complete the following
steps:
1. Open your browser and navigate to one of the DMPs:
http://sv4k-ip-address/ptp.html
© Cisco Systems, Inc. All rights reserved.
39 of 68
Page 48

2. Enter the username and password.
For more information, see the "Verifying PTPOperation for the SV-4K Media
Player" on the previous page.
3. Identify the PTP master by finding the unit that has an "offsetFromMaster" value
of 0.0.
Figure 11 highlights the PTP master and shows a network where PTP is
operating successfully with 12 SV-4K members.
Figure 11. Successful PTPClock Status
40 of 68
© Cisco Systems, Inc. All rights reserved.
Page 49

Verifying the Deployment of the SV-4K Media Player
This module includes the following topics:
l Verifying the SV-4K Startup Sequence, Page 41
l Startup Sequence Flow for the SV-4K Media Player, Page 41
Verifying the SV-4K Startup Sequence
IMPORTANT: Before you power on the SV-4K device for the
first time, be sure that you have completed the following
configuration and tasks:
l Switch configuration, including the required LLDP for
proper POE+ operation.
l DHCPserver configuration.
l Uploaded the released firmware to Cisco StadiumVision
Director.
l Configured the auto-registration settings for the SV-4K to
properly provision its firmware.
When you have completed these deployment tasks, you are ready to connect a new
SV-4K device to the Cisco StadiumVision Director network.
Startup Sequence Flow for the SV-4K Media Player
Table 18 provides a summary of the tasks and related information to deploy the SV-4K
media player.
NOTE: The provisioning and registration process uses a random
wait time to prevent large number of devices sending requests to
the servers at the same time. As a result, the time for each SV4Kdevice to finish the startup sequence will be different.
© Cisco Systems, Inc. All rights reserved.
41 of 68
Page 50

Table 18. SV-4K Startup Task Sequence
Startup Task TVDisplay:
SV-4K obtains IP
addressfrom
DHCPserver.
SV-4K contacts the
Cisco StadiumVision
Director server.
SV-4K Err LED blinks
for a short period
(normal).
SV-4K reboots.
Firmware upgrade
message
(As applicable; Only
after the SV-4Khas
been initially deployed)
IMPORTANT NOTE: During the initial provision process, or after factory
reset, the SV-4K DMP will reboot multiple times before completing the process.
Do not interrupt. This can take several minutes. Do not interrupt.
The following message appears if firmware upgrade is needed:
Current system version is out of date. Restart and update!
The device reboots to complete the upgrade process.
The TV repeats display of the screens for obtaining the IP address from
DHCP server and contacting Cisco StadiumVision Director server again
before bypassing the firmware upgrade step.
42 of 68
© Cisco Systems, Inc. All rights reserved.
Page 51

Startup Task TVDisplay:
Configuration files from
Cisco StadiumVision
Director server
download.
HTML runtime starts.
Verify SV-4K device has
registered in Control
Panel > Setup >
Devices.
If Location has not yet been specified, the Type will be DMP.
© Cisco Systems, Inc. All rights reserved.
43 of 68
Page 52

Monitoring and Maintaining the SV-4K Media Player
This module describes the workflow and tasks to monitor and maintain the working
operation of the SV-4K media player. It is intended for Cisco StadiumVision Director
administrators and installers.
For more information, see also the Cisco StadiumVision Director Operations Guide.
This module includes the following topics:
l Performing a Regular Reboot of the SV-4K Media Players, Page 44
l Verifying SV-4K Media Player Compliance, Page 44
l Clearing the Storage on the SV-4K Media Player, Page 46
l Clearing Registries on the SV-4K Media Player by Restoring Factory Defaults,
Page 48
Performing a Regular Reboot of the SV-4K Media Players
The best practice for maintaining normal operation of the SV-4K media players is to
perform a weekly reboot of the devices.
NOTE: The Cisco StadiumVision Director reboot task applies
globally to both the Cisco DMP 4310G and SV-4K devices.
For information about how to configure the Reboot DMP system task, see the How to
Configure the Reboot DMP System Task task note.
Verifying SV-4K Media Player Compliance
The Management Dashboard allows you to compare values on the SV-4Kdevice
against required values configured in the Cisco StadiumVision Director SV-4K settings.
Figure 12 shows how an SV-4K device should appear when it is fully compliant with
the configured Cisco StadiumVision Director settings:
l Required Value—Value configured in Cisco StadiumVision Director, or
automatically set by the system.
l Value on Device—Setting that the SV-4K device is running.
44 of 68
© Cisco Systems, Inc. All rights reserved.
Page 53

Figure 12. Normal Compliance for an SV-4KDevice
Table 19. SV-4K Compliance Property Descriptions
Property Name Description
init.sshd Unused. Value is always 1 and is not configurable.
init.DHCP Value is always "on." Static IP addresses are not supported.
init.BCNT Unused. This value is not configurable.
init.startService_
rs232
init.startService_
ntpc
init.version SV-4K firmware version.
ntpc.timezone Timezone for the SV-4K.
ntpc.hostname Name of the NTPserver for the SV-4K. For PTP slaves, setting the
ntpc.interval Interval (in seconds) after which the SV-4K PTP master
msi.sw_vlan Switch VLAN reported by LLDP for the SV-4K.
Value is always "yes."
NTPclient service on the SV-4K device. Value is always "yes."
time via NTP is disabled on SV-4K.
synchronizes its time with the NTP host.
"$svd_ignore" setting in Cisco StadiumVision means that the value
is not used for compliance verification.
To verify SV-4K media player compliance, complete the following steps:
1. From the Management Dashboard, run the Get Status command for selected SV4K devices:
a. Go to:
DMP and TVControls > Monitoring > Get Status
b. In the Select Devices panel, select all SV-4Kdevices that you want an
updated status for.
© Cisco Systems, Inc. All rights reserved.
45 of 68
Page 54

c. To execute the command, click the play (>) button located at bottom left of the
panel.
2. In the Device List panel, select the SV-4K device that you want to verify.
3. Go to the device details area at the bottom of the panel and click Compliance.
Clearing the Storage on the SV-4K Media Player
The SV-4K provides a minimum of 120 GB of solid-state storage, with 100
GBavailable for content.
If you begin to run out of storage or otherwise need to recover the SSD, you can clear
the storage on the SV-4Kmedia player.
To find information about available storage, select an SV-4K device in the
Management Dashboard device list. Then, go to Settings > Storage in the device
details area of the dashboard.
TIP: The HTMLruntime must be running on the SV-4K media
player to use this task.
To clear the storage on the SV-4K media player, complete the following steps:
1. Go to the Management Dashboard.
2. Select the SV-4K devices that you want to clear.
46 of 68
© Cisco Systems, Inc. All rights reserved.
Page 55

3. Go to DMPand TVControls > DMP Commands > Reset Storage (Figure 13).
Figure 13. Reset Storage Command
4. Click Play.
The contents of the SSDstorage is removed (including the Cisco StadiumVision
Director runtime software and script contents) on the SV-4K devices. The SV4Ks will not automatically reboot after this command.
5. Select Reboot Device.
6. Click Play.
The selected SV-4Kdevices reboot and reprovision firmware and settings.
© Cisco Systems, Inc. All rights reserved.
47 of 68
Page 56

Clearing Registries on the SV-4K Media Player by Restoring Factory Defaults
If you need to clear the registry settings on the SV-4K and reprovision the SV-4K, use
the Restore Default Settings command.
To clear the registries on the SV-4K media player, complete the following steps:
1. Go to the Management Dashboard.
2. Select the SV-4K devices that you want to clear.
3. Go to DMP Install > Restore Default Settings.
4. Click Play.
Any persistent device settings on the SV-4Ks are erased and the box will be in
factory default state. The SV-4K automatically reboots and reprovisions its
firmware and settings.
48 of 68
© Cisco Systems, Inc. All rights reserved.
Page 57

Troubleshooting the SV-4K Media Player
This module includes the following topics:
l Before You Begin Troubleshooting the SV-4K, Page 49
l Troubleshooting PTPOperation for the SV-4K Media Player, Page 50
l Troubleshooting SV-4K Hardware Operation, Page 52
l Troubleshooting SV-4K TV and Video Display Problems, Page 54
Before You Begin Troubleshooting the SV-4K
Before you begin troubleshooting the SV-4K, you should follow the information in these
topics:
l RMA Process for the SV-4K, Page 49
l SV-4K Diagnostic URL, Page 49
RMA Process for the SV-4K
The Return Materials Authorization (RMA) process is performed through a call to Cisco
Technical Support to assess the problem for final troubleshooting to confirm the device
problem.
To begin the RMAprocess for the SV-4K, complete the following steps:
1. Locate your symptom in the SV-4Ktroubleshooting topics and begin to isolate the
problem by following the suggested troubleshooting steps.
2. If you cannot resolve the problem with any of the recommended troubleshooting
steps, contact Cisco Technical Support to proceed with further troubleshooting
and the RMA process.
SV-4K Diagnostic URL
Some of the troubleshooting steps for the SV-4K recommend that you open a browser
and navigate directly to the SV-4K device using the following URL to further diagnose a
© Cisco Systems, Inc. All rights reserved.
49 of 68
Page 58

problem:
http://sv4k-ip-address
The diagnostic URL requires a password for use. The password is set in the
"defaultDmpAdminPwd" registry key in the Management Dashboard (the same
password as for the Cisco DMP 4310G). The default username is "admin."
Be sure to reset the password from the default value as a security best practice.
CAUTION: Do not manually power off the SV-4K after changing
the password. To change the SV-4K password, you must use the
Power Cycle DMP switch command from the Management
Dashboard to restart the device properly. To use this command,
be sure that you have imported the switch data first.
NOTE: This password is also used for the Diagnostic Web
Server (DWS), and is used by the Cisco DMP 4310G.
Troubleshooting PTPOperation for the SV-4K Media
Player
This section identifies some of the symptoms related to problems with PTPoperation:
l Symptom: Local PNGs are not synchronized across SV-4K devices, Page 50
l Symptom: Playlists do not advance to the next content item on the SV-4K, Page
51
Symptom: Local PNGs are not synchronized across SV-4K devices
Troubleshooting steps:
1. Verify the PTPconfiguration on your SV-4K devices:
a. Go to:
Management Dashboard > SV Director Configuration > Global DMP
Settings > SV-4K Settings
b. Verify that the PTP domain and PTP master candidates property configuration
is correct for your network.
50 of 68
2. Open your browser and navigate to one of the SV-4Ks:
http://sv4k-ip-address/ptp.html
© Cisco Systems, Inc. All rights reserved.
Page 59

3. Enter the username and password.
4. Look for the message “PTP is not enabled.”
This message might mean that the device was not rebooted after changes to the
Management Dashboard settings.
5. If the message appears, reboot the SV-4K device.
Symptom: Playlists do not advance to the next content item on the SV-4K
If the current PTP master becomes unreachable (shuts down, or becomes unreachable
on the network), the PTP members will be unable to update their clocks and this
condition will occur.
Troubleshooting steps:
1. Verify the PTPconfiguration on your SV-4K devices:
a. Go to:
Management Dashboard > SV Director Configuration > Global DMP
Settings > SV-4K Settings
b. Verify that the PTP domain and PTP master candidates property configuration
is correct for your network.
2. Open your browser and navigate to one of the SV-4Ks:
http://sv4k-ip-address/ptp.html
3. Enter the username and password.
4. Identify the PTP master by finding the unit that has an "offsetFromMaster" value
of 0.0.
Figure 14. Identify the PTP Master
5. Ping the master PTP device.
© Cisco Systems, Inc. All rights reserved.
51 of 68
Page 60

6. If the master is not reachable and you have configured alternate masters but they
are not reported as master after waiting for a minute, reboot one of the reachable
PTP master candidates.
NOTE: Identifying the alternate master for this step can more
easily be done if you are explicitly identifying the IP address of
alternate masters, and not using the "*" wildcard to specify
possible election of any SV-4Kdevice on the network.
7. If a device shows that it has not synchronized, reboot the device to force
synchronization.
Troubleshooting SV-4K Hardware Operation
This section identifies some of the symptoms related to problems with the SV-4K media
player hardware:
l Symptom: "Please Insert Card" message on SV-4K startup screen, Page 52
l Symptom: Pwr and Eth LEDs are not lit and no signs of activity on the SV-4K,
Page 53
l Symptom: SV-4K Err or Err/Upd LEDs blinking, Page 53
l Symptom: SV-4K rebooting automatically after startup, Page 53
Symptom: "Please Insert Card" message on SV-4K startup
screen
Troubleshooting steps:
1. Verify that an IPaddress is assigned to the device.
2. Verify proper DHCP Option 43 configuration.
3. Verify that the Cisco StadiumVision Director server is running and reachable.
4. Contact Cisco Technical Support to do further troubleshooting and proceed with
RMA process.
52 of 68
© Cisco Systems, Inc. All rights reserved.
Page 61

Symptom: Pwr and Eth LEDs are not lit and no signs of activity on the SV-4K
Troubleshooting steps:
1. Verify any visible damage to the Ethernet port on the SV-4K device.
2. If there is not any visible port damage on the SV-4K:
a. Connect a 12V 5A power supply to the SV-4K to confirm startup and normal
operation.
b. Replace the Ethernet cable.
c. Connect the SV-4K to a known-working switch port for another SV-4K device.
d. Verify the POE+ settings on the switch.
TIP:If you have imported the switch settings to Cisco
StadiumVision Director, you can view the POE+ settings.
From the Management Dashboard, go to:
Tools > Settings > Switch Management > View Switch
Details
Power normally displays "29.5" for the SV-4K after
LLDPnegotiation with the switch.
e. If none of these steps locate the problem, contact Cisco Technical Support to
proceed with the RMA process.
Symptom: SV-4K Err or Err/Upd LEDs blinking
Troubleshooting steps:
1. Refer to the LEDdocumentation.
See the "LEDs on the SV-4K Media Player" on page8.
2. Troubleshoot according to the description of the problem.
Symptom: SV-4K rebooting automatically after startup
Troubleshooting steps:
1. Verify whether multiple SV-4Ks are doing an auto-reboot.
2. If multiple SV-4Ks are automatically rebooting at startup:
© Cisco Systems, Inc. All rights reserved.
53 of 68
Page 62

a. Verify that the devices are obtaining an IPaddress.
If the devices are not getting an IPaddress ("Unable to get IP address"
message on the TVdisplay), verify communication to the DHCPserver.
b. Verify proper DHCP Option 43 configuration.
3. If the SV-4K stays at the loading screen with the progress bar, verify
communication with the Cisco StadiumVision Director server.
4. (Advanced) Verify that an HTTP request comes in to the /var/log/httpd/access_log
(use the System State Report [SSR]).
Look for a message like the following:
10.194.169.242 - - [13/Oct/2014:13:10:05 -0700] "GET
/StadiumVision/dmp_v4/scripts/boot.brs HTTP/1.1" 200 89403 "-"
"-"
Troubleshooting SV-4K TV and Video Display Problems
This section identifies some of the symptoms related to problems with the SV-4K
display problems:
l Symptom: Black screen on the SV-4K TVdisplay/no multicast video stream, Page
54
l Symptom: No local control when external volume strategy configured, Page 55
Symptom: Black screen on the SV-4K TVdisplay/no multicast
video stream
Troubleshooting steps:
1. Verify if multiple TV displays are showing a black screen for the same multicast
video stream.
2. If multiple TV displays are showing a black screen for the same multicast stream:
a. Verify the SV-4K LEDs.
b. If the SV-4K LEDs are in normal state, verify that the Cisco StadiumVision
Director server has power and is reachable.
c. If all TV displays are the same and/or new model, test with a different, known-
working TV display model.
d. (Advanced) Test with laptop connected to the same switch port/interface as
the SV-4K with a problem, and see if the problematic video stream can be
displayed using the open source VLC player.
54 of 68
© Cisco Systems, Inc. All rights reserved.
Page 63

e. Test a different multicast video stream.
f. Test with local video content. If local video works, troubleshoot video headend
and/or other network problems.
g. Confirm video output setting on the SV-4K using a browser to go to:
http://sv4k-ip-address.
3. If the problem can be isolated to an SV-4Kdevice:
a. Verify that the Pwr/Eth LEDs are on.
b. Try a different HDMI cable.
c. Test a different TVdisplay.
d. (Advanced) Test with laptop connected to the same switch port/interface as
the SV-4K with a problem, and see if the problematic video stream can be
displayed using the open source VLC player.
Symptom: No local control when external volume strategy configured
Troubleshooting steps:
1. Is the RS-232 cable connected? Verify the cable connections.
2. Verify the serial cable type being used against the RS-232 requirements for the
TV display (null modem [crossover] or straight through).
3. Verify that the external output strategy works on other TV displays.
4. Verify the RS-232 codes from the manufacturer against the TV display
specifications in Cisco StadiumVision Director.
© Cisco Systems, Inc. All rights reserved.
55 of 68
Page 64

56 of 68
© Cisco Systems, Inc. All rights reserved.
Page 65

Appendix: Management Dashboard Commands for the SV-4K Media Player
This module provides a summary of the new and existing Management Dashboard
commands that are supported by the SV-4K media player.
l Auto-Registration Commands for the SV-4K Media Player, Page 57
l DMP Commands for the SV-4K Media Player, Page 57
l DMP Install Commands for the SV-4K Media Player, Page 58
l Global Settings Commands for the SV-4K Media Player, Page 58
l Monitoring Commands for the SV-4K Media Player, Page 59
l Switch Commands for the SV-4K Media Player, Page 59
l TV Commands for the SV-4K Media Player, Page 59
Auto-Registration Commands for the SV-4K Media Player
Table 20. Management Dashboard Auto-Registration Commands
Command Name Supported on SV-4K?
Change DMP State Yes
Provision DMP No
DMP Commands for the SV-4K Media Player
Table 21. Management Dashboard DMPCommands
Command Name Supported on SV-4K?
Display IP Yes
Restart Runtime Yes
Disable DHCP No
Enable DHCP No
Disable HDMI Autodetection No
Enable HDMIAutodetection No
© Cisco Systems, Inc. All rights reserved.
57 of 68
Page 66

Command Name Supported on SV-4K?
Disable Diagnostic Web Server Yes
Enable Diagnostic Web Server Yes
Reset Storage Yes
Update MIB No
Send RS232 Yes
Reboot Device Yes
Play SWF No
Stop SWF No
Play Media URL No
Stop Media URL No
Set Alpha Transparency No
1
1
1
DMP Install Commands for the SV-4K Media Player
Table 22. Management Dashboard DMP Install Commands
Command Name Supported on SV-4K?
Firmware Upgrade Yes
(only for firmware upload; not to provision firmware)
Restore Default Settings Yes
Initial Config No
Stage Template No
Initialize Touchscreen No
Show Calibration No
Setup NTP No
Global Settings Commands for the SV-4K Media Player
Table 23. Management Dashboard Global Settings Commands
Command Name Supported on SV-4K?
Global DMP Settings No
1
Introduced in Cisco StadiumVision Director Release 4.0 for the SV-4K media player only.
58 of 68
© Cisco Systems, Inc. All rights reserved.
Page 67

Monitoring Commands for the SV-4K Media Player
Table 24. Management Dashboard Monitoring Commands
Command Name Supported on SV-4K?
Get Status Yes
Ping Yes
Enable Monitoring No
Change Monitoring Thresholds No
Disable Monitoring No
Switch Commands for the SV-4K Media Player
Table 25. Management Dashboard Switch Commands
Command Name Supported on SV-4K?
Power Cycle DMP Yes
Power On DMP Yes
Power Off DMP Yes
Run Cabling Test using TDR Yes
Show TDR Test Results Yes
Ping Test Yes
Clear ARP Cache
Yes
TV Commands for the SV-4K Media Player
Table 26. Management Dashboard TVCommands
Command Name Supported on SV-4K?
TV On Yes
TV Off Yes
Set Display Input Yes
Set Display Banner Yes
Set Closed Caption Yes
Set Volume Yes
Set Video Channel Yes
Show Diagnostics Yes
1
Supported beginning in Cisco StadiumVision Director Release 4.0.0-402.
© Cisco Systems, Inc. All rights reserved.
1
59 of 68
Page 68

Command Name Supported on SV-4K?
Hide Diagnostics Yes
Show Diagnostics with Message Yes
Show Custom Swf No
Hide Custom Swf No
Display PIN Yes
Hide Channel Guide Yes
Disable User Control No
Enable User Control No
60 of 68
© Cisco Systems, Inc. All rights reserved.
Page 69

Appendix: Serial Commands for the SV4K Media Player
This module provides a summary of the new serial commands that are supported by
the SV-4K media player for RS-232 communication with TV displays.
NOTE: These commands are not supported by the Cisco DMP
4310G.
For more informaton about configuring serial commands for RS-232 TV control, see the
"Working with TVDisplays in Cisco StadiumVision Director" topic of the Cisco
StadiumVision Director Operations Guide.
New SV-4K Serial Commands for RS-232 TV Control
Table 27 shows a summary of the new SV-4K serial commands and their default
values.
NOTE: Different TVdisplay models might support only certain
RS-232 commands.
Table 27. New SV-4K Serial Commands
Command Name Value
dmp.Input1response 62203031204F4B303878
dmp.Input2response 62203031204F4B303278
dmp.Input3response 62203031204F4B303478
dmp.Input4response 62203031204F4B303078
dmp.volumeResponseFormat 66203031204F4B5F5F78
dmp.muteOnResponse 65203031204F4B303078
dmp.monitorAPIDelay 2000
dmp.monitorAVInput true
dmp.monitorMute true
dmp.monitorPower true
dmp.monitorVolume true
1
The commands in this table are supported by the LG 19LH20 TVdisplay.
1
© Cisco Systems, Inc. All rights reserved.
61 of 68
Page 70

Command Name Value
dmp.displayPwrQuery rs232.tx_hex=6B612030312046460D
dmp.displayAVInputQuery rs232.tx_hex=6B622030312046460D
dmp.muteQuery rs232.tx_6B652030312046460D
dmp.volumeQuery rs232.tx_6B662030312046460D
Input1 rs232.tx_6B622030312030390D
Input2 rs232.tx_6B622030312030320D
Input3 rs232.tx_6B622030312030340D
Input4 rs232.tx_6B622030312030300D
62 of 68
© Cisco Systems, Inc. All rights reserved.
Page 71

Appendix: SV-4K and DHCP Option 43
The SV-4K media player receive firmware and configuration from StadiumVision
Director, version 4.0 or higher. The SV-4K media player finds the StadiumVision
Director server through the use of DHCP options (specifically, options 60 and 43).
Option 60 is used to signal the SV-4K media player that the option 43 content is meant
for it to be received.
l If you are supporting a deployment with both Cisco DMP 4310G and SV-4K
devices, you will need to configure an Option 43 string for each model.
l If the DHCP server is limited to a single Option 43 string per DHCP pool (such as
with a Cisco DHCP server), then be sure to configure a separate DHCP scope for
the SV-4K media players.
In this example, a Cisco IOS DHCP is being used, which supports only a single pairing
of options 60 and 43 can be used within a single scope (requiring two different IP
scopes if there is a need to support both the Cisco DMP-4310G and the SV-4K media
players). This article only provides the procedure for the SV-4K media player.
Example 1. SV-4K DHCP Scope
ip dhcp pool SV-4K
network 10.10.1.0 255.255.255.0
default-router 10.10.1.1
option 60 ascii SV-4K-NA
option 43 hex
553e.6874.7470.3a2f.2f31.302e.3130.2e31.302e.3130.303a.
3830.3830.2f53.7461.6469.756d.5669.7369.6f6e.2f64.6d70.5f76.342f.736
3.7269.7074.732f.626f.6f74.2e62.7273
NOTE: The periods in the option 43 string are automatically
created by the IOS and ARE NOT TYPED when creating the
ASCII string.An example of the raw ASCII string value as typed
can be found below.
Example 2. Creating Option 60
Type the line as shown above. Possible variations are as follows:
© Cisco Systems, Inc. All rights reserved.
63 of 68
Page 72

Some IOS versions may require the text enclosed in quotes “SV-4K-NA”. If the IOS
doesn't accept a leading quote in the string, then quotations are not needed.
SV-4K string for North America DMPs: "Cisco SV-4K-NA"
SV-4K string for all other region DMPs: "Cisco SV-4K-ROW"
Example 3. Creating Option 43
Option 43 is a vendor-specific option. For the SV-4K media player, it needs to point to a
specific URL to execute auto-registration, auto-provisioning, and to receive initial
firmware and subsequent upgrades, etc. That URL is
http://x.x.x.x:8080/StadiumVision/dmp_v4/scripts/boot.brs (where x.x.x.x represents the
IPv4 address of the StadiumVision director server).
Different devices require option 43 information be presented in different formats.The
SV-4K media player requires type-length-value (TLV) format for the data string.
Specifically, the TLV format is constructed in the following manner:
l The string is built using hex values.
l The string begins with a two-character hex representation of the option 43 Type
(an option 43 sub-option).
l The second two-character hex representation is the length of the information
string, expressed in the number of ASCII characters of the string.
l Following the length value, the ascii string is typed out by using the two-character
hex representation of each character in the string.
For the SV-4K media player, the type designation is type 85 (decimal), expressed as
type 55 (hex).
Example 4. Option 43
For the following URL string:
http://10.10.10.100:8080/StadiumVision/dmp_v4/scripts/boot.brs
The option 43 string would be as follows (except all on one line, without carriage
returns) in the following format:
option 43 hex value
As shown below, the resulting URL above would be represented by the string below:
option 43 hex (there is a space here between ‘hex’ and the remainder of the string)
553E687474703A2F2F31302E31302E31302E3130303A383038302F5374616469756D
566973696F6E2F646D705F76342F736372697074732F626F6F742E627273
Using the description above and the ASCII lookup table below, the first characters of
the string would be explained in the following way:
64 of 68
© Cisco Systems, Inc. All rights reserved.
Page 73

553E687474703A2F2F
55 – the type code in hex
3E – the length of the characters to the right of the length value, expressed by counting
the number of two-character ascii characters represented (form the chart below).
And the first few characters, one at a time, would be as follows:
68 74 74 70 3A 2F 2F
H t t p : / /
The IP address is then represented the same way:
31 30 2E 31 30 2E 31 30 2E 31 30 30
1 0 . 1 0 . 1 0 . 1 0 0
The remainder of the string is the text of the remainder of the URL.
NOTE: As a Linux OS device, the Cisco StadiumVision Director
server is case sensitive, and the correct letter case must be
represented in the ASCII text strings.
Tips
l To make creating the string easier, start the string with 55 and copy the remainder
of the ASCII string past the IP address, as these values never change.
l The example string had a length value of 3E (62 represented as a hex value).
NOTE: In this value, DO NOT represent 62 as the hex character
values of 6 and 2: instead, take the decimal value of 62 and
convert to its equivalent hex (base 16) value (62 was converted to
3E in the example). Decimal-to-hex converters are easily found
on the Internet, and most computer calculators have a decimalto-hex function available, possible under an advanced feature.
l The example IP address was 12 characters long which leaves the remainder of
the hex string to be 50 characters long. Add the number of ASCII characters in
your IP address (including the dots!) to the known 50 characters and create your
string length value to replace the 3E.
This technical information can be used to program other 3rd-party DHCP servers.
Figure 15. ASCII Character lookup table
DEC HEX Symbol Description
32 20 Space
33 21 ! Exclamation mark
34 22 " Double quotes (or speech marks)
© Cisco Systems, Inc. All rights reserved.
65 of 68
Page 74

DEC HEX Symbol Description
35 23 # Number
36 24 $ Dollar
37 25 % Procenttecken
38 26 & Ampersand
39 27 ' Single quote
40 28 ( Open parenthesis (or open bracket)
41 29 ) Close parenthesis (or close bracket)
42 2A * Asterisk
43 2B + Plus
44 2C , Comma
45 2D - Hyphen
46 2E . Period, dot or full stop
47 2F / Slash or divide
48 30 0 Zero
49 31 1 One
50 32 2 Two
51 33 3 Three
52 34 4 Four
53 35 5 Five
54 36 6 Six
55 37 7 Seven
56 38 8 Eight
57 39 9 Nine
58 3A : Colon
59 3B ; Semicolon
60 3C < Less than (or open angled bracket)
61 3D = Equals
62 3E > Greater than (or close angled bracket)
63 3F ? Question mark
64 40 @ At symbol
65 41 A Uppercase A
66 42 B Uppercase B
67 43 C Uppercase C
68 44 D Uppercase D
69 45 E Uppercase E
70 46 F Uppercase F
71 47 G Uppercase G
72 48 H Uppercase H
73 49 I Uppercase I
74 4A J Uppercase J
75 4B K Uppercase K
66 of 68
© Cisco Systems, Inc. All rights reserved.
Page 75

DEC HEX Symbol Description
76 4C L Uppercase L
77 4D M Uppercase M
78 4E N Uppercase N
79 4F O Uppercase O
80 50 P Uppercase P
81 51 Q Uppercase Q
82 52 R Uppercase R
83 53 S Uppercase S
84 54 T Uppercase T
85 55 U Uppercase U
86 56 V Uppercase V
87 57 W Uppercase W
88 58 X Uppercase X
89 59 Y Uppercase Y
90 5A Z Uppercase Z
91 5B [ Opening bracket
92 5C \ Backslash
93 5D ] Closing bracket
94 5E ^ Caret - circumflex
95 5F _ Underscore
96 60 ` Grave accent
97 61 a Lowercase a
98 62 b Lowercase b
99 63 c Lowercase c
100 64 d Lowercase d
101 65 e Lowercase e
102 66 f Lowercase f
103 67 g Lowercase g
104 68 h Lowercase h
105 69 i Lowercase i
106 6A j Lowercase j
107 6B k Lowercase k
108 6C l Lowercase l
109 6D m Lowercase m
110 6E n Lowercase n
111 6F o Lowercase o
112 70 p Lowercase p
113 71 q Lowercase q
114 72 r Lowercase r
115 73 s Lowercase s
116 74 t Lowercase t
© Cisco Systems, Inc. All rights reserved.
67 of 68
Page 76

DEC HEX Symbol Description
117 75 u Lowercase u
118 76 v Lowercase v
119 77 w Lowercase w
120 78 x Lowercase x
121 79 y Lowercase y
122 7A z Lowercase z
123 7B { Opening brace
124 7C | Vertical bar
125 7D } Closing brace
126 7E ~ Equivalency sign - tilde
127 7F Delete
68 of 68
© Cisco Systems, Inc. All rights reserved.
 Loading...