

Page 1
A Division of Cisco Systems, Inc.
®
24 Port 10/100 + 2-Port Gigabit Switch
Model No.
with WebView
WIRED
SRW224
User Guide
Page 2

24-port 10/100 + 2-Port Gigabit Switch with WebView
Copyright and Trademarks
Specifications are subject to change without notice. Linksys is a registered trademark or trademark of Cisco
Systems, Inc. and/or its affiliates in the U.S. and certain other countries. Copyright © 2004 Cisco Systems, Inc. All
rights reserved. Other brands and product names are trademarks or registered trademarks of their respective
holders.
How to Use this Guide
Your guide to the 24-port 10/100 + 2-Port Gigabit Switch with WebView has been designed to make
understanding networking with the switch easier than ever. Look for the following items when reading this User
Guide:
This checkmark means there is a note of interest and
is something you should pay special attention to while
using the Switch.
This exclamation point means there is a caution or
warning and is something that could damage your
property or the Switch.
This question mark provides you with a reminder about
something you might need to do while using the Switch.
In addition to these symbols, there are definitions for technical terms that are presented like this:
word: definition.
Also, each figure (diagram, screenshot, or other image) is provided with a figure number and description, like
this:
Figure numbers and descriptions can also be found in the "List of Figures" section.
srw224-UG-61220ABW
Figure 0-1: Sample Figure Description
Page 3

24-port 10/100 + 2-Port Gigabit Switch with WebView
Table of Contents
Chapter 1: Introduction 1
Welcome 1
What’s in this Guide? 2
Chapter 2: Getting to Know the Switch 4
The Front Panel 4
The Back Panel 5
The Side Panel 5
Chapter 3: Connecting the Switch 7
Overview 7
Pre-Installation Considerations 8
Hardware Installation 8
Placement Options 9
Uplinking the Switch 10
Chapter 4: Configuration using the Console Interface 11
Overview 11
Configuring the HyperTerminal Application 11
Configuring the Switch through the Console Interface 12
Chapter 5: Configuring the Switch through the Web Utility 19
Overview 19
System Tab 20
Port Tab 22
Trunk Tab 23
VLAN Tab 23
Appendix A: Fast Ethernet and Gigabit Ethernet 27
About Fast Ethernet 27
About Gigabit Ethernet 27
Appendix B: Cabling 28
Overview 28
Twisted Pair Cabling 28
Fiber Optic Cabling 30
Appendix C: Windows Help 31
Appendix D: Glossary 32
Page 4

24-port 10/100 + 2-Port Gigabit Switch with WebView
Appendix E: Specifications 38
Appendix F: Warranty Information 39
Appendix G: Regulatory Information 40
Appendix H: Contact Information 41
Page 5

24-port 10/100 + 2-Port Gigabit Switch with WebView
List of Figures
Figure 2-1: Front Panel 4
Figure 2-2: Back Panel 5
Figure 2-3: Side Panel 5
Figure 3-1: Typical Network Configuration 7
Figure 3-2: Attaching the Rubber Feet to the Bottom of the Switch 9
Figure 3-3: Attaching the Brackets to the Switch (Front Panel Forward) 9
Figure 3-4: Mounting the Switch in A Rack 10
Figure 4-1: Finding HyperTerminal 11
Figure 4-2: Connection Description 11
Figure 4-3: Connect To 11
Figure 4-4: COM1 Properties 12
Figure 4-5: Login 12
Figure 4-6: Switch Main Menu 12
Figure 4-7: System Configuration 13
Figure 4-8: System Information 13
Figure 4-9: Advanced Switch Configuration 14
Figure 4-10: Password Setting 14
Figure 4-11: IP Configuration 15
Figure 4-12: Firmware Update 15
Figure 4-13: Main Menu 15
Figure 4-14: Send File 16
Figure 4-15: Xmodem File Send for SRW224 16
Figure 4-16: Restore System Default Setting 16
Figure 4-17: Reboot System 17
Figure 4-18: Return to Main Menu 17
Figure 4-19: Port Status 18
Figure 4-20: Port Configuration 18
Figure 4-21: Logout 18
Page 6

24-port 10/100 + 2-Port Gigabit Switch with WebView
Figure 5-1: Addrees Field 19
Figure 5-2: Password Screen 19
Figure 5-3: Welcome Screen 19
Figure 5-4: System Tab-System Information 20
Figure 5-5: System Tab-MISC Configuration 20
Figure 5-6: System Tab-Username/Password Setting 21
Figure 5-7: Port Tab-Port Status 22
Figure 5-8: Port Tab-Port Configuration 22
Figure 5-9: Trunk Configuration 23
Figure 5-10: 802.1Q VLAN 23
Figure 5-11: Advanced 802.1Q VLAN Setting 24
Figure 5-12: Edit a 802.1Q VLAN Group 24
Figure 5-13: Mode Change 25
Figure 5-14: Port Based VLAN 25
Figure 5-15: Add a Port Base VLAN Group 25
Figure 5-16: QoS Configuration 26
Figure 5-17: Logout Tab 26
Figure B-1: Cable Charts 28
Figure B-2: Straight-Through Cable 29
Figure B-3: Crossed-Over Cable 29
Page 7

24-port 10/100 + 2-Port Gigabit Switch with WebView
Chapter 1: Introduction
Welcome
Thank you for choosing the 24-port 10/100 + 2-Port Gigabit Switch with WebView. This Switch will allow you to
network better than ever.
This new Linksys rackmount switch delivers non-blocking, wire speed switching for your 10, and 100 megabit
network clients, plus multiple options for connecting to your network backbone. Twenty-four 10/100 ports wire
up your workstations, while the two integrated 10/100/1000BaseTX ports connect to other switches and the
backbone at Gigabit speeds. And the mini GBIC port allows future expansion to alternate transmission media like
optical fiber.
It features WebView monitoring and configuration via your web browser, making it easy to manage the 26 VLANs
and up to 7 trunking groups. Or if you prefer, you can use the integrated console port to configure the switch.
The non-blocking, wire-speed switching forwards packets as fast as your network can deliver them.
All ports have automatic MDI/MDI-X crossover detection. Each port independently and automatically negotiates
for best speed and whether to run in half- or full-duplex mode. Head-of-line blocking prevention keeps your
high-speed clients from bogging down in lower-speed traffic and fast store-and-forward switching prevents
damaged packets from being passed on into the network.
Use the instructions in this User Guide to help you connect the Switch, set it up, and configure it to bridge your
different networks. These instructions should be all you need to get the most out of the 24-port 10/100 + 2-Port
Gigabit Switch with WebView.
Chapter 1: Introduction
Welcome
1
Page 8

24-port 10/100 + 2-Port Gigabit Switch with WebView
What’s in this Guide?
This user guide covers the steps for setting up and using the Switch.
• Chapter 1: Introduction
This chapter describes the Switch’s applications and this User Guide.
• Chapter 2: Getting to Know the Switch
This chapter describes the physical features of the Switch.
• Chapter 3: Connecting the Switch
This chapter describes how to connect the Switch.
• Chapter 4: Configuration using the Console Interface
This chapter instructs you on how to use the Switch’s console interface for configuring the Switch.
• Chapter 5: Configuring the Switch through the Web Utility
This chapter shows you how to configure the Switch usign the Web Utility.
• Appendix A: Fast Ethernet and Gigabit Ethernet
This appendix describes the various Ethernets.
• Appendix B: Cabling
This appendix discusses different types of cabling.
• Appendix C: Windows Help
This appendix describes how you can use Windows Help for instructions about networking, such as installing
the TCP/IP protocol.
• Appendix D: Glossary
This appendix gives a brief glossary of terms frequently used in networking.
• Appendix E: Specifications
This appendix provides the Switch’s technical specifications.
• Appendix F: Warranty Information
This appendix supplies the Switch’s warranty information.
• Appendix G: Regulatory Information
This appendix supplies the Switch’s regulatory information.
Chapter 1: Introduction
What’s in this Guide?
2
Page 9

24-port 10/100 + 2-Port Gigabit Switch with WebView
• Appendix H: Contact Information
This appendix provides contact information for a variety of Linksys resources, including Technical Support.
Chapter 1: Introduction
What’s in this Guide?
3
Page 10
24-port 10/100 + 2-Port Gigabit Switch with WebView
Chapter 2: Getting to Know the Switch
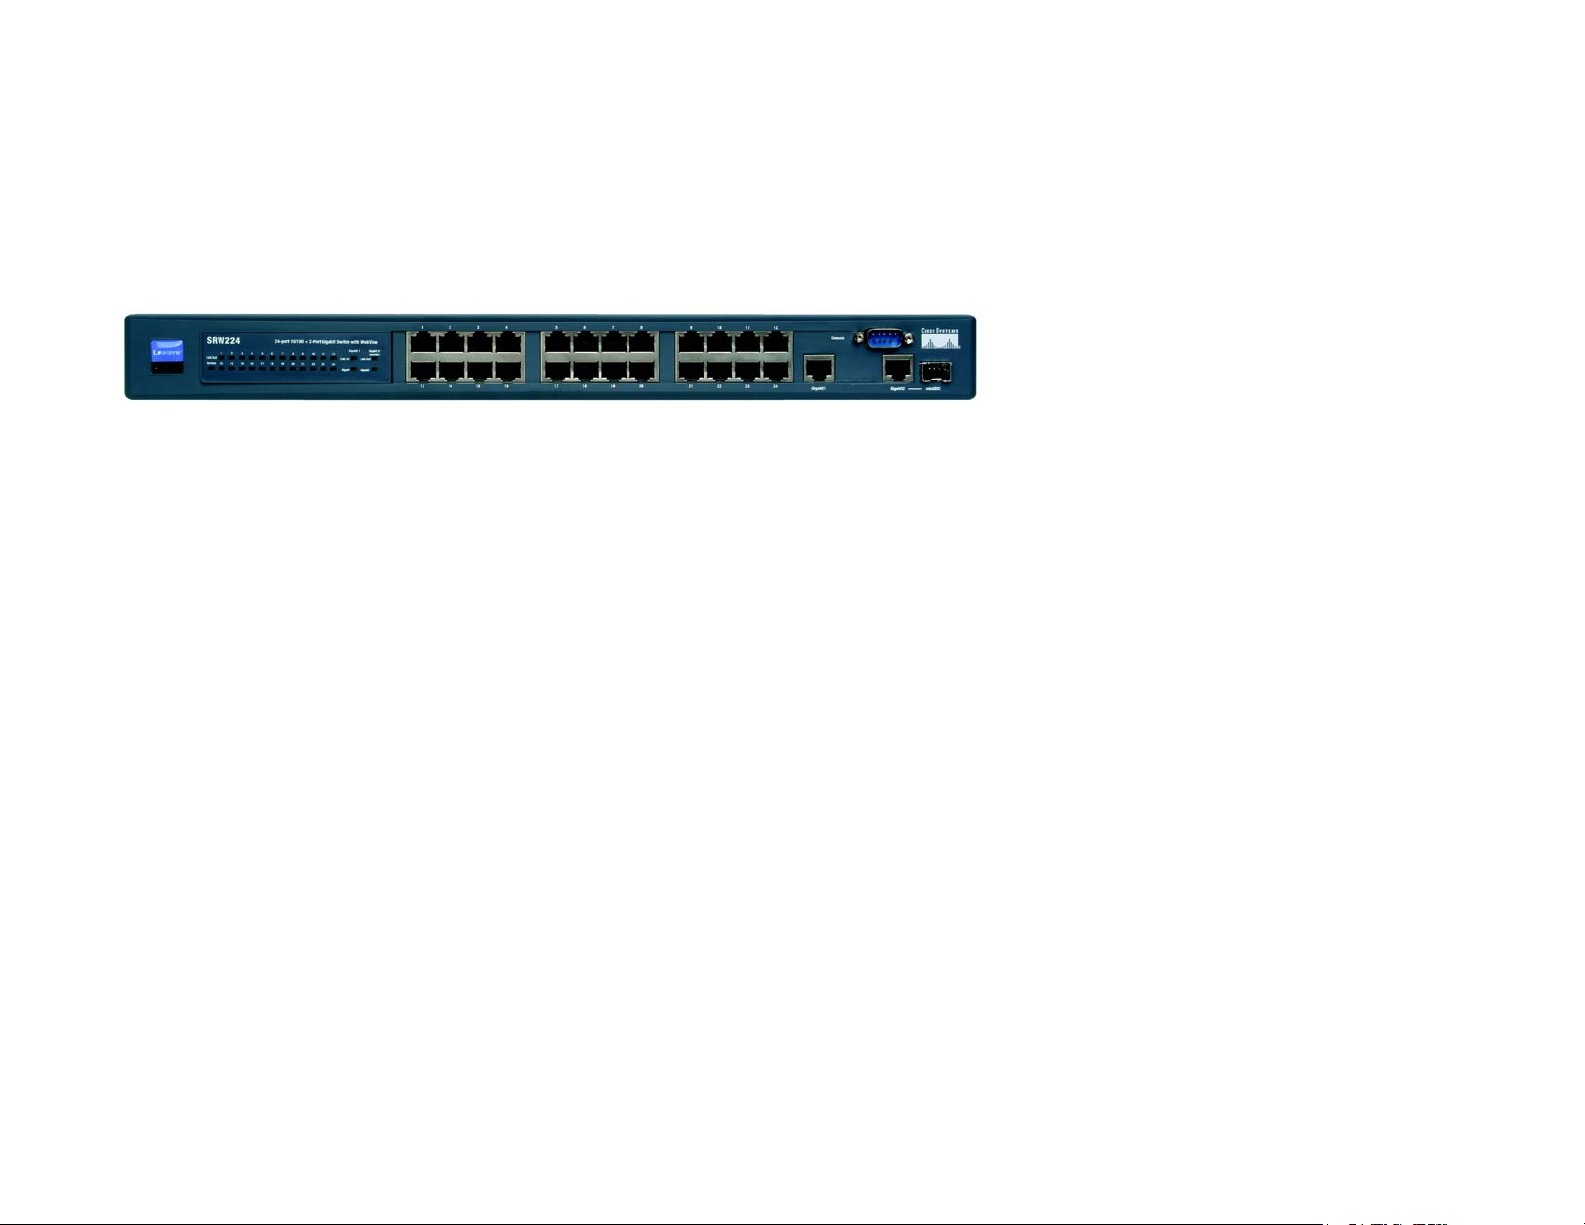
The Front Panel
The Switch's LEDs and ports are located on the front panel.
Figure 2-1: Front Panel
LEDs
System Green. Lights to indicate the power is being supplied to the Switch.
LINK/ACT Green. Lights to indicate a functional network link through the corresponding port (1
through 24) with an attached device. Blinks to indicate that the Switch is actively sending
or receiving data over that port.
Ports
LAN (1-24) The LAN (Local Area Network) ports connect to Ethernet network devices, such as other
switches or routers.
Gigabit1 /Gigabit2 / The switch is equipped with two Gigabit ports and a mini GBIC port that is shared with
miniGBIB Gigabit Port 2. If Gigabit Port 2 is being used, the minGBIC port cannot be used. They link to
high-speed network peripheral system or clients at speeds of up to
1000Mbps.
Gigabit Green. Lights to indicate the port is working in Gigabit mode.
Console The Console port is where you connect a serial cable from a PC’s serial port.
Chapter 2: Getting to Know the Switch
The Front Panel
4
Page 11
24-port 10/100 + 2-Port Gigabit Switch with WebView
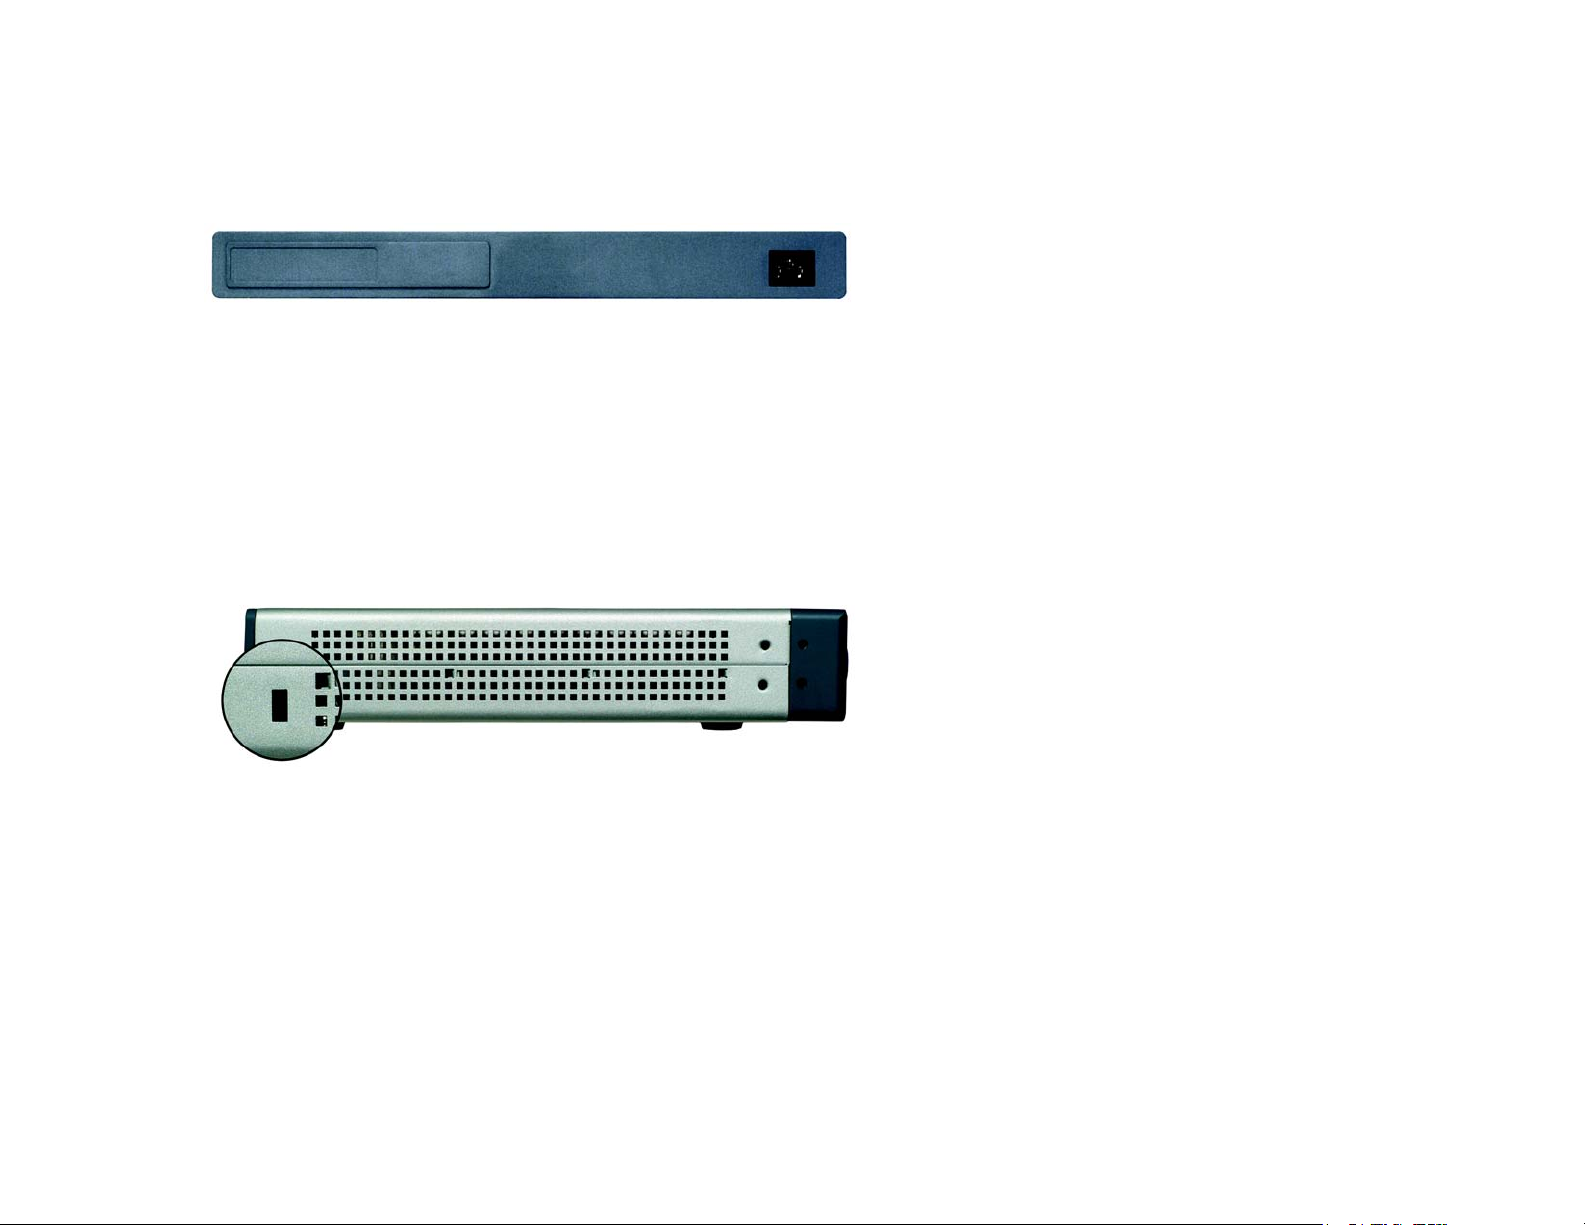
The Back Panel
The power port is located on the back panel of the Switch.
Figure 2-2: Back Panel
Power The Power port is where you will connect the power cord.
The Side Panel
The security slot is located on a side panel.
Figure 2-3: Side Panel
Security Slot The security slot is where you can attach a lock so the Switch will be protected from theft.
Chapter 2: Getting to Know the Switch
The Back Panel
5
Page 12

24-port 10/100 + 2-Port Gigabit Switch with WebView
RJ-45 Ports
The Switch is equipped with twenty-four auto-sensing RJ-45 ports. These RJ-45 ports support network speeds of
either 10Mbps or 100Mbps, and can operate in half and full-duplex modes. Auto-sensing technology enables
each port to automatically detect the speed of the device connected to it (10Mbps or 100Mbps), and adjust its
speed and duplex accordingly.
To connect a device to a port, you will need to use a network cable. You will need to use Category 5 (or better)
cable. For more information on twisted-pair cabling, refer to the Twisted-Pair Cabling section.
The Gigabit Expansion Ports
The Switch is equipped with one miniGBIC port and two Gigabit Ethernet ports that provide for the installation of
one expansion module. These ports provide links to high-speed network segments or individual workstations at
speeds of up to 1000Mbps (Gigabit Ethernet).
To establish a Gigabit Ethernet connection, you will need to install an MGBT1, MGBSX2, or MGBLH1 Gigabit
expansion module and use Category 5e cabling or fiber optic cabling. for more information on fiber optic cabling,
refer to the Fiber Optic Cabling section.
The Console Port
The Switch is equipped with a serial port labeled CONSOLE (located on the front of the switch) that allows you to
connect to a computer’s serial port (for configuration purposes) using the provided serial cable. You can use
HyperTerminal to manage the Switch using the console port.
With this and many other Linksys products, your networking options are limitless. Go to the Linksys website at
www.linksys.com for more information about products that work with the Switch.
Chapter 2: Getting to Know the Switch
The Side Panel
6
Page 13
24-port 10/100 + 2-Port Gigabit Switch with WebView
Chapter 3: Connecting the Switch
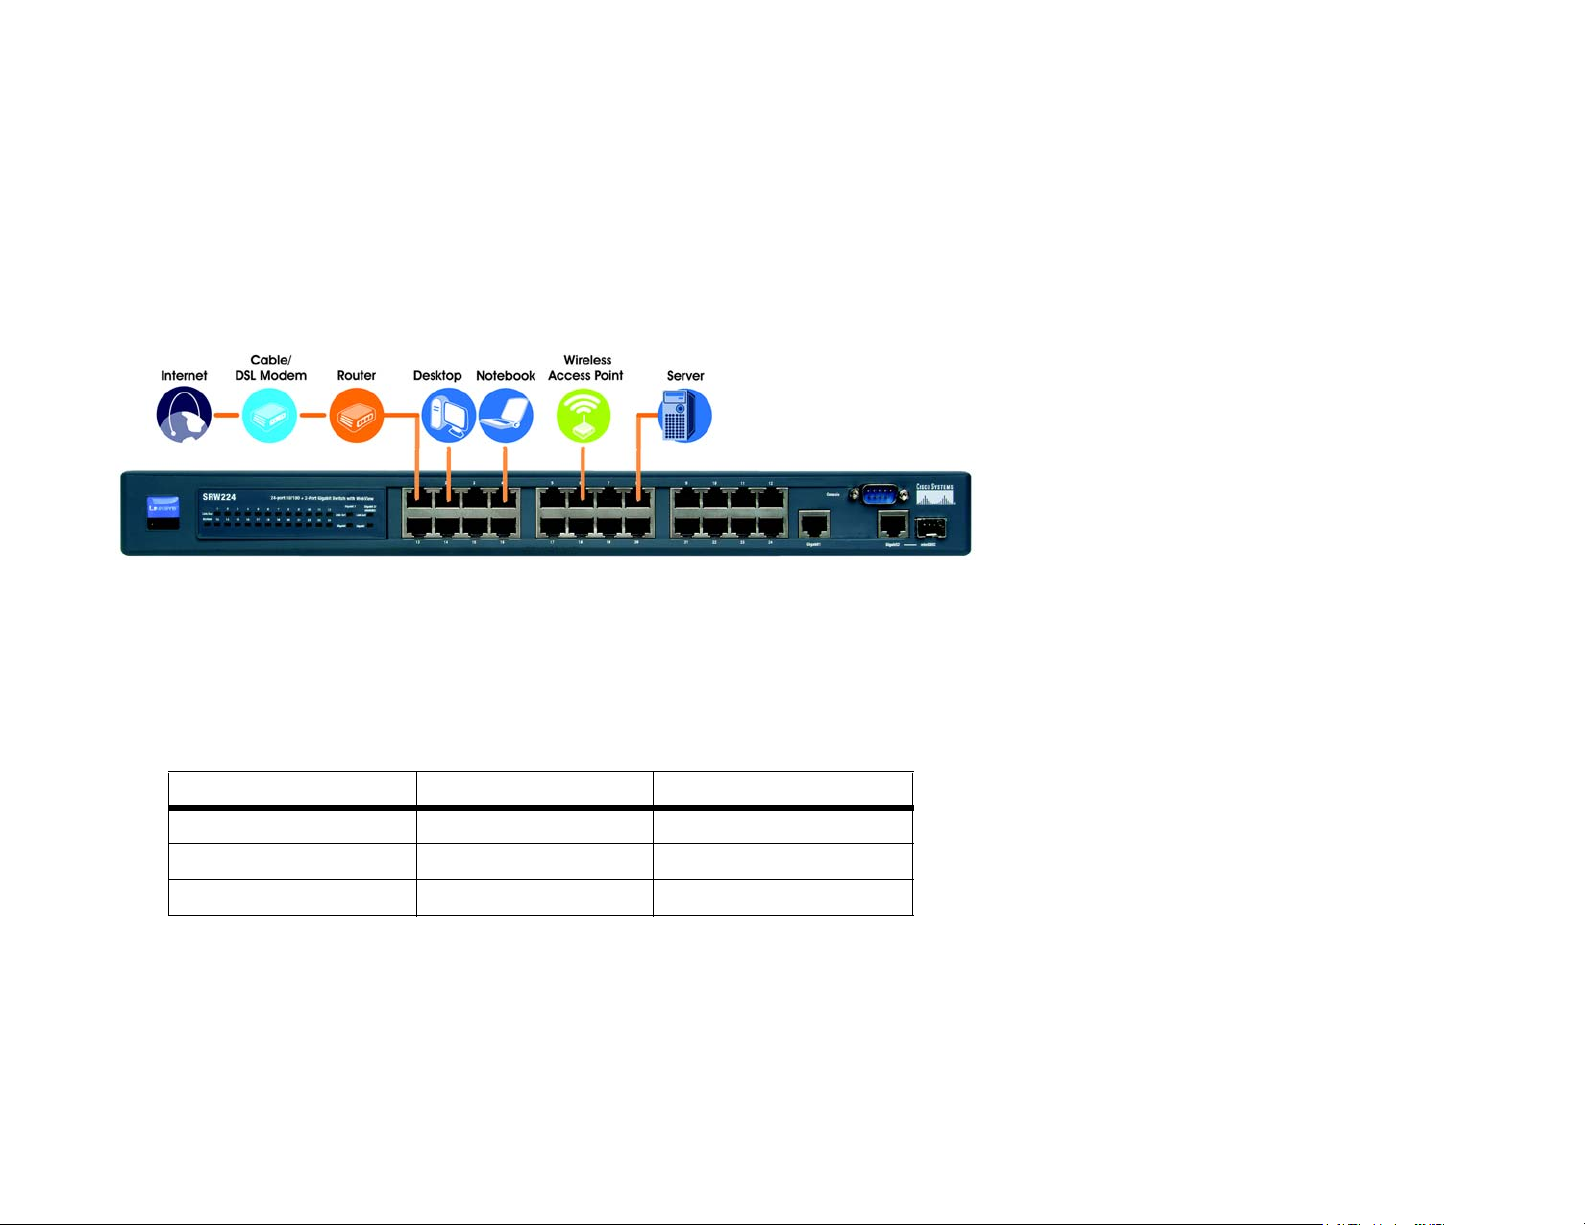
Overview
This chapter will explain how to connect network devices to the Switch. For an example of a typical network
configuration, see the application diagram shown in Figure 3-1.
Figure 3-1: Typical Network Configuration
When you connect your network devices, make sure you don’t exceed the maximum cabling distances, which are
listed in the following table:
Maximum Cabling Distances.
Table 1: Maximum Cabling Distances
From To Maximum Distance
Switch Switch or Hub 100 meters (328 feet)
Hub Hub 5 meters (16,4 feet)
Switch or Hub Computer 100 meters (328 feet)
*A hub refers to any type of 100Mbps hub, including regular hubs and stackable hubs. A 10Mbps hub connected
to another 10Mbps hub can span up to 100 meters (328 feet)
Chapter 3: Connecting the Switch
Overview
7
Page 14

24-port 10/100 + 2-Port Gigabit Switch with WebView
Pre-Installation Considerations
Fast Ethernet Considerations
If you will be using the Switch for Fast Ethernet (100Mbps) applications, you must observe the following
guidelines:
Full-Duplex Considerations
As previously mentioned, the Switch provides full-duplex support for its RJ-45 ports. Full-duplex operation allows
data to be sent and received simultaneously, doubling a port’s potential data throughput.
If you will be using the Switch in full-duplex mode, the maximum cable length using Category 5 cable is 328 feet
(100 meters).
Positioning the Switch
Before you choose a location for the Switch, observe the following guidelines:
• Make sure that the switch is accessible and that the cables can be connected easily.
• Keep cabling away from sources of electrical noise, power lines, and fluorescent lighting fixtures.
• Position the Switch away from water and moisture sources.
• To ensure adequate air flow around the Switch, be sure to provide a minimum clearance of two inches (50
mm).
• Do not stack free-standing Switches more than four units high.
• Connect Network Devices
Hardware Installation
To connect network devices to the Switch, follow these instructions:
1. Make sure all the devices you will connect to the Switch are powered off.
2. Connect a Category 5 Ethernet network cable to one of the numbered ports on the Switch.
3. Connect the other end to a PC or other network device.
Chapter 3: Connecting the Switch
Pre-Installation Considerations
8
Page 15
24-port 10/100 + 2-Port Gigabit Switch with WebView
4. Repeat steps 2 and 3 to connect additional devices.
5. If you are using the Gigabit port, connect a Category 5e Ethernet network cable to the Gigabit port on the
Switch, and connect the other end to a Gigabit server or other network device.
6. If you are using the mini-GBIC port, then connect the mini-GBIC module to the mini-GBIC port. For detailed
instructions, refer to the module’s documentation.
IMPORTANT: Make sure to use the power cord
that is supplied with the Switch. Use of a different
power cord could damage the Switch.
7. Connect the supplied power cord to the Switch’s power port, and plug the other end into an electrical outlet.
8. Power on the devices connected to the Switch. Each active port’s corresponding LED will light up on the
Switch.
NOTE: If you need to reset the Switch, remove the power cord
from the back of the Switch and then reconnect it.
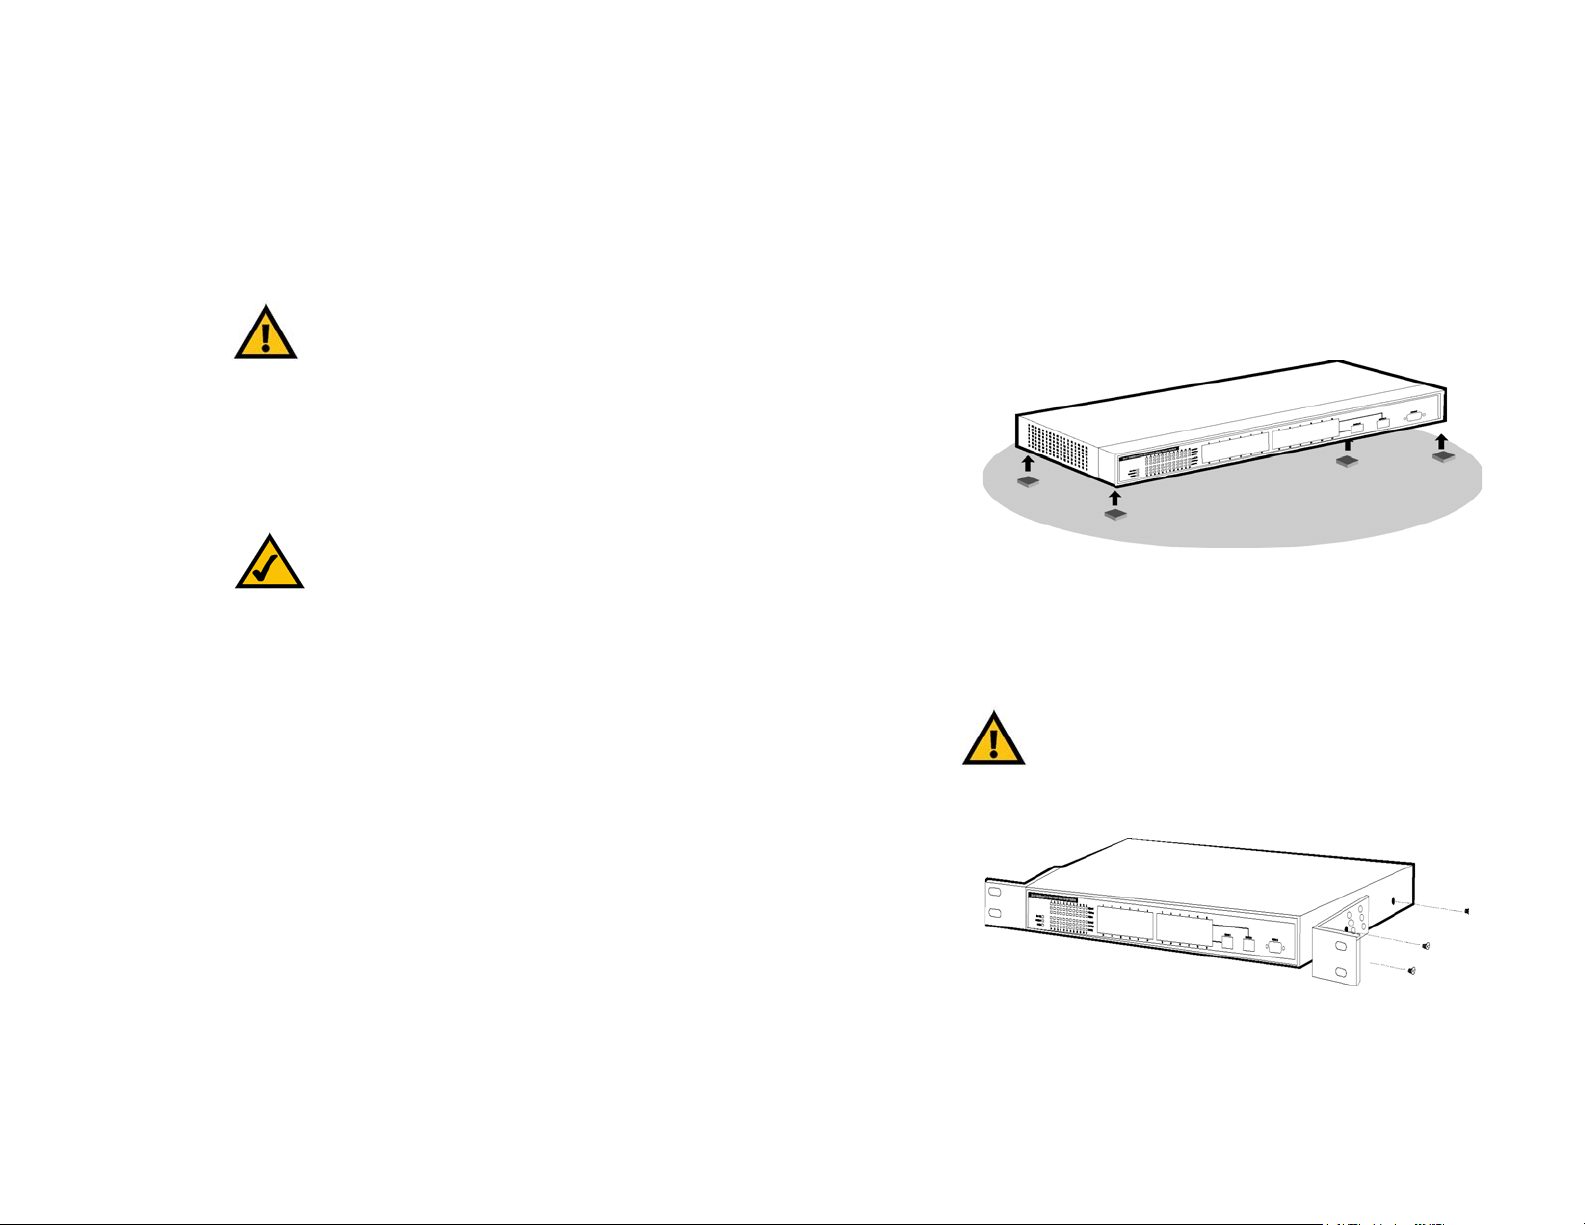
Placement Options
Figure 3-2: Attaching the Rubber Feet to the Bottom of
the Switch
There are two ways to physically install the Switch, either set the Switch on its four rubber feet for desktop
placement or mount the Switch in a standard-sized, 19-inch high rack for rack-mount placement.
Desktop Placement
1. Attach the rubber feet to the recessed areas on the bottom of the Switch. See Figure 3-1.
2. Place the Switch on a desktop near an AC power source.
3. Keep enough ventilation space for the Switch and check the environmental restrictions mentioned in
specifications as you are placing the Switch.
4. Connect the Switch to network devices according to the Hardware Installation instructions, above.
Chapter 3: Connecting the Switch
Placement Options
IMPORTANT: Make sure to use the screws supplied with
the mounting brackets. Using incorrect screws could
damage the Switch and would invalidate your warranty.
Figure 3-3: Attaching the Brackets to the Switch (Front
Panel Forward)
9
Page 16

24-port 10/100 + 2-Port Gigabit Switch with WebView
Rack-Mount Placement
To rack-mount the Switch in any standard 19-inch rack, follow the instructions described below.
1. Place the Switch on a hard flat surface with the front panel faced towards your front side
2. Attach a rack–mount bracket to one side of the Switch with the supplied screws. Figure 3-2 shows how to
attach brackets to one side of the Switch.
3. Secure the brackets tightly.
4. Follow the same steps to attach the other bracket to the opposite side.
5. After the brackets are attached to the Switch, use suitable screws to securely attach the brackets to any
standard 19-inch rack as shown in Figure 3-3.
6. Connect the Switch to network devices according to the Hardware Installation instructions.
Uplinking the Switch
To uplink the Switch, connect one end of a Cat5 (or better) cable into one of the 24 10/100 ports, and then
connect the other end of the cable into the peripheral device’s uplink port. MDI/MDIX will automaticlaly detect the
speed and cable type.
Figure 3-4: Mounting the Switch in A Rack
The hardware installation is complete,. Proceed to Chapter 4: Setting Up the 24-port 10/100 + 2-Port Gigabit
Switch with WebView, for directions on how to set up the Switch.
Chapter 3: Connecting the Switch
Uplinking the Switch
10
Page 17

24-port 10/100 + 2-Port Gigabit Switch with WebView
Chapter 4: Configuration using the Console Interface
Overview
The Switch features a menu-driven console interface for basic switch configuration. You can easily manage your
network from the screens through the console port. Before you can use the console interface, you will need to
configure the HyperTerminal application.
Configuring the HyperTerminal Application
1. Click the Start button. Select Accessories and then Communications. HyperTerminal should be one of the
options listed in this menu. Select HyperTerminal. Running the Hyper Terminal utility program.
2. Enter a name for this connection. In the example below, the name of connection is SRW224. Select an icon for
the application. Click OK.
3. Select a port to communicate with the switch. Select COM1, COM2, or TCP/IP.
4. Set the serial port settings, as follows, then click OK.
Bits per Second: 19200
Databits: 8
Parity: None
Stop bits: 1
Flow control: None
Figure 4-1: Finding HyperTerminal
Figure 4-2: Connection Description
Chapter 4: Configuration using the Console Interface
Overview
Figure 4-3: Connect To
11
Page 18

24-port 10/100 + 2-Port Gigabit Switch with WebView
Configuring the Switch through the Console Interface
Login
When you finish configuring the Hyper Terminal, the Login screen will appear. The first time you open the WebBased Utility, use the default username admin, and leave the password blank. Click the Login button. You can set
a new password later from the Password Setting screen.
Switch Screens
The Switch screens consist of a series of menus. Each menu has several options, which are listed vertically. A
highlight in each menu lets you select the option you wish to choose; pressing the Enter key activates the
highlighted option.
To navigate through the Console Interface use the Up Arrow or Down Arrow keys to move up or down, use the
Enter key to select, and the Esc key to return to the previous selection; menu options and any values entered or
present will get highlighted. Note that the bottom of the window always has a listing of the appropriate key
strokes.
Switch Main Menu
The Switch Main Menu screen displays four menu choices: System Configuration, Port Status, Port Configuration,
and Logout.
Figure 4-4: COM1 Properties
Figure 4-5: Login
Chapter 4: Configuration using the Console Interface
Configuring the Switch through the Console Interface
Figure 4-6: Switch Main Menu
12
Page 19

24-port 10/100 + 2-Port Gigabit Switch with WebView
System Configuration
System Configuration displays:
1. System Information
2. Advanced Switch Configuration
3. Password Setting
4. IP Configuration
5. Firmware Update
6. Restore System Default Setting
7. Reboot System
0. Return to Main Menu.
System Information
In System Information, you can check the Firmware Version.
Figure 4-7: System Configuration
Figure 4-8: System Information
Chapter 4: Configuration using the Console Interface
Configuring the Switch through the Console Interface
13
Page 20

24-port 10/100 + 2-Port Gigabit Switch with WebView
Advanced Switch Configuration
This screen allows you to make advanced switch configuration settings.
Broadcast Storm Filter. This allows you to filter by percentage the amount of broadcast traffic to your network to
prevent a storm of too many broadcasts from being sent at the same time. Select 5%, 10%, or 20%. Select Off to
prevent filtering.
Collision Retry Forever. In a collision, a packet will be re-sent until it reaches its destination. To enable this
feature, select Enable. To disable this feature, select Disable.
MAC Table Auto-Aging. If there is no response froma network device when searching for a MAC address within
the chosen time, the switch will remove the MAC address from the MAC address table. Select 150 sec, 300 sec, or
600 sec. To disable this feature, select Disable.
MAC Table Hashing. Select from a choice of two algorithm types used to check the MAC address table to
determine which MAC address is associated with what port or destination on the network. Select Direct Map or
CRC (Cyclical Redundancy Checking) Hash.
Console Auto Logout Time. The console will log out after the chosen time. Select 5 min, 10 min, or 20 min. Select
Never to disable the feature.
Web Auto Logout Time. The Web interface will log out after the chosen time. Select 5 min, 10 min, or 20 min.
Figure 4-9: Advanced Switch Configuration
Password Configuration
This screen allows you to set a password for your Switch.
Password Protection. To set a password for your network, select Enable. Enter your user name in the field, then
the password. Enter the password again to confirm that it is correct. If you don’t want to have a password to enter
the network, select Disable. The Username and Password can only be a maximum of six characters, using the
letters a through z, and numbers 0 through 9.
Chapter 4: Configuration using the Console Interface
Configuring the Switch through the Console Interface
Figure 4-10: Password Setting
14
Page 21

24-port 10/100 + 2-Port Gigabit Switch with WebView
IP Configuration
IP information is displayed here.
• MAC Address. The MAC Address of the Switch is displayed.
• IP Address. This IP Address of the network is displayed. (The default IP address is 192.168.1.254.) Verify that
the address you enter is correct and does not conflict with another device on the network.
• Subnet Mask. The subnet mask of the network is displayed.
• Default Gateway. The default gateway of the network is displayed.
If you would like to change the IP address settings of the Switch, select Edit at he bottom of the screen.
Firmware Update
When new firmware becomes available, you can update the Switch. To update the firmware, select Firmware
Update. When the message asks if you want to continue the update, select Y to continue or N if you want to
cancel.
Figure 4-11: IP Configuration
IMPORTANT: Do not disconnect the power during
a firmware upgrade. Damage to Switch could
occur.
After you select yes, the Switch will be set to receive the file. At the top of your screen, select Transfer from the
Main Menu, then select Send File.
Chapter 4: Configuration using the Console Interface
Configuring the Switch through the Console Interface
Figure 4-12: Firmware Update
Figure 4-13: Main Menu
15
Page 22

24-port 10/100 + 2-Port Gigabit Switch with WebView
The Send File screen will appear. Click Browse to locate the firmware file. Select the Xmodem protocol from the
Protocol drop-down menu. Click Send to send the firmware.
The Xmodem File Send for SRW224 screen will appear to display the status of the upgrade.
When you are prompted to restart the Switch, select Y to restart the Switch.
Restore System Default Setting
To restore the Switch back to the factory default settings, select Restore System Default Setting and press enter.
A confirmation message will appear stating that All User Configuration data will be reset to Default. Continue? [y/
n]. Press the “y” key to continue or the “n” key to cancel the restoration.
Figure 4-14: Send File
Figure 4-15: Xmodem File Send for SRW224
Chapter 4: Configuration using the Console Interface
Configuring the Switch through the Console Interface
Figure 4-16: Restore System Default Setting
16
Page 23

24-port 10/100 + 2-Port Gigabit Switch with WebView
Reboot System
If you would like to reboot the Switch, select Reboot System and press Enter.
Figure 4-17: Reboot System
Return to Main Menu
Select Return to Main Menu if you want to return to the main menu.
Chapter 4: Configuration using the Console Interface
Configuring the Switch through the Console Interface
Figure 4-18: Return to Main Menu
17
Page 24

24-port 10/100 + 2-Port Gigabit Switch with WebView
Port Status
This screen allows you to view the status of a port. The Port, Enable, Link Status, Spd/Dpx, and Flow Control are
displayed.
Port Configuration
This screen allows you to change the status of a port. Select the port, then Enable the port you want to configure
or Disable if you don’t. For the Speed/Duplex, enter 10 Half, 10 Full, 100 Half, 100 Full, or Auto for Auto MDI/
MDIX. For Flow Control, select On to control the flow of the packet transmission or Off.
Figure 4-19: Port Status
Logout
Select Logout to log out of the console configuration utility.
Chapter 4: Configuration using the Console Interface
Configuring the Switch through the Console Interface
Figure 4-20: Port Configuration
Figure 4-21: Logout
18
Page 25

24-port 10/100 + 2-Port Gigabit Switch with WebView
Chapter 5: Configuring the Switch through the Web Utility
Overview
Open your web browser and enter 192.168.1.254 into the address field. Press the Enter key and the Password
screen will appear. The first time you open the Web-Based Utility, use the default username admin, and leave the
password blank. Click the Login button. You can set a new password later from the Password Setting screen.
The first screen that appears displays the Welcome Screen. This allows you to access the six tabs: System, Port,
Trunk, VLAN, QoS, and Logout. Click a tab to view its contents.
Figure 5-1: Addrees Field
Chapter 5: Configuring the Switch through the Web Utility
Overview
Figure 5-2: Password Screen
Figure 5-3: Welcome Screen
19
Page 26

24-port 10/100 + 2-Port Gigabit Switch with WebView
System Tab
The System tab displays the system information.
• Firmware version. The current firmware version is displayed.
• MAC Address. The MAC Address of the Switch is displayed.
• IP Address. This IP Address of the network is displayed. (The default IP address is 192.168.1.254. Verify the
address. You can change the IP address, subnet mask, and default gateway here.
• Subnet Mask. The subnet mask of the network is displayed.
• Default Gateway. The default gateway of the network is displayed.
Click the Apply button after you have verified that the information is correct.
These following links are available on this tab:
To configure the advanced switch configuration, click the Click here to configure MISC configuration link.
To configure your username and password, click the Click here to configure your Username/Password link.
(Figure 5-6)
To reboot your system, click the Click here to reboot system link.
To restore the Switch back to the default settings, click the Click here to restore system default setting link.
Advanced Switch Configuration (Figure 5-5.)
This screen allows you to make advanced switch configuration settings.
Broadcast Storm Filter. This allows you to filter by percentage the amount of broadcast traffic to your network to
prevent a storm of too many broadcasts from being sent at the same time. Select 5%, 10%, or 20% from the
drop-down menu. Select Off to prevent filtering.
Figure 5-4: System Tab-System Information
Figure 5-5: System Tab-MISC Configuration
Chapter 5: Configuring the Switch through the Web Utility
System Tab
20
Page 27

24-port 10/100 + 2-Port Gigabit Switch with WebView
Collision Retry Forever. In a collision, a packet will be re-sent until it reaches its destination. To enable this
feature, select Enable from the drop-down menu. To disable this feature, select Disable.
MAC Table Auto-Aging. If there is no response froma network device when searching for a MAC address within
the chosen time, the switch will remove the MAC address from the MAC address table. Select 150 sec, 300 sec, or
600 sec from the drop-down menu. To disable this feature, select Disable.
MAC Table Hashing. Select from a choice of two algorithm type used to check the MAC address table to determine
which MAC address is associated with what port or destination on the network. Select Direct Map or CRC
(Cyclical Redundancy Checking) Hash from the drop-down menu.
Console Auto Logout Time. The console will log out after the chosen time. Select 5 min, 10 min, or 20 min from
the drop-down menu. Select Never to disable the feature.
Web Auto Logout Time. The Web interface will log out after the chosen time. Select 5 min, 10 min, or 20 min from
the drop-down menu.
Password Setting
This screen allows you to set a password for your Switch.
Password Protection. To set a password for your network, select Enable from the drop-down menu. Enter your
user name in the field, then the password. Enter the password again to confirm that it is correct. If you don’t want
to have a password to configure the Switch, select Disable.
Chapter 5: Configuring the Switch through the Web Utility
System Tab
Figure 5-6: System Tab-Username/Password Setting
21
Page 28

24-port 10/100 + 2-Port Gigabit Switch with WebView
Port Tab
This tab allows you to view the status of a port. The Port, Enable, Link Status, Spd/Dpx, and Flow Control are
displayed.
Click Click here to configure Speed/Duplex of each Port, which is located at the bottom of the screen, to
configure the ports.
Port Configuration
Figure 5-7: Port Tab-Port Status
This screen allows you to change the status of a port.Select the port, then select Enable or Disable to enable or
disable the port you want to configure. For the Speed/Duplex, enter 10 Half, 10 Full, 100 Half, 100 Full, or Auto
(turns Auto MDI/MDIX on or off). For Flow Control, select On to control the flow of the packet transmission or Off.
Click Apply when finished with your changes.
Chapter 5: Configuring the Switch through the Web Utility
Port Tab
Figure 5-8: Port Tab-Port Configuration
22
Page 29

24-port 10/100 + 2-Port Gigabit Switch with WebView
Trunk Tab
This tab allows you to configure the trunk group. Select the port, then select if it is a normal port, then select the
group you want to add the port to.
Click Apply when finished with your changes.
VLAN Tab
Figure 5-9: Trunk Configuration
VLAN Configuration
This tab allows you to configure the VLAN feature.
To configure the VLAN, select PortBased or 802.1Q from the drop-down menu. To disable this feature, select
Disable. I
802.1Q VLAN Mode
The VLAN Group list will display the existing VLAN groups. To add a VLAN group, click Add New. To delete a group
from the list, click Delete. Click Click Advanced 802.1Q VLAN Setting to change settings.
Click Apply to save the changes.
Chapter 5: Configuring the Switch through the Web Utility
Trunk Tab
Figure 5-10: 802.1Q VLAN
23
Page 30

24-port 10/100 + 2-Port Gigabit Switch with WebView
Advanced 802.1Q VLAN Setting
For each port, select Drop or Forward for Nonmember and Untagged.
Figure 5-11: Advanced 802.1Q VLAN Setting
Edit a 802.1Q VLAN Group
To add an 802.1QVLAN group, enter an identifying number between 1 and 255 in the VLAN ID field. Select Ta gged
from the drop-down menu under the port for each port that you want to add. Click Apply to save the changes.
Chapter 5: Configuring the Switch through the Web Utility
VLAN Tab
Figure 5-12: Edit a 802.1Q VLAN Group
24
Page 31

24-port 10/100 + 2-Port Gigabit Switch with WebView
If you change from an 802.1q VLAN mode to a Port-based VLAN mode, this screen will appear.
PortBased VLAN Mode
The VLAN Group list will display the existing VLAN groups.To add a VLAN group, click Add New. To delete a group
from the list, click Delete.
Click Apply to save the changes.
Figure 5-13: Mode Change
Add a PortBased VLAN Group
To add a PortBased VLAN group, enter an identifying number between 1 and 255 in the Group ID field. Select
Member from the drop-down menu under the port for each port that you want to add. Click Apply to save the
changes.
Chapter 5: Configuring the Switch through the Web Utility
VLAN Tab
Figure 5-14: Port Based VLAN
Figure 5-15: Add a Port Base VLAN Group
25
Page 32

24-port 10/100 + 2-Port Gigabit Switch with WebView
QoS Configuration
This screen allows you to configure the QoS. Select the QoS Mode of High Low = 3:1, Disable QoS Priority, High
Empty Then Low, High Low = 3:1, High Low = 5:1, High Low = 7:1 from the drop-down menu. Select the
Static Port Ingress Priority of High or Low from the drop-down menu, for the port you want to configure. Select
Off for the port to remain unchanged. For 802/1p Priority [7-0], select from 0 to 7, then select High or Low from
the drop-down menu.
Click Apply to save the changes.
Figure 5-16: QoS Configuration
Logout Tab
Click Logout OK to logout. Click back to go to the previous screen.
Chapter 5: Configuring the Switch through the Web Utility
VLAN Tab
Figure 5-17: Logout Tab
26
Page 33

24-port 10/100 + 2-Port Gigabit Switch with WebView
Appendix A: Fast Ethernet and Gigabit Ethernet
About Fast Ethernet
1. As the demand for desktop video, multimedia development, imaging, and other speed-intensive applications
continues to rise, the need for high performance, fault tolerant LAN technology will become more critical.
2. Standard Ethernet, which has been the most popular networking technology to date with a maximum data
throughput of 10Mbps (Megabits per second), is becoming insufficient to handle the latest video, multimedia,
and other speed-intensive client/server LAN applications.
3. Among the solutions to the problem of network speed, Fast Ethernet has emerged as the most viable and
economical. Capable of sending and receiving data at 100Mbps, it is more than fast enough to handle even
the most demanding video and other real-time applications.
4. Although there are a number of different competing Fast Ethernet implementations, 100BaseTX is by far the
most popular. Operating on two pairs of Category 5 unshielded twisted-pair (UTP) cabling, 100BaseTX
supports high speed signaling and is relatively inexpensive. Because it uses four wires for data transmission
and the same packet format, packet length, error control, and management information as 10BaseT,
100BaseTX can be made to communicate with slower 10BaseT equipment when routed through a switch.
5. This backwards compatibility is one of 100BaseTX's major advantages over other forms of Fast Ethernet; it
allows critical, speed-dependent network segments to be upgraded to 100BaseTX speeds as needed without
re-wiring, refitting, and retraining an entire site. Networks can now mix both slow and fast network segments
for different users or departments. Publishing, R&D, video, multimedia, or accounting departments can enjoy
a 100Mbps pace, while other corporate segments can operate at slower and more affordable 10Mbps speeds.
About Gigabit Ethernet
Gigabit Ethernet runs at speeds of 1Gbps (Gigabit per second), ten times faster than 100Mbps Fast Ethernet, but
it still integrates seamlessly with 100Mbps Fast Ethernet hardware. Users can connect Gigabit Ethernet hardware
with either fiber optic cabling or copper Category 5 cabling, with fiber optics more suited for network backbones.
As the new Gigabit standard gradually integrates into existing networks, current computer applications will enjoy
faster access time for network data, hardware, and Internet connections.
Appendix A: Fast Ethernet and Gigabit Ethernet
About Fast Ethernet
27
Page 34

24-port 10/100 + 2-Port Gigabit Switch with WebView
Appendix B: Cabling
Overview
Twisted Pair Cabling and Fiber Optic Cabling are discussed in this appendix.
Twisted Pair Cabling
There are different grades, or categories, of twisted-pair cabling. Category 5 is the most reliable and is highly
recommended. Straight-through cables are used for connecting computers to a hub. Crossover cables are used
for connecting a hub to another hub (there is an exception: some hubs have a built-in uplink port that is crossed
internally, which allows you to link or connect hubs together with a straight-through cable instead).
You can buy pre-made Category 5 cabling, or cut and crimp your own. Category 5 cables can be purchased or
crimped as either straight-through or crossover cables. A Category 5 cable has 8 thin, color-coded wires inside
that run from one end of the cable to the other. All 8 wires are used. In a straight-through cable, wires 1, 2, 3, and
6 at one end of the cable are also wires 1, 2, 3, and 6 at the other end. In a crossover cable, the order of the wires
change from one end to the other: wire 1 becomes 3, and 2 becomes 6. See the diagrams on the next page for
more detailed information on straight-through and crossover cabling.
To determine which wire is wire number 1, hold the cable so that the end of the plastic RJ-45 tip (the part that
goes into a wall jack first) is facing away from you. Face the clip down so that the copper side faces up (the
springy clip will now be parallel to the floor).When looking down on the copper side, wire 1 will be on the far left.
Crimping your own Network Cables
The processes for straight-through cabling and crossed-over cabling are illustrated below.
Appendix B: Cabling
Overview
Figure B-1: Cable Charts
28
Page 35

24-port 10/100 + 2-Port Gigabit Switch with WebView
Figure B-2: Straight-Through Cable
Appendix B: Cabling
Twisted Pair Cabling
Figure B-3: Crossed-Over Cable
29
Page 36

24-port 10/100 + 2-Port Gigabit Switch with WebView
Fiber Optic Cabling
Fiber optic cabling is made from flexible, optically efficient strands of glass and coated with a layer of rubber
tubing, fiber optics use photons of light instead of electrons to send and receive data. Although fiber is physically
capable of carrying terabits of data per second, the signaling hardware currently on the market can handle no
more than a few gigabits of data per second.
Fiber cables come with two main connector types. The most commonly used fiber optic cable is multi-mode fiber
cable (MMF), with a 62.5 micron fiber optic core. Single-mode fiber cabling is somewhat more efficient than
multi-mode but far more expensive, due to its smaller optic core that helps retain the intensity of traveling light
signals. A fiber connection always require two fiber cables: one transmits data, and the other receives it.
Each fiber optic cable is tipped with a connector that fits into a fiber port on a network adapter, hub, or switch. In
the U. S., most cables use a square SC connector that slides and locks into place when plugged into a port or
connected to another cable. In Europe, the round ST connector is more prevalent.
You must use the Linksys MGBT1, MGBSX1, or MGBLH1 miniGBIC modules with the Linksys SRW224. The
MGBSX1 and the MGBLH1 require fiber cabling with LC connectors. The MGBT1 requires a Category 5 Ethernet
Cable with an RJ-45 connector.
Appendix B: Cabling
Fiber Optic Cabling
30
Page 37

24-port 10/100 + 2-Port Gigabit Switch with WebView
Appendix D: Glossary
Adapter - A device that adds network functionality to your PC.
AES (Advanced Encryption Standard) - A security method that uses symmetric 128-bit block data encryption.
Backbone - The part of a network that connects most of the systems and networks together, and handles the
most data.
Bandwidth - The transmission capacity of a given device or network.
Bit - A binary digit.
Boot - To start a device and cause it to start executing instructions.
Bridge - A device that connects different networks.
Broadband - An always-on, fast Internet connection.
Browser - An application program that provides a way to look at and interact with all the information on the
World Wide Web.
Buffer - A shared or assigned memory area that is used to support and coordinate different computing and
networking activities so one isn't held up by the other.
Byte - A unit of data that is usually eight bits long
Cable Modem - A device that connects a computer to the cable television network, which in turn connects to the
Internet.
CSMA/CA (Carrier Sense Multiple Access/Collision Avoidance) - A method of data transfer that is used to prevent
data collisions.
CTS (Clear To Send) - A signal sent by a wireless device, signifying that it is ready to receive data.
Daisy Chain - A method used to connect devices in a series, one after the other.
Database - A collection of data that is organized so that its contents can easily be accessed, managed, and
updated.
Appendix D: Glossary
32
Page 38

24-port 10/100 + 2-Port Gigabit Switch with WebView
DDNS (Dynamic Domain Name System) - Allows the hosting of a website, FTP server, or e-mail server with a
fixed domain name (e.g., www.xyz.com) and a dynamic IP address.
Default Gateway - A device that forwards Internet traffic from your local area network.
DHCP (Dynamic Host Configuration Protocol) - A networking protocol that allows administrators to assign
temporary IP addresses to network computers by "leasing" an IP address to a user for a limited amount of time,
instead of assigning permanent IP addresses.
DMZ (Demilitarized Zone) - Removes the Router's firewall protection from one PC, allowing it to be "seen" from
the Internet.
DNS (Domain Name Server) - The IP address of your ISP's server, which translates the names of websites into IP
addresses.
Domain - A specific name for a network of computers.
Download - To receive a file transmitted over a network.
DSL (Digital Subscriber Line) - An always-on broadband connection over traditional phone lines.
DSSS (Direct-Sequence Spread-Spectrum) - Frequency transmission with a redundant bit pattern resulting in a
lower probability of information being lost in transit.
DTIM (Delivery Traffic Indication Message) - A message included in data packets that can increase wireless
efficiency.
Dynamic IP Address - A temporary IP address assigned by a DHCP server.
Ethernet - A networking protocol that specifies how data is placed on and retrieved from a common transmission
medium.
Finger - A program that tells you the name associated with an e-mail address.
Firewall - A set of related programs located at a network gateway server that protects the resources of a
network from users from other networks.
Firmware - The programming code that runs a networking device.
Fragmentation -Breaking a packet into smaller units when transmitting over a network medium that cannot
support the original size of the packet.
Appendix D: Glossary
33
Page 39

24-port 10/100 + 2-Port Gigabit Switch with WebView
FTP (File Transfer Protocol) - A protocol used to transfer files over a TCP/IP network.
Full Duplex - The ability of a networking device to receive and transmit data simultaneously.
Gateway - A device that interconnects networks with different, incompatible communications protocols.
Half Duplex - Data transmission that can occur in two directions over a single line, but only one direction at a
time.
Hardware - The physical aspect of computers, telecommunications, and other information technology devices.
HTTP (HyperText Transport Protocol) - The communications protocol used to connect to servers on the World
Wide Web.
Infrastructure - A wireless network that is bridged to a wired network via an access point.
IP (Internet Protocol) - A protocol used to send data over a network.
IP Address - The address used to identify a computer or device on a network.
IPCONFIG - A Windows 2000 and XP utility that displays the IP address for a particular networking device.
IPSec (Internet Protocol Security) - A VPN protocol used to implement secure exchange of packets at the IP layer.
ISM band - Radio bandwidth utilized in wireless transmissions.
ISP (Internet Service Provider) - A company that provides access to the Internet.
LAN - The computers and networking products that make up your local network.
LEAP (Lightweight Extensible Authentication Protocol) - A mutual authentication method that uses a username
and password system.
MAC (Media Access Control) Address - The unique address that a manufacturer assigns to each networking
device.
Mbps (MegaBits Per Second) - One million bits per second; a unit of measurement for data transmission.
mIRC - An Internet Relay Chat program that runs under Windows.
Multicasting - Sending data to a group of destinations at once.
Appendix D: Glossary
34
Page 40

24-port 10/100 + 2-Port Gigabit Switch with WebView
NAT (Network Address Translation) - NAT technology translates IP addresses of a local area network to a different
IP address for the Internet.
NAT (Network Address Translation) Traversal -A method of enabling specialized applications, such as Internet
phone calls, video, and audio, to travel between your local network and the Internet. STUN is a specific type of
NAT traversal.
Network - A series of computers or devices connected for the purpose of data sharing, storage, and/or
transmission between users.
NNTP (Network News Transfer Protocol) - The protocol used to connect to Usenet groups on the Internet.
Node - A network junction or connection point, typically a computer or work station.
Packet - A unit of data sent over a network.
Passphrase - Used much like a password, a passphrase simplifies the WEP encryption process by automatically
generating the WEP encryption keys for Linksys products.
Ping (Packet INternet Groper) - An Internet utility used to determine whether a particular IP address is online.
POP3 (Post Office Protocol 3) - A standard mail server commonly used on the Internet.
Port - The connection point on a computer or networking device used for plugging in cables or adapters.
Power over Ethernet (PoE) - A technology enabling an Ethernet network cable to deliver both data and power.
PPPoE (Point to Point Protocol over Ethernet) - A type of broadband connection that provides authentication
(username and password) in addition to data transport.
PPTP (Point-to-Point Tunneling Protocol) - A VPN protocol that allows the Point to Point Protocol (PPP) to be
tunneled through an IP network. This protocol is also used as a type of broadband connection in Europe.
RADIUS (Remote Authentication Dial-In User Service) - A protocol that uses an authentication server to control
network access.
RJ-45 (Registered Jack-45) - An Ethernet connector that holds up to eight wires.
Router - A networking device that connects multiple networks together.
RTP (Real-time Transport Protocol) - A protocol that enables specialized applications, such as Internet phone
calls, video, and audio, to occur in real time.
Appendix D: Glossary
35
Page 41

24-port 10/100 + 2-Port Gigabit Switch with WebView
RTS (Request To Send) - A networking method of coordinating large packets through the RTS Threshold setting.
Server - Any computer whose function in a network is to provide user access to files, printing, communications,
and other services.
SMTP (Simple Mail Transfer Protocol) - The standard e-mail protocol on the Internet.
SNMP (Simple Network Management Protocol) - A widely used network monitoring and control protocol.
Software - Instructions for the computer. A series of instructions that performs a particular task is called a
"program".
SOHO (Small Office/Home Office) - Market segment of professionals who work at home or in small offices.
SPI (Stateful Packet Inspection) Firewall - A technology that inspects incoming packets of information before
allowing them to enter the network.
Static IP Address - A fixed address assigned to a computer or device that is connected to a network.
Static Routing - Forwarding data in a network via a fixed path.
Subnet Mask - An address code that determines the size of the network.
Switch - 1. A data switch that connects computing devices to host computers, allowing a large number of
devices to share a limited number of ports. 2. A device for making, breaking, or changing the connections in an
electrical circuit.
TCP (Transmission Control Protocol) - A network protocol for transmitting data that requires acknowledgement
from the recipient of data sent.
TCP/IP (Transmission Control Protocol/Internet Protocol) - A set of instructions PCs use to communicate over a
network.
Telnet - A user command and TCP/IP protocol used for accessing remote PCs.
TFTP (Trivial File Transfer Protocol) - A version of the TCP/IP FTP protocol that has no directory or password
capability.
Throughput - The amount of data moved successfully from one node to another in a given time period.
TKIP (Temporal Key Integrity Protocol) - a wireless encryption protocol that provides dynamic encryption keys for
each packet transmitted.
Appendix D: Glossary
36
Page 42

24-port 10/100 + 2-Port Gigabit Switch with WebView
Topology - The physical layout of a network.
TX Rate - Transmission Rate.
UDP (User Datagram Protocol) - A network protocol for transmitting data that does not require acknowledgement
from the recipient of the data that is sent.
Upgrade - To replace existing software or firmware with a newer version.
Upload - To transmit a file over a network.
URL (Uniform Resource Locator) - The address of a file located on the Internet.
VPN (Virtual Private Network) - A security measure to protect data as it leaves one network and goes to another
over the Internet.
WAN (Wide Area Network)- The Internet.
WINIPCFG - A Windows 98 and Me utility that displays the IP address for a particular networking device.
Appendix D: Glossary
37
Page 43

24-port 10/100 + 2-Port Gigabit Switch with WebView
Appendix C: Windows Help
All wireless products require Microsoft Windows. Windows is the most used operating system in the world and
comes with many features that help make networking easier. These features can be accessed through Windows
Help and are described in this appendix.
TCP/IP
Before a computer can communicate within a network, TCP/IP must be enabled. TCP/IP is a set of instructions, or
protocol, all PCs follow to communicate over a network. This is true for wireless networks as well. Your PCs will
not be able to utilize wireless networking without having TCP/IP enabled. Windows Help provides complete
instructions on enabling TCP/IP.
Shared Resources
If you wish to share printers, folder, or files over your network, Windows Help provides complete instructions on
utilizing shared resources.
Network Neighborhood/My Network Places
Other PCs on your network will appear under Network Neighborhood or My Network Places (depending upon the
version of Windows you're running). Windows Help provides complete instructions on adding PCs to your
network.
Appendix C: Windows Help
31
Page 44

24-port 10/100 + 2-Port Gigabit Switch with WebView
Appendix E: Specifications
Standards IEEE 802.3, IEEE 802.3u, IEEE 802.3ab
Ports 24 - 10/100 , 2 - 10/100/1000, 1 - MiniGBIC, 1-Console
Cabling Type UTP CAT 5e or better
LEDs System, Link/Act, Gigabit, Gigabit 1, Gigabit 2/miniGBIC
Dimensions 17.01" x 1.77" x 13.74"
(L x W x H) (43 mm x 45 mm x 349 mm)
Unit Weight 8.6 lbs (3.9 kg)
Power Voltage Range 100 ~ 240VAC, Frequency range 50 – 60Hz, 50W max
Certifications FCC Class B, CE, UL
Operating Temp. 0ºC to 40ºC (32ºF to 104ºF)
Storage Temp. -20ºC to 70ºC (-4ºF to 158ºF)
Operating Humidity 10% to 90% Non-Condensing
Storage Humidity 10% to 95% Non-Condensing
Appendix E: Specifications
38
Page 45

24-port 10/100 + 2-Port Gigabit Switch with WebView
Appendix F: Warranty Information
LIMITED WARRANTY
Linksys warrants to You that, for a period of one year (the “Warranty Period”), your Linksys Product will be substantially
free of defects in materials and workmanship under normal use. Your exclusive remedy and Linksys' entire liability under
this warranty will be for Linksys at its option to repair or replace the Product or refund Your purchase price less any
rebates. This limited warranty extends only to the original purchaser.
If the Product proves defective during the Warranty Period call Linksys Technical Support in order to obtain a Return
Authorization Number, if applicable. BE SURE TO HAVE YOUR PROOF OF PURCHASE ON HAND WHEN CALLING. If You are
requested to return the Product, mark the Return Authorization Number clearly on the outside of the package and include a
copy of your original proof of purchase. RETURN REQUESTS CANNOT BE PROCESSED WITHOUT PROOF OF PURCHASE. You
are responsible for shipping defective Products to Linksys. Linksys pays for UPS Ground shipping from Linksys back to You
only. Customers located outside of the United States of America and Canada are responsible for all shipping and handling
charges.
ALL IMPLIED WARRANTIES AND CONDITIONS OF MERCHANTABILITY OR FITNESS FOR A PARTICULAR PURPOSE ARE LIMITED
TO THE DURATION OF THE WARRANTY PERIOD. ALL OTHER EXPRESS OR IMPLIED CONDITIONS, REPRESENTATIONS AND
WARRANTIES, INCLUDING ANY IMPLIED WARRANTY OF NON-INFRINGEMENT, ARE DISCLAIMED. Some jurisdictions do not
allow limitations on how long an implied warranty lasts, so the above limitation may not apply to You. This warranty gives
You specific legal rights, and You may also have other rights which vary by jurisdiction.
This warranty does not apply if the Product (a) has been altered, except by Linksys, (b) has not been installed, operated,
repaired, or maintained in accordance with instructions supplied by Linksys, or (c) has been subjected to abnormal
physical or electrical stress, misuse, negligence, or accident. In addition, due to the continual development of new
techniques for intruding upon and attacking networks, Linksys does not warrant that the Product will be free of
vulnerability to intrusion or attack.
TO THE EXTENT NOT PROHIBITED BY LAW, IN NO EVENT WILL LINKSYS BE LIABLE FOR ANY LOST DATA, REVENUE OR
PROFIT, OR FOR SPECIAL, INDIRECT, CONSEQUENTIAL, INCIDENTAL OR PUNITIVE DAMAGES, REGARDLESS OF THE THEORY
OF LIABILITY (INCLUDING NEGLIGENCE), ARISING OUT OF OR RELATED TO THE USE OF OR INABILITY TO USE THE PRODUCT
(INCLUDING ANY SOFTWARE), EVEN IF LINKSYS HAS BEEN ADVISED OF THE POSSIBILITY OF SUCH DAMAGES. IN NO EVENT
WILL LINKSYS’ LIABILITY EXCEED THE AMOUNT PAID BY YOU FOR THE PRODUCT. The foregoing limitations will apply even
if any warranty or remedy provided under this Agreement fails of its essential purpose. Some jurisdictions do not allow the
exclusion or limitation of incidental or consequential damages, so the above limitation or exclusion may not apply to You.
Please direct all inquiries to: Linksys, P.O. Box 18558, Irvine, CA 92623.
Appendix F: Warranty Information
39
Page 46

24-port 10/100 + 2-Port Gigabit Switch with WebView
Appendix G: Regulatory Information
FCC STATEMENT
This product has been tested and complies with the specifications for a Class B digital device, pursuant to Part 15 of the
FCC Rules. These limits are designed to provide reasonable protection against harmful interference in a residential
installation. This equipment generates, uses, and can radiate radio frequency energy and, if not installed and used
according to the instructions, may cause harmful interference to radio communications. However, there is no guarantee
that interference will not occur in a particular installation. If this equipment does cause harmful interference to radio or
television reception, which is found by turning the equipment off and on, the user is encouraged to try to correct the
interference by one or more of the following measures:
Reorient or relocate the receiving antenna
Increase the separation between the equipment or devices
Connect the equipment to an outlet other than the receiver's
Consult a dealer or an experienced radio/TV technician for assistance
FCC Radiation Exposure Statement
This equipment complies with FCC radiation exposure limits set forth for an uncontrolled environment. This equipment
should be installed and operated with minimum distance 20cm between the radiator and your body.
INDUSTRY CANADA (CANADA)
This Class B digital apparatus complies with Canadian ICES-003.
Cet appareil numérique de la classe B est conforme à la norme NMB-003 du Canada.
The use of this device in a system operating either partially or completely outdoors may require the user to obtain a license
for the system according to the Canadian regulations.
Appendix G: Regulatory Information
40
Page 47

24-port 10/100 + 2-Port Gigabit Switch with WebView
Appendix H: Contact Information
Need to contact Linksys?
Visit us online for information on the latest products and updates
to your existing products at: http://www.linksys.com or
ftp.linksys.com
Can't find information about a product you want to buy
on the web? Do you want to know more about networking
with Linksys products? Give our advice line a call at: 800-546-5797 (LINKSYS)
Or fax your request in to: 949-823-3002
If you experience problems with any Linksys product,
you can call us at: 800-326-7114
Don't wish to call? You can e-mail us at: support@linksys.com
If any Linksys product proves defective during its warranty period,
you can call the Linksys Return Merchandise Authorization
department for obtaining a Return Authorization Number at: 949-823-3000
(Details on Warranty and RMA issues can be found in the Warranty
Information section in this Guide.)
Appendix H: Contact Information
41
 Loading...