

Page 1

USER GUIDE
Cisco Small Business
SPA525G and SPA525G2 SPCP IP Phones
Page 2

Contents
Chapter 1: Getting Started 4
Overview 4
Caring for Your Phone 6
Understanding Your Phone Lines and Buttons 7
Phone Components 7
Softkey Buttons 9
Using the Keypad and Buttons with Menus 13
Using Keypad Shortcuts 13
Using the Navigation Button 13
Entering Numbers and Text in Fields 14
Using Phone Hardware and Accessories 15
Using the Speakerphone 15
Using Wired and Wireless Headsets 15
Switching Between the Handset, Headset, and Speakerphone 19
Using the Cisco Attendant Console 19
Changing the Cisco SPA500DS Attendant Console Display 20
Chapter 2: Installing Your Phone 21
Before You Begin 21
Connecting the Handset 22
(Optional) Attaching the Desk Stand 24
(Optional) Mounting the Phone to the Wall 24
Connecting Your Phone Power 25
Connecting Your Phone to the Network 25
Connecting Your Phone to the Wired Network 25
Connecting Your Phone to the Wireless Network 26
Setting the Phone Wireless Connection 28
Verifying Phone Startup 33
Updating Your Phone Firmware 33
Cisco Small Business SPA525G and SPA525G2 SPCP IP Phone User Guide 1
Page 3

Contents
Chapter 3: Using Basic Phone Functions 35
Placing or Answering a Call 36
Adjusting Call Volume and Muting 36
Using Mute 37
Putting a Call on Hold 37
Resuming a Call 37
Ending a Call 37
Transferring Calls 38
Managing Call Waiting 38
Recording a Live Call 39
Viewing and Returning Calls 39
Forwarding Calls 40
Setting Do Not Disturb 40
Configuring Call Waiting 41
Picking Up a Call 42
Placing a Three-Way Conference Call 42
Using the Phone Directories 43
Using Your Personal Address Book 43
Using the Corporate Directory 45
Using the Call History Lists 46
Viewing the Call History Lists 46
Deleting a Call History List 46
Calling from the Call History Lists 46
Deleting an Entry from the Call History Lists 47
Saving a Call History List Number to Your Directory 47
Accessing Voicemail 47
Chapter 4: Using Advanced Phone Functions 48
Using Your Bluetooth-Enabled Mobile Phone 48
Enabling Bluetooth 49
Cisco Small Business SPA525G and SPA525G2 SPCP IP Phone User Guide 2
Page 4

Pairing Your Cisco SPA525G2 with a Bluetooth-Enabled Mobile Phone 49
Verifying that the Cisco SPA525G2 is Paired 51
Importing Your Mobile Phone Address Book into the Cisco SPA525G2 52
Making a Mobile Phone Call through the Cisco SPA525G2 53
Receiving Mobile Phone Calls by using the Cisco SPA525G2 54
Switching Audio from Your Cisco SPA525G2 to Your Mobile Phone 54
Viewing Mobile Phone Battery and Signal Information on Your
Cisco SPA525G2 54
Contents
Charging Your Mobile Phone Using Your Cisco SPA525G2 55
Playing MP3 Files on Your Phone 56
Creating the Playlist 56
Playing Songs 57
Customizing Your IP Phone Screen 58
Changing the Screen Contrast 58
Setting the Screen Backlight Timer 58
Configuring the Phone Screen Saver 59
Changing the Phone Wallpaper 60
Restarting Your Phone 60
Viewing Phone, Network, and Call Information 61
Viewing Product Information 61
Viewing Network Information 61
Viewing Peripheral Status 62
Viewing the Wireless Connection Status 62
Advanced Menus for Technical Support Personnel 63
Appendix A: Where to Go From Here 64
Power Adapter Statement 66
FCC and IC Statement 66
Federal Communication Commission Interference Statement 66
IMPORTANT NOTE 67
Industry Canada Statement 67
Cisco Small Business SPA525G and SPA525G2 SPCP IP Phone User Guide 3
Page 5

Getting Started
This chapter provides an overview of your Cisco Attendant Console IP phone.
contains the following sections:
• Overview, page 4
• Understanding Your Phone Lines and Buttons, page 7
• Using the Keypad and Buttons with Menus, page 13
1
Overview
• Entering Numbers and Text in Fields, page 14
• Using Phone Hardware and Accessories, page 15
• Using the Cisco Attendant Console, page 19
The Cisco Attendant Console IP phone is a full-featured VoIP (Voice over Internet
Protocol) phone that provide voice communication over an IP network. It provides
traditional features, such as call forwarding, redialing, speed dialing, transferring
calls, conference calling, and accessing voice mail. Calls can be made or received
with a handset, headset or speaker.
The Cisco Attendant Console features vary, depending on the type of call control
system that you are using and the limitations set by the phone system
administrator. This document describes using the Cisco SPA525G and SPA525G2
with a Smart Phone Control Protocol (SPCP) phone system, such as the Cisco
Unified Communications 500 Series, with no limitations.
If you are using the Cisco Attendant Console IP phone with a BroadSoft or an
Asterisk system, see the
Phone User Guide
Cisco Small Business SPA525G and SPA525G2 SPCP IP Phones User Guide 4
.
Cisco Small Business SPA525G and SPA525G2 SIP IP
Page 6
Getting Started
Overview
1
Setup of the phone network is typically performed by using Cisco Configuration
Assistant (CCA) software. This software is available on Cisco.com.
The phone can be powered by connecting your phone to an Ethernet switch that
provides Power over Ethernet (PoE) or you can use an optional Cisco PA100 power
adapter.
A phone is connected to the network through an Ethernet connection or the built-in
Wireless-G radio. If you are using the Wireless-G connection, a Cisco PA100
power adapter is required. The phone provides an additional Ethernet port that
allows a computer to be connected to the network through the phone. (We
recommend that if a PC is connected to the network through the phone, that the
phone be connected to the network only by using the wired Ethernet connection).
The Cisco Attendant Console has a 320 x 240 color, 3.2" inch screen and can
manage up to five telephone extensions. They also provide the following hardware
features:
• Two Ethernet 10/100 Mbps ports
• 802.3af Power over Ethernet support
• USB 2.0 host port
• AUX port (to attach a Cisco Attendant Console)
• Bluetooth capability for headset support
• Bluetooth capability for mobile phone pairing (Cisco SPA525G2 only)
• 2.5mm stereo earphone jack
Cisco Small Business SPA525G and SPA525G2 SPCP IP Phones User Guide 5
Page 7

Getting Started
Overview
1
• Wireless-G client support
• Kensington security slot
The functionality of the phones can be modified by your phone system
administrator. Not all of the functional features described in this document are
available or they might function slightly differently on your phone. This document
describes the features as they function in factory default mode.
Caring for Your Phone
The Cisco Small Business IP phones are electronic devices that should not be
exposed to excessive heat, sun, cold, or water. To clean the equipment, use a
slightly moistened paper or cloth towel. Do not spray or pour cleaning solution
directly onto the hardware unit.
Cisco Small Business SPA525G and SPA525G2 SPCP IP Phones User Guide 6
Page 8
Getting Started
Understanding Your Phone Lines and Buttons
Understanding Your Phone Lines and Buttons
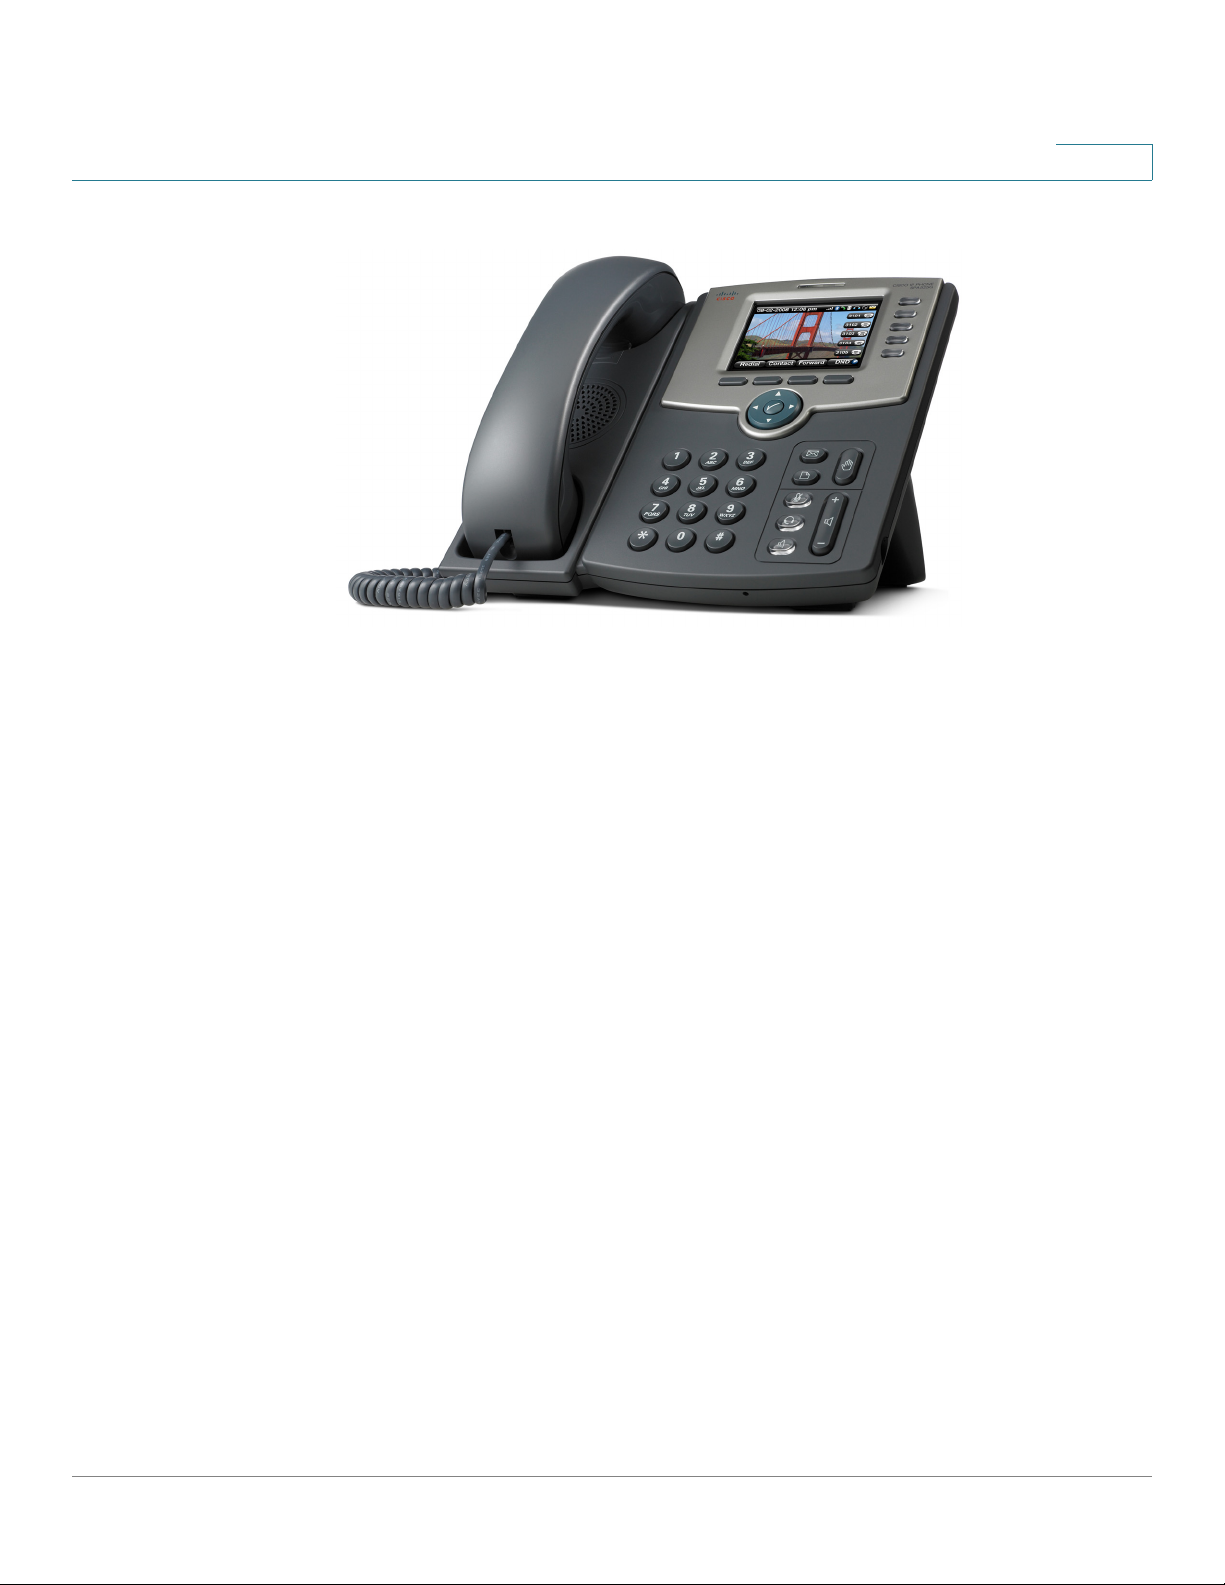
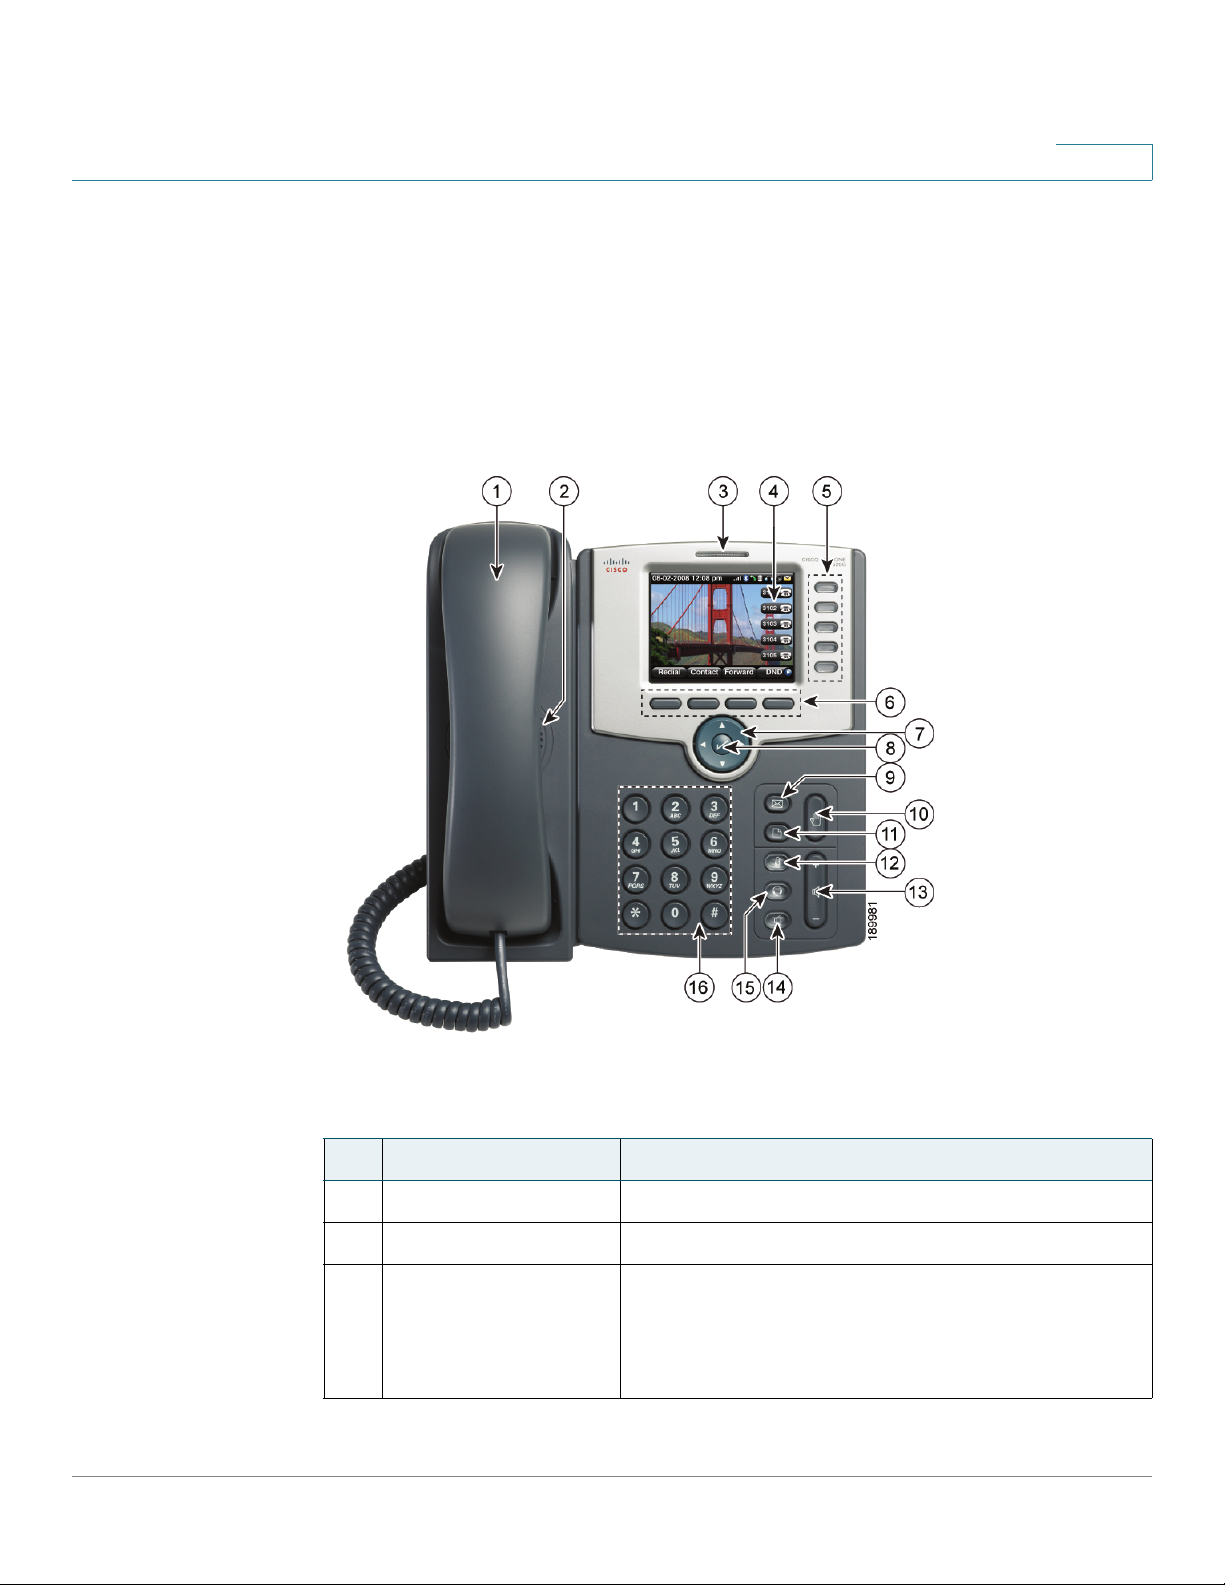
Figure 1 identifies the parts of your phone.
Phone Components
Figure1 Cisco SPA525G and Cisco SPA525G2 Phone Components
1
Table 1 IP Phone Components
# Phone Feature Description
1 Handset Pick up to answer or place calls.
2 Speaker Speaker for phone.
3 Message Waiting
Indicator
Cisco Small Business SPA525G and SPA525G2 SPCP IP Phones User Guide 7
When lit:
• Red—You have a new voice mail message.
• Flashing Red—You have an incoming call.
Page 9

Getting Started
Understanding Your Phone Lines and Buttons
Table 1 IP Phone Components
# Phone Feature Description
4 IP phone screen Your phone might vary, but typically it displays:
5 Line keys Phone line status:
1
• Date and time
• Phone station name
• Line extensions
• Softkey options
• Startup logo, screen saver, background
photo, and photo album
• Green (steady): Line is in use.
• Green (blinking): There is an incoming call.
• Red (blinking): Line is on hold.
• Orange: Line is unregistered (cannot be
used).
• Flashing Orange: The phone is not
connected to the network.
These keys can also be programmed by your
system administrator to perform differently than
described here or to add functions such as speed
dial, call pickup, or monitor an extension.
6 Softkey buttons Press a softkey to perform the action on the label
on the IP phone screen above the softkey.
7 Navigation button Press the arrows to scroll items on the IP phone
screen.
8 Center Select button Press to select the option or menu that is
highlighted on the screen.
9 Messages button Press to access voice mail. (Must be set up by
your phone administrator.)
10 Hold button Press to place a call on hold.
Cisco Small Business SPA525G and SPA525G2 SPCP IP Phones User Guide 8
Page 10
Getting Started
Understanding Your Phone Lines and Buttons
Table 1 IP Phone Components
# Phone Feature Description
1
11 Setup button
12 Mute button Press to mute or unmute the phone. When the
13 Volume button Press + to increase the volume and press - to
14 Speaker button Press to turn the speaker on or off. When the
15 Headset button Press to turn the headset on or off. When the
16 Keypad Press keypad keys to dial phone numbers, enter
Press to access a menu to configure features and
preferences (such as your directory, status, and speed
dials), access your call history, set up functions (such as
call forwarding), and provide phone status information.
phone is muted, the button glows red. A flashing
red mute button indicates that the phone has no
network connectivity.
lower the volume of the handset, headset, speaker
(when the handset is off hook), or ringer (when the
handset is on hook).
speaker is on, the button glows green.
headset is on, the button glows green.
letters, or choose menu items.
Softkey Buttons
The four softkey buttons have different functions depending on the menu
configuration and function selected. The following table shows the softkey buttons
that are typical (in alphabetical order).
Tab le 2 S o ft ke y B ut to ns
Button Function
Add Adds a new item (for example, a new directory entry).
AddList Creates a list (for example, MP3 files).
Back Returns you to the previous screen.
BXfer Performs a blind call transfer.
Cisco Small Business SPA525G and SPA525G2 SPCP IP Phones User Guide 9
Page 11

Getting Started
Understanding Your Phone Lines and Buttons
Tab le 2 S o ft ke y B ut to ns
Button Function
Call Rtn Returns the last missed call by dialing the number that called
Callback Plays an audio and visual notification on your phone when a
cbarge Allows callers to join a shared-line call.
CFwdAll Forwards all calls to a specified number. When forwarding is
Clear Deletes an entire text or number field.
Clr DND Clears Do Not Disturb.
1
you. See “Viewing and Returning Missed Calls,” on
page 41.
busy or unavailable party becomes available.
active, press this button to cancel forwarding.
Confrn Initiates a conference call. See “Placing a Three-Way
Conference Call,” on page 44.
Connect Connects to the selected item (for example, to the wireless
network or Bluetooth device).
Copy Copies the selected item (for example, a contact in the
Address Book).
delChar Deletes the last number or letter.
Delete Deletes an entire item (for example, a number from the Call
History list).
Dial Dials the string of numbers that you have entered, or the
number that you have highlighted in a list such as the Missed
Calls screen.
Directory Access your personal address book. See “Using Your
Personal Address Book,” on page 45.
DnD Do Not Disturb; prevents incoming calls from ringing your
phone. See “Setting Do Not Disturb,” on page 42.
Edit Opens an item so that you can edit numbers or letters, or
enable or disable a feature.
EditDial Edits a number before dialing.
EndCall Disconnects a call.
Exit Closes the current menu
Cisco Small Business SPA525G and SPA525G2 SPCP IP Phones User Guide 10
Page 12

Getting Started
Understanding Your Phone Lines and Buttons
Tab le 2 S o ft ke y B ut to ns
Button Function
Flash Provides hookflash functionality for three-way calling and
Forward Forwards calls coming to your phone. See “Forwarding
GPickup Allows you to pick up (answer) a call at that is ringing at
Handset Switches audio from the Cisco SPA525G2 to your Bluetooth-
1
call waiting services provided by the PSTN or Centrex
service.
Calls,” on page 42.
another extension in your group. See “Picking Up a Call,” on
page 44.
enabled mobile phone. See Using the Cisco SPA 525G2
With Your Bluetooth-Enabled Mobile Phone, page 51.
Handsfree Switches audio from your Bluetooth-enabled mobile phone
to the Cisco SPA525G2. See Using the Cisco SPA 525G2
With Your Bluetooth-Enabled Mobile Phone, page 51.
Hold Places a call on hold.
List In some menus, shows a list of configured items (for
example, a list of locations for weather or news).
LiveRcd Record a phone conversation.
More View additional softkeys.
NewCall Opens new line on speakerphone to place call.
Next Moves to the next item in a list (for example, a song in the
MP3 Playlist).
OK Confirms a selection.
Option Displays a sub-menu of tasks for the current screen.
Paste Pastes the item you copied into a list or field.
PickUp Allows you to pick up (answer) a call that is ringing at another
extension. See “Picking Up a Call,” on page 44.
Play Plays a selected item such as a song or a ringtone.
Previous Moves to a previous item in a list (for example, a song in the
MP3 Playlist).
Redial Redials the last number that was called. Brings up the list of
recently dialed numbers.
Cisco Small Business SPA525G and SPA525G2 SPCP IP Phones User Guide 11
Page 13

Getting Started
Understanding Your Phone Lines and Buttons
Tab le 2 S o ft ke y B ut to ns
Button Function
Refresh Refreshes the screen. Useful after changing a configuration
Remove Removes conference participant.
RmLstC Removes Last Participant from the Conference Call
Resume Resumes a call that is on hold.
Save Saves your changes.
Scan Scans for wireless networks or Bluetooth devices.
Select Selects the highlighted item on the IP phone screen.
Trnsfer Performs a call transfer. See “Transferring Calls,” on
1
or when you want to update information.
page 39.
TrnsfVM Transfers a call to voice mail.
View Displays more information about a selected item.
Cisco Small Business SPA525G and SPA525G2 SPCP IP Phones User Guide 12
Page 14

Getting Started
Using the Keypad and Buttons with Menus
Using the Keypad and Buttons with Menus
Press a softkey and keypad buttons to navigate menus and enter parameters on
the IP phone screen.
Using Keypad Shortcuts
Use the keypad to enter the number of the menu or sub-menu item. For example,
to open a menu that is labeled with number 2, press 2.
1
NOTE Menus and options can change depending on the software release and what is
allowed by your phone system administrator.
Using the Navigation Button
Use the navigation button to scroll up or down highlighting the desired menu item,
and then press Select or the center Select navigation button to choose the
highlighted item.
Cisco Small Business SPA525G and SPA525G2 SPCP IP Phones User Guide 13
Page 15

Getting Started
Entering Numbers and Text in Fields
Entering Numbers and Text in Fields
Some fields on the IP phones require you to enter numbers and text by using the
keypad or softkey buttons. In general, the following guidelines apply:
• Use the keypad to enter numbers and characters, pressing the key multiple
times to select the correct number or letter.
• Press the number key multiple times to move to a different letter under that
number. (For example, to enter “Mary,” you would press 6 five times rapidly
and then pause (for M); press 2 and then pause (for a), press 7 three times
rapidly (for r), then press 9 three times rapidly (for y).
Available characters are shown in the following table:
1
Key Character Set
1 1 / : \ , ! ; $ ^ |
2abc2ABC
3def3DEF
4ghi4GHI
5jkl5JKL
6mno6MNO
7pqrs7PQRS
8tuv8TUV
9wxyz9WXYZ
0 Space 0 ~ ? > ‘ < “
* . @ * & % [ ] _
#/P # + - = ( ) { }
Press delChar to backspace and delete a character.
Press Option > Clear to remove the entire entry.
Cisco Small Business SPA525G and SPA525G2 SPCP IP Phones User Guide 14
Page 16

Getting Started
Using Phone Hardware and Accessories
Using Phone Hardware and Accessories
Using the Speakerphone
The IP phones provide a speakerphone. To use the speakerphone, press Speaker
(the handset can be either on or off hook).
Using Wired and Wireless Headsets
The SPA IP phones support headsets from different manufacturers. For the latest
supported models, contact your reseller. Additional information can be found at
the manufacturer websites.
Connecting the Headset
1
Each brand and type of headset might require different steps to establish a
connection. Consult the documentation for your particular headset for more
information:
• Bluetooth headsets—See the “Connecting Bluetooth Headsets” section
on page 16.
• Wireless (non-Bluetooth) headsets (such as Plantronics or Jabra)—Follow
the instructions for your product to connect the phone to the wireless
headset base.
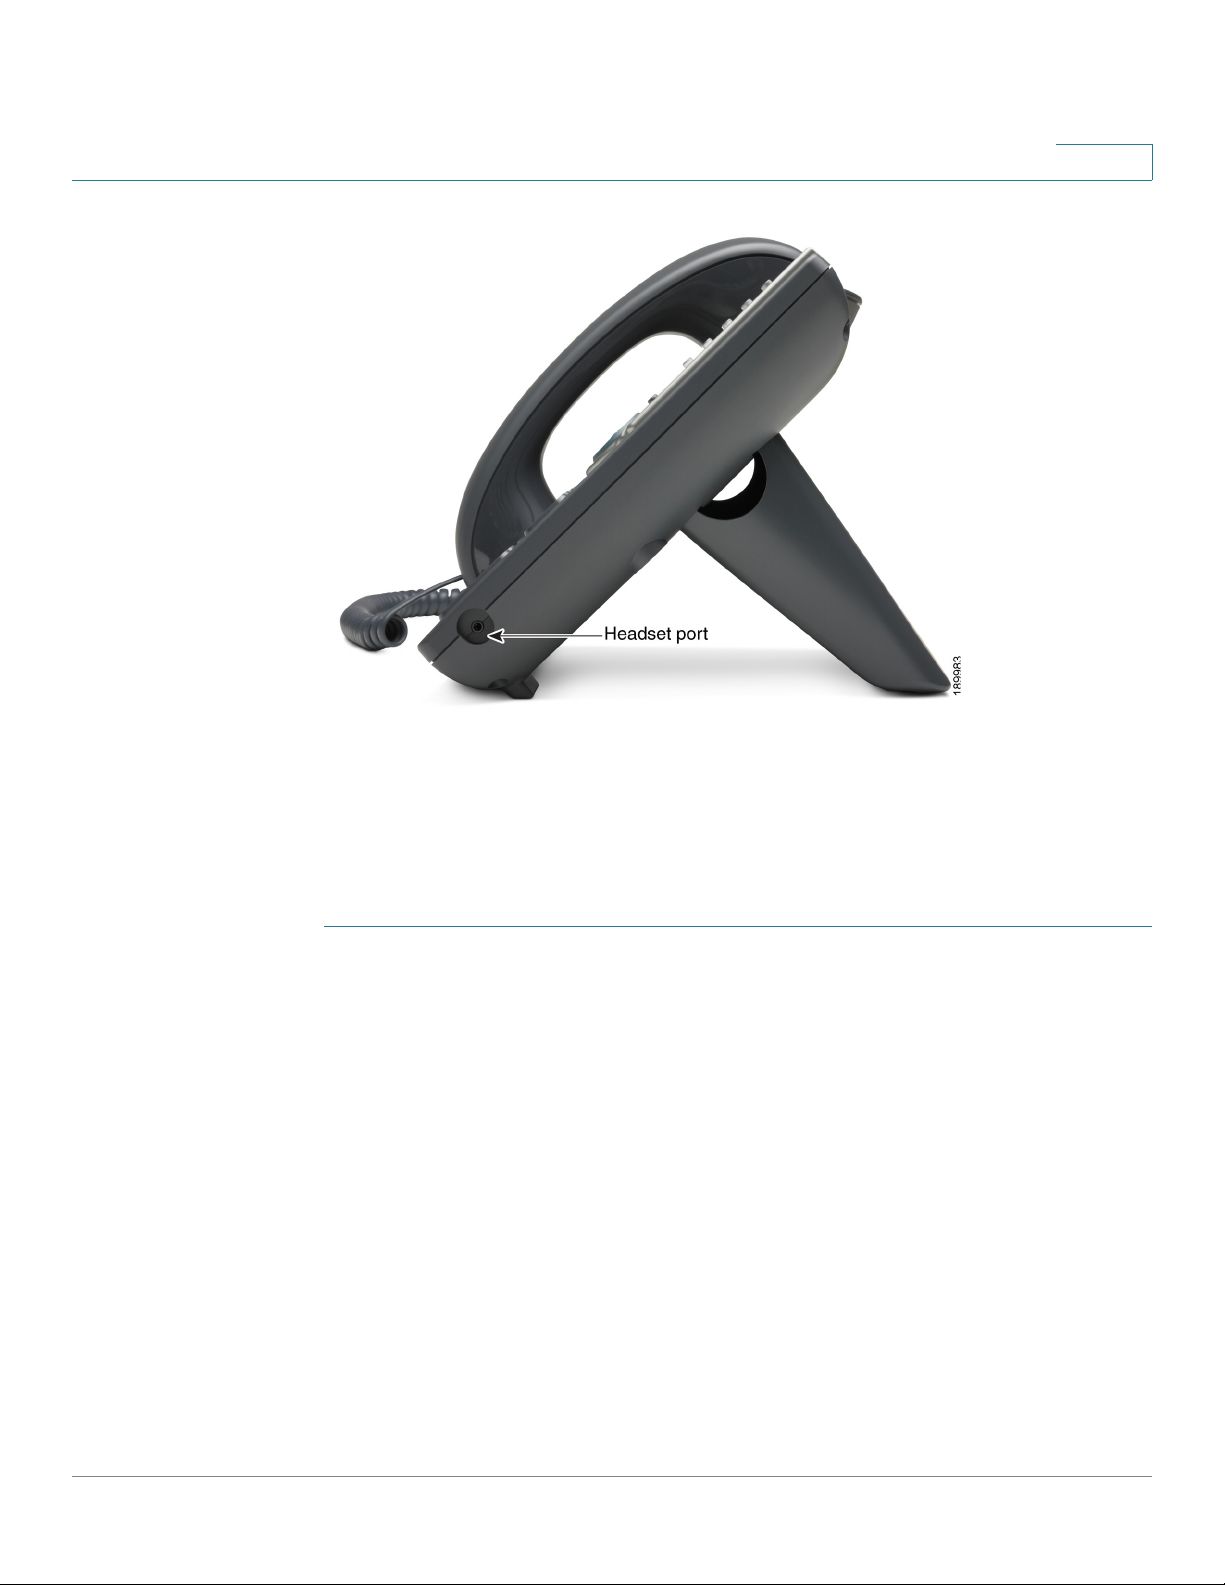
• Wired headsets—Connect the 2.5mm connector from the headset into the
headset port on the right side of the IP phone.
• Electronic Hookswitch (EHS)—Some headsets enable you to answer and
end phone calls by using controls located on the headset.
Cisco Small Business SPA525G and SPA525G2 SPCP IP Phones User Guide 15
Page 17
Getting Started
Using Phone Hardware and Accessories
1
Connecting Bluetooth Headsets
Your phone is Bluetooth compatible and works with Bluetooth devices such as
headsets.
To configure the phone to work with your headset, enable Bluetooth:
STEP 1 Press Setup.
STEP 2 Select User Preferences > Bluetooth Configuration.
Cisco Small Business SPA525G and SPA525G2 SPCP IP Phones User Guide 16
Page 18

Getting Started
Using Phone Hardware and Accessories
STEP 3 With Bluetooth highlighted, press the Arrow keys to toggle Bluetooth on or off.
1
STEP 4 Press Set.
STEP 5 Create a profile for your headset. In the Bluetooth Configuration screen, scroll to
Bluetooth Profiles. Press the Right Arrow key to enter the profile screen. You are
not allowed to navigate to the Bluetooth profiles screen, unless Bluetooth is
enabled and set.
STEP 6 Press Scan to scan for your headset.
STEP 7 In the list of found devices, select your headset and press Select to edit the profile.
STEP 8 Scroll to PIN and enter the PIN for your Bluetooth headset.
STEP 9 Scroll to Connect Automatically and press the Arrow key to turn to
STEP 10 Press Connect. The profile screen displays and a check mark appears next to the
headset if the connection was successful.
After enabling Bluetooth, set the Bluetooth mode:
STEP 1 Press Setup.
On
.
STEP 2 Scroll to User Preferences > Bluetooth Configuration.
Cisco Small Business SPA525G and SPA525G2 SPCP IP Phones User Guide 17
Page 19

Getting Started
Using Phone Hardware and Accessories
STEP 3 Scroll to Bluetooth Mode and press the Right Arrow key to choose one of the
following:
• Phone—Your IP phone pairs with a Bluetooth headset. Choose this option if
you will not use the Cisco IP phone with a Bluetooth-enabled mobile phone.
• Handsfree—Your IP phone will operate as a handsfree device with a
Bluetooth-enabled mobile phone.
• Both—Your Cisco IP phone uses a Bluetooth headset or operates with a
Bluetooth-enabled mobile phone. Your IP phone will connect to only one
device at a time (either the Bluetooth headset or the Bluetooth-enabled
mobile phone. See Using the Cisco SPA 525G2 With Your Bluetooth-
Enabled Mobile Phone, page 51 for more information.
If multiple Bluetooth devices are in range of the Cisco SPA525G or SPA525G2, the
order of devices in the Bluetooth Configuration > Bluetooth Profiles list is used, and
the device with a higher priority is activated first.
1
STEP 4 Scroll to Bluetooth Profiles and press the Right Arrow key to enter the profile
screen.
STEP 5 Press Scan to scan for your headset. Depending on the network environment (for
example, the number of Bluetooth devices and noise level), your Bluetooth
headset might not appear on the found devices list. Ensure the headset is
powered on and has Bluetooth activated, and retry the scan.
STEP 6 In the list of found devices, select your headset and press Select to edit the profile.
STEP 7 Scroll to PIN and enter the PIN for your Bluetooth headset.
STEP 8 Scroll to Connect Automatically and press the Right Arrow key to turn to On.
STEP 9 Press Connect. The profile screen displays and a check mark appears next to the
headset if the connection was successful.
Using a Headset with Your IP Phone
Steps to use your headset with the IP phone might vary. Consult the user
documentation for your headset for more information.
• To use a wired headset, press Headset and dial the number to place a call,
or press the headset button to answer a ringing call.
• To use a non-Bluetooth wireless headset (such as Jabra or Plantronics), lift
the receiver off hook before speaking or listening through the headset.
Cisco Small Business SPA525G and SPA525G2 SPCP IP Phones User Guide 18
Page 20

Getting Started
Using the Cisco Attendant Console
• To use a Bluetooth headset, make sure your headset is powered on. Press
Switching Between the Handset, Headset, and Speakerphone
Any of these audio devices can be used during a call. Only one device can be
used at a time. The handset can be on the hook when using the speaker or
headset function.
To switch from the handset to the speaker, press Speaker and place the handset
back on the hook.
1
Headset on your phone (or, if supported, press Answer on your Bluetooth
headset twice) and dial the number to place a call. Press Answer on your
Bluetooth headset to answer a ringing call. See the user documentation for
your Bluetooth headset for more information.
To switch from the speakerphone to a headset, press Headset.
To switch from the speaker to the handset, pick up the handset.
To switch from the headset to the speakerphone, press Speaker.
Using the Cisco Attendant Console
The Cisco Attendant Consoles are accessory consoles for the Cisco SPA500
Series IP phones. The Cisco SPA500S provides 32 three-color (red, green, and
orange) programmable line buttons, and the Cisco SPA500DS provides 30
buttons. The Cisco Attendant Console attaches to the IP phone with the
attachment arm provided. It obtains power directly from the IP phone; it does not
require a separate power supply. Two Cisco Attendant Console units can be
attached to a single IP phone to monitor a total of 64 (SPA500S) or 60 (SPA500DS)
separate lines.
Detailed information on the installation of the Cisco Attendant Console are
provided in the Cisco Small Business SPA500S Attendant Console Quick Start
Guide and the Cisco Small Business SPA500DS 15-Button Digital Attendant
Console for SPA500 Family Phones Quick Start Guide.
Cisco Small Business SPA525G and SPA525G2 SPCP IP Phones User Guide 19
Page 21

Getting Started
Using the Cisco Attendant Console
Configuration of the Cisco Attendant Console and assignment of the line buttons is
typically performed by the phone system administrator and is not described in
this document. The Cisco Attendant Console can be configured by using the same
phone web user interface for the IP phone to which the Cisco Attendant Console is
attached. See the Cisco SPA300 Series, SPA500 Series, and WIP310
Administration Guide on Cisco.com for more information.
Changing the Cisco SPA500DS Attendant Console Display
The Cisco SPA500DS provides a backlit LCD display. The backlight is controlled
by the backlight settings of the phone display and is not separately configurable;
that is, the Cisco SPA500DS display is lit when the phone display is lit, and is off
when the phone display is off.
You can choose the font size (10 or 12 point) of the text displayed on the Cisco
SPA500DS. You can also configure the text contrast, or how dark the text appears
on the display. To configure these options from the phone:
1
STEP 1 Press the Setup button.
STEP 2 Scroll to User Preferences and press Select.
STEP 3 Scroll to Att. Console Preferences and press Select.
STEP 4 Choose Font Size or Contrast from the menu.
• To change the font size, press the Right Arrow button to switch between 10
and 12 point font. Press Set to save.
• To change the display contrast, use the keypad to enter a number value from
1 to 30. The higher the number, the greater the contrast on the display. Press
Set to save.
Cisco Small Business SPA525G and SPA525G2 SPCP IP Phones User Guide 20
Page 22

Installing Your Phone
!
This chapter describes how to install and connect your IP phone. It contains the
following sections:
• Before You Begin, page 21
• Connecting the Handset, page 22
• (Optional) Attaching the Desk Stand, page 24
2
Before You Begin
Before you install and connect your phone, verify with your phone system
administrator (if applicable) that the network is ready for the phone, read the
safety notices, and make sure you have all the phone parts and documentation
available.
CAUTION Do not plug a telephone line cord into the port marked AUX. The RJ-11 port marked
AUX is reserved for connection with the Cisco Attendant Console. It is not for use
as a telephone line port or IP device connection.
• (Optional) Mounting the Phone to the Wall, page 24
• Connecting Your Phone Power, page 25
• Connecting Your Phone to the Network, page 25
• Verifying Phone Startup, page 33
• Updating Your Phone Firmware, page 33
Cisco Small Business SPA525G and SPA525G2 SPCP IP Phones User Guide 21
Page 23

Installing Your Phone
Connecting the Handset
Connecting the Handset
STEP 1 Find the longer end of the coiled phone cord. Insert it into the back of the phone
base in the slot marked with a phone symbol. This port is labeled #5 on Figure 2.
STEP 2 Insert the short end of the handset cord into the jack at the bottom of the handset
(not shown).
Figure 2 Cisco SPA525G and SPA525G2 IP Phone Connections
2
Cisco Small Business SPA525G and SPA525G2 SPCP IP Phones User Guide 22
Page 24

Installing Your Phone
Connecting the Handset
2
Number Component
1
2
3
4
5
not
numbered
Auxiliary port. Only for use with the Cisco Attendant Console.
Power port. Insert the power adapter plug into this port. (Use only with a
Cisco PA100 power adapter.)
Additional Ethernet port. Connect an Ethernet cable to this port to provide
network connectivity to a PC. (This port cannot be used when the phone
is connected to the network by using the built-in Wireless-G client.)
Ethernet port. Connect the network cable to this port.
Phone cord slot. Insert one end of the phone cord into this slot and the
other into the jack at the bottom of the phone handset.
USB port. For use with an external USB memory device (optional). You can
also use the USB port to charge a device such as a mobile phone.
Cisco Small Business SPA525G and SPA525G2 SPCP IP Phones User Guide 23
Page 25

Installing Your Phone
(Optional) Attaching the Desk Stand
(Optional) Attaching the Desk Stand
Do not attach the desk stand if you want to mount the phone to the wall. If you are
attaching a Cisco Attendant Console attach the console before attaching the desk
stand.
STEP 1 Line up the tabs on the desk stand with the slots on the back of the phone.
STEP 2 Slide the bottom tabs into the slots.
STEP 3 Lightly press down on the top of the desk stand. It should easily slide into the top
slots. Do not force it.
2
(Optional) Mounting the Phone to the Wall
To mount the phone to the wall, you must purchase the MB100 wall mount bracket
kit. Follow the instructions in the kit to attach the mount to the wall and the phone.
Figure 3 MB100 Wall Mount Kit
Cisco Small Business SPA525G and SPA525G2 SPCP IP Phones User Guide 24
Page 26

Installing Your Phone
Connecting Your Phone Power
Connecting Your Phone Power
The Cisco SPA525G and Cisco SPA525G2 do not ship with power supplies. If you
are not using Power over Ethernet (PoE), you must order a Cisco PA100 power
adapter for each phone.
If you are using Power over Ethernet (PoE) to power the phone, the phone receives
power when you connect an Ethernet cable from the phone SW port to a switch
that provides PoE. See the “Connecting Your Phone to the Wired Network”
section on page 25. If you are using a Cisco PA100 power adapter, insert one end
of the power adapter into an outlet and insert the other end into the power port on
the phone body.
Connecting Your Phone to the Network
2
The phone can be connected to a wired or wireless network by using a Cat5
(Cat5e or higher for the Cisco SPA512G and Cisco SPA514G) Ethernet cable, or
through a wireless network connection.
Connecting Your Phone to the Wired Network
Connect your phone to a wired network by using an Ethernet cable:
STEP 1 Plug the Ethernet cable into the back of the base station into the slot marked “SW.”
This port is labeled #4 on Figure 2 on page 22.
STEP 2 Plug the other end of the Ethernet cable into the appropriate device on your
network, such as a network switch.
NOTE The Cisco SPA525G and Cisco SPA525G2 provides a second Ethernet port. You
can connect a PC to this port to provide network access to the PC. This port is
labeled #4 in the Figure 2. This port cannot be used when the phone is connected
to the network by using the built-in Wireless-G client.
Cisco Small Business SPA525G and SPA525G2 SPCP IP Phones User Guide 25
Page 27

Installing Your Phone
Connecting Your Phone to the Network
Connecting Your Phone to the Wireless Network
The Cisco SPA525G and Cisco SPA525G2 phone supports connections to a
wireless network. Before setting up the wireless network, you must know the
wireless security type for your router. The phone works with the following security
types:
• Wired Equivalent Privacy (WEP)—With this type of security, you must enter
a 64– or 128–bit key on the phone (or a more easily remembered
passphrase to generate the key). The phone then authenticates with your
router to provide a secure connection.
• Wi-Fi Protected Access (WPA)—The phone supports WPA PSK, WPA2
PSK, WPA Enterprise, and WPA2 Enterprise. With this type of security, you
will at the minimum be required to enter a password on the phone. The
phone then authenticates with your router to provide a secure connection.
2
NOTE The PC port is not supported in wireless operation; the PC port is only supported
in a wired environment.
Determine Your Wireless Router Security Type
If you do not know your wireless router security type, log in to the router interface
to get this information. The steps below are written for a Cisco Small Business
router, but procedures for other routers should be similar.
STEP 1 Log in to your wireless router web interface. Your computer must be connected to
same subnetwork as the router. Enter the IP address of the wireless router in the
browser toolbar.
STEP 2 If required, enter the user name and password. (By default, Linksys routers
typically use “admin” for the user name and “admin” for the password. Cisco
routers typically use cisco for the username and cisco for the password.)
STEP 3 View the Wireless tab or screen. Note the network name (SSID) and the type of
security (WEP, WPA Personal, or WPA2 Personal).
If your router is using WEP, note the following information:
• WEP encryption: 64 bit or 128 bit. You need to choose this later.
• Default transmit key, or TX key: The default key (of the 4) that the router
transmits to authenticate. This value will be 1, 2, 3, or 4.
• Passphrase and keys: You choose one of two methods to enter the WEP
key. You either directly enter the WEP key, or enter a more simple
passphrase to generate the WEP key.
Cisco Small Business SPA525G and SPA525G2 SPCP IP Phones User Guide 26
Page 28

Installing Your Phone
Connecting Your Phone to the Network
The following example shows WEP information for a Linksys WRV200 router:
2
If your router is using WPA, note the WPA shared key, or passphrase that you shall
enter when configuring the phone.
The following example shows WPA information for a Linksys WRT160N router:
Cisco Small Business SPA525G and SPA525G2 SPCP IP Phones User Guide 27
Page 29

Installing Your Phone
Connecting Your Phone to the Network
2
Setting the Phone Wireless Connection
To set up the Cisco SPA525G and Cisco SPA525G2 wireless connection:
STEP 1 If you have plugged in an Ethernet cable to connect the phone to the wired
network, remove it and reboot the phone. When the phone is connected by using
wired Ethernet, the phone Wi-Fi connection is disabled.
STEP 2 Press Setup.
STEP 3 Scroll to Network Configuration and press Select.
STEP 4 In the Wi-Fi field, press the Left or Right Arrow key to turn Wi-Fi on.
STEP 5 Press Save.
STEP 6 Scroll to Wi-Fi Configuration and press the Right Arrow key.
Cisco Small Business SPA525G and SPA525G2 SPCP IP Phones User Guide 28
Page 30

Installing Your Phone
Connecting Your Phone to the Network
STEP 7 Choose one of the following options:
• Wireless Profile—Use this option to add a new wireless profile (either
manually or by scanning for available networks), editing an existing wireless
profile, or connecting to a previously configured network. See Manually
Adding a Wireless Profile, page 30.
• Wi-Fi Protected Setup—If your wireless router supports Wi-Fi Protected
Setup, use this method to set up your wireless connection. See Using Wi-Fi
Protected Setup, page 29.
Using Wi-Fi Protected Setup
If your router has a WPS button, you can use Wi-Fi Protected
Setup to add a new wireless network profile.
2
STEP 1 In the Wireless Configuration screen, select
STEP 2 Choose one of the following options:
Push Button Configuration:
a. Press the WPS button on your router.
b. On your phone, highlight Push Button Configuration and press Select. Your
phone might reboot before the Wi-Fi connection is established.
PIN Configuration:
a. After selecting PIN Configuration on your phone, note the PIN displayed.
b. Connect to your router interface by using a PC by following the instructions
provided with your router.
c. If required, enter the user name and password. (By default, Linksys routers
typically use admin for the user name and admin for the password. Cisco
routers typically use cisco for the username and cisco for the password.)
d. Locate the Wireless Protected Setup configuration menu.
e. Enter the PIN into the field that allows you to setup wireless devices by using a
PIN.
Wi-Fi Protected Setup
.
Cisco Small Business SPA525G and SPA525G2 SPCP IP Phones User Guide 29
Page 31

Installing Your Phone
Connecting Your Phone to the Network
f. Save your changes.
g. On the Cisco SPA525G and Cisco SPA525G2, with PIN Configuration
highlighted, press Select. To add the connection as a profile, press OK. Your
phone might reboot before the Wi-Fi connection is established.
Manually Adding a Wireless Profile
To add a new wireless network profile:
STEP 1 In the Network Configuration screen, ensure Wi-Fi is enabled.
STEP 2 Scroll to Wi-Fi Configuration and press the Right Arrow key to enter the Wi-Fi
Configuration screen.
STEP 3 Select Wireless Profile. Current wireless profiles are displayed.
2
STEP 4 Do one of the following tasks:
• Scan for available networks. See Scanning for Available Networks,
page 30.
• Manually add the network. See Manually Adding a Network, page 31.
Scanning for Available Networks
NOTE If your router has SSID (router name) broadcast disabled, it might not appear in the
list of networks. In that case, you must manually add the SSID (see Manually
Adding a Network, page 31).
STEP 1 In the Wireless Profile screen, press Scan.
STEP 2 In the list of available networks, scroll to the desired network and click Add to
select the highlighted network.
STEP 3 (Optional) Press the Right Arrow key under Security Mode to set the security
options:
• WEP—Wired Equivalent Privacy: You must enter the Default Transmit Key,
Key Type and Length, and the keys.
• WPA PSK or WPA2 PSK: You must enter the Cipher Type (TKIP or AES
CCMP) and the shared key.
Cisco Small Business SPA525G and SPA525G2 SPCP IP Phones User Guide 30
Page 32

Installing Your Phone
Connecting Your Phone to the Network
• WPA/WPA2 Enterprise: This type of authentication requires some advanced
expertise because it involves setting up a radius server for authentication
and, in some cases, creation of certificates for both the radius server and the
phone. See
- TTLS—Enter the anonymous ID, choose whether the phone should
- LEAP—Enter the user ID and password.
- TLS—Enter the user ID, choose whether the phone should check for the
2
You must enter the Cipher Type (TKIP or AES CCMP) and the EAP Type:
check for the server certificate, choose the TTLS Inner Protocol
(MSCHV2, MSCHAP, PAP, CHAP, or MD5), and enter the user ID and
password.
server certificate, enter the user ID, and configure the root certificate and
user certificate (see the “Uploading Security Certificates to the
Phone” section on page 32).
STEP 4 To save as a wireless profile, press Save.
Manually Adding a Network
STEP 1 From the Wireless Profile screen, press Option and select Add New to manually
add the network.
STEP 2 (Optional) Press the Right Arrow key under Security Mode to set the security
options:
• WEP—Wired Equivalent Privacy: You must enter the Default Transmit Key,
Key Type and Length, and the keys.
• WPA PSK or WPA2 PSK: You must enter the Cipher Type (TKIP or AES
CCMP) and the shared key.
• WPA/WPA2 Enterprise: You must enter the Cipher Type (TKIP or AES CCMP)
and the EAP Type:
- TTLS: Enter the anonymous ID (typically, anonymous unless the RADIUS
server has other rules), choose whether or not the phone should check
for the server certificate, choose the TTLS Inner Protocol (MSCHV2,
MSCHAP, PAP, CHAP, or MD5), and enter the User ID and password.
- LEAP: Enter the User ID and password.
Cisco Small Business SPA525G and SPA525G2 SPCP IP Phones User Guide 31
Page 33

Installing Your Phone
Connecting Your Phone to the Network
- TLS: Enter the User ID, choose whether the phone should check for the
STEP 3 To save as a wireless profile, press Save.
Uploading Security Certificates to the Phone
If you are using some types of wireless security (for example, WPA2 Enterprise),
you must upload security certificates to the phone. Certificates must be in the
following format:
• Root certificate: DER encoded binary x.509 (CER)
• User certificate: Personal Information Exchange (PKCS#12(.PFX))
2
server certificate, enter the User ID, and configure the Root certificate
and User certificate (see the “Uploading Security Certificates to the
Phone” section on page 32).
STEP 1 Connect a USB storage device to your PC.
STEP 2 Create a directory named ca on the USB device and copy the certificate files into
that directory.
STEP 3 Remove the USB device from your PC and insert it into the USB slot on the IP
phone.
STEP 4 After creating a wireless profile, in the Profile screen, press the Right Arrow key
under Security Mode to set the security options (WPA Enterprise or WPA2
Enterprise).
STEP 5 Scroll to Root Certificate and press the Right Arrow key. All files in the ca folder are
displayed.
STEP 6 Use the Up Arrow or Down Arrow key to choose the certificate you want to install
(for example, the root certificate). press Select.
STEP 7 Press Save to save the profile.
Cisco Small Business SPA525G and SPA525G2 SPCP IP Phones User Guide 32
Page 34

Installing Your Phone
!
Verifying Phone Startup
Verifying Phone Startup
After receiving power and network connectivity, the phone executes a boot-up
sequence. During this sequence, the display shows the Cisco logo. All of the lights
on the phone will flash. After this sequence (about five seconds) the phone
displays the standard menu. The date, name and number of the phone appear on
the top line of the IP phone screen. At the bottom of the IP phone screen, softkeys
appear over their associated buttons.
If the phone does not display this screen, confirm your installation and
connections. If these are correct, try unplugging the phone and plugging it back in
again. If you still don’t see the display, then contact your phone system
administrator or Internet Telephony Service Provider (ITSP).
Your phone ships with pre-installed firmware. However, later firmware versions
might be available that add features and fix problems with your phone. You should
upgrade your phone to the latest firmware for ideal performance. Often this
happens automatically when you connect the phone to the network.
2
CAUTION If you are using your phone with an Internet Telephony Service Provider (ITSP)
system, do not manually upgrade your phone firmware without consulting your
service provider. Your provider might automatically upgrade your phones without
any action on your part.
Updating Your Phone Firmware
Firmware updates are done from the Cisco Configuration Assistant. For detailed
update instructions, see the
Communications System Administrator Guide
To update the firmware:
STEP 1 Download the phone firmware from CCO to your PC that is running the Cisco
Configuration Assistant software.
STEP 2 Launch the Cisco Configuration Assistant (CCA) and connect to the customer site
or UC 500 device.
Cisco Configuration Assistant Smart Business
for your software release.
STEP 3 Choose Home > Topology to open the Topology View if it is not already open.
Cisco Small Business SPA525G and SPA525G2 SPCP IP Phones User Guide 33
Page 35

Installing Your Phone
Updating Your Phone Firmware
STEP 4 Locate the phone firmware file that you downloaded from Cisco.com (for example:
spa525g2-7-4-4.bin).
STEP 5 In the Topology View, use the mouse to drag the phone load file from the folder on
your PC to the UC 500 icon.
If CCA recognizes the file as a valid phone load, a popup dialog displays and you
are prompted to upload the file.
STEP 6 Select the file and click Upload. The dialog displays the upload and updated
progress.
STEP 7 Right-click the phone icon in the CCA topology view and restart the phone.
2
Cisco Small Business SPA525G and SPA525G2 SPCP IP Phones User Guide 34
Page 36

Using Basic Phone Functions
This chapter describes how to use the basic functions of your Cisco SPA525G and
SPA525G2 IP phone. It includes the following sections:
• Placing or Answering a Call, page 36
• Adjusting Call Volume and Muting, page 36
• Using Mute, page 37
3
• Putting a Call on Hold, page 37
• Resuming a Call, page 37
• Ending a Call, page 37
• Transferring Calls, page 38
• Managing Call Waiting, on page 38
• Recording a Live Call, on page 39
• Viewing and Returning Calls, page 39
• Forwarding Calls, page 40
• Setting Do Not Disturb, page 40
• Picking Up a Call, page 42
• Placing a Three-Way Conference Call, page 42
• Using the Phone Directories, page 43
• Using the Call History Lists, page 46
• Accessing Voicemail, page 47
Cisco Small Business SPA525G and SPA525G2 SPCP IP Phones User Guide 35
Page 37

Using Basic Phone Functions
Placing or Answering a Call
Placing or Answering a Call
You might have to dial a number or numbers to reach an outside line. Ask your
system administrator.
Depending on the phone system setup, you might be able to place or answer calls
by using various methods.
To place or answer a call:
• Pick up the handset.
• Press the Speaker button.
• Press the Headset button.
• Press a line button to place a call or a blinking line button to answer a call.
3
• Dial the number, and then lift the handset.
• Dial the number and press Dial.
• Press New Call and dial the number.
• Select a number from the directory and press Dial.
• Press Redial to dial the last number that you called.
• If you are on a call and another call comes in, press Answer to place the
current call on hold and answer the incoming call. To return to the first call,
select it by using the Up Arrow key or the Down Arrow key and then press
Resume.
• To place a new call while another call is active on the same line, press Hold,
press New Call, and enter the number.
Adjusting Call Volume and Muting
To adjust the volume while you are on a call, press + on the Volume button to
increase the volume, or press - to decrease the volume. Press Save.
Pressing the Volume button while not on a call adjusts the volume of the phone
ringer.
Cisco Small Business SPA525G and SPA525G2 SPCP IP Phones User Guide 36
Page 38

Using Basic Phone Functions
Putting a Call on Hold
Using Mute
To mute the phone microphone, speaker, or headset microphone, press Mute. The
button lights red. Press Mute again to unmute.
Putting a Call on Hold
To put an active call on hold, press Hold. A series of beeps (default) or (optional)
music-on-hold plays for the caller to indicate that the call is on hold.
Resuming a Call
3
Ending a Call
To resume the call, press the (optionally configured) flashing–red line button for the
call. If you have multiple calls, all calls are put on hold except the active call.
To end a call:
• If you are using the handset, hang up.
• If you are using the speakerphone, press Speaker.
• If you are using the headset, either press the Headset button (wired) or replace
the receiver (wireless).
•Press EndCall to hang up one call, and preserve another call. If necessary,
remove the call from hold by pressing the line button.
Cisco Small Business SPA525G and SPA525G2 SPCP IP Phones User Guide 37
Page 39

Using Basic Phone Functions
Transferring Calls
Transferring Calls
You can transfer a call to another extension.
STEP 1 During an active call, or with a call on hold, press Trnsfer.
STEP 2 Do one of the following:
• Enter the number to where you want to transfer the call; or
• Use the directory to choose a number from the personal directory.
STEP 3 Press Dial or wait a few seconds. The call is placed on hold and a new line is
opened to dial the number.
STEP 4 Do one of the following:
3
• To transfer the call without waiting for the other person to answer, press
Trnsfer after the call begins to ring and hang up. If you hang up before the
second call rings, the transfer fails and the first call is disconnected. If you
misdial, press the second line button again to receive a dial tone.
• To transfer after speaking privately to the other person, press
time during the conversation.
Managing Call Waiting
If you are on a call when a second call comes in, you will hear a call-waiting tone
and, or, see a flashing indicator light on the handset rest, depending on the
configuration of your phone.
To answer the new call on the same line:
STEP 1 Use the navigation button to select the call.
Trnsfer at any
STEP 2 Press Answer to answer the call. The call on the other line is automatically put on
hold.
Cisco Small Business SPA525G and SPA525G2 SPCP IP Phones User Guide 38
Page 40

Using Basic Phone Functions
Recording a Live Call
To return to the original call, use the following method:
STEP 1 Use the navigation button to select the call.
STEP 2 Press Resume to reconnect to the call.
Recording a Live Call
If this feature is available on your phone, you can record a call.
STEP 1 Press LiveRcd. This puts the other party on hold and initiates a call to the
configured live record number.
3
STEP 2 Press LiveRcd again to stop the recording.
Viewing and Returning Calls
You can view, edit, and return calls by looking the number up in the call history. For
example, the IP phone screen on your IP phone notifies you if a call came in that
was unanswered. To return the missed call, you can press Missed to view a list of
missed calls and dial a selected number.
To redial any call by selecting it from a call history list:
STEP 1 Press Setup.
STEP 2 Scroll to Call History and press Select.
STEP 3 Scroll to the desired list, such as Missed Calls, and press Select.
If a call is from an outside line or a long distance number, it might be necessary to
edit the call before returning it. For example, it might be necessary to add a prefix
digit that your system requires for an outgoing call. You can:
• Press Dial to dial the number that called you.
• Press EditDial to edit the number before calling it, and then press Dial.
Cisco Small Business SPA525G and SPA525G2 SPCP IP Phones User Guide 39
Page 41

Using Basic Phone Functions
Forwarding Calls
• Press Option to modify the list and choose:
Forwarding Calls
When you will be away from your phone, you can press a button to forward all calls
to a specified number. The number can be an extension, the voice mail system, an
external number, or one of your programmed speed dial numbers.
3
- Delete Entry to remove the entry from the list.
- Delete List to delete all entries from the list.
- Add to Address Book to add the entry to your personal address book.
STEP 1 Press CFwdAll.
STEP 2 Enter the number, including any prefix digit that your system requires for an
outgoing call.
OR press a speed dial button to forward calls to a programmed speed dial
number.
STEP 3 Press EndCall to save your settings.
STEP 4 When you are ready to cancel call forwarding, press CFwdAll.
Setting Do Not Disturb
Use the Do Not Disturb feature to prevent incoming calls from ringing your phone. If
you have voice mail configured, incoming callers immediately reach voice mail. If
voice mail is not configured, callers hear a busy signal or message.
STEP 1 To set Do Not Disturb, press Do Not Disturb on your phone. The IP phone screen
indicates that Do Not Disturb is turned on for your phone.
Press Setup and select User Preferences. Then:
Cisco Small Business SPA525G and SPA525G2 SPCP IP Phones User Guide 40
Page 42

Using Basic Phone Functions
Configuring Call Waiting
STEP 1 Choose Call Preferences.
3
STEP 2 Scroll to
STEP 3 Press the Right Arrow key to turn Do Not Disturb on.
STEP 4 Press Save.
STEP 5 To turn off Do Not Disturb, press DnD.
Press Setup and select User Preferences. Then:
STEP 1 Choose Call Preferences.
STEP 2 Scroll to
STEP 3 Press the Right Arrow key to turn Do Not Disturb off.
STEP 4 Press Save.
Do Not Disturb
Do Not Disturb
Configuring Call Waiting
.
.
Call waiting alerts you when you are on a call with a status message and ringing
that another call is incoming. If you turn call waiting off, incoming calls do not ring
your phone if you are on another call, and the caller hears a busy signal or
message.
To turn call waiting on or off:
STEP 1 Press Setup.
STEP 2 Scroll to User Preferences and press Select.
STEP 3 Select Call Preferences.
STEP 4 Scroll to Call Waiting and press the Right Arrow key to turn call waiting
STEP 5 Press Save.
Cisco Small Business SPA525G and SPA525G2 SPCP IP Phones User Guide 41
On
or
Off
.
Page 43

Using Basic Phone Functions
Picking Up a Call
Picking Up a Call
Depending on the way your phone network is configured, you can pick up a call
ringing at another extension, or a group of phones might be configured such that
members of the group can pick up a call ringing at any group member phone.
To pick up a call ringing at an extension in your group:
STEP 1 Press GPickUp. The phone displays any extensions in the group that have ringing
calls.
STEP 2 Choose the call you want to pick up and press Dial.
To pick up a call ringing at any extension:
3
STEP 1 Press PickUp.
STEP 2 Enter the extension number of the phone that you want to pick up.
Placing a Three-Way Conference Call
To initiate a conference call:
STEP 1 Press Confrn during an active call. The first call is placed on hold, a second line is
opened, and you hear a dial tone.
STEP 2 Dial the second person’s telephone number.
STEP 3 Press Confrn again. All three parties are connected in the conference call.
When you hang up, the other two parties are disconnected. To keep the other
parties in a call, but disconnect yourself from the call, press Join (if available on
your phone system).
Cisco Small Business SPA525G and SPA525G2 SPCP IP Phones User Guide 42
Page 44

Using Basic Phone Functions
Using the Phone Directories
Using the Phone Directories
The Cisco SPA525G and SPA525G2 IP phones provide several different types of
phone directories, depending on the phone model and what the system
administrator has set up for the company.
In general, the phones provide the following types of directories:
• Personal Address Book—The personal directory provides a place for you to
store and view frequently dialed numbers. You can also dial numbers from
the directory.
• Corporate Directories—Depending on your phone network configuration,
you might have a Corporate Directory (XML) and a Corporate Directory
(LDAP) available.
3
Using Your Personal Address Book
To access the Phone Directory, press Setup, select Directories, and select
Personal Address Book.
You have the following options in the Address Book:
• Options—Press Options and choose one of the following options:
- Search—Search for a name.
- Delete—Delete a contact.
- Copy—Copy a contact.
- Paste—Paste a contact.
- Edit Dial—Edit a contact’s number before dialing.
• Dial—Press to dial a highlighted contact.
• Add—Choose to add a new contact.
Use the Down Arrow key to scroll through entries in the address book. Use the
Right Arrow key to scroll through the phone numbers available for the highlighted
contact.
Adding a New Contact
To add a new entry to the directory:
Cisco Small Business SPA525G and SPA525G2 SPCP IP Phones User Guide 43
Page 45

Using Basic Phone Functions
Using the Phone Directories
STEP 1 In the Personal Address Book screen, press Add.
STEP 2 Use the keypad to enter the name of the directory entry. When finished with the
name, use the Down Arrow to navigate to the other fields.
TIP To enter numbers and letters, press Option and select Input All. To en t e r on ly
numbers, press Option and select Input Num. To clear all characters from an entry,
press Option and select Clear.
STEP 3 Enter the office, mobile, or home phone number, including any digits you must dial
to access an outside line and the appropriate area code, if necessary. You must
enter at least one phone number for a contact.
TIP To enter numbers and letters, press Option and choose Input All. To enter only
numbers, press Option and select Input Num. To enter an IP address, press Option
and select Input IP. To clear all characters from an entry, press Option and select
Clear.
3
STEP 4 Press Save to save the entry.
Copying a Contact
You can copy a contact to create a new contact, changing information as
necessary on the second contact. To copy a contact:
STEP 1 In the Personal Address Book screen, scroll to highlight a contact.
STEP 2 Press Option and select Copy.
STEP 3 Press Option again and select Paste.
STEP 4 Edit any necessary fields and press Save.
Searching for a Contact
To search for a contact:
STEP 1 In the Personal Address Book screen, press Option and select Search.
STEP 2 Begin to enter the person’s name. The list below displays entries as you type in
characters. Scroll to highlight the entry you want.
Cisco Small Business SPA525G and SPA525G2 SPCP IP Phones User Guide 44
Page 46

Using Basic Phone Functions
Using the Phone Directories
You can press Dial to call the contact, or Option to delete, copy, or edit the contact.
Deleting a Contact
To delete a contact:
STEP 1 In the Personal Address Book screen, highlight the contact you want to delete.
STEP 2 Press Option and select Delete.
STEP 3 Press OK to delete the contact.
Editing a Contact
3
To edit a contact’s phone information:
STEP 1 In the Personal Address Book screen, highlight the contact you want to edit.
STEP 2 Choose one of the following options:
• Press the center Select navigation button to choose the contact and edit the
numbers in the entry. Use delChar to delete numbers individually, or press
Option and choose Clear to delete all of the numbers.
•Press Save when finished.
Using the Corporate Directory
NOTE Depending on your Internet Telephony Service Provider or corporate network
setup, you may not have a corporate directory available to you.
To use the corporate directory:
STEP 1 Press Setup and select Directories.
STEP 2 Scroll to the Corporate Directory you want to view and press Select.
Cisco Small Business SPA525G and SPA525G2 SPCP IP Phones User Guide 45
Page 47

Using Basic Phone Functions
Using the Call History Lists
Using the Call History Lists
Viewing the Call History Lists
To view the Call History lists:
STEP 1 Press Setup.
STEP 2 Scroll to Call History and press Select.
STEP 3 Select the Call History list you want to view. Available Call History lists are:
• All Calls—Shows all calls placed, received, or missed.
• Missed Calls—Shows the last 60 missed calls.
3
• Received Calls—Shows the caller ID of the last 60 answered calls.
• Placed Calls—Shows all calls placed from the phone.
STEP 4 Press Select to view the list.
Deleting a Call History List
STEP 1 Press Setup.
STEP 2 Scroll to Call History and press Select.
STEP 3 Scroll to the Call History list you want to delete.
STEP 4 Press Option and select Delete List.
STEP 5 Press OK to delete the list.
Calling from the Call History Lists
To dial a number from one of the Call History lists:
STEP 1 Choose the call.
STEP 2 Press Dial.
Cisco Small Business SPA525G and SPA525G2 SPCP IP Phones User Guide 46
Page 48

Using Basic Phone Functions
Accessing Voicemail
NOTE If the call was from a long distance number, you may have to edit the call before
dialing it. Press EditDial and use the softkeys and keypad to edit the number.
Deleting an Entry from the Call History Lists
STEP 1 In the call history list, choose the call.
STEP 2 Press Option and select Delete Entry.
STEP 3 Press OK.
Saving a Call History List Number to Your Directory
3
STEP 1 In the call history list, choose the call.
STEP 2 Press Option and select Add to Address Book.
STEP 3 Press Select. The Address Book entry screen appears.
STEP 4 Edit the information (if desired) and press Save again. The entry is added to your
directory.
Accessing Voicemail
To access voicemail, press Messages on your phone. Your system administrator
must configure your phone with the correct voicemail number so that pressing the
Messages button automatically dials your voicemail system.
Cisco Small Business SPA525G and SPA525G2 SPCP IP Phones User Guide 47
Page 49

Using Advanced Phone Functions
This chapter describes how to configure advanced features on your
Cisco SPA525G and SPA525G2 IP phone. It contains the following sections:
• Using Your Bluetooth-Enabled Mobile Phone, page 48
• Playing MP3 Files on Your Phone, page 56
• Customizing Your IP Phone Screen, page 58
4
• Restarting Your Phone, page 60
• Viewing Phone, Network, and Call Information, page 61
• Viewing the Wireless Connection Status, page 62
• Advanced Menus for Technical Support Personnel, page 63
Using Your Bluetooth-Enabled Mobile Phone
The Cisco SPA525G or SPA525G2 support Bluetooth to allow use of the phone
with a wireless Bluetooth-enabled headset. The Cisco SPA525G2 also supports
the use of your IP phone in conjunction with Bluetooth-enabled mobile phone. You
can do the following:
• Pair your Bluetooth-enabled mobile phone and the IP phone. Your mobile
phone is assigned a line button on the Cisco SPA525G2.
• Switch audio for in-progress calls between your mobile phone and the
Cisco SPA525G2.
• Import your mobile phone address book to your Cisco SPA525G2 personal
address book.
• Use your Cisco SPA525G2 as a handsfree device for your mobile phone.
Cisco Small Business SPA525G and SPA525G2 SPCP IP Phones User Guide 48
Page 50

Using Advanced Phone Functions
Using Your Bluetooth-Enabled Mobile Phone
Not all mobile phones support this function. See the list of Bluetooth-enabled
mobile phones supported with the Cisco SPA525G2 that is posted at the Cisco
support community at http://www.cisco.com/go/smallbizsupport. Also consult the
latest Cisco SPA525G2 release notes available at cisco.com.
NOTE The layout and options shown on the phone screens might differ slightly, depending
on the type of phone system to which your Cisco SPA525G2 is connected.
Enabling Bluetooth
STEP 1 Press the Setup button.
STEP 2 Scroll to User Preferences and press Select.
STEP 3 Scroll to Bluetooth Configuration and press Select.
4
STEP 4 With Bluetooth selected, press the Right Arrow key repeatedly until the screen
displays a blue check mark in the field.
STEP 5 Press Save.
Pairing Your Cisco SPA525G2 with a Bluetooth-Enabled Mobile Phone
To pair your Cisco SPA525G2 with your Bluetooth-enabled mobile phone, you can
initiate pairing from the Cisco SPA525G2 or from your mobile phone.
This feature is based on the following standard Bluetooth profiles:
• Phone Book Access Profile 1.0
• Handsfree Profile 1.5
• Handset Profile 1.1
Cisco Small Business SPA525G and SPA525G2 SPCP IP Phones User Guide 49
Page 51

Using Advanced Phone Functions
Using Your Bluetooth-Enabled Mobile Phone
Initiating Pairing from the Cisco SPA525G2
The Cisco SPA525G2 connects to one Bluetooth device at a time. If multiple
Bluetooth devices are in range of the Cisco SPA525G2, the order of devices in the
Bluetooth Configuration > Bluetooth Profiles list is used, and the device with a
higher priority is activated first.
To pair a Bluetooth device with the IP phone:
STEP 1 Enable Bluetooth on the IP phone as described in the “Enabling Bluetooth”
section on page 49.
STEP 2 Press the Setup button.
STEP 3 Scroll to User Preferences and press Select.
STEP 4 Scroll to Bluetooth Configuration and press Select.
4
STEP 5 Scroll to Bluetooth Mode and press the Right Arrow key to choose one of the
following:
• Handsfree—Your Cisco SPA525G2 will operate as a handsfree device with
a Bluetooth-enabled mobile phone.
• Phone—Your Cisco SPA525G2 pairs with a Bluetooth headset only. Choose
this option if you do not use the IP phone with a Bluetooth–enabled mobile
phone.
• Both—Your Cisco SPA525G2 will operate with your Bluetooth-enabled
mobile phone or a Bluetooth headset.
STEP 6 Scroll to Bluetooth Profiles and press the Right Arrow key to enter the profile
screen.
STEP 7 Press Scan to scan for the Bluetooth device.
Depending on the network environment (for example, the number of Bluetooth
devices and noise level), your Bluetooth headset might not appear on the found
devices list. Ensure the headset is powered on and has Bluetooth activated, and
retry the scan.
STEP 8 In the Select a Bluetooth Device to Pair list, select the device that you want to pair
and press Connect.
Cisco Small Business SPA525G and SPA525G2 SPCP IP Phones User Guide 50
Page 52

Using Advanced Phone Functions
Using Your Bluetooth-Enabled Mobile Phone
Initiating Pairing from Your Bluetooth-Enabled Mobile Phone
The procedure varies depending on your phone model. You must turn Bluetooth
on, and it might be necessary to configure a separate setting to make your mobile
phone discoverable by other devices.
Before starting, it is helpful to find the MAC address of your Cisco SPA525G2 IP
phone. Go to the Setup menu and select Status > Product Information. The MAC
address is listed.
The following procedure uses an Apple iPhone as an example:
STEP 1 On your iPhone, click Settings.
STEP 2 Under General, choose Bluetooth. Verify that Bluetooth is turned on.
STEP 3 In the Bluetooth Window, under Devices, find the MAC address of your
Cisco SPA525G2 IP phone.
4
STEP 4 Select the MAC address of the Cisco SPA525G2.
STEP 5 Enter the PIN (the default is 0000) and press Connect.
When paired with your mobile phone, the Cisco SPA525G2 display screen
assigns one of your line buttons to the mobile phone. A mobile phone icon with a
flashing lightning bolt icon is displayed next to the mobile phone name, number, or
other identifier (such as the phone model) for your phone.
The name, number, or other identifier shown depends on what is configured on
your mobile phone. If you have not configured a name on your paired phone, the
phone might display your phone number or some other identifier (such as the
phone model). The display name can vary, depending on your phone model and
configuration.
Verifying that the Cisco SPA525G2 is Paired
The Bluetooth phone icon colors show the status of your mobile phone and/or the
Cisco SPA525G2:
• No icon—Bluetooth is disabled
• Gray icon— Bluetooth is enabled, but the phones are not connected.
• Blue icon—Bluetooth is enabled and the Cisco SPA525G2 is connected to a
headset.
Cisco Small Business SPA525G and SPA525G2 SPCP IP Phones User Guide 51
Page 53

Using Advanced Phone Functions
Using Your Bluetooth-Enabled Mobile Phone
• Green icon—Bluetooth is enabled and the Cisco SPA525G2 is connected to
a mobile phone.
To verify the mobile phone configuration:
STEP 1 On the Cisco SPA525G2, press the Setup button.
STEP 2 Scroll to User Preferences and press Select.
STEP 3 Scroll to Bluetooth and press Select.
STEP 4 Scroll to Bluetooth Profiles and press the Right Arrow key.
The mobile phone appears in the list of Bluetooth devices.
4
Importing Your Mobile Phone Address Book into the Cisco SPA525G2
Not all mobile phones support importing your address book.
To import your mobile phone book into the personal address book on the
Cisco SPA525G2:
STEP 1 Press the Setup button and select Directories.
STEP 2 Select Personal Address Book.
STEP 3 Press Import.
Depending on your mobile phone, it might be necessary to authorize the Bluetooth
connection, even if the phone is already paired with the Cisco SPA525G2.
The phone displays a status message about the import.
If the import is successful, your imported contacts are shown in the directory.
Cisco Small Business SPA525G and SPA525G2 SPCP IP Phones User Guide 52
Page 54

Using Advanced Phone Functions
Using Your Bluetooth-Enabled Mobile Phone
Making a Mobile Phone Call through the Cisco SPA525G2
When you make a mobile phone call by using your Cisco SPA525G2, your
Cisco SPA525G2 acts as a handsfree device for your phone. The call is made
through your mobile phone, but the audio is present on and the call control is done
by using the Cisco SPA525G2. (See “Switching Audio from Your
Cisco SPA525G2 to Your Mobile Phone” section on page 54.)
To make a call through a mobile phone:
STEP 1 Press the line button associated with your mobile phone (the line button is marked
with a mobile phone icon with a flashing lightning bolt).
STEP 2 Do one of the following:
• Enter a number on the dial pad and press Dial.
4
• Press the Setup button and select Directories. Choose a number and press
Dial.
• Scroll to recently-called number and press Select.
NOTE You probably do not dial a digit to reach an outside line on your mobile phone. If you
usually enter a digit before dialing (such as 9) to reach an outside line from the
Cisco SPA525G2 when it is not paired with a mobile phone, it might not be
necessary to do so when calling through your mobile phone; follow the usual
process for making calls on your mobile phone.
The outgoing call appears on both your Cisco SPA525G2 and your mobile phone
display. The Cisco SPA525G2 displays an off-hook icon next to the mobile phone
display name.
After the call is connected, the icon next to the mobile phone display shows that
the call is established. The audio goes through the Cisco SPA525G2, although the
mobile phone display also shows a connected call.
The layout and options shown on your phone screen might differ slightly,
depending on the type of phone system to which your Cisco SPA525G2 is
connected.
Cisco Small Business SPA525G and SPA525G2 SPCP IP Phones User Guide 53
Page 55

Using Advanced Phone Functions
Using Your Bluetooth-Enabled Mobile Phone
Receiving Mobile Phone Calls by using the Cisco SPA525G2
If your mobile phone is paired with the Cisco SPA525G2, an incoming call to your
mobile phone is also shown on the Cisco SPA525G22.
Do one of the following:
• Press Answer to connect to the call.
• Press the red flashing line button associated with your mobile phone.
• Pick up the Cisco SPA525G2 handset.
• Press Ignore to ignore the call.
Switching Audio from Your Cisco SPA525G2 to Your Mobile Phone
4
You can only switch audio back and forth between the Cisco SPA525G2 and your
mobile phone if the call is connected by using the Cisco SPA525G2-to-mobile
phone feature. You cannot switch a call on your Cisco SPA525G2 that is not
associated with your mobile phone.
To switch audio from your Cisco SPA525G2 to your mobile phone during a call,
press Handset.
To switch audio back to the Cisco SPA525G2 from your mobile phone, on a
connected call, press Handsfree.
Viewing Mobile Phone Battery and Signal Information on Your Cisco SPA525G2
When a mobile phone call is incoming, outgoing, or connected on your
Cisco SPA525G2, the phone display shows information about your mobile phone.
Not all mobile phones support this function.
The layout and options shown on your phone screen might differ slightly
depending on the type of phone system to which your Cisco SPA525G2 is
connected.
Cisco Small Business SPA525G and SPA525G2 SPCP IP Phones User Guide 54
Page 56

Using Advanced Phone Functions
Charging Your Mobile Phone Using Your Cisco SPA525G2
The display bubble shows the following information if it is supported by the mobile
phone:
• Battery indicator—Shows the battery life left on your mobile phone.
• Signal strength—Shows the signal strength for your mobile phone.
• Network—The phone network for your mobile phone.
Charging Your Mobile Phone Using Your Cisco SPA525G2
You can use the USB port on the Cisco SPA525G2 to charge your mobile phone if
your phone has a USB connection.
4
Cisco Small Business SPA525G and SPA525G2 SPCP IP Phones User Guide 55
Page 57

Using Advanced Phone Functions
Playing MP3 Files on Your Phone
Playing MP3 Files on Your Phone
Your IP phone contains an audio player that can play .mp3 files. To play music on
your IP phone, you must load the audio files onto a USB memory device (not
provided with the phone). The phone reads the content of the files from the device,
so the device must remain inserted while playing the files.
Only MP3 music without Digital Media Rights protection can be played on the IP
phone.
Creating the Playlist
The MP3 playlist on the phone is limited to 48 songs.
To c r e at e a p la yl is t :
4
STEP 1 Connect a USB storage device to your PC.
STEP 2 Create a directory named mp3 on the USB device and copy the audio files into
that directory.
STEP 3 Remove the USB device from your PC and insert it into the USB slot on the phone.
STEP 4 Press the Setup button.
STEP 5 Scroll to MP3 Player and press Select.
STEP 6 Press Add List to create a playlist from the songs on the USB device.
STEP 7 Choose songs by using one of the following methods:
• Choose individual songs by scrolling to the song you want and pressing the
Right Arrow key or Select.
• Choose all songs on the USB device by pressing SelectAll.
You can clear all songs by pressing ClearAll.
STEP 8 After choosing songs, the songs are marked with a check next to the song. Press
Add to add the selected songs to the playlist.
Cisco Small Business SPA525G and SPA525G2 SPCP IP Phones User Guide 56
Page 58

Using Advanced Phone Functions
Playing MP3 Files on Your Phone
Playing Songs
In the Playlist, scroll to the song you want to begin playing and press Play.
You can control the play by using the following controls:
• Stop—Stop the song. Pressing play restarts the song.
• Previous—Move to the previous song in the playlist.
• Next—Move to the next song in the playlist.
• Back—Move back one screen to the playlist.
Controlling the Audio
Use the Volume button to turn the sound up or down.
4
To switch the audio destination between the speaker, headset, and handset, press
the Up Arrow or Down Arrow key. The icon on the left above the song length
display shows the audio destination of speaker, handset, or headset.
Cisco Small Business SPA525G and SPA525G2 SPCP IP Phones User Guide 57
Page 59

Using Advanced Phone Functions
Customizing Your IP Phone Screen
Customizing Your IP Phone Screen
You can customize your IP phone screen.
Changing the Screen Contrast
To adjust the contrast of the IP phone screen:
STEP 1 Press the Setup button.
STEP 2 Scroll to User Preferences and press Select.
STEP 3 Scroll to Screen Preferences and press Select.
STEP 4 Scroll to Display Brightness. The default contrast is 15. Enter a number between 1
(lowest) and 15 (greatest) to change the contrast.
4
STEP 5 Press Save.
Setting the Screen Backlight Timer
You can set a timer for your screen so that your IP phone screen becomes dark
after a specified time when the phone is idle.
STEP 1 Press the Setup button.
STEP 2 Scroll to User Preferences and press Select.
STEP 3 Scroll to Screen Preferences and press Select.
STEP 4 Scroll to Backlight. Press the Right Arrow key to choose
darkening feature is enabled.
STEP 5 Scroll to Backlight Timer. Enter the number of seconds before the display should
shut off after the phone is idle.
STEP 6 Press Save.
On
, which means that the
Cisco Small Business SPA525G and SPA525G2 SPCP IP Phones User Guide 58
Page 60

Using Advanced Phone Functions
Customizing Your IP Phone Screen
Configuring the Phone Screen Saver
You can enable your phone screen saver and specify its appearance and the
amount of time for the phone to be idle before it begins.
To configure your screen saver:
STEP 1 Press the Setup button.
STEP 2 Scroll to User Preferences and press Select.
STEP 3 Scroll to Screen Preferences and press Select.
STEP 4 With Screen Saver highlighted, press the Right Arrow key to toggle the feature on
(checked) or off (unchecked).
STEP 5 Scroll to Screen Saver Settings and press the Right Arrow key to choose the
settings:
4
• Screen Saver Type—Choose from:
- Black Background—Displays a black screen.
- Gray Background—Displays a gray screen.
- Black/Gray Rotation—The screen cycles from black to gray.
- Picture Rotation—The screen rotates through a series of pictures that
your system administrator has made available on the phone.
- Digital Frame—Displays the background picture.
• Trigger Interval—Enter the number of seconds that the phone remains idle
before the screen saver displays.
• Refresh Interval—Enter the number of seconds to elapse before the screen
saver refreshes (if, for example, you chose a rotation of pictures).
STEP 6 Press Save.
Cisco Small Business SPA525G and SPA525G2 SPCP IP Phones User Guide 59
Page 61

Using Advanced Phone Functions
Restarting Your Phone
Changing the Phone Wallpaper
To change the background picture on your phone:
STEP 1 Press the Setup button.
STEP 2 Scroll to User Preferences and press Select.
STEP 3 Scroll to Screen Preferences and press Select.
STEP 4 Scroll to Wallpaper. Press the arrow keys to select an image to use as the
wallpaper.
STEP 5 Use the navigation arrows to highlight an image. To preview how the image will
look on your phone, highlight the image and press View.
STEP 6 Press Select to choose the image.
4
STEP 7 Press Save.
Restarting Your Phone
It might be necessary to restart your phone. For example, if the screen locks up. To
restart your phone:
STEP 1 Press Setup.
STEP 2 Scroll to Device Administration and press Select.
STEP 3 Scroll to Restart and press Select.
Cisco Small Business SPA525G and SPA525G2 SPCP IP Phones User Guide 60
Page 62

Using Advanced Phone Functions
Viewing Phone, Network, and Call Information
Viewing Phone, Network, and Call Information
The Cisco SPA525G and SPA525G2 provide menus to view status and network
information about your phone.
Viewing Product Information
To view product information about your phone:
STEP 1 Press the Setup button.
STEP 2 Scroll to Status and press Select.
STEP 3 Select Product Information. You can view the following information:
4
• Product Name
• Serial Number
• MAC (Hardware) Address
• Software Version
• Hardware Version
• Certificate
• Customization
Viewing Network Information
To view network information for your phone:
STEP 1 Press Setup.
STEP 2 Scroll to Status and press Select.
STEP 3 Scroll to Network Status and press Select. You can view the following information:
• Network Type
• Network Status
• Addressing Type
Cisco Small Business SPA525G and SPA525G2 SPCP IP Phones User Guide 61
Page 63

Using Advanced Phone Functions
Viewing the Wireless Connection Status
• IP Address
• Subnet Mask
• Default Router
• Primary DNS
• Secondary DNS
• MAC (Hardware) Address
Viewing Peripheral Status
To view information about phone peripherals, such as a USB memory stick or a
Cisco Attendant Console:
4
STEP 1 Press Setup.
STEP 2 Scroll to Status and press Select.
STEP 3 Scroll to Peripheral Status and press Select. You can view the following
information:
• USB Status
• Attendant Console (Attn Cons) Status
Viewing the Wireless Connection Status
If you have set up your wireless connection (described in “Connecting Your
Phone to the Wireless Network” section on page 27), you can view the status of
your wireless connection.
STEP 1 Press the Setup button.
STEP 2 Scroll to Network Configuration and press Select.
STEP 3 Select Wi-Fi Configuration and press the Right Arrow key.
Cisco Small Business SPA525G and SPA525G2 SPCP IP Phones User Guide 62
Page 64

Using Advanced Phone Functions
Advanced Menus for Technical Support Personnel
STEP 4 Scroll to Wireless Status and press Select. The status, SSID name, and signal
strength are displayed. Press Detail for more information.
Advanced Menus for Technical Support Personnel
These Network Configuration menus are used to configure and troubleshoot your
phone and the phone network. You should not change these settings or perform
these actions unless directed to do so by your phone system administrator:
• Connection Type
• Static IP Address Settings
4
• CDP
• VLAN
• VLAN ID
• Multicast Address
• Alternate TFTP ON>OFF
• TFTP Server 1
• DHCP Address Released ON>OFF
• Erase Configuration ON>OFF
Cisco Small Business SPA525G and SPA525G2 SPCP IP Phones User Guide 63
Page 65

Where to Go From Here
Cisco provides a wide range of resources to help you and your customer obtain
the full benefits of the Cisco SPA525G or Cisco SPA525G2.
Support
A
Cisco Small Business Support
Community
Cisco Small Business Support
and Resources
Phone Support Contacts www.cisco.com/en/US/support/
Cisco Small Business
Firmware Downloads
Product Documentation
IP Phone www.cisco.com/go/spa500phones
Cisco Small Business IP
Phone Accessories
www.cisco.com/go/smallbizsupport
www.cisco.com/go/smallbizhelp
tsd_cisco_small_business
_support_center_contacts.html
www.cisco.com/go/smallbizfirmware
Select a link to download firmware for Cisco
Small Business Products. No login is required.
Downloads for all other Cisco Small Business
products, including Network Storage Systems,
are available in the Download area on Cisco.com
at www.cisco.com/go/software (registration/
login required).
www.cisco.com/en/US/products/ps10042/
tsd_products_support_series_home.html
Cisco Small Business
Communications Systems
Cisco Unified
Communications 500 Series
Cisco Small Business IP Phone SPA 525G/SPA 525G2 User Guide (SPCP) 64
www.cisco.com/go/sbcsresources
www.cisco.com/go/uc500resources
Page 66

Where to Go From Here
A
Regulatory Compliance and
Safety Information for the
Cisco SPA300 Series and
Cisco SPA500 Series IP
Phone
Cisco Small Business
Cisco Partner Central for
Small Business (Partner Login
Required)
Cisco Small Business Home www.cisco.com/smb
www.cisco.com/en/US/docs/voice_ip_comm/
csbpipp/ip_phones/regulatory_compliance/
guide/rcsi_500_series.pdf
www.cisco.com/web/partners/sell/smb
Cisco Small Business IP Phone SPA 525G/SPA 525G2 User Guide (SPCP) 65
Page 67

Power Adapter Statement
This product is intended to be supplied by a Listed Direct Plug-In Power Unit
marked “Class 2" or Listed Adapter marked “L.P.S.” (or “Limited Power Source”)
and rated from +5Vdc, 2A minimum.
FCC and IC Statement
Federal Communication Commission Interference Statement
This equipment has been tested and found to comply with the limits for a Class B
digital device, pursuant to Part 15 of the FCC Rules. These limits are designed to
provide reasonable protection against harmful interference in a residential
installation. This equipment generates, uses and can radiate radio frequency
energy and, if not installed and used in accordance with the instructions, may
cause harmful interference to radio communications. However, there is no
guarantee that interference will not occur in a particular installation. If this
equipment does cause harmful interference to radio or television reception, which
can be determined by turning the equipment off and on, the user is encouraged to
try to correct the interference by one of the following measures:
• Reorient or relocate the receiving antenna.
• Increase the separation between the equipment and receiver.
• Connect the equipment into an outlet on a circuit different from that to which
the receiver is connected.
• Consult the dealer or an experienced radio/TV technician for help.
FCC Caution: Any changes or modifications not expressly approved by the party
responsible for compliance could void the user's authority to operate this
equipment.
This device complies with Part 15 of the FCC Rules. Operation is subject to the
following two conditions:
1. This device may not cause harmful interference, and
2. This device must accept any interference received, including interference that
may cause undesired operation.
© 2010 – 2012 Cisco Systems, Inc. All rights reserved. OL-18195-05
Page 68

Cisco and the Cisco logo are trademarks or registered trademarks of Cisco and/or its affiliates in the U.S. and other countries. To view a list of Cisco trademarks,
go to this URL: www.cisco.com/go/trademarks. Third-party trademarks mentioned are the property of their respective owners. The use of the word partner
does not imply a partnership relationship between Cisco and any other company. (1110R)
IMPORTANT NOTE
FCC Radiation Exposure Statement:
This equipment complies with FCC radiation exposure limits set forth for an
uncontrolled environment. This equipment should be installed and operated with
minimum distance 20cm between the radiator & your body.
This transmitter must not be co-located or operating in conjunction with any other
antenna or transmitter.
Industry Canada Statement
This device complies with RSS-210 of the Industry Canada Rules. Operation is
subject to the following two conditions:
1. This device may not cause harmful interference, and
2. This device must accept any interference received, including interference that
may cause undesired operation.
Revised April 2012
© 2010 – 2012 Cisco Systems, Inc. All rights reserved. OL-18195-05
 Loading...