

Page 1
Quick Start Guide
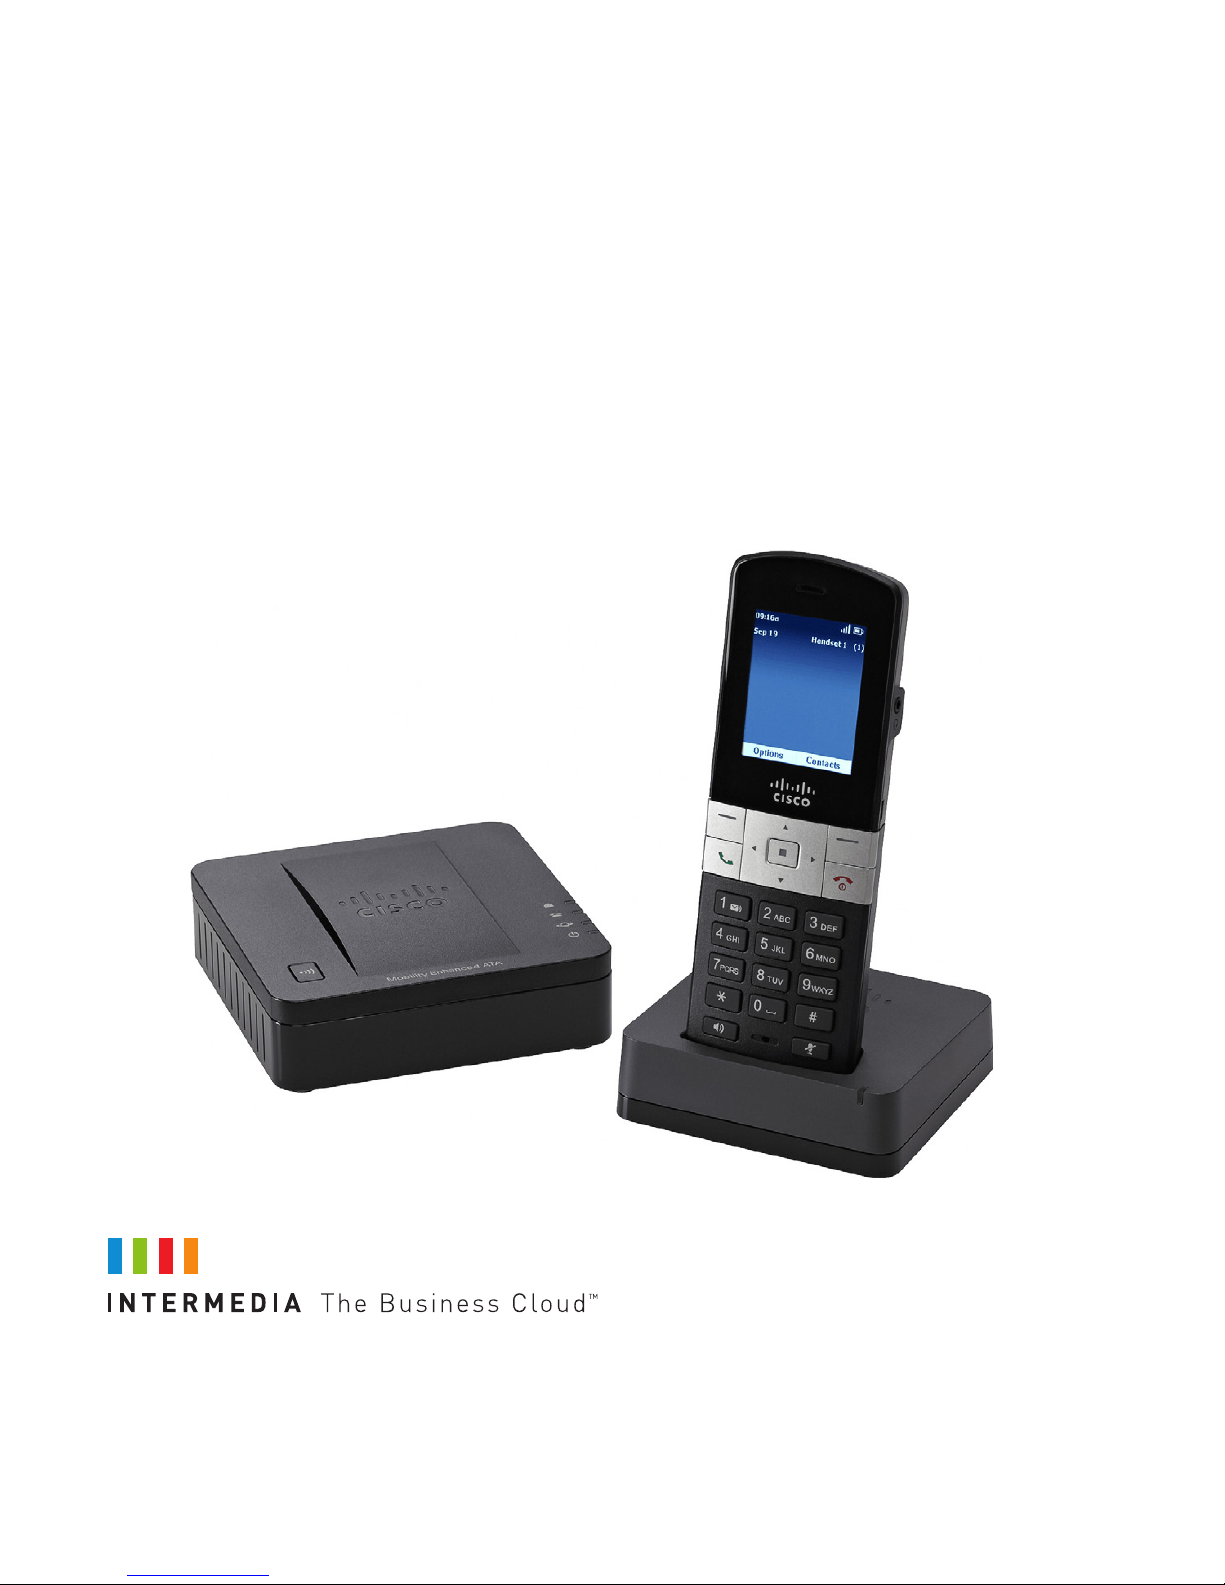
Intermedia Hosted PBX
Cisco SPA 232 Wireless DECT Phone
Page 2

2
Welcome to your Hosted PBX Service.
Page 3
3
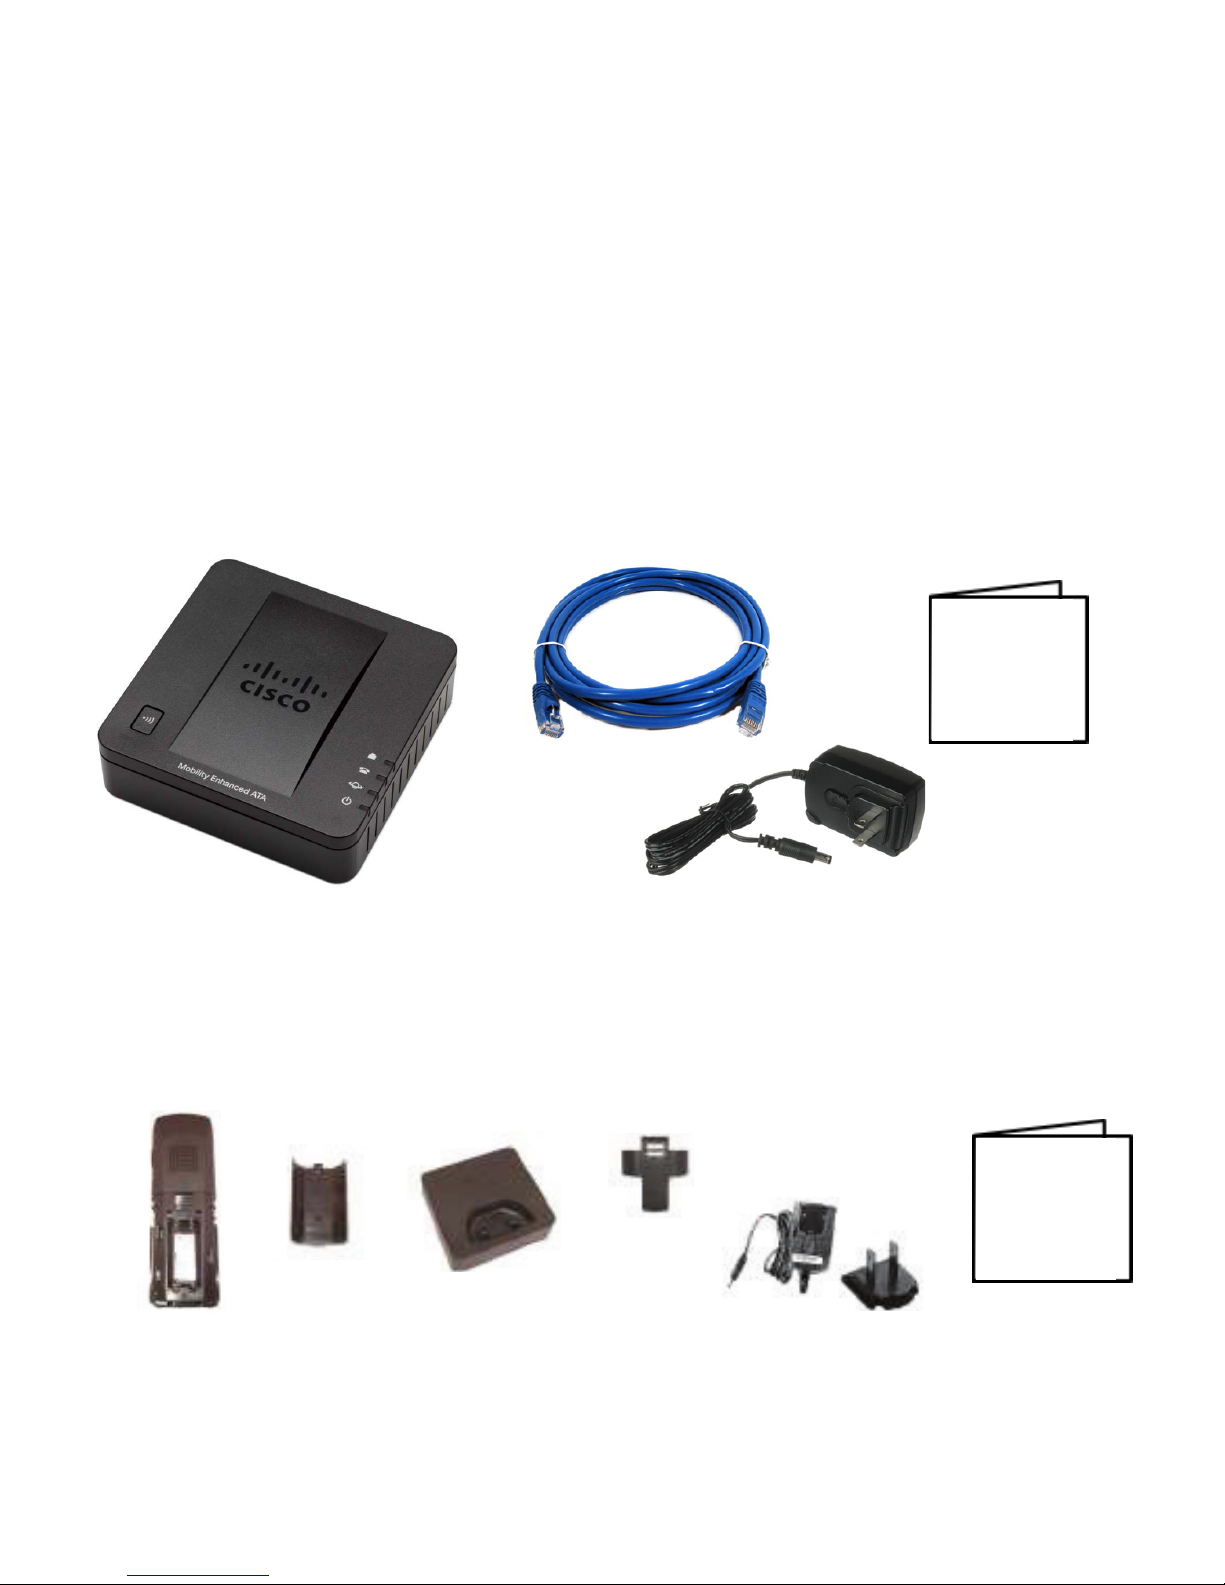
What’s in the box?
Cisco SPA 232 Wireless DECT Phone
Figure 1. Cisco SPA232D Multi-Line DECT ATA
SPA 232 Base Parts
SPA 232 Handset Parts
A. Phone Base
B. Ethernet Cable
C. Power Adapter with Plug
D. Quick Start Guide
A. Cordless Handset
B. Handset Backplate
C. Handset Cradle
D. Belt Clip & Tool
E. Power Adapter with Plug
F. Quick Start Guide
A
B
C
D
F
Quick Start Guide
Quick Start Guide
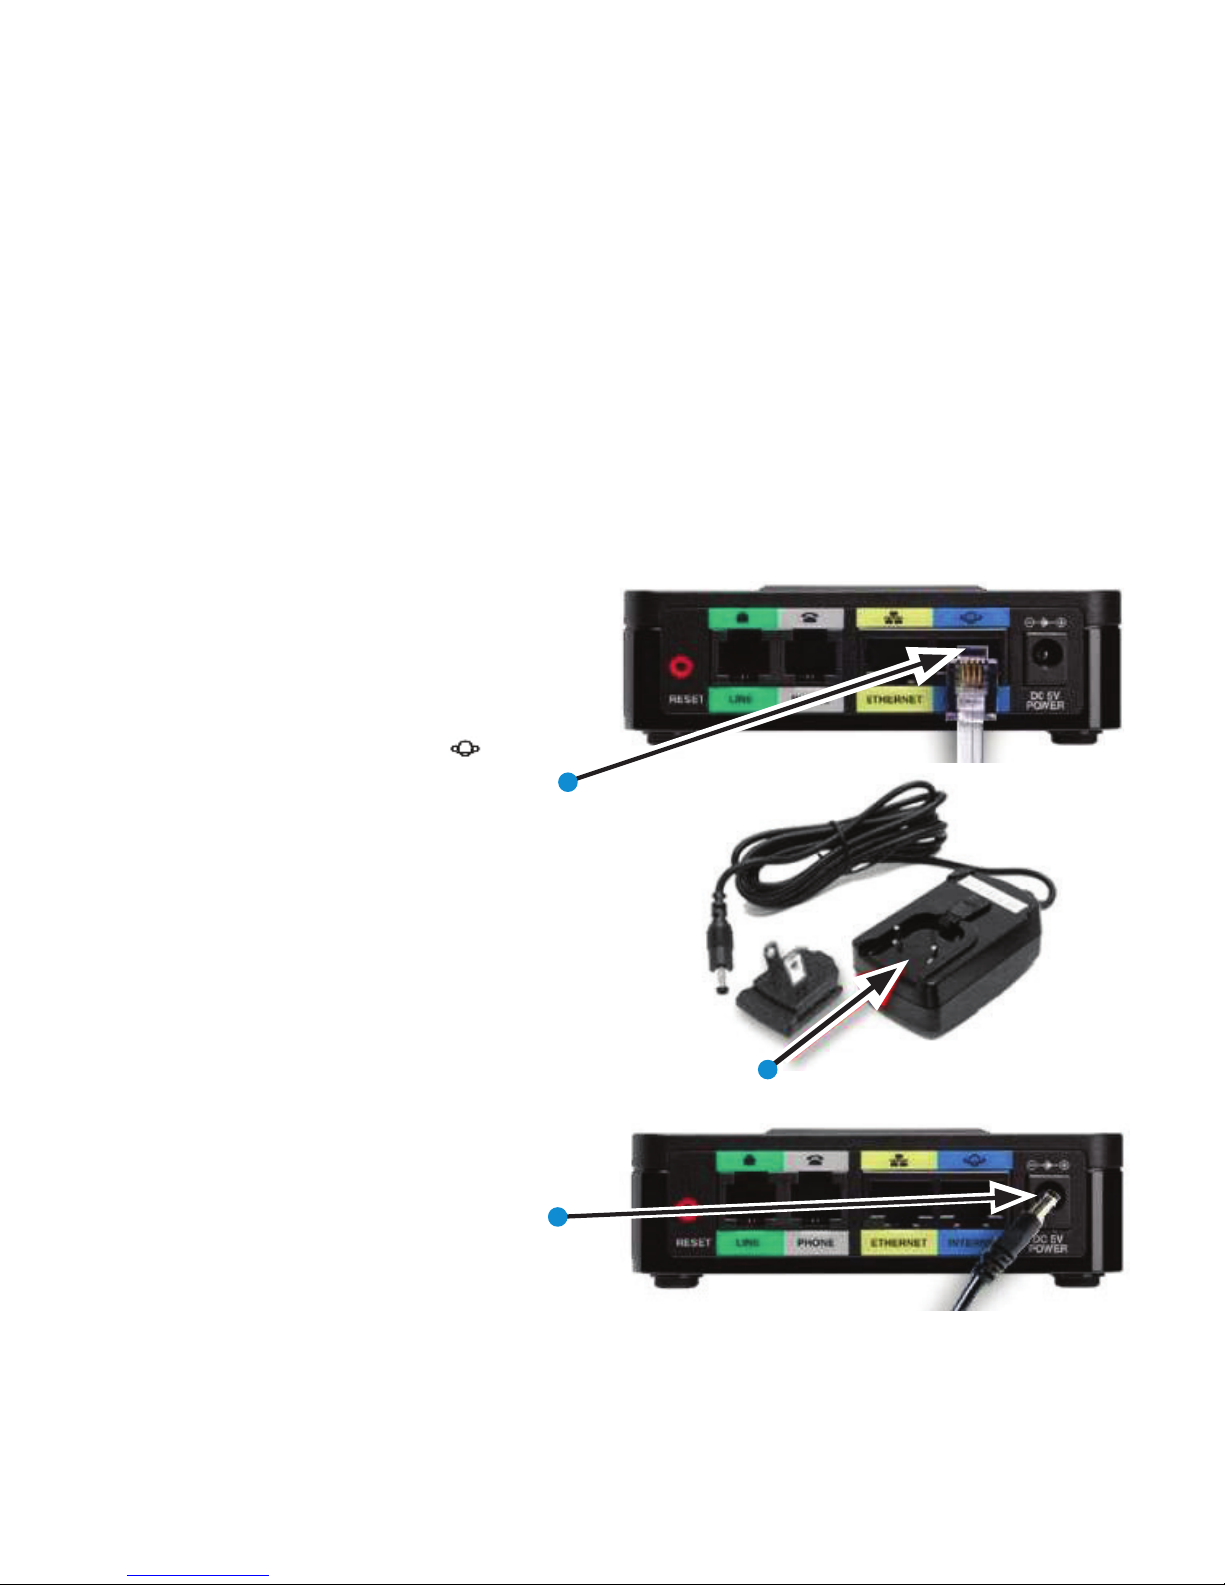
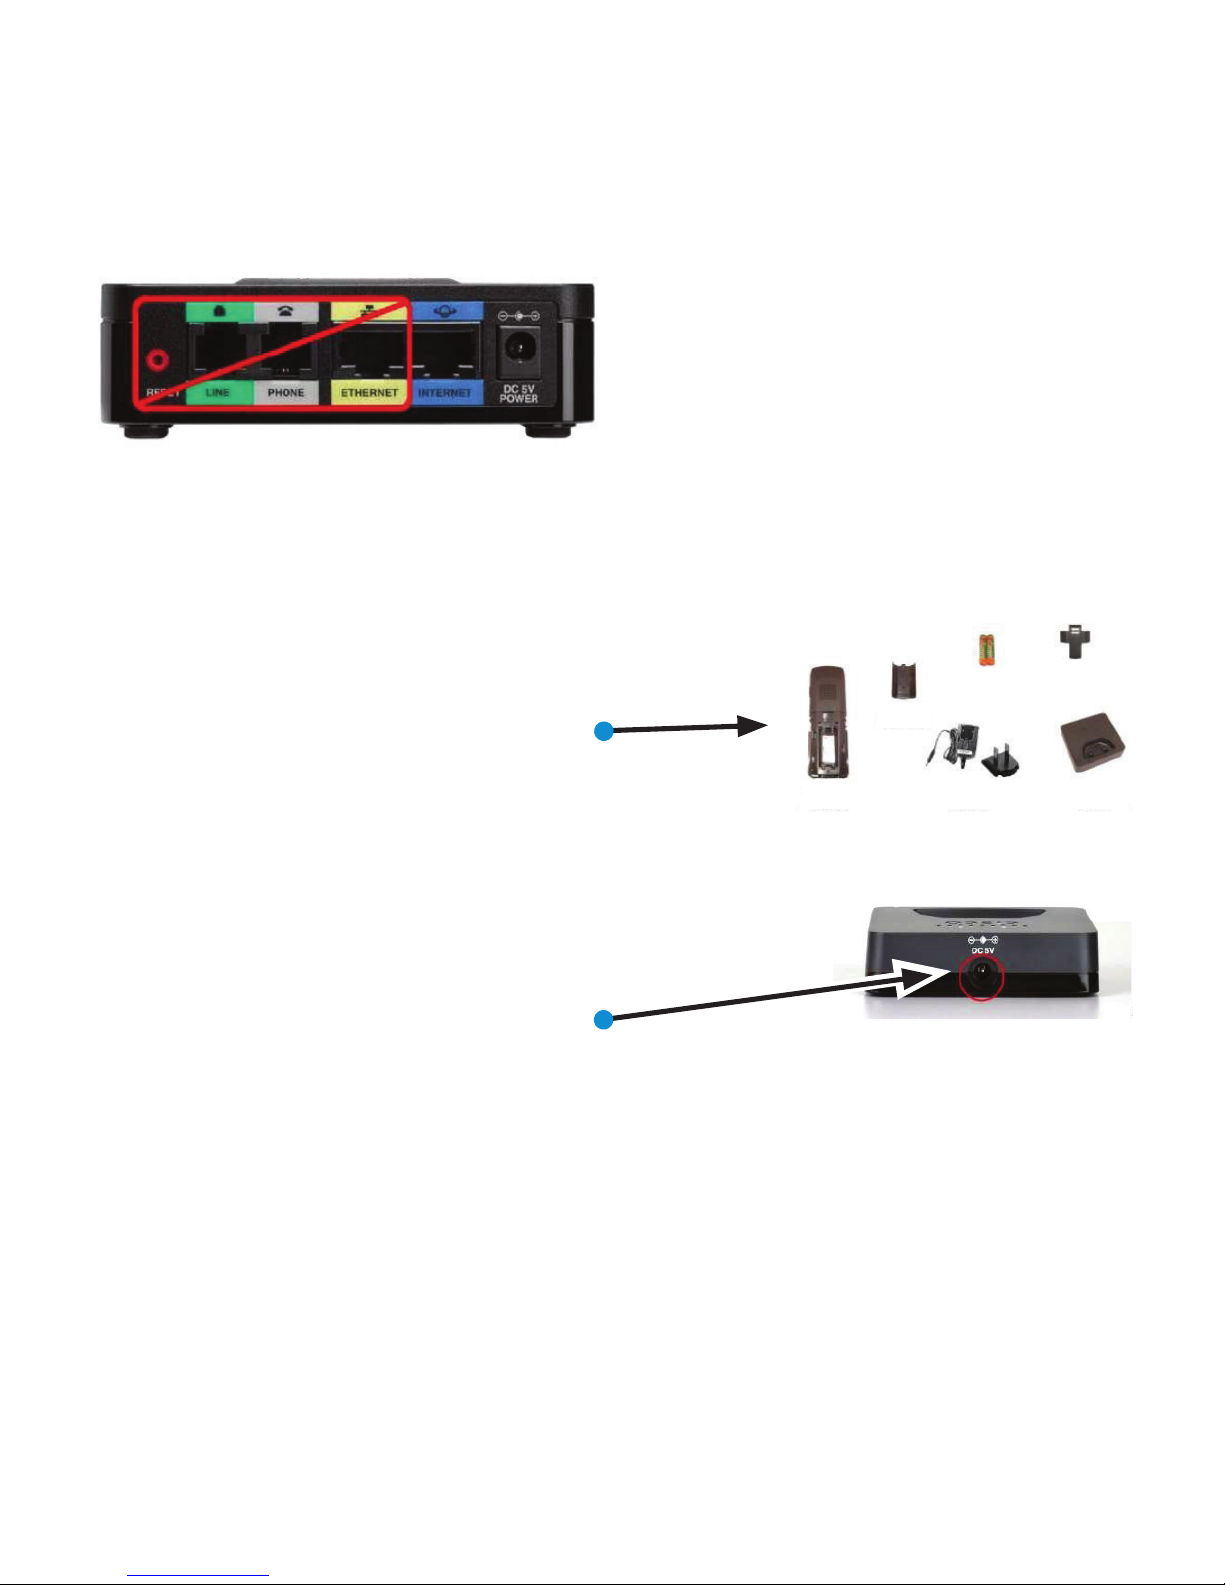
The ports labeled “PHONE” and “LINE” at the rear of the Cordless
Base are not used. Do not connect anything to these connectors.
The “RESET” button at the rear of the Cordless Base is not used.
Pressing the RESET button will make your Cordless Base
inoperable and require replacement.
Setting up the Cordless Handsets
4. Open Cordless Handset box and remove the Cordless
Handset, Power Clip, Power Adapter, and Charging Cradle.
A
B
C
D
E
Page 4
4
Guided Setup
Connect Cables
Please follow the diagram to install your phone. Once plugged in, the
phone will automatically download its conguration and start to work.
Connecting the Cordless Base:
1. Open the Cordless Base box and
remove the Cordless Base, Power Clip,
Power Adapter and blue Ethernet cable.
Connect one end of the blue Ethernet
cable to the blue INTERNET port on
the rear of the Cordless Base.
2. Connect the other end of the blue
Ethernet cable to any free port on your
existing router or anywhere on your
existing data network.
3. Insert the Power Clip into the Power
Adapter.
4. Connect the Cordless Base Power
Adapter to the “DC 5V Power” connector
at the rear of the Cordless Base, and
then plug the Power Adaptor into a
power outlet.
Cordless Handsets can be installed in the following ways
• You may use up to 3 Cordless Handsets per Cordless Base.
Connecting the Cordless Base:
1. Open the Cordless Base box and remove the cordless base,
power clip, power adapter and blue Ethernet cable.
Connect one end of the blue Ethernet cable to the blue INTERNET
port on the rear of the Cordless Base
Installing Cordless Base and Handsets
2. Connect the other end of the blue Ethernet cable to any free
port on your existing router or anywhere on your existing data
network.
3. Connect the Cordless Base power adapter to the “DC 5V
Power” connector at the rear of the Cordless Base
, and then plug the power adaptor into a power outlet.
8. Insert the power clip into the power adapter.
Cordless Handsets can be installed in the following ways
• You may use up to 3 Cordless Handsets per Cordless Base.
Connecting the Cordless Base:
1. Open the Cordless Base box and remove the cordless base,
power clip, power adapter and blue Ethernet cable.
Connect one end of the blue Ethernet cable to the blue INTERNET
port on the rear of the Cordless Base
Installing Cordless Base and Handsets
Page 5
5
Note: The ports labeled “PHONE” and
“LINE” at the rear of the Cordless Base
are not used. Do not connect anything
to these ports.
Warning: The “RESET” button at the
rear of the Cordless Base is not used.
Pressing the RESET button will make
your Cordless Base inoperable and
require replacement.
Setting up the Cordless Handsets:
4. Open Cordless Handset box and remove the
Cordless Handset, Power Clip, Power Adapter, and
Charging Cradle.
5. Remove the protective lm from the Handset and
Charging Cradle.
6. Insert the Power Clip into the Power Adapter (see
Step 3).
7. Connect the Power Adapter to the Charging Cradle in
the port shown.
8. Install the optional Belt Clip on the Cordless Handset.
For optimal battery performance, please charge the
phone for a minimum of 10 hours before using.
Once the phone has been plugged in and operational,
the voicemail box is functional with a default greeting.
The ports labeled “PHONE” and “LINE” at the rear of the Cordless
Base are not used. Do not connect anything to these connectors.
The “RESET” button at the rear of the Cordless Base is not used.
Pressing the RESET button will make your Cordless Base
inoperable and require replacement.
8. Insert the power clip into the power adapter.
9. Insert the power adapter into the power source or wall outlet.
10. Connect the power adapter to the charging cradle in the port
shown below.
The ports labeled “PHONE” and “LINE” at the rear of the Cordless
Base are not used. Do not connect anything to these connectors.
The “RESET” button at the rear of the Cordless Base is not used.
Pressing the RESET button will make your Cordless Base
inoperable and require replacement.
Setting up the Cordless Handsets
4. Open Cordless Handset box and remove the Cordless
Handset, Power Clip, Power Adapter, and Charging Cradle.
Page 6

6
Voicemail Box Setup
RECORDING YOUR PERSONAL VOICEMAIL GREETING
1. Press & hold 1 on your keypad.
2. Press the Down Arrow to your phone number.
3. Press the Select (center) button.
-OR-
1. Dial your extension number.
2. Enter the default PIN of 0000.
3. Select option 8 for User Options.
4. Select option 1 to record the unavailable greeting.
5. Follow the voice prompts to record and check your greeting.
CHANGING THE PIN FROM THE PHONE
1. Log in to your voicemail box.
2. Press 8 for User Options.
3. Press 7 to change your PIN.
4. Enter the new 6 to 10-digit PIN when prompted.
Your new PIN:
• Must be numeric digits and must not start with “0”.
• Must not contain sequential or repeating digits, such as “123”
or “111”.
Page 7

LOGGING INTO YOUR VOICEMAIL BOX VIA THE WEB
1. Go to www.intermedia.net/login/voice
2. Enter your Phone Number and PIN/Password
3. Click LOGIN
7
Page 8

8
The Cordless Handset has a front keypad as well as side keys.
These keys can be used to customize your Cordless Handset as
well as make and manage calls. The following table describes the
keys on the key panel of your Cordless Handset.
Cordless Handset Key Descriptions
Features
Earphone Speaker
Microphone
Handset Display
Dial Keypad
Mute ButtonSpeakerphone Button
Start Call Button
Left Softkey
4-Way Navigation Keypad
Center Select Button
Right Softkey
End Call Button
Page 9

9
Headset
Port
Speaker
Notes:
Right softkey:
Press the softkey to
perform the action
shown in the lower
right of the Handset
display.
Left softkey:
Press the softkey to
perform the action
shown in the lower
left of the Handset
display.
End Call button
Press the button
briey to end a call.
Press the button and
hold it to turn the
Handset on and o.
4-way navigation
keypad
Press the arrow
buttons to move
up, down, left, or
right through menus
displayed on the
Handset.
Page 10

10
Commonly Used Features
PLACING OUTGOING CALLS
When the phone is not in use:
1. Pick up the handset from the base unit, press the O-hook button,
or the speakerphone button.
2. Dial a 3-digit extension or telephone number.
When you are already on a call:
3. Press the Options Softkey and select New Call by pressing the center
button in the Navigation keypad.
• This will place the rst call on hold AND provide dial tone to
make a second call
4. Dial a 3-digit extension or telephone number.
5. Press the Onhook button to hang up the active call.
6. Press the Options Softkey and then the center button on the
Navigation keypad to resume the original call.
ANSWERING AN INCOMING CALL
…On the Handset:
Pick up the handset from the base unit and press the O-hook button or
the Answer Softkey.
Page 11

11
ANSWERING AN INCOMING CALL (CONT.)
…On a Headset:
When a headset is connected, press the O-hook button.
…On Speakerphone:
Pick up the handset from the base unit and press the O-hook button.
IGNORING AN INCOMING CALL
Press the “Ignore” Softkey to send the caller to voicemail.
ENDING A CALL
Press the End Call Softkey.
HOLD
Placing a Call On Hold:
1. While on a call, press the Options Softkey and navigate to the Hold
option using the down arrow on the Navigation keypad.
2. Press the center button on the Navigation keypad to place the call
on hold.
Retrieving Calls On Hold:
• Press the Options Softkey and select Resume by pressing the center
button in the Navigation keypad.
Page 12

12
TRANSFERRING CALLS
Blind Transfers:
1. While on a call, Press the Options Softkey.
2. Scroll down to Blind Transfer by pressing the down arrow button in
the Navigation keypad.
3. Press the center button in the Navigation keypad.
4. Dial the desired phone number or extension number.
5. The call is automatically transferred.
Attended (Consultative or Warm ) Transfers:
1. While on a call, Press the Options Softkey.
2. Scroll down to Transfer using the down arrow button in the
Navigation keypad.
3. Press the center button in the Navigation keypad.
4. Dial the desired phone number or extension number.
5. When the party answers, announce the call.
6. Press the Options Softkey.
7. Scroll down to Transfer and press the center button in the
Navigation keypad.
8. The call will be transferred.
MUTE
1. While on a call, press the Mute button on the Handset.
2. To un-mute the microphone, press the Mute button again.
Page 13

13
VOICEMAIL
1. Press & hold 1 on your keypad.
2. Press the down Arrow to your phone number.
3. Press the Select (center) button.
4. Enter your PIN when prompted
-OR-
1. Dial your extension number.
2. Enter your PIN when prompted.
VOLUME ADJUSTMENT
In-Call Volume:
• While on a call, press the left and right arrow buttons on the
Navigation keypad to raise or lower the volume.
Ringer Volume:
• While the phone is not in use, press the left and right arrow buttons
on the Navigation keypad to raise or lower the ringer volume.
Page 14

14
CALL WAITING
When an inbound call rings in, you will hear a beep tone emitted by your
phone.
To Answer the Second Call:
1. Press the “Answer” Softkey.
2. Press the “Option” Softkey and select the “Swap” Softkey to switch to
the original call or back again
To Reject the Second Call:
• Press the “Ignore” Softkey to immediately send the caller to
voicemail.
To Ignore the Second Call:
• Press the “Ignore” Softkey to send the caller to voicemail
SPEAKERPHONE
While the phone is not in use:
• Press the speakerphone button to activate the speakerphone and
get dial tone for an outbound call.
Page 15

15
SPEAKERPHONE
While on a call on the handset / headset:
• Press the speakerphone button to continue the current call on the
speakerphone.
While a call on speakerphone is active:
• To hang up the current call, press the speakerphone button.
FORWARDING CALLS
1. Press the center Select button.
2. Scroll right to Call Settings and press the center Select button again.
3. Scroll down to Call Forwarding and press the center Select button.
4. Choose the type of forwarding needed.
5. Enter the forwarding destination number or extension.
6. Press Save.
Forward All Dest — Forwards all incoming calls.
Forward Busy Dest — Forwards incoming calls when the phone is busy.
Forward No Ans Dest — Forwards incoming calls when the phone is not
answered.
Page 16

16
FORWARDING CALLS (CONT.)
Disabling Forward:
1. Press the center Select button.
2. Scroll right to Call Settings and press the center Select button again.
3. Scroll down to Call Forwarding and press the center Select button.
4. Clear the numbers in the eld by pressing the Delete softkey.
5. Press Save.
FREE
Download CallScape for
increased desktop productivity:
www.intermedia.net/callscape
Page 17

17
www.intermedia.net/knowledgebase/voice
voicesupport@intermedia.net 1.877.880.0055
We are here to help.
Page 18

www.intermedia.net
CiscoSPA232D-QS-001
*CISCOSPA232D-QS-001*
 Loading...