

Page 1
Quick Start Guide
Cisco 826 and Cisco SOHO 76 Router Cabling and Setup
1 Cisco One-Year Limited Hardware Warranty Terms
2 Overview
3 Parts List
4 Verify the PC Setup
5 Connect the Router to a PC
6 Connect the Router to a Hub
7 Connect an ADSL Line
8 Connect the Power and Turn On the Router
9 Verify the Connections by Using the LEDs
10 Set Up the Router to Access the Network
11 Obtaining Documentation
12 Documentation Feedback
13 Cisco Product Security Overview
14 Obtaining Technical Assistance
15 Obtaining Additional Publications and Information
Page 2

1 Cisco One-Year Limited Hardware Warranty Terms
There are special terms applicable to your hardware warranty and various services that you can use during the warranty period.
Your formal Warranty Statement, including the warranties and license agreements applicable to Cisco software, is available on
Cisco.com.
Launch your browser, and go to this URL:
http://www.cisco.com/go/warranty
2
Page 3

Complete the information below, and keep it for reference.
Company product purchased from
Company telephone number
Product model number
Product serial number
Maintenance contract number
2 Overview
This document describes the basic process of cabling and configuring the Cisco 826 and Cisco SOHO 76 routers.
You can access the most current Cisco documentation on the World Wide Web at the following sites:
• http://www.cisco.com
• http://www-china.cisco.com
• http://www-europe.cisco.com
3 Parts List
The shipment of your router includes the following items:
• One Cisco 826 or Cisco SOHO 76 router
• One yellow Ethernet cable
• One lavender ADSL cable
• One light blue console cable
• One black power supply
• One black power supply cord
• Cisco 800 and SOHO Series Product Documentation
If any of the items is missing or damaged, contact your customer service representative.
4 Verify the PC Setup
If you are connecting a PC to the router Ethernet port, you must first verify that the PC has a network interface card (NIC)
installed and that Transmission Control Protocol/Internet Protocol (TCP/IP) has been loaded and configured. For more
information on how to configure TCP/IP, refer to the Microsoft documentation provided with your Windows operating system.
3
Page 4
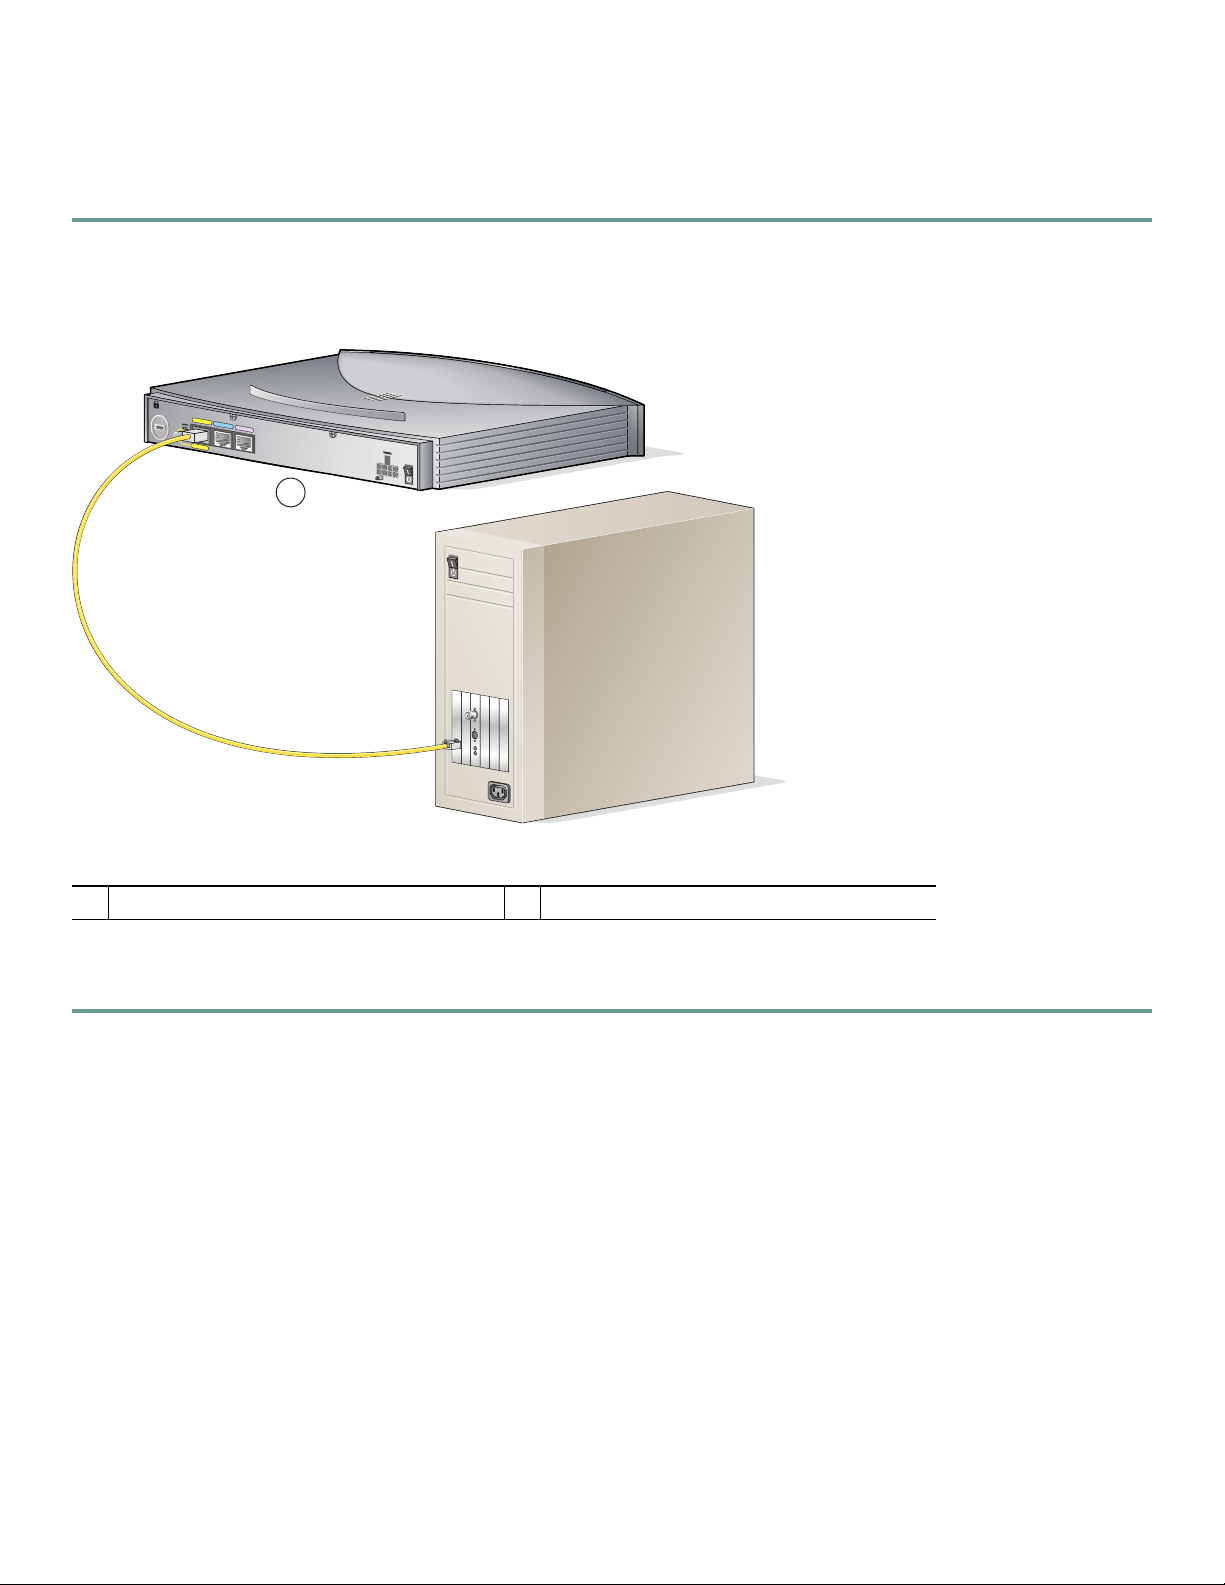
5 Connect the Router to a PC
Follow these steps to connect the Cisco 826 or Cisco SOHO 76 router to a PC:
Step 1 Connect the yellow Ethernet cable from the yellow Ethernet port on the back panel of the router to the Ethernet port
on the computer, as shown in Figure 1.
Figure 1 Connecting the Router to a PC
ET
H
ER
T
N
O
E
H
T
U
B
T
O
PC
1
M
C
odel Cisco 826
O
N
S
O
LE
AD
S
Lo
ISD
N
+
5,+
12,-1
2
,-2
4,-71
V
D
C
1
Cisco 826 router
1
Step 2 Verify that the TO HUB/TO PC switch on the left side of the back panel has been set to the TO PC position (out). If
the button is in, press it to set it to the out position.
4
Page 5

6 Connect the Router to a Hub
Follow these steps to connect the Cisco 826 or Cisco SOHO 76 router to a hub:
Step 1 Connect the yellow Ethernet cable from the yellow Ethernet port on the back panel of the router to the Ethernet port
on the hub, as shown in Figure 2.
Figure 2 Connecting Router to a Hub
1
E
T
H
E
R
T
N
O
E
H
T
U
B
TO
P
C
M
C
odel Cisco 826
O
N
S
O
LE
A
D
S
Lo
IS
D
N
1
+
5
,+
1
2,-1
2,-2
4
,-7
1
V
D
C
2
1X
2X
ETHERNET
3X
4X
5X
6X
7X
8X
MDI MDI-X
Cisco 1528 Micro Hub 10/100
2
Cisco 826 router
1
SPEED
100BaseTX
10BaseT
LED
1
SOLID
2
3
4
BLINK
5
6
7
8
Step 2 Verify that the TO HUB/TO PC switch on the left side of the back panel has been set to the TO HUB position (in). If
the button is out, press it to set it to the in position.
5
Page 6

7 Connect an ADSL Line
Follow these steps to connect an ADSL to the ADSL over ISDN port on your router:
Step 1 Connect the lavender ADSL cable to the lavender ADSL over ISDN port on the router, as shown in Figure 3. If you have
microfilters or do not have telephone service on the ADSL line, use the lavender CAB-ADSL-RJ11 cable. If you have a
splitter installed, use the lavender CAB-ADSL-RJ11X cable with the blue stripe. One of these two ADSL cables is
supplied with the router. (The cable supplied is the one that was selected during the ordering process.)
Figure 3 Connecting the Router to an ADSL Line
TO HUB
ETHERNET
TO PC
1
CONSOLE
Model Cisco 827-4V
ADSL
+5,+12,-12,-24,-71, VDC
PH
ON
E
4
3
2
1
1
2
Cisco 827-4V router
1
2
Wall jack
Step 2 Connect the other end of the ADSL cable to the external wall jack.
6
Page 7

8 Connect the Power and Turn On the Router
Follow these steps to connect power to the Cisco 826 or Cisco SOHO 76 router and turn it on:
Step 1 Make sure the router power is off. Press the power switch to standby ( ).
Step 2 Connect the power supply cable to the 8-pin connector on the router, as shown in Figure 4.
Figure 4 Connecting the Power to a Router
1
E
TH
ER
TO
N
ET
H
U
B
TO
P
C
1
C
O
N
SO
LE
A
D
SLoISD
N
Model Cisco 826
+5
,+12,-12,-24,-71 VD
C
4
2
3
Cisco 826 router
1
8-pin connector
2
Desktop power supply
3
To electrical outlet
4
Step 3 Connect the socket end of the power cord to the desktop power supply.
Step 4 Connect the plug end of the power cord to an electrical outlet.
Step 5 Turn on the router. Press the power switch to on (|).
7
Page 8

9 Verify the Connections by Using the LEDs
The following table describes the normal condition for LEDs and what to do if you observe an abnormal condition. For more
information on all LEDs or to resolve problems, see the Cisco 826 and Cisco SOHO 76 Router Hardware Installation Guide.
Normal
LED
OK On Power is
ADSL CD On ADSL is
ADSL RXD Blinking ADSL port
ADSL TXD Blinking ADSL port
ETHERNET 1 On Ethernet
ETHERNET RXD Blinking Ethernet port
ETHERNET TXD Blinking Ethernet port
Condition Explanation Actions to Take
If the LED is off, power is not being supplied to
supplied to the
router.
connected.
receives data.
sends data.
device is
connected.
is receiving a
packet.
is transmitting
a packet.
the router. Check the outlet to make sure that it is
not switched off. Check the power cables to verify
that the cable from the outlet to the power supply
is properly connected. Check the cable from the
power supply to the router to make sure that it is
properly connected.
If the LED is off, check the connections. Also,
verify that service is being provided to the
premises.
If the LED is off continuously and you know that
data is being sent to the router, check the ADSL
connections. Also, check to ensure that the router
or the ADSL switch (the service provider device)
is properly configured.
If the LED is off continuously and you know that
data is being sent to the router, check the ADSL
connections. Also, check to ensure that the router
is properly configured.
If the LED is off, toggle the TO HUB/TO PC
button (if set to TO HUB [in], reset to TO PC
[out], and vice versa). Also, make sure that the
connected device is powered on.
If the LED is off continuously and you are that
sure another device is attempting to send data to
the router, check the Ethernet connections. Also,
make sure that the router or the LAN device
attempting to send data to the router is properly
configured.
If the LED is off continuously and you are sure
that the router is attempting to send data to
another device, check the Ethernet connections.
Also, make sure that the router is properly
configured.
8
Page 9

10 Set Up the Router to Access the Network
The Cisco Router Web Setup (CRWS) software is already loaded on your router. If you purchased your router through an
Internet service provider (ISP), it is possible that your router has already been configured for use at your site, and no additional
configuration is necessary.
If your router has not been configured by your service provider or network administrator, it can be configured by using the
command-line interface (CLI). However, unless you are an advanced user, we recommend that you use CRWS to configure the
router. CRWS is a web-based utility that makes it easy to configure the router by following the setup instructions on the screen.
(Detailed information about CRWS is provided in the Cisco Router Web Setup User’s Guide.)
To launch CRWS, complete these steps:
Step 1 Log on to a PC connected to the router LAN (ETHERNET).
Step 2 Open a web browser.
Step 3 Type in the universal resource locator (URL) http://10.10.10.1.
Step 4 Click the Router Setup link in the Cisco Router Web Setup home page, and follow the instructions that appear in the
page that is displayed.
If the CRWS home page does not appear when you enter the URL (Step 3), test the connection between the PC and the router
by doing the following:
• Check that the OK LED on the router is on.
• Check the connection between the router and the PC, including the cable from the PC to the hub, and the cable from the
hub to the PC.
• Be sure that the TO HUB/TO PC button is in the correct position.
If the CRWS home page still does not appear, verify that the web browser’s Work Offline option is disabled.
If the web page still does not appear, verify that your PC is automatically configured to receive an IP address. Follow the
instructions in the Cisco Router Web Setup User’s Guide, which is available on Cisco.com.
11 Obtaining Documentation and Submitting a Service Request
For information on obtaining documentation, submitting a service request, and gathering additional information, see the monthly
What’s New in Cisco Product Documentation, which also lists all new and revised Cisco technical documentation, at:
http://www.cisco.com/en/US/docs/general/whatsnew/whatsnew.html
Subscribe to the What’s New in Cisco Product Documentation as a Really Simple Syndication (RSS) feed and set content to be
delivered directly to your desktop using a reader application. The RSS feeds are a free service and Cisco currently supports
RSS Version 2.0.
9
Page 10

10
Page 11

Corporate Headquarters
Cisco Systems, Inc.
170 West Tasman Drive
San Jose, CA 95134-1706
USA
www.cisco.com
Tel: 408 526-4000
800 553-NETS (6387)
Fax: 408 526-4100
European Headquarters
Cisco Systems International BV
Haarlerbergpark
Haarlerbergweg 13-19
1101 CH Amsterdam
The Netherlands
www-europe.cisco.com
Tel: 31 0 20 357 1000
Fax: 31 0 20 357 1100
Americas Headquarters
Cisco Systems, Inc.
170 West Tasman Drive
San Jose, CA 95134-1706
USA
www.cisco.com
Tel: 408 526-7660
Fax: 408 527-0883
Asia Pacific Headquarters
Cisco Systems, Inc.
Capital Tower
168 Robinson Road
#22-01 to #29-01
Singapore 068912
www.cisco.com
Tel: +65 6317 7777
Fax: +65 6317 7799
Cisco Systems has more than 200 offices in the following countries. Addresses, phone numbers, and fax numbers are listed on the
Cisco Web site at www.cisco.com/go/offices
Argentina • Australia • Austria • Belgium • Brazil • Bulgaria • Canada • Chile • China PRC • Colombia • Costa Rica • Croatia • Czech Republic • Denmark • Dubai, UAE
Finland • France • Germany • Greece • Hong Kong SAR • Hungary • India • Indonesia • Ireland • Israel • Italy • Japan • Korea • Luxembourg • Malaysia • Mexico
The Netherlands • New Zealand • Norway • Peru • Philippines • Poland • Portugal • Puerto Rico • Romania • Russia • Saudi Arabia • Scotland • Singapore • Slovakia
Slovenia • South Africa • Spain • Sweden • Switzerland • Taiwan • Thailand • Turkey • Ukraine • United Kingdom • United States • Venezuela • Vietnam • Zimbabwe
CCSP, CCVP, the Cisco Square Bridge logo, Follow Me Browsing, and StackWise ar e trademarks of Cisco Systems, Inc.; Changing the Way We Work, Live, Play, and Learn, and iQuick Study are service marks of Cisco
Systems, Inc.; and Access Registrar, Aironet, ASIST, BPX, Catalyst, CCDA, CCDP, CCIE, CCIP, CCNA, CCNP, Cisco, the Cisco Certified Internetwork Expert logo, Cisco IOS, Cisco Press, Cisco Systems, Cisco Systems
Capital, the Cisco Systems logo, Cisco Unity, Empowe ring the Internet Generation, Enterprise/Solver, EtherChannel, EtherFast, EtherSwitch, Fast Step, FormShare, GigaDrive, GigaStack, HomeLink, Internet Quotient, IOS,
IP/TV, iQ Expertise, the iQ logo, iQ Net Readiness Scorecard, LightStream, Linksys, MeetingPlace, MGX, the Networkers logo, Networking Aca demy, Network Registrar, Packet, PIX, Post-Routing, Pre-Routing, ProConnect,
RateMUX, ScriptShare, SlideCast, SMARTnet, StrataView Plus, TeleRouter, The Fastest Way to Increase Your Internet Quotient, and TransPath are registered trademarks of Cisco Systems, Inc. and/or its affiliates in the United
States and certain other countries.
All other trademarks mentioned in this document or Website are the property of their respect ive owners. The use of the word partner does not imply a partne rship relationship between Cisco and any other company. (0502R)
Printed in the USA on recycled paper containing 10% postconsumer waste.
78-11439-07
DOC-7811439=
 Loading...