

Page 1
Cisco Smart+Connected Portable Tablet
Reference Guide
This document provides additional information about the available ports, technical specifications and
features of the Cisco Smart+Connected Portable Tablet.
Refer to the following topics for more information:
• Overview, page 3
• Package Contents, page 4
• Power and Network Connections, page 4
• LED Indicators, page 4
• Device Illustrations and Descriptions, page 6
–
Front View, page 6
–
Top View, page 7
–
Bottom View, page 7
–
Right Side View, page 8
–
Back View, page 8
• Portable or Tabletop Installation Options, page 9
–
Using the Cisco Portable Tablet as a Portable Device, page 9
–
Using the Cisco Portable Tablet as a Tabletop Device, page 10
• Understanding the Touchscreen Modes, page 12
• Configuration, page 12
–
Configure the Network Settings, page 12
–
Connect to Director from the Cisco Portable Tablet, page 14
–
Composer Pro Configuration, page 15
• Power and Battery Management, page 15
• Battery Instructions, page 15
–
Power Off the Device, page 16
Americas Headquarters:
Cisco Systems, Inc., 170 West Tasman Drive, San Jose, CA 95134-1706 USA
Page 2

–
Power Management Best Practices, page 16
• Cleaning the Touchscreen and Docking Station, page 16
• Troubleshooting, page 16
• Specifications, page 18
• Regulatory/Safety Information, page 19
• Related Documentation, page 19
• Warranty, page 20
• Service and Support, page 21
Cisco Smart+Connected Portable Tablet Reference Guide
2
OL-27364-01
Page 3
Overview
Overview
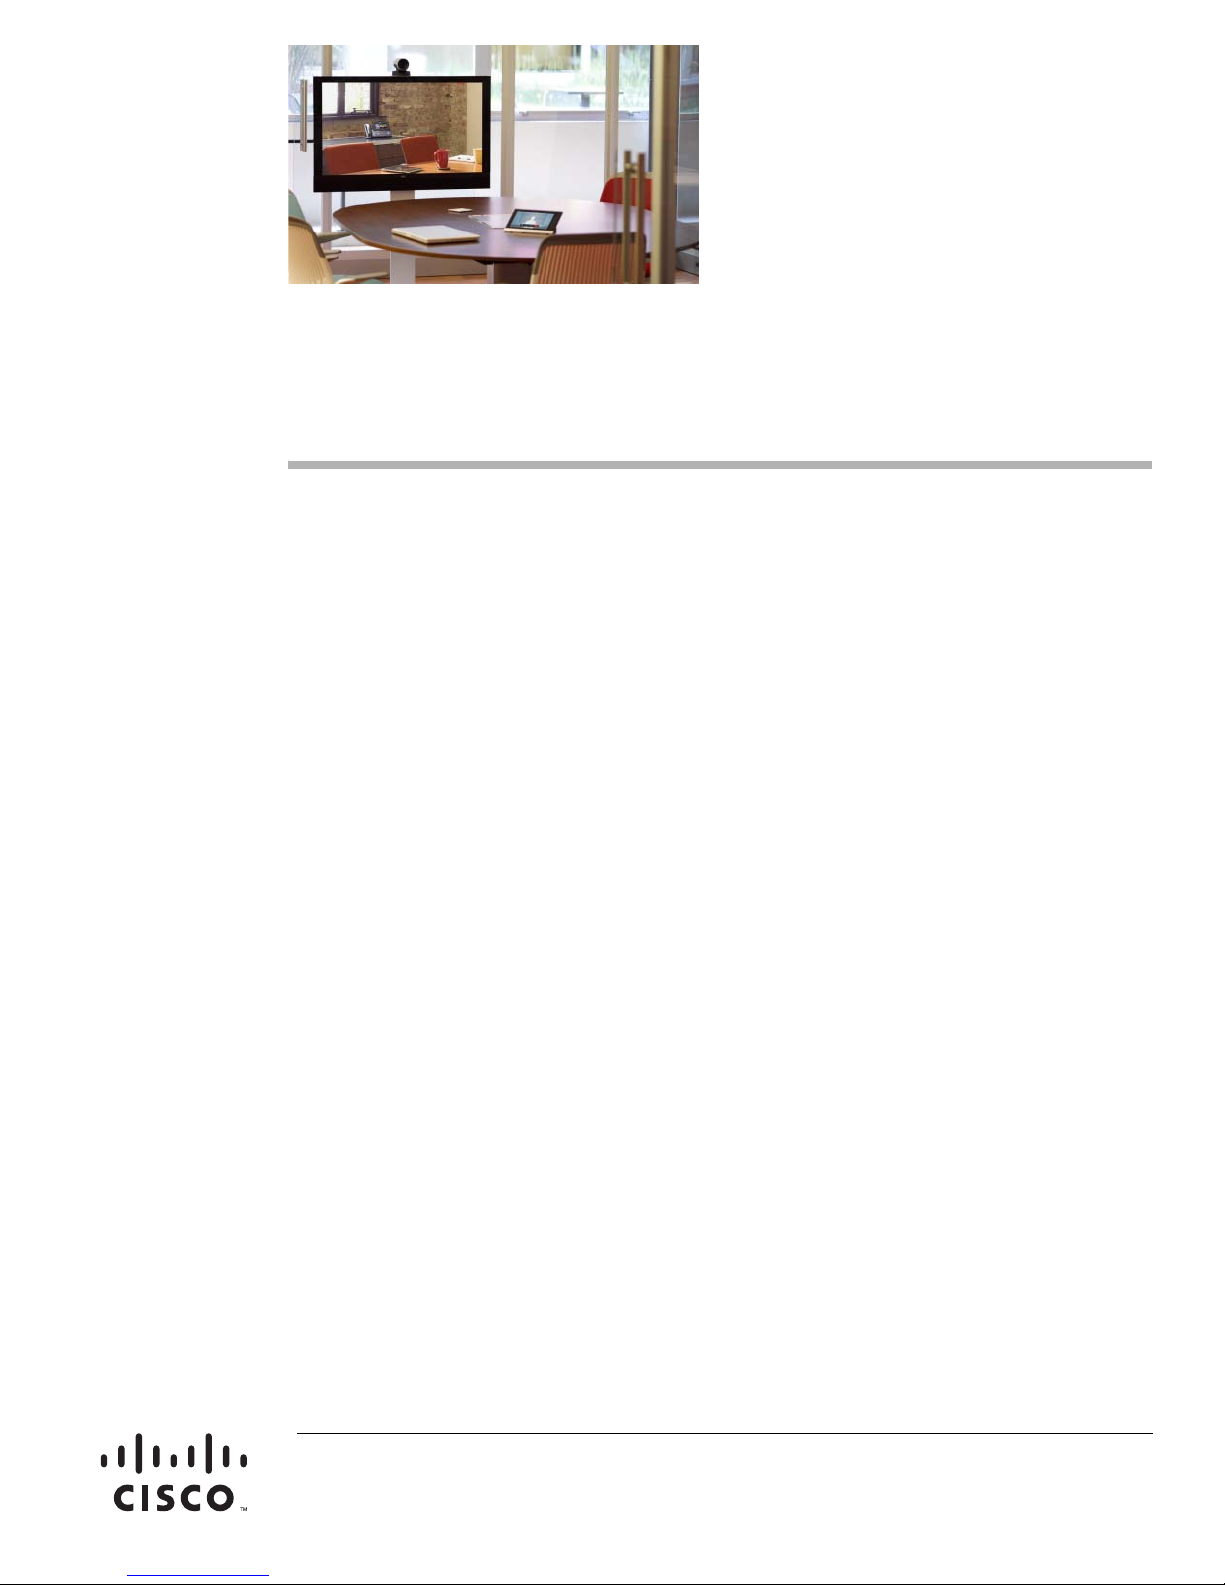
The Cisco Smart+Connected Portable Tablet delivers always-on, dedicated system control in a sleek
tablet form-factor that works as a portable or a tabletop touchscreen for ultimate control and flexibility.
The Cisco Portable Tablet features full-motion video intercom and the fidelity of wideband audio for
crystal-clear communications and control throughout the residence. Since the Cisco Portable Tablet
supports Wi-Fi networking, it can be carried throughout the residence for convenient access to the Cisco
Smart+Connected Residential features and services. The included docking station has a built-in Ethernet
connection that supports Power over Ethernet (PoE), allowing the device to receive power directly from
the Ethernet cable while eliminating the need for a separate power connection. Features include:
• Easily configured as a portable or as a tethered tabletop unit for flexible installation.
• Integrated camera with full-motion video for high-quality video communications with the Cisco
Smart+Connected Video Door Station and Cisco Smart+Connected 7" In-wall Display
• Integrated speakers and dual microphones with beamforming and G.722 wideband audio for
uncompromised high-fidelity sound.
• Audio and video intercom integration with other Cisco In-wall Displays and Cisco Portable Tablets
installed in the residence.
• Full-color, capacitive LCD touchscreen control, along with four programmable buttons, for
convenient fingertip control.
• Wired and wireless connections through Wireless-N and 10/100 Ethernet (through the docking
station).
• Flexible power options with AC power supply adapter, Power over Ethernet (PoE), or internal
battery.
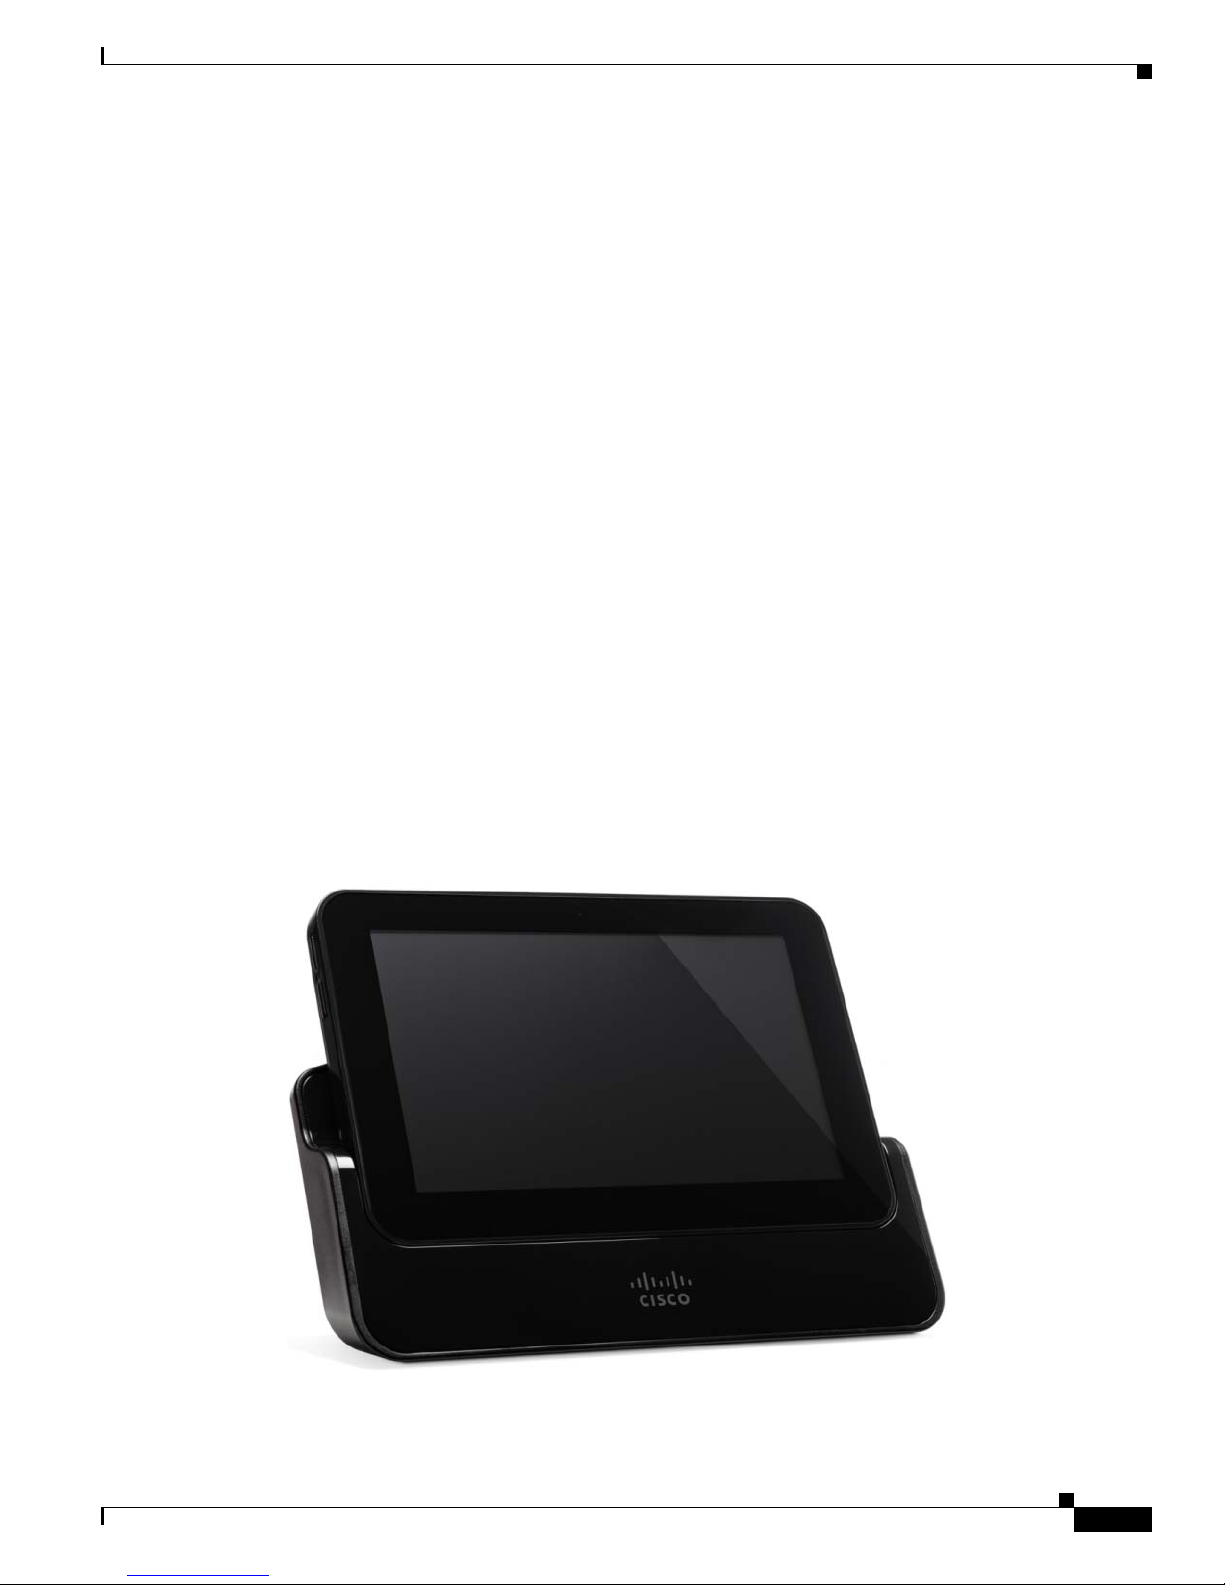
Figure 1-1 Cisco Smart+Connected Portable Tablet
OL-27364-01
Cisco Smart+Connected Portable Tablet Reference Guide
3
Page 4
Package Contents
Package Contents
Carefully unpack the Cisco Portable Tablet and ensure the following items are included in the box.
Caution Do not apply excessive pressure to the touchscreen display during handling. Doing so can crack the
screen and damage the touchscreen.
• Cisco Portable Tablet and docking station
• DC Power Adapter (only use the power supply provided)
• (Optional) Two (2) screws for securing the docking station to the Cisco Portable Tablet
• Warranty Card
Power and Network Connections
Before you begin to install this Cisco Portable Tablet, you’ll need to make a few decisions:
1. Will the Cisco Portable Tablet be used as a portable device (docking station not attached) or with
the docking station attached? See “Portable or Tabletop Installation Options” and “Power
Management Best Practices” for details.
2. Will the DC Power Adapter or Power over Ethernet be used? See the “Portable or Tabletop
Installation Options” section on page 9 for details.
LED Indicators
The LEDs on the Cisco Portable Tablet indicate the status of the power supply, battery charge, booting,
and so on, as described in the next table.
Ta b l e 1LED Indicators
LED Color Touchscreen Status
Off • Not charging
Red Off, charging
Green • On, not charging
Green (blinking) Booting, not charging
Green (fast blinks) Restoring, not charging
Orange • On, charging
Orange (blinking) Booting while charging
Orange (fast blinks) Restoring while charging
• Screensaver mode, blank
• Screensaver mode, charging
• Suspend/asleep, not charging
• Suspend/asleep, charging
Cisco Smart+Connected Portable Tablet Reference Guide
4
OL-27364-01
Page 5

LED Indicators
Note • If the device is OFF, press Power. If the device is asleep, press any button or tap the screen.
• The device must be connected to a power supply for at least six (6) hours so the battery can fully
charge.
• If the battery power is critically low, you can still turn on the device as long as the docking station
is plugged into the power adapter or a Power over Ethernet (PoE) switch.
OL-27364-01
Cisco Smart+Connected Portable Tablet Reference Guide
5
Page 6
Device Illustrations and Descriptions
Device Illustrations and Descriptions
• Front View, page 6
• Top View, page 7
• Bottom View, page 7
• Right Side View, page 8
• Back View, page 8
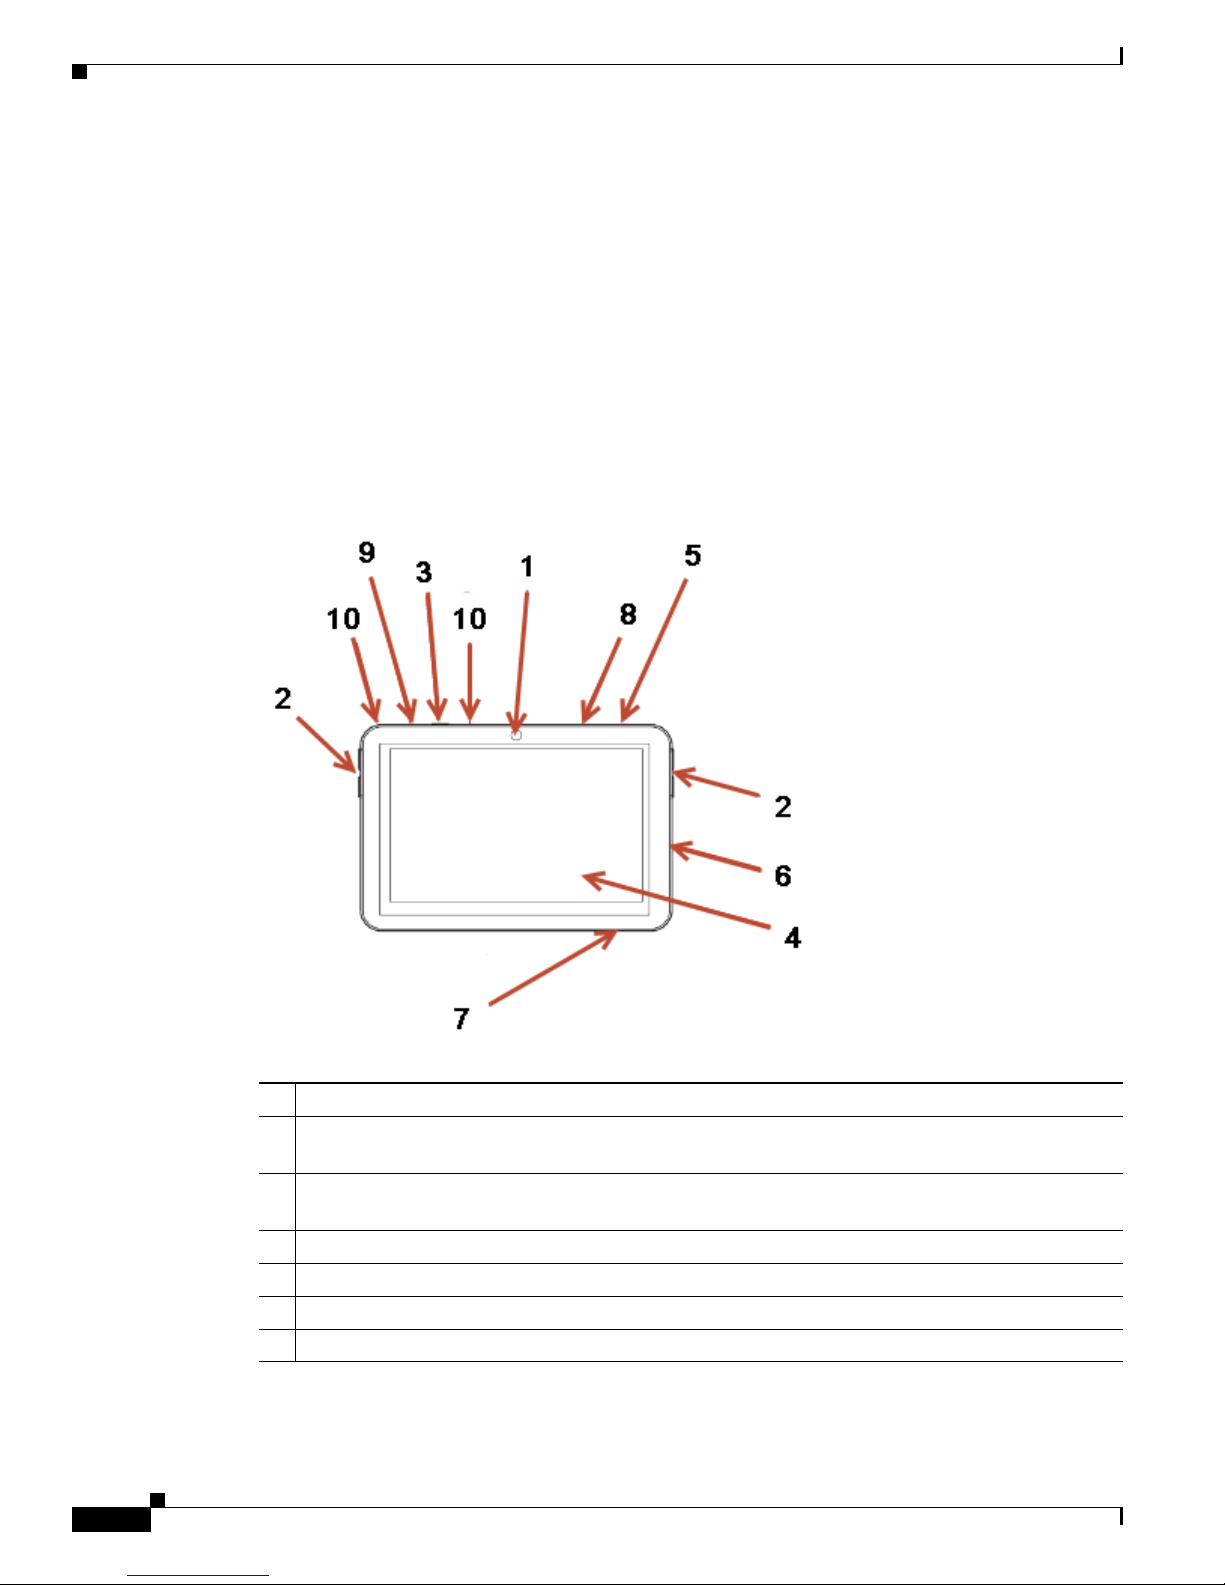
Front View
Figure 1-2 Front View
1 Camera. Used for video intercom with another compatible device in another room.
2 Programmable Buttons (4). Used to program various automation activities in Composer Pro
programming.
3 Power Button. Used to power the Cisco Portable Tablet on or off. See the “Understanding the
Touchscreen Modes” section on page 12.
4 Touchscreen. The front face of the Cisco Portable Tablet.
5 Reset/Restore Pinhole. Used to reset or restore the factory defaults.
6 Speaker. Used for intercom purposes.
7 Headphone Jack (3.5 mm). Used to connect headphones for intercom purposes.
Cisco Smart+Connected Portable Tablet Reference Guide
6
OL-27364-01
Page 7
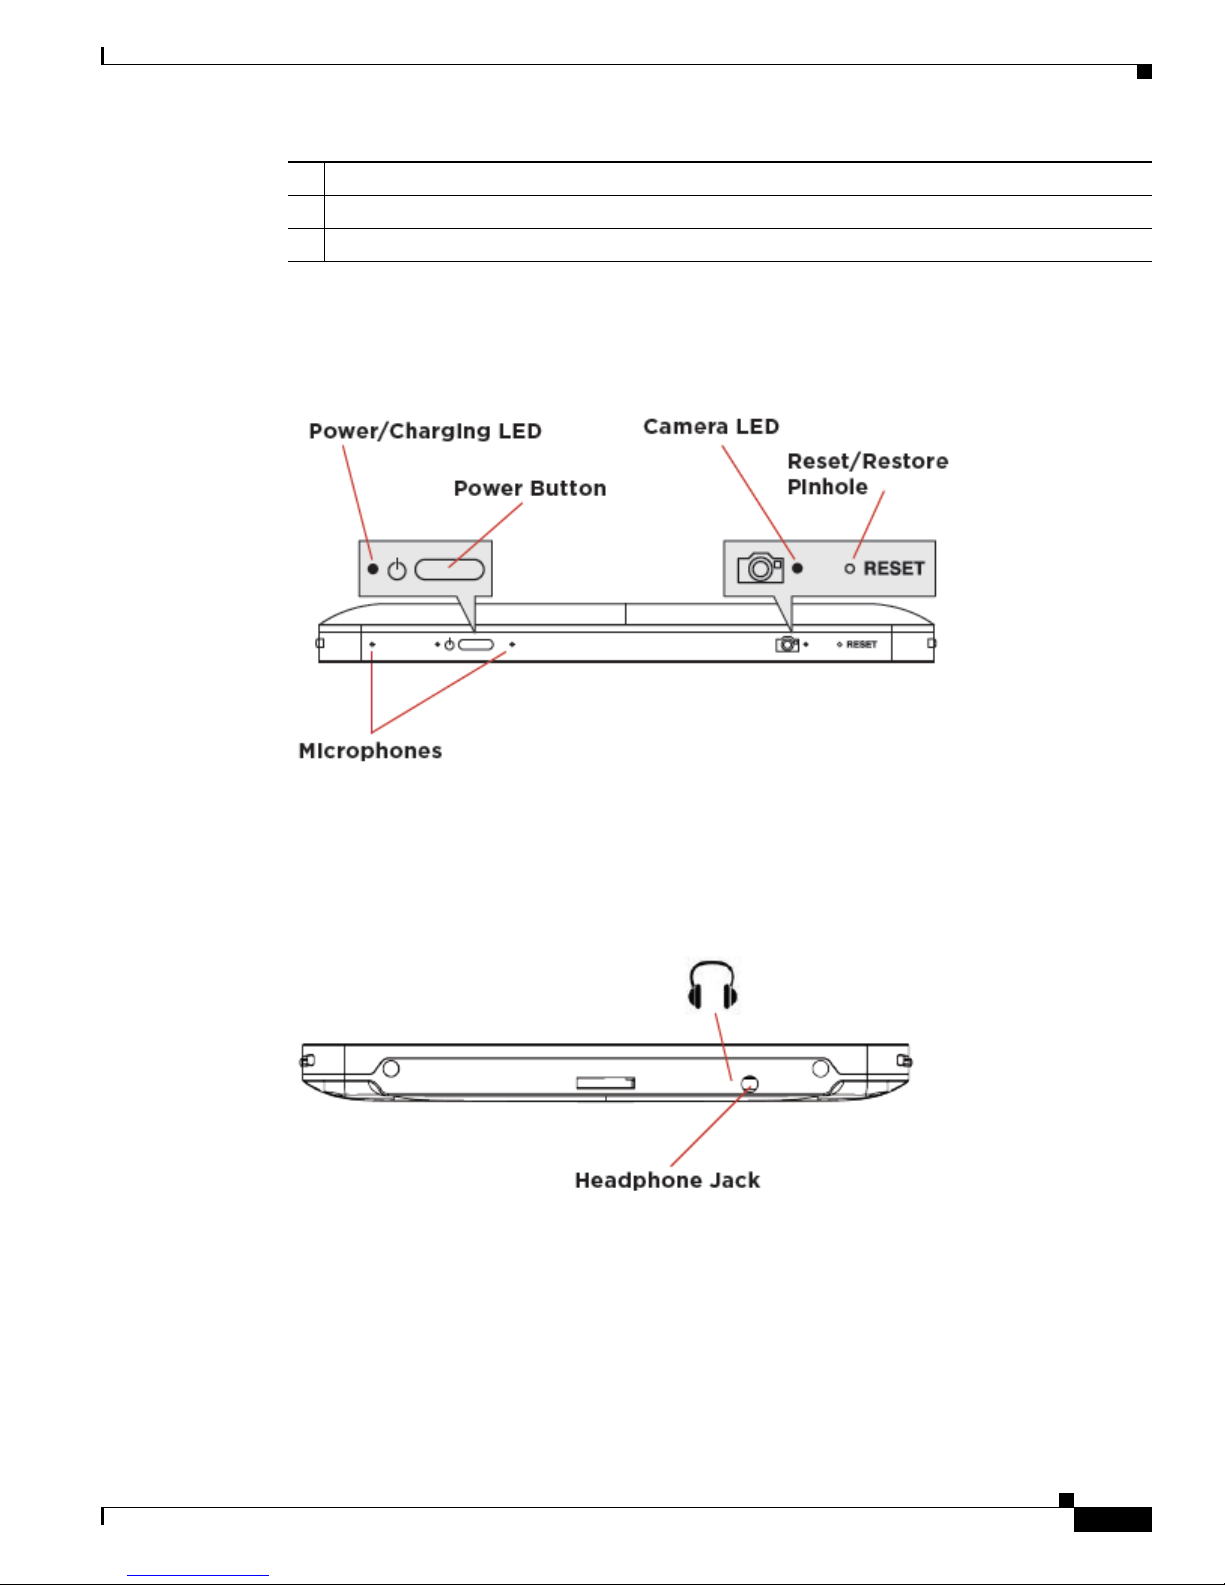
Top View
Device Illustrations and Descriptions
8 Camera LED Indicator. Indicates if the camera is on. Green indicates the camera is on.
9 Power LED Indicator. Indicates if the power is on.
10 Microphones. Used to speak into the Cisco Portable Tablet when the intercom is used.
Figure 1-3 To p View
Bottom View
Figure 1-4 Bottom View
OL-27364-01
Cisco Smart+Connected Portable Tablet Reference Guide
7
Page 8

Device Illustrations and Descriptions
Right Side View
Figure 1-5 Right Side View
Back View
Figure 1-6 Ba ck Vie w
Cisco Smart+Connected Portable Tablet Reference Guide
8
OL-27364-01
Page 9

Portable or Tabletop Installation Options
The Cisco Portable Tablet can be used as a portable device, or attached (screwed) to the docking station.
Complete one of the following procedures:
• Using the Cisco Portable Tablet as a Portable Device, page 9—If the device will be removed from
the docking station, you must use a Wi-Fi connection.
• Using the Cisco Portable Tablet as a Tabletop Device, page 10—If the device will ONLY be used as
a tabletop, configure either an Ethernet or Wi-Fi connection and attach the device to the base using
the two (2) included screws.
Using the Cisco Portable Tablet as a Portable Device
Note You must set up for Wi-Fi if the Cisco Portable Tablet will be used as a portable device. See “Configure
the Network Settings.”
Procedure
Portable or Tabletop Installation Options
Step 1 Place the docking station on a flat surface.
Step 2 Power the device using either a power cable or a Power over Ethernet (PoE) connection.
a. Insert the power cable into the power jack slot on the back of the device (see Figure 1-7).
b. Plug the power cord into a wall outlet.
c. To use Ethernet, plug the RJ-45 connector into the PoE connector (such as a Cisco SF302-08P
Switch) and then into the Ethernet jack on the back of the docking station (see
Figure 1-7).
OL-27364-01
Cisco Smart+Connected Portable Tablet Reference Guide
9
Page 10

Portable or Tabletop Installation Options
Figure 1-7 Back View with Power Connections
Note • If you use Ethernet and undock the Cisco Portable Tablet, you will lose connectivity.
• The power cord angles to the right and is held by the retaining clip. When you insert the power cord,
it also snaps into the retaining clip.
Step 3 Insert the Cisco Portable Tablet into its docking station.
Step 4 Wake up the Cisco Portable Tablet by touching the screen or pressing any button.
Using the Cisco Portable Tablet as a Tabletop Device
Procedure
Step 1 Place the docking station on a flat surface.
Step 2 Power the device using either a power cable or a Power over Ethernet (PoE) connection.
a. Insert the power cable into the power jack slot on the back of the device (see Figure 1-7).
b. Plug the power cord into a wall outlet.
c. To use Ethernet, plug the RJ-45 connector into the PoE connector (such as a Cisco SF302-08P
Switch) and then into the Ethernet jack on the back of the docking station (see
Figure 1-7).
Cisco Smart+Connected Portable Tablet Reference Guide
10
OL-27364-01
Page 11

Portable or Tabletop Installation Options
Step 3 You can attach the Cisco Portable Tablet to the docking station using the screws provided to prevent the
Cisco Portable Tablet from becoming disconnected and nonfunctional every time it is removed from the
docking station.
Warning
Power off the Cisco Portable Tablet before inserting the screws.
Procedure
To attach the Cisco Portable Tablet to the docking station:
Step 1 Remove the two (2) rubber protectors from the screw holes on the bottom of the docking station.
Step 2 Insert the Cisco Portable Tablet into the docking station.
Step 3 Turn the Cisco Portable Tablet and docking station upside down and insert the two (2) screws (included).
Step 4 Screw the docking station to the Cisco Portable Tablet (Figure 1-8).
Figure 1-8 Bottom View: Docking Station and Screw Holes
Step 5 Wake up the Cisco Portable Tablet by either touching the screen or by pressing any button.
OL-27364-01
Cisco Smart+Connected Portable Tablet Reference Guide
11
Page 12

Understanding the Touchscreen Modes
Step 6 (Optional) You can permanently mount the Cisco Portable Tablet and docking station to a tabletop by
screwing the base onto a flat surface (screws not included). See
Understanding the Touchscreen Modes
The touchscreen uses the following modes:
Ta b l e 2 Touchscreen Modes
Mode Description
Off The screen, the AC Power indicator, and the battery indicator are all dark (the
touchscreen has no power). To power up the device, ensure that the battery is charged,
or that the docking station’s power cord is connected to the docking station and the
touchscreen is properly seated in the docking station.
Suspend The screen is dark. but the Power indicator is lit. To wake up the device, press any
button or tap the touchscreen. See “Power Management Best Practices” for details.
Screensaver The screen saver is running. To wake up the device, tap the screen.
Wake The screen displays anything other than a screen saver. To force the device into Sleep
mode, press and release the Power button.
Figure 1-8.
Configuration
• Configure the Network Settings, page 12
• Connect to Director from the Cisco Portable Tablet, page 14
• Composer Pro Configuration, page 15
Configure the Network Settings
You must configure the network settings on the Cisco Portable Tablet so it can communicate with the
other devices in the Cisco Smart+Connected residence.
Procedure
To configure the network settings for this device:
Step 1 If using a wireless network, ensure that the Wi-Fi WAP is on the same network as the Cisco Controller
in the system.
Step 2 Gather the following wireless network information from your WAP:
• SSID (Service Set Identifier).
• WEP/WPA/WPA2 security key, if enabled.
• IP Addressing Requirements: The default is DHCP (with dynamic addresses). If you need to use a
static IP address, you must provide a network IP address for this device.
Cisco Smart+Connected Portable Tablet Reference Guide
12
OL-27364-01
Page 13
Configuration
Step 3 Configure the wireless settings (if not using Wi-Fi, skip to Step 4).
a. On the touchscreen, tap More > Settings > Network.
b. Under Wire less, select Enable.
c. If you don’t see the network you want, select Other.
d. At Network Name, select to add the SSID or name of the wireless network when the keyboard
appears.
e. At Security, select None, WEP, or WPA.
f. At Passwo rd, type the password given to you by the person who set up the wireless network.
g. Select Connect. Notice that the IP settings change.
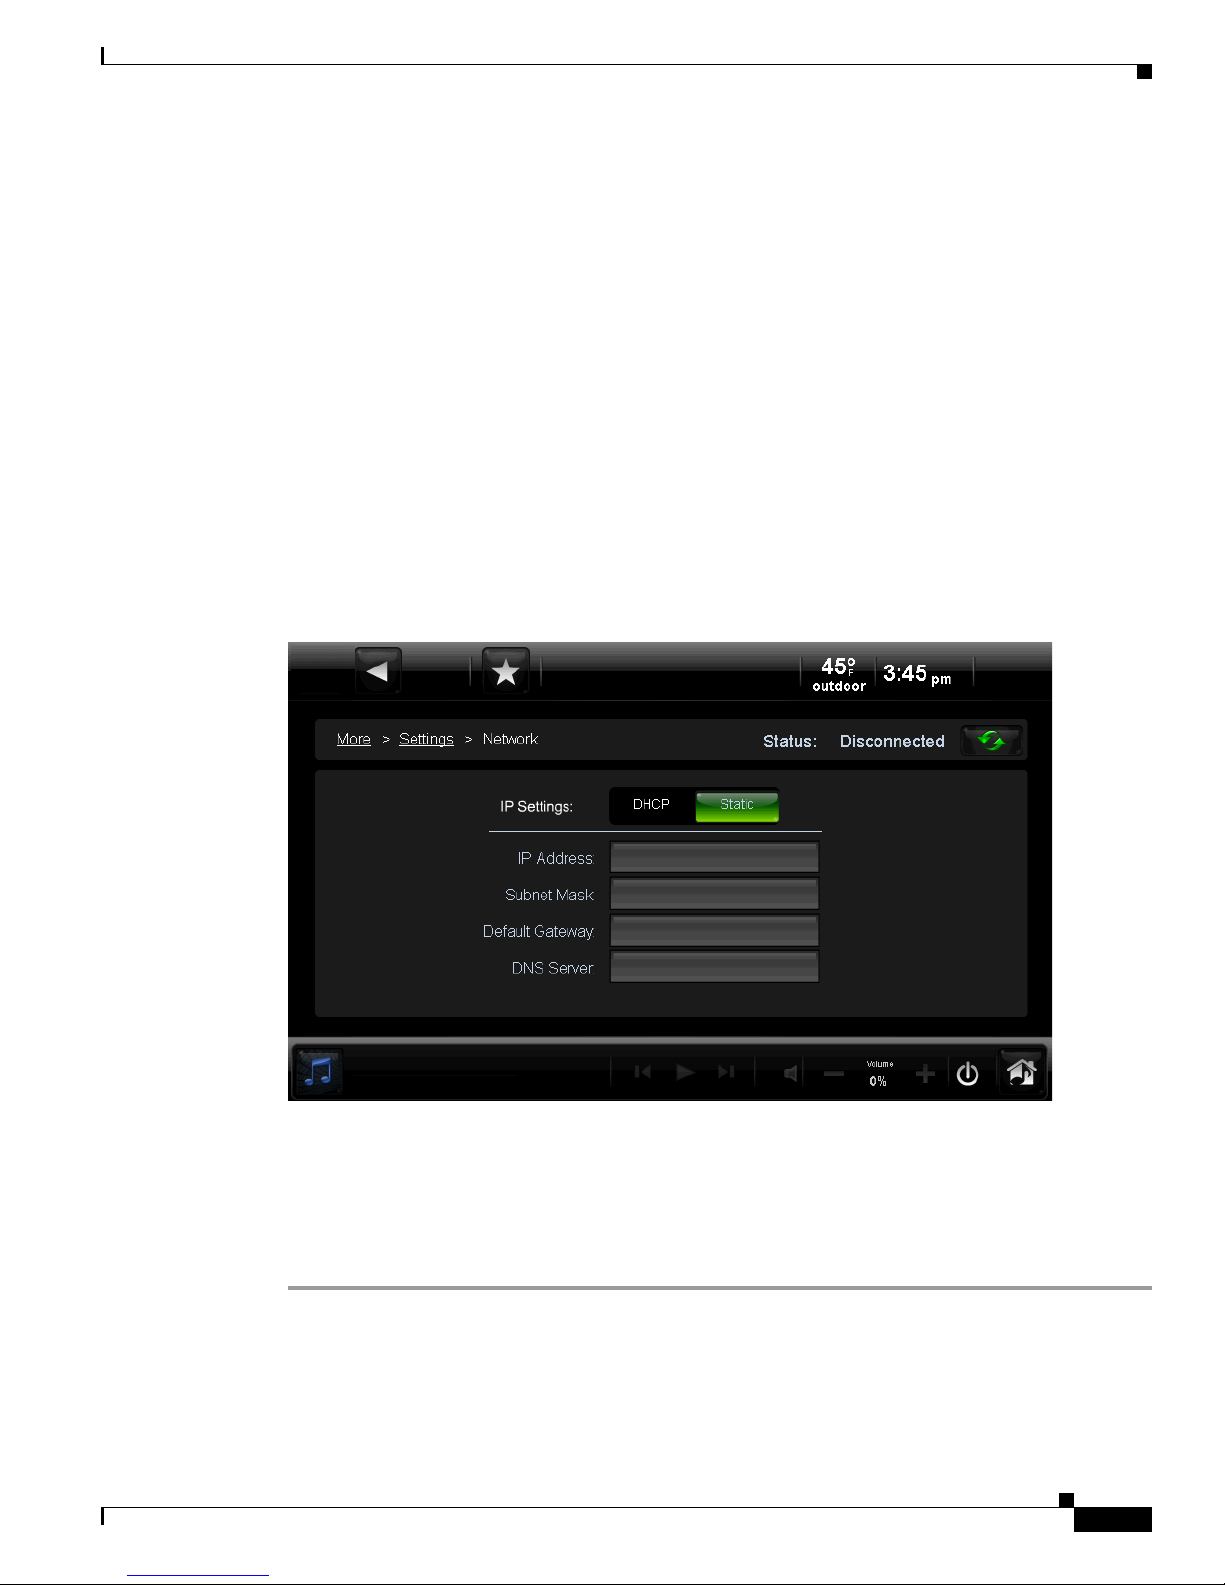
Step 4 The IP address is set to DHCP by default. If you need to set a static IP address, complete the following
steps; otherwise, you are finished with these steps.
a. On the touchscreen, tap More > Settings > Network (if necessary).
b. On the Network page, tap Static (see Figure 1-9).
Figure 1-9 Static IP Address
c. Select each field and use the keyboard to enter the IP Address, Subnet Mask, Default Gateway and
DNS server(s).
d. Tap Done when each field is complete.
e. Tap OK to return to the Network page.
You can now connect to a Director (a Cisco Controller running on the network).
OL-27364-01
Cisco Smart+Connected Portable Tablet Reference Guide
13
Page 14
Configuration
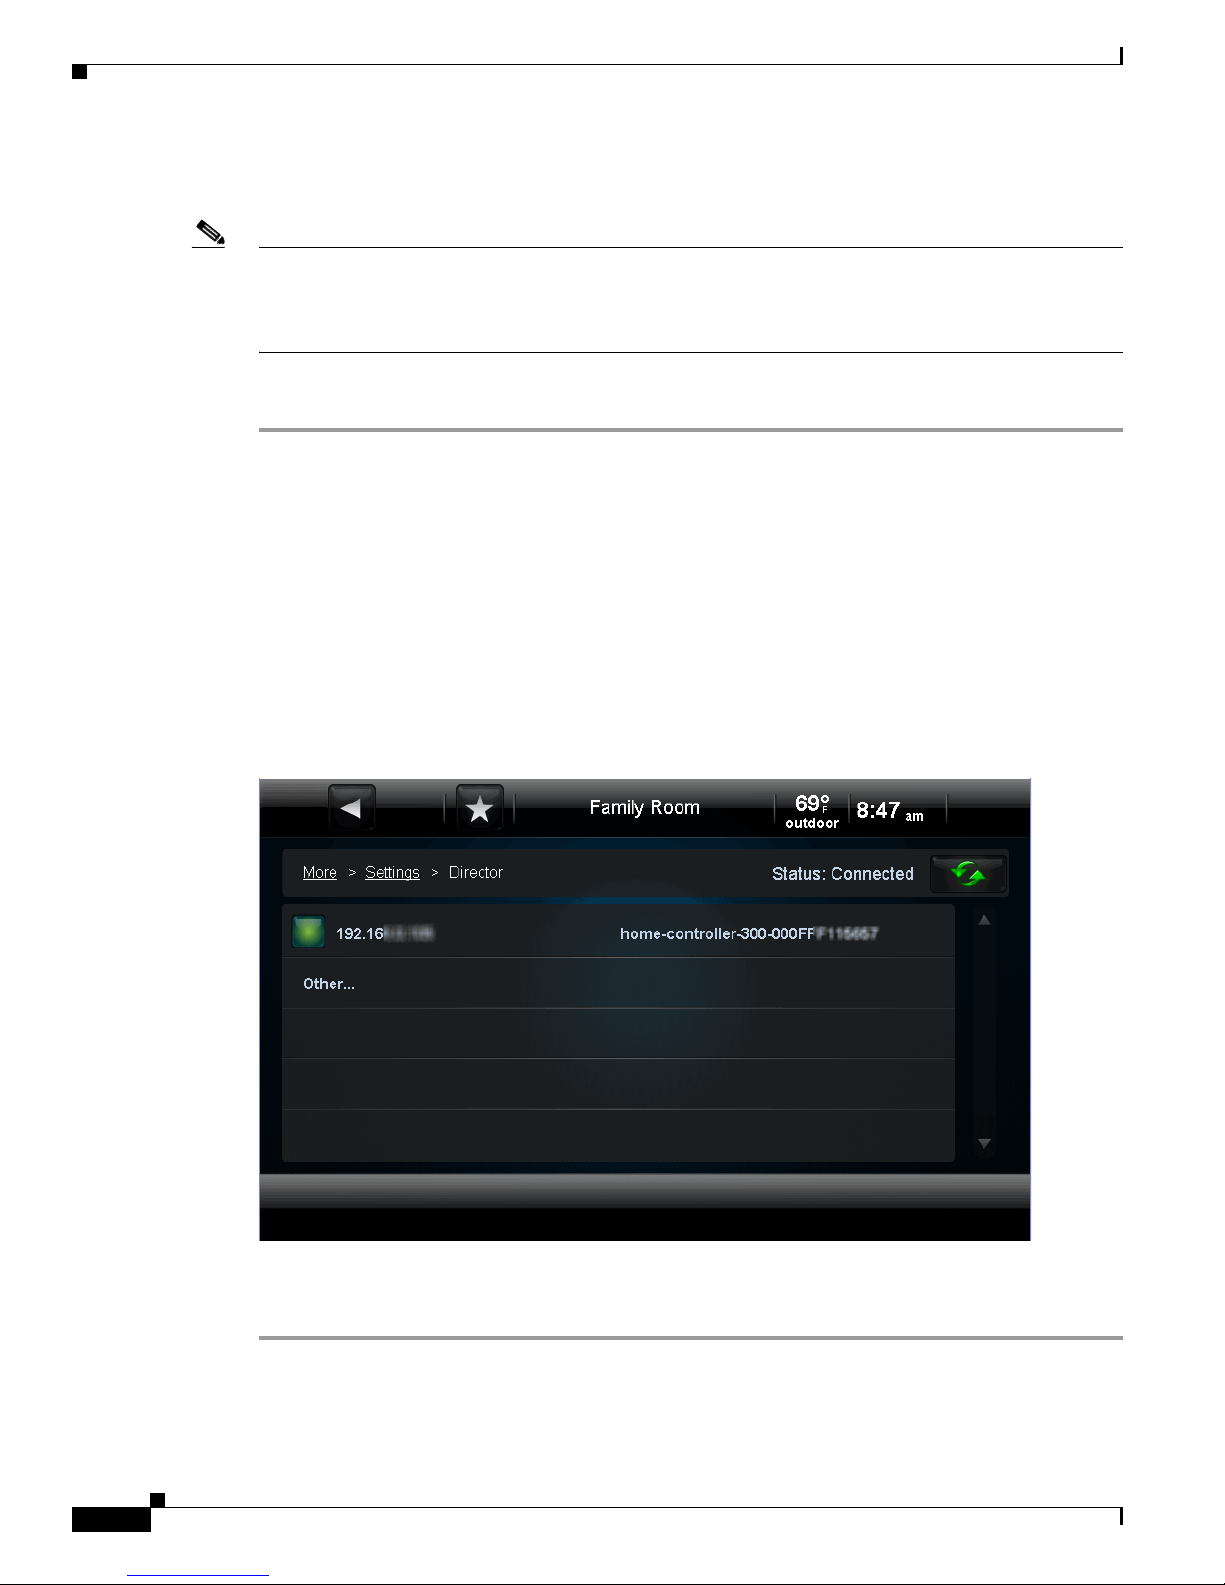
Connect to Director from the Cisco Portable Tablet
Note The touchscreen’s controls are auto-populated by a project on the Cisco Controller to which it connects.
If the subsystem buttons are not lit, and no default room displays on the touchscreen, you are not
connected to a Cisco Controller. Ensure that the devices are added to Composer Pro and identified in the
project. See the “Composer Pro Configuration” section on page 15 for details.
Procedure
Step 1 On the Home page, tap More > Settings.
Step 2 Tap Director.
Step 3 If the Director page does not display, the Director view has probably been disabled; you must provide a
password to enable it.
• If you need the password, contact your Cisco reseller.
• If you have the password, tap Config > Disable View, enter the password, and then tap Director to
deselect it. Tap the Director button again, and view the Director page.
Step 4 In the Director list of IP addresses, tap the Cisco Controller’s IP address. The screen displays the current
connections (
Figure 1-10).
Figure 1-10 Cisco Cont ro ller Address
Step 5 Verify that the Name, IP Address, and default location (room) display on the Cisco Portable Tablet to
ensure all of the correct connections.
Cisco Smart+Connected Portable Tablet Reference Guide
14
OL-27364-01
Page 15

Composer Pro Configuration
Using Composer Pro, add the driver for the Cisco Portable Tablet to your project.
Procedure
Step 1 Start Composer Pro and connect to a Director (Cisco Controller running on the network).
Step 2 Add the Cisco Portable Tablet driver to the project:
a. In the System Design View (default view) project tree (left pane), highlight the room where the
Cisco Portable Tablet resides.
b. Under My Drivers, double-click Portable 7” Touch Screen V2.
Step 3 Identify the device:
a. Click the Connections > Network tab.
b. In the IP Network Connections list (center pane), highlight Portable 7” Touch Screen V2, and then
click Identify.
c. When prompted, go to the Cisco Portable Tablet and press the bottom button on the right side, as
indicated on the Identify screen in Composer Pro, to identify the device to the network.
d. When the address displays in Composer Pro, click Close.
Power and Battery Management
Tip See the Cisco Smart+Connected Residential Installation and Configuration Guide for more
information.
Power and Battery Management
Note A lithium ion polymer rechargeable battery is used in this product. The battery in this product is non-user
replaceable and should be removed by a Cisco authorized service technician only.
• Battery Instructions, page 15
• Power Off the Device, page 16
• Power Management Best Practices, page 16
Battery Instructions
• For safety reasons, the battery is shipped only partially charged. When you are ready to use the Cisco
Portable Tablet, fully charge the battery by placing it in the docking station for at least four (4) hours.
• If you remove the Cisco Portable Tablet from the docking station for long periods of time, the
touchscreen turns off. In this case, insert the Cisco Portable Tablet into the docking station again to
recharge the device. A Red or Orange LED indicates that it’s charging. See the
section on page 4 for more information.
“LED Indicators”
OL-27364-01
Cisco Smart+Connected Portable Tablet Reference Guide
15
Page 16

Cleaning the Touchscreen and Docking Station
Power Off the Device
To power off the Cisco Portable Tablet, press and hold the Pow er button for at least five (5) seconds, and
then wait a few more seconds for the device to turn off.
Power Management Best Practices
Read the following guidelines for Cisco Portable Tablet use in and out of the docking station or when
intercom is used.
• The Power Management settings do not apply when the Cisco Portable Tablet is in its docking
station.
• The Power Management settings do apply when the Cisco Portable Tablet is out of the docking
station. Go to More > Settings > Power Management.
• If the Cisco Portable Tablet Suspend option is enabled, intercom connections will fail when the
device is in suspend mode. Disable the Suspend option if necessary (set it to Never).
• The default settings are Never for Turn Backlight Off and After 3 mins for Suspend. Typically, the
battery will last for about 13 hours with these settings.
Here are some other examples and how much battery power is consumed in these settings:
• If Turn Backlight Off is set to 3 mins and Suspend is set to Never, the battery will last half as long
as the default settings due to increased battery use.
• If Turn Backlight Off is off and Suspend is off, the battery will last about a quarter as long as the
default settings due to increased battery use.
Cleaning the Touchscreen and Docking Station
Procedure
Step 1 Unplug the power jack from the docking station.
Step 2 Use a soft, damp cloth to wipe off the surface.
Troubleshooting
If you experience operational problems with the Cisco Portable Tablet, read the following sections for
system troubleshooting. If problems persist, please contact your Cisco dealer or your Cisco
representative.
Battery Operation Problems
If the battery is low...
• Recharge the battery as soon as possible.
Cisco Smart+Connected Portable Tablet Reference Guide
16
OL-27364-01
Page 17

Display Problems
Troubleshooting
• Dock the Cisco Portable Tablet (if using as a portable), and continue to use the touchscreen in its
docking station until fully charged.
If the touchscreen turns off automatically:
• Check whether the battery power is low or completely drained.
• Check whether the system is in Suspend mode (see the “Understanding the Touchscreen Modes”
section on page 12).
• Tap the screen to check whether the display will activate.
• Plug in the DC power adapter or PoE cable to charge the battery.
If the touchscreen doesn’t turn on when it’s not connected to the docking station:
• The battery power may be too low to run the touchscreen. Try connecting it to the docking station
to recharge it.
If the screen appears blank, press the any button or tap the touchscreen to wake it up.
System Operation Problems
If the touchscreen is not responding...
• Always try to power the touchscreen off before resetting the touchscreen. Reset the device by
pressing the Reset/Restore pinhole on the top of the screen. You may need to use an unbent paperclip
to press the button.
Caution The microphone holes look similar to the Reset/Restore pinhole. Inserting a paperclip into these pinholes
will permanently damage the microphones. See Figure 1-2.
• Unplug the docking station and plug it back in.
• If pressing the Reset/Restore pinhole button does not solve the problem, as a last resort, perform a
factory restore. Press and hold the Reset/Restore pinhole button (see
until the Power LED begins to blink rapidly. This will reset all configurations. The factory restore
process may take 3-5 minutes to complete.
If the touchscreen is damaged...
• Contact the Cisco Reseller from whom you purchased the touchscreen.
If you have network connection problems...
• View the system’s wireless status by checking the Wi-Fi indicator on the Touchscreen Navigator.
• Make sure you’ve provided the required network configuration information described in the
“Configure the Network Settings” section on page 12.
Figure 1-2 for the location)
• Ensure that the same key is being used on the Cisco Portable Tablet and at the wireless access point
(WAP).
• Make sure the WAP is connected to the proper network jack while it is functioning in the network
infrastructure mode.
OL-27364-01
Cisco Smart+Connected Portable Tablet Reference Guide
17
Page 18

Specifications
Specifications
Ta b l e 1-3 Cisco Portable Tablet Specifications
Basic Specifications Description
Display
Integrated camera 640 x 480 VGA
Display dimensions 7-inch TFT LCD
Pixel Resolution 800 x 480
touchscreen Capacitive Touch
Programmable buttons 4
Intercom
Microphone Dual microphones
Speaker Internal
Video and audio Full duplex video (H.264) and audio (G.722)
Communications
Wi-Fi Wireless-N (2.4-GHz 802.11n/g/b)
30 fps
Min. lumination: 5 Lux
Viewing angle: 60 degrees
Voice pickup from 10 feet away
Beamforming
RF frequency: 2.4 GHz
Antenna: Internal
18
Encryption: 64/128 WEP, TKIP/AES
Authentication: WPS, WEP, WPA, WPA2
Ethernet 10/100 Base-T Ethernet RJ-45
Power
Power Supply Power over Ethernet IEEE802.3af
AC 100V-to 240V, 50~60Hz
Power over Ethernet (PoE) Yes
Battery
Suspend Mode 20 hours
Typical Use 12 hours (default setting)
Charge Time 6 hours
Other
Audio G.722 Wideband Audio
Environmental
Cisco Smart+Connected Portable Tablet Reference Guide
OL-27364-01
Page 19

Table 1-3 Cisco Portable Tablet Specifications (continued)
Operating Temperature 32° F to 104° F (0° C - 40° C)
Relative humidity of 95%
Storage temperature -4° F to 149° F
(-20° C to 65° C)
Buttons and Outputs
Reset Recessed Button requires pin or paperclip.
Reset: Push once
Restore Factory Defaults: Push and hold 5 to 7 seconds. This will reset
the tablet to default settings and may require the device to be updated
in the project.
Dimensions (W x H x D) 7.5" × 5" × 0.75"
(190.5 mm x 127 mm x 19.05 mm)
not including charging dock
Mounting Portable or Tabletop
Regulatory/Safety Information
Regulatory/Safety Information
To review regulatory information, go to www.cisco.com/go/smartconnectedresidential/docs.
Related Documentation
For more information about the Cisco Smart+Connected Residential products, go to the following URLs:
For more information about the Cisco Smart+Connected Residential products, see the following
documents and websites:
Subject / Document Title Location
General
Product Information and Home Page www.cisco.com/go/smartconnectedresidential
Data Sheets http://www.cisco.com/en/US/products/ps1244
5/products_feature_guides_list.html
Cisco 1-Year Limited Hardware Warranty Terms www.cisco.com/go/smartconnectedresidential
warranty
Regulatory Compliance and Safety Information for Cisco Smart+Connected
Residential Products
Cisco Support www.cisco.com/cisco/web/support/
ReleaseNotes
Release Notes for the Cisco Smart+Connected Residential Solution www.cisco.com/go/smartconnectedresidential/
Installation and Configuration
www.cisco.com/go/smartconnectedresidential/
docs
docs
OL-27364-01
Cisco Smart+Connected Portable Tablet Reference Guide
19
Page 20

Warranty
Cisco Smart+Connected Residential Installation and Configuration Guide www.cisco.com/go/smartconnectedresidential/
docs
Cisco RMS Installation and Administration
Cisco Smart+Connected Remote Management Console Administration
Guide
Cisco Smart+Connected Remote Management Server Installation Guide
Hardware Reference Guides
Cisco Smart+Connected Controller 200 Reference Guide
Cisco Smart+Connected Controller 250 Reference Guide
Cisco Smart+Connected Controller 800 Reference Guide
Cisco Smart+Connected 7” In-wall Display Reference Guide
Cisco Smart+Connected Portable Tablet Reference Guide
Cisco Smart+Connected I/O Extender Reference Guide
Cisco Smart+Connected Universal Remote 150 Reference Guide
Cisco Smart+Connected Universal Remote 250 Reference Guide
www.cisco.com/go/smartconnectedresidential/
docs
www.cisco.com/go/smartconnectedresidential/
docs
Cisco Smart+Connected Video Door Station Reference Guide
Accounts and Licensing
Cisco Smart+Connected Residential Licensing and Registration Guide See your Cisco representative or partner for
more information.
Other
Smart Device Compatibility and other information:
Cisco Smart+Connected Smart Device License for Real Estate Developers
Composer Pro User Guide http://www.control4.com/documentation/Com
Note For information about third-party hardware and software, see the manufacturer’s product documentation
and/or website.
www.cisco.com/go/smartconnectedresidential
poser_Pro_User_Guide/index.htm
Warranty
A Cisco 1-year warranty applies. Go to the following URL for more information:
www.cisco.com/go/smartconnectedresidentialwarranty
Cisco Smart+Connected Portable Tablet Reference Guide
20
OL-27364-01
Page 21

Service and Support
Cisco offers a wide range of support programs to accelerate customer success. These innovative
programs are delivered through a unique combination of people, processes, tools, and partners, resulting
in high levels of customer satisfaction. For more information, contact your Cisco sales representative or
go to
www.cisco.com/cisco/web/support/index.html
Service and Support
This document is to be used in conjunction with the documents listed in the “Related Documentation” section.
Cisco and the Cisco Logo are trademarks of Cisco Systems, Inc. and/or its affiliates in the U.S. and other countries. A listing of Cisco's trademarks
can be found at
partner does not imply a partnership relationship between Cisco and any other company. (1005R)
Any Internet Protocol (IP) addresses and phone numbers used in this document are not intended to be actual addresses and phone numbers. Any
examples, command display output, network topology diagrams, and other figures included in the document are shown for illustrative purposes only.
Any use of actual IP addresses or phone numbers in illustrative content is unintentional and coincidental.
© 2012-2013 Cisco Systems, Inc. All rights reserved.
OL-27364-01
www.cisco.com/go/trademarks. Third party trademarks mentioned are the property of their respective owners. The use of the word
Cisco Smart+Connected Portable Tablet Reference Guide
21
Page 22

Service and Support
Cisco Smart+Connected Portable Tablet Reference Guide
22
OL-27364-01
 Loading...