

Page 1

User Guide for Cisco Show and Share 5.3.x
November 2013
Cisco Systems, Inc.
www.cisco.com
Cisco has more than 200 offices worldwide.
Addresses, phone numbers, and fax numbers
are listed on the Cisco website at
www.cisco.com/go/offices.
Page 2

THE SPECIFICATIONS AND INFORMATION REGARDING THE PRODUCTS IN THIS MANUAL ARE SUBJECT TO CHANGE WITHOUT NOTICE. ALL
STATEMENTS, INFORMATION, AND RECOMMENDATIONS IN THIS MANUAL ARE BELIEVED TO BE ACCURATE BUT ARE PRESENTED WITHOUT
WARRANTY OF ANY KIND, EXPRESS OR IMPLIED. USERS MUST TAKE FULL RESPONSIBILITY FOR THEIR APPLICATION OF ANY PRODUCTS.
THE SOFTWARE LICENSE AND LIMITED WARRANTY FOR THE ACCOMPANYING PRODUCT ARE SET FORTH IN THE INFORMATION PACKET THAT
SHIPPED WITH THE PRODUCT AND ARE INCORPORATED HEREIN BY THIS REFERENCE. IF YOU ARE UNABLE TO LOCATE THE SOFTWARE LICENSE
OR LIMITED WARRANTY, CONTACT YOUR CISCO REPRESENTATIVE FOR A COPY.
The Cisco implementation of TCP header compression is an adaptation of a program developed by the University of California, Berkeley (UCB) as part of UCB’s public
domain version of the UNIX operating system. All rights reserved. Copyright © 1981, Regents of the University of California.
NOTWITHSTANDING ANY OTHER WARRANTY HEREIN, ALL DOCUMENT FILES AND SOFTWARE OF THESE SUPPLIERS ARE PROVIDED “AS IS” WITH
ALL FAULTS. CISCO AND THE ABOVE-NAMED SUPPLIERS DISCLAIM ALL WARRANTIES, EXPRESSED OR IMPLIED, INCLUDING, WITHOUT
LIMITATION, THOSE OF MERCHANTABILITY, FITNESS FOR A PARTICULAR PURPOSE AND NONINFRINGEMENT OR ARISING FROM A COURSE OF
DEALING, USAGE, OR TRADE PRACTICE.
IN NO EVENT SHALL CISCO OR ITS SUPPLIERS BE LIABLE FOR ANY INDIRECT, SPECIAL, CONSEQUENTIAL, OR INCIDENTAL DAMAGES, INCLUDING,
WITHOUT LIMITATION, LOST PROFITS OR LOSS OR DAMAGE TO DATA ARISING OUT OF THE USE OR INABILITY TO USE THIS MANUAL, EVEN IF CISCO
OR ITS SUPPLIERS HAVE BEEN ADVISED OF THE POSSIBILITY OF SUCH DAMAGES.
Cisco and the Cisco logo are trademarks or registered trademarks of Cisco and/or its affiliates in the U.S. and other countries. To view a list of Cisco trademarks, go to this
URL: www.cisco.com/go/trademarks. Third-party trademarks mentioned are the property of their respective owners. The use of the word partner does not imply a partnership
relationship between Cisco and any other company. (1110R)
Wowza Media Server Pro Unlimited © 2006-2009 Wowza Media Systems, Inc. All rights reserved. WOWZA and related logos are registered trademarks of Wowza Media
Systems, Inc. Cisco Digital Media Systems are powered by Wowza Media Server Software.
User Guide for Cisco Show and Share 5.3.x
© 2002 – 2013 Cisco Systems, Inc. All rights reserved.
Page 3

CONTENTS
Preface ix
About Cisco Show and Share ix
Change History ix
New and Changed in Release 5.3 ix
New and Changed in Release 5.3.7 x
New and Changed in Release 5.3.12 xi
Related Documentation xi
Obtaining Documentation and Submitting a Service Request xi
CHAPTER
CHAPTER
1 Start Here 1-1
Accessing Cisco Show and Share 1-1
Prerequisites 1-1
Configuration Note for Microsoft Internet Explorer 1-2
Access Cisco Show and Share 1-3
Sign In to Cisco Show and Share 1-4
About User Roles and Privileges 1-5
Set Your Personal Preferences 1-6
2 Quick Start 2-1
Cisco Show and Share Interface 2-1
The Home Page 2-2
The Video Playback Page 2-3
The My Account Page 2-4
The Upload Video Page 2-5
The Record a Video Page 2-6
The Publish Your Video Page 2-7
Basic Navigation 2-9
Screen Elements 2-9
Keyboard Navigation 2-14
CHAPTER
3 Browse and Search Videos 3-1
Browse the Featured Videos 3-2
Browse The Public Videos 3-3
Change the Public Videos List View 3-3
User Guide for Cisco Show and Share 5.3.x
iii
Page 4

Contents
Sort the Public Videos 3-4
Filter the Public Videos 3-5
Filter by Category 3-5
Filter by Tag 3-6
Filter by Date 3-7
Filter by Keyword 3-8
Navigate Your Filtered Results 3-8
Play a Video 3-8
Search for Videos 3-9
Basic Search 3-10
Advanced Search 3-11
Search Tip 3-13
Subscribe to an RSS Feed 3-13
CHAPTER
4 Play, Comment, Tag, and Share Videos 4-1
Concepts 4-1
About Video Playback 4-1
The Video Playback Page 4-2
The Video Player 4-3
The Video Information Tabs 4-5
Procedures 4-6
Pause and Play Videos 4-6
Play Videos Full Screen 4-7
Add a Video to Your Favorites List 4-7
Change the Video Resolution 4-8
Comment on Videos 4-8
Adding a General Comment 4-8
Adding a Timeline Comment 4-9
Flag a Comment as Inappropriate 4-9
Add Tags to Videos 4-10
Rate Videos 4-11
Share Videos 4-11
Copy the Video Link 4-12
Embed the Video in a Web Page 4-13
Embed the Extended Video Player in a Web Page 4-14
Send the Video Link in E-Mail 4-16
Play Embedded Videos 4-16
View Pulse Information 4-17
Guidelines and Limitations 4-17
iv
User Guide for Cisco Show and Share 5.3.x
Page 5

About Pulse Keyword Identification 4-18
About Pulse Speaker Identification 4-19
Navigate the Video Using the Speakers List 4-20
Navigate the Video Using the Keywords List 4-21
Navigate the Video Using Both Speakers and Keywords 4-21
Re-Upload a Published Video 4-22
Jump to a Chapter 4-23
Watch Slides 4-23
Read a Transcript 4-24
Download Files 4-25
Troubleshooting 4-26
Contents
CHAPTER
CHAPTER
5 Edit Video 5-1
About Video Editing 5-1
Limitations and Restrictions 5-2
Procedures 5-3
Open a Video to Edit 5-3
Edit Your Video 5-4
Trim Your Video 5-5
Create Chapters Within Your Video 5-6
Add Transitions Between Segments 5-7
Synchronize Slides to Your Video 5-8
Change the Video Thumbnail 5-10
Label Speakers 5-11
Delete Keywords 5-15
Troubleshooting 5-16
6 Publish Your Video 6-1
Procedures 6-1
Access the Publish Your Video Page 6-2
Edit the Video Summary 6-4
Restrict Viewer Access to the Video 6-4
Disable Pulse Speakers and Keywords 6-7
Add the Video to a Category 6-7
Set the Video Interaction Options 6-9
Add Related Videos 6-10
Schedule Publication 6-11
Publish the Video 6-12
User Guide for Cisco Show and Share 5.3.x
v
Page 6

Contents
CHAPTER
7 Create, Add, and Manage Videos 7-1
Prerequisites 7-1
About Video Uploads 7-1
Procedures 7-2
Record, Upload, or Link a Video 7-2
Use a Webcam to Record Video from Your Computer 7-2
Upload a Video File 7-5
Link to a Video File 7-7
Add Supplemental or Downloadable Files to a Video 7-9
Add Slides to a Video 7-9
Add a Text Transcript to a Video 7-10
Add Downloadable Files to a Video 7-10
Save or Publish Your Video 7-11
Reference 7-11
About Video Status 7-11
HTML Supported by the Description Field 7-12
FAQ 7-14
Troubleshooting 7-15
CHAPTER
8 Live Events 8-1
Prerequisites 8-1
Concepts 8-1
About Live-Events 8-2
About Digital Media Encoders 8-3
About the Question-and-Answer Workflow 8-3
Some Notes About Communication Between Cisco Show and Share and the DMM 8-4
Guidelines and Limitations 8-5
Procedures 8-6
Prepare for a Live Event 8-6
Administer a Live Event 8-6
Create a DME Live Event Draft 8-6
Create a non-DME Live Event Draft 8-9
Preview a Live Event Draft 8-10
Edit a Live Event Draft 8-11
Publish a Live Event Listing 8-12
Send a Live Event Notification 8-13
Start and Administer (Moderate) a Live Event 8-14
Start the Live Event 8-14
vi
User Guide for Cisco Show and Share 5.3.x
Page 7

Create a VoD From a Live Event 8-17
Download Questions From a Live Event 8-17
Delete a Live Event 8-18
Reference 8-18
Supported Dimensions for Encoded Video 8-18
Supported Encoding Bit Rates for Flash Video on DMEs 8-18
Supported Encoding Profiles for Windows Media on DMEs 8-19
Capture Profiles for Windows Media 9 Conversions 8-19
Capture Profiles for Broadband 8-19
Capture Profiles for Color PDAs 8-20
Capture Profiles for Dial-up Modems and ISDN 8-20
Troubleshooting 8-21
Contents
CHAPTER
9 Use Show and Share Author Reports 9-1
About Cisco Show and Share Author Reports 9-1
About the Page View Report 9-2
About the Video View Report 9-3
About the Viewer Aggregation Report 9-4
Procedures 9-5
Generate Reports 9-5
Export Report Data 9-5
User Guide for Cisco Show and Share 5.3.x
vii
Page 8

Contents
viii
User Guide for Cisco Show and Share 5.3.x
Page 9

Preface
Revised: June 2014
•
About Cisco Show and Share
• Change History
• Related Documentation, page xi
• Obtaining Documentation and Submitting a Service Request, page xi
About Cisco Show and Share
Cisco Show and Share is a secured social network for video collaboration, communication, and learning.
User-generated video is central to the Cisco Show and Share experience. As a Cisco Show and Share
user, you can view and interact with videos. As a Cisco Show and Share author, you can upload or record
videos. You can also synchronize slide presentations with the video, upload transcripts, and add optional,
downloadable files to your video.
Change History
This change history contains only those updates that apply to Cisco Show and Share users with Visitor,
Video Author, Video Publisher, or Live Event User roles. Administrators should visit the Administrator
Guide for Cisco Show and Share 5.3.x on Cisco.com for a list of changes to the administration features.
• New and Changed in Release 5.3, page ix
• New and Changed in Release 5.3.7, page x
• New and Changed in Release 5.3.12, page xi
New and Changed in Release 5.3
New Supported Languages
You can now display the interface in German, Portuguese-Brazil, and Italian.
Note The Italian language option is provided as a Beta feature. You may experience some
inconsistencies in the interface if you choose this language.
User Guide for Cisco Show and Share 5.3.x
-ix
Page 10

Multiple Video Resolution Support
Depending upon your system settings, viewers may have the option to view videos at different
resolutions. This can be especially helpful if you are viewing videos over a slower network
connection—if video playback pauses often, you can switch to a lower resolution to help increase
playback performance. This option is only available if your Cisco Show and Share uses a Cisco MXE to
transcode the uploaded videos and your system administrator has enabled multiple resolutions.
Mobile Application Support
Note The Cisco Show and Share mobile client application is beta and is suitable for early pilots and trials. We
do not recommend an enterprise production deployment at this time. The mobile technology space is
evolving quickly with new devices and software versions, so the beta application is subject to change.
Cisco Show and Share 5.3 supports access through a mobile application. Viewers can download the
mobile application to a supported iOS device and view, rate, comment, and upload videos to Cisco Show
and Share.
This feature must be enabled by your system administrator.
See the Cisco Show and Share 5.3 Mobile Application User Guide on Cisco.com for more information
on how to install and use the application:
http://www.cisco.com/en/US/docs/video/digital_media_systems/5_x/5_3/showandshare/mobile-client/
mobileapp.html
Pulse Keyword and Speaker Identification Support
Cisco Show and Share 5.3 introduces support for extracting keywords and identifying speakers in
uploaded videos when used with a Cisco MXE running version 3.3 software. You can use this
information when searching for or filtering videos or to navigate to specific points within a video.
This feature must be enabled by your system administrator.
WebEx Recording Upload Support
If your system has an integrated Cisco MXE running version 3.3 software, you can upload WebEx .arf
files for transcoding.
This feature must be enabled by your system administrator.
Recorded Video Transcoding Support
If your system has an integrated Cisco MXE running version 3.3 software, and your system administrator
has enabled the Pulse feature set, videos recorded directly in the Cisco Show are transcoded, which
enables the Pulse features and the multiple resolution support for them.
New and Changed in Release 5.3.7
Multiple Live Event Users
Multiple Live Event users can log in. When multiple Live Event users are logged in, Live Event draft
preview is not supported.
-x
Italian Language Improvement
Improved user interface for the Italian language option.
User Guide for Cisco Show and Share 5.3.x
Page 11

Pulse Keyword and Speaker Identification Enhancements
Video Authors can label guest speakers on a video-by-video basis. Doing so does not add the guest
speaker’s name to the list of users that are already present within Cisco Show and Share.
Video Authors can now remove incorrect Pulse keywords completely on a video-by-video basis. This
action cannot be undone, and doing so does not remove the keywords from the Pulse vocabulary list.
Video Authors can disable Pulse Speakers and Keywords on a video-by-video basis.
New and Changed in Release 5.3.12
Show Private Video Check Box
Allows users to display private videos on their Home page. See “The Home Page” section for more
information.
Related Documentation
See all related documentation for Cisco Show and Share on Cisco.com:
http://www.cisco.com/en/US/products/ps6682/tsd_products_support_series_home.html
Obtaining Documentation and Submitting a Service Request
For information on obtaining documentation, submitting a service request, and gathering additional
information, see the monthly What’s New in Cisco Product Documentation, which also lists all new and
revised Cisco technical documentation, at:
http://www.cisco.com/en/US/docs/general/whatsnew/whatsnew.html
Subscribe to the What’s New in Cisco Product Documentation as an RSS feed and set content to be
delivered directly to your desktop using a reader application. The RSS feeds are a free service. Cisco currently
supports RSS Version 2.0.
User Guide for Cisco Show and Share 5.3.x
-xi
Page 12

-xii
User Guide for Cisco Show and Share 5.3.x
Page 13

Start Here
Revised: November 2013
•
Accessing Cisco Show and Share, page 1-1
• Sign In to Cisco Show and Share, page 1-4
• Set Your Personal Preferences, page 1-6
Accessing Cisco Show and Share
• Prerequisites, page 1-1
• Configuration Note for Microsoft Internet Explorer, page 1-2
• Access Cisco Show and Share, page 1-3
CHA P T ER
1
Prerequisites
Before you access Cisco Show and Share, you need:
• Access to your network where Cisco Show and Share is hosted.
• A network connection that is fast enough to play a video stream. A dialup connection may result in
choppy video playback.
• One of the following web browsers:
–
Windows: Microsoft Internet Explorer 7.0, 8.0, or 9.0 (see also Configuration Note for
Microsoft Internet Explorer, page 1-2) or Mozilla Firefox 3.6.3.
–
Mac OS X: Safari 3.1.2 minimum or Firefox 3.5.3 or later recommended
• Access to the Internet from your computer. Cisco Show and Share attempts to contact the Internet
to download the plugins needed to play Flash, Windows, or Quicktime media in your browser if they
have not been installed previously.
User Guide for Cisco Show and Share 5.3.x
1-1
Page 14
Accessing Cisco Show and Share
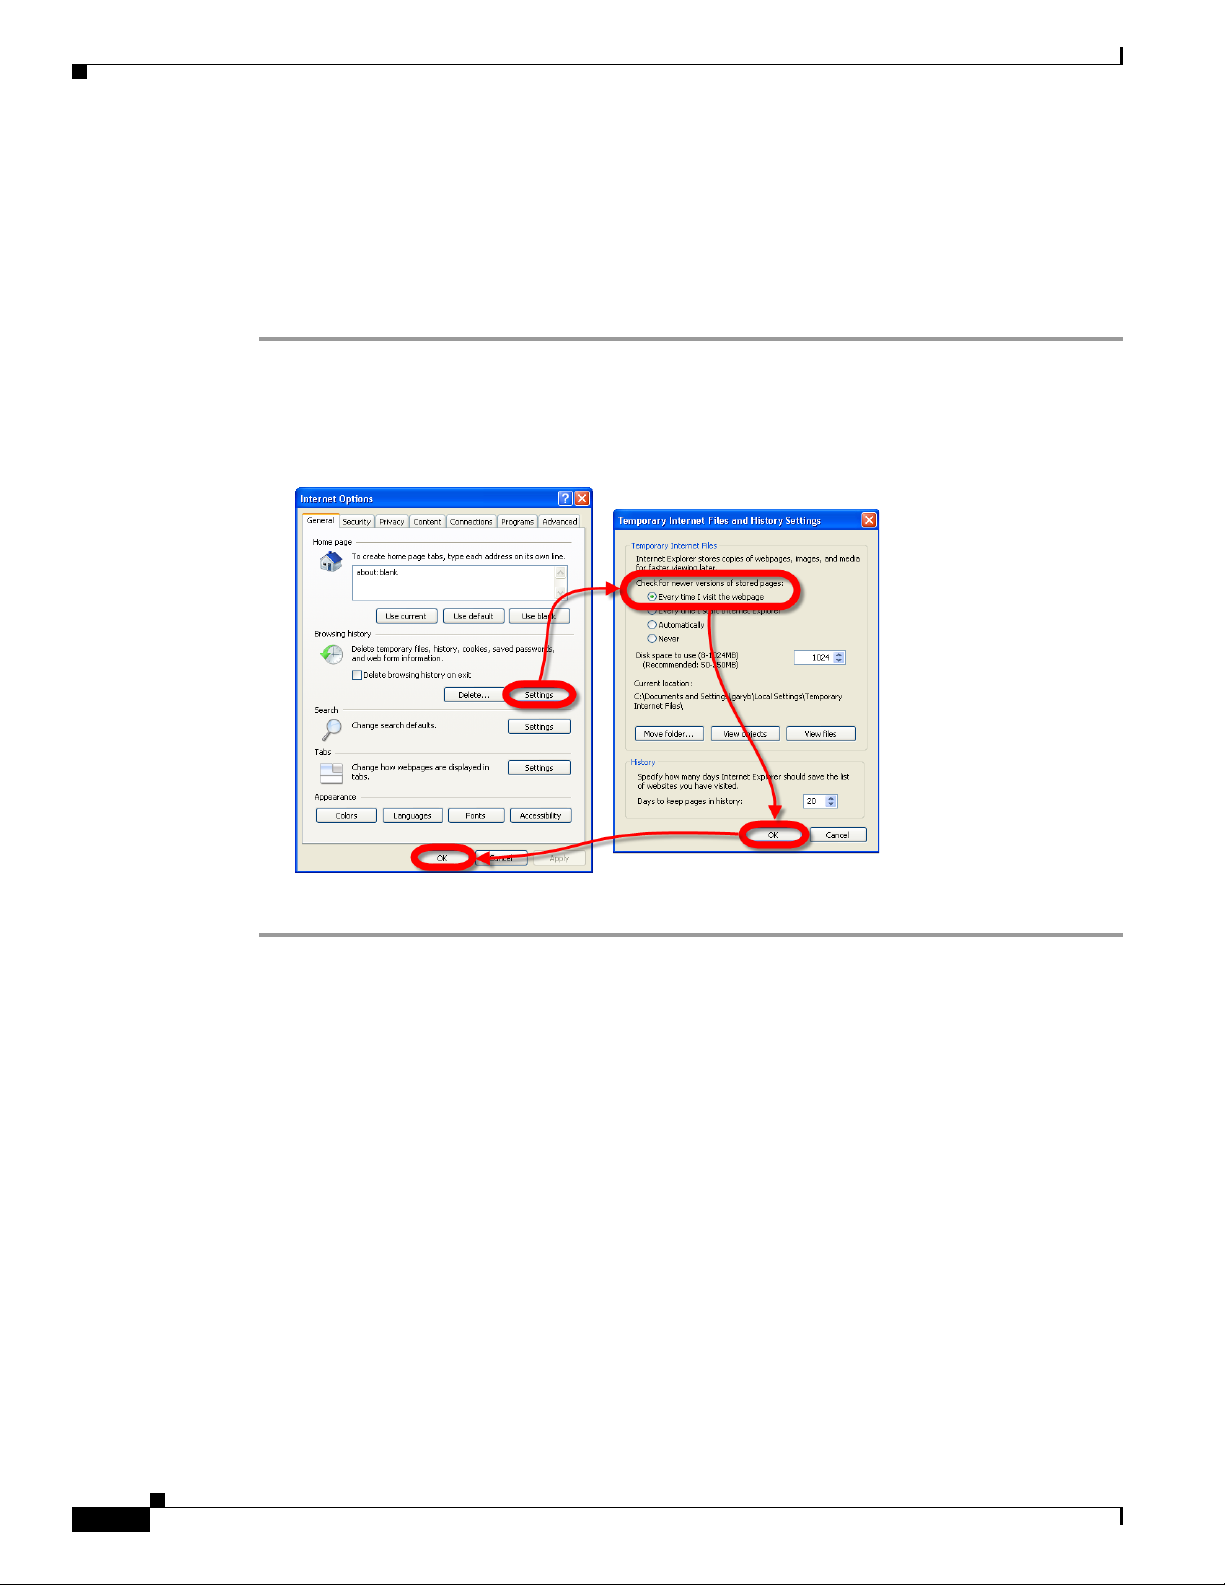
Configuration Note for Microsoft Internet Explorer
For Cisco Show and Share to display properly in Microsoft Internet Explorer, you must configure
Internet Explorer to check for changes each time that it loads any page from Cisco Show and Share.
Procedure
Step 1 Choose Tools > Internet Options.
Step 2 Click Settings in the Browsing history area.
Step 3 Click the option to check for changes each time.
Step 4 Click OK twice.
Chapter 1 Start Here
Step 5 Stop. You have completed this procedure.
1-2
User Guide for Cisco Show and Share 5.3.x
Page 15
Chapter 1 Start Here
Access Cisco Show and Share
To access Cisco Show and Share, point your web browser to:
http://server_name
Replace server_name with the name of your Cisco Show and Share server, for example
http://video.example.com. Do not use an IP address.
Note You may receive a security warning to accept the site security certificate when you first access your
Cisco Show and Share site. Confirm the security exception to proceed to the site.
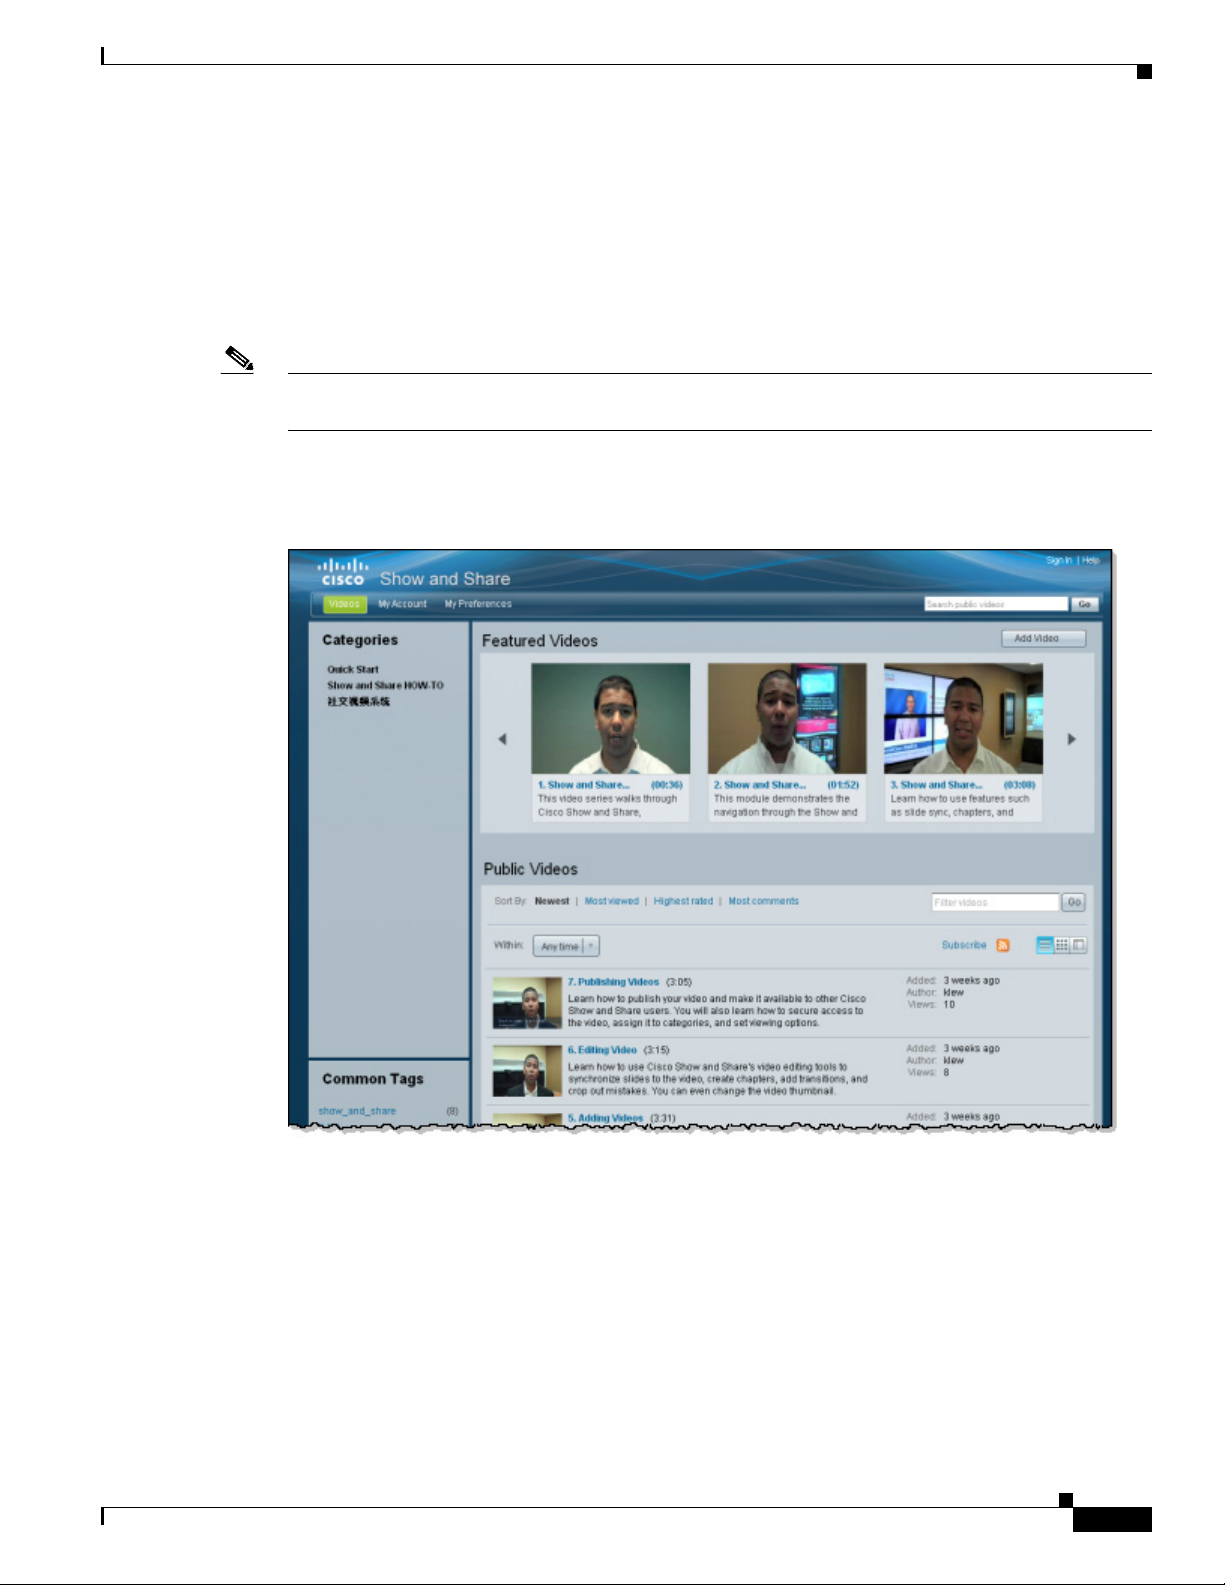
When Cisco Show and Share loads, you see a page similar to the one shown in Figure 1-1.
Figure 1-1 The Cisco Show and Share Home Page
Accessing Cisco Show and Share
When you first access Cisco Show and Share, you access the site as a visitor. Visitors can search,
browse, filter, and watch public videos. Visitors might also be able to rate, comment upon, and tag videos
if those features were enabled for general use.
Visitors cannot upload or record videos. You must be logged in to access those functions. To log into
Cisco Show and Share, see Sign In to Cisco Show and Share, page 1-4.
User Guide for Cisco Show and Share 5.3.x
1-3
Page 16
Sign In to Cisco Show and Share
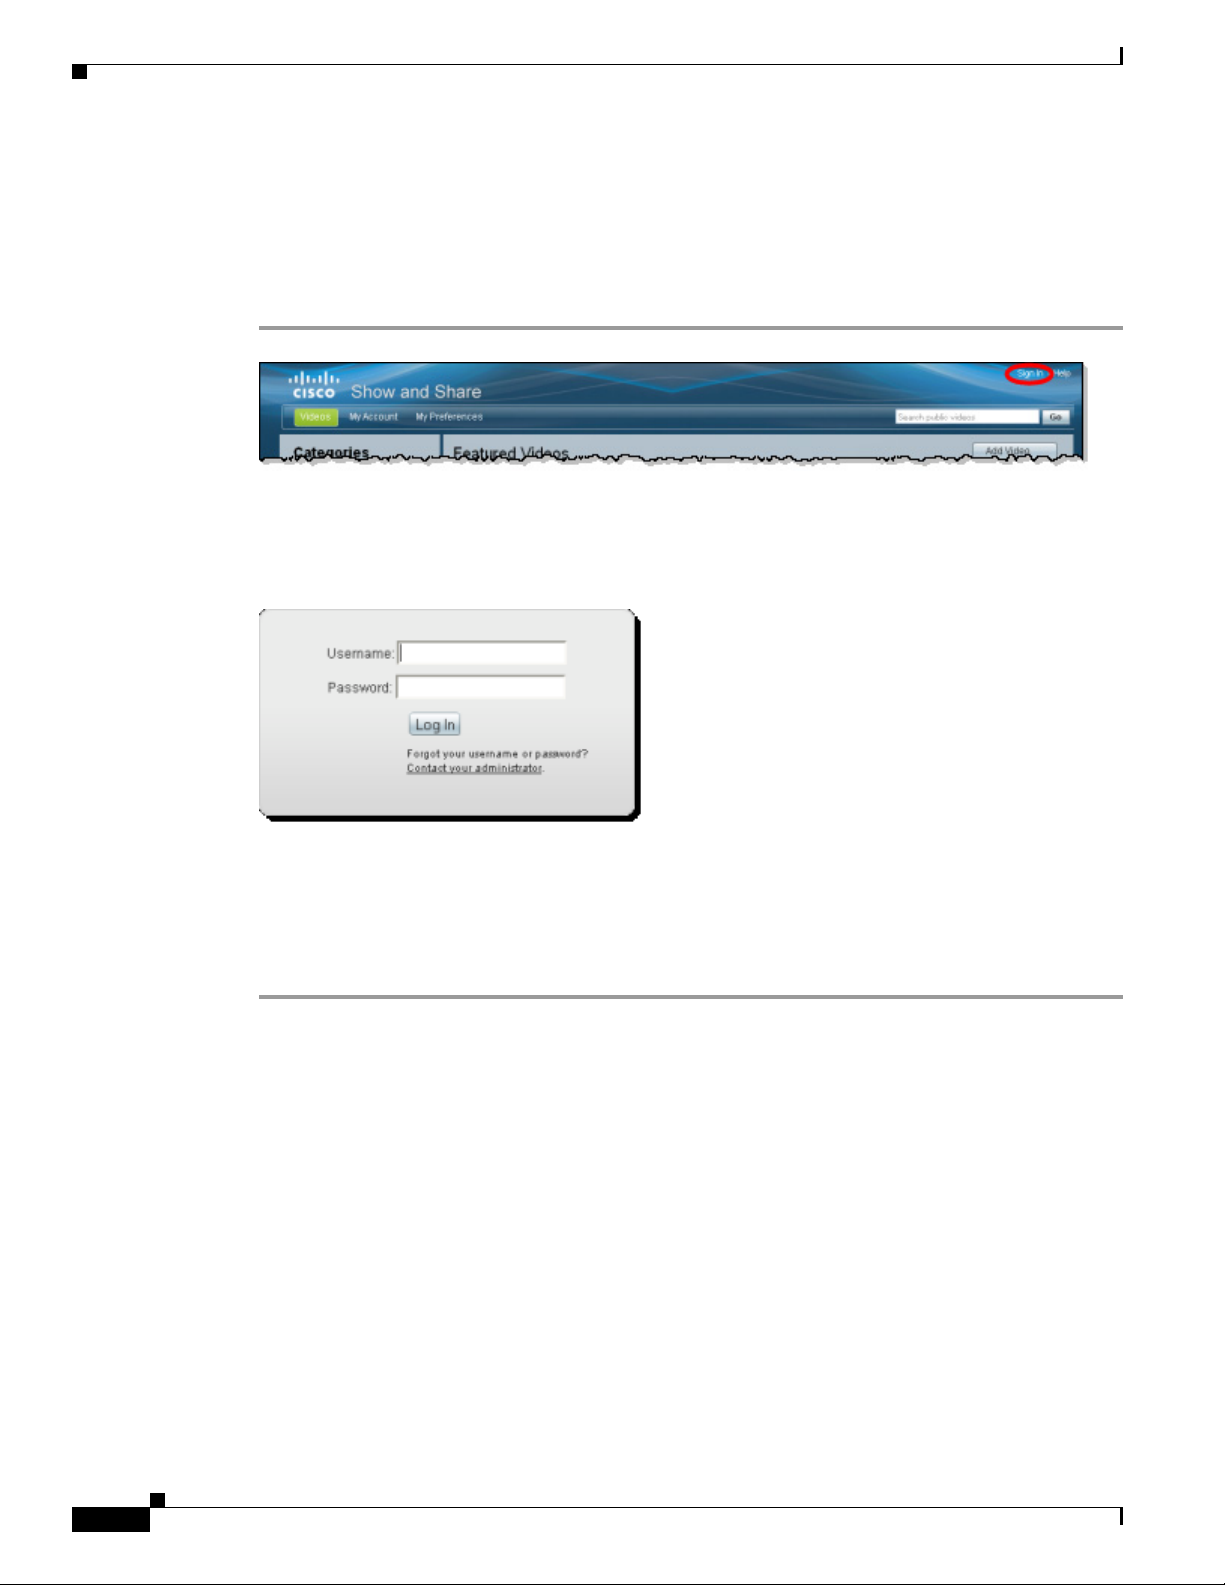
Sign In to Cisco Show and Share
You must be signed-in to Cisco Show and Share to access specific features, such as uploading videos,
the My Account page, and the My Preferences page.
To sign-in to Cisco Show and Share, follow these steps:
Step 1 Click the Sign In link in the global navigation area at the top of the page.
You will see one of the following sign-in screens, or your own corporate sign-in screen, depending upon
your version of Cisco Show and Share and if the sign-in process has been tied into your corporate
authentication system:
Chapter 1 Start Here
Step 2 Enter your username and password.
Step 3 Click Log In.
You are returned to the Videos page.
Step 4 Stop. You have completed this procedure.
1-4
User Guide for Cisco Show and Share 5.3.x
Page 17

Chapter 1 Start Here
About User Roles and Privileges
The following table describes the user roles that are available in Cisco Show and Share. Users may have
more than one role. For example, in many installations video authors are also video publishers and live
event users.
Users can also have one or more of the administrator roles listed at the bottom of the table. Administrator
functions are described in the Administrator Guide for Cisco Show and Share 5.3.x.
Role: What the role can do:
Visitor Visitors can typically browse and view videos. They may also be able to
Video Author Video Authors upload, record, and edit videos. They can submit videos for
Video Publisher Video Publishers approve videos for publication. They can browse and
Live Event User Live Event Users edit, publish, administer, and delete live events. They can
Category Administrator Category Administrators create and delete categories. They can browse
Reports Administrator Reports Administrators run and view Cisco Show and Share reports. They
Administrator Administrators assign permissions to other users and set site-wide
Sign In to Cisco Show and Share
comment on, rate, and tag videos.
publication. They can browse and view videos. They may also be able to
comment on, rate, and tag videos.
To record video in Cisco Show and Share, Video Authors must have a
video camera and microphone attached to their computer. If they are not
built in, they must be USB-based.
view videos. They may also be able to comment on, rate, and tag videos.
browse and view videos. They may also be able to comment on, rate, and
tag videos.
and view videos. They may also be able to comment on, rate, and tag
videos.
can browse and view videos. They may also be able to comment on, rate,
and tag videos.
preferences. They can reset your password if you forget yours. They can
browse and view videos. They may also be able to comment on, rate, and
tag videos.
Administrators can enable or disable certain features globally or restrict their access to a subset of users.
The logic works like this:
• No one can use what an administrator has hidden from everyone.
• You must log in to use what an administrator has reserved for registered users.
• When you are logged in, you cannot use anything whose access rights exclude you.
To gain access to features that have been restricted to registered users by the site administrator, and to
be able to upload, record, and edit videos, you must log in to Cisco Show and Share and have the
privileges to perform those actions.
User Guide for Cisco Show and Share 5.3.x
1-5
Page 18
Set Your Personal Preferences
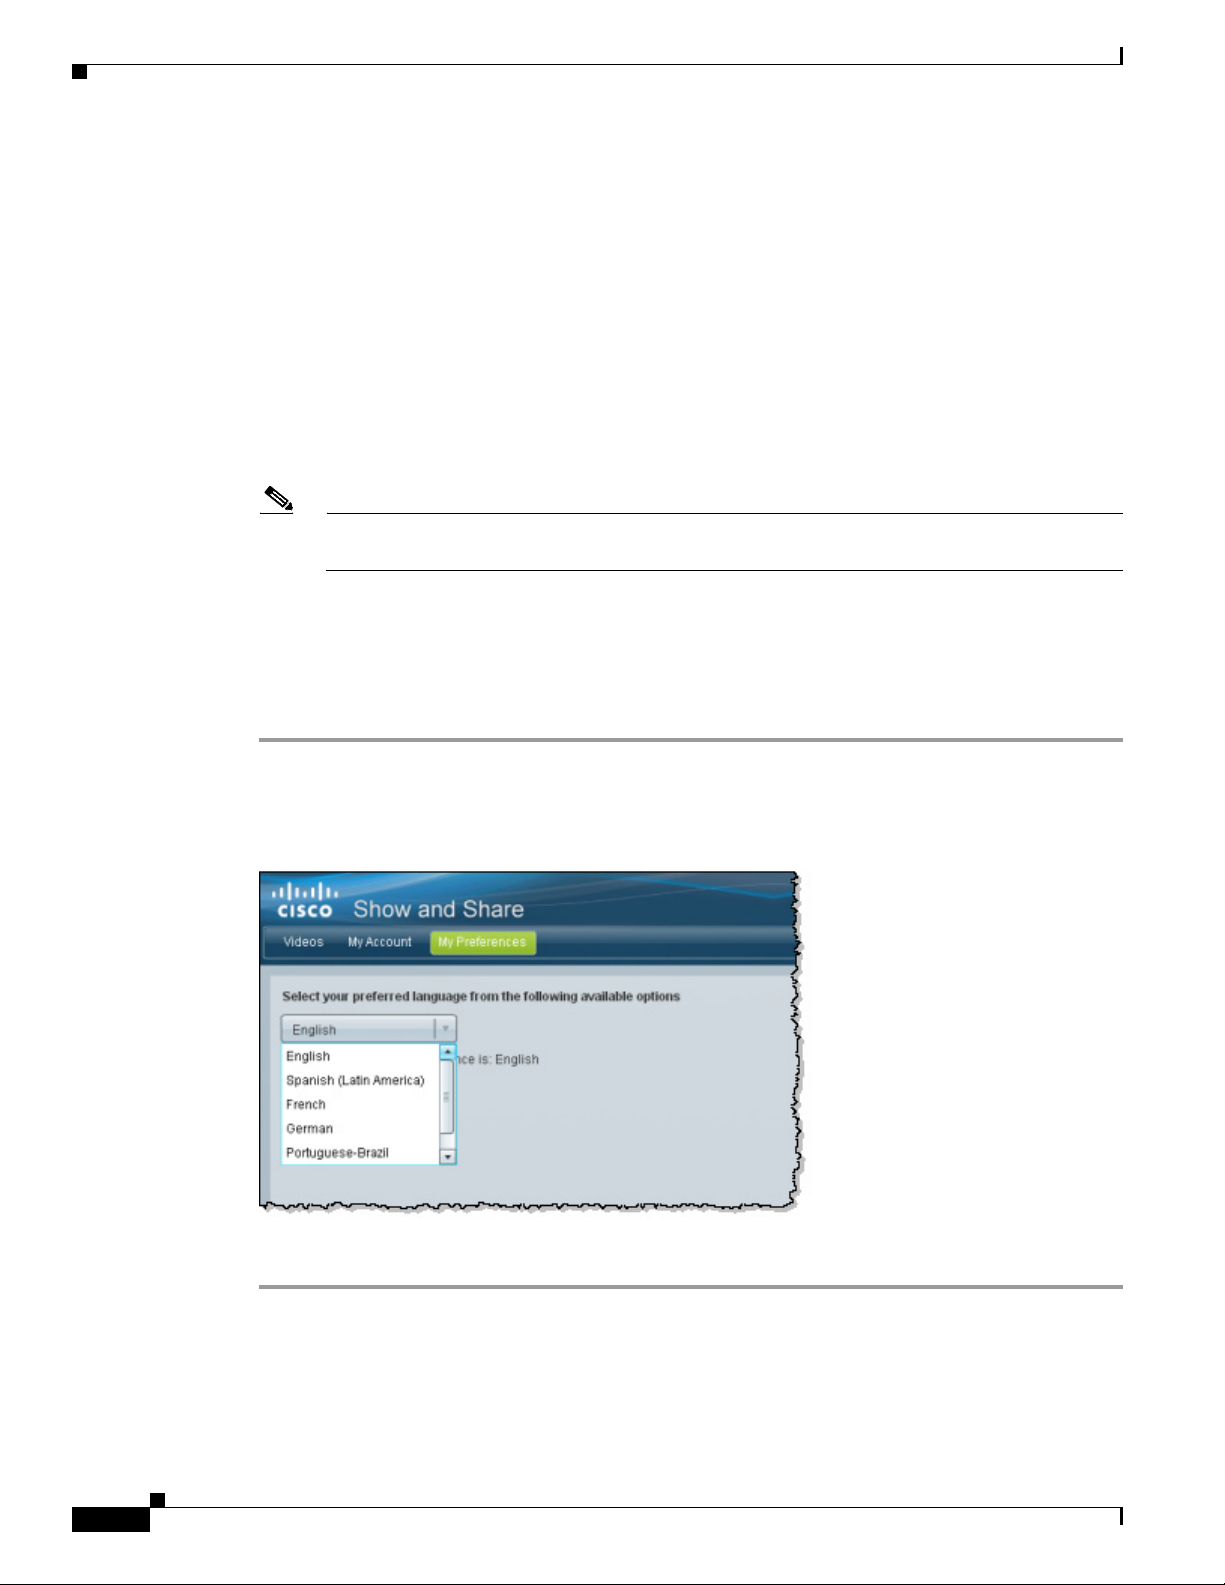
Set Your Personal Preferences
When you first log in to Cisco Show and Share, the interface is presented in a language chosen by your
system administrator. You can change the language displayed to one of the following:
• English
• Spanish (Latin America)
• French
• German
• Portuguese-Brazil
• Italian
Note The Italian language option is provided as a Beta feature. You may experience some
inconsistencies in the interface if you choose this language.
Even though you change the language displayed for your Cisco Show and Share Sessions, it does not
change the base language of the system. Features, such as search, will still follow the rules for the base
system language.
Chapter 1 Start Here
Procedure
Step 1 Log in to Cisco Show and Share.
Step 2 Click My Preferences in the menu bar.
Step 3 Choose a language from the Select your preferred language list.
Step 4 Click Apply.
1-6
User Guide for Cisco Show and Share 5.3.x
Page 19

CHA P T ER
2
Quick Start
Revised: November 2013
The Cisco Show and Share Quick Start section provides an overview of the Cisco Show and Share
interface and features. It is designed to act as a quick reference an to get you acquainted with the most
commonly accessed pages. Each section contains links to where you can find more information about
that screen.
Note The screens in this section might look slightly different from those in your site. Your site might use a
custom logo and background or be in another language.
This section contains the following topics:
• Cisco Show and Share Interface, page 2-1
• Basic Navigation, page 2-9
Cisco Show and Share Interface
• The Home Page
• The Video Playback Page
• The My Account Page
• The Upload Video Page
• The Record a Video Page
• The Publish Your Video Page
User Guide for Cisco Show and Share 5.3.x
2-1
Page 20

Cisco Show and Share Interface
The Home Page
The Home page is the starting point of your Cisco Show and Share experience. You can always navigate
back to the Home page by clicking Videos in the menu bar.
Chapter 2 Quick Start
At the top of the Home page are featured videos. Below the Featured Videos are the Public Videos. These
are videos that do not have any viewing restrictions attached to them. By default, the newest videos are
shown at the top of the list. You can also sort the list by the most watched, the highest rated, or containing
the most comments. When sorted by the number of comments, both general comments and timeline
comments count towards the comment total for a video.
Videos with viewing restrictions appear on the Private tab in your My Account page if you have
permission to access them. For the “superuser” account, private videos also appear on the home page.
Note Beginning in Show and Share Release 5.3.12, you can select the Show Private Videos check box to
display private videos on your Home page (in addition to appearing on your My Account > Private tab).
You can filter the public videos by selecting a tag, a category, entering a filter term, or any combination
of those methods. You can also change the Public Videos list view. For more information about browsing
and searching for videos from the home page, see Browse and Search Videos, page 3-1.
2-2
User Guide for Cisco Show and Share 5.3.x
Page 21
Chapter 2 Quick Start
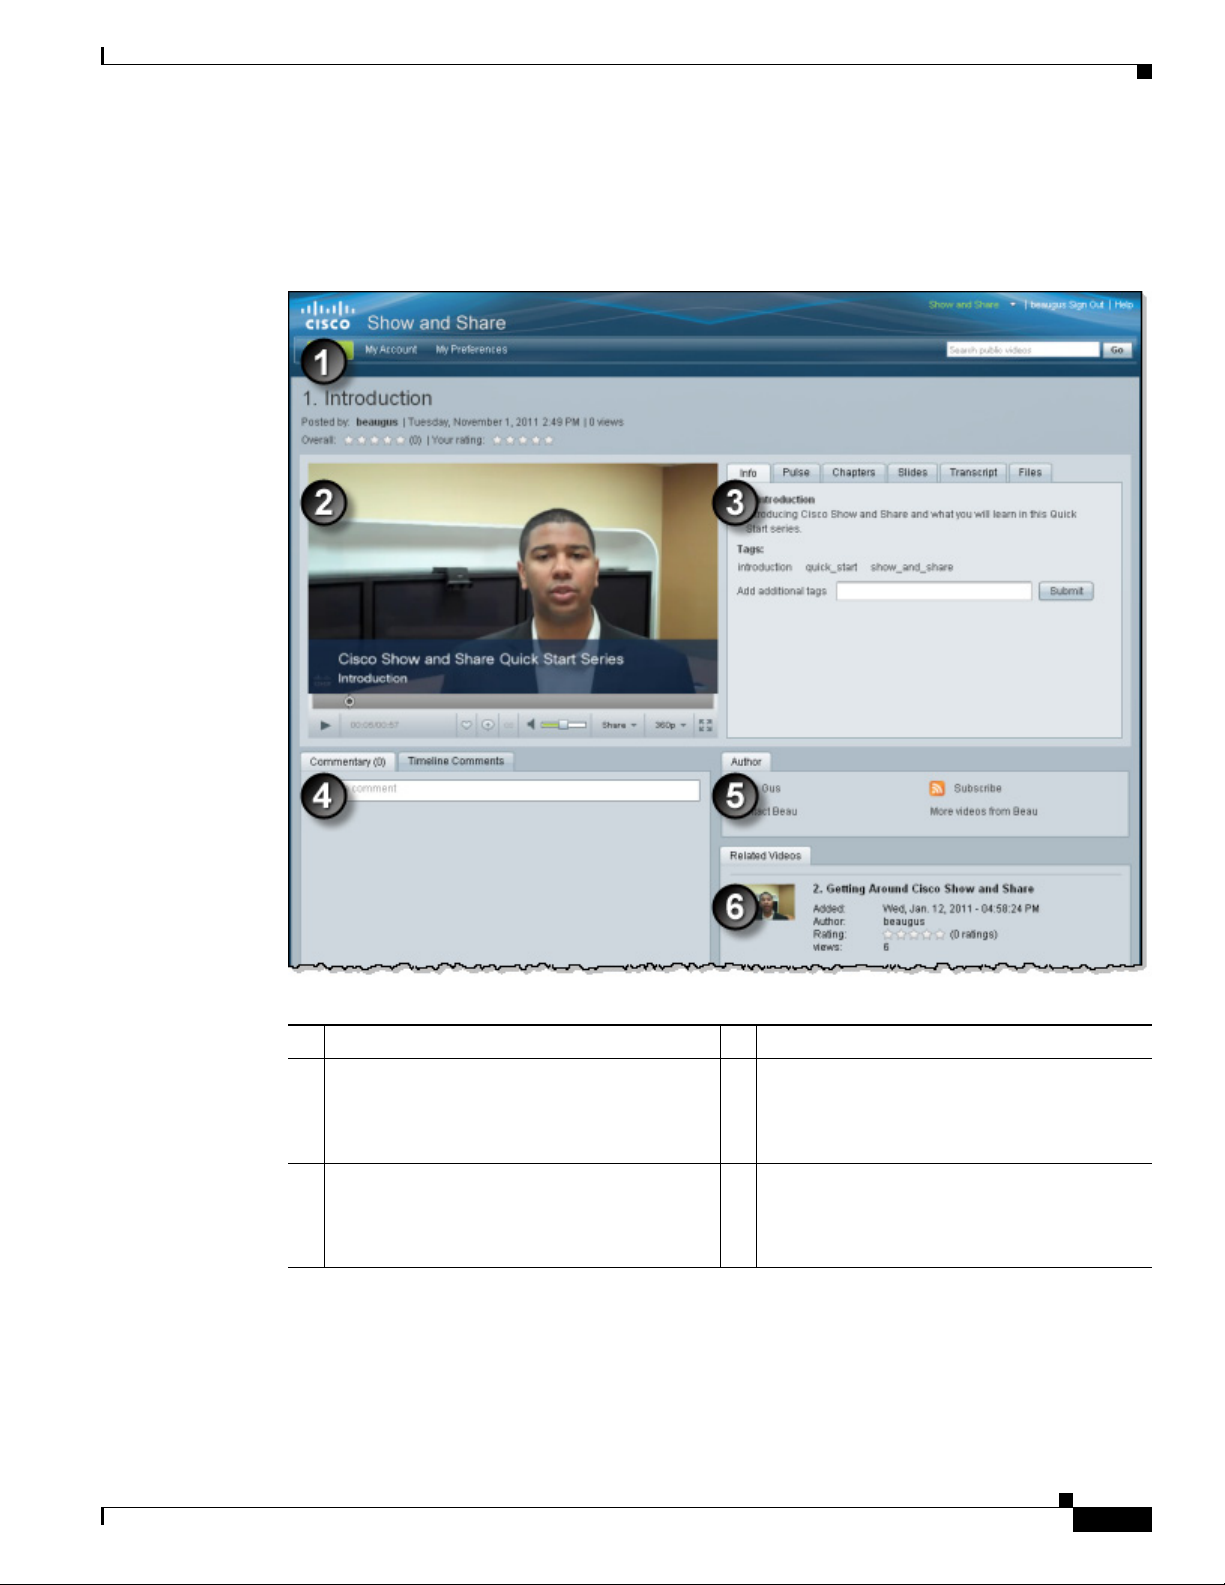
The Video Playback Page
Any time you click a video, the Video Playback page appears. When the page loads, the video begins to
play automatically.
Cisco Show and Share Interface
1 Video title and detail information. 2 Video player.
3 Video information tabs. The Info tab appears
for every video. Other tabs appear depending
upon the features used by the video.
5 Author information. You can send the author
an e-mail message, subscribe to an RSS feed
of the author’s videos, or see more videos
from the author.
For more information about using the features on the Video Playback page, see Play, Comment, Tag, and
Share Videos, page 4-1.
4 Comment area. General comments about the
video are shown on the Commentary tab.
Comments from the timeline are shown on the
Timeline Comments tab.
6 Videos related to the current video. The
author can choose specific related videos or
let the system pick the videos (based on them
having tags and categories in common).
User Guide for Cisco Show and Share 5.3.x
2-3
Page 22
Cisco Show and Share Interface
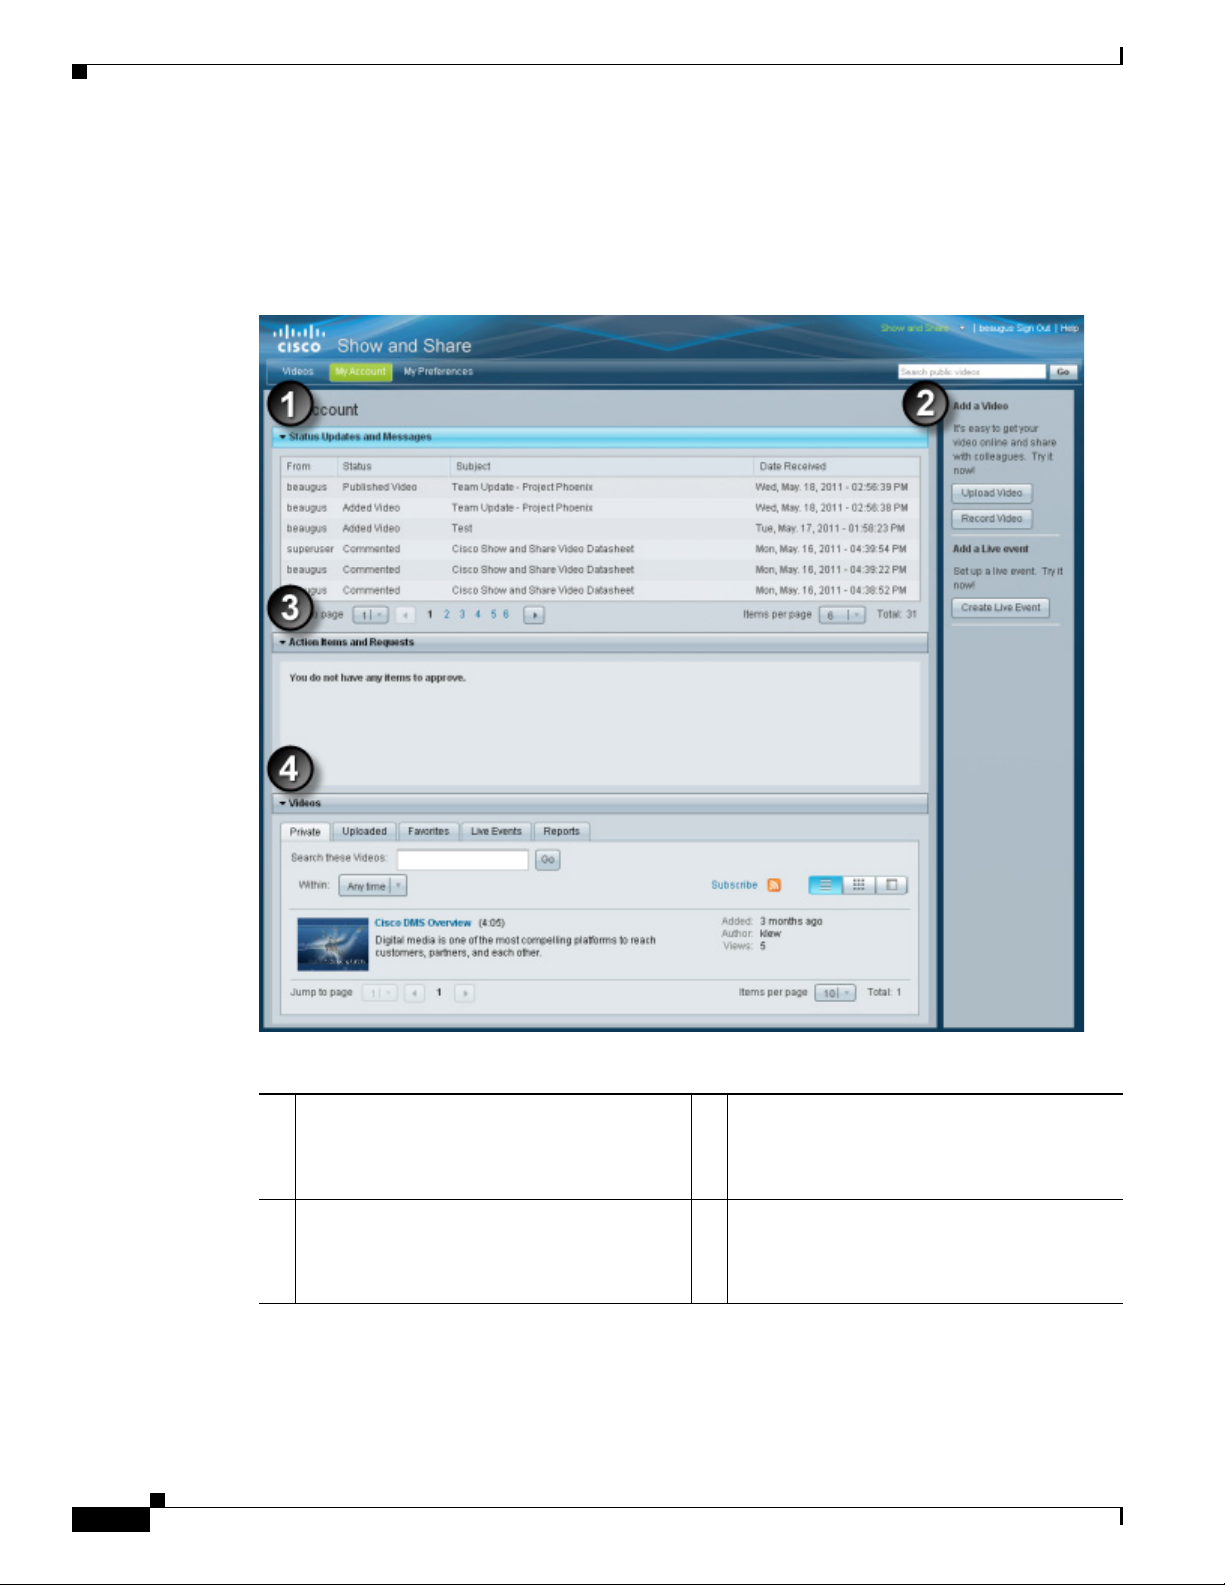
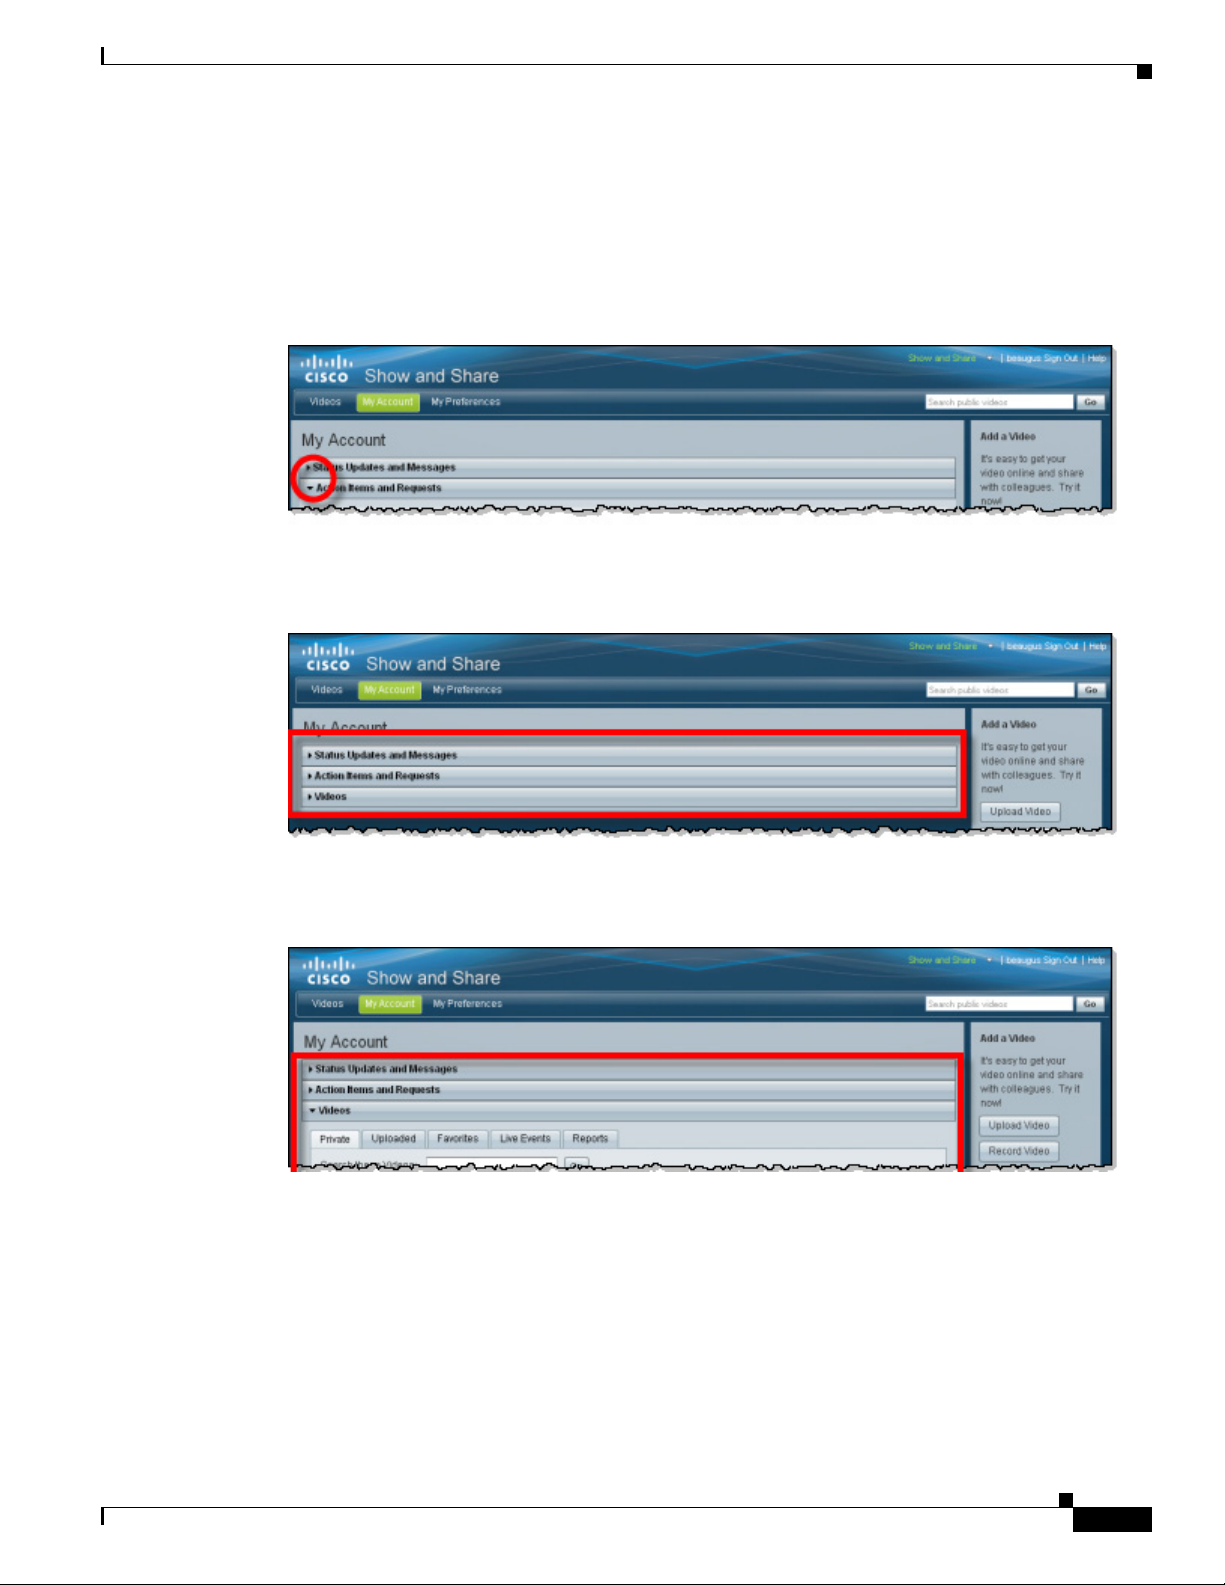
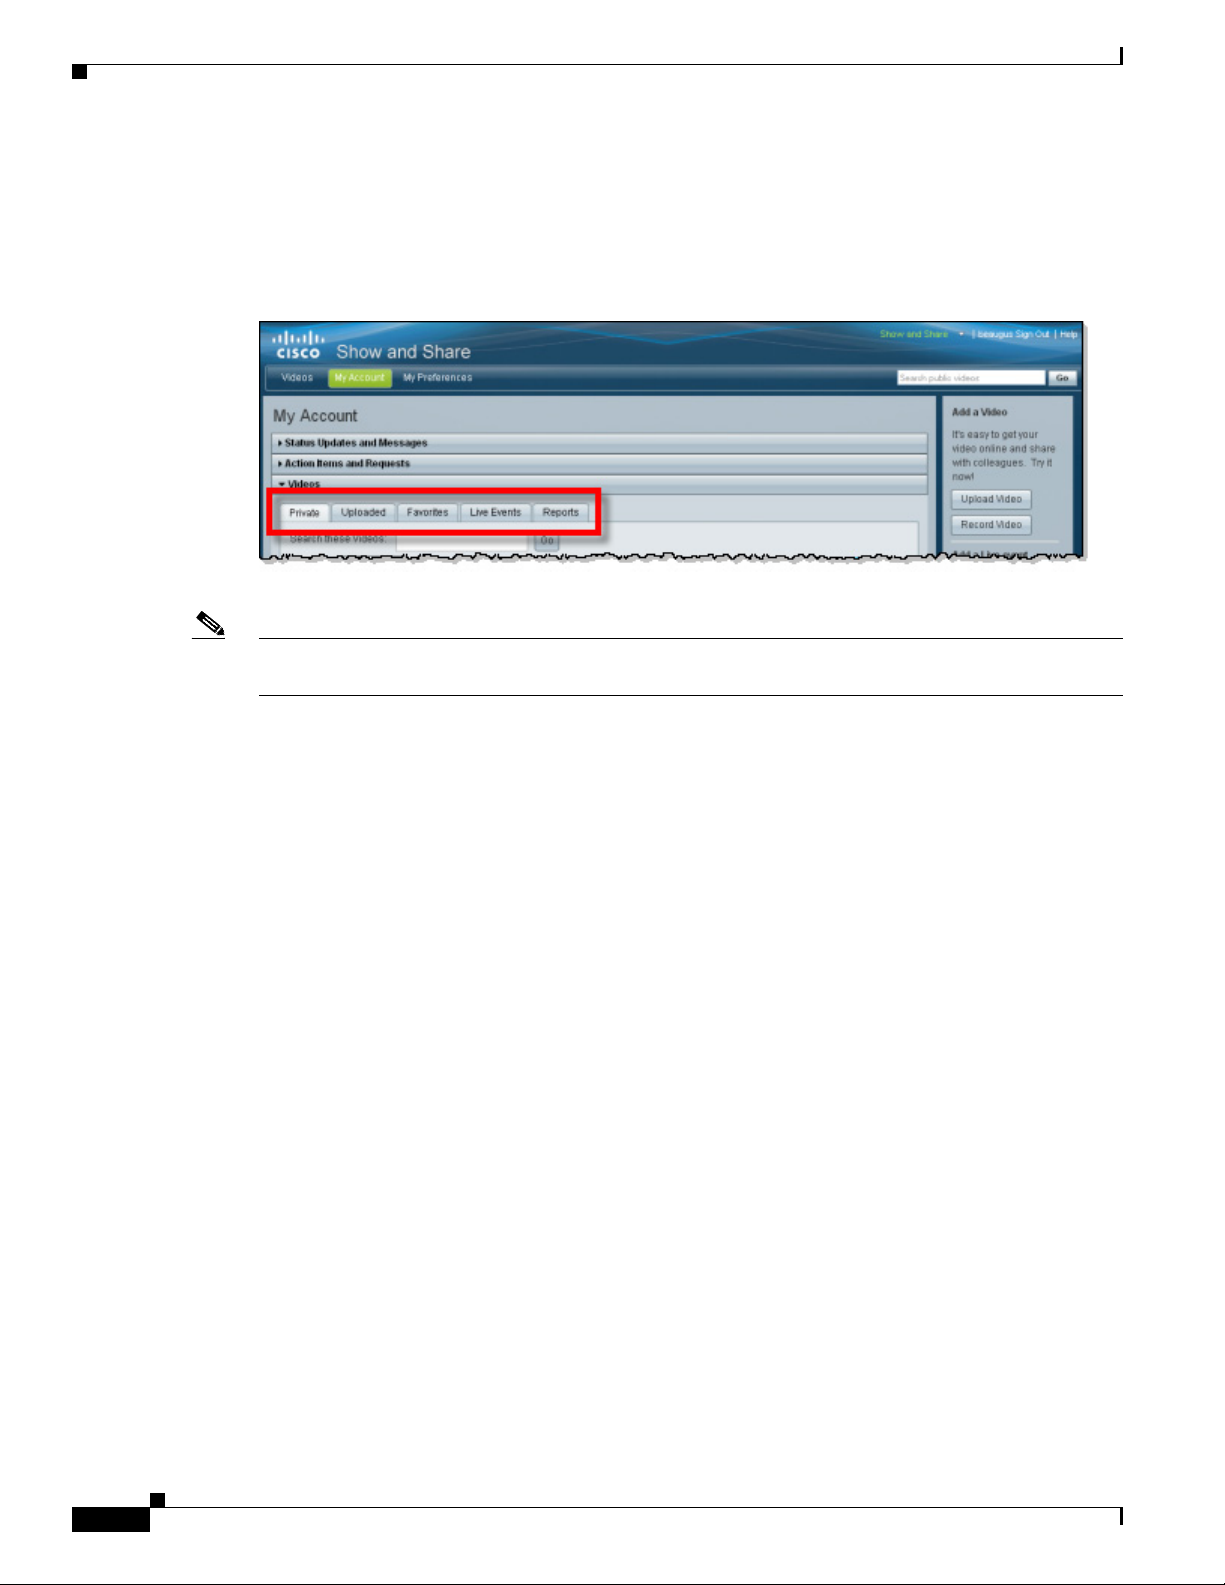
The My Account Page
Click My Account in the menu bar to access the My Account page. You must be logged-in to access this
page. If you are not logged-in, you will be prompted to do so. See Sign In to Cisco Show and Share,
page 1-4.
Chapter 2 Quick Start
2-4
1 Status Updates and Messages. Notifications
about comments on your videos and
publishing status appear in this area.
3 Action Items and Requests. If you are a video
approver (if your Show and Share has the
Video Approval process enabled), your
pending approvals appear in this area.
For more information about Live Events, see Live Events, page 8-1.
For more information about uploading videos, see Create, Add, and Manage Videos, page 7-1.
For more information about video reports, see Use Show and Share Author Reports, page 9-1.
User Guide for Cisco Show and Share 5.3.x
2 Add a Video. (Author or Live Event role
required) You can start the upload or video
record process from this page. You can also
configure and schedule a live event.
4 Videos. This area contains the videos you
have uploaded, live events you have
scheduled, and videos that have viewing
restrictions (that you can view).
Page 23
Chapter 2 Quick Start
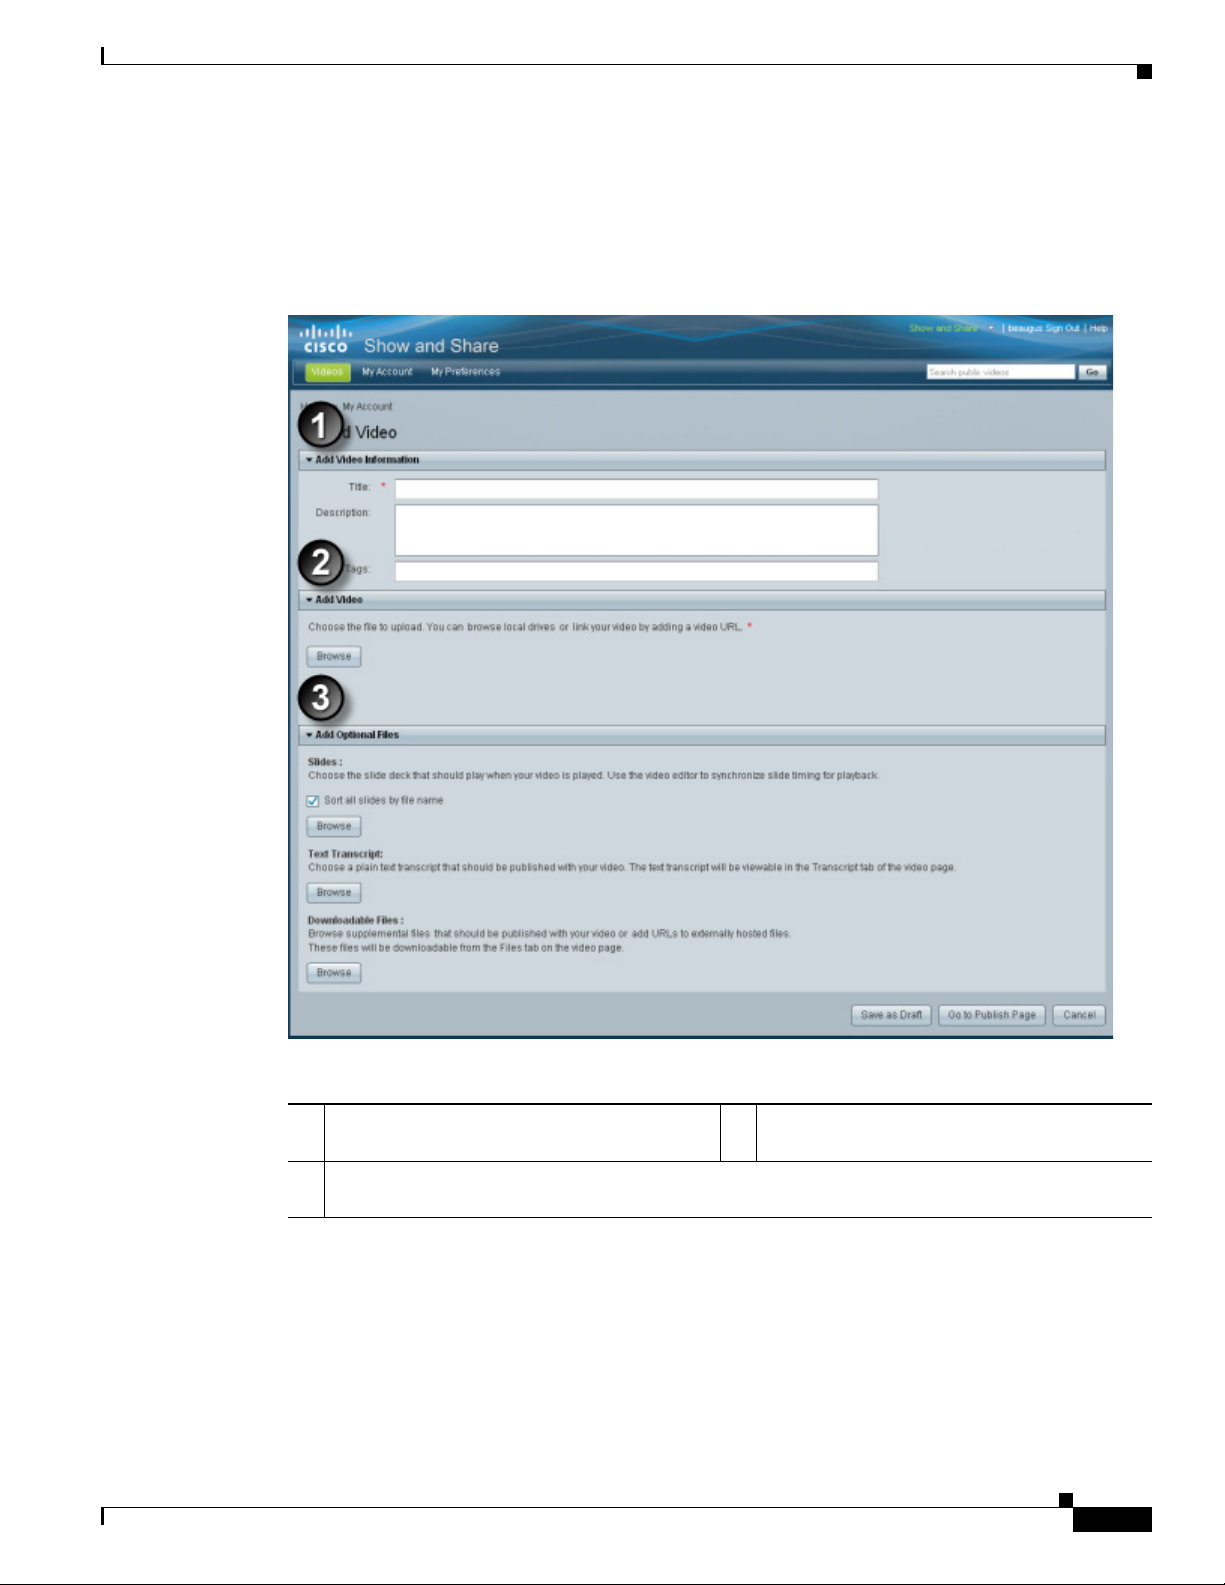
The Upload Video Page
Access the Upload Video page by clicking Add Video > Upload a Video on the Home page or by
clicking Upload Video on the My Account page. You must be logged-in to access this page. If you are
not logged-in, you will be prompted to do so. See Sign In to Cisco Show and Share, page 1-4.
Cisco Show and Share Interface
1 Video Information. You can add a title,
description, and tags to the video.
3 Add Optional Files. You can upload slides to be synchronized with the video, a text transcript of
the video, and downloadable files to accompany the video.
For more information about uploading videos, see Create, Add, and Manage Videos, page 7-1.
For more information about synchronizing slides, see Edit Video, page 5-1.
2 Add Video. Specify the video to upload.
User Guide for Cisco Show and Share 5.3.x
2-5
Page 24
Cisco Show and Share Interface
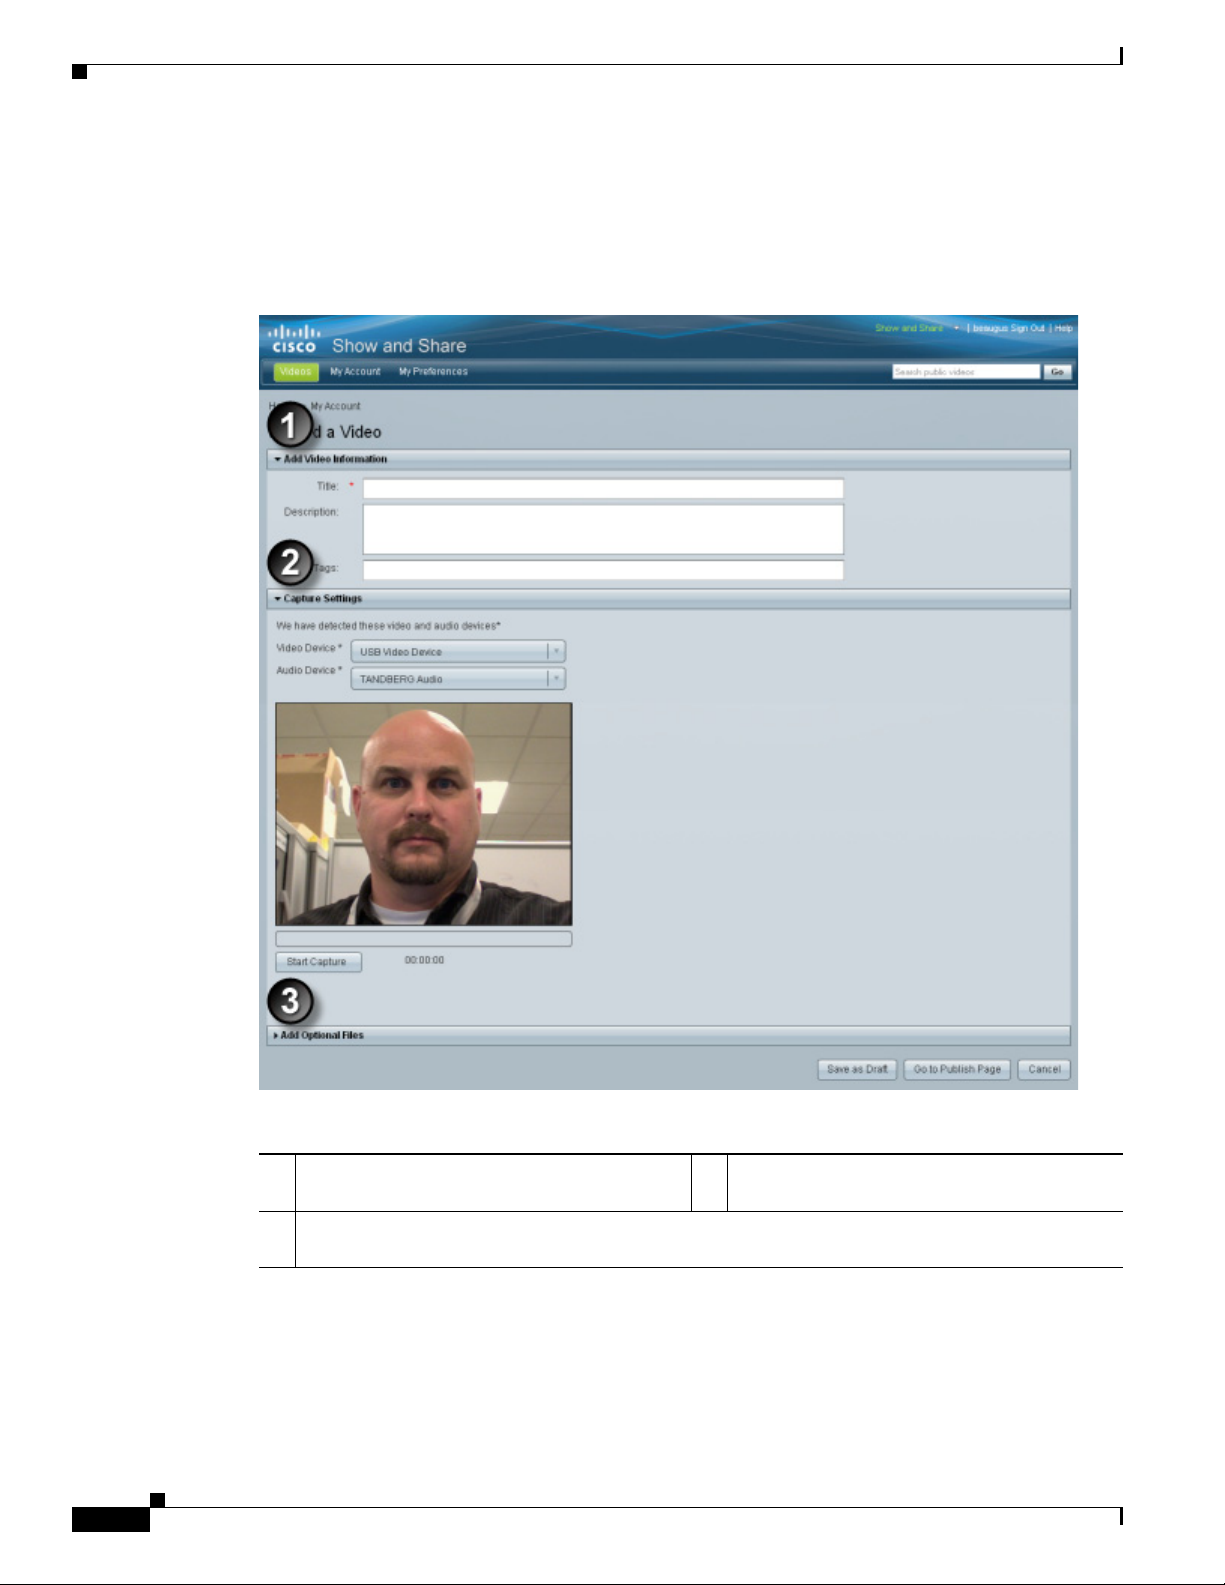
The Record a Video Page
Access the Upload Video page by clicking Add Video > Record a Video on the Home page or by
clicking Record Video on the My Account page. You must be logged-in to access this page. If you are
not logged-in, you will be prompted to do so. See Sign In to Cisco Show and Share, page 1-4.
Chapter 2 Quick Start
2-6
1 Video Information. You can add a title,
description, and tags to the video.
3 Add Optional Files. You can upload slides to be synchronized with the video, a text transcript of
the video, and downloadable files to accompany the video.
For more information about recording videos, see Create, Add, and Manage Videos, page 7-1.
For more information about synchronizing slides, see Edit Video, page 5-1.
User Guide for Cisco Show and Share 5.3.x
2 Capture Settings. Specify the audio and video
capture devices and record your video.
Page 25
Chapter 2 Quick Start
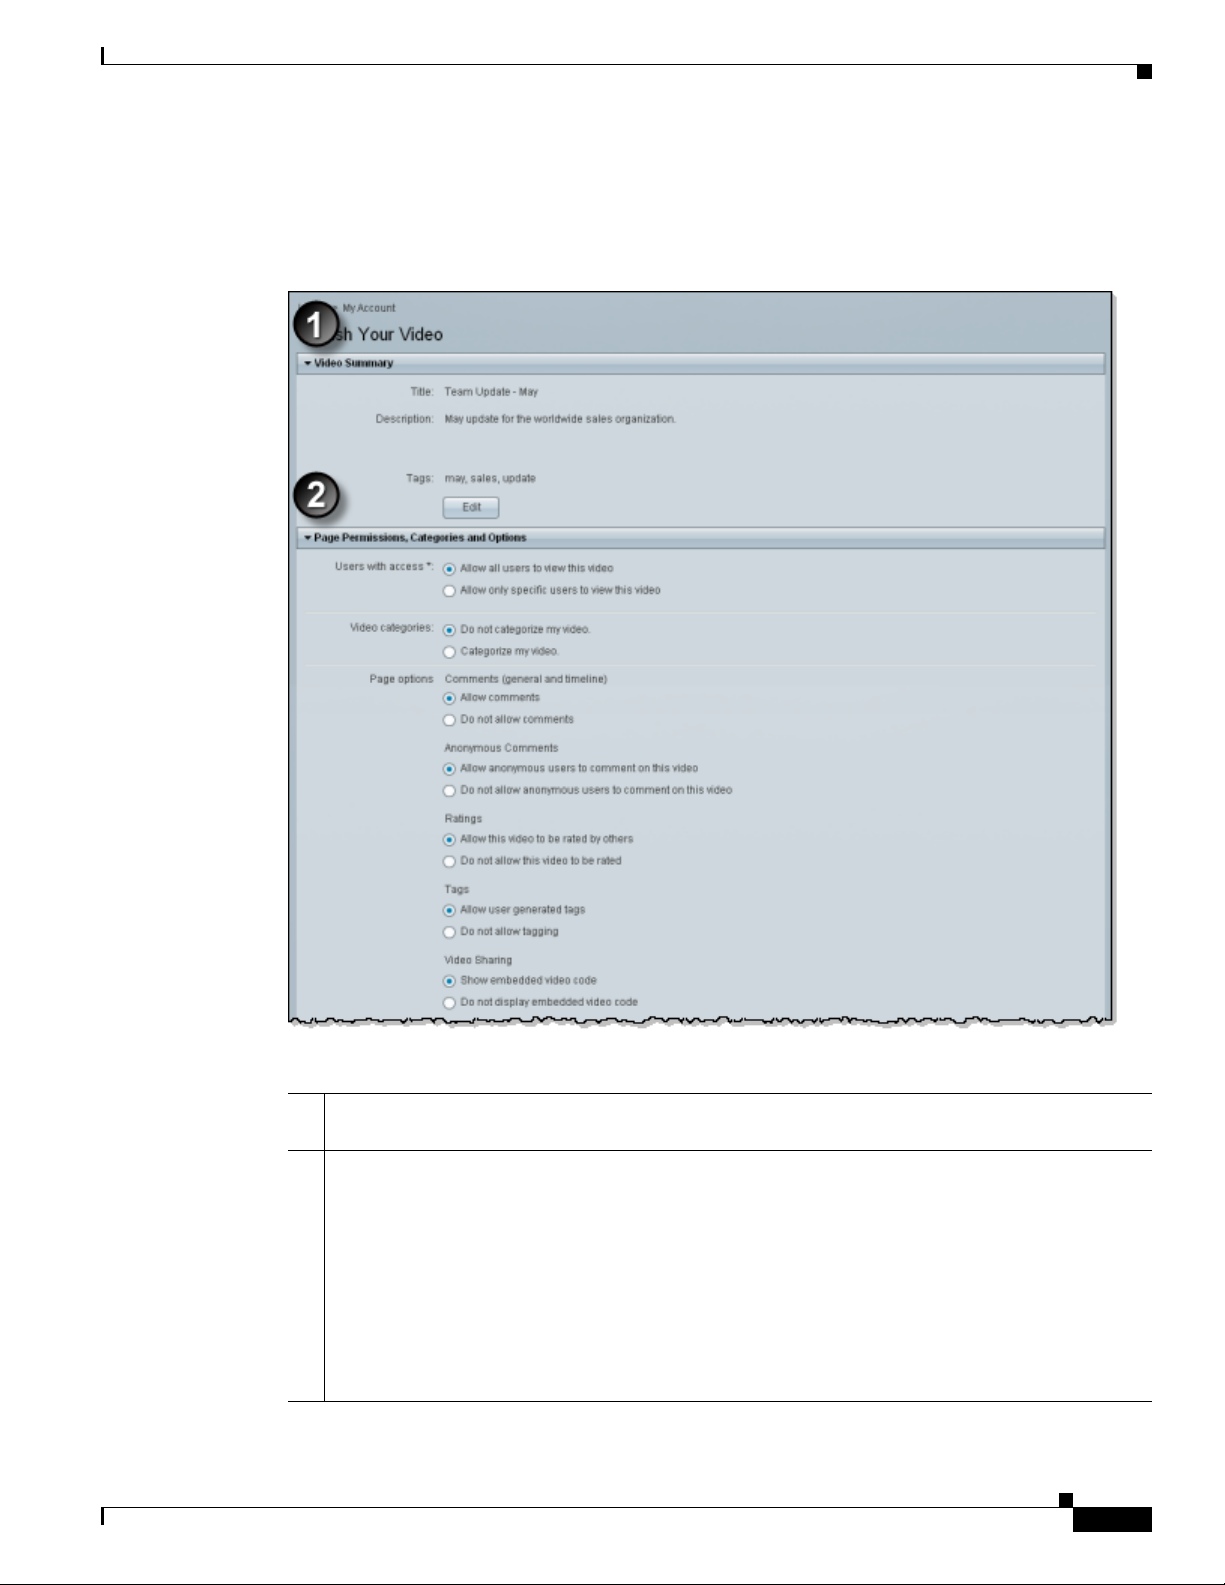
The Publish Your Video Page
You must be logged-in to access this page. If you are not logged-in, you will be prompted to do so. See
Sign In to Cisco Show and Share, page 1-4.
Cisco Show and Share Interface
1 Video Summary. Contains the video information you entered in the Upload Video or Record Video
screen. You can edit this information before publishing
2 Page Permissions.You can restrict access to the video, assign it to one or more categories, and
disable the following features for the video you are publishing if the features have been enabled
globally:
• Commenting on videos
• Commenting anonymously
• Rating videos
• Tagging videos
• Sharing videos
User Guide for Cisco Show and Share 5.3.x
2-7
Page 26
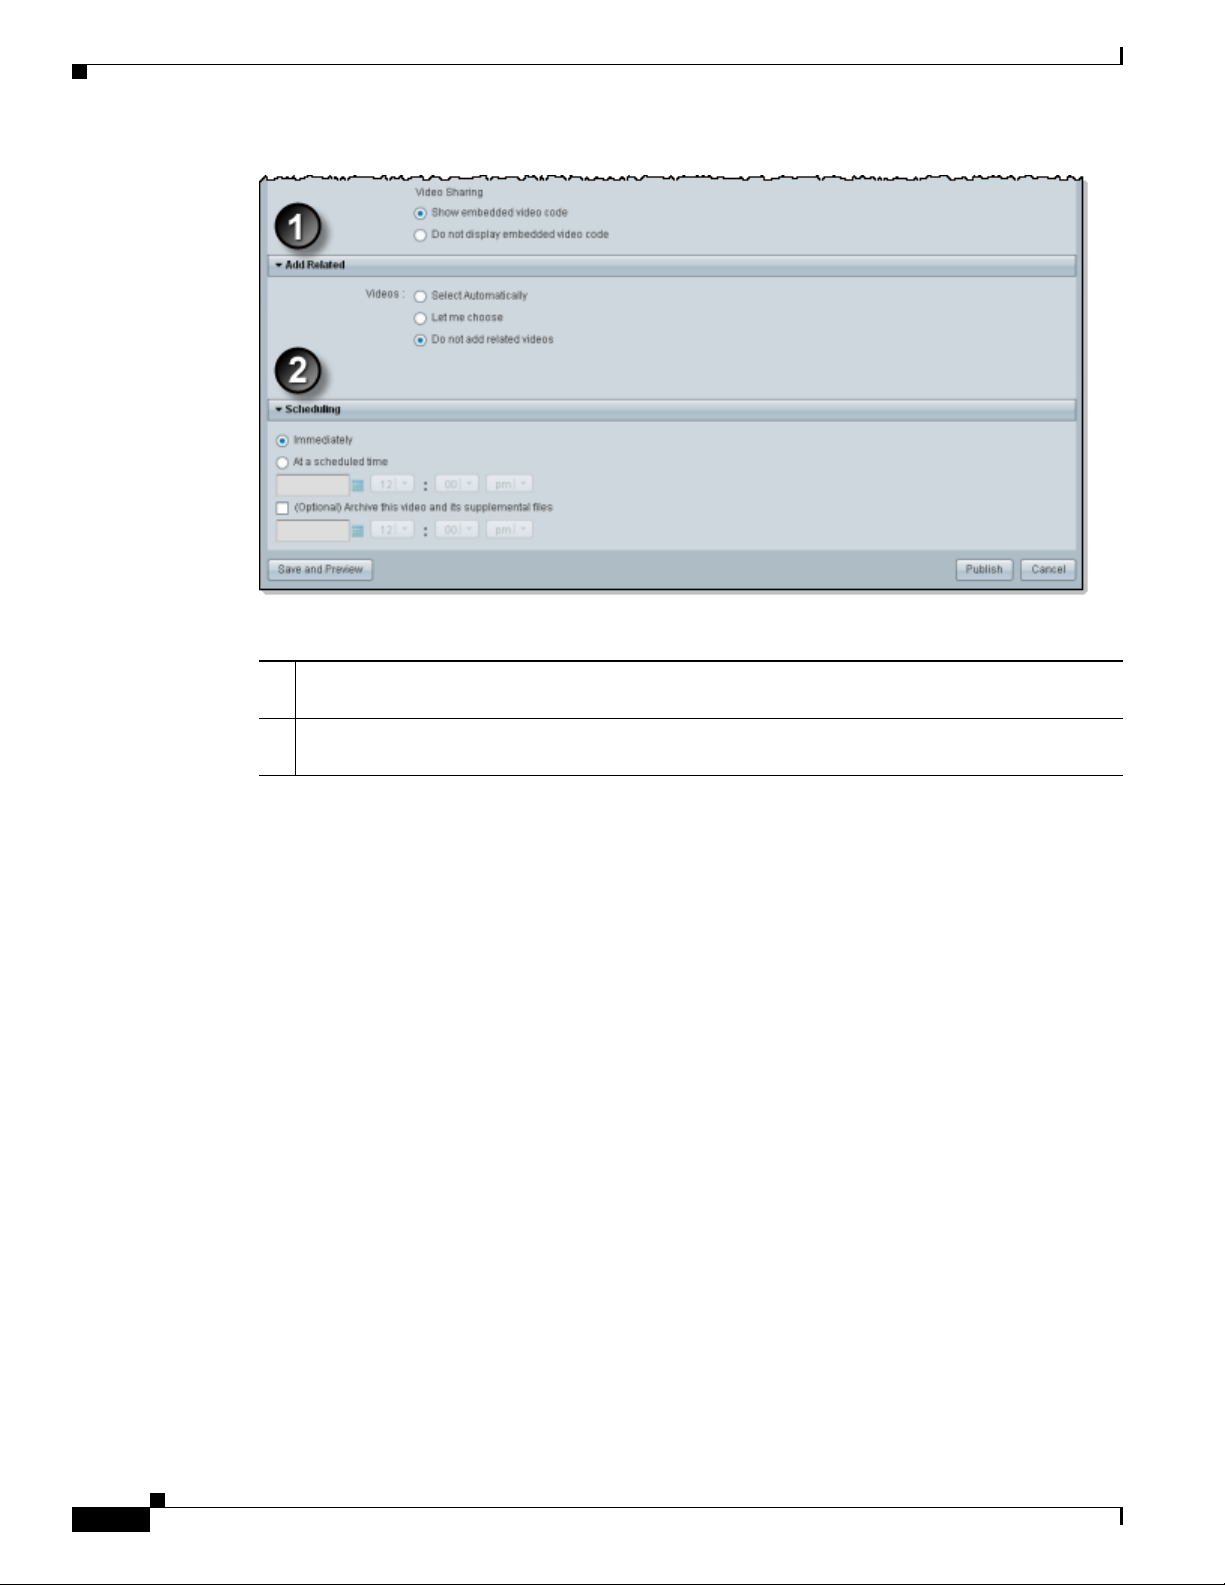
Cisco Show and Share Interface
Chapter 2 Quick Start
1 Add Related. You can manually specify related videos or have the system automatically select
them based on tags and categories assigned to the videos.
2 Scheduling.You can schedule when you want the video to appear in Cisco Show and Share and
when you want it removed from public viewing.:
For more information about publishing videos, see Publish Your Video, page 6-1.
2-8
User Guide for Cisco Show and Share 5.3.x
Page 27
Chapter 2 Quick Start
Basic Navigation
This section contains the following topics:
• Screen Elements, page 2-9
• Keyboard Navigation, page 2-14
Screen Elements
The Header
In Cisco Show and Share, the horizontal area at the top of each page is called the header.
Figure 2-1 Header
Basic Navigation
Global Navigation
Tip You cannot sign in until you have a Cisco Show and Share user account. However, some basic features
The header is useful in several ways.
• Global Navigation, page 2-9
• Basic Search, page 2-10
• Primary Tab Bar, page 2-10
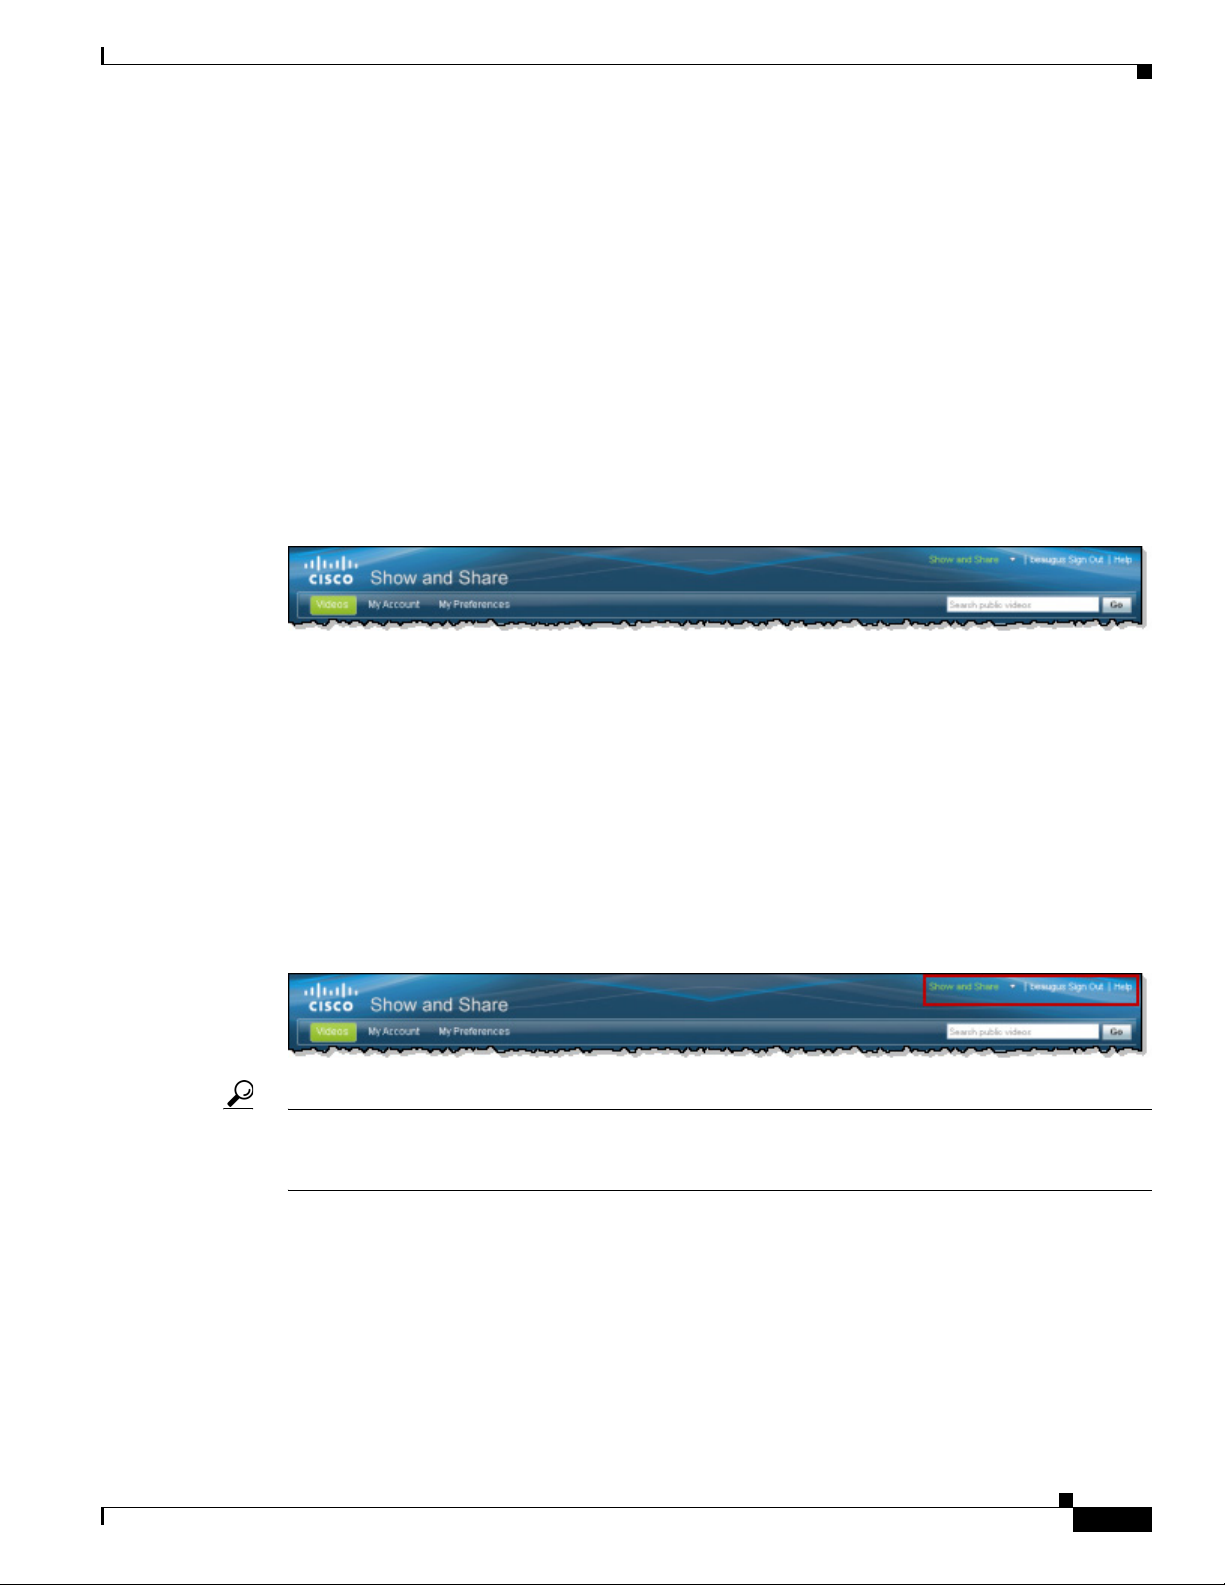
The headers’s top right corner includes a row of links that you can click. These global navigation links
help you to sign in or sign out, for example.
Figure 2-2 Global Navigation Links
might be available even before you sign in. To request a user account, contact the administrator for your
Cisco Show and Share site.
Global navigation links behave differently in various situations.
• When you have not yet signed in to your user account, a link invites you to sign in. But while you
are signed in, that link changes so that you can sign out when you are finished.
• We show a triangle in the global navigation when you can use a link like a menu and choose among
applications. The menu expands when you click this triangle. Choose an option in the menu to
switch between applications. (We might then ask you to sign in.) You can use only the applications
that you are authorized to use. After you open an application, its name replaces the name of
whichever application you closed.
User Guide for Cisco Show and Share 5.3.x
2-9
Page 28

Basic Navigation
Basic Search
Chapter 2 Quick Start
Figure 2-3 Global Navigation Menu
Tip To learn about Cisco Show and Share Administration features, see User Guide for Cisco
Show and Share Administration 5.2.x on Cisco.com.
The header also includes a basic search function. Enter a word or phrase in the field, and then click Go.
Figure 2-4 Basic Search
Primary Tab Bar
A row of tabs loads under the Show and Share name. We call this the primary tab bar. Click a tab to
move between the major areas in Cisco Show and Share that you are authorized to use.
Until you sign in to your Cisco Show and Share account, some features are hidden from you. These
include the My Show and Share tab and everything on it.
Figure 2-5 Primary Tab Bar
2-10
User Guide for Cisco Show and Share 5.3.x
Page 29
Chapter 2 Quick Start
Drawers
Basic Navigation
A drawer contains objects and controls that work together in a special way. You can open a drawer or
close it at any time, for any reason. While a drawer is closed, you cannot see or work with anything inside
it. Later, you might open it again to use it.
Figure 2-6 Toggles to Open or Close a Drawer
Figure 2-7 Closed Drawers
Figure 2-8 Closed and Opened Drawers
User Guide for Cisco Show and Share 5.3.x
2-11
Page 30
Basic Navigation
Secondary Tab Bar
Chapter 2 Quick Start
Any drawer might contain tabs that affect only what you see inside that drawer. We call this a secondary
tab bar. You must open a drawer before you can use its tabs.
Figure 2-9 Secondary Tab Bar
Note Unless you are a live event manager and the software feature license is installed that activates live event
support in Cisco Show and Share, you do not see the My Live Events tab.
2-12
User Guide for Cisco Show and Share 5.3.x
Page 31

Chapter 2 Quick Start
Sidebars
Basic Navigation
Some pages in Cisco Show and Share include a narrow column on the right or left side. This is called a
sidebar. The elements in a sidebar help you to jump quickly to another area.
Figure 2-10 Sidebar Examples
Example:
Sidebar on left.
Example:
Sidebar on right.
User Guide for Cisco Show and Share 5.3.x
2-13
Page 32

Basic Navigation
Keyboard Navigation
The following pages support keyboard navigation:
• Login
• Home
• My Account
• Upload Video
• Record a Video
• Publish Video
• Video Playback
• Search Results
The following areas do not support keyboard navigation:
• Create Live Event
• Video Editor
• Administration
Chapter 2 Quick Start
• Category chooser and Group chooser (available from the Publish Video page)
See the following sections for more information about using keyboard navigation:
• General Keyboard Navigation, page 2-14
• Navigate the Featured Videos, page 2-15
• Navigate the Public Videos, page 2-15
• Control Video Playback, page 2-16
General Keyboard Navigation
Table 2- 1 describes the general navigation features available on pages where keyboard navigation is
supported.
Table 2-1 General Navigation
Key Function
Tab Move to the next field. The field can be a link, button, text field, checkbox,
Shift-Tab Move to the next field. The field can be a link, button, text field, checkbox,
Spacebar Activate the highlighted link, open or close the selected drawer, select a checkbox,
Right-Arrow/
Left-Arrow
ALT-DownArrow
Esc. Close a drop down list.
Up/Down
Arrows
drop-down list, drawer, area, or set of options. Selected fields are outlined.
drop-down list, drawer, area, or set of options. Selected fields are outlined.
select the highlighted tab, or select the highlighted item in a list.
Select an option in a highlighted set of options. Highlight a specific tab in a group of
tabs.
Open a drop down list.
Highlight an item in a list.
2-14
User Guide for Cisco Show and Share 5.3.x
Page 33

Chapter 2 Quick Start
Navigate the Featured Videos
Step 1 Press TAB until the featured videos are highlighted.
Step 2 Use the Left and Right arrow keys to select a featured video.
Step 3 Press the Spacebar to launch the video.
Basic Navigation
Navigate the Public Videos
Step 1 Press TAB until the first public video in the list is highlighted.
Step 2 To navigate the list:
• Continue to press TAB to highlight the next video in line.
• Press TAB after the last video to highlight the page controls at the bottom of the list. Use the Up and
Step 3 Press the Spacebar on a highlighted video to launch the video.
Down arrow keys on the Jump to Page control to change pages or use the Spacebar on the page
forward/back buttons and the page numbers to change pages.
User Guide for Cisco Show and Share 5.3.x
2-15
Page 34

Basic Navigation
Control Video Playback
Step 1 Press TAB to highlight the video.
Step 2 Use the following to control video playback while the video itself is highlighted:
Table 2-2 General Navigation
Key Function
Spacebar Play/pause the video.
Right Arrow Move forward.
Left Arrow Move backward
Shift+Right
Move to next chapter.
Arrow
Shift+Left
Move to previous chapter.
Arrow
Up Arrow Volume Up
Down Arrow Volume Down
Chapter 2 Quick Start
Step 3 Press TAB again to move the focus to the player controls. Use TAB to move through the controls and
Spacebar to activate the control.
2-16
User Guide for Cisco Show and Share 5.3.x
Page 35

CHA P T ER
3
Browse and Search Videos
Revised: February 4, 2013
This section describes ways that you can browse through or search for public videos from the home page.
It contains the following topics:
• Browse the Featured Videos, page 3-2
• Browse The Public Videos, page 3-3
• Navigate Your Filtered Results, page 3-8
• Play a Video, page 3-8
• Search for Videos, page 3-9
• Subscribe to an RSS Feed, page 3-13
User Guide for Cisco Show and Share 5.3.x
3-1
Page 36

Browse the Featured Videos
Browse the Featured Videos
Featured videos appear at the top of the home page. Videos are designated as “featured” by the Cisco
Show and Share administrators. Refer to your organization’s policies and procedures for information
about how videos are determined to be featured videos.
Procedure
Step 1 If not on the home page, click Videos on the primary tab bar.
If featured videos exist, you will see their thumbnails at the top of the page.
Chapter 3 Browse and Search Videos
3-2
Step 2 Click the left and right arrows to browse through featured videos, as needed.
Step 3 (Optional) Click a video to open its video player.
User Guide for Cisco Show and Share 5.3.x
Page 37

Chapter 3 Browse and Search Videos
Browse The Public Videos
When you first access the Cisco Show and Share home page, the Public Videos list displays the newest
videos at the top of the list. You can change the list view and sort and filter the list to make finding videos
easier.
• Change the Public Videos List View, page 3-3
• Sort the Public Videos, page 3-4
• Filter the Public Videos, page 3-5
Change the Public Videos List View
The list view buttons appear above the video list. The list view only remains for the session you are
currently in. If you sign out or exit, the view reverts to the default list view.
Browse The Public Videos
Click a button to change the list view. Ta b le 3-1 describes the views.
Table 3-1 List Views
Button View
(List View)
(Grid View)
(Table View)
User Guide for Cisco Show and Share 5.3.x
3-3
Page 38

Browse The Public Videos
Sort the Public Videos
You can sort the public video list by newness, most views, ratings, or number of comments.
Chapter 3 Browse and Search Videos
To sort the list, click one of the following options in the Sort By list:
• Newest—The most recently added videos appear at the top of the list. This is the default sort order
of the list.
• Most viewed—The videos are sorted in descending order by the number of views.
• Highest rated—The videos are sorted in descending order by rating.
• Most comments—The videos are sorted in descending order by the number of comments. Both
general and timeline comments count towards the comment total for a video.
Under certain circumstances, the sort by most viewed list may appear to be out of order. Videos with
fewer views can appear higher in the list than a video with more views. This happens when a video author
creates a draft of a public video (for example, to edit some of the video information). Views of the draft
video count towards the overall video views, but are not reflected in the number of views shown in the
Views count of the public video. This situation is corrected when the video author re-publishes the draft
video.
3-4
User Guide for Cisco Show and Share 5.3.x
Page 39

Chapter 3 Browse and Search Videos
Filter the Public Videos
There are several methods for filtering the Public Videos list. You can use any combination of the
following methods to filter the video list. You can also combine these filters with the changed view and
sorting to help you quickly find the videos you are looking for.
• Filter by Category, page 3-5
• Filter by Tag, page 3-6
• Filter by Date, page 3-7
• Filter by Keyword, page 3-8
Filter by Category
You can filter the Public Videos list to show only those videos belonging to a selected category.
Step 1 Click a category in the Categories area.
The Home page displays the filtered list of public videos.
Browse The Public Videos
If you have nested categories, click the triangle next to the category name to reveal the sub-categories,
and then click one of the sub-categories.
Step 2 To remove the category filter, click Categories.
User Guide for Cisco Show and Share 5.3.x
3-5
Page 40

Browse The Public Videos
Filter by Tag
Step 1 Click a category in the Common Tags area.
Chapter 3 Browse and Search Videos
You can filter the Public Videos list to show only those videos that have the selected tag.
The Public Videos list displays only those videos with the selected tag.
Step 2 To remove the tag filter, click the X to the right of the selected tag.
3-6
User Guide for Cisco Show and Share 5.3.x
Page 41

Chapter 3 Browse and Search Videos
Filter by Date
You can filter the list to show only those videos that were published within the last day, week, month, or
90 days.
Step 1 Choose a time frame from the Within list.
Browse The Public Videos
The Public Videos list shows only those videos that were published within the selected time frame.
Step 2 To remove the date filter, choose Any time form the Within list.
User Guide for Cisco Show and Share 5.3.x
3-7
Page 42

Navigate Your Filtered Results
Filter by Keyword
Step 1 Enter the word or phrase in the Filter videos field and click Go.
Chapter 3 Browse and Search Videos
You can filter the list to show only those videos that match a word or phrase of your choosing. Video
titles, descriptions, tags, and user information are included in searches. If the Pulse keyword and speaker
identification feature is enabled, speaker names and keywords are also part of the filter.
Step 2 To remove the keyword filtering, clear the Filter videos field and click Go.
Navigate Your Filtered Results
Pagination controls include the buttons and fields clustered under a table, by which you:
• Set how many rows a table should show per page before it starts to span multiple pages.
• Move from one page to another in a table that spans multiple pages.
• Cause the table to show refreshed data.
Play a Video
After you have found the video you were looking for, click the video title or thumbnail to play the video.
For more information about playing and interacting with videos, see Play, Comment, Tag, and Share
Videos, page 4-1.
3-8
User Guide for Cisco Show and Share 5.3.x
Page 43

Chapter 3 Browse and Search Videos
Search for Videos
The following applies to basic and advanced searches:
• Search ignores common words, such as “the” (or the equivalent in the system base language).
• Search ignores special characters, such as punctuation. If you have titles with a special character
(non-alphanumeric character), such as an ampersand (&), and you perform a search for that
character, you will not receive any search results because the special character is ignored.
• If you search for more than one term, it treats the search as an “and” and does not split the terms
across fields that are being searched. For example, if you have a video submitted by a user with the
user ID of “user1” and tagged with the tag “tag”, searching for “user1 tag” may not produce the
video in the results. This is because the search looks for both user1 and tag in the tags field and user1
and tag in the user ID field. However, you can filter the display on the home page with the desired
tag and then search for the user ID.
This section contains the following topics:
• Basic Search, page 3-10
• Advanced Search, page 3-11
Search for Videos
User Guide for Cisco Show and Share 5.3.x
3-9
Page 44

Search for Videos
Basic Search
Step 1 Enter a search term and then click Go.
Chapter 3 Browse and Search Videos
Procedure
The Search Results page appears.
3-10
Step 2 You can further refine the search by filtering the results by tag, author, or date published. Clicking one
or more of the filter entries in the Filter Results by area.
User Guide for Cisco Show and Share 5.3.x
Page 45

Chapter 3 Browse and Search Videos
Advanced Search
Step 1 Click Go. You do not need to enter a search term.
The Search Results page appears.
Step 2 Click Advanced Search.
The Advanced Search form opens.
Search for Videos
Step 3 Enter search terms in the search term fields. You can enter terms in more than one field. If you do, they
are treated as if joined by “and”. For example, you can search for an exact phrase and at least one of
another list of words:
• All of these words—all of the words must appear in the title, the description, the tags, or the author
information. The order that they appear in is unimportant.
• This exact phrase—all of the words must appear in the title, the description, the tags, or the author
information. Additionally, they must appear in the exact order.
• At least one of these words—at least one of the words in the list must appear in the video title, the
description, the tags, or the author information. The words in the list must be separated by a space.
• Without these words—exclude videos that contain the specified words in the video title, the
description, the tags, or the author information. Separate the words with a space. The order that they
appear in is unimportant.
User Guide for Cisco Show and Share 5.3.x
3-11
Page 46

Search for Videos
Step 4 (Optional) Specify a category the video must be in:
Step 5 (Optional) Narrow down the fields searched by selecting one of the following options in the That occur
Chapter 3 Browse and Search Videos
a. Click Specific category.
A list of categories appears.
b. Select a category from the list.
field:
• Anywhere—search video titles, descriptions, and tags.
• Page title only—confine the search to the video titles only.
• Description only—confine the search to the video descriptions.
• Tags only—confine the search to the video tags.
Step 6 (Optional) Enter a user name in the Published by field to restrict the results to videos published by a
specific author.
Step 7 (Optional) Restrict the search to videos published in a specific date range:
a. Click Between in the Date Published field
Date entry fields appear.
b. Type a date or select one from the date chooser. Leave a date field blank to indicate that there should
not be a start or a finish date.
Step 8 (Optional) Restrict the search to videos with a specific rating or better by choosing a rating from the
Rated list.
Step 9 Click Search.
The Search Results page appears.
3-12
User Guide for Cisco Show and Share 5.3.x
Page 47

Chapter 3 Browse and Search Videos
Subscribe to an RSS Feed
Step 10 You can further refine the search by filtering the results by tag, author, or date published. Clicking one
or more of the filter entries in the Filter Results by area.
Search Tip
Save your search by bookmarking the URL in the Search Results page. You can then repeat your search
or share your searches with others.
Subscribe to an RSS Feed
Click Subscribe to specify the video content that you want delivered directly. Videos appear in your RSS
reader if you have permission to access them. Table 3 - 2 describes each RSS Feed type.
Table 3-2 RSS Feed Descriptions
RSS Feed Description
Home page: Public Videos Subscribes to all published videos.
Home page: Public Videos > Filter by Category Subscribes to all videos in a specific category.
My Account page: Videos Subscribes to all published videos.
Video Playback page: Author Subscribes to all videos by a specific author.
User Guide for Cisco Show and Share 5.3.x
3-13
Page 48

Subscribe to an RSS Feed
Chapter 3 Browse and Search Videos
3-14
User Guide for Cisco Show and Share 5.3.x
Page 49

CHA P T ER
4
Play, Comment, Tag, and Share Videos
Revised: September 2013
No matter where you are in the Cisco Show and Share interface, whenever you click on a video
thumbnail or title, you are taken to the Video Playback page. The video playback page does more than
just let you watch videos, it lets you interact with them by leaving comments, rating them, reading
transcripts, watching synchronized slides, and downloading supplemental files. If your installation also
has a Cisco MXE integrated with it and the Pulse feature set enabled, you can also browse the speakers
and keywords within the video.
Topics in this section describe how to play and respond to videos.
• Concepts, page 4-1
• Procedures, page 4-6
• Troubleshooting, page 4-26
Concepts
To learn more about the video playback page, see the following topics:
• The Video Playback Page, page 4-2
• The Video Player, page 4-3
• The Video Information Tabs, page 4-5
About Video Playback
Videos are played back using one of two methods: streaming or progressive download.
With streaming playback, the video starts to play immediately after accessing the page. You can use the
timeline and play head to jump to any point in the video.
With progressive download, the video begins playing after a portion of the video has been downloaded.
You might experience a slight delay before the video begins. The video continues to download as you
are watching it. You can skip to any point in the video up to the point where it has downloaded. Once
the video has fully downloaded, you can move forward and backwards to any point.
User Guide for Cisco Show and Share 5.3.x
4-1
Page 50

Concepts
The Video Playback Page
Any time you click a video, the Video Playback page appears. When the page loads, the video begins to
play automatically.
Chapter 4 Play, Comment, Tag, and Share Videos
4-2
1 Video title and detail information. 2 Video player. See The Video Player, page 4-3.
3 Video information tabs. The tabs shown
depend upon the features used by the video.
See The Video Information Tabs, page 4-5.
5 Author information. You can send the author
an e-mail message, subscribe to an RSS feed
of the author’s videos, or see more videos
from the author.
User Guide for Cisco Show and Share 5.3.x
4 Comment area. General comments about the
video are shown on the Commentary tab.
Comments from the timeline are shown on the
Timeline Comments tab. See Comment on
Videos, page 4-8.
6 Videos related to the current video. The
author can choose specific related videos or
let the system pick the videos (based on them
having tags and categories in common).
Page 51

Chapter 4 Play, Comment, Tag, and Share Videos
The Video Player
Concepts
1 The video area.
2 The timeline and play head.
3 The player controls. See Table 4 - 1 for information about the controls.
User Guide for Cisco Show and Share 5.3.x
4-3
Page 52

Concepts
Chapter 4 Play, Comment, Tag, and Share Videos
Table 4-1 Cisco Show and Share 5.2.3 Video Player Controls
Control Name Details
Pause / Play When the Video Player page first loads, the video plays
automatically. Click the pause button to pause the playback.
The button becomes a play button when the video is paused.
Progress
Indicator
Favorites
button
Timeline
Shows you how far into the video you are and how much
time is left until you reach the end of the video.
Adds the video to your Favorites tab on the My Account
page.
Inserts a timeline comment at the current point in the video.
comment
button
Closed
Captioning
Button
Vo l u m e
control
Displays or hides closed captions. This option is only
available for .wmv files that contained embedded closed
captions when uploaded.
Controls the volume. Click the speaker icon to mute and
unmute the video. Slide the slider left and right to lower or
raise the volume.
Share button Click this button to share the video. You can share the video
by e-mail, copy a link to the video, or copy code to embed
the video in a web page. See Share Videos, page 4-11, for
more information about sharing videos.
Resolution
Selector
Click this button to select a different playback resolution.
This option is only available if your system has a Cisco MXE
integrated with it.
4-4
Fullscreen
playback
button
User Guide for Cisco Show and Share 5.3.x
Click this button to enter full screen playback mode.
Page 53

Chapter 4 Play, Comment, Tag, and Share Videos
The Video Information Tabs
The video information tabs contain additional information about the video. Tabs only appear for the
features that are associated with the video. For example, if a video has a transcript, the Transcript tab
appears. If it does not have a transcript, the Transcript tab is hidden.
Table 4-2 Video Information Tabs
Tab Label Description
Info Shows a description of the video and any tags associated with the video. This tab
is available for all videos and is the default tab unless slides have been
synchronized to the video.
Pulse Displays the Pulse keyword and speaker identification features.
If there is Pulse feature information available for a video, this tab is the active
tab when the page loads.
If there is no Pulse feature information for the video, this tab is hidden.
Chapters Shows any chapter markers that the publisher inserted into this video. Click a
chapter marker to jump to its position in the video timeline and start playback at
that moment.
Slides Shows any presentation slides that the publisher synchronized with this video.
The slide deck advances automatically. Click a slide to jump to its position in
the video timeline and start playback at that moment.
If slides are not synchronized with the video, this tab is hidden.
Transcript Shows any transcript text that the publisher attached to this video. You must
scroll the transcript manually. It is not synchronized with video playback.
This tab does not appear if the author has not uploaded a transcript with the
video.
Files Shows any downloadable files that the publisher attached to this video. Click a
file to start downloading it.
Concepts
YY
Y
Y
YY
Y
YY
VoD
Live
N
N
N
If there aren’t any files attached to the video, this tab is hidden.
Below the video player are two additional tabs:
Tab Label Description
VoD
Live
Comments Shows any general comments for the video, if commenting is enabled. Y N
Timeline
Comments
Shows any timeline comments, if they are enabled. Each such comment is
marked on the video timeline. Click one of these marks to read the comment,
Y
N
jump to its position in the video timeline, and start playback at that moment.
Note Live events have tabs for asking questions of the speaker and responding to polls instead of the
comments tabs.
User Guide for Cisco Show and Share 5.3.x
4-5
Page 54

Procedures
Procedures
Chapter 4 Play, Comment, Tag, and Share Videos
• Pause and Play Videos, page 4-6
• Play Videos Full Screen, page 4-7
• Add a Video to Your Favorites List, page 4-7
• Change the Video Resolution, page 4-8
• Comment on Videos, page 4-8
• Add Tags to Videos, page 4-10
• Rate Videos, page 4-11
• Share Videos, page 4-11
• Play Embedded Videos, page 4-16
• View Pulse Information, page 4-17
• Jump to a Chapter, page 4-23
• Watch Slides, page 4-23
• Read a Transcript, page 4-24
• Download Files, page 4-25
Pause and Play Videos
When you first access a video, it begins to play by default. You can pause and restart the video at any
time.
Procedure
Step 1 Click the pause button to pause the video.
Step 2 To resume playback, click the play button.
Step 3 To skip to a specific point in the video, drag the play head to the point in the timeline.
Note See Control Video Playback, page 2-16, for information about using the keyboard controls for the video
player.
4-6
User Guide for Cisco Show and Share 5.3.x
Page 55

Chapter 4 Play, Comment, Tag, and Share Videos
Play Videos Full Screen
Procedure
Step 1 On the video playback screen, click the Fullscreen button ( ).
The video opens in full screen mode. The following controls appear below the video:
Table 4-3 Full Screen Player Controls
Element Name Details
Procedures
Timeline Shows you where you are in the video. You can drag the
marker to move to another point in the video. Your location
in the video is preserved when you exit full screen mode.
Vol um e Adjust the volume without leaving full screen mode. Click
the speaker icon to quickly mute and unmute the audio.
Pause/Play Click to pause the video. Click the button again to resume.
The video remains playing or paused when you switch
between standard and full screen playback.
Resolution Selector Click this button to select a different playback resolution.
Exit Fullscreen Click to exit full screen mode. You can also press the ESC
Step 2 To exit full screen playback, press the ESC key or click the Exit Fullscreen ( ) button.
Add a Video to Your Favorites List
You can add a video to your Favorites list. Your Favorites list appears as a tab in the Videos drawer on
the My Account page. You must be logged in to add a video to your Favorites list.
Procedure
Step 1 On the video playback screen, click the Favorites button.
The video now appears in your My Favorites list on the My Account page.
Step 2 To view your favorite videos, go to My Account > Videos > Favorites.
This option is only available if your system has a Cisco
MXE integrated with it.
key to exit full screen mode.
User Guide for Cisco Show and Share 5.3.x
4-7
Page 56

Procedures
Change the Video Resolution
You can change the resolution of the video while viewing it. This option is only available if your Cisco
Show and Share uses a Cisco MXE to transcode the uploaded videos and your system administrator has
enabled multiple resolutions.
You may want to select lower resolutions when playing videos back on slower network connections or
if the playback pauses often.
The following resolutions may be available: 360p, 480p, and 720p. Depending on the resolution of the
original video, and the system setting, not all resolutions may be available.
Procedure
Step 1 On the video player, click the resolution selector button. This button displays the current resolution of
the video.
Step 2 Select the resolution you want to view.
Chapter 4 Play, Comment, Tag, and Share Videos
Comment on Videos
You can comment on videos in two different ways:
• General comments that apply to the whole video. These comments appear below the video on the
video playback page. See Adding a General Comment, page 4-8.
• Timeline comment that apply to a specific point in the video. These comments appear in the
Timeline Comments tab below the video. Additionally, vertical bar in the video timeline indicates
where timeline comments have been entered. See Adding a Timeline Comment, page 4-9.
Both types of comments count towards the total number of comments for a video.
Commenting on videos may not be available if the system administrator has turned off this feature at the
system level or if the person who uploaded the video turned off the feature for the video.
If you re-publish a video with comments, you are given the option to retain the comments when the video
is republished.
You can also flag comments as inappropriate. See Flag a Comment as Inappropriate, page 4-9.
Adding a General Comment
Step 1 Click in the comment box in the Commentary tab below the video. If comments have been added by
other users, the comment box appears above the existing comments.
Step 2 Type your comment.
Step 3 Click Add Comment.
4-8
Your comment appears at the top of the list. If you are logged-in to Cisco Show and Share, your user
name, along with the date and time the comment was entered, appears above your comment. If you are
not logged in, ANONYMOUS_USER appears as the user name.
User Guide for Cisco Show and Share 5.3.x
Page 57

Chapter 4 Play, Comment, Tag, and Share Videos
Adding a Timeline Comment
Step 1 Play the video.
Step 2 When the video gets to a point where you want to add a timeline comment, click the Add Timeline
Comment button ( ).
Note Timeline comments are not supported with videos in Windows media format. The Add Timeline
Comment button does not appear in the playback screen for videos in Windows media format.
The video pauses and the Timeline Comment box appears.
Step 3 Type your comment and click OK.
Your timeline comment appears in the Timeline Comment tab.
Flag a Comment as Inappropriate
Procedures
Step 1 Click the Commentary or Timeline Comments tab.
Step 2 Click Report Abuse next to the inappropriate comment.
The system administrators are notified that the comment has been flagged.
User Guide for Cisco Show and Share 5.3.x
4-9
Page 58

Procedures
Add Tags to Videos
You can add tags to your own or to other people’s videos from the Video Playback page. You cannot add
tags to live events. This option may not be available if the system administrator has turned off this feature
at the system level or if the person who uploaded the video turned off the feature for the video.
Procedure
Step 1 On the video playback screen, click the Info tab to open it.
The video tags appear at the bottom of the tab.
Chapter 4 Play, Comment, Tag, and Share Videos
4-10
Step 2 Click in the Add additional tags box.
Step 3 Type in your tags. Each tag is separated by a space. If you have tags that contain more than one word,
combine the words with a character such as an underscore (_) or a dash (-). For example,
show_and_share.
Step 4 Click Submit.
User Guide for Cisco Show and Share 5.3.x
Page 59

Chapter 4 Play, Comment, Tag, and Share Videos
Rate Videos
You can rate your own and other people’s videos. Ratings range from a low of zero stars to a high of
five stars.
Because ratings increment by one-half of a star at a time, there are 10 possible ratings that you might
give. The average all of the submitted ratings for a video appears to everyone.
Note This option may not be available if the system administrator has turned off this feature at the system level
or if the person who uploaded the video turned off the feature for the video.
Step 1 Navigate to the Video Player page.
The ratings appear above the video. You will see an Overall rating, which is the average of all the ratings
given to the video, and your own rating.
Procedures
Step 2 Click the stars below the video. You can click in half-star increments.
Step 3 To change your rating after clicking on a star, you need to leave and return to the player page for the
Share Videos
video.
You can share videos by sending a link in e-mail, copying the video link, or copying the embed code to
use in web pages. See the following topics for more information:
• Copy the Video Link, page 4-12
• Embed the Video in a Web Page, page 4-13
• Embed the Extended Video Player in a Web Page, page 4-14
• Send the Video Link in E-Mail, page 4-16
User Guide for Cisco Show and Share 5.3.x
4-11
Page 60

Procedures
Copy the Video Link
You can copy the video URL to share in documents, web pages, or chat sessions.
Procedure
Step 1 On the video playback screen, click the Share button below the video.
Step 2 Click Copy Link.
A dialog box displays the URL.
Chapter 4 Play, Comment, Tag, and Share Videos
4-12
Step 3 Highlight and copy the URL.
User Guide for Cisco Show and Share 5.3.x
Page 61

Chapter 4 Play, Comment, Tag, and Share Videos
Embed the Video in a Web Page
You can embed your video in a web page or other type of document that accepts HTML code, such as a
blog, a wiki, or a simple HTML page.
There are two types of embed code available: Javascript and Flash. The Flash embed code is only
available for videos in one of the Flash formats. For videos in a Windows format, only the Javascript
code is available.
Use the Javascript embed code unless the page you are embedding the video into does not support
Javascript. Some blogging and wiki products do not allow Javascript to run on their pages. Using the
Javascript embed code allows you to track video views for videos embedded in HTML pages. See About
the Video View Report, page 9-3, for more information about tracking video views.
The Flash embed code does not allow you to track video views. Use the Flash embed code if the page
you are embedding the video into does not support Javascript or if tracking the number of video view is
not important.
Procedure
Step 1 On the video playback screen, click the Share button below the video.
Step 2 Click Copy Embed Code.
A dialog box opens with HTML code in it. By default, the Javascript embed code is automatically copied
to the clipboard.
Procedures
Step 3 To use the Flash embed code instead, click Flash.
The Flash embed code is automatically copied to the clipboard.
Step 4 Click OK to close the dialog box.
Step 5 Paste the code in the source of your web document where you want the video to appear.
If you are using a WYSIWYG HTML editor, you must switch to the HTML source view before pasting
the code.
To modify the embed code, see: Modifying the Embed Code, page 4-14.
User Guide for Cisco Show and Share 5.3.x
4-13
Page 62

Procedures
Modifying the Embed Code
You can modify the size of the embedded video and whether or not the video automatically plays when
the web page loads. When planning your web page, note that the player controls add another 50 pixels
to the height of your video.
Javascript Embed Code
To modify the width of the embedded video, change the value “480” in the embed code, shown in the
example below. The height of the video is automatically adjusted to maintain the aspect ratio.
<script type="text/javascript"
src="https://video.example.com/vportal/scripts/videoplayer/DmsEmbedLib.js"></script><scrip
t>document.write(dmsEmbed.getSimplePlayer("C-ccc14127-f1a7-4b58-b967-5efc307d568d:4","http
s://video.example.com/vportal/VideoPlayer.jsp?ccsid=C-ccc14127-f1a7-4b58-b967-5efc307d568d
:4#","false",480));</script>
To control the automatic playback of the video when the web page loads, change the value “false”
(shown in bold text, below) to one of the following values:
• “false”—The video is paused when the page loads.
• “true”—The video plays automatically when the page loads.
<script type="text/javascript"
src="https://video.example.com/vportal/scripts/videoplayer/DmsEmbedLib.js"></script><scrip
t>document.write(dmsEmbed.getSimplePlayer("C-ccc14127-f1a7-4b58-b967-5efc307d568d:4","http
s://video.example.com/vportal/VideoPlayer.jsp?ccsid=C-ccc14127-f1a7-4b58-b967-5efc307d568d
:4#","false",480));</script>
Chapter 4 Play, Comment, Tag, and Share Videos
Flash Embed Code
To modify the width of the embedded video, change the value "480" in the embed code, shown in the
example below. To maintain aspect ratio, add a value for height. Ensure that the height and width values
match in object classid and embed src.
<object
classid="clsid:D27CDB6E-AE6D-11cf-96B8-444553540000"id="Embed-1.0-SNAPSHOTC-7f126f39-1a384f4f-8a7c-b2542098a979:2" width="480px" height="320px">
<embed src="https://video.example.com/vportal/swf/Embed-1.0-SNAPSHOT.swf" quality="high"
bgcolor="#FFFFFF" width="480px" height="320px"
id="Embed-1.0-SNAPSHOTC-7f126f39-1a38-4f4f-8a7c-b2542098a979:2"
name="Embed-1.0-SNAPSHOTC-7f126f39-1a38-4f4f-8a7c-b2542098a979:2" align="middle"
play="true" loop="false"
flashVars="baseurl=https://video.example.com/vportal/VideoPlayer.jsp?ccsid=C-7f126f39-1a38
-4f4f-8a7c-b2542098a979:2#&play=false&embedurl= quality="high" allowfullscreen="true"
wmode="transparent" allowScriptAccess="always" type="application/x-shockwave-flash"
pluginspage="http://www.adobe.com/go/getflashplayer" /></object>
You can disable full screen view by changing “true” to “false” in the following line of the Flash embed
code:
<param name="allowFullScreen" value="true" />
Embed the Extended Video Player in a Web Page
4-14
Beginning in Show and Share Release 5.3.12 you can create an extended embedded video player that
allows users to view Pulse keywords, video titles, and timeline comments when viewing the video. By
using the extended player, users can navigate directly to specific words, comments, or speakers.
User Guide for Cisco Show and Share 5.3.x
Page 63

Chapter 4 Play, Comment, Tag, and Share Videos
Guidelines and Limitations
• To enable the extended video player, the video publisher must select Share Embed Code when
publishing the video. This will enable the Share button when the published video is viewed, and
allow editing of the embed code.
• Any viewer of the published video can edit the embed code to enable the extended video player.
• Any action that refreshes the video such as resolution change or maximize to minimize, will revert
the extended video player to the simple video player.
• These features are not available:
–
Info tab > Add Tag option
–
Add to favorites
• We do not recommend clicking or using the Settings button.
• The edited HTML file should be hosted on a Web server.
Procedure
Step 1 On the video playback screen, click the Share button below the video.
Procedures
Step 2 Click Copy Embed Code.
A dialog box opens with the HTML code. By default, the Javascript embed code is automatically copied
to the clipboard.
Step 3 Click OK to close the dialog box.
Step 4 Paste the Javascript embedded code in a text editor.
Step 5 Remove the content of the <div> tag.
Step 6 Remove the tags named <div> and </div>
Step 7 Replace the getSimplePlayer text with getExtendedPlayer.
Step 8 Save the file as an HTML file and deploy the file on a web server. Or, copy and paste the code in the
source of your web document where you want the video to appear.
User Guide for Cisco Show and Share 5.3.x
4-15
Page 64

Procedures
Step 9 Access the web server and click the file to load the video.
Send the Video Link in E-Mail
You can quickly send a link to the video in an e-mail message.
Prerequisites
• You must have an e-mail account and an e-mail application configured on your system.
• Your e-mail must support UTF-8 character encoding.
Procedure
Step 1 On the video playback screen, click the Share button below the video.
Step 2 Click Send Email.
An e-mail message opens with a link to the video in the body of the message.
Chapter 4 Play, Comment, Tag, and Share Videos
Step 3 Add your message and send the e-mail.
Play Embedded Videos
When you watch a Cisco Show and Share video that is embedded in a web site, only a few of the player
controls are available to you: play/pause, the timeline, volume, and full screen.
4-16
User Guide for Cisco Show and Share 5.3.x
Page 65

Chapter 4 Play, Comment, Tag, and Share Videos
If you are viewing and embedded video that has restrictions, you will be prompted to log in to watch the
video. Simply enter your Cisco Show and Share login information and click Log In to watch the video.
Embedded videos do not include any information or resources that are available on the tabs of the video
player page. For example, synchronized slides, Pulse keyword and speaker information, chapters,
transcripts, and downloadable files are not available. You also cannot submit general comments or
timeline comments for an embedded video.
Beginning in Show and Share Release 5.3.12, when you embed a video with the extended video player,
some of the original information and resources are available for viewers. See Embed the Extended Video
Player in a Web Page, page 4-14 for more information.
Procedures
See Troubleshooting, page 4-26, for information about issues you may encounter when playing videos
embedded in web pages.
View Pulse Information
The Pulse tab contains speaker and keyword information extracted from your video. You can use this
information to navigate to specific points in the video. Additionally, this information is used when
searching and filtering videos.
This section contains the following topics:
• Guidelines and Limitations, page 4-17
• About Pulse Keyword Identification, page 4-18
• About Pulse Speaker Identification, page 4-19
• Navigate the Video Using the Speakers List, page 4-20
• Navigate the Video Using the Keywords List, page 4-21
• Re-Upload a Published Video, page 4-22
Guidelines and Limitations
• The Pulse keyword and speaker identification features are only available if your system has a Cisco
MXE integrated with it and your system administrator has enabled the Pulse features.
User Guide for Cisco Show and Share 5.3.x
4-17
Page 66

Procedures
• Videos that were uploaded or recorded in previous versions of Cisco Show and Share, or that were
uploaded before the Pulse features were enabled, will not contain the Pulse information. You must
re-upload those videos to obtain the Pulse information. See Re-Upload a Published Video,
page 4-22.
About Pulse Keyword Identification
The Pulse engine can identify specific keywords spoken within videos. It does not identify all words in
a video. Instead, your system administrator provides and maintains a list of keywords on the Cisco MXE.
The Pulse engine scans the video for those keywords and places markers in the video timeline where they
appear. When you select a keyword from the list, all instances of that keyword appear as markers in the
timeline. You can jump to a specific marker or navigate forward and backwards through them.
The black triangle marks in the video timeline, below, mark each instance of the keyword “videos” in
the video.
Chapter 4 Play, Comment, Tag, and Share Videos
Additionally, these keywords are included when filtering video lists or searching for videos with
keywords.
The Pulse keyword identification feature only identifies English keywords. Additionally, the accuracy
of keyword identification depends upon the quality of the recorded audio and whether or not there is a
lot of background noise in the audio track.
4-18
User Guide for Cisco Show and Share 5.3.x
Page 67

Chapter 4 Play, Comment, Tag, and Share Videos
About Pulse Speaker Identification
The Pulse engine can identify different speakers within videos. It does this by identifying unique
voiceprints.
Speaker identification is a learned process. At first, voiceprints are assigned a generic speaker tag, such
as Speaker 1. Authors can then use the Cisco Show and Share editing tools to associate voiceprints with
specific speakers. The speaker names are taken from the Cisco Show and Share registered users list.
Authors cannot assign names outside of the user pool.
Once a voiceprint has been associated with a specific user, subsequent videos uploaded with that
voiceprint automatically show the speaker name.
The colored areas in the video timeline, below, mark each instance of a speaker in the video. This video
has a single speaker—the gray areas between the yellow bars indicate where no one is speaking.
Procedures
The accuracy of the Pulse speaker identification depends upon the quality of the recorded audio and
whether or not there is a lot of background noise in the audio track. Sometimes a single speaker may
show up as named and as a generic speaker in the same video because of background noise or changes
in recording quality. The more times a speaker is identified by a video author, the more accurate the
system becomes.
See Label Unidentified Speakers, page 5-12, for information about how to assign speakers to
unidentified voiceprints.
User Guide for Cisco Show and Share 5.3.x
4-19
Page 68

Procedures
Navigate the Video Using the Speakers List
To navigate the video using the speaker list, do one or more of the following:
Table 4-4 Speaker List Navigation
Do... To do this...
Click a speaker name Display the color code for the selected speaker in the timeline and
Click the forward button next to
a speaker name
Chapter 4 Play, Comment, Tag, and Share Videos
jump to the next instance of that speaker.
Jump to the beginning of the next block of that speaker in the
timeline.
Click the back button next to a
speaker name
Jump to:
• The beginning of the speaker block if the play head is currently
in a block of the selected speaker
.
• The beginning of the previous speaker block if the play head is
currently NOT in a block of the selected speaker.
Double-click the back button
next to a speaker name
Jump to the beginning of the previous speaker block if the timeline is
currently in a block of the selected speaker.
Click All Speakers Display the color codes for all speakers in the timeline.
4-20
User Guide for Cisco Show and Share 5.3.x
Page 69

Chapter 4 Play, Comment, Tag, and Share Videos
Navigate the Video Using the Keywords List
To navigate the video using the keyword list, you must first click a keyword to display the instances of
that work in the timeline. Then you can do one of the following:
Table 4-5 Keyword List Navigation
Do... To do this...
Click the forward button next to
the keyword
Procedures
Jump to the next occurrence of that keyword.
Click the back button next to a
Jump to the previous occurrence of that keyword.
keyword
Navigate the Video Using Both Speakers and Keywords
You further filter the keyword list to keywords spoken by a particular person in the video.
Step 1 Click a speaker name in the Speakers list.
Step 2 Click a keyword in the Keywords list.
The timeline shows only the selected speaker and the selected keywords spoken by that speaker.
You can use the forward and back buttons to navigate among the filtered results.
User Guide for Cisco Show and Share 5.3.x
4-21
Page 70

Procedures
Re-Upload a Published Video
To get the Pulse features for a video published before the Pulse features were enabled, you must
re-upload the video. Re-uploading the video causes it to be sent to the Cisco MXE for processing.
Prerequisite
You must have access to the source of the video you are re-uploading.
Procedure
Step 1 Log-in to Cisco Show and Share.
Step 2 Go to the My Account > Videos > Uploaded.
Step 3 Click the Manage Video button for the video you want to re-upload.
Chapter 4 Play, Comment, Tag, and Share Videos
The Upload Video page for that video appears.
Step 4 In the Add Video area, click Browse.
Step 5 Navigate to the video and click Open.
Step 6 Save the video as a draft or republish the video. The video will be re-processed by the Cisco MXE and
the Pulse features available when the video is published.
4-22
User Guide for Cisco Show and Share 5.3.x
Page 71

Chapter 4 Play, Comment, Tag, and Share Videos
Jump to a Chapter
Procedure
Step 1 Click the Chapters tab.
Procedures
Step 2 Click a chapter in the list to jump to that point in the video.
Watch Slides
Step 1 Click the Slides tab.
Procedure
The slides appear on the tab. They will change automatically as the video plays.
Step 2 To go through the presentation manually, use the scroll bar to see additional slides.
Step 3 Double-click a slide to jump to that point in the video.
Step 4 If the slides are difficult to read, hover your mouse over the slides and click the popout button ( ).
User Guide for Cisco Show and Share 5.3.x
4-23
Page 72

Procedures
Read a Transcript
Transcripts are text files that are uploaded by the video author. They are not synchronized with the video
and you cannot use them to navigate through the video.
Procedure
Step 1 Click the Trans c r i p t tab.
Chapter 4 Play, Comment, Tag, and Share Videos
Step 2 To search the transcript, enter a word or phrase in the Find field and click go. You can continue searching
through the transcript by clicking the Next and Previous buttons.
Note Searching the transcript does not navigate you through the video.
Step 3 Click the Hide arrow at the end of the search bar to hide it. You can expand it again later if needed.
4-24
User Guide for Cisco Show and Share 5.3.x
Page 73

Chapter 4 Play, Comment, Tag, and Share Videos
Download Files
Procedure
Step 1 Click the Files tab.
Procedures
Step 2 Click a file name to download the file.
Note You cannot right-click (Windows) or Ctrl-Click (Mac OS X) a file to download it.
User Guide for Cisco Show and Share 5.3.x
4-25
Page 74

Troubleshooting
Troubleshooting
When I download an attached Microsoft Word, PowerPoint, or Excel file from the Files tab, the saved file has a
.zip extension instead of a .docx, .xlsx, or .pptx extension.
This can occur when you download a .docx, .xlsx, or .pptx file from Cisco Show and Share using
Microsoft Internet Explorer 8.
To fix the problem, simply change the .zip file extension to the correct file extension after downloading
the file.
The aspect ratio of my embedded Flash video is not maintained on the web page.
To preserve aspect ratio, the Flash embed code requires width and height values for object classid and
embed src.
My embedded video appears as a black box on the web page.
This can have several causes.
1. First use the same web browser you used to access the web page with the embedded video to access
Cisco Show and Share. If you receive a security warning, follow the steps for your browser to accept
the security certificate. Then try to access the page with the embedded video again.
2. If you did not receive a security warning, this may be caused by opening the HTML page with the
embedded video as a file rather than a web page (for example, double-clicking the HTML document
in your file system). The HTML page must be served by an HTML server for the embedded video
to show correctly.
You can determine whether or not you opened the HTML page as a file by looking at the address bar
in your web browser. If you see a standard file path, such as
rather than a URL, such as
page as a file rather than a web page served by an HTML server.
Chapter 4 Play, Comment, Tag, and Share Videos
c:\documents\example\index.htm,
http://example.com/example/index.htm, then you opened the HTML
When I click on an embedded video to play it, it disappears.
When I click on and embedded video to play it, I receive the message “Windows media plugin not installed click
here to install.”
This occurs on Mac OS. The video you are trying to play is in a Windows media format and playback is
not supported on your OS.
The bottom of my video is cut off.
This may happen with some videos that are played back with the Quicktime plugin.
When I use my browser to zoom in during video playback, the video player controls disappear behind the video.
For the best viewing experience, we recommend that you use the video player controls for video
playback. To increase the size of the video, use the fullscreen playback button.
I cannot fast forward, rewind, or use the play head to skip ahead or go back.
There are several possible causes for this:
• The video is not hosted on a streaming server. When a video is not hosted on a streaming server, it
is supplied to you by “progressive download”. In this case, the video starts playing while it is still
downloading. You cannot fast forward past the point of where the download is reached.
• You are watching a .wmv video. The Windows media plugin for Firefox doe not allow you to use
the fast forward, rewind, or play head to move around the video. If you are using the Internet
Explorer browser, you can use the play head to move forward and backwards in the video.
4-26
User Guide for Cisco Show and Share 5.3.x
Page 75

Chapter 4 Play, Comment, Tag, and Share Videos
I receive a security warning in my browser when I try to add a comment.
This can happen if the system administrator or the video publisher has prevented anonymous comments
for the video and you are not yet logged into the system. This warning is not harmful. To continue, accept
the certificate, log into the system, and then leave your comment.
There is a delay when I try to replay a video.
Trying to replay an FLV video right after it finishes can result in a 20-40 second delay before it starts
again.
I do not see the 720p option for the video I am watching
The different resolutions available depend on several factors:
• The original resolution of the video being uploaded. If the resolution was below 720p, a 720p
version will not be created for it.
• The system settings. Your system administrator may not have enabled that resolution.
Troubleshooting
User Guide for Cisco Show and Share 5.3.x
4-27
Page 76

Troubleshooting
Chapter 4 Play, Comment, Tag, and Share Videos
4-28
User Guide for Cisco Show and Share 5.3.x
Page 77

CHA P T ER
5
Edit Video
Revised: November 2013
Cisco Show and Share includes a built-in video editor to help you add polish to your recorded and
uploaded videos. With the video editor, you can:
• Trim out unwanted parts of the video.
• Divide your video into chapters.
• Insert animated transitions between chapters.
• Synchronize a slide show with your video.
• Choose a new thumbnail for your video.
• Make speaker assignments for unrecognized speakers.
• Remove incorrect Pulse keywords.
Visit the following topics to learn more about the capabilities of and how to use the Cisco Show and
Share video editor:
• About Video Editing, page 5-1
• Limitations and Restrictions, page 5-2
• Procedures, page 5-3
• Troubleshooting, page 5-16
About Video Editing
The Cisco Show and Share built-in video editor is nonlinear and nondestructive.
This type of editing does not actually change the original material in any way. Instead, it adds markers
and pointers to information that accompanies video frames during playback.
User Guide for Cisco Show and Share 5.3.x
5-1
Page 78

Limitations and Restrictions
Limitations and Restrictions
• The Cisco Show and Share editor does not support the editing of Windows media (WMV, WMA,
ASF, ASX) files. You need to edit those files outside of Cisco Show and Share using editing software
that supports those formats.
Table 5- 1 lists the files types and extensions that are editable or not editable in the Cisco Show and
Share Editor.
Table 5-1 Video Format Editing Support
File
Format
Windows
Media
Adobe
Flash
video
MPEG4
Part 10/
H.264
Extensions Notes
.wmv
.wma
.asf
.asx
.flv Editable within Cisco Show and Share.
.mp4
.m4v
Not editable within Cisco Show and Share.
Editable within Cisco Show and Share.
Chapter 5 Edit Video
• You cannot edit Flash or MPEG4 videos that are referenced by URL rather than uploaded.
• For your edits and slide synchronization to appear, the video files must be served from a Flash
streaming server.
• If the Pulse feature set or mobile application access is enabled, video clipping and splitting are
disabled. When video splitting is disabled, the Add Transitions drawer will not appear in the editor.
However, you can still add slide synchronization and chapters and change the thumbnail.
5-2
User Guide for Cisco Show and Share 5.3.x
Page 79

Chapter 5 Edit Video
Procedures
1. Open a Video to Edit, page 5-3
2. Edit Your Video, page 5-4
Open a Video to Edit
Procedure
Step 1 Choose My Account > Videos > Uploaded.
Step 2 Hover your mouse over the row for the video you want to edit and click Edit Video.
Procedures
Note To edit a published video, you must first click Manage Video and then Save As Draft. This creates a
draft version of the video in addition to the published version. The original published version remains
available to viewers until you publish the new draft.
Cisco Show and Share opens its video editor and loads your video. The image below shows the video
editor when the Pulse feature set is enabled.
User Guide for Cisco Show and Share 5.3.x
5-3
Page 80

Procedures
Edit Your Video
You can edit video with Cisco Show and Share. More specifically, you can:
Tip Click Save often while editing your video to save your work in progress.
Chapter 5 Edit Video
• Trim Your Video, page 5-5
• Create Chapters Within Your Video, page 5-6
• Add Transitions Between Segments, page 5-7
• Synchronize Slides to Your Video, page 5-8
• Change the Video Thumbnail, page 5-10
• Label Speakers, page 5-11
• Delete Keywords, page 5-15
5-4
User Guide for Cisco Show and Share 5.3.x
Page 81

Chapter 5 Edit Video
Trim Your Video
Step 1 Click Play ( ) to start watching your video.
Step 2 Click Pause ( ) when your video reaches the start of the segment you want to delete.
Step 3 Click Delete a Segment ().
Step 4 To mark and delete a segment, do the following.
Procedures
The option to trim and split your video is not available if the Pulse feature set or mobile application
access is enabled.
Procedure
New elements appear on and around the timeline.
a. Drag the markers ( ) left or right along the timeline to mark the area to delete.
b. Preview what you have marked ( ).
c. Delete what you have marked ( ) or cancel the deletion ( ). Do not move the play head yet, you
might want to add a transition effect to this spot to tie together the two parts of the video.
Step 5 (Optional) To add a transition effect:
a. Click Split the Video to split the video at the point where you trimmed it.
The two segments of the video appear in the segment browser below the video.
b. Click the transition placeholder between the two segments.
c. Open the Transitions drawer and click Add for the transition you want to add. See Add Transitions
Between Segments, page 5-7, for more information about transitions.
Step 6 Click Save.
User Guide for Cisco Show and Share 5.3.x
5-5
Page 82

Procedures
Create Chapters Within Your Video
Procedure
Step 1 Click the Add Chapters drawer on the right to open it if it is closed.
Step 2 Click Play ( ) to start watching your video.
Step 3 Click Pause ( ) when your video reaches a point where you want to add a chapter.
Tip You can also drag the play head to the desired point on the timeline.
Step 4 Use the Chapter Name field to enter a title for the chapter.
Step 5 (Optional) Use the Chapter Description field to enter more detailed information for the chapter.
Step 6 Click Add.
Cisco Show and Share adds a chapter marker ( ) to the timeline, where you paused the playback
head ( ).
Chapter 5 Edit Video
Note The chapter marker may appear at the previous or next whole second rather than the location of
the play head where the video was paused (for example, the marker may appear at 4 seconds
rather than 3 seconds). This happens if when you pause the video between the second marks. The
marker is placed at the next whole second if the video is paused at x.5 seconds or greater, and at
the displayed whole second if it is paused at under x.5 seconds.
You can do the following with the chapter marker:
• You can hover your mouse pointer over the chapter marker to see information about the chapter.
• You can click the delete icon ( ) the chapter summary to remove the chapter.
• You can drag the chapter marker to move it to a new place on the timeline.
Step 7 Click Save.
5-6
User Guide for Cisco Show and Share 5.3.x
Page 83

Chapter 5 Edit Video
Add Transitions Between Segments
The option to add transitions between two parts of your video is not available if the Pulse feature set or
mobile application access is enabled.
Procedure
Step 1 If your video does not have separate segments, move the play head to the place in your video where you
want to add a transition and click Split the Video.
The two segments appear in the segment browser below the video. A transition placeholder appears
between them.
Step 2 Click a transition placeholder in the segment browser to choose it.
Step 3 Open the Add Transitions drawer if it is closed.
Procedures
Step 4 Mouseover any transition in the drawer to see its effect animated.
These are the transition effects.
Wipe right. Wipe left. Wipe up. Wipe
down.
Step 5 Click the Add button above a transition effect to use it.
Tip If you choose the wrong transition effect by mistake, you can drag it from the segment browser
Spin out,
then in,
then out.
Spin out. Diagonal
wipe left.
Diagonal
wipe right.
to the trash can. Then, simply choose another effect.
Step 6 Click Save.
Dilate. Fade. Sweep.
User Guide for Cisco Show and Share 5.3.x
5-7
Page 84

Procedures
Synchronize Slides to Your Video
Procedure
1. If you did not upload slides when you initially uploaded or recorded the video, see Upload Slides.
2. After you have uploaded your slides, synchronize them to the video. See Synchronize Slides
Upload Slides
To add slides to your video package, export your slide deck as a series of sequentially numbered JPEG
images. Then, collect these images together in a compressed ZIP archive.
Tip For best results, export your slides using the following dimensions:
— If your viewers mostly use the default slide window: 360x270 pixels
— If your viewers mostly use the resizable “tearoff” slide window: 800 x600 pixels.
Procedure
Chapter 5 Edit Video
Step 1 Open the Slides drawer.
Step 2 Click Add Slides.
Step 3 Browse to the individual .jpg files or to the .zip file that contains your slides. If you are uploading
individual .jpg files, you can select multiple files in the dialog box.
Step 4 Click Open.
The slides appear in the slide drawer.
5-8
User Guide for Cisco Show and Share 5.3.x
Page 85

Chapter 5 Edit Video
Synchronize Slides
Step 1 Open the Add Slides drawer if it is closed.
Step 2 You can use the zoom slider at the top of the drawer to resize your slides for better legibility.
Step 3 Move the play head on your video to where you want to add the slide, and then click Add on the slide
Tip You can play your video and hover your mouse over the next slide you want to add. Click Add when the
Procedures
Procedure
you want to synchronize to that location.
play head gets to the place where you want the slide to appear. This way you can quickly add slides
without pausing the playback.
Step 4 Repeat for each slide in the slide deck.
Step 5 Click Save.
User Guide for Cisco Show and Share 5.3.x
5-9
Page 86

Procedures
Change the Video Thumbnail
By default, Cisco Show and Share assigns a thumbnail according to the following rules:
If your video is ... It uses this frame for the thumbnail...
less than 3 seconds long 0 seconds
Between 3 and 8 seconds long 4 seconds
8 seconds or longer 8 seconds
If you have a video that is longer than 8 seconds, but the title shot only lasts for 5 seconds, the
automatically generated thumbnail may not contain your video title. Or, if you recorded a message, the
system may have captured an unflattering facial expression for the thumbnail. Use this procedure to
correct the situation.
Procedure
Step 1 Open the Advanced Options drawer if it is closed.
Chapter 5 Edit Video
5-10
Step 2 Move the playback head to the frame you want to use as the thumbnail.
Step 3 Click Save Thumbnail.
Step 4 Click Save.
User Guide for Cisco Show and Share 5.3.x
Page 87

Chapter 5 Edit Video
Label Speakers
When the Pulse feature set is enabled, the Pulse speaker identification engine attempts to identify the
speaker in a video. It does this by comparing the voice print with those of previously identified speakers.
If the Pulse engine cannot identify the speaker, it assigns the voiceprint a generic label, such as
Speaker 1.
How to Label Unidentified or Guest Speakers in a Video
If ... Then, Edit the Video and ...
A speaker is unidentified
One speaker is labeled as multiple speakers Use either the Label Unidentified Speakers or the Label
Multiple speakers are labeled as one
speaker
Procedures
• Use the Label Unidentified Speakers workflow to
assign a speaker name.
Note The speaker name must be from users that are
already present within Cisco Show and Share.
• If the speaker is not present in Show and Share, use
the Label Guest Speakers workflow to create and
assign a guest speaker name.
Guest Speakers workflow to assign the same name to the
multiple speakers. Play the video. The speaker names are
merged during video playback.
Use the Label Guest Speakers workflow to assign a
speaker name in the First field and a second speaker name
in the Last field.
Note Add two e-mail addresses in the Email field,
separated by a comma.
A speaker is labeled incorrectly and the
correct name is unknown
Use the Label Guest Speakers workflow to create a guest
speaker named Unknown speaker and assign this name to
the speaker.
Note Leave the e-mail address field empty.
Music is labeled as a speaker Use the Label Guest Speakers workflow to create a guest
speaker named Nonspeech and assign this name to the
speaker.
Note Leave the e-mail address field empty.
Guidelines and Limitations
• For appliances running Release 5.3 and earlier, you can only assign unidentified speaker names from
the users that are already present within Cisco Show and Share.
For appliances running Release 5.3.7 and later, if you have a guest speaker from outside of your
organization and that person does not have a Cisco Show and Share account, you can assign that
person’s name as a guest speaker.
User Guide for Cisco Show and Share 5.3.x
5-11
Page 88

Procedures
• If you assign a new speaker name to a previously-identified speaker, that change will appear in all
• Videos uploaded before the Pulse feature set was enabled will not contain speaker identification.
• Sometimes the same speaker can be labeled as two different speakers, or a previously identified
Label Unidentified Speakers
Procedure
Step 1 Choose My Account > Videos > Uploaded.
Step 2 Hover your mouse over the row for the video you want to edit and click Edit Video.
Step 3 Open the Speakers drawer if it is closed.
Chapter 5 Edit Video
future video uploads. However, it will not change the speaker label for existing videos unless that
video is re-uploaded and processed by the Pulse engine.
You need to re-upload the video for it to be processed by the Pulse engine.
speaker fails to be identified. This can happen when the audio quality differs between videos or
video segments. Simply assign the same name to the two different speakers or to the unidentified
speaker. The more samples you have of a speaker’s voice, the more accurate the system becomes.
The list of speakers identified in the video appears. The color codes assigned to the speaker appear in
the timeline where that speaker was identified.
Step 4 Click Name next to the speaker you want to identify.
The Assign Speaker Name dialog box appears.
5-12
Step 5 Use the page controls at the bottom of the dialog box or the search field above the name list to find the
user that you want to assign.
Step 6 Click the username and then click Select.
Step 7 Click Rename the voiceprint in the confirmation dialog box.
User Guide for Cisco Show and Share 5.3.x
Page 89

Chapter 5 Edit Video
Procedures
The voiceprint in the current and any future uploaded videos is identified with the name you selected.
When you view the video in the Video Playback page, the speaker identification appears on the Pulse tab.
Step 8 Repeat this procedure for each speaker you need to identify.
Step 9 Click Save.
Label Guest Speakers
For appliances running Release 5.3.7 and later, if the speaker is not a user that is already present within
Cisco Show and Share, you can label that speaker’s name as a guest speaker from outside of your
organization.
Guidelines and Limitations
• If you label a guest speaker, that change will appear only for the existing video. If the video is
uploaded again and processed by the Pulse engine, you will need to re-label the guest speaker.
• Videos uploaded before the Pulse feature set was enabled will not contain speaker identification.
You need to re-upload the video for it to be process by the Pulse engine.
User Guide for Cisco Show and Share 5.3.x
5-13
Page 90

Procedures
Chapter 5 Edit Video
Procedure
Step 1 Choose My Account > Videos > Uploaded.
Step 2 Hover your mouse over the row for the video you want to edit and click Edit Video.
Step 3 Open the Speakers drawer if it is closed.
The list of speakers identified in the video appears. The color codes assigned to the speaker appear in
the timeline where that speaker was identified.
Step 4 Click Name next to the speaker you want to identify.
The Assign Speaker Name dialog box appears.
5-14
1 Name 3 Assign Speaker Name
2 Add new speaker — —
Step 5 Click Add new speaker.
Step 6 Enter the first and last names. Optionally, you can add an e-mail address.
Step 7 Click Next.
Step 8 Verify the information and then click Finish.
When you view the video in the Video Playback page, the speaker identification appears on the Pulse tab.
User Guide for Cisco Show and Share 5.3.x
Page 91

Chapter 5 Edit Video
Step 9 Repeat this procedure for each speaker that you need to identify.
Step 10 Click Save.
Step 11 Click Exit.
Delete Keywords
Procedures
Tip Changes take effect when you publish the video.
For appliances running Release 5.3.7 and later, you can remove incorrect Pulse keywords on a
video-by-video basis.
Guidelines and Limitations
• If you delete keywords, that change will appear only for the existing video. If the video is uploaded
again and processed by the Pulse engine, you will need to delete the keywords again.
• Keywords are also deleted from the Cisco Show and Share search functionality.
Procedure
Step 1 Choose My Account > Videos > Uploaded.
Step 2 Hover your mouse over the row for the video you want to edit and click Edit Video.
Step 3 Open the Keywords drawer if it is closed.
The list of keywords identified in the video appears. The color codes assigned to the keywords appear in
the timeline where that speaker was identified.
Step 4 Check the check boxes next to the keywords that you want to remove from this video.
Note You cannot undo keyword deletion.
Step 5 Click Save.
Step 6 Click Exit.
User Guide for Cisco Show and Share 5.3.x
5-15
Page 92

Troubleshooting
Troubleshooting
My edits do not appear when I play the video back after publishing. Why weren’t they saved?
Cisco Show and Share uses nondestructive editing. This means that instead of changing the actual video,
Cisco Show and Share inserts markers and pointers to indicate the changes. This type of editing requires
the video to be served from a Flash streaming server. If the videos are stored on the Cisco Show and
Share server itself, they will be served from a Flash streaming server.
However, quite often the video source is actually stored and served from an external server dedicated to
storing large quantities of video files. If the video is being served from another type of server, for
example a simple web server, then the edits that you make will not appear during playback. If you
experience this problem, contact your system administrator for more information about the type of server
being used for the videos.
Where do I go to change the keywords for the Pulse keyword identification feature?
Viewers and Authors cannot add keywords to the Pulse keyword identification engine. Your Cisco MXE
administrator is responsible for maintaining the list.
Chapter 5 Edit Video
5-16
User Guide for Cisco Show and Share 5.3.x
Page 93

CHA P T ER
6
Publish Your Video
Revised: November 2013
After you have uploaded or recorded a video and made any edits, the final task you have is to publish it.
Before you publish your video, you can:
• Update the title, description, and tags.
• Assign it to categories.
• Choose who can see it.
• Disable page options (comments, ratings, tags, and sharing) individually.
• Link to related videos.
• Schedule exactly when it should become visible to other users.
• Schedule exactly when it should be archived (hidden from other users).
Procedures
Follow these steps to publish your video. Only the fist and last steps are mandatory; the other steps are
optional items you can perform before publishing your video.
1. Access the Publish Your Video Page, page 6-2
2. (Optional) Edit the Video Summary, page 6-4
3. (Optional) Restrict Viewer Access to the Video, page 6-4
4. (Optional) Disable Pulse Speakers and Keywords, page 6-7
5. (Optional) Add the Video to a Category, page 6-7
6. (Optional) Set the Video Interaction Options, page 6-9
7. (Optional) Add Related Videos, page 6-10
8. (Optional) Schedule Publication, page 6-11
9. Publish the Video, page 6-12
User Guide for Cisco Show and Share 5.3.x
6-1
Page 94

Procedures
Access the Publish Your Video Page
You can access the Publish Your Video page from several places within Cisco Show and Share:
Draft Videos Go to: My Account > Videos > Uploaded. Click Publish.
Upload a Video Click Go to Publish Page.
Record a Video Click Go to Publish Page.
Draft Live Event Go to: My Account > Videos > Live Events. Click Publish.
Video Approver Go to: My Account > Action Items and Requests. Click Publish.
The Publish Your Video page appears.
Chapter 6 Publish Your Video
6-2
1 Video Summary. See Edit the Video Summary, page 6-4, to change this information.
2 Page Permissions. See Add the Video to a Category, page 6-7, Restrict Viewer Access to the Video,
page 6-4, and Set the Video Interaction Options, page 6-9, to change this information.
User Guide for Cisco Show and Share 5.3.x
Page 95

Chapter 6 Publish Your Video
Procedures
1 Add Related. See Add Related Videos, page 6-10, to add related videos.
2 Scheduling. See Schedule Publication, page 6-11, to schedule when your video should be available
to viewers.
User Guide for Cisco Show and Share 5.3.x
6-3
Page 96

Procedures
Edit the Video Summary
This is an optional step in publishing your video.
Procedure
Step 1 Expand the Video Summary drawer.
Step 2 Click Edit.
The Title, Description, and Tags fields become editable.
Step 3 Enter the new information in the fields. When entering more than one tag, separate the tags with a space.
Restrict Viewer Access to the Video
This is an optional step in publishing your video. When you restrict access to a video, it will no longer
appear on the Home page. Instead, it will appear in the Private tab of the My Account > Videos page for
users that you give access to the video.
Chapter 6 Publish Your Video
Note Videos with restricted viewer access cannot be added as related videos.
You do not need to add yourself to the viewing privileges of videos that you upload. You are
automatically given privileges to those videos and the videos will appear on the Private tab on your My
Account page.
Procedure
Step 1 Expand the Page Permissions, Categories and Options drawer.
Step 2 Choose Allow only specific users to view this video.
The Group table appears.
6-4
Step 3 Click Select Group.
The Group Selector dialog appears.
User Guide for Cisco Show and Share 5.3.x
Page 97

Chapter 6 Publish Your Video
Step 4 To use one or more groups that you have created, do the following:
a. Select the check box next to the group name. You can select more than one group.
Procedures
b. Click OK.
Step 5 To pick an existing public group, do the following. Public groups are groups that you or others have
created and have given permission for others to use and edit.
a. Click the Public Groups tab.
a. Select the check box next to the group name. You can select more than one group.
b. Click OK.
Step 6 To create a new group, do the following:
a. Click Create New Group.
The Create New Group dialog appears.
User Guide for Cisco Show and Share 5.3.x
6-5
Page 98

Procedures
Chapter 6 Publish Your Video
b. Type a name for your new group in the Name field. This field is required.
c. Type a description for your new group in the Description field. This field is required.
d. Select Allow others to edit this group if you want to make the group public.
Selecting this option allows other people to add and remove users from this group. They will also
be able to delete the group.
If you make the group public, it will not appear on the My Groups tab. Instead, it will appear on the
Public Groups tab.
e. Click Add New Users. You must add at least one user to the group to save the group.
The Select Group Users dialog appears.
6-6
f. You can page through the list of users or use the search function to find the users to add. Select the
check box next to their name to include the user in the group.
g. Click Save to close the Select Group Users dialog box.
h. Click Save Group to close the Create New Group dialog box.
a. Select the check box next to the group name. You can select more than one group.
b. Click OK.
Step 7 To remove a group from the Group table, click the trash can icon next to the group. To disable viewing
restrictions (and make the video public), select Allow all users to view this video.
User Guide for Cisco Show and Share 5.3.x
Page 99

Chapter 6 Publish Your Video
Disable Pulse Speakers and Keywords
For appliances running Release 5.3.7 and later, you can disable Pulse Speakers and Keywords on a
video-by-video basis if the Pulse feature is enabled globally.
You cannot enable or disable a feature for a video if the system administrator disabled it globally.
Procedure
Step 1 Expand the Page Permissions, Categories and Options drawer.
Step 2 Select Do not Display Pulse Speakers and Keywords.
Step 3 Choose Save and Preview or choose Publish.
Add the Video to a Category
Procedures
Procedure
Step 1 Expand the Page Permissions, Categories and Options drawer.
Step 2 Click Categorize my video.
Step 3 Click Select Category.
The category picker appears.
User Guide for Cisco Show and Share 5.3.x
6-7
Page 100

Procedures
Chapter 6 Publish Your Video
Step 4 Click Expand All to list the available categories or click the triangle icon to the left of a category to
expand only that category.
Step 5 Check the check box for each category that you want to use. Uncheck any check boxes, as needed, for
categories that you prefer not to use.
Step 6 Click OK to confirm your choices and close the Category Picker.
6-8
User Guide for Cisco Show and Share 5.3.x
 Loading...