

Page 1

Cisco Nexus B22 Fabric Extender for HP
Getting Started Guide
This Getting Started Guide describes the Cisco Nexus B22 Fabric Extender for HP and how to start using
it. This product is referred to by HP as the Cisco Fabric Extender for HP Bladeystem. This Getting
Started Guide includes the following sections:
• Information about the Cisco Nexus B22 Fabric Extender for HP, page 1
• Shipping Box Contents, page 2
• HP Blade System Architecture, page 3
• Installing the Cisco Nexus B22 Fabric Extender for HP, page 5
• Updating NX-OS, page 6
• Configuring the Cisco Nexus B22 Fabric Extender for HP, page 7
• Verifying the Configuration, page 19
• NoteFor HP Integrity Superdome 2, the minimum F/W bundle is 2.51.102, page 20
• Related Documentation, page 21
• Technical Support, page 21
Information about the Cisco Nexus B22 Fabric Extender for HP
The Cisco Nexus product line simplifies datacenter operations in an efficient and cost-effective manner.
The Cisco Nexus product line transforms the data center with innovative, standards-based, multilayer,
multiprotocol, and multipurpose Ethernet-based fabric. These products enable any transport over
Ethernet, including Layer 2 and Layer 3 traffic, and storage traffic, all on one common data center-class
platform.
The Cisco Nexus B22 Fabric Extenders behave as remote line cards for a parent Cisco Nexus 5000 Series
switch. The Fabric Extenders are essentially extensions of the parent Cisco Nexus switch fabric, with
the Fabric Extenders and the parent Cisco Nexus switch together forming a distributed modular system.
Up to 24 Cisco Nexus B22 Fabric Extenders can be connected to a single Nexus 5000 Series switch,
allowing a single distributed modular system to scale to 384 HP blade servers.
Americas Headquarters:
Cisco Systems, Inc., 170 West Tasman Drive, San Jose, CA 95134-1706 USA
Page 2
Shipping Box Contents
Each Cisco Nexus B22 Fabric Extender connects via 1 or 10 Gigabit Ethernet to up to 16 servers within
a HP BladeSystem and the HP Integrity Superdome 2 chassis, and contains 8 10 Gigabit Ethernet fabric
uplinks towards the Cisco Nexus 5000 Series switch. Multiple low cost options are available for fabric
connections between the Cisco Nexus B22 and the Cisco Nexus 5000 series switch. Low-cost
Connections up to 10 meters can be made with copper Twin-ax cable, and longer connections up to 100
meters can use the Fabric Extender Transceiver. Other standard 10 Gigabit Ethernet optics such as
10Gbase-SR and 10Gbase-LR are also supported for these fabric connections.
Finding the Latest Documentation Online
Use the following links to check for the latest documentation for your server product:
• http://www.cisco.com/en/US/products/ps9670/tsd_products_support_series_home.html
• http://www.hp.com/go/bladesystem/documentation
• http://www.hp.com/go/Integrity_Servers-docs
Check these links often to verify that your documentation is up to date.
Shipping Box Contents
The Cisco Nexus B22 Fabric Extender for HP shipping box contains:
• Cisco Nexus B22 Fabric Extender for HP, with 16 internal host ports and 8 external network ports.
• This box may contain 16 Fabric Extender Transceivers. The product ID of the bundle with the Cisco
Nexus B22 Fabric Extender and the Fabric Extender Tranceiver is N2K-B22HP-F.
• 1 CD that contains
–
Getting Started Guide
–
Regulatory Compliance and Safety Information
–
HP End User License Agreement letter
–
Warranty Document
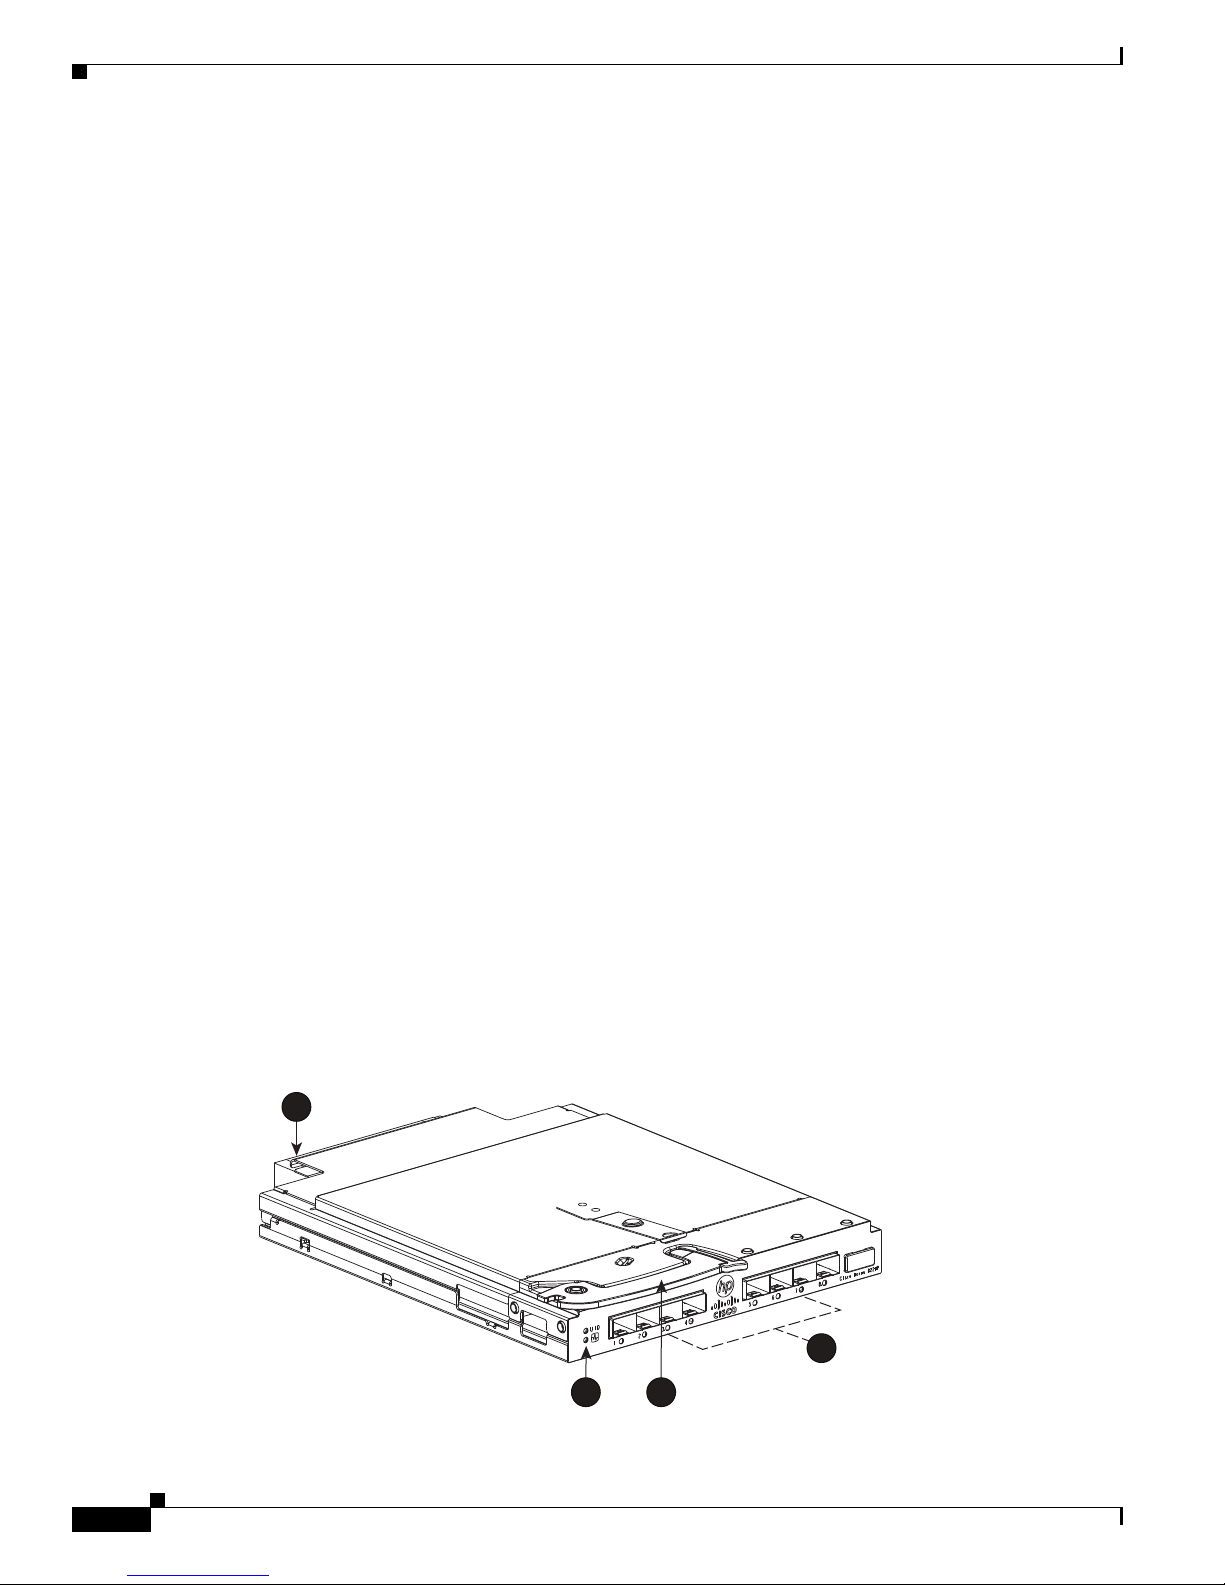
Figure 1 shows the Cisco Nexus B22 Fabric Extender for HP.
Figure 1 Cisco Nexus B22 Fabric Extender for HP
1
Cisco Nexus B22 Fabric Extender for HP Getting Started Guide
2
310166
2
4
3
Page 3
1 Midplane connector
2 Eight external network ports
3 Installation handle
4 Unit ID (UID) LED and Health LED
HP Blade System Architecture
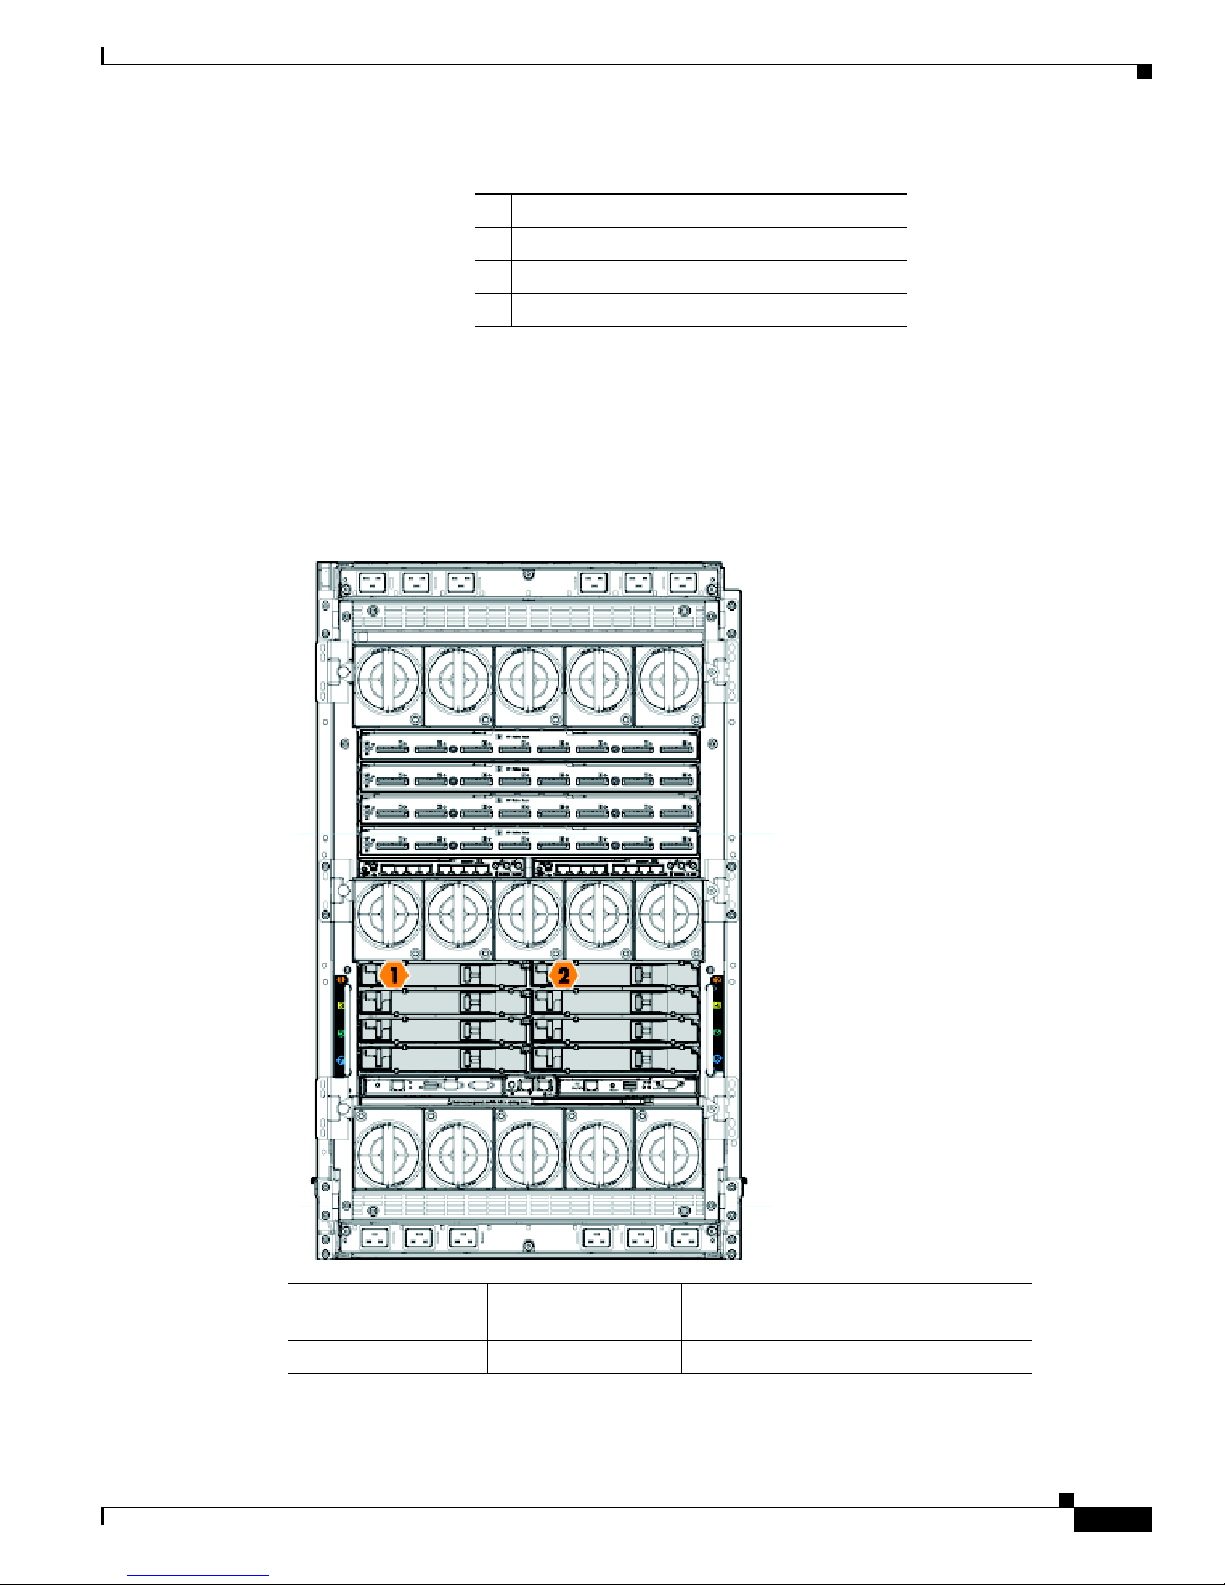
Figure 2 shows the rear view of the enclosure.
Figure 2 Rear View of the Blade Enclosure
HP Blade System Architecture
Server Blade Signal
NIC 1(embedded) 1 orange interconnect label
Compute Enclosure
Interconnect Bay
Cisco Nexus B22 Fabric Extender for HP Getting Started Guide
Interconnect Bay Labels
3
Page 4
HP Blade System Architecture
153140
1
3
5
7
9
11
2
2
4
6
8
10
NIC 2(embedded) 2 orange interconnect label
NIC 3(embedded) 1 orange interconnect label
NIC 4(embedded) 2 orange interconnect label
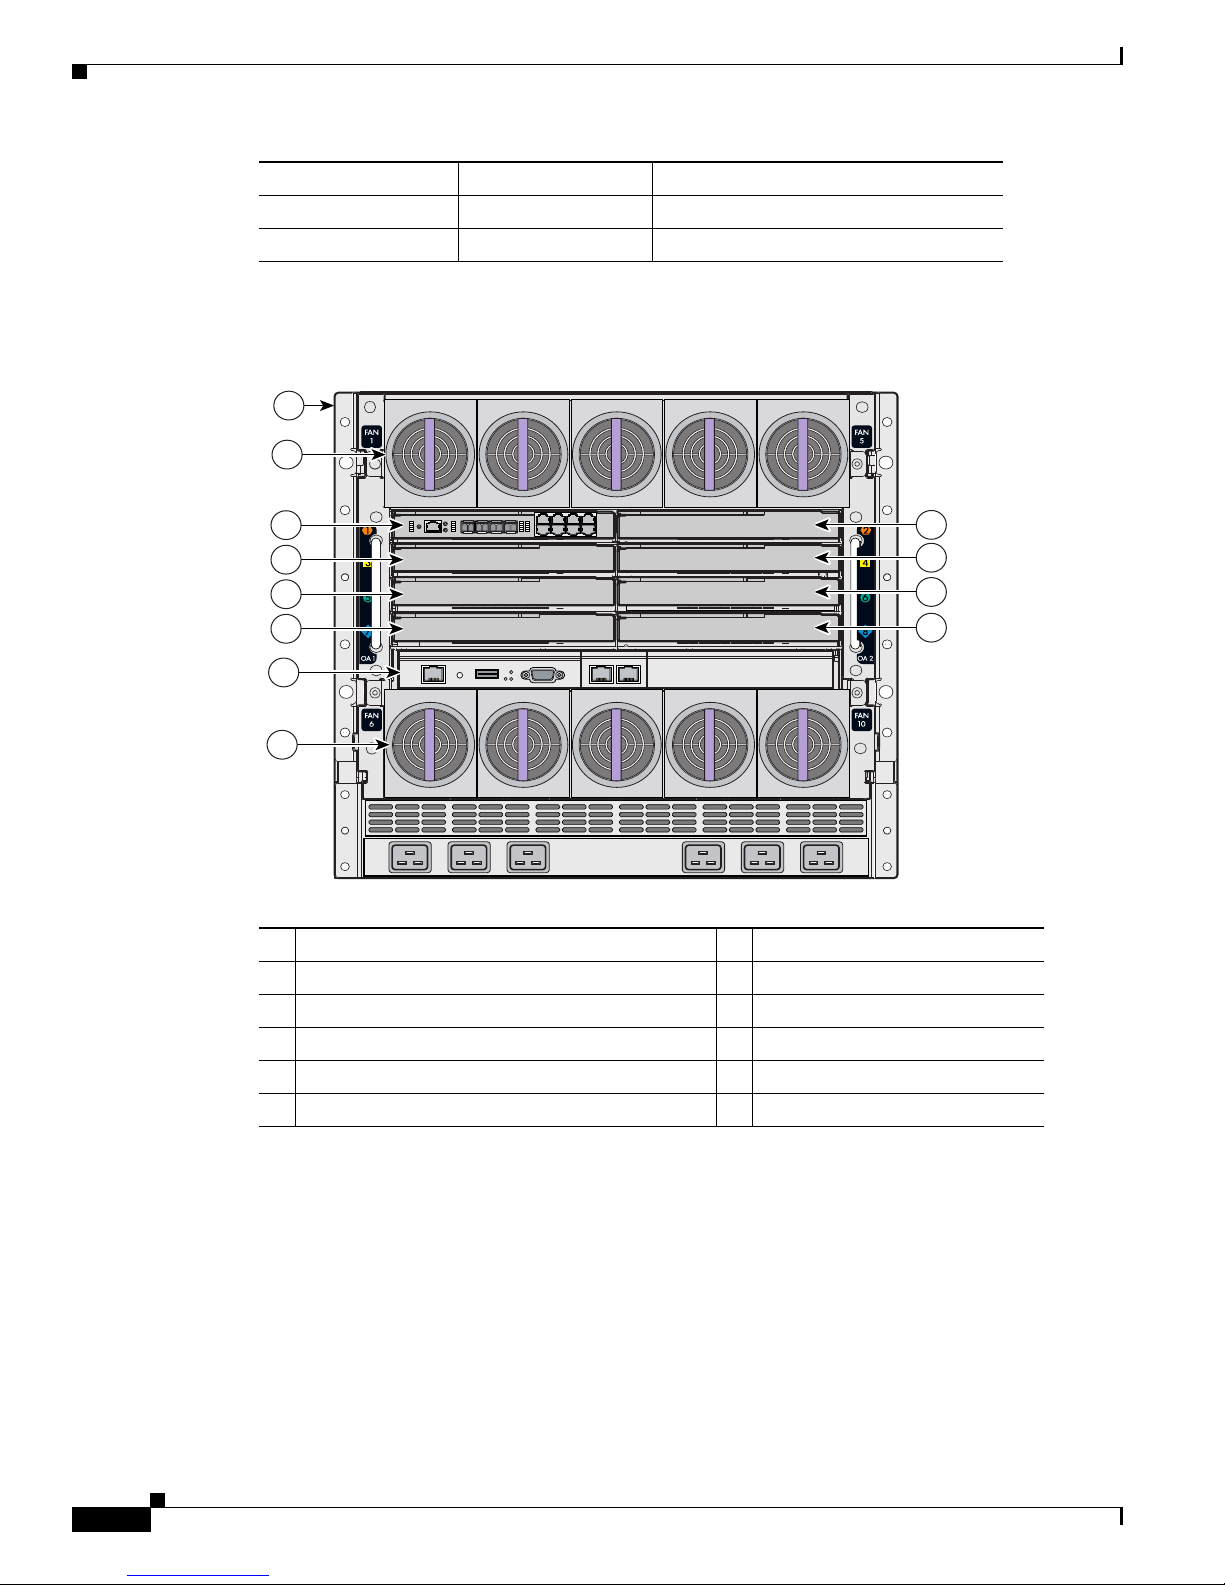
Figure 3 shows the rear view of the enclosure, in which you install the switch module.
Figure 3 Rear View of the Enclosure
Enclosure rear view
1
Enclosure fans
2
Interconnect module bay 1
3
Interconnect module bay 2
4
Interconnect module bay 3
5
Interconnect module bay 4
6
Consider these prerequisites before you install the switch module:
• Fill any unoccupied interconnect bays or any unoccupied power module bays in the blade
enclosure with blanks.
• Identify the bays in which you will insert the switch modules. Plan to install the first switch module
in bay 1, the second in bay 2, and so on up to bay 8, if possible. The bay in which you choose to
install each switch module depends on whether mezzanine or Ethernet cards are installed in the
blade enclosure and how they are configured. See the blade enclosure documentation information
about installing and configuring the mezzanine or Ethernet cards.
• See the HP c-Class or HP Integrity Superdome 2 documentation for information on the port mapping
Interconnect module bay 5
7
Interconnect module bay 6
8
Interconnect module bay 7
9
Interconnect module bay 8
10
Onboard Administrator module
11
between blade enclosures and the switch modules.
Cisco Nexus B22 Fabric Extender for HP Getting Started Guide
4
Page 5
Installing the Cisco Nexus B22 Fabric Extender for HP
Installing the Cisco Nexus B22 Fabric Extender for HP
Caution Properly ground yourself before handling the switch.
Populate all the enclosure interconnect bays with an interconnect module or one of the blank panels
provided with the enclosure. For the HP Integrity Superdome 2, the Fabric Extender will go to Bay 1,
Bay 2 or both.
To install the Cisco Nexus B22 Fabric Extender for HP in the enclosure:
1. Locate the appropriate interconnect bay at the rear of the enclosure. See the setup and installation
guide provided with the enclosure.
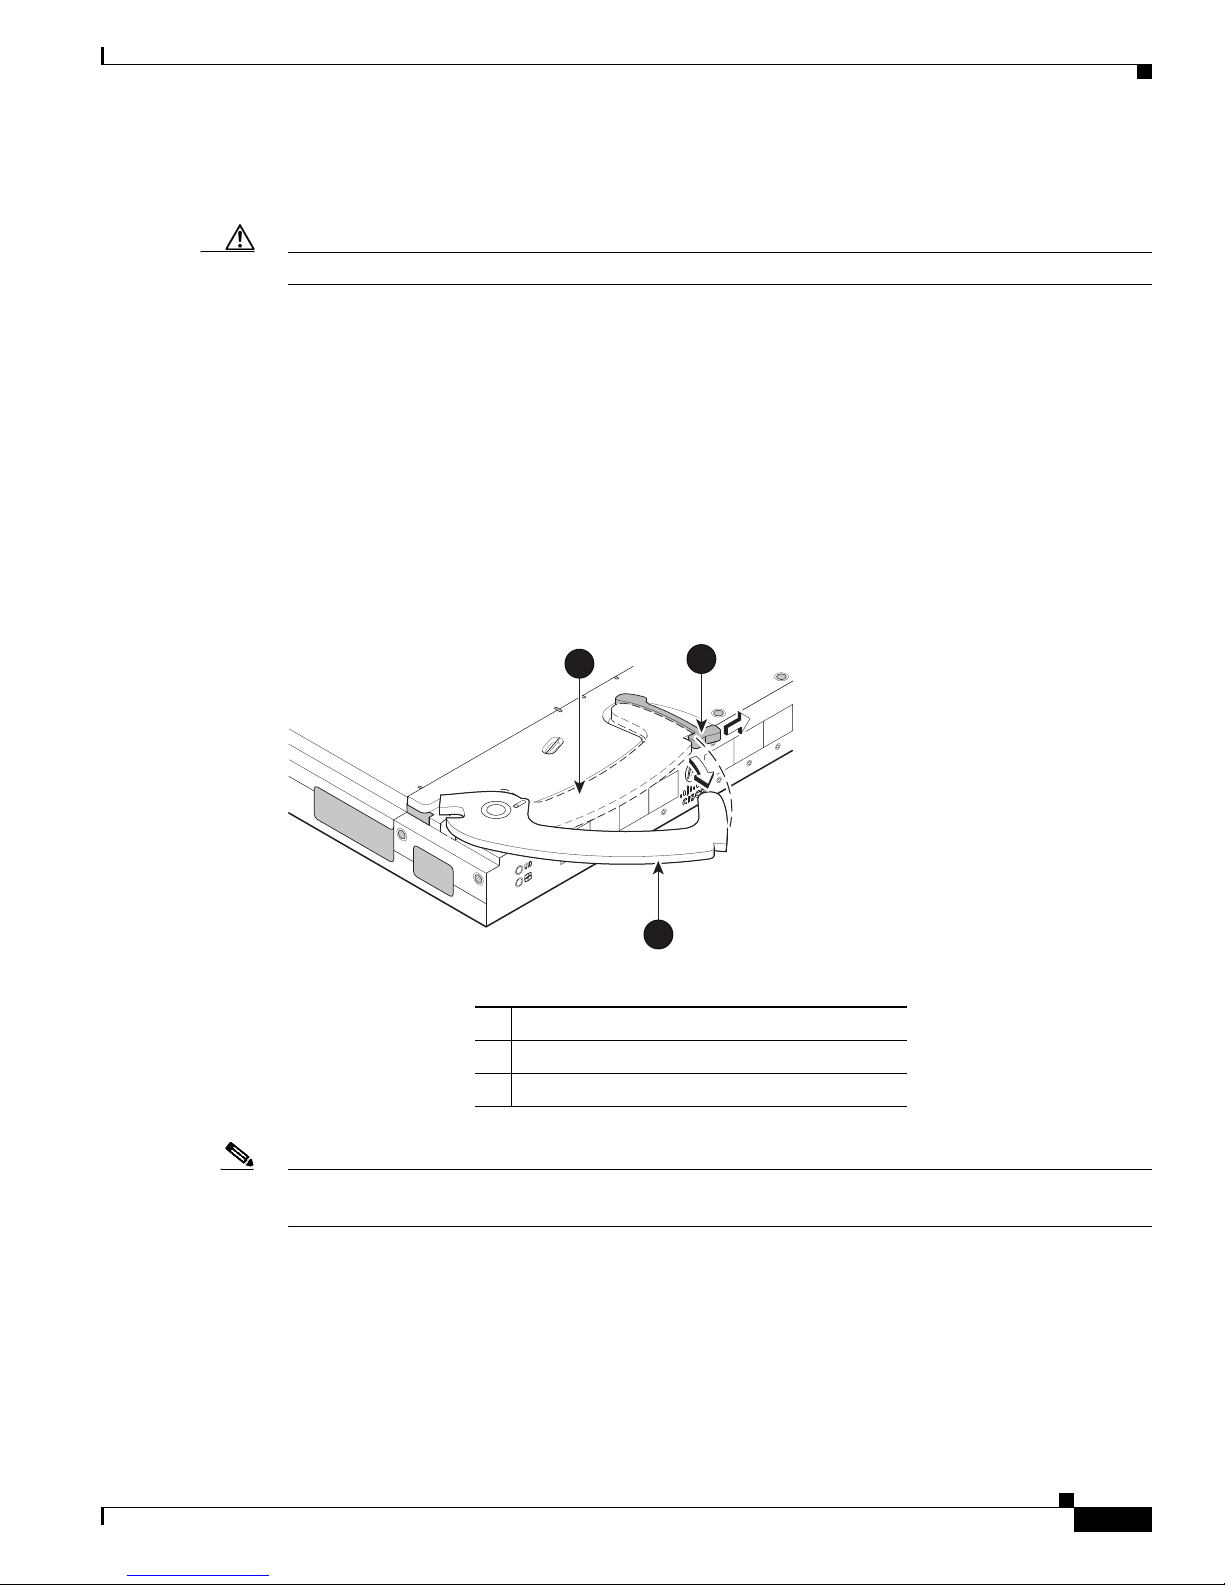
2. Press the handle latch to release the handle. See Figure 4.
Figure 4 Releasing the Installation Handle
1
2
scale: 2/3" = 1"
310167
20
19
18
17
!
3
1 Installation handle in latched position
2 Handle latch
3 Installation handle (released)
Note The Cisco Nexus B22 Fabric Extender for HP is a hot-pluggable device. The enclosure may be on or off
during installation.
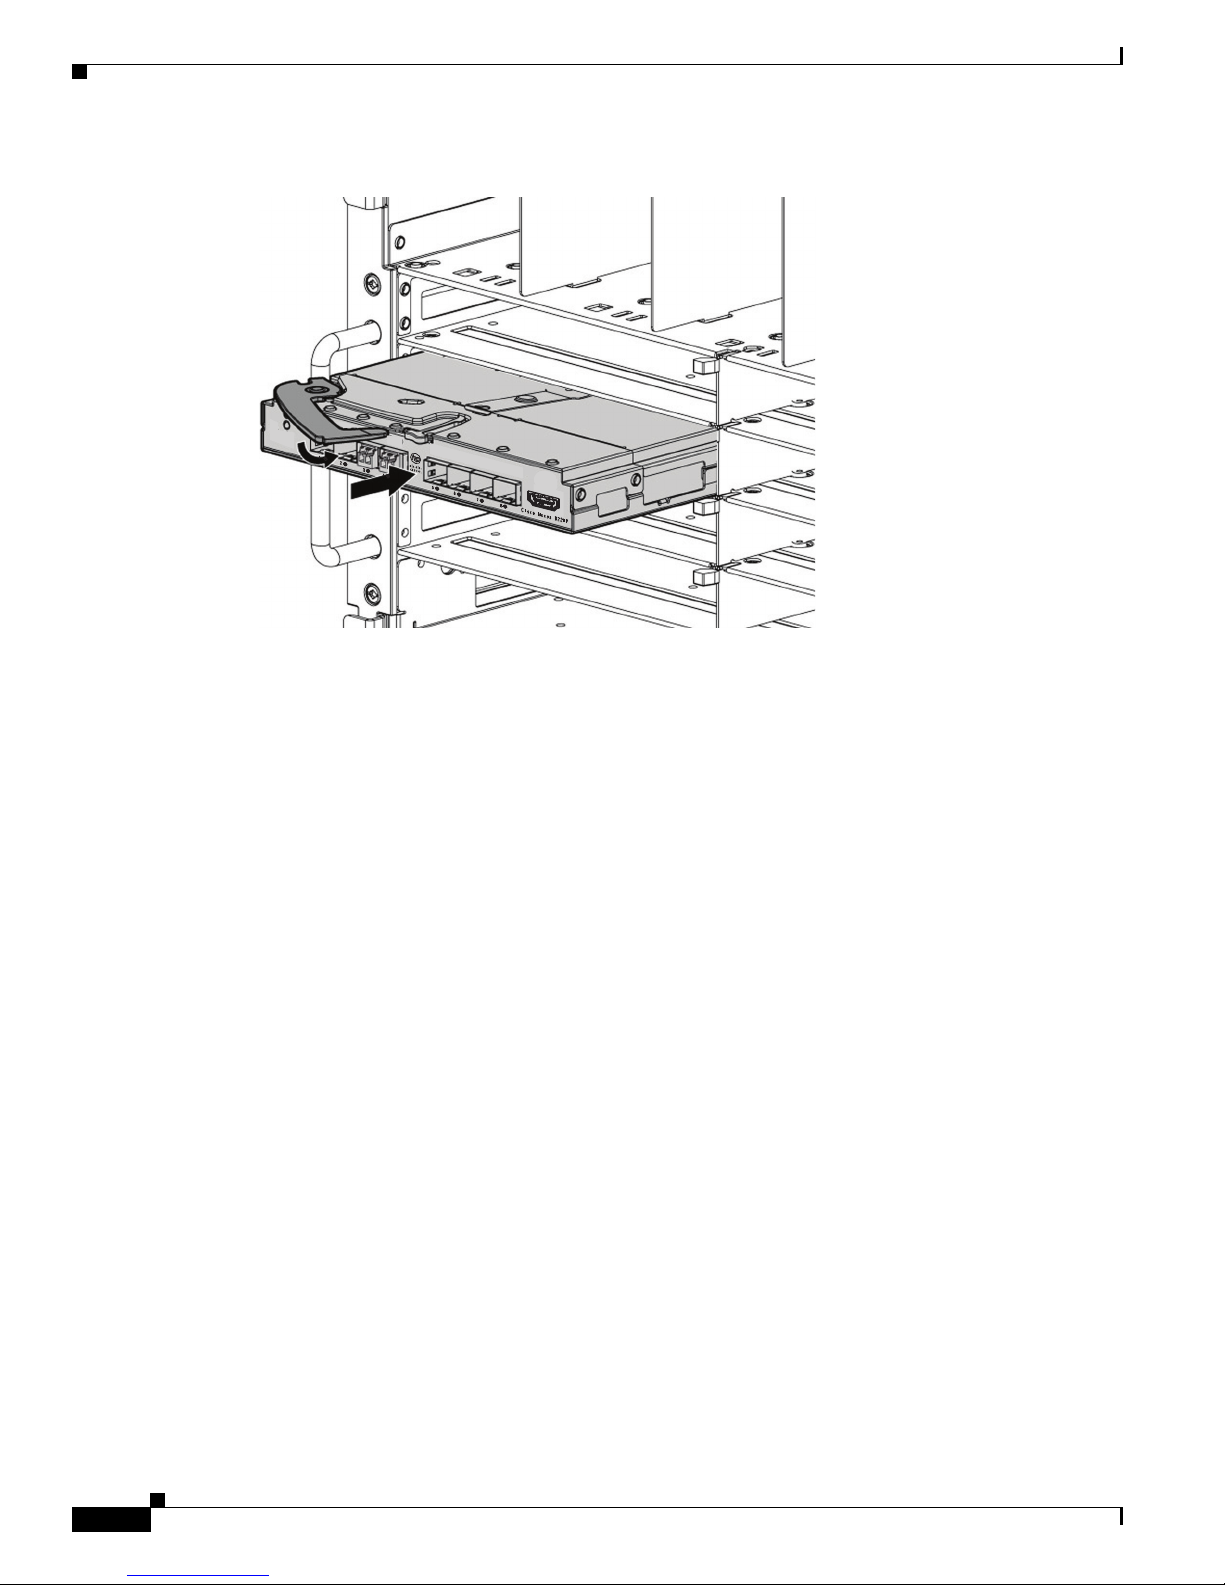
3. Align the Cisco Nexus B22 Fabric Extender for HP with the appropriate interconnect bay, according
to the specific configuration for the enclosure. For the HP Integrity Superdome 2, use bay-1, bay-2
or both. Push the switch firmly into the interconnect bay. See
Figure 5.
Cisco Nexus B22 Fabric Extender for HP Getting Started Guide
5
Page 6
Updating NX-OS
Figure 5 Installing the Fabric Extender Into an Interconnect Bay
310169
4. Press the installation handle into the latch to lock the switch into place.
5. Connect the cables.
6. Configure the Cisco Nexus 5000 switch to recognize and boot up the Cisco Nexus B22 Fabric
Extender for HP.
Updating NX-OS
To achieve the best performance, HP recommends updating to the latest NX-OS software version.
The Cisco Nexus B22 Fabric Extender for HP downloads the necessary firmware from the connected
Cisco Nexus 5x00 switch. You can update the Cisco Nexus 5x00 Switch without any disruptions using
the install all command. Contact the company from whom your Cisco Nexus 5x00 Switch was
purchased.
For units purchased through HP, see the HP StorageWorks Single Point of Connectivity Knowledge
(SPOCK) website at www.hp.com/storage/spock for the latest HP supported NX-OS version.
Obtain the most current NX-OS software from the HP Support Center website:
http://h20565.www2.hp.com/portal/site/hpsc/public
You can download NX-OS software from the Cisco website:
http://www.cisco.com/cisco/software/navigator.html?mdfid=282076290&i=rm
If your units are purchased through Cisco, see Cisco Nexus 5000 Series NX-OS Software Upgrade and
Downgrade Guide for instructions on how to download NX-OS from Cisco.
The Cisco Nexus B22 Fabric Extender for HP is managed by its parent Cisco Nexus 5000 Series switch
over the fabric interfaces through a zero-touch configuration model. You upgrade the Fabric Extender by
upgrading the software on the parent Cisco Nexus 5000 Series switch.
When a Fabric Extender is properly associated with a parent switch, the following upgrade operations
are performed:
Cisco Nexus B22 Fabric Extender for HP Getting Started Guide
6
Page 7

Configuring the Cisco Nexus B22 Fabric Extender for HP
• The switch checks the software image compatibility and upgrades the Fabric Extender if necessary.
• The switch pushes the configuration data to the fabric extender. The Fabric Extender does not store
any configuration locally.
• The Fabric Extender updates the switch with its operational status. All fabric extender information
is displayed using the switch commands for monitoring and troubleshooting.
In-Service Software Upgrades (ISSUs) are supported on the Cisco Nexus 5000 Series switches. An ISSU
can update the software images on your device without disrupting data traffic. An ISSU updates the
Kickstart, System, and Fabric Extender image.
The install all command triggers the ISSU on Cisco Nexus 5000 Series switches and the Cisco Nexus
B22 Fabric Extender for HP. The command provides the following benefits:
• You can upgrade the Cisco Nexus 5000 Series switches and the Cisco Nexus B22 Fabric Extender
for HP using just one command.
• You can receive descriptive information about the intended changes to your system before you
continue with the installation. For example, it identifies potential disruptive upgrades.
• You can continue or cancel the upgrade when you see this question (the default is no):
Do you want to continue (y/n) [n] : y
• You can upgrade the Cisco NX-OS software using a nondisruptive procedure.
• The command automatically checks the image integrity, which includes the running kickstart and
system images. The command sets the kickstart and system boot variables.
• The command performs a platform validity check to verify that a wrong image is not used.
• The Ctrl-c escape sequence gracefully ends the install all command. The command sequence
completes the update step in progress and returns to the EXEC prompt.
• After issuing the install all command, if any step in the sequence fails, the upgrade ends.
• The following message appears to warn you about the impact of upgrading the power sequencer:
Warning: please do not remove or power off the module at this time.
Note: Power-seq upgrade needs a power-cycle to take into effect.
On success of power-seq upgrade, SWITCH OFF THE POWER to the system and then, power it
up.
• You can force a disruptive upgrade.
For additional information, see the Cisco Nexus 5000 Series NX-OS Software Upgrade and Downgrade
Guide.
Configuring the Cisco Nexus B22 Fabric Extender for HP
This section describes how to configure a Cisco Nexus B22 Fabric Extender for HP with a Cisco Nexus
5000 Series switch and includes the following sections:
• Associating a Fabric Extender to a Fabric Interface, page 8
• Configuring the Fabric Extender, page 10
• Redistributing the Links, page 11
• Displaying Fabric Extender Information, page 12
Cisco Nexus B22 Fabric Extender for HP Getting Started Guide
7
Page 8

Configuring the Cisco Nexus B22 Fabric Extender for HP
Associating a Fabric Extender to a Fabric Interface
A Fabric Extender is connected to the switch through physical Ethernet interfaces or an EtherChannel.
By default, the switch does not allow the attached Fabric Extender to connect until it has been assigned
a chassis ID and is associated with the connected interface.
Note The Fabric Extender may connect to the switch through a number of separate physical Ethernet
interfaces or at most one EtherChannel interface.
This section includes the following topics:
• Associating a Fabric Extender to an Ethernet Interface, page 8
• Associating a Fabric Extender to an EtherChannel, page 9
• Disassociating a Fabric Extender from an Interface, page 10
Associating a Fabric Extender to an Ethernet Interface
To associate the Fabric Extender to an Ethernet interface, perform this task:
Step 1
Step 2
Step 3
Step 4
Step 5
Command Purpose
switch# configure terminal
switch(config)# interface ethernet
slot/port
switch(config-if)# switchport mode
fex-fabric
switch(config-if)# fex associate chassis
Enters configuration mode.
Specifies an Ethernet interface to configure.
Sets the interface to support an external Fabric
Extender.
Associates the chassis ID to the Fabric Extender unit
attached to the interface. The range of the chassis ID
is from 100 to 199.
switch# show interface ethernet
port/slot fex-intf
(Optional) Displays the association of a Fabric
Extender to an Ethernet interface.
This example shows how to associate the Fabric Extender to an Ethernet interface on the switch:
switch# configure terminal
Enter configuration commands, one per line. End with CNTL/Z.
switch(config)# interface ethernet 1/19
switch(config-if)# switchport mode fex-fabric
switch(config-if)# fex associate 102
This example shows how to display the association of the Fabric Extender and the switch:
switch# show interface ethernet 1/19 fex-intf
Fabric FEX
Interface Interfaces
-------------------------------------------------- Eth1/19 Eth100/1/16 Eth100/1/15 Eth100/1/14 Eth100/1/13
Eth100/1/12 Eth100/1/11 Eth100/1/10 Eth100/1/9
Eth100/1/8 Eth100/1/7 Eth100/1/6 Eth100/1/5
Eth100/1/4 Eth100/1/3 Eth100/1/2 Eth100/1/1
Cisco Nexus B22 Fabric Extender for HP Getting Started Guide
8
Page 9

Associating a Fabric Extender to an EtherChannel
To associate the Fabric Extender to an EtherChannel, perform this task:
Command Purpose
Step 1
Step 2
Step 3
Step 4
Step 5
switch# configure terminal
switch(config)# interface port-channnel
channel
switch(config-if)# switchport mode
fex-fabric
switch(config-if)# fex associate chassis
switch# show interface port-channel
channel fex-intf
This example shows how to associate the Fabric Extender to an EtherChannel interface on the switch:
switch# configure terminal
Enter configuration commands, one per line. End with CNTL/Z.
switch(config)# interface port-channel 2
switch(config-if)# switchport mode fex-fabric
switch(config-if)# fex associate 100
switch(config-if)# exit
switch(config)# interface ethernet 1/19
switch(config-if)# switchport mode fex-fabric
switch(config-if)# fex associate 100
switch(config-if)# channel-group 2
switch(config-if)# exit
switch(config)# interface ethernet 1/20
switch(config-if)# switchport mode fex-fabric
switch(config-if)# fex associate 100
switch(config-if)# channel-group 2
switch(config-if)# exit
switch(config)# interface ethernet 1/21
switch(config-if)# switchport mode fex-fabric
switch(config-if)# fex associate 100
switch(config-if)# channel-group 2
switch(config-if)# exit
switch(config)# interface ethernet 1/22
switch(config-if)# switchport mode fex-fabric
switch(config-if)# fex associate 100
switch(config-if)# channel-group 2
switch(config-if)# exit
Configuring the Cisco Nexus B22 Fabric Extender for HP
Enters configuration mode.
Specifies an EtherChannel to configure.
Sets the EtherChannel to support an external Fabric
Extender.
Associates the chassis ID to the Fabric Extender unit
attached to the interface. The range of the chassis ID
is from 100 to 199.
(Optional) Displays the association of a Fabric
Extender to an EtherChannel interface.
Note You have to associate each Ethernet interface that is a members of the EtherChannel as a fabric interface
as shown in the above example.
This example shows how to display the association of the Fabric Extender and the switch:
switch# show interface port-channel 2 fex-intf
Fabric FEX
Interface Interfaces
-------------------------------------------------- Po2 Eth100/1/1 Eth100/1/2 Eth100/1/3 Eth100/1/4
Cisco Nexus B22 Fabric Extender for HP Getting Started Guide
9
Page 10

Configuring the Cisco Nexus B22 Fabric Extender for HP
Eth100/1/5 Eth100/1/6 Eth100/1/7 Eth100/1/8
Eth100/1/9 Eth100/1/10 Eth100/1/11 Eth100/1/12
Eth100/1/13 Eth100/1/14 Eth100/1/15 Eth100/1/16
Disassociating a Fabric Extender from an Interface
To disassociate the Fabric Extender from an interface, perform this task:
Command Purpose
switch(config-if)# no fex associate
Configuring the Fabric Extender
To configure global features for a Fabric Extender, perform this tasks:
Command Purpose
Step 1
Step 2
Step 3
switch# configure terminal
switch(config)# fex chassis
switch(config-fex)# description desc
switch(config-fex)# no description
switch(config-fex)# pinning max-links
uplinks
switch(config-fex)# no pinning max-links
switch(config-fex)# serial serial
switch(config-fex)# no serial
switch(config-fex)# beacon
switch(config-fex)# no beacon
Disassociates the Fabric Extender unit attached to the
interface.
Enters configuration mode.
Enters configuration mode for the specified Fabric
Extender chassis ID. The range of the chassis ID is
from 100 to 199.
Specifies the description. The default is the string
FEXxxxx where xxxx is the chassis ID. If the chassis
ID is 123, the description is FEX0123.
Deletes the description.
Defines the number of uplinks. The default is 1. The
range is from 1 to 4.
This command is only applicable if the Fabric
Extender is connected to its parent switch using one
or more statically pinned fabric interfaces. There can
only be one EtherChannel connection.
Resets the number of uplinks to the default.
Defines a serial number string. If this command is
configured, then a switch will only allow the
corresponding chassis ID to associate (using the fex
associate command) if the Fabric Extender reports a
matching serial number string.
Configuring a serial number other than that of the
given Fabric Extender will force the Fabric Extender
offline.
Deletes the serial number string.
Turns on the beacon LED. This LED allows you to
locate a specific Fabric Extender in a rack.
Turns off the beacon LED.
Cisco Nexus B22 Fabric Extender for HP Getting Started Guide
10
Page 11

Caution Changing the number of uplinks with the pinning max-links command or the no pinning max-links
command disrupts all the host interface ports of the Fabric Extender.
Redistributing the Links
When you provision the Fabric Extender with statically pinned interfaces, the downlink host interfaces
on the Fabric Extender are pinned to the fabric interfaces in the order they were initially configured. If
you want to maintain a specific relationship of host interfaces to fabric interface across reboots, you
should re-pin the links.
You may want to perform this function in these two situations:
• A change in the max-links configuration.
• If you need to maintain the pinning order of host interfaces to fabric interfaces.
Changing the Number of Links
If you initially configured port 19 on the parent switch as your only fabric interface, all 16 host interfaces
are pinned to this port. If you provision another port, for example 20, then you must enter the pinning
max-links 2 command to redistribute the host interfaces. All host interfaces are brought down and host
interfaces 1 to 8 are pinned to fabric interface 19 and host interfaces 9 to 16 are pinned to fabric interface
20.
Configuring the Cisco Nexus B22 Fabric Extender for HP
Maintaining the Pinning Order
The pinning order of the host interfaces is initially determined by the order in which the fabric interfaces
were configured. In this example, four fabric interfaces were configured in the following order:
switch(config-fex)#
switch(config-fex)#
switch(config-fex)# show interface ethernet 1/19 fex-intf
Fabric FEX
Interface Interfaces
-------------------------------------------------- Eth1/19 Eth100/1/4 Eth100/1/3 Eth100/1/2 Eth100/1/1
switch(config-fex)# show interface ethernet 1/20 fex-intf
Fabric FEX
Interface Interfaces
-------------------------------------------------- Eth1/20 Eth100/1/8 Eth100/1/7 Eth100/1/6 Eth100/1/5
switch(config-fex)# show interface ethernet 1/21 fex-intf
Fabric FEX
Interface Interfaces
-------------------------------------------------- Eth1/21 Eth100/1/12 Eth100/1/11 Eth100/1/10 Eth100/1/9
switch(config-fex)# show interface ethernet 1/22 fex-intf
Fabric FEX
Interface Interfaces
-------------------------------------------------- Eth1/22 Eth100/1/16 Eth100/1/15 Eth100/1/14 Eth100/1/13
Cisco Nexus B22 Fabric Extender for HP Getting Started Guide
11
Page 12

Configuring the Cisco Nexus B22 Fabric Extender for HP
The next time that you reboot the Fabric Extender, the configured fabric interfaces are pinned to the host
interfaces in an ascending order by port number of the fabric interface. If you want to configure the same
fixed distribution of host interfaces without restarting the Fabric Extender, enter the fex pinning
redistribute command.
To redistribute the host interfaces on the Fabric Extender, perform this task:
Command Purpose
switch# fex pinning redistribute chassis
This example shows how to redistribute the host interfaces on a Fabric Extender:
switch# fex pinning redistribute 100
Caution The fex pinning redistribute command disrupts all the host interface ports of the Fabric Extender.
For additional information about configuring the Cisco Nexus B22 Fabric Extender for HP and Cisco
Nexus 5000 Series Switches, see the following documentation:
Redistributes the host connections. The range of the
chassis ID is from 100 to 199.
• Cisco Nexus 2000 Series Fabric Extender Software Configuration Guide
http://www.cisco.com/en/US/docs/switches/datacenter/nexus2000/sw/configuration/guide/rel_4_0
_1a/NX2000CLIConfig.html
• Cisco Nexus 5000 Series NX-OS Software Configuration Guide
http://www.cisco.com/en/US/docs/switches/datacenter/nexus5000/sw/configuration/guide/cli_rel_
4_0_1a/CLIConfigurationGuide.html
Displaying Fabric Extender Information
This section describes the show commands that are available to display the configuration and status of
the Fabric Extender and includes the following topics:
• Displaying Configuration Information, page 12
• Displaying Chassis Management Information, page 15
Displaying Configuration Information
To display configuration information about the defined interfaces, perform one of these tasks:
Command Purpose
switch# show fex [chassis [detail]
switch# show interface type number
fex-intf
switch# show interface fex-fabric
Displays information about a specific Fabric Extender
or all attached units.
Displays the Fabric Extender ports pinned to a
specific switch interface.
Displays the switch interfaces that have detected a
Fabric Extender uplink.
Cisco Nexus B22 Fabric Extender for HP Getting Started Guide
12
Page 13

Configuring the Cisco Nexus B22 Fabric Extender for HP
This example shows how to display all the attached Fabric Extender units:
switch(config-fex)# show fex
FEX FEX FEX FEX
Number Description State Model Serial
-----------------------------------------------------------------------100 FEX0100 Online N2K-B22HP-P FOC1516ZZLS
switch(config-fex)#
This example shows how to display the detailed status of a specific Fabric Extender:
switch# show fex 100 detail
FEX: 100 Description: FEX0100 state: Online
FEX version: 5.0(3)N2(1) [Switch version: 5.0(3)N2(1)]
FEX Interim version: 5.0(3)N2(0.236)
Switch Interim version: 5.0(3)N2(0.236)
Extender Model: N2K-B22HP-P, Extender Serial: FOC1514256S
Part No: 73-13780-05
Bay: 2
Rack: UnnamedRack
Enclosure: 1Z34AB789012
Enclosure Serial: USE6401VEX
Rack Id: Default RUID
Card Id: 145, Mac Addr: e8:b7:48:4b:e8:82, Num Macs: 64
Module Sw Gen: 21 [Switch Sw Gen: 21]
post level: complete
pinning-mode: static Max-links: 4
Fabric port for control traffic: Eth1/19
Fabric interface state:
Eth1/19 - Interface Up. State: Active
Eth1/20 - Interface Up. State: Active
Eth1/21 - Interface Up. State: Active
Eth1/22 - Interface Up. State: Active
Fex Port State Fabric Port
Eth100/1/1 Up Eth1/19
Eth100/1/2 Down Eth1/19
Eth100/1/3 Down Eth1/19
Eth100/1/4 Down Eth1/19
Eth100/1/5 Down Eth1/20
Eth100/1/6 Down Eth1/20
Eth100/1/7 Down Eth1/20
Eth100/1/8 Down Eth1/20
Eth100/1/9 Up Eth1/21
Eth100/1/10 Down Eth1/21
Eth100/1/11 Down Eth1/21
Eth100/1/12 Down Eth1/21
Eth100/1/13 Down Eth1/22
Eth100/1/14 Down Eth1/22
Eth100/1/15 Down Eth1/22
Eth100/1/16 Down Eth1/22
Logs:
06/22/2011 21:43:50.260429: Module register received
06/22/2011 21:43:50.261621: Image Version Mismatch
06/22/2011 21:43:50.261906: Registration response sent
06/22/2011 21:43:50.262180: Requesting satellite to download image
06/22/2011 21:47:36.78886: Deleting route to FEX
06/22/2011 21:47:36.83969: Module disconnected
06/22/2011 21:47:36.85724: Module Offline
06/22/2011 21:53:08.757010: Module register received
06/22/2011 21:53:08.758178: Registration response sent
06/22/2011 21:53:09.6227: Module Online Sequence
06/22/2011 21:53:11.736373: Module Online
06/22/2011 22:09:48.190062: Deleting route to FEX
06/22/2011 22:09:48.196995: Module disconnected
Cisco Nexus B22 Fabric Extender for HP Getting Started Guide
13
Page 14

Configuring the Cisco Nexus B22 Fabric Extender for HP
06/22/2011 22:09:48.198227: Deleting route to FEX
06/22/2011 22:09:48.203294: Module disconnected
06/22/2011 22:09:48.204160: Offlining Module
06/22/2011 22:09:48.204977: Module Offline Sequence
06/22/2011 22:09:48.527385: Module Offline
06/22/2011 22:10:23.644325: Module register received
06/22/2011 22:10:23.645444: Registration response sent
06/22/2011 22:10:23.864695: Module Online Sequence
06/22/2011 22:10:25.289316: Module Online
This example shows how to display the Fabric Extender interfaces pinned to a specific switch interface:
switch(config-fex)# show interface ethernet 1/19 fex-intf
'Fabric FEX
Interface Interfaces
-------------------------------------------------- Eth1/19 Eth100/1/4 Eth100/1/3 Eth100/1/2 Eth100/1/1
This example shows how to display the switch interfaces that are connected to a Fabric Extender uplink:
switch(config-fex)# show interface fex-fabric
Fabric Fabric Fex FEX
Fex Port Port State Uplink Model Serial
--------------------------------------------------------------100 Eth1/19 Active 1 N2K-B22HP-P FOC1514256S
100 Eth1/20 Active 2 N2K-B22HP-P FOC1514256S
100 Eth1/21 Active 3 N2K-B22HP-P FOC1514256S
100 Eth1/22 Active 4 N2K-B22HP-P FOC1514256S
switch(config-fex)#
Note The above example shows a Fabric Extender with four uplink connections, only one of which is currently
active.
This example shows how to display the SFP+ transceiver and diagnostic optical monitoring (DOM)
information for Fabric Extender uplinks:
switch# show interface ethernet 1/40 transceiver
Ethernet1/40
sfp is present
name is CISCO-EXCELIGHT
part number is SPP5101SR-C1
revision is A
serial number is ECL120901AV
nominal bitrate is 10300 MBits/sec
Link length supported for 50/125mm fiber is 82 m(s)
Link length supported for 62.5/125mm fiber is 26 m(s)
cisco id is -cisco extended id number is 4
switch# show interface ethernet 1/40 transceiver fex-fabric
Ethernet1/40
sfp is present
name is CISCO-EXCELIGHT
part number is SPP5101SR-C1
revision is A
serial number is ECL120601U0
nominal bitrate is 10300 MBits/sec
Link length supported for 50/125mm fiber is 82 m(s)
Link length supported for 62.5/125mm fiber is 26 m(s)
cisco id is -cisco extended id number is 4
Cisco Nexus B22 Fabric Extender for HP Getting Started Guide
14
Page 15

Note The first show command above shows the SFP+ transceiver that is plugged into the parent switch
interface. The second show command displays the SFP+ transceiver that is plugged into the uplink port
on the Fabric Extender.
Displaying Chassis Management Information
To display configuration information used on the switch supervisor to manage the Fabric Extender,
perform one of these tasks:
Command Purpose
switch# show diagnostic result fex
chassis
switch# show inventory fex chassis
switch# show module fex chassis
Configuring the Cisco Nexus B22 Fabric Extender for HP
Displays results from the diagnostic test for a Fabric
Extender chassis.
Displays inventory information for a Fabric Extender
chassis.
Displays module information about a Fabric Extender
chassis.
This example shows how to display the module information about all connected Fabric Extender units:
switch(config-fex)# show module fex
FEX Mod Ports Card Type Model Status.
--- --- ----- ---------------------------------- ------------------ ----------100 1 16 Fabric Extender 16x10GE + 8x10G Module N2K-B22HP-P present
FEX Mod Sw Hw World-Wide-Name(s) (WWN)
--- --- -------------- ------ ----------------------------------------------100 1 5.0(3)N2(1) 0.501 --
FEX Mod MAC-Address(es) Serial-Num
--- --- -------------------------------------- ---------100 1 e8b7.484b.e880 to e8b7.484b.e88f FOC1514256S
switch(config-fex)#
switch(config-fex)# show module fex 100
FEX Mod Ports Card Type Model Status.
--- --- ----- ---------------------------------- ------------------ ----------100 1 16 Fabric Extender 16x10GE + 8x10G Module N2K-B22HP-P present
FEX Mod Sw Hw World-Wide-Name(s) (WWN)
--- --- -------------- ------ ----------------------------------------------100 1 5.0(3)N2(1) 0.501 --
FEX Mod MAC-Address(es) Serial-Num
--- --- -------------------------------------- ---------100 1 e8b7.484b.e880 to e8b7.484b.e88f FOC1514256S
switch(config-fex)#
This example shows how to display the inventory information about a specific Fabric Extender unit:
switch(config-fex)# show inventory fex 100
NAME: "FEX 100 CHASSIS", DESCR: "N2K-B22HP-P CHASSIS"
PID: N2K-B22HP-P , VID: V00 , SN: FOC1516ZZLS
NAME: "FEX 100 Module 1", DESCR: "Fabric Extender Module: 16x10GE, 8x10GE Supervisor"
PID: N2K-B22HP-P , VID: V00 , SN: FOC1514256S
switch(config-fex)#
Cisco Nexus B22 Fabric Extender for HP Getting Started Guide
15
Page 16

Configuring the Cisco Nexus B22 Fabric Extender for HP
This example shows how to display diagnostic test results for a specific Fabric Extender unit:
switch(config-fex)# show diagnostic result fex 100
FEX-100: Fabric Extender 16x10GE + 8x10G Module SerialNo : FOC1514256S
Overall Diagnostic Result for FEX-100 : OK
Test results: (. = Pass, F = Fail, U = Untested)
TestPlatform:
0) SPROM: ---------------> .
1) Inband interface: ---------------> .
2) Fan: ---------------> .
3) Power Supply: ---------------> .
4) Temperature Sensor: ---------------> .
Eth 1 2 3 4 5 6 7 8
Port -------------------------
. . . . . . . .
Eth 9 10 11 12 13 14 15 16
Port ------------------------
. . . . . . . .
TestFabricPorts:
Fabric 1 2 3 4 5 6 7 8
Port -------------------------
. . . . . . . .
switch(config-fex)#
This example shows how to display the environment status for a specific Fabric Extender unit:
switch(config-fex)# show environment fex 100
Temperature Fex 100:
----------------------------------------------------------------Module Sensor MajorThresh MinorThres CurTemp Status
(Celsius) (Celsius) (Celsius)
----------------------------------------------------------------1 Outlet-1 85 75 39 ok
1 Outlet-2 85 75 48 ok
1 Inlet-1 85 75 36 ok
1 Inlet-2 85 75 27 ok
1 Die-1 110 105 55 ok
switch(config-fex)#
This example shows how to display the SPROM for a specific Fabric Extender unit:
switch(config-fex)# show sprom fex 100 all
DISPLAY FEX 100 SUP sprom contents
Common block:
Block Signature : 0xabab
Block Version : 3
Block Length : 160
Block Checksum : 0x1860
EEPROM Size : 65535
Block Count : 3
FRU Major Type : 0x6002
FRU Minor Type : 0x0
OEM String : Cisco Systems, Inc.
Product Number : N2K-B22HP-P
Serial Number : FOC1514256S
Part Number : 73-13780-05
Part Revision : 02
Mfg Deviation : 0
H/W Version : 0.501
Mfg Bits : 0
Engineer Use : 0
Cisco Nexus B22 Fabric Extender for HP Getting Started Guide
16
Page 17

snmpOID : 9.12.3.1.9.78.9.0
Power Consump : 625
RMA Code : 0-0-0-0
CLEI Code : COUCAPKCAA
VID : V00
Supervisor Module specific block:
Block Signature : 0x6002
Block Version : 2
Block Length : 103
Block Checksum : 0x2603
Feature Bits : 0x0
HW Changes Bits : 0x0
Card Index : 11048
MAC Addresses : 00-00-00-00-00-00
Number of MACs : 0
Number of EPLD : 0
Port Type-Num : 1-8
Sensor #1 : 85,75
Sensor #2 : 85,75
Sensor #3 : 85,75
Sensor #4 : 85,75
Sensor #5 : 95,85
Sensor #6 : -128,-128
Sensor #7 : -128,-128
Sensor #8 : -128,-128
Max Connector Power: 625
Cooling Requirement: 8
Ambient Temperature: 40
Configuring the Cisco Nexus B22 Fabric Extender for HP
DISPLAY FEX 100 backplane sprom contents:
Common block:
Block Signature : 0xabab
Block Version : 3
Block Length : 160
Block Checksum : 0x17e8
EEPROM Size : 65535
Block Count : 5
FRU Major Type : 0x6001
FRU Minor Type : 0x0
OEM String : Cisco Systems, Inc.
Product Number : N2K-B22HP-P
Serial Number : FOC1516ZZLS
Part Number : 68-4133-02
Part Revision : 05
Mfg Deviation : 0
H/W Version : 0.501
Mfg Bits : 0
Engineer Use : 0
snmpOID : 9.12.3.1.3.1058.0.0
Power Consump : 0
RMA Code : 0-0-0-0
CLEI Code : COUCAPKCAA
VID : V00
Chassis specific block:
Block Signature : 0x6001
Block Version : 3
Block Length : 39
Block Checksum : 0x465
Feature Bits : 0x0
HW Changes Bits : 0x0
Stackmib OID : 0
MAC Addresses : e8-b7-48-4b-e8-80
Number of MACs : 64
Cisco Nexus B22 Fabric Extender for HP Getting Started Guide
17
Page 18

Configuring the Cisco Nexus B22 Fabric Extender for HP
OEM Enterprise : 0
OEM MIB Offset : 0
MAX Connector Power: 0
WWN software-module specific block:
Block Signature : 0x6005
Block Version : 1
Block Length : 0
Block Checksum : 0x66
wwn usage bits:
00 00 00 00 00 00 00 00
00 00 00 00 00 00 00 00
00 00 00 00 00 00 00 00
00 00 00 00 00 00 00 00
00 00 00 00 00 00 00 00
00 00 00 00 00 00 00 00
00 00 00 00 00 00 00 00
00 00 00 00 00 00 00 00
00 00 00 00 00 00 00 00
00 00 00 00 00 00 00 00
00 00 00 00 00 00 00 00
00 00 00 00 00 00 00 00
00 00 00 00 00 00 00 00
00 00 00 00 00 00 00 00
00 00 00 00 00 00 00 00
00 00 00 00 00 00 00 00
00 00 00 00 00 00 00 00
00 00 00 00 00 00 00 00
00 00 00 00 00 00 00 00
00 00 00 00 00 00 00 00
00 00 00 00 00 00 00 00
00 00 00 00 00 00 00 00
00 00 00 00 00 00 00 00
00 00 00 00 00 00 00 00
00 00 00 00 00 00 00 00
00 00 00 00 00 00 00 00
00 00 00 00 00 00 00 00
00 00 00 00 00 00 00 00
00 00 00 00 00 00 00 00
00 00 00 00 00 00 00 00
00 00 00 00 00 00 00 00
00 00
License software-module specific block:
Block Signature : 0x6006
Block Version : 1
Block Length : 16
Block Checksum : 0x77
lic usage bits:
00 00 00 00 00 00 00 00
DISPLAY FEX 100 UPLINK sprom contents
Common block:
Block Signature : 0x0
Block Version : 0
Block Length : 0
Block Checksum : 0x0
EEPROM Size : 0
Block Count : 0
FRU Major Type : 0x0
FRU Minor Type : 0x0
OEM String :
Product Number :
Serial Number :
Part Number :
Cisco Nexus B22 Fabric Extender for HP Getting Started Guide
18
Page 19

Part Revision :
Mfg Deviation :
H/W Version : 0.0
Mfg Bits : 0
Engineer Use : 0
snmpOID : 0.0.0.0.0.0.0.0
Power Consump : 0
RMA Code : 0-0-0-0
CLEI Code :
VID : V00
Supervisor Module specific block:
Block Signature : 0x0
Block Version : 0
Block Length : 0
Block Checksum : 0x0
Feature Bits : 0x0
HW Changes Bits : 0x0
Card Index : 0
MAC Addresses : 00-00-00-00-00-00
Number of MACs : 0
Number of EPLD : 0
Port Type-Num : 0-0
Sensor #1 : 0,0
Sensor #2 : 0,0
Sensor #3 : 0,0
Sensor #4 : 0,0
Sensor #5 : 0,0
Sensor #6 : 0,0
Sensor #7 : 0,0
Sensor #8 : 0,0
Max Connector Power: 0
Cooling Requirement: 0
Ambient Temperature: 0
switch(config-fex)#
switch(config-fex)#
switch(config-fex)#
switch(config-fex)#
switch(config-fex)#
switch(config-fex)#
Verifying the Configuration
Verifying the Configuration
The Onboard Administrator (OA) is the management module used to support and manage the HP
BladeSystem c-Class enclosure or the HP Integrity Superdome 2 and all the devices used in the
enclosure. Once the switch is installed in the interconnect bay, the OA verifies that the switch type
matches the mezzanine cards present on the server blades. If there is no mismatch, the OA powers on the
switch. If the switch does not power on, check the enclosure and switch status using the OA web
interface. For more information and troubleshooting tips, see the HP BladeSystem Onboard
Administrator User Guide or the or the HP Integrity Superdome 2 Onboard Administrator User Guide.
To verify the configuration,
1. Locate the LEDs. See Figure 6.
Cisco Nexus B22 Fabric Extender for HP Getting Started Guide
19
Page 20

Additional Information
Figure 6 Identifying LEDs
1
310170
2
1 UID LED
2 Health LED
2. Check the LEDs and refer to the indicators described in the following table.
Item Description Indicators
1 UID LED—Helps the user locate a
specific module in the BladeSystem,
such as for replacement.
2 Health LED—Indicates normal
operation.
Note You need an OA version of 3.3.
Note For HP Integrity Superdome 2, the minimum F/W bundle is 2.51.102
Additional Information
For more information on the association between the server mezzanine bays and the enclosure
interconnect bays, see the setup and installation guide provided with your enclosure. For more
information see the HP websites:
• http://www.hp.com/go/bladesystem/interconnects
Off
Steady green light
• http://www.hp.com/go/bladesystem/documentation
• http://www.hp.com/go/Integrity_Servers-docs
The location where you install the mezzanine card determines where you need to install the interconnect
modules such as the Cisco Nexus B22 Fabric Extender for HP.
Figure 7 shows the external ports for the Cisco Nexus B22 Fabric Extender for HP.
Cisco Nexus B22 Fabric Extender for HP Getting Started Guide
20
Page 21

Figure 7 External Ports
Related Documentation
310168
1
Note For specific information about the Bladesystem enclosure internal port mapping, see the setup and
installation guide provided with the enclosure.
Related Documentation
Documentation for Cisco Nexus 5000 Series Switches and Cisco Nexus 2000 Series Fabric Extenders is
available at the following URL:
http://www.cisco.com/en/US/products/ps9670/tsd_products_support_series_home.html
Installation documentation for the HP BladeSystem is available at:
http://h18004.www1.hp.com/products/blades/components/c-class-tech-installing.html
Documentation for HP Integrity Superdome 2:
http://h20000.www2.hp.com/bizsupport/TechSupport/DocumentIndex.jsp?lang=en&cc=us&taskId=10
1&prodClassId=-1&contentType=SupportManual&docIndexId=64255&prodTypeId=15351&prodSeri
esId=4311905
2
1 External ports 1, 2, 3, and 4
2 External ports 5, 6, 7, and 8
Technical Support
Technical support for the Cisco Nexus B22 Fabric Extender for HP can be obtained from either Cisco or
Hewlett Packard. This topic includes the following sections:
• For Hewlett Packard Support, page 21
• For Cisco Support, page 22
For Hewlett Packard Support
For hardware replacement under warranty, contact Hewlett Packard.
In the United States, for contact options see the Contact HP United States webpage. To contact HP by
phone:
• Call 1-800-HP-INVENT (1-800-474-6836). This service is available 24 hours a day, 7 days a week.
For continuous quality improvement, calls may be recorded or monitored.
Cisco Nexus B22 Fabric Extender for HP Getting Started Guide
21
Page 22

Technical Support
• If you have purchased a Care Pack (service upgrade), call 1-800-633-3600. For more information
In other locations or for the name of the nearest HP authorized reseller, see the Contact HP worldwide
(in English) webpage.
For Cisco Support
For configuration or troubleshooting assistance, the Cisco Nexus B22 Fabric Extender for HP is covered
under the Cisco support contract of the parent Cisco Nexus switch.
For information on obtaining documentation, submitting a service request, and gathering additional
information, see the monthly What’s
revised Cisco
http://www.cisco.com/en/US/docs/general/whatsnew/whatsnew.html
Subscribe to the What’s New in Cisco Product Documentation as an RSS feed and set content to be
delivered directly to your desktop using a reader application. The RSS feeds are a free service. Cisco currently
supports RSS
Cisco and the Cisco Logo are trademarks of Cisco Systems, Inc. and/or its affiliates in the U.S. and other countries. A listing of Cisco's trademarks
can be found at
partner does not imply a partnership relationship between Cisco and any other company. (1005R)
©2011 Cisco Systems, Inc. All rights reserved.
about Care Packs, refer to the HP website.
New in Cisco Product Documentation, which also lists all new and
technical documentation, at:
Ve r si o n 2.0.
www.cisco.com/go/trademarks. Third party trademarks mentioned are the property of their respective owners. The use of the word
Cisco Nexus B22 Fabric Extender for HP Getting Started Guide
22
 Loading...