

Page 1

Cisco PNNI Network Planning Guide for MGX and SES Products, Release 5
Release 5
April 14, 2004
Corporate Headquarters
Cisco Systems, Inc.
170 West Tasman Drive
San Jose, CA 95134-1706
USA
http://www.cisco.com
Tel: 408 526-4000
800 553-NETS (6387)
Fax: 408 526-4100
Text Part Number: OL-3847-01 Rev. D0
Page 2

THE SPECIFICATIONS AND INFORMATION REGARDING THE PRODUCTS IN THIS MANUAL ARE SUBJECT TO CHANGE WITHOUT NOTICE. ALL
STATEMENTS, INFORMA TION, AND RECOMMENDATIONS IN THIS MANUAL ARE BELI EVED TO BE ACCURATE BUT ARE PRE SENTED WITHOUT
WARRANTY OF ANY KIND, EXPRESS OR IMPLIED. USERS MUST TAKE FULL RESPONSIBILITY FOR THEIR APPLICATION OF ANY PRODUCTS.
THE SOFTWARE LICENSE AND LIMITED WARRANTY FOR THE ACCOMPANYING PRODUCT ARE SET FORTH IN THE INFORMATION PACKET THAT
SHIPPED WITH THE PRODUCT AND ARE INCORPORATED HEREIN BY THIS REFERENCE. IF YOU ARE UNABLE TO LOCATE THE SOFTWARE LICENSE
OR LIMITED WARRANTY, CONTACT YOUR CISCO REPRESENTATIVE FOR A COPY.
The Cisco implementation of TCP header compression is an adaptation of a program developed by the University of California, Berkeley (UCB) as part of UCB’s public
domain version of the UNIX operating system. All rights reserved. Copyright © 1981, Regents of the University of California.
NOTWITHSTANDING ANY OTHER WARRANTY HEREIN, ALL DOCUMENT FILES AND SOFTWARE OF THESE SUPPLIERS ARE PROVIDED “AS IS” WITH
ALL FAULTS. CISCO AND THE ABOVE-NAMED SUPPLIERS DISCLAIM ALL WARRANTIES, EXPRESSED OR IMPLIED, INCLUDING, WITHOUT
LIMITATION, THOSE OF MERCHANTABILITY, FITNESS FOR A PARTICULAR PURPOSE AND NONINFRINGEMENT OR ARISING FROM A COURSE OF
DEALIN G, USA GE, OR TRADE PRACT ICE.
IN NO EVENT SHALL CISCO OR ITS SUPPLIERS BE LIABLE FOR ANY INDIRECT, SPECIAL, CONSEQUENTIAL, OR INCIDENTAL DAMAGES, INCLUDING,
WITHOUT LIMITATION, LOST PROFITS OR LOSS OR DAMAGE TO DATA ARISING OUT OF THE USE OR INABILITY TO USE THIS MANUAL, EVEN IF CISCO
OR ITS SUPPLIERS HAVE BEEN ADVISED OF THE POSSIBILITY OF SUCH DAMAGES.
CCIP, CCSP, the Cisco Arrow logo, the Cisco Powered Network mark, Cisco Unity, Follow Me Browsing, FormShare, and StackWise are trademarks of Cisco Systems, Inc.;
Changing the Way We Work, Live, Play, and Learn, and iQuick Study are service marks of Cisco Systems, Inc.; and Aironet, ASIST, BPX, Catalyst, CCDA, CCDP, CCIE,
CCNA, CCNP, Cisco, the Cisco Certified Internetwork Expert logo, Cisco IOS, the Cisco IOS logo, Cisco Press, Cisco Systems, Cisco Systems Capital, the Cisco Systems
logo, Empowering the Internet Generation, Enterprise/Solver, EtherChannel, EtherSwitch, Fast Step, GigaStack, Internet Quotient, IOS, IP/TV, iQ Expertise, the iQ logo, iQ
Net Readiness Scorecard, LightStream, Linksys, MGX, MICA, the Networkers logo, Networking Academy, Network Reg istrar, Packet, PIX, Post-Routing, Pre-Routing,
RateMUX, Registrar, ScriptShare, SlideCast, SMARTnet, StrataView Plus, Stratm, SwitchProbe, TeleRouter, The Fastest Way to Increase Your Internet Quotient, TransPath,
and VCO are registered trademarks of Cisco Systems, Inc. and/or its affiliates in the United States and certain other countries.
All other trademarks mentioned in this document o r Website are the property of their respective owners. The use of the word partner does not imply a partnership relationship
between Cisco and any other company. (0402R)
Cisco PNNI Network Planning Guide for MGX and SES Products, Release 5
Copyright © 2003, Cisco Systems, Inc.
All rights reserved.
Page 3

About This Guide xi
Objectives xi
Audience xi
Organization xi
Conventions xii
Documentation xiii
Documentation Notes for the April 2004 Product Releases xiii
Related Documentation xiii
Technical Manual Order of Use xiv
Technical Manual Titles and Descriptions xv
Obtaining Documentation xxvii
Cisco.com xxvii
Ordering Documentation xxvii
Finding Documentation for Cisco MGX, BPX, SES, and CWM Products xxviii
Changes to This Document xxviii
Documentation Feedback xxix
CONTENTS
CHAPTER
Obtaining Technical Assistance xxix
Cisco TAC Website xxix
Opening a TAC Case xxix
TAC Case Priority Definitions xxx
Obtaining Additional Publications and Information xxx
1 Introduction to PNNI 1-1
The PNNI Network Database 1-1
The Single Peer Group Topology 1-2
The Hierarchical PNNI Network Topology 1-3
Peer Group Leaders 1-6
Simple Node Representation 1-6
Complex Node Representation 1-7
Border Nodes 1-8
Hierarchical PNNI Network Benefits 1-8
PNNI Internetworking with AINI 1-8
PNNI Internetworking with IISP 1-9
Part Number OL-3847-01 Rev. D0, April, 2004
Cisco PNNI Network Planning Guide for MGX and SES Products, Release 5
iii
Page 4

Contents
CHAPTER
CHAPTER
2 Interoperability and Performance Planning 2-1
Compatible Standards 2-1
Specifications 2-1
Connection Limit Adjustments 2-4
Physical Network Planning 2-5
Install Redundant Hardware in Switches 2-5
Parallel Links Between Adjacent Switches 2-5
Multiple Links Between Adjacent Peer Groups 2-6
Multiple Links to an External Network 2-6
Multiple Paths Between Network Nodes 2-6
Planning Guidelines for Individual Peer Groups 2-6
Planning Guidelines for Hierarchical Networks 2-7
Planning Guidelines for Peer Group Leaders 2-7
Planning Guidelines for Border Nodes 2-7
3 Address and Closed User Group Planning 3-1
Address Planning Overview 3-1
Planning Address Configuration Settings 3-3
Selecting an ATM Address Format 3-3
Supported Address Formats 3-4
Guidelines for Selecting an Address Format 3-5
Address Registration Authorities 3-6
Selecting a PNNI Level 3-6
Selecting the PNNI Peer Group ID 3-10
Selecting the ATM Address 3-11
Selecting the ILMI Address Prefix 3-12
Selecting the SPVC Address Prefix 3-12
Planning Address Prefixes for AINI and IISP Links 3-12
Selecting Static Addresses for UNI Ports 3-13
Additional Guidelines for Creating an Address Plan 3-13
Closed User Group Overview 3-14
Part Number OL-3847-01 Rev. D0, April, 2004
Cisco PNNI Network Planning Guide for MGX and SES Products, Release 5
iv
Page 5

Planning CUG Configuration Settings 3-15
Selecting an Interlock Code 3-15
Selecting an Index 3-15
Selecting CPE Addresses 3-16
Selecting Internal CUG Access Options 3-16
Selecting External CUG Access Options 3-17
Specifying a Preferential CUG 3-17
Selecting a Default CUG Address 3-18
Worksheets 3-18
Contents
CHAPTER
4 Planning Intermediate Route Selection 4-1
How MGX and SES Nodes Select Routes 4-1
Link and Route Metrics 4-1
Administrative Weight 4-1
Cell Transfer Delay 4-2
Cell Delay Variation 4-2
Available Cell Rate 4-2
Maximum Cell Rate 4-3
Shortest Path Table Routing 4-3
The Shortest Path Tables 4-3
How SVCs and SVPs use the SPTs 4-5
How SPVCs and SPVPs use the SPTs 4-5
On-Demand Routing 4-6
Load Balancing for SPT and On-Demand Routing 4-6
How MGX and SES Nodes Select Links 4-6
Additional Routing Features in MGX and SES Nodes 4-7
Preferred Routing 4-7
Priority Routing 4-8
Grooming 4-8
Soft Rerouting 4-9
Priority Bumping 4-9
Blocking Pass-Through Connections 4-9
Nodal Point-to-Multipoint Branch Restriction 4-9
I
NDEX
Part Number OL-3847-01 Rev. D0, April, 2004
Cisco PNNI Network Planning Guide for MGX and SES Products, Release 5
v
Page 6

Contents
vi
Cisco PNNI Network Planning Guide for MGX and SES Products, Release 5
Part Number OL-3847-01 Rev. D0, April, 2004
Page 7

Figure 1-1 Example Single Peer Group Topology 1-3
Figure 1-2 Example Hierarchical PNNI Network Topology Showing Multiple Peer Groups 1-4
Figure 1-3 Example Hierarchical PNNI Network Topology Showing a Two-Level Hierarchy 1-5
Figure 1-4 Simple Node Representation 1-7
Figure 1-5 Complex Node Representation 1-7
Figure 1-6 Example PNNI Internetworking with AINI Topology 1-9
Figure 3-1 PNNI Addressing Example 3-2
Figure 3-2 Supported ATM Address Formats 3-4
Figure 3-3 PNNI Network Physical Topology 3-7
Figure 3-4 MPG WAN Topology 3-7
Figure 3-5 Default Peer Group ID 3-10
FIGURES
Figure 3-6 20-byte Node Address 3-11
Figure 3-7 Closed User Group Example 3-14
Figure 4-1 P2MP Root, Leaf, and Party Components 4-10
Figure 4-2 Farthest Node Branching 4-11
Part Number OL-3847-01 Rev. D0, April, 2004
Cisco PNNI Network Planning Guide for MGX and SES Products, Release 5
vii
Page 8

Figures
viii
Cisco PNNI Network Planning Guide for MGX and SES Products, Release 5
Part Number OL-3847-01 Rev. D0, April, 2004
Page 9

TABLES
Table 1 Technical Manuals and Release Notes for Cisco MGX and BPX Switches and Media Gateways (April 2004
Product Releases) xvi
Table 2 Documents that Ship with Multiservice Switch Products xxii
Table 3 Descriptions of Technical Manuals and Release Notes for Cisco Multiservice Switch Products xxii
Table 4 Changes to This Book Since the Previous Release xxviii
Table 2-1 PNNI Networking Specifications for MGX Switches and the MGX 8880 Media Gateway 2-2
Table 2-2 PNNI Networking Specifications for SES Equipped BPX Switches 2-3
Table 2-3 Switch and CWM Connection Units for Each Connection Type 2-4
Table 3-1 ATM Address Components 3-5
Table 3-2 Address Registration Authorities 3-6
Table 3-3 Recommended PNNI Level Values 3-9
Table 3-4 Nodal Address Worksheet 3-18
Table 3-5 Port Address Worksheet 3-19
Table 3-6 CUG Configuration Worksheet 3-19
Table 4-1 Pre-calculated Routing Tables 4-4
Table 4-2 Supported Service Classes for MGX and SES Nodes 4-4
Table 4-3 Link Selection Parameters Required for Various Classes of Service 4-7
Table 4-4 MGX Service Module Support for P2MP Branching 4-10
Part Number OL-3847-01 Rev. D0, April, 2004
Cisco PNNI Network Planning Guide for MGX and SES Products, Release 5
ix
Page 10

Tables
Cisco PNNI Network Planning Guide for MGX and SES Products, Release 5
x
Part Number OL-3847-01 Rev. D0, April, 2004
Page 11

Objectives
About This Guide
This preface describes the objectives, audience, organization, and conventions of the Cisco PNNI
Network Planning Guide for MGX and SES Products, Release 5.
This guide describes how to plan a PNNI network before for installing and configuring the following
products:
Audience
The Cisco PNNI Network Planning Guide for MGX and SES Products, Release 5 helps network
architects and planners identify the information they need to provide to the personnel that will install
and configure the PNNI switch products described in this guide.
Organization
The major sections of this document are as follows:
• Cisco MGX 8830 Release 3.0 and higher
• Cisco MGX 8850 (PXM1E) Release 3.0 and higher
• Cisco MGX 8850 (PXM45) Release 2.0 and higher
• Cisco MGX 8880 Media Gateway Release 5.0 and higher
• Cisco MGX 8950 Release 2.1.60 and higher
• Cisco BPX 8600 and Cisco Service Expansion Shelf (SES) with SES Release 1.0 or later software
• Chapter 1, “Introduction to PNNI,” introduces PNNI network concepts, components, and
terminology.
• Chapter 2, “Interoperability and Performance Planning,” lists PNNI network specifications and
provides general guidelines for planning PNNI networks.
Part Number OL-3847-01 Rev. D0, April, 2004
Cisco PNNI Network Planning Guide for MGX and SES Products, Release 5
xi
Page 12

Conventions
Conventions
This publication uses the following conventions.
Command descriptions use these conventions:
Examples use these conventions:
About This Guide
• Chapter 3, “Address and Closed User Group Planning,” describes how to implement network plans
using ATM addresses that help define the network structure.
• Chapter 4, “Planning Intermediate Route Selection,” describes how PNNI network nodes select
routes and provides guidelines for influencing route selection.
• Commands and keywords are in boldface.
• Arguments for which you supply values are in italics.
• Required command arguments are inside angle brackets (< >).
• Optional command arguments are in square brackets ([ ]).
• Alternative keywords or variables are separated by vertical bars ( | ).
• Terminal sessions and information the system displays are in screen font.
• Information you enter is in boldface screen font.
• Nonprinting characters, such as passwords, are in angle brackets (< >).
• Default responses to system prompts are in square brackets ([ ]).
Note Means reader take note. Notes contain helpful suggestions or references to materials not contained in
this manual.
Caution Means reader be careful. In this situation, you might do something that could result in equipment
damage or loss of data.
Tip Provides additional information that can help you understand the product or complete a task more
efficiently.
Warning
This warning symbol means danger. You are in a situation that could cause bodily injury. Before you
work on any equipment, you must be aware of the hazards involved with electrical circuitry and
familiar with standard practices for preventing accidents. (To see translated versions of this warning,
refer to the Regulatory Compliance and Safety Information document that accompanied the product.
xii
Cisco PNNI Network Planning Guide for MGX and SES Products, Release 5
Part Number OL-3847-01 Rev. D0, April, 2004
Page 13

About This Guide
Documentation
A Guide to Cisco Multiservice Switch and Media Gateway Documentation ships with your product. That
guide contains general information about how to locate Cisco MGX, BPX, SES, and CWM
documentation online.
Documentation Notes for the April 2004 Product Releases
The April 2004 release includes new hardware or features for the following releases:
• Cisco MGX Release 5 for the MGX 8880 Media Gateway
• Cisco MGX Release 5 for these multiservice switches:
–
Cisco MGX 8850 (PXM1E)
–
Cisco MGX 8850 (PXM45)
–
Cisco MGX 8950
–
Cisco MGX 8830
Documentation
• Cisco MGX Release 1.3, for these multiservice switches:
–
Cisco MGX 8850 (PXM1)
–
Cisco MGX 8230
–
Cisco MGX 8250
• Cisco VXSM Release 5. The Voice Switch Service Module (VXSM) card is new for this release.
• Cisco WAN Manager Release 15. The Cisco WAN Manager (CWM) network management software
is improved for this release. The previous release of CWM was 12. CWM Release 15 introduces a
helpful new documentation feature: web-based online Help. To invoke online Help, press F1 on a
PC, press the Help key on a UNIX workstation, or select Help from the main or popup menu.
Other components of multiservice WAN products, such as the Service Expansion Shelf (SES) and WAN
switching software have no new features for the April 2004 release, therefore, their existing
documentation was not updated.
Related Documentation
This section describes the technical manuals and release notes that support the April 2004 release of
Cisco Multiservice Switch products.
Part Number OL-3847-01 Rev. D0, April, 2004
Cisco PNNI Network Planning Guide for MGX and SES Products, Release 5
xiii
Page 14

Documentation
Technical Manual Order of Use
Use the technical manuals listed here in the following order:
Step 1 Refer to the documents that ship with your product. Observe all safety precautions.
• Regulatory Compliance and Safety Information for Cisco Multiservice Switch and Media Gateway
Products (MGX, BPX, and SES)—This document familiarizes you with safety precautions for your
product.
• Guide to Cisco Multiservice Switch and Media Gateway Documentation—This document explains
how to find documentation for MGX, BPX, and SES multiservice switches and media gateways as
well as CWM network management software. These documents are available only online.
• Installation Warning Card—This document provides precautions about installing your cards. It
explains such subjects as removing the shipping tab and inserting cards properly into the correct
slots.
Step 2 Refer to the release notes for your product.
Step 3 If your network uses the CWM network management system, upgrade CWM. (If you are going to install
CWM for the first time, do so after Step 4.) Upgrade instructions are included in the following
documents:
• Cisco WAN Manager Installation Guide, Release 15
About This Guide
• Cisco WAN Manager User’s Guide, Release 15
Step 4 If your network contains MGX and SES products, refer to this manual for planning information:
• Cisco PNNI Network Planning Guide for MGX and SES Products
Step 5 Refer to these manuals for information about installing cards and cables in the MGX chassis:
• Cisco MGX 8850 (PXM1E/PXM45), Cisco MGX 8950, Cisco MGX 8830, and Cisco MGX 8880
Hardware Installation Guide, Releases 2 Through 5 for installing cards and cables in these chassis.
• Cisco MGX 8xxx Edge Concentrator Installation and Configuration Guide for installing cards and
cables in the Cisco MGX 8230, Cisco MGX 8250, or Cisco MGX 8850 (PXM1) chassis.
Step 6 Refer to the manuals that help you configure your MGX switch and processor cards:
• Cisco MGX 8850 (PXM1E/PXM45), Cisco MGX 8950, Cisco MGX 8830, and Cisco MGX 8880
Configuration Guide, Release 5 for these chassis.
• Cisco MGX 8xxx Edge Concentrator Installation and Configuration Guide for the Cisco MGX 8230,
Cisco MGX 8250, or Cisco MGX 8850 (PXM1) chassis.
Step 7 Refer to the manual that supports the additional cards you intend to install in your switch. For example:
• The services books can help you establish ATM, Frame Relay, or circuit emulation services on your
switch.
• The VISM book can help you set up your switch as a voice gateway, and the RPM book can help
you implement IP on the switch.
Step 8 Additional books, such as command reference guides and error message books, can help with the daily
operation and maintenance of your switch.
xiv
Cisco PNNI Network Planning Guide for MGX and SES Products, Release 5
Part Number OL-3847-01 Rev. D0, April, 2004
Page 15

About This Guide
Note Manual titles may be different for earlier software releases. The titles shown in Tabl e 1 are for the April
2004 release.
Technical Manual Titles and Descriptions
Table 1 lists the technical manuals and release notes that support the April 2004 multiservice switch
product releases. Books and release notes in Tab le 1 are listed in order of use and include information
about which multiservice switch or media gateway the document supports.
The books for Cisco MGX 8230, Cisco MGX 8250, and Cisco MGX 8850 (PXM1) switches were not
updated for the April 2004 release, therefore, some information about configuring and using the new
MPSM-8-T1E1 card in these switches is included in the following books:
• Cisco ATM Services (AUSM/MPSM) Configuration Guide and Command Reference for MGX
Switches, Release 5
• Cisco Frame Relay Services (FRSM/MPSM) Configuration Guide and Command Reference for
MGX Switches, Release 5
• Cisco Circuit Emulation Services (CESM/MPSM) Configuration Guide and Command Reference for
MGX Switches, Release 5
Documentation
Terms
Information about how to install or upgrade to the MPSM-8-T1E1 card in Cisco MGX 8230, Cisco
MGX 8250, and Cisco MGX 8850 (PXM1) switches is in the Release Notes for Cisco MGX 8230, Cisco
MGX 8250, and Cisco MGX 8850 (PXM1) Switches, Release 1.3.00.
Note Refer to each product’s release notes for the latest information on features, bug fixes, and more.
Two main types of ATM cards are used in MGX switches: AXSM and AUSM. AXSM stands for ATM
Switching Service Module. AUSM stands for ATM UNI (User Network Interface) Service Module.
CWM stands for Cisco WAN Manager, our multiservice switch network management system.
Legacy service module refers to a previously introduced card. For this release, the term is used
specifically for the CESM-8-T1E1, FRSM-8-T1E1, and AUSM-8-T1E1 cards, which can now be
replaced by the new MPSM-8-T1E1 card.
MPSM stands for Multiprotocol Service Module.
RPM stands for Route Processor Module.
SES stands for Service Expansion Shelf.
VISM stands for Voice Interworking Service Module.
VXSM stands for Voice Switch Service Module.
Part Number OL-3847-01 Rev. D0, April, 2004
Cisco PNNI Network Planning Guide for MGX and SES Products, Release 5
xv
Page 16

About This Guide
Documentation
Table 1 Technical Manuals and Release Notes for Cisco MGX and BPX Switches and Media Gateways (April 2004
Product Releases)
Document Title and Part Number
Overview and Safety Documents
Guide to Cisco Multiservice Switch
and Media Gateway
Documentation
DOC-7814807=
Installation Warning Card
DOC-7812348=
Regulatory Compliance and Safety
Information for Cisco Multiservice
Switch and Media Gateway
Products (MGX, BPX, and SES)
DOC-7814790=
Release Notes for the Cisco MGX
8880 Media Gateway, Release
5.0.00
OL-5190-01
Release Notes for Cisco MGX 8850
(PXM1E/PXM45), Cisco MGX
8950, and Cisco MGX 8830
Switches, Release 5.0.00
MGX
8850
(PXM45)
Rel. 5
MGX
8950
Rel. 5
MGX
8880
Rel. 5.
BPX
with SES
Rel. 4
MGX
8230 Rel.
1.3
MGX
8250 Rel.
1.3
MGX
8850
(PXM1)
Rel. 1.3
MGX
8830
Rel. 5
MGX
8850
(PXM1E)
Rel. 5
xxxxxxxxx
xxxxxxxxx
—xxxxxxxx
————————x
————x x x x
OL-4538-01
Release Notes for Cisco MGX 8230,
Cisco MGX 8250, and Cisco MGX
8850 (PXM1) Switches, Release
1.3.00
OL-4539-01
Release Notes for the Cisco Voice
Switch Service Module (VXSM),
Release 5.0.00
OL-4627-01
Release Notes for Cisco WAN
Manager, Release 15.0.00
OL-4151-01
Release Notes for the Cisco Voice
Interworking Service Module
(VISM), Release 3.2.10
OL-4544-01
Cisco PNNI Network Planning Guide for MGX and SES Products, Release 5
xvi
—x x x —————
——————x —x
————x x x x x
—xxxxxx—x
Part Number OL-3847-01 Rev. D0, April, 2004
Page 17

About This Guide
Documentation
Table 1 Technical Manuals and Release Notes for Cisco MGX and BPX Switches and Media Gateways (April 2004
Product Releases) (continued)
Document Title and Part Number
Release Notes for Cisco MGX
Route Processor Module (RPM-XF)
IOS Release 12.3(2)T5 for
PXM45-based Switches, Release
5.0.00
OL-4536-01
Release Notes for Cisco MGX
Route Processor Module (RPM-PR)
IOS Release 12.3(2)T5 for MGX
Releases 1.3.00 and 5.0.00
OL-4535-1
Cisco MGX 8230 Edge
Concentrator Overview, Release
1
1.1.3
DOC-7812899=
Cisco MGX 8250 Edge
Concentrator Overview, Release
1
1.1.3
MGX
8850
(PXM45)
Rel. 5
MGX
8950
Rel. 5
MGX
8880
Rel. 5.
BPX
with SES
Rel. 4
MGX
8230 Rel.
1.3
MGX
8250 Rel.
1.3
MGX
8850
(PXM1)
Rel. 1.3
MGX
8830
Rel. 5
MGX
8850
(PXM1E)
Rel. 5
——————x x x
—xxxxxxxx
—x ———————
——x ——————
DOC-7811576=
Cisco MGX 8850 Multiservice
Switch Overview, Release 1.1.3
1
OL-1154-01
Hardware Installation Guides
Cisco MGX 8850
(PXM1E/PXM45), Cisco MGX
8950, Cisco MGX 8830, and Cisco
MGX 8880 Hardware Installation
Guide, Releases 2 Through 5
OL-4545-01
Cisco Service Expansion Shelf
Hardware Installation Guide,
Release 1
1
DOC-786122=
———x —————
————x x x x x
x ————————
Part Number OL-3847-01 Rev. D0, April, 2004
Cisco PNNI Network Planning Guide for MGX and SES Products, Release 5
xvii
Page 18

About This Guide
Documentation
Table 1 Technical Manuals and Release Notes for Cisco MGX and BPX Switches and Media Gateways (April 2004
Product Releases) (continued)
Document Title and Part Number
Planning and Configuration Guides
Cisco PNNI Network Planning
Guide for MGX and SES Products
OL-3847-01
Cisco MGX 8850
(PXM1E/PXM45), Cisco MGX
8950, Cisco MGX 8830, and Cisco
MGX 8880 Configuration Guide,
Release 5
OL-4546-01
Cisco WAN Manager Installation
Guide, Release 15
OL-4550-01
Cisco WAN Manager User’s Guide,
Release 15
OL-4552-01
Cisco MGX 8850 Edge
Concentrator Installation and
Configuration, Release 1.1.3
1
MGX
8850
(PXM45)
Rel. 5
MGX
8950
Rel. 5
MGX
8880
Rel. 5.
BPX
with SES
Rel. 4
MGX
8230 Rel.
1.3
MGX
8250 Rel.
1.3
MGX
8850
(PXM1)
Rel. 1.3
MGX
8830
Rel. 5
MGX
8850
(PXM1E)
Rel. 5
x———xxxxx
————x x x x x
————x x x x x
————x x x x x
———x —————
DOC-7811223=
Cisco SES PNNI Controller
Software Configuration Guide,
Release 3
1
DOC-7814258=
Cisco MGX 8230 Edge
Concentrator Installation and
Configuration, Release 1.1.3
1
DOC-7811215=
Cisco MGX 8250 Edge
Concentrator Installation and
Configuration, Release 1.1.3
1
DOC-7811217=
x ————————
—x ———————
——x ——————
xviii
Cisco PNNI Network Planning Guide for MGX and SES Products, Release 5
Part Number OL-3847-01 Rev. D0, April, 2004
Page 19

About This Guide
Documentation
Table 1 Technical Manuals and Release Notes for Cisco MGX and BPX Switches and Media Gateways (April 2004
Product Releases) (continued)
BPX
with SES
Document Title and Part Number
Service Module Configuration and Reference Guides
Cisco MGX Route Processor
Rel. 4
—x x x —————
Module (RPM-PR) Installation and
Configuration Guide, Release 2.1
78-12510-02
Cisco Frame Relay Software
——————x ——
Configuration Guide and Command
Reference for the Cisco MGX 8850
(PXM45) FRSM-12-T3E3 Card,
Release 3
1
DOC-7810327=
Cisco ATM Services
—
(AUSM/MPSM) Configuration
Guide and Command Reference for
MGX Switches, Release 5
2
OL-4540-01
Cisco Frame Relay Services
—
(FRSM/MPSM) Configuration
Guide and Command Reference for
MGX Switches, Release 5
2
MGX
MGX
8230 Rel.
1.3
222
222
MGX
8250 Rel.
1.3
8850
(PXM1)
Rel. 1.3
MGX
8850
(PXM45)
Rel. 5
MGX
8950
Rel. 5
MGX
8880
Rel. 5.
MGX
8830
Rel. 5
MGX
8850
(PXM1E)
Rel. 5
x x — ——
x xx ——
OL-4541-01
Cisco Circuit Emulation Services
(CESM/MPSM) Configuration
Guide and Command Reference for
MGX Switches, Release 5
2
OL-0453-01
Cisco MGX Route Processor
Module (RPM-XF) Installation and
Configuration Guide, Release 4
1
OL-5087-01
Cisco ATM Services (AXSM)
Configuration Guide and Command
Reference for MGX Switches,
Release 5
OL-4548-01
—
222
x xx ——
——————x x —
——————x x x
Part Number OL-3847-01 Rev. D0, April, 2004
Cisco PNNI Network Planning Guide for MGX and SES Products, Release 5
xix
Page 20

About This Guide
Documentation
Table 1 Technical Manuals and Release Notes for Cisco MGX and BPX Switches and Media Gateways (April 2004
Product Releases) (continued)
Document Title and Part Number
Cisco ATM and Frame Relay
Services (MPSM-T3E3-155)
Configuration Guide and Command
Reference for MGX Switches,
Release 5
OL-4554-01
Cisco Voice Switch Services
(VXSM) Configuration Guide and
Command Reference for MGX
Switches and Media Gateways,
Release 5
OL-4625-01
Cisco Voice Interworking Services
(VISM) Configuration Guide and
Command Reference, Release 3.2
1
OL-4359-01
Reference Guides
Cisco MGX 8230 Multiservice
Gateway Error Messages, Release
1
1.1.3
MGX
8850
(PXM45)
Rel. 5
MGX
8950
Rel. 5
MGX
8880
Rel. 5.
BPX
with SES
Rel. 4
MGX
8230 Rel.
1.3
MGX
8250 Rel.
1.3
MGX
8850
(PXM1)
Rel. 1.3
MGX
8830
Rel. 5
MGX
8850
(PXM1E)
Rel. 5
———— x x x ——
——————x —x
—xxxxxx—x
—x ———————
DOC-78112113=
Cisco MGX 8230 Multiservice
Gateway Command Reference,
Release 1.1.3
1
DOC-7811211=
Cisco MGX 8250 Multiservice
Gateway Command Reference,
Release 1.1.3
1
DOC-7811212=
Cisco MGX 8250 Multiservice
Gateway Error Messages, Release
1
1.1.3
DOC-7811216=
Cisco MGX 8800 Series Switch
Command Reference, Release
1
1.1.3
DOC-7811210=
—x ———————
——x ——————
——x ——————
—x x x —————
xx
Cisco PNNI Network Planning Guide for MGX and SES Products, Release 5
Part Number OL-3847-01 Rev. D0, April, 2004
Page 21

About This Guide
Documentation
Table 1 Technical Manuals and Release Notes for Cisco MGX and BPX Switches and Media Gateways (April 2004
Product Releases) (continued)
Document Title and Part Number
Cisco MGX 8800 Series Switch
System Error Messages, Release
1
1.1.3
DOC-7811240=
Cisco SES PNNI Controller
Command Reference, Release 3
1
DOC-7814260=
Cisco MGX 8850
(PXM45/PXM1E), Cisco MGX
8950, Cisco MGX 8830, and Cisco
MGX 8880 Command Reference,
Release 5
OL-4547-01
Cisco WAN Manager SNMP Service
Agent, Release 15
OL-4551-01
Cisco WAN Manager Database
Interface Guide, Release 15
MGX
8850
(PXM45)
Rel. 5
MGX
8950
Rel. 5
MGX
8880
Rel. 5.
BPX
with SES
Rel. 4
MGX
8230 Rel.
1.3
MGX
8250 Rel.
1.3
MGX
8850
(PXM1)
Rel. 1.3
MGX
8830
Rel. 5
MGX
8850
(PXM1E)
Rel. 5
—x x x —————
x ————————
————x x x x x
————x x x x x
————x x x x x
OL-4587-01
Cisco MGX and Service Expansion
x———xxxxx
Shelf Error Messages, Release 5
OL-4553-01
1. This document was not updated for the April 2004 release.
2. Some configuration and command information is included in this book for using the multiprotocol service module (MPSM-8-T1E1) in a Cisco MGX
8230, MGX 8250, or MGX 8850 (PXM1) switch.
Note For the April 2004 product release, there are no new features for the Service Expansion Shelf (SES) of
the BPX switch and BPX WAN switching software. Therefore, documentation for these items was not
updated. Tab le 1 lists the most recent technical manuals and release notes for these products.
Part Number OL-3847-01 Rev. D0, April, 2004
Cisco PNNI Network Planning Guide for MGX and SES Products, Release 5
xxi
Page 22

Documentation
Table 1 also lists the latest documentation available for the Cisco MGX 8230, Cisco MGX 8250, and
Cisco MGX 8850 (PXM1) switches. These switches use the PXM1 processor card. Although there are
new features in MGX Release 1.3 for these switches, only the release notes were updated. And the
following books contain some information about configuring the MPSM-8-T1E1 card for use in these
switches:
• Cisco Circuit Emulation Services (CESM/MPSM) Configuration Guide and Command Reference for
MGX Switches, Release 5
• Cisco Frame Relay Services (FRSM/MPSM) Configuration Guide and Command Reference for
MGX Switches, Release 5
• Cisco ATM Services (AUSM/MPSM) Configuration Guide and Command Reference for MGX
Switches, Release 5
Table 2 lists the documents that ship with product.
Table 3 contains alphabetized titles and descriptions of all the manuals and release notes listed in
Table 1.
Table 2 Documents that Ship with Multiservice Switch Products
Document Title Description
Guide to Cisco Multiservice Switch and Media Gateway
Documentation
DOC-7814807=
Installation Warning Card
DOC-7812348=
Regulatory Compliance and Safety Information for Cisco
Multiservice Switch and Media Gateway Products (MGX,
BPX, and SES)
DOC-7814790=
Describes how to find the manuals and release notes that
support multiservice switches and network management
products. These documents are available only online. This
guide ships with product.
Contains precautions that you should take before you
insert a card into a slot. This Warning Card ships with
product.
Provides regulatory compliance information, product
warnings, and safety recommendations for all the Cisco MGX
multiservice switches: MGX 8230, MGX 8250, MGX 8850
(PXM1), MGX 8850 (PXM45), MGX 8850 (PXM1E), MGX
8830 and MGX 8950. Also provides such information for the
MGX 8880 Media Gateway. This book ships with product.
About This Guide
Table 3 Descriptions of Technical Manuals and Release Notes for Cisco Multiservice Switch Products
Document Title Description
Cisco ATM and Frame Relay Services (MPSM-T3E3-155)
Configuration Guide and Command Reference for MGX
Switches, Release 5
OL-4554-01
Cisco ATM Services (AUSM/MPSM) Configuration Guide and
Command Reference for MGX Switches, Release 5
OL-4540-01 A0
Provides software configuration procedures for provisioning
ATM and Frame Relay connections on the new
MPSM-T3E3-155 multiprotocol service module. Also
describes all MPSM-T3E3-155 commands.
Provides software configuration procedures for provisioning
connections and managing the AUSM cards supported in this
release. Also describes all AUSM commands. Includes
software configuration procedures for provisioning
connections and managing the new MPSM-8-T1E1 card as an
AUSM card replacement.
Cisco PNNI Network Planning Guide for MGX and SES Products, Release 5
xxii
Part Number OL-3847-01 Rev. D0, April, 2004
Page 23

About This Guide
Documentation
Table 3 Descriptions of Technical Manuals and Release Notes for Cisco Multiservice Switch Products (continued)
Document Title Description
Cisco ATM Services (AXSM) Configuration Guide and
Command Reference for MGX Switches, Release 5
OL-4548-01
Cisco Circuit Emulation Services (CESM/MPSM)
Configuration Guide and Command Reference for MGX
Switches, Release 5
OL-0453-01
Cisco Frame Relay Services (FRSM/MPSM) Configuration
Guide and Command Reference for MGX Switches, Release 5
OL-4541-01
Cisco MGX 8230 Edge Concentrator Installation and
Configuration, Release 1.1.3
Explains how to configure the AXSM cards and provides a
command reference that describes the AXSM commands in
detail. The AXSM cards covered in this manual are the
AXSM-XG, AXSM/A, AXSM/B, AXSM-E, and
AXSM-32-T1E1-E.
Provides software configuration procedures for provisioning
connections and managing the Circuit Emulation Service
Module (CESM) cards supported in this release. Also
describes all CESM commands. Includes software
configuration procedures for provisioning connections and
managing the new MPSM-8-T1E1 card as a CESM card
replacement.
Provides software configuration procedures for provisioning
connections and managing the Frame Relay Service Module
(FRSM) cards supported in this release. Also describes all
FRSM commands. Includes software configuration
procedures for provisioning connections and managing the
new MPSM-8-T1E1 card as an FRSM card replacement.
Provides installation instructions for the Cisco MGX 8230
edge concentrator.
DOC-7811215=
Cisco MGX 8230 Edge Concentrator Overview, Release 1.1.3
DOC-7812899=
Cisco MGX 8230 Multiservice Gateway Command Reference,
Release 1.1.3
DOC-7811211=
Cisco MGX 8230 Multiservice Gateway Error Messages,
Release 1.1.3
DOC-78112113=
Cisco MGX 8250 Edge Concentrator Installation and
Configuration, Release 1.1.3
DOC-7811217=
Cisco MGX 8250 Edge Concentrator Overview, Release 1.1.3
DOC-7811576=
Cisco MGX 8250 Multiservice Gateway Command Reference,
Release 1.1.3
DOC-7811212=
Cisco MGX 8250 Multiservice Gateway Error Messages,
Release 1.1.3
Describes the system components and function of the
Cisco MGX 8250 edge concentrator.
Provides detailed information on the general command line
interface commands.
Provides error message descriptions and recovery
procedures.
Provides installation instructions for the Cisco MGX 8250
edge concentrator.
Describes the system components and function of the
Cisco MGX 8250 edge concentrator.
Provides detailed information on the general command line
interface commands.
Provides error message descriptions and recovery
procedures.
DOC-7811216=
Part Number OL-3847-01 Rev. D0, April, 2004
Cisco PNNI Network Planning Guide for MGX and SES Products, Release 5
xxiii
Page 24

About This Guide
Documentation
Table 3 Descriptions of Technical Manuals and Release Notes for Cisco Multiservice Switch Products (continued)
Document Title Description
Cisco MGX 8800 Series Switch Command Reference, Release
1.1.3
DOC-7811210=
Cisco MGX 8800 Series Switch System Error Messages,
Release 1.1.3
DOC-7811240=
Cisco MGX 8850 (PXM1E/PXM45), Cisco MGX 8950, Cisco
MGX 8830, and Cisco MGX 8880 Hardware Installation
Guide, Releases 2 Through 5
OL-4545-01
Cisco MGX 8850 (PXM1E/PXM45), Cisco MGX 8950, Cisco
MGX 8830, and Cisco MGX 8880 Configuration Guide,
Release 5
OL-4546-01
Cisco MGX 8850 (PXM45/PXM1E), Cisco MGX 8950, Cisco
MGX 8830, and Cisco MGX 8880 Command Reference,
Release 5
OL-4547-01
Cisco MGX 8850 Edge Concentrator Installation and
Configuration, Release 1.1.3
Provides detailed information on the general command line
for the Cisco MGX 8850 (PXM1), Cisco MGX 8250, and
Cisco MGX 8230 edge concentrators.
Provides error message descriptions and recovery procedures
for Cisco MGX 8850 (PXM1), Cisco MGX 8250, and
Cisco MGX 8230 edge concentrators.
Describes how to install the Cisco MGX 8950, the
Cisco MGX 8850 (PXM1E/PXM45), and the
Cisco MGX 8830 switches. Also describes how to install the
MGX 8880 Media Gateway. This document explains what
each switch does and covers site preparation, grounding,
safety, card installation, and cabling. The Cisco MGX 8850
switch uses either a PXM45 or a PXM1E controller card and
provides support for both serial bus-based and cell bus-based
service modules. The Cisco MGX 8830 switch uses a
PXM1E controller card and supports cell bus-based service
modules. The Cisco MGX 8950 supports only serial
bus-based service modules. The Cisco MGX 8880 uses a
PXM45/C controller card, and supports only serial bus-based
service modules. This hardware installation guide replaces
all previous hardware guides for these switches.
Describes how to configure the Cisco MGX 8880 Media
Gateway. Also describes how to configure Cisco MGX 8850
(PXM1E), Cisco MGX 8850 (PXM45), and Cisco
MGX 8830 switches to operate as ATM edge switches and
the Cisco MGX 8950 switch to operate as a core switch. This
guide also provides some operation and maintenance
procedures.
Describes the PXM commands that are available in the CLI
of the Cisco MGX 8850 (PXM45), Cisco MGX 8850
(PXM1E), Cisco MGX 8950, and Cisco MGX 8830 switches.
Also describes the PXM commands that are available in the
CLI of the Cisco MGX 8880 Media Gateway.
Provides installation instructions for the Cisco MGX 8850
(PXM1) edge concentrator.
DOC-7811223=
Cisco MGX 8850 Multiservice Switch Overview, Release 1.1.3
OL-1154-01
Cisco MGX and Service Expansion Shelf Error Messages,
Release 5
OL-4553-01
Cisco PNNI Network Planning Guide for MGX and SES Products, Release 5
xxiv
Describes the system components and function of the
Cisco MGX 8850 (PXM1) edge concentrator.
Provides error message descriptions and recovery
procedures.
Part Number OL-3847-01 Rev. D0, April, 2004
Page 25

About This Guide
Documentation
Table 3 Descriptions of Technical Manuals and Release Notes for Cisco Multiservice Switch Products (continued)
Document Title Description
Cisco MGX Route Processor Module (RPM-XF) Installation
and Configuration Guide, Release 4
OL-5087-01
Cisco MGX Route Processor Module (RPM-PR) Installation
and Configuration Guide, Release 2.1
78-12510-02
Cisco PNNI Network Planning Guide for MGX and SES
Products
OL-3847-01
Cisco Service Expansion Shelf Hardware Installation Guide,
Release 1
Describes how to install and configure the Cisco MGX Route
Processor Module (RPM-XF) in the Cisco MGX 8850
(PXM45) and Cisco MGX 8950 switch. Also provides site
preparation procedures, troubleshooting procedures,
maintenance procedures, cable and connector specifications,
and basic Cisco IOS configuration information.
Describes how to install and configure the Cisco MGX Route
Processor Module (RPM/B or RPM-PR) in the
Cisco MGX 8850 (PXM1), the Cisco MGX 8250, and the
Cisco MGX 8230 edge concentrators. Also provides site
preparation procedures, troubleshooting procedures,
maintenance procedures, cable and connector specifications,
and basic Cisco IOS configuration information.
Provides guidelines for planning a PNNI network that uses
Cisco MGX 8830, Cisco MGX 8850 (PXM45 and PXM1E),
Cisco MGX 8950, or Cisco BPX 8600 switches or the
MGX 8880 Media Gateway. When connected to a PNNI
network, each Cisco BPX 8600 Series switch requires an SES
for PNNI route processing.
Provides instructions for installing and maintaining an SES
controller.
DOC-786122=
Cisco SES PNNI Controller Command Reference, Release 3
DOC-7814260=
Cisco SES PNNI Controller Software Configuration Guide,
Release 3
DOC-7814258=
Cisco Voice Interworking Services (VISM) Configuration
Guide and Command Reference, Release 3.2
OL-4359-01
Cisco Voice Switch Services (VXSM) Configuration and
Command Reference Guide for MGX Switches, Release 5
OL-4625-01
Cisco WAN Manager Database Interface Guide, Release 15
OL-4587-01
Describes the commands used to configure and operate the
SES PNNI controller.
Describes how to configure, operate, and maintain the SES
PNNI controller.
Describes how to install and configure the Voice
Interworking Service Module (VISM) in the Cisco
MGX 8830, Cisco MGX 8850 (PXM45), and Cisco MGX
8850 (PXM1E) multiservice switches. Provides site
preparation procedures, troubleshooting procedures,
maintenance procedures, cable and connector specifications,
and Cisco CLI configuration information.
Describes the features and functions of the new Voice Switch
Service Module (VXSM) in the Cisco MGX 8880 Media
Gateway and in the Cisco MGX8850 (PXM45 and PXM1E)
multiservice switches. Also provides configuration
procedures, troubleshooting procedures, and Cisco CLI
configuration information.
Provides information about accessing the CWM Informix
database that is used to store information about the network
elements.
Part Number OL-3847-01 Rev. D0, April, 2004
Cisco PNNI Network Planning Guide for MGX and SES Products, Release 5
xxv
Page 26

About This Guide
Documentation
Table 3 Descriptions of Technical Manuals and Release Notes for Cisco Multiservice Switch Products (continued)
Document Title Description
Cisco WAN Manager Installation Guide, Release 15
OL-4550-01
Cisco WAN Manager SNMP Service Agent, Release 15
OL-4551-01
Cisco WAN Manager User’s Guide, Release 15
OL-4552-01
Cisco Frame Relay Software Configuration Guide and
Command Reference for the Cisco MGX 8850 (PXM45)
FRSM-12-T3E3 Card, Release 3
Provides procedures for installing Release 5 of the CWM
network management system.
Provides information about the CWM Simple Network
Management Protocol service agent, an optional adjunct to
CWM that is used for managing Cisco WAN switches
through SNMP.
Describes how to use the CWM Release 15 software, which
consists of user applications and tools for network
management, connection management, network
configuration, statistics collection, and security management.
Note The CWM interface now has built-in documentation
support in the form of online Help. On a PC, press F1
to access Help; on a UNIX workstation, press the
Help key. Alternatively, on either system you can
select Help from the main or popup menu.
Describes how to use the high-speed Frame Relay
(FRSM-12-T3E3) commands that are available in the CLI of
the Cisco MGX 8850 (PXM45) switch.
DOC-7810327=
Release Notes for Cisco MGX 8230, Cisco MGX 8250, and
Cisco MGX 8850 (PXM1) Switches, Release 1.3.00
OL-4539-01
Release Notes for Cisco MGX 8850 (PXM1E/PXM45), Cisco
MGX 8950, and Cisco MGX 8830 Switches, Release 5.0.00
OL-4538-01
Release Notes for the Cisco MGX 8880 Media Gateway,
Release 5.0.00
OL-5190-01
Release Notes for Cisco MGX Route Processor Module
(RPM-PR) IOS Release 12.3(2)T5 for MGX Releases 1.3.00
and 5.0.00
OL-4535-01
Release Notes for Cisco MGX Route Processor Module
(RPM-XF) IOS Release 12.3(2)T5 for PXM45-based Switches,
Release 5.0.00
OL-4536-01
Release Notes for the Cisco Voice Interworking Service
Module (VISM), Release 3.2.10
OL-4544-01
Provides new feature, upgrade, and compatibility
information, as well as information about known and
resolved anomalies.
Provides new feature, upgrade, and compatibility
information, as well as information about known and
resolved anomalies.
Provides new feature and compatibility information, as well
as information about known and resolved anomalies.
Provides upgrade and compatibility information, as well as
information about known and resolved anomalies.
Provides upgrade and compatibility information, as well as
information about known and resolved anomalies.
Provides new feature, upgrade, and compatibility
information, as well as information about known and
resolved anomalies.
xxvi
Cisco PNNI Network Planning Guide for MGX and SES Products, Release 5
Part Number OL-3847-01 Rev. D0, April, 2004
Page 27

About This Guide
Documentation
Table 3 Descriptions of Technical Manuals and Release Notes for Cisco Multiservice Switch Products (continued)
Document Title Description
Release Notes for the Cisco Voice Switch Service Module
(VXSM), Release 5.0.00
OL-4627-01
Release Notes for Cisco WAN Manager, Release 15.0.00
OL-4151-01
Provides new feature, upgrade, and compatibility
information, as well as information about known and
resolved anomalies.
Provides new feature, upgrade, and compatibility
information, as well as information about known and
resolved anomalies.
Obtaining Documentation
Cisco provides several ways to obtain documentation, technical assistance, and other technical
resources. These sections explain how to obtain technical information from Cisco Systems.
Cisco.com
You can access the most current Cisco documentation on the World Wide Web at this URL:
http://www.cisco.com/univercd/home/home.htm
You can access the Cisco website at this URL:
http://www.cisco.com
International Cisco websites can be accessed from this URL:
http://www.cisco.com/public/countries_languages.shtml
Ordering Documentation
You can find instructions for ordering documentation at this URL:
http://www.cisco.com/univercd/cc/td/doc/es_inpck/pdi.htm
You can order Cisco documentation in these ways:
• Registered Cisco.com users (Cisco direct customers) can order Cisco product documentation from
the Ordering tool:
http://www.cisco.com/en/US/partner/ordering/index.shtml
• Nonregistered Cisco.com users can order documentation through a local account representative by
calling Cisco Systems Corporate Headquarters (California, USA) at 408 526-7208 or, elsewhere in
North America, by calling 800 553-NETS (6387).
Part Number OL-3847-01 Rev. D0, April, 2004
Cisco PNNI Network Planning Guide for MGX and SES Products, Release 5
xxvii
Page 28

Documentation
Finding Documentation for Cisco MGX, BPX, SES, and CWM Products
The previous “Ordering Documentation” section applies to other Cisco documentation. Starting in 2003,
all documents listed in the “Related Documentation” section are available online only unless stated
otherwise. You can find the documents listed in Ta bl e 1 online as follows:
• In your browser’s URL field, enter www.cisco.com. In the top right search field, enter the complete
document part number (for example, enter OL-4538-01, including the -01 suffix). Click on GO.
• For the Cisco Wide Area Network Manager (CWM) documents, in your browser’s URL field, enter
http://www.cisco.com/univercd/cc/td/doc/product/wanbu/svplus/index.htm and look for the
CWM release number.
• For all other documents, in your browser’s URL field, enter
http://www.cisco.com/univercd/cc/td/doc/product/wanbu/index.htm. Look for the switch name
and release number. For example, look for MGX 8850 (PXM1E), then Release 5.
Changes to This Document
Table 4 summarizes the changes made to this guide since the previous release.
About This Guide
Table 4 Changes to This Book Since the Previous Release
Chapter Changes
Chapter 1, “Introduction to PNNI” Added the following sections:
• The PNNI Network Database
• Simple Node Representation
• Complex Node Representation
Chapter 2, “Interoperability and Performance
Planning”
Chapter 3, “Address and Closed User Group
Added specifications for Release 5 and revised
some specifications and guidelines.
Minor revisions.
Planning”
Chapter 4, “Planning Intermediate Route
Selection”
Rewrote most of the chapter. Added the following
sections:
• Shortest Path Table Routing
• How MGX and SES Nodes Select Links
• Preferred Routing
• Priority Routing
• Grooming
• Soft Rerouting
xxviii
• Priority Bumping
Cisco PNNI Network Planning Guide for MGX and SES Products, Release 5
Part Number OL-3847-01 Rev. D0, April, 2004
Page 29

About This Guide
Documentation Feedback
You can submit e-mail comments about technical documentation to bug-doc@cisco.com.
You can submit comments by using the response card (if present) behind the front cover of your
document or by writing to the following address:
Cisco Systems
Attn: Customer Document Ordering
170 West Tasman Drive
San Jose, CA 95134-9883
We appreciate your comments.
Obtaining Technical Assistance
For all customers, partners, resellers, and distributors who hold valid Cisco service contracts, the Cisco
Technical Assistance Center (TAC) provides 24-hour-a-day, award-winning technical support services,
online and over the phone. Cisco.com features the Cisco TAC website as an online starting point for
technical assistance. If you do not hold a valid Cisco service contract, please contact your reseller.
Obtaining Technical Assistance
Cisco TAC Website
The Cisco TAC website provides online documents and tools for troubleshooting and resolving technical
issues with Cisco products and technologies. The Cisco TAC website is available 24 hours a day, 365
days a year. The Cisco TAC website is located at this URL:
http://www.cisco.com/tac
Accessing all the tools on the Cisco TAC website requires a Cisco.com user ID and password. If you
have a valid service contract but do not have a login ID or password, register at this URL:
http://tools.cisco.com/RPF/register/register.do
Opening a TAC Case
Using the online TAC Case Open Tool is the fastest way to open P3 and P4 cases. (P3 and P4 cases are
those in which your network is minimally impaired or for which you require product information.) After
you describe your situation, the TAC Case Open Tool automatically recommends resources for an
immediate solution. If your issue is not resolved using the recommended resources, your case will be
assigned to a Cisco TAC engineer. The online TAC Case Open Tool is located at this URL:
http://www.cisco.com/tac/caseopen
For P1 or P2 cases (P1 and P2 cases are those in which your production network is down or severely
degraded) or if you do not have Internet access, contact Cisco TAC by telephone. Cisco TAC engineers
are assigned immediately to P1 and P2 cases to help keep your business operations running smoothly.
To open a case by telephone, use one of the following numbers:
Asia-Pacific: +61 2 8446 7411 (Australia: 1 800 805 227)
EMEA: +32 2 704 55 55
USA: 1 800 553-2447
Part Number OL-3847-01 Rev. D0, April, 2004
Cisco PNNI Network Planning Guide for MGX and SES Products, Release 5
xxix
Page 30

Obtaining Additional Publications and Information
For a complete listing of Cisco TAC contacts, go to this URL:
http://www.cisco.com/warp/public/687/Directory/DirTAC.shtml
TAC Case Priority Definitions
To ensure that all cases are reported in a standard format, Cisco has established case priority definitions.
Priority 1 (P1)—Your network is “down” or there is a critical impact to your business operations. You
and Cisco will commit all necessary resources around the clock to resolve the situation.
Priority 2 (P2)—Operation of an existing network is severely degraded, or significant aspects of your
business operation are negatively affected by inadequate performance of Cisco products. You and Cisco
will commit full-time resources during normal business hours to resolve the situation.
Priority 3 (P3)—Operational performance of your network is impaired, but most business operations
remain functional. You and Cisco will commit resources during normal business hours to restore service
to satisfactory levels.
Priority 4 (P4)—You require information or assistance with Cisco product capabilities, installation, or
configuration. There is little or no effect on your business operations.
About This Guide
Obtaining Additional Publications and Information
Information about Cisco products, technologies, and network solutions is available from various online
and printed sources.
• Cisco Marketplace provides a variety of Cisco books, reference guides, and logo merchandise. Go
to this URL to visit the company store:
http://www.cisco.com/go/marketplace/
• The Cisco Product Catalog describes the networking products offered by Cisco Systems, as well as
ordering and customer support services. Access the Cisco Product Catalog at this URL:
http://cisco.com/univercd/cc/td/doc/pcat/
• Cisco Press publishes a wide range of general networking, training and certification titles. Both new
and experienced users will benefit from these publications. For current Cisco Press titles and other
information, go to Cisco Press online at this URL:
http://www.ciscopress.com
• Packet magazine is the Cisco quarterly publication that provides the latest networking trends,
technology breakthroughs, and Cisco products and solutions to help industry professionals get the
most from their networking investment. Included are networking deployment and troubleshooting
tips, configuration examples, customer case studies, tutorials and training, certification information,
and links to numerous in-depth online resources. You can access Packet magazine at this URL:
http://www.cisco.com/packet
• iQ Magazine is the Cisco bimonthly publication that delivers the latest information about Internet
business strategies for executives. You can access iQ Magazine at this URL:
xxx
http://www.cisco.com/go/iqmagazine
Cisco PNNI Network Planning Guide for MGX and SES Products, Release 5
Part Number OL-3847-01 Rev. D0, April, 2004
Page 31

About This Guide
Obtaining Additional Publications and Information
• Internet Protocol Journal is a quarterly journal published by Cisco Systems for engineering
professionals involved in designing, developing, and operating public and private internets and
intranets. You can access the Internet Protocol Journal at this URL:
http://www.cisco.com/ipj
• Training—Cisco offers world-class networking training. Current offerings in network training are
listed at this URL:
http://www.cisco.com/en/US/learning/index.html
Part Number OL-3847-01 Rev. D0, April, 2004
Cisco PNNI Network Planning Guide for MGX and SES Products, Release 5
xxxi
Page 32

Obtaining Additional Publications and Information
About This Guide
xxxii
Cisco PNNI Network Planning Guide for MGX and SES Products, Release 5
Part Number OL-3847-01 Rev. D0, April, 2004
Page 33

CHAPTER
1
Introduction to PNNI
Private Network-to-Network Interface (PNNI) is a suite of network protocols that can be used to discover
an ATM network topology, create a database of topology information, and route calls over the discovered
topology. With proper planning, setting up a PNNI network is much easier and faster than manually
configuring connections through an ATM network.
This chapter introduces the PNNI network database and the following common network topologies:
• The Single Peer Group Topology
• The Hierarchical PNNI Network Topology
• PNNI Internetworking with AINI
• PNNI Internetworking with IISP
This chapter also provides guidelines on how you can apply these topologies using the following
switches:
• Cisco MGX 8830 Release 3.0 and higher
• Cisco MGX 8850 (PXM1E) Release 3.0 and higher
• Cisco MGX 8850 (PXM45) Release 2.0 and higher
• Cisco MGX 8880 Media Gateway Release 5.0 and higher
• Cisco MGX 8950 with Release 2.1.60 or later software
• Cisco BPX 8600 and Cisco Service Expansion Shelf (SES) with SES Release 1.0 or later software
The PNNI Network Database
PNNI is commonly referred to as a link state protocol, which means that the protocol collects
information about the current state of links and nodes in the network to build a network database. The
PNNI network database can be used to determine the network structure and the current state of network
components. To build the PNNI network database, each PNNI node must receive topology information
from all the other devices in the network. To keep the database current, the node must receive regular
updates from other nodes.
Part Number OL-3847-01 Rev. D0, April, 2004
Cisco PNNI Network Planning Guide for MGX and SES Products, Release 5
1-1
Page 34

The Single Peer Group Topology
Tip A node is a network device that communicates with other network devices. Cisco PNNI-compatible
devices serve as nodes in a PNNI network. In this document, the terms node and switch are often used
interchangeably. However, in most cases, the PNNI node is a component of a Cisco PNNI-compatible
device. For example, some Cisco MGX switches, Release 2.0 and later, can operate as both a PNNI node
and as an MPLS device.
The PNNI protocol communicates the state of a PNNI network in PNNI Topology State Elements
(PTSEs). PTSEs are discrete messages that contain information about one of the following types of
network components:
• PNNI nodes
• Reachable addresses
• PNNI links between nodes
To enable communications with other nodes, each switch needs to have all the PTSE information for
each switch in the network. Each node is responsible for flooding out its own PTSE information to all
the other switches in the network.
Since up-to-date PTSE information is required for optimal routing decisions to be made, there are several
different mechanisms in place to help ensure that all nodes have reasonably accurate PTSE information.
The five common reasons for updating PTSEs are as follows:
• Resources administratively added, removed or altered on a node.
Chapter 1 Introduction to PNNI
• Resource failure such as an Loss of Signal (LOS) on a link.
• A significant change in link resources due to virtual circuits (VCs) routing or derouting.
• Periodic updates defined by the PTSE refresh and PTSE lifetime interval timers.
• A processor switch module (PXM) switchover.
PTSE information is passed between nodes using PNNI Topology State Packets (PTSPs). These packets
utilize the Routing Control Channel (RCC; VPI = 0 and VCI = 18) between adjacent nodes. The RCC is
also used for Hello packets and other PNNI messages. If the switch is unable to establish the RCC with
the adjacent node, then PTSE information is not exchanged. Once a node receives PTSE information,
the node stores the contents, or element information, in the database. This information is used to generate
precomputed routing tables that identify routes to other network devices. The PNNI database is also used
to perform on-demand routing when the appropriate routing table does not contain a viable path.
The Single Peer Group Topology
A single peer group topology is a PNNI network in which all nodes share PTSEs with all other nodes.
As each node is brought up in a single peer group network, that node learns about all the other nodes,
and the other nodes learn about the new node. All nodes are capable of determining routes to all other
nodes within the single peer group. Figure 1-1 shows an example single peer group topology.
1-2
Cisco PNNI Network Planning Guide for MGX and SES Products, Release 5
Part Number OL-3847-01 Rev. D0, April, 2004
Page 35

Chapter 1 Introduction to PNNI
Figure 1-1 Example Single Peer Group Topology
The Hierarchical PNNI Network Topology
66057
PNNI network
A single peer group topology is the easiest to set up. Since all communications are between nodes in the
same peer group, you do not have to configure connections to other peer groups or to other network
types. If the network will never connect to a public network, you can use most of the default PNNI
configuration settings.
The Cisco switches described in this guide support up to 160 nodes in a single peer group. The
specifications for Cisco switches are described in Tab l e 2-1 in Chapter 2, “Interoperability and
Performance Planning.”
The size of a single peer group is partially limited by the size of the PNNI database and the processing
resources required to maintain it. As the size of the peer group grows, the PNNI database within the node
grows, as does the PNNI processing requirements. When the network size increases beyond the
capabilities of the network nodes, you can connect the single peer group network to other networks to
create the following types of topologies:
• The Hierarchical PNNI Network Topology
• PNNI Internetworking with AINI
• PNNI Internetworking with IISP
The hierarchical PNNI topology enables multiple PNNI peer groups to communicate with each other,
and this increases the total size of the network. The ATM Inter-Network Interface (AINI) and Interim
Inter-Switch Protocol (IISP) protocols enable private PNNI networks to connect to other private or
public PNNI networks. The AINI and IISP protocols enable communications between networks, but
provide a privacy barrier that keeps the network databases in each network private to that network.
The Hierarchical PNNI Network Topology
A hierarchical PNNI network is a topology that interconnects multiple PNNI peer groups to form a larger
network. Figure 1-2 shows an example hierarchical PNNI network topology that interconnects multiple
peer groups.
Cisco PNNI Network Planning Guide for MGX and SES Products, Release 5
Part Number OL-3847-01 Rev. D0, April, 2004
1-3
Page 36

The Hierarchical PNNI Network Topology
Note Hierarchical PNNI networks are not supported on Cisco MGX 8850 switches before Release 2.1.60, and
they are not supported on the SES PNNI Controller before Release 1.1.60.
Figure 1-2 Example Hierarchical PNNI Network Topology Showing Multiple Peer Groups
Peer
group 2
Chapter 1 Introduction to PNNI
Peer
group 5
Peer group 1
Peer
group 3
PNNI networks
Peer
group 4
66058
Notice that the only difference between the single peer group in Figure 1-1 and the hierarchical PNNI
network in Figure 1-2 is the grouping of the nodes. This grouping of the nodes creates smaller PNNI
databases within the nodes in each peer group and reduces the PNNI processing requirements in each
node. This grouping also provides room to add more nodes in each of the groups.
In a hierarchical network, the database for each peer group is smaller because the peer group collects,
stores and processes PTSEs for only those nodes in the same peer group. The nodes within a peer group
do receive information on other peer groups, but the information is summarized. From the perspective
of an individual peer group, other peer groups appear to be single nodes. Nodes within one peer group
do not receive PTSEs from other peer groups and therefore do not collect, store, and process information
about all the individual nodes and links in other peer groups.
The Cisco switches described in this guide support up to 32 visible peer groups in one network. (The
specifications for Cisco switches are described in Tab l e 2-1 in Chapter 2, “Interoperability and
Performance Planning.”) A visible peer group is a peer group with which the local peer group can
communicate. Because each visible peer group appears as a logical group node (LGN), each visible peer
group reduces the available node count for a peer group. For example, if the local peer group discovers
32 visible peer groups, the node count for the local peer group is reduced to 128 (160 - 32 = 128).
1-4
Figure 1-3 demonstrates why a multiple peer group PNNI network is called a hierarchical PNNI
network.
Cisco PNNI Network Planning Guide for MGX and SES Products, Release 5
Part Number OL-3847-01 Rev. D0, April, 2004
Page 37
Chapter 1 Introduction to PNNI
Peer
group 2
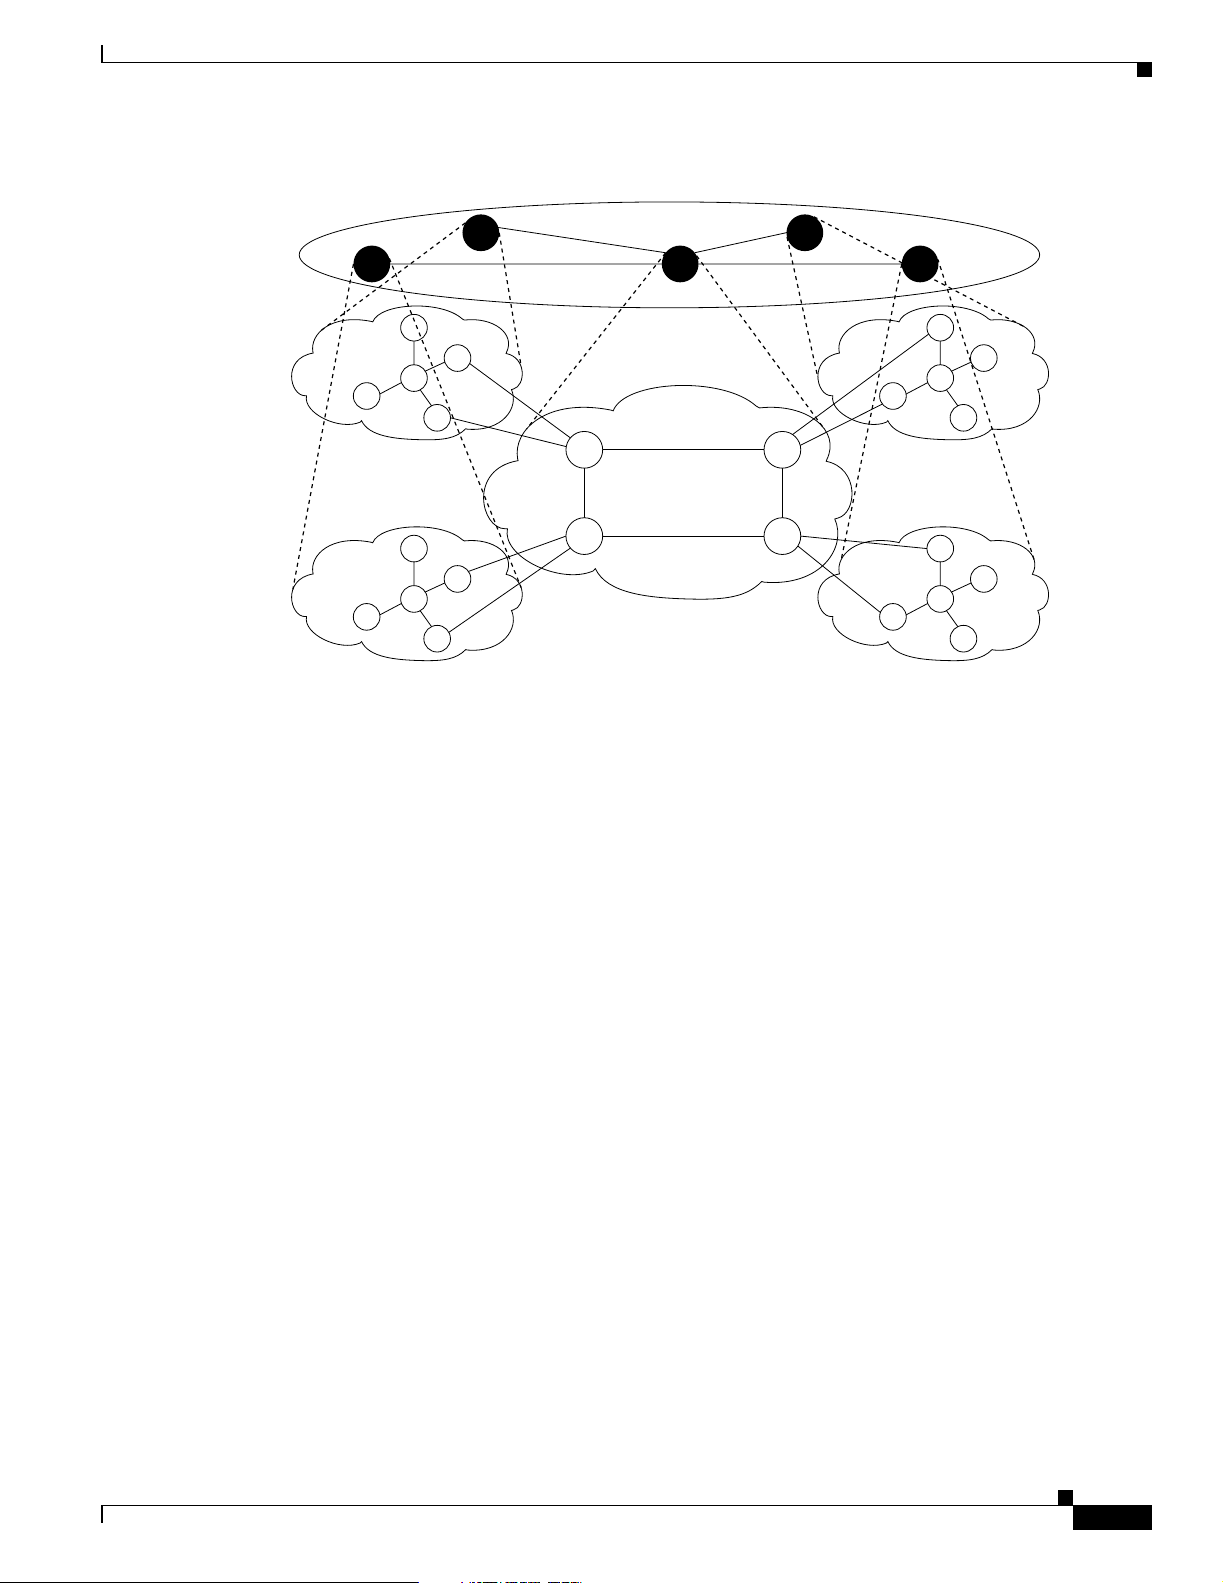
Figure 1-3 Example Hierarchical PNNI Network Topology Showing a Two-Level Hierarchy
Peer
group 2
The Hierarchical PNNI Network Topology
Level 40
peer
Peer
group 5
group 5
Level 56
66059
Peer
group 3
Peer group 1
Peer
group 4
PNNI networks
In a hierarchical PNNI network, logical levels are used to manage the portions of the PNNI database that
describe communications paths between individual peer groups. PNNI divides the entire network
database into manageable chunks, and the portions that describe communications between peer groups
are managed by LGNs that operate at levels above the lowest-level peer groups.
Within each level 56 peer group in Figure 1-3, all the nodes exchange PTSEs to build and maintain a
PNNI database that describes communication paths to all other nodes within the peer group. However,
individual peer group nodes do not exchange PTSEs with nodes outside their peer group. Instead, LGNs
are created during configuration to operate at level 40 and communicate with other level 40 nodes.
The level 40 nodes in Figure 1-3 are all part of the same level 40 peer group and exchange PTSEs in the
same way as do the lower level nodes. The level 40 LGN for each peer group in Figure 1-3 is called a
peer group leader and provides summarized information to its child peer group about the other peer
groups represented at level 40. Each peer group leader also provides summarized peer group information
about its child peer group to the other peer group leaders at the same level. Peer Group 1, for example,
learns about 8 nodes: 4 physical nodes are in its own peer group, and 4 LGNs are actually representing
other peer groups.
To demonstrate how hierarchical networks support more nodes than single peer group networks,
consider the two-level example in Figure 1-3. A single peer group can support 160 nodes. In Figure 1-3,
there are 5 peer groups, so each peer group will learn about 4 LGNs that will represent the other peer
groups. This allows each peer group to support up to 156 physical nodes (160 - 4 = 156). The hierarchical
network in Figure 1-3 can support 780 physical nodes (156 * 5 = 780).
Part Number OL-3847-01 Rev. D0, April, 2004
Cisco PNNI Network Planning Guide for MGX and SES Products, Release 5
1-5
Page 38

The Hierarchical PNNI Network Topology
Hierarchical networks can support thousands of nodes because each higher level summarizes
information for all lower levels. For example, suppose a level 64 peer group were added below Peer
Group 2 in Figure 1-3. All nodes in the new level 64 peer group would be summarized by the peer group
leader for Peer Group 2. The impact on the hierarchical network would be the following:
• Peer Group 2 would support one less physical node because it would have to add one LGN to
represent the level 64 child peer group.
• The level 64 child peer group could support as many as 155 physical nodes (160 nodes - 1 LGN for
each of the 5 peer groups at the higher levels.
• There would still be plenty of room for adding more physical nodes to levels above and below those
shown in Figure 1-3.
The following sections provide additional information the peer group leaders that operate at higher levels
in a PNNI hierarchy and introduce the border nodes that connect one peer group to another.
Peer Group Leaders
A peer group leader (PGL) is a higher level node (such as the level 40 nodes in Figure 1-3) that
summarizes data for a child peer group (such as the level 56 nodes in Figure 1-3). A child peer group is
a peer group that operates one level below the PGL that supports it. Each PGL works with other PGLs
at the same level to build and maintain network data that it summarizes and distributes to its child peer
group. The PGL also receives summarized data from a parent PGL if another level exists above the PGL’s
level. Network data from levels above the PGL is also summarized and distributed to child peer groups.
Chapter 1 Introduction to PNNI
Network administrators can use configuration commands to control which node becomes the PGL. The
configuration process assigns a PGL election priority to each node in the peer group. When PNNI nodes
start up, an election is held to determine which node has the highest PGL priority, and that node becomes
the PGL. If the PGL node fails, a new election is held among the operating nodes to determine a new
PGL. There is just one peer group leader for each peer group.
Each higher level peer group is made up of LGNs that represent the peer groups at the next lower level.
These LGNs collect and manage information that is needed to communicate with the peer groups
represented. As with the lowest level, these LGNs elect a PGL, which is responsible for determining
communications paths to PNNI groups not represented within the peer group.
Note Network administrators add higher levels by adding LGNs with the addpnni-node command. The PGL
election priority is configured with the cnfpnni-election command.
The PGL task adds to the work load of a PNNI node. The PGL must not only collect and manage data
for communications outside the peer group, it must also collect and manage data for communications
within the peer group. Because the PGL task adds to the work load of a PNNI node, it is good design
practice to choose peer group leaders (and backup peer group leaders) carefully. Consider reducing the
load on switches that serve as peer group leaders, and avoid using border nodes as peer group leaders.
Simple Node Representation
When a LGN presents its child peer group information to other peer groups, the default representation
is called simple node representation. To other peer groups, the local peer group is represented as a single
node with no nodal state parameters. Figure 1-4 illustrates simple node representation.
1-6
Cisco PNNI Network Planning Guide for MGX and SES Products, Release 5
Part Number OL-3847-01 Rev. D0, April, 2004
Page 39

Chapter 1 Introduction to PNNI
Figure 1-4 Simple Node Representation
Outside link 1
The Hierarchical PNNI Network Topology
Outside link 2
Other peer groups receive information about the outside links leading to the local peer group, but no
internal peer group information is advertised to other peer groups. The advantage of simple node
representation is that it keeps the PNNI database within each node smaller than that for complex node
representation. Simple node representation also requires fewer resources on the LGN that represents the
peer group. The disadvantage it that the true cost of crossing a peer group is hidden by simple node
representation. In some networks, this can cause connections to be routed over less desirable routes.
Complex Node Representation
The alternative to simple node representation is complex node representation. When complex node
representation is enabled for a LGN, the LGN presents additional information about the peer group it
represents. Figure 1-5 illustrates complex node representation.
Figure 1-5 Complex Node Representation
Peer Group A
Outside link 3
Outside link 4
Outside link 1
Nucleus
The default complex node representation presents the peer group as a node with multiple ports. A logical
nucleus is calculated and logical spokes are created between the nucleus and the logical ports that
terminate each outside link. When the LGN presents a complex node to other peer groups, those peer
groups can pick the path to use through the local peer group. In contrast, when the simple node
representation is used, remote peer groups can choose to communicate through the local peer group, but
the remote group must rely on border nodes within the local peer group to determine the path within the
local peer group.
Part Number OL-3847-01 Rev. D0, April, 2004
Outside link 2
Peer Group A
Outside link 3
Spoke
Outside link 4
Cisco PNNI Network Planning Guide for MGX and SES Products, Release 5
1-7
Page 40

PNNI Internetworking with AINI
Border Nodes
Chapter 1 Introduction to PNNI
The advantage to complex node representation is that it provides more information to other peer groups,
and this can lead to better route selection. The disadvantage of complex node representation is that it
adds to the size of the database in remote peer groups. Complex node representation also requires more
processing resources on the LGN that represents a peer group as a complex node.
Border nodes are nodes that participate in a PNNI peer group and maintain links to other peer groups. A
border node is a member of only one peer group. Links to other nodes within a peer group are called
inside links, and links to nodes in other peer groups are called outside links. A border node is any node
that is configured for outside links.
PNNI automatically determines whether or not a node is a border node by examining the PNNI peer
group ID at each end of a PNNI link. (The PNNI peer group ID is described in the “Selecting the PNNI
Peer Group ID” section of Chapter 3, “Address and Closed User Group Planning.”) If the peer group IDs
are different, both nodes are border nodes for their respective peer groups.
When planning for border nodes, you might want to avoid routing internal peer group traffic through
border nodes so that border nodes have more processing resources for supporting traffic traveling in and
out of the peer group.
Hierarchical PNNI Network Benefits
The primary benefit of a hierarchical PNNI network is scalability. Single peer group networks are limited
to 160 nodes, but hierarchical networks can support many more nodes.
For networks with less than 100 nodes, a single peer group will usually provide superior performance
over a hierarchical network because an originating node is aware of all routes and can choose the best
route. In hierarchical networks, the higher level processes that route calls between peer groups are aware
of the peer group structure, but they are not aware of the routes available within the peer groups.
Hierarchical networks will always adhere to call requirements, but they may not always route calls over
the most optimum route.
PNNI Internetworking with AINI
ATM Inter-Network Interface (AINI) is an industry standard protocol for enabling static routing between
separate PNNI networks. AINI only advertises ATM addresses and address groups that are manually
configured on AINI links, so the manual configuration makes AINI links more expensive to configure
than PNNI links. AINI provides network security and independence by blocking all PNNI
advertisements across AINI links. AINI is typically used to enable select communications between two
independent networks. For example, AINI links might be used to interconnect two different companies
or between a company and a service provider. Figure 1-6 shows an example of PNNI networking with
AINI.
1-8
Note AINI networking is not supported on Cisco MGX 8850 switches before Release 2.1.60 and is not
supported on the SES PNNI Controller before Release 1.1.60.
Cisco PNNI Network Planning Guide for MGX and SES Products, Release 5
Part Number OL-3847-01 Rev. D0, April, 2004
Page 41

Chapter 1 Introduction to PNNI
Figure 1-6 Example PNNI Internetworking with AINI Topology
PNNI Internetworking with IISP
PNNI network
PNNI Internetworking with IISP
Interim Inter-Switch Protocol (IISP) is the predecessor to AINI and serves the same purpose as AINI,
which is to link two independent PNNI networks. Unlike AINI, IISP does not support all UNI 4.0
features.
Note Standards-based IISP supports SVC and SVP connections. Cisco has enhanced IISP to also support
CBR1, rt-VBR1, rt-VBR2, rt-VBR3, nrt-VBR1, nrt-VBR2, and ABR SPVC and SPVP connections.
If the border nodes between two independent PNNI networks support AINI, you should use AINI for any
links between them. The only time you should use IISP is when one or both of the border nodes do not
support AINI.
AINI
AINI
PNNI network
66061
Part Number OL-3847-01 Rev. D0, April, 2004
Cisco PNNI Network Planning Guide for MGX and SES Products, Release 5
1-9
Page 42

PNNI Internetworking with IISP
Chapter 1 Introduction to PNNI
1-10
Cisco PNNI Network Planning Guide for MGX and SES Products, Release 5
Part Number OL-3847-01 Rev. D0, April, 2004
Page 43

Interoperability and Performance Planning
This chapter describes the standards supported by the Cisco switches covered in this guide and provides
performance specifications for these switches.
Compatible Standards
The Cisco switches described in this guide are designed to interoperate with switches that support the
following standards:
• Private Network-to-Network Interface (PNNI) Version 1
• User-Network Interface (UNI) 3.0
• UNI 3.1
• UNI 4.0
CHAPTER
2
• Integrated Local Management Interface (ILMI) 4.0
• ATM Inter-Network Interface (AINI) 1.0
• Interim Inter-Switch Protocol (IISP) 3.0 and 3.1
• Traffic Management (TM) 4.0
Specifications
Table 2- 1 lists PNNI network specifications for MGX switches and the MGX 8880 Media
Gateway.Table 2- 2 lists PNNI network specifications for SES equipped BPX switches.
Note The specifications listed in Table 2-1 and Tab le 2- 2 are recommended or maximum limits that may be
constrained by the memory requirements for other features. For example, the switches listed cannot
simultaneously support the maximum number of connections, links, and logical interfaces.
Part Number OL-3847-01 Rev. D0, April, 2004
Cisco PNNI Network Planning Guide for MGX and SES Products, Release 5
2-1
Page 44

Chapter 2 Interoperability and Performance Planning
Specifications
Table 2-1 PNNI Networking Specifications for MGX Switches and the MGX 8880 Media Gateway
MGX 8850, MGX 8880 & MGX 8950
(PXM45) MGX 8830 & MGX 8850
(PXM1E)
Capabilities 2.1.7 345345
PNNI nodes per SPG PNNI network
(maximum recommended)
Hierarchical levels per MPG PNNI
network (maximum/recommended)
Visible PNNI peer groups per
network
(recommended)
PNNI nodes per lowest level MPG
peer group (recommended)
1
PNNI links per switch (maximum)
PXM1E
PXM45
2
160 160 160 160 160 160 160
10/3 10/3 10/3 10/3 10/3 10/3 10/3
32 32 32 32 32 32 32
128 128 128 128 128 128 128
—
99
—
100
—
100
—
—
32
—
32
—
32
—
PXM45/B
PXM45/C
PNNI links per peer group
(maximum)
Preferred routes per switch
(maximum)
PXM1E
PXM45
2
PXM45/B
PXM45/C
PNNI summary addresses per
switch (maximum)
PNNI suppression addresses
(maximum)
Maximum number of signaling
interfaces per switch (UNI and NNI,
physical and virtual)
Physical and logical ATM interfaces
per switch (maximum)
PXM1E
PXM45
2
99
—
100
—
192
192
192
192
—
—
—
—
—
—
3400 3400 3400 3400 3400 3400 3400
—
—
—
—
5000
5000
—
—
5000
5000
10000
—
—
5000
10000
5000
—
—
—
5000
—
—
—
5000
—
—
—
50 50 50 50 50 50 50
50 50 50 50 50 50 50
100 192 192 192 192 192 192
—
192
—
3200
—
4000
—
—
4000
—
4000
—
4000
—
PXM45/B
PXM45/C
2-2
192
—
Cisco PNNI Network Planning Guide for MGX and SES Products, Release 5
3200
—
4000
4000
4000
4000
—
—
—
—
—
—
Part Number OL-3847-01 Rev. D0, April, 2004
Page 45

Chapter 2 Interoperability and Performance Planning
Specifications
Table 2-1 PNNI Networking Specifications for MGX Switches and the MGX 8880 Media Gateway (continued)
MGX 8850, MGX 8880 & MGX 8950
(PXM45) MGX 8830 & MGX 8850
(PXM1E)
Capabilities 2.1.7 345345
SVC connections per switch
(maximum)
3
SPVC connections per switch
(maximum)
Total connections per switch (SVCs
and SPVCs)
3
3
Border ports per complex node30303030303030
ATM prefixes per interface
(maximum)
ATM addresses per interface
(maximum)
ATM static addresses per switch
(maximum)
P2MP root connections per switch — — 5 K 5 K — — 500
P2MP branches per switch — — 128 128 — — 32
P2MP parties allowed per root
connection
P2MP parties per switch — — 10 K 10 K — — 1 K
1. This recommendation is based on normal memory usage within the switch.
2. PXM45, which is the first released version of the PXM45 card and is sometimes called PXM45A, is not supported on
Release 5 switches.
3. Connections limits are calculated differently for a switch and for CWM. For more information, refer to the following
section, “Conn ection Limit A dju stments.”
50 K 250 K 250 K 250 K 13.5 K 13.5 K 13.5 K
50 K 250 K 250 K 250 K 27 K 27 K 27 K
50 K 250 K 250 K 250 K 27 K 27 K 27 K
16 16 16 16 16 16 16
256 256 256 256 256 256 256
3000 3000 3000 3000 3000 3000 3000
——1 K1 K——100
Table 2-2 PNNI Networking Specifications for SES Equipped BPX Switches
BPX/SES
Capabilities SES 1.0 SES 1.1 SES 3 SES 4
PNNI nodes per SPG PNNI network
255/190 255/128 255/128 255/128
(maximum/recommended)
Hierarchical levels per PNNI
1/1 10/3 10/3 10/3
network (maximum/recommended)
PNNI peer groups per network
1 323232
(maximum recommended)
PNNI nodes per peer group
255 128 128 128
(maximum recommended)
SVC connections per switch
SPVC connections per switch
Part Number OL-3847-01 Rev. D0, April, 2004
1
1
50 K 50 K 100 k 100 k
50 K 50 K 100 k 100 k
Cisco PNNI Network Planning Guide for MGX and SES Products, Release 5
2-3
Page 46

Chapter 2 Interoperability and Performance Planning
Connection Limit Adjustments
Table 2-2 PNNI Networking Specifications for SES Equipped BPX Switches (continued)
BPX/SES
Capabilities SES 1.0 SES 1.1 SES 3 SES 4
Total connections per switch (SVCs
and SPVCs)
1
Physical ATM interfaces per switch
(maximum)
Preferred routes per switch
(maximum)
P2MP root connections per switch — — — 500
P2MP branches per switch — — — 1
P2MP parties allowed per root
connection
P2MP parties per switch — — — 1 K
1. Connections limits are calculated differently for a switch and for CWM. For more information,
refer to the following section, “Connection Limit Adjustments.”
2. SES equipped BPX switches do not support branching.
50 K 50 K 100 k 100 k
100 100 100 100
— — 1000 1000
2
———100
Connection Limit Adjustments
For MGX software Release 3.0 and above, and CWM Release 12.0, Patch 1 and above, the unit for
connection limits is different for the switch and for CWM.
Note The connection limit adjustments described in this section apply only to CWM-managed switches. If you
are not using CWM to manage switches, you can ignore this section.
For switches, the connection limit units are connections. For CWM, the connection limit units are
persistent endpoints. For example, a switch can support 250K connections, and CWM can support 250K
persistent endpoints per switch.
Table 2- 3 shows how the switch and CWM account for each connection type.
Table 2-3 Switch and CWM Connection Units for Each Connection Type
Connection Type Switch Connections CWM Endpoints
SVC 1 0
Pass-through
connection
1
Routed SPVC 1 1
DAX SPVC
1. Pass-through connections are connections that do not terminate on a switch. These connections
terminate on other switches in the network and merely “pass through” the local switch.
2. A digital cross-connect (DAX) SPVC is an SPVC built between two interfaces on the same switch.
2
10
12
2-4
Cisco PNNI Network Planning Guide for MGX and SES Products, Release 5
Part Number OL-3847-01 Rev. D0, April, 2004
Page 47

Chapter 2 Interoperability and Performance Planning
Table 2- 3 identifies some important differences between the way connections are counted on the switch
and in CWM. For example, although all connection types are counted as one connection on the switch,
SVCs and pass-through connections are not included when calculating the connection limit for CWM.
DAX SPVCs, however, are counted as two connections when calculating the connection limit for CWM.
The real issue is what happens if you configure a CWM-managed switch with only DAX SPVCs. In this
example, the switch can support 250K DAX SPVCs, but CWM can support only 125K DAX SPVCs.
To determine the actual connection limits for a CWM-managed switch, multiply the number of each
connection type by the unit cost in each column of Tab l e 2-3. The total for each column must not exceed
250K.
Physical Network Planning
The PNNI switches described in this guide can reroute connections and adjust to equipment or link
failures only when the physical network has been designed to use redundant hardware and links. When
designing a PNNI network, consider doing the following:
• Install redundant hardware in switches
Physical Network Planning
• Install parallel links between adjacent switches
• Set up multiple links between adjacent peer groups
• Use multiple links when connecting to an external network
• Provide multiple communication paths between any two nodes that will communicate with each
other
The following sections provide additional information on these guidelines.
Install Redundant Hardware in Switches
The switches described in this guide support redundant power supplies, Processor Switch Module
(PXM) cards, line cards, and trunk cards. Although PNNI can reroute calls, using redundant hardware
can improve network stability and performance by preventing reroutes caused by hardware failure.
Parallel Links Between Adjacent Switches
When there are two or more links between adjacent switches, those links are called parallel links.
Parallel links support more traffic than single links and provide link redundancy for each other. If one
link fails, the other is still available. Another way to provide link redundancy is to use the Automatic
Protection System (APS), which provides link redundancy for optical interfaces.
By default, MGX switches load balance across parallel links. Load balancing uses one of four methods
to balance the traffic load over parallel links. The goal is to prevent any single link from being overloaded
when other links have available bandwidth. Load balancing is described in more detail in Chapter 4,
“Planning Intermediate Route Selection.”
Part Number OL-3847-01 Rev. D0, April, 2004
Cisco PNNI Network Planning Guide for MGX and SES Products, Release 5
2-5
Page 48

Planning Guidelines for Individual Peer Groups
Multiple Links Between Adjacent Peer Groups
Communications between two peer groups takes place through two border nodes. Parallel links between
two border nodes improves reliability. Adding additional border nodes to handle communications
between two peer groups provides alternative routing paths and prevents network outages caused by a
single node failure.
Multiple Links to an External Network
An external network link is any non-PNNI network link. External network links include AINI and IISP
links. As with internal network links, consider using parallel links and additional border nodes to provide
alternative paths to external networks. When you configure multiple static links to an external network,
remember to duplicate the ATM address advertisement configuration on all redundant links.
Multiple Paths Between Network Nodes
It is good design practice to ensure that there are at least two different paths between any pair of nodes
that will communicate with each other. A pair of redundant links is one path. If one switch site is
damaged by fire or earthquake, there should be at least one other switch that can provide an alternative
path between the source and destination switches.
Chapter 2 Interoperability and Performance Planning
It is also a good design practice to distribute paths across multiple service modules so that a service
module failure does not disrupt all communications between two nodes.
Planning Guidelines for Individual Peer Groups
The first step in planning a PNNI topology is to determine if all network nodes will participate in one
peer group or in hierarchical peer groups. The single and hierarchical peer group topologies are
introduced in Chapter 1, “Introduction to PNNI.” When a network grows beyond the capabilities of a
single peer group, you must use the hierarchical peer group topology.
The planning for a single peer group topology is the same as the planning for a single peer group within
a hierarchical PNNI network. The difference between planning for a single peer group network and
planning for a hierarchical network is that for hierarchical networks, you have to plan the
communications between peer groups. The following list summarizes the capabilities and guidelines for
a single peer group:
• For networks with less than 100 nodes, Cisco Systems recommends using a single peer group
topology.
• A single peer group supports up to 160 nodes as described in Tab l e 2 -1.
• All nodes within a single peer group must be able to communicate with each other over a path of
inside links.
• PNNI can route calls through a maximum of 20 nodes within a single peer group. The structure of
the peer group should be such that no node is more than 19 hops from any other node.
2-6
• As the number of nodes in a single peer group grows, the network and system resource requirements
for each node grows.
Cisco PNNI Network Planning Guide for MGX and SES Products, Release 5
Part Number OL-3847-01 Rev. D0, April, 2004
Page 49

Chapter 2 Interoperability and Performance Planning
Planning Guidelines for Hierarchical Networks
• Although the number of network nodes in your network might not dictate a hierarchical topology,
other network requirements can. For example, an anticipated network expansion might be easier
later if you plan for it now.
• Consider future growth when planning peer groups. If the number of existing nodes is approaching
the limit of a single peer group, consider using a hierarchical topology so that you do not have to
reconfigure nodes later when the network size expands.
Planning Guidelines for Hierarchical Networks
When you have a plan for dividing your network into multiple peer groups, the next step is to plan
communications between those peer groups. To enable communications between peer groups, you will
need to identify a peer group leader for each peer group. The following sections provide planning
guidelines for the peer group leaders and border nodes in a hierarchical network.
Planning Guidelines for Peer Group Leaders
Peer group leaders are the logical nodes that represent their peer group at the next higher level in the
PNNI hierarchy. Peer group leaders are introduced in Chapter 1, “Introduction to PNNI.” When planning
for peer group leaders, consider the following facts and guidelines:
• For a peer group to communicate with another peer group, the peer group must have at least one
node that is capable of acting as peer group leader.
• It is good design practice to configure multiple nodes within a peer group to serve as peer group
leader. The peer group priority is a configurable parameter that determines which of the peer group
leader candidates becomes peer group leader.
• To compensate for the additional processing requirements of peer group leaders, consider reducing
the traffic load for the peer group leader switch and avoid using the same switch as both a peer group
leader and a border node.
Planning Guidelines for Border Nodes
Border nodes are physical nodes that are members of one peer group and have PNNI outside-links to
member nodes of other peer groups. Border nodes are introduced in Chapter 1, “Introduction to PNNI.”
To compensate for the additional processing requirements of border nodes, consider reducing the
intra-peer-group traffic load for the border node and avoid using the same switch as both a border node
and a peer group leader.
Part Number OL-3847-01 Rev. D0, April, 2004
Cisco PNNI Network Planning Guide for MGX and SES Products, Release 5
2-7
Page 50

Planning Guidelines for Hierarchical Networks
Chapter 2 Interoperability and Performance Planning
2-8
Cisco PNNI Network Planning Guide for MGX and SES Products, Release 5
Part Number OL-3847-01 Rev. D0, April, 2004
Page 51

CHAPTER
3
Address and Closed User Group Planning
Proper address planning can greatly increase the performance of a PNNI WAN. Although a PNNI WAN
can support almost any addressing scheme, an uncoordinated address scheme can cause excessive
address advertisement and needless rerouting, both of which reduce network performance. A good
addressing plan is one which is hierarchical in nature and thus summarizes simply and efficiently.
The PNNI Closed User Group (CUG) feature allows the network administrator to define user groups of
ATM addresses. Once these user groups are defined, the administrator can control how users within the
groups communicate with other group members and with those outside the group.
This chapter provides an address planning overview, a CUG planning overview, and general guidelines
for creating an ATM address plan and a CUG plan.
Note All Cisco MGX and SES switch products ship with default addresses. These defaults are provided for
lab evaluations of these products. Before the switch is deployed, Cisco Systems advises you to
reconfigure the default addresses using the address plan guidelines in this chapter.
Address Planning Overview
Every route across a PNNI network is determined by two ATM End Station Addresses (AESAs), a source
and a destination. When a connection is being established, the source PNNI routing node looks up the
destination address in PNNI routing tables. If the routing tables do not contain a satisfactory predefined
route, the switch uses the PNNI topology database to search for a route. Routing decisions are made
based on many criteria as discussed in Chapter 4, “Planning Intermediate Route Selection.” This section
focuses on how proper address planning can make PNNI routing more efficient.
Note The source end of a connection is also called the master end of the connection, as the master end is
responsible for initiating the connection. The destination end is also called the slave end.
PNNI provides both a routing protocol and a signaling protocol. The routing protocol is used to build a
topology database and create a route table of all the reachable AESAs. The signalling protocol is used
to establish calls across the PNNI network. When initiating a call, the signaling protocol refers to the
routing table or topology database to locate a route to the destination ATM address.
To understand the importance of an address plan, consider how PNNI would respond if there were no
plan. Consider a network with 100 non-coordinated destination ATM addresses. Assume that all
addresses were chosen at random. To enable access to all destinations, PNNI has to create a separate
route for each of the 100 destinations, and this has to be repeated on every switch in the network.
Cisco PNNI Network Planning Guide for MGX and SES Products, Release 5
Part Number OL-3847-01 Rev. D0, April, 2004
3-1
Page 52

Address Planning Overview
Furthermore, PNNI switches exchange data with all other nodes in the peer group, so lots of address
information would be transmitted constantly throughout the network as PNNI monitors the network
topology.
Now let’s consider a more efficient example. Figure 3-1 shows a PNNI network with some simplified
addresses in place of the 20-byte ATM addresses.
Figure 3-1 PNNI Addressing Example
Chapter 3 Address and Closed User Group Planning
A.11
A.12
A.13
A3
A1
Peer group A
A4
A5
A.21
A2
A.22
A6
A.23
89686
For consistency, assume that the six switches shown in Figure 3-1 connect to a total of 100 destinations.
Notice that the destination addresses for the external lines connected to A.1 all use the prefix A.1, and
the destination lines connected to A.2 use the prefix A.2. When you configure a common prefix for
multiple addresses, you can reduce the size of the routing table and the topology database by storing
routes to the address prefix, instead of routes to every destination. In this example, all nodes in Peer
Group A store routes to the other switches, but there is no need to store additional routes for every
destination address. The use of address prefixes is also called address summarization.
Address summarization also makes network management easier because you do not need to manually
enter every AESA into the source nodes. Instead, you define a PNNI address prefix, which summarizes
all destinations that share that prefix.
Address summarization does not preclude the use of non-conforming addresses. For example, if network
management dictates the use of a specific non-conforming ATM address for a destination, that address
can be manually entered at the switch, and PNNI will advertise a route to that device. The
non-conforming address is called a foreign address. The support of foreign addresses makes PNNI more
flexible, but keep in mind that excessive use of foreign addresses does impact switch performance.
3-2
Tip Chapter 4, “Planning Intermediate Route Selection,” describes how up to five routes can be stored in a
total of 10 route tables for each destination. To understand the impact of foreign addresses, multiply the
potential of 50 routes times the number of switches in a peer group, and then multiply that number times
the number of foreign addresses. Address summarization is a key component in PNNI address planning.
When a call is placed to a destination address, PNNI refers to the destination addresses and prefixes in
the routing tables or topology database. After the best route is chosen to the destination switch, the
destination switch selects the appropriate destination interface by searching internal address tables for
the longest prefix match. When a switch and its interfaces are configured with prefixes that enable PNNI
to quickly locate the destination interface, PNNI routing is most efficient.
Although address summarization does make network management easier and routing more efficient, it
can be misused and make PNNI routing less efficient. Consider the case where the same address prefix
is assigned to multiple nodes. This is a valid configuration, but it can lead PNNI to unnecessarily reroute
Cisco PNNI Network Planning Guide for MGX and SES Products, Release 5
Part Number OL-3847-01 Rev. D0, April, 2004
Page 53

Chapter 3 Address and Closed User Group Planning
connections as it attempts to locate the correct node. A better design would use the longest possible
prefix to represent all the interfaces on a node, and then a longer prefix on each interface that uniquely
defines each interface.
At the end of this chapter, there are two worksheets (Table 3- 4 and Ta b l e 3-5 ) into which you can enter
your WAN address values. If you are familiar with designing PNNI address structures, or if a plan is
already completed, you can go directly to the Address Plan Worksheet and enter the values. The
procedures for configuring ATM addresses on Cisco MGX and SES switch products are described in the
following guides:
• Cisco MGX 8850 (PXM1E/PXM45), Cisco MGX 8950, Cisco MGX 8830, and Cisco MGX 8880
Configuration Guide, Release 5
• Cisco SES PNNI Controller Software Configuration Guide, Release 3
Planning Address Configuration Settings
Use the following steps to create a WAN address plan:
Planning Address Configuration Settings
Step 1 Select an ATM address format
Step 2 Select a PNNI level
Step 3 Select the PNNI peer group ID
Step 4 Select the ATM address
Step 5 Select the ILMI address prefix
Step 6 Select the SPVC address prefix
Step 7 Plan address prefixes for AINI and IISP links
Step 8 Select static addresses for UNI ports
These steps are described further in the remainder of this chapter.
Selecting an ATM Address Format
Each PNNI node must be configured for at least one ATM address format. This is an ATM requirement
that must be considered when choosing PNNI addresses. To establish ATM connections, each ATM UNI
end system must have at least one ATM End System Address (AESA) that uniquely identifies that ATM
endpoint. This section explains the supported AESA address formats and their structures.
Caution Each node must support the address format of all its neighboring nodes.
Part Number OL-3847-01 Rev. D0, April, 2004
Cisco PNNI Network Planning Guide for MGX and SES Products, Release 5
3-3
Page 54

Planning Address Configuration Settings
Supported Address Formats
The Cisco MGX and SES switch products support the following standard ATM formats:
• Native E.164
• Data Country Code (DCC)
• International Code Designator (ICD)
• AESA-embedded E.164
• Local AESA
The native E.164 address specifies an Integrated Services Digital Network (ISDN) number and is used by
Public Switched Telephone Networks (PSTNs). A native E.164 address has a variable length of up to 15
Binary Coded Decimal (BCD) digits. The other address formats are usually used for private networks. The
default address format for the Cisco MGX and SES switch products is the ICD format.
In the PNNI network, native E.164 addresses are mapped to an E.164 AESA format. The native AESA
is inserted as a left-justified IDI portion of the AESA, with the semi-octet Hex FFFF padded to form an
integral byte at the end. This left-justified rule may be changed to right-justified via CLI if needed.
The substructures of the address formats are transparent to PNNI routing. Figure 3-2 shows the
substructures of the supported ATM address formats. Tab le 3-1 describes the substructures shown in
Figure 3-2.
Chapter 3 Address and Closed User Group Planning
Figure 3-2 Supported ATM Address Formats
DCC AESA format
(AFI = 39)
ICD AESA format
(AFI = 47)
Embedded E.164
AESA format
(AFI = 45)
Local
AESA format
(AFI = 49)
1 1210 6
AFI
DCC HO-DSP
IDI
IDP
1 1210 6
AFI
ICD HO-DSP
IDI
IDP
1 1846
AFI
1 112 6
AFI
IDP
E.164
IDP
IDI
20 bytes
DSP
DSP
DSP
DSP
ESI
ESI
ESIHO-DSP
ESIHO-DSP
SEL
SEL
SEL
SEL
46511
3-4
Cisco PNNI Network Planning Guide for MGX and SES Products, Release 5
Part Number OL-3847-01 Rev. D0, April, 2004
Page 55

Chapter 3 Address and Closed User Group Planning
Planning Address Configuration Settings
Table 3-1 ATM Address Components
ATM Field Description Default Values
AFI Authority Format Identifier (1 byte). 47
ICD International Code Designator (2 bytes) The default value is the ICD assigned to
Cisco Systems.
IDI Initial Domain Identifier (8 bytes). The contents of this field vary depending on the
value of the AFI. For example, with a DCC AESA (AFI=39), the IDI value of Hex
840F identifies the United States.
HO-DSP High-Order Domain Specific Part (4 to 12 bytes). The meaning is defined by the
address authority controlling the AESA. This component couples with AFI and IDI
to route a call to the appropriate switch.
ESI End System Identifier (6 bytes). This field repeats the PNNI Controller MAC address
when the ATM address identifies the PNNI node. (When an ATM address identifies
an ATM end system, the ESI field will be completed through ILMI registration with
the end system. In this case, the ESI is typically the MAC address of the ATM CPE.
The unique ESI field will distinguish that ATM end system [ATM CPE] from all other
ATM end systems.)
SEL PNNI selector byte (1 byte). The selector byte is used to identify different target
applications on the node.
0091
—
—
PXM45
MAC address at first
boot.
00
Guidelines for Selecting an Address Format
It is important to select a address format plan which meets the future needs and scale of the network.
Changing the node ATM address format and addresses after its initial deployment requires major service
disruption, and requires complete reconfiguration of the node and all of its connections. Consider the
following guidelines when selecting an address format:
• Consider whether a registered address will be required in the future. The default registered address
is registered to Cisco and is part of the ATM address.
• If an address format has been chosen for the WAN, or if your WAN will consist of existing nodes
for which an address format has been selected, you can select that address format.
• Both Public ATM networks (PSTNs) and Narrowband Integrated Services Digital Networks
(N-ISDN) usually use E.164 numbers. PNNI allows end-system reachability to be advertised via the
E.164 address prefix.
• In the Data Country Code (DCC) format, each country has a unique DCC value. If you select this
address format, your value must match this standard.
• In the International Code Designator (ICD) format, the ICD identifies an organization such as a
company or campus. This identification is useful when you are deploying a WAN that will be
accessed by several campuses or sites.
• Native E.164 addresses can be embedded in the AESA.
Enter the address format or formats that you select into the Nodal Address Worksheet, Ta b le 3-4 , which
appears at the end of this chapter.
Note Local AFIs should not be used for addressing within ATM Service Provider networks.
Part Number OL-3847-01 Rev. D0, April, 2004
Cisco PNNI Network Planning Guide for MGX and SES Products, Release 5
3-5
Page 56

Planning Address Configuration Settings
Address Registration Authorities
Table 3- 2 lists the address registration authorities.
Table 3-2 Address Registration Authorities
Category Type Authorities
AT M Service
Providers
(ASPs)
Private
networks
ICD
1. US—American National Standards Institute (ANSI).
2. UK—British Standards Institution (BSI).
Identifiers for Organizations for Telecommunications Addressing (IOTA)
http://www.bsi-global.com/DISC/Working+Withyou/Naming+Addressing.xalter.
DCC
1. ISO National Administrative Authority (Registration Authority).
2. List of authorities:
–
US—American National Standards Institute (ANSI).
–
Germany—Deutsche Industrie-Normen (DIN).
E.164 International Telecommunications Union (ITU), the National Numbering Authority.
ASP Addresses Private ATM networks can apply to their ATM Service Provider for addresses.
ICD Identifiers for Organizations for Telecommunications Addressing (IOTA)
http://www.bsi-global.com/DISC/Working+Withyou/Naming+Addressing.xalter.
DCC ISO National Administrative Authority (Registration Authority).
Unregistered
addresses
Private networks may create unregistered addresses. Note that such addresses are not
globally unique. It is recommended that unregistered addresses be formed using the local
AFI (49).
Chapter 3 Address and Closed User Group Planning
Selecting a PNNI Level
PNNI uses a hierarchical address scheme to define the physical topology and to create a logical hierarchy
above the physical topology. Figure 3-3 shows an example of a physical topology.
3-6
Cisco PNNI Network Planning Guide for MGX and SES Products, Release 5
Part Number OL-3847-01 Rev. D0, April, 2004
Page 57

Chapter 3 Address and Closed User Group Planning
Figure 3-3 PNNI Network Physical Topology
Planning Address Configuration Settings
PNNI network
38622
The topology shown in Figure 3-3 becomes a Single Peer Group (SPG) PNNI WAN if no hierarchy is
applied. In an SPG WAN, every node stores information about every other node and the CPE that connect
to it. To distribute information about all the nodes in the WAN, the PNNI switches send PNNI Topology
State Element (PTSE) messages to each other on a regular basis. In a small WAN, an SPG application is
appropriate. When the WAN grows beyond 100 nodes, PTSE distribution and the size of the node PNNI
databases begins to affect network performance. At this point, you might want to consider creating a
Multiple Peer Group (MPG) WAN.
Figure 3-4 shows an example topology of a PNNI MPG WAN.
Figure 3-4 MPG WAN Topology
Level 40
ZZ
38623
Level
56
Level
56
Part Number OL-3847-01 Rev. D0, April, 2004
Level
56
Level 56
Level
56
Cisco PNNI Network Planning Guide for MGX and SES Products, Release 5
3-7
Page 58

Planning Address Configuration Settings
The network shown in Figure 3-4 uses the same physical topology as that shown in Figure 3-3 for an
SPG WAN. The difference is that the physical network has been divided into five peer groups at level
56. The level will be explained later in this section. What is important to understand now is that the
physical topology is still the same as when all nodes were in a single peer group. Dividing the physical
WAN into multiple peer groups simply reduces the size of each peer group, which reduces the total
number of PTSEs and the size of the PNNI database within each node. This improves PNNI network
performance within each of the smaller peer groups, which leaves more bandwidth and node resources
available for processing calls.
The level 40 peer group shown in Figure 3-4 is a logical peer group that has been defined to enable
communications between the peer groups at the lower levels. Each of the level 56 peer groups operate
more efficiently because they do not have to keep up with changes in the other level 56 peer groups.
However, because the level 56 peer groups do not know the details about the other level 56 peer groups,
they cannot communicate with the other groups without help from a higher level process.
The level 40 peer group shown in Figure 3-4 is created by adding a higher-level PNNI processes to one
of the nodes in each level 56 peer group. Each higher level process operates as a logical group node
(LGN) at this higher level, and together these nodes form a logical PNNI peer group at this level. The
level 40 peer group nodes exchange PTSEs regarding the level 56 peer groups and maintain a database
with routing information for communicating between the lower-level peer groups. Level 40 nodes do not
store the routing details stored within the level 56 peer groups, because that information is already stored
at the lower level. The level 40 nodes only store the information that the level 56 nodes need to locate
and communicate with other peer groups.
Chapter 3 Address and Closed User Group Planning
If the network shown in Figure 3-4 were to grow until there were more than 100 LGNs at level 40, the
level 40 peer group could be divided into multiple peer groups and a higher level could be created to
enable communication between the level 40 peer groups. This process can continue until the practical
maximum of 10 levels is reached. When you consider that 100 level 40 peer groups equate to
approximately 10,000 level 56 nodes (100 level 40 nodes times 100 level 56 nodes), it is easy to see how
adding additional layers enables PNNI to scale.
Note These calculations are based on general guidelines. Peer groups on MGX and SES nodes can support up
to 160 nodes. Also, remember that these calculations are for network nodes, not CPE. The actual number
of CPE and calls supported is considerably higher.
In general, when you create an SPG or MPG network, you need to select a starting level for your PNNI
network, which should be the lowest level you will ever need. You can always add higher levels to an
SPG or MPG network, but creating lower levels requires a significant amount of reconfiguration.
The PNNI level is mathematically related to the ATM addresses used in a PNNI network. Valid levels
are 1 through 104. These numbers specify the number of ATM address bits that are used for the peer
group ID, which is described in the next section. Specifically, the level identifies the number of
sequential most-significant ATM address bits that define the peer group ID.
Although the PNNI specifications provide for up to 104 PNNI levels, they also limit the practical
application to 10 levels. Some PNNI experts suggest that four levels will be sufficient for most PNNI
networks. For these reasons, and because it easier to translate bytes of an ATM address instead of bits,
Table 3- 3 shows the recommended levels to use for PNNI networks.
3-8
Cisco PNNI Network Planning Guide for MGX and SES Products, Release 5
Part Number OL-3847-01 Rev. D0, April, 2004
Page 59

Chapter 3 Address and Closed User Group Planning
Table 3-3 Recommended PNNI Level Values
Level Peer Group ID Portion of ATM Address
8 11 xx xx xx xx xx xx xx xx xx xx xx xx xx xx xx xx xx xx xx 1
16 11 22 xx xx xx xx xx xx xx xx xx xx xx xx xx xx xx xx xx xx 2
24 11 22 33 xx xx xx xx xx xx xx xx xx xx xx xx xx xx xx xx xx 3
32 11 22 33 44 xx xx xx xx xx xx xx xx xx xx xx xx xx xx xx xx 4
40 11 22 33 44 55 xx xx xx xx xx xx xx xx xx xx xx xx xx xx xx 5
48 11 22 33 44 55 66 xx xx xx xx xx xx xx xx xx xx xx xx xx xx 6
56 11 22 33 44 55 66 77 xx xx xx xx xx xx xx xx xx xx xx xx xx 7
64 11 22 33 44 55 66 77 88 xx xx xx xx xx xx xx xx xx xx xx xx 8
72 11 22 33 44 55 66 77 88 99 xx xx xx xx xx xx xx xx xx xx xx 9
80 11 22 33 44 55 66 77 88 99 AA xx xx xx xx xx xx xx xx xx xx 10
88 11 22 33 44 55 66 77 88 99 AA BB xx xx xx xx xx xx xx xx xx 11
96 11 22 33 44 55 66 77 88 99 AA BB CC xx xx xx xx xx xx xx xx 12
104 11 22 33 44 55 66 77 88 99 AA BB CC DD xx xx xx xx xx xx xx 13
Planning Address Configuration Settings
Peer Group ID
Length
(Bytes)
The default PNNI level for Cisco MGX and SES switch products is 56, which is the midpoint of the
recommended values. If this is the lowest level that you expect to need, you can accept the default. If
you anticipate needing lower levels in the future, you should select the lowest level that you think you
will need now, and enter the level number in the Nodal Address Worksheet, Table 3-4, which appears at
the end of this chapter. If you are planning to create higher PNNI levels, you can also note these in the
worksheet.
Note If your ATM network connects to a public network, or if you want to conform to public network ATM
address rules for future expansion, you cannot create more than one peer group at PNNI levels 1 through
8. This is because the first 8 bits (byte 1) are reserved for the AFI and must be set to a fixed value. Also,
if the address format you choose is DCC AESA or ICD AESA, you can create only one peer group for
each DCC or ICD.
Part Number OL-3847-01 Rev. D0, April, 2004
Cisco PNNI Network Planning Guide for MGX and SES Products, Release 5
3-9
Page 60

Planning Address Configuration Settings
Selecting the PNNI Peer Group ID
As described in the previous section, the PNNI level selects the number of ATM address bits that are
unique within the peer group ID. After you select a PNNI level for a peer group, you need to define the
peer group ID using the PNNI level, the number of address bits defined by the PNNI level, and trailing
zeros. Figure 3-5 shows the format of the default peer group ID for the Cisco MGX and SES switch
products.
Figure 3-5 Default Peer Group ID
56: 47.00.9181.0000.0000.0000.0000.00
Chapter 3 Address and Closed User Group Planning
Default peer
group level
Default ATM
address format
Cisco
ICD
89685
As Figure 3-5 shows, the peer group ID begins with the PNNI level, followed by a colon. The unique
portion of the peer group ID follows next. The unique portion of the ID, which is the first 7 bytes by
default, corresponds with the left-most or most-significant bytes of the ATM address. The Cisco default
PNNI level is 56, so the first 7 bytes of the default ATM address make up the unique portion of the peer
group ID: 47.009181000000.
The total length of a peer group ID is 14 bytes, so the bytes that follow the unique portion of the peer
group ID are all set to 0. Therefore, the complete default peer group ID for all Cisco MGX and SES
switch products is: 56:47.00.9181.0000.0000.0000.0000.00. The periods within the peer group ID are
used to make it easier to read the peer group ID. To create a second peer group at the same default level,
you must modify the unique portion of the peer group ID. For example: 56:47.00.9181.0000.01.
Note Only the unique portion of the peer group ID, which is defined by the PNNI level, is used to identify the
peer group. In the example of the default level 56, the first 7 bytes of the ATM address define the peer
group ID. Although up to 13 bytes can be used for the peer group ID, all bytes beyond what is specified
by the PNNI level are ignored with respect to the peer group ID. Although the nonunique bits in the first
13 bytes appear as zeros in the peer group ID display, they do not have to be set to 0 for ATM addresses.
The peer group ID is used to identify ATM addresses that are part of the same PNNI peer group. For
example, the following PNNI addresses are all in the same default PNNI peer group:
3-10
• 47.009181000000112233445566.778899101112.01
• 47.009181000000112233445566.778899101113.01
• 47.009181000000112233445566.778899101114.01
• 47.009181000000778899101112.112233445566.01
The above addresses are all in the same peer group because the PNNI level for all addresses is the default
level (56 bits or 7 bytes) and the first 7 bytes of all these addresses are the same.
When planning peer group IDs for your WAN, consider the following:
• All peer group IDs within a peer group must be identical.
• Each peer group must have its own ID that is unique within the WAN.
Cisco PNNI Network Planning Guide for MGX and SES Products, Release 5
Part Number OL-3847-01 Rev. D0, April, 2004
Page 61

Chapter 3 Address and Closed User Group Planning
• If you change the address format, you need to change the peer group ID.
• If you change any of the identifiers within the unique portion of the peer group ID (for example, the
ICD), you must change the peer group ID.
Enter the peer group ID into the Nodal Address Worksheet, Table 3-4, which appears at the end of this
chapter.
Selecting the ATM Address
The node ATM address must be unique on the WAN and conform to the selections you have made for
the following parameters:
• Address format
• Peer group ID
Figure 3-6 shows the default ATM address for the Cisco MGX and SES switch products switch.
Figure 3-6 20-byte Node Address
Planning Address Configuration Settings
47
00 91 81 00 00 00 XX XX XX XX XX XX XX XX XX XX XX XX 00
Cisco
ICD
AT M
address
format
MAC address MAC address
44609
The first byte (47) of the default address identifies the address as an International Code Designator (ICD)
ATM End Station Address (AESA). The second and third bytes (0091) define the globally unique ICD
assigned to Cisco, and the next four bytes (81000000) are identical for all Cisco MGX and SES switch
products. The unique portion of the default node address is the 6-byte MAC address, which is used in
bytes 8 through 13 and again in bytes 14 through 19. Byte 20, which is the selector byte, is set to 00 by
default.
Note Cisco recommends that you change the Cisco ICD portion of the address (0091). This number is
registered to Cisco and using it will cause conflicts if the network you create is ever connected to a
network to which Cisco connects, or to a network that is using Cisco equipment with the default
parameters.
You do not have to change the default ATM address for Cisco MGX and SES switch products if the
combination of the peer group ID and the MAC address is acceptable. If you want to create a custom
ATM address for the switch, enter the address into the Nodal Address Worksheet, Table 3-4, which
appears at the end of this chapter.
Caution The default ATM address is created using the primary PXM45 or PXM1E card MAC address. If the
default address is being used and the primary PXM card is replaced, the ATM address of the switch
changes. After replacing a PXM card, check the switch ATM address and reconfigure it if necessary. To
avoid this problem entirely, configure a unique ATM address for the switch.
Part Number OL-3847-01 Rev. D0, April, 2004
Cisco PNNI Network Planning Guide for MGX and SES Products, Release 5
3-11
Page 62

Planning Address Configuration Settings
Selecting the ILMI Address Prefix
Although ILMI is not part of the PNNI specification, ILMI addressing should be coordinated with PNNI
addressing to minimize the number of PNNI advertised ATM addresses. The Cisco MGX and SES switch
products support ILMI dynamic addressing on UNI ports. When dynamic addressing is enabled, one or
more ILMI prefixes can be used to generate ATM addresses for CPE as follows:
1. The CPE retrieves the 13-byte ILMI prefix from the switch.
2. The CPE appends its 7 bytes with the 13-byte prefix to form its AESA.
3. The ILMI running on the switch registers the constructed AESA on the switch.
The default ILMI prefix is the first 13-bytes of the default ATM address, which consists of the 7-byte
peer group ID (0x47 0091 8100 0000) plus the unique 6-byte MAC address. If you change the peer group
ID for the switch, you should also change the ILMI address prefix so that the bytes that correspond to
the peer group ID match the corresponding bytes in the ILMI prefix.
When ILMI is enabled on a UNI port, you can add up to 16 address prefixes for that port. The same ILMI
prefix can be assigned to multiple ports. These ILMI prefixes are advertised by PNNI to enable switched
virtual circuit (SVC) routing to CPE that use these prefixes.
Enter the ILMI prefixes you plan to use into the Port Address Worksheet, Ta ble 3-5 , which appears at
the end of this chapter.
Chapter 3 Address and Closed User Group Planning
Selecting the SPVC Address Prefix
If you set up soft permanent virtual connections (SPVCs), the port at each end of the connection must
have a globally unique SPVC address. This address is generated by the switch when the connection is
defined and consists of the SPVC prefix and an internally generated number that identifies the port.
The default SPVC prefix is the first 13-bytes of the default ATM address, which consists of the 7-byte
peer group ID (0x47 0091 8100 0000) plus the unique 6-byte MAC address. If you change the peer group
ID for the switch, you should also change the SPVC address prefix so that the bytes that correspond to
the peer group ID match the corresponding bytes in the SPVC prefix.
When planning the SPVC prefix for your WAN, consider the following:
• The SPVC prefix and the ILMI prefix can be the same, or they can be different.
• There can be just one SPVC prefix for each node.
• Once you create a connection using an SPVC prefix, you cannot change the SPVC prefix until all
SPVCs have been deleted.
Enter the SPVC prefix into the Nodal Address Worksheet, Ta ble 3 -4, which appears at the end of this
chapter.
Planning Address Prefixes for AINI and IISP Links
ATM Inter-Network Interface (AINI) and Interim Inter-Switch Protocol (IISP) are two protocols that are
used for connecting private PNNI networks to public PNNI networks or to other private PNNI networks.
These links enable communications between separately managed networks without exposing the internal
structure of each independent network to the other. For example, when an AINI or IISP link is properly
configured, a CPE on one independent network can communicate with a CPE on another independent
network. However, PTSEs are not transmitted across these links, so the independent networks only have
access to ATM addresses that are deliberately shared during configuration.
3-12
Cisco PNNI Network Planning Guide for MGX and SES Products, Release 5
Part Number OL-3847-01 Rev. D0, April, 2004
Page 63

Chapter 3 Address and Closed User Group Planning
To enable communications over AINI and IISP links, static addresses must be configured on the end of
each link as described in the following guides:
• Cisco MGX 8850 (PXM1E/PXM45), Cisco MGX 8950, Cisco MGX 8830, and Cisco MGX 8880
Configuration Guide, Release 5
• Cisco SES PNNI Controller Software Configuration Guide, Release 3
There is no default prefix for AINI and IISP links, and because these protocols are used on separate link
types (not PNNI links), there is no requirement to configure prefixes for AINI and IISP links. However,
the PNNI database within each network does store the static addresses, so if there are multiple static
addresses that have the same prefix, you can improve PNNI routing efficiency and save configuration
time by configuring a summary address prefix that covers multiple ATM addresses. The summary
address prefix is a partial ATM address and represents all destinations for which the most significant
bytes of the ATM address match the summary address.
When planning AINI and IISP prefixes for your WAN, consider the following possibilities:
• If you are connecting to a network managed by another authority, that authority will probably issue
the destination addresses to you.
• The same address or summary address can be configured on more than one port, and multiple
addresses can be configured on each port.
Planning Address Configuration Settings
• Because the destination devices are not part of the PNNI network, IISP address prefixes do not have
to conform to the PNNI level, peer group ID, or node prefix.
Enter any AINI or IISP prefixes into the Port Address Worksheet, Table 3-5, which appears at the end of
this chapter.
Selecting Static Addresses for UNI Ports
When CPE devices do not support ILMI, they cannot automatically gain an ATM address from the node,
so you must configure a static ATM address on the port that leads to the CPE. You can add up to 255
static addresses on each port, if this number remains within the maximum addresses per node limit.
Multiple ports can be configured with the same static address, but there should be just one CPE that uses
each address. When a port leads to multiple CPE that use a common prefix, you can use a summary
address to create a single entry that routes to multiple CPE.
Enter the static addresses or summary addresses into the Port Address Worksheet, Tab le 3-5, which
appears at the end of this chapter.
Additional Guidelines for Creating an Address Plan
The following are guidelines for creating an address plan:
• Select the lowest-level PNNI level that will enable future expansion.
• Use PNNI levels that fall on 8-byte boundaries. This improves scalability and makes the PNNI level
number easier to work with.
• Use default values for as many entities as possible.
• Use AINI and IISP links to connect to public WANs.
• Do not use Cisco node address defaults in public WANs.
Part Number OL-3847-01 Rev. D0, April, 2004
Cisco PNNI Network Planning Guide for MGX and SES Products, Release 5
3-13
Page 64

Closed User Group Overview
• Confirm that each reconfigured node ID and node address are unique. The switch software does not
detect configuration errors caused by duplicate ATM addresses.
• Use summary port prefixes wherever possible to reduce overhead.
Closed User Group Overview
The PNNI Closed User Group (CUG) feature allows network users to form a closed community within
a PNNI network. Figure 3-7 shows an example of closed user groups in a network.
Figure 3-7 Closed User Group Example
Chapter 3 Address and Closed User Group Planning
CPE A,
CUGs 1 & 2
CPE C,
CUG 2
Switch W
Switch X
Switch Y
Switch Z
CPE D,
CUG 2
CPE B,
CUG 1
CPE E
116412
A network user may be associated with one, multiple, or no CUGs. In Figure 3-7, CPE A is a CUG
member of CUGs 1 and 2. CPE B, C, and D are members of either CUG 1 or CUG 2. Members of a
specific CUG can communicate typically among themselves, but in general not with network users
outside of the CUG. In the example, CPE A can communicate with CPE B, C, and D because it is a
member of both CUGs. This section will also show how CPE A can be enabled for communications with
CPE E.
Specific network users can have additional restrictions preventing them from originating calls to, or
receiving calls from, network users of the same CUG. For example, CPE B can be configured so that it
cannot originate calls to other CUG 1 members, but it can accept calls from other members.
Configuration options allow a network user to be further restricted when originating calls to, or receiving
calls from, network users outside of any CUG membership defined for the network user. In Figure 3-7,
CPE E is not a member of any CUG and the default configuration for CUG members will prevent
communications between CPE E and the other CPE. Using configuration options, however, CPE1 can be
allowed to originate calls to CPE E, and CPE D can be configured to accept calls from CPE E.
The user within a CUG is actually a UNI ATM End Station Address (AESA) or an ATM address prefix,
and this address or address prefix can be assigned to more than one interface on a switch. When an ATM
address is assigned to more than one CUG, the CPE that use that address must specify the CUG for a
connection or accept a configured default CUG called the preferential CUG.
3-14
CUG membership is evaluated only when setting up connections. CUG membership is an independent
feature and does not interoperate with the address filtering feature.
The CUG feature follows the ITU-T Q.2955.1 recommendation and supports point-to-point and
point-to-multipoint connections.
CUGs are managed with the switch CLI. Cisco MGX switches and Cisco LS1010 switches can
participate in CUGs. The Cisco WAN Manager (CWM) program does not currently support CUGs.
Cisco PNNI Network Planning Guide for MGX and SES Products, Release 5
Part Number OL-3847-01 Rev. D0, April, 2004
Page 65

Chapter 3 Address and Closed User Group Planning
CUG membership is supported as follows:
• An ATM address or ATM address prefix can be a member of up to 100 CUGs.
• CUGs can be provisioned on up to 200 ATM addresses or prefixes.
• The maximum number of CUGs is 65535.
• An ATM address to which a CUG is assigned can use either the NSAP or E.164 address format.
Note The CUG feature is not supported on nodes which are configured with right-justified E.164 addresses using
the cnfe164justify command.
Planning CUG Configuration Settings
The following sections introduce and provide planning guidelines for the CUG configuration
parameters.
Planning CUG Configuration Settings
Selecting an Interlock Code
A CUG is established by assigning the same 24-byte interlock code to two or more prefixes or AESAs
on a PNNI network. All prefixes and addresses that share the same interlock code are considered part of
the same CUG and can establish connections amongst themselves, unless these connections are blocked
by configuration options.
When selecting an interlock code, consider the following guidelines:
• The interlock codes should be managed so that an existing interlock code is not selected for a new
CUG.
• Other than being unique to a single CUG, there is no requirement on the contents of the interlock
code.
When planning a CUG, consider using the CUG Configuration Worksheet, Table 3- 6, which appears at
the end of this chapter. Each CUG uses only one interlock code, so place that code in the first row of the
worksheet.
Selecting an Index
A CUG index is a number that the administrator specifies when making an address or prefix part of a
CUG. The CUG index is mapped to the appropriate interlock code within the switch. During CPE
configuration, the appropriate CUG index is configured on the CPE to match the index already defined
on the node. When the CPE requests a call, it supplies the index, which is used by the switch to identify
the appropriate CUG.
When specifying an index, consider the following guidelines:
• Within each switch, the same, unique index number should be used for all CUG assignments that
share the same interlock code.
• The interlock code is not used outside of the switch. Once the index number is mapped to the
interlock code, the interlock code is used for all network communications.
• The CPE cannot use the index without further configuration.
Part Number OL-3847-01 Rev. D0, April, 2004
Cisco PNNI Network Planning Guide for MGX and SES Products, Release 5
3-15
Page 66

Planning CUG Configuration Settings
The CPE must be configured to specify a particular CUG index during call setup when any of the
following conditions exist:
• One or more CUGs are defined for the CPE prefix or address and no preferential CUG is defined.
• Multiple CUGs are defined for the prefix or address and the CPE intends to use a CUG other than
the preferential CUG.
If a CPE AESA is a member of only one CUG and that CUG is defined as the preferential CUG (see
“Specifying a Preferential CUG,” which appears later in this chapter), the CPE does not need to be
configured to use a particular CUG. The preferential CUG serves as the implicit CUG, and is used
whenever a CUG index is not specified by the CPE.
Note When a CPE requests a specific CUG during call setup, this is called an explicit CUG request.
When planning a CUG using the CUG Configuration Worksheet, Ta b l e 3 -6 , enter the index in the second
row of the worksheet.
Selecting CPE Addresses
Chapter 3 Address and Closed User Group Planning
To add a CPE to a CUG, the configuration process assigns a CPE address or prefix to a CUG interlock
code and index. For each CUG assignment, you must specify the following:
• The ATM address or prefix of a local UNI interface.
• The length of the ATM address.
• The ATM address plan, which is either NSAP or E164.
This information is required so that the switch interprets the address or prefix correctly.
If the prefix or address you are assigning to a CUG uses the NSAP format, specify the address length in
bits. A full AESA is 160 bits (20 bytes times 8 bits). A shorter address length indicates an ATM address
prefix, which assigns all addresses with that prefix to the CUG you specify.
If the prefix or address you are assigning to a CUG uses the E.164 format, specify the prefix or address
length in digits.
When planning a CUG using the CUG Configuration Worksheet, Tab le 3- 6, use one worksheet row to
identify the CUG configuration for each CUG member. The first column identifies the address or prefix
for the CUG member, and the rest of the columns specify the address information, access information,
and preferential CUG status.
Selecting Internal CUG Access Options
Internal access options control communications between a specific CUG member and the rest of the
CUG. In the CLI, this is expressed in terms of calls barred. If you want to block outgoing calls from one
CUG member to other CUG members, write the word outgoing in the row for the CUG member address
in the CUG Configuration Worksheet, Ta b l e 3-6. To block calls from other CUG members to a CUG
member, write in the word incoming.
3-16
Cisco PNNI Network Planning Guide for MGX and SES Products, Release 5
Part Number OL-3847-01 Rev. D0, April, 2004
Page 67

Chapter 3 Address and Closed User Group Planning
Note The network administrator can set the internal access during the initial CUG member configuration, or
change the configuration later. There is no option to simultaneously block incoming and outgoing
communications. If the administrator needs to block incoming and outgoing communications, the
member should be removed from the CUG.
Selecting External CUG Access Options
External access options control communications between a specific CUG member and all destinations
outside of the CUG. By default, CUG members cannot access destinations outside of the CUG. In the
CLI, the external access options are divided into incoming and outgoing controls. The CUG
Configuration Worksheet, Tab le 3- 6 provides separate columns where you can enter the incoming and
outgoing external access options for each CUG member.
There are two controls for managing incoming communications to CUG members from external sources:
disallowed and allowed.
There are three controls for managing outgoing communications from a CUG member to external
destinations: disallowed, per call, and permanent. The disallowed control does what its name implies.
The per call control enables outgoing calls when an outgoing CPE call specifically requests outside
access, and the permanent control permanently enables outgoing connections as if they were CUG
membership connections.
Planning CUG Configuration Settings
Note The network administrator can set the external access during the initial CUG member configuration, or
change the configuration later.
Specifying a Preferential CUG
A preferential CUG is a configuration definition that specifies which CUG membership applies when
the CUG member (CPE) does not specify a CUG index during call set up. There can be just one
preferential CUG for each CUG member. A preferential CUG assignment is ignored during call setup
when the CPE explicitly requests a CUG (using a CUG index).
If a preferential CUG is not assigned to a user and the CPE originates a call without a CUG index, the
call is treated as a normal call that is not part of any CUG. Normal calls cannot be established with CUG
members unless those members have been configured to communicate outside the CUG.
Note If outgoing calls to the CUG are barred for the user, the CUG cannot be defined as the preferential CUG.
When planning a CUG using the CUG Configuration Worksheet, Tab l e 3-6, use the last table column to
indicate if the CUG index and interlock code specified at the top of the table should be the default CUG
for this CUG member.
Part Number OL-3847-01 Rev. D0, April, 2004
Cisco PNNI Network Planning Guide for MGX and SES Products, Release 5
3-17
Page 68

Worksheets
Selecting a Default CUG Address
A default CUG address is a default address that is assigned to a switch to be used for CUG validation
when the connected CPE does not signal a calling party ATM address. The default CUG address does
not have to match any addresses or prefixes assigned on the switch. It is not used for PNNI routing. It is
simply a default address to which a CUG can be assigned.
When a default CUG address is configured, all calls originating and terminating at the switch are treated
as CUG calls, regardless of the ATM address. If the CPE does not signal an ATM address, CUG
validation uses the default CUG address and evaluates the call based on the CUG membership assigned
to the default CUG address. If multiple CUGs are assigned to the default CUG address, it is a good plan
to specify one CUG as a preferential CUG.
When planning a default CUG address using the CUG Configuration Worksheet, Tab le 3- 6, remember
that there can only be one default CUG address per switch. If you want to assign more than one CUG to
the default CUG address, copy Tab l e 3 -6 for each CUG assignment and remember that the default CUG
address or prefix must be the same in all copies planned for the same switch.
Worksheets
Chapter 3 Address and Closed User Group Planning
This section provides the configuration worksheets that are described earlier in this chapter.
Table 3- 4 is a worksheet that you can use to write down ATM address planning information that applies
to the switches in your WAN.
Table 3-4 Nodal Address Worksheet
Node Name Address
Format
Lowest
PNNI
Level
Peer Group ID ATM Address Additional
PNNI Levels
SPVC
Prefix
3-18
Table 3- 5 is a worksheet that you can use to write down ATM address planning information that applies
to the ports on a single switch. To complete an address plan, complete one Nodal Address Worksheet for
the WAN and an individual Port Address Worksheet for each switch in the WAN.
Cisco PNNI Network Planning Guide for MGX and SES Products, Release 5
Part Number OL-3847-01 Rev. D0, April, 2004
Page 69

Chapter 3 Address and Closed User Group Planning
Table 3-5 Port Address Worksheet
Port ILMI Prefixes
Worksheets
AINI and IISP Prefixes and
Addresses UNI Addresses
Table 3- 6 is a worksheet for planning a single closed user group on a single switch. Use a copy of this
table for each CUG on a switch. Remember that only one address or prefix can serve as the default CUG
address on a switch, and there can be only one preferred CUG per address or prefix.
Table 3-6 CUG Configuration Worksheet
CUG Interlock Code
CUG Index
Address or prefix Length Plan
Internal
Access
(calls
barred)
External Access
Outgoing
Access
Incoming
Access
Preferred?
Default
CUG
Address?
Part Number OL-3847-01 Rev. D0, April, 2004
Cisco PNNI Network Planning Guide for MGX and SES Products, Release 5
3-19
Page 70

Worksheets
Chapter 3 Address and Closed User Group Planning
3-20
Cisco PNNI Network Planning Guide for MGX and SES Products, Release 5
Part Number OL-3847-01 Rev. D0, April, 2004
Page 71

Planning Intermediate Route Selection
When a PNNI network node receives a call request, there can be multiple routes available that meet the
quality of service (QoS) requirements for the call. This chapter describes how PNNI selects a route from
multiple acceptable routes, and it describes parameters that you can modify to control route selection.
How MGX and SES Nodes Select Routes
MGX and SES nodes provide for the following PNNI route sources:
• Manually defined preferred routes (Release 3 and later)
• Pre-calculated routing tables called shortest path tables
• On-demand routes calculated from PNNI database entries
The following sections describe the link and route metrics used during routing, how shortest path table
routing works, and how on-demand routing works. At the end of this chapter is a section on additional
routing feature provided by MGX and SES nodes.
CHAPTER
4
Link and Route Metrics
Most route metrics are calculated based on the link metrics for each link along the route. Because of this,
link and route metrics often use the same name or similar names. This can be confusing if you do not
consider the context in which the terms are used. Link metrics apply when configuring an individual link
or when choosing between two or more links. Route metrics apply when configuring a connection or
choosing between two or more routes.
The following sections introduce some of the most common link and route metrics and explain the
differences between their use as either link or route metrics.
Administrative Weight
Administrative weight (AW) is a configurable cost that can be defined for each link in a PNNI network.
The default link AW is 5040. There is no significance to the cost units. What is important is how the cost
relates to that for other links in the network. For example, if two parallel links between two nodes have
different costs, and if the link selection criteria is set to use the link with the lowest AW, the link with
the smallest AW is chosen.
Part Number OL-3847-01 Rev. D0, April, 2004
Cisco PNNI Network Planning Guide for MGX and SES Products, Release 5
4-1
Page 72

How MGX and SES Nodes Select Routes
You can change the AW on links to control network traffic. For example, you can reduce traffic on a
backup link by increasing the AW to more than that on the desirable link. If the desirable link fails, the
backup link becomes the lowest cost link and becomes available.
When AW is applied to a route, it is sometimes called the cumulative AW and is the sum of the AW
values assigned to all links along a route. Some operations calculate the cumulative AW from the source
to the destination, and other operations calculate the round trip cumulative AW. For example, if all links
in a network use the default link AW, the source to destination AW for a route that uses two links is
10080. The round trip AW for the same route is 20160.
If you leave the AW set to the default value on all network links, routing using the lowest AW is the same
as routing using the fewest hops. A hop is a connection segment through a node. Changing the AW on a
link gives you the opportunity to make that link more or less desirable for routing.
Cell Transfer Delay
Cell transfer delay (CTD) is the measure of the delay an ATM cell encounters as it passes through an
interface. Since each link has an interface at each end, each link CTD is the sum of the CTD at each end
of the link.
The route CTD is the sum of the CTD values for all links through which the route passes and represents
the time interval between a cell exiting the source node and entering the destination node.
Chapter 4 Planning Intermediate Route Selection
The CTD used in MGX and SES nodes is a static value that is set by Cisco according to PNNI 1.0
standard and is based on the speed of the interface. Faster interfaces will have lower CTD values, and
slower interfaces will have higher values.
Note Because the CTD is defined according to the PNNI 1.0 standard, the CTD for any specific link speed
should match the CTD assigned to third-party interfaces that use that link speed.
Cell Delay Variation
Cell delay variation (CDV) is a measurement of the variation in CTD over links and through nodes. The
route CDV is equal to the largest CDV along a route.
The CDV used in MGX and SES nodes is a static value that is set by Cisco and is based on the type of
interface and node.
Available Cell Rate
Available cell rate (AvCR) is a dynamically generated value that indicates how much of the link
bandwidth is available for the requested service class. AvCR is measured in cells per second (cps).
You cannot configure the AvCR for a link, but you can configure a parameter called the overbooking
factor, which can change how the AvCR is advertised for new calls. After the PNNI controller calculates
the AvCR for a route, it applies the overbooking factor to the AvCR before advertising the AvCR. The
purpose of the overbooking factor is to allow you to purposely under book or over book a link.
For example, if link users are reserving more bandwidth than they actually need, bandwidth is being
wasted. Overbooking allows you to make the wasted bandwidth available to other users. For example, if
you estimate that 30% of the link bandwidth is not being used, you can configure the overbooking factor
so that the advertised AvCR is 30% higher than the actual value. This enables the PNNI controller to
4-2
Cisco PNNI Network Planning Guide for MGX and SES Products, Release 5
Part Number OL-3847-01 Rev. D0, April, 2004
Page 73

Chapter 4 Planning Intermediate Route Selection
route more calls for the link. Of course, if link users suddenly start using all link resources, some
user-compliant traffic may be discarded when congestion occurs. Bandwidth overbooking can be
configured on a per-service-class-basis for each interface in the node.
Note Beginning with Release 3.0, Cisco MGX and SES nodes also support connection overbooking, which is
configured with the addcon command. When per-service-class overbooking and connection based
overbooking are both configured, both are applied simultaneously to each affected connection.
For more information, see the Cisco MGX 8850 (PXM1E/PXM45), Cisco MGX 8950, Cisco MGX 8830,
and Cisco MGX 8880 Configuration Guide, Release 5 or see the appropriate service module
configuration guide.
For CBR, rtVBR, and nrtVBR traffic, the advertised AvCR represents the bandwidth available for calls.
For ABR traffic, AvCR is the capacity available for minimum cell rate (MCR) reservation. AvCR does
not apply to UBR traffic.
The AvCR for a route is equal to the lowest link AvCR along the route.
Maximum Cell Rate
How MGX and SES Nodes Select Routes
The maximum cell rate (maxCR) is a static value that is configured for each logical interface and can be
configured separately for each service class. The maxCR represents the maximum throughput available
for PNNI connections and cannot be modified by the overbooking factor. To block traffic for a particular
service class over a link, set the maxCR for that service class to 0.
The maxCR for a route is equal to the lowest link maxCR along the route.
Shortest Path Table Routing
Most routing attempts begin with a search for a route in the shortest path tables. The following sections
introduce the shortest path tables and explain how the tables are used by SVCs, SVPs, SPVCs, and
SPVPs.
The Shortest Path Tables
The PNNI routing protocol automatically builds shortest path tables (SPTs) that list optimized routes for
each destination address. When an MGX or SES node receives a call request, it compares the destination
ATM address with the addresses and address prefixes in the node’s routing tables. The node looks for a
match between the first 19 bytes of the destination address and the address prefixes in its database. The
longest match determines the routes that are eligible. If there is just one route for the longest matching
entry, and if that route meets the QoS requirements for the call, that is the route selected.
When multiple routes are available for the longest match, other route selection parameters are used to
determine the optimum route.
Note Border nodes can be configured with a 0-length prefix, which matches all ATM addresses. This 0-length
prefix serves as a default destination or route for all calls that do not match up to a longer ATM address
or prefix within the PNNI network. When a border nodes uses AINI or IISP links to communicate with
Part Number OL-3847-01 Rev. D0, April, 2004
Cisco PNNI Network Planning Guide for MGX and SES Products, Release 5
4-3
Page 74

How MGX and SES Nodes Select Routes
an external network, the use of the 0-length prefix allows the administrator to specify that all calls that
do not match a longer prefix should be routed to the external network. If the 0-length prefix is not used,
the administrator must manually configure static addresses for all external destinations.
MGX and SES nodes generate routing tables using PTSE information from other nodes and the Dijkstra
SPF Algorithm. The pre-computed routing tables are derived by applying the following information
from the PTSEs:
• Destination address
• AW
• CTD
• CDV
• Available bandwidth
• Available logical connection numbers (LCNs)
• Port ID
The end result is the set of SPTs shown in Ta b le 4- 1.
Chapter 4 Planning Intermediate Route Selection
Table 4-1 Pre-calculated Routing Tables
Traffic Metric Class of Service Tables
AW CBR, rt-VBR, nrt-VBR, ABR, UBR
CTD CBR, rt-VBR, nrt-VBR
CDV CBR, rt-VBR
The SPTs can be divided into the three groups listed in the Traffic Metric column in Tab le 4- 1 . For each
traffic metric, a class of service SPT is created for each class of service listed in the Class of Service
Tables column. The service classes are defined in Ta bl e 4-2.
Table 4-2 Supported Service Classes for MGX and SES Nodes
Service
Class Acronym Definition Guidelines
CBR
Constant bit rate Use to limit connections to a static amount of bandwidth that is continuously
available until the connection is torn down. The amount of bandwidth is
characterized by the peak cell rate (PCR) value.
rt-VBR
Real-time variable bit rate Use for real-time applications that require tightly constrained delay and delay
variation (voice/video applications). Category characterized in terms of a PCR,
sustainable cell rate (SCR), and maximum burst size (MBS).
nrt-VBR
ABR
Non-real-time variable bit
rate
Use for non-real-time applications with bursty traffic. Category is characterized
in terms of a PCR, SCR, and MBS.
Available bit rate Use to allow ATM layer transfer characteristics provided by the network to
change after the connection is established. Flow control mechanism is specified.
UBR
Unspecified bit rate Use for unspecified bit-rate ranges. This setting provides only maximum bit-rate
configuration—no bit rate is guaranteed.
4-4
Cisco PNNI Network Planning Guide for MGX and SES Products, Release 5
Part Number OL-3847-01 Rev. D0, April, 2004
Page 75

Chapter 4 Planning Intermediate Route Selection
Each class of service SPT is simply a list of the shortest paths for a particular routing metric to all known
destinations. AW SPTs list the shortest paths or routes based on the lowest cumulative AW, and CTD
SPTs list the shortest routes based on the lowest cumulative CTD.
The number of shortest paths stored in a SPT for any destination depends on whether there are multiple
routes with the lowest routing metric value. For example, if three routes to a destination all have the same
minimum CDV value, all three routes are listed in the CDV table for the appropriate class of service.
There is also a range option that you can use to make the SPTs store routes with similar values. For
example, you can configure the switch to store routes that are within 5 percent of the shortest route in
the table. Up to five routes can be listed in a SPT for a destination.
The default configuration of MGX and SES nodes creates all 10 class of service tables. If you do not
plan to use the routing tables for a particular routing metric, you can save processor resources by
disabling the construction and maintenance of the appropriate routing metric SPTs (using the
cnfpnni-routing-policy command).
Note If you disable the creation of one or more groups of SPTs and a connection attempts to use a missing
table, the switch uses on-demand routing to locate a conforming route for the connection.
How MGX and SES Nodes Select Routes
How SVCs and SVPs use the SPTs
SVCs and SVPs are initiated by CPE using UNI connections to the switch. UNI versions 3.0 and 3.1
cannot request a CTD or CDV value for a connection, so all UNI 3.0 and 3.1 connections are routed using
the AW SPTs.
UNI 4.0 connections can request CTD and CDV values for a connection. UNI 4.0 connections use the
SPTs in one of the following ways:
• If no CTD or CDV value is requested for the connection, the connection uses a route from the AW
SPT for the appropriate class of service.
• If a CTD or CDV value is requested for the connection, the connection uses a route from the
appropriate CTD or CDV SPT for the appropriate class of service.
• If both a CTD and a CDV value is requested for the connection, the connection uses a route from
the CTD SPT for the appropriate class of service. The route chosen is a route that conforms to the
CTD and CDV values requested. If a conforming route is not available in the SPT, on demand
routing is used to find a conforming route.
How SPVCs and SPVPs use the SPTs
The default configuration for each SPVC and SPVP uses the appropriate AW SPT for each class of
service. However, you can configure requested values for AW, CTD, and CDV for each connection using
the addcon and cnfcon commands.
If multiple routing metrics are specified for an SPVC or SPVP, the switch searches the SPTs for
conforming routes according to following priorities:
1. AW
2. CTD
3. CDV
For example if all three routing metrics are specified, the switch searches for conforming routes in the
AW SPTs. If CTD and CDV are specified, the switch searches the CTD SPTs.
Part Number OL-3847-01 Rev. D0, April, 2004
Cisco PNNI Network Planning Guide for MGX and SES Products, Release 5
4-5
Page 76

How MGX and SES Nodes Select Links
Any route selected from the SPTs must conform to all specified metrics. If a conforming route is not
available in chosen SPT, on demand routing is used to find a conforming route.
On PXM1E cards and service modules, you can change this with the addcon command.
On-Demand Routing
When the SPTs cannot produce a route for a connection, the switch performs on-demand routing. A SPT
can fail to produce a route because the shortest route or routes in the table have failed. On-demand
routing is also required when a connection specifies multiple routing metrics and the SPT routes do not
conform to all of the metrics.
During on-demand routing, the switch searches the PNNI database for routes that match the specified
criteria. On demand routing takes more time than SPT routing. However, on-demand routing can access
more of the PNNI database and select better routes.
As a switch administrator, you can choose what action the controller takes when it discovers the first
acceptable on-demand route. You can configure the controller for first fit, which produces the fastest
route selection, or you can configure the switch for best fit. When the controller is configured for first
fit on-demand route selection, it selects the first route that satisfies all connection requirements. When
the controller is configured for best fit on-demand route selection, it identifies all routes that meet the
call requirements, and then it chooses the route based on the setting of the load balancing option.
Chapter 4 Planning Intermediate Route Selection
Load Balancing for SPT and On-Demand Routing
The load balancing option, which applies to SPT routing and on-demand routing, is a configurable
parameter that allows you to control how a route is chosen when multiple routes offer the same level of
service. You can configure the load balancing option to choose randomly from multiple routes or choose
according to the best AvCR. If you select the random method, the PNNI controller considers the
conforming routes equal and balances the load by randomly assigning calls to each. If you choose the
route based on the AvCR, the route with the highest available cell rate is chosen.
How MGX and SES Nodes Select Links
The SPTs are built by calculating routes that are optimized for lowest AW, CTD, or CDV. However, for
most service classes, each link along a route must conform to additional parameters. If no route is found
in the SPTs, on-demand routing must be used to calculate a conforming route from the PNNI database.
The link parameter requirements for a service class establishes the quality of service (QoS) required for
a call. Ta ble 4- 3 shows the link parameters that must be satisfied for each service class.
4-6
Cisco PNNI Network Planning Guide for MGX and SES Products, Release 5
Part Number OL-3847-01 Rev. D0, April, 2004
Page 77

Chapter 4 Planning Intermediate Route Selection
Table 4-3 Link Selection Parameters Required for Various Classes of Service
Additional Routing Features in MGX and SES Nodes
Service
Class Address AW maxCR AvCR CTD CDV CLR
CBR
rt-VBR
nrt-VBR
ABR
UBR
1. CLR0 is the cell loss ratio for cells with the Cell Loss Priority bit set to 0.
2. CLR
Required Required Required Required Required Required Required Required
Required Required Required Required Required Required Required Required
Required Required Required Required Required — Required Required
RequiredRequiredRequiredRequired————
RequiredRequiredRequired—————
is the cell loss ratio for all cells with the Cell Loss Priority bit set to either 0 or 1.
0+1
1
0
When two parallel links are available along the route, the controller chooses a link based on the
configuration of the switch. The link selection options are:
• AW —Selects the link with the least AW in the egress direction. This is the default.
• AvCR—Selects the link with the largest AvCR in the egress direction.
• maxCR—Selects the link with the largest maxCR in the egress direction.
• loadbalance—Selects links randomly so that one link does not become overburdened while the
other is idle.
Additional Routing Features in MGX and SES Nodes
CLR
0+1
2
The following sections describe additional routing features you might want to consider when planning
a PNNI network.
Preferred Routing
Preferred routes allow the switch administrator to define a specific route between the source and
destination nodes, and then specify this route as the preferred route when defining SPVCs. If the
connection is configured as a directed route, no other route is allowed, even if the route fails. If the
connection is not configured as a directed route, other routes are considered when the preferred route is
not available. When other routes are required, the switch can use the pre-calculated routing tables or
on-demand routing.
Preferred routing was introduced in Release 3.0.00 and is supported on the MGX 8830, MGX 8850
(PXM1E), MGX 8850 (PXM45), and MGX 8950 switches and the MGX 8880 Media Gateway. Release
3.0.20 and later support preferred routing on SES nodes.
Note Preferred routes created with Release 3 software cannot be gracefully upgraded to Release 4 or later
preferred routes.
Part Number OL-3847-01 Rev. D0, April, 2004
Cisco PNNI Network Planning Guide for MGX and SES Products, Release 5
4-7
Page 78

Additional Routing Features in MGX and SES Nodes
Note In all Release 3 software, the preferred routing feature specifies a route within a single peer group.
Release 3 software does not support preferred routes that span multiple peer groups. Release 4 and later
software does support preferred routes that span multiple peer groups.
The preferred route and directed route for an SPVC or SPVP is defined when the connection is created.
Although you can change the preferred route configuration after a connection is created, you can
eliminate reconfiguration by planning for preferred routes before creating connections.
Priority Routing
Priority based routing allows you to specify a priority for each SPVC or SPVP connection. High priority
connections are established before low priority connections. During failures, the high priority
connections are also released and reestablished before low priority connections.
Priority routing was introduced in Release 3.0.00 and is supported on the MGX 8830, MGX 8850
(PXM1E), MGX 8850 (PXM45), and MGX 8950 switches and the MGX 8880 Media Gateway. Release
3.0.20 and later support priority routing on SES nodes.
Chapter 4 Planning Intermediate Route Selection
Grooming
The routing priority for an SPVC or SPVP can be defined with either the addcon or the cnfcon
command. For SVCs and SVPs, the routing priority is assigned using the cnfpnportsig command. This
routing priority also applies to the priority bumping feature. Although you can change the routing
priority after a connection is created, you can eliminate reconfiguration by planning for priority routing
before creating connections.
Tip The priority routing feature allows administrators to influence the order in which connections are routed
or rerouted when network events require connection rerouting. The priority routing feature does not
change the criteria for selecting routes. It controls the sequence in which connections are routed or
rerouted.
Connection grooming is the process of checking each connection to determine if a more efficient route
is available. If a prospective new route is significantly better than the incumbent route, the connection is
rerouted.
Grooming is also used to return a connection to its non-directed preferred route (if configured) after it
has been rerouted due to failure along its preferred route. Connections will only return to their
non-directed preferred routes when one of the following occurs:
• The connection is manually groomed.
• Automatic grooming is enabled and the grooming operation completes.
• The current connection route experiences a failure.
4-8
Grooming may be needed, for example, if a link fails along the most desirable route, and then returns to
service. When the link fails, the connection is rerouted to another route, which may be a less desirable
route. To return the connection to the more desirable route, you can use manual grooming or scheduled
grooming. The advantage to scheduled grooming is that is can occur automatically at times when the
network is not busy.
Cisco PNNI Network Planning Guide for MGX and SES Products, Release 5
Part Number OL-3847-01 Rev. D0, April, 2004
Page 79

Chapter 4 Planning Intermediate Route Selection
The grooming feature can be implemented at any time. Grooming is not configured at the same time as
connections, so there is no penalty if you do not include grooming in the initial plan for a PNNI network.
Soft Rerouting
The soft reroute feature is new in Release 5 and minimizes reroute times by establishing a new
connection before releasing the rerouted connection. This feature requires no prior planning and can be
implemented at any time. For more information, refer to the Cisco MGX 8850 (PXM1E/PXM45), Cisco
MGX 8950, Cisco MGX 8830, and Cisco MGX 8880 Configuration Guide, Release 5.
Priority Bumping
Priority bumping is a new feature in Release 5.0. When enabled, priority bumping can be used to release
lower priority connections to make room for an incoming, higher priority connection.
The priority bumping feature can be implemented at any time. However, the routing priority used for
priority bumping is the same as used for priority routing. Because the routing priority is configured while
creating and configuring connections, you might want to review the priority bumping feature details
before configuring connections and interfaces. You can find more information on priority bumping in
the Cisco MGX 8850 (PXM1E/PXM45), Cisco MGX 8950, Cisco MGX 8830, and Cisco MGX 8880
Configuration Guide, Release 5.
Additional Routing Features in MGX and SES Nodes
Blocking Pass-Through Connections
As a switch administrator, you can configure MGX and SES nodes to support or deny connections that
pass through the node. If you chose to deny transit or pass-through connections, the node will only accept
calls that terminate on one of the node’s interfaces. Other nodes will not be able to establish routes
through the blocked node to other nodes. This feature is called the Nodal Transit Restriction feature.
Nodal Point-to-Multipoint Branch Restriction
The point-to-multipoint (P2MP) feature enables select Cisco MGX switches to support PNNI network
applications such as data and video broadcast and LAN emulation. P2MP branching is a feature that
allows a switch to accept one incoming connection and produce multiple outgoing connections. This
enables basic P2MP connectivity. For the nodes that support P2MP branching, branching can be enabled
or disabled.
Note Cisco SES equipped BPX switches can serve as the source or destination of a P2MP connection, but
these switches cannot perform branching.
Figure 4-1 shows the data flow in a P2MP connection and introduces the root, leaf, and party terms,
which apply to the interfaces that support P2MP connections.
Part Number OL-3847-01 Rev. D0, April, 2004
Cisco PNNI Network Planning Guide for MGX and SES Products, Release 5
4-9
Page 80

Additional Routing Features in MGX and SES Nodes
Figure 4-1 P2MP Root, Leaf, and Party Components
Root
endpoint
The simplest P2MP connection takes place through a single node. One endpoint serves as the root of a
simple tree topology and is labeled the root end point. The data traffic is uni-directional. All data flows
from the root endpoint to the destination endpoints.
A destination end point is called a party. A party is an ATM end station that connects to an edge switch
and receives data from the connection root. Each party is identified by an ATM End Station Address
(AESA) and an end point reference, which is a number that uniquely identifies the party. The endpoint
reference is critical when multiple parties connect through the same AESA.
Leaf
endpoint
Leaf
endpoint
Party 1
Party 2
Party 3
Party 4
Party 5
Party 6
Party 7
Party 8
Chapter 4 Planning Intermediate Route Selection
75690
A leaf is a connection end point on an outgoing switch interface. At the edge of the network, the leaf
represents the connection between the network and the party. Connections (SVCs or SPVCs) are
established between the root and each leaf. At the interface that hosts the leaf, the received data is
forwarded to each party using the AESA. As shown in Figure 4-1, each leaf can support multiple parties.
The current release of the P2MP feature on Cisco MGX switches operates on the service modules listed
in Table 4-4.
Table 4-4 MGX Service Module Support for P2MP Branching
Service Module Slot Multicasting Supported Port Mulitcasting Supported
AXSM/A
1
Yes Yes
AXSM/B Yes Yes
AXSM-E Yes No
AXSM-XG Yes Yes
BPX/SES No No
PXM1E Yes
1. The AXSM/A term refers to the first release of the AXSM card, which is named AXSM. The AXSM/A term is
often used to clarify that the reference is to the AXSM card and not the AXSM/B card.
2. Slot multicasting is supported in Release 4.0.15 and later.
3. Port multicasting is supported in Release 5.0 and later.
2
Ye s
3
4-10
Slot multicasting or branching enables the PXM to branch an incoming P2MP connection to multiple
service modules within the switch. Port multicasting allows a service module to branch an outgoing
P2MP connection to multiple egress interfaces on that service module or to multiple channels on a port.
When a service module does not support branching, the branching must be done at an upstream node that
does support branching. To show how this works, this section introduces the PNNI farthest node
branching feature.
Cisco PNNI Network Planning Guide for MGX and SES Products, Release 5
Part Number OL-3847-01 Rev. D0, April, 2004
Page 81

Chapter 4 Planning Intermediate Route Selection
The farthest-node branch option is a PNNI enhancement that allows PNNI to use network links more
efficiently. Figure 4-2 demonstrates farthest-node branching.
Figure 4-2 Farthest Node Branching
Additional Routing Features in MGX and SES Nodes
Root
Switch 1
1 SVC
4 SVCs
Switch 2
Switch 3
Leaf
Leaf 1,
Leaf 2,
Leaf 3,
Leaf 4,
Party 1
Party 2
Party 3
Party 4
Party 5
Party 6
Party 7
Party 8
75691
In Figure 4-2, Switch 2 supports branching and Switch 3 does not. When PNNI sets up the P2MP
connection to parties 1 through 4, it determines that the Switch 2 outgoing interface supports branching,
so PNNI establishes 1 SVC between Switch 1 and 2.
Switch 3 in Figure 4-2 does not support branching, so Switch 1, which does support branching,
establishes 4 SVCs to Switch 3. The destination for each SVC must be a leaf, so four leaf end points are
established on Switch 3, one for each party. The four leaf end points can be on one interface, or they can
be spread out on multiple interfaces. A leaf end point is an SVC endpoint.
Farthest-node branching is a PNNI feature that takes advantage of branching when it is available.
Switch 1 could have originated a separate connection for each party on Switch 2, but this would have
required 4 SVCs instead of 1, and all four would be carrying the same data. Farthest node branching
improves network efficiency by reducing the number of SVCs required for P2MP connections and by
reducing the bandwidth requirements for P2MP connections.
Previous software releases disabled branching with the branching restricted option. This option is now
set by default to enable branching. If the network includes a node that does not support branching, the
farthest branching node from the root creates an SVC for every downstream party.
Note This release does not support the P2MP leaf-initiated join feature, and leaf endpoints cannot use a P2MP
connection to communicate with other leaf endpoints.
Part Number OL-3847-01 Rev. D0, April, 2004
Cisco PNNI Network Planning Guide for MGX and SES Products, Release 5
4-11
Page 82

Additional Routing Features in MGX and SES Nodes
Chapter 4 Planning Intermediate Route Selection
4-12
Cisco PNNI Network Planning Guide for MGX and SES Products, Release 5
Part Number OL-3847-01 Rev. D0, April, 2004
Page 83

INDEX
Numerics
0-length prefix 4-3
A
ABR
description
route selection parameter 4-7
addcon command 4-3, 4-5, 4-8
addpnni-node command 1-6
address
AINI prefix
default 3-10
destination 3-2
formats 3-3
IISP prefix 3-12
ILMI prefix 3-12
plan guidelines 3-13
planning 3-1
registration authorities 3-6
route selection parameter 4-7
selection 3-11
source 3-1
SPVC prefix 3-12
static 3-13
worksheet, node 3-18
worksheet, port 3-19
address summarization, PNNI 3-2
administrative weight
See AW
AESA
AESA-embedded E.164 3-4
4-4
3-12
3-14, 4-10
AINI
MGX 8850 support
1-8
planning address prefixes 3-12
SES support 1-8
topology definition 1-8
version 2-1
American National Standards Institute 3-6
ANSI 3-6
APS 2-5
ATM addresses
default address
3-10
formats 3-3
ILMI prefix 3-12
plan guidelines 3-13
planning 3-1
registration authorities 3-6
selection 3-11
SPVC prefix 3-12
static 3-13
ATM End Station Address
See AESA
ATM public network, PNNI level limitation
audience, for this document xi
Automatic Protection System
See APS
available bit rate
See ABR
available cell rate
See AvCR
AvCR
definition
4-2
route selection parameter 4-7
3-9
Part Number OL-3847-01 Rev. D0, April, 2004
Cisco PNNI Network Planning Guide for MGX and SES Products, Release 5
IN-1
Page 84

Index
AW 4-1
default value 5040 4-1
definition 4-1
route selection parameter 4-7
B
bandwidth overbooking 4-2, 4-3
best fit 4-6
border nodes
definition
1-8
planning guidelines 2-7
BPX 8600 1-1
branching
farthest-node
4-11
P2MP 4-9
British Standards Institution 3-6
BSI 3-6
C
calls barred 3-16
caution symbol, defined xii
CBR
description
route selection parameter 4-7
CDV
definition
route selection parameter 4-7
cell delay variation
See CDV
cells per second
cell transfer delay
See CTD
child peer group
Cisco.com xxvii
Cisco BPX 8600 1-1
4-4
4-2
4-2
1-5, 1-6
Cisco MGX 8850
AINI support
1-8
hierarchical PNNI support 1-4
Cisco MGX 8880 Media Gateway 1-1
Cisco MGX switches 1-1
Cisco Service Expansion Shelf
See SES
Cisco TAC
See TAC
Cisco WAN Manager
See CWM
class of service
4-7
Closed User Group
See CUG
CLR0+1, route selection parameter
CLR0, route selection parameter 4-7
cnfcon command 4-5, 4-8
cnfe164justify command 3-15
cnfpnni-election command 1-6
cnfpnni-routing-policy command 4-5
cnfpnportsig command 4-8
complex node representation 1-7
connections
destination endpoint
3-1
master endpoint 3-1
slave endpoint 3-1
source endpoint 3-1
constant bit rate
See CBR
conventions, documentation
xii
cps 4-2
CTD
definition
4-2
route selection parameter 4-7
4-7
Part Number OL-3847-01 Rev. D0, April, 2004
Cisco PNNI Network Planning Guide for MGX and SES Products, Release 5
IN-2
Page 85

Index
CUG
calls barred
configuration worksheet 3-19
default address 3-18
explicit 3-16
external access control 3-17
implicit 3-16
index 3-15
interlock code 3-15
internal access control 3-16
overview 3-14
preferential 3-16, 3-17
selection 3-15
specifications 3-15
user 3-14
cumulative AW 4-2
CWM 3-14
3-16
objectives xi
obtaining xxx
ordering xxvii
organization xi
recommended order of use xiv
that ships with products xxii
E
E.164 addresses
format
right-justified 3-15
end point 4-10
end point reference 4-10
explicit CUG 3-16
3-4
F
D
database
PNNI
PNNI network 1-1
data country code
See DCC
DCC
default CUG address 3-18
destination address 3-2
destination endpoint, connection 3-1
Deutsche Industrie-Normen 3-6
Dijkstra SPF algorithm 4-4
DIN 3-6
directed route 4-7
documentation
changes for this release
conventions xii
descriptions of manuals xxii
feedback xxix
manuals for each product release xvi
3-1
3-4
xxviii
farthest-node branching 4-11
first fit 4-6
foreign address 3-2
G
grooming 4-8
H
hardware, redundant 2-5
Hello packets 1-2
hierarchical PNNI 3-7
benefits 1-8
definition 1-3
planning guidelines 2-7
PNNI level 3-7
hop 2-6, 4-2
Part Number OL-3847-01 Rev. D0, April, 2004
Cisco PNNI Network Planning Guide for MGX and SES Products, Release 5
IN-3
Page 86

Index
I
ICD 3-4
IISP
Cisco enhanced
1-9
planning address prefixes 3-12
topology definition 1-9
version 2-1
ILMI
address prefix
3-12
version 2-1
implicit CUG 3-16
index, CUG 3-15
inside link 1-8
Interim Inter-Switch Protocol
See IISP
interlock code
3-15
international code designator
SeeICD
International Telecommunications Union
IOTA 3-6
ISO National Administrative Authority 3-6
ITU 3-6
L
leaf, P2MP 4-10
leaf-initiated join 4-11
LGN 1-4, 3-8
link
adjacent peer groups
external network 2-6
inside 1-8
metrics 4-1
MGX and SES link selection 4-6
outside 1-8
parallel links 2-5
link state protocol 1-1
2-6
3-6
load balancing 4-6
parallel links 2-5
route selection option 4-7
logical group node
See LGN
logical nucleus
1-7
logical spokes 1-7
LOS 1-2
loss of signal 1-2
M
MAC address 3-11
manuals
See documentation
master endpoint, connection
maxCR
definition
4-3
route selection parameter 4-7
maximum cell rate
See maxCR
MCR
4-3
metrics, links and routes 4-1
MGX 8850
AINI support
1-8
hierarchical PNNI support 1-4
MGX 8880 Media Gateway 1-1
MGX switches 1-1
minimum cell rate 4-3
MPG
See hierarchical PNNI
multicasting
4-10
multiple links
adjacent peer groups
external network 2-6
multiple paths 2-6
multiple peer groups
See hierarchical PNNI
multipoint branch restriction
3-1
2-6
4-9
IN-4
Cisco PNNI Network Planning Guide for MGX and SES Products, Release 5
Part Number OL-3847-01 Rev. D0, April, 2004
Page 87

Index
N
network database 1-1
network planning, physical network 2-5
nodal address worksheet 3-18
nodal transit restriction 4-9
node
border
1-8
complex node representation 1-7
definition 1-2
simple node representation 1-6
non-real-time variable bit rate
See nrt-VBR
note symbol, defined
xii
nrt-VBR
description
4-4
route selection parameter 4-7
nucleus 1-7
O
on-demand routing 4-1, 4-6
outside link 1-8
overbooking factor 4-2
P
P2MP
BPX/SES specifications
branching 4-9
branching, service module support 4-10
branch restriction 4-9
connection leaf 4-10
connection party 4-10
connection root 4-10
farthest-node branching 4-11
leaf-initiated join 4-11
MGX switch specifications 2-3
overview 4-9
2-4
parallel links 2-5
party, P2MP 4-10
pass-through connection, blocking 4-9
paths 2-6
peer group ID 3-10
peer group leader
See PGL
peer groups
ID selection
3-10
leaders 1-6
multiple
See hierarchical PNNI
single
1-2
PGL 1-5
definition 1-6
planning guidelines 2-7
priority 1-6, 2-7
physical network planning 2-5
planning, physical network 2-5
PNNI
address summarization
3-2
definition 1-1
hierarchical 3-7
level limitation, public networks 3-9
level selection 3-6
network database 1-1
networking specifications
MGX
2-2
SES 2-3
peer group ID 3-10
route selection 4-1
routing protocol 3-1
routing table 3-1
signaling protocol 3-1
software releases 1-1
topology database 3-1
version 2-1
PNNI Topology State Element
See PTSE
Part Number OL-3847-01 Rev. D0, April, 2004
Cisco PNNI Network Planning Guide for MGX and SES Products, Release 5
IN-5
Page 88

Index
PNNI topology state packets 1-2
Point-to-Multipoint
See P2MP
port address worksheet
3-19
port multicasting 4-10
preferential CUG 3-16, 3-17
preferred route 4-7
routing
preferred
4-1
prefix
AINI
3-12
IISP 3-12
ILMI 3-12
SPVC 3-12
priority bumping 4-8, 4-9
priority routing 4-8
processor switch module 1-2
protocol, link state 1-1
PTSE 1-2, 3-7
PTSP 1-2
publications
See documentation
public ATM network
PNNI level limitation
3-9
PXM 1-2
root 4-10
route
CDV
4-2
CTD 4-2
directed 4-7
maxCR 4-3
metrics 4-1
preferred 4-7
route selection 4-1
AvCR 4-7
AW 4-7
best fit 4-6
first fit 4-6
load balancing 4-7
maxCR 4-7
routing
on-demand
4-6
preferred 4-7
SPT 4-3
routing control channel 1-2
routing priority 4-8
routing protocol, PNNI 3-1
routing table, PNNI 3-1
rt-VBR
description
4-4
route selection parameter 4-7
Q
QoS 4-1, 4-6
quality of service
See QoS
R
RCC 1-2
real-time variable bit rate
See rt-VBR
redundant hardware
Cisco PNNI Network Planning Guide for MGX and SES Products, Release 5
IN-6
2-5
S
Service Expansion Shelf
See SES
SES
1-1
AINI support 1-8
hierarchical PNNI support 1-4
shortest path table
See SPT
signaling protocol, PNNI
simple node representation 1-6
3-1
Part Number OL-3847-01 Rev. D0, April, 2004
Page 89

Index
single peer group
definition
1-2
planning guidelines 2-6
PNNI level 3-7
slave endpoint, connection 3-1
slot multicasting 4-10
soft reroute 4-9
software, PNNI support 1-1
source address 3-1
source endpoint, connection 3-1
specifications 2-1
spokes 1-7
SPT
definition
4-1
introduction 4-3
routing 4-3
SPVC and SPVP usage 4-5
SVC and SVP usage 4-5
SPVC address prefix 3-12
standards 2-1
static ATM addresses, planning 3-13
T
TAC
case priority definitions
opening a case xxix
website xxix
technical assistance
obtaining
xxix
Technical Assistance Center
See TAC
tips symbol, defined
TM 4.0 2-1
xxx
xii
topology
AINI topology definition
hierarchical PNNI
benefits
1-8
definition 1-3
planning 3-7
IISP topology definition 1-9
MPG
See hierarchical PNNI
single peer group
1-2
topology database, PNNI 3-1
Traffic Management 4.0 2-1
transit restriction 4-9
U
UBR
description
4-4
route selection parameter 4-7
UNI
version
2-1
unspecified bit rate
See UBR
user, CUG
3-14
user-network interface
See UNI
V
VC 1-2
virtual circuit 1-2
W
1-8
Part Number OL-3847-01 Rev. D0, April, 2004
worksheets
CUG configuration
3-19
node address 3-18, 3-19
port address 3-19
Cisco PNNI Network Planning Guide for MGX and SES Products, Release 5
IN-7
Page 90

Index
IN-8
Cisco PNNI Network Planning Guide for MGX and SES Products, Release 5
Part Number OL-3847-01 Rev. D0, April, 2004
 Loading...