

Page 1
INSTRUCTION MANUAL
KEY INFORMATION YOU SHOULD KNOW:
• Lifetime 3 in 1 deck-Mulching, Discharging and Bagging (bag optional).
• Do not operate mower unless handle is locked into position.
• Ensure shroud hole covers are properly installed.
• For best cutting results, keep blade sharpened and balanced.
• Inspect and thoroughly clean your mower after each use (a deck with caked grass will degrade performance).
• Make sure mowing area is clear of other persons or pets prior to starting operation.
SAVE THIS MANUAL FOR FUTURE REFERENCE
Cat No. MM275 Form No. 598984-00 JULY 2005
Copyright © 2005 Black & Decker Printed in Mexico
MM275
18” MULCHING MOWER
Page 2

WARNING: Important Safety Warnings and Instructions
WARNING:
When using electric gardening appliances, basic
safety precautions should always be followed to
reduce risk of fire, electric shock, and personal
injury, including the following.
READ ALL INSTRUCTIONS
TO REDUCE RISK OF INJURY:
• Before any use, be sure everyone using this tool reads and understands
all safety instructions and other information contained in this manual.
• Save these instructions and review frequently prior to use and in
instructing others.
WARNING: Some dust created by this product contains chemicals
known to the State of California to cause cancer, birth
defects or other reproductive harm. Some examples
of these chemicals are:
• compounds in fertilizers
• compounds in insecticides, herbicides and pesticides
• arsenic and chromium from chemically treated lumber
To reduce your exposure to these chemicals, wear approved safety
equipment such as dust masks that are specially designed to filter out
microscopic particles.O
WARNING: This product contains chemicals, including lead, known
to the State of California to cause cancer, and birth
defects or other reproductive harm. Wash hands after
handling.R
ALL TOOLS
To reduce the risk of electric shock, this equipment has a polarized plug
(one blade is wider than the other).
This equipment must be used with a suitable polarized 2 wire or 3 wire extension
cord. Polarized connections will fit together only one way. Make sure that the
receptacle end of the extension cord has large and small blade slot widths. If the
plug does not fit fully into the extension cord, reverse the plug. If it still does not fit,
obtain a suitable extension cord. If the extension cord does not fit fully into the
outlet, contact a qualified electrician to install the proper outlet. Do not modify the
lawnmower plug or extension cord in any way.
THIS TOOL CAN BE DANGEROUS. Follow all warnings and Safety Instructions in
this manual. The operator is responsible for following warnings and instructions in
this manual and on unit. Restrict use of this power tool to persons who read,
understand and follow warnings and instructions in this manual and on unit.
• AVOID DANGEROUS ENVIRONMENT. Don’t use lawnmowers in damp or wet
locations. Don’t use lawnmowers in the rain.
• KEEP CHILDREN AWAY. All other persons and pets should be kept at a safe
distance from work area.
• STORE IDLE LAWNMOWER INDOORS. Lawnmowers should be stored indoors in
dry, secured area – out of reach of children.
• DON’T FORCE LAWNMOWER. It will do the job better and with less likelihood of
a risk of injury at the rate for which it was designed.
• USE RIGHT APPLIANCE. Do not use the lawnmower for any job except that for
which it is intended.
• DRESS PROPERLY. Do not wear loose clothing or jewelry. They can be caught in
moving parts. Rubber gloves, long pants and substantial, non-skid footwear are
recommended when working outdoors. Do not go barefoot or wear sandals.
• USE SAFETY GLASSES AND OTHER SAFETY EQUIPMENT. Use safety goggles or
safety glasses with side shields, complying with applicable safety standards and,
when needed, a face shield. Also use face or dust mask if operation is dusty. This
applies to all persons in the work area. Also use a hard hat, hearing protection,
gloves, safety shoes and dust collection systems when specified or required. Safety
glasses or the like are available at extra cost at your local dealer or
Black & Decker Service Center.
• DON’T ABUSE CORD. Never carry lawnmower by cord or yank it to disconnect
from receptacle. Keep cord from heat, oil, and sharp edges.
• DON’T OVERREACH. Keep proper footing and balance at all times.
• MAINTAIN LAWNMOWER WITH CARE. Keep cutting edge clean and sharp for
best performance and to reduce the risk of injury. Follow instructions for
lubricating and changing accessories. Inspect lawnmower cord periodically and if
damaged, have it repaired by authorized service facility. Inspect extension cords
periodically and replace if damaged. Keep handles dry, clean, and free from oil
and grease.
• DISCONNECT LAWNMOWER. Disconnect the lawnmower from the power supply
when not in use, before servicing, and when changing accessories such as blades
and the like.
• KEEP GUARDS in place and in working order.
• AVOID UNINTENTIONAL STARTING. Don’t carry plugged-in lawnmower with
finger on switch. Be sure switch is off when plugging in.
• BEFORE USING, always visually inspect to see that the blade, blade fasteners and
cutter assembly are not worn or damaged. Replace worn or damaged blades
and fasteners in sets to preserve balance.
• EXTENSION CORDS. Make sure your extension cord is in good condition. Cord
insulation must be intact with no cracks or deterioration. Plug connectors must be
undamaged. When using an extension cord, be sure to use one heavy enough to
carry the current your product will draw. An undersized extension cord will
cause a drop in line voltage resulting in loss of power and overheating, which can
shorten the life of the motor. The table shows the correct size to use depending on
cord length and nameplate ampere rating. If in doubt, use the next heavier gage.
The smaller the gage number, the heavier the cord.
• indicates the Mower is “DOUBLE INSULATED”
• OUTDOOR USE EXTENSION CORDS WARNING: To reduce the risk of electric
shock, use only with an extension cord intended for outdoor use, such as an
extension cord of type SW-A, SOW-A, STW-A, STOW-A, SJW-A, SJOW-A,
SJTW-A, or SJTOW-A.
• GROUND FAULT CIRCUIT INTERRUPTER (GFCI) protection should be provided on
the circuits or outlets to be used for the gardening appliance. Receptacles are
available having built in GFCI protection and may be used for this measure of
safety.
• STAY ALERT. Watch what you are doing. Use common sense. Do not operate
lawnmower when you are tired, ill or under the influence of any drugs or alcohol.
• CHECK DAMAGED PARTS. Before further use of the lawnmower, a guard or other
part that is damaged should be carefully checked to determine that it will operate
properly and perform its intended function. Check for alignment of moving parts,
binding of moving parts, breakage of parts, mounting, and any other conditions
that may affect its operation. A guard or other part that is damaged should be
properly repaired or replaced by an authorized service center unless otherwise
indicated elsewhere in this manual.
• REPAIRS AND SERVICE. Repairs, maintenance and any adjustments not specified
in this manual should be performed by Black & Decker authorized service centers
or other qualified service organizations, always using identical replacement parts.
• USE OF ACCESSORIES AND ATTACHMENTS. The use of any accessory or
attachment not recommended for use with this lawnmower could be hazardous.
Note: Refer to the accessory section of this manual for further details.
Minimum Gage for Cord Sets
Volts Total Length of Cord in Feet
120V 0-25 26-50 51-100 101-150
240V 0-50 51-100 101-200 201-300
Ampere Rating
More Not more American Wire Gage
Than Than
0-6 18 16 16 14
6 - 10 18 16 14 12
10 - 12 16 16 14 12
12 - 16 14 12 Not Recommended
GENERAL SAFETY WARNINGS AND INSTRUCTIONS
FOR ALL TOOLS
SAFETY WARNINGS AND INSTRUCTIONS: DOUBLE INSULATION
REPLACEMENT PARTS: When servicing use only identical Black & Decker
replacement parts.
IMPORTANT SAFETY INSTRUCTIONS: POLARIZED PLUGS
BEFORE RETURNING THIS PRODUCT
FOR ANY REASON PLEASE CALL
1-800-54-HOW-TO (544-6986)
IF YOU SHOULD EXPERIENCE A PROBLEM
WITH YOUR BLACK & DECKER PRODUCT,
CALL 1-800-54-HOW-TO (544-6986)
BEFORE YOU CALL, HAVE THE FOLLOWING INFORMATION AVAILABLE, CATALOG
No., TYPE No., AND DATE CODE (e.g. 20000130M). IN MOST CASES, ABLACK &
DECKER REPRESENTATIVE CAN RESOLVE YOUR PROBLEM OVER THE PHONE.
IF YOU HAVE A SUGGESTION OR COMMENT, GIVE US A CALL. YOUR FEEDBACK
IS VITALTO BLACK & DECKER.
2
Page 3
• THOROUGHLY inspect the area where the lawnmower is to be used and remove
all stones, sticks, wires, bones, and other foreign objects that could be thrown by
the blade.Objects struck by lawnmower blade can cause severe injury to persons.
• DO NOT operate the lawnmower when barefoot or wearing open sandals.
• NEVER attempt to make a wheel height adjustment while the motor is running or
while the lawnmower is plugged in.
• DO NOT put hands or feet near or under rotating parts. Keep clear of the
discharge opening at all times.
• RELEASE switch lever to turn mower off when crossing gravel drives, walks, roads,
or when flipping handle.
• IF MOWER stalls, release switch lever to turn mower off, wait for blade to stop and
unplug the cord before attempting to unclog the chute or remove anything from
under the deck.
• AFTER STRIKING a foreign object, release switch lever to turn mower off, wait for
the blade to stop and unplug the mower, thoroughly inspect the mower for any
damage, and repair the damage before restarting and operating the mower.
• IF THE lawnmower should start to vibrate abnormally release switch lever wait for
blade to stop and unplug mower check immediately for cause. Vibration is
generally a warning of trouble.
• RELEASE SWITCH lever to turn mower off, wait for the blade to stop and unplug
the mower whenever you leave the equipment, before removing the grass catcher,
discharge chute or unclogging or cleaning the mower housing, and when making
any repairs or inspections.
• MOW ACROSS the face of slopes; never up and down. Exercise extreme caution
when changing direction on slopes. Do not mow excessively steep slopes.
• KEEP HANDS and feet away from cutting area.
• KEEP BLADES sharp.
• IF YOU are using a grass catcher, check it frequently for wear and deterioration.
If excessively worn, replace with new bag for your safety.
• USE EXTREME CAUTION when reversing or pulling mower toward you.
SAVE THESE INSTRUCTIONS
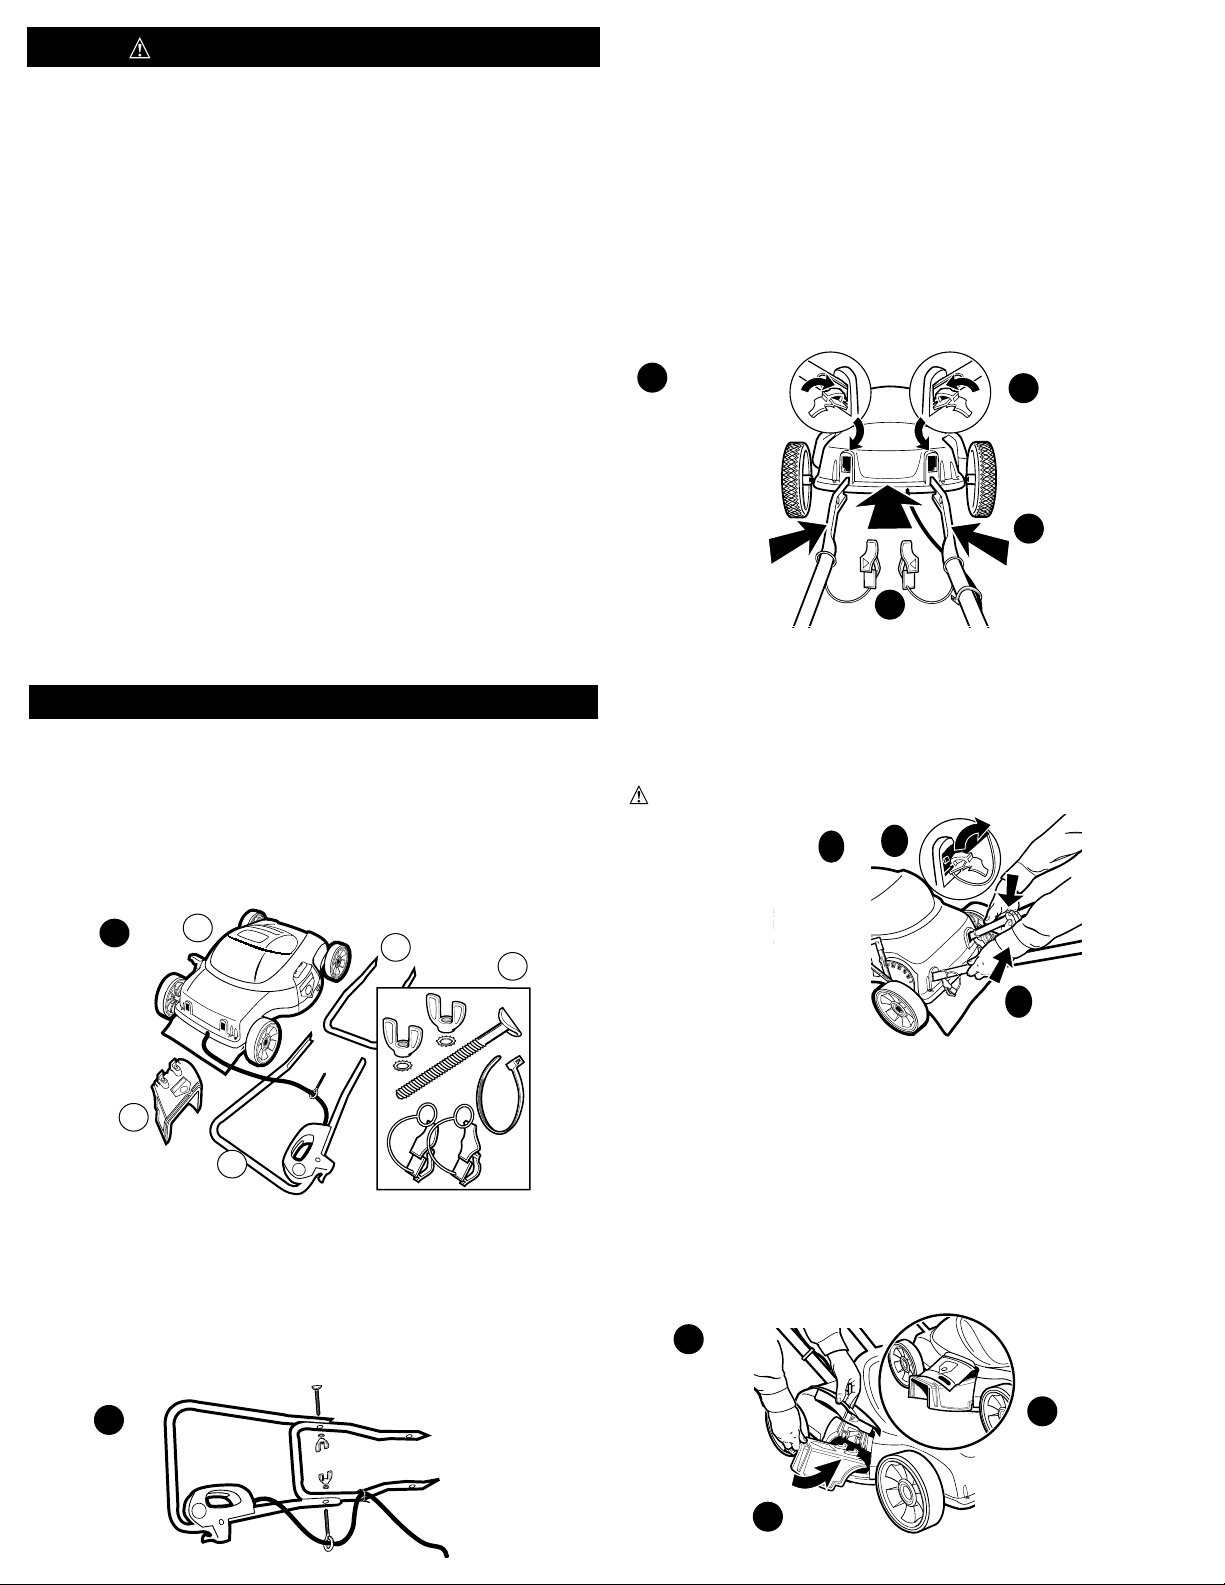
ASSEMBLY INSTRUCTIONS
BEFORE ASSEMBLING YOUR MOWER, CHECK THAT YOU HAVE RECEIVED THE
FOLLOWING IN THE SHIPPING CARTON.
SEE FIGURE 1.
A. Mower
B. Upper Handle
C. Lower Handle
D. Discharge Chute
E. Plastic Bag with handle bolt, wing nuts, star washers, cable tie and shroud hole
covers
ASSEMBLING THE HANDLE (FIGURE 2)
1. Your mower carton contains the mower, 2 handles, discharge chute and 1
plastic parts bag.
2. Fasten the upper and lower handle halves together using the eye bolt (already
installed on the power cord) and the bolt and wing nuts from the plastic bag.
Make sure the power cord and switch are on the same side of the mower as
the discharge area. The eye bolt is installed so that the cord is routed to the
outside. Place star washers on the bolts between handle and the wing nuts.
Tighten the wing nuts securely.
ATTACHING THE HANDLE (FIGURE 3)
1. UNPLUG TOOL, AND WAIT FOR BLADE TO COME TO A COMPLETE STOP.
2. Brace the front end of the mower so that it cannot roll forward.
3. Slide the shroud hole cover retaining loop over the end of the handle. Ensure
that the arrows on the hole covers are pointing towards each other when
installed. (Figure 3A)
4. Align the ends of the lower handle with the holes in the lawnmower shroud.
(Figure 3B)
5. Push the handles into the lawnmower until they are fully engaged taking care
not to pinch or damage the power cord.
6. Pull back on the handles to ensure a secure fit.
7. Install shroud hole covers by inserting the bottom edge of the shroud hole
cover onto the bottom edge of the shroud hole, then rotate hole cover forward
and push down until it is firmly snapped into position in the shroud.
(Figure 3C)
8. Install cable tie on lower handle to secure cord.
REMOVING THE HANDLE (FIGURE 4)
1. UNPLUG TOOL, AND WAIT FOR BLADE TO COME TO A COMPLETE STOP.
2. Brace the rear of the mower so that it cannot roll backward.
3. Push down on the shroud hole cover tab, and rotate the shroud hole cover out
of the shroud. (Figure 4A)
4. Grasp the ends of the lower handle with both hands. Squeeze the two sides
of the handle towards one another while pulling back on the handle.
(Figure 4B)
CAUTION: NEVER use a sharp object to move jacketed wires out of the way.
MULCHING
The mower is designed to mulch or discharge the grass depending on whether
mulch door is closed (mulching) or the mulch door is up and the discharge
chute is in place (discharging). No further assembly steps are required if you
are mulching. PROCEED TO OPERATING INSTRUCTIONS.
DISCHARGE CHUTE INSTALLATION (FIGURE 5)
(If you wish to discharge the clippings rather than mulch,
perform these steps)
1. UNPLUG TOOL, AND WAIT FOR BLADE TO COME TO A COMPLETE STOP.
2. Open mulch door by pulling on the mulch door finger grip. (Figure 5A)
3. Align the discharge chute arrows with the positioning arrows on the lawnmower
deck and insert the discharge chute as shown.
4. Position the chute until the chute hooks are trapped under the deck hooks and
release the chute and door.(Figure 5B)
3
C
B
A
4
A
B
1
D
C
A
B
E
2
5
A
B
ADDITIONAL WARNINGS FOR MOWERS
3
Page 4
NOTE: The cut height range for your mower is 1” - 3-1/2”
WHEEL HEIGHT ADJUSTMENT (FIGURE 9)
1. BEFORE MAKING ANY ADJUSTMENTS, TURN OFF, UNPLUG MOWER AND
WAIT FOR BLADE TO STOP.
2. Your mower features the Black & Decker single lever wheel height adjust system.
This system will adjust all four wheels at the same time. Mower adjusts from 1 to
3 1/2” with six increments.
3. Place your left hand on the height adjust handle and your right hand on the
lower handle as shown in Figure 9.
4. Pull height adjust handle away from mower, and re-set in the desired height
adjust position. (See recommended cut height by grass type under
OPERATING INSTRUCTIONS) Rotating the height adjust towards the front of the
mower lowers the cut height, and rotating towards the rear raises the cut height.
MULCHING TIPS
In the mulching configuration your new mower is designed to re-cut the grass
clippings into short lengths.
These clippings, which are dispersed as you mow will biodegrade quickly and
provide nutrients for the lawn.
• Set mower at highest cutting height when mowing in rough ground or in tall weed.
• Avoid cutting the lawn when it is wet. Wet grass tends to form clumps with the
mulching action. The best time to cut your lawn is in the afternoon.
• For best results, adjust the lawnmower cutting height so that the lawnmower cuts
off only the top third of the grass blades.
• If your lawn is overgrown it may be necessary to increase the cutting height to
reduce the pushing effect and prevent overloading the motor.
• For extremely heavy mulching make narrower cuts and mow slowly.
• Change your cutting pattern from week to week. Mow north to south one week
and east to west the next week. This will help prevent matting and graining of the
lawn.
8
OPERATING INSTRUCTIONS
NOTE: A lawnmower is a major appliance and should not be operated
simultaneously with other major appliances on the same house circuit.
Warning: Make sure that other persons and pets are at least 100 feet away.
Remove all stones, sticks, wire, bones,
and other debris which might be thrown
by the rotating blades
ATTACHING EXTENSION CORD TO MOWER (FIGURE 6)
DO NOT connect the extension cord to power source until you have finished
reading this manual and you are ready to start mowing.
1. The extension cord must be polarized and will only plug in one way, orient the
wide slot with the wide blade in the switch housing.
2. Loop the extension cord and push the loop up through the hole in the switch
housing.
3. Pull the extension cord on the side of the loop that is plugged into the switch
housing and remove all the slack in this section of the extension cord.
4. Place the loop over the strain relief tab on the switch housing and pull the
extension cord so the loop draws down around the strain relief tab as shown in
the detail. Double check to see that you did not loosen the extension cord.
SWITCH USE (FIGURE 7)
Your mower is equipped with a special switch. To operate the switch, insert your
finger into the opening (Figure 7) and push the lever out so that you can grasp it
with your other hand. Pull the lever back to turn the unit on and hold it against the
mower handle to keep it running. To turn the mower off, just release the lever. The
spring loaded "SNAP ACTION" lever will quickly turn the mower off.
CAUTION: NEVER ATTEMPT TO OVERRIDE THE OPERATION OF THIS SWITCH.
EXTENSION CORD TO ELECTRICAL OUTLET (FIGURE 8)
1. Place most of the extension cord close to the electrical outlet, out of the path of
the mower. Attach extension cord to mower.
2. Start in direction where extension cord side of mower is closest to the outlet.
Begin mowing in the area closest to the outlet and mow in a back and forth
manner. Note the cord is kept on cut portion of lawn and out of the path of the
mower. (FIGURE 8)
3. Avoid mowing in circles as cord will be harder to manage.
6
7
COOL SEASON GRASSES
TYPE SHADE SUN
CREEPING BENT GRASS 1-1/3” 2/3”
VELVER BENT GRASS 1/4” 1/2”
ANNUAL BLUEGRASS 1/2” 1”
CANADA BLUEGRASS 3” 4”
KENTUCKY BLUEGRASS 2-1/2” 3”
ROUGH BLUEGRASS 1” 1-1/2”
SMOOTH BROMEGRASS 3” 4”
FINE RESUE 1-1/2” 2-1/2”
TALL FESCUE 2-1/2” 4”
ANNUAL RYEGRASS 2” 2-1/2”
WARM SEASON GRASSES
TYPE SHADE SUN
BAHIA GRASS 2” 3”
BERMUDA GRASS 1/2” 1”
BUFFALO GRASS 1-1/2” 2-1/2”
CARPET GRASS 1” 2”
CENTIPEDE GRASS 1” 2”
ST. AUGUSTINE GRASS 2” 3”
ZOYSIA GRASS 1/2” 1”
RECOMMENDED APPROXIMATE CUTTING HEIGHT
The cutting height should be higher in hot weather or shade , and
lower for the last mow before winter.
INSPECT CUTTING AREA
9
CUTTING HEIGHT POSITIONS
Position Cut
1 (LOW) 1”
2 1-1/2”
32”
4 2-1/2”
53”
6 (HIGH) 3-1/2”
LOW
HIGH
4
Page 5
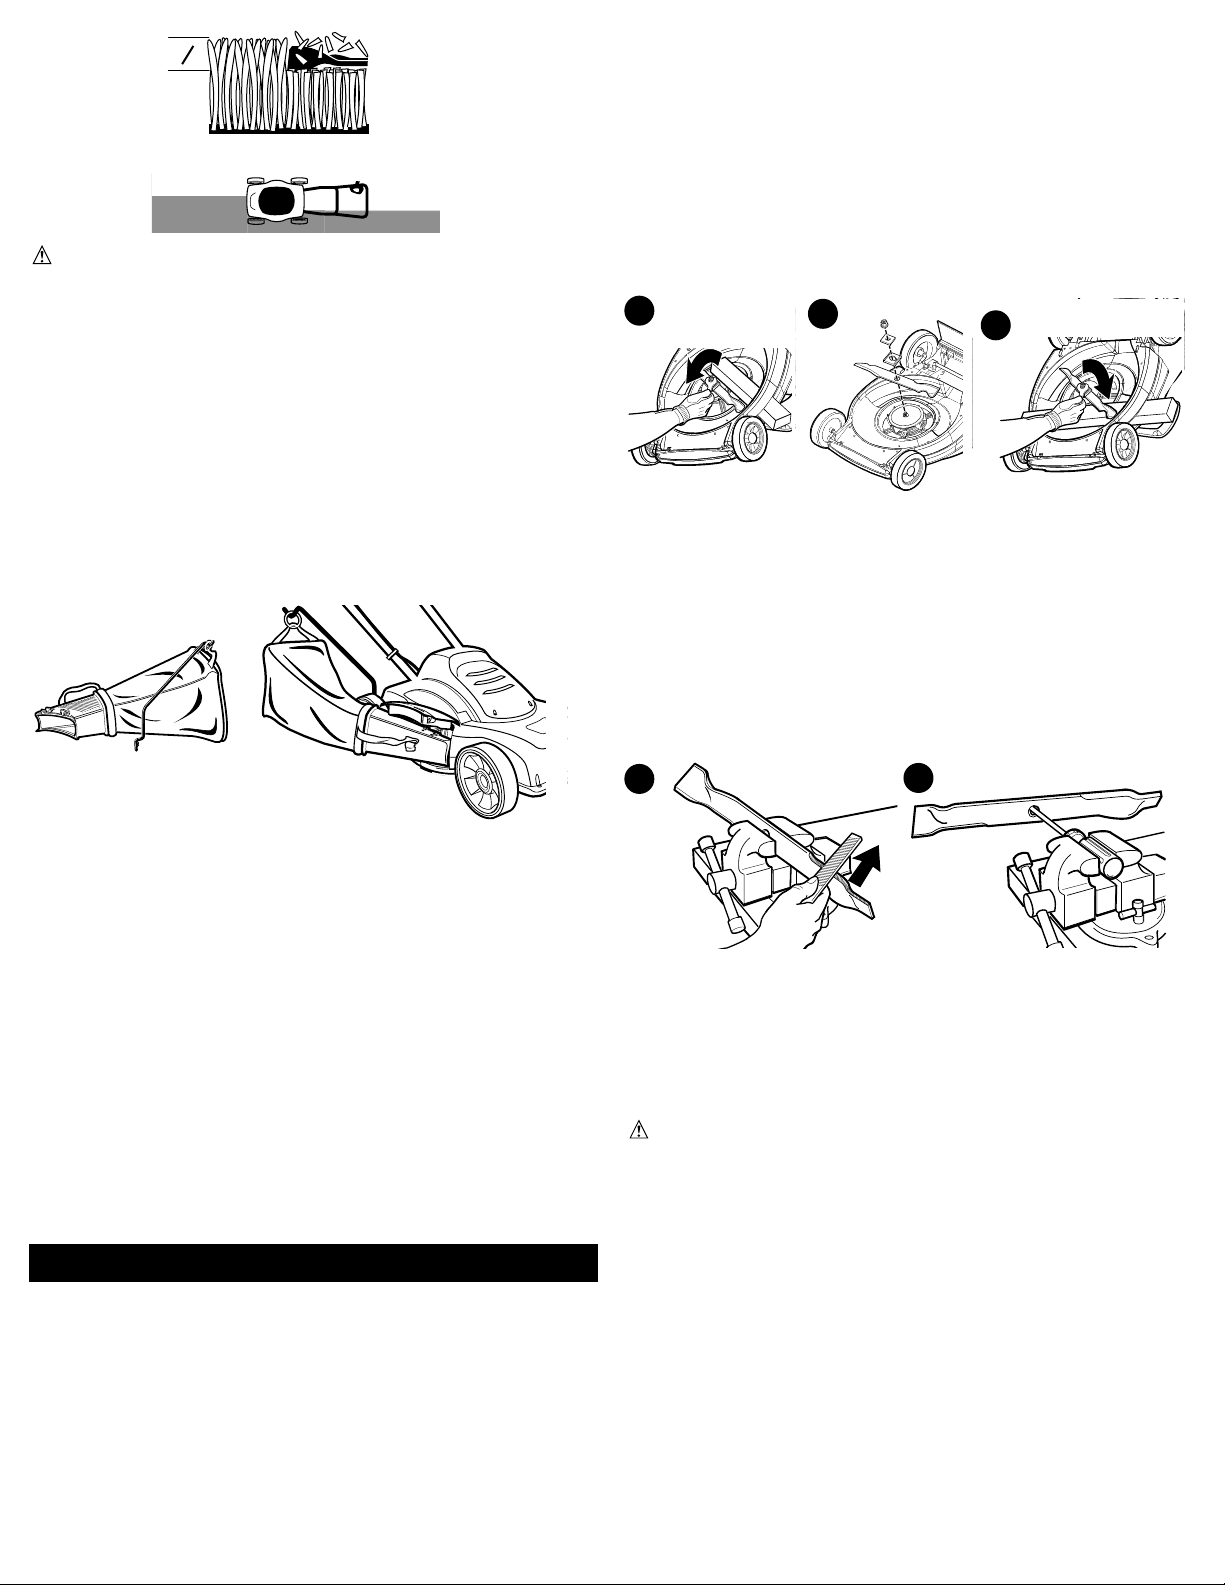
REMOVING AND ATTACHING BLADES
(FIGURE 10,11,12)
1.
RELEASE SWITCH LEVER TO TURN MOWER OFF, WAIT FOR THE BLADE TO STOP, AND
UNPLUG MOWER!
2.
Use a piece of 2x4 wood (about 2 feet long) to keep blade from turning while removing
blade nut.
3.
Wear gloves. Position wood and remove nut as shown in Figure 10.
4.
Remove lower blade spacer, lower insulator washer and blade. (Figure 11)
5.
When replacing sharpened or new blade on shoulder of fan, make sure the “GRASS SIDE”
identification on the blade is facing the ground. Place lower insulator washer over shoulder of
the fan. Now place lower blade spacer and the blade nut on the shaft.
NOTE: Align flats of shaft with flats in lower insulator washer and lower the blade space.
Position wood to keep shaft from turning (Figure 12) and then securely tighten blade nut.
SHARPENING AND BALANCING THE BLADE:
(FIGURE 13,14)
1.
BE SURE THE SWITCH LEVER IS RELEASED AND THE BLADE HAS STOPPED AND THE CORD
UNPLUGGED BEFORE REMOVING THE BLADE.
2.
Remove blade from mower. See instructions for removing and attaching blade.
3.
Secure blade in a vise as shown in Figure 13.
4.
Wear safety glasses and be careful not to cut yourself.
5.
Carefully file the cutting edges of the blade with a fine tooth file or sharpening stone.
6
.
Check balance of blade by placing centre hole in blade over a nail or screwdriver shank,
clamped horizontally in a vise. If either end of the blade rotates down, file off additional
material from that end. Blade is properly balanced when neither end drops. (Figure 14))
7.
Replace blade on mower and tighten securely.
LUBRICATION:
No lubrication is necessary. Do not oil the wheels. They have plastic bearing surfaces which
require no lubrication.
ACCESSORIES:
Recommended accessories for use with your tool are available from your local
dealer or authorized service center. If you need assistance regarding accessories,
please call: 1-800-54-HOW-TO.
WARNING: The use of any accessory not recommended for use with this tool
could be hazardous.
CAUTION: Do not attempt to unclog the blade chamber by dropping or
tapping the tool on the ground. This can damage the unit. Keep
hands clear of blade when cleaning.
DISCHARGING
The mower is designed to disperse the clippings back to the lawn.
1. Discharging may be necessary if the grass fills the optional bag too quickly.
2. Clippings may be further dispersed, if needed, by blowing them with a yard
blower.
3. In heavy grass conditions, a narrower pass may be required
OPTIONAL GRASS BAG (AVAILABLE AS AN OPTION AT EXTRA COST)
It is recommended to bag the clippings for the first few spring mowings and the
last mowing of the season to discourage diseases.
1. Bagging the clipping is sometimes preferred to reduce tracking of clippings into
pools, hot tubs, and homes.
2. Clippings can be added to your compost bin and used later for a natural
fertilizer.
CLEANING AND STORAGE
Warning! Be sure the tool is unplugged.
Remove and clean any debris from the outside of the mower and inside of guard
before storage. Store under cover. See MAINTENANCE section.
NOTE: Do not store the tool on or adjacent to fertilizers or chemicals. Such storage
can cause rapid corrosion to metal parts.
Preventing Corrosion
Fertilizers and other garden chemicals contain agents that greatly accelerate the
corrosion of metals. If you use the tool in areas where fertilizers or chemicals have
been used, the tool should be cleaned immediately afterwards.
Wipe all exposed parts with a damp cloth. You may lubricate only metal parts with
a light petroleum based oil. Do not lubricate wheels.
Cleaning out the underside of the mower is done easiest immediately after mowing
(ENSURE MOWER IS UNPLUGGED AND BLADE HAS STOPPED). A rag, crumpled
newspaper or paper towels, can be used to wipe out caked clippings.
A clean mowing deck improves the efficiency of the blade and maintains high
performance. When cleaning, DO NOT immerse tool in water or squirt it with a
hose or pressure washer. Use only mild soap and damp cloth to clean the mower.
Never let any liquid get inside the mower; never immerse any part of the mower
into a liquid.
MAINTENANCE
Before each mowing session unplug the mower and ensure that the blade has
stopped. Check all nuts, bolts and screws to ensure proper tightness, Be sure to
check the blade fastening system.
IMPORTANT: To assure product SAFETY and RELIABILITY, repairs, maintenance and
adjustment should be performed by authorized service centers or other qualified
service organizations. Use only identical replacement parts.
Inspect and thoroughly clean your mower at the beginning of each mowing season
for longer life and better performance.
From time to time turn the mower off and wait for the blade to stop. Then unplug
the power cord and turn the mower on its side. Using an object such as a stick or
rag, wipe out any accumulation of grass in the blade area. Also clean out any
grass or debris which may be packed around the discharge/mulch door area. Be
careful of the sharp edges of the blade.
1
3
10
11
12
14
13
5
R
E
P
L
A
C
E
I
F
D
A
M
A
G
E
D
Page 6
TROUBLE SHOOTING/CORRECTIVE ACTION GUIDE:
Service Information
Black & Decker offers a full network of company-owned and authorized service
locations throughout North America. All Black & Decker Service Centers are staffed
with trained personnel to provide customers with efficient and reliable power tool
service.
Whether you need technical advice, repair, or genuine factory replacement parts,
contact the Black & Decker location nearest you.
To find your local service location, refer to the yellow page directory under
“Tools—Electric” or call: 1-800-54-HOW-TO.
WARRANTIES
Full Two-Year Home Use Warranty
Black & Decker (U.S.) Inc. warrants this product for two years against any defects in
material or workmanship. The defective product will be replaced or repaired at no
charge in either of two ways:
The first, which will result in exchanges only, is to return the product to the retailer from
whom it was purchased (provided that the store is a participating retailer). Returns
should be made within the time period of the retailer’s policy for exchanges (usually 30
to 90 days after the sale). Proof of purchase may be required. Please check with the
retailer for their specific return policy regarding returns that are beyond the time set for
exchanges.
The second option is to take or send the product (prepaid) to a Black & Decker owned
or authorized Service Center for repair or replacement at our option. Proof of
purchase may be required. Black & Decker owned and authorized service centers are
listed under “Tools-Electric” in the yellow pages of the phone directory.
This warranty does not apply to accessories. This warranty gives you specific legal
rights and you may have other rights which vary from state to state. Should you have
any questions, contact the manager of your nearest
Black & Decker Service Center.
Deck Warranty
Lifetime Warranty for DECK only against any defects in material or workmanship.
This product is not intended for commercial use.
PROBLEM CORRECTIVE ACTION
-Motor will not start - Check fuse or circuit breaker to ensure power is to
outlet
- Check extension cord with another
electrical device to ensure cord is good.
- Call customer service respresentative
1 800 54 HOW TO
-Motor keeps slowing down - The underside of the mower may be plugged with
clippings, UNPLUG mower and clean out.
- Grass may be too tall, try pushing at a slower pace, or
raise cut height.
- Check blade sharpness and balance, and correct if
required.
- If mulching, it may be too much grass, UNPLUG mower
and attach discharge chute to disperse grass
-Runs but poor cut results - The blade may be dull, unplug mower and carefully
check for sharpness.
- Blade may be damaged(bent or badly chipped),
UNPLUG mower and replace if necessary.
- Grass may be too high or thick for cutting height,
UNPLUG mower and raise cutting height.
-Excess vibration - Blade may be loose, UNPLUG mower and check blade
for tightness.
- Blade may be bent or badly chipped , UNPLUG mower
and replace if necessary.
- Blade may be unbalanced. Refer to blade balancing
section of instruction manual.
-Mower is hard to push - Mower is too close to the ground with the amount of
grass being cut, UNPLUG mower and raise cutting
height.
- UNPLUG mower and check wheels and axles to
ensure all are rotating easily.
-Mower leaves clumps of grass - Too much grass, UNPLUG mower and raise cutting
height.
- If mulching, it may be too much grass, UNPLUG mower
and attach discharge chute to disperse grass
- UNPLUG mower and carefully check blade for
sharpness.
- Grass may be too wet to cut. Wait for grass to dry.
-Discharge/Bag plugging - Grass may be too wet, try again when grass is dry.
- Too much grass, UNPLUG mower and raise cutting
height.
Imported by
Black & Decker (U.S.) Inc.,
701 E. Joppa Rd.
Towson, MD 21286 U.S.A.
See ‘Tools-Electric’
– Yellow Pages –
for Service & Sales
6
Page 7

TONDEUSE DE 45 cm (18 po)
FRANÇAIS
MODÈLE MM275
Cat. noMM275 Form. no598984-00 Juillet 2005
Copyright © 2005 Black & Decker Imprimé au Mexico
RENSEIGNEMENTS IMPORTANTS
• Châssis «3 dans 1» : Déchiquetage, éjection et ensachage (sac vendu séparément).
• Utiliser la tondeuse seulement si le guidon est verrouillé en place.
• S’assurer que les couvercles des trous du châssis sont bien installés.
• Afin d’optimiser les résultats de la coupe, s’assurer que la lame est affûtée et équilibrée.
• Inspecter et nettoyer la tondeuse à fond après chaque utilisation (un châssis garni d’une accumulation d’herbe nuit au rendement).
• S’assurer qu’il n’y a personne ni aucun animal dans la zone de coupe avant le début des travaux.
CONSERVER LE PRÉSENT GUIDE À TITRE DE RÉFÉRENCE.
GGUUIIDDEE DD’’UUTTIILLIISSAATTIIOONN
Page 8

• NE JAMAIS FORCER L'OUTIL. Afin d'obtenir un rendement efficace et avec moins
de risques de blessures, utiliser l'outil à son rendement nominal.
• UTILISER L'OUTIL APPROPRIÉ. Se servir de l'outil selon l'usage prévu.
• PORTER DES VÊTEMENTS APPROPRIÉS. Éviter de porter des vêtements amples et
des bijoux qui peuvent être happés par les pièces en mouvement. Porter des gants
de caoutchouc, des pantalons et des chaussures robustes à semelle antidérapante
pour travailler à l'extérieur. Ne pas se servir de l’outil pieds nus ou en sandales.
• PORTER DES LUNETTES DE SÉCURITÉ ET AUTRE ÉQUIPEMENT DE SÉCURITÉ.
Porter des lunettes de protection ou de sécurité à écrans latéraux, conformément
aux normes de sécurité appropriées, et, au besoin, un écran facial. Porter
également un masque respiratoire si le travail de coupe produit de la poussière.
La présente mesure vaut pour toute personne dans la zone de travail. Il faut
également porter un casque, des protège-tympans, des gants et des chaussures de
sécurité ainsi qu'utiliser des systèmes de dépoussiérage lorsque spécifié ou exigé.
Les lunettes de sécurité et autre matériel semblable sont vendus séparément chez
les détaillants et dans les centres de service Black & Decker.
• NE PAS MANIPULER LE CORDON DE FAÇON ABUSIVE. Ne pas transporter
l'outil par le cordon ni tirer sur ce dernier pour le débrancher de la prise. Éloigner
le cordon des sources de chaleur, des flaques d'huile et des arêtes tranchantes.
• NE PAS DÉPASSER SA PORTÉE. Toujours demeurer dans une position stable et
garder son équilibre.
• PRENDRE SOIN DES OUTILS. S’assurer que le rebord tranchant est propre et
affûté afin d’optimiser le rendement de l’outil et de minimiser les risques de
blessures. Suivre les directives concernant la lubrification et le remplacement des
accessoires. Inspecter régulièrement le cordon de l'outil et le faire réparer au
besoin à un atelier d'entretien autorisé. Inspecter régulièrement les cordons de
rallonge et les remplacer lorsqu'ils sont endommagés. S'assurer que les poignées
sont toujours propres, sèches et libres de toute tache d'huile ou de graisse.
• DÉBRANCHER LES OUTILS NON UTILISÉS. Respecter cette mesure lorsqu'on ne se
sert pas de l'outil, ou qu'on doit le réparer ou en changer un accessoire.
• LAISSER LES PROTECTEURS en place et en bon état.
• ÉVITER LES DÉMARRAGES ACCIDENTELS. Ne pas laisser le doigt sur
l'interrupteur lorsqu'on transporte l'outil. S'assurer que l'interrupteur est à la
position hors circuit lorsqu'on branche l'outil.
• AVANT D’UTILISER L’OUTIL, toujours vérifier la lame, les attaches de la lame et le
couteau de la tondeuse pour s’assurer qu’ils ne sont ni usés ni endommagés.
Remplacer les lames et les attaches usées ou endommagées ensemble pour en
maintenir l’équilibre.
• CORDONS DE RALLONGE. S'assurer que le cordon de rallonge est en bon état.
L’isolation du cordon doit être intacte, sans fissures ni usure. Les connecteurs de la
fiche ne doivent pas être endommagés. Lorsqu'on se sert d'un cordon de rallonge,
s'assurer qu'il est de calibre approprié pour la tension nécessaire au
fonctionnement de l'outil. L'utilisation d'un cordon de calibre inférieur occasionne
une baisse de tension entraînant une perte de puissance et la surchauffe; ce qui
peut réduire la durée du moteur. Le tableau suivant indique le calibre approprié
selon la longueur du cordon et les mentions de la plaque signalétique de l'outil. En
cas de doute, utiliser un cordon de calibre supérieur. Le chiffre indiquant le calibre
est inversement proportionnel au calibre du cordon.
• signifie que la tondeuse comporte une “DOUBLE ISOLATION”.
• AVERTISSEMENT RELATIF À L’UTILISATION DE RALLONGES À L’EXTÉRIEUR :
Afin de réduire les risques de secousses électriques, utiliser seulement un cordon
de rallonge conçu pour l'extérieur et portant une des mentions suivantes : SW-A,
SOW-A, STW-A, STOW-A, SJW-A, SJOW-A, SJTW-A ou SJTOW-A.
• UN DISJONCTEUR DIFFÉRENTIEL devrait être installé sur les prises ou les circuits
utilisés pour alimenter les outils de jardinage. Il existe des prises pourvues de
disjoncteurs différentiels intégrés qui peuvent servir à cet effet.
• DEMEURER VIGILANT. Travailler avec vigilance et faire preuve de bon sens. Ne
pas se servir de l'outil lorsqu'on est fatigué ou après avoir ingéré des drogues ou
de l’alcool.
• VÉRIFIER LES PIÈCES ENDOMMAGÉES. Avant d'utiliser de nouveau l'outil, bien
vérifier un protecteur endommagé ou toute autre pièce défectueuse afin de
déterminer si elle fonctionnera de façon appropriée et si elle remplira la fonction
prévue. Vérifier l'alignement et les attaches des pièces mobiles, le degré d'usure
des pièces et leur montage, ainsi que tout autre facteur susceptible de nuire au bon
fonctionnement de l'outil. Faire réparer ou remplacer tout protecteur ou toute
autre pièce endommagée dans un centre de service autorisé, sauf si le présent
guide fait mention d'un avis contraire.
• RÉPARATION ET ENTRETIEN. Les réparations, l'entretien et les réglages non
décrits dans le présent guide devraient être confiés au personnel d'un centre de
service Black & Decker ou d’un atelier d'entretien autorisé n'utilisant que des
AVANT DE RETOURNER LE PRODUIT, PEU
IMPORTE LA RAISON, PRIÈRE DE COMPOSER LE
1 800 544-6986
AVERTISSEMENT : Importantes mesures de sécurité
AVERTISSEMENT : Afin de réduire les risques
d'incendie, de secousses électriques
ou de blessures lorsqu'on utilise des
outils de jardinage électriques, il faut
toujours respecter les mesures de
sécurité suivantes.
LIRE TOUTES LES DIRECTIVES.
AFIN DE RÉDUIRE LES RISQUES DE BLESSURES
• Avant toute utilisation, s'assurer que tous ceux qui se servent de l'outil
lisent et comprennent toutes les mesures de sécurité et tout autre
renseignement contenu dans le présent guide.
• Conserver ces mesures et les relire fréquemment avant d'utiliser l'outil et
d'en expliquer le fonctionnement à d'autres personnes.
AVERTISSEMENT :Le produit génère de la poussière qui peut
renfermer des produits chimiques. Selon l’état de
la Californie, ces produits chimiques peuvent
causer le cancer ainsi que des malformations
congénitales, et ils présentent d’autres dangers
au système reproductif humain. Voici des exemples
de tels produits chimiques :
• les composés d’engrais;
• les composés d’insecticides, d’herbicides et
de pesticides;
• l’arsenic et le chrome provenant de bois traité.
Afin de minimiser les risques, porter de l’équipement de sécurité approuvé
comme des masques antipoussières spécialement conçu pour filtrer les
particules microscopiques.
AVERTISSEMENT : Le produit renferme des produits chimiques, dont
du plomb. Selon l’état de la Californie, ce produit
chimique peut causer le cancer ainsi que des
malformations congénitales, et il présente d’autres
dangers au système reproductif humain. Se laver
les mains après l’utilisation.
Le produit est muni d'une fiche polarisée (une lame plus large que l'autre) afin de
minimiser les risques de secousses électriques.
Le produit doit alors être utilisé avec un cordon de rallonge bifilaire ou trifilaire
approprié. Ce genre de fiche n'entre que d'une façon dans une prise polarisée.
S'assurer que la prise de la rallonge possède une fente plus large que l'autre.
Lorsqu'on ne peut insérer la fiche à fond dans la rallonge, il faut tenter de le faire
après avoir inversé les lames de côté. Si la fiche n'entre toujours pas dans la
rallonge, il faut se procurer une rallonge appropriée. Lorsqu'on ne peut insérer la
fiche de la rallonge à fond dans la prise murale, il faut communiquer avec un
électricien certifié pour qu'il installe une prise appropriée. Il ne faut pas modifier la
fiche de l’outil ni celle de la rallonge.
L’OUTIL PRÉSENTE DES RISQUES. Respecter tous les avertissements et mesures de
sécurité du présent guide et ceux indiqués sur l’outil; l’utilisateur a la responsabilité
de s’y conformer. Seules les personnes qui ont lu et compris ces avertissements et
mesures de sécurité, et qui ont l’intention de s’y conformer peuvent se servir de
l’outil de jardinage électrique.
• TENIR COMPTE DU MILIEU DE TRAVAIL. Ne pas utiliser l'outil dans un endroit
mouillé ou humide. Ne pas se servir l'outil sous la pluie.
• ÉLOIGNER LES ENFANTS. Tous les visiteurs et les animaux domestiques doivent
être tenus à l'écart de l'aire de travail.
• RANGER LES OUTILS INUTILISÉS À L'INTÉRIEUR. Il faut ranger les outils dans un
endroit sec et sûr, hors de la portée des enfants.
Calibre minimal des cordons de rallonge
Tension Longueur totale du cordon en pieds
120 V 0-25 26-50 51-100 101-150
240 V 0-50 51-100 101-200 201-300
Intensité (A)
Au Au Calibre moyen des fils (AWG)
moins plus
0-6 18 16 16 14
6 - 10 18 16 14 12
10 - 12 16 16 14 12
12 - 16 14 12 Non recommandé
MESURES DE SÉCURITÉ POUR TOUS LES OUTILS
MESURES DE SÉCURITÉ : DOUBLE ISOLATION
PIÈCES DE RECHANGE : Lors des travaux d’entretien, utiliser seulement des pièces
de rechange Black & Decker identiques.
IMPORTANTES MESURES DE SÉCURITÉ : FICHE POLARISÉE
8
Page 9

pièces de rechange identiques.
• ACCESSOIRES. L'utilisation de tout accessoire non recommandé pour le produit
peut être dangereuse. Note : Pour obtenir de plus amples renseignements,
consulter la rubrique «Accessoires» du présent guide.
MESURES DE SÉCURITÉ ADDITIONNELLES RELATIVES
AUX TONDEUSES
• BIEN VÉRIFIER LA ZONE où on utilise la tondeuse et en enlever tous les cailloux,
bâtons, fils, os ou autres corps étrangers qui pourraient être projetés par la lame
en mouvement. De tels objets projetés par la lame présente des risques de
blessures graves.
• NE JAMAIS utiliser la tondeuse lorsque les pieds sont déchaussés ou recouverts de
sandales.
• NE PAS tenter de modifier la hauteur des roues lorsque le moteur est en marche ni
lorsque la tondeuse est branchée.
• ÉLOIGNER les mains et les pieds des pièces en mouvement. Se tenir à bonne
distance de l’ouverture d’éjection en tout temps.
• RELÂCHER LE LEVIER de l’interrupteur pour arrêter la tondeuse avant de traverser
les entrées et les chemins, ou lorsqu’on bascule le guidon.
• LORSQUE LE MOTEUR CALE, relâcher l’interrupteur pour mettre la tondeuse hors
tension, attendre l'immobilisation de la lame et débrancher la tondeuse avant de
débloquer le couloir d’éjection ou de retirer des objets coincés sous la tondeuse.
• LORSQUE LA LAME DE LA TONDEUSE HEURTE un corps étranger, relâcher le
levier de l’interrupteur, attendre l'immobilisation complète de la lame, débrancher
la tondeuse, s’assurer que la tondeuse n’a pas été endommagée et la réparer
avant de l’utiliser de nouveau.
• LORSQUE LA tondeuse commence à vibrer de façon anormale, relâcher le levier
de l’interrupteur, attendre l'immobilisation complète de la lame, débrancher la
tondeuse et rechercher immédiatement la cause des vibrations. Ces dernières sont
habituellement un signe de dérangement.
• RELÂCHER LE LEVIER de l’interrupteur pour arrêter le moteur, attendre
l'immobilisation de la lame et débrancher la tondeuse lorsqu'on laisse la tondeuse
sans surveillance, avant de retirer le sac à herbe, de débloquer le châssis ou le
couloir d’éjection, de nettoyer le carter de la tondeuse, et lors de réparations ou
d’inspection.
• TONDRE EN TRAVERS dans le cas d’une pente et non en va-et-vient vertical. Faire
attention lorsqu’on change de sens sur une pente. Ne pas tondre les pentes
abruptes.
• ÉLOIGNER les mains et les pieds de la zone de coupe.
• S’ASSURER QUE LES LAMES sont toujours affûtées.
• LORSQU’ON utilise un sac à herbe, en vérifier fréquemment l’usure, Lorsque le
sac est bien usé, le remplacer.
• FAIRE PREUVE D’UNE EXTRÊME PRUDENCE lorsqu’on modifie la course de la
tondeuse ou qu’on la dirige vers soi.
CONSERVER CES MESURES.
ASSEMBLAGE
AVANT D’ASSEMBLER LA TONDEUSE, S’ASSURER QUE TOUTES LES PIÈCES
SUIVANTES SE TROUVENT DANS L’EMBALLAGE.
VOIR LA FIGURE 1.
A. Tondeuse
B. Partie supérieure du guidon
C. Partie inférieure du guidon
D. Couloir d’éjection
E. Sac en plastique renfermant un boulon pour le guidon, des écrous à oreilles,
des rondelles en étoile, un serre-fil et des couvercles pour les trous du châssis.
ASSEMBLAGE DU GUIDON (FIGURE 2)
1. L’emballage de la tondeuse renferme la tondeuse, deux parties du guidon, un
couloir d’éjection et un sac de ferrures en plastique.
2. Assembler les deux parties du guidon à l’aide du boulon à œillet (déjà installé
sur le cordon d’alimentation) ainsi que le boulon et les écrous à oreilles du sac
en plastique. S’assurer que le cordon d’alimentation et l’interrupteur se
trouvent du même côté de la tondeuse que le couloir d’éjection. Le boulon à
œillet est installé de sorte que le cordon est acheminé vers l’extérieur. Installer
les rondelles en étoile sur les boulons entre le guidon et les écrous à oreilles.
Bien serrer les écrous à oreilles.
FIXATION DU GUIDON (FIGURE 3)
1. DÉBRANCHER L’OUTIL ET ATTENDRE L’IMMOBILISATION COMPLÈTE DE LA LAME.
2. Bloquer la partie avant de la tondeuse de sorte que celle-ci ne puisse rouler
vers l’avant.
3. Faire glisser la boucle de retenue du couvercle du trou du châssis jusqu’à
l’extrémité du guidon. S’assurer que les flèches sur les couvercles des trous
pointent l’une vers l’autre lorsque l’installation est terminée (fig. 3A).
4. Aligner les extrémités de la partie inférieure du guidon sur les trous du châssis
(fig. 3B).
5. Enfoncer le guidon dans la tondeuse jusqu’à ce que les extrémités du guidon
soient bien en place en prenant soin de ne pas pincer ni endommager le
cordon d’alimentation.
6. Tirer sur le guidon pour s’assurer qu’il est bien en place.
7. Installer les couvercles des trous du châssis en insérant le rebord inférieur du
couvercle sur le rebord inférieur du trou, puis faire tourner le couvercle vers
l’avant et l’enfoncer jusqu’à ce qu’il s’enclenche dans le châssis (fig. 3C).
8. Installer le serre-fil sur la partie inférieure du guidon afin de retenir le cordon
d’alimentation.
RETRAIT DU GUIDON (FIGURE 4)
1. DÉBRANCHER L’OUTIL ET ATTENDRE L’IMMOBILISATION COMPLÈTE DE LA LAME.
2. Bloquer la partie arrière de la tondeuse de sorte que celle-ci ne puisse rouler
vers l’arrière.
3. Enfoncer la languette du couvercle du trou du châssis et faire tourner le
couvercle hors de la tondeuse (fig. 4A).
4. Saisir les extrémités du guidon des deux mains. Forcer celles-ci l’une vers
l’autre tout en tirant le guidon hors de la tondeuse (fig. 4B).
MISE EN GARDE : NE JAMAIS utiliser un objet pointu pour éloigner
les fils sous gaine.
DÉCHIQUETAGE
La tondeuse est conçue pour déchiqueter ou éjecter les brindilles selon que la porte
de déchiquetage soit fermée (déchiquetage) ou soulevée et que le couloir d’éjection
soit en place (éjection). Le mode de déchiquetage ne nécessite aucun assemblage.
CONTINUER À LA RUBRIQUE RELATIVE AU FONCTIONNEMENT.
INSTALLATION DU COULOIR D’ÉJECTION (FIGURE 5)
(Lorsqu’on préfère éjecter les brindilles plutôt que les déchiqueter,
faire ce qui suit.)
1. DÉBRANCHER L’OUTIL ET ATTENDRE L’IMMOBILISATION COMPLÈTE DE LA LAME.
2. Ouvrir la porte de déchiquetage en tirant sur les prises pour les doigts de la
porte (fig. 5A).
3. Aligner les flèches du couloir d’éjection sur les flèches de positionnement du
châssis de la tondeuse et insérer le couloir d’éjection de la façon illustrée.
4. Placer le couloir jusqu’à ce que les crochets du couloir soient coincés sous les
crochets du châssis, puis relâcher le couloir et la porte (fig. 5B).
1
D
C
A
B
E
3
C
B
A
4
A
B
2
9
Page 10

NOTE : Les positions de coupe de la tondeuse vont de 25,4 mm (1 po) à 88,9 mm
(3 1/2 po).
RÉGLAGE DE LA HAUTEUR DES ROUES (FIGURE 9)
1. AVANT DE RÉGLER L’OUTIL, RELÂCHER L'INTERRUPTEUR AFIN DE METTRE LE
MOTEUR HORS TENSION, ATTENDRE L'IMMOBILISATION COMPLÈTE DE LA
LAME ET DÉBRANCHER LA TONDEUSE.
2. La tondeuse est dotée du système monotouche de réglage de la hauteur des
roues de Black & Decker. Ce système permet de régler simultanément la hauteur
des quatre roues. La tondeuse se règle à six positions entre 25,4 mm (1 po) et
88,9 mm (3 1/2 po).
3. Placer la main gauche sur la poignée de réglage de la hauteur et la main droite
sur la partie inférieure du guidon de la façon illustrée à la figure 9.
4. Tirer sur la poignée de réglage de la hauteur en l’éloignant de la tondeuse et
régler à la hauteur voulue. (Voir les réglages recommandés à la rubrique
relative au fonctionnement.) Il faut faire tourner le dispositif de réglage vers
l’avant pour abaisser la hauteur de coupe et vers l’arrière, pour l’augmenter.
6
7
PELOUSE - TEMPÉRATURES FRAÎCHES
TYPE OMBRE SOLEIL
HERBE RECOURBÉE RAMPANTE 33,7 mm (1 1/3 po) 16,7 mm (2/3 po)
HERBE RECOURBÉE VELOURS 6,3 mm (1/4 po) 12,7 mm (1/2 po)
PATURIN DES PRÉS 12,5 mm (1/2 po) 25,4 mm (1 po)
PATURIN COMPRIMÉ 76,2 mm (3 po) 101,6 mm (4 po)
HERBE BLEUE DU KENTUCKY 63,5 mm (2 1/2 po) 76,2 mm (3 po)
PTURIN DES PRÉS COMMUN 25,4 mm (1 po) 38,1 mm (1 1/2 po)
BROME 76,2 mm (3 po) 101,6 mm (4 po)
HERBE « RESCUE » FINE 38,1 mm (1 1/2 po) 63,5 mm (2 1/2 po)
HERBE « RESCUE » HAUTE 63,5 mm (2 1/2 po) 101,6 mm (4 po)
FROMENTAL 50,8 mm (2 po) 63,5 mm (2 1/2 po)
PELOUSE - TEMPÉRATURES CHAUDES
TYPE OMBRE SOLEIL
HERBE DE BAHIA 50,8 mm (2 po) 76,2 mm (3 po)
HERBE DES BERMUDES 12,7 mm (1/2 po) 25,4 mm (1 po)
HERBE DE BUFFALO 38,1 mm (1 1/2 po) 63,5 mm (2 1/2 po)
HERBE « CARPET » 25,4 mm (1 po) 50,8 mm (2 po)
HERBE « CENTIPEDE » 25,4 mm (1 po) 50,8 mm (2 po)
HERBE « ST. AUGUSTINE » 50,8 mm (2 po) 76,2 mm (3 po)
HERBE « ZOYSIA » 12,7 mm (1/2 po) 25,4 mm (1 po)
HAUTEUR DE COUPE RECOMMANDÉE
La hauteur de coupe devrait être plus élevée lorsque la température
est élevée ou dans les endroits ombragés, et basse pour la dernière
tonte avant l’hiver.
9
POSITIONS POUR LA HAUTEUR DE COUPE
Position
Hauteur de coupe
1 (BASSE) 25,4 mm (1 po)
2 38,1 mm (1 1/2 po)
3 50,8 mm (2 po)
4 63,5 mm (2 1/2 po)
5 76,2 mm (3 po)
6 (ÉLEVÉE) 88,9 mm (3 1/2 po)
BASSE
ÉLEVÉE
5
A
B
8
FONCTIONNEMENT
NOTE : Une tondeuse consomme beaucoup d’énergie et il ne faudrait pas s’en
servir en même temps que d’autres appareils énergivores.
Avertissement : S’assurer qu’il n’y a ni personnes ni animaux sur une distance
d’au moins 30 m (100 pi).
Enlever tous les cailloux, bâtons, fils, os
ou autres corps étrangers qui pourraient
être projetés par la lame en mouvement.
FIXATION DU CORDON DE RALLONGE À LA TONDEUSE (FIGURE 6)
NE PAS raccorder la rallonge à la source d’alimentation avant d’avoir terminé la
lecture du présent guide et d’être prêt à utiliser la tondeuse.
1. La rallonge doit être polarisée et ne se branche que d’une façon. Orienter la
fente large vers la broche large du corps de l’interrupteur.
2. Faire une boucle avec la rallonge et pousser la boucle dans le trou du corps de
l’interrupteur.
3. Tirer sur la section de la rallonge qui se trouve dans le corps de l’interrupteur
afin d’enlever tout jeu.
4. Fixer la boucle sur la languette de retenue du corps de l’interrupteur comme le
montre le détail. S’assurer que la rallonge n’est pas lâche.
UTILISATION DE L’INTERRUPTEUR (FIGURE 7)
La tondeuse comporte un interrupteur particulier. Pour l’actionner, il faut insérer un
doigt dans l’ouverture (fig. 7) et pousser sur l’interrupteur pour le faire sortir et
l’attraper de l’autre main. Tirer l’interrupteur vers l’arrière pour actionner la
tondeuse et l’appuyer contre le guidon pour assurer un fonctionnement continu. Il
suffit de relâcher l’interrupteur pour arrêter la tondeuse. Le levier est muni d’un
ressort à ACTION RAPIDE qui arrête rapidement la tondeuse.
MISE EN GARDE : NE JAMAIS TENTER DE NEUTRALISER LE BON
FONCTIONNEMENT DE L’INTERRUPTEUR.
RALLONGE PRÈS DE LA PRISE MURALE (FIGURE 8)
1. Déposer la rallonge près de la prise murale, loin du trajet de la tondeuse. Fixer
la rallonge à la tondeuse.
2. Commencer à tondre le plus près possible de l’endroit où la rallonge est
branché et effectuer un mouvement de va-et-vient. Laisser la rallonge reposer
du côté taillé de la pelouse, loin du trajet de la tondeuse (fig. 8).
3. Éviter de se déplacer en cercles car le cordon sera plus difficile à manier.
INSPECTION DE LA ZONE DE COUPE
10
Page 11

DÉCHIQUETAGE
En mode de déchiquetage, la tondeuse est conçue pour déchiqueter l’herbe coupée
sur la pelouse.
Ces brindilles déchiquetées sont dispersées pendant la tonte. Elles se dégradent
biologiquement plus vite et elles servent de nutriments à la pelouse.
• Régler la tondeuse à la position la plus élevée lorsque le terrain est inégal ou
lorsque l’herbe est haute.
• Éviter de tailler l’herbe lorsqu’elle est mouillée. L’herbe mouillée tend à former des
tas lorsqu’on la déchiquette. Le meilleur temps pour tondre la pelouse est au début
de l’après-midi.
• Afin d’optimiser les résultats, régler la hauteur de coupe de sorte que la tondeuse
ne coupe que le tiers de la hauteur de l’herbe.
• Lorsque l’herbe est haute, il peut être nécessaire d’augmenter la hauteur de coupe
afin de minimiser l’effort de poussée et ainsi prévenir la surcharge du moteur.
• En cas de travaux intenses de déchiquetage, effectuer des passes étroites et lentes.
• Modifier le sens de la coupe d’une semaine à l’autre. Tondre du sud au nord une
semaine et de l’est vers l’ouest, l’autre afin de prévenir la formation d’un
paillasson ou le dégarnissage de la pelouse.
MISE EN GARDE : Ne pas tenter de débloquer la chambre de la lame en laissant
tomber ou en frappant l’outil contre le sol. Cela risque
d’endommager la tondeuse. Éloigner les mains de la lame
lors du nettoyage.
ÉJECTION DES BRINDILLES
La tondeuse est conçue pour disperser l’herbe coupée sur la pelouse.
1. Il peut être nécessaire d’éjecter les brindilles si le sac à herbe facultatif se
remplit trop rapidement.
2. On peut disperser les brindilles un peu plus, le cas échéant, à l’aide d’une
souffleuse.
3. Lorsque l’herbe est haute, il est conseillé de faire des passes étroites.
SAC À HERBE FACULTATIF (VENDU SÉPARÉMENT)
Il est conseillé d’ensacher l’herbe de la première coupe du printemps et de la
dernière tonte de la saison afin d’éviter les maladies.
1. On préfère parfois ensacher l’herbe pour éviter qu’elle ne se retrouve dans la
piscine, dans les bains tourbillons ou dans la maison.
2. On peut verser les brindilles dans le compost et s’en servira plus tard comme
fertilisant naturel.
NETTOYAGE ET RANGEMENT
Avertissement! S’assurer que la tondeuse est débranchée.
Enlever tous les brins d'herbe qui se sont accumulés sur la tondeuse et sous le
protecteur, puis nettoyer la tondeuse avant de la ranger. Protéger des intempéries.
Voir la rubrique relative à l’entretien.
NOTE : Ne pas ranger la tondeuse sur des produits fertilisants ou chimiques, ni près
de ceux-ci car ils peuvent en entraîner la corrosion rapide.
Prévention de la corrosion
Les produits fertilisants et autres produits de jardinage renferment des agents qui
accélèrent grandement le processus de la corrosion des métaux. Lorsqu'on utilise
la tondeuse à des endroits où des produits fertilisants ou chimiques ont été
répandus, nettoyer immédiatement la tondeuse.
Essuyer toutes les pièces exposées avec un chiffon humide. On peut seulement
lubrifier les pièces métalliques avec une huile légère à base de pétrole. Ne pas
lubrifier les roues.
10
11
12
14
13
1
3
Il est plus facile de nettoyer le dessous du châssis immédiatement après s’être servi
de la tondeuse (S’ASSURER QUE LA TONDEUSE EST DÉBRANCHÉE ET QUE LA
LAME EST IMMOBILISÉE). On peut utiliser du papier journal, un chiffon ou de
l’essuie-tout froissés pour enlever les accumulations de brindilles.
L’efficacité de la lame s’accroît lorsque le châssis de la tondeuse est propre. On
s’assure de la sorte du rendement élevé de l’outil. Lors du nettoyage, NE PAS
immerger l’outil ni l’arroser à l’aide d’un boyau ou d’un appareil sous pression.
Utiliser seulement un savon doux et un chiffon humide pour nettoyer la tondeuse.
Ne jamais laisser un liquide s’infiltrer dans la tondeuse; ne jamais l’immerger.
ENTRETIEN
Avant chaque utilisation, débrancher la tondeuse et s’assurer que la lame est
immobilisée. Vérifier tous les écrous, boulons et vis afin de s’assurer qu’ils sont
bien serrés. Vérifier également le système de fixation de la lame.
IMPORTANT: Pour assurer la SÉCURITÉ D'EMPLOI et la FIABILITÉ de l'outil, n'en
confier la réparation, l’entretien et les rajustements qu'à un centre de service ou à
un atelier d'entretien autorisé. Utiliser seulement des pièces de rechange
identiques.
Inspecter et bien nettoyer la tondeuse au début de chaque saison de coupe afin
d’en prolonger la durée et d’en améliorer le rendement.
À l’occasion, mettre la tondeuse hors tension et attendre l’immobilisation de la
lame. Puis, débrancher le cordon d’alimentation et déposer la tondeuse sur le côté.
À l’aide d’un objet comme un bâton ou un chiffon, enlever toute accumulation de
brindilles autour de la lame. Enlever également toute accumulation de brindilles
près du couloir d’éjection ou de la zone de déchiquetage. Prendre garde de ne
pas se blesser sur les arêtes tranchantes de la lame.
INSTALLATION ET RETRAIT DE LA LAME (FIGURES 10, 11 ET 12)
1.
RELÂCHER LE LEVIER DE L’INTERRUPTEUR POUR ARRÊTER LA TONDEUSE, ATTENDRE
L’IMMOBILISATION DE LA LAME ET DÉBRANCHER LA TONDEUSE!
2.
Utiliser un morceau de bois de 10 cm sur 60 cm (2 po X 4 po) d'une longueur d’environ
10 cm (2 pi) afin d'empêcher la lame de tourner lorsqu'on retire l'écrou de la lame.
3.
Porter des gants. Placer le morceau de bois et retirer l'écrou de la manière illustrée à la
figure 10.
4. Retirer la cale inférieure de la lame, la rondelle isolante inférieure et la lame
(fig. 11).
5.
Lorsqu’on remet la lame affûtée ou une nouvelle lame sur l’épaule du ventilateur, s’assurer que
les arêtes tranchantes de la lame se dirigent vers le sol.
Installer la rondelle isolante inférieure sur l’épaule du ventilateur. Puis placer la cale inférieure
de la lame et l’écrou de la lame sur l’arbre.
NOTE : Aligner les plats de l’arbre sur les plats de la rondelle isolante inférieure et abaisser la
cale. Placer le bout de bois pour empêcher la lame de tourner (fig. 12) et bien serrer l’écrou de
la lame.
AFFÛTAGE ET ÉQUILIBRAGE DE LA LAME (FIGURES 13 ET 14)
1.
RELÂCHER LE LEVIER DE L’INTERRUPTEUR POUR ARRÊTER LA TONDEUSE, ATTENDRE
L’IMMOBILISATION DE LA LAME ET DÉBRANCHER LA TONDEUSE!
2. Enlever la lame de la tondeuse. Consulter les rubriques relatives au retrait et à
l'installation de la lame.
3. Fixer la lame dans un étau (fig. 13).
4. Porter des lunettes de sécurité et prendre soin de ne pas se couper.
5. Limer avec soin les arêtes tranchantes de la lame avec une lime à dents fines
ou une meule.
6. Vérifier l'équilibrage de la lame en accrochant cette dernière par son trou
central sur un clou ou un tournevis retenu horizontalement dans un étau.
Lorsqu'une extrémité de la lame s'abaisse, meuler ou limer cette extrémité. La
lame est bien équilibrée lorsqu'aucun bout ne s'abaisse (fig. 14).
7. Remettre la lame en place et bien la serrer.
11
R
E
P
L
A
C
E
I
F
D
A
M
A
G
E
D
Page 12

LUBRIFICATION
Ne pas lubrifier. Ne pas graisser les roues. Celles-ci comportent des roulements en plastique
qui ne nécessitent aucune lubrification.
ACCESSOIRES
On peut se procurer les accessoires recommandés pour l'outil chez les détaillants
ou au centre de service de la région. Pour trouver un accessoire, composer le
numéro suivant : 1 (800) 544-6986.
AVERTISSEMENT : L'utilisation de tout autre accessoire peut être dangereuse.
LISTE DE DÉPANNAGE
Renseignements relatifs au service
Black & Decker exploite un réseau complet de centres de service et d'ateliers
d'entretien autorisés par toute l'Amérique du Nord. Le personnel de tous les
centres de service Black & Decker a reçu la formation voulue pour assurer
l'entretien efficace et fiable des outils électriques.
Pour obtenir des renseignements d'ordre technique, des conseils relatifs aux
réparations ou des pièces de rechange d'origine, communiquer avec le centre de
service Black & Decker de la région.
On peut trouver l'adresse du centre de service de la région dans l'annuaire des
Pages jaunes à la rubrique «Outils électriques» ou en composant le numéro
suivant : 1 (800) 544-6986.
Importé par
Black & Decker Canada Inc.
100 Central Ave.
Brockville (Ontario) K6V 5W6
Voir la rubrique “Outils électriques”
des Pages jaunes
pour le service et les ventes.
GARANTIES
Garantie complète de deux ans pour utilisation domestique
Black & Decker garantit le produit pour une période de deux ans contre les vices de
matière ou de fabrication. Le produit défectueux sera réparé ou remplacé sans frais
conformément à l'une des conditions suivantes.
Pour échanger l'outil, il suffit de le retourner au détaillant (si le détaillant participe au
programme d'échange rapide Black & Decker). Le retour doit être effectuer dans les
délais impartis par la politique de retour du détaillant (habituellement entre 30 et 90
jours suivant la date d'achat). Le détaillant peut exiger une preuve d'achat. Prière de
vérifier la politique de retour du détaillant au-delà des délais impartis.
On peut également retourner l'outil (port payé) à un centre de service Black & Decker
ou à tout autre atelier d'entretien accrédité pour y être remplacé ou réparé, à notre
gré. On peut exiger une preuve d'achat. Les adresses des centres de service Black &
Decker se trouvent à la rubrique «Outils électriques» des Pages Jaunes.
La présente garantie ne vaut pas pour les accessoires. Les modalités de la présente
garantie donnent des droits légaux spécifiques. L'utilisateur peut également se
prévaloir d'autres droits selon l'état ou la province qu'il habite. Pour obtenir de plus
amples renseignements, communiquer avec le directeur du centre de service Black &
Decker de la région.
Garantie du châssis
Le châssis est garanti à vie seulement contre les vices de matière ou de fabrication.
Le produit n’est pas conçu pour une utilisation commerciale.
PROBLÈME SOLUTION
- Impossibilité de démarrer - Vérifier le fusible ou le disjoncteur de la prise pour
s’assurer que celle-ci fonctionne.
- Essayer la rallonge avec un autre outil pour la vérifier.
- Communiquer avec un représentant du service à la
clientèle au 1 (800) 544 6986.
- Ralentissement du moteur - Il peut y avoir une accumulation de brindille sous le
châssis. DÉBRANCHER la tondeuse et la nettoyer.
- L’herbe peut être trop haute, avancer plus lentement ou
soulever la hauteur de coupe.
- Vérifier l’affûtage et l’équilibrage de la lame; corriger le
cas échéant.
- Lors du déchiquetage, l’herbe peut être trop dense.
DÉBRANCHER la tonduse et fixer le couloir d’éjection pour
disperser les brindilles.
- Tonte inégale - La lame peut être émoussée; débrancher la tondeuse et
vérifier la lame.
- La lame peut être endommagée (courbée ou très
émêchée); DÉBRANCHER la tondeuse et remplacer la
lame au besoin.
- L’herbe peut être trop haute ou trop dense pour la
hauteur de coupe; DÉBRANCHER la tondeuse et en
augmenter la hauteur de coupe.
- Vibrations excessives - La lame peut être lâche;. DÉBRANCHER la tondeuse et
bien serrer la lame.
- La lame peut être endommagée (courbée ou très
émêchée); DÉBRANCHER la tondeuse et remplacer la
lame au besoin.
- La lame peut être déséquilibrée. Consulter la rubrique
relative à l’équilibrage de la lame du présent guide.
- Tondeuse difficile à manier - La tondeuse est trop près du sol pour la quantité d’herbe
à tondre; DÉBRANCHER la tondeuse et en augmenter la
hauteur de coupe.
- DÉBRANCHER la tondeuse et en vérifier les roues et les
essieux pour s’assurer qu’ils tournent librement.
- Tondeuse laisse des amas d’herbe - Il y a trop d’herbe; DÉBRANCHER la tondeuse et en
augmenter la hauteur de coupe.
- Lors du déchiquetage, l’herbe peut être trop dense.
DÉBRANCHER la tonduse et fixer le couloir d’éjection pour
disperser les brindilles.
- DÉBRANCHER la tondeuse et vérifier si la lame est bien
affûtée.
- L’herbe peut être trop mouillée pour être coupée.
Attendre que l’herbe sèche.
- Blocage du couloir ou du sac - L’herbe peut être trop mouillée; recommencer lorsque la
pelouse est sèche.
- Il y a trop d’herbe; DÉBRANCHER la tondeuse et en
augmenter la hauteur de coupe.
12
Page 13

ESPAÑOL
MANUAL DE INSTRUCCIONES
MM275
PODADORA DE 457,2 mm (18")
INFORMACION CLAVE QUE DEBE SABER
• Cubierta eterna 3 en 1 para desbrozar, descargar y embolsar (la bolsa es opcional)
• No opere la podadora a menos que el mango esté asegurado en su posición.
• Asegúrese de que las tapas de los orificios de la cubierta se instalen de manera apropiada.
• Para mejores resultados de corte, conserve la cuchilla afilada y balanceada.
• Inspeccione y limpie a conciencia su podadora después de cada uso (una cubierta con pasto acumulado
afectará el rendimiento).
• Asegúrese de que el área de podado esté libre de otras personas y de mascotas antes de iniciar la operación.
CONSERVE ESTE MANUAL PARA REFERENCIAS FUTURAS
Cat No. MM275 Form No. 598984-00 Julio 2005
Copyright © 2005 Black & Decker Impreso en México
Page 14

de joyería. Pueden quedar atrapadas en las piezas móviles. Se recomienda el
empleo de pantalones largos y de calzado resistente, antiderrapante cuando
trabaje a la intemperie. No trabaje con los pies descalzos o con sandalias.
• UTILICE GAFAS DE SEGURIDAD Y DEMAS EQUIPO DE PROTECCION. Utilice gafas
o anteojos de seguridad con cubiertas laterales, que cumplan con los estándares
de seguridad y, cuando se requiera, una máscara. Utilice también una máscara
contra polvo si la operación lo produce. Esto se aplica a todas las personas que
estén en el área de trabajo. Utilice también un casco, protección auditiva,
guantes, calzado de seguridad y sistemas de recolección de polvo cuando así se
especifique o se requiera. Las gafas de seguridad están a su disposición con
cargo adicional con el distribuidor de su localidad o en los centros de servicio Black &
Decker.
• NO MALTRATE EL CABLE. Nunca acarree la podadora tomándola por el cable, ni
tire de éste para desconectarlo de la toma de corriente. Aleje el cable de calor,
grasa y bordes afilados.
• NO SE SOBREEXTIENDA. Conserve los pies bien apoyados, al igual que el balance.
• CUIDE SU PODADORA. Conserve la cuchilla limpia y afilada para obtener el
mejor rendimiento y para reducir el riesgo de lesiones. Siga las instrucciones de
lubricación y cambio de accesorios. Inspeccione el cable de la podadora y, si está
dañado, hágalo reparar en una estación de servicio autorizado. Inspeccione los
cables periódicamente y cámbielos cuando estén dañados. Conserve los mangos
secos, limpios y libres de aceite y grasa.
• DESCONECTE LA PODADORA. Desconecte la podadora de la toma de corriente
cuando no la use, antes de darle servicio, y cuando cambie de accesorios, como
la cuchilla.
• CONSERVE LA GUARDAS en su sitio y en funcionamiento.
• EVITE EL ENCENDIDO ACCIDENTAL. No transporte la podadora conectada con el
dedo en el interruptor. Asegúrese que el interruptor esté en posición de apagado
antes de conectar la podadora.
• ANTES DE USAR LA PODADORA, inspecciónela visualmente para verificar que la
cuchilla, sus sujetadores y el montaje no estén desgastados o dañados. Reemplace
las cuchillas y tornillos desgastados o dañados en juegos para conservar el balance.
• CABLES DE EXTENSION. Asegúrese que el cable de extensión esté en buenas
condiciones. El aislamiento del cable debe estar intacto sin cuarteaduras ni
deterioro. Los conectores de la clavija no deben tener daños. Cuando use un cable
de extensión, asegúrese de utilizar una con el calibre adecuado para soportar la
corriente que su aparato necesita. Un cable de extensión con calibre inferior al
necesario causará una caída en el voltaje de la línea ocasionando pérdida de
potencia y sobrecalentamiento, lo que puede acortar la vida del motor. La tabla
muestra el calibre correcto para usarse de acuerdo con la longitud del cable y el
amperaje señalado en la placa de identificación. Si tiene dudas, utilice el calibre
siguiente. Mientras menor sea el número del calibre, mayor será su capacidad.
• indica que la podadora tiene “DOBLE AISLAMIENTO”
• CABLES DE EXTENSION PARA USO A LA INTEMPERIE. ADVERTENCIA: Para
reducir el riesgo de choque eléctrico, utilícese únicamente con cables de extensión
para uso a la intemperie, como los tipos SW-A, SOW-A, STW-A, STOW-A,
SJW-A, SJOW-A, SJTW-A, o SJTOW-A.
• INTERRUPTOR DE CIRCUITO POR FALLA EN TIERRA (GFCI). Debe utilizarse
protección de este tipo en los circuitos o tomas que se utilizarán con el aparato de
jardinería. Existen tomas de corriente con la protección GFCI integrada y pueden
utilizarse para esta medida de seguridad.
• ESTE ALERTA. Concéntrese en lo que esté haciendo. Use el sentido común. No
opere la podadora cuando esté cansado, enfermo o bajo la influencia de drogas
o alcohol.
• REVISE LAS PARTES DAÑADAS. Antes de seguir utilizando la podadora, debe
revisar cuidadosamente las guardas u otras partes que se hayan dañado, para
determinar si cumplen bien con su función. Revise la alineación de las partes
móviles, el montaje de las piezas, rupturas de partes y cualesquiera otras
condiciones que pudiesen afectar su operación. Una guarda u otra parte dañada
debe repararse o cambiarse apropiadamente en un centro de servicio autorizado
a menos que se indique otra cosa en este manual.
• REPARACIONES Y SERVICIO. Las reparaciones, el mantenimiento y los ajustes no
especificados por este manual deben efectuarse en centros de servicio autorizado
Black & Decker u otras organizaciones de servicio calificado, que siempre utilicen
refacciones idénticas.
• USO DE ACCESORIOS Y DISPOSITIVOS. El uso de cualquier accesorio o
dispositivo no recomendado para emplearse con esta podadora puede ser
peligroso. Nota: consulte la sección relacionada con los accesorios en este manual
para conocer los detalles.
ANTES DE DEVOLVER ESTE PRODUCTO POR
CUALQUIER RAZON POR FAVOR LLAME
(55) 5326-7100
ADVERTENCIA: Advertencias e instrucciones
importantes de seguridad
ADVERTENCIA:
Cuando use herramientas eléctricas de
jardinería, debe seguir ciertas precauciones
básicas de seguridad para reducir los riesgos de
incendio, choque eléctrico y lesiones personales,
entre las que se encuentran las siguientes.
LEA TODAS LAS INSTRUCCIONES
PARA REDUCIR EL RIESGO DE LESIONES:
• Antes de cualquier uso, asegúrese que cualquier persona que emplee
esta herramienta lea y comprenda todas las instrucciones de seguridad y
demás información contenida en este manual.
• Conserve estas instrucciones y revíselas con frecuencia antes de usar la
herramienta y de instruir a terceras personas.
G
ADVERTENCIA:
Parte del polvo originado por este producto
contiene químicos que en el Estado de California
se consideran como causantes de cáncer, defectos
congénitos u otros daños reproductivos. Algunos
ejemplos de estos químicos son:
• compuestos en fertilizantes
• compuestos en insecticidas, herbicidas y pesticidas
• arsénico y cromo de madera tratada químicamente
Para reducir su exposición a estos químicos, utilice equipo de seguridad
aprobado como máscaras contra polvo diseñadas específicamente para
filtrar partículas microscópicas.
ADVERTENCIA: Este producto contiene químicos, incluyendo
plomo, que en el Estado de California se
consideran como causantes de cáncer y defectos
congénitos u otros daños reproductivos. Lave sus
manos después de manejarlo.
Para reducir el riesgo de choque eléctrico, este equipo cuenta con una clavija
polarizada (con una pata más ancha que la otra). Este equipo debe usarse con
una extensión polarizada adecuada de 2 o 3 hilos. Las conexiones polarizadas se
acoplan de una sola manera. Asegúrese que el extremo de la extensión con el
contacto tenga una ranura más larga que la otra. Si la clavija no se adapta
perfectamente al cable de extensión, inviértala. Si aún así no se ajusta, obtenga la
extensión adecuada. Si la extensión no se acopla perfectamente a la toma de
corriente, comuníquese con un electricista calificado para que le instale una toma
apropiada. No modifique la clavija de la podadora o de la extensión de ninguna
manera.
ESTA HERRAMIENTA PUEDE SER PELIGROSA.Siga todas las advertencias e
instrucciones de seguridad de este manual. El operador es responsable de seguir
las advertencias e instrucciones señaladas en este manual y en la unidad. Restrinja
el uso de esta herramienta a personas que lean, comprendan y sigan las
advertencias e instruccionesincluidas en este manual y en la unidad.
• EVITE AMBIENTES PELIGROSOS. No utilice podadoras en lugares mojados o
inundados. No utilice las podadoras bajo la lluvia.
• CONSERVE APARTADOS A LOS NIÑOS. Todas las personas y mascotas deben
permanecer a distancia segura del área de trabajo.
• GUARDE LA PODADORA BAJO TECHO. Las podadoras deben guardarse bajo
techo, en una zona seca y segura – fuera del alcance de los niños.
• NO FUERCE LA PODADORA. Esta hará mejor su trabajo y de manera y con
menor riesgo de ocasionar una lesión bajo las especificaciones para las que se
diseñó.
• UTILICE EL APARATO APROPIADO. No utilice la podadora para ningún trabajo
excepto para aquél para el que está destinado.
• VISTASE DE MANERA APROPIADA. No utilice prendas de vestir flojas ni piezas
Calibre mínimo para cables de extensión
Volts Longitud total del cable en pies
120V 0-25 26-50 51-100 101-150
240V 0-50 51-100 101-200 201-300
Amperaje
Más de No más de American Wire Gage
0-6 18 16 16 14
6 - 10 18 16 14 12
10 - 12 16 16 14 12
12 - 16 14 12 No se recomienda
ADVERTENCIAS E INSTRUCCIONES GENERALES
DE SEGURIDAD PARA TODAS LAS HERRAMIENTAS
PARTES DE REPUESTO: Cuando efectúe servicio utilice únicamente refacciones
idénticas Black & Decker.
INSTRUCCIONES IMPORTANTES DE SEGURIDAD: CLAVIJAS POLARIZADA
ADVERTENCIAS E INSTRUCCIONES DE SEGURIDAD: DOBLE AISLAMIENTO
14
Page 15

ADVERTENCIAS ADICIONALES PARA PODADORASall stones,
• Inspeccione CONCIENZUDAMENTE el área en donde se va a utilizar la podadora y
retire todas las piedras, varas, alambres, huesos y demás objetos extraños que
pudiesen ser lanzados por la cuchilla. Los objetos golpeados por la cuchilla
pueden ocasionar lesiones de gravedad a las personas.
• NO opere la podadora cuando esté descalzo o cuando calce sandalias.
• NUNCA intente ajustar la altura de las ruedas con el motor en funcionamiento o
cuando la podadora esté conectada.
• NO ponga las manos o los pies cerca de las piezas giratorias. Conserve siempre
libre la abertura de descarga.
• LIBERE la palanca del interruptor para apagar la podadora cuando atraviese
caminos de grava o para plegar el mango.
• SI LA PODADORA se atasca, libere la palanca del interruptor para apagar la
podadora, espere a que la cuchilla se detenga, y desconecte el cable antes de
intentar desbloquear la bahÌa de descarga o de remover cualquier cosa de debajo
de la cubierta.
• DESPUES DE GOLPEAR un objeto extraño, suelte la palanca del interruptor para
apagar la podadora, espere a que la cuchilla se detenga y desconecte la
podadora. Revise la unidad en busca de cualquier daño, y repare el daño antes
de volver a operar la podadora.
• SI LA podadora comienza a vibrar anormalmente, suelte la palanca del interruptor
para que la cuchilla se detenga y desconecte la podadora para revisar la causa
inmediatamente. Las vibraciones generalmente son advertencia de problemas.
• LIBERE LA PALANCA DEL INTERRUPTOR para apagar la podadora, espere a que
la cuchilla se detenga y desconéctela dondequiera que la deje, antes de desmontar
la bolsa para pasto, el canal de descarga lateral, o de destapar o limpiar la
carcaza de la podadora, y cuando haga cualquier inspección o reparación.
• PODE a través de las cuestas, nunca hacia arriba y hacia abajo. Tenga extrema
precaución cuando cambie de dirección en las cuestas. No pode en cuestas
excesivamente inclinadas.
• CONSERVE MANOS y pies lejos del área de corte.
• CONSERVE AFILADAS las cuchillas.
• SI usted utiliza una bolsa para pasto, revísela con frecuencia en busca de desgaste
y deterioro. Si está desgastada excesivamente, cámbiela por otra por su propia
seguridad.
• TENGA PRECAUCION EXTREMA cuando camine hacia atrás o cuando tire de la
podadora hacia usted.
CONSERVE ESTAS INSTRUCCIONES
INSTRUCCIONES DE ENSAMBLAJE
ANTES DE ENSAMBLAS SU PODADORA, VERIFIQUE QUE HAYA RECIBIDO LO
SIGUIENTE EN LA CAJA. OBSERVE LA FIGURA 1.
A. Podadora
B. Mango superior
C. Mango Inferior
D. Canal de descarga
E. Bolsa de plástico con tornillo del mango, mariposas, roldanas de estrella, cincho
para el cable y tapas para los orificios de la cubierta.
ENSAMBLAJE DE LOS TUBOS DEL MANGO (FIGURA 2)
1. La caja de su podadora contiene la podadora, 2 mangos y 1 bolsa de plástico
con piezas.
2. Una las partes superior e inferior del mango utilizando la armella (instalada ya
en el cable de alimentación) y los tornillos y mariposas que vienen en la bolsa
de plástico. Asegúrese que el cable de alimentación y el interruptor
queden del mismo lado de la podadora, del lado del canal de descarga. La
armella se coloca de manera que el cable quede hacia el lado exterior. Coloque
las roldanas de estrella en los tornillos entre el tubo y la mariposa. Apriete las
mariposas con firmeza.
INSTALACION DEL MANGO (FIGURA 3)
1. DESCONECTE LA HERRAMIENTA, Y ESPERE A QUE LA CUCHILLA SE DETENGA
COMPLETAMENTE.
2. Sujete el extremo delantero de la podadora de manera que no pueda rodar
hacia el frente.
3. Deslice el aro de retención de las tapas de los orificios de la cubierta por los
extremos del mango. Asegúrese de que las flechas de las tapas apunten una
hacia otra al instalarlas (Figura 3A).
4. Alinee los extremos del mango inferior con los orificios de la cubierta de la
podadora (Figura 3B).
5. Empuje los mangos en la podadora hasta que se hayan enganchado
completamente.
6. Tire del mango para asegurar que hayan quedado firmes.
7. Instale las tapas de los orificios de la cubierta insertando el borde inferior de
la tapa en la parte inferior del orificio, después gire la tapa hacia adelante y
empújela hacia abajo hasta que quede asegurada en su posición en la
cubierta (Figura 3C).
8. Instale el cincho en el mango inferior para asegurar el cable.
REMOCION DEL MANGO (FIGURA 4)
1. DESCONECTE LA HERRAMIENTA Y ESPERE A QUE LA CUCHILLA SE
DETENGA POR COMPLETO.
2. Sujete el extremo trasero de la podadora para que no ruede hacia atrás.
3. Empuje hacia abajo las tapas de los orificios de la cubierta, y gírelos hasta
sacarlos de la cubierta (Figura 4A).
4. Tome los extremos del mango inferior con ambas manos. Oprima ambos
lados del mango uno hacia el otro mientras que tira del mango hacia atrás
(Figura 4B).
PRECAUCION: NUNCA utilice un objeto con filo para mover los cables.
DESBROCE:
La podadora está diseñada para desbrozar o descargar el pasto dependiendo de
que la puerta de desbroce esté cerrada (desbroce) o esté levantada y el canal de
descarga esté en su sitio (descarga). No se requieren más pasos de ensamblaje si
usted va a desbrozar. PROCEDA CON LAS INSTRUCCIONES DE OPERACION.
INSTALACION DEL CANAL DE DESCARGA (FIGURA 5)
(Si desea descargar los recortes en vez de desbrozarlos, efectúe estos pasos)
1. DESCONECTE LA HERRAMIENTA Y ESPERE A QUE LA CUCHILLA SE
DETENGA POR COMPLETO.
2. Abra la puerta de desbroce tirando del sujetador para el dedo (Figura 5A).
3. Alinee las flechas del canal de descarga con las flechas de
posicionamiento de la cubierta de la podadora e inserte el canal de descarga
como se muestra.
4. Coloque el canal de descarga hasta que los ganchos del canal queden
atrapados bajo los ganchos de la cubierta, libere el canal y la puerta (Figura 5B).
1
D
C
A
B
E
2
3
C
B
A
5
A
B
4
A
B
15
Page 16

INSTRUCCIONES DE OPERACION
NOTA: Una podadora es un aparato mayor y no debe operarse simultáneamente
con otros aparatos mayores en el mismo circuito de la casa.
Advertencia: Asegúrese de que otras personas y mascotas estén por lo menos a
30 metros de distancia.
Retire todas las piedras, varas,
alambres, huesos y demás desperdicios
que pudieran ser arrojados por las
cuchilla en movimiento.
INSTALACION DE UNA EXTENSION EN LA PODADORA
(FIGURA 6)
NO conecte el cable de extensión a la alimentación de corriente hasta que haya
terminado de leer este manual y esté listo para empezar a podar.
1. El cable de extensión debe ser polarizado y solo debe poder conectarse de una
manera; oriente la ranura grande con la pata grande de la carcaza del
interruptor.
2. Haga un rizo con el cable de extensión y empuje el rizo hacia arriba a través
del orificio de la carcaza del interruptor.
3. Tire del cable de extensión por el lado del rizo que está conectado en la
carcaza del interruptor y elimine el cable sobrante en esta sección del cable.
4. Coloque el rizo sobre la leng¸eta de protección del cable en la carcaza del
interruptor y tire del cable de manera que el rizo se ajuste alrededor de la
lengüeta como se muestra en el detalle. Verifique doblemente que no se haya
aflojado el cable de extensión.
USO DEL INTERRUPTOR (FIGURA 7)
Su podadora está equipada con un interruptor especial. Para operar el interruptor,
inserte el dedo en la abertura (Figura 7) y empuje la palanca hacia fuera de
manera que pueda sujetarla con la ora mano. Tire de la palanca hacia atrás para
encender la unidad y sujétela contra el mango de la podadora para conservarla
en funcionamiento. Para apagar la podadora, simplemente suelte la palanca. La
acción de resorte de la palanca apagará rápidamente la podadora.
PRECAUCION: NUNCA INTENTE ANULAR LA ACCION DE ESTE INTERRUPTOR.
CABLE DE EXTENSION A TOMA DE CORRIENTE (FIGURA 8)
1. Coloque la mayor parte del cable de extensión cerca de la toma de corriente,
fuera del camino de la podadora. Instale la extensión en la podadora.
2. Comience a podar en la zona cercana a la toma de corriente haciendo
recorridos hacia delante y hacia atrás. Note que el cable se conserva en la
porción cortada del césped y fuera del camino de la podadora (Figura 8)
3. Evite podar en círculos ya que será más difícil manejar el cable.
NOTA: El rango de altura de corte de su podadora está entre 25.4 mm y
88.9 mm.
AJUSTE DE ALTURA DE LAS RUEDAS (FIGURA 9)
1. ANTES DE HACER CUALQUIER AJUSTE, APAGUE, DESCONECTE LA
PODADORA Y ESPERE A QUE LA CUCHILLA SE DETENGA.
2. Su podadora cuenta con el sistema de ajuste de altura de ruedas de una
palanca de Black & Decker. Este sistema ajusta la altura de las cuatro ruedas al
mismo tiempo. La podadora se ajusta de 25,4 mm (1") a 88,9 mm (3 1/2") con
seis incrementos.
3. Coloque su mano izquierda en la manija de ajuste de altura y su mano
derecha en el mango inferior, como se ilustra en la Figura 8.
4. Tire de la manija de ajuste de altura hacia el lado opuesto a la podadora, y re
ajuste en la posición de altura que desee. (Vea las alturas recomendadas por
tipo de césped en las INSTRUCCIONES DE OPERACION) Girar el ajuste de
altura hacia el frente de la podadora baja la altura de corte, y girar hacia atrás
eleva la altura de corte.
RECOMENDACIONES PARA DESBROCE
En la configuración de desbroce su podadora nueva está diseñada para
re-cortar los recortes de pasto a longitudes mucho menores.
Estos recortes, que se dispersan al podar, se degradan rápidamente y le
proporcionan nutrientes a su césped.
• Ajuste la podadora a la posición de corte más alta cuando pode en suelo
agreste o en hierbas altas.
• Evite cortar el césped cuando esté mojado. El pasto mojado tiende a formar
plastas con las acción de desbroce. La mejor hora para cortar su césped es
temprano por la tarde.
• Para obtener los mejores resultados, ajuste la altura de corte de la podadora de
manera que corte únicamente el tercio superior de las hojas de pasto.
• Si su césped está muy crecido, puede ser necesario incrementar la altura de
corte para reducir el efecto de empuje y evitar sobrecargar el motor.
• Para desbroces extremadamente pesados, haga cortes angostos y muévase
lentamente.
• Cambie su patrón de corte de semana a semana. Pode de norte a sur una
semana y de este a oeste a la semana siguiente. Esto evitará que el césped se
maltrate.
REVISE LA ZONA DE CORTE
6
8
7
ALTURA DE CORTE APROXIMADA RECOMENDADA
La altura de corte deberá ser mayor en clima cálido o bajo
sombra y menor para el último podado antes del invierno.
PASTOS DE TEMPORADA FRIA
TIPO SOMBRA SOL
PASTO INCLINADO CREEPING 33.7 mm 16.7 mm
PASTO INCLINADO VELVER 6.3 mm 12.7 mm
PASTO AZULADO ANUAL 12.5 mm 25.4 mm
PASTO AZULADO DEL CANADA 76.2 mm 101.6 mm
PASTO AZULADO DE KENTUCKY 63.5 mm 76.2 mm
PASTO AZULADO ASPERO 25.4 mm 38.1 mm
BROMO SUAVE 76.2 mm 101.6 mm
RESUE FINO 38.1 mm 63.5 mm
FESCUE ALTO 63.5 mm 101.6 mm
BALLICO ANUA 50.8 mm 63.5 mm
PASTOS DE TEMPORADA CALIENTE
TIPO SOMBRA SOL
PASTO BAHIA 50.8 mm 76.2 mm
PASTO BERMUDA 12.7 mm 25.4 mm
PASTO BUFFALO 38.1 mm 63.5 mm
PASTO ALFOMBRA 25.4 mm 50.8 mm
PASTO CENTIPEDO 25.4 mm 50.8 mm
PASTO SAN AGUSTIN 50.8 mm 76.2 mm
PASTO ZOYSIA 12.7 mm 25.4 mm
9
BAJA
ALTA
POSICIONES DE ALTURA DE CORTE
Posición Corte
1 (BAJA) 25,4 mm (1”)
2 38,1 mm (1-1/2”)
3 50,8 mm (2”)
4 63,5 mm (2-1/2”)
5 76,2 mm (3”)
6 (ALTA) 88,9 mm (3-1/2”)
16
Page 17

PRECAUCION: No intente desbloquear la cámara de la cuchilla azotando o
golpeando la podadora contra el piso. Esto puede dañar la
unidad. Conserve las manos lejos de la cuchilla al limpiar.
DESCARGA
La podadora está diseñada para dispersar los recortes de pasto en el césped.
1. La descarga puede ser necesaria si el pasto llena la bolsa opcional demasiado
rápido.
2. Los recortes pueden dispersarse, en caso necesario con la ayuda de un
soplador de patio.
3. En condiciones de pasto pesado, se puede requerir de una pasada más
angosta.
BOLSA PARA PASTO OPCIONAL (DISPONIBLE COMO OPCION CON COSTO EXTRA)
Se recomienda embolsar los recortes de pasto en el primer podado de
primavera y en el último podado de la temporada para desalentar las
enfermedades.
1. Es preferible embolsar los recortes algunas veces para disminuir el
desplazamiento de estos recortes a piscinas, tinas y al interior de la casa.
2. Los recortes se pueden añadir a su depósito de composta y utilizarse
posteriormente como fertilizante natural.
LIMPIEZA Y GUARDADO
¡Advertencia! Asegúrese de que la herramienta estédesconectada.
Elimine y limpie cualquier desecho de la parte exterior de la podadora y del interior
de la guarda antes de guardarla. Guárdela bajo la cubierta. Véase la sección
MANTENIMIENTO.
NOTA: No guarde la herramienta sobre fertilizantes o productos químicos ni
cerca de ellos. Esto puede ocasionar la r·pida corrosión de piezas metálicas.
Evite la corrosión
Los fertilizantes y otros productos quÌmicos de jardinerÌa contienen agentes que
aceleran la corrosión en los metales. Si usted usa su herramienta en áreas en las
que se han utilizado fertilizantes u otros químicos, la herramienta deberá limpiarse
de inmediato después de usarla.
Limpie todas las piezas con un trapo húmedo. Puede lubricar únicamente las
piezas de metal con aceite con base de petróleo. No lubrique las ruedas.
La limpieza a la parte inferior de la podadora se facilita haciéndola
inmediatamente después del podado (ASEGURESE QUE LA PODADORA ESTE
DESCONECTADA Y QUE SE HA DETENIDO). Se puede utilizar periódico o toallas
de papel arrugados para limpiar los residuos de pasto pumulado.
Una cubierta de podado limpia mejora la eficiencia de la cuchilla y conserva el
rendimiento alto. Cuando limpie, NO sumerja la herramienta en agua ni la rocíe
con una manguera. Utilice únicamente jabón suave y un trapo húmedo para
limpiar la podadora. Nunca permita que se introduzcan íquidos en la podadora ni
sumerja ninguna parte de ésta en ningún lÌquido.
MANTENIMIENTO
Antes de cada temporada de podado desconecte la podadora y asegúrese de que
la cuchilla se ha detenido. Revise todas las tuercas, los tornillos y los pernos para
asegurar el ajuste apropiado. Aseg˙rese de revisar el sistema de fijación de la
cuchilla.
IMPORTANTE: Para garantizar la SEGURIDAD y la CONFIABILIDAD del producto,
las reparaciones, el mantenimiento y los ajustes deberán ser efectuados en centros
de servicio autorizado u otras organizaciones de servicio calificado. Utilice
únicamente refacciones idénticas.
Inspeccione y limpie a conciencia su podadora al inicio de cada temporada de
podado para mayor duración y mejor rendimiento.
De cuando en cuando, apague la podadora y espere a que la cuchilla se detenga.
A continuación, desconecte el cable y cloque la podadora sobre uno de sus lados.
Con la ayuda de una objeto como una vara o un trapo, limpie cualquier depósito
de pasto en el área de la cuchilla. También limpie cualquier desecho que se haya
acumulado alrededor de la zona de descarga. Tenga cuidado con los filos de la
cuchilla.
REMOCION E INSTALACION DE CUCHILLAS (FIGURAS 10, 11, 12)
1.
LIBERE LA PALANCA DEL INTERRUPTOR PARA APAGAR LA PODADORA, ESPERE A QUE LA
CUCHILLA SE DETENGA Y DESCONECTE LA PODADORA.
2. Use una pieza de madera de 10 cm de ancho por 60 cm de longitud para
evitar que la cuchilla gire al aflojar la tuerca.
3. Emplee guantes para protegerse las manos y quite la tuerca como se observa
en la Figura 10.
4. Retire el espaciador inferior de la cuchilla, la arandela aisladora inferior y la
cuchilla (Figura 11).
5. Cuando coloque la cuchilla afilada o nueva en el hombro del ventilador,
asegúrese que los filos queden hacia la tierra. Coloque la arandela aisladora
sobre el hombro del ventilador. A continuación coloque el espaciador inferior y
la tuerca de la cuchilla en la flecha.
NOTA: Alinee las partes planas de la flecha con las partes planas del aislador
inferior y con la ayuda de la pieza de madera coloque la cuchilla de
manera que no gire para poder apretar la tuerca.
AFILADO Y BALANCEO DE LA CUCHILLA: (FIGURAS 13 Y 14)
1. ASEGURESE DE QUE LA PALANCA DEL INTERRUPTOR ESTE LIBRE Y QUE LA CUCHILLA SE
HAYA DETENIDO Y EL CABLE ESTE DESCONECTADO ANTES DE SACAR LA CUCHILLA.
2. Saque la cuchilla de la podadora. Vea las instrucciones para la remoción y colocación de la
cuchilla.
3. Asegure la cuchilla en una prensa como se muestra en la Figura 13.
4. Use anteojos de seguridad y tenga cuidado de no cortarse.
5. Afile cuidadosamente los bordes cortantes de la cuchilla con una lima de dientes finos M-3 o
con una piedra de afilar.
6. Verifique el balance de la cuchilla. Vea las instrucciones para balancear la cuchilla.
7. Verifique el balance de la cuchilla colocando la perforación central sobre un clavo o sobre el
vástago de un destornillador sujetado en una prensa. Si cualquiera de los extremos gira hacia
abajo, afile ese
extremo. La cuchilla está balanceada correctamente cuando
ninguno de los extremos cae. (Figura 14)
8. Coloque la cuchilla en la podadora y apriete con firmeza.
LUBRICACION:
No se requiere lubricación. No aceite las ruedas. Tienen baleros con superficie plástica que no
requiere lubricación.
ACCESORIOS:
Los accesorios recomendados para usarse con su herramienta están a su
disposición con el distribuidor o en el centro de servicio autorizado de su
localidad. Si necesita ayuda en relación con los accesorios, por favor
llame: (55)5326 7100.
ADVERTENCIA: El empleo de cualquier accesorio no recomendado para
usarse con esta herramienta puede ser peligroso.
1
10
11
12
14
13
17
3
R
E
P
L
A
C
E
I
F
D
A
M
A
G
E
D
Page 18

Para servicio y ventas consulte
“HERRAMIENTAS ELECTRICAS”
en la sección amarilla.
PROBLEMA ACCION CORRECTIVA
- El motor no enciende - Revise el fusible o el interruptor de
circuito para asegurar que haya corriente en la toma
- Pruebe la extensión con otro aparato para
asegurar que funcione.
- Llame a servicio a clientes (55) 5326 7100
- El motor funciona lento - Pruebe subiendo la altura de corte ya que el pasto
puede estar muy alto y pruebeotra vez.
- La parte inferior de la podadora puede estar bloqueada
con pasto acumulado. DESCONECTE la podadora y
suba la altura de podado.
- Si está desbrozando, puede ser demasiado pasto,
DESCONECTE la podadora e instale el canal de descarga
para dispersar el pasto.
- Funciona pero corta pobremente - La cuchilla puede no tener filo, desconecte la podadora
y revise con cuidado que tenga filo.
- La cuchilla puede estar dañada (doblada o mellada),
DESCONECTE la podadora y cambie la cuchilla si es
necesario.
- El pasto puede estar muy alto, o muy grueso,
DESCONECTE la podadora y suba la altura de podado.
- Vibración excesiva - La cuchilla puede estar floja. DESCONECTE la podadora
y verifique que la cuchilla esté apretada.
- La cuchilla puede estar doblada o mellada, DESCONECTE
la podadora y cambie la cuchilla.
- Es difícil empujar la podadora - La podadora está muy cerca al suelo con la cantidad de
pasto a cortar, DESCONECTE la podadora y suba la
altura de podado.
- DESCONECTE la podadora y revise la ruedas y los ejes
para asegurar que giren con libertad.
- La podadora deja - Demasiado pasto, DESCONECTE la podadora y suba la
mechones de pasto altura de corte.
- Si está desbrozando, puede ser demasiado pasto,
DESCONECTE la podadora e instale el canal de
descarga para dispersar el paston.
- DESCONECTE la podadora y revise con cuidado el filo
de la cuchilla.
- Bloqueo de descarga/bolsa - El pasto puede estar muy húmedo, trate de nuevo
cuando el pasto esté seco.
- Demasiado pasto, DESCONECTE la podadora y suba la
altura de corte.
Información de servicio
Black & Decker ofrece una red completa de centros de servicio propiedad de la
compañía y franquiciados a través de toda Norteamérica. Todos los centros de
servicio Black & Decker cuentan con personal capacitado para proporcionar el
servicio a herramientas más eficiente y confiable.
Siempre que necesite consejo técnico, reparaciones o partes de repuesto genuinas,
comuníquese con el centro Black & Decker más cercano a usted.
Para encontrar su centro de servicio local, consulte la sección amarilla
bajo "Herramientas eléctricas", o llame al: (55) 5326-7100
Garantía completa para uso doméstico por dos años
Black & Decker (U.S.) garantiza este producto por dos años completos contra
cualquier falla originada por materiales o mano de obra defectuosos. El producto
defectuoso será reemplazado o reparado sin cargo alguno en cualquiera de las
siguientes dos maneras:
La primera, que resulta únicamente en cambios, es regresar el producto al
vendedor al que se compró (en la suposición que es un distribuidor participante).
Las devoluciones deberán hacerse dentro del tiempo estipulado por la política de
cambios del distribuidor (usualmente de 30 a 90 días después de la venta). Se
puede requerir prueba de compra. Por favor verifique con el vendedor las políticas
específicas de devolución relacionadas a las devoluciones en tiempo posterior al
estipulado para cambios.
La segunda opción es llevar o enviar el producto (con porte pagado) a los centros
de servicio Black & Decker propios o autorizados, para que la reparemos o
reemplacemos a nuestra opción. Se puede requerir prueba de compra. Los centros
de servicio Black & Decker propios y autorizados están enlistados bajo
“Herramientas eléctricas” en la sección amarilla del directorio telefónico.
Esta garantía no se aplica a los accesorios. Esta garantía le otorga derechos
legales específicos y usted pudiera tener otros derechos que varíen de estado a
estado. Si tiene cualquier pregunta, comuníquese con el gerente del centro de
servicio Black & Decker más cercano a usted.
Garantía en la cubierta
Garantía de por vida para la CUBIERTA únicamente contra cualquier defecto en el
material o mano de obra.
Este producto no ha sido diseñado para uso comercial.
IMPORTADOR: BLACK & DECKER S.A. DE C.V.
BOSQUES DE CIDROS ACCESO RADIATAS NO. 42
BOSQUES DE LAS LOMAS, 05120 MEXICO, D.F.
(55) 5326-7100
SECCI N
AMARILLA
Si funciona…
y funciona muy bien.
SOLUCION A PROBLEMAS FRECUENTES / GUIA DE ACCIONES CORRECTIVAS
18
Page 19

Page 20

 Loading...