

Page 1

1
www.joip.com
Cisco Linksys SPA 2102
Phone adapter with Router for your Internet calling
Page 2

2
www.joip.com
Home Phone Adapter
1. Introduction ........................................................................................................................................................ 3
2. Signup .................................................................................................................................................................. 4
3. Using the Linksys Phone Adapter as an ATA ............................................................................................. 6
3. Using the Linksys Phone Adapter as an ATA + Home Router ............................................................... 9
4. VoIP Calling Features ..................................................................................................................................... 12
6. For Further Assistance ................................................................................................................................... 15
Page 3

3
www.joip.com
1. Introduction
What is the joip Home phone service?
The joip Home phone service allows you to make calls through your Home internet connection, saving you up
to 70% on your phone bill. Internet Phone to Phone service works just like your regular phone and provides
you with the best VoIP services.
Simply Signup, Receive your phone adaptor and connect it to your internet connection and home phone.
With joip Home phone, you can also take your account and number with you: receive and make calls from
your Home phone, Mobile phone, PC or Tablet. You can find all the relevant information at www.joip.com
under our products section.
This means that you can make low-cost phone calls at any given moment!
Page 4
4
www.joip.com
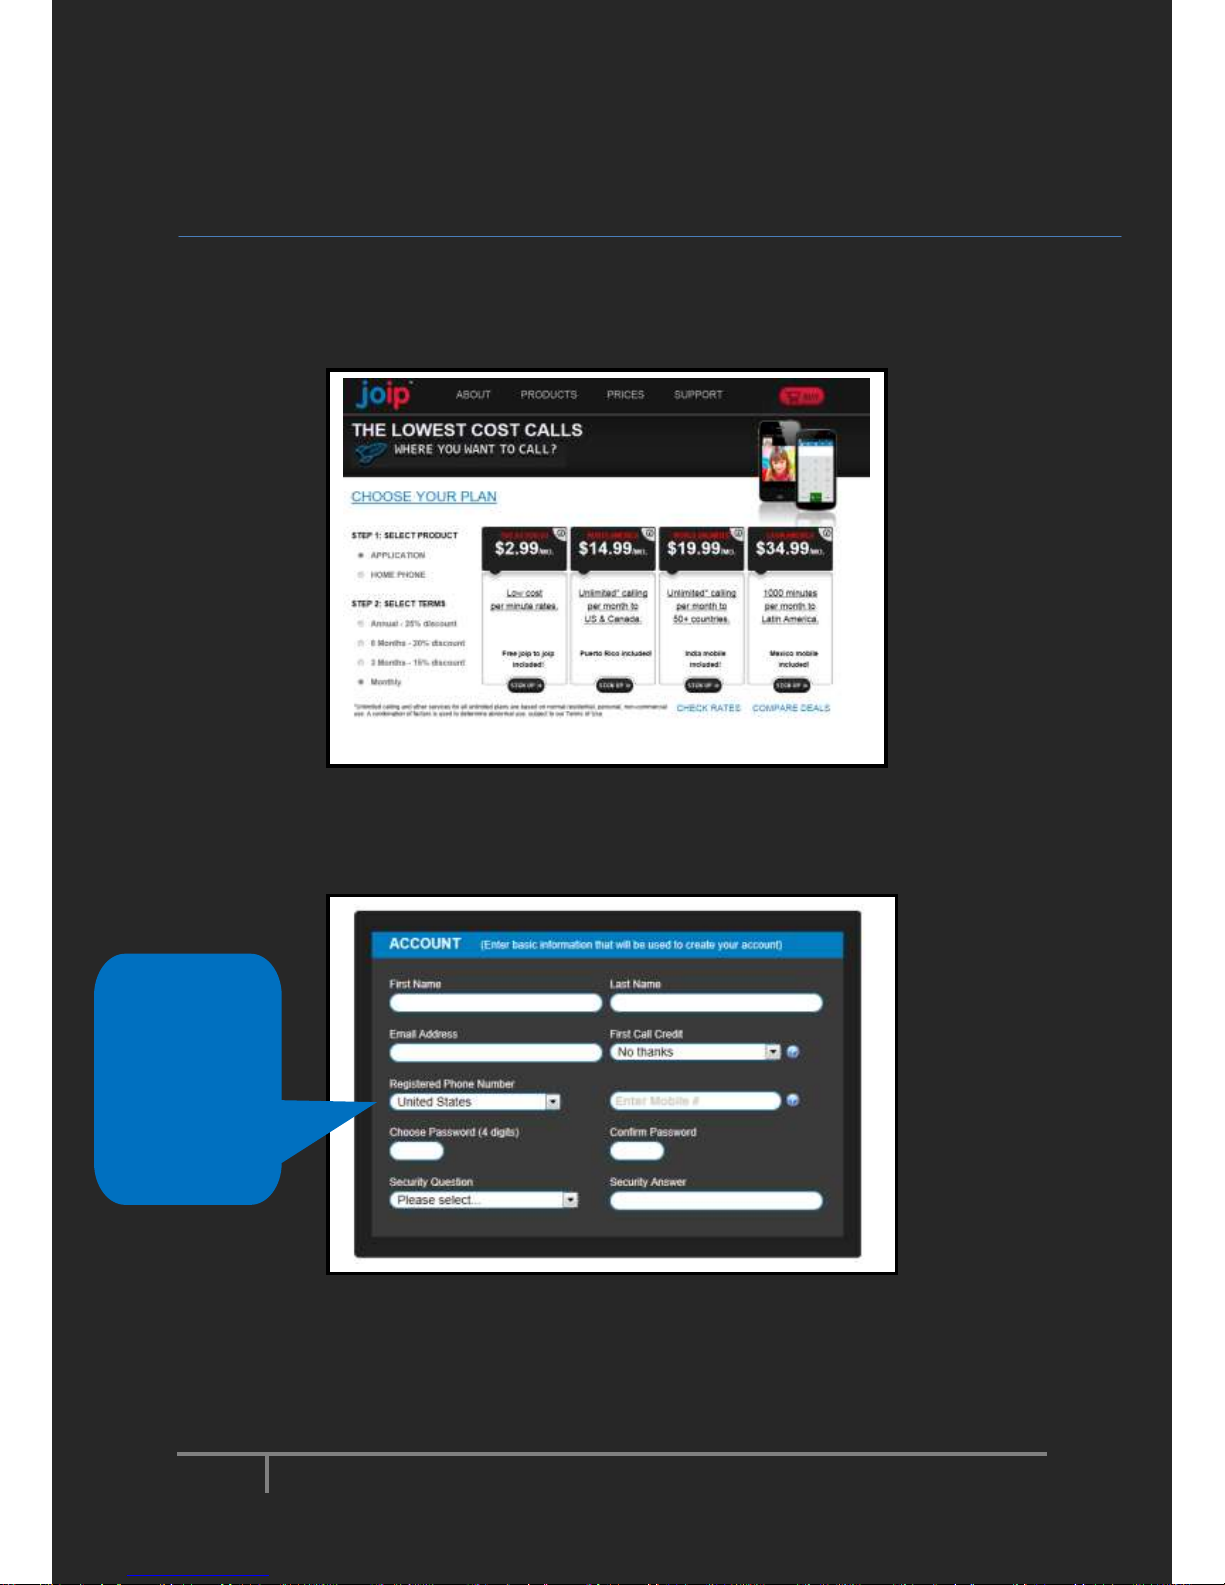
2. Signup
1. Visit our website and choose the calling plan you prefer.
2. Fill out the signup form and click ‘Continue’.
The ‘Registered
phone number’
will link your
phone to the app
and function as
your Caller ID
when using the
app
Page 5
5
www.joip.com
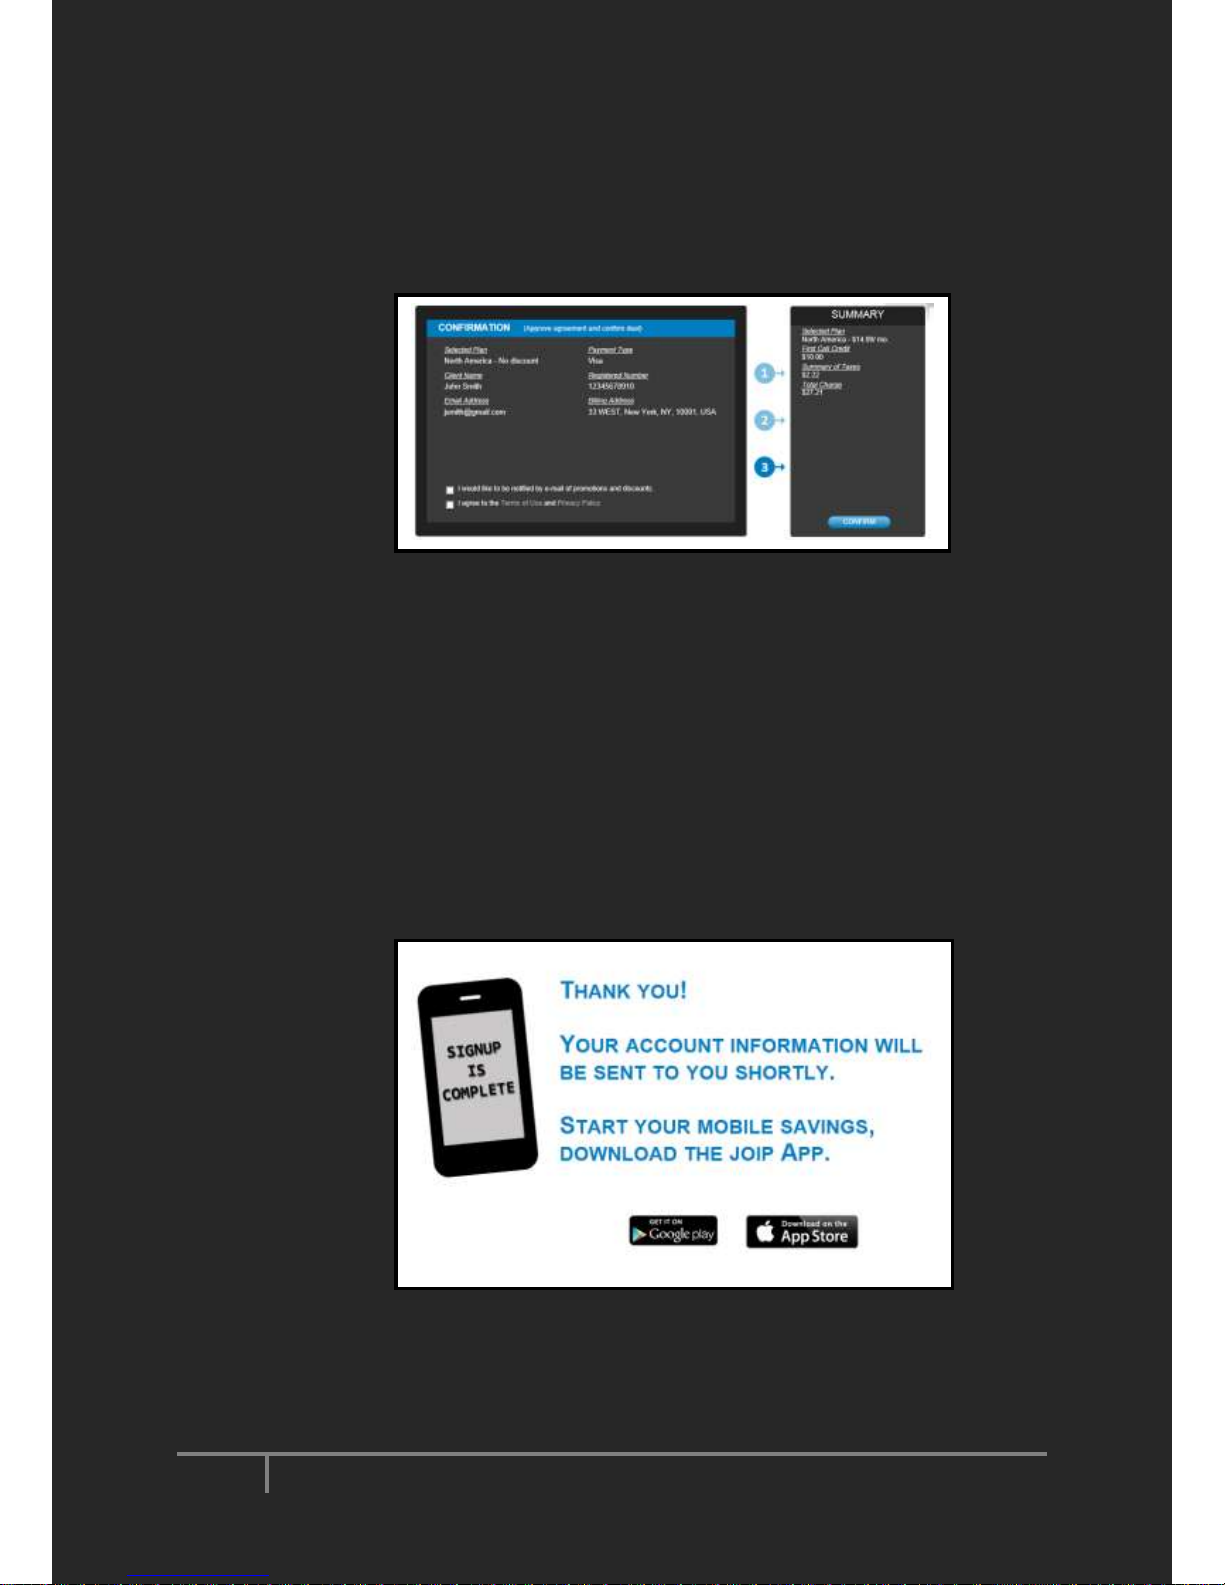
3. Review the summary and click ‘Confirm’. Note that before confirming your signup is not yet
completed.
4. Wait for the confirmation page. Please check your mailbox for our confirmation email containing
your account details (8-digit User ID and the 4-digit password you have chosen). It may take up to 30
minutes for the email to arrive.
Page 6

6
www.joip.com
3. Using the Linksys Phone Adapter as an ATA
Configuration 1- If you use a broadband modem (ADSL modem or cable modem)
IMPORTANT NOTE: Your Linksys Phone Adapte r is pre-configured as a DHCP client for use with your home router. If your router is not con figured to
support DHCP, please contact Customer Care at http://joip.custhelp.com/ for further assistance.
Standard
Home
Router
Linksys
Phone
Adapter
ADSL or Cable
Modem
`
PC
Ethernet
cable
provided in
the package
Internet
INSTALLATION:
Step I: Connect your Linksys Phone Adapter to your home network/router
1. Connect the phone: Connect a telephone to “PHONE 1” of the two phone ports (as shown in the
diagram below) on the Linksys;
2. Connect the home router: Use the Ethernet cable provided in the packaging and connect the
“INTERNET” port (as shown in the diagram below) on the Linksys to an spare Ethernet port on
your home router;
3. Connect the power: Connect the power cord to the receptacle on the Linksys marked “POWER”
(as shown in the diagram below), and the power adapter to an electrical outlet.
Page 7

7
www.joip.com
Step II: Start making and receiving IP phone calls
1. Wait for the “POWER”, and “PHONE 1” LEDs on the Linksys to stop blinking. It should only take
a few minutes. Once the LEDs are solidly lit, pick up the telephone receiver and verify that you
hear a dial tone;
2. Once you hear a dial tone, you are ready to make and receive calls. When placing calls, always
use 10-digit dialing such as 210-555-1212 (area code + number) even if it is a local number.
Configuration 2 - If you use a broadband solution that combines an ADSL modem or a cable modem
with a router
IMPORTANT NOTE: Your Linksys Phone Adapte r is pre-configured as a DHCP client for use with your home router. If your router is not con figured to
support DHCP, please contact Customer C are at http://joip.custhelp.com/ for furthe r assistance.
ADSL or Cable
Modem combined
with a Router
Linksys
Phone
Adapter
`
PC
Ethernet
cable
provided in
the package
Internet
Ethernet
Switch
INSTALLATION:
Step I: Verify Ethernet Port Availability
1. Check your broadband solution. If there is at least one spare Ethernet Port, skip the rest of this
Step and proceed to Step II.
2. If there is no spare Ethernet Port on your broadband home portal, you need to obtain an
Ethernet Switch or Hub, and connect it to the router. An Ethernet switch or hub is not provided
in the package. If you need assistance with this step, please contact Customer Care at
http://joip.custhelp.com/ for further assistance.
Page 8

8
www.joip.com
Step II: Connect your Linksys Phone Adapter
1. Connect the phone: Connect a telephone to “PHONE 1” of the two phone ports (as shown in the
diagram below) on the Linksys;
2. Connect to the router or switch: Use the Ethernet cable provided in the packaging and connect
the “INTERNET” port (as shown in the diagram below) on the Linksys to a spare Ethernet port on
your router (or the Ethernet switch or hub as described in Step I);
3. Connect the power: Connect the power cord to the receptacle on the Linksys marked “POWER”
(as shown in the diagram below), and the power adapter to an electrical outlet.
Step III: Start making and receiving IP phone calls
1. Wait for the “POWER” and “PHONE” LEDs on the Linksys to stop blinking. It should only take a
few minutes. Once the LEDs are solidly lit, pick up the telephone receiver and verify that you
hear a dial tone;
2. Once you hear a dial tone, you are ready to make and receive calls.
When placing calls always use 10-digit dialing such as 210-555-1212 (area code + number) even if
it is a local number.
Page 9

9
www.joip.com
3. Using the Linksys Phone Adapter as an ATA +
Home Router
IMPORTANT NOTE: Your PC need to be pre -configured as a DHCP client for use with Linksys Phone Adapter. If your PC is not configured as DHC P, please
contact Customer Care at http://joip.custhelp.com/ for further assistance.
INSTALLATION:
Step I: Connect your Linksys Phone Adapter to your home network/router
1. Connect the phone: Connect a telephone to “PHONE 1” of the two phone ports (as shown in the
diagram below) on the Linksys;
2. Connect the home router: Use the Ethernet cable provided in the packaging and connect the
“INTERNET” port (as shown in the diagram below) on the Linksys to an spare Ethernet port on your
home router;
3. Connect your PC: Use different Ethernet cable and connect the “ETHERNET” port (as shown in the
diagram below) on the Linksys to the Ethernet port on your PC;
Page 10

10
www.joip.com
4. Connect the power: Connect the power cord to the receptacle on the Linksys marked “POWER” (as
shown in the diagram below), and the power adapter to an electrical outlet;
Step II: Configure the Linksys Phone Adapter
1. Launch the web browser on the PC.
2. Enter http://192.168.0.1/advanced in the Address field (192.168.0.1 is the default local IP address of
the Phone Adapter). Then press the Enter key.
3. You will see a login screen (as shown in the diagram below). In the User Name field, enter user, the
default user name for user access (this cannot be changed).
4. The Router - Status screen will appear. Click the WAN Setup tab.
5. Select PPPoE for the Connection Type.
Page 11

11
www.joip.com
6. Enter the user name in the PPPoE Login Name field, and enter the password in the PPPoE Login
Password field.
7. Click Submit All Changes.
Step III: Start making and receiving IP phone calls
1. Wait for the “POWER” and “PHONE” LEDs on the Linksys to stop blinking. It should only take a few
minutes. Once the LEDs are solidly lit, pick up the telephone receiver and verify that you hear a dial
tone;
2. Once you hear a dial tone, you are ready to make and receive calls.
When placing calls always use 10-digit dialing such as 210-555-1212
(area code + number) even if it is a local number.
Page 12

12
www.joip.com
4. VoIP Calling Features
Take advantage of our advanced VoIP features:
Call Forwarding - Forward all of your calls to another telephone number. We offer you different call forwarding
options.
Unconditional call forward allows you to forward all incoming calls to another telephone number.
To enable , press *71*telephone number and the # key.
To d isable, press *72 followed by the # key.
Conditional call forward provides 3 ways to enable call forward.
1. Busy Call Forward – Forward incoming calls to another phon e when your phone is busy.
To enable , press *75*telephone number followed by the # key.
To d isable, press *76 followed by the # key.
2. Not A vailable Call Forward – Forward incoming calls to another phone when your VoIP telephone is offline.
To enable , press *77*telephone number followed by the # key.
To d isable, press *78 followed by the # key.
3. No Answer Call Forward – Forward incoming calls to another phone when you do not answe r your phone.
To enable p ress *73*telephone number followed by the # key.
To d isable press *74 followed by the # key.
Voicemail – Set up your voicemail and check your messages from your broadband phone or a remote location.
Access voicemail settings
Simply dial *0 followed by the # key from your phone to enter the menu. Choose your 4 digit password, set up your own greetin gs, and more.
Check your messages – There are 2 ways to check your messages:
1. Check your voicemail from your VoIP phone
Pick up your phone and a stutter tone indicates th at you have new messages. Dial *0 followed by the # key to enter the voice mail
menu and hear your messages.
2. Check your voicemail from any phone
Dial your own VoIP telephone number from any phone. When you hear the greeting message, press * then follow the prompts to
listen to your messages.
Page 13

13
www.joip.com
Caller ID - See the phone number and name of the person calling you with caller ID.
Call Waiting - Call waiting allows you to take another call while you are already on the phone with someone. You will
hear a tone indicating a second call. To answer the second call and put the first call on hold, press the flash button.
Press flash to switch between calls.
Cancel Call Waiting (*70) - Press *70 and dial the destination telephone number to disable call waiting during the
call. Call waiting will be enabled during the next call you make.
Call Waiting with Caller ID - Call waiting with caller ID displays the phone number and name of the incoming caller
while you are already on the phone talking to someone. Press the flash button to switch between calls.
Block Outbound Caller ID (*67) - Press *67 before dialing a number to block the call destination from seeing your
identity on their caller ID.
Repeat Dial (*66) - Repeat dial automatically redials the last outbound number you called for up to 30 minutes.
Once the outbound caller answers, our system will call you back to connect the call. To enable, press *66 followed by
the # key.
Return Call (*69) - Return call allows you to immediately return the call of an incoming caller, even if you didn’t
answer the phone. Dial *69 followed by the # key from your phone and the last incoming phone number will be
called.
Do Not Disturb (*40) - Set up Do Not Disturb so that your phone will not ring and all incoming calls will go directly to
your voicemail. To enable, press *40 followed by the # key, from your phone. To disable press *41 followed by the #
key.
Speed Dial - Save up to 10 of your most frequently dialed numbers to shortcuts for speed dialing. To enable, press
*X*telephone number followed by the # key. Replace X with a number between 1 and 10 that will be the shortcut to
dial. When you enter the telephone number, make sure to enter an 11-digit number, such as 1-210-555-1212. To use
speed dial, press *X followed by the # key. To delete, press *X* followed by the # key (X represents a number
between 1 and 10).
3-way Calling - Connect three parties into one call at any time. While you are on a call, press flash to place the call on
hold, dial the number of the third person, press flash again, and all three parties will be connected.
Page 14

14
www.joip.com
5. Web-Based VoIP Features
Log into the Members Center with your account number and 4 digits password. You can then access the following
features and information:
My calls:
My Call Detail Records (CDRs) – View a log of all incoming and outbound calls.
My Voicemail – Check your voicemail box and set up new message email notifications.
My Features: Update your calling features from the website
Call Forward
Speed dial
Find me
Call waiting
Do not disturb
Block caller ID
Block international calls
My Account: Update \ View your account information
Personal details
Credit card details
Service address
Change package
Account password
Add funds
View billing statement
View rates
Keep my existing phone number (LNP for US and Canada only).
Page 15

15
www.joip.com
6. For Further Assistance
If you do not know how to set up your home router, Ethernet switch or hub
Please refer to the user guide that came with these equipment.
If you require further assistance
Please contact Customer Care at http://joip.custhelp.com/
Thank you for choosing
 Loading...