

Cisco Linksys LNE100TX User Manual
USER GUIDE
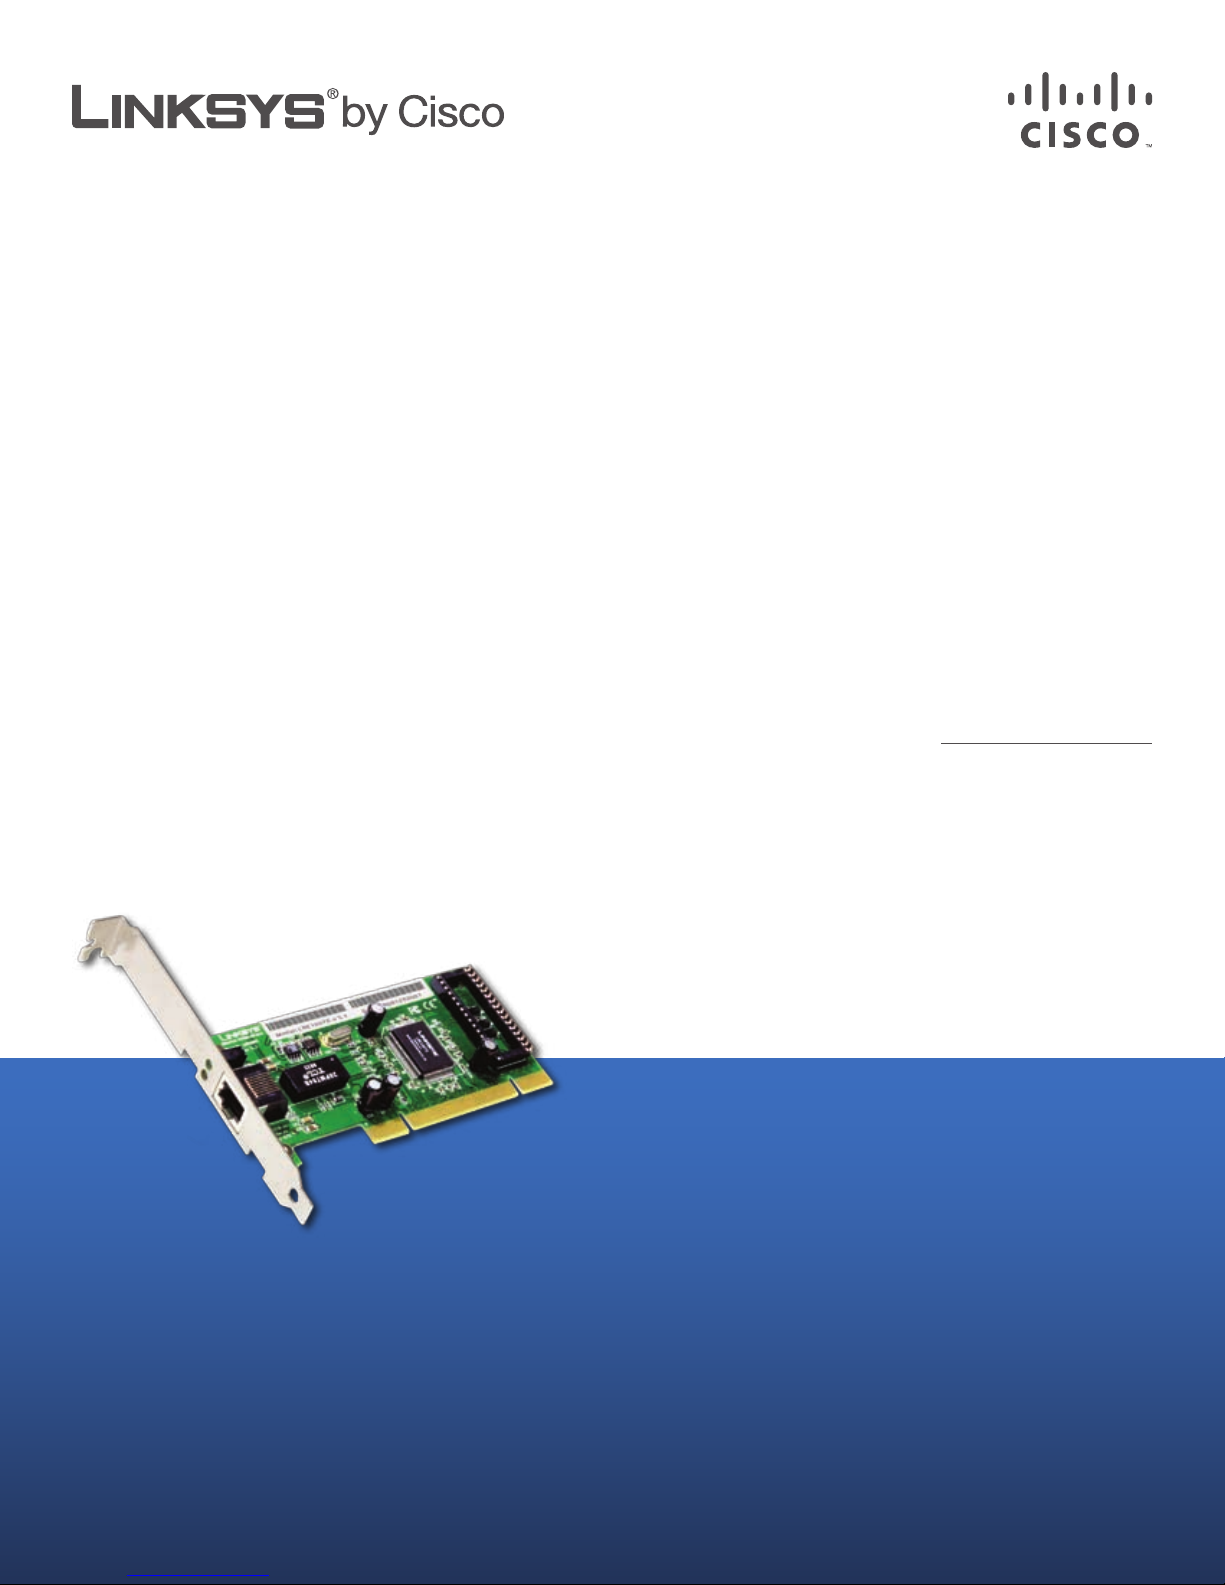
EtherFast 10/100 LAN Card
Model: LNE100TX (EU)
About This Guide
Icon Descriptions
While reading through the User Guide you may see
various icons that call attention to specific items. Below is
a description of these icons:
NOTE: This check mark indicates that there is
a note of interest and is something that you
should pay special attention to while using the
product.
WARNING: This exclamation point indicates
that there is a caution or warning and it is
something that could damage your property or
product.
About This Guide
WEB: This globe icon indicates a noteworthy
website address or e-mail address.
Online Resources
Website addresses in this document are listed without
http:// in front of the address because most current web
browsers do not require it. If you use an older web browser,
you may have to add http:// in front of the web address.
Resource Website
Linksys www.linksys.com
Linksys International www.linksys.com/international
Glossary www.linksys.com/glossary
Network Security www.linksys.com/security
Copyright and Trademarks
Linksys, Cisco and the Cisco Logo are
registered trademarks or trademarks of
Cisco Systems, Inc. and/or its affiliates
in the U.S. and certain other countries.
Copyright © 2008 Cisco Systems, Inc. All
rights reserved. Other brands and product
names are trademarks or registered
trademarks of their respective holders.
EtherFast 10/100 LAN Card
i

EtherFast 10/100 LAN Card
Table of Contents
Chapter 1: Introduction 1
Welcome 1
What’s in this Guide? 2
Chapter 2: Networking Basics 4
An Introduction to LANs 4
The Use of IP Addresses 4
Chapter 3: Getting to Know the Etherfast 10/00 LAN Card 6
LEDs 6
The RJ-45 Port 6
Chapter 4: Installing the LAN Card 7
Installing the LAN Card and Cabling 7
Chapter 5: Installing the Drivers with the Setup Utility 9
Overview 9
Using the Setup Utility 9
Chapter 6: Manual Installation and Setup 11
Overview 11
Windows 95 11
Windows 98 16
Windows ME 21
Windows NT 26
Windows 2000 32
Windows XP 34
Appendix A: Troubleshooting 35
Common Problems and Solutions 35
Appendix B: Glossary 39
Appendix C: Windows Help 46
Appendix D: Windows 95, 98, ME, Client for a Windows NT or 2000 Domain Server 47
Appendix E: Starting over in Windows 95, 98, ME, 2000, or XP 48
Starting Over in Windows 95, 98, or XP 48
Starting Over in Windows 2000 or XP 50
Appendix F: Manually Installing the Network Components in Windows 95, 98, and ME52

EtherFast 10/100 LAN Card
Manual Installation 52
Adding Missing Components 52
Appendix G: Installing the Network Protocols for Windows 95, 98, and ME 54
Appendix H: About Plug-and-Play Technology 56
Appendix I: Uninstalling the Drivers with the Install Wizard 58
Appendix J: Specifications 59
Appendix K: Warranty Information 60
Appendix L: Regulatory Information 61
Appendix M: Contact Information 62

EtherFast 10/100 LAN Card
List of Figures
Figure 3-1: Back Panel 6
Figure 4-1: Installing the Card 7
Figure 4-2: Installing the Cable 8
Figure 5-1: Welcome 9
Figure 5-2: Setup Tab 9
Figure 5-3: Computer Name 9
Figure 5-4: Reboot 10
Figure 5-5: Driver Install Successful 10
Figure 5-6: Driver Install Successful for Win 2000 10
Figure 6-1: Update Device 11
Figure 6-2: Unable to Locate Driver 11
Figure 6-3: Select Other Location 12
Figure 6-4: Driver Found 12
Figure 6-5: Copying Files 13
Figure 6-6: Configuration 13
Figure 6-7: File and Print Sharing 14
Figure 6-8: Help Tab 14
Figure 6-9: Filter Tab 15
Figure 6-10: Access Control 15
Figure 6-11: Restart your Computer 15
Figure 6-12: Searching for Drivers 16
Figure 6-13: Search for the Best Driver 16
Figure 6-14: Specify a Location 17
Figure 6-15: Location of Driver 17
Figure 6-16: Installation Complete 18
Figure 6-17: Configuration 18
Figure 6-18: File and Print Sharing 19
Figure 6-19: Client for Microsoft Networks 19

EtherFast 10/100 LAN Card
Figure 6-20: Indentification 20
Figure 6-21: Access Control 20
Figure 6-22: Specify the Location 21
Figure 6-23: Search for the best driver 22
Figure 6-24: Windows is Ready to install the Driver 22
Figure 6-25: Hardware Installation Complete 23
Figure 6-26: Configuration 23
Figure 6-27: File and Printer Sharing 24
Figure 6-28: Access Control 24
Figure 6-29: Share-Level Access Control 25
Figure 6-30: Install it Now 26
Figure 6-31: Wired to the Network 26
Figure 6-32: Search for Network Adapter 26
Figure 6-33: Select Network Adapter 27
Figure 6-34: Insert Disk 27
Figure 6-35: Choose a Software 27
Figure 6-36: Manually Select an Adapter 28
Figure 6-37: TCP/IP Protocol 28
Figure 6-38: Copy Files 28
Figure 6-39: Media Type 29
Figure 6-40: DHCP Server 29
Figure 6-41: Workgroup or Domain 29
Figure 6-42: Adapters 30
Figure 6-43: Select Network Adapter 30
Figure 6-44: Insert Disk 30
Figure 6-45: Select OEM Option 31
Figure 6-46: Auto Sense 31
Figure 6-47: Windows NT Setup 31
Figure 6-48: Restart your Computer 31
Figure 6-49: Found New Hardware Wizard 32

EtherFast 10/100 LAN Card
Figure 6-50: Install Hardware Device Drivers 32
Figure 6-51: Locate Driver Files 32
Figure 6-52: Insert the Setup CD 33
Figure 6-53: Driver Files Search Results 33
Figure 6-54: Installation Complete 33
Figure D-1: Network Properties 47
Figure E-1: Network 48
Figure E-2: Remove Linksys Components 49
Figure E-3: Remove More Linksys Components 49
Figure E-4: Hardware 50
Figure E-5: Device Manager 50
Figure E-6: Click OK 51
Figure G-1: Control Panel 54
Figure G-2: Configuration Tab 54
Figure G-3: Network Component Type 55
Figure G-4: Network Protocol 55
Figure I-1: Uninstall 58
Figure I-2: Uninstall Successful 58

1
Chapter 1: Introduction
Welcome
EtherFast 10/100 LAN Card
Chapter 1: Introduction
Welcome
Fast Ethernet is a standard of networking built specifically for speed-intensive network applications like videoconferencing, multimedia development, imaging, and complex databases. Capable of sending and receiving data
at 100 megabits-per-second in half-duplex mode, and 200Mbps in full duplex, Fast Ethernet technology is at least
10 times as fast as traditional 10BaseT networks.
Built to run with the fastest network applications, the EtherFast® 10/100 LAN Card is a high performance
network adapter for desktop computers with 32-bit PCI expansion slots. The EtherFast® 10/100 LAN Card is
ready to run with both 10BaseT and 100BaseTX networks right out of the box and the Card's 10/100 RJ-45 port
automatically detects your network's maximum speed and adjusts itself accordingly.
The EtherFast® 10/100 LAN Card from Linksys also features Wake-On-LAN (WOL) event management. If your PCI
motherboard has built-in WOL support (the Card supports PME only), you’ll be able to utilize this unique
management feature. You can remotely turn on any computer with a WOL network Adapter. If you don’t have WOL
support on your motherboard or you have no need for it, the EtherFast® 10/100 LAN Card will operate normally
anyway. If your mission critical applications require blinding network speed, the EtherFast® 10/100 LAN Card is
the best value for your networking dollar.

2
Chapter 1: Introduction
What’s in this Guide?
EtherFast 10/100 LAN Card
What’s in this Guide?
This user guide covers the steps for setting up and using the EtherFast® 10/100 LAN Card.
• Chapter 1: Introduction
This chapter describes the Card’s applications and this User Guide.
• Chapter 2: Networking Basics
This chapter discusses a few of the basics about wireless networking.
• Chapter 3: Getting to Know the EtherFast® 10/100 LAN Card
This chapter describes the physical features of the Card.
• Chapter 4: Installing the PCI Card
This chapter shows you how to connect the Card to your PC.
• Chapter 5: Installing the Drivers with the Setup Utility
This chapter instructs you on how to use the Card’s Setup Wizard and configure the Card.
• Chapter 6: Manual Installation and Setup
This chapter shows you how to manually set up the Card.
• Appendix A: Troubleshooting
This appendix describes some potential problems and solutions, as well as frequently asked questions,
regarding installation and use of the Card.
• Appendix B: Glossary
This appendix gives a brief glossary of terms frequently used in networking.
• Appendix C: Windows Help
This appendix describes how you can use Windows Help for instructions about networking, such as installing
the TCP/IP protocol.
• Appendix D: Windows 95, 98, ME, Client for a Windows NT or 2000 Domain Server
This appendix explains how to install the Card if you will be using a Windows NT or 2000 domain server
• Appendix E: Starting over in Windows 95, 98, ME, 2000, or XP
This appendix describes how to re-install the driver if you have installation difficulties.
• Appendix F: Manually Installing the Network Components in Windows 95, 98, and ME
This appendix explains how to install your Network Components.

3
Chapter 1: Introduction
What’s in this Guide?
EtherFast 10/100 LAN Card
• Appendix G: Installing the Network Protocols for Windows 95, 98, and ME
This appendix explains how to install the Windows Network Protocols.
• Appendix H: About Plug-and-Play Technology
This appendix provides information about Plug-and-Play Technology
• Appendix I: Uninstalling the Drivers with the Install Wizard
This appendix describes how to uninstall the driver.
• Appendix J: Specifications
This appendix provides the Card’s technical specifications.
• Appendix K: Warranty Information
This appendix supplies the Card’s warranty information.
• Appendix L: Regulatory Information
This appendix supplies the Card’s regulatory information.
• Appendix M: Contact Information
This appendix provides contact information for a variety of Linksys resources, including Technical Support.

4
Chapter 2: Networking Basics
An Introduction to LANs
EtherFast 10/100 LAN Card
Chapter 2: Networking Basics
An Introduction to LANs
Simply put, a router is a network device that connects two networks together.
The Router connects your local area network (LAN), or the group of PCs in your home or office, to the Internet. The
Router processes and regulates the data that travels between these two networks.
The Router’s Network Address Translation (NAT) technology protects your network of PCs so users on the Internet
cannot “see” your PCs. This is how your LAN remains private. The Router protects your network by inspecting the
first packet coming in through the Internet port before delivery to the final destination on one of the Ethernet
ports. The Router inspects Internet port services like the web server, ftp server, or other Internet applications,
and, if allowed, it will forward the packet to the appropriate PC on the LAN side.
The Use of IP Addresses
IP stands for Internet Protocol. Every device in an IP-based network, including PCs, print servers, and routers,
requires an IP address to identify its location, or address, on the network. This applies to both the Internet and
LAN connections.
There are two ways of assigning IP addresses to your network devices.
A static IP address is a fixed IP address that you assign manually to a PC or other device on the network. Since a
static IP address remains valid until you disable it, static IP addressing ensures that the device assigned it will
always have that same IP address until you change it. Static IP addresses are commonly used with network
devices such as server PCs or print servers.
If you use the Router to share your cable or DSL Internet connection, contact your ISP to find out if they have
assigned a static IP address to your account. If so, you will need that static IP address when configuring the
Router. You can get the information from your ISP.
A dynamic IP address is automatically assigned to a device on the network. These IP addresses are called
dynamic because they are only temporarily assigned to the PC or other device. After a certain time period, they
expire and may change. If a PC logs onto the network (or the Internet) and its dynamic IP address has expired, the
DHCP server will assign it a new dynamic IP address.
Dynamic IP address: a temporary IP
address assigned by a DHCP server.
Static IP address: a fixed address
assigned to a computer or device that
is connected to a network.
NAT (Network Address Translation):
NAT technology translates IP
addresses of a local area network to a
different IP address for the Internet.
DHCP (Dynamic Host Configuration
Protocol): a protocol that lets one
device on a local network, known as a
DHCP server, assign temporary IP
addresses to the other network
devices, typically computers.

5
Chapter 2: Networking Basics
The Use of IP Addresses
EtherFast 10/100 LAN Card
A DHCP server can either be a designated PC on the network or another network device, such as the Router. By
default, the Router’s Internet Connection Type is Obtain an IP automatically (DHCP).
The PC or network device obtaining an IP address is called the DHCP client. DHCP frees you from having to assign
IP addresses manually every time a new user is added to your network.
For DSL users, many ISPs may require you to log on with a user name and password to gain access to the
Internet. This is a dedicated, high-speed connection type called Point to Point Protocol over Ethernet (PPPoE).
PPPoE is similar to a dial-up connection, but PPPoE does not dial a phone number when establishing a
connection. It also will provide the Router with a dynamic IP address to establish a connection to the Internet.
By default, a DHCP server (on the LAN side) is enabled on the Router. If you already have a DHCP server running
on your network, you MUST disable one of the two DHCP servers. If you run more than one DHCP server on your
network, you will experience network errors, such as conflicting IP addresses. To disable DHCP on the Router,
see the Basic Setup section in “Chapter 7: Using the Router’s Web-based Utility.”

6
Chapter 3: Getting to Know the Etherfast 10/00 LAN Card
LEDs
EtherFast 10/100 LAN Card
Chapter 3: Getting to Know the Etherfast 10/00 LAN Card
The Adapter’s displays (LEDs) and connection (the RJ-45 Port), shown in Figure 3-1, are described in this chapter.
LEDs
100 Amber. The 100 LED will illuminate when the Adapter is operating at 100Mbps. If the 100 LED
is not illuminated and the PC is powered on, the Adapter is operating at 10Mbps.
Link/Act Green. The Link LED will illuminate when the Adapter has been successfully connected to a
network and flicker when data is being transmitted or received over the network.
The RJ-45 Port
The RJ-45 Port is where you will connect the UTP Category 5 or better network cabling.
Figure 3-1: Back Panel
7
Chapter 4: Installing the LAN Card
Installing the LAN Card and Cabling
EtherFast 10/100 LAN Card
Chapter 4: Installing the LAN Card
Overview
Each EtherFast® 10/100 LAN Card is equipped with an RJ-45 port that automatically adjusts to either 10Mbps or
100Mbps speeds, allowing your PC to attach to either Fast Ethernet (also known as 100BaseTX) or regular
10BaseT Ethernet network segments without additional hardware or software.
The Adapter should only be used with twisted-pair cabling. 10BaseT and 100BaseTX cabling is available in a
number of different grades. For best results, we recommend using 8-wire, UTP Category 5 unshielded twistedpair for both 10BaseT and 100BaseTX network segments, although UTP Category 3 can be used for 10BaseT
segments. The cable that connected the Adapter to your network should not exceed 100 meters (328 feet). Both
UTP Category 3 and 5 twisted-pair cabling can be purchased at most computer stores.
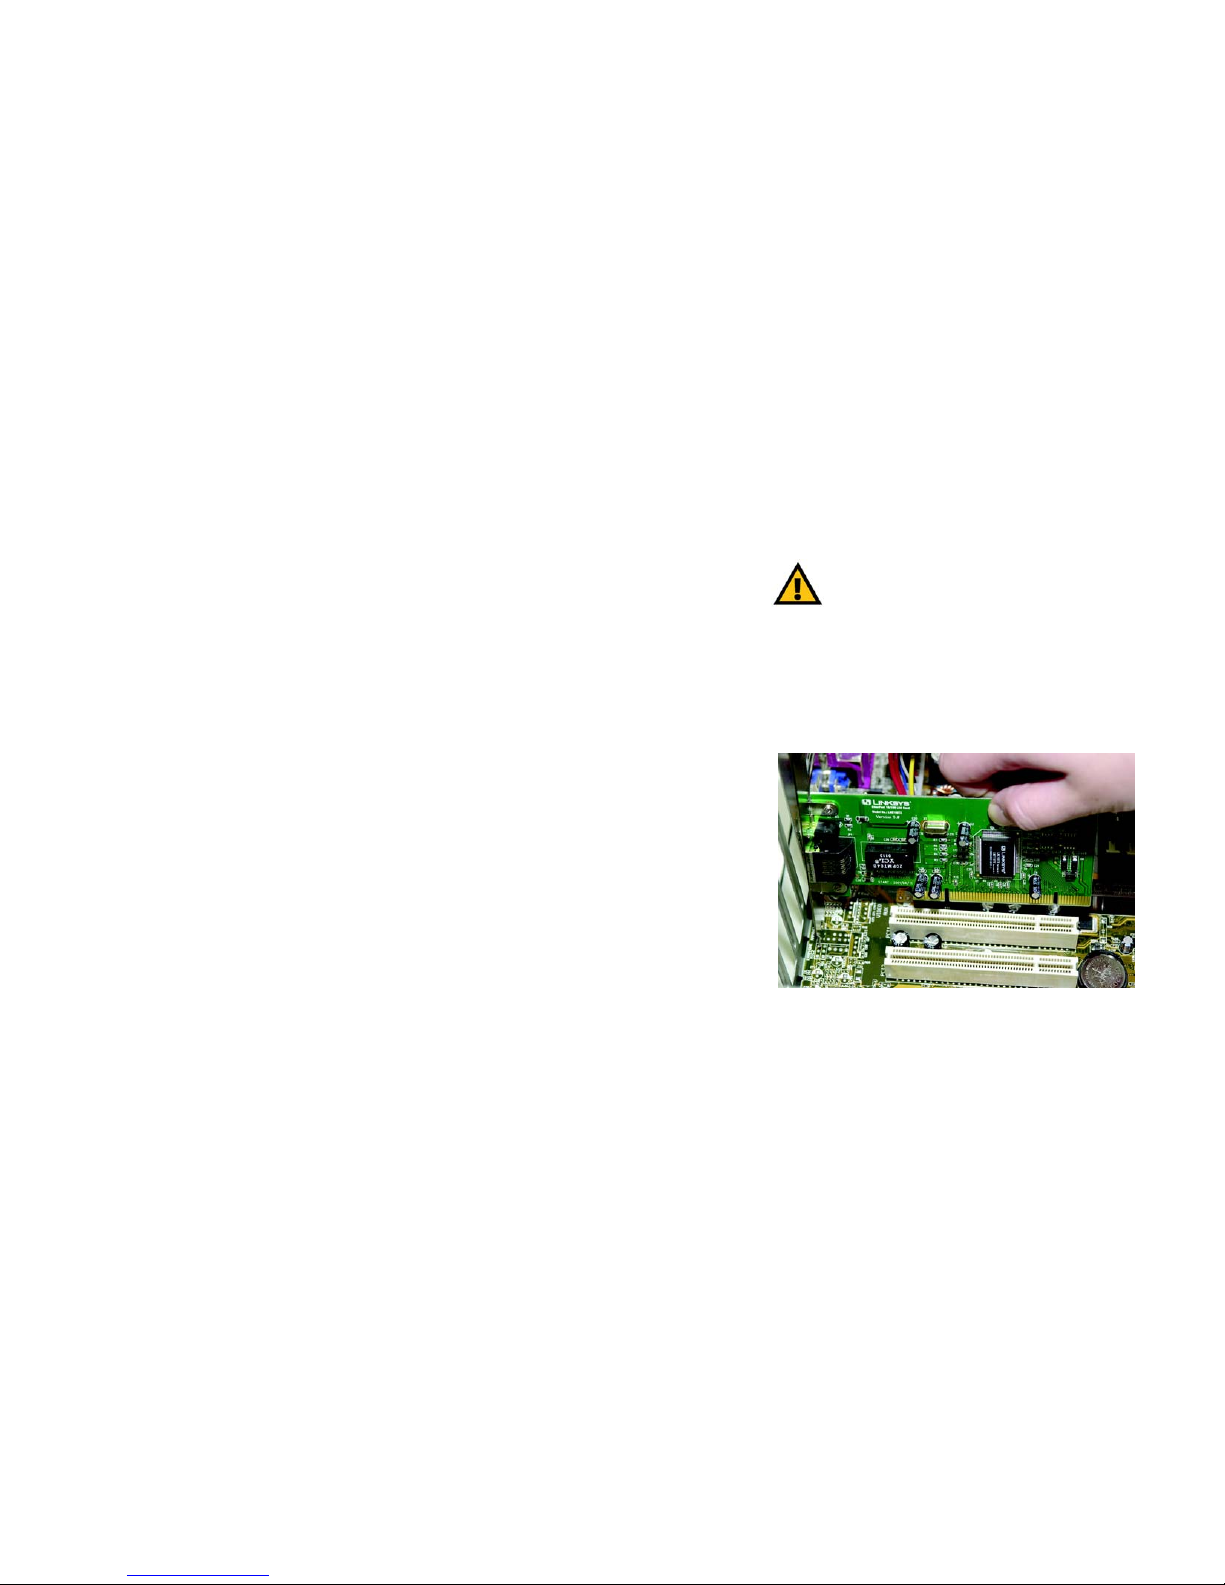
Installing the LAN Card and Cabling
1. Power off your PC and any peripheral equipment attached to it. Unplug your PC’s power cable.
2. Remove your computer's outside cover.
3. To discharge any possible static electricity build-up, briefly touch a metal portion of your computer. Then,
remove your computer's outside cover.
4. Open your computer and locate the PCI slot(s) on your motherboard. PCI slots are easily identified by their
beige or white color. Remove the metal slot cover on the back of the PC, then insert the EtherFast® 10/100
LAN Card into an empty PCI slot, as shown in Figure 4-1. (Your LAN Card may vary in appearance from the one
shown.)
5. Once the EtherFast® 10/100 LAN Card is firmly in place, secure its fastening tab to your PC's chassis with a
mounting screw.
6. Replace your PC's cover.
Figure 4-1: Installing the Card
IMPORTANT: When installing the Adapter, be sure
to press the Adapter solidly into the PCI slot. Our
Adapters are built to resist the pressure
necessary to insert the Adapter correctly in the
PCI slot. Avoid a call to technical support by
making sure that the Adapter is inserted all the
way into your PC’s network slot! You will know
this has occurred when the Adapter’s faceplate is
flush with your computer’s slot.
8
Chapter 4: Installing the LAN Card
Installing the LAN Card and Cabling
EtherFast 10/100 LAN Card
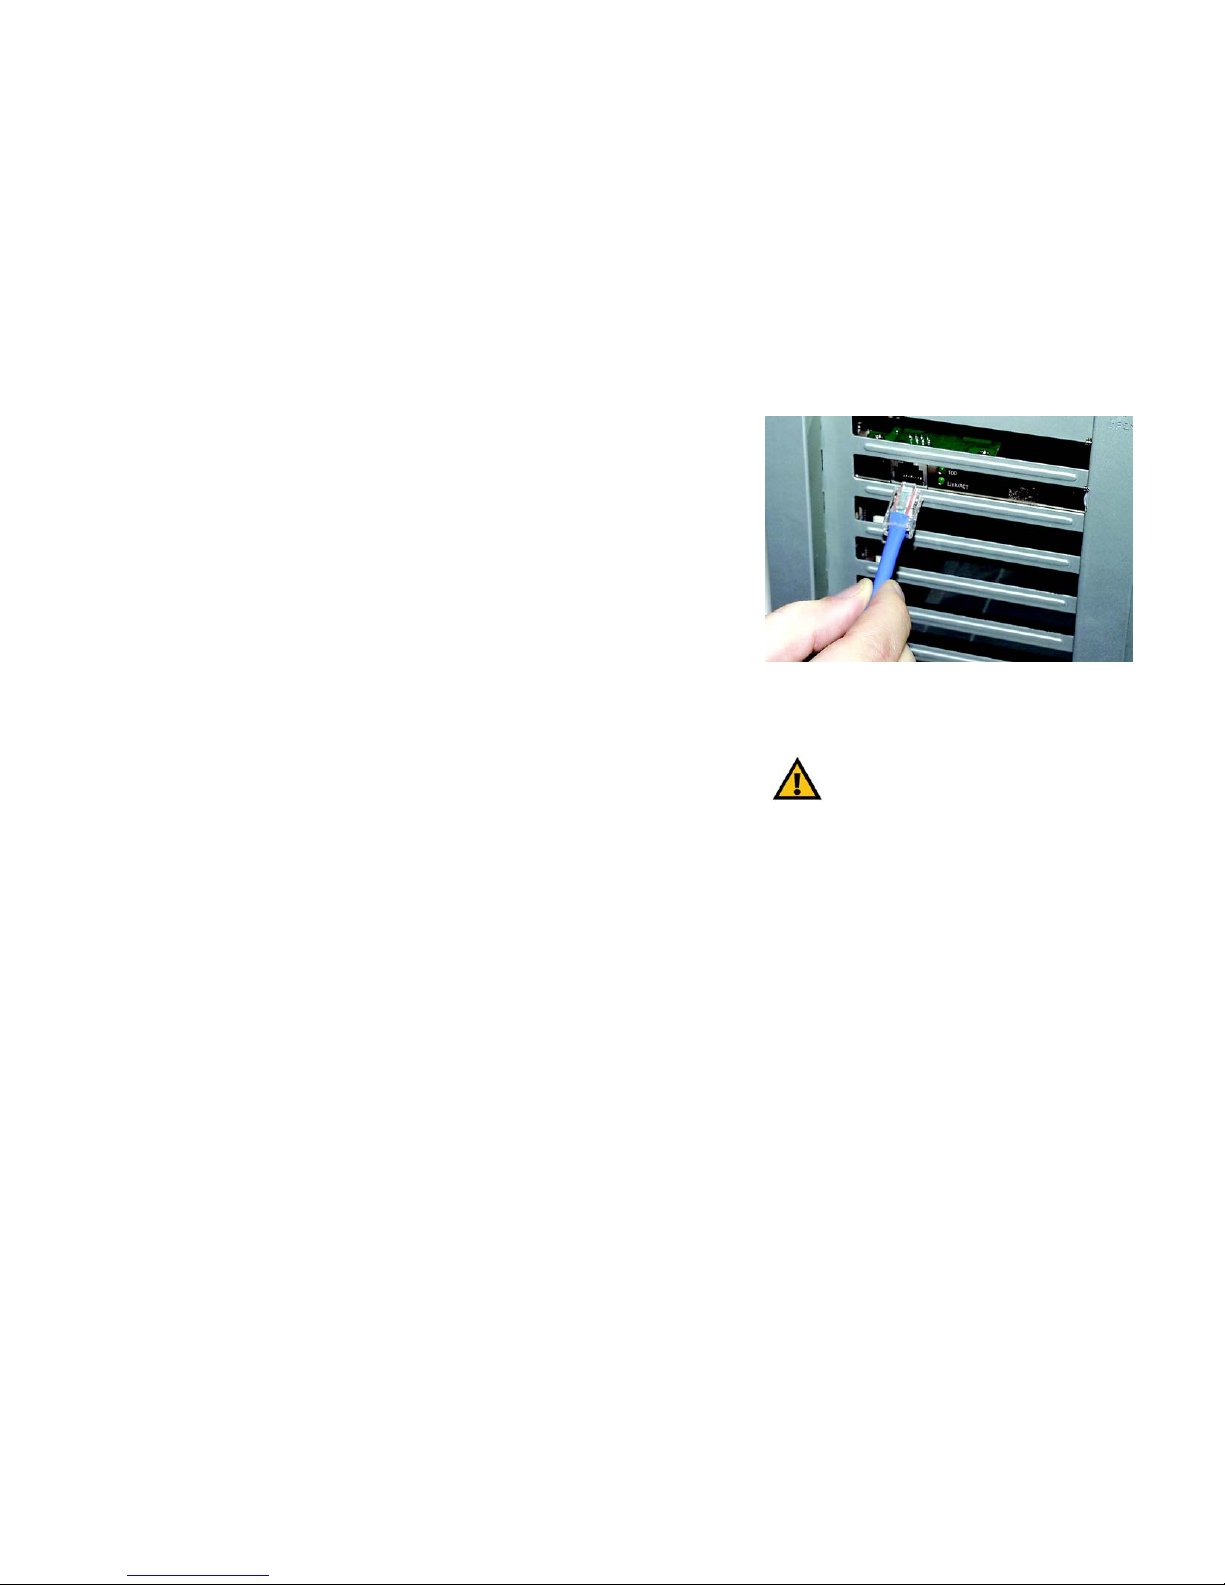
7. Connect one end of a twisted-pair cable to your PC at the EtherFast® 10/100 LAN Card's RJ-45 port, as
shown in Figure 4-2.
8. Plug the other end of the cable into one of your network’s 10/100 hub or switch ports, DSL modem, cable
modem, router, etc.
9. Reconnect your PC’s power, then power on your computer. Your computer will automatically recognize the
Adapter and assign it a unique IRQ ("interrupt") and I/O address.
The Card installation is complete. Next, you must install the device drivers for the EtherFast® 10/100
LAN Card.
To configure the 10/100 LAN Card, turn to Chapter 6: Manual Installation and Setup.
If you are using an operating system other than Windows 95, 98, ME, NT, 2000 or XP, you will find the
network driver installation instructions on the Setup Utility CD’s readme.exe file.
Figure 4-2: Installing the Cable
IMPORTANT: Note: If you intend to use both
10Mbps and 100Mbps components on your
network, you will need an auto-sensing hub or
switch. For more information on auto-sensing
hubs or switches, go to the Linksys website at
www.linksys.com.
9
Chapter 5: Installing the Drivers with the Setup Utility
Overview
EtherFast 10/100 LAN Card
Chapter 5: Installing the Drivers with the Setup Utility
Overview
The 10/100 LAN Card’s drivers can easily be installed with the Setup Utility included on the Setup Utility CD. This
chapter will describe the steps necessary to do this.
Using the Setup Utility
The Install Wizard works for installing the drivers under Windows 95, 98, Millennium, and 2000. To manually
install and setup the 10/100 LAN Card on a Windows XP or NT PC, refer to Chapter 6.
1. Start your PC. Windows will automatically detect the presence of the 10/100 LAN Card in your PC and bring up
the Add New Hardware Wizard screen. Click the Cancel button on this screen, because you will be installing
the driver’s through the Install Wizard.
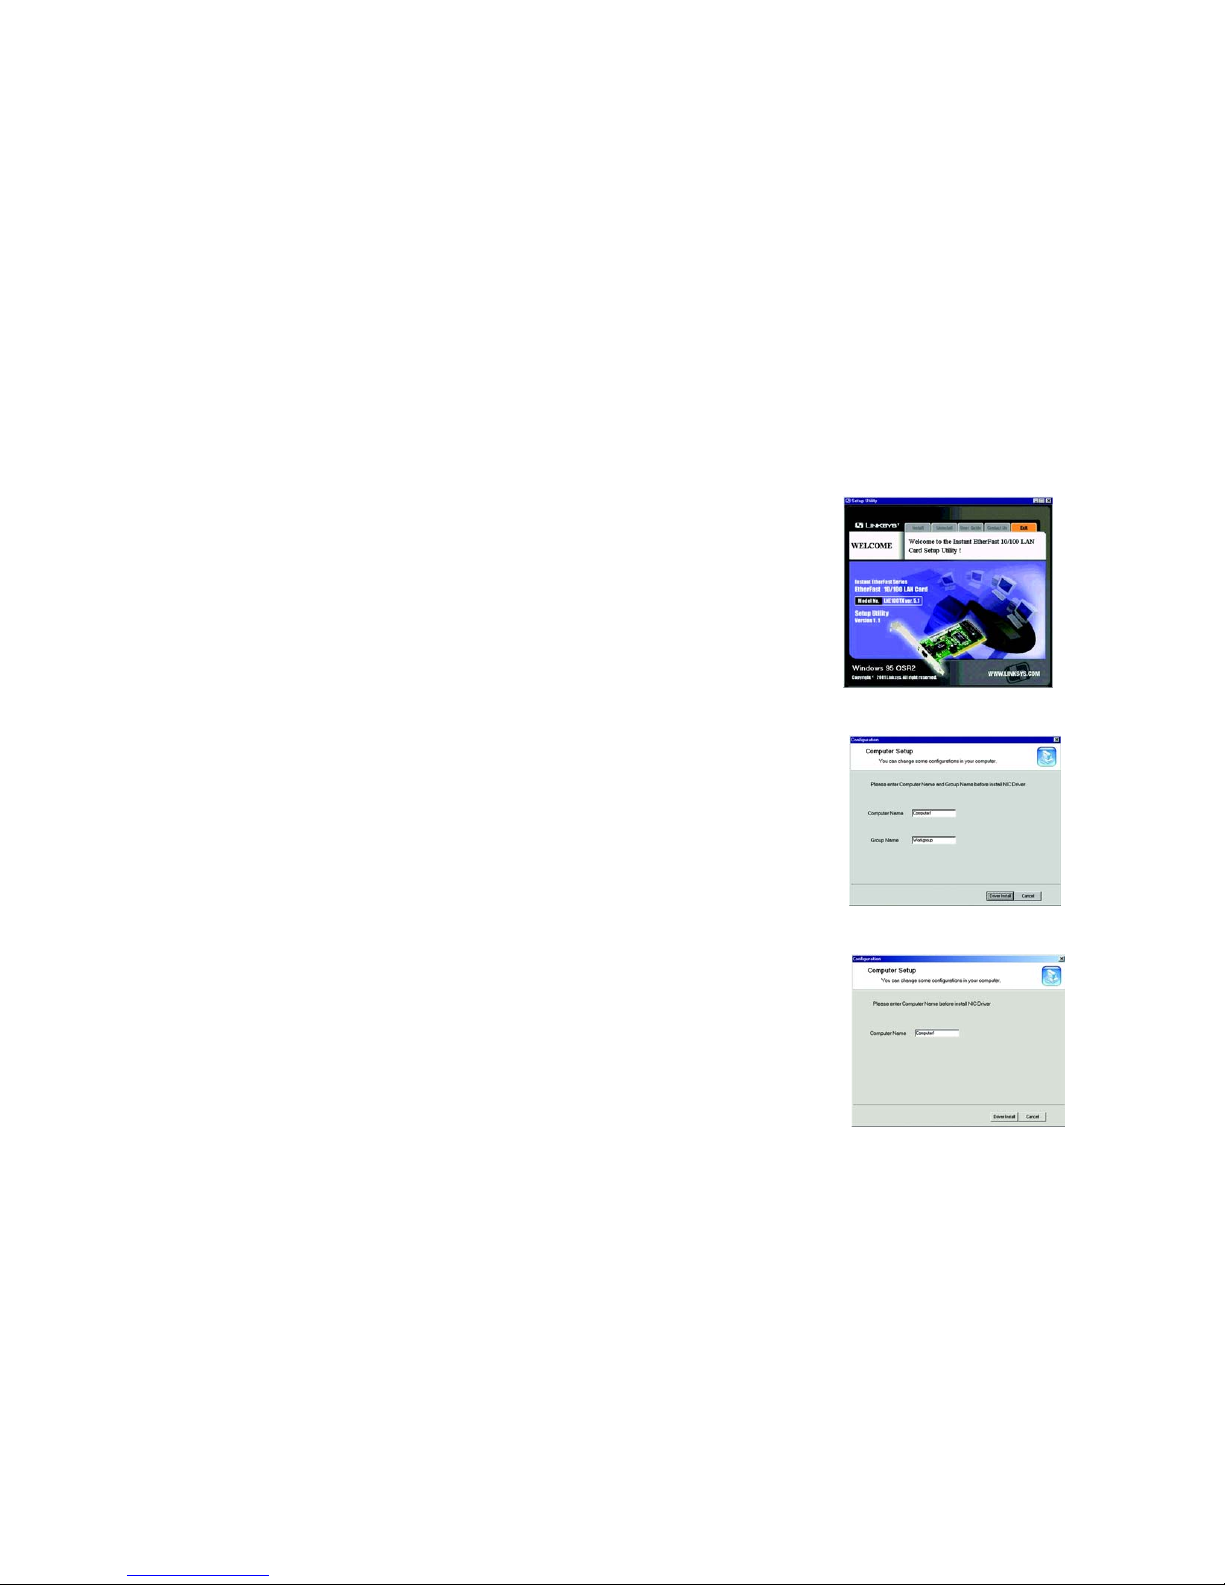
2. Insert the Setup Utility CD into your CD-ROM drive. The Setup Utility’s Welcome screen will come up
automatically and identify the version of Windows you are using. As shown in Figure 5-1, the Windows 95
OSR2 is identified.
3. Move your cursor over the Install tab and the Install screen will appear, as shown in Figure 5-2. Click the
Install Now button.
4. The next screen you see will depend on your Windows operating system
If you are using Windows 95, 98, Millennium or 2000, you will see the screen shown in Figure 5-3.On this
screen, you will need to type your computer’s name and your group, or workgroup, name in the appropriate
fields. Then, click the Driver Install button to continue.
Figure 5-1: Welcome
Figure 5-2: Setup Tab
Figure 5-3: Computer Name
10
Chapter 5: Installing the Drivers with the Setup Utility
Using the Setup Utility
EtherFast 10/100 LAN Card
If you are using Windows 2000, you will see the screen shown in Figure 5-4. On this screen, you will need to
type your computer’s name in the appropriate field. Then, click the Driver Install button to continue.
5. The drivers will now be installed.
If you are using Windows 95, 98, Millennium, or XP, you will see the screen shown in Figure 5-5.This signifies
that the driver installation is complete and your system will reboot.
If you are using Windows 2000, you will see the screen shown in Figure 5-6. If requested to reboot, do so
manually at this time. This signifies that the driver installation is complete. You should now reboot your
system.
Driver installation is complete.
Figure 5-4: Reboot
Figure 5-5: Driver Install Successful
Figure 5-6: Driver Install Successful for Win 2000
11
Chapter 6: Manual Installation and Setup
Overview
EtherFast 10/100 LAN Card
Chapter 6: Manual Installation and Setup
Overview
After installing the EtherFast 10/100 LAN Card in your computer, follow these instructions for installing the
network device driver. For troubleshooting tips during setup, refer to the Troubleshooting section.
The installation procedure for the network driver will vary depending on which version of Windows you are using.
Go to the section for your operating system.
Windows 95
The installation procedure for the network driver will vary slightly depending on which version of Windows 95 you
are using. To begin the driver installation, and to determine which version of Windows 95 you are using:
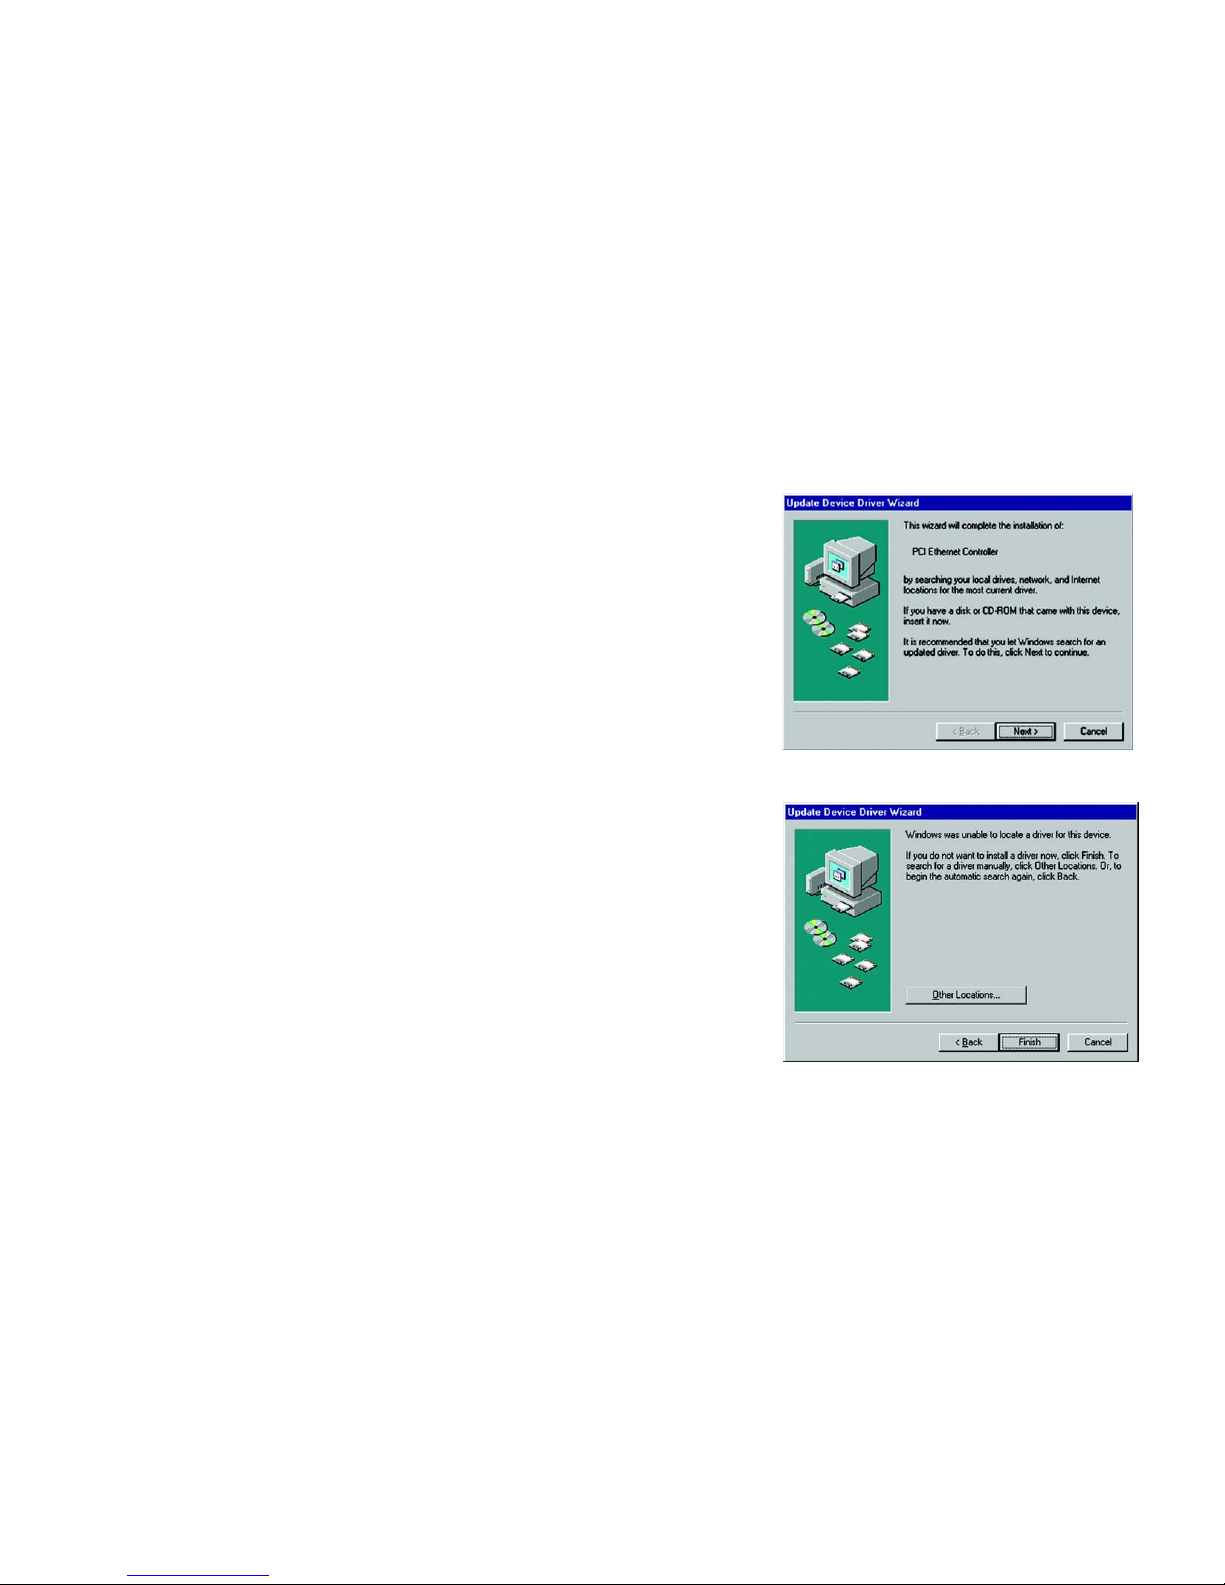
1. If you haven’t already done so, start up your PC.
2. Windows 95 will automatically detect the EtherFast 10/100 LAN Card in your computer and an Update Device
Driver Wizard window (shown in Figure 6-1) will appear.
While the Update Device Driver Wizard window is visible, put the LNE100TX Setup Utility CD into your CD-ROM
drive and click the Next button. A screen will appear, shown in Figure 6-2 stating that Windows 95 was
unable to locate the driver. Click the Other Locations button to enter the driver’s location manually.
Figure 6-1: Update Device
Figure 6-2: Unable to Locate Driver
12
Chapter 6: Manual Installation and Setup
Windows 95
EtherFast 10/100 LAN Card
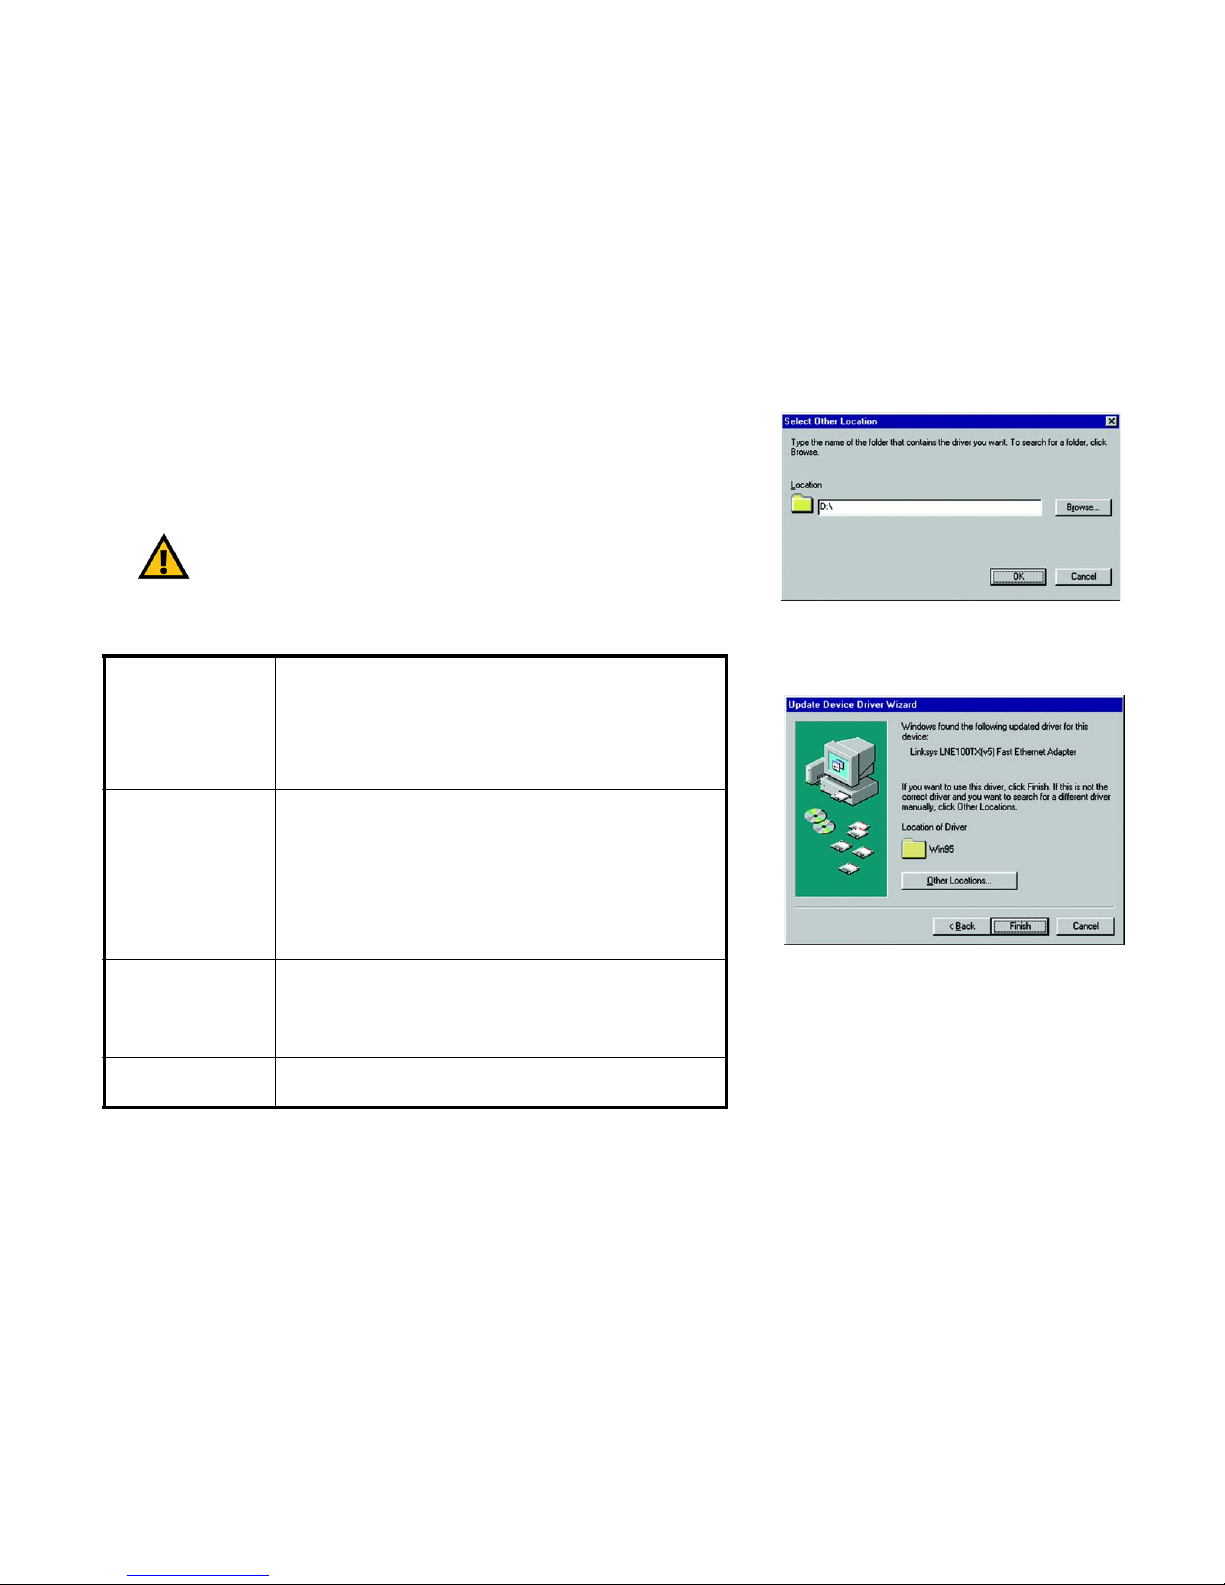
3. Type the driver location, D:\, in the location field on the Select Other Location Screen, shown in Figure 6-3.
Then, click the OK button.
4. Windows will show that the files have been found. (See Figure 6-4.) Click the Finish button to continue. Then,
when you are prompted, verify that the LNE100TX Setup Utility CD is in your CD-ROM drive.
Table 1: Possible Prompts
If your PC asks for the
Setup Utility CD
1. Click OK.
2. Verify that the Setup Utility CD is in your PC’s CD-ROM drive.
3. Type d:\ in the “Copy files from:” box.
4. Click OK.
If you are asked to supply
your Windows 95 Installation Files or Disks
1. Click OK.
2. If you have a Windows 95 CD-ROM, type d:\win95 in the “Copy files
from:” box, where d: is your CD-ROM drive.
3. If you don’t have a Windows 95 CD-ROM, type c:\win-
dows\options\cabs.
4. Click OK.
If you are asked for a file
that includes
“LNE100TX” in its name
1. Insert the Setup Utility CD into your PC’s CD-ROM drive.
2. Type d:\Drivers\WIN95 in the “Copy files from:” box.
3. Click OK.
If you receive a Version
Conflict error
1. Choose to keep the newest version of the file by clicking Yes
IMPORTANT: Do not press Skip or Cancel or the drivers will not be
installed!
Figure 6-3: Select Other Location
Figure 6-4: Driver Found
13
Chapter 6: Manual Installation and Setup
Windows 95
EtherFast 10/100 LAN Card
5. Windows will begin copying the EtherFast 10/100 LAN Card’s driver files to your PC. Refer to the chart on the
preceding page to help guide you through the process.
6. The screen shown in Figure 6-5 will prompt you for the driver location. In the Copy Files From: field, type
D:\. Then, click the OK button.
7. Windows 95 will begin copying files to your PC. When asked if you want to restart your PC, remove any disks
and click Yes . If Windows does not ask you to restart your PC, click the Start button, choose Shut Down,
choose Restart, then click the Ye s button.
The Windows 95 driver installation is complete.
Please continue on to the next section, which will provide instructions for configuring Windows 95’s
network protocol. Consult your Windows documentation for network configuration information if
necessary.
Network Component Configuration
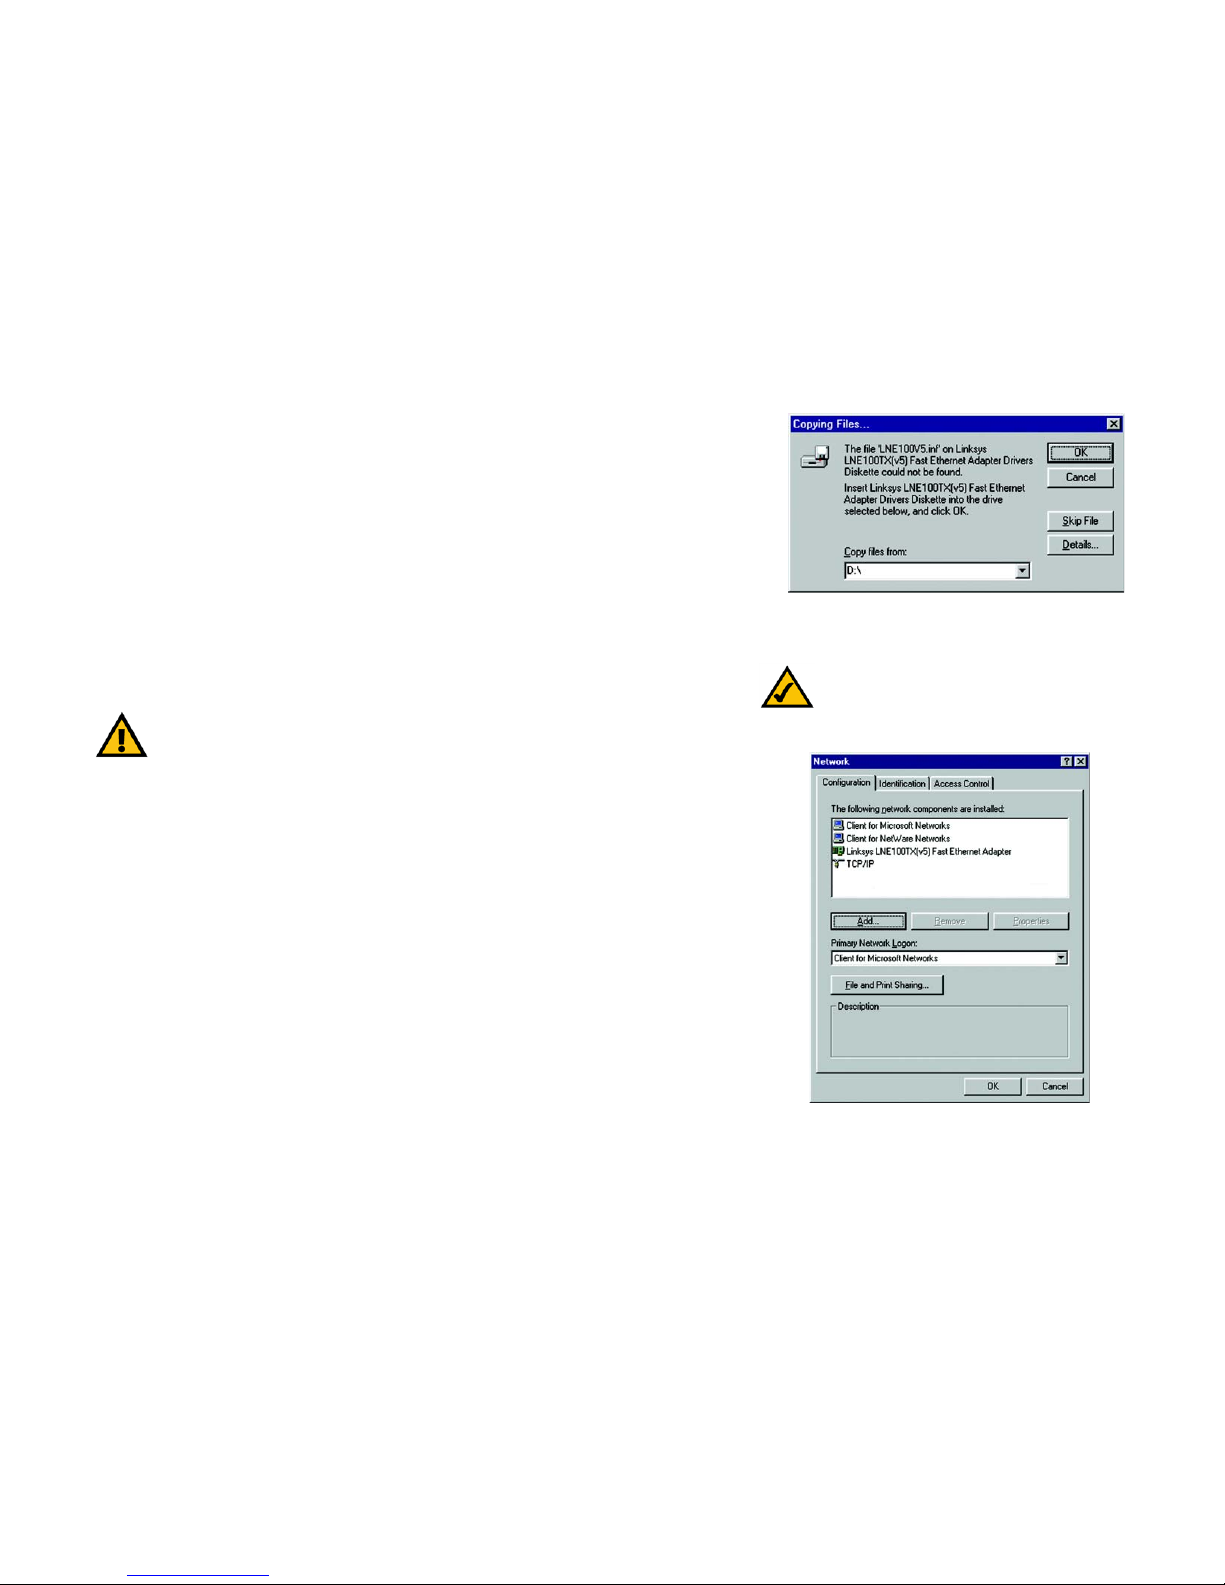
1. Once you are back at the Windows 95 desktop, click on your taskbar's Start button, then Settings, then
Control Panel, and then double-click the Network icon.
2. The Network window will appear. Click on the Configuration tab. A window similar to that shown in Figure 66 will appear. There may be other components listed in addition to the ones shown below (for example, Dialup Adapter), which is normal. If any of the components shown below are missing, however, you’ll need to
manually install them. If that’s the case, refer to Appendix E: Manually Installing the Network Components in
Windows 95, 98, and Millennium now.
• Client for Microsoft Networks
• Client for NetWare Networks
• Linksys LNE100TX (v5)Fast Ethernet Adapter
• TCP/IP
IMPORTANT: From this point on, you must provide Windows with a user name and password
every time you are prompted to do so. Remember to click OK to properly log into Windows. If
you click Cancel or hit the Escape (ESC) key, you will not log into the network.
NOTE: If you need to install the TCP/IP Protocol,
see Appendix F: Installing the Network Protocols
for Windows 95, 98, and Millennium.
Figure 6-5: Copying Files
Figure 6-6: Configuration

14
Chapter 6: Manual Installation and Setup
Windows 95
EtherFast 10/100 LAN Card
3. Click the File and Print Sharing button. The File and Print Sharing window, shown in Figure 6-7, will appear.
If you'd like others to be able to access the files on your PC's hard drive, select I want to be able to give others
access to my files.
If you'd like to share your printer with other users on the network, select I want to be able to allow others
to print to my printer(s).
4. Click the OK button. File and Printer Sharing for Microsoft Networks should now appear in the list of installed
components, as shown in Figure 6-8.
5. After making sure that all of the listed network components are installed on your system, verify that Client for
Microsoft Networks is listed in the Primary Network Logon box.
NOTE: If you do not enable File and Printer
Sharing, your PC will be invisible on the
network, inaccessible by anyone.
NOTE: Your Computer Name and Workgroup
Name must both be fewer than 15 characters,
and should only consist of numbers and letters.
Figure 6-7: File and Print Sharing
Figure 6-8: Help Tab
15
Chapter 6: Manual Installation and Setup
Windows 95
EtherFast 10/100 LAN Card
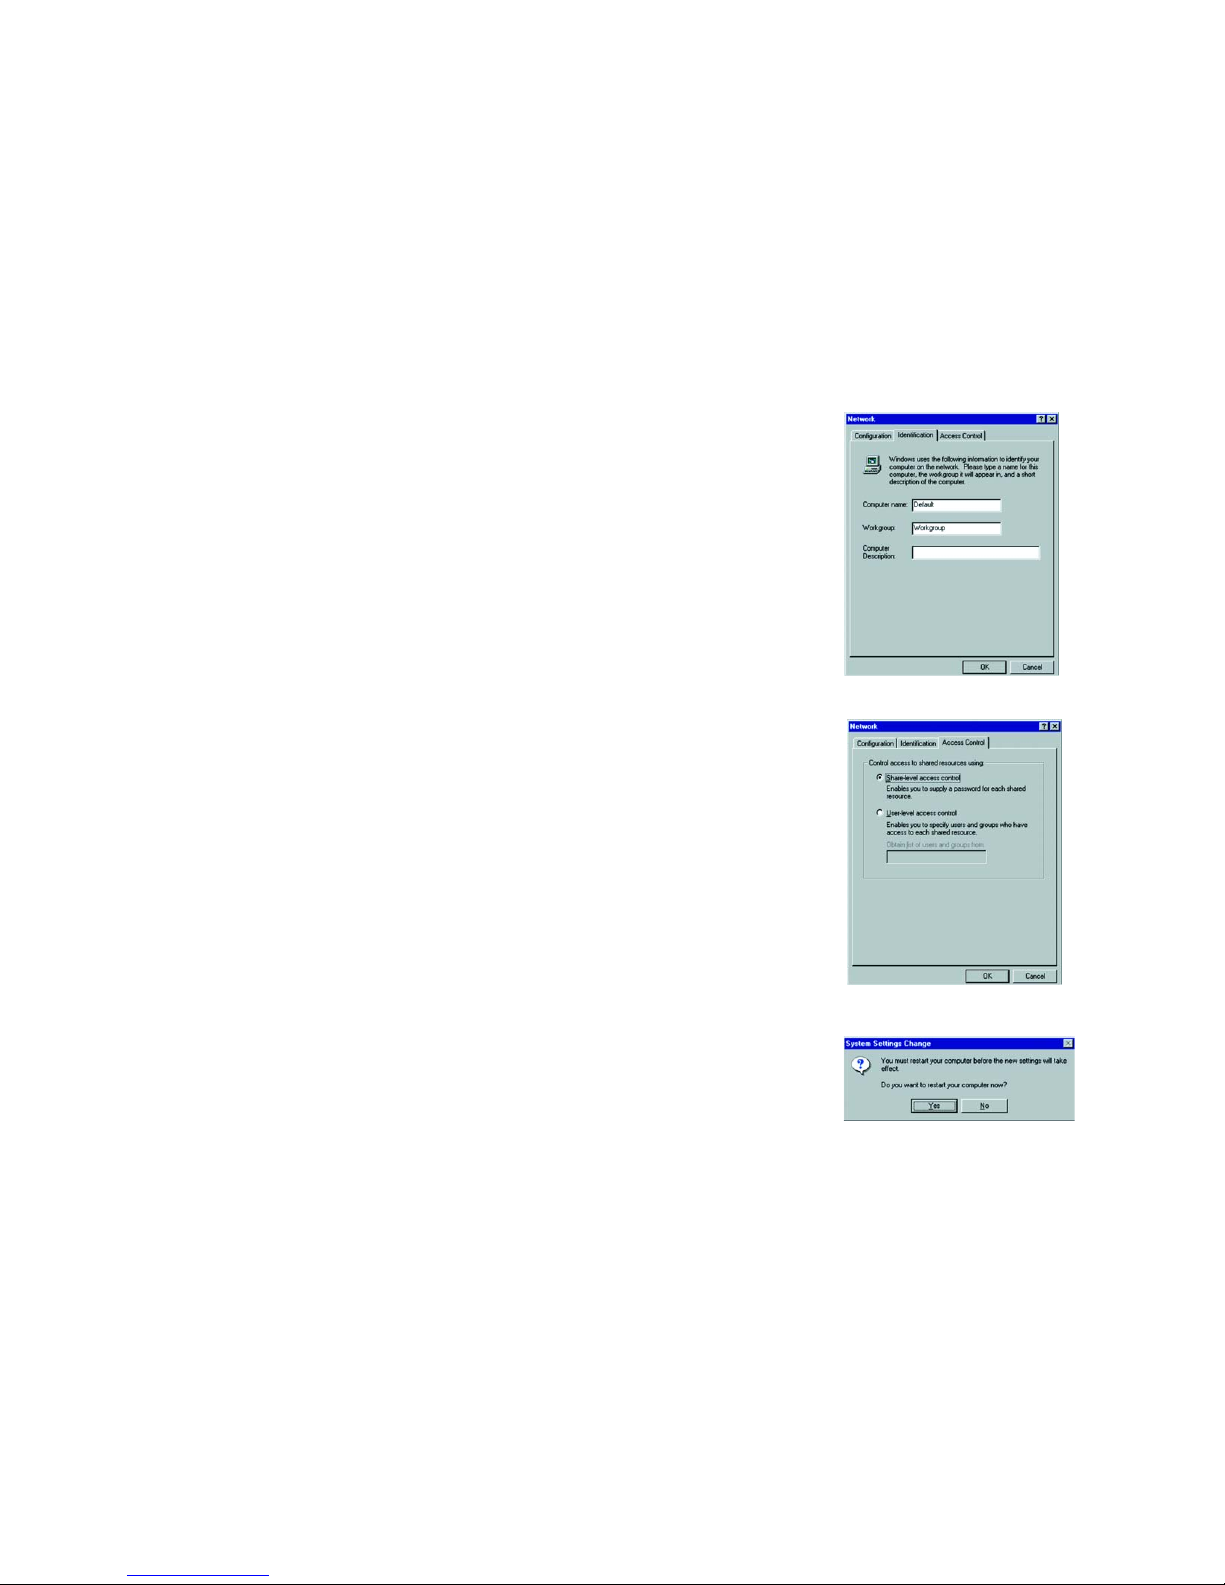
6. Click on the Identification tab, shown in Figure 6-9. Type the name of your computer in the Computer Name
box. Choose a name that is unique from the other computer names on the network.
7. Type the name of your workgroup in the Workgroup box. The Workgroup name should be the same Workgroup
Name in use by all of the other PCs on the network. Use the same Workgroup Name that is in use on your
other computers.
8. (Optional) Enter a description of your computer in the Computer Description box. This box may be left blank.
9. Click the Access Control tab, shown in Figure 6-10. Make sure that Shared-level access control is selected.
If the setting is on User-Level access control and you can’t change it, refer to the Troubleshooting section.
10. Click the OK button. Your system may or may not ask you for your Windows 95 CD-ROM or the location of the
Windows 95 installation files. Direct Windows to D:\win95 (where D: is your CD-ROM Drive), making sure your
Windows CD-ROM is in the CD-ROM drive.
11. Once Windows has copied the necessary files, the System Settings Change window appears. Remove all
disks from your PC and click the Yes button to restart your PC. If you don't see the screen shown in Figure 611, shut down Windows 95 and restart your PC. Remember to remove the Setup Utility CD, if necessary, prior
to rebooting.
12. A Logon window will appear, requiring you to enter a username and password. Make up a username and
password and click the OK button. Do not press the ESC key or click the Cancel button, or you won't be
able to log onto the network. If the a logon screen does not appear or if it does not allow you to log on, refer to
the Troubleshooting section.
13. Once you are at the Windows 95 desktop, double-click on the Network Neighborhood icon. You should see an
icon for the entire network and the names of the other PCs on the network. Open the Entire Network icon.
If you can see your computer along with all the other computers on the network in Network
Neighborhood, then the Windows 95 network configuration is complete.
Continue with Appendix B: Sharing Your Files and Printers if you want data from your PC to be available
to others on the network
or you may stop here, if you wish to configure File and Printer Sharing at a later time.
Figure 6-9: Filter Tab
Figure 6-10: Access Control
Figure 6-11: Restart your Computer
16
Chapter 6: Manual Installation and Setup
Windows 98
EtherFast 10/100 LAN Card
Refer to the Troubleshooting section if:
• You don't see anything at all in Network Neighborhood and have pressed the F5 key on your keyboard a few
times to refresh the screen.
• You only see your own computer in Network Neighborhood.
• You see all computers on the network except yours and have tried pressing the F5 key a few times.
• You only see computers that are running the same operating system as you and you don’t see any others.
Windows 98
1. Start up your PC in Windows 98.
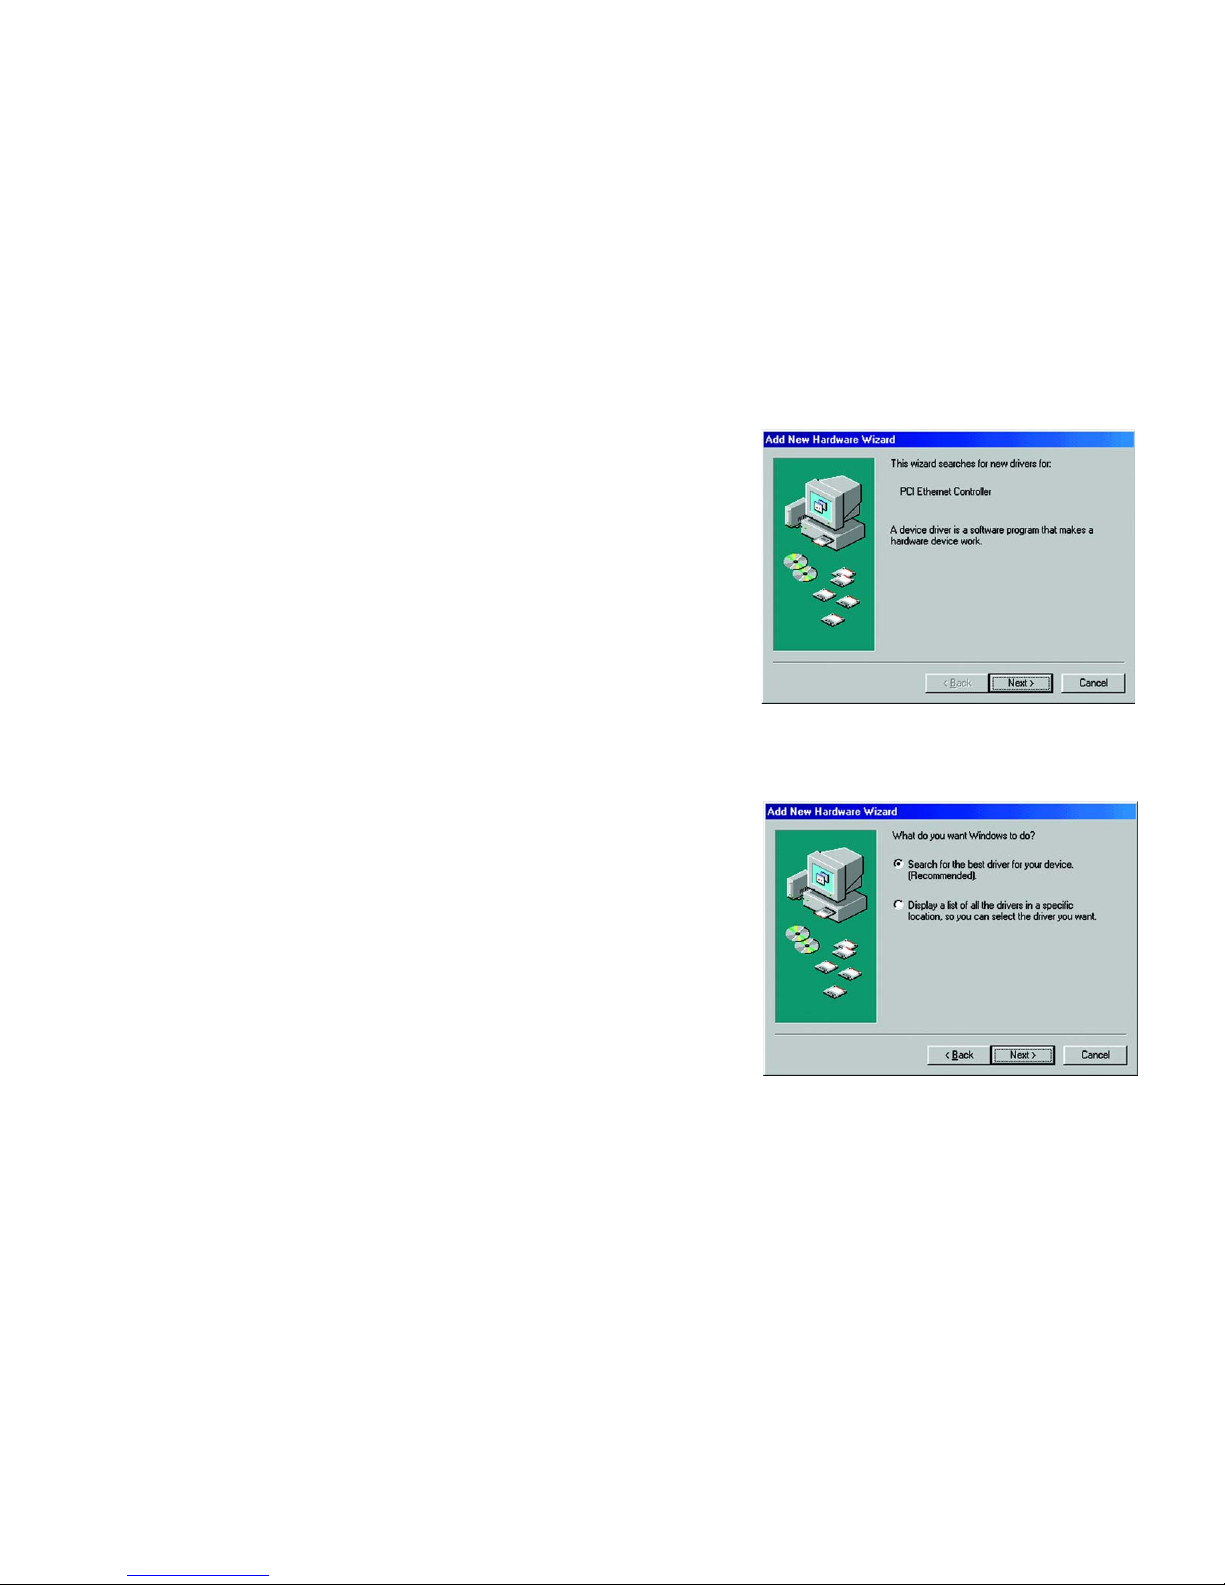
2. Windows 98 will automatically detect the presence of the Adapter in your PC.
3. Insert the LNE100TX Setup Utility CD into your CD-ROM drive while the Add New Hardware Wizard window,
shown in Figure 6-12, is visible. Click the Next button.
4. As shown in Figure 6-13, select Search for the best driver for your device (Recommended) and click the
Next button.
Figure 6-12: Searching for Drivers
Figure 6-13: Search for the Best Driver
17
Chapter 6: Manual Installation and Setup
Windows 98
EtherFast 10/100 LAN Card
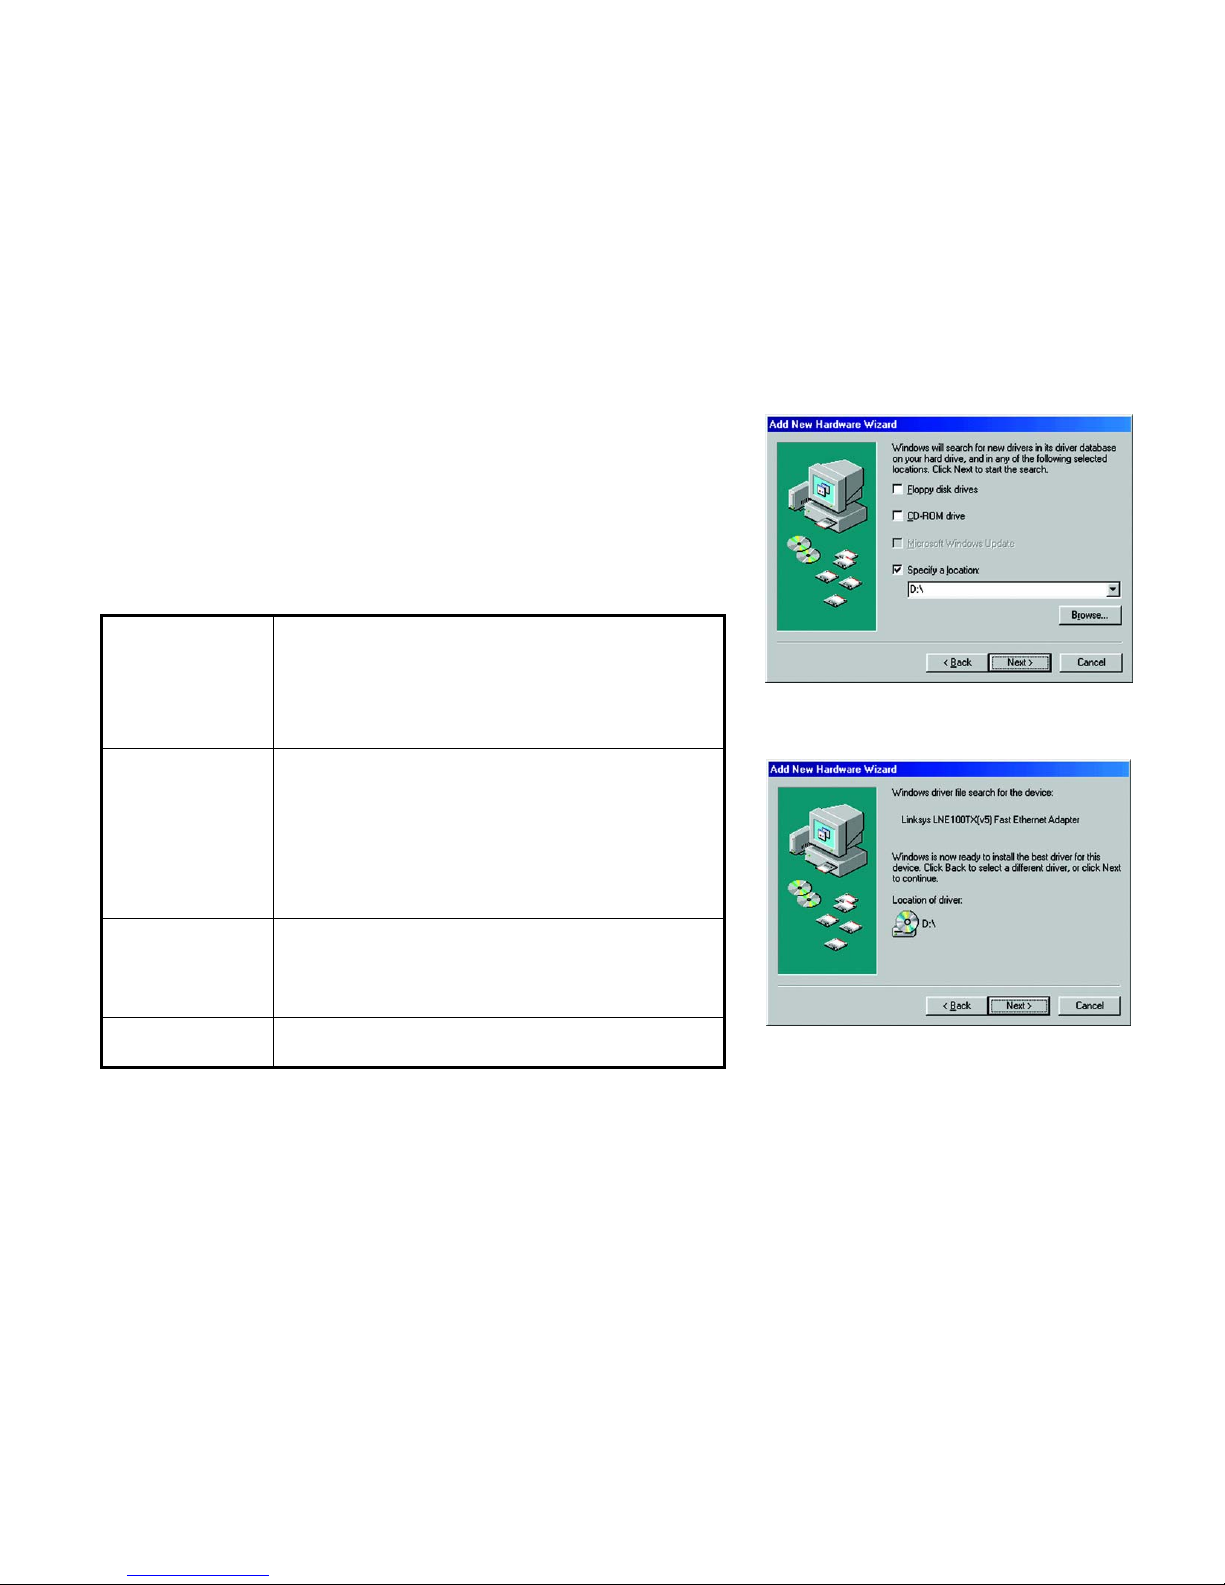
5. Select Specify a location and type D:\ in the drop-down box, shown in Figure 6-14. Then, click the Next
button.
6. The screen shown in Figure 6-15 will notify you that Windows is searching for the Linksys LNE100TX (v5) Fast
Ethernet Adapter driver. When the window the driver is ready to be installed, click the Next button.
7. Windows will begin copying the EtherFast 10/100 LAN Card’s driver files to your PC. Refer to the chart below
to help guide you through the process
.
Table 2: Possible Prompts
If your PC asks for the
Setup Utility CD
1. Click OK.
2. Verify that the Setup Utility CD is in your PC’s CD-ROM drive.
3. Type d:\ in the “Copy files from:” box.
4. Click OK.
If you are asked to supply
your Windows 98 Installation Files or Disks
1. Click OK.
2. If you have a Windows 98 CD-ROM, type d:\win98 in the “Copy files
from:” box, where d: is your CD-ROM drive.
3. If you don’t have a Windows 98 CD-ROM, type c:\win-
dows\options\cabs.
4. Click OK.
If you are asked for a file
that includes “Netlnev” in
its name
1. Insert the Setup Utility CD into your PC’s CD-ROM drive.
2. Type d:\Drivers\WIN98 in the “Copy files from:” box.
3. Click OK.
If you receive a Version
Conflict error
1. Choose to keep the newest version of the file by clicking Yes
Figure 6-14: Specify a Location
Figure 6-15: Location of Driver
18
Chapter 6: Manual Installation and Setup
Windows 98
EtherFast 10/100 LAN Card
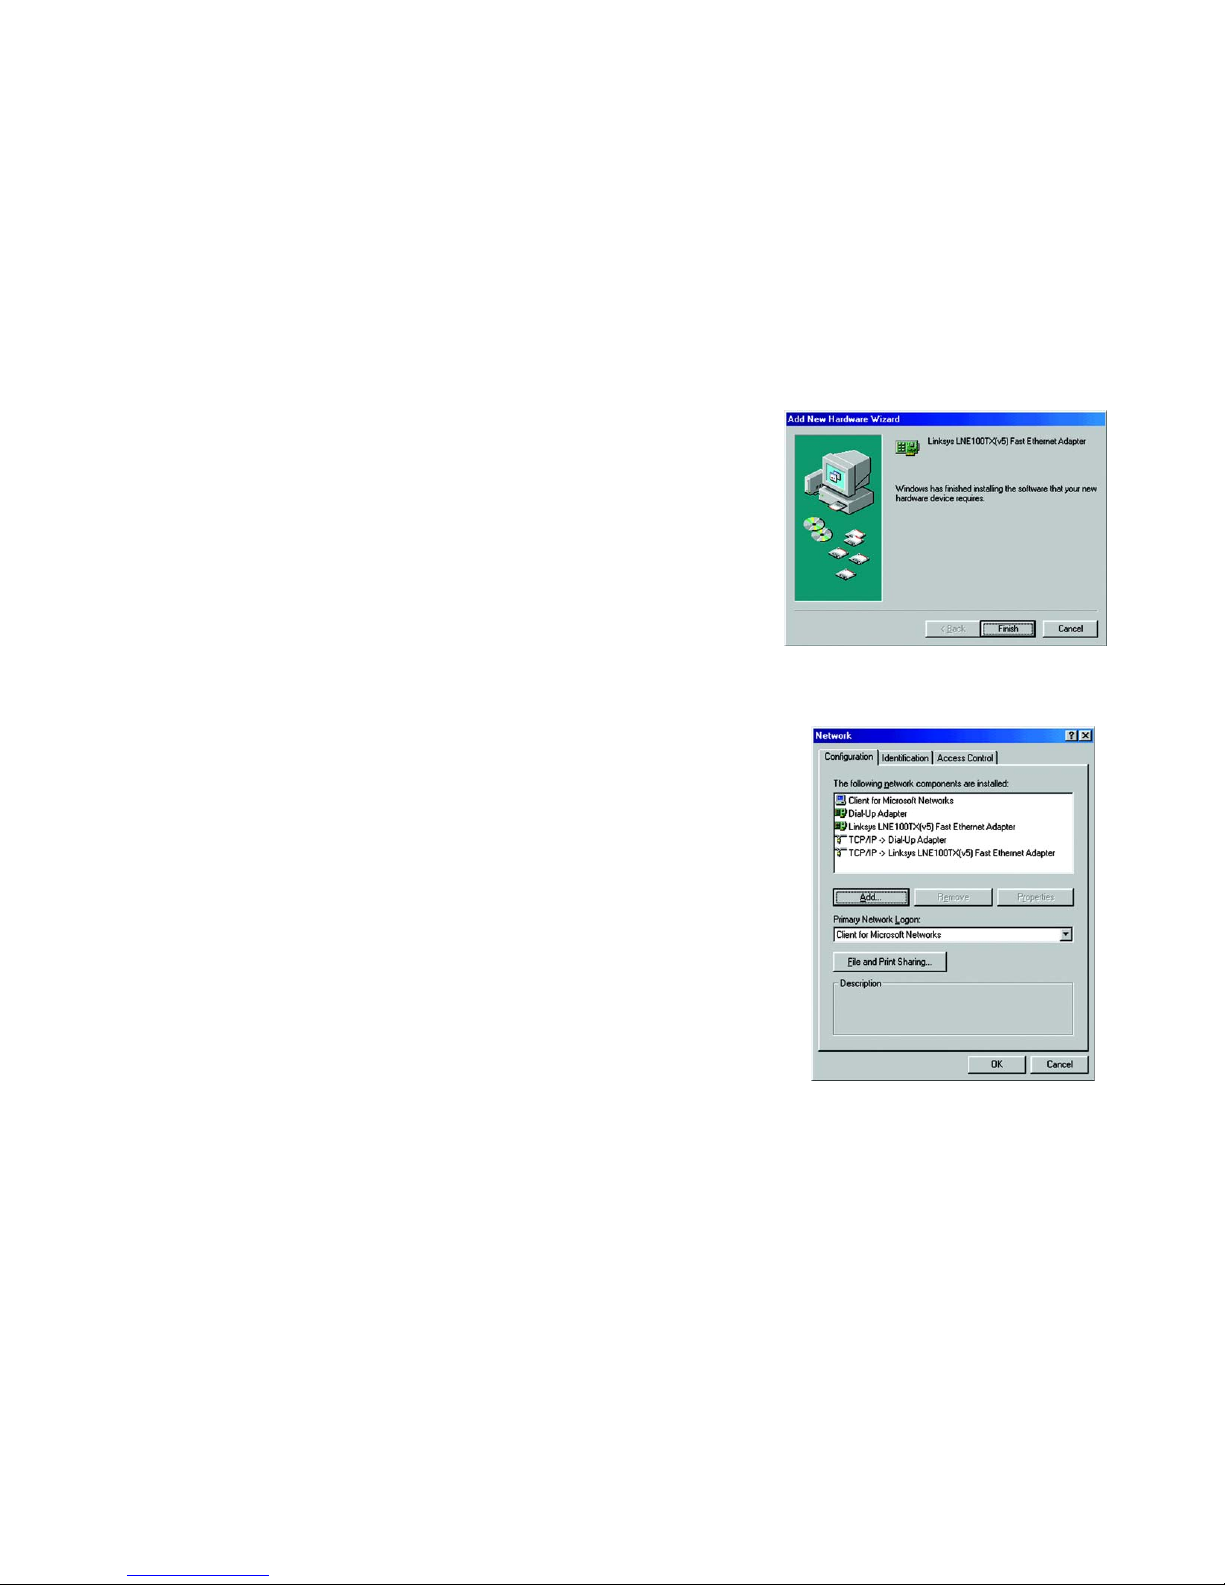
8. The screen shown in Figure 6-16 notifies you that Windows has finished installing the software onto your PC.
Click the Finish button.
9. When asked if you want to restart your PC, remove the Setup Utility CD and click the Yes button. If you are
using the Windows CD-ROM, leave it in your PC. You may need it later.
10. If Windows does not ask you to restart your PC, click the Start button, choose Shut Down, choose Restart,
then click the Yes button.
The Windows 98 driver installation is complete.
Please continue on to the next section, which will provide instructions for configuring Windows 98’s
network protocol. Consult your Windows documentation for your network configuration information if
necessary.
Network Component Configuration
1. Once you are back at the Windows 98 desktop, click on your taskbar's Start button, then Settings, then
Control Panel, and then double-click the Network icon.
2. The Network window will appear. Click on the Configuration tab. On the following screen, there may be other
components listed in addition to the ones shown in Figure 6-17 (for example, a Dial-up Adapter), which is
normal. If any of the components shown below are missing, however, you’ll need to manually install them.
Refer to Appendix E: Manually Installing the Network Components in Windows 95, 98, and Millennium now.
• Client for Microsoft Networks
• Dial-Up Adapter
• Linksys LNE100TX (v5) Fast Ethernet Adapter
• TCP/IP -> Dial-Up Adapter
• TCP/IP -> Linksys LNE100TX (v5) Fast Ethernet Adapter
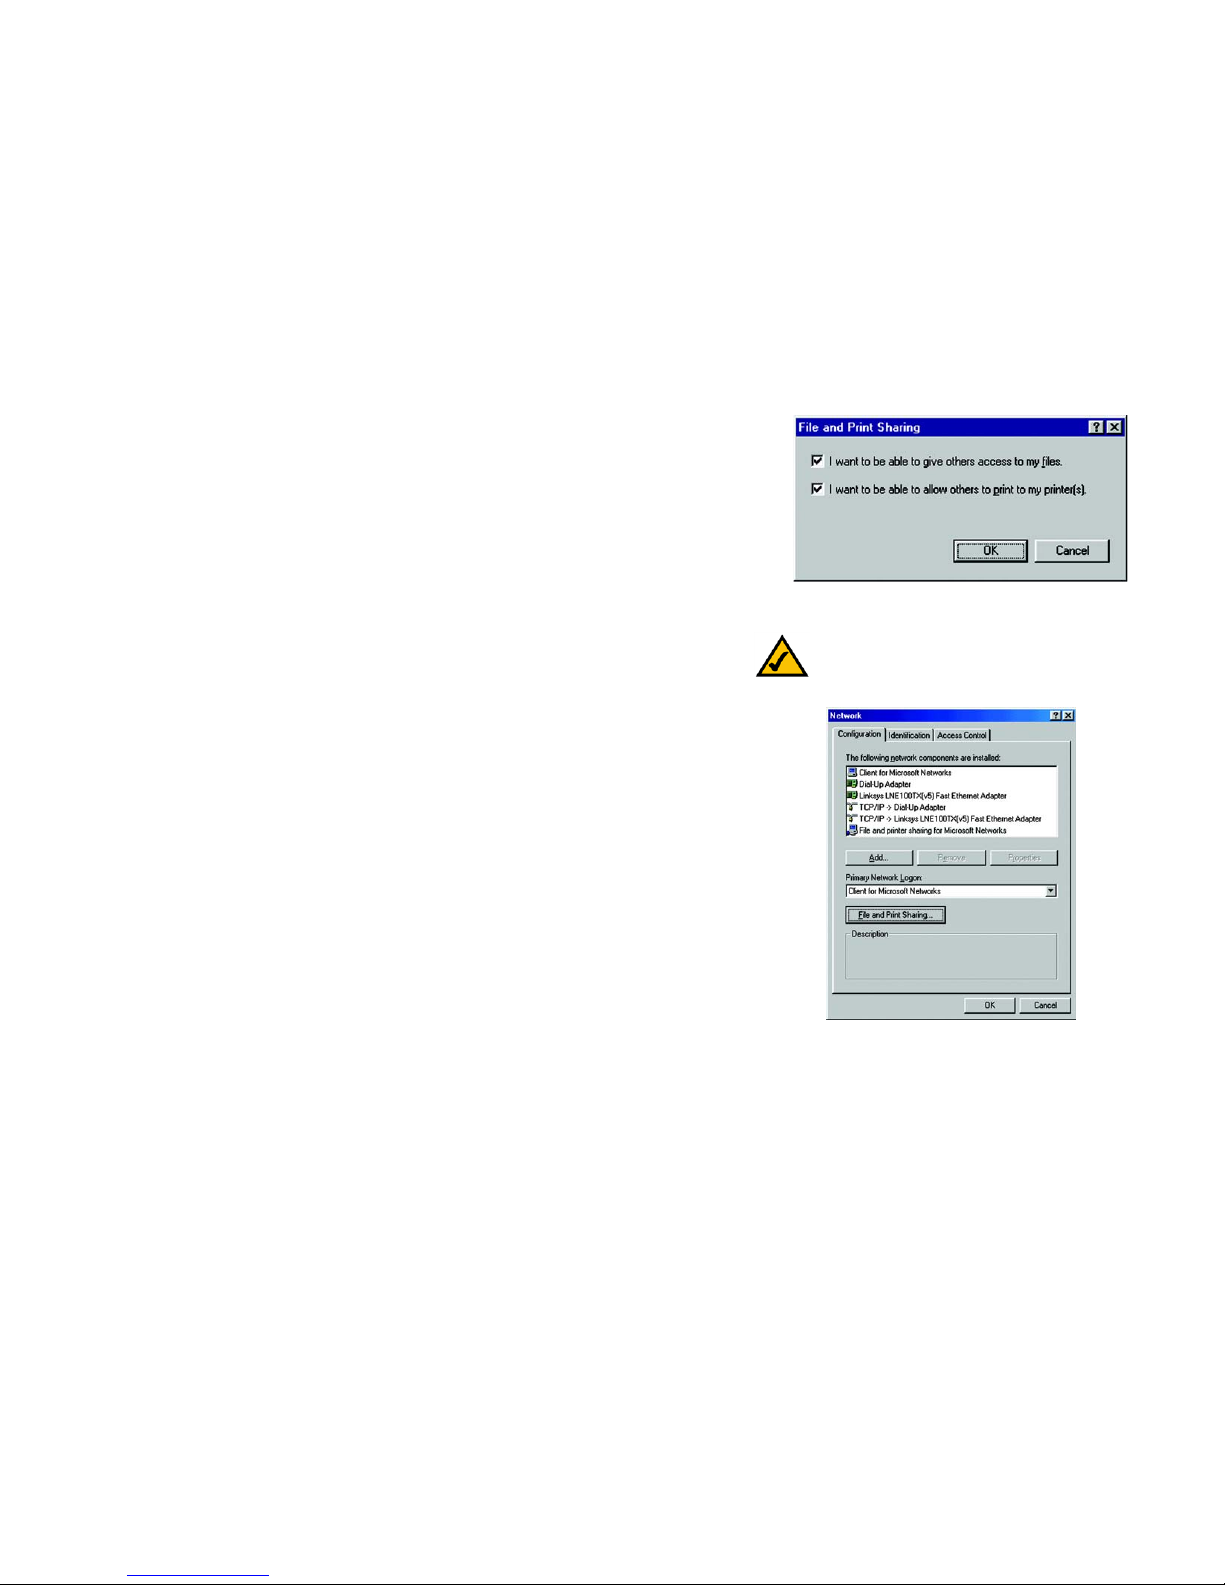
3. Click the File and Print Sharing button. The File and Print Sharing window will appear, shown in Figure 6-18.
If you'd like others to be able to access the files on your PC's hard drive, select I want to be able to give
others access to my files. If you'd like to share your printer with other users on the network, select I want
to be able to allow others to print to my printer(s).
Figure 6-16: Installation Complete
Figure 6-17: Configuration
19
Chapter 6: Manual Installation and Setup
Windows 98
EtherFast 10/100 LAN Card
4. Click the OK button.
5. File and Printer Sharing for Microsoft Networks should now appear in the list of installed components, as
shown in Figure 6-19.
6. After ensuring that all of the listed network components are installed on your system, in the Primary Network
Logon box select Client for Microsoft Networks.
NOTE: If you do not enable File and Printer
Sharing, your PC will be invisible on the network,
inaccessible by anyone.
Figure 6-18: File and Print Sharing
Figure 6-19: Client for Microsoft Networks
 Loading...