

Page 1

NetVanta Unified Communications Technical Note
___________________________________________________________________________________
Installing and Configuring Cisco 7940/7960
Series IP Phones
Introduction
The 7940/7960 IP Phone models from Cisco provide easy-to-use displays, modern styles, and broad
ranges of features. The 7940 offers two lines, while the 7960 offers six lines for increased productivity.
The 7940 and 7960 are interoperable with ADTRAN’s NetVanta Enterprise Communications Server and
can be autodetected and configured with ease. The purpose of this technical note is to provide instructions
for installing and configuring Cisco phones with the NetVanta Enterprise Communications Server.
Known Integration Issues
There are no known integration issues at this time.
Enabling Cisco SIP Phone Configuration
This section describes how to install the Cisco configuration files and phone firmware so that Cisco 79x0
phones can be automatically detected and provisioned by the UC server.
Obtaining Firmware Upgrades
The UC server supports Cisco 79x0 session initiation protocol (SIP) firmware version P0S3-08-9-00.
ADTRAN does not distribute Cisco firmware, so you must obtain the firmware files from Cisco Systems
(http://www.cisco.com) or from your authorized Cisco reseller.
NOTE: You must have a maintenance contract with Cisco to access the firmware upgrades on Cisco’s
corporate website.
The firmware files obtained from Cisco must be comprised of the following:
P0S3-08-9-00.loads
P0S3-08-9-00.sb2
P0S3-08-9-00.bin
P0S3-08-9-00.sbn
1
Page 2

Installing the Configuration Files
Included with this technical note is a folder containing configuration files and templates used by the UC
server to automatically detect and provision Cisco 79x0 Series telephones. This folder must be copied into
the UC server folder tree (along with the Cisco SIP firmware files as outlined above in Obtaining
Firmware Upgrades on page 1).
To install the configuration files:
1. Extract the Cisco folder from the .zip file titled Cisco (7940, 7960) Installation and Configuration
(P0S3-08-9-00) (located in the same directory as this document) and copy it under the
PhoneTypes folder located here:
X:\Program Files\ADTRAN\NetVanta UC Server\Data\System\PhoneTypes, where X is the
drive where the UC server program files are installed.
For example, the resultant path after the folder is copied (henceforth known as the Cisco
PhoneTypes folder) might appear as follows:
C:\Program Files\ADTRAN\NetVanta UC Server\Data\System\PhoneTypes\Cisco
2. Copy the Cisco SIP firmware files (as outlined in Obtaining Firmware Upgrades on page 1) into
the Cisco PhoneTypes folder.
CAUTION: Cisco phones will not automatically upgrade to the correct version if the firmware files
are not copied into the above folder. Failing to upgrade the phones to the correct version may result
in unexpected behavior and/or a loss of functionality.
3. Restart the NetVanta UC Server Application Service.
Select Start > Control Panel > Administrative Tools > Services.
Scroll down and select NetVanta UC Server Application Services.
Right-click the entry and select Restart.
2
Page 3
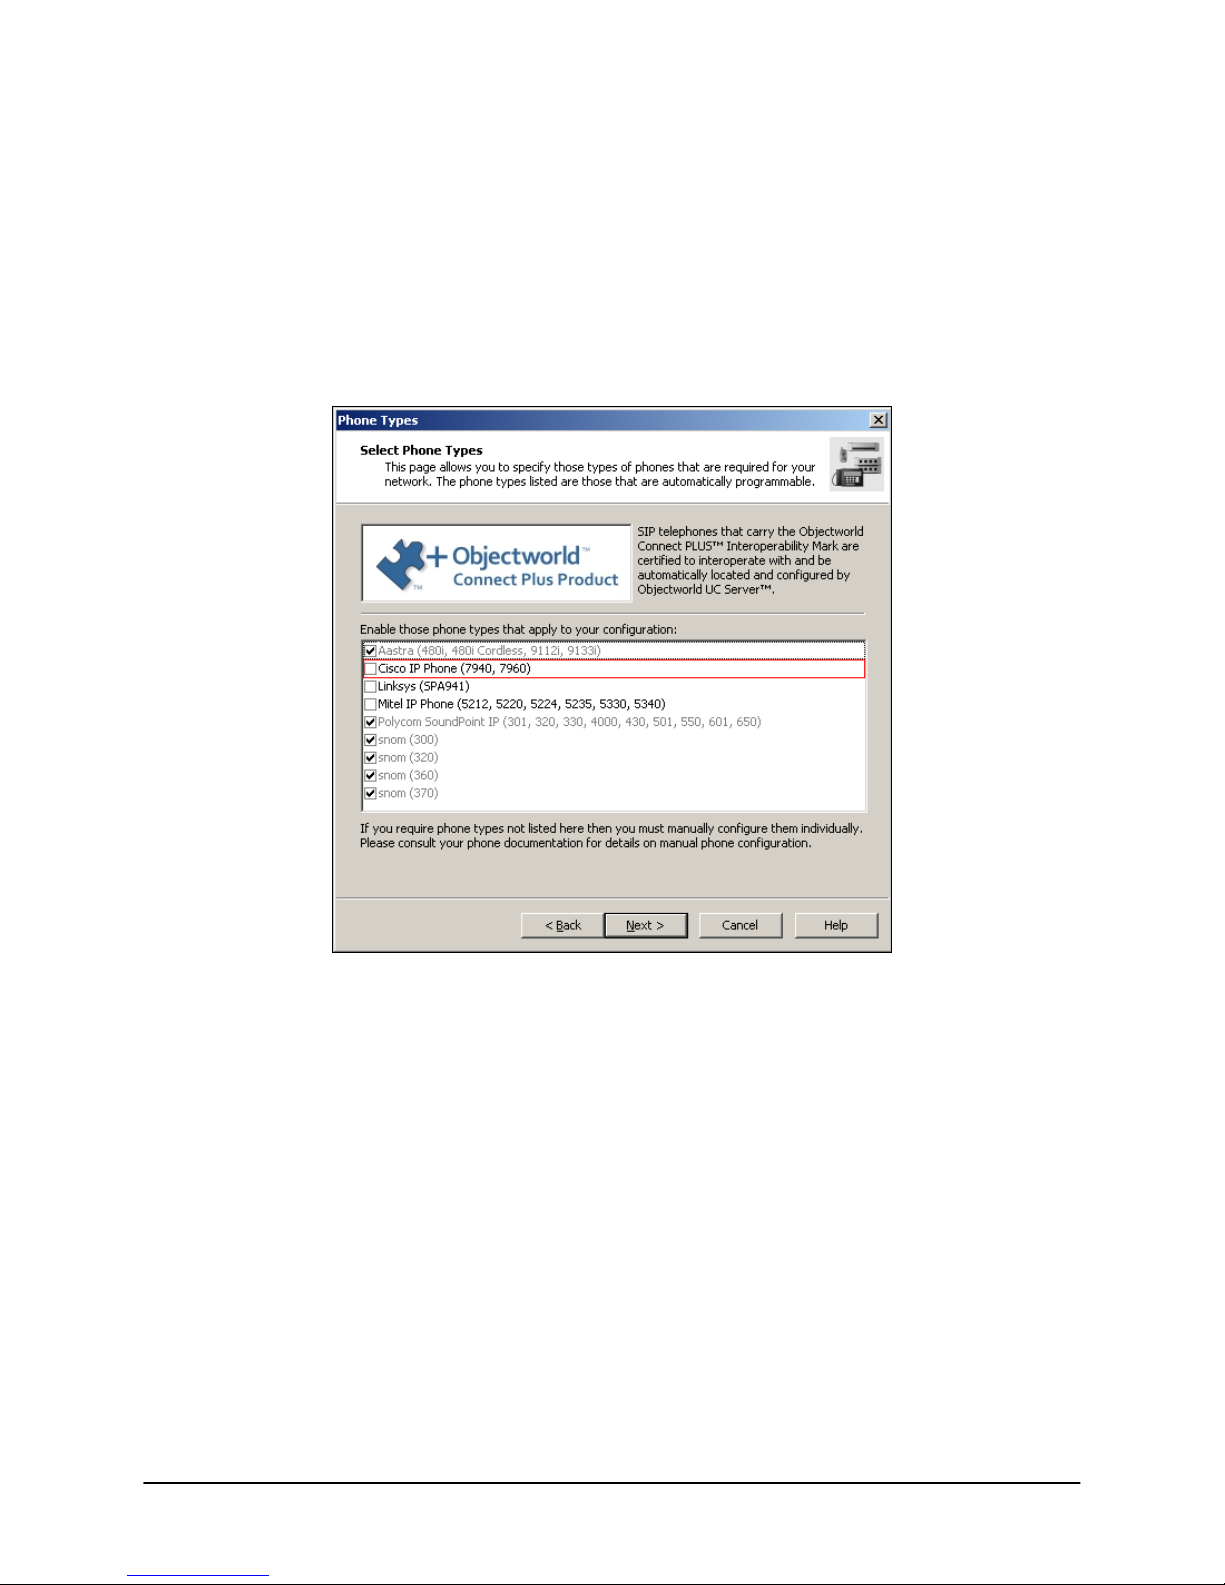
Enabling Support for Cisco SIP Phones
To enable support for Cisco SIP phones:
1. Select Start > All Programs > NetVanta UC Server > Server Configuration Wizard.
2. Select the Phone Types step.
3. Select Next to bypass the welcome screen.
4. Select the check box next to Cisco (see the figure below).
5. Continue through the wizard by selecting Next at each page until the wizard is finished.
3
Page 4

Dynamic Host Configuration Protocol (DHCP) Server
Configuration
When a Cisco phone is plugged into the network, it retrieves an IP address from the DHCP server. It also
checks one of the options for the IP address of the Trivial File Transfer Protocol (TFTP) provisioning
server. If this option is not present, Cisco phones do not automatically upgrade their firmware, nor are
they automatically provisioned. For DHCP servers other than Windows® Server 2003 and SBS, consult
the appropriate documentation and complete the option configuration as indicated in Step 3.a.
To configure the DHCP server for Windows Server 2003/2008 and Small Business Server (SBS):
1. Select Start > Control Panel > Administrative Tools > DHCP.
2. Right-click the domain where you want the Cisco phones to be provisioned and select Set
Predefined Options.
3. Look for Option 150.
a. If Option 150 is not already defined, select Add.
Name UC Server Provisioning Server
Data Type IP Address
Code 150
Description UC Server Provisioning Server IP Address
b. If Option 150 is already defined
If it is defined as an IP Address type and the value is the IP address for the UC
server, no action is required.
If it is not defined as an IP Address type and/or the value is not the IP address
for the UC server, automatic detection of the Cisco phones is not possible
unless this option can be changed as per the instructions in Step 3.a.
4. Select OK.
5. Right-click the Scope Options for the domain and select Configure Options.
6. Select the check box next to Option 150.
7. In the IP address field, enter the IP address of the UC server.
8. Select OK.
4
Page 5

Preparation
After the firmware and configuration files are installed on the UC server and the DHCP server is
configured, the next step is connecting the phones to the network and waiting for the initial boot. The
initial boot may take a long time to complete if firmware upgrades occur. While this upgrade is
happening, do not unplug the phone.
Validation
After the phone firmware is upgraded and rebooted and the phone is in an idle state, make sure that the
phone is running the correct firmware and has been automatically detected by the UC server.
Firmware Validation
To verify the firmware:
1. From the Cisco phone, select Settings > Status.
2. Scroll down and select Firmware Versions.
3. Examine Application Load ID. It should read P0S3-08-9-00.
If the firmware version listed on the phone does not match the above value, consult the
troubleshooting section at the end of this document.
Automatic Detection Validation
To verify automatic detection:
1. Launch the UC client: select Start > All Programs > UC Client.
2. Log in using the admin authentication or using an authentication with admin profile access.
3. In the Administration menu, select Phones.
4. Sort by the medium access control (MAC) address column and search for the MAC address of the
Cisco phone that you connected to the network. The phone’s MAC address is printed on the
underside of the phone.
If the phone does not appear in the list, consult the troubleshooting section at the end of this
document.
Adding an Identity
You must either have an unused identity that you can add to the phone, or you must create a new
identity/user to associate with the phone. For more information about creating users and identities in the
UC server, refer to the NetVanta UC Server Administrator Guide–Enterprise Communications Edition,
available online at http://kb.adtran.com/.
5
Page 6

Associating an Identity with the Phone
After you install the phone and create a user/identity, you must associate that identity with the phone.
To associate the identity with the phone:
1. Launch the UC client by selecting Start > All Programs > UC Client.
2. Log in using the admin authentication or using an authentication with admin profile access.
3. In the Administration menu, select Phones.
4. Double-click the Cisco phone to which you want to associate the identity.
5. Select Add.
6. Select the identity you want to use and select Select.
7. Select OK.
6
Page 7

8. Wait for the phone to automatically reboot. This should take under 5 seconds.
If the phone does not reboot automatically, navigate back to the Phones pane in the UC
client, right-click the specific phone and select Restart Phones.
If the phone does not restart at this point, disconnect and reconnect the power to the phone.
9. After the bootup process is complete, the new identity will appear on the phone display.
Troubleshooting
1. The Cisco phone does not appear in the Phones list in the UC client.
Verify the following:
DHCP server Option 150 is present, enabled, and contains the IP address of the UC
server machine.
NetVanta TFTP service is running.
Select Start > Control Panel > Administrative Tools > Services.
Scroll down to NetVanta TFTP Server.
Ensure service is set to Automatic and is running.
Ensure Windows Firewall is not blocking the TFTP port.
Disable Windows Firewall.
Or
Create an exception for the NetVanta TFTP Service program:
For example, C:\Program Files\ADTRAN\NetVanta UC
Server\Bin\TFTPService.exe.
Ensure the Cisco phone family is enabled.
Run the Server Configuration Wizard and ensure that the Cisco phone family
is checked.
If the check box is cleared, perform the steps outlined in Installing the
Configuration Files on page 2.
7
Page 8

Ensure Cisco firmware and configuration files are present in the TFTP Server.
Navigate to .\Program Files\ADTRAN\NetVanta UC Server\Data\TFTP.
Ensure (at a minimum) that the following files are present:
SIPDefault.cnf
template.cnf
If not present, perform the steps outlined in Enabling Cisco SIP Phone
Configuration on page 1.
2. The Cisco phone does not download its configuration from the TFTP server after being
assigned an identity with the UC client.
Verify the following:
NetVanta TFTP service is running.
Select Start > Control Panel > Administrative Tools > Services.
Scroll down to NetVanta TFTP Server.
Ensure service is set to Automatic and is running.
Ensure Windows Firewall is not blocking the TFTP port.
Disable Windows Firewall.
Or
Create an exception for the NetVanta TFTP Service program:
For example, C:\Program Files\ADTRAN\NetVanta UC
Server\Bin\TFTPService.exe.
Ensure that configuration files exist for the phone being provisioned.
Navigate to .\Program Files\ADTRAN\NetVanta UC Server\Data\TFTP.
Ensure (at a minimum) that the following files are present:
SIPDefault.cnf
SIP<MAC>.cfg (where <MAC> is the MAC address of the phone being
provisioned)
If not present, redo the steps outlined in Enabling Cisco SIP Phone
Configuration on page 1.
Ensure that the NetVanta UC Server Application Services service has full
permissions for the TFTP folder .\Program Files\ADTRAN\NetVanta UC
Server\Data\TFTP.
8
Page 9

3. The Cisco phone does not respond to restart/reload configuration requests from the UC
client, or incorrect identity/identities assigned to the phone.
If you experience the symptoms above, you can reset the protocol settings:
Open a Telnet session to the phone.
Enter the password cisco.
Issue the command erase protflash.
A manual reboot may be required if the phone does not reboot after 10 minutes.
If this does not address the issue, you can perform a factory default reset:
Hold down the # key as soon as the phone starts to power up.
When prompted to enter the factory default key sequence, dial 123456789*0#.
9
 Loading...