

Page 1

Cisco IP DECT 6800 Series User Guide
First Published: 2019-02-18
Last Modified: 2019-03-15
Americas Headquarters
Cisco Systems, Inc.
170 West Tasman Drive
San Jose, CA 95134-1706
USA
http://www.cisco.com
Tel: 408 526-4000
800 553-NETS (6387)
Fax: 408 527-0883
Page 2

THE SPECIFICATIONS AND INFORMATION REGARDING THE PRODUCTS IN THIS MANUAL ARE SUBJECT TO CHANGE WITHOUT NOTICE. ALL STATEMENTS,
INFORMATION, AND RECOMMENDATIONS IN THIS MANUAL ARE BELIEVED TO BE ACCURATE BUT ARE PRESENTED WITHOUT WARRANTY OF ANY KIND,
EXPRESS OR IMPLIED. USERS MUST TAKE FULL RESPONSIBILITY FOR THEIR APPLICATION OF ANY PRODUCTS.
THE SOFTWARE LICENSE AND LIMITED WARRANTY FOR THE ACCOMPANYING PRODUCT ARE SET FORTH IN THE INFORMATION PACKET THAT SHIPPED WITH
THE PRODUCT AND ARE INCORPORATED HEREIN BY THIS REFERENCE. IF YOU ARE UNABLE TO LOCATE THE SOFTWARE LICENSE OR LIMITED WARRANTY,
CONTACT YOUR CISCO REPRESENTATIVE FOR A COPY.
The following information is for FCC compliance of Class A devices: This equipment has been tested and found to comply with the limits for a Class A digital device, pursuant to part 15
of the FCC rules. These limits are designed to provide reasonable protection against harmful interference when the equipment is operated in a commercial environment. This equipment
generates, uses, and can radiate radio-frequency energy and, if not installed and used in accordance with the instruction manual, may cause harmful interference to radio communications.
Operation of this equipment in a residential area is likely to cause harmful interference, in which case users will be required to correct the interference at their own expense.
The following information is for FCC compliance of Class B devices: This equipment has been tested and found to comply with the limits for a Class B digital device, pursuant to part 15 of
the FCC rules. These limits are designed to provide reasonable protection against harmful interference in a residential installation. This equipment generates, uses and can radiate radio
frequency energy and, if not installed and used in accordance with the instructions, may cause harmful interference to radio communications. However,there is no guarantee that interference
will not occur in a particular installation. If the equipment causes interference to radio or television reception, which can be determined by turning the equipment off and on, users are
encouraged to try to correct the interference by using one or more of the following measures:
• Reorient or relocate the receiving antenna.
• Increase the separation between the equipment and receiver.
• Connect the equipment into an outlet on a circuit different from that to which the receiver is connected.
• Consult the dealer or an experienced radio/TV technician for help.
Modifications to this product not authorized by Cisco could void the FCC approval and negate your authority to operate the product.
The Cisco implementation of TCP header compression is an adaptation of a program developed by the University of California, Berkeley (UCB) as part of UCB’s public domain version of
the UNIX operating system. All rights reserved. Copyright©1981, Regents of the University of California.
NOTWITHSTANDING ANY OTHER WARRANTY HEREIN, ALL DOCUMENT FILES AND SOFTWARE OF THESE SUPPLIERS ARE PROVIDED "AS IS" WITH ALL FAULTS.
CISCO AND THE ABOVE-NAMED SUPPLIERS DISCLAIM ALL WARRANTIES, EXPRESSED OR IMPLIED, INCLUDING, WITHOUT LIMITATION, THOSE OF
MERCHANTABILITY, FITNESS FOR A PARTICULAR PURPOSE AND NONINFRINGEMENT OR ARISING FROM A COURSE OF DEALING, USAGE, OR TRADE PRACTICE.
IN NO EVENT SHALL CISCO OR ITS SUPPLIERS BE LIABLE FOR ANY INDIRECT, SPECIAL, CONSEQUENTIAL, OR INCIDENTAL DAMAGES, INCLUDING, WITHOUT
LIMITATION, LOST PROFITS OR LOSS OR DAMAGE TO DATA ARISING OUT OF THE USE OR INABILITY TO USE THIS MANUAL, EVEN IF CISCO OR ITS SUPPLIERS
HAVE BEEN ADVISED OF THE POSSIBILITY OF SUCH DAMAGES.
Any Internet Protocol (IP) addresses and phone numbers used in this document are not intended to be actual addresses and phone numbers. Any examples, command display output, network
topology diagrams, and other figures included in the document are shown for illustrative purposes only. Any use of actual IP addresses or phone numbers in illustrative content is unintentional
and coincidental.
All printed copies and duplicate soft copies of this document are considered uncontrolled. See the current online version for the latest version.
Cisco has more than 200 offices worldwide. Addresses and phone numbers are listed on the Cisco website at www.cisco.com/go/offices.
Cisco and the Cisco logo are trademarks or registered trademarks of Cisco and/or its affiliates inthe U.S. and other countries. To view a list of Cisco trademarks, go to this URL: www.cisco.com
go trademarks. Third-party trademarks mentioned are the property of their respective owners. The use of the word partner does not imply a partnership relationship between Cisco and any
other company. (1721R)
©
2019 Cisco Systems, Inc. All rights reserved.
Page 3

CONTENTS
CHAPTER 1
Your Handset 1
Your Handset 1
Getting Started 2
Turn On Your Handset 2
Turn Off Your Handset 2
Report an Emergency Situation 2
Lock the Handset Keypad 2
Unlock the Handset Keypad 3
Buttons and Hardware 3
Navigation 7
Supported Characters 7
Handset Screen Features 8
Header Icons 9
Differences Between Phone Calls and Lines 10
Phone Batteries 11
Care of Your Handset 11
CHAPTER 2
Clean the Handset Screen 12
Clean the Handset Exterior 12
If You Drop Your Handset in Water 13
Additional Help and Information 13
Cisco IP DECT 6800 Series Documentation 14
Lost Phone Connectivity 14
Cisco One-Year Limited Hardware Warranty Terms 14
Handset Setup 15
Handset Hardware Installation 15
Cisco IP DECT 6800 Series User Guide
iii
Page 4

Contents
Handset Package Contents 15
Install the Battery in the Handset 16
Remove the Handset Clip 19
Handset Battery Charging 21
Set Up the Charging Cradle 21
Charge the Handset Battery 21
Automatic Handset Configuration 22
Manual Handset Configuration 22
Handset Firmware Upgrades 23
CHAPTER 3
Calls 25
Make Calls 25
Make a Call 25
Make a Call on a Different Line 25
Make a Call with the Speakerphone 26
Make a Call with a Headset 26
Speed Dial Calls 26
Assign a Speed Dial Number 26
Make a Speed Dial Call 28
Answer a Call 28
Answer an Alarm Call 29
Answer Call Waiting 29
Silence an Incoming Call 29
End a Call 30
Hold and Resume a Call 30
Swap Between Active and Held Calls 30
Mute Your Call 30
Create a Conference Call 31
Transfer a Call 31
BroadWorks Shared Call Appearance 31
Star Codes 32
Return a Call with a Star Code 32
Transfer a Call with a Star Code 32
Activate and Deactivate Call Forward All with Star Codes 32
Cisco IP DECT 6800 Series User Guide
iv
Page 5

Activate and Deactivate Call Waiting with Star Codes 33
Block and Unblock Outgoing Caller Information with a Star Code 33
Block and Unblock Anonymous Calls with a Star Code 33
Turn Do Not Disturb On and Off with a Star Code 34
Use Push to Talk 34
Contents
CHAPTER 4
CHAPTER 5
Text Messages 35
Text Messages 35
Send a Text Message 35
Reply to a Text Message Immediately 36
Add a Text Message Sender to Your Local Contacts 37
Append a Text Message Sender to a Local Contact 37
Forward a Text Message 38
Delete a Text Message Immediately 38
Delete all Text Messages 39
View Your Text Message History 39
Reply to a Text Message from Your Text History 40
Delete a Text Message from the Text Message History 40
Delete all Text Messages from the Text Message History 41
Configure Your Text Message Settings 41
Contacts and Directories 43
CHAPTER 6
Local Contacts 43
Add a Local Contact 43
Call a Local Contact 44
Edit a Local Contact 44
Delete a Local Contact 45
Delete all Local Contacts 45
Directories 45
Call a Central Directory Contact 45
Recent Calls and Voicemail 47
Recent Calls List 47
View Your Recent Calls 47
Cisco IP DECT 6800 Series User Guide
v
Page 6

Contents
Call Someone in Your Recent Calls List 47
Access Your Voicemail 48
CHAPTER 7
Alarms, Alarm List, and F-Keys 49
Alarms 49
Set an Alarm 49
Set a Recurrent Alarm 50
Set the Snooze Time 50
Respond to an Alarm 50
Emergency Alarm List 51
View the Received Emergency Alarms 51
Function Keys 51
Set up an F-Key 52
Make a Call with an F-Key 52
Add an F-key to Your Speed Dial List 52
Delete an F-Key 53
Delete all F-Keys 53
View Your Speed Dial List 54
CHAPTER 8
Settings 55
Settings Menu 55
Audio Settings 55
Set Silent Mode from the Settings Menu 55
Set the Ring Volume from the Settings Menu 55
Set the Ringtone For Different Call Types 56
Set the Alert Volume 57
Set the Handset Vibration Mode 57
Set the Tone When a Key is Pressed 57
Set the Confirmation Sound 58
Set the Coverage Warning 58
Set the Charger Warning 58
Time and Date 59
Set the Time Format 59
Set the Date Format 59
Cisco IP DECT 6800 Series User Guide
vi
Page 7

Set the Handset Language 60
Set the Handset LED 60
Set the Timer to Turn Off the Screen 61
Security Menu 61
Set the Handset Lock and PIN 61
Set the Timer to Automatically Lock the Handset 62
Change the Settings PIN 63
Set the Handset Name 63
Set Auto Answer 63
Allow the Handset to Ring While Charging 64
Set Do Not Disturb 64
Hide Your Caller ID When You Make a Call 65
Call Forward 65
Contents
CHAPTER 9
Set Call Forward Unconditional 65
Set Call Forward When There is No Answer 66
Set Call Forward When the Line is Busy 66
Set the Idle Screen Saver 67
Set the Idle Clock 67
Bluetooth 68
Bluetooth and Your Handset 68
Enable Bluetooth 68
Search and Pair a Bluetooth Device 68
Manage the Paired Bluetooth Devices 69
Turn on Push To Talk 69
Set the Ring Volume for an Incoming Call 70
Change the Volume on a Call 70
Accessories 71
Supported Headsets 71
CHAPTER 10
Important Headset Safety Information 71
Audio Quality 72
Troubleshooting 73
General Troubleshooting 73
Cisco IP DECT 6800 Series User Guide
vii
Page 8

Contents
Handset Doesn't Ring 73
Handset Doesn't Respond to Key Presses 73
Handset Screen Displays "Searching" 74
View the Handset Status 74
Reset the Handset Settings 74
CHAPTER 11
Product Safety and Security 77
Safety and Performance Information 77
Safety Guidelines 78
Battery Safety Notices 78
Power Outage 79
Regulatory Domains 79
Health-Care Environments 79
External Devices Usage 79
System Behavior During Times of Network Congestion 80
Compliance Statements 80
Compliance Statements for the European Union 80
CE Marking 80
RF Exposure Statement for the European Union 80
Compliance Statements for the USA 81
General RF Exposure Compliance 81
Part 15 Radio Device 81
viii
Compliance Statements for Canada 81
Canadian RF Exposure Statement 81
Compliance Statements for New Zealand 82
Permit to Connect (PTC) General Warning 82
Use of IP Networks with the PSTN 82
The Use of Voice Compression Through the PSTN 82
Echo Cancellation 82
Compliance Statements for Taiwan 83
DGT Warning Statement 83
Compliance Statement for Argentina 83
Compliance Statements for Brazil 83
Compliance Statement for Singapore 84
Cisco IP DECT 6800 Series User Guide
Page 9

Cisco Product Security Overview 84
Important Online Information 84
Contents
Cisco IP DECT 6800 Series User Guide
ix
Page 10

Contents
Cisco IP DECT 6800 Series User Guide
x
Page 11

Your Handset
Your Handset
The Cisco IP DECT 6800 Series is made up of the Cisco IP DECT 210 Multi-Cell Base Station and the Cisco
IP DECT Phone 6825 Handset.
Figure 1: Cisco IP DECT 210 Multi-Cell Base Station and Cisco IP DECT Phone 6825 Handset
CHAPTER 1
• Your Handset, on page 1
• Getting Started, on page 2
• Buttons and Hardware, on page 3
• Care of Your Handset, on page 11
• Additional Help and Information, on page 13
The handsets communicate with the base station using Digital Enhanced Cordless Telecommunications (DECT)
to provide call functions.
In this document, the term phone means the handset and the term system means the handset and base station.
Note
Not all features may be supported by your handset. Contact your service provider for the supported features.
Cisco IP DECT 6800 Series User Guide
1
Page 12

Getting Started
Getting Started
Turn On Your Handset
Procedure
Press and hold Power/End until the screen turns on.
Turn Off Your Handset
Procedure
Your Handset
Press and hold Power/End until the screen turns off.
Report an Emergency Situation
Your handset has an emergency button, located at the top of the handset. If set up by your administrator, you
can press this button to raise an alert in an emergency situation. The handset places a call to a predefined
emergency number and automatically turns on the speakerphone.
Procedure
Press and hold Emergency for 3 seconds.
Lock the Handset Keypad
You can manually lock the keypad to stop accidental dialing.
Note
When the keypad is locked, you can only dial emergency numbers.
Cisco IP DECT 6800 Series User Guide
2
Page 13

Your Handset
Procedure
Press and hold Asterisk until the message “Press and hold *” and the key lock icon ( or ) are
displayed on the screen.
Related Topics
Set the Handset Lock and PIN, on page 61
Set the Timer to Automatically Lock the Handset, on page 62
Unlock the Handset Keypad
If the keypad is locked, you must unlock it before you can place most calls. You may need to input a PIN to
unlock the handset.
Unlock the Handset Keypad
Note
When the keypad is locked, you can only dial emergency numbers.
Procedure
Press and hold Asterisk until the message “Press and hold *” and the key lock icon or
doesn't display on the screen.
Related Topics
Set the Handset Lock and PIN, on page 61
Set the Timer to Automatically Lock the Handset, on page 62
Buttons and Hardware
Your handset has many buttons and hardware features that you will use regularly. Use the following figure
and table to identify the important button and hardware features.
Cisco IP DECT 6800 Series User Guide
3
Page 14
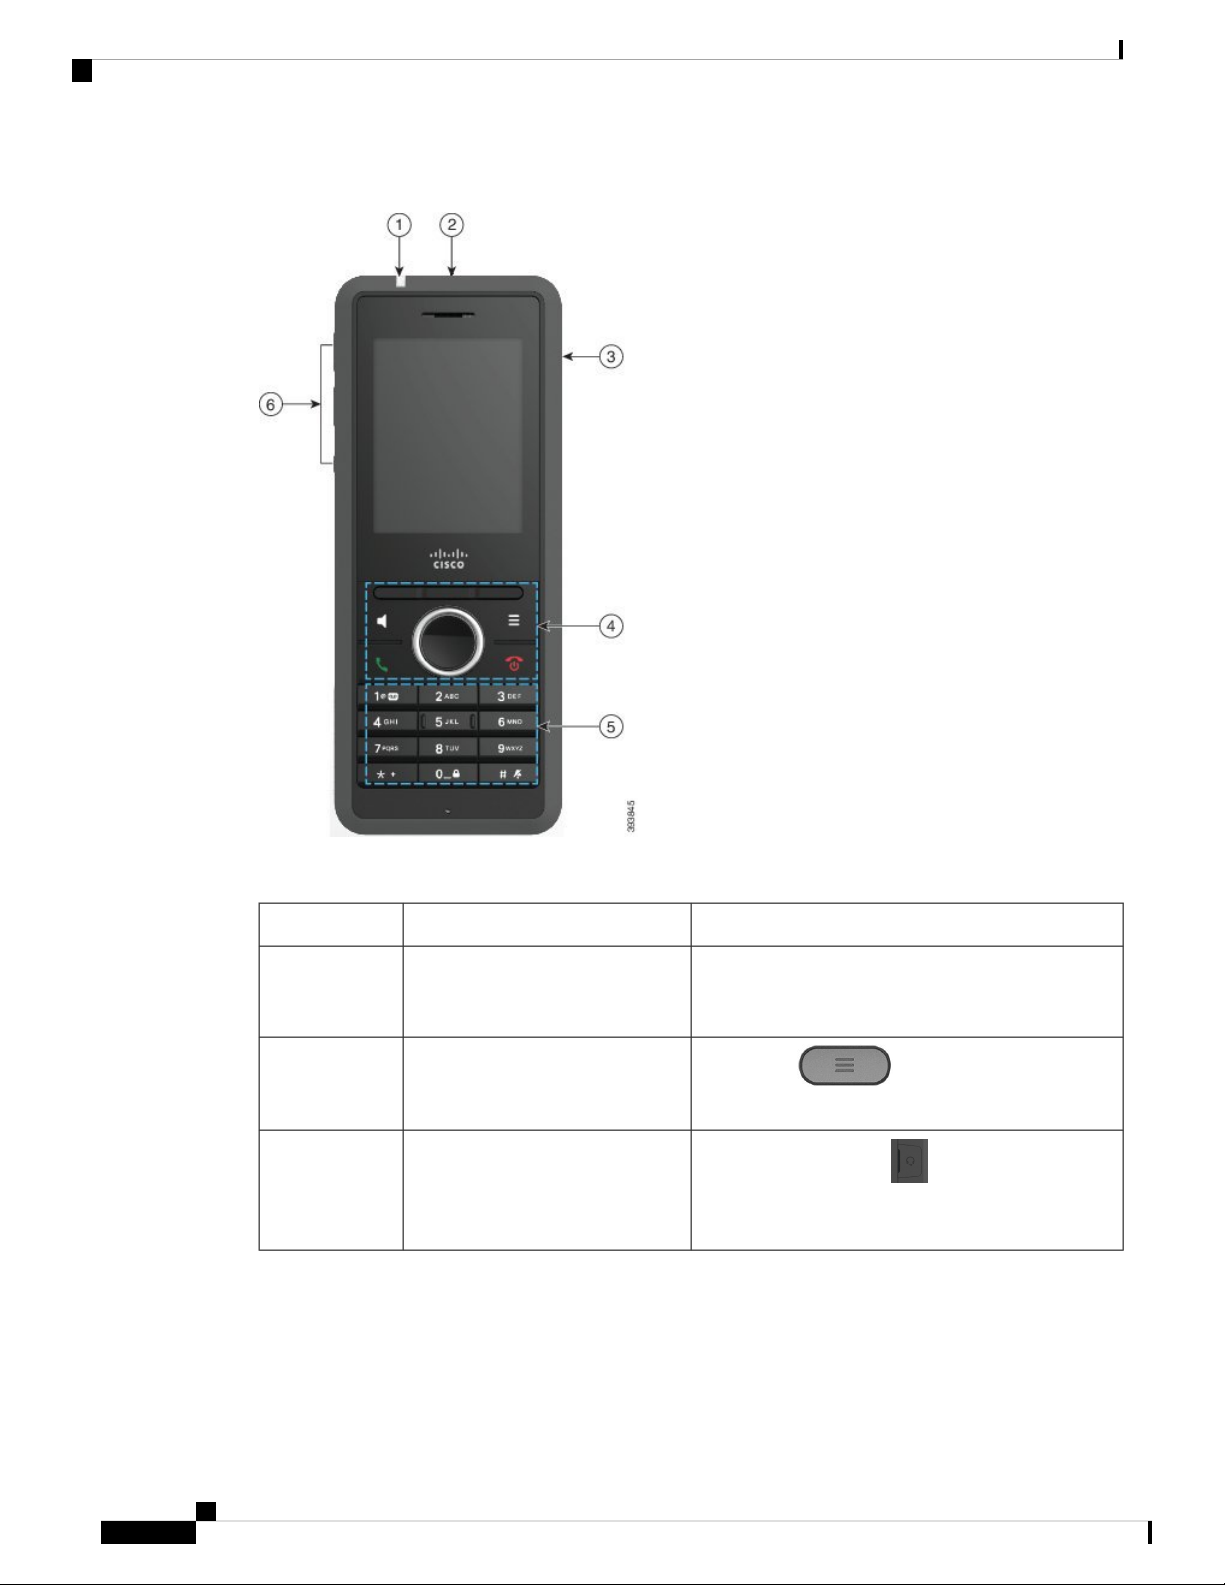
Buttons and Hardware
Your Handset
Figure 2: Cisco IP DECT Phone 6825 Handset Buttons and Hardware
Table 1: Cisco IP DECT Phone 6825 Handset Buttons and Hardware
Indicator light (LED)1
Emergency button2
Headset port3
DescriptionName or GroupingItem
Indicator light—Use the light to identify states. You
can configure the event that triggers the red, yellow,
or green LED.
Emergency Raises an emergency alarm,
if configured.
Headset port with cover . Remove the protective
cover and plug in a headset or ear buds (3.5 mm audio
jack).
Cisco IP DECT 6800 Series User Guide
4
Page 15
Your Handset
Buttons and Hardware
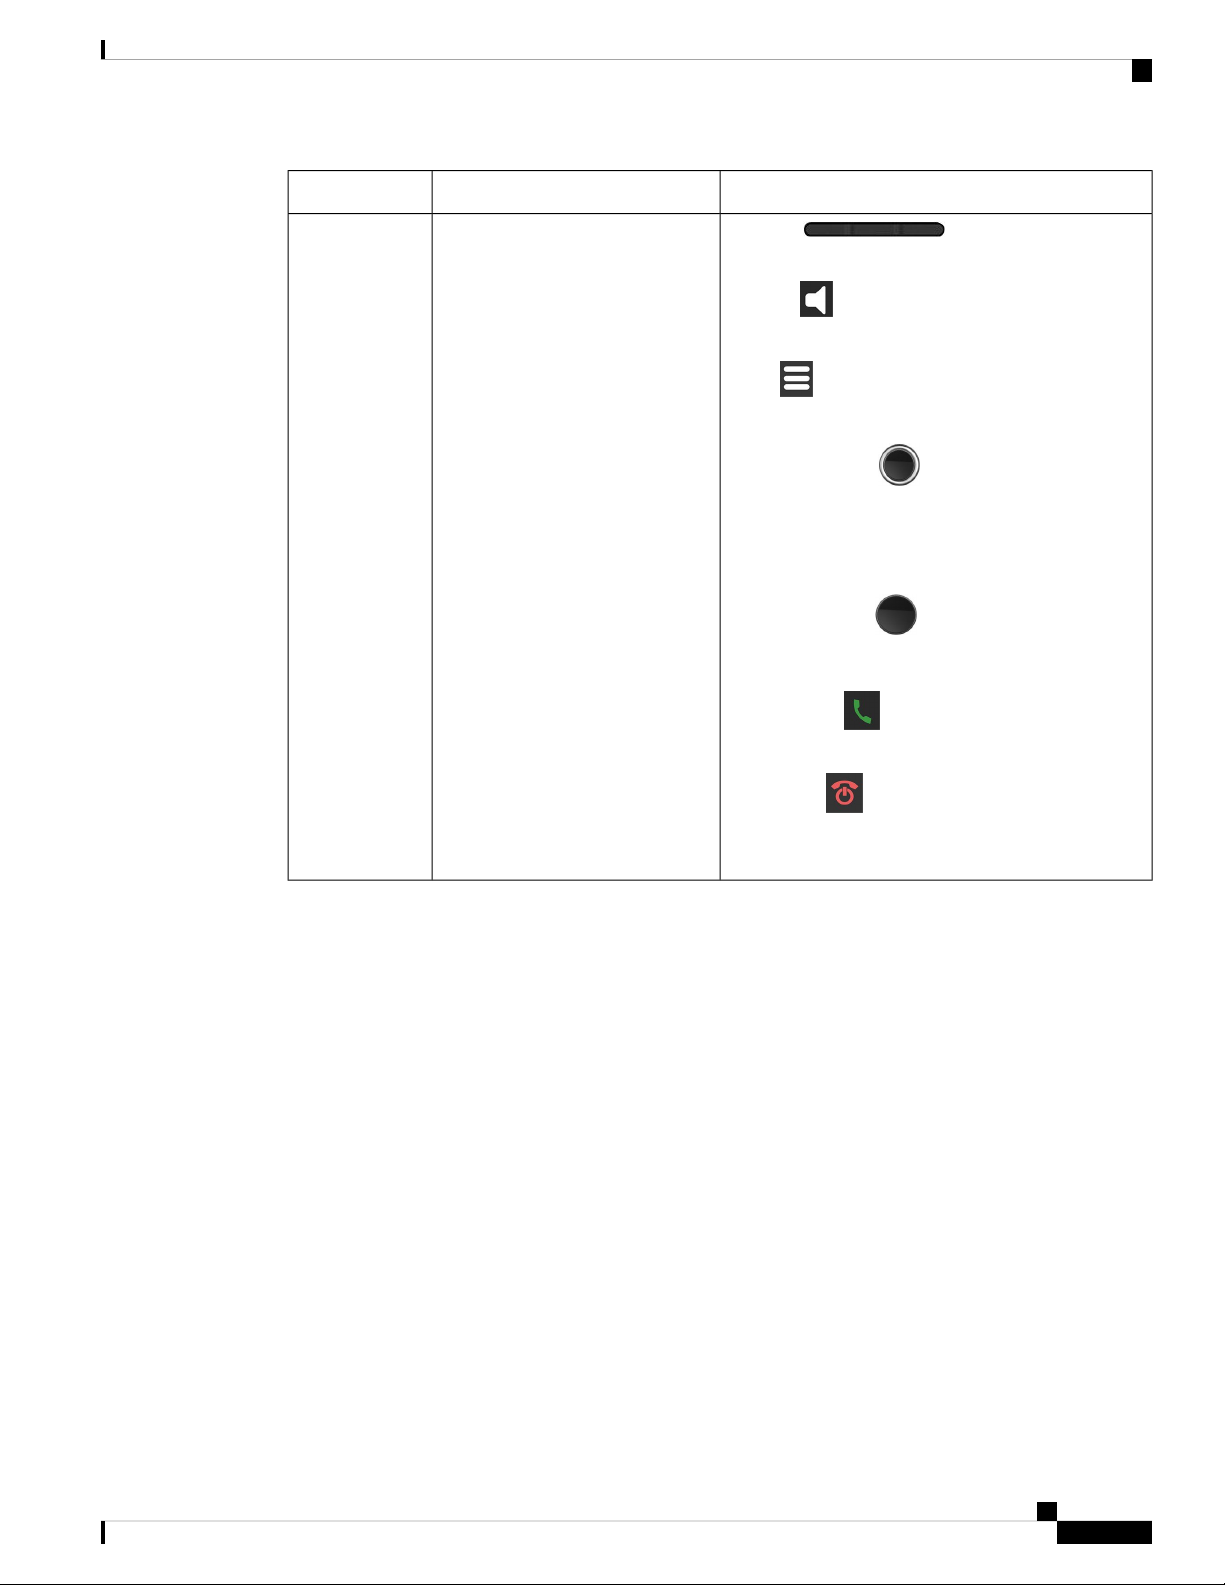
DescriptionName or GroupingItem
4
Softkeys, handset control buttons
(Speaker, Menu), Navigation
Softkeys Activate the option
displayed on the screen.
cluster, call control buttons
(Answer/Send, Power/End).
Speaker Toggle the speaker mode on or off for
the handset.
Menu Access directories, settings, status, and
other information.
Navigation cluster Navigation ring and Select
button:
• Navigation ring (outer ring): Move up, down,
left, or right.
• Select button (center of the cluster): select
a menu item.
Answer/Send Answer a ringing call or, after
dialing a number, place the call.
Power/End Turn the handset on or off, or end
a connected call. In menus, the button returns you to
the previous screen.
Cisco IP DECT 6800 Series User Guide
5
Page 16
Buttons and Hardware
Your Handset
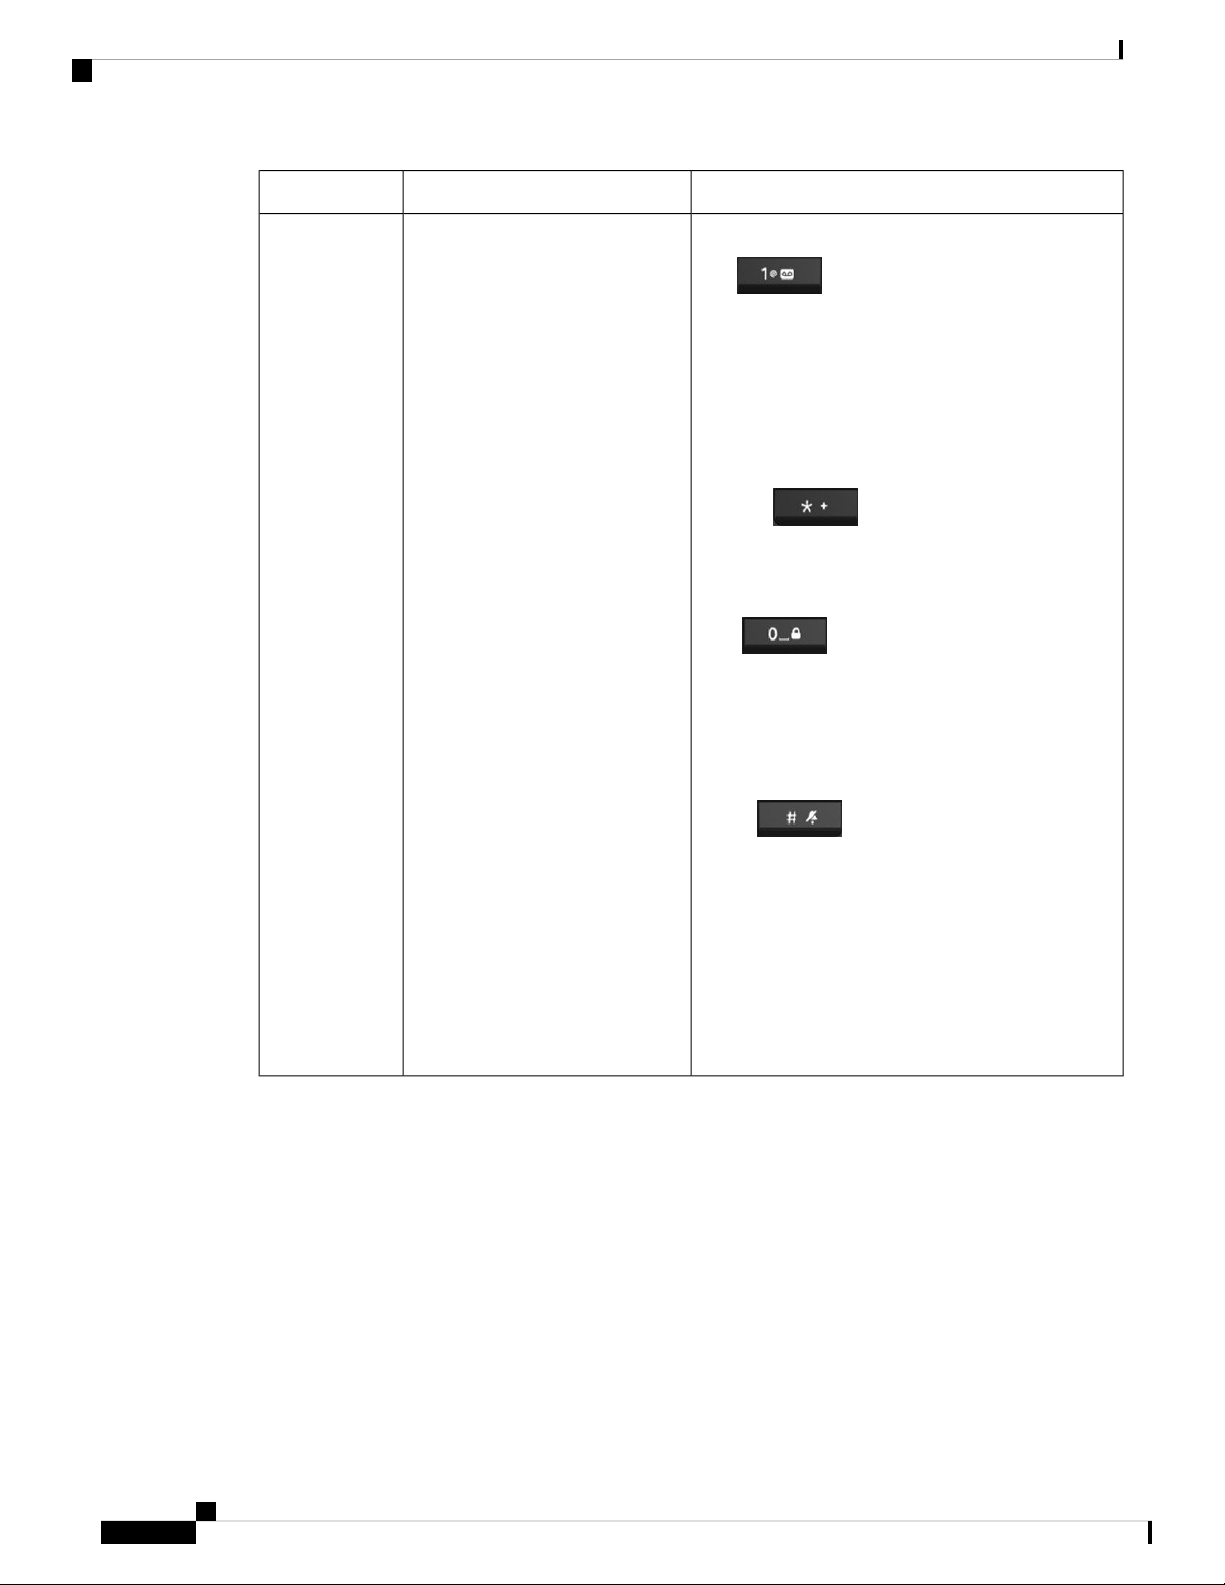
DescriptionName or GroupingItem
Keypad5
Dial numbers and enter letters.
One
• Enter “1” when you dial a number.
• Access voicemail. Press and hold to
automatically dial the voicemail system.
• Enter these special text characters: . ! ? , - " @
+ ; :
Asterisk
• Press and hold to add the plus (+) symbol at the
beginning of a phone number.
Zero
• Enter “0” when you dial a number.
• Press and hold to lock or unlock the keypad.
• Enter a space.
Pound
• Press and hold to silence the handset ringer. If
configured, the handset will vibrate instead.
• Enter this special text characters: #
Use the keys 2 through 9 to enter letters and numbers.
Note
In some languages, additional characters
may be present.
Cisco IP DECT 6800 Series User Guide
6
Page 17
Your Handset
Navigation
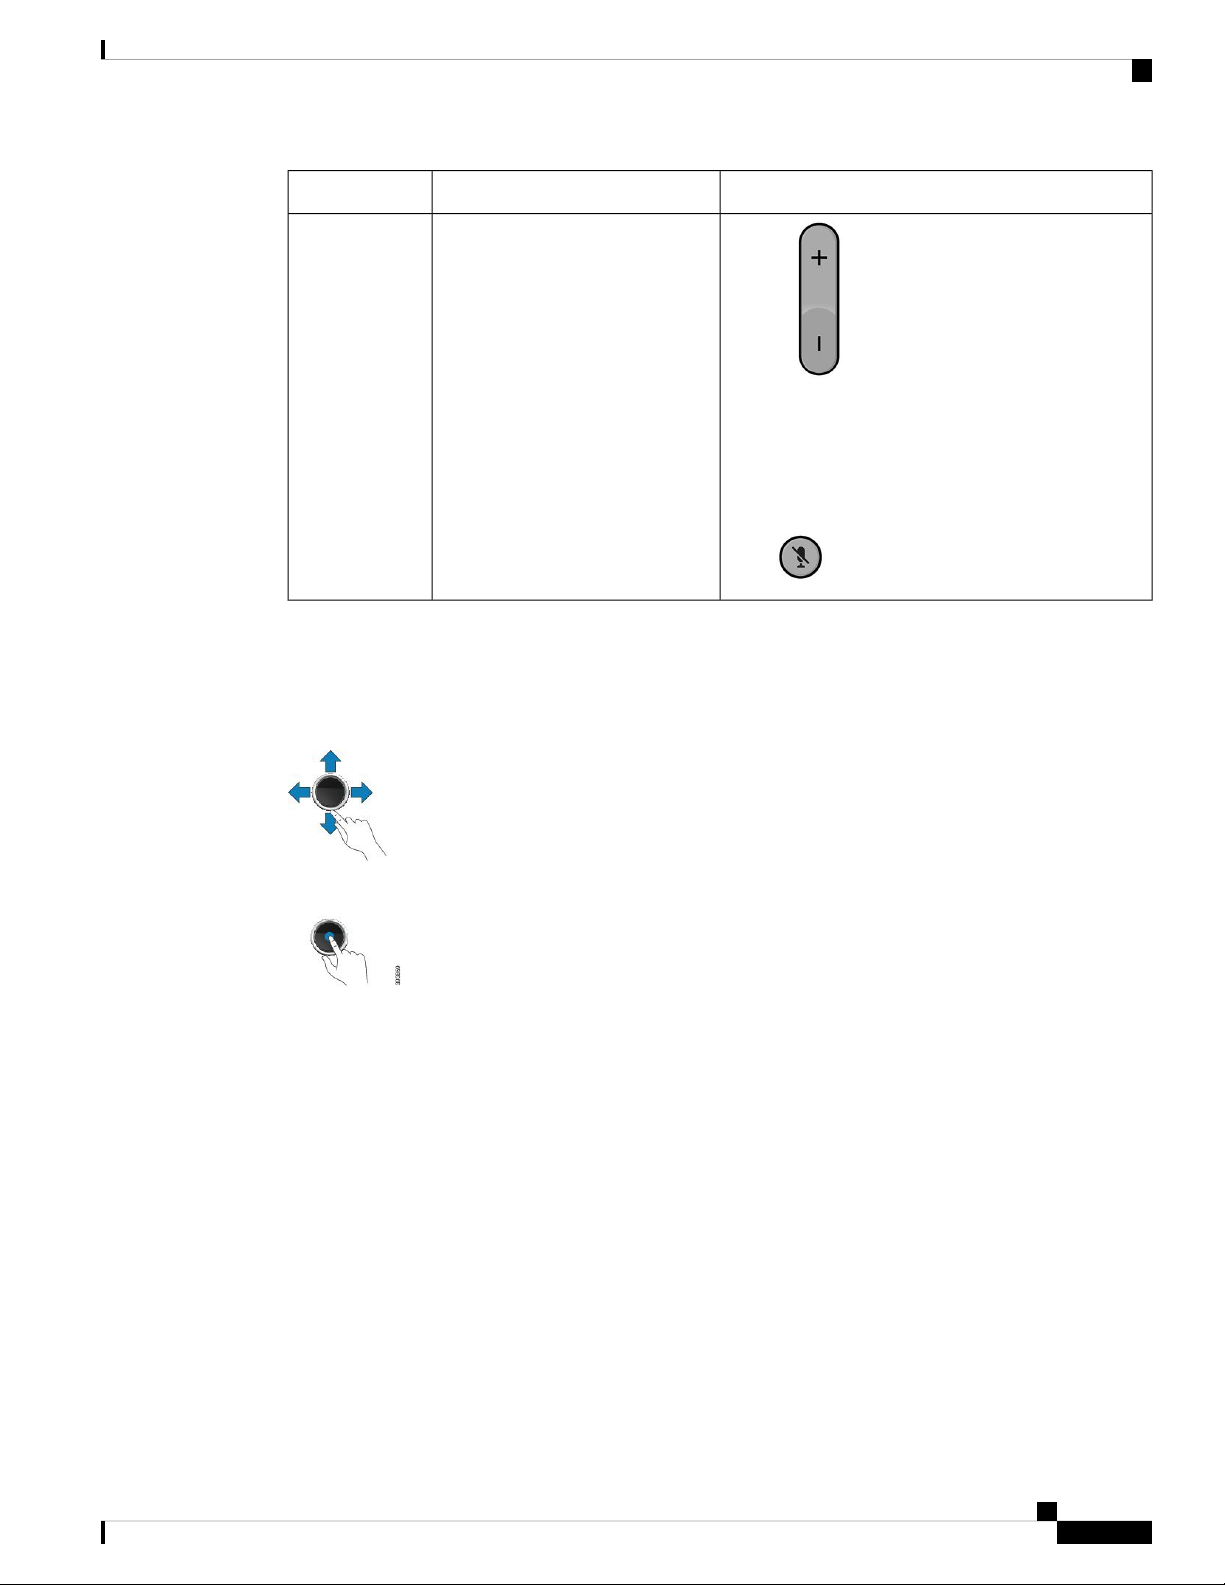
DescriptionName or GroupingItem
Volume and Mute buttons6
Volume
• When the handset is idle, change the ring volume
or turn off the ringer.
• During a call, control the speaker volume for the
active handset, headset, or speaker.
Mute Toggle the mute feature on or off.
Navigation
Use the outer ring of the Navigation cluster to scroll through menus and to move between fields. Use the inner
Select button of the Navigation cluster to select menu items.
Supported Characters
When you input information, the Cisco IP DECT Phone 6825 Handset supports the following characters:
Cisco IP DECT 6800 Series User Guide
7
Page 18

Handset Screen Features
Your Handset
Figure 3: Supported Characters
Handset Screen Features
The screen shows information about your handset such as directory number, date and time, and softkeys. The
screen is made up of three sections: the header row, the middle section, and the footer row.
Figure 4: Handset Screen
1
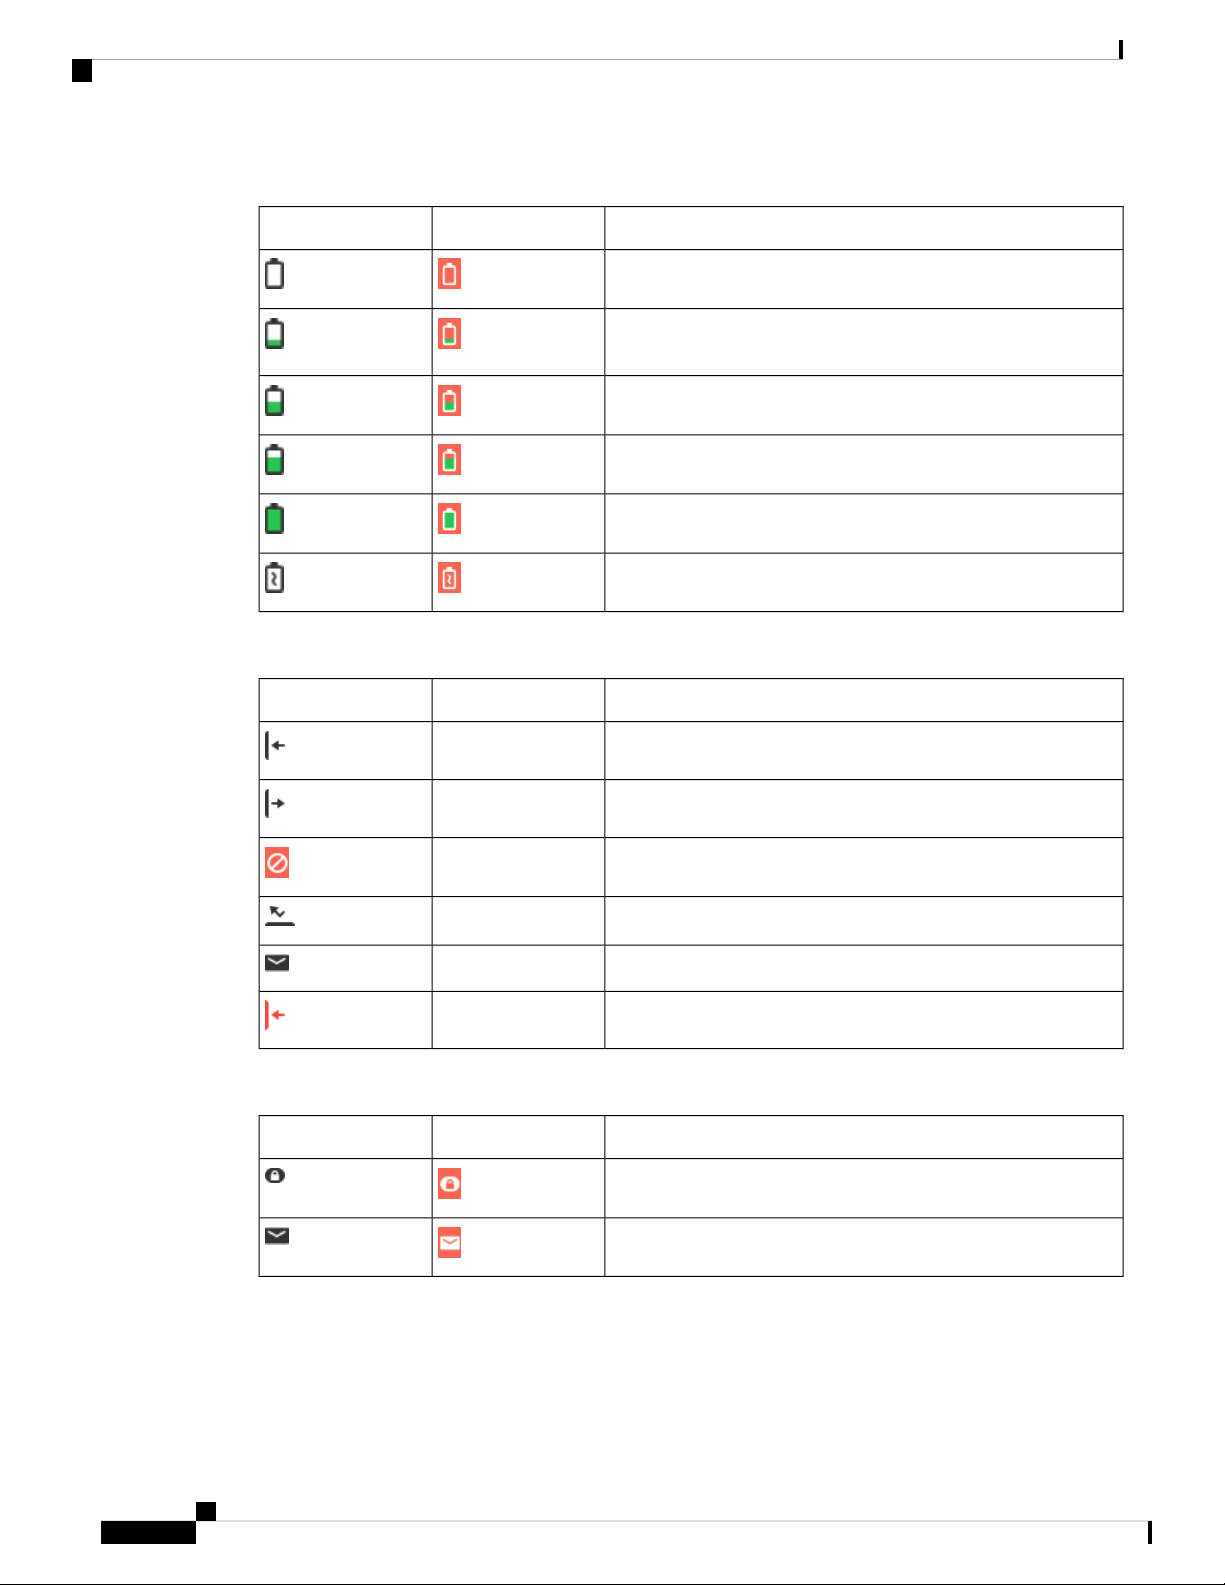
At the top of the screen is the header row. The header row displays the radio signal strength and
battery charge, as well a number of icons. The icons display when features are active.
If your organization uses the BroadWorks Shared Call Appearance feature, a row of boxes displays
immediately below the header row.
Cisco IP DECT 6800 Series User Guide
8
Page 19

Your Handset
Header Icons
Header Icons
2
The middle of the screen displays the information associated with the handset: date and time,
configured handset owner, and handset phone number.
3
The bottom row of the screen contains the softkey labels. Each label indicates the action for the
softkey button below the screen. Sometimes, icons are displayed above the softkey labels.
Related Topics
BroadWorks Shared Call Appearance, on page 31
The header icons tell you about the handset state. This section displays the header icons and gives their
meaning. The header row icons can be different when do not disturb (DND) is enabled.
Audio Path Icons
DescriptionDND Mode IconIcon
Speaker is off
Headset in use.
Handset is muted.
Bluetooth Icons
Network Icons
DescriptionDND Mode IconIcon
Bluetooth is connected.
Bluetooth is disconnected.
DescriptionDND Mode IconIcon
No network connection.
Weak network connection.
Good network connection.
Better network connection.
Best network connection
Cisco IP DECT 6800 Series User Guide
9
Page 20
Differences Between Phone Calls and Lines
Battery Icons
Your Handset
DescriptionDND Mode IconIcon
Battery is depleted. Recharge the battery to use the handset.
Battery is 1% to 24% charged. Recharge the battery as soon as
possible.
Battery is 25% to 49% charged.
Battery is 50% to 74% charged.
Battery is 75% to 100% charged.
Battery is charging.
Call-Related Icons
Other Icons
DescriptionDND Mode IconIcon
Answered call
Dialed call
Do not disturb is enabled.
Phone is forwarded.
Voicemail message waiting.
Missed call
DescriptionDND Mode IconIcon
Handset keypad is locked.
Message
Differences Between Phone Calls and Lines
We use the terms lines and calls in very specific ways to explain how to use your phone.
Cisco IP DECT 6800 Series User Guide
10
Page 21

Your Handset
Phone Batteries
Your phone contains a lithium ion battery. The fully charged battery provides the following hours of service:
The battery life is reduced when the phone is turned on. Calls, messages, application use, Bluetooth use, and
actions like menu navigation use power and reduce the talk time. Your phone screen dims and turns off after
a configurable period of inactivity to reduce battery drain.
Phone Batteries
• Lines—Each line corresponds to a directory number or intercom number that others can use to call you.
You have up to four lines.
• Calls—Each line can support up to two calls. However, you can have only two calls on the handset.
Only one call can be active at any time; the other call is automatically placed on hold.
Here is an example: If you have four lines and each line supports two calls, then you can have two
connected calls at one time. These two calls can be on the same line or on different lines. Only one of
those calls is active and the other is a held call.
• Up to 17 hours of talk time
• Up to 200 hours of standby time
Related Topics
Set the Timer to Turn Off the Screen, on page 61
Care of Your Handset
You can clean your handset. Make sure you follow our cleaning instructions.
Clean your handset immediately if it comes in contact with anything that may cause stains, or other damage;
for example, dirt or sand, ink, makeup, soap, detergent, acids, acidic foods, or lotions.
Caution
Do not blow or use compressed air (for example, aerosol cans, low- or high-pressure air nozzles) to clean the
openings of the handset.
Do not use a vacuum cleaner or other suction device to clean the openings of the handset.
Do not use pins or other objects to clean the openings of the handset.
Use of air, suction, or mechanical objects to clean the openings can damage the handset and voids the handset
warranty.
If you happen to drop the handset into water, or it gets splashed, follow our instructions to dry off the handset.
See If You Drop Your Handset in Water, on page 13.
Cisco IP DECT 6800 Series User Guide
11
Page 22

Clean the Handset Screen
Clean the Handset Screen
Procedure
If your handset screen gets dirty, wipe it with a soft, dry cloth.
Your Handset
Caution
Do not use any liquids or powders on the phone because they can contaminate the handset components
and cause failures.
Clean the Handset Exterior
You can clean the handset exterior using a dry, lint-free cloth. For the health-care environment, we recommend
that you use Caviwipes™and Saniwipes™to thoroughly clean the handset. Caviwipes and Saniwipes contain
up to 17% isopropanol.
Any cleaning solution containing a higher amount of isopropanol, including pure isopropanol, or an alternative
alcohol-based liquid could potentially damage the handset. Do not clean the handset with bleach or other
caustic products.
Excessive use of Caviwipes and Saniwipes more than 3 times a day will damage the handset surface coating
and will change the appearance of handset.
Clean your handset immediately if it comes in contact with anything that may cause stains, or other damage;
for example, dirt or sand, ink, makeup, soap, detergent, acids, acidic foods, or lotions.
Caution
Do not blow or use compressed air (for example, aerosol cans, low- or high-pressure air nozzles) to clean the
openings of the handset.
Do not use a vacuum cleaner or other suction device to clean the openings of the handset.
Do not use pins or other objects to clean the openings of the handset.
Use of air, suction, or mechanical objects to clean the openings can damage the handset and voids the handset
warranty.
Procedure
Step 1 Remove the handset from the charger.
Step 2 Wipe the handset and screen with a soft, lint-free cloth or with an approved sanitizing wipe.
Step 3 If there are foreign objects (for example, fine sand) in an opening in the handset, tap the handset against your
hand to dislodge the objects.
Cisco IP DECT 6800 Series User Guide
12
Page 23
Your Handset
If You Drop Your Handset in Water
If you drop your handset in water, here's what you do:
• Gently shake the water off the handset.
• Dry the handset with a soft, dry, lint-free cloth.
• Leave your handset in a dry area with some air flow; for example, a fan blowing cool air can be directed
onto the handset speaker grill to help the handset dry out. Just don't put the fan close to the handset.
Here are some things you don't do:
• Don't open the battery door while the handset is wet.
• Don't use compressed air to blow off the water.
• Don't use a hair dryer to dry off the handset.
• Don't put a cotton swab, paper towel, or cloth into the headset jack or inside the battery compartment.
• Don't tap the handset on a hard surface.
If You Drop Your Handset in Water
• Don't put a wet handset into the charging cradle. You must wait until the handset is completely dry.
Note
The handset warranty does not cover handsets that have been dropped in water or other fluids.
Caution
Do not blow or use compressed air (for example, aerosol cans, low- or high-pressure air nozzles) to clean the
openings of the handset.
Do not use a vacuum cleaner or other suction device to clean the openings of the handset.
Do not use pins or other objects to clean the openings of the handset.
Use of air, suction, or mechanical objects to clean the openings can damage the handset and voids the handset
warranty.
If the sound is muffled after you dry the handset, there may still be water in the microphone or speaker
compartments. Place your handset, speaker-side down, on a dry, lint-free cloth to see if water drips out. If
there is still water in the handset, allow the handset to completely dry before you use it.
Additional Help and Information
If you have questions about the functions available on your phone, contact your administrator.
The Cisco website (https://www.cisco.com) contains more information about the phones and call control
systems.
• For quick start guides and end-user guides in English, follow this link:
https://www.cisco.com/c/en/us/support/collaboration-endpoints/
ip-phone-6800-series-multiplatform-firmware/products-user-guide-list.html
Cisco IP DECT 6800 Series User Guide
13
Page 24

Cisco IP DECT 6800 Series Documentation
• For guides in languages other than English, follow this link:
https://www.cisco.com/c/en/us/support/collaboration-endpoints/
ip-phone-6800-series-multiplatform-firmware/tsd-products-support-translated-end-user-guides-list.html
• For licensing information, follow this link:
https://www.cisco.com/c/en/us/support/collaboration-endpoints/
ip-phone-6800-series-multiplatform-firmware/products-licensing-information-listing.html
Cisco IP DECT 6800 Series Documentation
See the publications that are specific to your language and firmware release. Navigate from the following
Uniform Resource Locator (URL):
https://www.cisco.com/c/en/us/support/collaboration-endpoints/ip-dect-6800-series-multiplatform-firmware/
tsd-products-support-series-home.html
Lost Phone Connectivity
Your Handset
Sometimes your phone can lose its connection to the base station, or the base station can lose its connection
to the call control system. When this connection is lost, your phone displays a message.
If you are on an active call when either connection is lost, the call ends.
If you lost the connection because you moved out of the base station range, you should add a coverage warning.
For more information, see Set the Coverage Warning, on page 58.
When the phone reconnects to the base station or the base station reconnects to the call control system, you'll
be able to use your phone normally again.
Cisco One-Year Limited Hardware Warranty Terms
Special terms apply to your hardware warranty and services that you can use during the warranty period.
Your formal Warranty Statement, including the warranties and license agreements applicable to Cisco software,
is available on Cisco.com at this URL: https://www.cisco.com/go/hwwarranty.
Cisco IP DECT 6800 Series User Guide
14
Page 25

Handset Setup
• Handset Hardware Installation, on page 15
• Handset Battery Charging, on page 21
• Automatic Handset Configuration, on page 22
• Manual Handset Configuration, on page 22
• Handset Firmware Upgrades, on page 23
Handset Hardware Installation
Handset Package Contents
Your handset package has the following contents:
• Handset with attached belt clip. Inside the handset is the battery, with a piece of plastic over the battery
contacts.
CHAPTER 2
Note
You need to remove the plastic over the battery contacts. For more information,
see Install the Battery in the Handset, on page 16.
• Charging cradle with attached USB cable.
• Regional power adapter for the charging cradle.
• Plastic cover to replace the belt clip on the handset.
Note
Make sure that you save this small plastic cover, in case you need it.
• Printed compliance document.
Related Topics
Install the Battery in the Handset, on page 16
Handset Battery Charging, on page 21
Cisco IP DECT 6800 Series User Guide
15
Page 26
Install the Battery in the Handset
Remove the Handset Clip, on page 19
Install the Battery in the Handset
The handset battery is shipped inside the handset, but there is a plastic tab over the battery contacts. You need
to remove the plastic tab.
Procedure
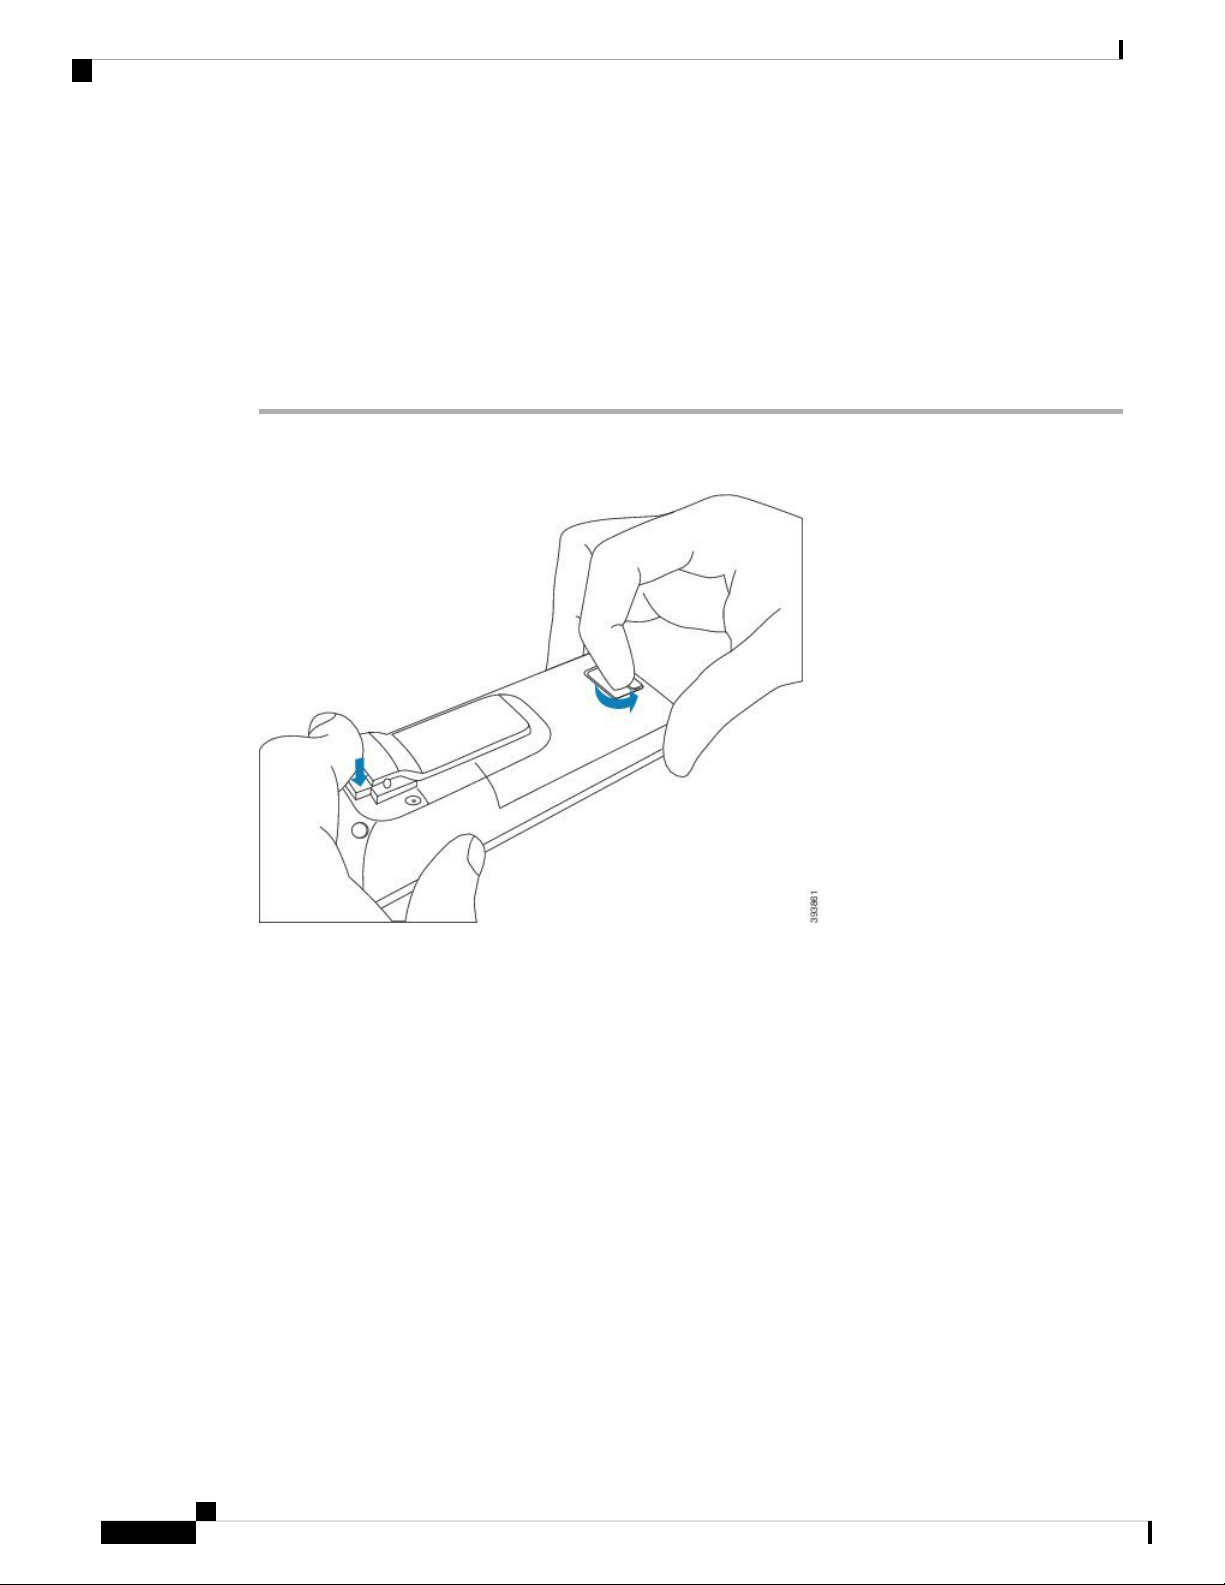
Step 1 On the back of the handset, turn the latch counterclockwise to unlock the back, lift the clip, and lift the cover
to remove the battery cover.
Handset Setup
Step 2 Remove the battery from the handset.
Cisco IP DECT 6800 Series User Guide
16
Page 27
Handset Setup
Install the Battery in the Handset
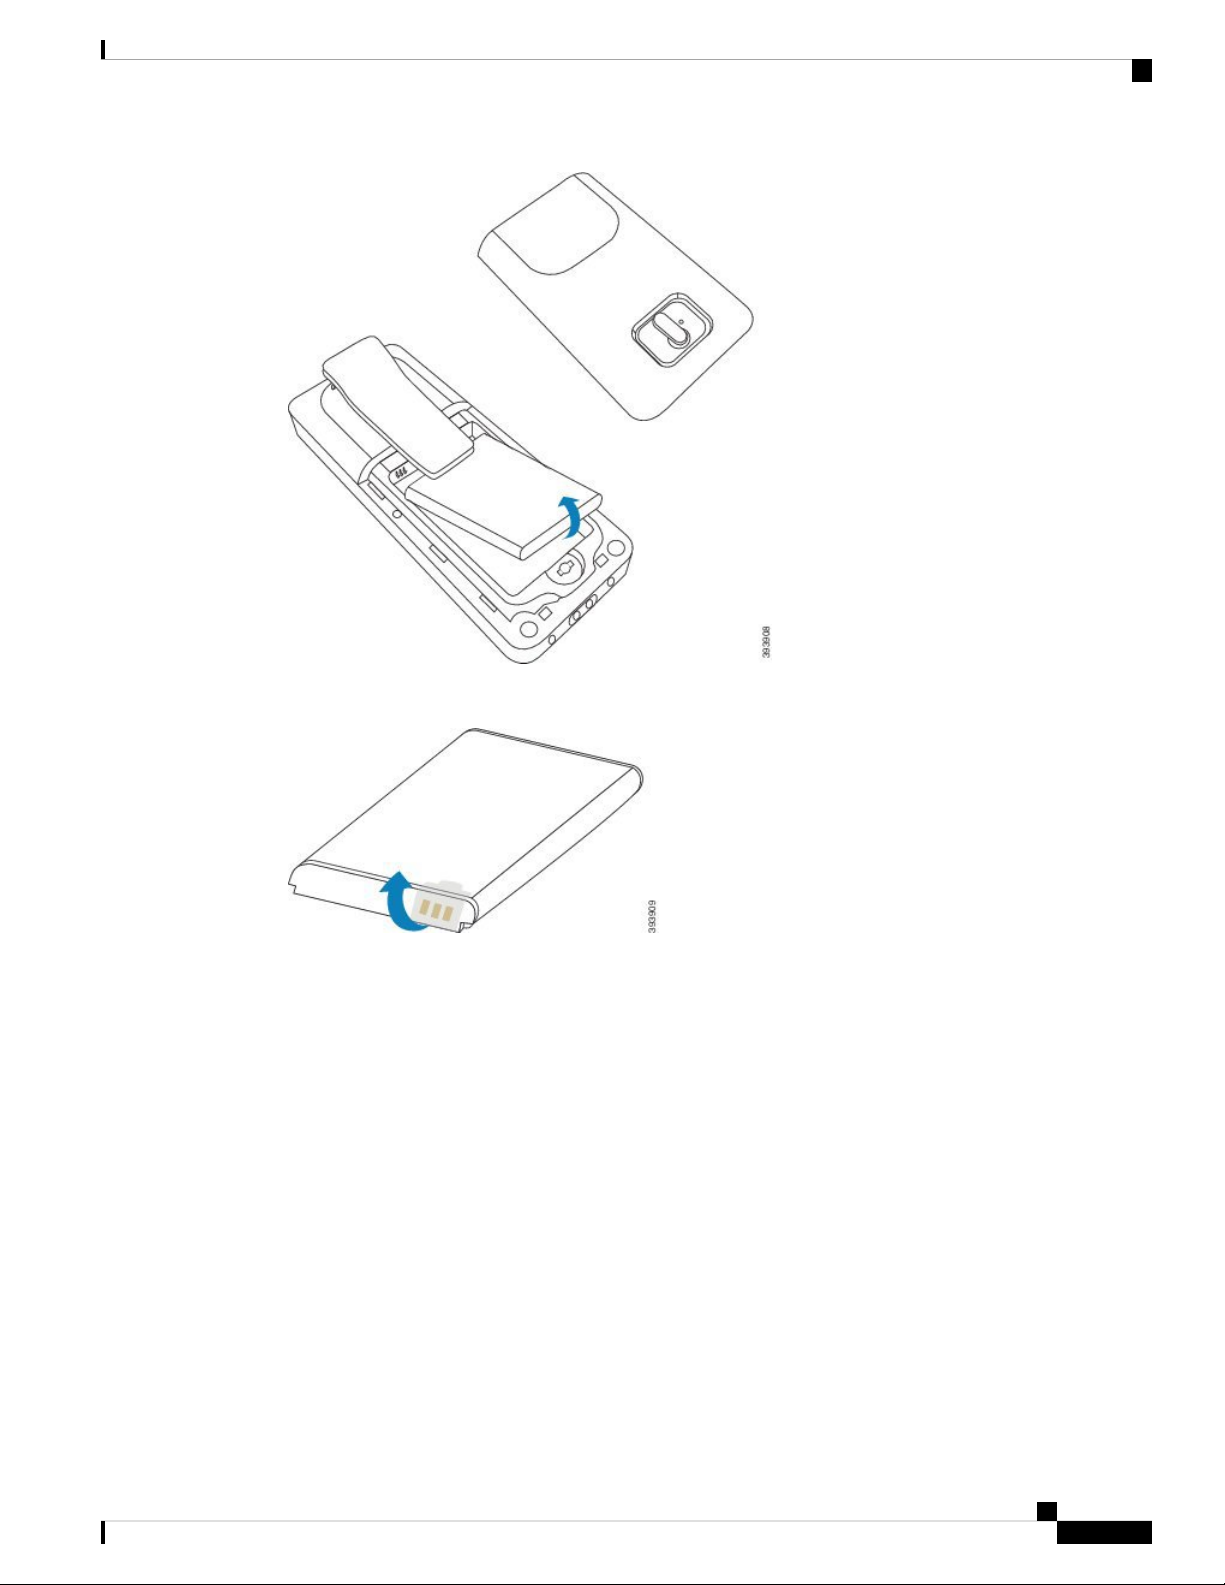
Step 3 Remove the plastic over the contacts.
Step 4 Place the battery under the clip and drop it into the compartment.
Cisco IP DECT 6800 Series User Guide
17
Page 28
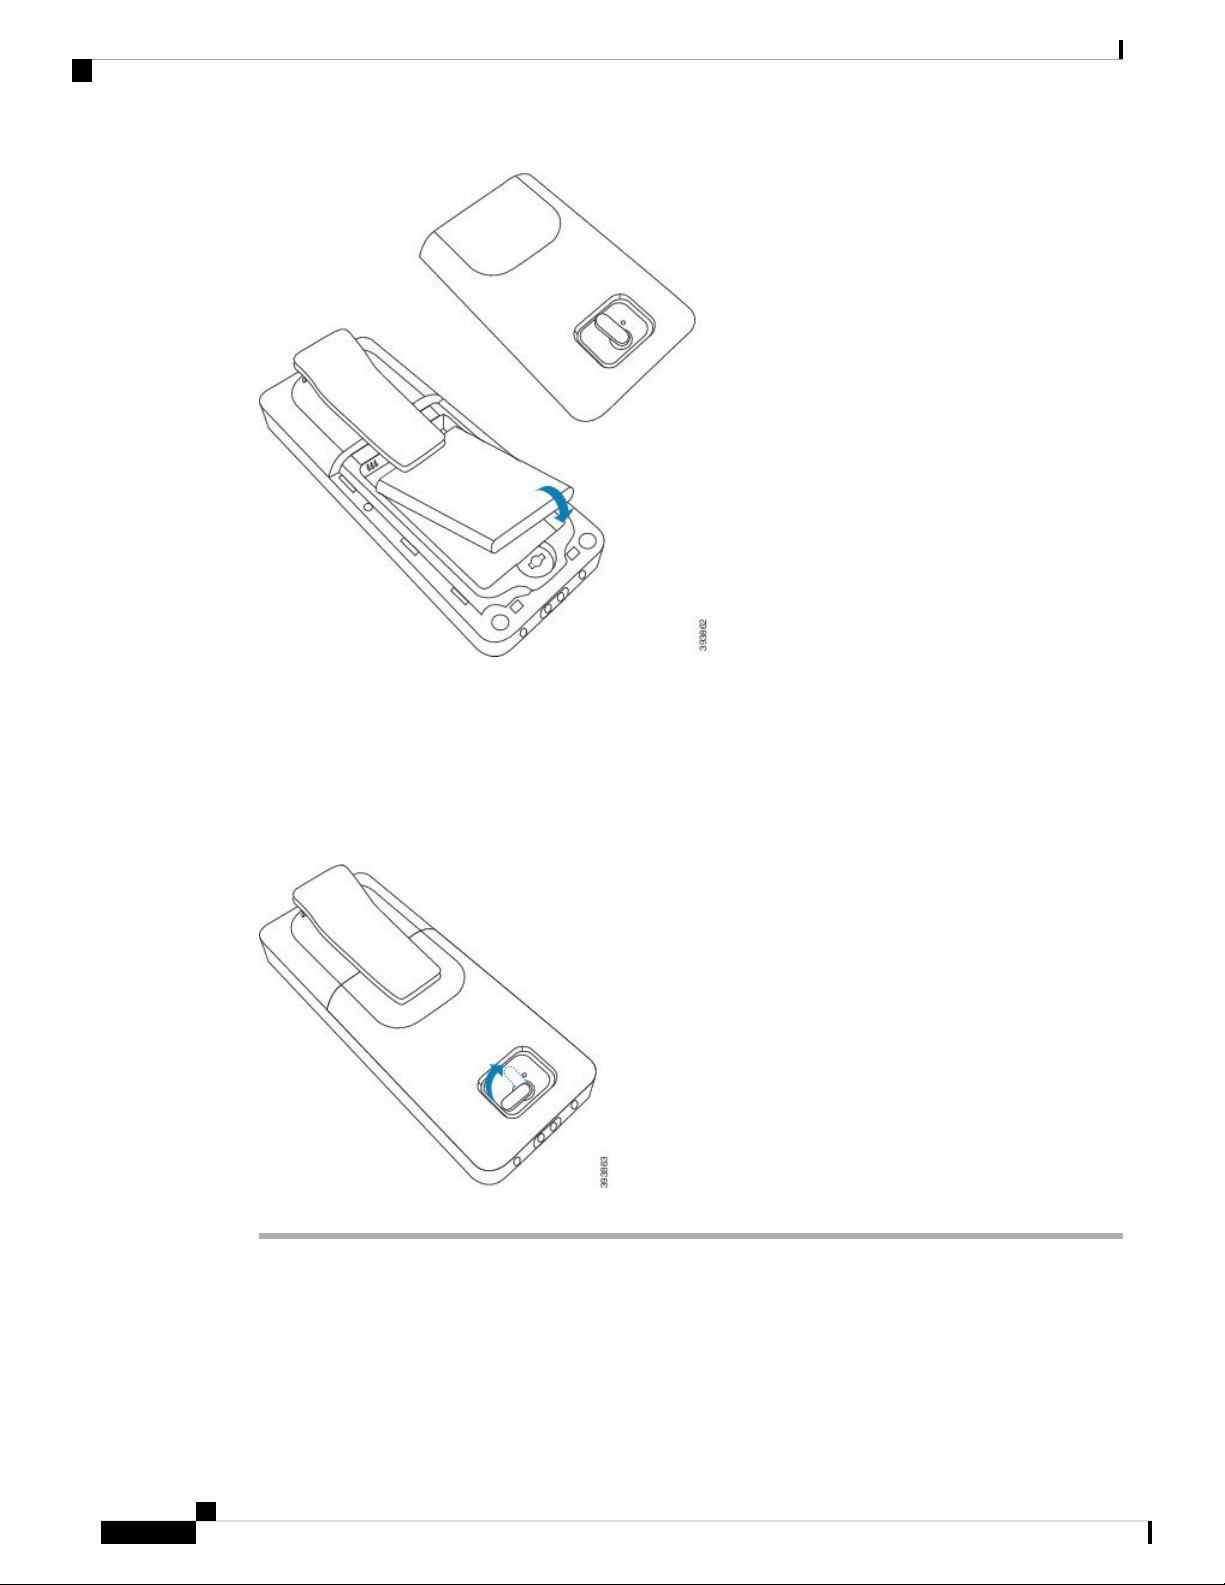
Install the Battery in the Handset
Handset Setup
The battery contacts are on the top left edge of the battery and the top left edge of the battery compartment.
Ensure that the contacts meet and that the battery is seated in the compartment.
Step 5 Replace the battery cover, make sure that the cover is closed, and turn the latch clockwise to the locked
position.
Don't force the cover closed. If it doesn't close easily, take it off and check that the battery is completely seated
in the battery compartment.
What to do next
Before you use the handset, you need to charge it. See Charge the Handset Battery, on page 21.
Cisco IP DECT 6800 Series User Guide
18
Page 29
Handset Setup
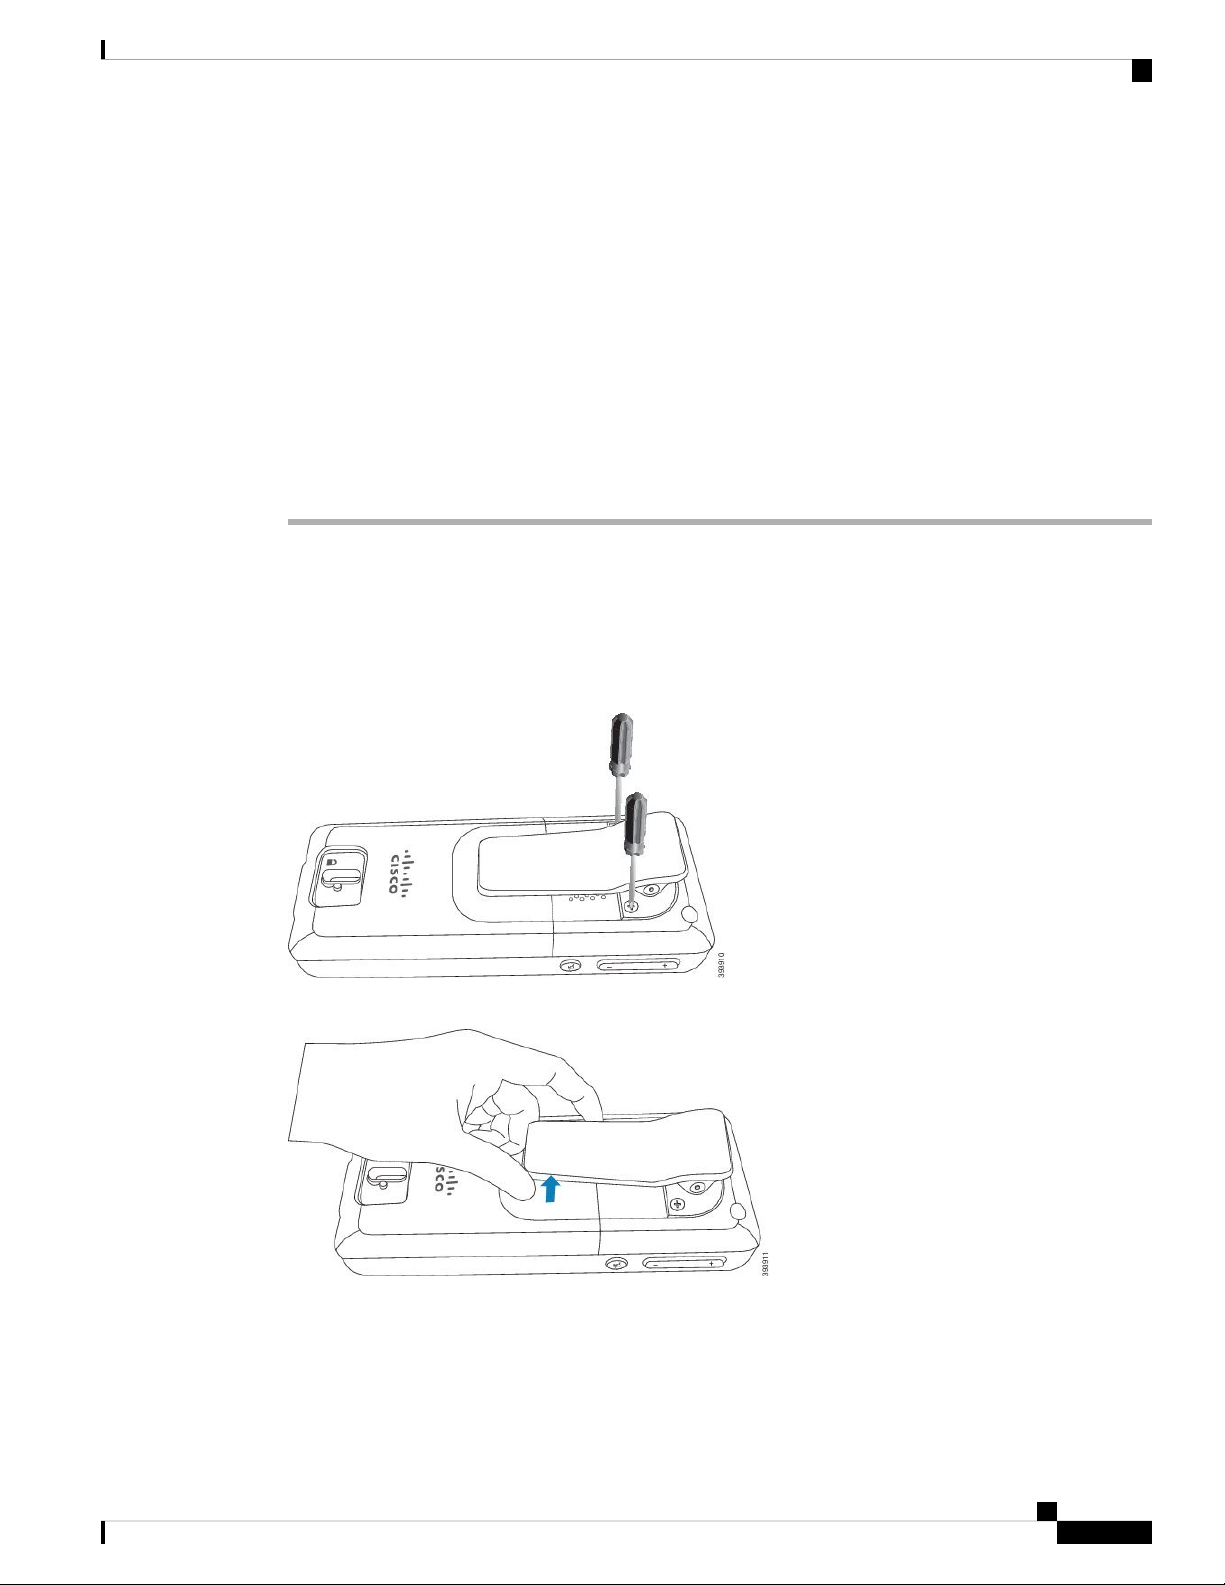
Remove the Handset Clip
You can remove the clip from the back of the handset and replace it with a smooth cover that shipped with
your handset.
Before you begin
You need:
• #1 Phillips-head screwdriver
• Plastic cover to replace the belt clip on the handset. This cover is shipped to you in the product box.
Procedure
Step 1 Turn off the handset.
Step 2 Place the handset face down on a flat, level surface. You may want to place the handset on a large, clean cloth
to protect the handset.
Step 3 Use the screwdriver to remove the screws on the clip. Set the screws aside.
Remove the Handset Clip
Note
The screws are small, so be careful not to lose them.
Step 4 Lift up the loose end of the clip. The clip assembly should come off the handset.
Step 5 The replacement cover has a hook in the back. Slide the hook into the recessed area of the handset and press
it into the handset.
This diagram shows the hook on the back.
Cisco IP DECT 6800 Series User Guide
19
Page 30

Remove the Handset Clip
Handset Setup
This diagram shows the way you put the hook into the handset.
Press down until the clip is in position and the back is flat.
Step 6 Use the screwdriver to screw the screws into the cover and handset.
Cisco IP DECT 6800 Series User Guide
20
Page 31

Handset Setup
Step 7 Store the cover with the belt clip, in case you need to use it.
Handset Battery Charging
Set Up the Charging Cradle
Handset Battery Charging
You use the charging cradle to charge the handset. The cradle has a built-in USB cable that plugs into the
power adapter. The power adapter is designed for your country's electrical outlet configuraiton and power
rating.
Procedure
Step 1 Place the cradle on a level surface.
Step 2 Plug the USB connector of the power cord into the power adapter.
Step 3 Plug the power adapter into the electrical outlet.
Charge the Handset Battery
You use the handset charger to charge the handset battery. The battery comes partially charged, but you should
charge it for a minimum of 10 hours before you use it for the first time.
Cisco IP DECT 6800 Series User Guide
21
Page 32

Automatic Handset Configuration
If you remove and replace the battery from the handset, you need to fully discharge and then fully charge the
battery so that the battery indicator is accurate.
Handset Setup
Caution
Caution
Charge the battery with the handset charger provided. If you use another method, you can damage the battery,
the handset, or your surrounding area.
Only charge the battery in environments where the temperature is between 32°F (0°C) and 104°F (40°C).
Do not charge the battery in hazardous environments or where there is explosion danger.
When you place the handset into the charger, it turns on (if not already on) and displays a message that the
handset is charging. The handset screen dims and turns off at the configured time.
If the LED on the handset starts to flash, the handset is updating its firmware.
Before you begin
Set up the cradle as described in Set Up the Charging Cradle, on page 21.
Ensure that your handset charger is plugged into the electrical outlet.
Procedure
Place the handset in the charger so that the contacts in the handset and the contacts in the charger match.
The handset screen should turn on and display a message that the handset is charging. If this doesn't happen,
remove the handset from the charger and try again.
Automatic Handset Configuration
In many cases, when you first power on the handset, it will automatically configure itself to communicate
with the base station. If your handset doesn't automatically configure, you have to manually configure it, using
information provided by your administrator.
Manual Handset Configuration
Sometimes you have to manually configure your handset. Your administrator will give you the information
you need to access the base station web pages, access appropriate web pages, and set various fields.
You can find the manual configuration instructions in the Cisco IP DECT 6800 Series Administration Guide.
Cisco IP DECT 6800 Series User Guide
22
Page 33

Handset Setup
Handset Firmware Upgrades
From time to time, your administrator will need to upgrade the firmware on your handset. The handset
downloads the new firmware file from the server.
After the download completes, the handset needs to install the file. You see a message on the screen to tell
you to put your handset into the charging cradle. When you put the handset in the charging cradle, the LED
flashes to alert you that the handset is loading the new firmware. Leave the handset in the charging cradle
until the LED stops flashing.
Handset Firmware Upgrades
Cisco IP DECT 6800 Series User Guide
23
Page 34

Handset Firmware Upgrades
Handset Setup
Cisco IP DECT 6800 Series User Guide
24
Page 35

Make Calls
CHAPTER 3
Calls
• Make Calls, on page 25
• Answer a Call, on page 28
• End a Call, on page 30
• Hold and Resume a Call, on page 30
• Mute Your Call, on page 30
• Create a Conference Call, on page 31
• Transfer a Call, on page 31
• BroadWorks Shared Call Appearance, on page 31
• Star Codes, on page 32
• Use Push to Talk, on page 34
Your handset works just like a regular phone. But we make it easier for you to make calls.
Make a Call
Your handset can have more than one line. By default, you place calls on the primary line.
Procedure
Step 1 When your handset is idle, enter the phone number with the keypad. To start the number with plus (+), press
and hold Asterisk until the + displays on the screen.
Step 2 Press Answer/Send .
Make a Call on a Different Line
You may have more than one line on your handset. By default, your handset selects the first line. But, you
can make a call from the second line.
Cisco IP DECT 6800 Series User Guide
25
Page 36

Make a Call with the Speakerphone
Procedure
Step 1 When your handset is idle, enter the phone number with the keypad. To start the number with plus (+), press
and hold Asterisk until the + displays on the screen.
Step 2 Press Line.
Step 3 Highlight the line and press Select.
Make a Call with the Speakerphone
Procedure
Step 1 When your handset is idle, enter the phone number with the keypad. To start the number with plus (+), press
Calls
and hold Asterisk until the + displays on the screen.
Step 2 Press Speakerphone .
Make a Call with a Headset
Procedure
Step 1 When your handset is idle, remove the cover from the headset port and plug in your headset.
Step 2 Enter thephone number with the keypad.Tostart the number with plus(+), press and hold Asterisk
until the + displays on the screen.
Step 3 Press Answer/Send .
Speed Dial Calls
If you make frequent calls to specific phone numbers, you can set up your handset for speed dials. You can
set up to 8 speed dial numbers.
Assign a Speed Dial Number
You can assign a speed dial number to a contact. You assign speed dials to entries 2 to 9. Entry 1 is used for
your speed dial to voicemail.
Cisco IP DECT 6800 Series User Guide
26
Page 37

Calls
Speed-Dial Numbers
Before you begin
You need at least one contact in your Contacts list.
Procedure
Step 1 Press Contacts.
Step 2 Highlight the contact.
Step 3 Press More.
Step 4 Select Speed Dial.
Step 5 If you don't have an empty speed dial index entries, highlight a number you don't need, and press Delete.
Step 6 Highlight an empty speed dial index and press Add.
Step 7 Press Power/End .
Related Topics
Add a Local Contact, on page 43
Speed-Dial Numbers
When you dial a number on your handset, you enter a series of digits. When you set up a speed-dial number,
the speed-dial number must contain all the digits you need to make the call. For example, if you need to dial
9 to get an outside line, you enter the number 9 and then the number you want to dial.
You can also add other dialed digits to the number. Examples of additional digits include a meeting access
code, an extension, a voicemail password, an authorization code, and a billing code.
The dial string can contain the following characters:
• 0 to 9
• Pound (#)
• Asterisk (*)
• Comma (,)—This is the pause character, and gives a 2- second delay in the dialing. You can have several
commas in a row. For example, two commas (,,) represent a pause of 4 seconds.
The rules for dial strings are:
• Use the comma to separate the parts of the dial string.
• An authorization code must always precede a billing code in the speed-dial string.
• A single comma is required between the authorization code and the billing code in the string.
• A speed-dial label is required for speed dials with authorization codes and additional digits.
Before you configure the speed dial, try to dial the digits manually at least once to ensure that the digit sequence
is correct.
Your handset does not save the authorization code, billing code, or extra digits from the speed dial in the call
history. If you press Redial after you connect to a speed-dial destination, the handset prompts you to enter
any required authorization code, billing code, or additional digits manually.
Cisco IP DECT 6800 Series User Guide
27
Page 38

Make a Speed Dial Call
Example
To set up a speed-dial number to call a person at a specific extension, and if you need an authorization code
and billing code, consider the following requirements:
• You need to dial 9 for an outside line.
• You want to call 5556543.
• You need to input the authorization code 1234.
• You need to input the billing code 9876.
• You must wait for 4 seconds.
• After the call connects, you must dial the extension 56789#.
In this scenario, the speed-dial number is 95556543,1234,9876,,56789#.
Make a Speed Dial Call
After you set up the speed dial, as described in Assign a Speed Dial Number, on page 26, you can make a
speed dial call. Speed dial indexes are the numbers 2 to 9.
Calls
Example
If you have your home number in your local contacts, you can assign it the speed dial index 9. Then when
you press and hold the 9 key, the handset automatically dials your home.
Before you begin
You need the speed dial index for the contact.
Procedure
Step 1 Press and hold the number on the keypad corresponding to the speed dial index.
Step 2 Release the key when the call starts to dial.
Answer a Call
If you have multiple lines, your handset displays the line that has the incoming call.
If you have a Bluetooth headset paired to the handset, the call is answered on the headset. If you don't have
a Bluteooth headset paired, the call is answered on the handset.
Procedure
Press Answer/Send .
Cisco IP DECT 6800 Series User Guide
28
Page 39

Calls
Answer an Alarm Call
If your handset is set up as the recipient of alarm (emergency) calls, you receive alarm calls when someone
presses the Emergency button on their handset. Alarm calls can be set up to ring one handset or
a number of handsets.
When an alarm call rings, you hear a different ringtone and your handset indicates that you have an alarm
call. If you accept the call, the alarm is saved in the Alarms list. If you reject the call, the alarm isn't saved in
the Alarms list.
Procedure
Press Ok to answer the call or press Reject.
Related Topics
Emergency Alarm List, on page 51
Answer an Alarm Call
Answer Call Waiting
If you are on a call, and another call comes in, you hear the call waiting tone and the incoming call displays
on the handset screen.
Procedure
Do one of these actions:
• To accept the call, press Answer/Send . Your active call is automatically put on hold.
• To reject the call, press Decline. The call is sent to voicemail, if configured.
Silence an Incoming Call
If you don't want to answer a call, you can silence the handset to stop the ringing. The call will transfer to
your voicemail, if voicemail is configured.
Procedure
When a call is ringing,
• Press Decline to immediately send the call to voicemail (if configured).
• Press Ignore to silence the ringer. If the call is not answered, then it is sent to voicemail (if configured).
Cisco IP DECT 6800 Series User Guide
29
Page 40

End a Call
End a Call
Procedure
Press Power/End .
Hold and Resume a Call
You can put a call on hold and then resume it.
Procedure
Calls
Step 1 From an active call, press Hold.
Step 2 Press Resume to pick the call back up.
Swap Between Active and Held Calls
When you have an active call and a held call, you can easily swap the calls. The current active calls goes on
hold and the previously held call becomes the active call.
Procedure
Press Swap.
Mute Your Call
You can mute yourself, so that others on the call can't hear you.
Procedure
Step 1 Press Mute .
Step 2 To unmute yourself, press Mute again.
Cisco IP DECT 6800 Series User Guide
30
Page 41

Calls
Create a Conference Call
You can add another person into an active call to create a 3-way conference call.
Procedure
Step 1 From an active call, press Conf.
Step 2 Enter the coworker's number and press Answer/Send .
Step 3 Press Conf after the coworker answers.
Transfer a Call
Create a Conference Call
You can transfer a call to a coworker. You can transfer the call without waiting for the coworker to answer,
or talk with the coworker before you transfer the call.
Procedure
Step 1 From an active call, press Transfer.
Step 2 Enter the coworker's number and press Answer/Send .
Step 3 Press Transfer before or after the coworker answers.
Related Topics
Transfer a Call with a Star Code, on page 32
BroadWorks Shared Call Appearance
Your organization may use the BroadWorks Shared Call Appearance feature. With this feature, handsets are
set up in groups. When enabled, each handset in the group displays as a box immediately below the header
row. The color of the box identifies the state of the handset:
• Red: The handset in use.
• Solid green: The handset is idle.
• Flashing green: The handset has an incoming call.
For details about this and other BroadWorks features, see the Broadworks documentation.
Cisco IP DECT 6800 Series User Guide
31
Page 42

Star Codes
Star Codes
You can use star codes to quickly access some functions. These codes are made up of the asterisk (*) and a
2-digit code.
For the list of star codes, contact your administrator.
Return a Call with a Star Code
You can call the last person who called you with a star code instead of using the Recents list.
Use the star code given to you by your administrator or service provider.
Procedure
While your handset is idle, enter the call return star code.
Calls
Related Topics
Call Someone in Your Recent Calls List, on page 47
Transfer a Call with a Star Code
You can immediately transfer a call to a coworker. This type of transfer doesn't allow you to talk with the
coworker first.
Use the star code given to you by your administrator or service provider.
Procedure
Step 1 While on an active call, enter the call transfer star code.
Step 2 Enter the number to transfer the call to.
Related Topics
Transfer a Call, on page 31
Activate and Deactivate Call Forward All with Star Codes
You can set up your handset to forward all your calls to another coworker or to voicemail with a star code.
Use the star code given to you by your administrator or service provider.
Procedure
Step 1 While your handset is idle, enter the call forward unconditional star code.
Cisco IP DECT 6800 Series User Guide
32
Page 43

Calls
Activate and Deactivate Call Waiting with Star Codes
Step 2 Enter the number to forward calls to.
Step 3 To make calls ring on your handset again, enter the star code to cancel call forward unconditional.
Related Topics
Set Call Forward Unconditional, on page 65
Activate and Deactivate Call Waiting with Star Codes
You can turn off call waiting notification. When you activate call waiting, you don't hear a tone for an incoming
call when you are on a call.
Use the star code given to you by your administrator or service provider.
Procedure
Step 1 While your handset is idle, enter the star code to block call waiting.
Step 2 To hear the tone again, enter the star code to enable call waiting.
Block and Unblock Outgoing Caller Information with a Star Code
You can stop your handset from sending your caller information. You may need to do this for privacy reasons.
Use the star code given to you by your administrator or service provider.
Procedure
Step 1 While your handset is idle, enter star code to block caller information.
Step 2 To allow the handset to send caller information, enter the star code to enable caller information.
Related Topics
Hide Your Caller ID When You Make a Call, on page 65
Block and Unblock Anonymous Calls with a Star Code
You can ensure that only calls with a proper caller ID ring on your handset with a star code.
Use the star code given to you by your administrator or service provider.
Procedure
Step 1 While your handset is idle, enter the star code to block anonymous calls.
Step 2 To allow calls to ring again, enter the star code to allow anonymous calls.
Cisco IP DECT 6800 Series User Guide
33
Page 44

Turn Do Not Disturb On and Off with a Star Code
Turn Do Not Disturb On and Off with a Star Code
When you don't want to be disturbed by incoming calls, you can turn on do not disturb (DND). When you
handset is in DND state, the DND icon displays on the screen.
Use the star code given to you by your administrator or service provider.
To use this feature, your administrator must enable DND.
Procedure
Step 1 While your handset is idle, enter the do not disturb star code.
Step 2 To deactivate DND, enter code to cancel do not disturb.
Related Topics
Set Do Not Disturb, on page 64
Calls
Use Push to Talk
You can use the handset as a two-way radio with the Push to Talk feature. The message is played over the
handset speaker automatically. Only 1 person at a time can use Push to Talk. If you press Mute while you
are receiving a Push to Talk message, the handset speaker mutes.
Before you begin
• You need Push to Talk enabled on your handset.
• At least one more handset in the system needs Push to Talk enabled.
Procedure
Step 1 When your handset is idle, push and continue to hold Mute .
Step 2 After the Connected screen displays, you can talk.
Step 3 When your message is complete, release Mute.
Related Topics
Turn on Push To Talk, on page 69
Cisco IP DECT 6800 Series User Guide
34
Page 45

Text Messages
• Text Messages, on page 35
• Send a Text Message, on page 35
• Reply to a Text Message Immediately, on page 36
• Add a Text Message Sender to Your Local Contacts, on page 37
• Append a Text Message Sender to a Local Contact, on page 37
• Forward a Text Message, on page 38
• Delete a Text Message Immediately, on page 38
• Delete all Text Messages, on page 39
• View Your Text Message History, on page 39
• Configure Your Text Message Settings, on page 41
Text Messages
Your administrator may enable you to send and receive text messages from coworkers on the system. You
may also be able to send text messages to people outside the system. Your administrator should tell you the
text message constraints.
CHAPTER 4
You can view the history of your text messages and you can set some messaging parameters to suit your needs.
Send a Text Message
You can send a message of up to 160 characters.
Procedure
Step 1 Press Menu .
Step 2 Select Messaging > Drafts.
Step 3 Press New.
Step 4 Use the keypad to type your message. The length of your message displays on the bottom right corner of the
screen.
Cisco IP DECT 6800 Series User Guide
35
Page 46

Text Messages
Reply to a Text Message Immediately
Step 5 (Optional) If you need special symbols that are not on the keypad, press Symbol and select the symbol you
need.
Step 6 (Optional) Press Clear to delete the last character of your message.
Step 7 Press Send.
Step 8 Choose the message priority from these options:
• Normal: The message is sent in default mode.
• Urgent: The message is sent as urgent. The recipient sees an icon with an exclamation mark on the
message in their Inbox screen. You see the icon with an exclamation mark on the message in your Sent
messages screen. Messages sent as Urgent display at the top of the list.
Step 9 Choose message recipient with one of these options:
• Contacts: When you select this option, your local contacts list is displayed and you can select a contact.
• Enter number: When you select this option, you enter a phone number in the next screen.
• Central Directory: When you select this option, the central phone directory is displayed and you can
select a contact.
The full phone number must be used for text messages. For example, if your contact has an internal extension
8902 and an external number of +2345678902, you must use +2345678902.
Step 10 Press Send.
Step 11 Press OK.
Reply to a Text Message Immediately
When you receive a text message, you can reply to it quickly from the text message screen. You can also reply
later from the text message history.
Procedure
Step 1 Press Reply.
Step 2 Use the keypad to type your message. The length of your message displays on the bottom right corner of the
screen
Step 3 (Optional) If you need special symbols that are not on the keypad, press Symbol and select the symbol you
need.
Step 4 (Optional) Press Clear to delete the last character of your message.
Step 5 Press Send.
Step 6 Choose the message priority from these options:
• Normal: The message is sent in default mode.
• Urgent: The message is sent as urgent. The recipient sees an icon with an exclamation mark on the
Step 7 Press Send.
Cisco IP DECT 6800 Series User Guide
36
message in their Inbox screen. You see the icon with an exclamation mark on the message in your Sent
messages screen. Messages sent as Urgent display at the top of the list.
Page 47

Text Messages
Add a Text Message Sender to Your Local Contacts
Step 8 Press OK.
Related Topics
Reply to a Text Message from Your Text History, on page 40
Add a Text Message Sender to Your Local Contacts
When you receive a text message, you can add the person to your local contact list from the text message
screen. You can also add the person later from the text message history.
Before you begin
You must be viewing a text message.
Procedure
Step 1 Press More.
Step 2 Select Save as contact.
Step 3 Press Select.
Step 4 Enter the name with the keypad and press Save.
Step 5 Highlight a phone number entry (Work, Mobile, Home, or Other) and press Add.
Step 6 Press Save to save the contact number.
Step 7 Press Save to save the new contact.
Append a Text Message Sender to a Local Contact
When you receive a text message, you can append information about the person to an existing local contact
from the text message screen. You can also append the information later from the text message history (see
View Your Text Message History, on page 39).
Before you begin
You must be viewing a text message.
Procedure
Step 1 Press More.
Step 2 Select Append to contact.
Step 3 Press Append.
Step 4 Highlight a phone number entry (Work, Mobile, Home, or Other) and press Append.
Step 5 Press Save to save the contact number.
Cisco IP DECT 6800 Series User Guide
37
Page 48

Forward a Text Message
Step 6 Press Yes.
Forward a Text Message
When you receive a text message, you can forward it quickly from the text message screen.
Before you begin
You must be viewing a text message.
Procedure
Step 1 Press More.
Step 2 Select Forward.
Step 3 Use the keypad to type your message. The length of your message displays on the bottom right corner of the
screen.
Step 4 (Optional) If you need special symbols that are not on the keypad, press Symbol and select the symbol you
need.
Step 5 (Optional) Press Clear to delete the last character of your message.
Step 6 Press Send.
Step 7 Choose the message priority from these options:
Text Messages
• Normal: The message is sent in default mode.
• Urgent: The message is sent as urgent. The recipient sees an icon with an exclamation mark on the
message in their Inbox screen. You see the icon with an exclamation mark on the message in your Sent
messages screen. Messages sent as Urgent display at the top of the list.
Step 8 Choose the message recipient with one of these options:
• Contacts: When you select this option, your local contacts list is displayed and you can select a contact.
• Enter number: When you select this option, you enter a phone number in the next screen.
• Central Directory: When you select this option, the central phone directory is displayed and you can
select a contact.
The full phone number must be used for text messages. For example, if your contact has an internal extension
8902 and an external number of +2345678902, you must use +2345678902.
Step 9 Press Send.
Step 10 Press OK.
Delete a Text Message Immediately
You can delete a text message after you read it.
Cisco IP DECT 6800 Series User Guide
38
Page 49

Text Messages
Before you begin
You must be viewing a text message.
Procedure
Step 1 Press More.
Step 2 Select Delete message.
Step 3 Press Yes.
Related Topics
Delete a Text Message from the Text Message History, on page 40
Delete all Text Messages
You can delete all received text messages after you read a message. The messages in your Text message Inbox
are deleted.
Delete all Text Messages
Before you begin
You must be viewing a text message.
Procedure
Step 1 Press More.
Step 2 Select Delete all messages.
Step 3 Press Yes.
Related Topics
Delete all Text Messages from the Text Message History, on page 41
View Your Text Message History
The text message history can contain up to 250 messages. If you have more than this number of messages,
the Overwrite old messages field in the messaging settings controls if the handset overwrites old messages.
For more information, see Configure Your Text Message Settings, on page 41.
The messages display in different lists: Inbox, Drafts, Sent messages. When you access Messaging, the
Inbox is displayed.
Procedure
Step 1 Press Menu .
Cisco IP DECT 6800 Series User Guide
39
Page 50

Reply to a Text Message from Your Text History
Step 2 Select Messaging .
Step 3 Press right on the Navigation ring to access the next screen.
Reply to a Text Message from Your Text History
You can respond to a text message later from the text messaging history.
Procedure
Step 1 Press Menu .
Step 2 Select Messaging .
Step 3 Highlight the message.
Step 4 Press Reply.
Step 5 Use the keypad to type your message. The length of your message displays on the bottom right corner of the
screen
Step 6 (Optional) If you need special symbols that are not on the keypad, press Symbol and select the symbol you
need.
Step 7 (Optional) Press Clear to delete the last character of your message.
Step 8 Press Send.
Step 9 Choose the message priority from these options:
Text Messages
• Normal: The message is sent in default mode.
• Urgent: The message is sent as urgent. The recipient sees an icon with an exclamation mark on the
message in their Inbox screen. You see the icon with an exclamation mark on the message in your Sent
messages screen. Messages sent as Urgent display at the top of the list.
Step 10 Press Send.
Step 11 Press OK.
Related Topics
Reply to a Text Message Immediately, on page 36
Delete a Text Message from the Text Message History
You can delete a text message in the text history from your Inbox, Drafts, or Sent messages folder.
Procedure
Step 1 Press Menu .
Cisco IP DECT 6800 Series User Guide
40
Page 51

Text Messages
Delete all Text Messages from the Text Message History
Step 2 Select Messaging .
Step 3 Press right on the navigation ring to display the appropriate folder.
Step 4 Press More.
Step 5 Select Delete Message.
Step 6 Press Yes.
Related Topics
Delete a Text Message Immediately, on page 38
Delete all Text Messages from the Text Message History
You can delete all text message in the text history in your Inbox, Drafts, or Sent messages folder.
Procedure
Step 1 Press Menu .
Step 2 Select Messaging .
Step 3 Press right on the navigation ring to display the appropriate folder.
Step 4 Press More.
Step 5 Select Delete all messages.
Step 6 Press Yes.
Related Topics
Delete all Text Messages, on page 39
Configure Your Text Message Settings
You can set up your handset for these actions:
• Overwrite old messages when the text message history reaches the limit. Youcan keep up to 250 messages.
If you don't enable the handset to overwrite old messages, you have to manually delete messages when
the text message history is full.
• Save the messages you send in the text message history. By default, your sent messages are saved in the
text message history.
• Set how a new message displays when your handset is idle. When you receive a new message, you can
set the handset to:
• Display only that you have a new message.
• Display the full message immediately. This is the default setting.
Cisco IP DECT 6800 Series User Guide
41
Page 52

Configure Your Text Message Settings
Procedure
Step 1 Press Menu .
Step 2 Select Messaging > Settings.
Step 3 Select Overwrite old and press On or Off. By default, this field is set to Off.
Step 4 Select Sent Messages and press On or Off. By default, this field is set to On.
Step 5 Select Display and press On or Off. By default, this field is set to On.
Text Messages
Cisco IP DECT 6800 Series User Guide
42
Page 53

Contacts and Directories
• Local Contacts, on page 43
• Directories, on page 45
Local Contacts
You can create and save information about your contacts in the local contact list. Your local contacts list can
contain up to 250 entries. Each contact can have three numbers.
After you add contacts, you can easily call a contact. You can also set up speed dials to your local contacts.
Your administrator can also upload a local contacts list to your handset, and export your contacts list.
You can access the contact list from the main screen or from the Menu.
Add a Local Contact
You can add a contact to your contact list.
CHAPTER 5
Procedure
Step 1 Press Contacts .
Step 2 Press More.
Step 3 Highlight Add contact and press Select.
Step 4 Press Edit.
Step 5 Enter the name of the contact.
Step 6 Press Save.
Step 7 Highlight Work, Mobile, Home, or Other, and press Edit.
You need to add at least one phone number.
Step 8 Enter the contact number and press Save.
If you make a mistake, press Clear to delete the last character entered.
Step 9 (Optional) Add a ringtone to the contact.
Cisco IP DECT 6800 Series User Guide
43
Page 54

Call a Local Contact
a) Highlight Ringtone and press Edit.
b) Select a melody.
You can use Play to hear the ringtone
c) Press Select.
Step 10 Press Save.
Step 11 Press Yes.
Related Topics
Assign a Speed Dial Number, on page 26
Call a Local Contact
You can call a contact to your contact list. If your contact has more than one phone number configured, you
can select which number you want to call.
Procedure
Contacts and Directories
Step 1 Press Contacts .
Step 2 Highlight an entry.
Step 3 (Optional) If your contact has more than one phone number configured, press right or left on the navigation
ring to display the number to call.
Step 4 Press Call.
Edit a Local Contact
You can edit a contact entry in your contact list.
Procedure
Step 1 Press Contacts .
Step 2 Highlight the contact to edit.
Step 3 Press More.
Step 4 Select Edit contact.
Step 5 Highlight the information to change.
a) Press Edit.
b) Change the information
c) Press Save.
Cisco IP DECT 6800 Series User Guide
44
Page 55

Contacts and Directories
Step 6 Press Save to change the contact entry.
Delete a Local Contact
You can delete a contact to your contact list.
Procedure
Step 1 Press Contacts .
Step 2 Highlight the contact to delete.
Step 3 Press More.
Step 4 Select Delete contact.
Step 5 At the prompt, press Yes.
Delete a Local Contact
Delete all Local Contacts
You can delete all the contacts to your contact list.
Procedure
Step 1 Press Contacts .
Step 2 Press More.
Step 3 Select Delete all contacts.
Step 4 At the prompt, press Yes.
Directories
Your administrator can set up a central directory for your organization. The directory allows you to search
and call any number in the directory.
You can access the directory from the main screen or from the Menu.
Call a Central Directory Contact
You can search, view, and call a number in the directory. The type of search you can use depends on the
method your administrator used to set up the directory.
Cisco IP DECT 6800 Series User Guide
45
Page 56

Call a Central Directory Contact
Procedure
Step 1 Press Directory .
Step 2 Do one of these actions:
• Scroll down to highlight an entry.
• Press Search, enter part or all of the first name of the user, and press Search.
Step 3 (Optional) Press Line and select a line to call on.
Step 4 Press Select.
Contacts and Directories
Cisco IP DECT 6800 Series User Guide
46
Page 57

Recent Calls and Voicemail
• Recent Calls List, on page 47
• Access Your Voicemail, on page 48
Recent Calls List
Your handset collects information about all calls to and from your handset and saves them in a Recents list.
When you view the Recents list, you can:
• View all calls.
• View all answered calls.
• View all dialed calls.
• View all missed calls.
View Your Recent Calls
CHAPTER 6
Your handset keeps a log of all the recent calls. Up to 50 calls are kept in the Recents list. You can view all
calls, the calls you answered, the calls you made (dialed calls), and calls you missed.
Procedure
Step 1 Press Recents .
Step 2 Press right or left on the Navigation ring to view different lists.
Call Someone in Your Recent Calls List
You can call anyone who is displayed in your recent calls list.
Cisco IP DECT 6800 Series User Guide
47
Page 58

Access Your Voicemail
Procedure
Step 1 Press Recents .
Step 2 Press right or left on the Navigation ring to view different lists.
Step 3 Highlight an entry and press Call.
Related Topics
Return a Call with a Star Code, on page 32
Access Your Voicemail
You can access your voice messages directly from your handset. But your administrator must set up your
voicemail account, and may also set up your handset to access the voicemail system. When set up, you use
Recent Calls and Voicemail
One to access your voicemail.
When you don't have your handset available, you can call from any device to your voicemail system to access
your voicemail. Your administrator can give you the voicemail system phone number.
When you have a voicemail, you see the Voicemail icon on the screen header. You may also hear a stutter
tone played from your handset, headset, or speakerphone when you use a phone line. This stutter tone is
line-specific. You only hear it when you use a line that has voice messages.
Note
Because each voicemail system is different, we can't tell you how to use your voicemail system. For information
about your voicemail commands, see the voicemail system user documentation or contact your administrator.
Procedure
Step 1 Press and hold the One .
Step 2 Follow the voice prompts.
Cisco IP DECT 6800 Series User Guide
48
Page 59

Alarms
Set an Alarm
CHAPTER 7
Alarms, Alarm List, and F-Keys
• Alarms, on page 49
• Emergency Alarm List, on page 51
• Function Keys, on page 51
You can use your handset as an alarm clock. When the alarm rings, you can dismiss the alarm or set the
handset to ring in a few minutes.
You can set your handset to remind you at a specific time with an alarm timer. When the timer expires and
the handset rings, the alarm field returns to Off.
You can set only one single-use alarm at a time.
Procedure
Step 1 Press Menu .
Step 2 Select Alarms > Alarm.
Step 3 Set the time for the alarm.
Press right or left on the Navigation ring to move from field to field. Press up or down on the Navigation
ring to increment or decrement the entry, or enter the number with the keypad.
Step 4 Press Save.
Cisco IP DECT 6800 Series User Guide
49
Page 60

Set a Recurrent Alarm
Set a Recurrent Alarm
You can set your handset to remind you at a specific time each day with a recurrent alarm timer. You can set
only one recurrent alarm on the handset.
Procedure
Step 1 Press Menu .
Step 2 Select Alarms > Recurrent Alarm.
Step 3 Set the time for the alarm.
Press right or left on the Navigation ring to move from field to field. Press up or down on the Navigation
ring to increment or decrement the field.
Step 4 Press Save .
Step 5 Highlight each day of the week for the alarm and press Mark.
Step 6 Press Ok.
Alarms, Alarm List, and F-Keys
Set the Snooze Time
When an alarm rings, you can press Snooze to make the alarm ring again at the configured time. By default,
the delay is 10 minutes, but you can set any delay from 1 minute to 10 minutes.
Procedure
Step 1 Press Menu .
Step 2 Select Alarms > Snooze time.
Step 3 Select the snooze time.
Step 4 Press Select .
Respond to an Alarm
At the configured alarm time, the handset rings and you respond to the alarm. If you are on a call, the alarm
doesn't ring through until you end the call.
Cisco IP DECT 6800 Series User Guide
50
Page 61

Alarms, Alarm List, and F-Keys
Before you begin
You need either a single alarm or a recurrent alarm configured. See Set an Alarm, on page 49 or Set a Recurrent
Alarm, on page 50.
Procedure
Do one of the these actions:
• Press Snooze to make the alarm ring again at the selected interval (see Set the Snooze Time, on page
50).
• Press Dismiss.
Emergency Alarm List
Emergency Alarm List
You can view the list of emergency alarms you received, if emergency alarms are configured to ring on your
handset.
Related Topics
Answer an Alarm Call, on page 29
View the Received Emergency Alarms
Procedure
Step 1 Press Menu .
Step 2 Select Alarm list .
Step 3 If there are alarms, press Select to view the alarm information.
Function Keys
You can set up function keys (known as F-keys) to access phone numbers. For example, you can set up an
F-key to call your security department. After you set up an F-key, you can add it to your speed dial list.
Cisco IP DECT 6800 Series User Guide
51
Page 62

Set up an F-Key
Set up an F-Key
Procedure
Step 1 Press Menu .
Step 2 Select F-Keys .
Step 3 Press More.
Step 4 Select Add F-Key.
Step 5 Highlight the Name field and press Edit.
Step 6 Enter a name.
Step 7 Press Save.
Step 8 Highlight the Number field and press Edit.
Step 9 Enter a number.
Step 10 Press Save.
Step 11 Press Yes.
Alarms, Alarm List, and F-Keys
Make a Call with an F-Key
You can call a person from the F-key entry.
Procedure
Step 1 Press Menu .
Step 2 Select F-Keys .
Step 3 Select an entry and press Call.
Add an F-key to Your Speed Dial List
You can add an F-key to your speed dial list.
Before you begin
You need an F-key defined.
Cisco IP DECT 6800 Series User Guide
52
Page 63

Alarms, Alarm List, and F-Keys
Procedure
Step 1 Press Menu .
Step 2 Select F-Keys .
Step 3 Highlight an entry.
Step 4 Press More.
Step 5 Select Speed dial.
Step 6 Do one of these actions.
Delete an F-Key
• Select an empty entry and press Add.
• Select an existing speed dial and press Replace.
• Select an existing speed dial, press Delete, and then press Add.
Delete an F-Key
Procedure
Step 1 Press Menu .
Step 2 Select F-Keys .
Step 3 Select and entry and press More.
Step 4 Select Delete F-Key.
Step 5 Press Yes.
Delete all F-Keys
Procedure
Step 1 Press Menu .
Step 2 Select F-Keys .
Step 3 Press More.
Step 4 Select Delete all F-Keys.
Step 5 Press Yes.
Cisco IP DECT 6800 Series User Guide
53
Page 64

View Your Speed Dial List
View Your Speed Dial List
Procedure
Step 1 Press Menu .
Step 2 Select F-Keys .
Step 3 Press More.
Step 4 Select Speed dial.
Alarms, Alarm List, and F-Keys
Cisco IP DECT 6800 Series User Guide
54
Page 65

Settings
• Settings Menu, on page 55
• Set the Ring Volume for an Incoming Call, on page 70
• Change the Volume on a Call, on page 70
Settings Menu
Audio Settings
Set Silent Mode from the Settings Menu
You can stop the handset from ringing where there is an incoming call. This is called silent mode.
When the handset is in silent mode, incoming calls display on the screen, but the handset does not play a
ringtone.
CHAPTER 8
Procedure
Step 1 Press Menu .
Step 2 Select Settings > Audio Settings.
Step 3 Highlight Silent.
Step 4 Press Off to allow the handset to ring or press On to disable ringing.
Set the Ring Volume from the Settings Menu
You can change the volume of the ringer. This volume does not impact the volume level when you are on a
call.
Cisco IP DECT 6800 Series User Guide
55
Page 66

Set the Ringtone For Different Call Types
Procedure
Step 1 Press Menu .
Step 2 Select Settings > Ring volume.
Step 3 Press right or left on the ring of the navigation cluster .
Step 4 Press Ok to save the level.
Set the Ringtone For Different Call Types
You can set different ring tones for these types of calls:
• Normal call
• Normal message
Settings
• Urgent message
• Emergency
• Alert
Procedure
Step 1 Press Menu .
Step 2 Select Settings > Audio settings.
Step 3 Select the ringtone you want to change.
• Ring melody
• Ring normal ms.
• Ring urgent ms.
• Ring emergency
• Alert tone
Step 4 Press up or down on the ring of the navigation cluster to highlight a tone.
Step 5 Press Play to hear the tone.
Step 6 Press Select to save the tone.
Cisco IP DECT 6800 Series User Guide
56
Page 67

Settings
Set the Alert Volume
You can change the volume of the tone that you hear when you press Emergency .
Procedure
Step 1 Press Menu .
Step 2 Select Settings > Alert volume.
Step 3 Press right or left on the ring of the navigation cluster .
Step 4 Press Ok to save the level.
Set the Alert Volume
Set the Handset Vibration Mode
You can set the handset to vibrate when you have an incoming call.
Procedure
Step 1 Press Menu .
Step 2 Select Settings > Vibrator.
Step 3 Highlight your choice.
• Off (default): When an incoming call rings on the handset, the handset doesn't vibrate.
• Vibrate then ring: When an incoming call rings on the handset, the handset vibrates and then rings.
• Vibrate only: When an incoming call rings on the handset, the handset vibrates. You do not hear the
ringtone.
• Vibrate and ring: When an incoming call rings on the handset, the handset vibrates and rings at the
same time.
Step 4 Press Select to save the setting.
Set the Tone When a Key is Pressed
You can set the sound you hear when you press a key.
Procedure
Step 1 Press Menu .
Cisco IP DECT 6800 Series User Guide
57
Page 68

Set the Confirmation Sound
Step 2 Select Settings > Key sound.
Step 3 Highlight your choice.
• Silent (default): When you press a key, you don't hear anything.
• Click: When you press a key, you hear a click.
• Tone: When you press a key, you hear a tone.
Step 4 Press Select to save the setting.
Set the Confirmation Sound
You can set the handset to play a tone when you change a setting on the handset.
Procedure
Settings
Step 1 Press Menu .
Step 2 Select Settings > Audio Settings.
Step 3 Highlight Confirmation sound.
Step 4 Press Off to stop the tone or press On to make the handset play the tone.
Set the Coverage Warning
You can set the handset to play a tone when you move your handset too far away from the base station.
Procedure
Step 1 Press Menu .
Step 2 Select Settings > Audio Settings.
Step 3 Highlight Coverage warning.
Step 4 Press Off to stop the tone or press On to make the handset play the tone.
Set the Charger Warning
You can set the handset to play a tone when you put the handset on the charger.
Cisco IP DECT 6800 Series User Guide
58
Page 69

Settings
Procedure
Step 1 Press Menu .
Step 2 Select Settings > Audio Settings.
Step 3 Highlight Charger warning.
Step 4 Press Off to stop the tone or press On to make the handset play the tone.
Time and Date
Set the Time Format
You can set the way that the time displays on the handset.
Time and Date
Procedure
Step 1 Press Menu .
Step 2 Select Settings > Time & date > Time.
Step 3 Press Format.
Step 4 Highlight your choice.
Step 5 Press Select to save the setting.
Set the Date Format
You can set the way the date displays on the handset.
In this procedure, the date August 24, 2018 is used for the choices. The choices display in the date on your
handset.
Procedure
• 24 hour (default): Display the time in 24-hour format.
• am/pm: Display the time in 12-hour format.
Step 1 Press Menu .
Step 2 Select Settings > Time & date > Date.
Step 3 Press Format.
Cisco IP DECT 6800 Series User Guide
59
Page 70

Set the Handset Language
Step 4 Highlight your choice.
• 24-08-2018 (default): Display the date in dd-mm-yyyy format.
• 08/24/2018: Display the date in mm/dd/yyyy format.
• 24-Aug-2018: Display the date in dd-mmm-yyyy format.
• 24/08/2018: Display the date in dd/mm/yyyy format.
• 24.08.2018: Display the date in dd.mm.yyyy format.
• 2018-08-24: Display the date in yyyy-mm-dd format.
Step 5 Press Select to save the setting.
Set the Handset Language
You can the language for the handset display.
Procedure
Settings
Step 1 Press Menu .
Step 2 Select Settings > Language.
Step 3 Highlight your language choice.
Step 4 Press Select to save the setting.
Set the Handset LED
The LED at the top of the handset can light green, red, or yellow. You can set the color you want for specific
situations.
Procedure
Step 1 Press Menu .
Step 2 Select Settings > LED signal.
Step 3 Select the LED choice.
• Green LED
• Yellow LED
• Red LED
Step 4 Highlight the choice for the LED to light.
• Off: The LED will not light up.
Cisco IP DECT 6800 Series User Guide
60
Page 71

Settings
• Missed call: The LED lights if you missed a call.
• Voice message: The LED lights if you have a voicemail message.
• Low battery: The LED lights if the handset battery is running out of power.
Step 5 Press Select to save the setting.
Set the Timer to Turn Off the Screen
You can set the handset to turn off the screen after a specific amount of time. Before the screen turns off, it
dims after a specific amount of inactivity.
Procedure
Step 1 Press Menu .
Set the Timer to Turn Off the Screen
Step 2 Select Settings > Power save.
Step 3 Highlight your choice.
• 5 seconds: The screen dims after 2 seconds and turns off after 5 seconds.
• 10 seconds: The screen dims after 5 seconds and turns off after 10 seconds.
• 20 seconds: The screen dims after 5 seconds and turns off after 20 seconds.
• 30 seconds: The screen dims after 10 seconds and turns off after 30 seconds.
• 45 seconds: The screen dims after 10 seconds and turns off after 45 seconds.
• 60 seconds: The screen dims after 10 seconds and turns off after 60 seconds.
Step 4 Press Select to save the setting.
Security Menu
Set the Handset Lock and PIN
You can set up the handset to require a PIN to unlock it.
Note
When the keypad is locked, you can only dial emergency numbers.
The default PIN is 0000.
Procedure
Step 1 Press Menu .
Cisco IP DECT 6800 Series User Guide
61
Page 72

Set the Timer to Automatically Lock the Handset
Step 2 Select Settings > Security > Phone lock.
Step 3 Enter the PIN and press OK.
Step 4 Highlight Phone lock.
Step 5 Press Off to turn off the need for a PIN or On to require a PIN.
Step 6 Select Change PIN.
Step 7 Enter a new PIN and press OK.
You must use four digits for the PIN.
Step 8 Press Select to save the setting.
Related Topics
Lock the Handset Keypad, on page 2
Unlock the Handset Keypad, on page 3
Set the Timer to Automatically Lock the Handset
Settings
You can set the handset to lock the keypad after a specific length of inactivity. When the keypad locks, you
need to unlock it before you can use it.
Note
When the keypad is locked, you can only dial emergency numbers.
Procedure
Step 1 Press Menu .
Step 2 Select Settings > Security > Automatic keylock.
Step 3 Highlight your choice.
• Off (default): The keypad never locks.
• 15 seconds: The keypad locks in 15 seconds.
• 30 seconds: The keypad locks in 30 seconds.
• 45 seconds: The keypad locks in 45 seconds.
• 1 minute: The keypad locks in 1 minute.
• 2 minutes: The keypad locks in 2 minutes.
• 3 minutes: The keypad locks in 3 minutes.
• 4 minutes: The keypad locks in 4 minutes.
• 5 minutes: The keypad locks in 5 minutes.
Step 4 Press Select to save the setting.
Related Topics
Lock the Handset Keypad, on page 2
Cisco IP DECT 6800 Series User Guide
62
Page 73

Settings
Unlock the Handset Keypad, on page 3
Change the Settings PIN
You can set the handset to require a PIN before the handset can reset to the default settings.
The default PIN is 0000.
Procedure
Step 1 Press Menu .
Step 2 Select Settings > Security > Change PIN.
Step 3 Enter the current PIN and press OK.
Step 4 Enter a new PIN and press OK.
You must use four digits for the PIN.
Change the Settings PIN
Step 5 Press Select to save the setting.
Set the Handset Name
You can give the handset a name. The name displays on the main screen of the handset.
Procedure
Step 1 Press Menu .
Step 2 Select Settings > Handset name.
Step 3 Enter a name using the keypad.
Step 4 (Optional) If you need special symbols, press Symbol, navigate to the required symbol, and press Select.
Step 5 (Optional) If you want to delete the last character, press Clear.
Step 6 Press Save.
Set Auto Answer
You can set the way that the handset handles incoming calls.
Cisco IP DECT 6800 Series User Guide
63
Page 74

Allow the Handset to Ring While Charging
Procedure
Step 1 Press Menu .
Step 2 Select Settings > Auto answer.
Step 3 Highlight your choice.
• Normal (default): You press Answer/Send to answer the call.
• Any key: You can press any key to answer the call.
• Automatic: The incoming call is automatically answered.
Step 4 Press Select to save the setting.
Allow the Handset to Ring While Charging
Settings
If you don't want the handset to ring while it is charging, you can turn off the ringer. Incoming calls continue
to display on the screen.
Procedure
Step 1 Press Menu .
Step 2 Select Settings > Silent charging.
Step 3 Highlight your choice.
• Off (default): The handset will ring while on the charger.
• Silent: The handset won't ring will on the charger.
Step 4 Press Select to save the setting.
Set Do Not Disturb
You can set the handset to not disturb you when you get an incoming calls. This is called do not disturb (DND)
mode. When you are in this mode, you see the DND icon in the screen headers. If you get a call while
DND is active, the call is sent to voicemail.
While in DND, many of the icons that display on the header are different from normal.
To use this feature, your administrator must enable DND.
Cisco IP DECT 6800 Series User Guide
64
Page 75

Settings
Hide Your Caller ID When You Make a Call
Procedure
Step 1 Press Menu .
Step 2 Select Settings > Do not disturb.
Step 3 Highlight your choice.
• Disabled (default): DND mode is off.
• Enabled: DND mode is on.
Step 4 Press Select to save the setting.
Related Topics
Turn Do Not Disturb On and Off with a Star Code, on page 34
Header Icons, on page 9
Hide Your Caller ID When You Make a Call
Under normal circumstances, your handset sends your Caller ID (name and phone number) when you make
a call. You can set your handset to make a call without the Caller ID for the next call or for all calls.
Procedure
Step 1 Press Menu .
Step 2 Select Settings > Hide number.
Step 3 Highlight your choice.
• Off (default): Your Caller ID is always sent.
• On for next call: Your Caller ID is not sent for the next call. Subsequent calls will have the Caller ID
sent.
• Always on: Your handset never sends the Caller ID.
Step 4 Press Select to save the setting.
Related Topics
Block and Unblock Outgoing Caller Information with a Star Code, on page 33
Call Forward
Set Call Forward Unconditional
You can set your handset to forward all calls to a specific phone number. When your handset is forwarded,
you see the call forward icon on the screen header.
Cisco IP DECT 6800 Series User Guide
65
Page 76

Set Call Forward When There is No Answer
Procedure
Step 1 Press Menu .
Step 2 Select Settings > Call Forward > Forward Unconditionally.
Step 3 Highlight Forward Unconditionally.
Step 4 Press Off to turn the feature off or press On to turn the feature on.
Step 5 Highlight Forward To and enter the phone number to receive the call.
Step 6 Press Select to save the setting.
Related Topics
Activate and Deactivate Call Forward All with Star Codes, on page 32
Set Call Forward When There is No Answer
Settings
You can set your handset to forward unanswered calls to a specific phone number. When your handset is
forwarded, you see the call forward icon on the screen header.
Procedure
Step 1 Press Menu .
Step 2 Select Settings > Call Forward > Forward No Answer.
Step 3 Highlight Forward No Answer.
Step 4 Press Off to turn the feature off or press On to turn the feature on.
Step 5 Highlight Forward To and enter the phone number to receive the call.
Step 6 Highlight Forward After (s) and enter the time in seconds to wait before the call is forwarded.
Step 7 Press Select to save the setting.
Set Call Forward When the Line is Busy
You can set your handset to forward calls to a specific phone number when you are on a call (busy). When
your handset is forwarded, you see the call forward icon on the screen header.
Procedure
Step 1 Press Menu .
Step 2 Select Settings > Call Forward > Forward Busy.
Cisco IP DECT 6800 Series User Guide
66
Page 77

Settings
Step 3 Highlight Forward Busy.
Step 4 Press Off to turn the feature off or press On to turn the feature on.
Step 5 Highlight Forward To and enter the phone number to receive the call.
Step 6 Press Select to save the setting.
Set the Idle Screen Saver
When the handset is in the charger, you can control the screen display.
Procedure
Step 1 Press Menu .
Step 2 Select Settings > Idle Screen Saver.
Step 3 Highlight your choice.
Set the Idle Screen Saver
• Off (default): The screen turns off at the time set in Set the Timer to Turn Off the Screen, on page 61.
• Idle clock (dimmed): The screen displays the dimmed clock.
• Startup image (dimmed): The screen displays the dimmed start up graphic.
Step 4 Press Select to save the setting.
Set the Idle Clock
You can control if the time displays on the home screen when the handset is idle.
Procedure
Step 1 Press Menu .
Step 2 Select Settings > Idle Clock.
Step 3 Highlight your choice.
• Off: The time doesn't display on the home screen.
• On (default): The time displays on the home screen.
Step 4 Press Select to save the setting.
Cisco IP DECT 6800 Series User Guide
67
Page 78

Bluetooth
Bluetooth
You can use a Bluetooth headset with your handset. To use the headset, you need to turn Bluetooth on and
pair (connect) the headset to the handset.
Bluetooth and Your Handset
Bluetooth connections work best when you're within 3 to 6 feet (1 to 2 meters) from your handset, but you
might be able to be as far away as 66 feet (20 meters). The Bluetooth connection can degrade if you have a
barrier (wall, door, window), large metal object, or other electronic devices between your handset and the
connected device.
Enable Bluetooth
You can use a Bluetooth headset with your handset. By default, Bluetooth is turned off. When Bluetooth is
enabled, the handset uses more battery power.
When Bluetooth is enabled, you see the Bluetooth icon displayed in the screen header. The icon changes
when you have a Bluetooth headset paired to the handset.
Settings
Procedure
Step 1 Press Menu .
Step 2 Select Settings > Bluetooth > Enable/disable.
Step 3 Press Yes to enable Bluetooth or No to disable Bluetooth.
Search and Pair a Bluetooth Device
You can display a list of paired Bluetooth devices.
Procedure
Step 1 Press Menu .
Step 2 Select Settings > Bluetooth > Search for devices.
Step 3 Highlight your headset in the list and press Select.
Cisco IP DECT 6800 Series User Guide
68
Page 79

Settings
Manage the Paired Bluetooth Devices
Procedure
Step 1 Press Menu .
Step 2 Select Settings > Bluetooth > Paired devices.
Step 3 Highlight the headset you want to manage and do one of these actions:
• Press Disconnect to disconnect the connected headset. The headset remains paired to the handset, but
not active.
• Press More and select Change name to edit the name of the headset.
• Press More and select Delete all to delete (unpair) all the headsets in the list. You need to confirm the
deletion.
• Press More and select Delete to delete (unpair) the headset from the list. You need to confirm the deletion.
• Press More and select Info to view more information about the headset.
Manage the Paired Bluetooth Devices
Turn on Push To Talk
You can use the handset as a two-way radio to talk with other active handsets in the system. You press a
specific button to start and end a conversation, so the feature is called Push to Talk.
Before you can use the feature, you need to enable it on your handset.
Procedure
Step 1 Press Menu .
Step 2 Select Settings > Push to Talk.
Step 3 Highlight your choice.
• Off (default): You can't use Push to Talk.
• On: You can use Push to Talk.
Step 4 Press Select to save the setting.
Related Topics
Use Push to Talk, on page 34
Cisco IP DECT 6800 Series User Guide
69
Page 80

Set the Ring Volume for an Incoming Call
Set the Ring Volume for an Incoming Call
Procedure
While the handset is ringing, press Volume up or down.
Change the Volume on a Call
Settings
Procedure
While on a call, press Volume up or down.
Cisco IP DECT 6800 Series User Guide
70
Page 81

Accessories
• Supported Headsets, on page 71
• Important Headset Safety Information, on page 71
• Audio Quality, on page 72
Supported Headsets
You can use these types of headsets with your handset:
• Headset with a 3.5 mm audio plug
We recommend the Cisco Headset 521 and 522. For more information, see https://www.cisco.com/c/en/
us/products/collaboration-endpoints/headset-500-series/index.html.
• Bluetooth LE headset
Related Topics
Bluetooth, on page 68
CHAPTER 9
Important Headset Safety Information
High Sound Pressure—Avoid listening to high volume levels for long periods to prevent
possible hearing damage.
When you plug in your headset, lower the volume of the headset speaker before you put the headset on. If
you remember to lower the volume before you take the headset off, the volume will start lower when you
plug in your headset again.
Be aware of your surroundings. When you use your headset, it may block out important external sounds,
particularly in emergencies or in noisy environments. Don’t use the headset while driving. Don’t leave your
headset or headset cables in an area where people or pets can trip over them. Always supervise children who
are near your headset or headset cables.
Cisco IP DECT 6800 Series User Guide
71
Page 82

Audio Quality
Audio Quality
Beyond physical, mechanical, and technical performance, the audio portion of a headset must sound good to
the user and to the party on the far end. Sound quality is subjective, and we cannot guarantee the performance
of any headsets. However, various headsets from leading headset manufacturers are reported to perform well
with Cisco IP Phones.
For additional information, see https://www.cisco.com/c/en/us/products/unified-communications/uc_endpoints_
accessories.html
Accessories
Cisco IP DECT 6800 Series User Guide
72
Page 83

Troubleshooting
• General Troubleshooting, on page 73
• View the Handset Status, on page 74
• Reset the Handset Settings, on page 74
General Troubleshooting
You can use this chapter to troubleshoot common problems that you might encounter.
Handset Doesn't Ring
Problem
The phone can receive calls but no ringtone is heard.
Cause
CHAPTER 10
The phone may be in silent mode and the silent mode icon is displayed in the screen header.
Solution
• Increase the volume from the Settings menu.
• Press and hold the pound (#) key for two seconds while the phone is idle to disable silent mode.
Handset Doesn't Respond to Key Presses
Problem
Nothing happens with you press a key on the handset.
Cause
The keypad is probably locked.
Cisco IP DECT 6800 Series User Guide
73
Page 84

Handset Screen Displays "Searching"
Solution
Press and hold the star (*) key for 2 seconds to unlock the keypad.
Handset Screen Displays "Searching"
Problem
The handset displays the message Searching.
Cause
The handset is too far from the closest base station or the base station is not active.
Solution
• If the handset has been stationary, the base station may be rebooting or inactive.
1. Wait a couple of minutes to see if the handset can communicate with the base station.
Troubleshooting
2. If the problem persists, check that the base station has power
• If the handset has been carried around, it may be out of range of the base station.
• Short term solution: Move the handset closer to the base station.
• Long term solution: Add another base station to improve coverage.
View the Handset Status
You can see the status of your handset to assist in troubleshooting problems. Information includes the firmware
version installed on the handset as well as information about the connected base station.
Procedure
Step 1 Press Menu .
Step 2 Select Settings > Status.
Reset the Handset Settings
Your administrator may ask you for reset your handset. When this happens, your user settings (for example,
Setting menu, Local contacts, Speed dials) but the handset remains registered with the base station.
Cisco IP DECT 6800 Series User Guide
74
Page 85

Troubleshooting
Step 1 Press Menu .
Step 2 Select Settings > Reset settings.
Step 3 Press Yes to confirm the reset.
Step 4 Enter the handset PIN.
Step 5 Press Ok.
Reset the Handset Settings
Procedure
Cisco IP DECT 6800 Series User Guide
75
Page 86

Reset the Handset Settings
Troubleshooting
Cisco IP DECT 6800 Series User Guide
76
Page 87

Product Safety and Security
• Safety and Performance Information, on page 77
• Compliance Statements, on page 80
• Cisco Product Security Overview, on page 84
• Important Online Information, on page 84
Safety and Performance Information
Read the following safety notices before installing or using your IP phone.
CHAPTER 11
Warning
Warning
Warning
IMPORTANT SAFETY INSTRUCTIONS
This warning symbol means danger. You are in a situation that could cause bodily injury. Before you work
on any equipment, be aware of the hazards involved with electrical circuitry and be familiar with standard
practices for preventing accidents. Use the statement number provided at the end of each warning to locate
its translation in the translated safety warnings that accompanied this device. Statement 1071
SAVE THESE INSTRUCTIONS
To see translations of the warnings that appear in this publication, refer to the statement number in the
Regulatory Compliance and Safety Information—Cisco IP DECT 6800 Series at the following URL:
https://www.cisco.com/c/dam/en/us/td/docs/voice_ip_comm/cuipph/MPP/6825/RCSI/RCSI-0366-book.pdf
Read the installation instructions before using, installing, or connecting the system to the power source.
Statement 1004
Voice over IP (VoIP) service and the emergency calling service do not function if power fails or is disrupted.
After power is restored, you might have to reset or reconfigure equipment to regain access to VoIP and the
emergency calling service. In the USA, this emergency number is 911. Youneed to be aware of the emergency
number in your country. Statement 361
Cisco IP DECT 6800 Series User Guide
77
Page 88

Safety Guidelines
Product Safety and Security
Warning
Warning
Ultimate disposal of this product should be handled according to all national laws and regulations. Statement
1040
The plug-socket combination must be accessible at all times because it serves as the main disconnecting
device. Statement 1019
Safety Guidelines
The following are safety guidelines for using the Cisco IP DECT 6800 Series in specific environments:
• Do not use this product as the primary communications tool in healthcare environments, as it may use
an unregulated frequency band that is susceptible to interference from other devices or equipment.
• The use of wireless devices in hospitals is restricted to the limits set forth by each hospital.
• The use of wireless devices in hazardous locations is limited to the constraints posed by the safety directors
of such environments.
• The use of wireless devices on airplanes is governed by the Federal Aviation Administration (FAA).
Battery Safety Notices
Warning
Warning
Warning
These battery safety notices apply to the batteries that are approved for the Cisco IP DECT 6800 Series.
There is the danger of explosion if the battery is replaced incorrectly. Replace the battery only with the same
or equivalent type recommended by the manufacturer. Dispose of used batteries according to the manufacturer’s
instructions. Statement 1015
Do not touch or bridge the metal contacts on the battery. Unintentional discharge of the batteries can cause
serious burns. Statement 341
Explosion Hazard: Do not charge the phone battery in a potentially explosive environment. Statement 431
Cisco IP DECT 6800 Series User Guide
78
Page 89

Product Safety and Security
Power Outage
Caution
Power Outage
• Do not dispose of the battery pack in fire or water. The battery may explode if placed in a fire.
• Do not disassemble, crush, puncture, or incinerate the battery pack.
• Handle a damaged or leaking battery with extreme care. If you come in contact with the electrolyte, wash
the exposed area with soap and water. If the electrolyte has come in contact with the eye, flush the eye
with water for 15 minutes and seek medical attention.
• Do not charge the battery pack if the ambient temperature exceeds 104 degrees Fahrenheit (40 degrees
Celsius).
• Do not expose the battery pack to high storage temperatures (above 140 degrees Fahrenheit, 60 degrees
Celsius).
• When discarding a battery pack, contact your local waste disposal provider regarding local restrictions
on the disposal or recycling of batteries.
To obtain a battery, contact your local dealer. Use only the batteries that have a Cisco part number.
The ability to access emergency service through the phone depends on the base stations being powered. If
there is an interruption in the power supply, Service and Emergency Calling Service dialing will not function
until power is restored. In the case of a power failure or disruption, you may need to reset or reconfigure
equipment before using the Service or Emergency Calling Service dialing.
Regulatory Domains
The radio frequency (RF) for the handset is controlled by the base station. The base station is configured for
a specific regulatory domain. If you use this system outside of the specific regulatory domain, the system will
not function properly, and you might violate local regulations.
Health-Care Environments
This product is not a medical device and uses an unlicensed frequency band that is susceptible to interference
from other devices or equipment.
External Devices Usage
The following information applies when you use external devices with the DECT handset.
Cisco recommends the use of good quality external devices (such as headsets) that are shielded against
unwanted radio frequency (RF) and audio frequency (AF) signals.
Depending on the quality of these devices and their proximity to other devices such as mobile phones or
two-way radios, some audio noise may still occur. In these cases, Cisco recommends that you take one or
more of the following actions:
• Move the external device away from the source of the RF or AF signals.
Cisco IP DECT 6800 Series User Guide
79
Page 90

System Behavior During Times of Network Congestion
• Route the external device cables away from the source of the RF or AF signals.
• Use shielded cables for the external device, or use cables with a better shield and connector.
• Shorten the length of the external device cable.
• Apply ferrites or other such devices on the cables for the external device.
Cisco cannot guarantee the performance of the system because Cisco has no control over the quality of external
devices, cables, and connectors. The system will perform adequately when suitable devices are attached using
good quality cables and connectors.
Product Safety and Security
Caution
In European Union countries, use only external headsets that are fully compliant with the EMC Directive
[89/336/EC].
System Behavior During Times of Network Congestion
Anything that degrades network performance can affect phone system voice quality, and in some cases, can
cause a call to drop. Sources of network degradation can include, but are not limited to, the following activities:
• Administrative tasks, such as an internal port scan or security scan
• Attacks that occur on your network, such as a Denial of Service attack
Compliance Statements
Compliance Statements for the European Union
CE Marking
The following CE mark is affixed to the equipment and packaging.
RF Exposure Statement for the European Union
This device has been evaluated and found compliant in accordance with EU EMF Directive 2014/53/EU.
Cisco IP DECT 6800 Series User Guide
80
Page 91

Product Safety and Security
Compliance Statements for the USA
General RF Exposure Compliance
This device has been evaluated and found compliant to the ICNIRP (International Committee on Non-Ionizing
Radiation Protection) limits for Human Exposure of RF Exposure.
Part 15 Radio Device
Compliance Statements for the USA
Caution
The Part 15 radio device operates on a non-interference basis with other devices operating at this frequency.
Any changes or modification to said product not expressly approved by Cisco, including the use of non-Cisco
antennas, could void the user’s authority to operate this device.
Compliance Statements for Canada
This device complies with Industry Canada license-exempt RSS standard(s). Operation is subject to the
following two conditions: (1) this device may not cause interference, and (2) this device must accept any
interference, including interference that may cause undesired operation of the device.
This product meets the applicable Innovation, Science and Economic Development Canada technical
specifications.
Avis de Conformité Canadien
Ce dispositif est conforme aux normes CNR exemptes de licence d’Industrie Canada. Le fonctionnement de
ce dispositif est autorisé sous réserve des deux conditions suivantes : (1) il ne doit pas produire de brouillage
et (2) l’utilisateur du dispositif doit être prêt à accepter tout brouillage radioélectrique reçu même si ce brouillage
est susceptible de compromettre le fonctionnement du dispositif.
Le présent produit est conforme aux spécifications techniques applicables d'Innovation, Sciences et
Développement économique Canada.
Canadian RF Exposure Statement
THIS DEVICE MEETS THE LIMITS AS REFERENCED BY ISED RSS-102 R5 FOR EXPOSURE TO
RADIO WAVES
Your device includes a radio transmitter and receiver. It is designed not to exceed the General populace
(uncontrolled) limits for exposure to radio waves (radio frequency electromagnetic fields) as referenced in
RSS-102 which references Health Canada Safety Code 6 and include a substantial safety margin designed to
assure the safety of all persons, regardless of age and health.
As such the systems are designed to be operated as to avoid contact with the antennas by the end user. It is
recommended to set the system in a location where the antennas can remain at least a minimum distance as
specified from the user in accordance to the regulatory guidelines which are designed to reduce the overall
exposure of the user or operator.
The device has been tested and found compliant with the applicable regulations as part of the radio certification
process.
Cisco IP DECT 6800 Series User Guide
81
Page 92

Compliance Statements for New Zealand
Déclaration d'Exposition aux RF Canadienne
CE PÉRIPHÉRIQUE RESPECTE LES LIMITES DÉCRITESPAR LA NORME RSS-102 R5 D'EXPOSITION
À DES ONDES RADIO
Votre appareil comprend un émetteur et un récepteur radio. Il est conçu pour ne pas dépasser les limites
applicables à la population générale (ne faisant pas l'objet de contrôles périodiques) d'exposition à des ondes
radio (champs électromagnétiques de fréquences radio) comme indiqué dans la norme RSS-102 qui sert de
référence au règlement de sécurité n°6 sur l'état de santé du Canada et inclut une margede sécurité importantes
conçue pour garantir la sécurité de toutes les personnes, quels que soient leur âge et état de santé.
En tant que tels, les systèmes sont conçus pour être utilisés en évitant le contact avec les antennes par l'utilisateur
final. Il est recommandé de positionner le système à un endroit où les antennes peuvent demeurer à au moins
une distance minimum préconisée de l'utilisateur, conformément aux instructions des réglementations qui
sont conçues pour réduire l'exposition globale de l'utilisateur ou de l'opérateur.
Le périphérique a été testé et déclaré conforme aux réglementations applicables dans le cadre du processus
de certification radio.
Compliance Statements for New Zealand
Product Safety and Security
Permit to Connect (PTC) General Warning
The grant of a Telepermit for any item of terminal equipment indicates only that Telecom has accepted that
the item complies with minimum conditions for connection to its network. It indicates no endorsement of the
product by Telecom, nor does it provide any sort of warranty. Above all, it provides no assurance that any
item will work correctly in all respects with another item of Telepermitted equipment of a different make or
model, nor does it imply that any product is compatible with all of Telecom's network services.
Use of IP Networks with the PSTN
Internet Protocol (IP) by its nature introduces delay into speech signals as each data packet is formulated and
addressed. Telecom Access Standards recommends that suppliers, designers and installers using this technology
for calls to or from the PSTN refer to ITU E Model requirements in the design of their networks. The overall
aim is to minimise delay, distortion and other transmission impairments, particularly for those calls involving
cellular and international networks, which already suffer extensive delay.
The Use of Voice Compression Through the PSTN
Because of the extensive delay already experienced when calling cellular and international networks, some
of which is already caused by their use of voice compression technologies. Telecom Access Standards will
only approve G711 voice technology for use on the PSTN. G711 is an ‘instantaneous speech-encoding
technique’ whereas G729 and all its variants are considered ‘near instantaneous’ introducing additional delay
into the speech signal.
Echo Cancellation
Echo cancelers are not normally required in the Telecom PSTN because geographic delays are acceptable
where CPE return loss is maintained within Telepermit limits. However, those private networks that make
use of Voice-over-IP (VoIP) technology are required to provide echo cancellation for all voice calls. The
combined effect of audio/VoIP conversion delay and IP routing delay can cause the echo cancellation time
of 64 mS to be required.
Cisco IP DECT 6800 Series User Guide
82
Page 93

Product Safety and Security
Compliance Statements for Taiwan
DGT Warning Statement
Compliance Statements for Taiwan
Compliance Statement for Argentina
Advertencia
No utilizar una fuente de alimentación con caracteristícas distintas a las expresadas ya que podría ser peligroso.
Compliance Statements for Brazil
Art. 6º - 506
This equipment is a secondary type device, that is, it is not protected against harmful interference, even if the
interference is caused by a device of the same type, and it also cannot cause any interference to primary type
devices.
For more information, go to this URL: http://www.anatel.gov.br
Cisco IP DECT 6800 Series User Guide
83
Page 94

Compliance Statement for Singapore
Este equipamento opera em caráter secundário, isto é, não tem direito a proteção contra interferência prejudicial,
mesmo de estações do mesmo tipo, e não pode causar interferência a sistemas operando em caráter primário.
Site Anatel: http://www.anatel.gov.br
Resolution nº 303/2002 e nº 533/2009
This product is approved by Anatel, in accordance with the procedures regulated by Resolution no. 242/2000
and meets the technical requirements applied, including the exposure limits of the Specific Absorption Rate
for electric, magnetic and electromagnetic fields of radiofrequency, in accordance with Resolutions nº 303/2002
and nº 533/2009.
Resoluções no. 303/2002 e no. 533/2009
Este produto está homologado pela Anatel, de acordo com os procedimentos regulamentados pela Resolução
no. 242/2000 e atende aos requisitos técnicos aplicados, incluindo os limites de exposição da Taxa de Absorção
Específica referente a campos elétricos, magnéticos e eletromagnéticos de radiofrequência, de acordo com as
Resoluções no. 303/2002 e no. 533/2009.
Product Safety and Security
Compliance Statement for Singapore
Cisco Product Security Overview
This product contains cryptographic features and is subject to U.S. and local country laws that govern import,
export, transfer, and use. Delivery of Cisco cryptographic products does not imply third-party authority to
import, export, distribute, or use encryption. Importers, exporters, distributors, and users are responsible for
compliance with U.S. and local country laws. By using this product, you agree to comply with applicable
laws and regulations. If you are unable to comply with U.S. and local laws, return this product immediately.
Further information regarding U.S. export regulations can be found at https://www.bis.doc.gov/
policiesandregulations/ear/index.htm.
Important Online Information
End User License Agreement
The End User License Agreement (EULA) is located here: https://www.cisco.com/go/eula
Cisco IP DECT 6800 Series User Guide
84
Page 95

Product Safety and Security
Important Online Information
Regulatory Compliance and Safety Information
Regulatory Compliance and Safety Information (RCSI) is located here:
https://www.cisco.com/c/dam/en/us/td/docs/voice_ip_comm/voice_ip_comm/cuipph/MPP/6825/RCSI/
RCSI-0366-book.pdf
Cisco IP DECT 6800 Series User Guide
85
Page 96

Important Online Information
Product Safety and Security
Cisco IP DECT 6800 Series User Guide
86
 Loading...