

Page 1

Cisco IP Communicator
User Guide
Version 1.1
Corporate Headquarters
Cisco Systems, Inc.
170 West Tasman Drive
San Jose, CA 95134-1706
USA
http://www.cisco.com
Tel: 408 526-4000
800 553-NETS (6387)
Fax: 408 526-4100
Customer Order Number:
Text Part Number: OL-5051-01
Page 2

Page 3

Contents
Getting Started with Cisco IP Communicator 1
What is Cisco IP Communicator? 1
Hardware and Platform Requirements 2
Quick Start Checklist 2
Installing Audio Devices 3
Installing and Launching Cisco IP Communicator 4
Installing Cisco IP Communicator on Your Computer 4
Launching Cisco IP Communicator 5
Using the Audio Tuning Wizard 6
Configuration and Registration Tasks 8
Testing Cisco IP Communicator 9
An Overview of Cisco IP Communicator 10
Cisco IP Communicator Features 10
Using the Cisco IP Communicator Interface 10
Phone Screen Features 14
Call-Handling and Navigation Tips 15
Using Keyboard Shortcuts 15
Using the Right-Click Menu 16
Closing and Minimizing Cisco IP Communicator 17
Understanding Lines vs. Calls 17
Going On-Hook and Off-Hook 18
Using Online Help 18
Understanding Feature Availability 18
Using Cisco IP Communicator to Handle Calls 19
Basic Call Handling 19
Placing a Call 20
Cisco IP Communicator User Guide iii
Page 4

Answering a Call 22
Ending a Call 23
Using Hold and Resume 24
Using Mute 24
Transferring a Connected Call 25
Switching Between Calls 25
Starting or Joining a Standard Conference Call 26
Forwarding Your Calls to Another Number 27
Advanced Call Handling 28
Storing and Retrieving Parked Calls 28
Redirecting a Ringing Call to Cisco IP Communicator 29
Starting or Joining a Meet-Me Conference Call 29
Understanding Shared Lines 30
Adding Yourself to a Shared-Line Call 30
Customizing Cisco IP Communicator Settings 31
An Overview of Settings 31
Adjusting the Volume for a Call 31
Customizing Rings and Message Indicators 32
Customizing the Phone Screen 33
Setting Up Speed Dial Buttons 33
Viewing and Customizing Preferences 34
User Settings 34
Network Settings 36
Audio Settings 38
Understanding Audio Modes 39
Network Audio Settings 42
Advanced Audio Settings 43
Directories Settings 45
Using Headsets and Other Audio Devices 46
Using a Headset 46
Using Your Computer as a Speakerphone 48
Using a USB Handset 49
Removing and Re-Installing Audio Devices 50
iv OL-5051-01
Page 5

Obtaining Audio Devices 50
Using Voice Messaging, Call Logs, and Directories 51
Using a Voice Message Service 51
Searching Your Call Logs and Directories 52
Using the Quick Search Feature 53
Entering Password Information for Quick Search 53
Accessing Your User Options Web Pages 55
Logging In to the User Options Web Pages 55
Subscribing to Phone Services 56
Troubleshooting Cisco IP Communicator 57
General Troubleshooting Issues 57
Voice Quality Issues 60
Cisco IP Communicator User Guide v
Page 6

vi OL-5051-01
Page 7

Getting Started with Cisco IP Communicator
These sections give you the basic information you need to start using your new
CiscoIPCommunicator.
• What is Cisco IP Communicator?, page 1
• Hardware and Platform Requirements, page 2
• Quick Start Checklist, page 2
• Installing Audio Devices, page 3
• Installing and Launching Cisco IP Communicator, page 4
• Using the Audio Tuning Wizard, page 6
• Configuration and Registration Tasks, page 8
• Testing Cisco IP Communicator, page 9
What is Cisco IP Communicator?
Cisco IP Communicator is a desktop application that turns your computer into a full-featured
Cisco IP Phone, allowing you to place, receive, and otherwise handle calls. If you install
Cisco IP Communicator on a laptop or portable computer, you can use Cisco IP Communicator (and
all of your phone services and settings) from any location where you can connect to the corporate
network. For example, if you are on a business trip you can use Cisco IP Communicator to receive calls
and check voice messages while online. Or, if you are working from home, co-workers can reach you
by dialing your work number.
To get started installing and using Cisco IP Communicator, see the “Quick Start Checklist” section on
page 2.
For an introduction to Cisco IP Communicator features, see the “An Overview of
Cisco IP Communicator” section on page 10.
Cisco IP Communicator User Guide 1
Page 8

Hardware and Platform Requirements
To use Cisco IP Communicator, you need a computer with a sound card and/or USB audio device. The
table that follows shows the minimum and recommended requirements for the computer and operating
system on which Cisco IP Communicator runs. Providing a faster CPU and additional RAM
(recommended configuration) allows Cisco IP Communicator to be more responsive and launch faster.
Minimum
Requirements Operating System Minimum CPU
Minimum
Configuration
Recommended
Configuration
In addition to requirements outlined in the table above, Cisco IP Communicator requires the
following:
• A minimum of 100 MB free disk space
• A non-ISA full-duplex sound card or USB audio headset or handset
• A 10/100 Mbit Ethernet network interface card
• SVGA video card
To get started installing and using Cisco IP Communicator, see the “Quick Start Checklist” section on
page 2.
• Windows 2000 Professional with
service pack 3.0 or later
• Windows XP Professional with
service pack 1.0 or later
• Windows 2000 Professional with
service pack 3.0 or later
• Windows XP Professional with
service pack 1.0 or later
450 MHz
Pentium III or
equivalent
733 MHz
Pentium III or
equivalent
RAM
128 MB 800 x 600
192 MB 1.024 x 768
Screen
Resolution
Quick Start Checklist
Follow the checklist below to get Cisco IP Communicator set up on your desktop so that you can start
making calls. The checklist provides pointers to sections in this User Guide where you can find details.
Quick Start task For more information, see...
1. Install any sound cards or USB audio devices that
you want to use, including a USB headset or handset.
2. Install the Cisco IP Communicator application. Installing Cisco IP Communicator on Your
3. Launch Cisco IP Communicator. Launching Cisco IP Communicator, page 5
2 OL-5051-01
Installing Audio Devices, page 3
Computer, page 4
Page 9

Getting Started with Cisco IP Communicator
Quick Start task For more information, see...
4. Use the Audio Tuning Wizard to select audio
modes and tune audio devices.
5. Accomplish network configuration or registration
steps required by your system administrator.
6. Place test calls. Testing Cisco IP Communicator, page 9
• Using the Audio Tuning Wizard, page 6
• Understanding Audio Modes, page 39
Configuration and Registration Tasks,
page 8
Installing Audio Devices
You can install audio devices any time, but the ideal time to do this is before you install and launch
Cisco IP Communicator.
What kind of audio devices can I use?
You can use several audio devices with Cisco IP Communicator. The table below provides an
overview. If you want a list of specific brand-name audio devices that you can use with
Cisco IP Communicator, ask your system administrator.
Audio device Description Notes
USB devices:
• a USB handset
• a USB headset
External analog
devices:
• an analog
headset
• external speakers
or microphones
Internal audio
devices:
• built-in
microphone
• built-in speakers
Cisco IP Communicator User Guide 3
USB devices require device
driver software and have
rectangular plugs.
Analog audio devices do not
require software. They
work as extensions of your
computer’s sound card.
These audio devices are
internal to your computer
and work with your
computer’s sound card.
Follow the device manufacturer’s instructions
to install USB devices. If prompted, complete
the Microsoft Windows Found New Hardware
Wizard.
Plug analog devices into audio jacks on your
computer.
Cisco IP Communicator recognizes analog
devices as extensions of your sound card;
choose your sound card when you want to
modify or view settings for analog devices.
Internal audio devices only work when you do
not have external audio devices plugged into
the audio jacks on your computer; otherwise,
sound will be routed to the external devices.
Page 10

Note If you install or insert an audio device that requires a driver (a USB handset, USB headset, or
sound card) after launching Cisco IP Communicator, you will need to close and relaunch the
application before Cisco IP Communicator will recognize the device.
The next step
After installing audio devices, you are ready to install and launch Cisco IP Communicator. The Audio
Tuning Wizard will recognize your installed audio devices and give you the opportunity to select and
tune them. See the “Installing and Launching Cisco IP Communicator” section on page 4.
Related topics
• Using Headsets and Other Audio Devices, page 46
• Removing and Re-Installing Audio Devices, page 50
Installing and Launching Cisco IP Communicator
This section covers these topics:
• Installing Cisco IP Communicator on Your Computer, page 4
• Launching Cisco IP Communicator, page 5
Installing Cisco IP Communicator on Your Computer
Your system administrator will provide you with an executable file or an installation link. Follow the
procedure below to install the Cisco IP Communicator software on your computer.
Note If you use a laptop computer, be sure that you are not connected to a docking station when
launching Cisco IP Communicator for the first time after installation.
Procedure
Step 1 Open CiscoIPCommunicatorSetup.exe by double-clicking on this file or on the installation
link provided by your system administrator.
The InstallShield wizard opens and begins preparing for installation.
Step 2 When prompted, click Next to initiate the InstallShield wizard.
Step 3 Read the license agreement carefully, then click “I accept” and Next.
Step 4 Enter data in the Customer Information window and click Next. If you think other people
need to use Cisco IP Communicator on this computer, select yes.
4 OL-5051-01
Page 11

Getting Started with Cisco IP Communicator
Step 5 In the Ready to Install window, click Install.
Installation might take a few minutes.
Step 6 If you want to launch Cisco IP Communicator now, click the “Launch the program” check
box and click Finish. (In some cases, you will be prompted to reboot at this point and will not
see the “Launch the program” check box.)
The next step
See the “Launching Cisco IP Communicator” section on page 5.
Launching Cisco IP Communicator
Note If you use a laptop computer, be sure that you are not connected to a docking station when
launching Cisco IP Communicator for the first time after installation.
If you clicked the “Launch the program” check box as a final step in installation,
Cisco IP Communicator will automatically launch.
To launch manually, choose Start > Programs > Cisco IP Communicator, or double-click the
Cisco IP Communicator desktop shortcut.
The first time that you launch Cisco IP Communicator, the Audio Tuning Wizard opens. On
subsequent launches, you might be prompted to use the Audio Tuning Wizard to revert to previous
volume settings. See the “Using the Audio Tuning Wizard” section on page 6.
Accepting updates
Additionally, you might be prompted upon launching to accept an AutoUpdate software installation.
You can accept or decline. In general, you should accept AutoUpdate prompts as soon as possible in
order to maintain the latest version of the product on your computer. However, if you are using
Cisco IP Communicator over a remote connection, you might choose to postpone running AutoUpdate
until you are connected locally. (For example, if you are working from home, you might wait until you
return to the office.) AutoUpdate might take longer to complete over a remote connection.
The next step
After installing and launching Cisco IP Communicator, the next step is to select and tune audio
devices. See the “Using the Audio Tuning Wizard” section on page 6.
Cisco IP Communicator User Guide 5
Page 12

Using the Audio Tuning Wizard
The Audio Tuning Wizard guides you through the process of selecting and tuning installed audio
devices.
• Selecting means assigning an audio device to one or more audio modes and/or to the ringer. See
the “Understanding Audio Modes” section on page 39 for more information about audio modes.
• Tuning involves testing and, if necessary, modifying the speaker and microphone volume for each
selected device.
The Audio Tuning Wizard appears automatically the first time that you launch
Cisco IP Communicator after installation. Or you can access it manually from the right-click menu as
needed on subsequent launches. The table below provides more information about the Audio Tuning
Wizard and other audio setting options.
If you... Then.... Notes
Just installed
CiscoIPCommunicator
and need to use the
Audio Tuning Wizard for
the first time
See the Check Audio
Settings window on a
subsequent launch after
installing
Want to change the
volume for a call
Tune each audio device when the
Audio Tuning Wizard appears.
The Audio Tuning Wizard gives you
the opportunity to select audio devices
for audio modes. For more
information about making these
selections, see the “Understanding
Audio Modes” section on page 39.
Choose one of these buttons:
• Revert—to reinstate previous
settings for this audio device
• Tune—to re-tune this device
• Cancel—to maintain modified
settings (for example, to keep the
sound card muted)
If your audio settings have been
working properly, choose Revert.
Click on the
Cisco IP Communicator interface. To
save your settings, click Save.
Tuning a device is a different
task from changing the volume
setting for a call. Ideally, you
will tune each device only once
and re-tune only if you
encounter voice quality issues.
The Check Audio Settings
window appears on subsequent
launches if you modified (or
muted) the volume for a device
since you last tuned it. For
example, if you muted your
computer’s sound card or
changed the volume controls on
a USB handset or USB headset.
This is the best way to change
volume settings on a per-call
basis. See the “Adjusting the
Volume for a Call” section on
page 31 for details.
6 OL-5051-01
Page 13

Getting Started with Cisco IP Communicator
If you... Then.... Notes
Want to re-tune an audio
device to address voice
quality issues
Want to change your
audio mode selections
without re-tuning audio
devices
Note Before you use the Audio Tuning Wizard to tune an audio device that has its own volume
adjustor, such as a headset with inline volume controls, increase the device’s volume level to
the highest setting.
Access the Audio Tuning Wizard
manually. To do so, right-click on
CiscoIPCommunicator, or choose
Start > Programs >
Cisco IP Communicator > Audio
Tuning Wiz a rd.
Right-click on
Cisco IP Communicator and choose
Preferences> Audio.
See the “Voice Quality Issues”
section on page 60 for help with
troubleshooting.
For more information about
changing audio mode selections,
see the “Understanding Audio
Modes” section on page 39.
The next step
If you are completing the Quick Start Checklist and have finished using the Audio Tuning Wizard, the
next step is to perform any necessary configuration tasks required before you begin using
Cisco IP Communicator to make calls. See the “Configuration and Registration Tasks” section on
page 8.
Cisco IP Communicator User Guide 7
Page 14

Configuration and Registration Tasks
After you have installed the Cisco IP Communicator application, completed the Audio Tuning Wizard,
and can see the Cisco IP Communicator interface on your desktop, you may need to complete one or
more of the configuration and registration tasks listed below before you can start making calls.
Note The following tasks vary by company and phone system; your system administrator will give
you specific instructions. Do not perform these tasks unless instructed to do so.
Choosing a network adapter
Cisco IP Communicator relies on your network adapter selection to identify itself to the network; the
correct network adapter must be selected for Cisco IP Communicator to function properly. To select
a network adapter, right-click on the Cisco IP Communicator interface, then choose Preferences >
Network > Device Name, and choose a network adapter from the Network Adapter drop-down menu.
Your system administrator will tell you which network adapter to choose. In general, you should
choose the adapter that is most likely to provide permanent connectivity or the adapter that is always
enabled—even if it is not plugged in. Avoid choosing a wireless card.
Note This setting is used for network identification, not audio transmission. You do not need to
change this setting once it is established unless you are permanently removing or disabling the
selected network adapter. In this case, coordinate with your system administrator before
selecting a new adapter.
Locating a device name
To view the device name of your selected network adapter, right-click on the Cisco IP Communicator
interface, then choose Preferences > Network > Device Name. Note the device name and send it to
your system administrator, if requested.
Specifying a TFTP server
Your system administrator might ask you to specify one or two TFTP server addresses in the
Cisco IP Communicator interface. To do this, right-click on the interface, then choose Preferences >
Network > Use these TFTP servers, and enter a TFTP address in the field.
Your system administrator will tell you if you need to perform this task.
Registering with TAPS
After you install and launch Cisco IP Communicator, you might need to auto-register using TAPS (the
Tool for Auto-Registered Phones Support).
8 OL-5051-01
Page 15

Getting Started with Cisco IP Communicator
To register with TAPS, use Cisco IP Communicator to dial the TAPS extension provided by your
system administrator and follow the voice prompts. You might need to enter your entire extension,
including the area code. After Cisco IP Communicator displays a confirmation message, you can end
the call. Cisco IP Communicator will re-start.
The next step
The next step is to make sure Cisco IP Communicator is ready for use. See the “Testing
Cisco IP Communicator” section on page 9.
Testing Cisco IP Communicator
If you are following the “Quick Start Checklist” section on page 2 and have performed the
configuration and registration tasks required by your system administrator, Cisco IP Communicator is
ready to test. Make sure that you can see your extension number and hear a dial tone after going
off-hook.
• If you cannot see your extension number or hear a dial tone, ask your system administrator for
help. There may be further steps that your system administrator requires of you.
• Otherwise, place a few test phone calls and ask other parties how your voice sounds. Read the
sections below for more information.
If you need to adjust the volume
Start by adjusting the audio mode volume on the Cisco IP Communicator interface. Click
or press the Page Up/Page Down keys on your keyboard. For more information, see
the“Adjusting the Volume for a Call” section on page 31. If you experience voice quality problems,
see the “Troubleshooting Cisco IP Communicator” section on page 57.
If you are using a remote connection
If you are using Cisco IP Communicator over a remote connection (for example, on a VPN connection
from home or a hotel), enable the “Optimize for low bandwidth” feature. To do so, right-click on the
Cisco IP Communicator interface and choose Preferences > Audio.
After optimizing for low bandwidth, call someone and ask how your voice sounds. If you or the other
party sound muffled or unnatural, try applying audio filters during the call. Audio filters can improve
sound quality when low bandwidth is enabled. For information about applying audio filters, see the
“Advanced Audio Settings” section on page 43.
The next step
Now that you have set up and tested your new phone, you might want to learn more about the features
and services that it offers. See the “An Overview of Cisco IP Communicator” section on page 10.
Cisco IP Communicator User Guide 9
Page 16

An Overview of Cisco IP Communicator
These sections provide an overview of Cisco IP Communicator:
• Cisco IP Communicator Features, page 10
• Using the Cisco IP Communicator Interface, page 10
• Call-Handling and Navigation Tips, page 15
Cisco IP Communicator Features
Cisco IP Communicator functions much like a traditional telephone, allowing you to place and receive
phone calls, put calls on hold, speed dial numbers, transfer calls, and so on. Cisco IP Communicator
also supports special telephony features (such as Call Park and Meet-Me conferencing) that can extend
and customize your call-handling capabilities.
In addition to call-handling features, Cisco IP Communicator supports:
• An Audio Tuning Wizard
• Quick Search directory dialing
• Easy access to your User Options web pages and phone services
• A comprehensive online help system
• An optional skin to change the look of Cisco IP Communicator
For an overview of Cisco IP Communicator components, see the “Using the Cisco IP Communicator
Interface” section on page 10.
Using the Cisco IP Communicator Interface
Use your mouse to click buttons and menu items and your computer keyboard to enter letters,
numbers, and keyboard shortcuts.
Cisco IP Communicator comes with two desktop appearances called skins:
• Figure 1 shows Cisco IP Communicator with an optional skin selected (Mercurio.xml)
• Figure 2 shows Cisco IP Communicator with the default skin selected (Default.xml)
Table 1 identifies buttons and other components shared by both skins.
10 OL-5051-01
Page 17
Figure 1 Cisco IP Communicator with an optional skin selected
Figure 2 Cisco IP Communicator with the default skin selected
21
An Overview of Cisco IP Communicator
3
16
2 pt
15
4
5
6
7
8
9
14
10111213
105031
Cisco IP Communicator User Guide 11
Page 18
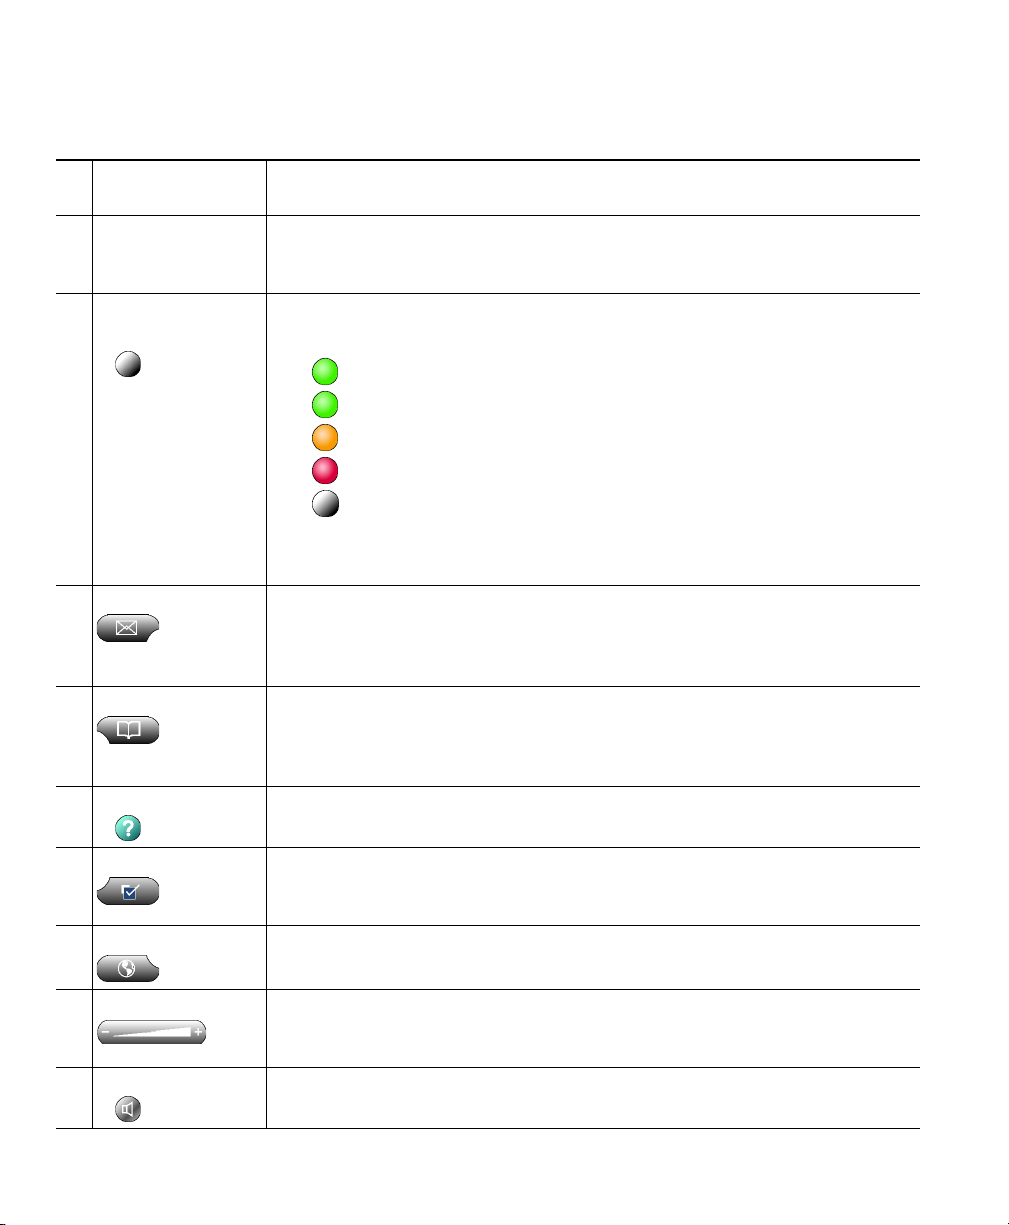
Table 1 Buttons and other components, as illustrated in Figure 2
Phone screen Allows you to view call status and feature menus, and activate items. See the
1
“Phone Screen Features” section on page 14 for details.
Minimize and
2
close icons
Line buttons and
3
speed dial buttons
Messages button Typically auto-dials your voice message service (varies by service).
4
Directories button Opens/closes the Directories menu. Use it to view and dial from call logs and
5
Help button Activates the Help menu. (Ctrl + I is the keyboard shortcut.) See the “Using
6
Allows you to hide the Cisco IP Communicator interface or quit the
application. See the “Understanding Feature Availability” section on
page 18.
Each button opens/closes a line or speed dials a number. (Ctrl + numbers 1
- 8 are keyboard shortcuts). Line buttons indicate line status as follows:
•Green, steady—Active call on this line (off-hook)
•Green, blinking—Call on hold on this line
•Orange, blinking—Incoming call ringing on this line
•Red—Shared line, currently in use
•No color—No call activity on this line (on hook)
You can convert extra line buttons into speed-dial buttons. See the “Setting
Up Speed Dial Buttons” section on page 33.
(Ctrl + M is the keyboard shortcut.) For more information, see item 16 in
this table and the “Using Voice Messaging, Call Logs, and Directories”
section on page 51.
a corporate directory. (Ctrl + D is the keyboard shortcut.) Alternately, you
can use the Quick Search feature (Alt + K) to search directories. See “Using
Voice Messaging, Call Logs, and Directories” section on page 51.
Online Help” section on page 18.
Settings button Opens/closes the Settings menu. Use it to control phone screen appearance
7
and ring sounds. (Ctrl + S is the keyboard shortcut.) See the “Customizing
Cisco IP Communicator Settings” section on page 31.
Services Button Opens/closes the Services menu. (Ctrl + V is the keyboard shortcut.) See the
8
“Accessing Your User Options Web Pages” section on page 55.
Volume button Controls audio mode volume and other settings. (Page up/Page down are
9
keyboard shortcuts). See “Customizing Cisco IP Communicator Settings”
section on page 31.
Speaker button Toggles speakerphone mode on or off. (Ctrl + P is the keyboard shortcut.)
10
See the “Using Headsets and Other Audio Devices” section on page 46.
12 OL-5051-01
Page 19

An Overview of Cisco IP Communicator
Table 1 Buttons and other components, as illustrated in Figure 2
Mute button Toggles the Mute feature on or off. (Ctrl + T is the keyboard shortcut.) See
11
the “Using Mute” section on page 24.
Headset button Toggles headset mode on or off. (Ctrl + H is the keyboard shortcut.) See the
12
“Using Headsets and Other Audio Devices” section on page 46.
Navigation button Allows you to scroll through menus and highlight items. (Not available on
13
the optional skin.) Alternately, use the arrow keys on your computer.
Keypad Allows you to enter numbers and letters, and choose menu items. (Not
14
available on the optional skin.) Alternately, use your computer keyboard.
Softkey buttons Each activates a softkey. You can click softkey labels (instead of buttons) to
15
activate softkeys, as well. (F2 - F6 are the keyboard shortcuts.) See the
“Using Cisco IP Communicator to Handle Calls” section on page 19.
Voice message and
16
ring indicator
Indicates an incoming call and new voice message. If you are using the
optional skin, the message waiting indicator is the Cisco IP Communicator
icon in the left corner of the interface (as shown). See the “Using Voice
Messaging, Call Logs, and Directories” section on page 51.
Tips
• You can right-click on the Cisco IP Communicator interface to view and configure settings, choose
skins, and enable screen-only mode. See the “Using the Right-Click Menu” section on page 16.
• The default skin (Figure 2) and the optional skin (Figure 1) use the same set of button icons.
However, button shapes and locations may differ by skin.
• For a complete list of shortcuts, see the “Using Keyboard Shortcuts” section on page 15.
• See the “Phone Screen Features” section on page 14 for information about how calls and lines are
displayed on the Cisco IP Communicator phone screen.
Cisco IP Communicator User Guide 13
Page 20

Phone Screen Features
This is what your Cisco IP Communicator phone screen might look like with a call active and several
feature menus open. You can click screen items to select or activate them.
Primary line Displays your primary extension number and the time and date. If several
1
tabs are open, the time and date alternate with the extension number.
Line area Displays your extension number(s). Each extension represents a phone line
2
and corresponds to a (line button).
Speed dial area Displays speed dial labels. Each label corresponds to a speed dial button.
3
See the “Setting Up Speed Dial Buttons” section on page 33.
Softkey labels Each displays a softkey function. Activate a softkey by clicking the softkey
4
label or the button below the label.
Status line Displays status information and user prompts.
5
Call activity area Displays currently active calls, including caller ID, call duration, and
6
call-state icons. You can click an active call to select it.
Phone tab Appears when there is call activity. Click this tab to return to the call
7
activity area from another screen.
Feature tabs Each indicates an open feature menu. Feature tabs appear after you open a
8
feature by clicking the corresponding feature button:
,,,, or .
Related topics
• Using the Cisco IP Communicator Interface, page 10
• Call-Handling and Navigation Tips, page 15
14 OL-5051-01
Page 21

An Overview of Cisco IP Communicator
Call-Handling and Navigation Tips
These sections provide guidelines to help you handle calls and navigate the Cisco IP Communicator
interface:
• Using Keyboard Shortcuts, page 15
• Using the Right-Click Menu, page 16
• Closing and Minimizing Cisco IP Communicator, page 17
• Understanding Lines vs. Calls, page 17
• Going On-Hook and Off-Hook, page 18
• Using Online Help, page 18
• Understanding Feature Availability, page 18
Using Keyboard Shortcuts
Keyboard shortcut Function
Ctrl + D Opens/closes the Directories menu
Ctrl + S Opens/closes the Settings menu
Ctrl + V Opens/closes the Services menu
Ctrl + M Opens the voice message system
Ctrl + I Opens/closes the online help system
Ctrl + H Toggles headset mode on/off
Ctrl + P Toggles speakerphone mode on/off
Ctrl + T Toggles the Mute feature on/off
Ctrl + (number keys 1 through 8) Opens/closes line buttons or speed dial buttons 1 - 8
Alt + S Opens the Preferences dialog box
Alt + K Opens the Quick Search directory feature
Alt + X Exits Cisco IP Communicator
Alt + F4 Closes Cisco IP Communicator
Page up Increases volume for the current audio mode
Page down Decreases volume for the current audio mode
F2 - F6 Activates softkeys 1 - 5
/ (with NumLk function enabled) Activates the # key
Cisco IP Communicator User Guide 15
Page 22

Using the Right-Click Menu
Right-click on any part of the Cisco IP Communicator interface to access these menu items.
Item Description
Skins Allows you to change the look of the interface. Cisco IP Communicator
comes with two skins: the default skin (right-click > Skins > Default.xml)
and an optional skin (right-click > Skins > Mercurio.xml). Figure 2 and
Figure 1 show illustrations of the skins.
Screen Only Toggles screen-only view on and off. Keyboard shortcuts are particularly
useful if you are using Cisco IP Communicator in screen-only view. See
the “Using Keyboard Shortcuts” section on page 15.
Always on top Toggles this feature on and off. When enabled, this feature keeps the
Cisco IP Communicator interface visible on your desktop, even if other
applications are active. (You can still minimize the interface.) See the
“Understanding Feature Availability” section on page 18.
Audio Tuning Wizard Launches the Audio Tuning Wizard, a tool that helps you select and tune
audio devices. See the “Using the Audio Tuning Wizard” section on
page 6 and the “Troubleshooting Cisco IP Communicator” section on
page 57.
Quick Search Opens the Quick Search dialog box. (The keyboard shortcut for this
dialog box is Alt + K.) Quick Search allows you to search one or more
directories with a single search command. See the “Using the Quick
Search Feature” section on page 53.
Cisco User Options Opens the Cisco IP Phone User Options web page where you can
configure features, settings, and IP phone services—including Speed Dial
buttons. See the “Setting Up Speed Dial Buttons” section on page 33 and
“Accessing Your User Options Web Pages” section on page 55.
User Guide Provides a link to a PDF version of the Cisco IP Communicator
User Guide.
Preferences... Opens the Preferences dialog box, which includes User, Network, Audio,
and Directories windows. See the “Viewing and Customizing
Preferences” section on page 34. (The keyboard shortcut for accessing
Preferences is Alt + S.)
About
CiscoIPCommunicator
Exit Allows you to quit the Cisco IP Communicator interface.
Displays Cisco IP Communicator software version information.
16 OL-5051-01
Page 23

An Overview of Cisco IP Communicator
Closing and Minimizing Cisco IP Communicator
If you want to... Then...
Minimize the
interface
Hide the
interface
Retrieve the
interface
Quit Do one of the following:
Do one of the following:
• Click the minimize icon in the top right corner of the interface
• Click the Cisco IP Communicator taskbar button one or more times
Right-click the system tray icon and choose Hide. This removes the
Cisco IP Communicator icon from your taskbar but does not close the
application.
Do one of the following:
• Double-click the system tray icon
• Click the button icon in the task bar
• Click the close icon in the top right corner of the interface
• Choose Exit from the right-click menu
• Right-click the system tray icon and choose Exit
Tips
• If you receive a new call when the Cisco IP Communicator interface is hidden or minimized, the
interface will be retrieved automatically and appear on the foreground of your desktop.
• If you want the Cisco IP Communicator interface to remain visible on your desktop even if you
have other applications active, choose Always on top from the right-click menu. (You can still
choose to minimize the interface with the Always on top feature selected.)
Understanding Lines vs. Calls
It is sometimes easy to confuse lines and calls. Use these tips to avoid confusion:
• Lines—Lines support calls. To see how many lines you have, look at the line area of your phone
screen. You have as many lines as you have extension numbers. You might have just one line.
• Calls—Each line supports two calls. (That is why you might find yourself handling two calls, even
though you have only one line on your phone.)
Note Only one call can be active at any given time. Other connected calls must be on hold. See the
“Using Hold and Resume” section on page 24.
Cisco IP Communicator User Guide 17
Page 24

Going On-Hook and Off-Hook
Some call-handling tasks and instructions differ depending on whether Cisco IP Communicator is
on-hook or off-hook.
• On-Hook—No calls are active, and you do not have an active dial tone. Cisco IP Communicator
provides on-hook dialing, which allows you to enter or choose phone numbers before activating
a dial tone.
• Off-Hook—The handset is enabled, the speakerphone or headset is active, or any of several other
methods are used to get a dial tone or to answer an incoming call.
Using Online Help
Cisco IP Communicator provides a convenient online help system. Help topics appear on the phone
screen. See the table below for details.
If you want to... Then...
View the main menu Click on your phone (or Ctrl + I on your keyboard) and wait several
seconds for the menu to display. If you are already in Help, click Main.
Learn about a button
or softkey
Learn about a menu
item
Get help using Help Click and choose Help from the Main Menu.
Click , then quickly click a button or softkey.
Click , then quickly click the menu item.
Or, click twice quickly with the menu item highlighted.
Understanding Feature Availability
Your company’s phone support team determines which features and services are available to you and
how they will be configured. Therefore, some of the features included in this User Guide might not be
available to you or might work differently on your phone system. Contact your support desk or system
administrator if you have questions about feature availability.
18 OL-5051-01
Page 25

Using Cisco IP Communicator to Handle Calls
Using Cisco IP Communicator to Handle Calls
These sections describe how to handle calls using Cisco IP Communicator:
• Basic Call Handling, page 19
• Advanced Call Handling, page 28
Basic Call Handling
This section covers basic call-handling tasks such as placing, answering, and transferring calls. The
features required to perform these tasks are standard and available on most phone systems.
This section contains the following topics:
• Placing a Call, page 20
• Answering a Call, page 22
• Ending a Call, page 23
• Using Hold and Resume, page 24
• Using Mute, page 24
• Transferring a Connected Call, page 25
• Switching Between Calls, page 25
• Starting or Joining a Standard Conference Call, page 26
• Forwarding Your Calls to Another Number, page 27
Tip For more information about placing, receiving, and ending calls while using a handset,
speakerphone, or headset, see the “Using Headsets and Other Audio Devices” section on
page 46.
Cisco IP Communicator User Guide 19
Page 26

Placing a Call
To place a call, use one of several options to go off-hook before or after dialing a number.
If you want to... Then...
Dial on-hook (before
invoking a dial tone)
Dial off-hook (after
invoking a dial tone)
Redial a number Click Redial to dial the most recently dialed number. Or, click the
Speed dial a number Click (a speed dial button). See the “Setting Up Speed Dial Buttons”
Dial from a call log Click > Missed Calls, Received Calls, or Placed Calls. To access
Dial from a corporate
directory
Dial from a Personal
Address Book (PAB)
entry
Enter a phone number and go off-hook by using one of these methods:
• Click the number that you have just entered
• Click or
• Click Dial
• Click (a line button)
• Lift the handset (if available)
or
Begin entering a phone number. The AutoDial feature might pop up to
display matching phone numbers, if available, from your Placed Calls log.
Click a matching number to dial it.
Click NewCall, , , or (a line button), then enter a number.
Navigation button (or the up/down arrow keys on your computer
keyboard) while on-hook to access your Placed Calls log. Click a number
to dial it.
section on page 33.
Placed Calls only, you can click the Navigation button (or the up/down
arrow keys on your computer keyboard) while on-hook. To dial a number
in any call log, click it. If you need to edit the number first, scroll to the
number and click EditDial.
Right-click on Cisco IP Communicator to access Quick Search. Alternately,
choose > Corporate Directory (exact name can vary). For more
information, see the “Using Voice Messaging, Call Logs, and Directories”
section on page 51.
Choose > PAB service (exact name might vary). (Depending on
configuration, you might be able to use Quick Search, as well. See the
“Using the Quick Search Feature” section on page 53.)
Before you can use the PAB service, you must subscribe to it. For help, see
the “Accessing Your User Options Web Pages” section on page 55.
20 OL-5051-01
Page 27

Using Cisco IP Communicator to Handle Calls
If you want to... Then...
Place a call when
another call is active
Receive notification
when a busy or ringing
extension becomes
available
Dial on a secondary line Before or after entering a number, click .
Dial using a Fast Dial
code
Dial using headset
mode
Dial using
speakerphone mode
Dial using handset
mode
Click Hold. Next, click New Call. Then dial, redial, or speed dial a number.
To return to the held call, click resume.
Call the number and click CallBack while listening to the busy tone or ring
sound. Hang up. When the extension becomes available,
Cisco IP Communicator will provide an audio and visual alert. (The call
back to this number is not automatic; you must place the call.) CallBack is
a special feature that your system administrator might configure for you.
choose > Fast Dials (exact name might vary). To dial from a listing,
click it, or scroll to it and go off-hook.
For help subscribing to the Fast Dial service, see the “Accessing Your User
Options Web Pages” section on page 55.
Do one of the following:
• If is unlit, click it before or after dialing, re-dialing, or
speed-dialing a number.
• If is lit, click New Call, Redial, a speed dial button, or (a line
button). If necessary, enter a phone number.
For more information, see the “Using a Headset” section on page 46.
First make sure that an analog headset is not plugged in to the audio jacks
on your computer. Click New Call or and enter a phone number. Or,
use another method to place the call, then click to switch over to
speakerphone mode.
Many of the actions you take to dial a number will automatically trigger
speakerphone mode. For more information, see the “Using Your Computer
as a Speakerphone” section on page 48.
Lift or otherwise enable the handset before or after dialing, re-dialing, or
speed-dialing a number. See the “Using a USB Handset” section on page 49.
Tips
• To add a prefix to a number in one of your call logs, scroll to the number and click EditDial.
• If you are dialing without a dial tone, you cannot use * or # as the leading digit. If you need to
use these digits, go off-hook to invoke a dial tone, then dial.
Related topics
• Answering a Call, page 22
• Ending a Call, page 23
Cisco IP Communicator User Guide 21
Page 28

Answering a Call
To answer a call, go-off hook. See the table below for details.
If you want to... Then...
Answer with a headset Click , if unlit.
Or, if is already lit, click Answer or (a flashing line
button).
For more information, see the “Using a Headset” section on
page 46.
Answer with the speakerphone Click , Answer, or . See the “Using Your Computer as a
Speakerphone” section on page 48.
Answer with a handset Lift (or otherwise enable) the handset. See the “Using a USB
Handset” section on page 49.
Switch from a connected call to
answer a ringing call
Set up CiscoIPCommunicator
to automatically connect an
incoming call after a ring or two
Retrieve, or allow someone else
to retrieve, a held call on
another phone (such as a phone
in a conference room)
Use your line to answer a call
that is ringing on another phone
Click Answer or . Doing so answers the new call and
automatically places the first call on hold. See the “Using Hold and
Resume” section on page 24 for more information.
Ask your system administrator to set up the AutoAnswer feature
for one or more of your lines. You can use AutoAnswer with either
speakerphone mode or headset mode. For more information, see
the “Using Headsets and Other Audio Devices” section on
page 46.
Use Call Park. See the “Storing and Retrieving Parked Calls”
section on page 28.
Use Call Pickup. See the “Redirecting a Ringing Call to
Cisco IP Communicator” section on page 29.
Related topics
• Using Hold and Resume, page 24
• Transferring a Connected Call, page 25
• Switching Between Calls, page 25
22 OL-5051-01
Page 29

Using Cisco IP Communicator to Handle Calls
Ending a Call
To end a call, hang up. See the table below for details.
If you want to... Then...
Hang up while using the handset Disable the handset or click EndCall. See the “Using a USB
Handset” section on page 49.
Hang up while using the headset Click , if lit.
If you want headset mode to remain active, keep the button lit by
clicking EndCall. See the “Using a Headset” section on page 46.
Hang up while using the
speakerphone
Hang up one call but preserve
another call on the same line
Tip You need to keep headset mode activated if you want to use AutoAnswer with your headset.
(First, your system administrator must configure AutoAnswer for you.) If you use a headset
but do not use AutoAnswer, you might still prefer to keep headset mode activated. For more
information, see the “Using Headsets and Other Audio Devices” section on page 46.
Click or EndCall. See the “Using Your Computer as a
Speakerphone” section on page 48.
Click EndCall. If necessary, first click Resume to remove the call
from hold.
Related topics
• Placing a Call, page 20
• Answering a Call, page 22
• Transferring a Connected Call, page 25
Cisco IP Communicator User Guide 23
Page 30

Using Hold and Resume
Only one call can be active at any given time; all other remaining connected calls must be placed on
hold. You cannot continue, end, transfer, or otherwise handle a call while it is on hold.
If you... Then...
Want to put a call on hold Make sure the call you want to put on hold is selected and click
Hold.
Want to remove a call from
hold
Have multiple calls on
multiple lines on hold
Tips
• Engaging the Hold feature typically generates music or a beeping tone. For this reason, avoid
putting a conference call on hold.
• In situations where there are multiple calls on a single line, the active call always appears at the
top of your screen; the held call appears below.
Make sure the call you want to remove from hold is selected and
click Resume or (a blinking line button).
Click (a blinking line button). If necessary, make sure the call
you want to remove from hold is selected and click Resume.
Using Mute
Mute disables the audio input for your audio devices, such as a headset, speakerphone, or microphone.
With Mute enabled, you can hear other parties on a call but they cannot hear you.
If you want to... Then...
Toggle Mute on Click .
Toggle Mute off Click .
Note If you launch Cisco IP Communicator while your audio device or computer is muted, the
Check Audio Settings window might appear to ask you if you want to Revert, Tune, or Cancel
your audio settings. If your audio settings have been working properly, choose Revert. If you
want to view or change them, choose Tune. If you want to keep the device muted, choose
Cancel.
24 OL-5051-01
Page 31

Using Cisco IP Communicator to Handle Calls
Transferring a Connected Call
Transfer redirects a connected call. The target is the number to which you want to transfer the call.
If you want to... Then...
Transfer a call without
talking to the transfer
recipient
Talk to the transfer
recipient before transferring
a call (“consult transfer”)
Tips
• You cannot transfer a call that it is on hold. Click Resume to take a selected call off of hold, then
transfer it.
• Similarly, you cannot transfer a call—even if it is not on hold—when there is another call on the
same line on hold. Resume and end one call before transferring the other call.
During a connected call, click Transf e r and enter the target number.
When you hear the call ringing, click Tra ns fe r again.
During a connected call, click Transf e r and enter the target number.
Wait for the transfer recipient to answer. If the recipient accepts the
transferred call, click Tr an sf er again. If the recipient refuses the call,
click Resume to return to the original call.
Switching Between Calls
You can switch between connected calls on one or more lines. If the call you want to switch to is not
automatically selected (highlighted), click the call appearance on your phone screen.
If you want to... Then...
Switch between connected
calls on one line
Switch between connected
calls on different lines
Switch from a connected call
to answer a ringing call
Display an overview of active
calls
Cisco IP Communicator User Guide 25
Select the call you are switching to and click Resume.
Click the appropriate (blinking line button) for the line (and call)
you are switching to. If necessary, select the call and click Resume.
Click Answer or (a flashing line button). Doing so answers the
new call and places the first call on hold automatically.
Click while a call is active to return to the main background
screen, hiding the active call information. This gives you an overview
of all active calls on each of your lines. Click again to return to
the original view.
Page 32

Tips
• Only one call can be active at any given time; other connected calls will be placed on hold
automatically.
• In situations where there are multiple calls on a single line, the active call always appears at the
top of your screen; the held call appears below.
Starting or Joining a Standard Conference Call
A standard conference allows 3 or more people to participate in a single call. See the table below for
details.
If you want to... Then...
Start a conference call During a connected call, click Confrn to add another party to the
call. (You might need to click the more softkey first.) Enter the
conference participant’s phone number. After the call connects
and you have spoken to the conference participant, click Confrn
again to add this party to your call.
Add parties to a conference call Follow the procedure above to add each participant.
Join a conference call Answer the call when it rings. You do not need to do anything
special to join a standard conference call.
Drop the last party added to a
conference call
End a conference call Hang up.
Click RmLstC.
Note The feature described in this section is a standard conference calling feature available on most
phone systems. You might have access to Meet-Me conference calling, as well. Your system
administrator must set up Meet-Me conference calling for you. See the “Starting or Joining a
Meet-Me Conference Call” section on page 29 for information about using this feature.
Related topics
• Placing a Call, page 20
• Forwarding Your Calls to Another Number, page 27
• Advanced Call Handling, page 28
26 OL-5051-01
Page 33

Using Cisco IP Communicator to Handle Calls
Forwarding Your Calls to Another Number
You can use Call Forward All to redirect your incoming calls from your Cisco IP Communicator to
another number.
Note Enter the Call Forward All target number exactly as you would need to dial it from your desk
phone. For example, enter an access code such as 9 or the area code, if necessary.
If you want to... Then...
Set up call forwarding on
your primary line
Cancel call forwarding on
your primary line
Verify that call
forwarding is enabled on
your primary line
Set up or cancel call
forwarding for any line
Click CFwdALL and enter a target phone number.
Click CFwdALL.
Look at the call state icon for the line. When call forwarding is enabled,
an animated arrow appears over the phone icon, and a message appears
in the status area indicating the number to which calls are forwarding.
Log in to your User Options web pages, select your device, then choose
Forward all calls... from the main menu. You can set up or cancel call
forwarding from the Call Forwarding web page. (See the “Accessing
Your User Options Web Pages” section on page 55.)
Tips
• You can forward your calls to a traditional analog phone or to another IP phone, although your
system administrator might restrict the call forwarding feature to numbers within your company.
• You must configure this feature per line; if a call reaches you on a line where call forwarding is
not enabled, the call will ring as usual.
Related topics
• Answering a Call, page 22
• Transferring a Connected Call, page 25
• Advanced Call Handling, page 28
Cisco IP Communicator User Guide 27
Page 34

Advanced Call Handling
Advanced call-handling tasks involve special (non-standard) features that your system administrator
might configure for you to use on Cisco IP Communicator, depending on your call-handling needs and
work environment. You will not have access to these features by default.
This section contains the following topics:
• Storing and Retrieving Parked Calls, page 28
• Redirecting a Ringing Call to Cisco IP Communicator, page 29
• Starting or Joining a Meet-Me Conference Call, page 29
• Understanding Shared Lines, page 30
• Adding Yourself to a Shared-Line Call, page 30
Storing and Retrieving Parked Calls
You can “park” a call when you want to store the call so that you or someone else can retrieve it from
another phone in the Cisco CallManager system (for example, at a co-worker’s desk or in a conference
room). Call Park is a special feature that your system administrator might configure for you.
If you want to... Then...
Store an active call using
Call Park
Retrieve a parked call Enter the call park number from any Cisco IP Communicator or
Note You have a limited amount of time to retrieve the parked call before it reverts to ringing at its
original destination. See your system administrator for this time limit.
Related topics
• Basic Call Handling, page 19
• Using Hold and Resume, page 24
• Transferring a Connected Call, page 25
28 OL-5051-01
During a call, click Park (you might need to click the more softkey
first). This prompts Cisco IP Communicator to store the call. Note the
call park number displayed on the phone screen and hang up.
Cisco IP Phone in your network to connect to the call.
Page 35

Using Cisco IP Communicator to Handle Calls
Redirecting a Ringing Call to Cisco IP Communicator
Call PickUp allows you to redirect a call that is ringing on a co-worker’s phone to your
Cisco IP Communicator so that you can answer it. Call PickUp is a special feature that your system
administrator might configure for you, depending on your call-handling needs and work environment.
For example, you might use this feature if you share call-handling responsibilities with co-workers.
If you want to... Then...
Answer a call ringing on another
extension within your group
Answer a call ringing on another
extension outside of your group
Click (an available line button) and PickUp. The call now
rings on your line.
Click (an available line button) and GPickUp. Enter the
call group pickup code number provided by your system
administrator. The call now rings on your line.
Related topics
• Transferring a Connected Call, page 25
Starting or Joining a Meet-Me Conference Call
Conference calling allows multiple parties to talk simultaneously. Unlike a standard conference, where
the conference organizer must call participants, a Meet-Me conference call allows participants to dial
a Meet-Me conference number at a pre-determined time to join the conference call. The Meet-Me
conference calling option is a special feature that your system administrator might configure for you.
If you want to... Then...
Establish a Meet-Me
conference
Join a Meet-Me conference Dial the Meet-Me number provided by the conference initiator. You
End a Meet-Me conference Hang up.
Click Meet-Me, if available. (You might need to click the more softkey
first.) Dial the Meet-Me conference number provided by your system
administrator or phone help desk, then follow the voice instructions.
can join after the initiator has established the conference. You do not
need to use the Meet-Me softkey to join a conference.
Tips
• To use the standard conference calling option, see the “Starting or Joining a Standard Conference
Call” section on page 26. Standard conference calling is available on most phone systems.
• A Meet-Me conference call can typically support more than 100 participants. The maximum
number is determined by your system administrator.
Cisco IP Communicator User Guide 29
Page 36

Understanding Shared Lines
Your system administrator might give you a “shared” line. Typically, a shared line has two main uses:
• One person applies a shared line to multiple phones that he or she uses—For example, your shared
line, extension 23456, applies to your Cisco IP Communicator and your desktop phone. In this
case, an incoming call to extension 23456 rings on your Cisco IP Communicator and your desktop
phone, and you can use either phone to answer the call.
• Multiple people share a line—For example, you are a manager who shares a line and extension
number with your assistant. An incoming call to the extension rings on both your phone and your
assistant’s phone. If your assistant answers, you can use a shared line feature called Barge to add
yourself to the connected call. (See the “Adding Yourself to a Shared-Line Call” section on page 30
for more information about Barge.)
Your system administrator will tell you if you use a shared line. Shared line features, such as Barge,
do not apply to standard, unshared lines.
Adding Yourself to a Shared-Line Call
If you use a shared line, you can use Barge to join an established conversation. When you use Barge,
other parties on the call hear a beep tone announcing your presence. When you hang up, the remaining
parties hear a disconnect tone, and the original call continues. Barge applies to shared lines only.
If you want to... Then...
Add yourself to a call in-progress on
a shared line
End a barge conference Hang up.
Select the call on the phone screen and click Barge. (You might
need to click the more softkey first.)
Tips
• You will be disconnected from a call you have barged if the call is put on hold, transferred, or
turned into a conference call.
• You cannot answer a second line while you are on a barged call.
• Click while a call is active to return to the main background screen. This shows you an
overview of all active calls.
Related topics
• Basic Call Handling, page 19
• Understanding Shared Lines, page 30
30 OL-5051-01
Page 37

Customizing Cisco IP Communicator Settings
Customizing Cisco IP Communicator Settings
This section contains these topics:
• An Overview of Settings, page 31
• Adjusting the Volume for a Call, page 31
• Customizing Rings and Message Indicators, page 32
• Customizing the Phone Screen, page 33
• Setting Up Speed Dial Buttons, page 33
• Viewing and Customizing Preferences, page 34
An Overview of Settings
Here is some useful information to keep in mind about Cisco IP Communicator settings:
• Most settings are accessible by right-clicking on Cisco IP Communicator and choosing
Preferences. See the “Viewing and Customizing Preferences” section on page 34.
• Ring sounds and background image settings are available from > User Preferences. See the
“Customizing Rings and Message Indicators” section on page 32.
• A few settings are accessed online from your Cisco CallManager User Options web pages. See the
“Accessing Your User Options Web Pages” section on page 55.
• If and some settings in the right-click menu are not responsive, your system administrator
might have disabled settings access. Ask your system administrator for more information.
Adjusting the Volume for a Call
.
If you want to... Then...
Adjust the volume
level during a call
Adjust the volume
level for the ringer
Cisco IP Communicator User Guide 31
Click or press the Page Up/Page Down keys on your keyboard
during a call or after invoking a dial tone. Click Save to preserve the new
volume as the default level for the currently active audio mode.
You can also adjust the volume level using your computer’s volume controls
or any volume controls that are available on the audio device. (See the Tips
that follow for more information about this method.)
Click while Cisco IP Communicator is on-hook (no calls or dial
tone active). The new ringer volume is saved automatically.
Page 38

Tips
• You can adjust the volume only for the currently active audio mode. For example, if you increase
the volume while using speakerphone mode, you have not affected the headset mode volume.
• If you adjust the volume without saving the change, the volume will revert to the previously-saved
level the next time you use that audio mode.
• If you adjust the volume on a selected audio device directly (for example, if you adjust your
computer’s volume controls), the Check Audio Settings window might appear the next time you
launch Cisco IP Communicator. See the “Using the Audio Tuning Wizard” section on page 6.
Customizing Rings and Message Indicators
You can customize the way Cisco IP Communicator indicates the presence of an incoming call or a
new voice mail message for each of your lines. Customized ring sounds and other indicators can help
you quickly differentiate between multiple lines. For example, you can choose a chirping sound to
indicate an incoming call on Line 1 and a drumbeat to indicate an incoming call on Line 2
.
If you want to... Then...
Change the ring sound Choose > User Preferences > Rings and select a phone line or
the default ring setting. Choose a ring type to play a sample of it. When
you have selected the ring you want, click Select and Save. Press
Default to reset the ring sound back to the original default setting.
Change the ring pattern
(flash-only, ring once,
beep-only, etc.)
Change the way that the
voice message indicator
behaves
Log in to your User Options web pages, select your device, then choose
Change the Ring Settings for your phone from the main menu. See the
“Accessing Your User Options Web Pages” section on page 55.
Log in to your User Options web pages, select your device, then choose
Change the Message Waiting Lamp policy... from the main menu.
Typically, the default policy tells the indicator to “always light” when
you receive a new voice message.
Note the location of the message waiting indicator:
• If you are using the default skin (right-click > Skins > Default.xml),
the indicator is the light strip on the left side of the interface.
• If you are using the optional skin (right-click > Skins >
Mercurio.xml), the indicator is the Cisco IP Communicator icon
in the left corner of the interface.
Related topics
• Adjusting the Volume for a Call, page 31
• Customizing the Phone Screen, page 33
32 OL-5051-01
Page 39

Customizing Cisco IP Communicator Settings
Customizing the Phone Screen
You can change the language and background image that your phone screen uses.
If you want to... Then...
Change the background
image
Change the language on
your phone screen
Related topics
• Customizing Rings and Message Indicators, page 32
• Accessing Your User Options Web Pages, page 55
Choose > User Preferences > Background Images. Click a
thumbnail image, then click Select. Next, click Preview or Save.
Log in to your User Options web pages, select your device, then choose
Change the Locale... from the main menu.
Setting Up Speed Dial Buttons
You can assign a speed dial label to any line button that does not represent a phone line. (A line button
represents a phone line when your extension number appears next to the button on your phone screen.)
For example, you might have one phone line and seven “empty” line buttons on your phone screen
that you can convert to speed dial buttons. Set up speed dial buttons from your User Options web
pages, as described in the table below.
Note Your system administrator can assign speed dial buttons to you; he or she can also restrict the
number of speed dial buttons that you can configure.
If you want to... Then...
Set up speed dial
buttons
Related topics
• Basic Call Handling, page 19
• Accessing Your User Options Web Pages, page 55
Cisco IP Communicator User Guide 33
Log in to your User Options web pages, select your device, then choose
Add/Update Speed Dials from the main menu.
Enter a phone number and label for each available speed dial button. Enter the
number exactly as you would need to dial it from your desk phone. For
example, enter an access code or area code, if necessary.
Page 40

Viewing and Customizing Preferences
Most Cisco IP Communicator settings can be accessed from windows in the Preferences dialog box.
To access Preferences, enter the Alt + S keyboard shortcut or right-click on Cisco IP Communicator
and choose Preferences.
The topics below describe the windows in the Preferences dialog box:
• User Settings, page 34
• Network Settings, page 36
• Audio Settings, page 38
• Directories Settings, page 45
User Settings
Access the User settings window by choosing Alt + S > User, or right-click > Preferences > User.
34 OL-5051-01
Page 41

Customizing Cisco IP Communicator Settings
# Item Description For related information, see...
User Information
1
area
USB Handset
2
menu
Enable Logging
3
check box
Enter your Cisco CallManager username and
password in order to access:
• Your User Options web pages and phone
services
• Your Personal Address Book from the
Quick Search feature
If you do not know your Cisco CallManager
username and password, ask your system
administrator.
Allows you to choose among multiple USB
handsets if you have more than one handset
available.
When enabled, allows your system
administrator to retrieve detailed
Cisco IP Communicator logs for
troubleshooting purposes.
Your system administrator might ask you to
enable this setting.
• Using the Quick Search
Feature, page 53
• Accessing Your User
Options Web Pages,
page 55
• Installing Audio Devices,
page 3
• Using Headsets and
Other Audio Devices,
page 46
Troubleshooting
CiscoIPCommunicator,
page 57
Related topics
• An Overview of Settings, page 31
• Network Settings, page 36
• Audio Settings, page 38
• Directories Settings, page 45
Cisco IP Communicator User Guide 35
Page 42

Network Settings
Access the Network settings window by choosing Alt + S > Network, or right-click > Preferences >
Network.
36 OL-5051-01
Page 43

# Item Description
Network Adapter menu This setting, which is established right
1
after installation, allows
Cisco IP Communicator to identify itself
to the network; it is not used for audio
transmission. For this reason, you do not
need to change this setting once it is
established unless you are permanently
removing or disabling the selected
network adapter. In this case, coordinate
with your system administrator before
selecting a new adapter.
If you have multiple adapters and are
prompted to choose one immediately
after installing Cisco IP Communicator,
choose the adapter that is most likely to
provide permanent connectivity or is
always enabled—even if unplugged.
Your system administrator can tell you
which adapter to choose.
Device Name The device name is unique to your
2
network adapter. Your system
administrator might ask you to collect
the device name for registration or
troubleshooting purposes.
TFTP Servers area Allows you to specify TFTP servers, or to
3
return to using the default TFTP server.
Your system administrator will tell you
if you need to modify this setting.
Customizing Cisco IP Communicator Settings
For related information,
see...
Configuration and
Registration Tasks, page 8
Configuration and
Registration Tasks, page 8
Configuration and
Registration Tasks, page 8
Note The network settings shown in the above illustration are examples only.
Related topics
• An Overview of Settings, page 31
• Audio Settings, page 38
• Directories Settings, page 45
Cisco IP Communicator User Guide 37
Page 44

Audio Settings
Access the Audio settings window by choosing Alt + S > Audio, or right-click > Preferences > Audio.
# Item Description For related information, see...
Audio Modes
1
area
38 OL-5051-01
Allows you to assign devices to audio modes
and the ringer. The drop-down menu
associated with each audio mode displays
your currently available audio devices.
Depending on what devices you installed
before launching Cisco IP Communicator,
your available audio devices can include:
• a USB handset
• a USB headset
• a sound card
• Installing Audio Devices,
page 3
• Understanding Audio
Modes, page 39
• Using Headsets and
Other Audio Devices,
page 46
Page 45

Customizing Cisco IP Communicator Settings
# Item Description For related information, see...
Advanced...
2
button
Network...
3
button
Optimize for low
4
bandwidth
check box
Opens the Advanced Audio Settings window. Advanced Audio Settings,
page 43
Opens the Network Audio Settings window. Network Audio Settings,
page 42
If you are using Cisco IP Communicator over
a remote connection (for example, on a VPN
connection from home or a hotel), voice
quality might suffer from insufficient
bandwidth. Enabling the “Optimize for low
bandwidth” feature when you are using
Cisco IP Communicator over a remote
connection can prevent robotic-sounding
audio and other problems.
To enable this feature, right-click on the
Cisco IP Communicator interface and choose
Preferences > Audio.
You might choose to apply audio filters to
enhance voice quality when using low
bandwidth.
• Advanced Audio Settings,
page 43
• Troubleshooting
CiscoIPCommunicator,
page 57
Note The audio settings shown in the above illustration are examples only.
Related topics
• Understanding Audio Modes, page 39
• Network Audio Settings, page 42
• Advanced Audio Settings, page 43
Understanding Audio Modes
Each audio device that you plan to use with Cisco IP Communicator must be assigned to an audio
mode:
• Handset mode
• Headset mode
• Speakerphone mode
The ringer, which alerts you to an incoming call, must have a device assigned to it, as well.
Cisco IP Communicator User Guide 39
Page 46

Audio mode selection tells Cisco IP Communicator which audio devices you want to use for audio
input and output.
The first time that you launch Cisco IP Communicator, you have an opportunity to assign audio
devices to audio modes using the Audio Tuning Wizard. Subsequently, you can assign audio devices
to modes by right-clicking on Cisco IP Communicator and choosing Preferences > Audio.
Tip For a description of analog and USB audio devices, see the “Installing Audio Devices” section
on page 3.
Audio mode selection tips
By default, Cisco IP Communicator selects one audio device for all of your audio modes and the ringer.
This device could be a sound card, for example. If you have multiple audio devices available, you have
additional configuration options. For example, if you have a USB headset, you can select it for headset
mode, then activate it by clicking .
You can maintain the default configuration or customize it. If you choose to customize the
configuration, follow these recommendations:
• If you use a USB handset, assign it to handset mode.
• If you use a USB headset, assign it to headset mode.
• If you use an analog headset, assign your computer’s sound card to headset mode.
• Select your computer’s sound card for speakerphone mode.
• Assign the ringer to the device that you want to alert you when you receive call. Be aware,
however, that if you assign the ringer to a sound card and plug an analog headset into your
computer, you will not be able to hear the ringer unless you are wearing the headset.
How to activate audio modes
• To activate headset mode, click . To activate speakerphone mode, click . Doing so will also
activate whatever device you have selected for each mode.
• By default, speakerphone mode will be activated when you click softkeys, line buttons, and speed
dial buttons (unless you have a USB handset enabled). If you want headset mode to be the default
mode instead, click , then click EndCall. Headset mode will act as the default audio mode as
long as remains lit (unless you have a USB handset enabled).
• To activate handset mode, go off-hook with your USB handset (assuming this device is available
and assigned to handset mode). The method you use to take a USB handset off-hook depends on
how the handset is designed. You might need to press a hook-switch or “on” button.
• The ringer becomes active when you receive an incoming call.
Tip See the “Using Headsets and Other Audio Devices” section on page 46 for more information.
40 OL-5051-01
Page 47

Customizing Cisco IP Communicator Settings
How audio devices are displayed in audio mode menus
Audio mode menus are drop-down menus that contain one or more audio devices. (Right-click >
Preferences > Audio). Here is some information about what you might see in these menus:
• If you have only one audio device installed when Cisco IP Communicator launches, you will see
one audio device in each menu.
• Not all installed audio devices appear in audio mode menus. The devices that do appear are the
devices that require drivers (meaning USB handsets, USB headsets, and sound cards).
• Analog audio devices, which plug into the audio jacks on your computer, do not appear in your
audio mode menus. Cisco IP Communicator does not distinguish between analog audio devices
and your sound card. To select an analog device, select your sound card. (See the “Installing Audio
Devices” section on page 3 if you need help installing or identifying analog audio devices.)
• If you do not see an installed USB audio device or sound card in the menu, make sure the device
is inserted and re-launch Cisco IP Communicator. Cisco IP Communicator will only recognize
audio devices that are installed and plugged in when the application launches. (See the “Installing
Audio Devices” section on page 3 if you need help installing or identifying USB audio devices.)
Related topics
• Using the Audio Tuning Wizard, page 6
• Viewing and Customizing Preferences, page 34
• Removing and Re-Installing Audio Devices, page 50
Cisco IP Communicator User Guide 41
Page 48

Network Audio Settings
Access the Network Audio settings window by choosing Alt + S > Audio > Network..., or right-click
> Preferences > Audio > Network....
# Item Description
Audio IP Address area The default setting for this area is “Detect automatically.”
1
Do not change this setting unless asked to do so by your
system administrator.
Audio Port Range area The default setting for this area is “Use the default port
2
range.” Do not change this setting unless asked to do so by
your system administrator.
Note The network audio settings shown in the above illustration are examples only.
Related topics
• Audio Settings, page 38
• Advanced Audio Settings, page 43
• Troubleshooting Cisco IP Communicator, page 57
42 OL-5051-01
Page 49

Customizing Cisco IP Communicator Settings
Advanced Audio Settings
Access the Advanced Audio settings window by choosing Alt + S > Audio > Advanced..., or
right-click > Preferences > Audio > Advanced....
# Item Description For related information, see...
Mode menu Use this menu if you want to apply a
1
speaking or listening filter to one audio
mode in particular.
2
Filters
• Speaking
• Listening
Applying a speaking filter can alter the
sound of your voice; applying a listening
filter can alter the sound of the other
party’s voice.
As a rule, keep filters set to “None”
unless you are using
Cisco IP Communicator over a VPN
connection and have enabled low
bandwidth (Preferences > Audio). With
low bandwidth enabled, applying filters
can make your voice or the other party’s
voice sound sharper and more natural.
You can experiment with applying filters
during a call. To gauge the effect of a
speaking filter, ask the other party how
you sound.
• Understanding Audio
Modes, page 39
• Using Headsets and Other
Audio Devices, page 46
• Audio Settings, page 38
• Troubleshooting
CiscoIPCommunicator,
page 57
Cisco IP Communicator User Guide 43
Page 50

# Item Description For related information, see...
Volume Limit
3
check box
“OK” button Applies the filter settings to the selected
4
“Apply to all”
5
button
Your system administrator might advise
you to enable this feature if calls
originating outside of your company’s
network consistently sound louder than
calls originating within the network.
audio mode only.
Applies the filter settings to all audio
modes.
• Using the Audio Tuning
Wizard, page 6
• Adjusting the Volume for a
Call, page 31
• Troubleshooting
CiscoIPCommunicator,
page 57
Understanding Audio Modes,
page 39
Understanding Audio Modes,
page 39
Related topics
• Audio Settings, page 38
• Network Audio Settings, page 42
44 OL-5051-01
Page 51

Customizing Cisco IP Communicator Settings
Directories Settings
Access the Directories settings window by choosing Alt + S > Directories, or right-click > Preferences >
Directories.
Before you can use the Quick Search feature to search corporate directories, you might need to enter
a username and password in the Directories window of the Preferences dialog box. First, try using
Quick Search without entering this information. If Quick Search does not respond, obtain your
Directories username and password from your system administrator and enter them here.
Additionally, you must specify your Directories username and password in this window if you want
to use Quick Search to search your Personal Address Book. See the “Using the Quick Search Feature”
section on page 53 for more information.
Related topics
• An Overview of Settings, page 31
• User Settings, page 34
• Audio Settings, page 38
• Entering Password Information for Quick Search, page 53
Cisco IP Communicator User Guide 45
Page 52

Using Headsets and Other Audio Devices
This chapter provides information about using audio devices such as a handset, headset, and your
computer’s speaker and microphone with Cisco IP Communicator’s audio modes (handset mode,
headset mode, and speakerphone mode).
This section contains the following topics:
• Using a Headset, page 46
• Using Your Computer as a Speakerphone, page 48
• Using a USB Handset, page 49
• Removing and Re-Installing Audio Devices, page 50
• Obtaining Audio Devices, page 50
Using a Headset
You can use a USB headset or an analog headset with Cisco IP Communicator.
• A USB headset has a flat, rectangular plug that connects to a USB port on your computer.
• An analog headset has rounded plugs that connect to your computer’s audio jacks.
Analog headsets work in conjunction with your computer’s sound card and do not require device
drivers.
46 OL-5051-01
Page 53

Refer to the table below for details.
If you... Then...
Want to u s e a
headset to place
and receive calls
Make sure that is activated (lit) to indicate that Cisco IP Communicator is
operating in headset mode. You can toggle headset mode on and off by clicking
or by entering the keyboard shortcut Ctrl + H.
If you use a headset as your primary audio device, you might want to keep
lit even after you end a call by clicking EndCall instead of to hang up. When
is not lit, Cisco IP Communicator uses speakerphone mode as the default
audio mode. Cisco IP Communicator responds to softkeys, speed dial buttons,
and other features by routing audio through the active mode.
You can use a headset in conjunction with all of the controls on
Cisco IP Communicator, including and .
Note An analog headset will work in speakerphone mode, but using it in
headset mode can improve audio quality.
Using Headsets and Other Audio Devices
Use an analog
headset as your
only audio device
Use AutoAnswer
with a headset
Want to switch to a
headset during a
call
Tip AutoAnswer is a special feature that your system administrator might enable for you if you
receive a high volume of incoming calls or handle calls on behalf of others. When AutoAnswer
is enabled, Cisco IP Communicator answers phone calls automatically and routes them
through speakerphone mode or headset mode, depending on configuration.
Follow the guidelines listed above. In addition, be aware the ringer will be
audible only through your headset speakers when the headset is plugged in to
your computer. You must be wearing your headset to hear the phone ring.
Keep activated (lit) by clicking EndCall to hang up. (Click first, if
necessary). When is lit, Cisco IP Communicator is operating in headset
mode.
Click or enter the keyboard shortcut Ctrl + H. If you were using a USB
handset before switching, you can turn it off or hang it up.
Related topics
• Basic Call Handling, page 19
• Understanding Audio Modes, page 39
• Using Your Computer as a Speakerphone, page 48
Cisco IP Communicator User Guide 47
Page 54

Using Your Computer as a Speakerphone
You can use your computer’s sound card to place and receive calls in speakerphone mode. See the table
below for details.
If you want to... Then...
Use your computer like
a speakerphone to place
and answer calls
Make sure that is lit so that Cisco IP Communicator will operate in
speakerphone mode. Unlike other modes, speakerphone mode provides
echo suppression. You can toggle speakerphone mode on and off by
clicking or by entering the keyboard shortcut Ctrl + P.
By default, speakerphone mode is active. This means that many of the
actions you take to place or answer a call will automatically trigger
speakerphone mode, such as using a speed dial button or softkey.
Note If you have an analog headset plugged in to the computer, you will
not be able hear audio through your computer’s speakers in
speakerphone mode.
Switch to the
speakerphone during a
call
Use your computer’s
speaker as a ringer to
alert you to incoming
calls
Use AutoAnswer with
speakerphone mode
Click or the keyboard shortcut Ctrl + P. If you were using a handset
before switching, turn it off or hang it up.
Make sure that your sound card is assigned to the ringer mode and that you
have not muted your computer’s speaker. Additionally, if you plug an
analog headset into your computer, the ringer will be audible from the
headset speakers only.
Click or to place, answer, and end calls, open and close lines, and
to switch from other audio devices to speakerphone mode. Because
speakerphone mode is active by default, you do not need to keep the
corresponding button lit as you do for headset mode.
(AutoAnswer is a non-standard feature that your system administrator
might enable for you.)
Related topics
• Basic Call Handling, page 19
• Understanding Audio Modes, page 39
• Using a Headset, page 46
• Using a USB Handset, page 49
48 OL-5051-01
Page 55

Using Headsets and Other Audio Devices
Using a USB Handset
You can use a USB handset with Cisco IP Communicator. See the table below for details.
Note You should assign a USB handset to handset mode; this configuration allows
Cisco IP Communicator to recognize if the handset is on-hook or off- hook, allowing you to
end a call by hanging up the USB handset, for example. For more information about this
assignment, see the “Understanding Audio Modes” section on page 39.
If you want to... Then...
Place or end a call with the
handset
Switch to the handset during a
call
Enable or disable the USB handset. Many handsets have a
hook-switch or on/off button. Lift or enable the handset to take it
“off-hook.”
You can use a USB handset in conjunction with all of the controls
on Cisco IP Communicator, including and .
Lift (or otherwise) enable the handset.
Related topics
• Installing Audio Devices, page 3
• Basic Call Handling, page 19
• Using a Headset, page 46
• Using Your Computer as a Speakerphone, page 48
• Removing and Re-Installing Audio Devices, page 50
Cisco IP Communicator User Guide 49
Page 56

Removing and Re-Installing Audio Devices
If you use Cisco IP Communicator on a laptop, you might find that you often remove and re-install
audio devices as you travel between locations. Refer to the table below for information about
reinstalling an audio device when you are ready to use it again.
If you want to... Then...
Re-install a
previously tuned
USB handset, USB
headset, or sound
card
Tips
• Each time that you launch, Cisco IP Communicator checks to see if the audio device that you used
during your previous session is installed. If the device is not found, the Cisco IP Communicator
will prompt you to re-install it.
• If you install an audio device that requires device drivers (a USB handset, USB headset, or a sound
card) after launching, Cisco IP Communicator will not recognize the device until you re-launch
the application.
• If you are using Cisco IP Communicator over a remote connection, establish VPN connectivity
before launching Cisco IP Communicator.
1. Install the audio device (for example, plug in the USB handset) when
Cisco IP Communicator is not running.
2. Launch CiscoIPCommunicator.
3. Select and, if necessary, tune the device. (To manually access the Audio
Tuning Wizard, right-click on the Cisco IP Communicator interface and
choose Preferences > Audio.)
4. If necessary, assign the device to the desired audio mode(s). See the
“Understanding Audio Modes” section on page 39.
Related topics
• Installing Audio Devices, page 3
• Using the Audio Tuning Wizard, page 6
Obtaining Audio Devices
Your system administrator might supply you with audio devices. If you plan to purchase them, ask
your system administrator for the most up-to-date list of supported devices.
50 OL-5051-01
Page 57

Using Voice Messaging, Call Logs, and Directories
Using Voice Messaging, Call Logs, and Directories
This section contains these topics:
• Using a Voice Message Service, page 51
• Searching Your Call Logs and Directories, page 52
• Using the Quick Search Feature, page 53
Using a Voice Message Service
Note Your company determines the voice message service that your phone system uses. For the most
accurate and detailed information about using the service, see the product documentation.
If you want to... Then...
Set up and
personalize your
voice message
service
Listen to your voice
messages or access
the messages menu
See if you have a
new voice message
Click and follow the voice instructions. If a pop-up messages menu
appears on your phone screen, choose an appropriate menu item.
Your system administrator will provide you with a default password for your
voice message service. For security reasons, you should change your default
password as soon as possible.
Click .
Depending on your voice message service, clicking either auto-dials the
message service or provides a pop-up menu on your touchscreen.
Look at Cisco IP Communicator for the following indicators:
• A flashing envelope icon and text message on your phone screen.
• A steady red light in your message waiting indicator:
–
If you are using the default skin (right-click > Skins > Default.xml), the
indicator is the light strip on the left side of the interface.
–
If you are using the optional skin (right-click > Skins > Mercurio.xml)
the indicator is the Cisco IP Communicator icon in the left corner of
the interface.
The behavior of the message waiting indicator can vary. See the “Customizing
Rings and Message Indicators” section on page 32.
Cisco IP Communicator User Guide 51
Page 58

Searching Your Call Logs and Directories
The table below provides an overview of how to search—and dial from—listings in your call logs and
corporate and personal directories.
Note For more information about Quick Search, see the “Using the Quick Search Feature” section
on page 53.
If you want to... Then...
View your call logs Choose > Missed Calls, Placed Calls, or Received Calls. A maximum of
100 records is stored in each of these logs. To view your Placed Calls only, press
the Navigation button (or the arrow keys on your keypad) while on-hook.
Dial from a call log Choose a listing. If you need to edit the number displayed in the log (to add or
to remove a prefix, for example), scroll to the number to select it, then click
EditDial.
Dial from a
corporate directory
Dial from your
Personal Address
Book (PAB)
You have two search options:
• Access Quick Search from the right-click menu.
• Access the Corporate directory by choosing > Corporate Directory
(exact name can vary).
Depending on various factors, these search methods might yield different
results. A good rule of thumb is to use the Quick Search feature first.
You have two search options:
• Use Quick Search. If configured to work with your PAB, Quick Search will
look for a match in your PAB first and, if no matches are found, in your
corporate directory second.
• Access your PAB by choosing > PAB service (exact name can vary).
Before you can use the PAB service, you must subscribe to it. See the “Accessing
Your User Options Web Pages” section on page 55.
Tips
• To erase all of your call logs, click Clear.
• If network connectivity is disrupted, you might lose information in your call logs. Also, a limited
number of records can be stored. Ask your system administrator for details.
52 OL-5051-01
Page 59

Using Voice Messaging, Call Logs, and Directories
Using the Quick Search Feature
Quick Search allows you to search one or more directories with a single search command. These
directories can include multiple corporate directories and your personal address book, depending on
how your system administrator configured the Quick Search feature.
To access Quick Search, right-click on Cisco IP Communicator and choose Quick Search or enter the
keyboard shortcut (Alt + K).
In the Quick Search window, enter a name or extension number, then click Quick Dial or Search:
• Quick Dial—Automatically dials when the search yields one match. (You still need to click the
Dial softkey to place the call). If the search yields multiple matches, Quick Dial displays them.
• Search—Displays search results without automatically dialing a number.
To place a call from search results, click a listing in the Quick Search window, then click the Dial
softkey on Cisco IP Communicator.
See the “Entering Password Information for Quick Search” section on page 53 for more information.
Entering Password Information for Quick Search
Depending on how you want to use Quick Search, you might need to enter credential information,
including a user name and password:
Searching a corporate directory
If you do not use the Personal Address Book service and will use Quick Search to look up co-workers
in the corporate directory only, you may not need to take any configuration steps. Test this by
choosing Quick Search from the right-click menu or by entering Alt + K:
• If Quick Search opens, no configuration is necessary on your part.
• If Quick Search does not open, you need to enter a username and password in the Directories
window of the Preferences dialog box (right-click > Preferences > Directories). Ask your system
administrator to provide you with the values to enter.
Searching your Personal Address Book
If you use the Personal Address Book (PAB) service, Quick Search can look for matches in your PAB
first and in your corporate directory second. Before Quick Search will access your PAB, however, the
following conditions must be met:
• Your system administrator must configure Quick Search to integrate with personal directories.
• You must subscribe to the PAB service from the Cisco CallManager User Options web pages.
• Your Cisco CallManager username must appear in the User window (Preferences > User).
• You must enter your Directories username and password (Preferences > Directories).
Cisco IP Communicator User Guide 53
Page 60

Alternate search methods
If you want to use an alternate search method instead of using Quick Search, try these:
• To search corporate directories, choose > Corporate Directory (exact name can vary).
• To search your Personal Address Book, choose > PAB service (exact name might vary).
Enter search information and click Search.
Related topics
• Using Cisco IP Communicator to Handle Calls, page 19
• Customizing Cisco IP Communicator Settings, page 31
• Searching Your Call Logs and Directories, page 52
• Accessing Your User Options Web Pages, page 55
54 OL-5051-01
Page 61

Accessing Your User Options Web Pages
Accessing Your User Options Web Pages
You can establish, customize, and enable phone services, and control settings and features using the
Cisco CallManager User Options web pages.
Tip You can set up speed dial numbers from your User Options web pages. See the “Setting Up
Speed Dial Buttons” section on page 33 for information about this feature.
This chapter contains these sections:
• Logging In to the User Options Web Pages, page 55
• Subscribing to Phone Services, page 56
Logging In to the User Options Web Pages
Procedure
Step 1 Right-click in the Cisco IP Communicator interface and choose User Options....
Step 2 Enter the user ID and default password provided by your system administrator.
Step 3 From the general menu, select your device type from the “Select a device” drop-down list.
After you make your selection, a context-sensitive menu appears with options appropriate for
your device type. (If you do not see your device type listed, see your system administrator.)
See the “Subscribing to Phone Services” section on page 56 for related information.
Tips for Navigating the User Options Pages
• Select your device from the menu page to see all of your options.
• Click Update to apply and save your changes.
• Click Return to the Menu to get back to the context-sensitive menu.
• Click Log Off to exit the User pages.
Cisco IP Communicator User Guide 55
Page 62

Subscribing to Phone Services
Before you can access subscription phone services on your Cisco IP Communicator, you need to
subscribe to them from the User Options web pages. (See the “Logging In to the User Options Web
Pages” section on page 55 if you need help logging in.)
Services can include:
• Web-based information, such as stock quotes, movie listings, and weather reports
• Network data, such as corporate calendars and searchable directories
• Phone features, such as My Fast Dials and a Personal Address Book
Your system administrator determines the services that are available to you.
Refer to the table below for more information.
If you want to... Then do this after you log in and select your device type...
Subscribe to a service From the main menu, choose Configure your Cisco IP Phone Services.
Select a service from the “Available Services” drop-down list and click
Continue. Enter more information upon request (such as a zip code or
PIN), then click Subscribe.
Change or end
subscriptions
Access a service on
CiscoIPCommunicator
From the main menu, choose Configure your Cisco IP Phone Services.
Click a service in the “Your Subscribed Services” panel. Click Update
after making changes, or click Unsubscribe.
Click on Cisco IP Communicator. Doing so allows you to use
services that you have subscribed to or that your system administrator
has assigned to you.
56 OL-5051-01
Page 63

Troubleshooting Cisco IP Communicator
Troubleshooting Cisco IP Communicator
This section contains these topics:
• General Troubleshooting Issues, page 57
• Voice Quality Issues, page 60
Note If you are experiencing problems with Cisco IP Communicator, you might want to run the
Error Reporting Tool to capture relevant data for troubleshooting purposes. Choose Start >
Programs > Cisco IP Communicator. Write down the location where the error reporting tool
saves data so that you can send the file to your system administrator.
General Troubleshooting Issues
The table below can help you troubleshoot general issues you may experience. with
CiscoIPCommunicator.
Note If you are using Cisco IP Communicator on a computer that is running Microsoft Windows
2000, you cannot use the Audio Tuning Wizard to tune the microphone level of an audio
device that is currently active. Choose a time when you are not on a call and when the audio
device is not in use by another application to tune it. (Not an issue for Windows XP users.)
Cisco IP Communicator User Guide 57
Page 64

If... Then try this...
After first launch, no
extension number
appears and the status
line area shows
“Registering”
After launching,
CiscoIPCommunicator
cannot locate your
network adapter and asks
you to reinsert it
Your audio device does
not show up in an audio
mode drop-down menu
Make sure that you chose a TFTP server, if
necessary. Your system administrator should
provide you with the TFTP address if one is
needed.
If you are a remote user, make sure to
establish network connectivity before you
launch Cisco IP Communicator.
Replace the missing network interface
device, if possible. (For example, replace a
wireless card or a USB Ethernet adapter.)
If you first launched Cisco IP Communicator
on laptop that was connected to a docking
station, try docking to see if this fixes the
problem. If so, ask your system administrator
to help you configure your device name so
that Cisco IP Communicator will work
without the docking station attached.
If you have permanently removed or disabled
your selected network adapter, coordinate
with your system administrator before
selecting a new adapter.
If the device is a USB handset, USB headset,
or sound card, make sure that the device is
properly installed and re-launch
Cisco IP Communicator. (Devices installed
after launching are not recognized until the
next launch.)
If the device is an analog device, it will not
appear in the audio mode list because analog
devices are extensions of your sound card.
Choose your sound card instead.
For more information,
see...
• Configuration and
Registration Tasks,
page 8
• Network Settings,
page 36
• Configuration and
Registration Tasks,
page 8
• Network Settings,
page 36
• Installing Audio
Devices, page 3
• Understanding Audio
Modes, page 39
• Removing and
Re-Installing Audio
Devices, page 50
58 OL-5051-01
Page 65

If... Then try this...
After launching,
CiscoIPCommunicator
shows no extension
number or the wrong
extension number
When you invoke
Quick Search, nothing
happens
Your phone ringer is not
audible or is hard to hear
Contact you system administrator for
assistance.
You might have selected the wrong network
adapter. If you have multiple adapters and
are prompted to choose one immediately
after installing Cisco IP Communicator,
choose the adapter that is most likely to
provide permanent connectivity or is always
enabled—even if it is not plugged in. Your
system administrator can tell you which
adapter to choose.
Note that the network adapter setting allows
Cisco IP Communicator to identify itself to
the network; it is not used for audio
transmission. For this reason, do not change
this setting once it is established unless you
are permanently removing or disabling the
selected network adapter. In this case,
coordinate with your system administrator
before selecting a new adapter.
Choose right-click > Preferences >
Directories and enter a username and
password (Your system administrator can
tell you what user name and password to
use.)
If you want to search your Personal Address
Book using Quick Search, you must also
choose right-click > Preferences > User and
enter your user name.
Adjust your ringer volume by clicking
interface when no calls are active.
If you use a USB handset, do not select it to
serve as your ringer. In general, you should
choose your sound card for the ringer.
If your sound card is selected for ringer
mode, and a headset is plugged in to the
audio jacks on your computer, then you must
be wearing your analog headset in order to
hear the ringer.
Troubleshooting Cisco IP Communicator
on the Cisco IP Communicator
For more information,
see...
• Configuration and
Registration Tasks,
page 8
• Network Settings,
page 36
• Directories Settings,
page 45
• Using the Quick
Search Feature,
page 53
• Installing Audio
Devices, page 3
• Understanding Audio
Modes, page 39
Cisco IP Communicator User Guide 59
Page 66

Related topics
• Using the Audio Tuning Wizard, page 6
• An Overview of Settings, page 31
• Voice Quality Issues, page 60
Voice Quality Issues
The table below can help you troubleshoot voice quality issues you may experience with
CiscoIPCommunicator.
Note If you are using Cisco IP Communicator on a computer that is running Microsoft Windows
2000, you cannot use the Audio Tuning Wizard to tune the microphone level of an audio
device that is currently active. Choose a time when you are not on a call and when the audio
device is not in use by another application to tune it. (Not an issue for Windows XP users.)
Before you begin
Note the following information before you use the troubleshooting table below.
• If the problem is related to volume, first try adjusting the volume by clicking on the
Cisco IP Communicator interface.
• Try to determine if the source of the problem lies with your Cisco IP Communicator or with the
remote party’s phone by calling additional parties. If you suspect that the problem lies with the
other party’s phone, adjust the volume on the Cisco IP Communicator interface, but avoid
modifying settings using the Audio Tuning Wizard (as these modifications might not be broadly
applicable).
Note Your system administrator might ask you to enable logging in order to capture detailed
information for troubleshooting purposes. To enable logging, choose Alt + S > User, or
right-click > Preferences > User, and click Enable Logging. Write down the location where the
error reporting tool saves data so that you can send the file to your system administrator.
60 OL-5051-01
Page 67

If... Then try this...
The other party
sounds too loud
The other party
reports that you
sound too loud
The other party
sounds too quiet
The other party
reports that you
sound too quiet
The other party
sounds muffled
• Try adjusting the volume by clicking .
• Launch the Audio Tuning Wizard and adjust the speaker volume for the
current audio device.
• Move the microphone boom slightly away from your mouth and toward your
chin if you are using a headset.
• If the problem persists, launch the Audio Tuning Wizard and decrease the
microphone volume for the current audio device.
• If you still sound too loud to the other party, disable the Microphone Boost
feature, if it is enabled for that device. Do this from the Audio Tuning Wizard.
• Try adjusting the volume by clicking .
• Launch the Audio Tuning Wizard and adjust the speaker volume for the
current audio device.
• Make sure, if you are using a headset, that Cisco IP Communicator is
operating in headset mode and not speakerphone mode. Headset mode is
operating if is lit. If it is unlit, click it.
• Make sure that the microphone boom is positioned correctly if you are using
a headset.
• If the problem persists, launch the Audio Tuning Wizard and increase the
microphone volume for the current audio device. Before you tune an audio
device that has its own volume adjustor, such as a USB headset with volume
controls on the wire, increase the device’s volume level to the highest setting.
• If you still sound too quiet, enable the Microphone Boost feature for the
audio device from the Audio Tuning Wizard.
• If you are using Cisco IP Communicator remotely and have enabled the
“Optimize for low bandwidth” feature (Preferences > Audio), apply a
Listening audio filter. See the “Audio Settings” section on page 38.
• If you are not using Cisco IP Communicator over a remote connection,
disable the low bandwidth option.
• Ask the other party to decrease his or her microphone volume, if possible.
Troubleshooting Cisco IP Communicator
Cisco IP Communicator User Guide 61
Page 68

If... Then try this...
The other party
reports that you
sound muffled
The other party
sounds distant or
unnatural
The other party
reports that you
sound distant or
unnatural
The other party’s
voice is disrupted
by unintended
silences or
sounds jittery
• Launch the Audio Tuning Wizard and adjust the microphone volume for the
current audio device.
• If you have enabled the “Optimize for low bandwidth” feature (Preferences >
Audio), try applying a speaking filter and asking how you sound. See the
“Advanced Audio Settings” section on page 43 for information about
applying audio filters. See the “Audio Settings” section on page 38 for
information about the low bandwidth feature.
• If you are not using Cisco IP Communicator over a remote connection,
disable the low bandwidth option.
• Make sure, if you are using a headset, that Cisco IP Communicator is
operating in headset mode and not speakerphone mode. (The button
should be lit.)
• If you have enabled an audio filter to use with low bandwidth, try disabling
it. (Preferences > Audio > Advanced....)
If you have enabled the “Optimize for low bandwidth” feature (Preferences >
Audio), try applying a speaking filter and asking how you sound.
See the “Advanced Audio Settings” section on page 43 for information about
applying audio filters. See the “Audio Settings” section on page 38 for
information about the low bandwidth feature.
• Close any unnecessarily applications. Be aware that launching applications
and performing network-intensive tasks such as sending email may affect
audio quality.
• If you are using Cisco IP Communicator over a remote connection (for
example, on a VPN connection from home or a hotel), voice quality is
probably suffering from insufficient bandwidth. Enable the “Optimize for
low bandwidth” feature by right-clicking on the Cisco IP Communicator
interface and choosing: Preferences > Audio.
• Verify that your sound cards and audio drivers are correctly installed.
Note You may hear occasional pops, clicks, or broken audio when the network
is experiencing congestion or data traffic problems.
62 OL-5051-01
Page 69

Troubleshooting Cisco IP Communicator
If... Then try this...
You hear echo • Ask the other party to decrease his or her microphone or speaker volume, if
possible.
• If the other party is using Cisco IP Communicator in speakerphone mode, ask
him/her to make sure that the button is lit.
• Make sure that your sound card is not feeding back audio from the
microphone to the speaker. Follow these steps:
1. Right-click on the microphone icon in the system try and choose Open
Volume Controls.
2. Choose Options > Properties > Playback and make sure that all the
check boxes in the lower part of the window are selected, then click OK.
3. In the Volume Control window, make sure that Mute is selected for the
Microphone Balance column.
The other party
hears echo
The other party
cannot hear you
at all (but you
can hear
him/her)
The other party
can hear you, but
you cannot hear
any audio
Simultaneous
speaking fails
You cannot hear
any audio, not
even a dial tone
• Launch the Audio Tuning Wizard and reduce the microphone volume for the
current audio device.
• If you are using your computer as a speakerphone, keep the button lit.
• As a last resort, change your audio device.
• Make sure that you have not enabled Mute from controls on the headset wire
or on the USB handset.
• Make sure that your speaker and microphone plugs are inserted into the
correct audio jacks on your computer.
• Make sure that no other application is using your microphone, such as a
sound recorder or another software-based phone.
Make sure that your speaker and microphone plugs are inserted into the correct
audio jacks on your computer.
Make sure that you are using a full-duplex sound card.
• If you are using a docking station, and your audio device is plugged into it,
make sure that your computer is connected to the docking station, as well.
• Try restarting Cisco IP Communicator.
Related topics
• Using the Audio Tuning Wizard, page 6
• An Overview of Settings, page 31
• General Troubleshooting Issues, page 57
Cisco IP Communicator User Guide 63
Page 70

64 OL-5051-01
Page 71

Index
A
about window, accessing 16
address book
dialing from
searching 52
username and password for 35, 45, 53
advanced audio settings window, using 43
always-on-top feature 16
answering calls, options for 22
audio devices
for audio modes
for ringer mode 38
how displayed 41
installing 3, 50
purchasing 50
removing and replacing 50
selecting and tuning 6
types supported 3
using 46
volume, during a call 31
audio IP address, setting for 42
audio modes
activating
description of 39
help selecting 40
selecting devices for 38
setting for 38
20
38
40
troubleshooting menus for 58
understanding menus for 41
audio port range, setting for 42
audio quality, troubleshooting 60
audio settings window, using 38
audio settings, changing 6, 31
Audio Tuning Wizard
accessing
and the check audio settings window 6
description of 6
with Microsoft Windows 2000 57
AutoAnswer
description of
using with headset mode 47
using with speakerphone mode 48
using, general 22
auto-dial, description of 20
AutoUpdate, using 5
6
47
B
background, changing 33
barge, using 30
C
call forwarding, using 27
Cisco IP Communicator User Guide 65
Page 72

call logs
dialing from
editing 20
erasing 52
searching 52
call park, using 28
call pickup, using 29
callback feature, using 21
call-handling, advanced 28
call-handling, basic 19
calls
answering
compared to lines 17
displaying 14, 25
ending 23
forwarding 27
handling multiple 25
holding and resuming 24
meet-me conferencing for 29
multiple parties on 26, 29
muting 24
parking 28
per line 17
placing 20
redirecting while ringing 29
standard conferencing for 26
storing and retrieving 28
transferring 25
troubleshooting 60
volume for 31
check audio settings window, using 6
checklist, for installation 2
Cisco IP Communicator
20
22
configuring
features of 1, 10
illustration of 10
installing 4
launching 5
online help for 18
software version information 16
testing 9
updating 5
user guide for 16
with VPN 39
closing
icon for
instructions for 17
conference calling
meet-me
standard 26
configuring, checklist for 2
corporate directory, searching 52
8
12
29
D
device name
locating
setting for 37
troubleshooting 59
dial pad, identifying 13
dialing
from call logs
options for 20
directories
button, identifying
dialing from 20
8
20
12
66 OL-5051-01
Page 73

searching
directories settings window, using 45
disrupted audio 62
docking station, and first launching 5
documentation, accessing 16
52
E
echo problems 63
enable logging, setting for 35
error logs, enabling 35
error messages, troubleshooting 57
error reporting tool, using 57
F
fast dial service
dialing with
subscribing to 56
feature buttons, identifying 14
feature tabs, identifying 14
features, availability of 18
filters
applying
troubleshooting with 61
forwarding calls, options for 27
21
43
G
group call pickup, using 29
H
handset
purchasing
handset mode
activating
selecting audio device for 38
using 21, 49
handsets
choosing from multiple
installing 3
using 49
hanging up
options for
with multiple lines 23
hardware, requirements 2
headset
answering calls with
button, identifying 13
hanging up with 23
installing 3
types of 46
using 46
headset mode
activating
selecting audio device for 38
using 21, 47
headsets
purchasing
help
button for
button, using 18
hiding, instructions for 17
hold
50
40
23
22
40
50
12
35
Cisco IP Communicator User Guide 67
Page 74

and switching between calls
and transferring 25
display for 24
using 24
with conference calls 24
with multiple lines 24
I
installing
audio devices
checklist for 2
Cisco IP Communicator 4
requirements 2
testing after 9
interface
always-on-top feature for
closing and hiding 17
exiting closing
instructions for
illustration of 10
navigating 15
screen-only view 16
3, 50
16
K
keyboard shortcuts, using 15
L
laptop, and first launching 5
launching
and Audio Tuning Wizard
16
25
and check audio settings window 6
and laptop docking stations 5
Cisco IP Communicator 5
configuration tasks after 8
troubleshooting 57
updating after 5
lines
call forwarding for
compared to calls 17
identifying buttons for 12
shared, using 30
using barge with 30
using multiple 21, 25
wrong or missing at startup 59
low bandwidth
enabling
troubleshooting with 62
with filters 43
39
27
M
meet-me 29
messages
button, identifying
checking 51
indicator for 13, 32
listening to 51
minimizing
icon for
instructions for 17
missed calls, records of 20
mute
6
and check audio settings window
12
12
24
68 OL-5051-01
Page 75

button, identifying
using 24
13
N
navigation button, identifying 13
network adapter
choosing
setting for 37
troubleshooting 59
network audio settings window, using 42
network settings window, using 36
no audio 63
8
O
off-hook
description of
with answering 22
with dialing 20
with hanging up 23
with USB handset 40
one-way audio problems 63
on-hook
description of
with dialing 20
optimize for low bandwidth setting 39
18
18
personal address book
searching
username and password for 53
phone screen
customizing image for
displaying multiple calls on 26
identifying 12
phone tab, identifying 14
placed calls, records of 20
platform, requirements 2
preferences
advanced audio settings
audio settings 38
dialog box, accessing 34
directories settings 45
network audio settings 42
network settings 36
user settings 34
52
33
43
Q
quick dial, using 53
quick search
password for
troubleshooting 59
using 52, 53
45
R
P
received calls, records of 20
password setting
for directories window
for user window 35
Cisco IP Communicator User Guide 69
45
redial, using 20
registration
tasks associated with
8
Page 76

troubleshooting
with TAPS 8
reinserting audio devices 50
removing audio devices 50
requirements, for installing 2
resume softkey, using 24
right-click menu, description of 16
ring sound, changing 32
ringer
adjust volume for
indicator for 13, 32
selecting devices for 38
troubleshooting 59
57
31
S
screen-only view 16
scrolling, how to 13
searching
options for
password for 53
services
button, identifying
subscribing to 56
settings
advanced audio window
audio window 38
button, identifying 12
directories window 45
network audio window 42
network settings window 36
overview of 31
user window 34
52
12
43
shared lines
description of
with barge 30
shortcuts, keyboard 15
skins
buttons on
changing 16
illustration of 10
softkeys, about 13
sound card, using in speakerphone mode 48
speaker button, identifying 12
speakerphone mode
activating
selecting audio device for 38
using 21, 48
speakerphone, using 48
speed dial
buttons, configuring
buttons, identifying 12
labels 14
using 20
status line, identifying 14
30
13
40
33
T
TAPS, using 8
testing, after installation 9
TFTP server
selecting
setting for 37
transferring, options for 25
troubleshooting
at startup
8, 37
57
70 OL-5051-01
Page 77

enable logging for
error messages 57
general 57
using error reporting tool for 57
tuning, audio devices 6
35
U
updating, Cisco IP Communicator 5
user guide, accessing 16
user input, setting for 35
user options web pages
accessing
for services 56
username and password for 35, 55
user settings window, using 34
username setting
for quick search
for user window 35, 45
55
53
volume limit setting 44
W
wireless card, as selected adapter 58
V
voice message indicator
identifying
voice message service, using 51
voice quality, troubleshooting 60
volume
adjusting with Audio Tuning Wizard
button, identifying 12
for a call 31
for ringer 31
saving 31
troubleshooting 60
Cisco IP Communicator User Guide 71
13, 32
6
Page 78

72 OL-5051-01
Page 79

Page 80

Corporate Headquarters
Cisco Systems, Inc.
170 West Tasman Drive
San Jose, CA 95134-1706
USA
www.cisco.com
Tel: 408 526-4000
800 553-NETS (6387)
Fax: 408 526-4100
European Headquarters
Cisco Systems International BV
Haarlerbergpark
Haarlerbergweg 13-19
1101 CH Amsterdam
The Netherlands
www-europe.cisco.com
Tel: 31 0 20 357 1000
Fax: 31 0 20 357 1100
Americas Headquarters
Cisco Systems, Inc.
170 West Tasman Drive
San Jose, CA 95134-1706
USA
www.cisco.com
Tel: 408 526-7660
Fax: 408 527-0883
Asia Pacific Headquarters
Cisco Systems, Inc.
Capital Tower
168 Robinson Road
#22-01 to #29-01
Singapore 068912
www.cisco.com
Tel: +65 6317 7777
Fax: +65 6317 7799
Cisco Systems has more than 200 offices in the following countries. Addresses, phone numbers, and fax numbers are listed on the
Cisco Web site at www.cisco.com/go/offices
Argentina • Australia • Austria • Belgium • Brazil • Bulgaria • Canada • Chile • China PRC • Colombia • Costa Rica • Croatia • Czech Republic • Denmark • Dubai, U AE
Finland • France • Germany • Greece • Hong Kong SAR • Hungary • India • Indonesia • Ireland • Israel • Italy • Japan • Korea • Luxembourg • Malaysia • Mexico
The Netherlands • New Zealand • Norway • Peru • Philippines • Poland • Portugal • Puerto Rico • Romania • Russia • Saudi Arabia • Scotland • Singapore • Slovakia
Slovenia • South Africa • Spain • Sweden • Switzerland • Taiwan • Thailand • Turkey • Ukraine • United K ingdom • United States • Venezuela • Vietnam • Zimbabwe
CCIP, CCSP, the Cisco Arrow logo, the Cisco Powered Network mark, Cisco Unity, Follow Me Browsing, FormShare, and StackWise are trademarks of Cisco Systems, Inc.;
Changing the Way We Work, Live, Play, and Learn, and iQuick Study are service marks of Cisco Systems, Inc.; and Aironet, ASIST, BPX, Catalyst, CCDA, CCDP, CCIE, CCNA,
CCNP, Cisco, the Cisco Certified Internetwork Expert logo, Cisco IOS, the Cisco IOS logo, Cisco Press, Cisco Systems, Cisco Systems Capital, the Cisco Systems logo,
Empowering the Internet Generation, Enterprise/Solver, EtherChannel, EtherSwitch, Fast Step, GigaStack, Internet Quotient, IOS, IP/TV, iQ E xpertise, th e iQ logo, iQ Net
Readiness Scorecard, LightStream, MGX, MICA, the Networkers logo, Networking Academy, Network Registrar, Packet, PIX, Post-Routing, Pre-Routing, RateMUX, Registrar,
ScriptShare, SlideCast, SMARTnet, StrataView Plus, Stratm, SwitchProbe, TeleRouter, The Fastest Way to Increase Your Internet Quotient, TransPath, and VCO are registered
trademarks of Cisco Systems, Inc. and/or its affiliates in the U.S. and certain other countries.
All other trademarks mentioned in this document or Web site are the property of their respective owners. The use of the word partner does not imply a partnership relationship
between Cisco and any other company. (0304R)
OL-5051-01
 Loading...