

Page 1

Welcome!
Congratulations, you are now a new user
of our i3 device!
V R S
USER GUIDE
THEi3.com
Page 2

V R S
Table of Contents:
1. What is in the Package?
2. Setting up your i3
2.1 The i3 Remote Control:
2.2 Setting Up the i3
3. Understanding Your New i3
3.1 Camera Settings
3.2 “Do Not Disturb” Mode
3.3 Stand By Mode
3.4 Your Address Book
3.4.1 Directory
3.4.2 Recents
3.4.3 Favorites
3.5 Making a Call
3.5.1 From your Contacts List
3
5
5
5
10
10
10
11
12
13
14
15
16
16
3.5.2 Entering the Phone Number Manually
3.6 Receiving a Call
4. Frequently Asked Questions
16
18
19
2
Page 3
V R S
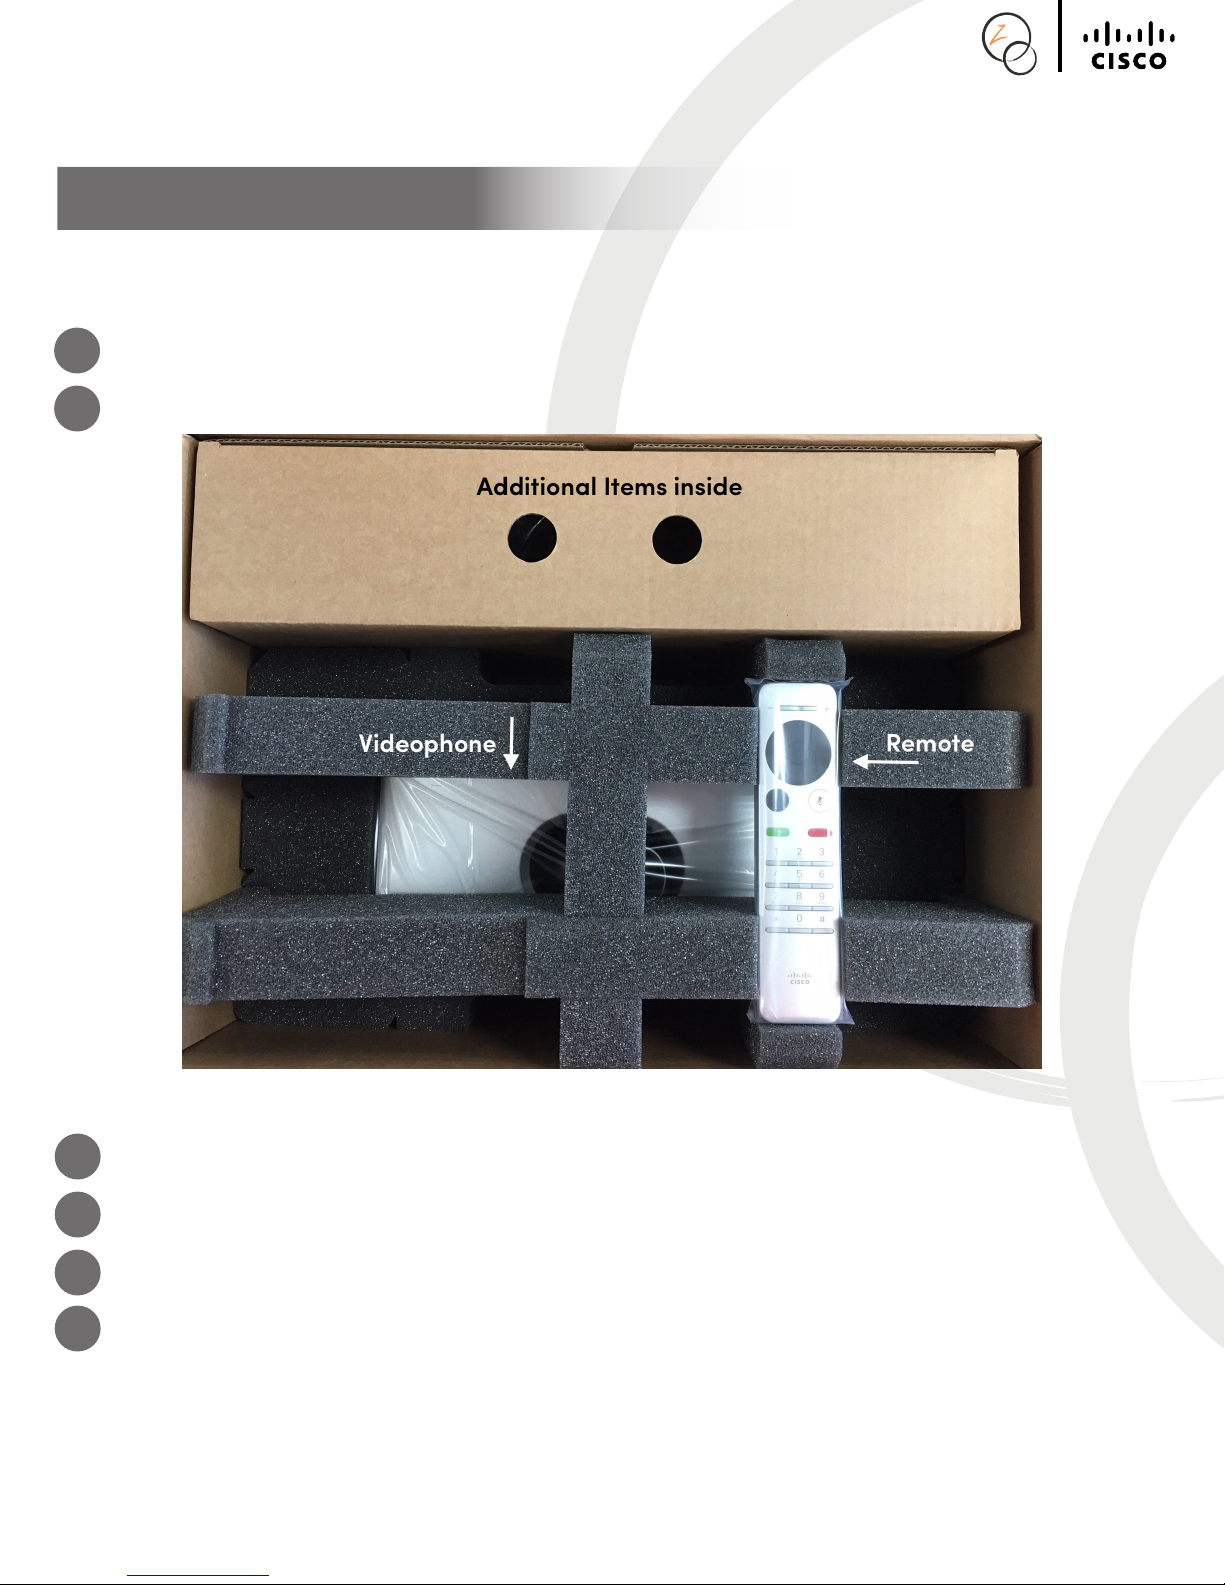
1. What is in the Package?
To make sure you have everything you need before set up; the following items should be within the
package:
1 i3 Videophone.
2 Remote.
3 Power adapter and Power Cable.
4 AA Batteries for the Remote.
.
5 Ethernet Cable.
6 HDMI Monitor Cable.
3
Page 4

V R S
The i3 will require a connection to a TV or a computer monitor that has HDMI capabilities, and the
TV or computer monitor is not something that will be provided to you.
The i3 has a built-in microphone which will enable a VCO user to speak directly to the TV or
monitor equipped with speakers, however the i3 does not have any built-in speakers. If desired, the
customer can use the speakers built into the TV or external speakers.
In order to have your i3 installed securely, we will also be including a mount with the shipment of the
i3. Make sure this mount is present before you start setting up the i3. There should be no assembly
required for the mount. You will only need to adjust the knob when it comes time to set up the
mount on top of the TV.
The POP Light is an accessory and is not always included with the package, if your order came
with a POP Light, you should see this with your i3. Instructions for setting up the POP Light will be
included in the POP Light package. If your order did not come with a POP Light, you should not be
expecting this.
Once you have confirmed you have everything, you are now ready to start setting up your new i3
device!
4
Page 5

V R S
2. Setting up your i3
Now that you have everything you need to set up your new i3, let’s get started!
Make sure the TV or computer monitor that you plan to use with the i3 has an available HDMI port.
2.1 The i3 Remote Control:
Your i3 comes with a remote control.
1 Zoom Out. (when not in video mode,
this will lower the sound)
2 Zoom In. (when not in video mode,
this will increase the sound)
3 Outer Circle with Arrows to move
cursor.
4 Inner Circle = OK.
5 Back Button.
6 Mute Button.
7 Green Button = Make a Call or
Access your Address Book.
8 Red Button = Hang Up.
9 Numbers.
5
Page 6
V R S
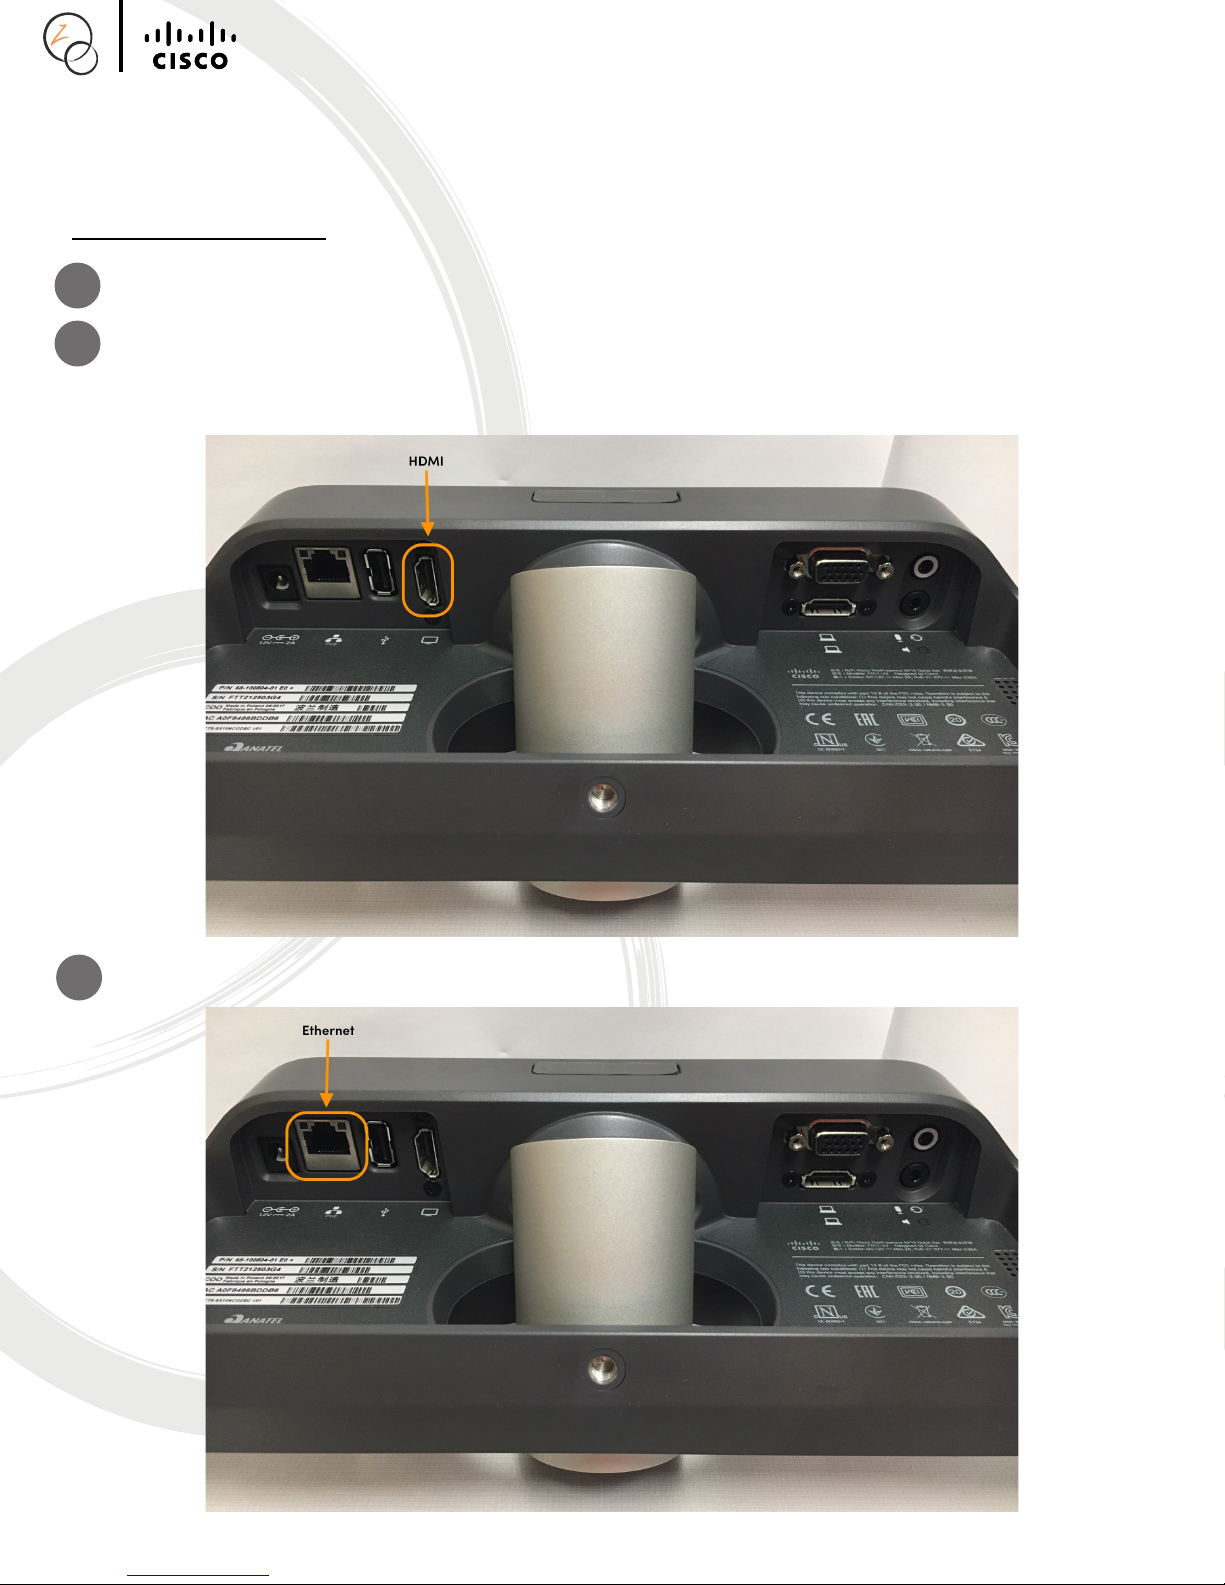
2.2 Setting Up the i3
1 Carefully take the i3 out of the box.
2 Take the HDMI cable, and plug one end in the i3.
3 Next, take the Ethernet Cable, and plug one end in the i3.
6
Page 7

4 Take the power supply and plug the round end in the i3.
V R S
7
Page 8

V R S
5 With all of the cables and plugs plugged in the i3, take the mount that came with the i3.
6 Remove the screw from the bottom of the i3, remove the silver bracket from the i3.
8
Page 9

V R S
7 Place the i3 on top of the mount, make sure to line up the holes so you can put the screw
back in.
8 Place the mounted i3 on top of the TV you are using for the i3, make adjustments to make sure
the i3 and the mount is safely secured.
9 Once the mounted i3 is safely secured, you can now plug in the opposite side of the HDMI
cable into an available port on your TV.
10 Next, take the opposite end of the Ethernet Cable and plug it in your modem, router or
Powerline. (the one you are using to connect the i3 to the network)
11 Lastly, take the other half of the power adapter, and plug it into the power supply and then plug
the opposite side into a power strip or into an outlet.
12 Insert batteries into the remote.
13 Using your TV remote, find the HDMI channel that your i3 is on.
14 You should see your phone number in the top left corner of your screen.
Now your i3 is set up!
9
Page 10

V R S
3. Understanding Your New i3
3.1 Camera Settings
When you first receive your i3, it is usually a good idea to set up your preferred camera zoom settings.
*Do not physically move the camera!
1 Using the Arrows on the remote, go to the Camera icon in the top right corner to access camera
settings.
2 Click OK.
3 Click OK again to make changes.
4 Use the Zoom in / Zoom Out on the remote to zoom in and out.
5 Use the Arrows to move the camera .
6 Once your view is set, click on the back button on the remote two times to exit Camera Settings.
10
Page 11

V R S
3.2 “Do Not Disturb” Mode
The i3 has a feature where you can set up Do Not Disturb when you do not want to receive any calls.
1 Using the Arrows on the remote, go to the gear icon next to your phone number in the top left
corner of the i3.
2 Click on OK to access the menu.
3 Move down to “Do Not Disturb”.
4 Click on OK to turn on or o.
5 You will return to the main screen.
11
Page 12

V R S
3.3 Stand By Mode
Need to put both the i3 and the TV to sleep at once? Simply put it in Stand By mode. The TV and the
i3 will wake up when a call comes in.
1 Using the Arrows on the remote, go to your phone number in the top left corner of the i3.
2 Click on OK to access the menu.
3 Move down to “Stand By”.
4 Click on OK.
5 The TV and the i3 will both go into Stand By mode until you wake it up or when a call comes in.
12
Page 13

3.4 Your Address Book
Like all of our other products, you have access to your address book on your i3.
The Address Book on the i3 is divided into three sections:
3.4.1 Directory
V R S
1 Press the green button on your remote.
2 Use the Arrows to move to “Directory”.
3 The contact list entries from your address book are all here.
4 When you select an address book entry you will have four options:
13
Page 14

V R S
a. Make the call.
b. Use the Arrows to move down to the three dots below the green “Call” button to access more
features such as:
14
Page 15

V R S
i. Mark as Favorite – when you mark the address book entry as a favorite, it will show up in
both the Directory and Favorites.
ii. Edit and Call – If you need to change the local number before dialing the number, this is what
you can use.
iii. Custom Call – To change the speed of the call, use this.
3.4.2 Recents
All of the recent called numbers you made and received will show up here. To tell the dierence
between those that were placed, and those that were received, you will see the words “Placed” and
“Received”.
15
Page 16

V R S
3.4.3 Favorites
All of the address book contacts you have marked as a Favorite will show up in this list.
16
Page 17

V R S
3.5 Making a Call
3.5.1 From your Contacts List
1 Press the green button on the remote to pull up the contact list.
2 Find the contact you need to call, this contact can be found in Directory or in Favorites if you
marked it as a favorite, or in Recents.
3 Click OK.
4 Move the Arrows to the green “Call” button to make the call.
5 When you are finished with the call, you can use the red button on the remote to hang up.
17
Page 18

V R S
3.5.2 Entering the Phone Number Manually
1 Press the green button on the remote to pull up the contact list.
2 Move the arrows to the top where it says “Search or Dial”.
3 Enter the phone number that you wish to call in this field using the numbers on the remote, or
click OK to use the keyboard on the i3.
18
Page 19

V R S
4 Then move the arrows to the green “Call” button to call the number you just dialed.
5 When you are finished with the call, you can use the red button on the remote to hang up.
3.6 Receiving a Call
When someone calls your i3 number, your i3 screen will flash to alert you to the incoming call.
4. Frequently Asked Questions
This section has some basic questions and answers that may help in answering questions about any
issues you may experience with your i3.
If you are not able to resolve any of your issues, please contact Customer Experience at 866.932.7891.
Q: My i3 went to sleep, and my TV turned o. Why? And how can I fix this?
A: Your TV may have their settings set up to turn o after a certain time automatically after no
activity. To prevent this from happening, you will need to go into the Settings on your TV to turn
the “Sleep Mode” o.
19
Page 20

THEi3.com
©2017 CSDVRS, LLC. All rights reserved. ZVRS, The Z, Z5, Z5Max, Z70, and the Z design are registered trademarks of CSDVRS, LLC.
Other names may be trademarks of their respective owners. Visit www.zvrs.com/notice for more information concerning 10-digit
numbering and E911 services for VRS.
V R S
 Loading...